1
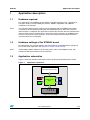
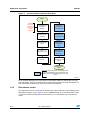
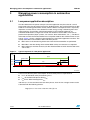
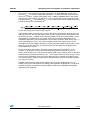
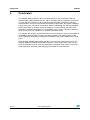
AN4102
Application note
Introducing the low-power concept in automotive applications using
the STM8AL board of the STM8A-DISCOVERY
Introduction
This application note illustrates the power consumption benefits of the STM8AL devices
included with the STM8A-DISCOVERY. This new family of devices has been designed to
comply with AEC-Q100 rev G. automotive requirements and offer high performance with
ultra-low power management capabilities.
The STM8AL board of the STM8A-DISCOVERY has a built-in IDD measurement feature that
is used to demonstrate the efficiency of the low power modes of the STM8AL devices.
This application does not require any additional hardware or software. Once the STM8AL
board is powered-up through a USB cable connected to the host PC with the USER1 button
pressed, the user can access the low power software resources of the standard
demonstration package.
This low-power software example comes preloaded with your STM8A-DISCOVERY, but is
accessible when the USER1 or USER2 buttons are pressed during the board’s power
supply sequence.
Reference documents
●
STM8A-DISCOVERY user manual (UM1574).
●
Application note Power management in STM8L and STM8AL (AN3147).
The above documents are available from http://www.st.com.
Table 1.
Applicalble products
Type
Part numbers
Microcontrollers
STM8ALxxx
Evaluation tools
STM8A-DISCOVERY
December 2012
Doc ID 023129 Rev 1
1/16
www.st.com
Contents
AN4102
Contents
1
Application description . . . . . . . . . . . . . . . . . . . . . . . . . . . . . . . . . . . . . . 3
1.1
Hardware required . . . . . . . . . . . . . . . . . . . . . . . . . . . . . . . . . . . . . . . . . . . 3
1.2
Hardware settings of the STM8AL board . . . . . . . . . . . . . . . . . . . . . . . . . . 3
1.3
Application schematics . . . . . . . . . . . . . . . . . . . . . . . . . . . . . . . . . . . . . . . . 3
1.4
Application principles . . . . . . . . . . . . . . . . . . . . . . . . . . . . . . . . . . . . . . . . . 4
1.5
1.6
2
Overview . . . . . . . . . . . . . . . . . . . . . . . . . . . . . . . . . . . . . . . . . . . . . . . . . 4
1.4.2
IDD measurement . . . . . . . . . . . . . . . . . . . . . . . . . . . . . . . . . . . . . . . . . . . 4
Getting started with the application . . . . . . . . . . . . . . . . . . . . . . . . . . . . . . 5
1.5.1
IDD measurement . . . . . . . . . . . . . . . . . . . . . . . . . . . . . . . . . . . . . . . . . . 5
1.5.2
Bias current record . . . . . . . . . . . . . . . . . . . . . . . . . . . . . . . . . . . . . . . . . 6
Low-power modes . . . . . . . . . . . . . . . . . . . . . . . . . . . . . . . . . . . . . . . . . . . 7
1.6.1
Low-power run mode (without LCD) . . . . . . . . . . . . . . . . . . . . . . . . . . . . 7
1.6.2
Halt mode . . . . . . . . . . . . . . . . . . . . . . . . . . . . . . . . . . . . . . . . . . . . . . . . 9
Software description . . . . . . . . . . . . . . . . . . . . . . . . . . . . . . . . . . . . . . . . 10
2.1
2.2
3
1.4.1
STM8AL peripherals used by the application . . . . . . . . . . . . . . . . . . . . . . 10
2.1.1
ADC . . . . . . . . . . . . . . . . . . . . . . . . . . . . . . . . . . . . . . . . . . . . . . . . . . . . 10
2.1.2
TIM4 . . . . . . . . . . . . . . . . . . . . . . . . . . . . . . . . . . . . . . . . . . . . . . . . . . . . 10
2.1.3
GPIOs . . . . . . . . . . . . . . . . . . . . . . . . . . . . . . . . . . . . . . . . . . . . . . . . . . 10
2.1.4
LCD controller . . . . . . . . . . . . . . . . . . . . . . . . . . . . . . . . . . . . . . . . . . . . 10
2.1.5
Clock . . . . . . . . . . . . . . . . . . . . . . . . . . . . . . . . . . . . . . . . . . . . . . . . . . . 11
STM8Lx standard firmware library configuration . . . . . . . . . . . . . . . . . . . 11
Managing power consumption in automotive applications . . . . . . . . 12
3.1
Low-power application description . . . . . . . . . . . . . . . . . . . . . . . . . . . . . . 12
4
Conclusion . . . . . . . . . . . . . . . . . . . . . . . . . . . . . . . . . . . . . . . . . . . . . . . . 14
5
Revision history . . . . . . . . . . . . . . . . . . . . . . . . . . . . . . . . . . . . . . . . . . . 15
2/16
Doc ID 023129 Rev 1
AN4102
Application description
1
Application description
1.1
Hardware required
This application uses STM8AL on-board LEDs (red LD3 and green LD4), a 4-digit/4-bar
LCD glass display and two USER push-buttons, USER1 and USER2. No additional
components are required.
Note:
The low-power demonstration software can be executed with the STM8AF board either
connected or disconnected (included with the STM8A-Discovery). Once the low-power
demonstration is completed, the application automatically launches the LIN communication
demonstration software included in the same initial software package. An STM8AF board
must be connected for correct operation of the LIN communication software otherwise a
communication error is displayed.
1.2
Hardware settings of the STM8AL board
The IDD jumper JP1 must be placed in the ON position for standard operation (except for
bias current record operation. See Section 1.5.2: Bias current record).
Note:
Solder bridges SB6 to SB8 must be shorted (bottom side of the STM8AL board). This
enables the IDD measurement circuitry hardware.
1.3
Application schematics
Figure 1 shows the electrical schematics used in the low-power demonstration section.
Figure 1.
Application schematics
IDD measurement circuitry
USER
1
LD3
STM8AL3L68T
MCU
LD4
USER
2
LEDs
User buttons
1234
4-digit / 4-bar LCD display
Doc ID 023129 Rev 1
3/16
Application description
AN4102
1.4
Application principles
1.4.1
Overview
The STM8AL board embeds specific analog and logic hardware connected to the
STM8AL3L68T microcontroller, which allows measuring and displaying the IDD current
supply when the device is placed in different power consumption modes, such as:
●
Run mode
●
Halt mode
●
LPR (low-power run mode) with LCD display OFF.
To see how much power the device is using, the user simply needs to read the value
displayed on the STM8AL board's LCD panel. The units of measurement are displayed
accordingly.
With this demonstration software you can obtain a precise and dynamic measurement of the
STM8AL3L68T’s supply current depending on the power mode used.
1.4.2
IDD measurement
The STM8AL board IDD measurement circuitry consists in measuring precisely the voltage
value V at the terminals of a high precision serial resistor (1%) inserted between the +3.3 V
power supply and the VDD pin of the MCU. Depending on the device’s power mode, the
application uses R or [1000 + 1] x R as the equivalent resistor value by closing or opening
K1. In Run mode, the current is in the range of mA, K1 is closed, and the equivalent resistor
is R. In low-power modes, the current is in the range of µA, K1 is opened, and the equivalent
resistor is 1001 x R.
Figure 2.
IDD measurement equivalent circuitry
+3V3
IDD
Gain=50
1%
R
V
Q14
1000R
EN
S
C
VDD
Q13
Counter
A
1%
K1
PF0
IDD Meas
+3V3
STM8AL3L68T
PC4
PE6
LP WakeUp
K2
GND
MS30843V1
4/16
Doc ID 023129 Rev 1
AN4102
Application description
The resistor is placed in parallel to a high-sense operational amplifier (A) with fixed gain that
amplifies the voltage (V) present on the resistors. A sample-and-hold stage is then inserted
and connected to an analog input of the MCU (PF0 IDD measurement) that finally converts
the resulting voltage, which reflects the consumption current.
In low-power modes only, a counter enabled by the STM8AL (PC4 pin) manages the
measurement timing while the microcontroller is idle. The microcontroller is woken-up after a
150 ms delay through the K2 switch.
While the microcontroller is in one of the power-saving modes, a capacitor (C) is able to
store the measurement charge so that the microcontroller can later give the value of the lowpower mode current consumption during the microcontroller’s wake-up phase (in the first 50
ms). Switch S is opened at the device start-up so as to keep the charge collected in the
capacitor (C) intact while the microcontroller is in low-power mode.
The current measurement precision is enhanced by taking into account the I bias current of
its own operational amplifier. When JP1 is placed in the OFF position (IDD measurement
circuitry disabled), a special test invoked by the USER2 push-button at the device start-up
measures this current value and stores it in the non-volatile memory. Once this value is
stored in the device, it is deducted from the next IDD measurement to compensate errors
due to I bias current (see Section 1.5.2: Bias current record).
For additional information related to the IDD measurement feature, refer to the
STM8A-DISCOVERY user manual (UM1574).
1.5
Getting started with the application
Two modes can be run within the STM8AL low-power application example.
●
IDD measurement in different power modes.
●
Bias current record.
The IDD measurement is available when the application is powered-up with the USER1
push-button pressed while the bias current record is available when the application is
powered-up with the USER2 push-button pressed.
However, for best performances, it is recommended to control and record the I bias current
before starting the IDD measurement mode.
1.5.1
IDD measurement
Firstly, check that JP2 is set to the ON position. Before applying power to the STM8AL board
through the USB cable (or through an external power supply), press the USER1 button and
maintain it pressed while the USB cable is connected. The IDD mode is selected and the
green LED LD4 is set. The "** TEST **" message is displayed. You are entering the IDD
measurement sequence. Once this mode is launched, the different steps automatically
unfold as described in the diagram below. If one of the measurements is outside the range
of the specification, the sequence ends with an error message related to the failing
measurement.
Doc ID 023129 Rev 1
5/16
Application description
Figure 3.
AN4102
IDD measurement sequence description
START
STM8AL
board is not
powered yet
and JP2 set
to ON
position
Press USER1 and
maintain it
pressed
Measuring
displaying and
checking VDD
Power supply
STM8AL Board
LD4 ON
Measuring
displaying and
checking Idd RUN
Release USER1
button
Measuring
displaying and
checking Idd
HALT
« ** TEST ** »
displayed on LCD
Measuring
displaying and
checking Idd LP
without LCD
LD4 OFF
« ** TEST OK ** »
displayed on LCD
LD4 set
Switch to LIN
Demo
For every step in blue color, if the measurement
is out the specification then the sequence ends
and an error message is displayed on the LCD
panel
-36
To save power during the IDD measurement in low-power mode run without the LCD (LP)
and Halt modes, the LCD is switched off. Once the measurement has been performed, it is
then switched on to display the value of the power consumption.
1.5.2
Bias current record
This operation consists in storing in the memory the value of the bias current inherent to the
operational amplifier A (see Figure 2) of your STM8AL board. The value of the bias current
is taken into account for low-power measurements so as to minimize any measurement
errors.
6/16
Doc ID 023129 Rev 1
AN4102
Application description
Once recorded, this value does not need to be refreshed and is kept in the non-volatile
memory for future use. It is recommended to perform this operation when you start your
evaluation in order to obtain the best precision.
Figure 4.
Bias current sequence
START
«**BIAS**»
displayed on LCD
STM8AL
board is not
powered yet
Set JP2 «Idd»
OFF
Press USER2 and
maintain it
pressed
Measuring,
displaying and
recording Ibias
current
This operation is done
until the user
removes the power
supply by disconnecting
the USB cable
Remove STM8AL
board power
supply
Power supply
STM8AL board
LD4 ON
Set JP2 «Idd»
ON
Release USER2
button
END
-36
1.6
Low-power modes
This section describes the low-power modes used in this application example.
1.6.1
Low-power run mode (without LCD)
In this mode, the CPU and some of the peripherals are running. The LCD and the RTC clock
are disabled to save power and the GPIOs are placed in an output push-pull configuration to
limit consumption. During low-power run mode, the code is executed from the RAM and the
CPU is clocked by the LSI oscillator. The Flash and data EEPROM are stopped and the
voltage regulator is configured in ultra-low power mode. The microcontroller can be woken
up from this power-saving mode by an external event generated by a GPIO.
Doc ID 023129 Rev 1
7/16
Application description
Figure 5.
AN4102
Low-power run without LCD
Low power mode
START
Executed from RAM
LCD disable
RTC clock source none
RTC clock OFF
LCD clock OFF
LSI disable
Includes in Halt_Init()
function
Regulator ultra-low power mode
GPIO low power config
Disable external counter U7
Switch ON LSI
Switch OFF HSI
Enable interrupts
Switch OFF Flash memory
Switch OFF regulator
WFE set to external interrupt from PE6
Enable external counter U7
Wait for event () instruction
Interrupt
occurred?
Includes in LPR_Init()
function and RAM segment
NO
YES
Clear interrupt
Disable WFE
Switch ON regulator
Switch ON HSI
END
-36
The parts shown in light green shading are executed from the RAM so that the Flash
memory and regulator can be switched off and thus save more power since the LSI
oscillator is also switched to act as the main clock source.
8/16
Doc ID 023129 Rev 1
AN4102
1.6.2
Application description
Halt mode
In this mode, the CPU, oscillator and peripherals are stopped but the device remains
powered on. The voltage regulator is configured in ultra-low power mode. The device
wakeup is done via an external interrupt.
In Halt mode, the device reaches a deeper level of energy saving by disabling the
oscillators. The device is woken up from this mode by an external interrupt generated by the
U7 counter.
Figure 6.
HALT mode
START
HALT mode
LCD disable
RTC clock source none
RTC clock OFF
LCD clock OFF
LSI disable
Regulator ultra low power mode
GPIO low power config
Disable external counter U7
Halt_Init() function
Enable external counter U7
Starts U7 counter that
controls microcontroller
wakeup
HALT() instruction
Interrupt
occurred?
Device in HALT mode
NO
YES
END
-36
For further information, refer to the application note "STM8L family power management"
(AN3147).
Doc ID 023129 Rev 1
9/16
Software description
AN4102
2
Software description
2.1
STM8AL peripherals used by the application
This application example uses the following STM8AL peripherals with the settings described
below.
2.1.1
ADC
The ADC performs analog-to-digital conversions of the internal reference voltage (VDD
voltage display) and of the voltage coming from the operational amplifier, which is the image
of the IDD current.
2.1.2
●
ADC resolution: 12-bit
●
ADC conversion mode: single
●
ADC sampling time: 9 cycles
TIM4
TIM4 is used to generate the delays needed for display or wait loops.
2.1.3
GPIOs
Port B is connected to the L99PM62GXP CAN and LIN driver (not used in the low-power
demonstration sequence).
Port C and Port E are connected to the USER push-button and the LEDs.
2.1.4
●
PE1 and PE2 are set as input floating pins with interrupt (USER push-button).
●
PC7 and PE7 are set as output push-pull pins (LD4 and LD3 LEDs respectively).
●
PE6 is set as an input floating pin with interrupt (IDD wakeup) with detection on the
rising edge.
●
During the low-power modes, the I/Os are placed in an output push-pull configuration to
reduce power consumption, except for a few pins related to the hardware interface
(buttons, PF0 IDD measurement pin, PE6 LP wakeup pin and PC4).
●
All Schmitt triggers on standard I/O pins are disabled to reduce power consumption.
●
The Schmitt trigger on PF0 is disabled so as to avoid measurement errors.
LCD controller
The various functions available in the firmware library for the LCD are used to initialize, clear
and display strings and scrolling messages needed in the application code. For some lowpower mode measurements, the LCD controller is turned OFF to minimize the current
consumption of the microcontroller.
10/16
Doc ID 023129 Rev 1
AN4102
2.1.5
Software description
Clock
The high-speed internal (HSI) 16 MHz oscillator is selected as clock source for the lowpower demonstration software. The application manages the peripheral clocks depending
on the selected power-saving mode. When the device enters low-power run mode, the HSI
is switched OFF and the LSI acts as the main clock source until the device is woken-up by
an external event. See Section 1.6: Low-power modes for clock management information
during low-power sequences.
2.2
STM8Lx standard firmware library configuration
There are no particular settings for the stm8l15x_conf.h configuration file. All peripheral
functions are enabled by default.
Doc ID 023129 Rev 1
11/16
Managing power consumption in automotive applications
AN4102
3
Managing power consumption in automotive
applications
3.1
Low-power application description
The idea behind the low-power concept is that the application may be active for a small
percentage of the time to perform some of its dedicated tasks, but can be placed into an idle
mode for a remaining period when activity from the MCU is not required. This is especially
important at a time where, in the electronics world, energy saving is becoming more and
more important. For example, 8-bit microcontrollers in the automotive domain are
sometimes dedicated to a single task and do not need to be active 100% of the time to
perform their operation (wiper systems, rain sensors, door mechatronics, etc…). The idea is
to be able to switch the microcontroller into a low-power mode for the maximum time to save
energy. Figure 7 shows a graphical representation of a low-power application over time. The
activity of the MCU can be broken down into three phases.
Figure 7.
●
MCU active is the time during which tasks from the microcontroller are performed.
●
MCU idle is the time during which neither MCU activity nor resources are required.
●
MCU wakeup is the time necessary for the microcontroller to switch from the idle to the
active state.
Typical sequence of a low-power application
IDD
tperiod
MCU active
IActive
IWu
MCU active
tIdle
tActive
tWu
Iavg
IIdle
t
MCU wakeup
MCU idle
MCU wakeup
-36
If we assume that the power consumption of these three phases is equivalent to:
●
IActive for the MCU active phase during tActive
●
IIdle for the MCU idle phase during tIdle
●
Iwu for the MCU wakeup phase tWu
and that tperiod is the total time for these three phases, then the IDD average current can be
calculated with the following formula.
Iavg=(tActive × IActive+tIdle ×IIdle+tWu ×IWu )/tperiod
12/16
Doc ID 023129 Rev 1
AN4102
Managing power consumption in automotive applications
For instance, if one estimates the power consumption of an STM8AL MCU in the active
phase of IActive = 4 mA (Run mode, HSE oscillator F = 16 MHz, execution from Flash) that
lasts tActive = 250 µs, a power consumption of IIdle = 400 nA (STM8AL MCU in Halt mode
with ultra-low power ULP bit set) during tIdle = 10 ms, and finally a wake-up from the HALT
sequence where IWu = 2.4 mA during tWu = 4.7 µs (wake-up from HALT to RUN mode using
the HSI oscillator), this corresponds to:
Finally, the average IDD current is Iavg = 99 µA
If the microcontroller were to be always active, the current consumption would be constant
and equal to 4 mA. The example above shows that the average current consumption is 40
times lower (4 mA vs. ~100 µA) in this operating mode and yet the microcontroller is active
approximately a hundred times per second, which may be sufficient depending on the
considered application. The microcontroller’s time activity represents about 25 ms over a 1second operating time (2.5%). If the microcontroller needs more activity time, then the
active/idle ratio can be adapted. Similarly, increasing the clock speed when possible is a key
factor to shorten the time spent in the active mode and then decrease the global power
consumption of the system.
On the other hand, when there is no activity required until one event happens, as for
instance, a switch that has to be operated before the application performs a series of
actions, then the MCU can be placed in low-power mode until an external event is detected
(external interrupt, peripheral interrupts, etc…). This mode is ideal in terms of energy saving
but may not be convenient in the case where high security is required, for example, when
the system needs to regularly control that the microcontroller is present and able to perform
any action at any time.
STM8AL automotive low-power microcontrollers allow various configurations that can
enable users to tune their products according to the application requirements. It is advised
to follow the power management recommendations outlined in the STM8L and STM8AL
application note (AN3147).
Doc ID 023129 Rev 1
13/16
Conclusion
4
AN4102
Conclusion
The STM8AL family of devices offers new opportunities for the automotive world and
combines both a high performance core and an ultra-low power management mechanism.
As more and more vehicles are being equipped with electronic components and since
microcontrollers are much more present in automotive applications, this induces additional
energy constraints, in particular for electrical vehicles. Controlling and reducing the global
power consumption of all these electronic elements is a new challenge for today’s and
tomorrow's automotive developments. The STM8AL family can be a solution to drastically
decrease the power consumption of a standard automotive system.
The example discussed in this document allows you to evaluate the current consumption of
the STM8AL microcontroller in various operating conditions and to demonstrate its lowpower capabilities by directly providing the consumption value to the STM8AL board LCD
panel.
More generally, STM8A-DISCOVERY provides a very low-cost environment that can be
used for additional automotive development projects. The example shown here can be a
useful starting point that can easily be expanded to investigate other aspects of the user's
target application, especially when lowering consumption is of consideration.
14/16
Doc ID 023129 Rev 1
AN4102
5
Revision history
Revision history
Table 1.
Document revision history
Date
Revision
21-Dec-2012
1
Changes
Initial release.
Doc ID 023129 Rev 1
15/16
AN4102
Please Read Carefully:
Information in this document is provided solely in connection with ST products. STMicroelectronics NV and its subsidiaries (“ST”) reserve the
right to make changes, corrections, modifications or improvements, to this document, and the products and services described herein at any
time, without notice.
All ST products are sold pursuant to ST’s terms and conditions of sale.
Purchasers are solely responsible for the choice, selection and use of the ST products and services described herein, and ST assumes no
liability whatsoever relating to the choice, selection or use of the ST products and services described herein.
No license, express or implied, by estoppel or otherwise, to any intellectual property rights is granted under this document. If any part of this
document refers to any third party products or services it shall not be deemed a license grant by ST for the use of such third party products
or services, or any intellectual property contained therein or considered as a warranty covering the use in any manner whatsoever of such
third party products or services or any intellectual property contained therein.
UNLESS OTHERWISE SET FORTH IN ST’S TERMS AND CONDITIONS OF SALE ST DISCLAIMS ANY EXPRESS OR IMPLIED
WARRANTY WITH RESPECT TO THE USE AND/OR SALE OF ST PRODUCTS INCLUDING WITHOUT LIMITATION IMPLIED
WARRANTIES OF MERCHANTABILITY, FITNESS FOR A PARTICULAR PURPOSE (AND THEIR EQUIVALENTS UNDER THE LAWS
OF ANY JURISDICTION), OR INFRINGEMENT OF ANY PATENT, COPYRIGHT OR OTHER INTELLECTUAL PROPERTY RIGHT.
UNLESS EXPRESSLY APPROVED IN WRITING BY TWO AUTHORIZED ST REPRESENTATIVES, ST PRODUCTS ARE NOT
RECOMMENDED, AUTHORIZED OR WARRANTED FOR USE IN MILITARY, AIR CRAFT, SPACE, LIFE SAVING, OR LIFE SUSTAINING
APPLICATIONS, NOR IN PRODUCTS OR SYSTEMS WHERE FAILURE OR MALFUNCTION MAY RESULT IN PERSONAL INJURY,
DEATH, OR SEVERE PROPERTY OR ENVIRONMENTAL DAMAGE. ST PRODUCTS WHICH ARE NOT SPECIFIED AS "AUTOMOTIVE
GRADE" MAY ONLY BE USED IN AUTOMOTIVE APPLICATIONS AT USER’S OWN RISK.
Resale of ST products with provisions different from the statements and/or technical features set forth in this document shall immediately void
any warranty granted by ST for the ST product or service described herein and shall not create or extend in any manner whatsoever, any
liability of ST.
ST and the ST logo are trademarks or registered trademarks of ST in various countries.
Information in this document supersedes and replaces all information previously supplied.
The ST logo is a registered trademark of STMicroelectronics. All other names are the property of their respective owners.
© 2012 STMicroelectronics - All rights reserved
STMicroelectronics group of companies
Australia - Belgium - Brazil - Canada - China - Czech Republic - Finland - France - Germany - Hong Kong - India - Israel - Italy - Japan Malaysia - Malta - Morocco - Philippines - Singapore - Spain - Sweden - Switzerland - United Kingdom - United States of America
www.st.com
16/16
Doc ID 023129 Rev 1