1
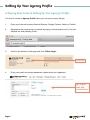
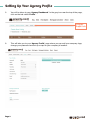
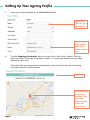
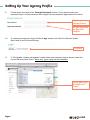
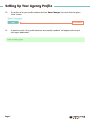
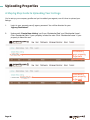
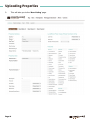
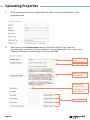
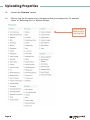
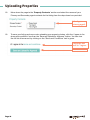
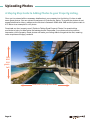
Real Estate Agent
User Manual
Table of Contents
1. Setting Up Your Agency Profile
3
2. Adding Your Team Members
8
3. Uploading Properties
10
4. Uploading Photos
19
5. Adding an Open for Inspection Time
22
6. Upgrading Your Listing
23
7. Making a Payment
24
8. Changing a Property to Sold
26
Setting Up Your Agency Profile
A Step by Step Guide to Setting Up Your Agency’s Profile.
You need to create an Agency Profile before you can post property listings.
1.
Open your Internet browser (Internet Explorer, Google Chrome, Safari or Firefox).
2.
Navigate to the property.com.fj website by typing ‘www.property.com.fj’ into your
address bar and pressing ‘Enter’.
3.
Scroll to the bottom of the page and click ‘Office Login’.
Click here
4.
Enter your email and unique password created when you registered.
Type in your
email and
password here
Page 3
Setting Up Your Agency Profile
5.
You will be taken to your ‘Agency Dashboard’. In the grey box near the top of the page,
click on the tab called ‘Profile’.
Click the
‘Profile’ tab
6.
Page 4
This will take you to your ‘Agency Profile’ page where you can add your company logo, change your password and set up a map for your company’s location.
Setting Up Your Agency Profile
7.
Insert your company details in the ‘Your Profile’ section.
Type in the
name of your
agency here
Type in your
main agency
email and
phone number
here
8.
Find the ‘Mapping Coordinates’ box to the right of the ‘Your Profile’ section. Click the green box called ‘Click Here to Set Map Location’. A map should appear with your office address pinned in red.
If the map does not recognise the exact address, you can click on the red pin and drag
and drop it onto the correct location.
Click here
If the pin is not
in the right
location, click
on it then
drag and drop
it onto the
correct area
Page 5
Setting Up Your Agency Profile
9.
Further down the page is the ‘Change Password’ section. If you want to reset your password type in a new password then retype the new password again below to confirm.
Type in your new
password here
Retype your new
password to
confirm
10.
To upload your agency’s logo, find the ‘Logo’ section and click the ‘Browse’ button.
Note: best to use a horizontal logo.
Click here
11.
A ‘File Upload’ window will appear. Locate where your company logo is saved, select the correct file and press ‘Open’. Note: only .jpg or .jpeg can be uploaded.
Select your logo
file then click
‘Open’
Page 6
Setting Up Your Agency Profile
12.
To confirm all of your profile updates find the ‘Save Changes’ box and click the green ‘Save’ button.
Click here
14.
Page 7
A green box with ‘Your profile has been successfully updated’ will appear at the top of
your agent dashboard.
Adding Your Team Members
A Step by Step Guide to Adding Your Staff.
Once you’ve updated your ‘Agency Profile’, loading in your agents’ details ensures the correct staff
names appear on your property listings.
1.
Login to your property.com.fj agency account. You will be directed to your
‘Agency Dashboard’.
2.
Click on the ‘Team’ tab.
Click here
3.
This will take you to the ‘Team’ page. Click on the ‘Add New Agent’ button.
Click here
Page 8
Adding in Your Team Members
4.
Enter your agent’s details into the relevant fields.
Enter in all your
agent’s details
here
5.
Navigate to the ‘Photo’ section and add a profile photo to your agent’s account. Click the ‘Choose File’ button next to either ‘Portrait’ or ‘Landscape’, depending on what size photo
you wish to upload. A file selection window will appear, select the correct photo then click
‘Open’ or ‘OK’.
Second, select
the photo
Third, Click
Open
First, Click
Choose File
6.
Press ‘Save’ at the bottom of the page and repeat the upload process for each agent.
Click here
Uploading Properties
A Step by Step Guide to Uploading Your Listings.
You’ve set up your company profile and you’ve added your agents, now it’s time to upload your
listings.
1.
Login to your property.com.fj agency account. You will be directed to your
‘Agency Dashboard’.
2.
Underneath ‘Create New Listing’ you’ll see ‘Residential Sale’ and ‘Residential Lease’.
Click ‘Residential Sale’ if your property is listed for sale. Click ‘Residential Lease’ if your property is listed for rent.
Click here if
your property
is for sale
Click here if
your property
is for rent
Page 10
Uploading Properties
3.
This will take you to the ‘New Listing’ page.
Page 11
Uploading Properties
4.
Find the ‘Property Address’ field.
5.
The country will automatically register as Fiji. Click on the drop-down box next to the ‘Division’ field and choose division your property is in.
Click here and
select the correct
division from
the list
6.
Click on the drop-down box next to the ‘Area/Town’ field and choose the area or town
your property is in. If your specific area is not listed, email [email protected] and we will
add it to the list for you.
Click here and
select the correct
area/town from
the list
Page 12
Uploading Properties
7.
Enter in the flat/unit number (if applicable), the street number and street name in the applicable fields.
8.
Move down to the ‘Property Data’ section. Select the ‘Property Type’ from the
drop-down box. Insert your ‘Property Headline’ in the applicable field. Then enter in your ‘Property Description’ or listing copy into the box provided.
Select ‘Property
Type’
Insert ‘Headline’
Insert ‘Property
Description’
Select ‘New
Project’ if the
property is a new
development
Optional fields
Page 13
Uploading Properties
7.
Beneath the ‘Property Details’ section you’ll find the ‘Mapping Coordinates’ field. Here you can show the precise location of the property on an aerial map. Click on the green
‘Click Here to Set Map Location’ button and your listing’s address should appear as a red
pin.
If the map does not recognise the exact address, you can click on the red pin and drag and drop it onto the correct location.
Click here
If the pin is not in
the right location
click on it then
drag and drop it
onto the correct
area
9.
After you have entered all of the property data, find the ‘Land/Block Floor Areas’ section.
10. Click on the drop-down box next to land area and select the correct measurement unit.
You must include a land size in order for your listing to be accepted by the system. If you
do not know the land size, simply enter 1 square metre in field provided
Click here and
select the
correct unit of
measurement
from the list
Page 14
Uploading Properties
11.
Click on the drop-down box next to ‘Floor Area’ and select the correct measurement unit. This section is optional however very useful to potential buyers.
Click here and
select the
correct unit of
measurement
from the list
13.
Click the drop-down box next to ‘Number of Floors/Levels’ and select the correct number.
Click here
Page 15
Uploading Properties
14.
Located the ‘Features’ section.
15.
Click on only the tick boxes next to the features that your property has. For example, ‘Views’ or ‘Swimming Pool’ or ‘Modern Kitchen’.
Click on the
features your
property has
Page 16
Uploading Properties
16.
If your property is listed for auction, fill out the applicable fields in the ‘Auction Date & Time’ section.
Type in the auction
address here
Insert auction
date here
Insert auction
time here
17. Below you’ll find the ‘Pricing’ section. You must enter a price into the ‘Price/Search Price’ field in order for the system to accept your listing.
However you have 3 pricing display options. Select ‘Display Above Price’ if you want the property price to show as a dollar value e.g. $350,000. Select ‘Display Text in Place of Price’ if your property is Price on Application (POA) or Expressions of Interest (EOI). If you do not wish to advertise the price of the property on your listing then select ‘Not Display Price’.
Must enter a
price here
Price Options
18.
If your property is listed for rent, the same process applies as above. The only difference is your price will be the rental price per month.
1000
Page 17
Uploading Properties
16.
Move down the page to the ‘Property Contacts’ section and select the names of your Primary and Secondary agent contacts for the listing from the drop-down box provided.
Select your
primary agent
18.
To save your listing and move onto uploading your property photos, click the ‘I agree to the
terms and conditions’ box then the ‘Save and Upload for Approval’ button. You can view
the full list of terms and by clicking on the ‘Terms and Conditions’ text in green.
Check the box
next to ‘I agree...’
Then click here
Page 18
Uploading Photos
A Step by Step Guide to Adding Photos to your Property Listing.
Once you’ve entered all the necessary details about your property into the listing, it’s time to add
some great photos. You can upload a maximum of 6 photos per listing. To ensure the photos do not
appear stretched or blurry, make sure the file size is between 450Kb and 1MB and the picture ratio is
4:3. Below is an example of a 4:3 photo.
Download our free ‘property.com.fj Guide to Taking Great Property Photos’ for practical tips
and tricks to help you take better real estate photos. Remember, your photos are a buyers first
impression of the property. Good photos will make your listing stand out against the rest, meaning
more enquiries and happy vendors!
300
600
900
pixels
tall
400 | 800 | 1200 pixels wide
Page 19
Uploading Photos
1.
In the ‘Photos’ section, click the blue ‘Select Files’ button in the bottom right-hand corner.
Click here
2.
A file selection window will pop-up on your screen. Navigate to the folder where the
photos for your property are saved. Press and hold the ‘Shift’ key while clicking on the
photos you wish to upload (the file will turn blue when selected). Then click the ‘Open’ or
‘OK’ button.
Press and hold ‘Shift’ while clicking on
the photos you want to upload
Then click here
Page 20
Uploading Photos
3.
Once your photos have finished uploading, you can rearrange the order of your images by
clicking on an image then dragging and dropping the photo in the order you would like
them to appear in the photo gallery. Once you are happy with the order, click the
‘Update Order’ button.
Click here
4.
Below ‘Photos’ you’ll find the ‘Floorplans’ section. The same upload process applies.
Navigate to the folder where the floorplan for your property is saved. Press and hold the
‘Shift’ key while clicking on the floorplan you wish to upload (the file will turn blue when
selected). Then click the ‘Open’ or ‘OK’ button.
Press and hold ‘Shift’ while clicking on
the floorplan you want to upload
Then click here
5.
Scroll to the bottom of the page and click the green ‘Save and Next’ button.
Click here
Page 21
Adding an Open for Inspection Time
A Step by Step Guide to Adding and Open for Inspection Time.
Adding an open for inspection time is not a mandatory step as many properties are inspection by
appointment only. If your property does not have any open for inspections (OFI) scheduled, simply
click ‘Next’ at the bottom of the page and skip to the next section of this User Manual.
1.
Find the ‘Add Open time’ section and click on the field next to ‘Add Open Inspection Date’.
A calendar box will appear, select the date of your OFI. Click in the field next to
‘Commencement Time’ and select the starting time of your OFI. Repeat this step for
‘End Time’. Then click ‘Next’.
Click here and
select OFI
date from the
calendar
Click here to
select start
time
Click here to
select end
time
Click here to save
Page 22
Upgrading Your Listing
A Step by Step Guide to Upgrading Your Listing.
Upgrading you property to either a Feature or Premium listing is as easy as 2 clicks of a button.
1.
Select the box next to either Premium or Feature listing upgrade depending on which level your vendor has signed up for. Then click the green ‘Make Payment’ button to be taken to the checkout page.
Click here for
Feature Property
Upgrade
Click here tor
Premium Property
Upgrade
Click here to
pay for upgrade
Page 23
Payment Options
In order to for listings to appear on property.com.fj we first need to
arrange payment details for all agent accounts.
We have 2 options available:
1. Pay as you go (best for small agencies).
2. Setup a monthly account and we will send you an invoice each month. If you prefer this
option please contact [email protected] and we will be in touch to set this up.
Our company account details are:
Account Name - Property (Fiji) Limited
Account Number - 9804941517
BSB - 039 010 (Westpac Namaka).
Accepted methods of payment:
R Cheque made out to Property (Fiji) Limited
R Payment via internet banking (please note transfers from any bank other than Westpac
will take 2 to 3 days to complete)
R Internet Payment Gateway - online payments using credit/debit cards
R Payment via Fiji Clear (please remember to notify your bank when making the payment
that you wish to use Fiji Clear)
R Direct deposit (deposit cash or cheque at the Bank)
Page 24
Changing a Property to Sold
A Step by Step Guide to Marking Your Listing as Sold.
Congratulations you’ve sold the property! Now it’s time to change the listing from ‘For Sale’ to ‘Sold’.
Sold properties will appear online for one month after the listing status has been changed.
1.
Navigate to your ‘Agent Dashboard’ and locate the sold property from the list. Click on the green link under the ‘Status’ heading.
Click here
1.
Select ‘Sold’ from the available options, then click ‘Save’.
Click here
Then click here
Page 25