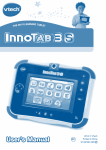
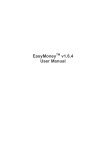
1
Ecommerce4Biz– User Manual ECommerce4Biz.com OS- Commerce User Manual Version 1.0 Designed and Developed by: Copyright b3NET.com, Inc. 1/34 Ecommerce4Biz– User Manual Table of Contents Topic Page Number Introduction 3 Logging In the Admin Panel 4 Dashboard Section 5 Catalog Section [Adding | Editing Categories & Products ; Setting Product Attributes; Featured Product; Specials; Manufactures; Product Type; Products Expected ] 6 - 13 Customer Section [Maintaining customer Database, Change Password; Who’s Online, Lapsed Customers; Testimonials Manager, Poll Manager, Reviews, Coupons] 13 – 15 Configuration Section 15 - 26 [Administrators, My Store, Visitors Thumbnails, Images, Store Mode, Cache, Session, Article Manager] Modules Section 27 – 31 [Billing, Shipping, Total Order] Reports Section 32 [Product Report, Customer Report, Sales Report etc.] Sales Section 33 [Order, Order Status, Sales Tax] Pages Section 34 [Content Management System , Newsletters , Articles] Copyright b3NET.com, Inc. 2/34 Ecommerce4Biz– User Manual Introduction ECommerce4Biz is an enhanced version of OS-Commerce (“open source Commerce”) which is an e-commerce and online store-management software program. It can be used on any web server that has PHP and MySQL installed. This OS-Commerce version of software, developed by b3NET.com, provides an advanced set of functionalities that meets the needs of any online business. This User Help Manual details the b3NET developed OS Commerce Master Module administration script. Each section and its functions are detailed here. It may slightly vary due to customized add-ons but the basic structure and functionality remains the same. About this document This document is for those organizations and individuals who have chosen b3NET.com, Inc, for their e-commerce website design, development and maintenance needs. This user help manual will take you through the process of adding and managing products, giving discounts, maintain customer database, keeping a track of sales and order and all other functionalities of a full-fledged e-commerce site. Copyright: This document is provided free of charge. This document is not be distributed without written authorization Copyright © 2010 by b3NET.com, Inc. Copyright b3NET.com, Inc. 3/34 Ecommerce4Biz– User Manual The Admin Panel - Logging In The Admin Panel of OS- Commerce is as follows: Username Password Using this the User(s) will be able login in the Admin Panel for tracking the performance of their e-commerce site and running their business successfully online. Image 1 – The Admin Panel Image 2 – Inside the Admin Panel There are eight sections in total with different functionalities: Dashboard Catalog Customer Reports Modules Configuration Sales Pages Copyright b3NET.com, Inc. 4/34 Ecommerce4Biz– User Manual Dashboard Image 3 – The Dashboard: View all reports at a glance. As soon as you log in, you can view the important reports on a single screen. Reports such as: 1. Most Viewed Products – what products are more in demand 2. Top 5 Best Seller – what products are mostly getting sold 3. Statistics – like no. of customers, product reviews etc. 4. Orders – orders that are pending, delivered, processing payment options etc. 5. New Customers – new customers who have just joined 6. Recent Orders – orders with customer names and billing amount of recent orders 7. Monthly Report – total number of products sold, billing amount and other details per month Copyright b3NET.com, Inc. 5/34 Ecommerce4Biz– User Manual Catalog Image 4 – The Catalog Section The Catalog section of the administration is where you control your categories, products and product attributes. This section is very powerful and gives you a great deal of flexibility when creating and managing your inventory. Categories/Products This is where you add your categories and products to the catalog. There are several things you can do, but first, you need to create a category. In the image below, you will see a folder listing. Each folder is a category. These folders are clickable, so that you can navigate into the categories, to see products in those categories and possible subcategories. Each category has 4 main options, Edit, Delete, Move and Copy. Each option is fairly straightforward. See Image 5 below – Copyright b3NET.com, Inc. 6/34 Ecommerce4Biz– User Manual Adding a New Category In the main categories/products window, to add a new category, click the New Category button (Seen in Image 5). When you click the New Category button, the New Category right column will appear. The following fields need to be filled out: Category Name Enter the name of your new category. Category SEO URL Enter a name that is Search Engine friendly and helps in basic SEO needs. Category Description Enter a brief description for the newly added category. Category Image Enter the local path to your image or hit the browse button to locate the image on your computer. A common mistake is to pre-upload the images to the server. Do not do this, or the image will not be added. Sort Order This is how you control the display order of your categories. Enter a number here. Meta Tag Description Meta Tag Keywords Page Title Such description helps our site in Search Engine Optimization. SEO friendly keywords can be added here for instant results. The title you enter here will be seen in the title bar of your newly created category page. After you have entered in the appropriate information click the Save button. Your new category has been added. To add a subcategory, click on a main category, and then click the New Category button. Editing a Category In case you need to Edit a category, select it by clicking on the blue icon right hand side so that it changes into an arrow necessary changes. Refer Image 5. present on the . Click on the Edit button and make the Similarly if you want to Delete a category or Move/ Copy a Category to some different folder, you will need to select the category (as above) to make the changes. To quickly navigate through your categories, there is a Search Box and a Go To box located in this section, just below the page header. Use these to make your editing easier. Copyright b3NET.com, Inc. 7/34 Ecommerce4Biz– User Manual Adding a New Product To add a new product, click the New Product button (Refer Image 5). Add the required info and you are on your way to populating your catalog. The following fields will need to be filled out: Product Status Date available Mark whether this is in or out of stock. Select the date this product will be available. Products Manufacturer Select the products manufacturer from the dropdown list if you are using manufacturers. Products Type Select the product type from the dropdown list if you are using a product type field. eg. Commercial, Residential. Category Select the product category from the dropdown list where the product belongs. Products Name Enter the product name. There will be a field for each language you have enabled in your store. Products SEO URL Enter a SEO friendly url for your product. Tax Class Products Price (Cost |Net| Gross) Set whether the item is taxable or not. Set the products price here. Products Description (Short | Long) Enter the description of your product. You can use HTML in this field which allows you to be very flexible in how you create your product pages. You can add images to the description, tables, hyperlinks, just about all of HTML. Products Quantity If you are using inventory/stock tracking, enter how many are in stock. Products Model Enter the model or catalog number of your product. Products Image Enter the path to the image on your local computer, or click the browse button to look for it. This image will be uploaded to the server when you complete this process. Products URL If you have a link to the products manufacturers website, or other link with more product info, you can add that link here. Meta Tags (Description | Keywords | Page Title) Enter appropriate keywords, description, title for SEO. Products Weight Set the weight of the product. Save | Cancel Click ‘Save’ button to enter the new product into the database or ‘Cancel’ in case of error. Copyright b3NET.com, Inc. 8/34 Ecommerce4Biz– User Manual Editing a Product In case you need to Edit a Product, select it by clicking on the blue icon right hand side so that it changes into an arrow necessary changes. (Refer Image 6) present on the . Click on the Edit button and make the Similarly if you want to Delete a category or Move/ Copy a Product to some different folder, you will need to select the category (as above) to make the changes. To quickly navigate through your products, there is a Search Box and a Go To box located in this section, just below the page header. Use these to make your editing easier. Image 6 – Product Section. Categories Special– This section is where you add items on 'Special Offers' – maybe discounts or rebates till some period of time and set the properties for those items. This 'Categories Specials' interface is the standard admin interface with the added option of an 'On/Off' button. If you click the green icon , the special is active. If you click the red icon ,the special is inactive. You can re-use specials and turn them on or off when you need to. The options for specials are below: New Category :: This is the button you use to add a new item on special. It will take you to the ‘Special Categories’ page. This page is easy to use, just follow the instructions. If you click on a special, you will get the option to edit or delete it in the right column. Copyright b3NET.com, Inc. 9/34 Ecommerce4Biz– User Manual Products Attributes This area of the catalog configuration is where you customize the attributes of your products. If you need to have different sizes, options, colors, and have different prices for each option, you have the ability to set this here. When you first look at the Products Attributes section, it can look a bit complicated. The base osCommerce installation includes sample data, including pre set attributes. You should study how these attributes are constructed. Then, it is suggested that you create a sample product, and your own attributes to see how the different options function. On the sub-menu Product Attributes, you will see 3 sections1. Product Options, 2. Option Values, 3. Products Attributes. Each section is described below to help you begin setting up your products attributes. Product Options :: This section is where you create the options that you will need available for your products. This can be whatever you need, size, color, model, version, or whatever else you need. Creating options is very easy, just type the name of the option in the text box and click the 'insert' button. This creates a master options list, but does not assign values to those options. That is done in the next step. Option Values :: This section is the place to actually assign values to your options. This is a simple process as well. You will see a dropdown box with the options you created. Select the option you want from the dropdown, then type the value you want to assign in the text box next to it, and click 'insert.' That creates a value that is assigned to that particular option. Repeat this for all values that you will need. Products Attributes :: This section is where you actually assign the options that you have created, to your products. You will see a series of dropdown boxes. The first box contains all your products in your store. Select the product that you would like to set attributes for. The next box contains all the options that you have set, so select the option you want to add to the product. Then, in the next dropdown, select the value that you want to assign to the option. The next box is not a dropdown, but a text box. Enter the monetary value of the option, and in the final box, place a + or a - sign. This value determines whether osCommerce will add or subtract the value of the attribute from the base product cost. Finally, click the insert button, and the attribute will be assigned to the product. Refer Image 7 below. Copyright b3NET.com, Inc. 10/34 Ecommerce4Biz– User Manual Image 7- Setting Up Product Attributes Featured Products If you want to exhibit particular products to the featured listing of your web site, then you can set this up by using the ‘Featured Products’ option. You will have the option to select the product from a dropdown menu list for available products and then set the ‘Expiry Date’ which will keep the product featured till the expiry date. Specials This section is where you add items on 'Special Offers' – maybe discounts, rebates or special price till some period of time and set the properties for those items. This 'Specials' interface has the option of an 'On/Off' button. If you click the green icon , the special offer is active. If you click the red icon ,the special offer is inactive. You can re-use specials and turn them on or off when you need to. The options for specials are below: New Product :: This is the button you use to add some ‘Special’ attribute to a new product. It will take you to the ‘Specials’ page. This page is easy to use, just follow the instructions. If you click on a special, you will get the option to edit or delete it in the right column. Copyright b3NET.com, Inc. 11/34 Ecommerce4Biz– User Manual Manufacturers This section is the place to set up manufacturers’ details for your products. If you do not want to use manufacturer information in your store, you may leave it blank. All the options in this area are described below. Insert To add a new manufacturer to your store, click this button and you will see all the options available in the right column, 'New Manufacturer' box. Manufacturers Name Add the name of the new manufacturer here. Manufacturers Description Enter some description of the new manufacturer here. Manufacturers Image Enter the path to the image you want to use for the manufacturer, or click the browse button to locate the image. Make sure the path points to the image on your home computer. OS-Commerce will find it and upload it to your server to the correct location. Manufacturers URL The link to the manufacturers web site, this will add a link to your catalog on the manufacturers page. Meta Tags (Description | Keywords | Page Title) Save Enter appropriate keywords, description, title for SEO. Click this button to add the manufacturer to your catalog. Edit | Delete a Manufacturer In case you need to Edit a Manufacturer, select it by clicking on the blue icon present on the right hand side so that it changes into an arrow . Click on the Edit button and make the necessary changes. All the above options will appear for you to edit. Click 'Save" when you are done. To delete an existing manufacturer, click the one you want to delete, and click the 'Delete' button. The 'Delete Manufacturer' option box will open in the right column. Follow the instructions there. Product Type This area of the catalog configuration is where you customize the type of your products. If you need to have different product types like Commercial, Residential, Business etc. you have the ability to set this here. Click ‘Insert’ to add a new Product type. This page is easy to use, just follow the instructions. If you click on a Product Type, you will get the option to edit or delete it in the right column. Copyright b3NET.com, Inc. 12/34 Ecommerce4Biz– User Manual Products Expected This section will list any products with a future date of availability. You have the option on this page to edit any product that is listed here. If you do not have any products that have a future date of availability, this section will be empty. Customer Image 8 – Customer Section The Customer section of the administration is where you control your customers, their passwords, reviews and order status. This section is very powerful and gives you a great deal of flexibility to manage your customers. Customers Details of customers who register at front end get added to this backend database for you to manage their passwords, order status and other important details. Image 9 – Customer Management Panel Copyright b3NET.com, Inc. 13/34 Ecommerce4Biz– User Manual In case you need to Edit a Customer, select it by clicking on the blue icon present on the right hand side so that it changes into an arrow . Click on the Edit button and make the necessary changes. Click 'Save" when you are done. You can Edit customer details like : Customer type such as Wholesaler or Dealer . Update Postal address upon request. Allow Newsletter Subscription. Manage Customer Discount rates. To delete an existing customer, click the one you want to delete, and click the 'Delete' button. The 'Delete Customer’ option box will open in the right column. Follow the instructions there. Orders: You can review the customer’s total Order Amount, Date of purchase and Status (whether pending or delivered). Email : You can email important discounts and other goodwill messages like Birthday wishes or Anniversary greetings directly to the customer. Change Password In case the customer sends a ‘Forgot Password’ message, you can reset his password and send it to him. Who’s Online Upon clicking this tab you can see the following details of customers who are currently online: Online ID Full Name IP Address Entry Time Last Click Last URL Lapsed Customers: Reports customers who are inactive and have not been making any purchases for some period of time. You can select a date – From and To in order to study the report. Copyright b3NET.com, Inc. 14/34 Ecommerce4Biz– User Manual Reviews This is where you edit or delete reviews and product ratings. The interface is the same as the rest of the admin. Select the review you want to edit or delete, then click the 'Edit' or 'Delete' buttons in the right column. Testimonials Manager This is where you edit or delete testimonials given by customers. The interface is the same as the rest of the admin. Select the testimonial you want to edit or delete, then click the 'Edit' or 'Delete' buttons in the right column. Poll Manager This is where you can hold a poll, set options and get votes to check the performance of your site or product quality etc. You may edit or delete Poll opinions. The interface is the same as the rest of the admin. Select the Poll Topic you want to edit or delete, then click the 'Edit' or 'Delete' buttons in the right column. Coupons You can allow Discount coupons for your customers to avail. The discount coupon panel shows the following details: Coupon Name Coupon Amount Coupon Code Redemptions Status On the right hand side, you can see the coupon report: Coupon Name Coupon Amount Date Last Redeemed Coupon Minimum Order Start Date End Date Uses per Coupon Uses per Customer Valid Product List Valid Categories List Date Created Date Modified Copyright b3NET.com, Inc. 15/34 Ecommerce4Biz– User Manual Click ‘Insert’ to add a new Discount Coupon. This page is easy to use, just follow the instructions. You can edit or delete Discount Coupon. The interface is the same as the rest of the admin. Select the Discount Coupon you want to edit or delete, then click the 'Edit' or 'Delete' buttons in the right column. Configuration Image 10 – The Configuration Section Administrators This section is where you can give administrative rights to users. Click ‘Insert’ to add a new Administrators. This page is easy to use, just follow the instructions. You can edit or delete Administrators. The interface is the same as the rest of the admin. Select the administrator you want to edit or delete, then click the 'Edit' or 'Delete' buttons in the right column. Copyright b3NET.com, Inc. 16/34 Ecommerce4Biz– User Manual My Store This section is where you enter in custom store information that Ecommerce4Biz uses. These options need to be set to your custom information in order for the store to display your correct information, send emails to the correct destinations, and to set how you want Ecommerce4Biz to function. Store Name Enter the name of your store here Store Owner Enter the name of the store owner here E-Mail Address Enter the e-mail address of the store owner here E-Mail From Enter the address you want to appear in the 'From' field of emails sent by Ecommerce4Biz. Country Enter the country that your store is based in Zone Enter the zone your store is in. This is needed for proper tax setup Expected sort order Set this to descending or ascending. This sets whether products are sorted from higher to lower or lower to higher Expected Sort Field The field to sort expected products by Switch To Default Language Currency This sets Ecommerce4Biz to switch currencies to match the selected language, if you have set multiple currencies. Send Extra Order Emails To Enter any emails that you would like an extra copy of the order to be sent to. eg. <[email protected]> Use Urls This option changes the URL format Ecommerce4Biz to be search engine friendly. Search-Engine Safe used by Display Cart After Adding Product When set to true, the customer is taken to the shopping cart page after each item is placed in the shopping cart. When set to false, the customer remains on the product page after the item is added. Allow Guest Friend When enabled, this will allow any user to send email to their friends about any of your products using the 'Tell a friend' box. When disabled, only logged in members can 'Tell a friend' . To Tell A Default Search Operator Allows you to change the default search operator, AND or OR. Experiment with this to see which operator gives you more accurate search results. Store Address and Phone The information here will be seen by the customer if you allow the Check/Money order option during checkout. This info will also be used in the invoices and packing slips in the admin section. Copyright b3NET.com, Inc. 17/34 Ecommerce4Biz– User Manual Show Category Counts This option turns category counts on/off in the category box in the catalog. It actually shows the quantity of products in a category when enabled. If you have a large database with many products or a very busy site, this should be turned OFF as it will slow your site down considerably. Tax Decimal Places How many decimal places you want to have in your tax percentage. Display Prices with Tax When on, this will automatically display all items prices with the tax included. When off, tax will only be shown during checkout. Hide Hidden Products When set to true, it allows you to hide/ unhide categories or products using the green or red toggle buttons. Category To offer a gift voucher To offer a discount coupon Indicate the amount of the gift voucher which you want to offer a new customer. Put 0 if you do not want to offer gift voucher. To offer a discount coupon to a new customer, enter the code of the coupon. Leave empty if you do not want to offer discount coupon. Minimum Values This section sets some key values needed to properly configure your store. These options all set the field size or value used by Ecommerce4Biz in different areas. These options are mainly for customer information and validation on signup. These values come pre-set, but you can change them to customize the function of your store. First Name Minimum length of first name field Last Name Minimum length of last name field Date of Birth Minimum length of date of birth field E-Mail Address Minimum length of e-mail address field Street Address Minimum length of street address field Company Minimum length of company name field Post Code Minimum length of post code field Copyright b3NET.com, Inc. 18/34 Ecommerce4Biz– User Manual City Minimum length of city field State Minimum length of state field Telephone Number Minimum length of telephone number field Password Minimum length of password field Credit Card Owner Name Minimum length of credit card owners name Credit Card Number Minimum length of credit card numbers Review Text Minimum character count for review text. Reviews must be longer than this amount. Best Sellers Minimum number of bestsellers to display. Also Purchased Minimum number of products to display in the 'This Customer Also Purchased' box Maximum Values This section sets many default maximums used by Ecommerce4Biz. Each is described in the admin section, but we have also listed the descriptions here. Address Book Entries Maximum address book entries a customer is allowed to have Search Results Amount of products to list per page in search results, and when a product category is clicked. Page Links Number of 'number' links use for page-sets if your product listings span multiple pages. If set to 5, there will be five links numbered 1 to 5 and a link that says Next>> Special Products Maximum number of products on special to display New Products Module Maximum number of new products to display in a category. Products Expected Maximum number of products expected to display Copyright b3NET.com, Inc. 19/34 Ecommerce4Biz– User Manual Manufacturers List When the number of manufacturers exceeds this number, a drop-down list will be displayed instead of the default list in the manufacturers box. Manufacturers Select Size When this value is '1' the classic drop-down list will be used for the manufacturers box. Otherwise, a list-box with the specified number of rows will be displayed. Length Name Maximum length of manufacturers name to display in the manufacturers box. of Manufacturers Maximum number of new reviews to display New Reviews Selection Reviews of Random How many records to select from to choose one random product review. Selection of Random New Products How many records to select from to choose one random new product to display. Selection Special How many records to select from to choose one random product special to display. of Products on Categories To List Per Row How many categories to list per row. New Products Listing Maximum number of new products to display in new products page. Best Sellers Maximum number of best sellers to display. Also Purchased Maximum number of products to display in the 'This Customer Also Purchased' box. Customer Box Order History Maximum number of products to display in the customer order history box. Order History Maximum number of orders to display in the order history page. Product Quantities In Shopping Cart Maximum number of product quantities that can be added to the shopping cart (0 for no limit) Copyright b3NET.com, Inc. 20/34 Ecommerce4Biz– User Manual Shipping/ Packaging This is where you set the base shipping information needed by most of the shipping modules. If your shipping modules are not working correctly or giving strange results, make sure the values below are set correctly. Country of Origin Postal Code Enter the Maximum Package Weight you will ship Package Tare weight. Larger packages - percentage increase. Select the country of origin to be used in shipping quotes from the dropdown menu. Enter the Postal Code (ZIP) of the Store to be used in shipping quotes. Carriers have a max weight limit for a single package. This is a common one for all. Enter the weight of typical packaging of small to medium packages What is the extra amount you will charge for larger package. For 10% enter 10. Product Listing All the settings here control how the product listings display, and what information is displayed. You control the order they are displayed by adding numbers in sequence. The option with '1' will display first, '2' second, '3' third, and so on. To disable any option from displaying, set it to '0' Display Product Image Enable to display the product image. Display Product Manufacturer Name Enable to display the Product Manufacturer Name. Display Product Model Enable to display the Product Model Number. Display Product Name Enable to display the Product Name. Display Product Price Enable to display the Product Price. Display Product Quantity Enable to display the Product Quantity. Display Product Weight Enable to display the Product Weight. Display Buy Now Column Enable to display the 'Buy Now' button. Display Category /Manufacturer Filter (0=disable; 1=enable) Enable to display the category/manufacturer filter. This allows to filter the display by category or manufacturer. Location of Prev/Next Navigation Bar (1-top, 2bottom, 3-both) This option controls where the navigation links appear on the page. Copyright b3NET.com, Inc. 21/34 Ecommerce4Biz– User Manual Stock This section controls the level of inventory tracking and how inventory affects checkout. Check Stock Level Enable to check to see if sufficent stock is available. Subtract Stock Enable to subtract product in stock by quantity in product orders. Allow Checkout Enable to allow a customer to checkout even if there is insufficient stock. Mark product out of stock Set this to display something on screen so customer can see which product has insufficient stock. Stock Re-order level Define when stock needs to be re-ordered. Featured This section controls the display of featured products on home page. Display Featured Products Maximum Display of Featured Include Sub Categories When Displaying Featured Products Specials Only When Displaying Featured Products Set to true or false in order to display featured. Set the maximum number of featured items to be displayed on Home page. Set to true or false in order to display featured items along with sub categories. Set to true or false in order to display specials only when displaying featured products Related Products This section controls the display of related products if you want to show different options available to the user for a single product. These values come pre-set, but you can change them to customize the function of your store. Enter values or set to ‘true’ or ‘false’ according to requirement. This page is easy to use, just follow the instructions. Copyright b3NET.com, Inc. 22/34 Ecommerce4Biz– User Manual Visitors Image 11 – Visitor Section with sub-menus Customer Details This section allows you to enable or disable fields used in the new customer signup page. You can control only the fields below from the admin. Activation Code for Registration Salutation Date of Birth Company Suburb State Logging This section allows you to set several logging options in Ecommerce4Biz that are handy for debugging and tracking. Store Page Parse Time Store the time it takes to parse a page. Log Destination Directory and filename of the page parse time log. Log Date Format The date format in the log. Display The Page Parse Time Display the page parse time (store page parse time must be enabled). Store Database Queries Store the database queries in the page parse time log (PHP4 only). Copyright b3NET.com, Inc. 23/34 Ecommerce4Biz– User Manual Testimonials This section controls the display of testimonials written by registered authors or customers. You have the option to edit, delete, control viewer ship of the testimonials from the admin panel. There are several options to make this section user friendly so you can change them to customize the display of testimonials according to your needs. Enter values or set to ‘true’ or ‘false’ according to requirement. This page is easy to use, just follow the instructions. Visitor Web Stats This section is used if you want a comprehensive web statistics graph to analyze your site visitors and its performance. You can set the ‘Use the GD Libray* to build graphs’ to ‘true’ and view graphs to analyse your web stats. This page is easy to use, just follow the instructions. (GD Library is an open source code library for the dynamic creation of images, maps, graphs by programmers.) Search Tag Cloud Keeps a record of what your customers search for generally. A maximum number of tags to be recorded and the box size containing the tags is pre-determined so that the design layout is maintained in front end. Values you can edit from Admin panel are: Max. shown Tags Box-width Poll This section controls the display of Poll results on the Poll-booth page. You have the option to edit, delete, control viewer ship of the polls outcome from the admin panel. Display Poll Poll Id Allow Comments Show if no Polls Allow multiple votes Number of Comments Decides how the poll shown in the side box is chosen. 0 = Random; 1 = Latest 2 = Most Popular ; 3 = Specific Poll ID Required to display a specific Poll result Enable or Disable poll comments. 0 = Disable ;1 = Enable Set to 0 or 1 in order to Hide/ unhide poll outcome. Allow people to vote more than once. Maximum number of comments to be display on the pollbooth page Copyright b3NET.com, Inc. 24/34 Ecommerce4Biz– User Manual Thumbnails By default, Ecommerce4Biz scales down the product images you upload to display them as thumbnails. Use this section to edit the original image proportions and align the thumbnail on a background color you set to suit your site. Enter values or set to ‘true’ or ‘false’ according to requirement. This page is easy to use, just follow the instructions. Images This section is important for setting your image sizes. Some things to note about images: If you set only one of the dimensions, either width or height, the other will fall proportionally if you also have ‘Calculate Image Size’ set to On. These settings do not Resample the images, so no matter what size they are set to, they will consume the full sized image bandwidth. Small Image Width The pixel width of small images that are displayed in product listings. Small Image Height The pixel height of small images that are displayed in product listings. Heading Image Width The pixel width of heading images displayed in the heading of the center of each page. Heading Image Height The pixel height of heading images displayed in the heading of the center of each page. Subcategory Image Width The pixel width of subcategory images displayed on main category pages. Subcategory Image Height The pixel height of subcategory images displayed on main category pages. Calculate Image Size This setting tells Ecommerce4Biz to calculate image sizes if enabled. This is needed if you want Ecommerce4Biz to automatically keep your thumbnails proportional. If this is on, it is recommended that you only set one of the values for your image sizes, either width or height, but not both. Leave one of the values blank (Note, blank does not mean 0. If you set a value to 0, it will not display). Image Required Enable this to display broken images. Good for development. If you do not want broken images to display, set this to false. Product Information Image Width The pixel width of images shown on your product information page Product Information Image Height The pixel height of images shown on your product information page PopUp Image Width The pixel width of images shown on your popup page. PopUp Image Height The pixel height of images shown on your popup page Copyright b3NET.com, Inc. 25/34 Ecommerce4Biz– User Manual Store Mode This section is used to set the operational status of the online store. It can be set to ‘Maintenance’ mode – by being redirected to maintenance page or ‘Fully functional’ mode. Many other details can also be administered from the backend to convey the store mode. Enter values or set to ‘true’ or ‘false’ according to requirement. This page is easy to use, just follow the instructions. Cache Ecommerce4Biz has built in page caching that can be used to significantly lower server load and increase the speed of the cart when used. If you make changes to your site, you will have to delete the cache in order to see the changes. Use Cache :: Set this to 'True' to enable cacheing. Cache Directory :: Set the path to the cache directory. The directory you set must be write-able. Sessions This section is used for session management. Following values can be administered from backend. Session Directory Force Cookie Use Check SSL Session ID Check User Agent Check IP Address Prevent Spider Sessions Recreate Session If sessions are file based, store them in this directory. Force the use of sessions when cookies are only enabled. Validate the SSL_SESSION_ID on every secure HTTPS page request. Validate the clients browser user agent on every page request. Validate the clients IP address on every page request. Prevent known spiders from starting a session. Recreate the session to generate a new session ID when the customer logs on or creates an account (PHP >=4.1 needed). Article Manager This section controls the display of articles in the article box. You have the option to edit the various parameters set to display the articles. Enter values or set to ‘true’ or ‘false’ according to requirement. This page is easy to use, just follow the instructions. Copyright b3NET.com, Inc. 26/34 Ecommerce4Biz– User Manual Modules Image 12 – Modules Section Ecommerce4Biz comes standard with several payment and shipping modules. This section of the administration tool allows you to enable, disable, and configure your modules. This is where you select what payment methods you will have at your store, and what shipping options are available. Billing This is the main payment module section. On this page, you will see a list of all currently installed payment modules in your store. Next to the module name, you will see a green icon and a red icon. To activate a module, click the green icon next to it. To deactivate a module, click the red icon next to it. Once a payment module is active, you may have to configure that module with certain required information. If this is needed, click the payment module, then click the 'edit' button in the right column. Now, you will see all the available options for that module. We have taken the time to detail the options for each payment module below. Standard Payment Modules Authorize.net This module allows you to use Authorize.Net as your payment gateway for real-time credit card processing in Ecommerce4Biz. The following options must be filled out properly in order for this module to work. Do you want to accept Authorize.net payments? :: Set this option to 'True' Login Username :: Your Authorize.net username Transaction Key :: The transaction key you set in Authorize.net admin. Transaction Mode :: Set this to 'Test' or 'Production' depending on whether you are processing live transactions or still testing. Transaction Method :: Set this to eCheck or Credit Card depending on the method you use. Customer Notifications :: When enabled Authorize.Net will e-mail a receipt to the customer in addition to Ecommerce4Biz. Payment Zone :: Allows you to limit the use of Authorize.net to a single zone. Set Order Status :: You can set the default order status to the store default, or set it to one of these: Delivered, Pending, Processing Copyright b3NET.com, Inc. 27/34 Ecommerce4Biz– User Manual Sort order of display :: This is where you set the order of the payment modules display on the checkout_payment.php page. Set this to a NON ZERO amount. Cash on Delivery This is the basic COD payment module if you want to use this type of payment option. This is also good for testing your store. Configuration options are below: Enable Cash On Delivery Module :: Set to 'True' to enable. Payment Zone :: Allows you to limit the use of this module to a single zone. Set Order Status :: You can set the default order status to the store default, or set it to one of these: Delivered, Pending, Processing Sort order of display :: This is where you set the order of the payment modules display on the checkout_payment.php page. Set this to a %O% ZERO number. PayPal Enable this module to accept payments using PayPal. Below are the configuration options for this module: Enable PayPal module :: Set to 'True' to enable. E-Mail Address :: The e-mail address to use for the PayPal service. Transaction Currency :: The currency to use for credit card transactions. The following currencies are supported: Selected Currency :: The current selected currency in the catalog Only USD Only CAD Only EUR Only GBP Only JPY Payment Zone :: Allows you to limit the use of this module to a single zone. Set Order Status :: You can set the default order status to the store default, or set it to one of these: Delivered, Pending, Processing Sort order of display :: This is where you set the order of the payment modules display on the checkout_payment.php page. Set this to a %O% ZERO number. 2CheckOut Enable this module to accept payments using 2CheckOut. Below are the configuration options for this module: Enable 2CheckOut Module :: Set to 'True' to enable. Login/Store %umber :: Login/Store Number used for the 2CheckOut service Copyright b3NET.com, Inc. 28/34 Ecommerce4Biz– User Manual Transaction Mode :: Transaction mode used for the 2Checkout service. This can be set to Test or Production. Merchant %otifications :: Should 2CheckOut e-mail a receipt to the store owner? This can be set to True or False. Payment Zone :: Allows you to limit the use of this module to a single zone. Set Order Status :: You can set the default order status to the store default, or set it to one of these: Delivered, Pending, Processing Sort order of display :: This is where you set the order of the payment modules display on the checkout_payment.php page. Set this to a %O% ZERO number. Shipping This is the main shipping module section. On this page, you will see a list of all currently installed shipping modules in your store. Next to the module name, you will see a green icon and a red icon. To activate a module, click the green icon next to it. To deactivate a module, click the red icon next to it. Once a shipping module is active, you may have to configure that module with certain required information. If this is needed, click the shipping module, then click the 'edit' button in the right column. Now, you will see all the available options for that module. We have given the detail the options for each shipping module below. Flat Rate Use this module if you want to use a flat rate shipping rate per order. The following configuration options must be set: o o o o o o Enable Flat Shipping :: Set this to true to enable this module. Shipping Cost :: Set the rate you want to charge per order. Tax Class :: Set this to the tax class you want to use for this shipping method, or leave it set to none if you do not want to tax the shipping charge. Shipping Zone :: If you set this to a zone, this method will only be available to orders shipping to that zone. Sort Order :: This sets the sort order of your shipping methods during checkout. If you have more than one shipping method, set this to a non zero quantity. Lower numbers defined here will appear higher/first on the checkout shipping page. Update :: Always click this button to commit your changes to Ecommerce4Biz. Per Item Use this module to set a 'Per Item' shipping charge. Set a base shipping rate, and that rate will be multiplied by the number of items that the customer has in their shopping cart. The following options must be set: o Enable Item Shipping :: Set this to true to enable this module. o Shipping Cost :: Set the rate you want to charge per item purchased. o Handling Fee :: Set the amount you want to charge for handling. This can be set to zero to deactivate the handling fee. Copyright b3NET.com, Inc. 29/34 Ecommerce4Biz– User Manual o Tax Class :: Set this to the tax class you want to use for this shipping method, or leave it set to none if you do not want to tax the shipping charge. o Shipping Zone :: If you set this to a zone, this method will only be available to orders shipping to that zone. o Sort Order :: This sets the sort order of your shipping methods during checkout. If you have more than one shipping method, set this to a non zero quantity. Lower numbers defined here will appear higher/first on the checkout shipping page. o Update :: Always click this button to commit your changes to Ecommerce4Biz. Table Rate This shipping method allows you to set so called table rate shipping. This module allows you to set whether shipping will be charged based on weight or quantity. Further, you define shipping price breaks based on weight or quantity amounts. The following options need to be set for this module: o o o o Enable Table Method :: Set this to true to enable this module. Shipping Table :: Set this option by following the example provided below. Table Method :: Set this to weight or price. Handling Fee :: Set the amount you want to charge for handling. This can be set to zero to deactivate the handling fee. o Tax Class :: Set this to the tax class you want to use for this shipping method, or leave it set to none if you do not want to tax the shipping charge. o Shipping Zone :: If you set this to a zone, this method will only be available to orders shipping to that zone. o Sort Order :: This sets the sort order of your shipping methods during checkout. If you have more than one shipping method, set this to a non zero quantity. Lower numbers defined here will appear higher/first on the checkout shipping page. o Update :: Always click this button to commit your changes to Ecommerce4Biz. EXAMPLE for Table Rate ShippingA store owner wants to charge $10 for orders weighing up to 20 lbs. Any orders over 20 lbs, but under 40 lbs are charged $18. To set this up using the table rate shipping method, the following must be entered into the 'Shipping Table' field of this module: 25:10.00,40:18.00 United Parcel Service (UPS) If you want to ship using UPS, enable this module. It is also important to note that in order for shipping calculations to be done correctly, you must set the zip/postal code of your store corectly in the configuration section of Ecommerce4Biz. The following options must be set: o Enable UPS Shipping :: Set this to true to enable this module. o UPS Pickup Method :: This should be set to however your UPS packages are picked up. Your options are : CC - Customer Counter, RDP – Daily Pickup, OTP - One Time Pickup, LC Letter Center, OCA - On Call Air o UPS Packaging :: Set this to the UPS Packaging method that you use. The following options are available : CP - Your Packaging, ULE - UPS Letter, UT - UPS Tube, UBE - UPS Express Box o Residential Delivery :: Set this to either RES or COM to have the module quote a residential or commercial shipping rate. o Handling Fee :: Set the amount you want to charge for handling. This can be set to zero to deactivate the handling fee. Copyright b3NET.com, Inc. 30/34 Ecommerce4Biz– User Manual o Tax Class :: Set this to the tax class you want to use for this shipping method, or leave it set to none if you do not want to tax the shipping charge. o Shipping Zone :: If you set this to a zone, this method will only be available to orders shipping to that zone. o Sort Order :: This sets the sort order of your shipping methods during checkout. If you have more than one shipping method, set this to a non zero quantity. Lower numbers defined here will appear higher/first on the checkout shipping page. o Update :: Always click this button to commit your changes to Ecommerce4Biz. United States Postal Service (USPS) To use USPS module, you first need an account with the USPS. If you do not have an account, you cannot use this module. The following options must be configured: o o o o o Enable USPS Shipping :: Set this to true to enable this module. Enter the USPS User ID :: This should be set to your USPS user ID. Enter the USPS Password :: This should be set to your USPS password. Which server to use :: Set this to either 'test' or 'production' Handling Fee :: Set the amount you want to charge for handling. This can be set to zero to deactivate the handling fee. o Tax Class :: Set this to the tax class you want to use for this shipping method, or leave it set to none if you do not want to tax the shipping charge. o Shipping Zone :: If you set this to a zone, this method will only be available to orders shipping to that zone. o Sort Order :: This sets the sort order of your shipping methods during checkout. If you have more than one shipping method, set this to a non zero quantity. Lower numbers defined here will appear higher/first on the checkout shipping page. o Update :: Always click this button to commit your changes to Ecommerce4Biz. Order Total This section deals with the calculation of the total order amount based on availability of discount coupons and tax applicable. The following options must be configured: Discount Coupons Customer Discount Gift Vouchers (-) Price break Discount Low Order Fee Global Quantity Discount Shipping Sub-Total Tax Total Copyright b3NET.com, Inc. 31/34 Ecommerce4Biz– User Manual Reports Image 14 – The Reports Section Ecommerce4Biz comes standard with several report modules to view Sales report, Customer or Product reports instantly. This section of the administration tool allows you to generate reports hourly, weekly, monthly or for any given time period. (a) (b) Image 15 – Various Report Generation Options (a) Sales Report (b)Customers Report (c)Product Report (c) Copyright b3NET.com, Inc. 32/34 Ecommerce4Biz– User Manual Sales Section Image 16 – Sales Section This section of the administration tool allows you to view order status of customers, levy tax according to zones etc. This section controls the display of orders made by customers, total order amount, date on which the order was made along with the status – whether pending or delivered or in process. The following options can be edited / deleted in this module: Customers Order Total Date Purchased Status A printout of the Invoice and Packing Slip can also be taken from this section. Image 17 – Setting Sales Tax This section allows you to set sales tax according to zones etc. Tax levied according to different zones are stored here. In this section you can set : Tax Zones Tax Classes Tax Rates Tax Class Title: Zone Tax Rate (in %) Description Priority Copyright b3NET.com, Inc. 33/34 Ecommerce4Biz– User Manual Pages Section Image 18 – Pages Section In this section you can design and edit the static pages of your website. You can also add and upload Newsletters and Articles. CMS – Content Management System Enter the description of your static web page. You can use HTML in this field which allows you to be very flexible in how you create your static pages. You can add images to the description, tables, hyperlinks, just about all of HTML. Same applies for Articles and Newsletters. ***** Copyright b3NET.com, Inc. 34/34