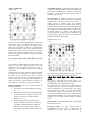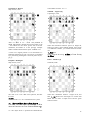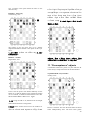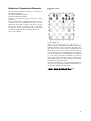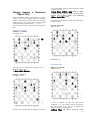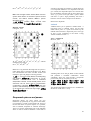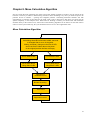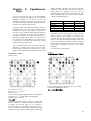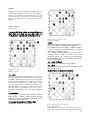
1
Chuzhakin Evgeny Chuzhakin’s System Version 2.14 Hazardous elements: find and win! A new technique for analyzing positions at the interface of strategy and tactics will considerably improve your playing and prevent you from making blunders. 1 Chuzhakin’s System Review The book written by Evgeny Chuzhakin is a research study of chess tactics problems. The book includes a strict system of search for combinations in practice which allows you to look at our ancient game in a totally different way. This is some kind of Mendeleev’s table in chess. Chuzhakin’s System gives a distinct classification of tactical potentialities of any position which makes a combination search significantly simpler. The importance of this book is beyond any doubts. It was Max Euwe who wrote about the necessity and complication of systematization of tactics problems. But until now this part of chess theory remained incomplete. Some attempts to develop a clear system of a tactical game were made by Max Euwe himself, Jacob Neistadt and other chess theoreticians. But despite interesting recommendations which can be really useful in some positions, their works did not provide a complete technique to work with tactics in any position. This task was solved by Evgeny Chuzhakin who showed us how it is possible to search for combinations rigorously, even if a chess player does not have a wide experience or a good combination feeling. It is interesting to trace how the system explains the inward nature of such combinations as deflection, double attack or overloading. Chuzhakin’s System offers chess players several advantages: 1. It allows carrying out a quick and qualitative analysis of a position. 2. It considerably decreases psychological and emotional stress in a chess player during a real game as in many cases it insures him against blunders and gives clear instructions when it is really necessary to evaluate tactical potentialities and where to search for them. 3. When you carry out a tactical analysis of a position, the number of elements you have to pay attention to is considerably reduced. Without using this system a chess player has to monitor all 64 squares of the chessboard and up to 32 pieces and pawns on it. Chuzhakin’s System makes it possible to calculate only hazardous elements, the number of which in most positions does not exceed five for each side. So a chess player acts faster and more effectively. 4. Creating hazardous elements for your opponent in due time and defending your own hazardous elements, you can control the game which allows you to strengthen the positional constituent where there are no certain combinations, but only tactical threats and positional benefits owing to them. The book is intended for skillful chess players who came to a standstill in their development even though they had studied chess theory. I recommend this book especially to those who make blunders in their games. Owing to Chuzhakin’s System the reader will play with more confidence, because he will be able to see tactical potentialities in advance, they will not appear all of a sudden from the ocean of variants. Evgeny Chuzhakin is not only a chess player, but also a programmer and a polymathic and creative person. A curious fact: every other Russian uses LG or Sumsung products and I know the author of this book as a person who creates and sells to these companies high-tech products for using them in Korean offices being an executive officer in the Tula company CADSoft Tools. I was amazed how he could increase his chess skills in a very short period of time. In autumn 2011 he showed just average results in tournaments taking places 5th to 10th, but in spring 2012 he won the Tula championship though he was not even one of the favorites during that time. As it turned out later, he used a special scientific system during the tournament which he could create using his skills as a programmer. If in the theory of the positional game there is some clarity, in the area of tactics chess players have a multitude of variants. Almost complete absence of clear theoretical recommendations does not make it any easier for a chess player to monitor tactical potentialities. Evgeny Chuzhakin managed not only to systemize tactical elements but he could also give an easy-to use practical instruction which allows avoiding blunders in practice. In 1989 I finished Olympic Reserve School No1, the Department of Chess. I was in the same group as Alisa Galliamova and other top-rank chess players under the auspices of M.M. Judovich and R.I. Kimelfeld who provided for us a good training in both positional and tactical game. After studying Jacob Neistadt’s works and those that belong to other tactics experts, I came to a conclusion that the center of attention there is typical tactical techniques, and often one combination includes several techniques of that kind. At the same time there is no description of prerequisites for attacks or it is very short and vague. They mostly concentrate on the accumulation of pieces near the enemy king and on free pieces which can be under a double attack. But chess is not limited to such combinations. Moreover, an attack on the king is an obvious threat and any modern chess player can understand that he has to secure the key piece. But tactical blunders in chess appear due to poor positions of pieces which let you perform a combination and gain material advantage. The most important question here - what is a poor position for a piece? How should you arrange your pawns and pieces so that you could not run into a combination? This book has a solution for this challenging problem. It can be done by searching for hazardous elements and analyzing them. Being aware of my chess education, Evgeny Chuzhakin asked me to make an expert estimation of the system where he suggested a general classification of tactical elements. He was ready to defend his system efficiency in any positions. 2 That made a good impression on me as the author did not intend to indulge in wishful thinking and to prove accuracy of his theory using only his own examples. Quite on the contrary, he gladly investigates all attempts to overturn it. The readers can also discuss the system as the book has its own website www.neoneuro.com where anyone can make comments and offer positions for examining. The author is ready to answer the readers’ questions. Ilyja Birjukov International Master Superior Judge of All-Russian Category 3 Introduction Have you happened to lose the queen by missing a trivial knight fork? Have you been under a double attack? When you make a strategic grip, do you want to have a system which will minimize all tactical potentialities of your opponent? Do you like to use a tactics and want to quickly find hidden sophisticated combinations which make chess really beautiful? In this case this book is for you. The system described here solves the problem expressed by Max Euwe in the middle of the last century. The problem statement is given in the epigraph. The work comprises a systematization of tactics problems to use them in a real game. The book describes a system which will allow the readers to see with almost mathematical accuracy the main tactical ideas behind the board. Whom is the book addressed to? The book is intended for a wide range of skilled chess players who have an idea of the chess strategy and tactics theory. This is a completely new material. That’s why it will be interesting to both Class-A players and Grandmasters. Why is this system useful for a chess player? It will considerably reduce the number of blunders, especially combination oversights It will allow you to play with more confidence and make an efficient use of time because there will be less squares on the board which need your attention It will instruct you when you should calculate tactical variants and when you can do without it It will help you find unexpected combinations owing to an simple and efficient algorithm It will tell you how to arrange your pieces to create tactical threats to your opponent It will me it easier to search for defense in a poor position It will show a new positional principle for a better strategic maneuvering It will reduce the number of variants which you have to calculate to analyze a position or chose a move. 4 What is new about the system and how is it different from what was known before? The main novelty of the system is an idea to create a clear-cut list of tactical prerequisites so that the whole tactics or, to be more exact, 99% of combinations could include the features specified in that list. This offers a lot of advantages that are more significant than just knowing each tactical element separately. Aristotle's famous rule works here: the whole is bigger than the sum of its parts. 1. The idea to calculate the list of tactical prerequisites - the so called hazardous elements - in each position without depending if there will be tactics in it or not. This makes sense, because in a real game we do not know in advance if combinations are possible or not and where they can be possible 2. Standard methods of using hazardous elements. We suggest looking for tactics depending on the hazardous elements available in a position, and give instructions how you can use these hazardous elements and their interactions. 3. A new positional principle: the less hazardous elements we have and the more hazardous elements the opponent has - the better. This can be used in positional maneuvering. Earlier: many positional principles, such as a center or open file capture, pawn weakness, etc. They are all still significant. 4. Methods for optimization of calculation of hazardous elements. It is specified that it is not necessary to calculate them again in each position; the majority of hazardous elements remain during many moves. That is why it is enough to examine the influence of the last move on the lists of hazardous elements for both sides which we remember from the previous position. 5. Special, clear-cut algorithms for calculation of attacks and defenses taking into account attacks through your own pieces, possibilities of an attack with tempo on protecting pieces and other peculiarities of the position. 6. Typical methods of using hazardous elements for searching tactics. A new type of classification of combinations where such methods as deflection, decoy, defense destruction and others are isolated cases of using hazardous elements. We give concrete instructions how you should search for combinations depending on the types of hazardous elements and their interactions. 7. Some wordings of the rules can also be considered a novelty, in particular the idea to take into account the so called “-hazard” and “tension coefficient”. Earlier: the majority of the rules won’t be a revelation for the reader. For example, let’s take crucial hazardous elements: the opponent’s material advantage or a piece under attack is dangerous - it’s evident without the book. But the system conclusions drawn from it are not evident – e.g. standard methods of play in case both sides have crucial hazardous elements. 8. Algorithms of thinking for a chess player when using this system. The following diagram shows how hazardous elements (HE) are used in a real game when calculating variants. 5 Calculating what HEs have been added, removed or changed after a move in the game. Making necessary changes in the lists of HEs and in the lists of ideas about using them. In the original position the lists are empty. List of White’s HEs List of Black’s HEs List of ideas about using White’s HEs List of ideas about using Black’s HEs Selection of candidate moves Blunder checking Your move Opponent’s move 9. The main novelty of the system is an idea to create a clear-cut list of tactical prerequisites so that the whole tactics or, to be more exact, 99% of combinations could include the features specified in that list. This offers a lot of advantages that are more significant than just knowing each tactical element separately. Aristotle's famous rule works here: the whole is bigger than the sum of its parts. Earlier: lists of tactical prerequisites and separate instructions what you should pay attention to when searching for tactics – from Emanuel Lasker and Max Euwe to Jakow Neistadt and John Nunn these lists had been developing helping chess players search for tactics. As those lists did not solve the tactical prerequisites search problem completely, it was not easy to use them as a whole. Moreover, all authors gave a very vague statement for some rules. It was not always clear if the king is weak or not, or how you should see a poor arrangement of pieces beforehand, when you should search for a fork and when - for a deflection combination. 6 Feedback The official website of the book is www.neoneuro.com, section Chess. You can ask questions there, make your comments and responses. You can also contact the author by e-mail: info at neoneuro.com. It is very important for me that every reader find this book useful. So if something is not clear or there are points at issue while reading the book, please contact me. I will be glad to discuss them on the website. 7 Chapter 3. Definitions. Clause 3 of the Rules if the most simple, so we’ll start with it – every new name should be clear and unique. That is why I will not use terms like strong/weak so commonly used in chess literature in a general sense. A weak square is a square that cannot be attacked by pawns. Only this definition is used in this book and it was introduced in my system by Nimzowitsch. Further definitions imply interactions of pieces and pawns of one of the sides. For example, the white knight-hazardous queen means it is situated in the knight-hazardous zone relative to the white king. Arrangement of black pieces and pawns is not considered in this case. Arrangement of other white pieces and pawns is also not considered. Such an abstract and a bit one-sided approach lets you significantly save your time. Wherever the enemy knight is, it is able to be transferred through the whole board in two leaps and deliver the final blow. Moreover, if the knight has no opponent, a pawn can be promoted to it. That is why when defending from forks or when preparing a fork, it is often better to watch not knights’ positions, but positions of pieces which can be attacked. Object is a piece or a pawn. Introduced for short. Hazardous objects: pawn-hazardous, knighthazardous, bishop-hazardous, rook-hazardous. These terms are used to denote objects the mutual arrangement of which allows you to double attack them with a piece or a pawn that is specified in the term and has smaller value; arrangement of enemy pieces which can make such an attack is not taken into account. A rook on the empty board can attack any two squares simultaneously, a bishop can attack any two squares of the same color. But neither bishop, nor rook can attack two objects simultaneously in one move with the exception of cases when one of them is already on the line of attack of the attacking piece. That is why bishop-hazardous objects are those on the same diagonal, rook-hazardous objects are those on the same file or rank. The mentioned above terms make sense only for two or more objects. For example, you can say that White have two knight-hazardous rooks a1-f1 or pawnhazardous knights a3-c3. There is often a checking of mutual arrangement of major pieces relative the king; in this case the word king is implied by default and you can say bishop-hazardous queen or knight-hazardous rook. The terms king-hazardous or queen-hazardous are not introduced, because they are the most important pieces and they cannot attack objects of smaller value with tempo. As for a potential attack on the king by the queen, it can be diagonal which will be taken into account as bishop-hazard or along the rank/file which will be taken into account as rook-hazard. Let’s see the diagram XABCDEFGHY 8-+-+-+-+( 7wQ-+-+-+-' 6-wQ-+-+-+& 5+-wQ-wQ-wQ-% 4-+-wQ-wQ-wQ$ 3+-wQ-wQ-wQ-# 2-+-wQ-wQ-wQ" 1+-wQ-wQ-mK-! xabcdefghy Pawn-hazardous position of the queen and the king: e1g1 Knight-hazardous position of the queen and the king: all variants except a7, c5 and e3. Bishop-hazardous position of the queen and the king: all variants on the diagonal a7-g1. Rook- hazardous position of the queen and the king: c1, e1 and g3, g5. The term knight-hazardous implies not only knighthazard, but it also explains the gist of events in a metaphorical way – the knight is at rest without showing any activity which can be expressed in a double attack or fork, while other pieces get into a danger which can become a target for the fast knight. The same concerns other pieces and pawns. Pawn-hazardous objects: there is one square between two pieces along the rank, for example c3-e3. These pieces can be attacked by a pawn. XABCDEFGHY 8rsnlwq-trk+( 7zpp+-vlpzpp' 6-+pzp-sn-+& 5+-+-zp-+-% 4-+L+P+-+$ 3+-sNP+N+-# 2PzPP+-zPPzP" 1tR-vLQ+RmK-!O xabcdefgh If White moves the Bishop to e3, then it appears in the pawn-hazardous position with the Knight c3 and Black wins an extra piece. 7.Ґe3?? d5 8.Ґb3 d4 -+ 8 Knight-hazardous objects: the objects which mutual arrangement makes it possible to attack them using a knight fork. It makes sense only for two or more objects. Knight-hazardous pieces are those that are placed on squares of the same color at the distance of not more than 4 squares from each other with the exception of knight-hazard-free squares which are located along the diagonal and there is one or three squares between them. XABCDEFGHY 8-+Q+Q+Q+( 7+Q+Q+Q+Q' 6Q+-+Q+-+& 5+Q+Q+Q+Q% 4Q+Q+K+Q+$ 3+Q+Q+Q+Q# 2Q+-+Q+-+" 1+Q+Q+Q+Q! xabcdefghy You can see in the diagram some variants of the knighthazardous position of the queen relative to the king on the e4 square. Knight-hazard-free squares are a8, c2, c6, g2, g6. In the following diagram you can see some variants of the knight-hazardous position of the queen relative to the king on g1. XABCDEFGHY 8-+-+-+-+( 7+-+-+-+-' 6-+-+-+-+& 5+-+-wQ-wQ-% 4-+-wQ-wQ-wQ$ 3+-wQ-+-wQ-# 2-+-wQ-wQ-wQ" 1+-wQ-wQ-mK-! xabcdefghy knight-hazardous. Knight-hazard-free squares: c5, e3. Knight-hazardous squares: c1, c3, d2, d4, e1, e5, f2, f4, g3, g5, h2, h4 – they are occupied by the queen in this diagram. Knight-hazardous pieces can be simultaneously attacked by a knight, i.e. by a fork. Most often it is knight-hazard for major pieces and the king that is calculated. Bishop-hazardous objects: objects that are placed on the diagonal. Most often they are calculated for major pieces and the king. Rook-hazardous objects: objects that are placed along the same rank or file. Usually only rook-hazardous position of the queen is taken into account. Knight-hazard-free squares: if there are two squares and the knight can leap from the initial square to the destination square in four or more moves, these squares are knight-hazard-free. Knight-hazard-free objects are those that are situated at the knight-hazard-free distance from each other. For example, the king g1 and the queen e3. In the latter case the queen is bishop-hazardous as the queen and the king are placed on the same diagonal. In the diagram you can see a knight-hazard-free position of the queen relative to the king. XABCDEFGHY 8Q+-+-+-+( 7+-+-m+-+-' 6-+Q+-+Q+& 5+-+-+-+-% 4-+-+K+-+$ 3+-+-+-+-# 2-+Q+-+Q+" 1+-+-+-+-! xabcdefghy Knight-hazard-free squares are also those that are situated in one square or three squares diagonally from the enemy knight. For example, for the knight c1 the knight-hazard-free squares are a3, e3, and g5. Hazardous element It is a complicated concept calculated by using a set of rules which are given in the chapter Hazardous Elements. The rule for calculating knight-hazardous squares by the example of the diagram: it is necessary to count four steps diagonally from the king to each side and find a circumscribing rectangle. It this diagram it is the rectangle c1-c5-h5-h1. All dark squares in the rectangle, except for the knight-hazard-free squares are 9 Gottschall vs Alef [4] Rybinsk 1997 XABCDEFGHY 8r+-+-trk+( 7+-+-+pzpp' 6p+-+l+-+& 5+psn-+-+-% 4-wq-sN-+-+$ 3+-+-+-+P# 2PzPL+-zPP+" 1tR-+QtR-mK-!O xabcdefghy XABCDEFGHY 8r+-+r+k+( 7zppzpq+pzpp' 6-+-+-sn-+& 5+-vl-sn-+-% 4-+-+-vL-+$ 3+-zPL+R+-# 2PzP-+N+PzP" 1tR-+Q+-+K!O xabcdefghy Hazardous elements White: a2, b2, d4, h3 Black: b4, c6, e6, h7 The way they are discovered is described in the chapter Hazardous elements. In the position in the diagram the decisive attack is the one against hazardous elements: 1.Ґxh7+! ¢xh7 2.£h5+ ¢g8 3.¤c6 g6 4.£h6 White wins the queen and delivers a checkmate. The concept of a hazardous element is one of the key concepts in this system where a detailed algorithm for searching and calculating hazardous elements and the technique on how to work with them are given. Attack and Defense: while calculating hazardous elements when you have to find out how many pieces attack and how many pieces defend a square on the chessboard, it is required to use the following rules: An attack on the element is counted, i.e. added if between the attacking piece and hazardous element there is a piece or a pawn of the attacking side which can move to expose the line of attack. When calculating hazardous elements the value of pieces is not taken into account, for example if the queen attacks a pawn which is protected by another pawn, the attack is counted. An attack with a pinned piece or a pawn is counted. Defense by a piece or a pawn which is pinned or attacked at the moment is not counted. Defense by pieces which can be attacked by a pawn or a piece of smaller value i.e. with tempo is not counted either, if after retreating they will not be able to protect the point which is calculated at the moment. White to move. Calculate the number of attacks and defenses of the d7 point. Attacks: no direct attacks, but there is an indirect attack by the queen on d1 through its bishop on d3. The number of attacks is 1. Defenses: both black knights protect their queen, but according to the rule mentioned above the knight on e5 is not taken into account as a protector as it is attacked by the bishop on f4. The knight on f6 is not considered a protector either as it is attacked by the rook on f3 through its bishop on f4. The number of defenses is 0. It turns out that the black queen is attacked one time and protected zero times! White is really winning, using this circumstance: _ 1. Ґxe5! ¦xe5 2. ¦xf6 ¦d8 [2...gxf6 3.Ґxh7+! ¢xh7 4.£xd7] 3. ¦f3 +Taking into account the previous definition, it is important to understand what “a possibility of moving to expose the line of attack” means. Note: we do not calculate vertical attacks by pieces if they are behind their pawns and there is no possibility to move away the pawn, e.g. by taking a pawn or a piece of the opponent. For example, we do not take into account the attack of the a1 rook on the a7 pawn in the original position, but we take into account diagonal attacks through pawns and also horizontal attacks “to the side” – the latter happen rarely in practice. It is necessary to note that attacks and defenses are counted in different ways for further calculation of hazardous elements; an attack has an advantage over defense. For example, an attack by a pinned piece is counted, but defense by a pinned piece is not. Shevchenko vs Arkhireeva [4] 10 Amin - Areshchenko Antalya, 2013 XABCDEFGHY 8-+-+rtrk+( 7+p+-+pzpp' 6p+-+-+-+& 5+-+-+P+Q% 4-+l+L+-+$ 3+-+-tR-+-# 2PwqP+-+PzP" 1+-+-tR-+K!O xabcdefghy On e8 we see two attacks through White’s bishop and one defense. On h7 we calculate the attack by the queen on h5 and by the bishop on e4 because the f5pawn can move forward opening the b1-h7diagonal. The attack by Black’s rook on e4 is calculated but the attack by the f8-rook on the f-vertical is not calculated because the f7-pawn completely blocks the vertical. White wins sacrificing a pawn and a piece that block the lines of attack. 25.f6! g6 26.Ґxg6! fxg6 27.Јh6 Јxf6 28.¦xe8 +X-ray attacks through blocked pawns can be taken into account at the chess player discretion, the most important X-rays are taken into account in rule 13 which let you avoid making blunders when ignoring such attacks. If a piece of the protecting side blocks the line of attack on another piece or a key pawn or an intrusion square, the attack on the blocked piece (pawn, intrusion square) is taken into account. It is within the discretion of the chess player to determine the importance of pawns and intrusion squares attacked “through”. In most cases it’s not necessary to count them for tactics. Tension coefficient (TC) for an object should be calculated as follows: If the object is not attacked and not protected. TC = 0. If the number of attacks is equal to the number of defenses then TC=”number of attacks”. For instance, if we have two attacks and two defenses, TC = 2. If the number of attacks is greater than the number of defenses, then TC is calculated as the number of attacks minus the number of defenses. In this case we write TC with “+”. For example, two attacks and one defense: TC = +1. Overloaded element: a hazardous element where the number of attacks exceeds the number of defenses and the element is defended by a “cheaper” material, for example, a pawn defends another pawn which is attacked by two pieces. Overprotection: the number of protections is higher than the number of attacks. This term introduced by Nimzowitsch in the book called “My system” is usually given in literature with the following explanation: if you protect an element under attack by a greater number of pieces than those that attack him, each piece that protects this element becomes free. Overprotection is recommended only to crucial, first of all central points of a position. The pieces which excessively protect a crucial point are considered to be in good strategic positions. Here is an example from Nimzowitsch’s book “My system”: Nimzowitsch vs Gise 1913 XABCDEFGHY 8r+-+kvlntr( 7zpp+n+pzpp' 6q+p+p+-+& 5+-+pzP-+-% 4-+-zP-+-+$ 3+-+-+-+-# 2PzPP+NzPPzP" 1tRNvLQ+RmK-!O xabcdefghy The central point of the positions is e5. On next moves White concentrates three pieces for its protection. 1.¤d2 ¤e7 2.¤f3 ¤g6 3. ¦e1 Ґb4 4.c3 Ґa5 5.Ґf4 The goal is achieved; the central point e5 is overprotected. That allowed White to control the center and afterwards to win by attacking the king. It’s interesting how the idea of overprotection is correlated with the system of hazardous elements where overprotection is a normal state of the object. Non-overprotection results in a hazardous element. Nimzowitsch suggests overprotection only for the crucial central elements of the position. When working with hazardous elements, pay special attention also to periphery of the board, where hazardous elements occur. Basic system is a set of mandatory rules, the simplest and fastest for search. Extended system is a basic system which is supplemented with new rules. A system can be extended by any chess player, his peculiarities of 11 playing, knowledge and preferences should be taken into account. Watch or remove is a term and a rule. It means that hazardous elements demand constant monitoring of tactical potentialities connected with them. First of all, it is necessary to pay attention to your own hazardous elements. Chapter 4. Rules for Calculation of Hazardous Elements (HE) The concept of hazardous elements (HE) is the most important in the system. Hazardous elements show you the key points on the chessboard where combinations can be performed. An important advantage of the hazardous element theory is its completeness – ALL combinations and tactical motives that can be in practice are directly connected with hazardous elements. Hazardous elements are not always a real threat. They are only a “weather cock” which shows from what quarter the wind of tactics can blow. There are a lot of rules for calculation of hazardous elements. This can be a challenge in the beginning, but you have to accept it, because this tactical play is very complicated and diverse and it is quite difficult to use a smaller number of rules. You should have a good understanding of the following rules and be able to quickly calculate HE based on them. 1. Material advantage of your opponent Material advantage can be frequently sacrificed featuring the most unexpected moves. For instance, if you sacrifice a piece, keep in mind that your opponent can sacrifice a piece in return – and in any part of the chessboard. Priorities: crucial HE. Alekhine - Vidmar Karlsbad, 1911 XABCDEFGHY 8r+l+-trk+( 7zp-zp-+Nzpp' 6-+p+-+-+& 5+-+-wq-+-% 4-zP-+P+-+$ 3+-+-+-+-# 2-zpP+-zPPzP" 1tR-vLQtR-mK-!O xabcdefghy White has an extra knight, but his rook and bishop are under attack. White will have to sacrifice a piece anyway. The most important thing is to do it in the right way. 1.¦b1! 1...bxc1Ј [1...¦xf7 2.Ґxb2] 2.¤xe5 Јf4 3.¤d3 With an extra pawn for White. Chigorin – Gunsberg Havana, 1890 XABCDEFGHY 8-+r+-trk+( 7+p+-+-zpp' 6pwQ-+-+-+& 5+-+-+p+-% 4-+-+-+q+$ 3sN-zP-+-+-# 2PzPL+-zPlzP" 1+-+R+RmK-!O xabcdefghy White has an extra piece and finds a winning exchange 1.Јe6+ ўh8 2.Ґxf5 Јg5 [2...¦xf5? 3.Јxc8+] 3.f4 Јxf5 4.Јxf5 ¦xf5 5.ўxg2+- 12 Cvicela – Manik [4] Hlohovec, 1998 XABCDEFGHY 8r+l+kvl-tr(U 7zp-+-zppzpp' 6-+p+-+-+& 5+-+-+-+-% 4-+P+-+-+$ 3+PsN-+-+-# 2P+Q+-zPPzP" 1wq-vL-+RmK-! xabcdefghy Black has an extra rook and to save the queen he can sacrifice any piece. 1...Ґf5! 2.£d2 ¦d8 3.£e3 Ґd3 4.£f3 f6 0-1 2. Objects under attack Hazardous elements are objects under attack, i.e. in cases when the number of attacks on an object exceeds the number of defenses. Priorities: crucial HE. At first glance, everything is simple: if a piece is under attack, you should defend it or move it away. More complicated positions appear when an enemy piece is attacked in return. Ipatov - Giri Antalya, 2013 XABCDEFGHY 8-+-wqr+k+(U 7+-+-+pzp-' 6l+N+-+-zp& 5zp-+-+Pvl-% 4-zp-trpsNP+$ 3+-+-wQ-+-# 2PzP-+-+-zP" 1+KtR-+-tR-! xabcdefghy Black has an extra pawn which means that White has HE #1, but at the same time Black’s queen and rook are under attack. Squares d4 and d8 are HEs #2. In order to get rid of pin, Black uses a typical method of counterattack, creating for White HE #2 on e3. 30... ¦d3! 31.Јa7 Јd6 32.¤xd3 Ґxd3+ 33.ўa1 Ґxc1 -+ Shevchenko - Kirillovich [4] Orel, 2001 XABCDEFGHY 8r+l+k+-tr( 7zpp+-zppvlp' 6-+-+-+p+& 5wq-+-+-+-% 4-+-vL-+-+$ 3+-+-+L+-# 2PzPP+-zPPzP" 1tR-+QmK-+R!O xabcdefghy Black has the bishop on g7 under attack and though White is in check this is not a guarantee of a peaceful play for Black. White decoys the queen under attack by sacrificing a pawn: 1.b4! £xb4+ 2.c3 £b5 3.Ґxg7 +Huguet – Molnar [4] Paris, 1963 XABCDEFGHY 8r+lwq-trk+( 7zpp+-zppvlp' 6-+nzp-+p+& 5+-+-+-+-% 4-+PsNP+n+$ 3+-sN-vL-+-# 2PzP-+LzPPzP" 1tR-+Q+RmK-!O xabcdefghy By making the hanging knight on g4 Black counted on an exchange, for example: 1.¤xc6? ¤xe3 2.¤xd8 ¤xd1 3.¦axd1 ¦xd8 with equality. But another thing ensued: 1.Ґxg4! Ґxd4 [1...¤xd4 2.Ґxc8 £xc8 3.Ґxd4+-; 1...Ґxg4 2.¤xc6 Ґxd1 3.¤xd8 Ґc2 4.¤xb7 Ґxc3 5.bxc3 Ґxe4 6.¤a5+-] 2.Ґxc8 13 Ґxc3 3.Ґxb7 Ґxb2 4.Ґxc6 ¦c8 5. ¦b1 - with an extra piece for White in all variants. Such combinations when a piece is sacrificed in order to gain more material as an enemy piece remains under attack are called desperado. 3. Unprotected objects A hazardous element is an object that is protected and attacked the same number of times or is neither protected nor attacked. The number of attacks and defenses should be calculated according to the rules specified in chapter 3. Let me remind you about these rules: An attack on the element is counted, i.e. added if between the attacking piece and hazardous element there is a piece or a pawn of the attacking side which can move to expose the line of attack. When calculating hazardous elements the value of pieces is not taken into account, for example if the queen attacks a pawn which is protected by another pawn, the attack is counted. An attack with a pinned piece or a pawn is counted. Defense by a piece or a pawn which is pinned or attacked at the moment is not counted. Defense by pieces which can be attacked by a pawn or a piece of smaller value i.e. with tempo is not counted either, if after retreating they will not be able to protect the point which is calculated at the moment. Tension coefficient (TC) for an object should be calculated as follows: If the object is not attacked and not protected. TC = 0. If the number of attacks is equal to the number of defenses then TC=”number of attacks”. For instance, if we have two attacks and two defenses, TC = 2. If the number of attacks is greater than the number of defenses, then TC is calculated as the number of attacks minus the number of defenses. In this case we write TC with “+”. For example, two attacks and one defense: TC = +1. with “+”. 3.4. The number of attacks is greater than the number of defenses, but the attacks are not direct, otherwise it would be rule 2. TC with “+”. In practice rule 3 is used for calculating most of the hazardous elements. Priorities: from lowest 3.1. to highest 3.4; the greater the number of attacks and defenses, the more hazardous the element is. Examples. 3.1. The object which is not attacked and not protected. TC = 0. Gurevic – Kamsky Chicago, 1989 XABCDEFGHY 8r+l+-trk+(U 7zpp+nvlpzpp' 6-wqp+p+-+& 5+-+-+-sN-% 4-+PzPp+-+$ 3+Q+-+-zP-# 2PzP-+PzPL+" 1tR-vL-tR-mK-! xabcdefghy White has an unprotected rook on e1, the knight on g5 is protected one time and attacked one time. It’s nice to use a double attack on these hazardous elements: 1...£a5! White resigned foreseeing 2.£c3 Ґb4 The object is considered a hazardous element according to rule 3 in the following cases: 3.1. The object which is not attacked and not protected. TC = 0. 3.2. The object which is protected and defended the same number of times. TC > 0 3.3. The objet which is attacked a greater number of times than it is defended, and the value of the attacked and defending object is considerably lower than the value of the attacking ones. E.g. a pawn is protected by another pawn and attacked by two pieces. In this case the object will not be considered under attack according to critical rule 2, but counted according to not critical rule 3. TC 14 Christiansen - Karpov Wijk aan Zee, 1993 same number of times. TC > 0 XABCDEFGHY 8r+-wqkvl-tr(U 7zp-+p+pzpp' 6-zpl+p+-+& 5+-+-+-+n% 4-+P+P+-+$ 3zP-sN-vL-+-# 2-zPQ+-zPPzP" 1tR-+-mKL+R! xabcdefghy Schmied – Aagaard [4] Copenhagen, 1995 After 11...£c7 or 11.... Ґc5 the position is equal. Black made a blunder moving the bishop to d6 – now Black has two minor pieces with 0 tension coefficient, and White as in the previous example makes a double attack with the queen: 12.£d1 1–0 A rook in its original position is not considered as a hazardous element as per rule 3 as long as it is shielded by a pawn along the diagonal - these are pawns b2, b7, g2, g7 Karjakin - Dominguez Wijk aan Zee, 2014 XABCDEFGHY 8-+r+k+-tr( 7+pwq-vlpzpp' 6p+nzppsn-+& 5+-+-+-+-% 4-+P+P+-+$ 3+-+-+N+-# 2PzP-+QzPPzP" 1tRNvLR+-mK-!O xabcdefghy The rook on a1 is not a HE in this position, but after the move 13.b3? it becomes HE # 3.1. As a result Black wins a pawn: XABCDEFGHY 8r+lwqkvl-tr(U 7+p+n+pzpp' 6p+-+psn-+& 5+-+-+-vL-% 4P+QsN-+-+$ 3+-sN-+-+-# 2-zP-+PzPPzP" 1tR-+-mKL+R! xabcdefghy White has hazardous elements: queen c4, knight d4, bishop g5. When a piece defends another piece which is a hazardous element, you should attack the former one: 1...¤e5 1-0 White resigned foreseeing 2.£b3 [2.¤xe6 Ґxe6] 2...£xd4 Benza – Meshkov [4] Smolensk, 2004 XABCDEFGHY 8-+-+r+k+(U 7+q+-+rvlp' 6-+-+-+p+& 5zp-+N+-wQ-% 4-zp-zP-+-+$ 3+P+-+-+-# 2P+-+-+PzP" 1+-tR-+R+K! xabcdefghyy White has a hazardous element – knight on d5, and after 1...h6! White loses the knight. It’s curious that Black did not notice a simple move and the game ended in a draw. 13.... ¤xe4! 14.£xe4 Ґf6 15.¤c3 Ґxc3 µ It is better 15.¤d4 ¤xd4 16.¦xd4 d5 17.£e3 dxc4 18.Ґb2 cxb3 19.¤c3 Ґxd4 20.£xd4 f6 і 3.2. The object which is protected and defended the 15 Nakamura - Li,Chao Antalya, 2013 XABCDEFGHY 8-trntrk+-+( 7zp-wQn+-+p' 6-+-+qzppvL& 5zP-+-zp-+-% 4-+-+P+-+$ 3+-+-+N+-# 2-zP-+-zPPzP" 1+-tRR+-mK-!O xabcdefghy The rook on b8 has TC=1, as it is attacked and protected one time: by the queen on c7 and the knight on d7 respectively. White attacks the defending object: the knight on d7, winning the material. 25.¦xd7 Јxd7 26.Јxb8 ¤b6 27.¤xe5 +In the final position White hits e5, which becomes a HE as per rule 3.3 after the 25th move of Black. Bulski - Varley Warsaw, 2013 XABCDEFGHY 8-mk-tr-+-tr( 7zpp+lvlp+p' 6-+-zppzp-+& 5wq-+-+-+-% 4-+-sNPzP-+$ 3+-tR-+-+P# 2PzPPwQ-+P+" 1+-mKR+-+-!O xabcdefghy Here we see HE #3.4 with TC=+1 on a5. The standard way of using this HE is opening the line of attack with tempo, first of all with a check. 19.¦c8+ ¦xc8 20.Јxa5+McShane - Anand 3.3. The object which is attacked a greater number of times than it is defended, and the value of the attacked and defending object is considerably lower than the value of the attacking ones. Palmo – Biava [4] Argentina, 1994 (corr) XABCDEFGHY 8r+-+-trk+( 7zp-wq-+p+p' 6lzpn+pvlp+& 5+-zpn+-sN-% 4P+N+-+-+$ 3+-zPP+-zP-# 2-zP-+QzPLzP" 1tR-vL-+RmK-!O xabcdefghy London, 2013 XABCDEFGHY 8rsn-+kvl-tr( 7zpp+n+pzp-' 6-+-+p+-+& 5+-+-+-+q% 4-+PzpNvL-zp$ 3+-+L+Q+P# 2PzP-+-zPP+" 1tR-+-+RmK-!O xabcdefghy 20.¤f6+ gxf6 21.Јxb7± Black’s hazardous element is the overloaded e6 square. 1.¤xe6! Black resigned foreseeing fxe6 [1...£e7 2.Ґxd5] 2.£xe6+ £f7 3.£xf7+ ¦xf7 4.Ґxd5 3.4. The number of attacks is greater than the number of defenses, but the attacks are not direct, otherwise it would be rule 2. TC with “+”. 16 Petrosian - Labib Antalya, 2013 value. Pawn by pawn, knight by bishop and so on. XABCDEFGHY 8-+-+-+-mk( 7+p+-+rzpl' 6pzp-wqr+-zp& 5+-+-+-+-% 4-zP-+P+N+$ 3zP-+n+-wQP# 2-vL-+-+-+" 1mK-tR-+-tR-!O xabcdefghy 5. Possibility of an attack The g7-square is attacked three times and defended twice: 31.¤xh6! ¦xh6 32.Ґxg7+ 1–0 Schmied – Aagaard [4] Copenhagen, 1995 XABCDEFGHY 8r+lwqkvl-tr(U 7+p+n+pzpp' 6p+-+psn-+& 5+-+-+-vL-% 4P+QsN-+-+$ 3+-sN-+-+-# 2-zP-+PzPPzP" 1tR-+-mKL+R! xabcdefghy White has hazardous elements: queen c4, knight d4, bishop g5. When a piece defends another piece which is a hazardous element, you should attack the former one: 1...¤e5 1-0 Black resigned foreseeing 2.£b3 [2.¤xe6 Ґxe6] 2...£xd4 A rook in its original position is not considered as a hazardous element as per rule 3 as long as it is shielded by a pawn along the diagonal - these are pawns b2, b7, g2, g7 4. Exchange Object that is attacked by other object of the same According to rule 5 a HE is an object which can be attacked on the next move by an object of a smaller value without sacrificing the attacking object. Rowson - Svidler London, 2013 XABCDEFGHY 8r+l+-trk+( 7zpp+n+-+p' 6-vln+p+p+& 5+N+p+qvL-% 4-+-+-+-zP$ 3+-+-+NzP-# 2PzP-+QzPL+" 1tR-+-+RmK-!O xabcdefghy In this position Black has two HEs #5: b5-d6-f5 and g5-h6-f8. White makes a draw sequentially attacking Black’s pieces. 16.¤d6 Јg4 17.Ґh6 ¦f6 18.Ґg5= 6. Pin Pinned objects are hazardous elements. Priorities: the higher the value of the pinned piece and the greater the number of attacks and defenses, the more hazardous the element. Li,Chao - Mamedov Antalya, 2013 XABCDEFGHY 8-+-+-+-+( 7+-+-+R+p' 6-+-zp-+pmk& 5+-zp-+-+-% 4-+-+R+-+$ 3+-+-sn-+P# 2P+-sN-+-+" 1+-mKLwq-+-! xabcdefghy 17 White attacks the defending piece and wins the pinned knight on e3. 39.¦f1 Јg3 40.¦f3 Јg5 41.¦exe3 +Novichkov – Aleksandrov [4] Ramenskoe, 1999 XABCDEFGHY 8-mkrwq-tr-+( 7+p+-+p+-' 6p+-+-+-zp& 5zP-zpPsnP+Q% 4-+-vl-+-+$ 3+-sN-+-vL-# 2-zP-+-+-zP" 1tR-+-+R+K!O xabcdefghy White with tempo deprives Black of a possible defense of a HE — the pinned knight on e5 and wins it: 1.f6! £d6 2. ¦ae1 ¦ce8 3. ¦f5+Masternak - Pleasants Warsaw, 2013 XABCDEFGHY 8r+-+-+ntr( 7zppmkq+psNl' 6-+nvl-+-zp& 5+-zp-+Pzp-% 4-+-+P+-+$ 3+QzP-vLN+P# 2PzP-+-+L+" 1+-+R+RmK-!O xabcdefghy 24.e5 1–0 always necessary to take into account attacks on the king, checks, combinations performed to destroy defense and other operations which can be carried out against the key piece. Cases when the king is specified as a hazardous element: 7.1 The king can be in check on the next move 7.2 The king does not have a “luft” when the first (last) rank is not evidently defended. “Evidence” of defense is a subjective value and a chess player can evaluate it as the case may be; as a rule, there is danger if there is no other piece near the king, e.g. the rook on f1 near the king on g1 and there are open ranks and files with one or more major pieces of the opponent. 7.3 One or more squares near the king are attacked 7.4 When the king is on the line of attack of a long-range piece: queen, rook or bishop including the cases when some pieces or pawns block the line of attack, it is counted as an X-ray attack, rule #13. Gusnik – Sofyin [4] Pardubice, 2003 XABCDEFGHY 8-+-+-+k+(U 7zpl+N+p+p' 6-+-+-+p+& 5+-+-+P+-% 4-+-+r+-+$ 3+P+-+-+-# 2P+-+-zP-zP" 1tR-+-+-mK-! xabcdefghy Check is a forced move, it often allows you to make worse your opponent’s position and to improve your own without losing a tempo. In the position in the diagram Black managed to do both: 1... ¦g4+ 2.¢f1 Ґa6+ 3.¢e1 ¦g1+ 0-1 7. King The king is always a hazardous element. To make records and calculations simpler, hereafter we’ll specify the king as a hazardous element only if it is opened or can be attacked. For example, in the initial position we’ll say the number of HE is zero. When calculating tactical peculiarities of a position it is 18 Stefanova – Giddins [4] Antwerp, 1997 Shulman – Sandler [4] Baldone, 1977 XABCDEFGHY 8rsn-wqkvl-tr( 7zpp+-+pzpp' 6-+-+psn-+& 5+-zpp+l+-% 4-+-zP-vL-+$ 3+-zP-zPN+-# 2PzP-+-zPPzP" 1tRN+QmKL+R!O xabcdefghy XABCDEFGHY 8r+-+-+k+( 7+-+-+pzpp' 6-+-tR-zP-+& 5+-wQ-+-+-% 4-zpP+p+-+$ 3+q+-+-+-# 2-+-+-zP-zP" 1+-+-+-mK-!O xabcdefghy This, at first glance, peaceful position which appeared after the fifth move of Black 5...e6? is followed by a fast outcome: 6.Ґxb8! ¦xb8 7. Ґb5+ ¢e7 [7...¤d7 8.¤e5 gaining a piece] 8.dxc5 +7.2. The king does not have a “luft” when the first (last) rank is not evidently defended. Varley - Jianu Warsaw, 2013 XABCDEFGHY 8-+-tr-+k+(U 7+psNrvlpzpp' 6-+l+psn-+& 5+-+-vL-+-% 4-wq-+-+-+$ 3+-+L+-+-# 2-+-+QzPPzP" 1+R+R+-mK-! xabcdefghy In order to use the weakness of the first horizontal Black hits HE #3 26...¦xd3 0–1 The king g8 is a hazardous element here, 1.£a5! ¦f8 2.£g5 1-0 7.3. One or more squares near the king are attacked Nicevski – Ljubojevic Novi Sad, 1975 XABCDEFGHY 8r+l+kvl-tr( 7+pwqn+pzp-' 6p+-zpp+-zp& 5+-+-+-vL-% 4-+-sNP+-+$ 3+-sN-+-+-# 2PzPP+-zPPzP" 1tR-+QtR-mK-!O xabcdefghy The black king is a hazardous element considering attacked squares e7 and d8. 1.¤xe6 fxe6? [1...£b8 2.¤xf8 hxg5 3.¤xd7+-] 2.£h5+ 7.4. When the king is on the line of attack of a long-range piece: queen, rook or bishop including the cases when some pieces or pawns block the line of attack, it is counted as an X-ray attack, rule #13. 19 Polushkina – Krush [4] Szeged, 1994 XABCDEFGHY 8r+l+-trk+( 7+-+nwq-zpp' 6p+-snp+-+& 5+p+-+p+-% 4-zP-+-+-+$ 3+QsN-zPN+-# 2P+-+-zPPzP" 1+LtR-+RmK-!O xabcdefghy Black’s hazardous element is confrontation b3-g8. You should also include the rook a8 in the list of critical hazardous elements here — according to rule 3. 1.¤d5! exd5 [In the game it was 1...£f7 2.¤g5 £h5 3.¤xe6+-] 2.£xd5+ ¢h8 3.£xa8+Botvinnik - Flohr Moscow, 1936 XABCDEFGHY 8q+-+r+-+( 7+p+r+kzpp' 6-+pzPp+-+& 5+-zP-+p+-% 4PtR-zP-+-+$ 3+-+-tR-zP-# 2-+-+Q+KzP" 1+-+-+-+-!O xabcdefghy At first glance, the location of the white king and the black queen on the same diagonal is not hazardous as there are two black pawns on the diagonal, besides these pawns are blocked. 45. Botvinnik also places the queen on the same diagonal where the black king is in order to break down the opponent’s resistance on next moves by pressing on e6, but he meets a counterattack 45...b5! And it’s not allowed to capture on b5 because it will be followed by a capture in return with a check. However, the advantage of White was enough for the victory after 46.Јc2 In the position in the diagram it would have been better to preliminary remove the hazardous element by moving 45.Ўg1, preparing the queen’s attack on c4. 8. Passed pawn Priorities: the closer to the promotion square, the more hazardous the element. 8.1 An enemy pawn one or two squares before the promotion square Movsesian – Bacrot [4] Sarajevo, 2000 XABCDEFGHY 8-+-+-+-+(U 7+-+-+-+-' 6p+-+-+pmk& 5zPr+-+-+p% 4-+-+-+-+$ 3zp-+K+-+P# 2-+psN-+-+" 1tR-+-+-+-! xabcdefghy White’s hazardous elements are a3 and c2. 1... ¦b1! white resigned foreseeing [2.¦xb1 cxb1£+ 3.¤xb1 a2] 2...c1£ 2.¤xb1 Kotronias - Stupak Warsaw, 2013 XABCDEFGHY 8r+-+-vl-tr( 7zpp+-+-zpp' 6P+-+kzp-+& 5+-+l+-+-% 4-+-+-vL-+$ 3+-+-+-+-# 2-zPP+-zPPzP" 1tR-+R+-mK-!O xabcdefghy The pawn on a6 is in two moves away from the queening square. White attacks a piece which defends b7. On d5 and b7 we see HE No3 with TC=1. HE #3 is often used as a preparation for the combinations where other motives are in action. 20 21.¦xd5! ўxd5 22.axb7 Ґc5 23.bxa8Ј+± 8.2 Pawns can become passed. This is one of the most complicated rules for calculation, because it is not always easy to determine if a pawn can be a passer or not. Anyway, in combinations where this rule can be applied there are almost always other HE involved, and this makes tactical calculation simpler. Nakamura - Kramnik Antalya, 2013 XABCDEFGHY 8-+-+-+k+( 7+-+N+-zp-' 6-zp-+pzp-+& 5+P+-+-+p% 4p+-+-zP-zP$ 3+-+-+-zP-# 2-+-+PmK-+" 1+-+-+-+-!O xabcdefghy At first glance the knight has no time to stop the pawn on a4, but the pawn on b5 comes to help. Should an opportunity arise, it is ready to move to b8 with a check. 40.¤c5! a3 [40...bxc5 41.b6+-] 41.¤b3 a2 42.ўe3 +Jones - Polgar London, 2013 XABCDEFGHY 8-+-+-+-+( 7+-+-+-mk-' 6-+-+p+-+& 5+P+-+-zp-% 4R+-zpl+-zp$ 3+-+-+-+-# 2-+-+K+-+" 1+-+-+-+-!O xabcdefghy After 63.¦xd4? the games ended very soon: 63...h3 64.¦xe4 h2-+ By the way, White could escape by promoting his pawn to a queen. E.g.: 1.b6! h3 2.¦a7+ ¢g6 3.b7 h2 4.b8£ h1£ with an equal position. Kropp – Kunas [4] FRG, 1984 ABCDEFGHY 8-+-+-+-+(U 7+-+-+-+-' 6-+-+-+-+& 5+-+-+p+p% 4-+-+-+-+$ 3+-+-+-zP-# 2-+-+K+kzP" 1+-+-+-+-! xabcdefghy The pawn on f4 can become a passer and is a hazardous element. White also has two other HE: h2 and g3, and he loses because Black attacks these HE making a passed pawn: 1...h4! White resigned [The draw could be held by 1...¢xh2? 2.¢f2 ¢h3 3.¢f3 h4 4.gxh4 ¢xh4 5.¢f4=] 2.gxh4 f4 3.h5 f3+ 4.¢e3 f2-+ Meessen – Cekro [4] Belgium, 2005 XABCDEFGHY 8-+-+-+-mk(U 7+-+n+-+p' 6-sN-zp-+-+& 5+P+Pzp-+P% 4-+P+Pzp-wq$ 3+K+-+P+-# 2-+-+-+-+" 1+-+-+-wQ-! xabcdefghy Here the pawn on f4 can become a passer. Another important HE which resulted in Black’s advantage is the knight on b6: 1...£g3 2.£f1 [2.£xg3 ¤c5+ 3.¢b4 fxg3–+] 2...¤xb6 3.¢b4 £h2 –+ 9. Intrusion squares Hazardous elements are intrusion squares. An intrusion 21 square is a square in the disposition of forces of the defending side where an enemy piece or pawn can penetrate. An attack and defense of the intrusion square are calculated in the same way as an attack and defense of an object. For instance, an intrusion square will be considered a hazardous element also in the case if there is a piece or a pawn of the attacking side between the attacking piece and the intrusion square. If this square is crucial, for example, there is a threat of intrusion into the last or the last but one rank and especially a checkmate threat on the last rank, the equal number of defenses and attacks will be considered a hazardous element. Should the intrusion squares on the 3rd and 4th ranks be taken into account? That’s an open question. If the number of hazardous elements is not great and you have time, it is better to count them, because such intrusion squares can be of significant positional importance. If you do not count these HE, this will not result in a combination blunder, but that can cause positional errors. If there are a lot of intrusion squares, the detailed calculation can be often neglected for the optimization of thinking. Priorities: the most hazardous squares are usually those on the last and the last but one rank. Dominguez - So Wijk aan Zee, 2014 XABCDEFGHY 8r+-wqr+k+( 7zpl+-+pvl-' 6-zp-+-+p+& 5+-zpp+-zP-% 4-+-+-wQ-+$ 3+-zPL+N+-# 2PzPP+-zP-+" 1+-mKR+-+R!O xabcdefghy There are intrusions squares near the Black’s king: f7, h7, h8 are HEs No9. White’s rook moves to one of them 19. ¦h7! Getting to h7, White threatens to take on f7 if the sacrifice would be accepted. [19...¢xh7 20.£xf7; 19...c4 20.£h4 cxd3 On g7 there are HEs No9 and No3 21.¦xg7+ ¢xg7 22.£h6+ ¢g8 23.¦h1 f6 24.£xg6+ ¢f8 25.¦h7+–] 19...d4 20.Ґc4! £e7 [20...Ґxf3 21.¦xg7+ ¢xg7 22.£xf7+ ¢h8 23.£xg6 ¦e7 24.£f6+ ¦g7 25.£xf3 £xg5+ 26.¢b1 ¦e8 27.Ґb5! ¦d8 28.Ґd3±] 21.£h4! [1–0] Black resigns due to 21...Ґxf3 22.¦xg7+ ¢xg7 23.£h6+ ¢g8 24.£xg6+ ¢f8 25.£h6+ ¢g8 26.g6 Godena - Morozevich Warsaw, 2013 XABCDEFGHY 8-tr-+-+k+(U 7zp-+-+p+-' 6-+-zp-+pzp& 5+-+-+-+-% 4q+Pvl-+-+$ 3sN-+-+-+-# 2Q+RvL-zPPzP" 1+-+-+-mK-! xabcdefghy White’s intrusions squares are b2, b3, d1. On b2 we see two attacks and two defenses, on d1 it is not defended and attacked through the rook. These HEs are threateningly used by Black. 29...¦b2 30.Јa1 [30.¦xb2 Јd1+ with a checkmate] 30...¦xc2 31.Јxd4 Јxa3 32.h3 Јb2 0–1 Duras - Spielmann Vienna, 1907 XABCDEFGHY 8-+k+r+-+( 7+-zp-+pzp-' 6-sn-+-+-+& 5sN-wq-+-zPp% 4Psn-+-+-+$ 3+-+-vL-+-# 2-+-+QzP-zP" 1+K+R+-+-!O xabcdefghy Black’s intrusion squares are a6, b7, d7 and d8 – the squares under attack near the king are hazardous elements even if the number of defenses exceeds the number of attacks. White wins playing on the intrusion squares d8 and b7 22 1.¦d8+! ¦xd8 [1...ўxd8 2.¤b7+ ўc8 3.¤xc5] 2.Ґxc5 1-0 Flohr - Thomas London, 1932 XABCDEFGHY 8r+-+q+-mk( 7+-+-+nzp-' 6-+ptr-zp-zp& 5zp-+p+-+-% 4Pzp-zP-sNPzP$ 3+-+QzP-+-# 2-zPR+-zP-+" 1mK-tR-+-+-!O xabcdefghy White uses HE – the intrusion square g6, starting from the attack on the HE c6, calculated according to rule 3. 1.¦xc6! ¦xc6 2.¦xc6 and it’s not allowed 2...Јxc6 because of 3.¤g6+ ўg8 4.¤e7+ +Arhipkin - Prodanov Albana, 1977 XABCDEFGHY 8-+-+rtrk+( 7zp-zpl+pzp-' 6-zpnwq-+-zp& 5+-+LzpPsN-% 4-+-+Q+-+$ 3+-zPP+-zP-# 2P+P+-+-zP" 1tR-+-+RmK-!O xabcdefghy Hazardous elements are intrusion squares on h7 and g6 1.f6! hxg5 2.£g6 1-0 10. Limited mobility of a piece This rule is not applied for pieces reliably protected, usually on the last or the last but one rank, “at home” so to say. Priorities: the smaller the number of possible moves, the more hazardous the element. 10.1. A piece that does not have any free moves or has only one possible move. Such pieces can be often attacked by pawns or mated by enemy pieces. Morphy - Arnous de Riviere Paris, 1863 XABCDEFGHY 8r+-snk+-tr( 7+pzpn+p+-' 6-vl-zpq+pzp& 5zp-+Nzp-+-% 4P+-zPP+-+$ 3+-zP-+N+P# 2-zP-+-zPP+" 1tR-vLQtR-mK-!O xabcdefghy It seems the black queen is not under threat, but it has no moves. White uses it to his advantage by smartly sacrificing the bishop 1.Ґxh6!+- and it’s not allowed 1...¦xh6 2.¤g5 and the queen is captured. Grachev – Korolev [4] Serpukhov, 2000 XABCDEFGHY 8r+-+-+k+( 7zp-tr-+pvlp' 6-zp-+p+p+& 5+-+-zP-vLq% 4-+-zP-+-+$ 3+-+-+-tR-# 2PzP-wQ-zP-zP" 1+-+-+-tRK!O xabcdefghy In the diagram this point is the queen on h5, which is a hazardous element as per rule 5. 1.£d3! Ґh6 2. ¦h3 £xg5 3. ¦xg5+23 10.2. A bishop or the queen which can move in one direction only Kuzmina – Orlova [4] St Petersburg, 1997 XABCDEFGHY 8-trlwqkvl-r(U 7+-zp-snpzpp' 6p+-zp-+-+& 5+p+L+-+-% 4-+-wQP+-+$ 3+-+-+-+-# 2PzPP+-zPPzP" 1tRNvL-+RmK-! xabcdefghy The bishop on d5 can move only to b3, another important hazardous element is the queen on d4 as per rule 5. 1...c6 2.£a7 [2.Ґb3 c5 3.£c3 c4] 2... ¦b7 3.£xa6 cxd5 -+ Biriukov - Novikov Bogoroditsk, 2011 XABCDEFGHY 8r+-+-trk+( 7+-+-vlqzp-' 6l+-zp-zp-zp& 5zp-zpPzp-+-% 4-+-+P+-sn$ 3+PsN-vL-z+P# 2P+QsN-zPP+" 1+-tRR+-mK-!O xabcdefghy In this case the pieces with limited mobility are the bishop on e3 and the knight on h4. Though the bishop on e7 is limited, it cannot be attacked and is not a HE. White attacked Black’s HE at once. 1. g3? 1...f5! Using the HE on e3, Black leaves the knight under attack and starts a strong attack. 2.Ґxc5 [Other variants did not save the situation 2. ¢h1 f4 3.Ґxc5 dxc5 4.gxh4 f3 5.¦g1 Ґxh4 6.¤f1 Ґg5 7.¦xg5 hxg5 8.¤g3 £f4 9.¤f5 g4 10.hxg4 £xg4 -+ или 2.gxh4 f4 3.Ґxc5 f3 4.¤f1 dxc5 5.¤e3 Ґxh4 6.d6 Ґe2 7.¤g4 Ґxd1 8.£xd1 Ґg5 9.¦c2 £e6 10.£d5 £xd5 11.¤xd5 -0.84] 2...dxc5 3.gxh4 Ґxh4 4.exf5 £h5 5.d6 ¦xf5 XABCDEFGHY 8r+-+-+k+( 7+-+-+-zp-' 6l+-zP-+-zp& 5zp-zp-zpr+q% 4-+-+-+-vl$ 3+PsN-+-+P# 2P+QsN-zP-+" 1+-tRR+-mK-!O xabcdefghy 6.¤ce4 ¦af8 7.£xc5 Ґxf2+ 8.¤xf2 ¦xf2 9.£xf2 ¦xf2 10. ¢xf2 £e2+ 11. ¢g3 Ґb7 0-1 11. “Presumptuous” objects A hazardous element is a pawn or a piece which is far in the enemy’s camp and can be cut off and attacked. Nepomniachtchi - Kryvoruchko Antalya, 2013 XABCDEFGHY 8-+-tr-+k+( 7+p+-+pzp-' 6p+-zpr+-zp& 5+-+R+-+-% 4-zP-+P+-zP$ 3zP-+R+PzP-# 2-+-wQ-+K+" 1wq-+-+-+-!O xabcdefghy Russia vs Ukraine. This was the final match of World Team Championship 2013. The three other games 24 ended in a draw, so the winner of this game would also bring a victory to his team. In the 40th move a new Ukrainian champion carelessly moved the queen to White’s camp. 40..Јf6-a1. 41. ¦c3! ¦de8 42.Јc2 and Black resigned because there is no defense from 43.¦d1 and the queen is caught. 12. Intruding enemy piece Priorities: intrusion of a rook into the last but one rank and intrusion of a knight into the 3rd (6th) rank are the most hazardous. Alekhine - Lasker Zuerich, 1934 The main hazardous element of Black is–d1-d5. Owing XABCDEFGHY 8-+-tr-trn+( 7zpp+n+-mkp' 6-wqpsN-zpp+& 5+-+-+-wQ-% 4-+-+P+-+$ 3+L+R+-+-# 2PzP-+-zPPzP" 1+-tR-+-mK-!O xabcdefghy The knight on d6 is in strong position and is a hazardous element for Black. 1.¤f5+ ўh8 2.Јxg6 4.¦xh6# hxg6 3.¦h3+ ¤h6 13. X-ray Location of the king or the queen on the line of attack of a long-range piece: a rook or a bishop; and also location of a rook on the line of attack of a bishop. The hazardous element is counted even if some pieces and pawns block the line of attack. Priorities: the higher the value of the piece under Xray attack, the more hazardous the element. Lasker,Ed - Tartakower New York , 1924 XABCDEFGHY 8r+-+-trk+( 7+l+-+pzpp' 6p+-vlpsn-+& 5+-+q+-+-% 4Pzp-sN-+-+$ 3+-+LzPP+-# 2-zP-+Q+PzP" 1tR-vLR+-mK-!O xabcdefghy to it, White gains the pawn. 1.¤b3! Revealing a line for a discovered attack. If Black captures the knight, the queen will be captured: 1...Јxb3? 2.Ґc4 1...Јh5 [1...Јc6 2.¤a5 Јc7 3.¤xb7 Јxb7 4.Ґxh7+ ¤xh7 5.¦xd6; 1...Јe5 2.f4 Јh5 3.Јxh5 ¤xh5 4.Ґxh7+ ўxh7 5.¦xd6;] 2.Ґxh7+ Јxh7 3.¦xd6 +Teriblom – Valbom [4] Sweden, 1972 XABCDEFGHY 8r+-+-trk+( 7zpq+-+pzp-' 6nzp-+p+-zp& 5+-+-+-+-% 4-zP-+l+-+$ 3zP-tR-+NzP-# 2-+Q+PzPLzP" 1+-tR-+-mK-!O xabcdefghy Black’s hazardous elements according to this rule: g2b7, g2-a8. White takes advantage of it in the following way: 1.¤g5! Ґxc2 2.Ґxb7 Ґa4 [2...hxg5 3.¦3xc2+-] 3.Ґxa8 hxg5 4.Ґb7 +- 25 14. -hazardous HE Priorities: the less number of moves the piece needs to attack, the more hazardous the element. 14.1 Pawn-hazardous pieces A hazardous element is pawn-hazardous pieces, if an enemy pawn can attack them in one or two moves. Baramidze - Akobian Antalya, 2013 XABCDEFGHY 8-tr-wqkvl-tr( 7zpp+-zppzpp' 6-+nzpl+-+& 5+-+-+-+-% 4-+-zP-+-+$ 3+QzP-+N+-# 2P+-+-zPPzP" 1tR-vL-mKL+R!O xabcdefghy The hazardous element on c6-e6 is transformed into a HE as per rule 1.1. – the king that can be placed in check: 1.d5! ¤a5 [1...Ґg4 2.dxc6 Ґxf3 3.gxf3 bxc6 4.£a4+-] 2.dxe6! ¤xb3 3.Ґb5+, +Gruenfeld – Johner Debrecen, 1925 XABCDEFGHY 8-+-+-+-+( 7+n+-+-+-' 6-+-+n+-+& 5zp-zpk+r+p% 4-+-+RzP-zP$ 3+PvL-zPKzP-# 2P+-+-+-+" 1+-+-+-+-!O xabcdefghy Black has the king and rook in the pawn-hazardous position: d5-f5. White takes advantage of it attacking another hazardous element the pawn on a5 1.Ґxa5! [worse 1.¦a4 ¦f8 2.Ґxa5 ¦a8 3.Ґc3 ¦xa4] 1...¤xa5 2.¦a4 Gaining a pawn considering a threat of attack on the HE d5-f5, for example by moving to е4 2...¤d4+ [2...¦f8 3.¦xa5] 3.exd4 ¤c6 4.dxc5 ўxc5 5.g4 hxg4+ 6.ўxg4 +Kikovich – Forintos [4] Budapest, 1957 XABCDEFGHY 8r+lmkn+-sn( 7zpp+-+p+-' 6-+-zP-+-zp& 5+-+-+-+-% 4-+-+-+-+$ 3+-+-+L+-# 2PzP-+-zPPzP" 1+-tR-tR-mK-!O xabcdefghy White takes advantage of the pawn-hazard c8-e8 and other Black’s HE. 1.¦xc8+! ¦xc8 2.d7 ўxd7 3.Ґg4+ ўc7 4.Ґxc8 1-0 14.2 Knight-hazardous major pieces A hazardous element is two major pieces and the king which are in knight-hazardous position relative to each other. The hazardous element is not counted if the opponent does not have a knight and it is not possible to promote a passed pawn to a knight in one or two moves. To decrease the number of hazardous elements for calculation we take into account only that knighthazardous position of pieces which can be attacked in two moves by an enemy knight, without taking into account the mutual arrangement of other pieces and pawns of both sides. For instance, in the original position we do not take into account knight-hazard of the rook a1 and the king e1, but when the black knight appears on c6 this hazardous element should be calculated with due regard to the following condition: To make it simpler in opening positions the hazardous element a1-e1 (a8-e8) and d1-h1 (d8-h8) should be calculated only in the following cases: a. when a knight directly attacks point c2 (c7) or f2 (f7), b. if points c2(c7) or f2 (f7) are insufficiently protected, i.e. they are hazardous elements according to rule 2,3 and 4. Spielmann – Dekker Boossum, 1934 26 XABCDEFGHY 8r+l+-tr-+( 7zpp+nmkpwQ-' 6-wqn+p+-+& 5+-+pzP-sN-% 4-vl-zP-+-+$ 3+-+-+-+-# 2PzP-+NzPPzP" 1tR-vL-+K+R!O xabcdefghy Black has the queen in the knight-hazardous position: b6-e7, this allows White to gain it. 1.¤xe6! ўxe6 [1...¦e8 2.Ґg5+ ўxe6 3.¤f4+ ўf5 4.Јh7+ ўxg5 5.¤h3+ ўg4 6.f3#; 1...ўe8 2.¤xf8] 2.¤f4+ ўe7 [2...ўf5 3.Јh7+ ўg5 4.Јh5#] 3.¤xd5+ ўe8 4.¤xb6 (1.a3? Фa6) 1-0 In the position mentioned above the black king e7 and rook f8 are also in the knight-hazardous position. 14.3 Bishop-hazardous major pieces A hazardous element is two major pieces and the king placed on the line of sight diagonally. If they cannot be attacked on this diagonal, the hazardous element is not counted; most often it happens when your opponent does not have a bishop of the color of the diagonal. Olisov - Abdurahmanov Uljanovsk, 2009 XABCDEFGHY 8r+-+kvlntr( 7zpp+qzpp+p' 6-+n+-+p+& 5+-+-+-+-% 4-+-zP-+l+$ 3+-sN-+N+-# 2PzP-+LzPPzP" 1tR-vLQmK-+R!O xabcdefghy XABCDEFGHY 8-+-tr-+k+( 7+pwq-+pvlp' 6p+-+p+p+& 5sn-+-zP-+-% 4-+p+-zP-+$ 3+-zP-vLL+P# 2PzP-+Q+P+" 1+-+-+RmK-!O xabcdefghy White uses the HE on 7-d8 my moving 1.Јf2 and won the exchange. 14.4 Rook-hazardous position of the queen and the king. It is counted only if the king and the queen are on the line of sight on the same rank or file without objects that separate them. Rook-hazard is not counted: - if there is a friendly rook on the line of the queen and the king - in the original position. 15. Major pieces shifted more than three ranks relative to their initial position Major pieces are hazardous elements if they are shifted further than the 3rd rank relative to their initial position, when on the chessboard there are pieces of smaller value which can attack them. For White this means location of major pieces on 4th to 8th ranks, for Black – 5th to 1st. Location of major pieces on these ranks is considered a hazardous element for practical reasons. There is no doubt that the queen can be attacked on the three “home” ranks, but the combinations which appear in such cases are always connected with other HE. So, in order to minimize the number of HE for calculation, we use this formal division – from 4th to 8th rank for White and from 5th to 1st rank for Black. In Black’s position a hazardous element is the location of the king and the queen d7-e8. 1.d5 Ґxf3 2.gxf3 Ґg7 3.dxc6+Chess Genius – Chuzhakin 2012 27 Galliamova – Kobalia [4] Samara, 2000 Noeckler – Kirschner [4] Augsburg, 1995 XABCDEFGHY 8-+-tr-+-mk( 7sn-tr-+-zp-' 6-zplzpLzp-zp& 5+-wq-zpN+-% 4p+P+P+-+$ 3zP-tR-+-+P# 2-zPQ+-zPP+" 1+-+R+-mK-!O xabcdefghy XABCDEFGHY 8-+-+-+k+( 7zppzp-+-zp-' 6-+-zp-+P+& 5+-snP+ntR-% 4-+r+-+-+$ 3mK-+-+-+-# 2P+-+-tr-+" 1+-+-+-+R!O xabcdefghy The black queen is too far in the enemy’s camp and is under attack: All White’s pawns are blocked, the king has no moves and there are only two pieces left. 1. ¦h8+! ¢xh8 2. ¦h5+ ¤h6 3. ¦xh6+ gxh6 4.g7+ ¢h7 5.g8£+ ¢xg8 Stalemate 1. ¦d5! Ґxd5 2.cxd5 £xc3 3.bxc3+Alieva – Yudasina [4] Schekino, 1985 17. Possibility of Zugzwang XABCDEFGHY 8r+-+-+k+(U 7+-+-zpp+p' 6-+-zp-vLpwQ& 5+l+P+PsN-% 4-+-+P+-+$ 3+-+p+-zPK# 2q+-+-+-zP" 1+-+-tr-+-! xabcdefghy A small number of possible moves cause the danger of zugzwang. Endgame HE White has a strong attack, but Black is to move, and he uses the advanced and unprotected position of the queen on h6 to his advantage: 1...£xh2+! 2.¢xh2 ¦a2+ White resigned foreseeing 3.¢h3 ¦h1+ 4.¢g4 ¦xh6 16. Possibility of stalemate If your opponent has not more than two pieces that can be moved, if his king is limited in moves and if he has not more than one unblocked pawn, you should consider a hazardous element – possibility of stalemate. Endgame HE Reinderman – Sokolov [4] Wijk aan Zee, 1999 XABCDEFGHY 8-+-+-+-+( 7+-+-+-+-' 6-+-+-+-+& 5+-+-+-+-% 4-+-+-+-+$ 3+-+-+-+-# 2p+-mK-+-+" 1mkq+-wQ-+-!O xabcdefghy Black can only move the king to b2 and the queen to d1, which is a hazardous element – a possibility of zugzwang. By making his move White puts Black in zugzwang. 1.£c1 £xc1+ 2.¢xc1= 28 18. Possibility of theoretical draw If the number of pieces and pawns is small and they are arranged in a special way it is possible to make sacrifices to pass on to a theoretical draw. Calculation of HE requires knowledge of typical draw positions. Endgame HE 29 Chapter 5. Notation of Hazardous Elements, Rules in Brief, Tables Let’s see once again all calculation rules for hazardous elements in short. Each rule has been numbered for your convenience. When calculating hazardous elements, it’s convenient to have a list of all calculation rules at hand. The simplified form of the rules is given below, and also in the appendix at the very end of the book. This was made for your convenience when reading next chapters of the book. Brief Rules for Calculation of HE No Description 1 Material advantage of your opponent Object under attack Object defended and attacked the same number of times or neither defended nor attacked 2 3 4 5 Inner priority Crucial Crucial The greater the number of attacks and defenses, the more hazardous the element. Tension coefficient (TC) is the number of attacks and defenses, if the number is equal, or attacks minus defenses with “+”. 6 Exchange Possibility of an attack made by an object of smaller value Pin 7 King 8 Passed pawn the closer to the promotion square, the more hazardous 9 Intrusion squares 10 Limited mobility 11 Presumptuous piece the most hazardous squares are usually those on the last and the last but one rank the smaller the number of possible moves, the more hazardous the higher the value of the piece, the more hazardous 12 Intruding enemy piece 13 X-rays 14 15 16 17 -hazardous HE General priority Important when: TC with “+”, TC > 0 Important Important the higher the value of the pinned piece, the more hazardous Important Mating threat is a crucial HE. Important when: 7.1. The king is in check 7.2. The last rank is weak, possibility of an attack Important when: There is a pawn near the promotion square Important: At the discretion of the chess player Important when: An attack on a piece with limited mobility Important Important when: An attack on a piece with limited mobility the higher the value of the piece under X-ray attack, the more hazardous the less number of moves the piece needs to attack, the more hazardous Important Important: At the discretion of the chess player Major pieces shifted more than three ranks relative to their initial position Possibility of stalemate Possibility of Zugzwang End-game End-game 30 18 Possibility of theoretical draw During the game you should pay a special attention to new HE which appeared after the last move and to those which will appear after a possible move. You should also monitor previous HE whose priority has got higher and in whose structure there have been changes. The hierarchy specified in the table is conditional. It shows what HE have influence on the result of the game statistically more often. But from time to time all HE can become the cause of a victory and defeat. That is, do not think if in a certain position there are three HE of different types, the most important will be the one which is higher in the table, this is not true. Priority calculation is more complicated than the calculation of HE and is a certain complication of the system for improving its efficiency. At the first stage of studying you can take into account all HE as equal. In this case in debut positions and in the positional play you can take into account all hazardous elements. The problem appears in sharp tactic positions and end-game where the number of HE gets bigger and a problem of choice appears - what should you pay attention to first of all? At the first stage this choice is made intuitively. Calculation and working with priorities is the second stage of studying the methods. Priority calculation algorithms let you see the comparative value of hazardous elements and use this information both in the positional maneuvering and in the search for tactics. Using priorities allow you to use the technique in the end-game where the number of HE gets significantly bigger – especially according rules 3 and 9. In the end-game the majority of pieces and pawns are often not protected and are HE according to rule 3, but at the same time they are not attacked that is they have a zero tension coefficient. When there are no queens this is not so dangerous, and in the end-game HE No3 can be taken into account only for a tension coefficient > 0. Intrusion squares are not taken into account in the end-game either, if there are a lot of them. This approach to the technique allows you to use it in the end-game, the defense from blunders becomes worse, and in some cases the technique will miss simple double attacks. Appearance of a great number of HE in the end-game and methods to overcome this problem are an important direction of development of this technique in future. A separate issue is sharp tactic positions. On the one hand, there are usually a great number of HE in them, on the other, the relative importance of different HE often appears when calculating long variants which in beyond the scope of this technique. It is strange but the issues of chess player’s thinking process are almost not disclosed in literature. The work of A. Kotov “Chess Player Thinking Secrets” describes the algorithm of calculation of "variants tree" where the choice of possible moves is made by a chess player intuitively. In the work by D. Nann with a similar title "Secrets of Practical Chess" certain advice about choosing a possible move for some types of positions is given. But still the issue of chess player’s thinking process in the area of search for possible moves can be considered totally undisclosed. Using HE as guides when calculating long combinations and certain advice and calculation algorithms depending on different types of HE and their pins – all these are prospective methods for developing this technique in future. 31 Notation of Hazardous Elements To write down hazardous elements it’s convenient to use the following form: W: White’s hazardous elements B: Black’s hazardous elements Usually we list HE in a position from left to right, bottom-up. HE are written down by specifying the square or a set of squares which are included in the HE. A rule for calculation of the HE is raised to the power. Crucial HE can be written in bold. If a HE is calculated according to several rules simultaneously, all the rules or the most important rules are raised to the power. Let’s see an example. Botvinnik - Sharov 1928 XABCDEFGHY 8-trl+-snk+( 7zp-tr-wqpzpp' 6-+-+p+-+& 5+-zP-+-+-% 4-+-+L+N+$ 3zP-+-+-wQ-# 2-+-+-zPPzP" 1tR-+-tR-mK-!O xabcdefghy Б: с52, e4-g414, b29 Ч:b83, c73, c7-e714, f64, g3-g813, g73, g87, h69, h79 White has great advantage in the number of hazardous elements. Besides, he has two crucial HE, that’s why they have to take certain actions. Knight-hazard of major pieces as per rule 10 is given here for the pieces c7-e7, because they can be attacked by the knight in two moves, whereas the knight-hazardous elements b8c7, a1-e1 and g1-g3cannot be attacked in two moves, that’s why they are not shown in the list. White has no dark-squared bishop and that devaluates the bishophazard b8-c7 according to rule14. White uses the HE on c7, f6, g7 and g3-g8, deflecting the queen on e7 twice from protection of the HE on c7, which allows making a double attack: 1.¤f6+! ¢h8 2.¤e8 £xe8 3.£xc7 1-0 32 Chapter 6. How to Use Hazardous Elements If there are HE, this is not a guarantee of tactical possibilities. However, if there are a lot of HE, certain tactical elements appear, and even if they are not correct, it’s necessary to calculate them. First of all you should search for a possibility to attack the hazardous elements - extra attacks or captures. time. In the theory of hazardous elements this is taken into account already in the title. The term “hazardous” does not mean any available action, hazard means a possibility of action. That is why calculation of HE is not a waste of time. It’s like a mine detector which helps you find bombs on the chessboard. Many of these bombs are not equipped with a fuse and cannot be exploded at once, but still when you keep the field on the chessboard it’s very useful to know where the bombs are. Logical Sense of Hazardous Elements Let’s see some examples Logical or physical essence of hazardous elements is the possibility to make your opponent get busy with certain tactical problems or it can be called tempo or chess time gaining in another way. E.g. if a piece is attacked in one move, it can be defended in one move. If two pieces are attacked in one move, it’s often not possible to defend them both in one move, and one of them is lost. Double attack is the simplest case which shows the gist of hazardous elements: if there are two unprotected pieces, one of them is lost in a double attack because of the lack of time to protect both pieces. Another case is a simultaneous attack on a piece and a check. In this case it’s enough to have one unprotected piece as it’s necessary to protect yourself from the check first of all – these are the chess rules. Check is a forced move – a move with tempo, with time gaining. A similar situation can appear with an advanced position of the queen, it can be attacked almost always and with tempo. In this case the attacking side, attacking the queen, makes certain changes on the board, and the opponent will defend from the attack on the queen. This means that if the attack on the queen is followed by another threat, e.g. a threat to occupy an intrusion square, it will be more difficult to defend from the second threat as first of all it’s necessary to move the queen from under the attack. Protection of hazardous elements often causes formation of new hazardous elements – we will see this issue below, in the chapter “Transformation of Hazardous Elements”. As a result- a tempo game against some HE allow you to play with tempo against other HE. You can consider availability of HE as a button. If you press it, your opponent will be made to defend his pieces. If you press two buttons simultaneously, or if defense from some buttons or some order of pressing the buttons has not been made up, this will result in the advantage of the attacking side. Pressure on HE is a kind of initiative and can be considered advantage. So calculation of hazardous elements is a mathematical calculation of key position buttons, buttons which objectively exist. You can only guess why such theories were not proposed before. I think the reason can be that the many HE are in the sleep, latent mode and they do not affect the position, so this means that calculating them can be a waste of Euwe - Alekhine Zurich , 1934 XABCDEFGHY 8r+l+-trk+(U 7+pzp-snpzpp' 6p+-wq-sn-+& 5+-+p+-+-% 4-+-zP-+-+$ 3zP-sNLzP-+-# 2-zPQ+NzPPzP" 1tR-+-mK-+R! xabcdefghy W: g23, h23 B: c73, d6-f614.1, h73,9 Black has a lot of possible moves, e.g. he can remove the HE on h73 by moving 11. ...h6. Instead of that Black made the following move: 11.... b6? Creating for him a new HE on a83. As Euwe specifies White could have made use of Black’s tactical weakness and won by moving: 12.e4!making a threat 13. e5 attacking the pawnhazardous pieces d6-f6 12...dxe4 13.¤xe4 ¤xe4 14.Ґxe4 ¤d5 15.Ґxh7+with an extra pawn Or 12.e4 ¤d7 13.exd5 h6 14.¤e4 and Black loses due to the weakness on c7. Euwe didn’t notice a combination on the board, he played 12.b4 and won anyway! What can a cold-blooded computer say about this? 12.e4 ¤d7 13.exd5? ¤f6! and Black holds out. But White can play positionally – capture the center and start attacking the king: 13.0–0 Ґb7 14.e5 £h6 15.f4 33 XABCDEFGHY 8r+-+-trk+(U 7+lzpnsnpzpp' 6pzp-+-+-wq& 5+-+pzP-+-% 4-+-zP-zP-+$ 3zP-sNL+-+-# 2-zPQ+N+PzP" 1tR-+-+RmK-! xabcdefghy now the threat to move the rook f1-f3-h3 gives a good material advantage for White. The greatest chess players of the world couldn’t notice this combination whereas the Hazardous Elements Theory clearly shows the direction of the attack here. An accurate calculation of combination is a different matter. This subject is beyond the system we offer, and here we can recommend a method of calculating a variant tree which was given by Kotov. edition of the book: Sakharov – Barsukov StPetersburg, 2012 XABCDEFGHY 8-+-tr-trk+( 7zpp+lwqpzp-' 6-+p+-+-zp& 5+-+-+-+-% 4-+-+-+-+$ 3zP-+LzP-+-# 2-zPQtR-zPPzP" 1+-+R+-mK-!O xabcdefghy W: a33, e33 B: a73, b73, d73, d83, e73, g87, h79 The position is interesting because White uses all Black’s HEs one after another, meanwhile new HEs almost do not appear. Karpov – Kortcshnoi Zurich (blitz), 2006 1.Јa4 attacking the HE on a7. XABCDEFGHY 8-tr-+-trk+( 7+-+-+-zp-' 6-+-zp-+qzp& 5zp-zpPzp-+-% 4PsnP+R+-+$ 3+-+-+PvL-# 2-tR-+-+PzP" 1+-+Q+-+K!O xabcdefghy 1...a6 Or 1...Ґe6 By scarifying the pawn, Black can break into the b3 HE, creating a HE on d3 and d2. This allows him to make the game more complicated though his position is lost anyway. 2.Јxa7 Ґb3 3.¦c1 ¦d7 4.Јb6 attacking the b3 HE to get rid of the pin on d3. 4...Ґe6 5.¦dd1 ¦fd8 6.Ґe2 After neutralizing the HE on d2 and d3, White has an extra pawn. 2.Јe4 Double attack on HE on e7 and h7 / g8. 2...Јxe4 3.Ґxe4 Now HEs on d7 and d8 are hanging. Black doesn’t lose the piece only because the white bishop turned out to be a hazardous element. W: b23, d13, e43, g33, h17.2 B: a53, e54, g63, g6-e45 Karpov played 1.£d2??, without paying attention to the fact that Kortchnoi could make use of hazardous elements. After 1.£d2?? the f3-pawn was added to HEs, a possibility of checkmate on the first rank became more clear. Kortchnoi did not notice the combination and responded with 1...¦f5? Instead of wining 1...£xe4! As a result Karpov won the game. Here is a variant from the game of a reader of the first 34 XABCDEFGHY 8-+-tr-trk+(U 7+p+l+pzp-' 6p+p+-+-zp& 5+-+-+-+-% 4-+-+L+-+$ 3zP-+-zP-+-# 2-zP-tR-zPPzP" 1+-+R+-mK-! xabcdefghy 3... ¦de8 4. ¦xd7 ¦xe4 5. ¦xb7 The result of the operation is the collapse of the HE on b7. Who could think in the original position that this is the pawn Black is not able to keep! White has a positional and material advantage which is a guarantee of an easy victory. Let’s return to the original position. XABCDEFGHY 8-+-tr-trk+( 7zpp+lwqpzp-' 6-+p+-+-zp& 5+-+-+-+-% 4-+-+-+-+$ 3zP-+LzP-+-# 2-zPQtR-zPPzP" 1+-+R+-mK-!O xabcdefghy Owing to the technique it’s easy to calculate variants as White just sequentially attacked Black’s hazardous elements which could be attacked. There is no complicated tactics here, no sacrifices, no positional game. The position is at the intersection of strategy and tactics. It’s interesting that the 8-quad computer Houdini shows the move 1.Јa4! in the first line only after 20 seconds of thinking! At first the leader move is as follows: 1.h3 – White takes away the HE connected with the weakness of the first rank. After that the computer shows the following variant where White also attacks Black’s HEs in each move: 1... ¦fe8 2.Ґh7+ ўh8 3.Ґf5 Ґxf5 4.Јxf5 g6 5.Јa5 White has only a small advantage. The point is that Black in his first move reduces the number of his HEs and holds out. Except 1... ¦fe8 Black can play 1... Ґe6, 1... Ґc8 or 1... a6, and White cannot gain a big advantage. Chapter 7. Standard Methods of Using HEs Combinations are usually belong to the following types: double attack, deflection, decoy, interference, checkmate combinations, etc.. It is often convenient to consider combinations types using the theory of hazardous elements. A standard double attack is a check and an attack on a piece, in other words it is an attack on two hazardous elements. If a piece is attacked and an intrusion threat is created, this is not completely a double attack though this attack can be strong enough to win. In the system of hazardous elements both combinations are a “double attack” on “hazardous elements”. Such unification makes hazardous elements very convenient for a chess player when playing a real game. Double attack, deflection, decoy, interference are tactical methods, but not motives. Until we can see tactical motives, we cannot use methods. Double attack – not just an attack but an attack on something important. Deflection – from something important, Decoy – in an important crucial position, Interference – from making influence on something important, This something important means a hazardous element. The most effective tactics classification is the one that allows you to move from something you see on the board to something you should search, that is from certain hazardous elements and their pins to methods of using them. Almost all combinations can be expressed through hazardous elements. This allows using this technique as a basic one for searching tactical ideas. Drawing on hazardous elements and their pins, you can develop a great number of standard methods. This area is a priority in the development of the system in the future. Let’s see the most important standard methods below. Direct Use of a Certain HE It is the rules that prompt you how to use this hazardous element. It is often possible to make a game pressing on a certain HE forcing your opponent to worsen his position. Methods to make pressure on HEs follow from the rule and inner priority: for rules 3 and 6 – we attract new objects for attack, for rule 8 – we move a pawn etc., making this HE stronger. Tal – NN 35 Austria, 1984 XABCDEFGHY 8r+-+rmk-+( 7+p+qsNp+p' 6p+-+-+p+& 5+-+-wQ-+-% 4-+-+-+-+$ 3+-+-+-+-# 2PzPP+-+PzP" 1+-mK-+R+-!O xabcdefghy In this case by making pressure on the HE on f7, White forced blocking of the e7-square to deliver a checkmate 1.£f6! 1-0 When playing against the pin it is good to attack a HE with tempo. Hamitevici – Bindrich [4] OropesadelMar, 2000 XABCDEFGHY 8r+-+-+-tr( 7+lwq-mkp+p' 6p+ntRpzp-+& 5+p+-+-+-% 4-+-+P+-+$ 3+L+-+N+-# 2PzP-+-zPPzP" 1+-tRQ+-mK-!O xabcdefghy W: b23, c13, d62,15, e43 B: c63, c73, c7-c113, d612, d79, e63, e77 1. ¦dxc6! Ґxc6 2.¤d4 ¦hd8 3.¤xc6+ £xc6 4. ¦xc6 ¦xd1+ 5.Ґxd1 Winning a piece. elements. Most often objects for such an attack are unprotected objects and intrusion squares. Ziatdinov - Akopian[4] Niksic, 1991 XABCDEFGHY 8-+-+-trk+(U 7+p+rwqpvlp' 6pzP-+p+p+& 5tR-+-+-+-% 4-+P+L+-+$ 3+-+-+-wQ-# 2-+P+-zPPzP" 1+R+-+-mK-! xabcdefghy W: a53,15, b13, c43, d29, d19, e43, g17 B: a63, c79, g8-g313 White has two unprotected rooks and a bishop, the king has no free square while the black rook is on the open line. The crucial fact is an attack on the three hazardous elements: a5, b1, g1. 1...£b4! 0-1 In the following game White making a threat to one HE, came to attack two other HEs with tempo. Nikolaidis - Vouros[4] Athens, 1993 XABCDEFGHY 8rsnlwqk+ntr( 7zp-+-+pzpp' 6-+-+p+-+& 5+p+-+-+-% 4-vlpzP-vL-+$ 3+-sN-zP-+-# 2-zP-+-zPPzP" 1tR-+QmKLsNR!O xabcdefghy Double Attack W: b23, c33, e1-b413, f4-g75, without a pawn B: a73, a83, b43, b53, b83, g73 In the theory of hazardous elements a double attack is a simultaneous attack on two or more hazardous 1.£f3 £d5 2.£g3 1-0 36 Playing Against a Defensive Object (DO) When a hazardous element is protected by a piece or a pawn, a nice way to struggle against it is making pressure on the defensive object (DO), first of all this concerns rule No 3.2, “ object which is protected and attacked the same number of times”. “TC> 0”. There are several basic methods of playing against DOs. Direct attack on DO Chekhover - Verlinsky Leningrad, 1933 XABCDEFGHY 8-tr-+r+k+(U 7+p+Q+Rzp-' 6p+-+p+-zp& 5+-+n+-+-% 4-+-+-+-sN$ 3zP-+-zP-zP-# 2-+R+-zPKzP" 1wq-+-+-+-! xabcdefghy The rook on f7 is protected by the queen on d7 – Black attacks the queen. 1...¤b6 2.Јc7 ¦bc8 0-1 Savitsky – Freiman Leningrad, 1934 XABCDEFGHY 8-+-wq-+-+( 7+k+-+pwQ-' 6p+Rsn-+p+& 5+-+p+-tr-% 4P+-zP-+-+$ 3+P+-zP-+-# 2-+-+-zP-tr" 1mK-tR-+-+-!O xabcdefghy The HE on f7 is protected by the knight on d6, which is also a hazardous element. White attacks the knight and makes a draw. 1.¦xd6 Јxd6 2.Јxf7+ ўb8 [Bad for Black 2...ўb6 3.¦c5+- a5 (3...¦g1+ 4.ўb2 ¦xf2+ 5.Јxf2 ¦h1 6.Јf7) 4.¦b5+ ўc6 5.Јb7#] 3.Јe8+ ўa7 4.Јf7+ Draw An example of attacking an object which defends an intrusion square: Nyback - Pancevski Warsaw, 2013 XABCDEFGHY 8-tr-+-mk-+( 7+p+l+-vl-' 6p+-wq-zp-+& 5+-zpLsnP+Q% 4-+P+-+-+$ 3zPP+-+-zPP# 2-+-+-vL-+" 1+-+-tR-mK-!O xabcdefghy 40.¦xe5 1–0 Deflection of DO Ding,Liren - Kamsky Antalya, 2013 XABCDEFGHY 8-+l+r+-+( 7+-wQ-+-snk' 6p+-+q+-+& 5+-+-zp-zp-% 4PzP-+P+-zp$ 3+-+N+-zP-# 2-+-+LzP-+" 1+-tR-+-mK-!O xabcdefghy c8 and e5 sqauares are HEs No3 with tension coefficient 2, i.e. two attacks and two protections. The direct attack on the HE on e5 deflects the defensive object– the queen on d6: 40.Јxe5 Јg6 [40...Јxe5 41.¤xe5 ¦xe5 37 42.¦xc8+-] 41.Јd5 +- Grant - Danielsen Warsaw, 2013 Abrosimov - Kirpichnikov Riga, 1969 XABCDEFGHY 8-tr-+r+-+( 7+-+-+pmkp' 6-+-zp-wqp+& 5zP-snP+-+-% 4-+-+nzP-+$ 3tR-+-+-zPP# 2-zpQ+N+LmK" 1+-+-+R+-! xabcdefghy XABCDEFGHY 8-+-+kvl-tr( 7+p+l+Rzp-' 6p+-zPp+-+& 5+-+-+-+-% 4-+-+P+p+$ 3+-tr-+-wQ-# 2P+-+-+PzP" 1+-wqL+R+K!O xabcdefghy Deflection of DO for using HE No 8.1 26...¤d2 27.Јxd2 b1Ј 28.¦xb1 ¦xb1–+ The HE on e7 is protected by the bishop on f8, the HE on f8 – by the rook on h8. In the beginning White tries to deflect the DO on h8 from protecting f8, simultaneously attacking e7, which is also a double attack. Then White destroys the DO on f8. 1.£h4! ¦f3 [the game ended at once: 1...¦xh4 2.¦xf8#] 2. ¦xf8+!¢xf8 3.£xh8+ ¢f7 4.gxf3 Svidler - Kramnik London, 2013 XABCDEFGHY 8r+-wq-trk+( 7zppzp-+pzp-' 6-+-+-sn-zp& 5+Nvl-+-+-% 4-+Pzp-+l+$ 3+-+-+-zP-# 2PzPQ+PzPLzP" 1tR-vLR+-mK-!O xabcdefghy 13.b4 Ґxb4 14.¤xd4± Interference with the DO’s line It can be used for long-range pieces that are used as defensive objects. Dolezal - Zvolanek[4] Plzen, 2001 XABCDEFGHY 8-+-+-trk+( 7tR-+-+-+-' 6-+-+pzpp+& 5+-zp-+-+p% 4-trP+-zP-+$ 3+-+-+-wQ-# 2-+q+-+PzP" 1+-+-tR-mK-!O xabcdefghy In this position White interferes with the defensive object – the queen on c2 in order to win tempo. This combination can also be considered a double attack and ambush. 1.f5! £xf5 2.£c7 1-0 Decoying DO to a pin Sometimes to win material you can ensnare an important piece to a square where it will pin one of defensive objects. Let’s see this position. 38 XABCDEFGHY 8-+-+-+k+( 7+-+r+pzp-' 6-+-+l+-wq& 5+-+-+-+-% 4-+-+-+-+$ 3+-+-wQ-+P# 2-vL-+-+P+" 1tR-+-+-+K!O xabcdefghy W: a89, g87, h63 On h6 there is HE No3 with TC=1. Using HE a89 and g87, White ensnares the black king with tempo to the diagonal a1-h8, after that the DO on g7 is pinned and the queen on h6 is captured. 1. ¦a8+ ¢h7 2. ¦h8+!¢xh8 [2...¢g6 3.¦xh6+] 3.£xh6+ ¢g8 4.£xg7# Understanding this mechanism you will be able to find a combination in the following game of the challenger tournament 2014. Svidler - Anand Candidates 2014 Khanty-Mansiysk, 2014 XABCDEFGHY 8r+l+-trk+(U 7zppwq-+-zpp' 6-vlp+-+-+& 5+-+ptR-vL-% 4-+-zP-+-+$ 3+-+-+-sNP# 2PzP-+-zPP+" 1tR-+Q+-mK-! xabcdefghy W b23, d43, e53, 15, f23,9, g55, b6-g113 The direct attack on d4 in order to attack the rook on e5 cannot be carried out here. Attacking the HE on f23,9, Black makes stronger the HE b6-g113, due to which the DO on d4 is pinned. 20...¦xf2 21.¦e8+ (21.¢xf2 £xe5) 21...¦f8µ And Black has an extra pawn. Instead of it Anand attacked the HE on g55 by moving 20.... h6? As a result the game ended in a draw. Playing against DO when TC > 1 Playing against DO often allows you to win a defensive object in exchange for a sacrificed one. Here we talk about the HE as per rule No 3 and tension coefficient 2 and above, i.e. when an element has several protectors. In this case it is desirable that the most valuable object should be at the place of the object (HE No 3) during an attack on DO. To decoy it, a combination can start with an attack on HE No3. Let’s see an example: XABCDEFGHY 8-+-+-+-+( 7+-+-+pmkp' 6-wQ-tR-vlp+& 5+-+-+-+-% 4-+-+-+-+$ 3+-wq-vL-zP-# 2-+r+-zPK+" 1+-+-+-+-!O xabcdefghy On f6 there is HE No3 with TC=2. To deflect a defensive object – the king on g7- White can move the bishop to h6, but this result only in an exchange of pieces. White’s goal is a more valuable piece on f6. So White captures on f6 at once and only after that he gives a check with h6: 1.¦xf6! £xf6 2.Ґh6+ winning the queen. When Both Crucial HEs Sides Have If each side has a crucial HE, for example HE No2 or checkmate threat, first of all you should consider getting rid from your HE with tempo. If we talk about a piece under attack, this can be defense of your piece or playing against the attacking object, or interference with the line of attack, or escape of your piece to a safe position. Another type of playing when both sides have crucial HEs - pieces under attack - is desperado. 39 Lasker,Em - Euwe Nottingham, 1936 Meier - Aronian Antalya, 2013 XABCDEFGHY 8-+-+-+-+( 7zpp+-+-zpp' 6-+p+kzp-+& 5vl-+-+-+-% 4-+nzP-+-+$ 3+-+K+-+P# 2PzP-+-zPP+" 1+-vL-sN-+-!O xabcdefghy XABCDEFGHY 8r+-wqltr-mk( 7+p+-+-+p' 6-+p+pvl-sn& 5+-zPpsNp+-% 4pzP-zP-+-zP$ 3zP-+-zP-zP-# 2-+-vLLtR-+" 1+-tR-wQ-mK-!O xabcdefghy White and Black have one crucial HE each - their knights are under attack. Sacrificing a pawn on b4 allows temporary interference with the knight's line of attack with tempo and then, by moving to Nc2, getting the crucial HE out of attack, also with tempo. 1.b4! Ґxb4 2.¤c2 1-0 On h6 there is HE No3 with TC=+1. White uses this moving the pawn that shields the line of attack with tempo: 25.e4 ¤f7 26.exf5 ¤xe5 27.dxe5 Ґxe5 28.fxe6 +- Rule No 3, Using Tension Coefficient with “+” A standard method when there is a TC with “+ is to discover the line of attack with tempo. A pawn or a piece which obstructs the line of attack can be sacrificed. The most typical case is a sacrifice of the opening piece with a check. Nepomniachtchi - Shoker Antalya, 2013 XABCDEFGHY 8r+-+-+k+( 7+q+-+-+p' 6p+ptr-vlp+& 5wQp+-zp-+-% 4P+-+P+-+$ 3+-+L+PzpP# 2-zPP+-+P+" 1+K+R+-tR-!O xabcdefghy On d6 TC=+1, the bishop moves away with a check: 24.Ґc4+ bxc4 25.¦xd6 +- Deflection of a Shielding Object The object that shields a crucial square of attack is pinned. Defense by a pinned object is not taken into account when calculating HEs. Deflection of such an object can be very effective. Baron - Baramidze Warsaw, 2013 XABCDEFGHY 8-+-+k+-tr(U 7+-zppvlpzpp' 6ltr-+-+-+& 5+-zp-zP-+-% 4p+P+L+-+$ 3+P+-+R+-# 2PvL-+-zPPzP" 1tR-+K+-+-! xabcdefghy As the b3-pawn is pinned, there is one attack and zero defenses on c4. 21...Ґxc4 22.bxc4 ¦xb2µ 40 Petrosian - L'Ami Antalya, 2013 XABCDEFGHY 8-tr-+-+k+( 7+-+-wq-+p' 6-zpp+psn-+& 5sn-sN-+p+p% 4-+-zP-+-+$ 3zP-wQ-+LzP-# 2-+-+PzP-+" 1+R+-+-mK-!O xabcdefghy 29.Јxa5 and Black resigned due to 29... bxa5 30.¦xb8+ ўf7 – the king is forced to take a rookhazardous position with the queen [30...¤e8 31.Ґxc6+-] 31.¦b7 +- HE No6 + HE No3: Pin of Under Protected Object When an object is pinned and the number of defenses is the same as the number of attacks, this increases the value of a hazardous element. In this case you should search for means to make an additional attack or an attack on the defensive object. These methods have been already considered, but in this part we'd like to note the importance of such a pin. An attack on such a HE can be made in several moves. Let's see an opening position: XABCDEFGHY 8r+lwqkvl-tr(U 7zppzp-+pzpp' 6-+nzp-sn-+& 5+-+-+-vL-% 4-+-sNP+-+$ 3+-sN-+-+-# 2PzPP+-zPPzP" 1tR-+QmKL+R! xabcdefghy If Black plays 6... g6? leaving the f6-square as HE No3+No6 only for one move, White wins making an immediate attack on the DO - the queen on d8. 7.¤xc6! bxc6 8.e5! dxe5 9.£xd8+ Attack with a Pinned Object A pinned object cannot move that's why its attacking potential greatly decreases but not to zero. So attacks by a pinned object are taken into account when calculating HEs, but defenses are not taken into account. If a pinned object attacks an enemy object, you should search ways to get rid of the pin with tempo. The following ways are possible here: Attack on the pinning object, i.e. attack on a long-range piece which created a pin. Deflection of the pinning object Interference with the line of the pin Deflection of a Pinning Object Kjartansson - Babula Warsaw, 2013 XABCDEFGHY 8-+-+-+k+(U 7+Q+-+r+-' 6-+-+-+pvl& 5+-+-zpl+p% 4-+L+-+-zP$ 3+-zp-wq-zP-# 2-+-+P+-mK" 1+-+-+R+-! xabcdefghy The black rook attacks the queen on b7, but it's totally pinned. To get rid of the pin with tempo you can sacrifice the black queen: 38...Јxe2+ 39.Јg2 [39.Ґxe2 ¦xb7-+] 39...Јxg2+ 40.ўxg2 c2 0–1 HE No7 + No10: Attack on the King with Limited Mobility If the king is a hazardous element according to rules 7 and 10, the standard method is searching for check; it can result in a checkmate or material advantage. If the king has no moves to retreat, you can search for check in one, two or more moves. If there is a 41 possibility to give a check at once or in future and the king has a square to retreat to, it is often correct to block this square in the beginning and then to search for methods to give a check or to deliver checkmate. McShane - Istratescu London, 2013 XABCDEFGHY 8-+-+-+rmk( 7zp-+-tR-zp-' 6-+lwq-trL+& 5+-zpp+-wQP% 4-+-+-+-+$ 3+-+-+-+-# 2PzP-+-zPp+" 1+-+-tR-mK-!O xabcdefghy The black king has no moves, so you can sacrifice any piece to give a check. 31.Јh6+ and Black resigned due to 31...gxh6 32.¦h7# Fuks - NN 1955 XABCDEFGHY 8-+l+-+r+( 7tR-+-+p+-' 6-+p+kvLpzp& 5+-wqpzPn+-% 4Qzp-+-+P+$ 3+-+-+N+-# 2-+-+-zP-zP" 1+-+-+-mK-!O xabcdefghy Cmilyte - Ptacnikova Warsaw, 2013 XABCDEFGHY 8-sn-+-trk+( 7zpq+-+pzp-' 6-zp-+psn-zp& 5+-+l+-sN-% 4-zP-wQ-+-+$ 3zP-+LzP-+-# 2-vL-+-zPPzP" 1+-tR-+-mK-!O xabcdefghy It is easy to find the first check and a bit more difficult to find the second one. 20.Ґh7+ ўh8 [20...¤xh7 21.Јxg7#] 21.Јxf6! 1-0 [21...gxf6 22.Ґxf6#] Akopian - Shoker Antalya, 2013 XABCDEFGHY 8-+-tr-trk+( 7+l+-+pvl-' 6-+-+-+-+& 5+-+-+-+Q% 4-+-wqP+-+$ 3+-+-+P+-# 2-+-+LzP-zP" 1+-+-tR-tRK!O xabcdefghy 31. ¦xg7+ Јxg7 [31...ўxg7 32.Јg5+ ўh7 33.Јh4+ ўg8 34.¦g1++-] 32. ¦g1 ¦d6 33. ¦xg7 +- White deflects the defensive objects on c5 and f5 from protecting the HE on e7. 1.Јxc6+ Јxc6 2.¤d4+ ¤xd4 3.¦e7# 42 Sakharov – NN StPetersburg, 2012 XABCDEFGHY 8-+-+-sn-+( 7zp-+-+Nzp-' 6-+-+p+-zp& 5+p+kzP-+-% 4-zP-+-zP-+$ 3+-+KzP-zPP# 2P+-+-+-+" 1+-+-+-+-!O xabcdefghy This is a game of a reader who actively discussed and used the technique which resulted in the formulation of this standard method. It is also interesting to read the comment of Vadim Sakharov who describes his ideas and looks for a method to change his thinking process in order to find a correct move in such a position. "It turned out that at this moment my opponent missed a checkmate in two moves. During the game I paid attention that the enemy king was in a tight position and I started searching for a way to deliver checkmate. I mean I noticed the motive. But naturally I was not sure that the checkmate was possible. And I didn't find the checkmate. I have no doubt that if I found such a position in a book with a task "White to move and deliver checkmate in two moves", being informed about the possibility of the checkmate, I would be able to find it for sure. Ok, it's good that I STARTED TO SEARCH for checkmate. Vadim Sakharov. piece with limited mobility, you should cut off the ways to retreat for it and then attack it. In your position the attack is the move e3-e4, then you should find a way to block the only square for the king to retreat to. The only white object which is capable to reach c6 is the knight, so you should consider the move 1.¤d8 Decoying to –hazard A standard method of playing against HE No3, No3, No9 and others is decoying or another way to force your opponent to move his pieces to a -hazardous position. Decoying to knight-hazard Saric - Banikas Warsaw, 2013 XABCDEFGHY 8-+r+-+k+(U 7+p+-+p+-' 6ptr-+-+-zp& 5+-+-zp-+-% 4-+-+-+pzP$ 3zP-zP-tR-zP-# 2-zPK+-sn-+" 1+-+-+LtR-! xabcdefghy 34...¦xb2+ 35.ўc1 [35.ўxb2 35...¦d8 36.Ґc4 ¦dd2–+ ¤d1+–+] My answer to the reader: Studying the position analytically shows that you should search for checkmate and you searched for it. Further, how should you search for checkmate or catch another piece, not necessarily the king? We do not speak about that in the book, though we probably should. To catch a 43 Van Wely - Solak Antalya, 2013 Bouwmeester - Padevsky TelAviv, 1964 XABCDEFGHY 8-+-+-sn-tR( 7+-+-mk-tr-' 6-+L+p+p+& 5zppzP-+-sN-% 4-zp-zP-vl-+$ 3+P+-+-+-# 2P+-+KzP-+" 1+-+-+-+-!O xabcdefghy XABCDEFGHY 8-wq-+-+k+( 7+-+r+p+-' 6-+-zpn+p+& 5+-+-sn-vL-% 4-zp-+-+P+$ 3+P+-+-+P# 2P+-wQ-+L+" 1+-tR-+-+K!O xabcdefghy 33.¦xf8 Ґxg5 [33...ўxf8 34.¦e8+ ўf7 35.¦a8 +- W: d2-d713, d39, f39, g43, g53 B: b43, b83, c89, f69, h69 34.¤xe6++-] Decoying to bishop-hazard Glud - Sokolov Warsaw, 2013 XABCDEFGHY 8-+r+r+k+(U 7zp-+lzp-+p' 6-wq-+NzppvL& 5+p+PzP-+-% 4-+-+-zP-+$ 3+Q+-sn-zPL# 2P+-+-+-zP" 1+-+-tR-+K! xabcdefghy 25...¤xd5 26.exf6 exf6 27.Јxd5 Ґc6 28.Ґg2 Ґxd5 29.Ґxd5 Јd6 30.¤c7+ Јxd5+ 0–1 HE Transformation You can see this type of operations most often and it is described in a separate chapter. 1.Ґf6 ¦a7 2.£h6 Threatening to win a HE on e5, White created a HE on h8 and made a killing checkmate threat. Counterattack When our piece or pawn is attacked it's possible not to attack it but to attack the corresponding enemy object. Sometimes attacking is the best defense. Sometimes. Because in chess this can result in desperado combinations when an enemy piece which you just attacked becomes a desperado piece and begins making sacrifice of itself at any place of the board. We will return to this subject below. Now let's examine standard counterattacks. Muffang - Alekhine Paris, 1923 XABCDEFGHY 8-+r+k+-+(U 7tR-+lsn-tr-' 6-+-+p+-zp& 5+-+pzPpsN-% 4-+-zP-+-+$ 3+-+-wQ-+-# 2-+qvL-zP-zP" 1+-tR-+-+K! xabcdefghy W: a73,15, c13, c212, d23, g52, h17 44 B: a712, c22,15, d73,9, e63, e87, f79, g512, g73, h63 White has a knight under attack, Black has the queen under attack. It seems the queen should retreat, but Black attacks White's queen winning a piece. 1...f4! 2.Јxf4 [2.Јe1 Јg6; 2.¦xc2 fxe3 3.¦xc8+ ¤xc8] 2...hxg5 3.¦xc2 gxf4 0-1 Ragozin - Model Leningrad, 1932 XABCDEFGHY 8r+-+-tr-mk(U 7zpl+-+-zpp' 6-zpp+-sn-+& 5+-+pwq-+-% 4Q+-sn-+-+$ 3+-sN-+-zP-# 2PzP-vL-sNLzP" 1+-+-tR-mK-! xabcdefghy W: a415, a4-b65, b23, c29, d23, e13, f39, g33, without advantage and 2 pawns B: a73, b73, d43, e52,15, e79 Black has a big material advantage but the queen is under attack and if it retreats the knight is lost. Black uses counterattack five times one after another and manages to move the knight on d4 out of attack. 1...b5 [1...¤e4 2.¤cxe4 dxe4 3.¦xe4 winning the knight] 2.Јb4 c5 [ошибочно 2...¤c2? 3.Јxf8+ ¦xf84.¦xe4- it’s a standard desperado scheme, as we already noted, such sacrifices can be often met in counterattack combination variants] 3.Јxc5 ¤d7 now the queen is defended by the knight and an attack on f8 cannot be carried out any longer 4.Јb4 ¤c2 5.¦xe5 ¤xb4 -+ sacrifice itself. Here the situation is similar but there is an important difference: if a desperado rook must give a check, the desperado objects we consider here have all freedom of actions and can move where they want, e.g. a piece can be put under a pawn's attack and there is quite a high probability that such a behavior will not result in simple lost of material. Reasons for desperado. Ambush Ambush allows you to perform a double attack - a long-range piece in ambush carries out the main attack and a piece or a pawn that breaks up the ambush often becomes a desperado piece. This type of play is also considered in the clause "Using Tension Coefficient with “+”" Torre - Lasker,Em Moscow, 1925 XABCDEFGHY 8r+-+rsnk+( 7zpl+-+pzp-' 6-+-zpp+-zp& 5+q+-+-vLQ% 4-zP-zP-+-+$ 3+-+-sN-tR-# 2P+-+-zPPzP" 1+-+-tR-mK-!O xabcdefghy Attacking HEs on b5 and g8, White creates ambush and performs a beautiful combination called "Windmill" where the rook becomes a desperado piece which picks up everything on its way. 1.Ґf6!! £xh5 2. ¦xg7+ ¢h8 3. ¦xf7+ ¢g8 4. ¦g7+ ¢h8 5. ¦xb7+ ¢g8 6. ¦g7+ ¢h8 7. ¦g5+ ¢h7 8. ¦xh5 The method of breaking up the line is a standard one when there is HE No13 – X-ray. Desperado pieces and pawns Desperado objects are those which can give themselves up practically at any place of the board, not necessarily to make certain threats but owing to the fact that there are special aspects in a position, such as ambush, desperado or material advantage. There is a concept of desperado rook in the endgame when in order to achieve stalemate a rook starts to 45 Mamedov - Petkov Warsaw, 2013 XABCDEFGHY 8r+-+rsnk+( 7+lwq-zppvlp' 6pzp-+n+p+& 5+-zp-zP-+-% 4P+L+N+-+$ 3+-zP-+NvL-# 2-zP-+-zPPzP" 1tR-+QtR-mK-!O xabcdefghy The black queen is on the same line as the opponent's bishop. A standard method is searching for a possibility to break up the diagonal. 18.¤f6+ exf6 19.exf6 Јc6 20.fxg7± Clearance of Threat Square If an object occupies a square from which another object will make a serious threat, e.g. of checkmate, fork, pawn promotion or another threat the importance of which is higher than the value of an object that blocks this square, the blocking object can become a desperado object. Such combinations are similar to ambush, but instead of breaking up the line here we speak about clearing of a certain square. Desperado Max Euwe definition: "Desperado is a piece that is devoted to destruction in a combination but for which we try to gain as much material as possible". As we already said desperado often appears as a result of counterattack. Bogoljubow- Schmid Bad Pyrmont, 1949 1.e4 e5 2.¤f3 ¤c6 3.¤c3 ¤f6 4.d4 exd4 5.¤xd4 XABCDEFGHY 8r+lwqkvl-tr(U 7zppzpp+pzpp' 6-+n+-sn-+& 5+-+-+-+-% 4-+-sNP+-+$ 3+-sN-+-+-# 2PzPP+-zPPzP" 1tR-vLQmKL+R! xabcdefghy W: d43,4, e43 B: c64 In this opening position Black decided “to muddy the waters”. 5. ... ¤xe4?! 6.¤xc6? [6.¤xe4 Јe7 7.f3 d5 8.¤xc6 bxc6 9.Ґd3 f5 10.Ґg5 Јe6 White has an advantage] XABCDEFGHY 8r+lwqkvl-tr(U 7zppzpp+pzpp' 6-+N+-+-+& 5+-+-+-+-% 4-+-+n+-+$ 3+-sN-+-+-# 2PzPP+-zPPzP" 1tR-vLQmKL+R! xabcdefghy W: c33,4, c62, d29, e17, f29 B: a73, d79, d82,9, e42, e79, e87, without a piece Now you cannot play 6...dxc6; 6...bxc6 7.¤xe4 Јe7 8.Јe2 and White has an extra piece. The black knight sacrifices itself step after step picking up everything what it comes across on its way. The white knight on c6 does the same thing. 6...¤xc3 7.¤xd8 ¤xd1 8.¤xf7 ¤xf2 46 XABCDEFGHY 8r+l+kvl-tr( 7zppzpp+Nzpp' 6-+-+-+-+& 5+-+-+-+-% 4-+-+-+-+$ 3+-+-+-+-# 2PzPP+-snPzP" 1tR-vL-mKL+R!O xabcdefghy It’s quite an unordinary position. Desperado continues: 9.¤xh8 ¤xh1 10.Ґd3 Ґc5 11.Ґxh7 ¤f2 12.Ґf4 d6 13.Ґg6+ Ўf8 14.Ґg3 ¤g4 XABCDEFGHY 8r+l+-mk-sN( 7zppzp-+-zp-' 6-+-zp-+L+& 5+-vl-+-+-% 4-+-+-+n+$ 3+-+-+-vL-# 2PzPP+-+PzP" 1tR-+-mK-+-!O xabcdefghy 15.¤f7? loses. Correct 15.Ўd2 Ґe6 16.Ґd3 Ґe3+ 17.Ўe2 Ґh6 18.¤g6+ Ўf7 19.¦f1+ ¤f6 with equality 15...¤e3 !16.Ўd2 Ґf5 17.¤g5 Ґxg6 18.¤e6+ Ўe7 19.¤xc5 ¤xc2 20.Ґh4+ Ўe8 21.¤e6 Ўd7 22.¤f4 ¤xa1 23.¤xg6 ¦e8 24.Ґf2 ¤c2 25.¤f4 ¤b4 0–1 Carlsen - Caruana Moscow, 2012 XABCDEFGHY 8-+-+-+k+( 7zp-+qzpp+p' 6-+-+-+p+& 5+p+-+-+-% 4n+-vlP+-+$ 3+-+-vLP+-# 2P+-+-zP-zP" 1+-wQ-+LmK-!O xabcdefghy W: a23, b29, c1-d45, c39, e34, f33 B: b53, c89, d43, d73 White’s position is a bit worse, so he begins an exchange operation. At first – an attack on the “defensive object” – the queen on d7 23.Ґxb5! [23.Ґxd4 £xd4 24.Ґxb5 ¤c3 with Black’s advantage] XABCDEFGHY 8-+-+-+k+(U 7zp-+qzpp+p' 6-+-+-+p+& 5+L+-+-+-% 4n+-vlP+-+$ 3+-+-vLP+-# 2P+-+-zP-zP" 1+-wQ-+-mK-! xabcdefghy And now there is a typical desperado exchanging all pieces and bringing a draw in the endgame: 23...Ґxe3 24.Ґxd7 Ґxc1 25.Ґxa4 Ґf4 26.h3 Ґe5 27.¢g2 Ґf4 28. ¢g1 Ґe5 29. ¢g2 Ґf4 30. ¢g1 ½ –½ Material advantage The side which has a material advantage can sacrifice it without fearing to be left with a smaller number of pieces and pawns. Aues - NN Berlin, 1954 47 XABCDEFGHY 8r+-+-trk+(U 7zplzp-+pzpp' 6-zp-+-wQ-+& 5+-+-+-+-% 4-+P+-+-+$ 3+-vLR+-+P# 2PzP-+qzPP+" 1+-+-+-mK-! xabcdefghy At first glance, Black is going to be checkmated. But a beautiful defense is found because White has no rook and his queen is under attack. This means any black pieces’ desperado is possible in order to provide protection from direct threats. 1...Јg4!! [1...Јe1+? 2.ўh2 Јxc3 3.Јxc3; 1...gxf6? 2.¦g3+ ўh8 3.Ґxf6#] 2.hxg4 gxf6 01 Spassky - Kortschnoj Moscow, 1955 XABCDEFGHY 8-+-+-+-+( 7+-+-zP-mk-' 6-+-+-+P+& 5+p+-+-+-% 4pvL-zP-vl-wq$ 3zP-+-+r+P# 2-+-+-+P+" 1+-+-tR-wQK!O xabcdefghy White has a hazardous passed pawn. Therefore when protecting his king he can sacrifice the queen. 1.Јh2! defending from R:h3 and promoting the queen with checkmate threats 1-0 Tuzinskiy - Chuzhakin Tula, 2012 XABCDEFGHY 8-+-+-mk-+( 7zpp+-+pzpQ' 6-+-tr-+n+& 5+-+-zp-sN-% 4-wq-zP-+-zP$ 3+-+P+-+L# 2-+K+-zP-+" 1+-+R+-tR-!O xabcdefghy White to move, and he has an extra rook and bishop. This means that almost all white pieces have a great degree of desperado. Sacrificing two pieces, White could win the game: [25.Ґe6! fxe6 26.¤xe6+!¦xe6 27.¦xg6 +-; or 25.¤e6+! fxe6 26.Ґxe6! ¦c6+ 27.Ґc4 +-] Instead of that he played 25.¤e4?? And lost. Tactical Defense There are often poisoned pawns or pieces in play; capturing them causes a counter combination. A tactically protected object is a hazardous element; if you capture it, the enemy object that occupied its place becomes a hazardous element. XABCDEFGHY 8r+l+kvlntr(U 7zpp+-+pzpp' 6-wqn+p+-+& 5+-zppzP-+-% 4-+-zP-+-+$ 3+-zPL+N+-# 2PzP-+-zPPzP" 1tRNvLQmK-+R! xabcdefghy W: b23, d3-c55, d42,4 48 B: c54, h73 Here is a position from French defense. In his last move 6.Ґd3 White left the d4-pawn without defense but it’s not possible to win the pawn: 6. ... cxd4 7.cxd4 ¤xd4? 8.¤xd4! Јxd4? 9.Ґb5+ winning the queen. Spassky - Fischer Reykjavik, 1972 XABCDEFGHY 8-+-+-mk-+( 7zpp+-+-zpp' 6-+-vlpzp-+& 5+-+-+-+-% 4-zP-+-+-+$ 3zP-+KzP-+-# 2-+-+-zPPzP" 1+-vL-+-+-!O xabcdefghy W: b43, c13, f23, g23, h22 B: a73, b73, d63, e63, h73 The position is approximately equal. White moves the b-pawn, leaving the h2-pawn under attack; he hopes to catch the bishop if it captures the pawn. Fischer captures the pawn and lost the game: 29.b5 Ґxh2?? 30.g3 h5 31.ўe2 h4 32.ўf3 ўe7 33.ўg2 hxg3 34.fxg3 Ґxg3 35.ўxg3 Soon White won with an extra piece. Temporary Sacrifice Combinations often do not result in a big material advantage in real games. It is often when combinations are performed to improve a position. Capablanca - Vidmar NewYork, 1927 XABCDEFGHY 8-+-tr-+-+(U 7+-+-+k+-' 6-zp-zp-zPp+& 5zp-+-+-mK-% 4P+PtR-+-+$ 3+P+-+-+-# 2-+-+-+-+" 1+-+-+-+-! xabcdefghy W: b33, d43, f63, g57 B: b63, d63, d83, e79, f77, g79 At first glance Black’s position is hopeless. For instance, 1...¦d7 2.¦h4 +But still Black manages to escape. He starts playing against the f6- HE pushing back the defensive object on g5. 1...¦e8! 2.¦xd6 ¦e5+ 3.ўf4 ¦e6 winning back the pawn. 4.¦xe6? ўxe6 5.ўg5 ўf7-+ Decoying to double attack Tomczak - Laurusas Warsaw, 2013 XABCDEFGHY 8r+-+r+k+(U 7zpp+qvlpzpn' 6-+-zp-+-+& 5+-zpP+-zPL% 4-+-+-zP-sn$ 3+NsN-+-+l# 2PzPPvL-tR-zP" 1tR-+Q+-mK-! xabcdefghy 18.Ґxf7+ ўxf7 19.Јh5+ ўg8 20.Јxh4± 49 Deflecting a Pawn to Use PawnHazard If pieces are in the pawn-hazardous position and there’s only one square blocked by a friendly pawn that separates them from a double attack, a typical attack is deflection of this pawn – an attack on squares it defends. Bogosavljevic - Godena Warsaw, 2013 XABCDEFGHY 8-+r+-trk+(U 7zp-zp-+pzpp' 6-zpn+p+-+& 5wq-+n+-+-% 4-+pzP-+-+$ 3+-zP-+PzP-# 2PwQ-vL-zP-zP" 1tR-+-tRLmK-! xabcdefghy After 27...f5? Black has HEs No3 on e6 and h5, and the king can be placed in check, HE No7.1. Owing to the check White’s queen managed to intrude with tempo to make a double attack: 28.Јa8+ ўh7 29.Јe8+Giri - Abdel Razik Antalya, 2013 XABCDEFGHY 8-+l+-trk+( 7+p+-vlNzp-' 6-wqp+-+-zp& 5zp-+-zpp+Q% 4-+P+-+-+$ 3+P+-+-+P# 2P+-+-+L+" 1+-tRR+-+K!O xabcdefghy Pawn-hazardous position of the queen on b2 and bishop on d2 is defended by the pawn on c3. Black deflects it by attacking the d4-square: 17...¤xd4 18.ўg2 [18.cxd4 c3–+] 18...¤f5–+ 33.¤xh6+ gxh6 34.Јg6+ ўh8 35.Јxh6+ 1–0 In this case White used the king’s weakness, rule No 7.3, and rule No 3 as well; White was going to use an undefended position of the queen on b6 moving 36.Ґd5! Combined Usage of Different Types Istratescu - Adams London, 2013 HE of Several different hazardous elements can be used in a combination. Adams - Istratescu London, 2013 XABCDEFGHY 8-+-+-+-mk(U 7zp-wq-+-zp-' 6-zp-+p+-+& 5+-+-+p+p% 4-+-+-+nzP$ 3zP-zP-+QzP-# 2-zP-+-zPK+" 1+-+L+-+-! xabcdefghy XABCDEFGHY 8rsn-wqr+k+( 7zpp+-+pzpp' 6-+p+-sn-+& 5+-+P+-+-% 4-+-+PzPl+$ 3vL-zPP+-+-# 2P+-+N+LzP" 1tR-+Q+RmK-!O xabcdefghy Here you can see deflection of the pinned object and after an attack on HE on e2 to destroy the protection of C3: 13...¤xd5 14.Јd2 Ґxe2 15.Јxe2 ¤xc3і 50 Table of Standard Methods The following table shows the rules for which standard methods for using HEs are used most often. Method Direct use of a certain HE Double attack Playing against defensive object (DO) Typification of using HEs allows searching for a standard tactical solution immediately - even before a chess player can calculate if there is a combination here or not! Direct attack on DO Deflection of DO Interference with the line of attack of DO Decoying DO to pin Playing against DO when TH > 1 Both sides have crucial HEs Rule No3, using tension coefficient with "+" Deflection of shielding object Attack by a pinned object If the king has no free moves or has only one move, you should search for check Decoying to –hazard HE Transformation Counterattack Desperado pieces and pawns Rules all 3, 9, 3,6,7,9,14 Ambush Desperado Material advantage Tactical defense Temporary sacrifices Decoying to double attack Deflecting a pawn to use pawnhazard example, we read a chapter about "interference" and search for potential interferences in the examples given below. This significantly simplifies searching for tactics. It is much more difficult in a real game, playing on the board, when you don't know not only what possible combinations can be about, but you also don't know if there are combinations motives or not. So the standard typification is convenient from the methodical point of view, but in a real game it is very difficult to typify a position. The theory of hazardous elements solves this problem in many ways. 1, 2, 7 3, 9 3, 6, 7, 8, 9, 11 3, 7, 9 7 + 10 3, 9 all 2 1, 2, 3 (TC "+"), 7, 8, 14, 16, 18 crucial 3, 9 14 This classification of standard methods for using hazardous elements partially reminds a standard typification of tactical operations –decoy, deflection, interference and others but there are some crucial differences. In the standard typification it is specified what happened in the combination, e.g. a piece was deflected from the protection of the king or the queen is decoyed to a knight fork. In this case we speak about deflection or decoy. The problem is that before the combination is found, such typification does not produce exact guidelines about what you should search for. It is usually easy to find a combination when you know what it is about in advance. For 51 Positional Methods of Using Hazardous Elements Playing for creating hazardous elements for your opponent and decreasing the number of your own HEs is a new positional principle. We are going to see some examples of such a game. In the next chapter this subject will be studied more thoroughly by an example of Capablanca's works. Harikrishna - Nakamura Wijkaan Zee, 2014 XABCDEFGHY 8r+-wqrvlk+( 7+l+-+p+p' 6psn-zp-snp+& 5+pzpPzp-+-% 4-+-+P+-+$ 3+PzP-+NsN-# 2P+L+-zPPzP" 1tR-vLQtR-mK-!O xabcdefghy White has a lot of good continuations. Which should he chose? We can say Black has only one hazardous element - the bishop on b7, and it is the bishop White makes a pressure upon in his next move: 15.¦b1 c4 Black does not surrender and continues to carry out his plan, but now he should play cautiously. The following was simpler: 15...Јc7 16.Ґe3 ¤g4 17.Ґg5 h6 with a small advantage of White. 16.bxc4 ¤xc4 17.a4 An attack on the HEs b5 and b7 gives initiative to White. XABCDEFGHY 8r+-wqrvlk+(U 7+l+-+p+p' 6p+-zp-snp+& 5+p+Pzp-+-% 4P+n+P+-+$ 3+-zP-+NsN-# 2-+L+-zPPzP" 1+RvLQtR-mK-! xabcdefghy 17... Јc7? Nakamura failed and made an unreasonable sacrifice. It was better to defend the pawn and simultaneously attack the opponent's hazardous element on c3: 17...Јa5 18.¦b4 ¤d7 19.¤f1 ¤c5 with a bit better White’s play 18.axb5 axb5 19.¦xb5 ¤a3 20.¦b3 ¤xc2 21.Јxc2± ¤d7 22.Ґe3 Ґa6 XABCDEFGHY 8r+-+rvlk+( 7+-wqn+p+p' 6l+-zp-+p+& 5+-+Pzp-+-% 4-+-+P+-+$ 3+RzP-vLNsN-# 2-+Q+-zPPzP" 1+-+-tR-mK-!O xabcdefghy White has a big advantage. In his next move he prepared the capture of the a-line and won quickly. 23.¦a3 Ґb5 24.¦ea1 ¦xa3 25.¦xa3 ¦b8 26.¦a7 Јc8 27.h3 ¤b6 28.Јc1 ¤c4?29.Ґh6 Јc5? 30.¤h5! Ґg7 31.Ґxg7 Јxa7 32.Јh6 f5 33.¤g5 1 –0 52 Chapter 8. Move Calculation Algorithm Now let’s study the most interesting part of the system. How should you think to be able to use the system on the board? It’s necessary to adhere to the following instruction when calculating every move you make except for the positions known in advance – openings and endgame positions. Calculating hazardous elements will take approximately 15 minutes of extra-time for the game. That is why in blitz and in fast chess you cannot use the system completely, at the analytical level. When time for thinking is limited, you should work with hazardous elements mostly at the intuitive level, some items of the following algorithm can be missed. At the same time in order to use the system intuitively, first you should learn how to use it in strict algorithmic order. Move Calculation Algorithm Calculating what HEs have been added, removed or changed after a move in the game. Making necessary changes in the lists of HEs and in the lists of ideas about using them. In the original position the lists are empty. List of White’s HEs List of Black’s HEs List of ideas about using White’s HEs List of ideas about using Black’s HEs Selection of candidate moves Blunder checking Your move Opponent’s move 53 1. Examine how HEs changed after a move was made in the game. Add HEs to the lists calculated earlier, separately for White and for Black, delete and change information about some HEs in the lists. In the original position the lists are empty. 2. Search for ideas of using your opponent’s HEs. You can keep your ideas of using old HEs for many future moves. So you should pay more attention to new HEs and to changes in the existing ones. Use both the list of HEs and the list of ideas about using HEs. Edit these lists after every move. When calculating variants use standard methods of using HEs. This can be very helpful as they give advice how you should play against HEs of different types. 3. Similarly to the previous item, search for ideas how your opponent can use your HEs. 4. Search for strategic ideas and make a “classic” position calculation using any techniques and knowledge. Information about HEs can be used in this stage as auxiliary. Monitoring changes in HEs in variants is carried out intuitively. 5. Select a move. 6. Check for blunders. Examine how the intended move can change the list of HEs. Calculate how your opponent can use HEs using the standard methods. As before, give special priority to HEs which appeared after the intended move. This is a critical moment that allows you to decrease the number of blunders and to save time. We mean if additional HEs did not appear the probability of making a blunder is quite low because using the existing HEs was already calculated in step 5. For example, calculate the move Bc1-f4; after it a hazardous element appears – the b2-pawn. We see that the opponent can attack it by moving Qd8-b6 and make a conclusion that the move Bf4 we are thinking about is a mistake and start searching for another move. 7. If the move we plan to make can cause forced operations, e.g. exchange or any variant which can change the situation on the board fundamentally, it is desirable that you calculate hazardous elements in the positions which will appear after the forced variants end. Further, similarly to the previous item, check the possibility of using HEs and, if necessary, calculate another candidate move. 8. If everything is OK, make a move; if you find a mistake, return to the previous items of the algorithm and continue calculating using the same scheme. 54 Examples Let’s see some examples of thinking which include analytical use of the system in real positions Chess Genius - Chuzhakin Tula, 2014 XABCDEFGHY 8-+-+-+-+( 7zp-+n+k+-' 6-zp-+-zp-zp& 5+-+-zp-zp-% 4-+P+P+K+$ 3zPR+-vLP+P# 2-+-+-+P+" 1+-+r+-+-!O xabcdefghy W:b33, d112,c43, g23 B: a73, b63, d13, h63, f59, h59 Here is a entertainment game against a chess program installed on a Smartphone. Let’s see how Black is thinking in this game. The PC made a move 1.¢f5 Let’s remember the scheme of thinking suggested above. 1. Examine how HEs changed after a move was made in the game. Add HEs to the lists calculated earlier, separately for White and for Black, delete and change information about some HEs in the lists. In the original position the lists are empty. Now the white king is a HE as per rule 7 – there are squares under attack near the king, and as per rule 10 – the king has only one free move to g4. HEs on b33, c43and g23 are kept from the previous position. See Black’s HEs. After White’s move f512 and f77 were added. A move earlier, Black had the following HEs– intrusion squares f59 and h59, now we exclude them from the list. The following HEs are kept from the previous position: a73, b63, d13, h63 Total, we have two new lists of HEs; the ones which appeared after White’s last move are underlined. W: b33, c43, g23, g47,10 B: a73, b63, d13, h63, f512, f77 2. Search for ideas of using your opponent’s HEs. You can keep your ideas of using old HEs for many future moves. So you should pay more attention to new HEs and to changes in the existing ones. Use both the list of HEs and the list of ideas about using HEs. Edit these lists after every move. When calculating variants, use standard methods of using HEs. This can be very helpful as they give advice how you should play against HEs of different types. Let’s start examining ideas how to use White’s HEs starting with the ones which appeared last. This is g47,1 – the white king in Black’s camp, it has one square to retreat to; this means there is a standard situation on the board - HE No7+10, which we studied in the chapter “Standard Methods of Using HEs”. Let’s remember recommendation for this type of positions: If the king is a hazardous element according to rules 7 and 10, the standard method is searching for check; it can result in a checkmate or material advantage. If the king has no moves to retreat, you can search for check in one, two or more moves. If there is a possibility to give a check at once or in the future and the king has a square to retreat to, it is often correct to block this square in the beginning and then to search for methods to give a check or to deliver checkmate. It’s not possible to put the king in check at once, but you can block the king by moving 1...h5 and then search for check. You cannot give check with the rook, the knight on d7 and the king on f5 are in the knight-hazard-free position – three moves are required to give check. But still if free squares for the white king are not appeared by that time, the threat will be strong. Calculate: 1…h5 2.g4 h4 or 2.g4 gh- and the king is not selected. If 2.c5 ¤f8 3.cxb6 ¤e6 and checkmate with the knight on g7 is 55 inevitable. So we see an active continuation, therefore, we can miss items 3-5 of the Move Calculation Algorithm and proceed to critical item 6 at once. 6. Check for blunders. After the move 1…h5 Black has the following HEs: B: a73, b63, d13, f512, f77, g53, h53 Think how White can use these hazardous elements beginning from the new ones. The attacks 2.h4 and 2.g4 were already examined. Using the HEs on b63, f512, f77can be carried out by White by attacking 2.c5, this attack has been already considered. Using a73 can be carried out either by the movement c4-c5, or by the movement of the a-pawn to a5. The latter does not prevent Black from making a checkmate attack. Finally, d13 is a low-risk element which is not crucial here. In the game it was: 1. ..h5! The computer realized its mistake at this moment and started playing to solve the problems with as little loss as possible. 2. ¦b5 It’s possible, but this one is better 2.¦c3! with the same idea to give up a piece and play c4-c5. 2.... ¤f8 Now there is HE No 3.4 on g5, and White gives up his bishop for two pawns. 3.Ґxg5 fxg5 4.¦xe5 XABCDEFGHY 8-+-+-sn-+(U 7zp-+-+k+-' 6-zp-+-+-+& 5+-+-tRKzpp% 4-+P+P+-+$ 3zP-+-+P+P# 2-+-+-+P+" 1+-+r+-+-! xabcdefghy Black has a piece and two pawns. Houdini evaluation: -1.5, though it’s quite hard to win with such an endgame against a computer. The computer’s base line is as follows: 4... ¦d3 5.a4 ¦a3 6. ¦d5 ¦xa4 7.c5 bxc5 8. ¦xc5 ¤e6 -1.50 Let’s see a more complicated example. On this forum http://forum.chessglum.com/viewtopic.php?f=37&t= 1572&start=210#p201749 there was a conversation between the author and the Women International Master Svetlana Ershova where she offered a position to analyze using this technique: XABCDEFGHY 8rsnl+-trk+( 7zpp+-vl-zpp' 6-+p+p+-+& 5wq-+p+p+-% 4-+PzPnvL-+$ 3zP-sNLzPN+-# 2-zPQ+-zPPzP" 1tR-+-+RmK-!O xabcdefghy You can see the full text of the author’s reply and discussion that followed on the website. Here we give only the key moments. So let’s calculate HEs: W: a33, c33, 4, c43, 4, e412, f29, g17, f4-g55 B: a53, 5, 15, b83, c79, d54, e43,5, e59, e73 Here I give my thoughts as they appeared in my mind when I was analyzing the game. General positional ideas and some calculations are skipped. My thoughts: Let’s have a look at the direct attacks on Black’s HEs:11.£a4; 11.b4; 11.Ґxb8;11.cd; 11.Ґxe4 It’s difficult to evaluate the moves now, so we try to remember only the ideas. Further, White has a HE – a knight on e4 is not nice. It would be good to remove it, e.g. 11.¤d2 and after that f2-f3. But this would create a HE on d2. So you’d better be attentive. White is not afraid of capturing on a3, c3, f2. An attack on HE No5 can be very dangerous: g7-g5g4. It seems, Black can already make it. Of course, having the queen on a5 the attack on the white king is not so scaring, but the pawn can break the interaction of White’s pieces. White can create two new HEs for Black by moving Qb3: b73 and b3-g813; but this will put the queen in a knight-hazardous position with the rook on f1. But it can be fraught with the knight fork on d2 under some circumstances. If we search for tactics for White, it can be only against the queen on a5, as it is a HE as per three rules. The white bishop cut off the queen from retreating to a6, so you can try to catch the queen clearing the c-line and attacking c7 with the bishop. Let’s try an exchange: 56 1. cd ed Further either: 12.¤b5 cxb5 13.Ґc7 £a4 14.b3 £a6 15.a4 b6 - at first glance the attack cannot be made Or: 12.¤xd5 and it’s not possible 12...£xd5?because the queen here is bishop-hazardous, it can be attacked by 13.Ґc4 This means 12...cxd513.Ґc7 The queen is caught. Some tactics has been found. Of course, Black can curtail it, but we keep the idea in mind. Let’s see some other variants. Let’s look at other continuation for Black: 11.cd ¤xc3 or it can be taken by the queen 12.bxc3 exd5 it can be cd 13.c4 Looks like the White stands better. You can make pressure on the c-line, bishops look at the queen’s flank. Let’s see further. 11.cd ¤xc3 12.d6... White is temporarily without a piece. According to Kotov, it makes a little "Shrub". It is not related to the system directly. Totally: 12...Ґxd613.Ґxd6 There is material equality on the board 13...¦d8 Now the desperado principle works: 14.Ґxb8¦xb8 15.bxc3 White has an extra piece. 12...Ґd8 In this case the same the move 13.¤c7or even 13.Ґc7 wins with the same variants. Let’s look at other possibilities. 12...Ґf6 I wouldn’t like to put a stake on the bishop on d8 because it means a retreat for the queen. 13.bxc3 There is an extra pawn on d6, it cannot be lost and White’s position is excellent. Then we look at desperado, Black has to exchange the knight on c3 for any material. But there are not even pawns within its scope of action, but it can move: 12...¤d5 13.dxe7 ¤xe7 There is material equality, but Black’s position is worse. The queen’s flank is not developed. White’s pieces are in good positions. The variants are not simple, you can miss something here. Generally you can play 11.cd, and then depending on Black’s response, check once again. It’s also necessary to check this variant: 11.cxd5 cxd5 12.¤b5 With an idea to catch the rook by moving ¤c7. 12...¤a6 13.¤c7 Maybe the queen can be caught in the variants selected earlier? 13...¤xc7 14.Ґxc7 b6 15.b4 It is caught, forced the following move 15...Ґxb4 It is also possible to play It’s worth saying that Svetlana Ershova is an opponent of the system. Despite the fact that she did not accept the technique, her criticism was useful for the development of some aspects of the technique. Any scientific theory that brings something fundamentally new to the existing knowledge has to pass the smell test when some specialists seriously try to overturn it. So the author is grateful for those who constructively criticized the system on chess forums. The move has been selected. Let’s check if we make a blunder after 11.cxd5 White has a HE f4-g5 11...g5 White has a crucial HE on f4, Black has a HE “without pawn”. A standard method when both sides have crucial HEs is to get rid of the crucial HE with tempo, that is: 12.Ґxb8 ¦xb8 13.dxc6 White has an extra pawn. If Black plays g5-g4, the white knight will move to e5 and everything is good. Attacks on a3 and f2 make no sense here, similarly to the attack on c3 that has already been calculated. Check for blunders has been completed. I read all this again. Some ideas stated above allowed me to search for something new and specify the given variants, namely: 11.cxd5 exd5 12.¤xd5 cxd5 13.Ґc7 b6 (the move was not specified) 14. b4 The main expected variant: 11.cxd5 ¤xc3 12.d6 ¤d5 13.dxe7 I play 11.cxd5 The following positions taken from the final game Capablanca – Alekhine was published in the first version of the book and was used as a basic one for discussion of the whole system of one of chess forums. The position is at the intersection of strategy and tactics and there are a lot of interesting ideas and variants in it. 57 Alekhine - Capablanca World Championship 13th,Buenos Aires (34) XABCDEFGHY 8-+r+-tr-+(U 7zpp+lwqpmkp' 6-sn-+-snp+& 5+-+-zp-+-% 4-+-+P+-+$ 3zP-+-+NsNP# 2LzP-+QzPP+" 1+-tR-+RmK-! xabcdefghy Let’s consider the move selection algorithm using the system in this position. 1. Calculate Black’s HEs: a73, b73, c79, c84, e53, e73, e7-g714.2, f79 2. Calculate White’s HEs: a23, a33, c13,4, e2-f114.3, h33 Black has a greater numbers of HEs. We keep this information in mind. 3. Select active candidate moves in order to use White’s HEs. 1). Attack on a2 1. Be6 2). Attack on c1 Rс1 3). Attack on e2-f1 a6. This will create a HE on b6 which can be attacked by White at once moving Qe3, so we exclude it. HEs a33, h33 cannot be used at the moment. We see we are not winning on the fly. Do not allow carrying out the maneuver Qd2: Rfd8 defending b7 and creating a HE on e4: Bc6 defending e5 and e7: Rfe8 defending g5: h6 (move in the game) So we selected 6 candidate moves based on the theory. 6. Further, we select candidate moves based on classic theories of positional and tactical game. Evaluate the candidate moves you already selected additionally. Chose which of them will be useful from different points of view. As there is a lot of theoretical material and it is beyond the scope of the system we discuss here, let’s skip it. 7. Calculate variants using Kotov’s system for example. 8. Select a move which we like and check HEs which can appear after we make it. If everything is ok: 9. Make a move. That’all. By this example you can see very well the scope of the system’s application. Now let’s see the first lines of Houdini 0.11 Rfd8 0.13 Be6 0.14 Rfe8 0.15 h6 0.16 R:c1 0.19 Rg8 (smart move!) 0.19 Bс6 6 candidate moves were included in the first 7 lines of Houdini and are considered good. 4. Now let’s how White can threaten. Black has a lot of HEs. It’s necessary to study if they can be attacked by White. It’s easy to notice that the black king is unapproachable at the moment. But pawn HEs can be attacked by moving Qd2 with an idea to move to a5, attacking a7 and e5. This is quite an unpleasant threat. This idea is an excellent illustration of the efficiency of the system of hazardous elements. It is very hard to see or to feel intuitively that your opponent is preparing a double attack by his next move. It’s impossible to see it using ordinary calculations, if only we do not mean a computer. And here a simple system of creation and removal of hazardous elements allows you to control the game without making very complicating calculations. 5. Select preventive candidate moves which improve your HEs. 58 Position for Self-Study Write or record on a voice recorder your thoughts while you are solving this position. Compare them with the method of thinking described in the chapter “Tasks for Self-Study. Keys” for position No1. XABCDEFGHY 8-+-+-+R+( 7mkp+-wqp+-' 6p+-+-zp-+& 5zP-+-+-+-% 4-zP-sNr+P+$ 3+-zPQvl-+-# 2-mK-+-+-+" 1+-+-+-+-!O xabcdefghy Types of Positions where the system is most effective. All positions can be conventionally divided into the following types: 1. Positional struggle 2. Tactical struggle with using different elements of a position 3. Attack on the king Now let’s see which chess elements are considered in chess literature most often. 1. Openings and strategic ideas of playing in certain typical positions 2. Typical endgames 3. Combinations. When considering openings and typical endgames there are often variants that include sacrifices and tactical threats typical for these positions. As for the literature on tactics, up to ¾ of all combinations in it are completely or partially directed against the king. If you examine games of the strongest grand masters, you will see that in most of them there is a precise positional struggle which ends in a draw. A violent attack on the king is significantly rare. Games between the strongest chess players when the leader is evident often include the following scheme: in the beginning there is a quiet positional struggle, then a weaker player makes a blunder and this allows a stronger player to win a pawn or a piece. Why did the loser make a blunder? In the majority of other games he does not make such blunders but when playing against stronger chess players he makes them constantly. This is a complicated question and the system we offer gives the following answer: In a quiet position a chess player considers first of all strategic aspects of struggle without wasting time on calculating unreal combinations. In sharp positions it is vice versa – the chess player is totally concentrated on the calculation of variants. Kotov wrote about this peculiarity in his books, he even recommended thinking exactly in this way. It is interesting that in sharp positions even 200-point rating advantage does not give a real advantage because the majority of games which strong grand masters lose to masters include this sharp tactical struggle. In quiet strategic positions a weaker chess player’s inner determination is concentrated on positional struggle first of all. That is why he cannot see sometimes simple 2-move combinations. At the same time a stronger chess player has advantage – using his best knowledge about playing in typical positions a strong chess player examines tactics even in a simple position which allows him to ‘’unexpectedly’’ win ‘’positional’’ games using tactical methods. So a psychological aspect that includes tactical relaxation of a chess player in a simple position is very important. So, in which positions is calculation of hazardous elements more effective and in which of them is it less effective? Let’s start with positions where efficiency of HEs is limited and proceed to those where calculation of HEs produces the best results: 1. “Quiet” positions, first of all endgame positions. Though there are often a lot of HEs as per rule 3 in them, taking into account that there are few pieces and it’s difficult for them to defend one another and pawns, you can see combinations based on these HEs seldom. There is no queen to make a double attack and there is no enemy queen to catch it with a fork. In such positions calculations of HEs is equally important and allows you to find tactics hidden even in quiet positions. But still efficiency of the system here is minimal. 2. Attack on the king. When calculating complicating combinations, especially those which include a lot of checks and the king is 59 checkmated far from its original position, efficiency of HEs is not so evident. As a rule, in several moves after you start a variant HEs change a lot and it’s necessary to calculate them again. It’s not effective time-spending for all variants. You must calculate HEs for a current position and for a position after a selected move. It’s desirable that you calculate them for final positions in complicating variants if you are not sure in evaluation. Unfortunately, it’s not enough time to calculate HEs in a greater number of positions. 3. Sharp positions with hanging pieces, attack threats, queen catching etc.. Here HEs help evaluate points which deserve your attention. When calculating certain variants again we deal with the problem of HEs’ change and lack of time to recalculate them in every position. Generally, in such positions calculating of HEs is a powerful means. But don’t expect to receive effect at once because your opponent also targets at tactics calculation and his calculation can be correct. 4. Positional play in middle game. In such positions initiative is usually developed gradually. The strongest side tries to make pressure on the opponent’s weakness and after that switches to active action to gain material advantage or make an attack on the king. The side without advantage fights for equality or for counter play. Such positions usually include a lot of tactics in variants though the game can look quiet externally. We think the system is most effective in these positions. Remember that they are the most complicating in practice and least studied in theory. Working with HEs help set and see hidden traps, defend weak positions in advance before they become problems, prevent unexpected tactical attacks of the opponent and prepare your own attacks. 60 Chapter Style 9. Capablanca’s We’ve also changed the way we record hazardous elements: earlier we used tables, now we enumerate hazardous elements in line and a rule for HE calculation is raised to the power. If several rules are used to calculate a HE, either all of them are raised to the power or the most crucial of them. Looking at chess in the light of HE theory helps you understand how you can play without making blunders and without losing dozens of games and how you can win without making aggressive attacks or a long positional grip. This article provides a thorough introduction to hazardous elements as a positional principle of the game. The main idea of this principle is to create HEs for your opponent and to protect your own HEs. This article also reveals methods of playing against HEs. As it is described in the book, the system is the most efficient in positional play where you can create tactical chances which are not easy to see in “quiet” games. On the other hand, the system helps you avoid Capablanca - Vidmar London, 1922 XABCDEFGHY 8r+l+-trk+(U 7zpp+nwqpzpp' 6-+p+p+-+& 5+-+n+-+-% 4-+LzP-+-+$ 3+-sN-zPN+-# 2PzPQ+-zPPzP" 1+-tR-+RmK-! xabcdefghy W: c2-d55, c34, c43,5, e33 B: c63, d53,7,5, e73, g87, h73,9 Black to move. In 1918 when playing against Marshall, Capablanca played here 11. ... ¤xc3; Black won that game. Vidmar’s play was worse: 11.... b6? After the move Black’s HE on c6 got very weak with tension coefficient +2. Because of this he would have to capture d5 with the pawn on c6, creating an intrusion square on c7 for White. Note HEs on c6, c7, d5, h7. It is these elements White could break through without giving any chance to Black. Black already lost making blunders and makes you play more reliably. Therefore, strange though it may appear, games of stable players of positional style are best at illustrating the system based on tactical analyses. Jose Raul Capablanca has got the best defeat statistics among all world champions. Capablanca Kasparov Karpov Fisher Lasker Defeat rate 6,2 6,7 8 11 12 Victory rate 51 41 38 56 57 Capablanca did not lose any game over a period of eight years, 1916 to1924. How is it possible to play without making any blunders? To answer this question, let’s look at the games of this Cuban chess player in the light of hazardous elements. After that we will also examine a modern variant of playing performed by Magnus Carlsen who is the most stable chess player of modern age and a new world champion. Let’s start with a simple game. the game. 12.¤xd5 cxd5 13.Ґd3 XABCDEFGHY 8r+l+-trk+(U 7zp-+nwqpzpp' 6-zp-+p+-+& 5+-+p+-+-% 4-+-zP-+-+$ 3+-+LzPN+-# 2PzPQ+-zPPzP" 1+-tR-+RmK-! xabcdefghy Here is a double attack on the HEs on h7 and c7, Black is not able to defend both squares. 13.... h6 14.Јc7 Јb4 61 XABCDEFGHY 8r+l+-trk+( 7zp-wQn+pzp-' 6-zp-+p+-zp& 5+-+p+-+-% 4-wq-zP-+-+$ 3+-+LzPN+-# 2PzP-+-zPPzP" 1+-tR-+RmK-!O xabcdefghy W: a23, b22, c711, d33 B: a73, a83, b43, c69, c712, c83, d73, g87, h79, Black in his turn “clings” to White’s HE on b2. If White can protect the pawn, his position is excellent, but he plays better making pressure on the hazardous element – the queen on b4. 15.a3 Јa4 15...£xb2 16.¦a1! in order to win “presumptuous” queen, HE b210,11 16... ¦b8! – if the queen cannot be saved in attacks, then we need to check the idea of a counterattack on the HE c712 finally Black can save the queen but he creates a HE on f8. 17.¦fb1 ¦b7 18.£c6 ¤b8 19.£d6 £c3 XABCDEFGHY 8-snl+-trk+( 7zpr+-+pzp-' 6-zp-wQp+-zp& 5+-+p+-+-% 4-+-zP-+-+$ 3zP-wqLzPN+-# 2-+-+-zPPzP" 1tRR+-+-mK-!O xabcdefghy White attacks now the HE on h7 to deflect the defensive object on g8 from f8 20.Ґh7+ ¢xh7 21.£xf8 16.h3 ¤f6 17.¤e5 Ґd7 XABCDEFGHY 8r+-+-trk+( 7zp-wQl+pzp-' 6-zp-+psn-zp& 5+-+psN-+-% 4q+-zP-+-+$ 3zP-+LzP-+P# 2-zP-+-zPP+" 1+-tR-+RmK-!O xabcdefghy The most hazardous is the bishop on d7, he is attacked and protected two times, so it’s tension coefficient is 2. If a hazardous element is attacked and protected the same number of times, the greater number of pieces attack and protect it, the more difficult it is to retain it. The thing is that defensive objects can be attacked in such positions; the greater is the number of such objects, the more possibilities to attack you have. Maneuvering with pieces is often based on this principle: you should try to attack the opponent’s hazardous elements even if he can protect them, because this not only pins the defensive side but also allows the attacking side to play against defensive objects. In the position shown in the diagram there are two defensive objects – the knight on f6 and the queen on a4. It’s not possible to attack the knight, that’s why the objective is the queen. 18.Ґc2 Јb5 19.a4! Јxb2 20.¤xd7 ¦ac8 21.Јb7 ¤xd7 22.Ґh7+ Ўxh7 23.¦xc8 White won the exchange and the game. Can we call this a tactical game? Rather no, than yes, because White gave up nothing except for the easily calculated sacrifices of pawns, he risked nothing. Can we call this a strategic game? Also no, because White used tactical weakness of the pawn on c6 and other hazardous elements that were of temporary but not strategic nature. White did not make any deep positional plans, he made pressure on hazardous elements step by step and won the exchange. The following Capablanca’s game shows the style of playing very well; this style includes constant creation of HEs and making pressure on HEs, forcing the opponent to make a blunder. Shipley - Capablanca Philadelphia, 1916 1.e4 e5 2.¤f3 ¤c6 3.Ґb5 a6 4.Ґa4 d6 5.d4 b5 6.Ґb3 ¤xd4 7.¤xd4 exd4 8.Ґd5 ¦b8 9.Ґc6+ Ґd7 10.Ґxd7+ Јxd7 11.Јxd4 ¤f6 12.0–0 Ґe7 13.¤c3 0–0 14.¦e1 62 XABCDEFGHY 8-tr-+-trk+(U 7+-zpqvlpzpp' 6p+-zp-sn-+& 5+p+-+-+-% 4-+-wQP+-+$ 3+-sN-+-+-# 2PzPP+-zPPzP" 1tR-vL-tR-mK-! xabcdefghy W: c23, c35, d43,5, e13 B: a63, a79 14...¦fe8 Preparing to make pressure on the pawn on e4. Now it is sort of protected three times and attacked one time. But if we follow the rules for calculation of attacks and defenses suggested in Chuzhakin’s system, we can see that the knight on c3 can be attacked and it is not a protector, the position of the queen on d4 is not stable either, though the queen can move away to d3 in case she is attacked by the pawn. The rook on e8 attacks the pawn on e4 through the friendly piece, so it is counted as an attack. Therefore a HE on e4 is created. Note the rook on e1: it is not protected and is a HE. It didn’t have any practical meaning in the game but when playing with hazardous elements it’s easier to make a blunder and this happened in the game. The black pawn on a6 is a HE and you should keep an eye on this pawn as well as the intrusion square on a7. 15.f3 b4 16.¤d5 ¤xd5 17.Јxd5 XABCDEFGHY 8-tr-+r+k+(U 7+-zpqvlpzpp' 6p+-zp-+-+& 5+-+Q+-+-% 4-zp-+P+-+$ 3+-+-+P+-# 2PzPP+-+PzP" 1tR-vL-tR-mK-! xabcdefghy be exchanged. White secured on e4, now Black creates HE on b23,6 and a1-f613 which significantly restrains White’s position. 17. ... Ґf6 It’s not easy for White. The bishop is pinned to the protection of the HE on b2, the rook on a1 has got stuck for a long time, all pawns of the queen flank are immovable, the rook on e1 is not protected; the only active piece is the queen, she can be attacked by three methods, so White gets the queen out of attack in advance. 18.Јd3 Јb5 Exchanging the only one White’s active piece. 19.Јxb5 ¦xb5 Another possibility is to capture with the pawn and then press with the rooks on the a-line. 20.a3 XABCDEFGHY 8-+-+r+k+(U 7+-zp-+pzpp' 6p+-zp-vl-+& 5+r+-+-+-% 4-zp-+P+-+$ 3zP-+-+P+-# 2-zPP+-+PzP" 1tR-vL-tR-mK-! xabcdefghy It’s interesting that White decides to proceed to an open game losing a pawn in most cases. 20. ... b3?! Here is a positional technical move in Capablanca’s style. Capturing on a3 is objectively stronger but it required calculation of a greater number of variants. 20...bxa3! 21.¦xa3 Ґxb2 And in 22.¦xa6? Ґc3 23.¦d1 ¦b1 Black squeezes White using the vulnerable position of the rook on d1. W: c23, d55, e13 B: a63, d73, f73,6, g8-d513 The two last Black’s HEs are connected to the centralized position of the white queen that will soon 63 XABCDEFGHY 8-+-+r+k+( 7+-zp-+pzpp' 6R+-zp-+-+& 5+-+-+-+-% 4-+-+P+-+$ 3+-vl-+P+-# 2-+P+-+PzP" 1+rvLR+-mK-!O xabcdefghy Move 23.¦f1 didn’t help White protect the king, because the check with the bishop on d4 removed this protection. In the position shown in the diagram 24.¦a2 ¦eb8 does not help – and White loses the exchange anyway after attacking the pin on c1, e.g. 25.Ўf2 Ґb2 After exchange in 21. ... Ґxb2 White loses the pawn. Capablanca decided to attack not the pin on b2 but a HE on c2. 21.¦e2 d5 The vulnerable position of the rook became evident. 22.c3 dxe4 XABCDEFGHY 8-+-+r+k+( 7+-zp-+pzpp' 6p+-+-vl-+& 5+r+-+-+-% 4-+-+p+-+$ 3zPpzP-+P+-# 2-zP-+R+PzP" 1tR-vL-+-mK-!O xabcdefghy Here White could get a defensive position attacking Black’s HE on c7, using a temporary pin on e4, due to the unprotected position of the rook on e8: 23.Ґf4! e.g., 23. ...¦c5 24.¦xe4 ¦xe4 25.fxe4 g5 26.Ґg3 Ґe5 27.Ўf2 Ўf8 -0.22 Instead of that White just captured the pawn and after that his position failed. 23.fxe4? ¦be5 24.Ґf4 now it’s too 24...¦xe4 25.¦xe4 ¦xe4 26.Ґxc7 ¦e2 late XABCDEFGHY 8-+-+-+k+( 7+-vL-+pzpp' 6p+-+-vl-+& 5+-+-+-+-% 4-+-+-+-+$ 3zPpzP-+-+-# 2-zP-+r+PzP" 1tR-+-+-mK-!O xabcdefghy The rook on e2 and the bishop on f6 dominate the board, Black’s position has been won. 27.¦b1 Ґg5 28.g3 Ґe3+ 29.Ўh1 f6 30.Ґf4 Ґxf4 31.gxf4 a5 32.Ўg1 Ўf7 33.h4 g6 0–1 The following game shows maneuvering on hazardous elements very well. Capablanca,Jose Raul - Fonaroff,Marc [C66] New York casual New York, 18.06.1918 1.e4 e5 2.¤f3 ¤c6 3.Ґb5 ¤f6 4.0–0 d6 5.d4 Ґd7 6.¤c3 Ґe7 7.¦e1? [7.d5! with great advantage] 7...exd4 8.¤xd4 ¤xd4 9.Јxd4 Ґxb5 10.¤xb5 0–0 XABCDEFGHY 8r+-wq-trk+( 7zppzp-vlpzpp' 6-+-zp-sn-+& 5+N+-+-+-% 4-+-wQP+-+$ 3+-+-+-+-# 2PzPP+-zPPzP" 1tR-vL-tR-mK-!O xabcdefghy W: b53,5, c23, d43,5, e13 B: a72, b73, c73 White has advantage in space. Black is able to move away the knight on b5 and the queen on d4, so it’s necessary to think about stop-squares for them. We can 64 think about developing the bishop to f4, g5 or even to b2, then ¦ad1, the knight can be returned to c3 before moving it to d5. Capablanca chose another way: in every move he created or made a bigger pressure on hazardous elements. 11.Јc3 c6 12.¤d4 ¤d7 13.¤f5 Ґf6 XABCDEFGHY 8r+-wq-trk+( 7zpp+n+pzpp' 6-+pzp-vl-+& 5+-+-+N+-% 4-+-+P+-+$ 3+-wQ-+-+-# 2PzPP+-zPPzP" 1tR-vL-tR-mK-!O xabcdefghy W: a1-f613, c32, f55 B: b73, c63, d62, g79, g87 14.Јg3 The computer thinks that Black is already “mature” and suggests winning the pawn by making a double attack on the HEs on b7 and d6: 14.Јb4 ¤c5 (14...¤e5 15.f4 ¤g6 16.Јxb7) 15.Ґf4 Instead of that White creates the HE g3-g8 and makes pressure on d6. 14. ... ¤e5 15.Ґf4 Јc7 16.¦ad1 ¦ad8 XABCDEFGHY 8-+-tr-trk+( 7zppwq-+pzpp' 6-+pzp-vl-+& 5+-+-snN+-% 4-+-+PvL-+$ 3+-+-+-wQ-# 2PzPP+-zPPzP" 1+-+RtR-mK-!O xabcdefghy White was maneuvering against Black’s HEs six moves in a row and now he wins with a simple combination. 17.¦xd6 attack of the HE on d6 defending the HE on e5. 17. ...¦xd6 18.Ґxe5 XABCDEFGHY 8-+-+-trk+(U 7zppwq-+pzpp' 6-+ptr-vl-+& 5+-+-vLN+-% 4-+-+P+-+$ 3+-+-+-wQ-# 2PzPP+-zPPzP" 1+-+-tR-mK-! xabcdefghy 18.... ¦d1?? Black went too far but allowed Capablanca to perform a very sophisticated combination. Even if this combination hadn’t been found, White would have got an extra pawn in a good position anyway. It was necessary to attack a white rook in a more simple way – with the queen. 18...Јa5! 19.Ґc3 Ґxc3 20.bxc3 ¦g6 21.¤e7+ Ўh8 22.¤xg6+ fxg6 and realization of an extra pawn presents severe technical difficulties. 19.¦xd1 Ґxe5 20.¤h6+ Ўh8 XABCDEFGHY 8-+-+-tr-mk( 7zppwq-+pzpp' 6-+p+-+-sN& 5+-+-vl-+-% 4-+-+P+-+$ 3+-+-+-wQ-# 2PzPP+-zPPzP" 1+-+R+-mK-!O xabcdefghy Now White attacks the HE on e5, creating HEs on d8, f7 and e5-h8 for Black: 21.Јxe5!! Јxe5 22.¤xf7+ 1–0 Euwe - Capablanca London, 1922 1.e4 e5 2.¤f3 ¤c6 3.Ґb5 ¤f6 4.0 –0 d6 5.d4 Ґd7 6.¤c3 exd4 7.¤xd4 Ґe7 8. ¦e1 0 –0 9.Ґf1 ¦e8 10.f3 ¤xd4 11.£xd4 Ґe6 65 XABCDEFGHY 8r+-wqr+k+( 7zppzp-vlpzpp' 6-+-zplsn-+& 5+-+-+-+-% 4-+-wQP+-+$ 3+-sN-+P+-# 2PzPP+-+PzP" 1tR-vL-tRLmK-!O xabcdefghy XABCDEFGHY 8r+-+r+k+( 7zpp+nvlpzpp' 6-+p+l+-+& 5+-+pzP-+-% 4N+-+-+-+$ 3+-+-+P+-# 2PzPPvL-mKPzP" 1tR-+-tRL+-!O xabcdefghy White controls the space, Black refrains from weakness. HEs: W: с23 d43, e13 , d4-g114 B: b73 HEs: W: a43,5,10, b23, c23, d23, e53, f2-e75, h23 B:b73, e610 Black has a gigantic advantage from the point of view of HEs. White should either protect the HE on e5 with the move to f4, or с2 with the move to Cd3. 17.g3? [17.Ґd3 b5 18.¤c3 Ґc5+ 19.¢g3 Ґd4 20.f4 ¤c5 21.¤d1 f6 22.Ґc3 fxe5 23.fxe5 Ґxc3 24.¤xc3 ¤d7 -0.51] The pawn on e5 is attacked two times and is protected one time, tension coefficient is +1. A standard method of playing in such positions is clearing the line of attack with tempo; to do this, it’s good to attack a HE with pieces which block the line; in this case Black attacks c2, a4 and f2 capturing the pawn on e5. 17. ...Bf5 18.Rac1 b5 19.Nc3 Bc5+ 20.Kg2 Nxe5 µ 12.£f2 c6 13.Ґd2? [13.Ґe3 £a5 14.a3 d5І] White created a HE on b2, Black makes an immediate attack: 13... £b6 XABCDEFGHY 8r+-+r+k+( 7zpp+-vlpzpp' 6-wqpzplsn-+& 5+-+-+-+-% 4-+-+P+-+$ 3+-sN-+P+-# 2PzPPvL-wQPzP" 1tR-+-tRLmK-!O xabcdefghy The game is equal. It is possible for White not to defend the HE on b2, playing, for example, with the rook on d1. Euwe makes a strategic mistake. 14.¤a4?[14. ¦ad1=] Now the knight is a HE as per rules 3, 5 and 10. 14...£xf2+ 15.¢xf2 d5 16.e5? [16.exd5 ¤xd5 17.a3 ¦ad8 Black has a small advantage] Instead of that White created a new HE on e5. 16...¤d7 XABCDEFGHY 8r+-+r+k+( 7zp-+-+pzpp' 6-+p+-+-+& 5+pvlpsnl+-% 4-+-+-+-+$ 3+-sN-+PzP-# 2PzPPvL-+KzP" 1+-tR-tRL+-!O xabcdefghy Black has a won game. 21.g4 Bg6 22.Kg3 h5 23.Bf4 f6 24.Bxe5 fxe5 25.Bd3 Bf7 26.g5 g6 27.Re2 Bd6 28.Kg2 Kg7 29.Rce1 Re7 30.Nd1 Rf8 31.Nf2 Be8 32.b3 Ref7 33.c4 Rxf3 34.cxd5 cxd5 35.Bb1 Bc6 36.Rd1 R3f4 37.Be4 Bc5 38.Nd3 dxe4 66 0 –1 In the next game Capablanca, who was very cautious in the opening and didn’t perform any combinations, smashed up Marshall playing with Black pieces; he got an extra pawn and gained a position by move 29. It’s interesting that from move 11 to 29 almost every Black’s continuation can be considered as maneuvering on hazardous elements. Marshall - Capablanca New York, 1927 1.e4 c6 2.d4 d5 3.¤c3 dxe4 4.¤xe4 Ґf5 5.¤g3 Ґg6 6.f4 e6 7.¤f3 Ґd6 8.Ґd3 ¤e7 9.0–0 ¤d7 XABCDEFGHY 8r+-wqk+-tr( 7zpp+nsnpzpp' 6-+pvlp+l+& 5+-+-+-+-% 4-+-zP-zP-+$ 3+-+L+NsN-# 2PzPP+-+PzP" 1tR-vLQ+RmK-!O xabcdefghy Black plays rather passively but paying attention to the HE on f43 10.¢h1 [10.¤e5 is more active] 10...£c7 attacking the HE on f4 and defending the HE on b711.¤e5 ¦d8 creating X-ray d1d812.£e2 Ґxd3 This exchange forces the knight to leave the center. It is not possible to capture by the queen because of X-ray – Black will capture on e5 in this case. 13.¤xd3 0 –0 Black completes his development, removes the king from X-ray and defends the HE on g7. XABCDEFGHY 8-+-tr-trk+( 7zppwqnsnpzpp' 6-+pvlp+-+& 5+-+-+-+-% 4-+-zP-zP-+$ 3+-+N+-sN-# 2PzPP+Q+PzP" 1tR-vL-+R+K!O xabcdefghy W: d43, f43 B: a73, d610, e63 White’s position is slightly worse, the HEs on f4 and d4 restrain his play. 14.Ґd2 The move is based on general positional considerations, while Black plays more concretely. The computer here suggests using HE on d610 and pressing on the Bishop: 14.c4 c5 15.b4 b6 16.dxc5 bxc5 17.b5 -0.11; Or attacking the Bishop by the Knight 14.¤e4 c5 15.Ґe3 cxd4 16.Ґxd4 ¤f5 17.Ґc3 Ґe7 18.£g4-0.12 14...c5 attacking HE on d4 15.¤e4 ¤f5 If Black captures on d4, then White captures on d6, decoying the queen into HE #5, after which Ґb4 wins a piece. 16.dxc5 ¤xc5 17.¤dxc5 Ґxc5 18.Ґc3 [Better 18.¤xc5 £xc5 19.Ґc3 ¦d5 20.£f2 ¦c8 21.£xc5 -0.38] 18...Ґd4 19. ¦ad1 XABCDEFGHY 8-+-tr-trk+(U 7zppwq-+pzpp' 6-+-+p+-+& 5+-+-+n+-% 4-+-vlNzP-+$ 3+-vL-+-+-# 2PzPP+Q+PzP" 1+-+R+R+K! xabcdefghy 67 Black continues the series of exchanges. Black takes advantage on the open file because the rook on f1 is engaged in the defense of the HE on f4. 19... Ґxc3 20.¤xc3 22.¤c3 ¦xd1 21.¤xd1 ¦d8 XABCDEFGHY 8-+-tr-+k+(U 7zppwq-+pzpp' 6-+-+p+-+& 5+-+-+n+-% 4-+-+-zP-+$ 3+-sN-+-+-# 2PzPP+Q+PzP" 1+-+-+R+K! xabcdefghy 30.¤d6 ¤e3 31.a4 ¤d5 32.¤xb7 ¤xf4 33.b4 ¤d5 34.b5 ¤c3 35.¤a5 ¤xa4 36.¤c6 ¢f8 37.¤xa7 ¢e7 38.¤c6+ ¢d6 39.¢g1 f6 40.¢f2 e5 41.¤d8 ¢d7 42.¤b7 ¢c7 43.¤a5 ¤c3 44.¢f3 ¤xb5 45.¢e4 ¤d6+ 46.¢d5 ¢d7 47.¤c6 ¤c8 48.¤b8+ ¢e7 49.¤c6+ ¢f7 50.¤d8+ ¢e8 0 –1 W: b23, c33, f43, h17.2 B: a73, c73, e63, f55 Move after move Black’s advantage becomes greater. Black goes on attacking White’s hazardous elements. 22...£b6 23. ¦d1 ¦xd1+ 24.¤xd1 £b4 25.£f2 XABCDEFGHY 8-+-+-+k+(U 7zpp+-+pzpp' 6-+-+p+-+& 5+-+-+n+-% 4-wq-+-zP-+$ 3+-+-+-+-# 2PzPP+-wQPzP" 1+-+N+-+K! xabcdefghy 25...h5 Black protects the Knight that was a HE as per rule 5 and makes an escape square for the king. The computer advices to begin the final maneuver Јb4-d6-d4 right away on the 25th move. 26.a3 £d6 27.¤c3 £d4 28.£xd4 ¤xd4 29.¤e4 ¤xc2 with an extra pawn and won position. 68 Carlsen Magnus Carlsen is often compared to Capablanca as he has the same spontaneous style and a low number of defeats. “If you make 50 error-free moves in a row, you will make a draw”. These words of Carlsten shed the light on his original style – playing for opponent’s mistake. Adams - Carlsen London, 2012 1.e4 e5 2.¤f3 ¤c6 3.Ґb5 a6 4.Ґa4 ¤f6 5.0–0 Ґe7 6.d3 b5 7.Ґb3 d6 8.a4 Ґd7 9.h3 0–0 10.Ґe3 Ґe6 11.Ґxe6 fxe6 12.¤bd2 b4 13.c3 XABCDEFGHY 8r+-wq-trk+(U 7+-zp-vl-zpp' 6p+nzppsn-+& 5+-+-zp-+-% 4Pzp-+P+-+$ 3+-zPPvLN+P# 2-zP-sN-zPP+" 1tR-+Q+RmK-! xabcdefghy W: b23, c33,4, d33 B: b43,4, c63, e63 13. ...d5?! Black has evident hazardous elements on c6 and e6; the most reliable thing is to defend them with the move 13...Јd7. Instead of that Carlsen moves the d-pawn, creating an additional HE on e5 which allows White to win the pawn. The plan here is simple: there is a HE on e5, a pawn which is defended and attacked one time. This means it’s necessary to make pressure on the defensive object – the knight on c6. As it is also a hazardous element, Black will not be able to defend it here. 14.cxb4 Ґd6 If 14...Ґxb4, attack along the line with: 15.Јc2 Јd7 16.¦fc1 – Black is able to keep material equality for several moves, but the HEs c6 and c7 make his position cheerless. 15.b5axb5 16.axb5 ¦xa1 17.Јxa1 ¤b4 Targeting at the HEs on c2 and d3 XABCDEFGHY 8-+-wq-trk+( 7+-zp-+-zpp' 6-+-vlpsn-+& 5+P+pzp-+-% 4-sn-+P+-+$ 3+-+PvLN+P# 2-zP-sN-zPP+" 1wQ-+-+RmK-!O xabcdefghy W: b53, b412, c29, d32, e35, e43,4 B: d54, e53, d6-f614 18.d4! White has found a good solution: he gets the d3pawn out of attack and attacks the HE on e5. This solution is also interesting: 18.Јa4 creating a HE on b4 and threatening with 19.¤xe5 deflection of defensive object, 18. ...¤xd3 19.Јb3 attack on the HE on d3, creating X-ray b3-g8, 19...¤b4 (19...¤f4? 20.Ґxf4 exf4 21.e5 –effect of the HE d6-f6) 20.¤xe5 White has an extra pawn, Black has some compensation. 18. ... exd4 19.¤xd4 Now the HE on e6 and d8 – f8 is hanging. 19. ...Јe8 Defending e6 and with an eye for the pawn on b5 that becomes a HE. 20.Јa4 ¤xe4 21.¤xe4 dxe4 22.¤c6 XABCDEFGHY 8-+-+qtrk+(U 7+-zp-+-zpp' 6-+Nvlp+-+& 5+P+-+-+-% 4Qsn-+p+-+$ 3+-+-vL-+P# 2-zP-+-zPP+" 1+-+-+RmK-! xabcdefghy W: a43, b23, b412, c63, f29, g17, h29 B: a79, b42, c612, e43 White threatens to win the pawn on e4 due to the critical mass of Black’s hazardous elements after move 69 13. Now Magnus starts playing in full force and effect. 22. ...¤d5! The computer thinks that it’s stronger to play 22...¤xc6 23.bxc6 Јg6, but the move in the game is a blunder. Carlsen does not want hard defense without counter chances on e4 and starts attack on the points b5, f2 and white queen. 23.Јxe4 ¤xe3! Why, playing without a pawn, should one exchange an active knight for a white bishop? In order to activate a rook. If Black starts attacking on the king’s flank, White’s knight on c6 will be in a bad position. In the center the knight will be attacked, in case it is moved to the king’s flank, to keep it on b5 is impossible and Black’s position can become better as a bishop in open positions is stronger than a knight. 24.Јxe3 ¦f5 Now it’s easier for Black to play: the rook can shield the HE on e6 frontally and they attack White’s HEs step by step. XABCDEFGHY 8-+-+q+k+( 7+-zp-+-zpp' 6-+Nvlp+-+& 5+P+-+r+-% 4-+-+-+-+$ 3+-+-wQ-+P# 2-zP-+-zPP+" 1+-+-+RmK-!O xabcdefghy W: b23, b52, c63, e35, f29, g17, h29 B: c612, e63, e83, f55, without a pawn1 25.¤d4 ¦e5 26.Јb3 ¦d5 27.Јc4 Јf7 28.b3 XABCDEFGHY 8-+-+-+k+(U 7+-zp-+qzpp' 6-+-vlp+-+& 5+P+r+-+-% 4-+QsN-+-+$ 3+P+-+-+P# 2-+-+-zPP+" 1+-+-+RmK-! xabcdefghy W: b53, c45, d43, f29, g17, h29 B: e63, c4-g813, without a pawn1 28. ... Јd7! The computer does not like this move, it suggests: [28...h6 29.¦e1 £f4 30.¤f3 £f5 31.¢f1 Ґc5 32.£e2 ¦d3 33.b4 Ґxb4 34.£xe6+ £xe6 fast equity evaluation 0.21] The idea of the move 28. ... Јd7 is clear: Black presses on the HE on d4, making the knight move away to c6; after that the queen will return to f7, then to f5 or f4, making the pressure on the HEs on b5 and h2(h1) harder. It will be not easy for the white knight to be there in time for defense, thought White still has advantage. 29.¤f3? Adams gave up the pawn without fight. It would be better to play 29.¤c6 Јf7 30.Јe2 disturbing the HE on e6. Now Black’s pawn structure is worse, but significantly more active pieces and a bishop that looks at both flanks compensate for this disadvantage. 29. ...¦xb5 30.¦a1 ¦d5 31.g3 h6 32.Јe4 Јe8 33.Ўg2 Ўf7! In most cases it’s too risky to move the king to the center in order to protect e6; here White has no enough time to attack it and to prevent developing the black queen. 34.¦a2 Јd8 35.¦e2 Јf6 XABCDEFGHY 8-+-+-+-+( 7+-zp-+kzp-' 6-+-vlpwq-zp& 5+-+r+-+-% 4-+-+Q+-+$ 3+P+-+NzPP# 2-+-+RzPK+" 1+-+-+-+-!O xabcdefghy 36.h4? White has serious HEs on b3, d3 and f3. After making a queen trade it will be hard for him; his only chance is to press on the main Black’s HE that is the pawn on e6. It’s impossible to put the knight on d4 at once, but it’s possible to strengthen the queen’s position putting it on one diagonal with the black king: 36.Јc4! and impossible 36. ...Јf5? 37.¤d4 White retains his position. A possible variant: 36...Ўg8 moving the king out of the dangerous diagonal 37.Јe4 Ўf7 – repeating the moves. Јf5 37.Јc4 ¦d3 70 XABCDEFGHY 8-+-+-+-+( 7+-zp-+kzp-' 6-+-vlp+-zp& 5+-+-+q+-% 4-+Q+-+-zP$ 3+P+r+NzP-# 2-+-+RzPK+" 1+-+-+-+-!O xabcdefghy 38.¦e3? Creating after exchange HEs on e3, g3 and opening the second rank for the black queen. Now his position is rather difficult. It was necessary to attack on d3. 38.¤e1! For example 38. ...Јd5+ 39.Јxd5 ¦xd5 40.¤c2 ¦d3 41.b4 ¦b3 42.¦e3 ¦b2 43.¦c3 As Black’s pawn structure is worse, it allows White to find weakness and press on it, neutralizing big activity of black pieces. 38. ... ¦xe3 39.fxe3 Јb1 XABCDEFGHY 8-+-+-+-+( 7+-zp-+kzp-' 6-+-vlp+-zp& 5+-+-+-+-% 4-+Q+-+-zP$ 3+P+-zPNzP-# 2-+-+-+K+" 1+q+-+-+-!O xabcdefghy White’s position is worse, it’s difficult for him to defend, but he can increase pressure on the HE on e6: 40.¤d4 Јe4+ 41.Ўf2 Јe5 42.¤e2 and White hold out. 40.e4? Now Black attacks the king, i.e. the object that defends the HE on g3–the king on g2, forcing the king to give up the f2-square, from which the final double attack on the HEs on f3 and g3 is made. Јb2+ 41.Ўh3 Јf2 42.e5 Јxf3 43.exd6 Јh1+ 44.Ўg4 Јd1+ 45.Ўh3 Јxd6 XABCDEFGHY 8-+-+-+-+( 7+-zp-+kzp-' 6-+-wqp+-zp& 5+-+-+-+-% 4-+Q+-+-zP$ 3+P+-+-zPK# 2-+-+-+-+" 1+-+-+-+-!O xabcdefghy Black easily realized an extra pawn. 46.h5 c5 47.g4 Јd4 48.Јf1+ Ўe7 49.Јf3 Јd5 50.Јc3 e5 51.Ўg3 Ўd6 52.Јc4 Јxc4 53.bxc4 e4 54.Ўf4 e3 55.Ўf3 Ўe6 56.Ўe2 Ўf6 57.Ўf3 Ўg5 58.Ўxe3 Ўxg4 59.Ўe4 Ўxh5 60.Ўd5 g5 61.Ўxc5 g4 62.Ўd4 g3 63.Ўe3 Ўg4 0–1 71 Chapter 10. Testimonials The most important thing I noticed when playing against a much stronger opponent, e.g. programs, is that a chess player needs SOMETHING that will let him feel psychologically comfortable, I mean no fear of opponent. No general knowledge of the game – opening theory, middlegame positions, good endgame skills – will make you absolutely confident and calm if you feel that your opponent has advantages in everything. When you know a lot, you actually know nothing. Using this system, I don’t have apprehension anymore when playing against programs and also people. Now, even if I lose, the reasons for that are other factors, not the ones that were before. It is important to build up a system to hold on to realizing that it can make the class of game stable, even if only psychologically, at first sight. Though, after you study all the details of the system, you will become a totally different chess player. I mean, a chess player being stressed and under a limited control needs a simple and efficient thing, but not the legacy of the whole chess world, because you’ll lose the game sooner than you’ll be able to choose something suitable from this legacy. In my opinion, creation of a clear list of HE for studying and using in practice mechanically is an example of creation of a user manual. As I already mentioned before, most often it is important not even to win but not to lose. I think, using this detailed system of HE delivers tremendous results. There are some programs I am not interested in playing against any longer. They are not that advanced, but I understand that they have nothing to win me. It’s the first time it’s been interesting to me to play against strong programs. I don’t have fear of losing anymore. Now I say to myself – “Try to win” and even if I lose I don’t become upset with it, because the quality of the games lost is totally different than it was before I started using HE. Of course, I don’t mean you should refuse from everything and use only HE, but for me it is the HE system that was the missing link in the whole game. The most important thing is to make the system completed for what it was designed for, to make a detailed list and technique of using and calculation. But it is almost ready. At the moment I use the technique as it is written in the first book. Vyacheslav Turovskiy http://www.neoneuro.com/ru/chess#comment-38 Thanks a lot for you work. I work as a chess coach for children in the chess school “Etude”. When my pupils start studying strategy, they forget about tactics. Your approach makes it possible to start assessing the position from searching hazardous elements and to switch to strategy, i.e. a search for a move becomes an integral algorithm. Of course, it is necessary to increase the number of examples for didactic purposes. Tatiana Anatolievna Ogneva http://www.neoneuro.com/ru/chess#comment-80 I’ve seen the demo version of the book and was very impressed. I’ve read it in one breath in two and a half hours. The book is very useful for beginners, like me, and for many others. Those who only start studying different strategies and tactics will be very interested to see real examples. There are no difficult terms in the book and that is a great plus in learning the material. Earlier I never thought of many things when making moves, I made blunders when attacked. In this book there is a nice description of how to avoid such blunders. Now I’m already not that bad when I play against computer at the beginner’s level, which really pleases me. The author of the book is a good egg and a real professional. Thanks for the nice and easy material. I recommend this book to everyone; even professionals will be able to pick up a lot of new things from it. http://www.neoneuro.com/ru/chess#comment-82 I’ve read the demo version and was deeply impressed! Honestly, it was a bit difficult to go into theory, especially taking into account that there is no complete picture provided because some chapters are absent. Generally speaking, the book is full of theoretical computations that let you look at chess totally different. I changed my worldview. I don’t know how the author could manage it. It is really tremendous work. I can only imagine how much time was spent for the creation of this book… What are the minuses? In my opinion, it would be nice to reduce the theoretical part. But if the author introduces some new ideas in chess, there are actually no minuses. It’s necessary to unlock the potential and a detailed variant is needed to do that. Thank you for changing my opinion on chess. I am going to make my sons read this book. It was great to find such a website on Internet. http://kasparovchess.crestbook.com/threads/6280/page-7#post-476805 72 I’ve become a Class A-player recently winning a couple of games. I performed there some easy combinations which I could never have found if I hadn’t read the book under discussion. The book helped me make my dream as a child come true. What can be greater than that? 73 Contents Chuzhakin’s System Review......................................................................................................................................... 2 Introduction ................................................................................................................................................................. 4 Whom is the book addressed to? ....................................................................................................................... 4 Why is this system useful for a chess player?..................................................................................................... 4 What is new about the system and how is it different from what was known before? .......................................... 5 Feedback .......................................................................................................................................................... 7 Chapter 3. Definitions. ................................................................................................................................................. 8 Chapter 4. Rules for Calculation of Hazardous Elements (HE) .................................................................................... 12 1. Material advantage of your opponent ........................................................................................................... 12 2. Objects under attack .................................................................................................................................... 13 3. Unprotected objects..................................................................................................................................... 14 4. Exchange .................................................................................................................................................... 17 5. Possibility of an attack ................................................................................................................................ 17 6. Pin .............................................................................................................................................................. 17 7. King ........................................................................................................................................................... 18 8. Passed pawn ............................................................................................................................................... 20 9. Intrusion squares ......................................................................................................................................... 21 10. Limited mobility of a piece........................................................................................................................ 23 11. “Presumptuous” objects ............................................................................................................................. 24 12. Intruding enemy piece ............................................................................................................................... 25 13. X-ray ........................................................................................................................................................ 25 14. -hazardous HE .......................................................................................................................................... 26 15. Major pieces shifted more than three ranks relative to their initial position ................................................. 27 16. Possibility of stalemate.............................................................................................................................. 28 17. Possibility of Zugzwang ............................................................................................................................ 28 18. Possibility of theoretical draw.................................................................................................................... 29 Chapter 5. Notation of Hazardous Elements, Rules in Brief, Tables ............................................................................. 30 Brief Rules for Calculation of HE.................................................................................................................... 30 Notation of Hazardous Elements ..................................................................................................................... 32 Chapter 6. How to Use Hazardous Elements ............................................................................................................... 33 Logical Sense of Hazardous Elements ............................................................................................................. 33 Let’s see some examples ................................................................................................................................. 33 Chapter 7. Standard Methods of Using HEs ................................................................................................................ 35 Direct Use of a Certain HE.............................................................................................................................. 35 Double Attack ................................................................................................................................................. 36 Playing Against a Defensive Object (DO) ....................................................................................................... 37 Direct attack on DO .............................................................................................................................. 37 Deflection of DO .................................................................................................................................. 37 Interference with the DO’s line ............................................................................................................. 38 Decoying DO to a pin ........................................................................................................................... 38 Playing against DO when TC > 1 .......................................................................................................... 39 When Both Sides Have Crucial HEs ................................................................................................................ 39 Rule No 3, Using Tension Coefficient with “+” ............................................................................................... 40 Deflection of a Shielding Object...................................................................................................................... 40 HE No6 + HE No3: Pin of Under Protected Object .......................................................................................... 41 Attack with a Pinned Object ............................................................................................................................ 41 HE No7 + No10: Attack on the King with Limited Mobility ............................................................................ 41 Decoying to –hazard ....................................................................................................................................... 43 Decoying to knight-hazard .............................................................................................................................. 43 Decoying to bishop-hazard.............................................................................................................................. 44 HE Transformation ......................................................................................................................................... 44 Counterattack ................................................................................................................................................. 44 Desperado pieces and pawns ........................................................................................................................... 45 Clearance of Threat Square ................................................................................................................... 46 Desperado ............................................................................................................................................ 46 Material advantage ............................................................................................................................... 47 Tactical Defense ............................................................................................................................................. 48 Temporary Sacrifice ........................................................................................................................................ 49 Decoying to double attack ............................................................................................................................... 49 Deflecting a Pawn to Use Pawn-Hazard .......................................................................................................... 50 Combined Usage of HE of Different Types ...................................................................................................... 50 74 Table of Standard Methods.............................................................................................................................. 51 Chapter 8. Move Calculation Algorithm...................................................................................................................... 53 Move Calculation Algorithm ........................................................................................................................... 53 Examples ........................................................................................................................................................ 55 Position for Self-Study .................................................................................................................................... 59 Types of Positions where the system is most effective. ..................................................................................... 59 Chapter 9. Capablanca’s Style .................................................................................................................................... 61 Chapter 10. Testimonials ............................................................................................................................................ 72 Full version is available in Russian at http://www.neoneuro.com/downloads/chuzhakinsystem2.1.pdf Chuzhakin Evgeny © 2014 75