1
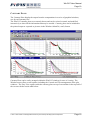
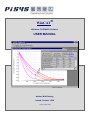
WinCAT Windows CATENARY Software USER MANUAL Author: M.A.Delaney Issued: October 1998 Pisys Limited 1998 WinCAT User Manual Page 1 CONTENTS INTRODUCTION .........................................................................................................................2 ABOUT WINCAT..........................................................................................................................2 A BRIEF HISTORY .........................................................................................................................2 INSTALLATION ..........................................................................................................................3 COMPUTER REQUIREMENTS ..........................................................................................................3 WINCAT SETUP ...........................................................................................................................3 DEMONSTRATION VERSION...........................................................................................................3 REGISTRATION ..............................................................................................................................3 WINCAT OPERATION ...............................................................................................................6 THE APPLICATION WINDOW .........................................................................................................6 MENU OPTIONS.............................................................................................................................6 WINCAT DATA FILES ..................................................................................................................6 DIALOGUE BOXES .........................................................................................................................7 DATA INPUT ................................................................................................................................8 GETTING STARTED ........................................................................................................................8 CREATE NEW DATA ......................................................................................................................8 PROJECT DETAILS .........................................................................................................................8 CATENARY SETUP.........................................................................................................................9 LINE COMPOSITION .......................................................................................................................9 SECTION DETAILS .......................................................................................................................10 LINE DEPLOYMENT .....................................................................................................................13 CATENARY LINES .......................................................................................................................15 RESULTS & OUTPUT ...............................................................................................................17 WINCAT CALCULATIONS...........................................................................................................17 RESULTS TABLE..........................................................................................................................18 CATENARY PLOTS .......................................................................................................................19 PRINTING ....................................................................................................................................21 OPTIONS & PREFERENCES...................................................................................................22 THE DATABASE ..........................................................................................................................22 UNIT SETS...................................................................................................................................22 SYN001:c:\documents and settings\administrator\my documents\products\pisys\wcmanualpdf.doc Page 1 WinCAT User Manual Page 2 INTRODUCTION ABOUT WINCAT WinCAT is PC Windows software for the analysis of hanging cable systems - such as offshore moorings, umbilicals and flexible risers., WinCAT is very powerful but is also easy to use. WinCAT has an optional Workboat capability that allows a surface craft to be introduced into the cable system. This allows analysis of anchor running, cable laying and many other offshore operations involving mooring lines, umbilical cables, bundle towage etc. Output results are presented as graphic plots of the catenary line together with a comprehensive table of numeric results. These can be printed and also output to other Windows software (eg. Excel) for further manipulation. WinCAT works with multiple catenary lines, and the plots can be simultaneously displayed for comparison of results. Also, multiple states of a catenary line can be computed and displayed in one operation. WinCAT is interactive, the catenary setup can be readily modified through the on-screen forms, and the effect is immediately computed and reflected in the tabular and plotted results. The data for all catenary lines is saved to the same data file so that all analysis scenarios for one project or one vessel can be held in a single dataset. WinCAT makes the setting up and managing of catenary data extremely easy, even for someone unfamiliar with cable systems. Check out the powerful capability features of WinCAT : Easy set-up with user friendly data input screens Multiple line sections with different properties for each Support buoys positioned at any points along the line Workboat option to handle line installation and laying Sloping seabed and ground friction can be modelled In-built database of line properties (chain, wire, etc.) User additions to database for lines, anchors, units etc. Switchable units (Metric/Imperial) for input and results Comprehensive results presented in tabular format Graphic catenary plots with multiple cases per plot Interaction with plots for line details and measurements Fully featured print layout capabilities and print preview A BRIEF HISTORY WinCAT was first released as Version 1.0 in 1995. The software was a conversion from the DOS based program originally written by Angus Jamieson in 1993 and later acquired by Pisys. A complete rewrite of the WinCAT user interface followed, and Version 2.0 was released in 1998. Martin Delaney contributed to the development of Version 2.0 and his company Synectica now exclusively provides sales and support for the WinCAT software product. The intellectual property rights to WinCAT are held by Pisys who permit use of the software under a nonexclusive Licence Agreement. SYN001:c:\documents and settings\administrator\my documents\products\pisys\wcmanualpdf.doc Page 2 WinCAT User Manual Page 3 INSTALLATION COMPUTER REQUIREMENTS WinCAT requires a personal computer (PC) running a Microsoft Windows operating system which must be one of the following versions: Windows NT, Windows 95 or Windows 98. Note: The older 16 bit operating systems such as Windows 3.0 and Windows 3.1 cannot run WinCAT. There are no specific hardware requirements beyond those necessary to support the Windows operating system, but WinCAT installation will take around 2 Megabytes of disk space. WINCAT SETUP WinCAT is distributed as a single file called WinCATsetup.exe. Running this file will commence the process of installing the software onto a suitable PC. Setup automatically steps through the procedure of decompressing and copying the necessary program and sample data files into the target folder, setting up the shortcut icons and registering the data file associations. The folder name and shortcut location may be chosen by the user if the defaults are unsuitable. Warning: If the folder (directory) name selected for installing WinCAT already exists, any program or data files in this folder that have identical names as those being installed will be overwritten. Other files in the folder will not be affected. When WinCAT is first installed onto a PC, it is configured to run as a Demonstration Version. DEMONSTRATION VERSION The Demonstration Version of WinCAT is licensed, at no cost, to prospective purchasers for the sole purpose of evaluation. Print and Save functions are disabled, but otherwise, the Demonstration Version is fully working software which will operate for 30 minutes each time it is started. Warning ! When using the Demonstration Version, the line properties given when using ALTs should not be relied up as being correct. REGISTRATION Purchasers of WinCAT are entitled to register as a licensed user and obtain their unique key codes to access the software. The Registration process will reconfigure the software from a Demonstration Version to a Licensed Version by removing the usage restrictions and enabling the optional capabilities for which the licence has been purchased. Separate registration is necessary for each copy installed on a different PC. After installing the software, follow instructions in the "Registration" window which is accessible from the opening splash screen via the [ Registration Info ] button. SYN001:c:\documents and settings\administrator\my documents\products\pisys\wcmanualpdf.doc Page 3 WinCAT User Manual Page 4 Registration Procedure: 1. Read and accept the Licence Agreement. 2. Contact Pisys Limited by phone, fax or e-mail. 3. Provide some details to identify yourself and advise the 8-digit "Security Code" that WinCAT displays. 4. The contact at Pisys will then issue the relevant "Password" and "Mask" strings which should to be typed into the entry boxes. Note - WinCAT can be installed onto any PC and does not need a hardware “dongle” or a special master disk. The security system relies on each installation being registered with the key codes which unlock the program for licensed use. The software is identical, but every installation requires unique Password and Mask keys to match the security code generated during installation. SYN001:c:\documents and settings\administrator\my documents\products\pisys\wcmanualpdf.doc Page 4 WinCAT User Manual Page 5 Once the registration process is complete, the “Configuration” window shows how the registration process has configured the software. As below, for example, a tick will appear against the enabled items and a cross against any optional capabilities for which a licence has not been purchased. Registration is a once only procedure and WinCAT will remain registered on the installed PC. Whenever WinCAT is run, the Registration Configuration may be checked by accessing the Registration Information window from the “About..” option on the main menu bar. Any WinCAT software updates that are installed will automatically become registered versions. If upgrades for optional capabilities are purchased at a later date, new software will not need to be installed, but it will be necessary to repeat the Registration process and enter new key codes. SYN001:c:\documents and settings\administrator\my documents\products\pisys\wcmanualpdf.doc Page 5 WinCAT User Manual Page 6 WINCAT OPERATION THE APPLICATION WINDOW WinCAT has a standard Windows main application window. Across the top is a Title Bar with a Menu Bar and Tool Bar immediately below it. A Status Bar across the bottom of the window gives useful information and feedback. The WinCAT window may be moved, resized, maximised and minimised just like any other standard Windows application. MENU OPTIONS All operations in WinCAT can be accessed via the Menu Bar. The complete list of menu options is given below. File Edit Tools New… Open… Save Project Details… Catenary Lines… Catenary Setup… Save As… Database… Compute Plot Options > Display Settings… Default Preferences… Print… Exit 1 : filename Window Cascade Tile Horizontal Tile Vertical Arrange Icons Help Contents… Index… Registration Info… About… Results Table Toolbar Failed Calculations Easy View All menu items have keyboard shortcuts which are indicated by the underscored letter. Several of the most frequently used menu options are also quickly accessed by their buttons on the Toolbar. To see which menu option is activated by a button, hover the mouse pointer over the button for a few seconds and it’s name pops up. WINCAT DATA FILES A number of catenary lines can be set up in WinCAT and the data for all catenary lines in the dataset can be saved to a file which can be read back in later. A data file can be given any name that is valid as a file name in Windows. SYN001:c:\documents and settings\administrator\my documents\products\pisys\wcmanualpdf.doc Page 6 WinCAT User Manual Page 7 When saving a new dataset, the file is given the default name extension .cat so that it can be recognised as a WinCAT file. However, a different extension can be given. WinCAT can only have one data file open at a time, but as a dataset can contain several catenary lines, all analysis scenarios for one project or one vessel can be held in a single data file. In addition to the catenary data, a WinCAT file holds all the Display Settings for the dataset including the active Units Set and settings for display of the Results Table and Catenary Plots. DIALOGUE BOXES Entering data or settings and selecting options is done through dialogue boxes which are self contained windows that appear up in the WinCAT main application window. Those windows that are mainly for the entry of data are referred to as forms. When a dialogue box is displayed, no other menus or parts of WinCAT will be accessible. When operations using the dialogue have been completed, it can be closed by using one of the buttons at the bottom of the window which are specifically provided for this. Some windows will have two buttons [ OK ] and [ Cancel ] and some only one button [ Close ]. This button has the effect of accepting all entered data and selections made in the window and acting on this as appropriate to the purpose of the window. This button has the effect of rejecting all the entered data and selections made since the window was opened and closes the window taking no further action. The [ Close ] button is used in windows where it would be inappropriate to allow cancelling the entries. It operates exactly the same as an [ OK ] button. As in all windows, moving around within a dialogue box can be achieved using the mouse pointer. However, keyboard navigation is also possible and in some cases may be much quicker and easier than using the mouse. The important keys to remember for keyboard navigation in a dialogue box are as the following. Tab key - Moves the focus from the current position to the next item in the dialogue box. Space key - Toggles the selection of tick boxes and also activates buttons. Arrow keys - Move the selection in lists and multiple choice options. Can also be used to move the text cursor within data entry fields. Return key - Activates the[ OK ] or [ Close ] button, except when used in a text entry box. Tip - The easy way to move through a data entry form filling in or editing the data is to use the keyboard Tab key. Shift Tab (together) moves backwards. SYN001:c:\documents and settings\administrator\my documents\products\pisys\wcmanualpdf.doc Page 7 WinCAT User Manual Page 8 DATA INPUT GETTING STARTED When WinCAT is run the “Get Started” window offers three options: • Open last saved file (filename.cat) • Open an existing file • Create new data Open last saved file - will read in the data from the named file and present the Catenary Lines summary allowing the data to be modified, or the catenary results to be computed. Open an existing file - will present the standard file Open dialogue for browsing through the file directories (folders) and selection of any WinCAT file. The default folder where WinCAT shows the available files is that given by the WinCAT shortcut properties “Start in:” folder path. Create new data - leads into the sequence of data entry windows which allows new catenary lines to be set up. Use of the [ Cancel ] button closes the Get Started window and allows access to options available from the menu bar. CREATE NEW DATA The create new data sequence steps through the following series of data entry windows: Project Details Catenary Setup Line Composition Section Details Line Deployment Catenary Lines PROJECT DETAILS The Project Details window allows entry of up to three titles and a user name. This data is used for identification on printed output and any of the fields may be left blank. Tip - If you regularly create new data with similar project details, then set up default values via the Tools, Default Preferences menu and these will then automatically appear in the Project Details form ready to be edited if necessary. SYN001:c:\documents and settings\administrator\my documents\products\pisys\wcmanualpdf.doc Page 8 WinCAT User Manual Page 9 CATENARY SETUP The Catenary Setup window allows for setting up or editing the details of a catenary line. WinCAT can handle the data for any number of catenary lines, so each line is identified by a unique Line Name. WinCAT supplies a default line name when any new line is created. This is “Line N” where N is the number 1 for the first line, 2 for the second line and so on. The default may be replaced with any text which uniquely identifies the line. All lines are Active by default. If the Active tick is cleared, then the catenary line becomes dormant - the data is retained, but no results are computed or available for printing. The data defining a catenary line is arranged in three parts each with its own tab in the Catenary Setup window: • Line Composition • Line Deployment • Notes LINE COMPOSITION A line is composed of one or more sections which are identified by their number. Every line must have a section 1 which is attached to the vessel at the surface. In WinCAT the attachment point is termed the “fairlead”. Additional sections (numbered 2, 3, etc.) need to be defined where the line type changes and/or there are buoys attached to the line. A line may have up to six sections. Fairlead Water Surface Section 1 line node Section 2 Section 3 Seabed Anchor All the sections defined for a line are shown in the Line Composition list box where the Line Type, Nominal Size, Length and Node Type are summarised. The data is shown in the units which are the active units set for data entry. Tip - If you wish to enter data in a different units set, cancel the Catenary Setup window and close the Catenary Lines window. Go to Display Settings via the Tools menu and change to the desired units set. Return to Catenary Setup by selecting Edit, Catenary Lines from the menu bar. SYN001:c:\documents and settings\administrator\my documents\products\pisys\wcmanualpdf.doc Page 9 WinCAT User Manual Page 10 When creating a new catenary line, and no sections have yet been defined, the [ + Add Section ] button must be used so that data for section 1 can be created. Subsequent sections are also created by use of this button. Tip - To insert a section before existing sections, first enter the section details using the [ + Add Section ] button then, on return to the Line Composition window, select and drag the new section to re-order the list. SECTION DETAILS Entry and editing of the data for a section of catenary line is done in the Section Details window. Every section comprises a length of "line" terminating in an end "node". To validly define a section, the section length and properties for the line and the node must be given. The length required is the total length of the section from start to end which must be greater than zero. Line properties may be entered directly for the default “Unspecified” line type. Alternatively, a predefined line type may be selected from the drop-down list and the properties will automatically pop into the form. Predefined line types must have been set up in the Database to be available for selection in the Section Details window. Tip - If you regularly create data using a few specific types and size of line, consider setting these up in the Database so they are available whenever you need to create new catenary data. For example, mooring wire or chain permanently kept on-board a particular vessel. There is set of special line types called Algorithmic Line Types (ALTs) which may be available in the Database (as a WinCAT enhancement option). These line types are special because their properties are related to in-built formulae and so can be calculated for any given line size. SYN001:c:\documents and settings\administrator\my documents\products\pisys\wcmanualpdf.doc Page 10 WinCAT User Manual Page 11 Depending on the Line Type selected, some line properties fields will become inaccessible. Those that are available, should be filled in or edited to give the appropriate properties values. Line Type Unspecified (the default) Defined in Database (not locked) Defined in Database (locked data) Algorithmic Line Types (ALTs) Accessible Fields All All None Nominal Size, Seabed Friction Factor Nominal Size - is the characteristic dimension of the line by which it’s properties are given in manufacturers’ catalogues. It is usually the external diameter, but may be the circumference. Nominal Size is not used in any calculations except in the special case of ALTs where the size has the following specific definitions: For Chain - the nominal diameter of the round bar used in manufacture of the chain links. For Wire Rope - the nominal overall diameter of the manufactured rope when new. Break Load - is usually the Catalogue Break Load (CBL) or guaranteed Minimum Break Load (MBL) as given by the manufacturer. The input value is used to provide an upper limit on the tension values for which catenary solutions will be computed. Elasticity - is the effective EA value for the line, where E is Young’s Modulus, and A is crosssection area. The value gives the linear stiffness of a unit length of line and therefore represents the force that would be required to cause 100% strain (doubling of length). The stiffness of steel chain and wire rope is high relative to the catenary effect, so it not used in WinCAT V2.0, although the line stretch effect should be incorporated in future versions. Dry Weight/Length - is the weight in air of a unit length of the line. This is the weight usually given in manufacturer’s data sheets. For flexible pipes, the weight of any internal fluids should be included. Submerged Wt Factor - is the factor by which the weight in air should be multiplied to give the weight in water. This will be a number less than 1, as the buoyancy effect reduces the weight. Typical values are 0.87 for steel chain, and 0.83 for steel wire rope. WinCAT will calculate the unit weight in water from the values entered for Dry Weight/Length and Submerged Wt Factor. However, the computed value may be changed by entering a different value, in which case, WinCAT will back-calculate and alter the Dry Weight/Length value to suit. Seabed Friction Factor - is the static friction factor that applies when the line is lying on the seabed. The value will depend upon the nature of the seabed and the line. In the absence of specific data, it is common practice to use a value of 1. The Seabed Friction Factor is used to determine the holding effect of any grounded line and the consequent reduction in line tension applying at the anchor. SYN001:c:\documents and settings\administrator\my documents\products\pisys\wcmanualpdf.doc Page 11 WinCAT User Manual Page 12 The type and properties for the node at the end of every section must be specified. In a catenary line with only one section, the Node Type should be an Anchor. Only one section in a catenary line should have an Anchor, and this should generally be the last section. However, where the optional Workboat capability is available and a Boat node type is defined for the last section, in which case the Anchor must be defined in the second to last section. Other node types available for defining the ends of intermediate sections are: Join - a weightless join to the following section Buoy - a surface or submerged buoy with an optional pennant. Data to define the properties of each node need to be entered into the form. Different properties are relevant to each Node Type as shown below: NODE TYPE Join Anchor Buoy DEFINED PROPERTIES none Weight in Air Holding Factor Submerged Wt Factor Uplift Capacity Buoy Height Pennant Length Roller/Sheave Height DEFAULT VALUES Holding Factor - is applied to the Weight in Air to give the expected holding capability of an anchor in the particular seabed. 100 kN 1.0 1.0 Thus: Holding Capacity = Holding Factor × Dry Anchor Weight. 100 kN 1.0 metre 0.0 metre 0.0 metre Note - WinCAT does not allow anchor sliding, but treats the anchor as fixed on the seabed. Submerged Wt Factor - is applied to the Weight in Air to give the weight of the Anchor in water. This is used in WinCAT calculations Boat only when the Workboat capability is being used and the anchor is suspended above the seabed. For a solid steel anchor, a typical factor would be 0.87 and for a concrete gravity block, 0.58 might be a typical value. Uplift Capacity - is the net buoyancy of the buoy when fully submerged (ie. after deducting the buoy self weight). Buoy Height and Pennant Length - are defined as shown in the diagram at right. Roller/Sheave Height - is the height above the water line at which the line is attached the Boat (see diagram below). SYN001:c:\documents and settings\administrator\my documents\products\pisys\wcmanualpdf.doc Page 12 WinCAT User Manual Page 13 Roller / Sheave Height Warning ! Ensure all entered data values are in the units stated by each input field in the form. When all the data for a line section has been entered, use the [ OK ] button to accept the data and add the section to the Line Composition list. Tip - You can select the default line and node properties that appear in the Section Details window when opening it to create new data. Go to the Display Settings window via the Tools menu and pick the Line Defaults tab. Any Line or Node Types that have been defined in the Database may be selected to be the defaults for creating new data. LINE DEPLOYMENT After the line composition has been defined, and before a catenary line can be computed and saved, the Line Deployment data must be entered. Selection of the Line Deployment tab on the Catenary Setup window, allows entry of the data which defines how the catenary line is deployed. The data is into two parts. The first part defines the vertical arrangement and requires entry of the fairlead depth, water depth and seabed slope (optional). All the vertical information is referenced to the water surface. Water Surface Fairlead Depth - is the distance below the water surface to the point where line section 1 is attached to the vessel. A negative value indicates that the fairlead point is above the water surface. Fairlead Depth Water Depth Water Depth - is the distance of the seabed below the water surface measured at a point directly below the fairlead. To activate seabed slope entry, the check box must be ticked. x Seabed y +ve slope angle Seabed slope - is entered as a gradient with the input value representing the horizontal distance over which the seabed rises or falls one unit. The direction of seabed slope is selected by the SYN001:c:\documents and settings\administrator\my documents\products\pisys\wcmanualpdf.doc Page 13 WinCAT User Manual Page 14 toggle button. The default slope is downwards (going away from the fairlead). Pressing the slope button changes this to an upward slope. Note: Printed output gives the angle of seabed slope in degrees and the sign convention is positive for downward slopes and negative for upward slopes. The lower part of the Line Deployment tab is concerned with the input of the data which will drive the catenary calculations to give the answers that are wanted. WinCAT Version 2.0 does not support solving for changes in Payout of the line. Therefore, the selection for “Fix Value of:” is locked at Payout and cannot be changed. To uniquely define a catenary so that the geometry can be computed, one further items of information is needed. This must be either the Tension at the fairlead, or the Range from the fairlead to the end of the catenary line. WinCAT version 2.0, requires the “Compute for:” selection to be as follows: End of Catenary Line: Anchor on the seabed Compute for values of: Tensions - at the fairlead Workboat on the surface Ranges - of boat from fairlead Note: In future versions of WinCAT, it is intended to allow the nomination of an adjustable section (from any of the defined sections). This will enable the fixed payout, which defaults to the length of the section, to be overridden in the Line Deployment data. It is also intended to allow catenary line solutions to be Range Tension Fix value of : Payout computed for payout values by fixing the Compute for: Tensions Tensions Payouts value of either Tension or Range. The or or or or full matrix of solution options as shown Ranges Payouts Tensions Compute for: by the table will then be available. WinCAT allows multiple values of the “Compute for” data to be entered so that several different catenary states can be computed in one go. These values are shown in a list box on the left side of the Line Deployment form. There are two ways for the data values to be entered and modified. • Using the [ + Add ] and [ - Delete ] buttons to build up a list of individual values . • Automatic generation of a spread of values by using the “Auto Step” feature. To use Auto Step, the check box must first be ticked. From - is the lowest value to start the list. To - is the highest value for ending the list. Step - is the interval for the generated values. The [ Apply ] button causes the values to be generated and added to the list box. Note: The list box allows up to 100 data values - many more than should ever be needed. SYN001:c:\documents and settings\administrator\my documents\products\pisys\wcmanualpdf.doc Page 14 WinCAT User Manual Page 15 Tip - To create a large list of data values for catenary computation, use the Auto Step feature. Then, if necessary, weed out or add extra values to create the required list. When done with Catenary Setup, click the [ OK ] button. Warning ! Clicking the [ Cancel ] button will cause all newly entered data and modifications to existing data to be discarded. Note: If Catenary Setup was invoked directly via the Edit menu or from Plot Options, then WinCAT will automatically Compute and display the results for the new data. (If there are several Catenary lines in the data set, only results for the edited line will be re-computed.) Otherwise, WinCAT returns to the Catenary Lines window. CATENARY LINES The Catenary Lines window presents a summary of all the Catenary lines in the current dataset. Active lines are shown in blue and inactive lines in black. The list may be re-ordered by selecting and dragging any line. The keyboard arrow keys or mouse can be used to move the selection bar to any line. A double mouse click or the [ View/Edit ] button will brings up the Catenary Setup form for the selected line. The [ + Add ] and [ - Delete ] buttons allow new lines to be added and unwanted lines to be deleted from the list. The [ Compute ] button causes a new set of results to be computed and displayed for all the active catenary lines. To leave the Catenary Lines window without computing a new set of results, the [ Close ] button may be used. Tip - if a line is not required, but the data might be useful for future work, it can be kept in the dataset and have it’s results computation suppressed by changing the Active status in the Catenary Setup form for the particular line. SYN001:c:\documents and settings\administrator\my documents\products\pisys\wcmanualpdf.doc Page 15 WinCAT User Manual Page 16 Tip - To create a new catenary setup that is similar to an existing one, use the [ Copy Catenary ] button. The line composition and the line deployment details can then be easily modified as required. SYN001:c:\documents and settings\administrator\my documents\products\pisys\wcmanualpdf.doc Page 16 WinCAT User Manual Page 17 RESULTS & OUTPUT WINCAT CALCULATIONS WinCAT carries out solution calculations whenever Compute is invoked by a button click or selection from the Tools menu. Catenary solutions are an iterative procedure, and WinCAT advises the progress of calculations through a pop-up window which disappears when the calculations are done. On completion of all calculations, the new set of results are displayed for all the active catenary lines. Failed Calculations WinCAT does sometimes have difficulty in providing solutions for some of the requested cases. This may be because unrealistic data has been provided and the condition represents a physically impossible situation, or, it may be that the iterative procedure has been unable to find a valid solution within the tolerances built into the program. Note: WinCAT is fail-safe in that it produces no solution rather than a wrong solution. WinCAT displays a Failed Calculations window giving diagnostic information on all cases where a solution has not been achieved. “Calculations not attempted tension outside achievable range” - is given for cases where WinCAT recognises that unrealistic data has been given. For example, tensions that are less than the weight of the line when hanging vertically from the fairlead, and tensions that are greater than 20% above the break load of the weakest line. “Calculation error….” Is given in cases where the calculation procedure has failed to reach a valid solution. This condition cannot be remedied by the user as it is a function of the solution methods and tolerances built into WinCAT. SYN001:c:\documents and settings\administrator\my documents\products\pisys\wcmanualpdf.doc Page 17 WinCAT User Manual Page 18 “Calculation failed due to high tension” - is given when the tension value is such that the catenary touchdown point reaches the anchor. This condition would lead to a taut line and is not solvable by WinCAT. The Failed Calculations window must be closed before the results of successful calculations can be viewed and catenary data modified. However, it can be brought back at any time via the Window menu or toolbar button. The results of successful calculations are presented as graphic plots of the catenary lines together with a comprehensive table of numeric results. These can be viewed, printed and also output to other Windows software (eg. Excel) for further manipulation. RESULTS TABLE The Results Table shows the numeric output from the computations for one catenary line in an easily understood tabular format. The results table can be included in the printed output, and the content and order of the results table can be customised so that only the information relevant to a particular analysis is given. Where there are several catenary lines in the dataset the Results Table relates to the selected Catenary Plot. The [ Previous Line ] and [ Next Line ] buttons can be used to change the selected catenary. The [ Previous Tension ] and [ Next Tension ] buttons change the selected result column in the table (shown in blue) and the corresponding case is highlighted on the plot (according to the Display Settings for Catenary Plots). The Results Table is always the top window, so it will overlay any Catenary Plot windows that occupy the same part of the WinCAT display. However, the Results Table can be maximised, minimised or closed by using the standard Windows buttons and menus as well as by using the WinCAT menu option and the toolbar button. Tip - Try using the Easy View option under the Windows menu for a display which arranges the WinCAT Catenary Plots and Results Table so they do not overlap. SYN001:c:\documents and settings\administrator\my documents\products\pisys\wcmanualpdf.doc Page 18 WinCAT User Manual Page 19 CATENARY PLOTS The Catenary Plots display the output from the computations in a series of graphical windows, one for each catenary line. The WinCAT catenary plots are accurately drawn and can be resized, zoomed, and modified interactively to show all the information that may be needed. Catenary plots can be included in the printed output or exported as pictures in the Windows Metafile (.wmf) format. Catenary Plots can be easily arranged within the WinCAT window for ease of viewing. The Window menu offers several options, including the Cascade and Tile arrangements of the plot windows. The Easy View option stacks the catenary plots on top of one another in the top half of the screen with the results table below. SYN001:c:\documents and settings\administrator\my documents\products\pisys\wcmanualpdf.doc Page 19 WinCAT User Manual Page 20 Several aspects of the Catenary Plots display can be customised by using the Display Settings window which is accessed via the Tools menu. Most of these settings apply to all Catenary Plots. The selections under the heading of Catenary Plot Defaults are applied to all Catenary Plots as initial defaults when they are first computed But, these aspects may then be modified for each individual Catenary Plot via the Plot Options. Roaming the cursor within the plot window provides an immediate feedback of information on line properties and co-ordinate positions via the status bar display. Spot selection of particular line elements brings up a detailed information box (as shown). Cursor functions extend to the accurate measurement of distances and angles. A measure result box pops up immediately a line is dragged anywhere in the plot window. SYN001:c:\documents and settings\administrator\my documents\products\pisys\wcmanualpdf.doc Page 20 WinCAT User Manual Page 21 Plot Options allow the catenary plot display to be manipulated and also allows access to other options related to the selected Catenary Plot, such as editing the setup data, printing, or exporting the plot as a metafile picture. The plot options are available via the Tools menu or by right mouse click in the Catenary Plot area. Tip - Plot Options provides a quick way to access the Catenary Setup for modifying the data of the selected catenary. PRINTING WinCAT has comprehensive printing and output available from the Print menu or toolbar button. The results can be output to the selected printer or sent to an ASCII text file. Print Layout allows setting of margins, headers and footers. SYN001:c:\documents and settings\administrator\my documents\products\pisys\wcmanualpdf.doc Page 21 WinCAT User Manual Page 22 OPTIONS & PREFERENCES THE DATABASE The Database is a very useful feature of WinCAT as it allows the setting up and management of data for commonly used Line Types and Node Types, and the definition of Unit Sets. Once entered in the database, the properties are automatically copied as data for a particular catenary line just by selecting the required type name from the drop-down lists of the input form. The database is stored with the WinCAT data file so project or vessel specific data sets are always available when working with the data file. UNIT SETS WinCAT allows working in any set of units. Data can even be entered in a different set of units to that chosen for display of results. There are three in-built units sets covering the most commonly used metric and imperial systems. However, users can easily create and use their own units sets through the powerful database capabilities Details and conversion factors for the WinCAT in-built Units Sets are given below. Mass Force / Weight Length Angle SYN001:c:\documents Metric Consistent tonne 1.000 kilonewton 1.000 metre 1.000 degree 1.000 Metric Engineering tonne 1.000 tonne 9.807 metre 1.000 degree 1.000 Imperial Engineering kip 0.4536 kip 4.4482 foot 0.3048 degree 1.000 and settings\administrator\my documents\products\pisys\wcmanualpdf.doc Page 22 WinCAT User Manual Page 23 The active Units Sets are set in the Display Settings window which is accessed from the Tools menu. Units Sets for Input Data and for the output Results and Graphs can be individually chosen from a list which contains all the Units Sets defined in the Database. The active Unit Sets are applied to all Catenary lines in the dataset All aspects set via the Display Settings dialogue are implemented immediately for the current dataset, and are kept in the data file when it is saved. The parameters associated with each Units Set may be viewed and modified via the Database. SYN001:c:\documents and settings\administrator\my documents\products\pisys\wcmanualpdf.doc Page 23