1
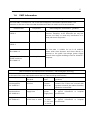
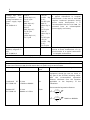
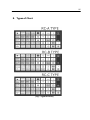
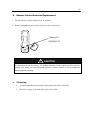
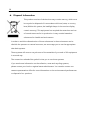
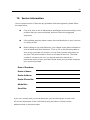
1
IMPORTANT NOTICE
This product may malfunction due to electromagnetic waves caused by portable
personal telephones, transceivers, radio-controlled toys, etc. Be sure to avoid having
objects such as, which affect this product, brought near the product.
2
CONTENTS
1.
Introduction
1.1. Outline of product ....................................................................................................4
1.2. Classifications ...........................................................................................................4
1.3. Standards .................................................................................................................4
1.4. EMC Information ......................................................................................................5
2. Safety Information..........................................................................................................8
2.1 Introduction .............................................................................................................8
2.2 Safety Symbols .........................................................................................................9
2.3 Environmental factors .............................................................................................12
2.4 Safety Precautions ..................................................................................................14
3. Features
4. Notes for Using the Instrument ....................................................................................17
5. Configurations ...........................................................................................................18
5.1 Main Body ..............................................................................................................18
5.2 Main Body cont. .....................................................................................................19
5.3 Accessories .............................................................................................................20
6. Installation
6.1 Position of Chart Projector ......................................................................................21
6.2 How to obtain correct Letter Size and focus ............................................................22
(Zooming Type only) ....................................................................................................22
7. Input and Use of Program ............................................................................................22
3
7.1 How to input user's program .................................................................................. 22
7.2 How to use your stored programs........................................................................... 24
8.
Types of Chart .......................................................................................................... 25
9.
Maintenance and Repair .......................................................................................... 26
a. Fuse Replacement .................................................................................................. 26
b. Remote Control batteries Replacement................................................................... 27
c. Cleansing .............................................................................................................. 27
d. Disposal Information .............................................................................................. 28
10. Specifications........................................................................................................... 29
11. Components List ...................................................................................................... 30
11.1 Standard accessories ........................................................................................... 30
12. Service Information.................................................................................................. 31
4
1. Introduction
1.1.
Outline of product
LUXVISION LCP-7800 is an automatic chart projector which provides 41 different
charts including red/green, polarized filters, binocular balance test chart,
stereoacuity test chart, fixation disparity test chart, fusion test chart and aniseikonia
test chart for the eye optometry. Users can select the desired charts
instantaneously by cordless remote controller. Charts move quickly and quietly. The
customized two programs will help you to perform more convenient and effective
examination. This automatic chart project is compatible with LUXVISION digital
refractor, CDR series.
1.2.
Classifications
- Type of protection against electric shock: Class I Equipment
- Degree of protection against electric shock: No applied parts
- Degree of protection against the ingress of water: Ordinary, IPX0
- Equipment not suitable for use in the presence of a flammable anesthetic mixture
with air or with oxygen or nitrous oxide.
1.3.
Standards
LVD: IEC/EN60601-1
EMC: IEC/EN60601-1-2
5
1.4.
EMC Information
Table 1:Guidance and manufacturer’s declaration – electromagnetic emissions
The LCP-7800 is intended for use in the electromagnetic environment specified below. The
customer or the user of the LCP-7800 should assure that it is used in such an environment.
Emissions test
Compliance
Electromagnetic environment - guidance
RF emissions
CISPR 11
Group 1
The LCP-7800 uses RF energy only for its internal
function. Therefore, its RF emissions are very low
and are not likely to cause any interference in n
earby electronic equipment
RF emissions
CISPR 11
Class A
Harmonic emissions
IEC 61000-3-2
Class A
Voltage fluctuations/
Flicker emissions
IEC 61000-3-3
Complies
The LCP-7800 is suitable for use in all establish
ments other than domestic and those directly co
nnected to the public low-voltage power supply
network that supplies buildings used for domesti c
purposes
Table 2:Guidance and manufacturer’s declaration – electromagnetic immunity
The LCP-7800 is intended for use in the electromagnetic environment specified below. The customer
or the user of the LCP-7800 should assure that it is used in such an environment.
Immunity test
IEC 60601
Compliance
Electromagnetic
environment
Test level
level
guidance
Electrostatic
±6 kV contact
±6
kV Floors should be wood, concrete or
Discharge(ESD)
±8 kV air
contact
ceramic tile. If floors are covered with
IEC 61000-4-2
±8 kV air
synthetic material, the relative humidity
should be at least 30%.
Electrical
fast ±2 kV for power ±2 kV for Mains power quality should be that of
transient/burst
supply lines
power
a typical commercial or hospital
IEC 61000-4-4
supply lines
environment
Surge
IEC 61000-4-5
±1 kV lines to lines
±2 kV lines to earth
±1
to
±2
to
kV lines
lines
kV lines
earth
Mains power quality should be that of
a typical commercial or hospital
environment.
6
Voltage dips, short
interruptions
and
voltage variations on
power supply input
lines
IEC 61000-4-11
<5% UT
(>95% dip in UT)
For 0,5 cycle
40% UT
(60% dip in UT)
For 5 cycle
70% UT
(30% dip in UT)
For 25 cycle
<5% UT
(>95% dip in UT)
For 5 cycle
<5% UT
(>95% dip
in UT)
For 0,5 cycle
40% UT
(60% dip in
UT)
For 5 cycle
70% UT
(30% dip in
UT)
For 25 cycle
<5% UT
(>95% dip
in UT)
For 5 cycle
3A/m
Mains power quality should be that of
a typical commercial or hospital
environment. If the user of LCP-7800
requires continued operation during
power mains interruptions, it is
recommended that the LCP-7800 be
powered from an uninterruptible
power supply or a battery.
Power frequency (5 3A/m
Power frequency magnetic fields sho
0/60Hz) magnetic fi
uld be at levels characteristic of a ty
eld
pical location in a typical commercial
IEC 61000-4-8
or hospital environment
Note: UT is the a.c. mains voltage prior to application of the test level.
Table 3: Guidance and manufacturer’s declaration – electromagnetic immunity
The LCP-7800 is intended for use in the electromagnetic environment specified below. The customer
or the user of the LCP-7800 should assure that it is used in such an environment.
Immunity test
IEC 60601 test level
Compliance
Electromagnetic environment-guidance
level
Portable and mobile RF communications
equipment should be used no closer to
any part of the SYSTEM, including cables,
than
the
recommended
separation
distance calculated from the equation
Conducted RF 3 Vrms
3V
applicable to the frequency of the
IEC 61000-4-6
150 kHz to 80MHz
transmitter.
Recommended separation distance
Radiated RF
IEC 61000-4-3
3 Vrms
80MHz to 2.5GHz
3V/m
3 .5
] P
V1
3 .5
d =[ ] P
E1
d =[
80MHz to 800MHz
7
d =[
7
] P
E1
800MHz to 2.5GHz
Where P is the maximum output power
rating of the transmitter in watts(W)
according to the transmitter manufacturer
and d is the recommended separation
distance in metres
(m).
Field strengths from fixed RF transmitters,
as determined by an electromagnetic site
survey, should be less than the compliance
level in each frequency range.
Interference may occur in the vicinity of
equipment marked wigh the following
symbol:
Recommended separation distances between portable and mobile RF communications equipment
and the LCP-7800
The LCP-7800 is intended for use in an electromagnetic environment in which radiated RF disturbances
are controlled. The customer or the user of the LCP-7800 can help prevent electromagnetic interference
by maintaining a minimum distance between portable and mobile RF communications equipment
( transmitters ) and the LCP-7800 as recommended below, according to the maximum output power of
the communications equipment.
Rated maximum
Separation distance according to frequency of transmitter
output power of
transmitter
W
m
150kHz to 80 MHz
d =[
3 .5
] P
V1
80MHz to 800MHz
d =[
3 .5
] P
E1
800MHz to 2.5GHz
d =[
7
] P
E1
0.01
0.12
0.12
0.23
0.1
0.38
0.38
0.73
1
1.2
1.2
2.3
10
3.8
3.8
7.3
100
12
12
23
8
2. Safety Information
2.1 Introduction
Safety is everyone’s responsibility. The safe use of this equipment is largely dependent
upon the installer, user, operator, and maintainer. It is imperative that personnel study
and become familiar with this entire manual before attempting to install, use, clean,
service or adjust this equipment and any associated accessories. It is paramount that
the instructions contained in this manual are fully understood and followed to
enhance safety to the patient and the user/operator. It is for this reason that the
following safety notices have been placed appropriately within the text of this manual
to highlight safety related information or information requiring special emphasis. All
users, operators, and maintainers must be familiar with and pay particular attention to
all Warnings and Cautions incorporated herein.
!
WARNING
"Warning” indicates the presence of a hazard that could result in severe personal injury,
death or substantial property damage if ignored.
!
CAUTION
“Caution” indicates the presence of a hazard that could result in minor injury, or property
damaged if ignored.
NOTE
This is used to emphasize essential information.
Be sure to read this information to avoid operating the device incorrectly.
9
2.2 Safety Symbols
The International Electrotechnical Commission (IEC) has established a set of symbols
for medical electronic equipment, which classify a connection or warn of any potential
hazards. The classifications and symbols are shown below.
ON
When the switch points to this symbol, power is being
supplied to the device.
OFF
When the switch points to this symbol, power is not being
supplied to the device.
Input
Indicates the Input port.
Output
Indicates the output port.
Caution, Consult accompanying documents.
Consult instructions for use
Protective Earth Connection
Alternating Current
10
European Conformity
Dispose of Electrical and Electronic Equipment
Correctly
Date of manufacture
Manufacturer
Authorized Representative in the European
Community
Serial Number
Temperature Limitation
Humidity Limitation
Atmospheric Pressure Limitation
11
This side up
Fragile , handle with care
Do not use hand hooks
Keep Dry
Stacking Limit by Number
12
2.3 Environmental factors
Avoid the following environments for operation or storage:
Where the equipment is exposed to water vapor.
Don’t operate an equipment with a wet hand.
Where the equipment is exposed to direct
sunlight.
Where the temperature changes extremely.
Normal operating temperature range is from 10℃
to 35℃, Humidity is from 30% to 90%.
Where it is near the heat equipment.
Where the humidity is extremely high or there is a
ventilation problem.
Where the equipment is subject to excessive shocks or
vibrations.
Where equipment is exposed to chemical material or
explosive gas.
Be careful not to be inserted dust, especially, metal
13
This instrument can withstand the following conditions:
1. Operation
- An ambient temperature range of 50°F ~ 95°F (10℃ ~ 35℃)
- A relative humidity range of 30% ~ 90%
- An atmospheric pressure range of 800 ~ 1060hpa
2. Transportation
- An ambient temperature range of -40F ~ 158°F (-40℃ ~ 70℃)
- A relative humidity range of 10% ~ 95%
- An atmosphere pressure range of 500 ~ 1060hpa
3. Storage
- An ambient temperature range of 14°F ~ 131°F (-10℃ ~ 55℃)
- A relative humidity range of 10% ~ 95%
- An atmosphere pressure range of 700 ~ 1060hpa
Avoid environments where the equipment is exposed to excessive shocks or
vibrations.
14
2.4 Safety Precautions
This equipment has been developed and tested according to national as well as
international safety standards. This guarantees a very high degree of safety for this
device. The correct handling of this equipment is imperative for its safe operation.
Therefore, please read carefully all instructions before switching on this device. For
more detailed information, please contact our Customer Service Department or one of
our authorized representatives.
1.
This equipment must not be used (a) in an area that is in danger of
explosions and (b) in the presence of flammable, explosive, or volatile
solvents such as alcohol, benzene or similar chemicals.
2.
Do not put or use this device in humid rooms. Humidity should be
maintained between 30 and 90% for normal operation. Do not expose the
device to water splashes, dripping water, or sprayed water. Do not place
containers containing fluids, liquids, or gases on top of any electrical
equipment or devices.
3.
The equipment must be operated only by, or under direct supervision of
a properly trained and qualified person.
4.
Modifications of this equipment may only be carried out by
LUXVISION service technicians or other authorized persons.
5.
The manufacturer is only responsible for effects on safety, reliability,
and performance of this equipment when the following requirements are
fulfilled: (1) The electrical installation in the respective room
corresponds to the specifications stated in this manual and (2) This
equipment is used, operated, and maintained according to this manual.
6.
The manufacturer is not liable for damage caused by unauthorized
tampering with the device(s). Such tampering will forfeit any rights to
claim under warranty.
7.
Only persons who have undergone proper training and instructions are
authorized to install, use, operate, and maintain this equipment.
15
8.
Keep the User’s Manual in a place easily accessible at all times for
persons operating and maintaining the equipment.
9.
Please do not pull on any cable. Always hold on to the plug when
disconnecting cables.
10. Before every operation, visually check the equipment for exterior
mechanical damage(s) and for proper function.
11. Do not cover any ventilation grids or slits.
!
WARNING
No modification of this equipment is allowed
16
3.
Features
Bright (LED), high quality images
Quiet, instantaneous chart selection
41 different charts including: red/green and polarizing filters, binocular
balance tests, stereo tests, fixation disparity tests, fusion tests and Aniseikonia tests.
34 Masks (vertical line, horizontal line, and single character)
2.5 ~ 8 m (8 ~ 26 feet) projection range
Cordless Remote Control
User Programmable (2 programs up to 30 charts each)
Easily networked with LUXVISION Digital Refractor
17
4. Notes for Using the Instrument
Do not hit or drop the instrument. The instrument may be damaged if it
receives a strong impact. The impact can damage the function of this
instrument. Handle it with care.
Exposure to direct sunlight or very bright indoor lights can influence the
results of measurements.
If you want to connect this with other equipment, consult the dealer.
Sudden heating of the room in cold areas will cause condensation of vapor
on the protective glass in the measurement window and on optical parts
inside the instrument. In this case, wait until the condensation disappears before
performing measurements.
Keep the objective glass of the examinee side clean. If it is stained with other
substances or a fingerprint, it may cause an error or inaccurate measurements.
Disconnect the power supply and consult the dealer when there is smoke,
strange odors, or noise while working.
Don’t use organic solution such as alcohol, thinner, benzene, etc. to clean
the surface of this instrument. It may damage the instrument.
When moving the LCP-7800 , always make sure the power supply is off, and then lift
the bottom of the unit with both hands.
If you leave the LCP-7800 without using it for long periods, disconnect the power
supply and protect the unit with dust cover.
18
5.
Configurations
5.1 Main Body
The LCP-7800 Chart Projector is mainly composed of the body, stand, screen
and remote control.
①
②
③
④
[Fig. 1 Front View with Remote Control]
1. Projection lens
3. Stand (table mount)
2. IR receiving window
4. Wireless remote control
19
5.2 Main Body
②
①
[Fig. 2 Bottom View]
⑤
④
⑥
③
⑦
[Fig. 3 Rear View]
1. Power On/Off Switch
2. Power ON/OFF LED
4. CAN (Controller Area Network)
6. AC Power Inlet
7. Fuse Holder
3. Tilting Adjustment
5. RS-232 Comm.Port
20
5.3 Accessories
2
3
4
5
6
7
8
9
10
1
[Fig.4 Accessories]
1. Table stand
4.Wrench (4mm)
7. Operator manual
2. Remote contol
3. Screen
5. Fuse(250v 3.15A) 6. Power cable
8. Dust Cover
9. Screw(3*10)
21
6. Installation
6.1 Position of Chart Projector
The single tube projector must be installed at the same distance from the screen as
the patient.
[Fig. 6 Installation without mirrors]
1.
Install chart projector at desired position within 2.5~8m (8~26 feet).
2.
Set the projection angle of chart processor based on Screen.
3.
Project 0.05(20/400, 6/120) “C” chart onto the screen.
4.
Adjust it for a bright clear image using the focusing wheel.
22
6.2 How to obtain correct Letter Size and focus
(Zooming Type only)
1.
Install chart projector at desired position of 2.5~8m (8~26 feet)
2.
Measure the distance from patient to screen
3.
Refer to the test scale shown in the Appendix A
4.
Have someone hold the test scale at the screen
5.
Project the 20/400(6/120, 0.05) alphabet “C”
6.
Adjust the position of the projector forward or backward and turn the
focusing wheel until “C” is brought in sharp focus within the respective
distance scale
It will be more accurate to the eye optometry when using the screen
7. Input and Use of Program
7.1 How to input user's program
Step 1.
Press the “LIGHT” button once.
Results: The light goes out.
Step 2.
Press the “PGM 1” button three times.
Results: The light will come on and the chart projector will display
the first chart of the default program.
Step 3.
Select the first chart for your new program.
Press the “Program ►” button once.
Step 4.
Select the second chart for your new program.
Press the “Program ►” button once.
23
Step 5.
Repeat steps 3 & 4 as desired for a total of thirty charts per program.
Note: If you want to check or modify the previously programmed
chart, press the “Program ◄” button.
Step 6.
Press the “PGM 1” button one time to save your new program.
Caution : If you do not press the PGM1 button, your program will not be
saved.
Program No. 2
Repeat Steps 1 through 6 substituting “PGM 2” for “PGM 1”.
24
7.2 How to use your stored programs.
Step 1.
Step 2.
Press “ PGM 1 ” or “PGM 2” to select the program of your choice.
Use the “Program ►” or “Program ◄” to scroll through your stored
program.
25
8. Types of Chart
[Fig. 7 Types of Chart]
26
9.
Maintenance and Repair
a. Fuse Replacement
1.
Turn off power, and disconnect the power cord.
2.
Pull out the plastic cover at the lower part of power socket, to replace the fuse.
!
WARNING
Do not touch the projector with wet hands. (Risk of electric shock)
[Fig. 9 Fuse assembly]
27
b. Remote Control batteries Replacement
1. On the remote control battery cover to remove.
2. Battery replacement and remote control cover is mounting..
Battery(2)
LR6(AA)1.5V
!
CAUTION
As this machine use dry battery, the reckless abandon of the machine itself or the dry
battery can cause the environmental pollution. Please contact to the professional
waste disposal company.
c.
Cleansing
1.
Product appearance and screen is dry and clean with a soft cloth.
2. The lens is messy if dry and clean with a soft cloth.
28
d. Disposal Information
This product consists of devices that may contain mercury, which must
be recycled or disposed of in accordance with local, state, or country
laws (Within this system, the backlight lamps in the monitor display
contain mercury). This equipment has required the extraction and use
of natural resources for its production. It may contain hazardous
substances for health and environment.
In order to avoid the dissemination of those substances in the environment and to
diminish the pressure on natural resources, we encourage you to use the appropriate
take-back systems.
Those systems will reuse or recycle most of the materials of your end-of-life equipment
in a sound way.
The crossed-out wheeled bin symbol invites you to use those systems.
If you need more information on the collection, reuse and recycling systems,
please contact your local or regional waste administrator. You can also contact our
nearest representative office for more information on the environmental performances
or disposal of our products
29
10. Specifications
Charts
41charts -34 mask, Red/green& Polarization
Filters
Distance of projection
2.5~8m(Optional: 8m screen)
Chart magnification
30X (When 5m distance)
Power saving
Automatic Lamp Off (10 min)
Program
2 programs with a maximum of 30 charts
each
Tilt angle
15 degrees
Power Supply
100-120V@50Hz : 1.0A
200-240V@60 Hz : 0.5A
Lamp
LED 4W
Fuse
250V, T3.15AL
Dimension
270X182X230mm
Weight
3.44kg (Body: 3.06kg + Stand: 0.38kg)
30
11.
Components List
11.1 Standard accessories
1. Table stand
2. Remote controller
3. Screen
4.Wrench (4mm)
5. Fuse(250v 3.15A)
6. Power cable
7. Operator manual
8. Dust Cover
9. Screw(3*10)
31
12. Service Information
How to contact service: If there are any problems with the equipment, please follow
the steps below:
First of all, refer to the 9. Maintenance and Repair sections according to the
problem that you are encountered. And then follow the suggested
sequences.
If the problem persists, please contact the local distributor in your province
or country at first.
Before calling to the local distributor, you’d better check these information
such as Model and Serial Numbers. To do so, fill up the following table as
soon as you purchase our product. You can look up these information at
any time. The serial number is found on the back of this unit. The serial
number is unique to this unit. You should retain this manual as a
permanent record of your purchase. Please retain your purchase receipt as
your proof of purchase.
Date of Purchase:
Dealer’s Name:
Dealer Address:
Dealer Phone No.:
Model No.:
Serial No.:
If you can’t contact with your local distributor, you can directly get in touch with
the service department of the LUXVISION using the phone number and the
address written in the below table.
33
Appendix A
Test Scale Hold this test scale at the Screen, and according to the refracting distance
from the patient’s eye to the screen such as 3m, 4m, 5m or 6m position the projector
backward and forward to fit the projector Alphabet 400 chart “C” with this Scale
frame in sharp focus
3m
34
4m
35
5m
36
6m
Ver 1.0 [20140605]