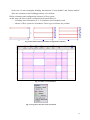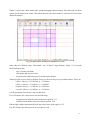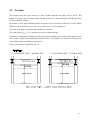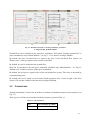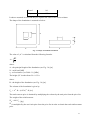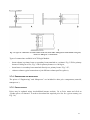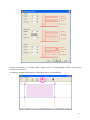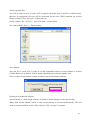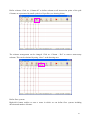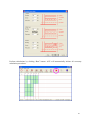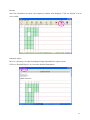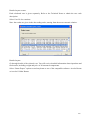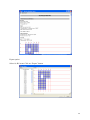
1
TABLE OF CONTENT 1 INTRODUCTION........................................................................................................................................ 2 1.1 SCOPE ......................................................................................................................................................... 2 1.2 INSTALLATION PROCEDURE ........................................................................................................................ 4 2 INTERFACE................................................................................................................................................ 4 2.1 STARTING WINDOW .................................................................................................................................... 4 2.2 INPUT DATA ................................................................................................................................................ 5 2.2.1 SINGLE MODULE...................................................................................................................................... 6 2.2.2 MULTI-MODULE .................................................................................................................................... 13 2.2.3 BEAM CALCULATOR .............................................................................................................................. 23 2.2.4 INDUSTRIAL HALLS ................................................................................................................................ 23 2.3 RUNNING ACE.......................................................................................................................................... 25 2.4 DATABASES .............................................................................................................................................. 27 2.5 OUTPUT FILE ............................................................................................................................................. 32 2.6 EXPORTING DATA ..................................................................................................................................... 37 2.7 SAVING DATA ........................................................................................................................................... 39 3 CALCULATION METHOD ..................................................................................................................... 39 3.1 BEAMS AND SLABS ................................................................................................................................... 39 3.2 COLUMNS ................................................................................................................................................. 42 3.3 FIRE PROTECTION ..................................................................................................................................... 44 3.3.1FIRE RESISTANCE OF STEEL STRUCTURES ............................................................................................. 44 3.3.2 FIRE PROTECTION MATERIALS ............................................................................................................... 45 3.4 FAÇADES, ROOF AND GROUND FLOOR ...................................................................................................... 49 3.5 FOUNDATIONS .......................................................................................................................................... 50 3.6 WIND BRACING ......................................................................................................................................... 52 3.7 PRICE ESTIMATION.................................................................................................................................... 52 3.7.1 BEAMS AND COLUMNS........................................................................................................................... 52 3.7.2 CONCRETE SLAB .................................................................................................................................... 53 3.7.3 CONNECTIONS ....................................................................................................................................... 53 3.7.4 ENGINEERING AND MANPOWER ............................................................................................................. 54 3.7.5 PRICES UPDATE ...................................................................................................................................... 54 4 REFERENCES ........................................................................................................................................ 58 5 PRACTICAL EXAMPLES.......................................................................................................... 59 5.1 EXAMPLE 1: SINGLE MODULE.................................................................................................................. 59 5.2 EXAMPLE 2: SINGLE MODULE WITH EXPORT TO ARCELOR BEAMS SOFTWARE ...................................... 67 5.3 EXAMPLE 3: MULTI-MODULES WITH EXPORT TO ARCELOR BEAMS SOFTWARE ..................................... 77 5.4 EXAMPLE 4: MULTI-MODULES WITH EXPORT TO ARCELOR CELLULAR BEAMS SOFTWARE ................... 90 5.5 EXAMPLE 5: BEAM CALCULATOR WITH “MODULE” MODE .................................................................... 104 5.6 EXAMPLE 6: BEAM CALCULATOR WITH “SINGLE BEAM” MODE ............................................................ 110 5.7 EXAMPLE 7: INDUSTRIAL HALL – FLAT ROOF ............................................................................................. 0 5.8 EXAMPLE 8: INDUSTRIAL HALL – PITCHED ROOF ....................................................................................... 0 5.9 EXAMPLE 9: PRICE ESTIMATION – DETAILED CASE NO 1 ........................................................................... 0 5.10 EXAMPLE 10: PRICE ESTIMATION – DETAILED CASE NO 2 ....................................................................... 0 1 1. INTRODUCTION 1.1. SCOPE The software ACE provides a quick price and weight estimation for floor systems based on Iprofiles as well as for simple industrial halls geometries. It also serves as a price calculator of already designed solutions. ACE is not a finite element calculation software and the results are based on the implemented databases. ACE provides 4 operating modes: - Single Module - quick price and weight estimation for one module of a floor system based on I-profiles, - Multi-Module - quick price and weight estimation for the whole floor based on I-profiles, - Beam Calculator – price calculator of floor systems based on already designed solutions (import of beams and slabs), - Industrial halls - quick price and weight estimation for simple geometries of industrial halls with flat or pitched roof. In Single/Multi-module modes, two different approaches are proposed for beams and columns: beams weight is estimated according to the database created using available engineering software [4, 5, 6], and columns are calculated using simplified rules according to EN 1993-1 [2]. Range of application is the following: - structure limited to 20 storeys, - maximum dimensions of beam modules: 20 x 20 m (40 x 20 m for cellular beams); maximum distance between secondary beams: 6,0 m for steel decks, 10,8 m for precast slab and 16,2 m for hollow core slab; - minimum dimensions of beam modules: 3,6 x 2,4 m; minimum distance between secondary beams: 2,4 m, - usual steel grades according to EN 10025: S235, S355 and S460 Histar, - arbitrary permanent and variable loads, - simplified method for column design – class 4 cross-sections excluded. 2 Fig. 1.1 Scheme of a single beam module For industrial halls, simplified approaches are proposed for a given range of application shown in Figs 1.2 and 1.3. Fig. 1.2 Flat roof input window – range of application Fig. 1.3 Pitched roof input window – range of application 3 1.2. INSTALLATION PROCEDURE The software runs in Windows environment. As ACE is of a small size, it does not require any particular space disk. ACE is provided on the CD-ROM/pendrive or can be downloaded from ArcelorMittal website. In order to install the software, run SETUP and follow instructions. This procedure creates a default directory C:/Program Files/ACE in which all files are installed. If another directory shall be defined by the user, it is necessary to write down the exact path (Menu File–Path in ACE). The software may be executed under any name specified by a user (default ACE). Some data files can be read, however it requires an extended knowledge of its format. These are the price list and profile database. The Technical Notes are given in the explicit PDF format. All files are stored in the subdirectories of C:/Program Files/ACE. The full setup version as well as the simplified one (without intervention in .dll files) are provided. 2. INTERFACE 2.1 STARTING WINDOW The Starting window appears once the software is executed (Fig. 2.1). Click “Start” button to open a new session. The user can choose one of 4 languages: English, French, Dutch or Polish. Fig. 2.1 Starting Window 4 Then New Task window is opened (Fig. 2.2). Four modes may be executed: - Single Module - quick price and weight estimation for one module of a floor system based on I-profiles, - Multi-Module - quick price and weight estimation for the whole floor based on I-profiles, - Beam Calculator – price calculator of floor systems based on already designed solutions (import of beams and slabs), - Industrial halls - quick price and weight estimation for simple geometries of industrial halls with flat or pitched roof. Fig. 2.2 New Task window: choice of a session mode 2.2 INPUT DATA This Chapter provides detailed information concerning input data definition related to Single Module, Multi-Module, Beam Calculator and Industrial halls, respectively. The following input data are to be defined in Single Module and Multi-Module: - unit dimensions, beam type, slab type, steel grade for beams and columns, fire protection, number of storeys, foundations, 5 - façade. The input file for Beam Calculator is directly imported from the external software: ArcelorMittal Beams (compatible with version 2.10) or Arcelor Cellular Beams (compatible with version 2.40b). The following input data are to be defined for industrial halls: - column height, frame span and spacing, total building length, steel grade, fire protection, wind and snow load for pitched roof halls, average prices per square meter for façade, roofing, foundation/ground floor, finishing and services. 2.2.1 SINGLE MODULE ACE Single Module deals with one single module of a floor system. First a geometry of a module shall be defined. The user defines the length of primary beams (L1) and secondary beams (L2) (Fig. 2.3). Possible configurations (scheme 1, scheme 2 and scheme 3) are automatically chosen by ACE. The choice is limited. Slab span limits are the following: - Schema 1 is checked for L1 within range of 2,4 – 6,0/10,8 m for steel decks/precast slabs, - Schema 1 is checked for L1 within range of 2,4 – 16,2 m for hollow core slabs, - Schema 2 is checked for L1 within range of 4,8 – 12,0/20,0 m for steel decks/precast slabs, - Schema 2 is checked for L1 within range of 4,8 – 20,0 m for hollow core slabs, - Schema 3 is checked for L1 within range of 7,2 – 20,0 m for steel decks and precast slabs, - Schema 3 is checked for L1 within range of 7,2 – 20,0 m for hollow core slabs, where L1 is the length of a primary beam. Fig. 2.3 Geometry definition – possible beams configurations 6 ACE imposes limits on beam module dimensions: upper limit 20,0 m x 20,0 m (40,0 m x 20,0 m for cellular beams), lower limit is 3,6 m x 2,4 m. The maximal lengths of secondary beams “L2” are the following: - slim floor L2 max = 12,0 m, - I-profiles L2 max = 20,0 m, - cellular beams L2 max = 40,0 m, and the values of “a” (distance between secondary beams = slab span, see Fig. 2.3) may vary for specific slab systems: - steel deck 2.4 to 6,0 m, precast slab 2.4 to 10,8 m, hollow core slab 2,4 to 16,2 m. For slimfloors, only scheme 1 is available. Figure 2.4 presents a view of a single module which appears in the Main window. Note that only one module can be analysed at a time. Other data are defined using Horizontal and Vertical input buttons. Figure 2.5 presents horizontal input data: - type of beams and slabs, steel grade and concrete class, fire protection (different for beams and columns). Arbitrary loads (User's) may be defined. However, the user may use pre-defined values. These are: office 1 where p = 0,75 kN/m2, q = 3,5 kN/m2 office 2 where p = 3,0 kN/m2, q = 3,0 kN/m2 hospital where p = 1,5 kN/m2, q = 4,5 kN/m2 car park where p = 0,0 kN/m2, q = 2,5 kN/m2 - p is the permanent load and q is the variable load. For ULS checks, the safety factors are the following: - permanent load with the safety load factor equal to 1,35 variable load with the safety load factor equal to 1,50. Slab weight is added automatically with the safety factor load equal to 1,35. For SLS checks, the safety factors are all equal to 1.00. 7 Fig. 2.4 Main window: definition of complete floor system (Single Module) ACE provides results for 3 steel grades and 2 concrete classes which are associated in the following pairs: - S235 and C30/37, S355 and C30/37, S460 and C40/45. The same steel grade is imposed for beams and columns at each run of the software. Fire protection cost may be added to the total price if activated. ACE provides 3 types of fire protection: - intumescent paint, sprayed material, rigid panels, which are calculated for different fire resistance conditions (R30 – R120) . ACE enables a price estimation for the following configurations of steel beam (I-profile, cellular beam) – concrete slab: - I profiles non-composite with steel deck, I profiles non-composite with precast slab, I profiles non-composite with hollow core slab, I profiles composite with steel deck, I profiles composite with precast slab, Cellular beams non-composite with steel deck, Cellular beams non-composite with precast slab, Cellular beams non-composite with hollow core slab, 8 - Cellular beams composite with steel deck, Cellular beams non-composite with precast slab, Integrated floor beams (IFB), Slimfloors (SFB). The choice of solutions among I-profiles can be limited. Four groups of profiles are distinguished: IPE, HEA, HEB and HEM (Fig. 2.5) and results can be obtained for any set of these groups. Cellular beams act exclusively as secondary beams. Primary beams are always non-composite. If solutions based on steel deck are considered, one common steel deck is taken for all cases. Slimfloors are always used as scheme 1. Solution with a hollow core slab covered by 5 cm concrete layer is adopted. Table 2.1 Possible beam-slab combinations Non composite Composite I – profiles Steel deck Precast slab Hollow core slab Steel deck Precast slab Cellular beam Steel deck Precast slab Hollow core slab Steel deck Precast slab Slim floor (IFB, SFB) - - Hollow core slab - - Fig. 2.5 Definition of horizontal input data 9 Fig. 2.6 Definition of horizontal input data: predefinition of steel profiles (IPE, HEA, HEB, HEM) Vertical input data are divided into three groups: - foundations, façades, ground floor, roof, columns and bracing, floor height, non-structural items (such as finishing or services). Roof, foundations, ground floor and bracing cannot be included in this mode. They are available in Multi-Module (see Chapter 2.2.2). “Include façade” activates calculation of façade price. The principle of Single Module is to define only single beam module, so façade price is based on approximate values of floor area and façade length given by the user. Approximate floor area defines the area of an analyzed floor. Approximate façade length defines the total façade length. Façade price: defines façade cost per square meter of the façade. Note that the output file provides façade price recalculated per square meter of the floor system. In order to pre-design columns, the following data must be defined: - floor height including values for free space (net office height), services and finishing – to be defined in "Floor height" input data, number of levels in a building. Splices are imposed every every second level. 10 Fig. 2.7 Definition of vertical data: columns and façades The user has to define parameters necessary to estimate floor height (see Fig. 2.8): - finishing of floor system: default value of 6,0 cm for common finishing, services: space to conduct pipes etc., free space: space between floor and false ceiling (net office height). Non-structural items related to the whole building should be defined: - internal finishing, services, preliminaries to be expressed as a percentage of all cost items or by a fixed value in EUR. The whole floor height is automatically calculated by ACE. Results can be found in the output file. 11 Fig. 2.8 Definition of vertical data: floor height Fig. 2.9 Definition of vertical data: other non-structural items 12 2.2.2 MULTI-MODULE Two approaches are possible: data from an existing project can be edited and recalculated, or a new project can be defined. - Existing project: in the main menu click “File” tab, then “Open” and select the appropriate file. Note that for the use of prices, if the user wants to work with the same price list used in the first project, the list which was related to that project has to be selected. If no price list is selected, ACE software will proceed to the calculation with a price list ‘by default’. - New project: click on “Geometry” icon and enter dimensions of the structure. Define main geometry For a new project, if an entire building is analyzed, the user has to enter geometry module by module, and in two directions (define coordinates for X Grid and Y Grid). Define columns For a new building (multi module), the user has to define the columns of the structure. - Click on “Columns – Add” icon: “Columns – All” icon: in order to define columns zone by zone or in order to define columns in the entire geometry. Note: if the geometry is not defined, the tabs or are not active. - Click on “Column – Del” icon: in order to delete one or several columns in the case of a non-rectangular building. Create modules The definition of the beams and the floor system is very specific, as no tab is available in the tool bars of the menu. However, this operation is obligatory in order to be able to continue in the ACE session. The way to define beams is the following: - Click the right mouse inside the drawing blank area on the ACE screen: a new set of functions appears on the screen: Create module Delete module Create all module Delete all module Beam orientation … ► Select scheme … ► - The beams and floor system for the whole building can be created in one step by using the “Create all modules” function. 13 In the case of a non-rectangular building, the functions “Create module” and “Delete module” allow the variations in the building geometry to be defined. Define orientation and configuration (scheme) of floor system At this stage, the floor system is defined with all possibilities of: - secondary beam orientation (X or Y orientation for all modules), and - scheme of floor system for all modules. Three types of scheme are possible: Fig. 2.10 Possible beams and columns arrangements (schemes) Fig. 2.11 Floor system definition Fig. 2.12 Legend to describe beams orientation 14 The legend (Fig. 2.12) describes how colours are related to the orientation of different modules. For example, the orientation of beams in Fig. 2.11 is in the X direction. The main window permits to define input data, run analysis as well as view a model in the drawing area (Fig. 2.11). In order to define geometrical and material data, the user shall pass through all icons, starting from the left. The step-by-step procedure is described below. Fig. 2.13 ACE Multi – drawing area First, a geometry of one floor level has to be defined. In order to do so, a grid has to be drawn in the drawing area (Fig. 2.13). Each grid intersection can be a column, no intermediate columns are possible. The following data are obligatory (Fig. 2.14): - Grid Label (letters for X-coordinates, numbers for Y-coordinates), Grid coordinates (in meters), Grid Spacing – distance between grid lines, No of Addit’l Grids – number of repetition of a defined grid spacing. 15 Fig. 2.14 Definition of grid parameters Once the grid defined, the user can input columns at grid intersections. Three buttons may be used to place required columns: - Column – Add – permits to define columns on the area drawn using the “fence”, Column – All – put column in all grid intersections (rectangular floor), Column – Del – delete column with the “fence”. ACE imposes limits on beam module dimensions: upper limit 20,0 m x 20,0 m (40,0 m x 20,0 m for cellular beams), lower limit is 3,6 m x 2,4 m. The maximal lengths of secondary beams “L2” are the following: - slim floor L2 max = 12,0 m, - I-profiles L2 max = 20,0 m, - cellular beams L2 max = 40,0 m, and the values of “a” (distance between secondary beams = slab span) may vary for specific slab systems: - steel deck 2.4 to 6,0 m, precast slab 2.4 to 10,8 m, hollow core slab 2,4 to 16,2 m. Three configurations of secondary beams are considered at each run of the software (see Fig. 2.10). Each configuration (scheme) is verified only for cases within its range of application as it is defined above. For slimfloors, only scheme 1 is available. The next step is to enter beams. ACE generates primary and secondary beams between all defined columns. Besides, secondary beams (none, one or two) are defined inside each beam module. Secondary beams orientation. 16 Modules can be oriented horizontally (secondary beams along x-axis) and vertically (secondary beams along y-axis). During one session, the following arrangements of secondary beams can be defined and analysed: - horizontal, - vertical, - horizontal and vertical. Colours are attributed for each arrangement – see Fig. 2.12. This legend prescribes colours related to different modules orientations. Another information concerns procedures of module definition or edition: use right-click button in order to enter the additional menu for modules definition and edition (Fig. 2.15). This menu allows to create or delete modules and to select beam orientation (horizontal, vertical or both). It also define whether a scheme is pre-defined automatically or fixed by the user. The user has the choice to select a particular beam orientation and scheme by clicking the right mouse again: - Beam orientation function: Create module Delete module Create all modules Delete all modules Beam orientation … ► X direction Selekt scheme … …► Y direction - Configuration of floor system: scheme selection Fig. 2.15 Main window: defininition of modules using right-click button menu 17 Figure 2.16 presents a floor model after getting through geometrical input. Note that only one floor system can be analysed at a time. That means that the same floor model is valid for all levels of the analyzed structure. Fig. 2.16 Main window: definition of complete floor system Other data are defined using “Horizontal” and “Vertical” input buttons. Figure 2.17 presents horizontal input data: - type of beams and slabs, steel grade and concrete class, fire protection (different types for beams and columns). Arbitrary loads (User's) may be defined. However, the user may use pre-defined values. These are: - office 1 where p = 0,75 kN/m2, q = 3,5 kN/m2 - office 2 where p = 3,0 kN/m2, q = 3,0 kN/m2 - hospital where p = 1,5 kN/m2, q = 4,5 kN/m2 - car park where p = 0,0 kN/m2, q = 2,5 kN/m2 p is the permanent load and q is the variable load. For ULS checks, the safety factors are the following: - permanent load with the safety load factor equal to 1,35 variable load with the safety load factor equal to 1,50. Slab weight is added automatically with the safety factor load equal to 1,35. For SLS checks, the safety factors are all equal to 1.00. 18 ACE provides results for 3 steel grades and 2 concrete classes which are associated in the following pairs: - S235 and C30/37, S355 and C30/37, S460 and C40/45. The same steel grade is imposed for beams and columns at each run of the software. Fire protection cost may be added to the total price if activated. ACE provides 3 types of fire protection: - intumescent paint, sprayed material, rigid panels, which are calculated at different fire resistance conditions (R30 – R120). ACE enables a price estimation for the following configurations of steel beam (I-profile, cellular beam) – concrete slab: - I profiles non-composite with steel deck, I profiles non-composite with precast slab, I profiles non-composite with hollow core slab, I profiles composite with steel deck, I profiles composite with precast slab, Cellular beams non-composite with steel deck, Cellular beams non-composite with precast slab, Cellular beams non-composite with hollow core slab, Cellular beams composite with steel deck, Cellular beams non-composite with precast slab, Integrated floor beams (IFB), Slimfloors (SFB). The choice of solutions among I-profiles can be limited. Four groups of profiles are distinguished: IPE, HEA, HEB and HEM (Fig. 2.18) and results can be obtained for any set of these groups. Cellular beams act exclusively as secondary beams. Primary beams are always non-composite. If solutions based on steel deck are considered, one common steel deck is taken for all cases. Slimfloors are always used as scheme 1. Solution with a hollow core slab covered by 5 cm concrete layer is adopted. 19 Table 2.2 Possible beam-slab combinations Non composite Composite I – profiles Steel deck Precast slab Hollow core slab Steel deck Precast slab Cellular beam Steel deck Precast slab Hollow core slab Steel deck Precast slab Slim floor (IFB, SFB) - - - - Hollow core slab Fig. 2.17 Definition of horizontal input data Fig. 2.18 Definition of horizontal input data: predefinition of steel profiles (IPE, HEA, HEB, HEM) 20 Vertical input data are divided into two groups: - foundations, façades, ground floor, roof, columns and bracing, floor height. Roof, foundations, ground floor, façades and bracing can be included in calculations. Figures 2.19 and 2.20 present all input values. Output file provides façade price recalculated per square meter of the floor system. “Include façade” activates calculation of façade price. Only the price of façade needs to be defined. Floor area and façade length are automatically calculated by ACE. In order to pre-design columns, the following data must be defined: - floor height including values for free space (net office height), services and finishing – to be defined in "Floor height" input data, number of levels in a building. Splices are imposed every level, every second level or every third level. Three types of soil are offered to pre-design foundations: - sand (0.50 MPa), gravel (0.60 MPa), clay (0.35 MPa). The price of foundations is referred to m2 of single floor and is given in the output file. Fig. 2.19 Definition of vertical data: foundations, façades, columns and bracing 21 The user has to define parameters necessary to estimate floor height: - finishing of floor system: default value of 6,0 cm for common finishing, services: space to conduct pipes etc., free space: space between floor and false ceiling (net office height). Non-structural items related to the whole building should be defined (Fig. 2.21): - internal finishing, services, preliminaries to be expressed as a percentage of all cost items or by a fixed value in EUR. The whole floor height is automatically by ACE. Results can be found in the output file. Fig. 2.20 Definition of vertical data: foundations, façades, columns and bracing 22 Fig. 2.21 Definition of vertical data: other non-structural items 2.2.3 BEAM CALCULATOR Beam Calculator uses data from the following sotfware: ArcelorMittal Beams and Arcelor Cellular Beams. Click on beams and import beams in the required format (only files created by Arcelor Beams or Arcelor Cellular Beams). Primary beams (L1) can only be I-profiles. In that case, only import from Arcelor Beams software is possible. Secondary beams (L2) can be both I-profiles and cellular beams. Figures 2.22 and 2.23 present a starting layout of Beam Calculator and a view of the defined module, respectively. If imported beams are composite, the data concerning slab are also imported. Otherwise, the user needs to define his own slab or to make an analysis without slab. The beam configuration (scheme) is imposed by the user (Mode “module” to be active). If an analyse of a single beam (not a part of a module) is required, switch to Mode “single beam”. If scheme 1 is chosen, L1 shall be imposed by the user. Beam calculator do not import columns, but columns can be considered in calculations by activating “include columns” option. Then, a column is to be chosen from the list (Fig. 2.24). 23 Fig. 2.22 Beam calculator: starting layout 24 Fig. 2.23 Beam calculator: view of the defined module Fig. 2.24 Beam calculator: column input 2.2.4 INDUSTRIAL HALLS This module has limited range of application. Its aim is to get a rough estimation of simple industrial hall solutions. The range of input data has been selected in order to cover common solutions. FLAT ROOF Range of application: - column height: 5.0 to 10.0 m, 25 - frame span: 10.0 to 24.0 m, frame spacing: 5.0 to 7.0 m, steel grade: S235, fire protection: intumescent paint R30-R60. prices for roofing, façade, foundation, ground floor, finishing, services: arbitrary values, secondary steel: a fixed value of extra 35% of steel added to the frame weight. Fig. 2.25 Flat roof input window – range of application PITCHED ROOF Range of application: - column height: 4.0 to 8.0 m, frame span: 8.0 to 30.0 m, frame spacing: 6.0 m, steel grade: S235, fire protection: intumescent paint R30-R60. prices for roofing, façade, foundation, ground floor, finishing, services: arbitrary values, secondary steel: a fixed value of extra 35% of steel added to the frame weight. 26 Fig. 2.26 Pitched roof input window – range of application 2.3 RUNNING ACE SINGLE MODULE AND MULTI-MODULE Once all input data introduced, calculation module may be executed using “Run” button. The option gives an automatic access to calculation routines for beams, slabs and columns. BEAM CALCULATOR Once all input data introduced, calculation module may be executed using “Calculate” button. The option activates price calculations for beams, slabs and columns. INDUSTRIAL HALLS Once all input data introduced, calculation module may be executed using “Calculate” button. Frame weight and price are given as a result. See Chapter 2.5 for details about output results. 2.4 DATABASES 2.4.1 SINGLE MODULE AND MULTI-MODULE 27 ACE is not a finite element software dedicated for beams. However, as beams are assumed simply supported, results are introduced in the form of the database with already designed solutions. They have been calculated using the following software: ArcelorMittal Beams, Arcelor Cellular Beams (ACB) and IFBWIN [4, 5, 6]. The calculation steps in the database vary from 1,2 m to 2,0 m in beam length and 0,6 m in slab span. The solver always chooses the closest solution on the safe side. No interpolation is made. If the solver does not find a solution which respects all restraints, no solution is given. Slabs are first checked. Once slab is chosen (and therefore its weight), beams are analysed. Other price components such as connections, studs, erection etc. are chosen with respect to the chosen beams. The content of the database: - steel pofile with geometrical data and resistance according to ULS and SLS checks, - shear studs, - propping, - slab types with geometrical data and resistance, - price components, - fire protection. Data about propping are automatically written down from the database. No precamberring for beams is assumed. For each scheme, ACE checks all possible solutions in order to find the most economic one. The choice of beams configuration is limited. Slab span limits are the following: - Schema 1 is checked for L1 within range of 2,4 – 6,0/10,8 m for steel decks/precast slabs, - Schema 1 is checked for L1 within range of 2,4 – 16,2 m for hollow core slabs, - Schema 2 is checked for L1 within range of 4,8 – 12,0/20,0 m for steel decks/precast slabs, - Schema 2 is checked for L1 within range of 4,8 – 20,0 m for hollow core slabs, - Schema 3 is checked for L1 within range of 7,2 – 20,0 m for steel decks and precast slabs, - Schema 3 is checked for L1 within range of 7,2 – 20,0 m for hollow core slabs, where L1 is the length of a primary beam. 2.4.2 INDUSTRIAL HALLS The approaches proposed for flat and pitched roof solutions differ one from another. However, in both cases calculations are based on the databases. 28 FLAT ROOF The following methodology for calculating costs of flat roof industrial buildings is proposed. The calculation of the costs of the steel structure of flat roof industrial buildings is divided in four parts. The calculation consist of the following parts: material, fabrication, finishing and erection. The used methodology, rates and formulas has been checked by several steel fabricators. Material The costs of the material exits of the prices of the beams, the bolts and secondary steel. The prices of the beams are depending of the price per kg and the steel grade. There is made an distinction in the price per kg for beams with a weight lower than 100 kg/m (light sections) and beams with a weight higher than 100 kg/m (heavy sections). There are also different prices for the three used steel grades S235, S355 and S460. So in total there are six different prices. The prices vary per country and are listed in de price list. The costs of the bolts does not vary per country. The costs are 15 euro/ton steel. For secondary steel has been calculated 35% of the costs of the beams. Fabrication Everything what is happen in the fabrication shop, costs of transport and costs of drawing and engineering is part of the subdivision fabrication. Connection In the costmodel there are prices for two different connections: simple connections and moment connections. There are two types of simple connections: endplate connections between column and beam in the top and base plate connections between column and foundation. For each type of connection there is a formula developed to account the manhours to make the connection. The price of the connection will increase when the weight of the connected beam of column will increase. The total costs of the connections are the total manhours for the different connections multiplied by the rate per manhour. The formulas of the connections are given in the following table. connection formula [manhour] endplate connection moment connection baseplate connection 0,0111x + 0,4335 0,0291x + 0,6341 0,0002x 2 + 0,0135x + 0,1975 lower limit upper limit 0,70 1,75 0,70 2,65 6,45 10,90 x = weight of beam [kg/m] Transport The cost of transport is based on the number of rides between the fabrication shop and the building site. The total cost are the number of rides multiplied by the cost per ride. The cost per ride is depending on a truck with a capacity of 20 tonnes steel. The price for a transport with a truck with 20 tonnes of steel is given in the price list. 29 Drawing and engineering The cost of engineering and drawing are depending on the cost of the connections. For the cost of engineering and drawing is taken 0,05 euro/kg steel. Finishing The subdivision finishing contains corrosion protection and fire protection. Corrosion protection The corrosion protection will be foreseen by coating. There has been an assumption of a two-layer protection. The costs of coating are the price per m2 multiplied by the total protected surface. The prices of the coating can vary between the different countries. The prices are listed in the price list. Fire protection The intumescent paint option is available for flat roof industrial halls. It is applied according to the rules described in Chapter 3.3. Erection The assumption is that the steel structure will be assembled by a team which consist of three men, two tower wagons and one crane. The costs of the team per day can be determined by the prices from the price list. The calculation of the cost per day for a team is given in below table. The unit prices are given in the price list. numbers manhours unit price subtotal Mechanicans 3 24 A 24A Tower waggons 2 16 B 16B Crane 1 8 C 8C Total 24A + 16B +8C The team can assemble a number of steel elements (beams) per day. The number of elements is depending of the weight of each element. At the end it is possible to determine the number of days assembling. This number multiplied by the costs per team will give the total cost of erection. The formula for the accounting of the number of elements which a team can erect is given below. formula erection -0,022x + 46,3 lower limit upper limit 18,8 43,6 x = weight of beam [kg/m] 30 PITCHED ROOF The database applied for pitched roof solutions are based on real design performed using ArcelorMittal Beams software. As an output, columns and rafters together with hunches are obtained. Other items such as connections, transport, erection are derived from interpolation obtained from some price estimation (see Fig. 2.27). Finishing The subdivision finishing contains corrosion protection and fire protection. Corrosion protection The corrosion protection will be foreseen by coating. There has been an assumption of a two-layer protection. The costs of coating are the price per m2 multiplied by the total protected surface. The prices of the coating can vary between the different countries. The prices are listed in the price list. Fire protection The intumescent paint option is available for flat roof industrial halls. It is applied according to the rules described in Chapter 3.3. Colum ns Manhours x 1000/ Net weight 25 20 15 10 5 0 0 200 400 600 800 1000 1200 Net w eight (kg) Rafters Manhours x 1000 / Net weight 30 25 20 15 10 5 0 0 500 1000 1500 2000 Net w eight (kg) Fig. 2.27 Database for pitched roof halls – estimation of manhour cost 31 2.5 OUTPUT FILE SINGLE MODULE AND MULTI-MODULE Calculations are executed using “Run” button. Once the calculations are terminated, the user proceeds to summary of results through “Results” button. An extract of the Summary output data is shown in Fig. 2.28 (summary of input data) and in Table 2.3 (recapitulative table). Fig. 2.28 Output file – summary report Table 2.3 Output file – recapitulative table No. Code (1) Floor height Price€/m2 Steel weight kg/m2 structure (3) (2) Module kg/m2 Façade foundation roof ground floor total 1 1-3ICP3-Y 3.81 25.2 100.32 152 9.05 0 9.71 270.75 475.22 2 1-3INP3-Y 4.11 38.1 109.54 158 9.05 0 9.71 285.8 488.06 3 1—ICP3-X 3.83 15.9 113.83 149 9.05 0 14.27 285.9 703.36 4 1—INP3-X 3.93 20.9 115.55 154 9.05 0 14.27 293.04 708.38 1) X - X (horizontal) direction orientation of secondary beams, Y - Y (vertical) direction orientation of secondary beams 2) Price of one floor 3) STRUCTURE = steel frame + slab + fire protection + façade + bracing 32 Legend for the code applied in the column “Code” INS – I-profile, non-composite, steel deck INP – I-profile, non-composite, precast slab INH – I-profile, non-composite, hollow core slab ICS – I-profile, composite, steel deck ICP – I-profile, composite, precast slab ICH – I-profile, composite, hollow core slab ANS – cellular beam, non-composite, steel deck ANP – cellular beam, non-composite, precast slab ANH – cellular beam, non-composite, hollow core slab ACS – cellular beam, composite, steel deck ACP – cellular beam, composite, precast slab IFB – integrated floor beam SFB – slimfloor beam Figures “1”, “2” or “3” which precede the letters of the codes stands for scheme 1, scheme 2 and scheme 3, respectively (see Table 2.1 for configurations of primary and secondary beams), whereas last figure “2”, “3” or “4” denotes steel grades, S235, S355 and S460, respectively. X and Y describes secondary beams orientation as stated below the table. Summary output data may be extended. The option “Report” is used to run a detailed report creator. Detailed report creator (see Fig. 2.29) enables to select a case, to define a report format (Word or plain text) and to print and save results. The extract of the detailed report is presented in Fig. 2.30. Fig. 2.29 Detailed report creator 33 Fig. 2.30 Detailed report: Multi-Module BEAM CALCULATOR The analysis is executed using “Calculate” button. Once the calculations are terminated, the user proceeds to the summary report. An extract of the data is shown in Fig. 2.31. The following results are given: - beams (profiles names, steel weight and price, connections may be included) - columns (profile name, steel weight and price) - slabs (weight and price) - whole structure (results in kg, kg/m2, €, €/m2) 34 Fig. 2.31 Detailed report – Beam Calculator 35 Fig. 2.32 Beam Calculator – summary report INDUSTRIAL HALLS The output file contains the summary of input data, profiles adopted, weight of structure and price breakdown. Fig. 2.33 shows the layout of he output data. The output file can be stored through File – Save option. 36 Fig. 2.33 Industrial halls – output results for flat roof and pitched roof solutions (summary of input data and price breakdown available for both solutions) 2.6 EXPORTING DATA ACE is a pre-design tool. In order to perform a final design, the user is able to export beams to one of the design tools: ArcelorMittal Beam (non-composite and composite I-profiles) or Arcelor Cellular Beams (non-composite and composite cellular beams). ACE is specially designed to create file formats which can be read in the abovementioned tools. Choose “Export beam” option and choose one beam to be exported. Note: ACE will automatically proceed to the suitable software: - ArcelorMittal Beams for I-profiles, - Arcelor Cellular Beams for cellular beams. Figures 2.34 and 2.35 present the export mode window for Single Module and Multi-Module, respectively. 37 Fig. 2.34 Export beam option – Single Module Fig. 2.35 Export beam option – Multi-Module Once a report about successful export appears (Fig. 2.36), the user has two options: - going back to ACE to perform another analysis, - running external software (ArcelorMittal Beams or Arcelor Cellular Beams) in order to perform a final design with the exported beam. 38 Fig. 2.36 Report on successful export Be aware new versions of the used software may be released. If any problem of compatibility appears, ask the software providers for support. 2.7 SAVING DATA ACE may be terminated using “Exit” button in the Main Toolbar, using “Exit” option from “File” Menu or simply using standard Windows options. Each task may be saved using “Save” option from “File” in the input windows or in the output window. The format created and then recognized by ACE is *.ace. In order to re-analyze a task, standard “Open” option is provided. The user is always asked to save data if the session is being quit without saving (“Exit” or “New” option). 3. CALCULATION METHOD This Chapter is related to Single Module and Multi-Module modes from 3.1 to 3.6. Chapter 3.7 is general for Single Module, Multi-Module and Industrial Halls. Chapter 3.3 also concerns Industrial Hall mode in some parts. 3.1 BEAMS AND SLABS ACE deals with typical multi-storey structures such as offices or parkings. Such structures contain repetitive single structural modules, which are defined by a slab limited by 4 beams (and secondary beams if any) and supported by 4 columns (Fig. 1.1 in Chapter 1). The aim of this software is to provide weight and price estimation of a real multi-module structure based on simple modules. The database implemented in ACE has been elaborated using the following software: Arcelor Beams, Arcelor Cellular Beams (ACB) and IFBWIN [4, 5, 6]. Steel profile library includes typical European profiles. 39 Simply supported beams are considered for all calculations. The wind bracing is not considered (refer to Chapter 3.6 for more details). It is assumed that the structure is propped if design requirements demand it. Some other parameters has been fixed: - concrete strength class: C30/37 or C40/45, - steel deck: 1 commonly used, - shear studs: 19 mm diameter, height according to slab thickness (slab/studs: 12 cm = 75 mm, 14 cm = 100 mm, 20 cm = 150 mm, >25 cm = 175 mm, respecting EN 1994-1). ACE provides usual steel grades in conformity with EN 1991-1 [1]: S235, S355, S460 Histar. The safety factor for database with beam modules is assumed constant M (=1.0). Beam design is performed according to EN 1993-1 [2], EN 1994-1-4 [3] and in conformity to requirements of EN 1991-1 [1]. Concrete slab is calculated according to EN 1994-1 [3]. Possible configurations are the following: - concrete slab on steel deck, - concrete slab on precast slab (5,0 m), - hollow core slab. Slab weight is given by multiplication of a concrete volume by 2500 kg/m3. Note that exact calculations of the slab are performed only for solutions with precast slab. The other solutions are available with exact weight and price, but the resistance data are those adopted from the solution with precast slab. The total system height is the sum of a profile height and a concrete slab height. For slimfloors, a beam height +5,0 cm extra concrete over the hollow core slab is taken. 40 Note: - maximum of the two profiles means a heavier profile is adopted - the choice between precambering and propping is based on prices of both solutions. Prices are checked automatically by ACE and may be modified b user Fig. 3.1 Composite beam design – procedure adopted in ACE 41 3.2 COLUMNS The structure may have up to 20 storeys - this is defined with the sub-option “No of levels”. The height of a storey (only a constant value through all storeys) is then defined by introducing values in “Floor Height” window. By default, in ACE Single Module splices are applied every second level. However, in ACE MultiModule it can be defined every level, every second lever or every third level. The same steel grades for beams and columns are imposed. The safety factors M (=1.1) is provided for steel in column design. Columns are automatically loaded at each level by the permanent and variable loads applied to the floor surface. Simple load combinations and EN 1993-1 [2] formulas for elements in compression with reduction due to buckling are then used. Floor system height is defined in Fig. 3.2. 42 Note: In Multi-Module the free space is determined by the highest steel profile representing secondary beam Fig. 3.2 Definition of the floor system height – ACE Single Module and ACE Multi-Module Column design: simplified EN 1993-1 [2] formulas with assumption of axial loading are used. Details of the calculation procedure : Load area = single beam unit A x B Loads n floors: G2 x A Q2 x A x n Gi – permanent loads; Gi includes slab weight Qi – variable loads n – reduction coefficient for variable load according to EN 1991-1 [1] Part 2.1 formula (6.2) 2 n 2 o n n Load combination NSd = 1.35 ( Gi + column weight) + 1.5 Qi Splices ACE Single Module: every second level 43 ACE Multi-Module: every level, every second level or every third level. Member resistance Assumptions : buckling length level height member forces : NSd only, MySd = MzSd = 0 EN 1993-1 check : §5.5.1 formula (5.45): Elements in compression taking into account buckling resistance of a member N Sd A Af y / M1 where A = 1 for class 1, 2 and 3, 1 2 2 0.5 , but 1 0.5 1 0.2 2 is an imperfection factor according to Table 5.5.1 of Eurocode 3 / 1 A 0.5 = l/i 1 = 93.3 235 / f y 3.3 0.5 FIRE PROTECTION FIRE RESISTANCE OF STEEL STRUCTURES [7] The required fire resistance of steel structures – in terms of fire resistance classes R – is given by national regulations and prescribed in EN. The assessment of the fire resistance of structural elements is based on standard fire tests in furnaces. Principles of calculation Steel temperature The increase in steel temperature is given by the following factors: a) The section factor (Am/V): i.e. the relation between the surface area exposed to the heat flux and the volume of the member per unit length. Calculation methods and values of (Am/V) for common sections are available. b) The thermal properties of a fire protection material: i.e. thermal conductivity p, its specific heat cp and its thickness dp. c) For fire protection material containing water, the evaporation of the water causes a delay of the 44 temperature increase of the steel when the temperature of the steel reaches 100 °C. Steel properties change with temperature. For a member at a uniform temperature, called critical temperature, the load bearing capacity becomes equal to the effect of the applied loads. Failure will then occur. The critical temperature is determined by the level of the applied load (action). An adaptation factor is introduced to take account of non uniform temperature distribution over the height and alongside the steel section. General material properties and calculation rules are available in national codes. FIRE PROTECTION MATERIALS Available fire protection types: - Intumescent paint, - Sprayed material, - Rigid panel. Fire protection classes: - R30, - R60, - R90, - R120. INTUMESCENT PAINT Typical Applications Used for visible steelwork with moderate fire protection requirements. Commonly used in the restoration of structural elements. Benefits - Unlike other methods of fire protection, there is no appreciable increase in overall member dimensions. - Can be applied rapidly and easily covers complex details. - Fixing to the steel is much simplified. - Certain manufactures produce thicker, more expensive coatings which give 120 minutes fire resistance and may be suitable for external use. Limitations - Many systems are not suitable for use either externally or in areas of high humidity. - Usually requires a blast cleaned surface and a priming coat. - Some coatings may require a top sealer coat. 45 Achievable finish Manufactures of intumescent paints invariably produce compatible top coat paint systems. These are usually available in a wide range of colours and finishing. Depending on the thickness and type of paint, the surface may appear “textured”. Design Intumescent paints expand, or intumesce, on heating to form an insulating foam-like char. This insulates the section, thereby ensuring that the member will support its design load for the required fire resistance period. The necessary thickness of protection is dependent on the section factor, the required fire resistance and the critical temperature. SPRAYED MATERIAL Typical applications Normally used on hidden members such as floor beams above a false ceiling and on members with complex connection details such as trusses and lattice girders. Benefits - Relatively low cost system. Rapid application. Can easily cover complex details. Limitations - Appearance may be inadequate for visible members. May require masking or shielding to limit over-spray. Unlike preformed types of protection, the applied thickness needs to be monitored. - Many systems are not suitable for use either externally or in areas of high humidity. Achievable finish Sprayed surfaces are usually hidden from view due to the undulating nature of the finished surface. The surface may be improved by manual finishing. Colorants may be added to the spray giving an eye-catching finished product. Design The spray protection insulates the section thereby ensuring that the critical temperature of the steel is not exceeded during the required fire resistance period. The insulating material is of two main types, namely low density (<250 kg/m) sprayed mineral fibres and higher density (>450 kg/m) sprayed vermiculite (both asbestos free). The necessary thickness of protection is dependant on the section factor, the required fire resistance and the critical temperature. RIGID PANEL Typical applications 46 Rigid box fire protection is generally used on columns or exposed beams. Low density boards are also frequently used on concealed beams. Some systems are suitable for external use. Benefits - Boxed appearance suitable for visible elements. A range of surface finishes or colour is available. Clean dry fixing. Installation causes little disruption to other trades. The board is of a guaranteed finished thickness. - In general, no preparation of the steel is necessary prior to applying the fire protection. Limitations - Can be difficult to fit around complex details. Significant fixing time. Some systems are not suitable for use either externally or in areas of high humidity. Generally more expensive than sprayed materials. Achievable finish The surface of the higher density insulations can be readily covered with a thin layer of plaster to enable a high standard of finishing to be achieved. The resistance of this system to impact damage varies depending on the individual product. Design The board insulates the steelwork thereby ensuring that the steel will support its design load for the required fire resistance period. The insulating material is of two main types, namely low density (<180 kg/m) fibre board and higher density (450 – 1000 kg/m) cement based gypsum, vermiculite or calcium silicate boards (all asbestos free). The boards are fitted using proprietary fixings, glue or screws. The necessary thickness of protection is dependant on the section factor, the required fire resistance and the critical temperature. FORMULAS FOR FIRE PROTECTION PRICE ESTIMATION In order to estimate price of fire protection, a set of empirical formulas has been developed. Input parameters are: - beam height - material and manhour prices The adopted solutions are presented below. Separate formulas have been developed for gypsum boards, intumescent paint and sprayed material. 47 48 3.4 FAÇADES, ROOF AND GROUND FLOOR ACE provides an estimation of façade price. As Single Module defines only one single beam module, façade price is based on approximate floor area and façade length given by the user. In return, Multi-Module provide a real façade length, therefore prices are more realistic. “Façade” – “Price” defines a façade cost per square meter of the façade. This is activated by “Include façade” option. Note that in the output file the façade price is recalculated per square meter of the floor system. 49 A/ B/ Fig. 3.3 Definition of façade, roof and ground floor parameters A/ Single Module, B/ Multi-Module Ground floor can be included in the total price estimation. This option “Include ground floor” is active (mandatory) only in Multi-Module – see Fig. 3.3. It is inactive in Single Module. By default, the price of ground floor is equal to the price of the calculated floor system. An arbitrary user’s value per square meter can also be defined. By default, no steel is included in the ground floor. Roof can be included in the total price estimation (available only Multi-Module) – see Fig.3.3. “Include roof” enables activation of this price component. By default, the roof price is equal to 60% of the calculated floor system. This value is increased by a waterproofing price. By default, the roof is made on steel frame which represents 60% of steel weight of the floor system. This weight is added to the total steel weight of building. 3.5 FOUNDATIONS “Include foundation” activates the procedure to estimate a foundation impact in price analysis (see Fig. 3.3). Three types of soil have been assumed with the resistance given in Table 3.1. Table 3.1 Soil parameters Soil Soil resistance q (MPa) Sand 0.5 50 Gravel 0.6 Clay 0.35 Loads are assumed as axial and they are equal to the value in the lowest column. The shape of the foundation is assumed as below: 0,25 A A B 0.25 A B A A Fig. 3.4 Shape of standard foundations The value of „A” is calculated from the following formula: A N q where: A – the principal length of the foundation (see Fig. 3.4) [m] N – axial load [MN] q – soil resistance (see Table 3.1) [MPa] The height „B” is taken from: B = 0.35 A where: B – the height of the foundation (see Fig. 3.4) [m]. The volume of the foundation is given by: VC A 2 B (0.25 A) 2 B [m3] The total concrete price is obtained by multiplying the volume by the unit price from the price list. The weight of the reinforcement: W R 100 VC [kg] WR is multiplied by the steel unit price from the price list in order to obtain the total reinforcement price. 51 The surface of timbering is calculated using the following formula: AD 5 A B [m2] AD is multiplied by the timbering unit price in order to obtain the total timbering price. The total price is the sum of the three calculated components. 3.6 WIND BRACING Wind bracing can be taken into account. Weight or price increase due to horizontal stabilization of structure is given by a nonlinear function dependent on the building height. K-bracing or Xbracing is considered. Those indicative values are derived from engineering practice and should be considered as rough estimation. This option is not active for ACE Single Module. The estimated wind bracing weight is presented in Summary Report (output file). 3.7 PRICE ESTIMATION ACE is specially designed to perform an extended price estimation of different floor systems. The complete list of prices is implemented in the software. This chapter provides general information about hyphothesis for price estimation which have been proposed in ACE. The price list can be updated, see details further in this Chapter. 3.7.1 BEAMS AND COLUMNS Material price depends on: - Profile weight (2 ranges: < 100 kg/m and > 100 kg/m), - Steel grade (S235, S355, S460 Histar), - Manpower. Shear studs (beams only) depends on: - Stud type (welded in shop), - Number of studs, - Manpower, - Slab type. For IFB, SFB or ACB systems an extra price per meter is added. The price of propping is a function of span and slab type. 52 Beams may be propped, precambered or designed without any of these two options. ACE defines itself whether a beam should be propped, then it selects propping or precambering when necessary. The choice between propping and precambering is based on the price of the solution and on the limit of precambering (max. 150 mm). The user can check whether a beam is assumed propped/precambered in the output details. The erection price is a function of beam and column weight (€/kg). The transport price is a function of beam or column weight (€/kg). The price of a corrosion protection is calculated as a function of the are of steel profile. Primer and finishing are 2 layers of protection considered in ACE. Prices (€/m2).are given in the price list. The overheads are the steel’s contractor’s overheads and are expressed by a percentage of the cost of the fabricated steelwork. The fire protection price depends on steel profile shape and on protection type. It is given in the separate database. 3.7.2 CONCRETE SLAB The concrete class is taken automatically as it is associated with the steel grade. - C30/37 – S235, - C30/37 – S355, - C40/45 – S460. Slab price is estimated in the following way: - Concrete slab – the price is the sum of the concrete volume and reinforcement (by default 1.0% of section area), - Steel deck: the price is linearly dependent of the deck span price, - Precast slab: price is a constant value corresponding to a precast slab of 5,0 cm, - Hollow core slab - the price is extrapolated from several pre-defined prices. 3.7.3 CONNECTIONS The following connections are available: beam–beam, beam–column, column–column. Each type has a different price which changes linearly as a function of beam weight and manpower. 53 Fig. 3.5 Types of connections A/ beam-column weak axis, beam under 100 kg/m, B/ beam-column strong axis, beam over 100 kg/m, C/ beam-beam Types of connections available in ACE Single Module: - beam-column /a primary beam or secondary beam attached to a column/: Fig. 3.5B for primary beams of 100 kg/m or less, Fig. 3.5D for primary beams over 100 kg/m, - beam-beam /a secondary beam attached directly to a primary beam/: Fig. 3.5C, - column-column: typical connection to join different column profiles (splices). 3.7.4 ENGINEERING AND MANPOWER The prices of “Engineering” and “Manpower” are included in other price components (material, transport etc.). 3.7.5 PRICES UPDATE Prices may be updated using ArcelorMittal internet website. Go to Price menu and click on “Update prices via Internet” in order to download the required price list for a given country (see Fig. 3.6). 54 Fig. 3.6 Price list – download from Internet Go to “Edit prices ...” submenu to review or to edit prices. The price values are displayed as shown in Fig. 3.7. Not all prices are explicitly given. The user can view the following ones: steel grade for profiles (S235, S355, S460), steel for angles (connections between structural elements), studs on site, 55 bolts (connections), propping for beams ans slabs, crane and transport, concrete (chape, reinforcement and timbering), reinforcement steel, overhead predicted by contractor, holow core slabs, precast slab based floors, floors with steel decking, manpower. Fig. 3.7 Price list – explicit values ACE provides several levels of the price edition: - “Open prices database”: this option allows to use other saved price lists, - “Edit prices” opens the price editor: it allows to edit the current price list with the following consequences: “Save” button – changes values in the current price list, “Save as ...” – allows to create a new price list, “Apply*” – allows to edit the price list, but new values are valid only for the current session and then are deleted. 56 - “Update prices via Internet” – this option is described above. Prices are calculated by ACE provider using a special calculation tool. Input price values are the following (example for Benelux countries): 57 4. REFERENCES [1] EN 1991-1: Basis of Design and Actions on Structures, Part1, Basis of Design. European Committee for Standardisation [2] EN 1993-1-1: Design of steel structures. Part 1.1: General rules and rules for buildings. European Committee for Standardisation [3] EN 1994-1-1: Design of composite steel and concrete structures. Part 1.1: General rules and rules for buildings. European Committee for Standardisation. [4] Arcelor Beams v. 1.02 – User’s Manual [5] Arcelor Cellular Beams v. 2.20 – User’s Manual [6] IFBWIN v. 5.20 – User’s Manual [7] Technical Note “Fire Resistance of Steel Structure” ECCS No 89 58 5. PRACTICAL EXAMPLES 5.1 EXAMPLE 1: SINGLE MODULE Click on „New” button to select a new task. Select “Single Module” mode (click on the drawing, not on the text) 59 The new window will open. It enables to define a basic geometry of modules. Put L1 = 5.0 m (primary beam length) and L2 = 10.0 m (secondary beam length). Note: the scheme type is automatically selected by ACE. Go to the next “Horizontal” icon. It is dedicated to loads, beam types, steel grades, concrete classes and fire protection definition. Define loads: select “User’s” load type. This is an arbitrary load to be specified by the user. Note that other load types are predefined. Put p = 5.0 kN/m2 and q = 5.0 kN/m2. Secondary beams: select all profiles for non-composite and composite I-profiles. Select “precast slab” as a unique slab type for all calculations. Steel grade and concrete class: select steel grade S355. This steel grade is associated with the concrete class of C30/37. Activate fire protection: do not select. This example does not deal with fire protection problems. Select beams: select all available profiles (IPE, HEA, HEB, HEM), then click “Accept” each time. 60 Go to the “Vertical” icon. This window is designed to define facade and column data. Some cells such as “Roof” or “Foundations” etc. are not active – they are only available for full multi-module analysis. Columns: define 5 levels and splices at every second level. Facade: put the price of 250 EUR/m2 and define an approximate length (160 m) and area (1200 m2) of the building. As ACE Single Module deals with one single module, approximate dimensions of the building shall be defined by the user as they cannot be deducted from other input data. Click on the “Next” button to proceed to the next window. This window describes vertical dimensions of a building. Values to be defined: - free space – available room height in a complete building, - all layers of the floor including finishing and services. Note that the floor system (beam + slab) is given automatically by ACE. 61 Keep default values in this example. Perform calculations by clicking “Run” button. ACE will automatically initiate all necessary calculation procedures. A temporary window shall appear to show the progress of calculations. 62 Results. Once the calculations are done, the temporary window will disappear. Click on “Result” icon to view results. Summary report. Review a summary of results including all input data and basic output results. Click on “Detailed Report” to view more detailed information. 63 Detailed report creator. Each calculated case is given separately. Refer to the Technical Notes to recognize the case code. Select Case No 1 to continue. Note: the results are given in the descending order, starting from the most economic solution. Detailed report. Go through details of the selected case. You will obtain detailed information about input data and final results, including weight and price of all structural components. 64 Select “Beam Export” option to send any beam to one of the compatible software: Arcelor Beams or Arcelor Cellular Beams. Export option Look at the drawing to see beams denomination. Note that in ACE Single Module both primary beam are the same (A1-A2 = B1-B2) as well as all secondary beams (A1-B1 = A1-A2-B2-B1 = A2-B2) Select A1-A2 beam. Click on “Export” button. 65 Saving exported files. You will be asked to save beam. ACE recognizes the beam type (I-profile or cellular beam), therefore an appropriate file type will be associated (in this case .PMX extension for Arcelor Beams software). Note: File type = Zapisz jako typ Name a file “PB”. Note: File name = Nazwa pliku Save data with the “Save” (= Zapisz) button. 66 Next analysis. Once the file is saved, ACE is ready to run the compatible software (Arcelor Beams or Arcelor Cellular Beams) or go back to ACE to obtain a detailed report related to another case. Click on “Back to ACE” option. 5.2 EXAMPLE 2: SINGLE MODULE WITH EXPORT TO ARCELOR BEAMS SOFTWARE Click on „New” button to select a new task. Select “Single Module” mode (click on the drawing, not on the text). 67 The new window will open. It enables to define a basic geometry of modules. Put L1 = 5.0 m (primary beam length) and L2 = 12.0 m (secondary beam length). Note: the scheme type is automatically selected by ACE. Go to the next “Horizontal” icon. It is dedicated to definition of loads, beam types, steel grades, concrete classes and fire protection. Define loads: select “Office2” load type. This load simulates common loads in offices. The values of p = 3.0 kN/m2 and q = 3.0 kN/m2 will be adopted. Secondary beams: select all profiles for non-composite and composite I-profiles. Select “precast slab” as a unique slab type for all calculations. Steel grade and concrete class: select steel grade S355. This steel grade is associated with the concrete class of C30/37. Activate fire protection: do not select. This example does not deal with fire protection problems. Select beams: select HEA and HEB, then click “Accept” each time. 68 Go to the “Vertical” icon. This window is designed to define facade and column data. Some cells such as roof or foundations etc. are not active – they are only available for full multimodule analysis. Columns: define 5 levels and splices at every second level. Facade: put the price of 250 EUR/m2 and define an approximate length (160 m) and area (1200 m2) of the building. As ACE Single Module deals with one single module, approximate dimensions of the building shall be given by the user as they cannot be deducted from other input data. Click on the “Next” button to proceed to the next window. 69 This window describes vertical dimensions of a building. Values to be defined: - free space – available room height in a completed building, - all layers of the floor including finishing and services. Note that the floor system (beam + slab) is given automatically by ACE. Keep default values in this example. 70 Perform calculations by clicking “Run” button. ACE will automatically initiate all necessary calculation procedures. A temporary window shall appear to show the progress of calculations. 71 Results. Once the calculations are done, the temporary window will disappear. Click on “Result” icon to view results. Summary report Review a summary of results including all input data and basic output results. Click on “Detailed Report” to view more detailed information. 72 Detailed report creator. Each calculated case is given separately. Refer to the Technical Notes to obtain the case code description. Select Case No 6 to continue. Note: the results are given in the descending order, starting from the most economic solution. Detailed report. Go through details of the selected case. You will receive detailed information about input data and final results, including weight and price of all structural components. Select “Beam Export” option to send any beam to one of the compatible software: Arcelor Beams or Arcelor Cellular Beams. 73 Export option. Look at the drawing to see beams denomination. Note that in ACE Single Module both primary beams are the same (A1-A2 = B1-B2) as well as all secondary beams (A1-B1 = A1-A2-B2-B1 = A2-B2) Select A1-A2 beam. Click on “Export” button. 74 Saving exported files. You will be asked to save beam. ACE recognizes the beam type (I-profile or cellular beam), therefore an appropriate file type will be associated (in this case .PMX extension for Arcelor Beams software). Note: File type = Zapisz jako typ Define a name a file: “PB”. Note: File name = Nazwa pliku Save data with the “Save” (= Zapisz) button. Next analysis. Once the file is saved, ACE is ready to run the compatible software (Arcelor Beams or Arcelor Cellular Beams) or go back to ACE to obtain a detailed report related to another case. Click on “Run Arcelor Beams” button in order to run Arcelor Beams software. Entering Arcelor Beams software. Arcelor Beams is a final design software. It enables a detailed analysis of any given beam. When “Run Arcelor Beams” button is used, Arcelor Beams is executed automatically. The user needs to accept conditions of use of the software. Click “Accept” to continue. 75 The main window will appear. Run the software (see the button below) to view input data and results. The output data are listed as shown below. All “Maximum criterion” values should be lower than 1 for any ULS and SLS criteria. Optimal design gives values close to 1. Use Arcelor Beams to optimize results if necessary (out of scope of this example). 76 5.3 EXAMPLE 3: MULTI-MODULE WITH EXPORT TO ARCELOR BEAMS Click on „New” button to select a new task. 77 Select “Single Module” mode (click on the drawing, not on the text). Go to „Geometry” button. It will enable to define a geometry of an arbitrary floor. First, a geometry of one floor level has to be defined. In order to do so, a grid has to be drawn in the drawing area. Each grid intersection can be a column, no intermediate columns are possible. The following data are obligatory: - Grid Label (letters for X-coordinates, numbers for Y-coordinates), Grid coordinates (in meters), Grid Spacing – distance between grid lines, 78 - No of Addit’l Grids – number of repetition of a defined grid spacing. Put “Grid spacing” = 5.0 m and “No of Addit’l Grids” = 4 for X-Grid coordinates. Click „Add” and then confirm by “Ok”. Put “Grid spacing” = 4.0 m and “No of Addit’l Grids” = 6 for Y-Grid coordinates. Click „Add” and then confirm by “Ok”. Define columns. Click on „Column-all” to define columns at all intersection points of the grid. Columns are represented by small symbols of I-profiles (see the drawing below). 79 Define floor systems. Right-click mouse button enables to enter a menu in which we can define floor systems including direction and number of beams. Choose beam orientation in both x- and y-direction. That means secondary beams will be oriented in both horizontal and vertical direction. “Select scheme” – use an automatic option in both x- and y-directions. In that case, ACE will optimize a number of secondary beams. Otherwise, we can define one of 3 schemes (see Technical Notes for details). 80 Click on „Create all modules”. The modules previously characterized will be applied and shown with predefined colours and patterns (see Legend at the figure below). Go to the next “Horizontal” icon. It is dedicated to definition of loads, beam types, steel grades, concrete classes and fire protection. Define loads: select “Office2” load type. This load simulates common loads in offices. The values of p = 3.0 kN/m2 and q = 3.0 kN/m2 will be adopted. Secondary beams: select all profiles for non-composite and composite I-profiles. Steel grade and concrete class: select all steel grades. The steel grades are automatically associated with the concrete classes. Activate fire protection: select R30 intumescent paint. Select beams: select all I-profiles (IPE, HEA, HEB, HEM and HL), then click “Accept” each time. Note: the choice of all possible options is able by clicking “Select all cases” button. 81 Go to the “Vertical” icon. This window is designed to define facade and column data. Columns: define 5 levels and splices at every second level. Facade: put the price of 250 EUR/m2. Activate “Ground Floor” and define its price as equal to slab (all upper floor slabs of a building). Activate “Roof” and define extra waterproofing price. Activate “Foundation” and define required conditions. “Standard” or “Plate” foundations will be applied automatically (see Technical Notes). “Sand” option provides average soil conditions for sand. Activate “Bracing not included in total price”. Therefore, an estimation of wind bracing will not be analysed in this example. Click on the “Next” button to proceed to the next window. 82 This window describes vertical dimensions of a building. Values to be defined: - free space – available room height in a completed building, all layers of the floor including finishing and services. Note that the floor system (beam + slab) is given automatically by ACE. Keep default values in this example. 83 Perform calculations by clicking “Run” button. ACE will automatically initiate all necessary calculation procedures. 84 Results. Once the calculations are done, the temporary window will disappear. Click on “Result” icon to view results. Summary report. Review a summary of results including all input data and basic output results. Click on “Detailed Report” to view more detailed information. 85 Detailed report creator. Each calculated case is given separately. Refer to the Technical Notes to obtain the case code description. Select Case No 1 to continue. Note: the results are given in the descending order, starting from the most economic solution. Detailed report. Go through details of the selected case. You will receive detailed information about input data and final results, including weight and price of all structural components. Select “Beam Export” option to send any beam to one of the compatible software: Arcelor Beams or Arcelor Cellular Beams. 86 Export option Select A1-B1 secondary beam. Click on “Export” button. 87 Saving exported files. You will be asked to save a beam. ACE recognizes the beam type (I-profile or cellular beam), therefore an appropriate file type will be associated (in this case .PMX extension for Arcelor Beams software). Note: File type = Zapisz jako typ Define a name a file: “ACB A1”. Note: File name = Nazwa pliku. Save data with the “Save” (= Zapisz) button. Next analysis. Once the file is saved, ACE is ready to run the compatible software (Arcelor Beams or Arcelor Cellular Beams) or go back to ACE to obtain a detailed report related to another case. Click on “Run Arcelor Beams” button in order to run Arcelor Beams software. Entering Arcelor Beams software. Arcelor Beams is a final design software. It enables a detailed analysis of any given beam. When “Run Arcelor Beams” button is used, Arcelor Beams is executed automatically. The user needs to accept conditions of use of the software. Click “Accept” to continue. 88 The main window will appear. Run the software (see the button below) to view input data and results. The output data are listed as shown below. All “Maximum criterion” values should be lower than 1 for any ULS and SLS criteria. Optimal design gives values close to 1. Use Arcelor Beams to optimize results if necessary (out of scope of this example). 89 5.4 EXAMPLE 4: MULTI-MODULE WITH EXPORT TO ARCELOR CELLULAR BEAMS SOFTWARE Click on „New” button to select a new task. 90 Select “Single Module” mode (click on the drawing, not on the text). Go to „Geometry” button. It will enable to define a geometry of an arbitrary floor. First, a geometry of one floor level has to be defined. In order to do so, a grid has to be drawn in the drawing area. Each grid intersection can be a column, no intermediate columns are possible. The following data are obligatory: - Grid Label (letters for X-coordinates, numbers for Y-coordinates), Grid coordinates (in meters), 91 - Grid Spacing – distance between grid lines, No of Addit’l Grids – number of repetition of a defined grid spacing. Put “Grid spacing” = 6.0 m and “No of Addit’l Grids” = 3 for X-Grid coordinates. Click „Add”. Continue by putting “Grid spacing” = 5.0 m and “No of Addit’l Grids” = 2 for X-Grid coordinates. Click „Add”, then confirm by „Ok”. Put “Grid spacing” = 8.0 m and “No of Addit’l Grids” = 5 for Y-Grid coordinates. Click „Add”, then confirm by „Ok”. 92 Define columns. Click on „Column-all” to define columns at all intersection points of the grid. Columns are represented by small symbols of I-profiles (see drawing below). The columns arrangement can be changed. Click on “Column – Del” to remove unnecessary columns. This can be obtained by using “fence” at the drawing area. Define floor systems. Right-click button enables to enter a menu in which we can define floor systems including direction and number of beams. 93 Choose beam orientation in both x- and y-direction. That means secondary beams will be oriented in both horizontal and vertical direction. “Select scheme” – use an automatic option in both x- and y-directions. In that case, ACE will optimize a number of secondary beams. Otherwise, we can define one of 3 schemes (see Technical Notes for details). Click on „Create all modules”. The modules previously characterized will be applied and shown with predefined colours and patterns (see Legend at the figure below). 94 At this stage, the floor geometry may be modified. Use “Delete module” to delete one module as shown below (click on the required module). Go to the next “Horizontal” icon. It is dedicated to definition of loads, beam types, steel grades, concrete classes and fire protection. Define loads: select “Office2” load type. This load simulates common loads in offices. The values of p = 3.0 kN/m2 and q = 3.0 kN/m2 will be adopted. Secondary beams: select all profiles for non-composite and composite I-profiles. 95 Steel grade and concrete class: select all steel grades. The steel grades are automatically associated with the concrete classes. Activate fire protection: select R30 intumescent paint. Select beams: select all I-profiles (IPE, HEA, HEB, HEM and HL), then click “Accept” each time. Note: the choice of all possible options is able by clicking “Select all cases” button. Go to the “Vertical” icon. This window is designed to define facade and column data. Columns: define 5 levels and splices at every second level. Facade: put the price of 250 EUR/m2. Activate “Ground Floor” and define its price as equal to slab (all upper floor slabs of a building). Activate “Roof” and define extra waterproofing price. Activate “Foundation” and define required conditions. “Standard” or “Plate” foundations will be applied automatically (see Technical Notes). “Sand” option provides average soil conditions for sand. Activate “Bracing not included in total price”. Therefore, an estimation of wind bracing will not be analysed in this example. Click on the “Next” button to proceed to the next window. 96 This window describes vertical dimensions of a building. Values to be defined: - free space – available room height in a completed building, all layers of the floor including finishing and services. Note that the floor system (beam + slab) is given automatically by ACE. Keep default values in this example. 97 Perform calculations by clicking “Run” button. ACE will automatically initiate all necessary calculation procedures. 98 Results. Once the calculations are done, the temporary window will disappear. Click on “Result” icon to view results. Summary report Review a summary of results including all input data and basic output results. Click on “Detailed Report” to view more detailed information. 99 Detailed report creator. Each calculated case is given separately. Refer to the Technical Notes to obtain the case code description. Select Case No 8 to continue. Note: the results are given in the descending order, starting from the most economic solution. Detailed report. Go through details of the selected case. You will receive detailed information about input data and final results, including weight and price of all structural components. Select “Beam Export” option to send any beam to one of the compatible software: Arcelor Beams or Arcelor Cellular Beams. 100 Export option. Select A1-B1 beam. Click on “Export” button. 101 Saving exported files. You will be asked to save beam. ACE recognizes the beam type (I-profile or cellular beam), therefore an appropriate file type will be associated (in this case .PMX extension for Arcelor Beams software). Note: File type = Zapisz jako typ Define a name a file: “ACB A1”. Note: File name = Nazwa pliku. Save data with the “Save” (= Zapisz) button. Next analysis. Once the file is saved, ACE is ready to run the compatible software (Arcelor Beams or Arcelor Cellular Beams) or go back to ACE to obtain a detailed report related to another case. Click on “Run ACB” button in order to run Arcelor Celular Beams software. Entering Arcelor Cellular Beams software. Arcelor Cellular Beams is a final design software. It enables a detailed analysis of any given beam. When “Run ACB” button is used, Arcelor Cellular Beams is executed automatically. The user needs to accept conditions of use of the software. Click “Accept” to continue. 102 The main window will appear. Run the software (see the button below) to view input data and results. The output data are listed as shown below. All “” values in the output file should be lower than 1 for any ULS and SLS criteria. Optimal design gives values close to 1. Use Arcelor Cellular Beams to optimize results if necessary (out of scope of this example). 103 5.5 EXAMPLE 5: BEAM CALCULATOR WITH “MODULE” MODE Click on „New” button to select a new task. 104 Select “Beam calculator” mode (click on the drawing, not on the text). Definition of input data. Define the type of analysis: click on “module” to choose an analysis of a single module (beams included between four columns). Choose “scheme 2” – the module with one internal secondary beam. Now it is possible to import beams. Click on one secondary beam (all secondary beams are assumed equal for one analysis) and on one primary beam (both primary beams are assumed equal for one analysis). “Import beam” option will open. ACE will recognize two file extensions related to Arcelor Beams and Arcelor Cellular Beams software. Note that primary beams can only be I-profiles, therefore only imported from Arcelor Beams software. 105 Download previously designed beams (.clb extension from Arcelor Cellular Beams software). In this case, cellular beams are imported for secondary beams. Once the secondary beams are imported, a short description will appear at the screen (type, length, steel grade). 106 Download previously designed beams (.pmx extension from Arcelor Beams software). In this case, I-beams are imported for primary beams. Once the primary beams are imported, a short description will appear at the screen (type, length, steel grade). 107 Columns may be included in the analysis. Click on “include columns” to activate this option. Define columns: I-profile HEA140, steel grade S235, floor height = 4.0 m, slices at each level. 108 Beam calculator is now ready to perform calculations. Click “Calculate” to perform price estimation. Note that slab definition has been made automatically as it has been imported together with the composite secondary beam. In case of a non-composite beam, the slab data shall be defined separately by the user. Review results including all input data and output of the price estimation. The prices are given per square meter of the floor module. 109 5.6 EXAMPLE 6: BEAM CALCULATOR WITH “SINGLE BEAM” MODE Click on „New” button to select a new task. 110 Select “Beam calculator” mode (click on the drawing, not on the text). Definition of input data. Define the type of analysis: click on “single beam” to choose an analysis of one beam. The choice of “scheme” is not active. Now it is possible to import beams. Click on the beam in the drawing area. “Import beam” option will open. ACE will recognize two file extensions related to Arcelor Beams and Arcelor Cellular Beams software. 111 Download the previously designed beam (.pmx extension from Arcelor Beams software). Once the I-beam is imported, a short description will appear at the screen (type, length, steel grade). 112 Define supplementary data: put „a” = 5.0 m. This is a distance between two adjacent beams. Columns may be included in the analysis. Click on “include columns” to activate this option. 113 Define columns: I-profile HEA140, steel grade S235, floor height = 4.0 m, slices at each level. Beam calculator is now ready to perform calculations. Click “Calculate” to perform price estimation. Note that slab definition has been made automatically as it has been imported together with the composite secondary beam. In case of a non-composite beam, the slab data shall be defined separately by the user. 114 Review results including all input data and output of the price estimation. The prices are given per square meter of the floor module. 115