1
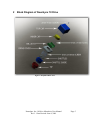
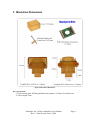
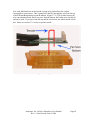
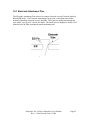
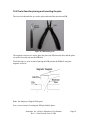
Neuralynx 18 Drive User Manual Microdrive used for manually driving electrodes and tetrodes for electrophysiology recordings Document Revision 1.1.1 Last Revised: June 8, 2009 Neuralynx, Inc. 105 Commercial Drive, Bozeman, MT 59715 Phone 406.585.4542 • Fax 406.585.9034 www.Neuralynx.com [email protected] Table of Contents 1 2 3 4 5 Disclaimer ................................................................................................................... 4 Block Diagram of Neuralynx 18 Drive ....................................................................... 5 Equipment Needed ...................................................................................................... 6 Glossary ...................................................................................................................... 7 Microdrive Dimensions .............................................................................................. 8 5.1 Assembly of Microdrive....................................................................................... 9 6 Section 2---Document Overview .............................................................................. 14 7 Prepping the Cannula ................................................................................................ 14 7.1 Cutting the Cannula ............................................................................................ 16 7.1.1 Individual Cannula Placement .................................................................... 16 7.1.2 Bundled Arrays (most common) ................................................................. 17 8 Drilling of the Tip ..................................................................................................... 19 8.1 Individual Spread ............................................................................................... 19 8.2 Bundled Array .................................................................................................... 19 9 Making Tetrodes ....................................................................................................... 19 10 Shuttle Prepping and Installation .............................................................................. 20 11 Cutting and Inserting PolyMicro Tubing .................................................................. 20 11.1 Cutting Polymicro Tubing .............................................................................. 20 11.1.1 Cleaving Procedure ..................................................................................... 20 11.2 Inserting Tubing into Shuttle .......................................................................... 23 12 Prepping Wire ........................................................................................................... 24 13 Testing Mechanics of Drive ...................................................................................... 25 14 Loading of Tetrodes into the Polymicro Tubing....................................................... 25 14.1 Loading Wire into Tubing .............................................................................. 25 14.1.1 Platinum Iridium ......................................................................................... 25 14.1.2 Nickel Chromium Wire............................................................................... 25 14.2 Securing Wire ................................................................................................. 25 15 Add Drive Cover ....................................................................................................... 26 16 Pinning the Tetrodes ................................................................................................. 27 16.1 Electrode Attachment Pins ............................................................................. 29 16.2 Tools Used for placing and inserting the pins ................................................ 30 17 Protective Inner Cap ................................................................................................. 32 18 Gold Plating and Testing .......................................................................................... 32 18.1 Testing ............................................................................................................ 32 18.2 Short Circuits .................................................................................................. 33 18.3 Continuity ....................................................................................................... 33 18.4 Final Cut ......................................................................................................... 33 18.5 Reminder ........................................................................................................ 34 18.6 Plating ............................................................................................................. 34 19 Recycling the Drive .................................................................................................. 36 19.1 Tip Replacement ............................................................................................. 36 19.2 Cleaning of the Whole Drive .......................................................................... 37 20 Appendix A ............................................................................................................... 38 21 Appendix B ............................................................................................................... 39 Neuralynx, Inc. 18-Drive Microdrive User Manual Rev 1.1 Last Revised: June 8, 2009 Page 2 List of Figures and Tables Figure 2-1Exploded Block View ........................................................................................ 5 Figure 2 Microdrive Dimensions ........................................................................................ 8 Figure 3 Vise ....................................................................................................................... 9 Figure 4 Guide Sleeves ..................................................................................................... 10 Figure 5 Screw Holes ........................................................................................................ 11 Figure 6 Drive Screw Cap................................................................................................. 12 Figure 7 Polymicro Tubing ............................................................................................... 13 Figure 8 NLX 18 Drive ..................................................................................................... 14 Figure 7-1 Guide System .................................................................................................. 15 Table 7-2.1 Polymicro and Cannula Size Chart................................................................ 15 Figure 7-3 Cannula Cutting Device .................................................................................. 16 Figure 7-4 Cannula Grinding Stone .................................................................................. 16 Figure 7-5 Bundled Cannula ............................................................................................. 17 Figure 7-6 Tinning Cannula .............................................................................................. 18 Figure 8-1 Bundled Arrays ............................................................................................... 19 Figure 10-1 Installing the Shuttle ..................................................................................... 20 Figure 11-1 Installing the Polymicro Tubing.................................................................... 23 Figure 12-1 Tetrode Tip Separating .................................................................................. 24 Figure 15-1 Complete Microdrive .................................................................................... 26 Figure 16-1 EIB Loading .................................................................................................. 27 Figure 16-2 Pinning EIB ................................................................................................... 28 Figure 16-3 Gold Pins ....................................................................................................... 29 Figure 16-4 EIB Pinning Tools ......................................................................................... 30 Figure 16-5 Pinning Procedure ......................................................................................... 30 Figure 16-6 Close up of Pinning Procedure ...................................................................... 31 Figure 17-1 Slack Area for Tetrodes ................................................................................ 32 Figure 18-1 Plating Equipment ......................................................................................... 34 Figure 19-1 Scoring Drive for Removal ........................................................................... 36 Figure 19-2 Removing Drive from Body.......................................................................... 37 Figure 30 EIB Pinout ........................................................................................................ 38 Neuralynx, Inc. 18-Drive Microdrive User Manual Rev 1.1 Last Revised: June 8, 2009 Page 3 1 Disclaimer This manual is intended to provide the information and procedures necessary to use the Neuralynx family of microdrives. It will guide you through all aspects of drive assembly and use. If you find any inaccuracies or improvements on any practices or procedures described within please contact Neuralynx so we can update this manual accordingly. This manual is currently a work in a progress and will be updated as more information becomes available. Thank you for using the Neuralynx family of microdrives. The first chapters of this document will show you how to put together your drive and to make sure all pieces are there and accounted for. The second portion of this manual will present techniques on how to load your Neuralynx Drive. It is very important to read the manual in full before attempting to implant or work at all with your drive. Also note that the NLX microdrive has not been sanitized for implantation. Proper sanitation techniques need to be followed for all implantable devices. Please follow your institutions sanitation procedures or contact Neuralynx for further instructions. This Product is Patent Pending Neuralynx, Inc. Neuralynx, Inc. 18-Drive Microdrive User Manual Rev 1.1 Last Revised: June 8, 2009 Page 4 2 Block Diagram of Neuralynx 18 Drive Figure 2-1Exploded Block View Neuralynx, Inc. 18-Drive Microdrive User Manual Rev 1.1 Last Revised: June 8, 2009 Page 5 3 Equipment Needed 1. Cannula 2. Polymicro Tubing 3. Piano Wire 4. Cannula Cutting Device 5. Fine Grinding Stone 6. Cue-Tip 7. Soldering Iron 8. Organic Flux 9. Organic Solder 10. Drill Bits 11. Fine tipped or Teflon Tweezers 12. Super Glue 13. Toothpicks 14. EIB Pinning Pliers 15. Gold EIB Pins 16. Tetrodes 17. Microdrive 18. Protective Eye Wear 19. Protective Breathing Equipment (Filtering Device) Neuralynx, Inc. 18-Drive Microdrive User Manual Rev 1.1 Last Revised: June 8, 2009 Page 6 4 Glossary Inner Diameter (ID) – the inner diameter of the poly-micro tubing Outer Diameter (OD) – the outer diameter of the poly-micro tubing CNC – Computer Numerical Control Organic Flux– a type of substance which facilitates soldering EIB – Electrode Interface Board NLX – Neuralynx PGT – Polymicro Guide Tubing Neuralynx, Inc. 18-Drive Microdrive User Manual Rev 1.1 Last Revised: June 8, 2009 Page 7 5 Microdrive Dimensions Figure 2 Microdrive Dimensions Drive Specifications 1) Drive screw pitch: 0.25mm pitch thus one rotation = 0.25mm of vertical travel. 2) Drive depth: 7mm Neuralynx, Inc. 18-Drive Microdrive User Manual Rev 1.1 Last Revised: June 8, 2009 Page 8 5.1 Assembly of Microdrive *Read all sections before beginning assembly* The Following Section gives a general outline of how the drive is put together. It is a good idea to read through the whole manual before proceeding through any of these steps. Depending on your array and cannula fitting, it might be easier to skip the insertion of the tip and wait to do this until after the cannula is inserted in chapter 8. 1. Start assembly from the bottom up. 2. Take the shuttle guide (figure 2-1) and place it into the tip. You should be able to insert the shuttle guide into the tip a couple of millimeters by hand. This is a press-fit piece and to fully install this, the two pieces need to be placed into a vise and lightly press together until they “click” (Figure 6-1). Note: After pieces are fit together, the only way to separate them is by breaking them (see Chapter 20). Figure 3 Vise Neuralynx, Inc. 18-Drive Microdrive User Manual Rev 1.1 Last Revised: June 8, 2009 Page 9 3. Take combined piece (tip and drive body) and insert shuttles. Do this by inserting the 1mm x 10mm screw into each shuttle. Then place each shuttle with\ screw into appropriate guide sleeve. On the shuttle, you will notice that on the top, the hole is larger than on the bottom. This larger hole needs to face towards the screw head. This will make it easier when loading the poly-micro tubing. You will have 5 shuttles for the 5 Drive 9 shuttles for the 9 Drive and 18 shuttles for the 18 drive. Figure 4 Guide Sleeves Neuralynx, Inc. 18-Drive Microdrive User Manual Rev 1.1 Last Revised: June 8, 2009 Page 10 4. Snap on the inner cap and screw on the EIB_36_18 Drive with the two screws into the two appropriate screw holes (Figure 6-3). Figure 5 Screw Holes Neuralynx, Inc. 18-Drive Microdrive User Manual Rev 1.1 Last Revised: June 8, 2009 Page 11 5. Use the two remaining screw holes and mount the drive screw cap. This can be done by using the two remaining 1mm x 7mm screws (Figure 6-4). Figure 6 Drive Screw Cap The microdrive is now complete and should weigh ~9.4 grams. The microdrive does come with a protective top cap which can be secured with a 2mm x 4 mm stainless steel screw. To load your tetrodes into the microdrive please use the following chapters as a guide. Like all Neuralynx products, if you have any questions or suggestions please let us know. Neuralynx, Inc. 18-Drive Microdrive User Manual Rev 1.1 Last Revised: June 8, 2009 Page 12 Microdrive Assembly Kit Part Listing Part# Quantity Description 1 1 Cleaving Stone Safety Glasses (Not 2 1 Pictured) Microdrive Manual 3 1 (this manual) 4 1 1M Poly-micro Tubing (ID:100μm OD: 170μm) with Card Figure 7 Polymicro Tubing Neuralynx, Inc. 18-Drive Microdrive User Manual Rev 1.1 Last Revised: June 8, 2009 Page 13 6 Section 2---Document Overview This section of the manual is intended to provide the information and procedures necessary to use the Neuralynx family of microdrives. It will guide you through all aspects of loading the drive with the appropriate wires. If you find any inaccuracies or improvements on any practices or procedures described within, please contact Neuralynx so we can update this manual accordingly. This manual is currently a work in progress and will be updated as more information becomes available. Thank you for using the Neuralynx family of microdrives. Please read the manual all the way through before you begin to load your microdrive. There are some steps that can be performed in a different order. If you have any questions about any of the processes used in this manual please contact Neuralynx. **It is important to always wear the appropriate safety equipment when using any cutting tools. (See Chapter 2)** Figure 8 NLX 18 Drive 7 Prepping the Cannula Neuralynx, Inc. 18-Drive Microdrive User Manual Rev 1.1 Last Revised: June 8, 2009 Page 14 **ALWAYS WEAR THE APPROPRIATE SAFETY EQUIPMENT WHEN CUTTING AND PREPPING ANY CANNULA. ** The Neuralynx line of microdrives uses a guide tube technique. This guide tube technique requires a series of steps which create a type of telescoping guide system. (Figure 8-1) This process will involve multiple steps which will be explained later. The tetrode will be surrounded by a polymicro guide tube (PGT) which will then be surrounded by a stainless steel guide cannula. Figure 7-1 Guide System The cannula that you will use will range from 25 gauge stainless steel cannula all the way down to 32 gauge. In the following step of this manual, we will use 28 gauge stainless steel cannula. The cannula that you choose will ultimately depend on the diameter of the wire you use in your tetrode spinning. (See Table 8-2.1) Single Wire Diameter 7-11 microns 11-20 microns Polymicro Tubing Used TSP040105 (ID: 40) TSP100170 (ID: 100) Cannula Size Used 30 Gauge Stainless Steel 28 Gauge Stainless Steel Table 7-2.1 Polymicro and Cannula Size Chart If you are using a bundled array, please skip this section and continue at section 8.1.2. Cut down cannula to ~5 mm long each. You will need enough pieces of cannula to compensate for the amount of PGT you will be using in the microdrive. Example: for a 5 drive you will need 5 cannula, for a 18 drive you will need 18 pieces of cannula, etc. You may want to cut a couple extra for spare in case one gets damaged. Neuralynx, Inc. 18-Drive Microdrive User Manual Rev 1.1 Last Revised: June 8, 2009 Page 15 7.1 Cutting the Cannula 7.1.1 Individual Cannula Placement Each cannula needs to be about 3-6 mm long. Cut down the cannula to the appropriate length using a cannula cutter (figure 8-3) or small hand saw with a fine blade. Figure 7-3 Cannula Cutting Device Each cannula needs to be thoroughly cleaned before inserting it into the microdrive. Take each cannula and grind each side with a fine grinding stone. This can be done by rubbing each side of the cannula in a circular direction on the stone. (When cutting the cannula, remember that when you grind down the tip it will remove about 1mm of cannula. To correct this, add 1mm on the overall section that you cut.) Figure 7-4 Cannula Grinding Stone The goal is to remove any and all imperfections of the cannula tip that were made during the cutting process. When grinding down the ends of the cannula it is possible that fractures at the end were pushed inside the tubing. To remove this debris, take a piece of piano wire and slide it in and out of the tubing. To fully clean tubing, place grinded cannula in a sonic cleaner or rinse under hot water. We have found that a fine tea Neuralynx, Inc. 18-Drive Microdrive User Manual Rev 1.1 Last Revised: June 8, 2009 Page 16 mesh strainer works well for the final cleaning of the cannula. Let the cannula dry completely before moving on to the next step. 7.1.2 Bundled Arrays (most common) The following example is with a 5 drive. The same procedures are used for all Neuralynx drives. You will only need to increase the amount of cannula and tubing that will be necessary to account for the increased shuttles. Before cutting each cannula down to size, the tubing must be tinned so that you can bond it together at a later stage. Take organic flux and soak the end of a cotton swab. When using this much flux it may cause a lot of smoke. It is recommended to wear some sort of filtered breathing device and have proper ventilation. Figure 7-5 Bundled Cannula Place the tubing in a cannula holder (figure 8-6). Fill your blade with solder and with the cotton swab on the top and solder on the bottom of the tubing, slide both up and down the cannula until there is an even amount of solder covering the tubing. This may take a couple of passes to fully cover the entire cannula. Be careful not to go too close to the ends because you do not want the solder to pass over the ends. Once the complete tubing is tinned, cut the cannula into sections of about 4-7 centimeters. Now that you have individual pieces of the tubing cut we can start to make the bundled array. You are going to need two pieces of small heat shrink during for the next step. For a 5 drive you will take the five pieces of cannula and place them in a bundled array. Place the heat shrink on both sides of the cannula (Figure 8-5). Use a heat gun and shrink the wrap until you have one solid core of 5 pieces of tubing. When you have one solid core, you will repeat the tinning process listed above and unite all 5 pieces to make one core bundle. Once the entire bundle is tinned together you can cut the bundled array down to the appropriate size. Follow section 8.1.1 and use the same technique to clean and file down the cannula. Your final product will be a piece of bundled cannula ready to be installed into the microdrive. Neuralynx, Inc. 18-Drive Microdrive User Manual Rev 1.1 Last Revised: June 8, 2009 Page 17 Figure 7-6 Tinning Cannula Neuralynx, Inc. 18-Drive Microdrive User Manual Rev 1.1 Last Revised: June 8, 2009 Page 18 8 Drilling of the Tip If you do not have access to a professional drilling site please use the following directions. It is recommended to get the tips drilled using a professional CNC machine. Figure 9-1 shows some common tip arrays. Figure 8-1 Bundled Arrays 8.1 Individual Spread Layout your pattern using a “sharpie” fine tip marker. Take a drill bit that is slightly larger than that of your cannula and drill each hole in your desired pattern. Make sure that you drill at a 90 degree angle. This will allow the guide tubes to be perpendicular which in turn will limit the amount of splay in the driven tetrode. Place each cannula in the tip and secure with super glue. Be careful not to use too much super glue and be aware that the glue can flow into the cannula. If this happens you will have to drill out the glue and re-clean the cannula. The amount of cannula that will be extruding from the tip is up to you. Remember that the main tip will be flush with the brain. We recommend about 2 to 3mm inside of the drive and about 1mm of the cannula to protrude outside of the tip. 8.2 Bundled Array Take a drill bit that is slightly larger than the overall cannula array. Find the exact center of the tip and drill your hole. Place the array into the drive tip and secure with super glue. Please read section 8.1 and follow the same directions. 9 Making Tetrodes There are many different techniques for making tetrodes. Our Tetrode Assembly Station Manual will guide you through some of those processes. If you have any questions or concerns at any point, please contact Neuralynx. Because tetrodes are easily damaged and can oxidize, you will want to prep the tip of Neuralynx, Inc. 18-Drive Microdrive User Manual Rev 1.1 Last Revised: June 8, 2009 Page 19 your microdrive before you make the tetrodes. Because of this, you want to make tetrodes right before you install them into your drive. We have also found that making your tetrodes a little longer than you expect to use makes loading much easier. You can always trim the excess at the end of the loading procedure. 10 Shuttle Prepping and Installation Take each shuttle and insert the 10mm screw into the tapped screw hole. If you look closely at the shuttle the hole that the polymicro tubing goes into is tapered. You want the larger side of this to face the screw head. See Figure 11-1 for the orientation of the shuttle relative to the screw head. Figure 10-1 Installing the Shuttle 11 Cutting and Inserting PolyMicro Tubing 11.1 Cutting Polymicro Tubing Please refer to Table 11-2.1 Polymicro and Cannula Size Chart for the appropriate sized polymicro to use. 11.1.1 Cleaving Procedure Warning: This capillary tubing is glass and can fracture. It is strongly recommended to wear approved safety glasses at all times. Neuralynx, Inc. 18-Drive Microdrive User Manual Rev 1.1 Last Revised: June 8, 2009 Page 20 General Information Cutting capillary tubing and optical fiber can be accomplished by a number of methods. Matching the cutting method quality to the application requirements is essential and should be given due consideration. Cleaving is a quick, simple method that can yield a high quality end finish and works for many applications. The goal of any cleaving tool is to penetrate through the polyimide and impart a sub-micron defect into the outer glass surface. Ceramic cleaving stones and diamond tip devices are common and effective tools for imparting the required defect. Once a defect is generated, applying a linear tension to the defect separates the capillary or optical fiber. This is the preferred method and leads to the highest quality end finishes. The most common error in cleaving is to bend the capillary or fiber, which normally yields a low quality cleave with an uneven and sometimes jagged end finish. A general misconception when dealing with capillary tubing is that cleaving and breakage are unrelated. A poor cleave generates excessive glass debris inside of the capillary which can lead to internal flaws and subsequent breakage. It is not uncommon for this debris to be swept down the capillary by the gasses or liquids that are introduced, leading to flaws and breakage some distance down the capillary from the cleave itself. This effect is most common in large inner diameter (ID) capillary, but can happen in any capillary product. When dealing with optical fiber, a subsequent lap and polish is commonly employed to provide a final end finish with optimal transmission properties. Alternately, laser cutting of optical fiber and capillary tubing has proven to be a reliable method for many applications that require a flaw free end face. Neuralynx, Inc. 18-Drive Microdrive User Manual Rev 1.1 Last Revised: June 8, 2009 Page 21 Procedure 1. Place the capillary tubing or optical fiber on a clean, flat surface. If possible, apply slight linear tension. 2. Holding the cleaving stone at approximately 30° angle to the tubing or fiber, draw the non-serrated edge of the cleaving stone across the tubing or fiber. Apply just enough pressure to penetrate through the polyimide coating. 3. Pull the tubing or fiber axially until it breaks. If it won’t break, the polyimide coating has not been fully penetrated. Repeat the above steps, pressing down with slightly more force while drawing the cleaving stone across the tubing or fiber. 4. Once cleaved, inspect the end finish to ensure the cleave quality meets the application requirements. Note: If end finish is not of concern, the tubing or fiber can be bent as opposed to pulling axially. The tubing will break more easily, but the end finish will be of lesser quality and excessive debris may be generated. Useful Tip: It is not uncommon for users to practice the above cleaving procedure in order to become familiar with proper technique. Neuralynx, Inc. 18-Drive Microdrive User Manual Rev 1.1 Last Revised: June 8, 2009 Page 22 11.2 Inserting Tubing into Shuttle Use the above techniques to cleave the polymicro to the appropriate length. For each drive you will want to cut the tubing to match the length of the shuttle guide. This will allow for maximum drive depths. Insert the polymicro tubing into the shuttle. Insert the tubing so that you have about 25 percent of the tubing on the top half and the rest of tubing protruding from the bottom. Place a small amount of super glue on the top of the shuttle where the polymicro tubing and shuttle connect. Lower the tubing until approximately 0.5 mm extends above the shuttle. (Ideally you would like this connection to be flush with the shuttle. Be careful, by making it flush, the super glue will flow into the glass which will result in a ruined setup.) Repeat this process on all shuttles. Figure 11-1 Installing the Polymicro Tubing Neuralynx, Inc. 18-Drive Microdrive User Manual Rev 1.1 Last Revised: June 8, 2009 Page 23 12 Prepping Wire Before they are ready to be loaded into the drive, tetrodes need to be prepped. This consists of separating the four wires. First, cut the loop at the top. Pull the two sets of wires down gently until you feel a little resistance, and then give a sharp tug to both sides to keep them separated. Do the same with each set of two wires. If the ends aren’t accessible at first, hold the wires a little below the end and twirl the ends between your fingers sharply until they separate enough for you to grab them. Separate and tug to hold as below. Use the tetrode tweezers if necessary. If the four wires are of different lengths, or the ends are curly, cut them down until they are all about the same length from the intersection point (where the polyimide coating has stuck them all together from the heat gun). It’s not really critical that they be any particular length, only that they are close to the same as each other, so that no one wire is too long or short when fed into the polymicro. Just be sure there’s enough straight tetrode at each end to push it into the hole in the Headstage, and enough play to span the four separate holes for each wire of the tetrode in the Headstage. Figure 12-1 Tetrode Tip Separating Neuralynx, Inc. 18-Drive Microdrive User Manual Rev 1.1 Last Revised: June 8, 2009 Page 24 13 Testing Mechanics of Drive It is a good idea at this point to test the mechanics of the drive. Raise and lower each shuttle making sure that they all move at a constant rate with no wobble. If there is any wobble in the shuttles, please contact Neuralynx for replacement shuttles. 14 Loading of Tetrodes into the Polymicro Tubing Due to the different stiffness’s of wire, you may find it easier to load the wire into the tubing outside of the drive. Below are two examples of different ways in which to load the tetrodes into the tubing. 14.1 Loading Wire into Tubing 14.1.1 Platinum Iridium The platinum iridium wire tends to be a little more flexible than some of the other wires you might be used to working with. Because of this, it is much easier to load the wire into the tubing first and then load the whole shuttle into the drive. Push the wire into the tubing so that a majority of the wire extends outside of the top of the tubing. This excess will later be pushed down the tubing, glued to the polymicro guide tube and then trimmed to the right length. Next, insert each shuttle into the appropriate shuttle guide and cannula. 14.1.2 Nickel Chromium Wire The nickel chromium wire is much stiffer than of the platinum iridium wire. This will allow you to insert the shuttles first and then insert the wire second. Take each shuttle with the tubing already connected and insert into the appropriate shuttle guide and cannula. 14.2 Securing Wire Once all shuttles are inserted into the tubes, raise the shuttle all the way to the top. Push the wire out of the bottom of the drive a couple of mm. Now you will have extra wire on both sides of the polymicro tubing (with a majority of the wire coming out of the top which will be pinned into the EIB). Even though the bottom will be trimmed at a later stage, be careful not to brush the bottom of the drive because it is possible to bend the tetrode. With excess tetrode coming out of both ends you will now secure the wire to the polymicro tubing. Take a small amount of super glue (a toothpick works well to decrease the amount of glue which is used) and place it at the junction where the tetrode and polymicro tubing meet. Repeat this on all shuttles. Give the glue a minute to dry. Your Neuralynx, Inc. 18-Drive Microdrive User Manual Rev 1.1 Last Revised: June 8, 2009 Page 25 next step is to lower all of the shuttles. Before you glue, you will want to make sure that there is enough excess of wire to still pin them in. This process can also be done before installing the drive cover. The tetrodes need to be secured to the polymicro tubing. This can be done by dabbing a small amount of super glue at the connection point of the polymicro tubing and the wire. Make sure that you have enough tetrode protruding from the bottom to trim later with the shuttles in the upmost position. Also, the top of the drive needs to have enough extra wire to be able to be pinned to the EIB. 15 Add Drive Cover This is where the extra wire comes in handy. Place the bottom of the drive in a small vise or holding device. Guide the tetrodes through the main hole of the drive cover. Once all tetrodes are guided through this cap, the cover can now be installed. Snap on the drive cover by firmly connecting the drive cover and main shuttle guide. This can be done by aligning the guide pin and firmly snapping the two pieces together with your fingers. At this point, your microdrive is almost complete. The tetrodes should be hanging out of both the top and the bottom of the drive and ready to be pinned onto the EIB. Figure 15-1 Complete Microdrive Neuralynx, Inc. 18-Drive Microdrive User Manual Rev 1.1 Last Revised: June 8, 2009 Page 26 16 Pinning the Tetrodes Lower all shuttles to the lowest possible position. For this step you will want to mount the lower portion of your drive in a stable holding device. You can use a small vise grip. Also, you need to use an alligator clip third hand to hold the EIB (note that the EIB below only has one omnetics connection) about 0.8cm to 1cm above the drive. (Figure 17-1) There are alternative ways of doing this. Please contact Neuralynx for suggestions.) After this is done, guide the tetrodes through the main large center hole of the EIB. Figure 16-1 EIB Loading Neuralynx, Inc. 18-Drive Microdrive User Manual Rev 1.1 Last Revised: June 8, 2009 Page 27 Now each individual wire in the tetrode is going to be guided down the via that corresponds to your pin out. This is going to be done by inserting the wire from the top of the EIB and then pinning it from the bottom. (Figure 17-2) This is done because the wire can sometimes break and if you pin it from the bottom, the broken wire can fall off and not be used. If you pin it from the top and the wire breaks, the whole tetrode will be lost. Please see section 17.1 on how to pin the tetrode. Figure 16-2 Pinning EIB Neuralynx, Inc. 18-Drive Microdrive User Manual Rev 1.1 Last Revised: June 8, 2009 Page 28 16.1 Electrode Attachment Pins The Electrode Attachment Pins are used to connect electrode wires to Electrode Interface Board (EIB) holes. The Electrode Attachment Pins provide a convenient and reliable method of attaching electrode wires to the EIBs. These pins are gold plated and tapered from 0.008” (tip) to 0.025 “(below the head). The small pins are designed to fit the 0.012” diameter holes in EIBs requiring the small attachment pins. Figure 16-3 Gold Pins Neuralynx, Inc. 18-Drive Microdrive User Manual Rev 1.1 Last Revised: June 8, 2009 Page 29 16.2 Tools Used for placing and inserting the pins The two tools shown below are used to place and install the pins into an EIB. Figure 16-4 EIB Pinning Tools The magnetic tweezers are used to place the pin in the EIB electrode hole and the pliers are used to force the pin into the EIB Hole. The following is a cross-section of placing the EIB pin into the EIB hole using the magnetic tweezers: Figure 16-5 Pinning Procedure Note: this diagram is flipped 180 degrees Now a cross-section of securing the EIB pin with the pliers: Neuralynx, Inc. 18-Drive Microdrive User Manual Rev 1.1 Last Revised: June 8, 2009 Page 30 Figure 16-6 Close up of Pinning Procedure Connecting an Electrode: Note: that this diagram is flipped 180 degrees To make a connection use the following procedure: 1) Insert the Electrode/Tetrode wire through the EIB hole from the top of the EIB; 2) Pick up an EIB/gold pin with the magnetic tweezers. You do not have to clasp the pin with the tweezers. Simply touch the pin with the tweezers and the pin should stick straight up. 3) Using the magnetic tweezers place a pin in the EIB hole; 4) Lightly tap the pin into the hole with the tip of the magnetic tweezers 5) Cinch the pin into the EIB Hole with the pliers. This process secures the pins into the EIB electrode holes. Please note that the pins may still be removed by pushing up from the bottom (tip) of the pin. Although under normal circumstances the pin is sufficiently retained with the above procedure, depending on the specific animal and/or experiment environment, users may permanently attach the pins to the EIB electrode wire holes. This is a simple process as described below in the “Optional Soldering Process” section. To test the force required to remove a pin, apply upward force from the tip of the pin with the magnetic tweezers, hemostats or the pliers (invert and use the longer jaw to push the pin out from the bottom of the EIB). If there is a chance that the animal will knock a pin loose then the soldering process below should be used to permanently attach the pin. Neuralynx, Inc. 18-Drive Microdrive User Manual Rev 1.1 Last Revised: June 8, 2009 Page 31 17 Protective Inner Cap With the shuttles still in the lowest position, attach the inner cap. Once this is done, raise the shuttles to their highest level. The excess slack in the wire should be automatically guided into the slack area. Figure 17-1 Slack Area for Tetrodes 18 Gold Plating and Testing 18.1 Testing For the testing phase, the drive should be securely held in a micromanipulator, or custom made testing holder. Such devices will be available soon from Neuralynx). The testing and plating phase is the most vulnerable period in the life cycle of the tetrode hyperdrive. Take great care to always have the drive held securely to be aware of which tetrodes are protruding from the bottom, and how you are holding the top. Neuralynx, Inc. 18-Drive Microdrive User Manual Rev 1.1 Last Revised: June 8, 2009 Page 32 18.2 Short Circuits To test for shorts, connect each pair of individual wires across an impedance meter (e.g. a meter that reads impedance by outputting a small, say 1nA current, sine wave at a relevant frequency, say 1kHz.) Resistance alone is not a good test of electrodes, and doesn’t actually relate well to their ability to transmit biological signals. One systematic way to check all possible pairs is to put one lead in a hole in the EIB top connector, then put the other lead in all remaining holes from there on one by one to test. If you measure less than 5Mohms, you have a short (or you touched the leads together!) If the short is in the M range, then it is most likely at the bottom (un-plated tetrode impedance is ~3M). In that case it is probably just some water or extra material on the tip of the tetrode. Let it dry or snip off the very end and check again. (Neuralynx also distributes cleaning gel for tetrodes and single electrodes.) 18.3 Continuity Once you have determined that there are no shorts you must test each channel for continuity. Fill the cups in both Delrin towers of the Plating/Wash Unit with saline. Slowly and carefully lower the drive with tetrodes extended, until the tips of the tetrodes to be tested, but not the tip of the Microdrive is clearly in the saline in the Plating side (the one with the stainless steel lead exiting the bottom). Connect one end of the impedance tester to the lead, and alternate touching the other to the connections on top of the EIB to test for continuity. Any non-infinite impedance is good enough at this point to imply continuity. Mark down which wires do not have continuity. Recheck to be sure that they are actually making it into the saline. Test individually to be sure. When all testing is done, raise up the drive, and let it dry for 25 minutes or so. Saline up in the drive tip will make shorts. You can also rinse each tetrode with a 70% ETOH solution after testing/plating. 18.4 Final Cut When all wires of all tetrodes have continuity, it is time to cut the tetrodes down to where they just pull into the drive tip with the drives screwed all the way up. One way to do this is to lower all the drives down a set amount (approximately 3mm) and extend one tetrode at a time. This “final cut” is best done by holding the drive horizontally in one hand, and the tetrode scissors in the other. Holding one blade still and chopping down in a swift, smooth motion with the other usually works best for cutting all tetrodes without bending them. A final cut can also be made with a sharp scalpel. Neuralynx recommends only one cut and then throwing away the scalpel. The blade needs to be as sharp as possible. Neuralynx, Inc. 18-Drive Microdrive User Manual Rev 1.1 Last Revised: June 8, 2009 Page 33 Once the final cut is done, you can go directly to plating, or bring the tetrodes up into the drive by holding the drive upside down and screwing the drive screws up one at a time until the tetrodes just go into the drive tip. The closer you can get the tetrodes to the end of the drive, the better you will know the depth to which you are in brain later on. Take your time with this process. Make sure that each tetrode is exactly flush with the end of the drive. This will give you a better idea of the amount of distance that your tetrodes travel. 18.5 Reminder Remember that the wires are secured with glue to the tubing, so the amount of distance that you leave between the tubing and the end of the tetrode will be the amount of the tetrode driven into the brain with the support of the tubing. For deeper brain structures, you may consider inserting a portion of the PM tubing into the brain if you are not concerned about damage to that area the tubing is passing through. For example, if you wanted to go 7 mm down into the striatum, you could leave 3 mm of the tetrode exposed, and have 4mm of the tubing enter the brain. 18.6 Plating Figure 18-1 Plating Equipment The last stage of Hyperdrive preparation before implantation is to plate the ends of the tetrode wire with Gold Chloride solution to reduce tetrode impedance (and, more relevantly, tip capacitance between the tetrode wire and brain). This stage proceeds similarly to the testing phase, but now the plating Delrin tower cup is filled with Gold Chloride solution (AuCl-). Tetrodes can be plated individually or in groups. For each channel, alternate between impedance testing and running negative current (~2A works well) through each wire for short bursts of time (not longer than 1 second). You will plate your tetrode down to the appropriate impedance for your particular experiment. This will depend on what type of cell structure and area you are trying to record from. If you plate down below 200-300k you may risk shorting all the wires of a tetrode together with gold solution. If you do over plate and short the wires, you can either cut the end of the tetrode (therefore shortening it slightly which is recommended) or reverse the direction of the current for 20 seconds or so to blow off the plating and start again. If an electrode simply won’t plate, reversing the current or cutting off the very end can also be an effective remedy. Replacing the whole tetrode works too. Neuralynx, Inc. 18-Drive Microdrive User Manual Rev 1.1 Last Revised: June 8, 2009 Page 34 IMPORTANT – After plating each tetrode, wash off the excess gold solution by dipping it in the water filled Delrin tower cup. The whole point of having two towers is to remind you to do this step. After washing, let it dry for ~25 minutes before retracting the tetrodes back into the drive. If you pull Gold solution up into the drive tip, it will dry up and leave a sticky residue that will prevent your tetrodes from being able to move out of the drive. After all channels of all tetrodes are plated, washed and dried, it is a good idea to check for shorts once again, just to be sure you didn’t over plate and short wires of a tetrode together. Plating is best done on the day of surgery, or should at least be retested just beforehand. Most tetrodes will stay plated over time, but often a couple will lose their plating for whatever reason, if left overnight, so you may as well be on the safe side and recheck it as close to surgery as possible. Don’t worry if the impedance creeps up a little bit, like to 500k. Just means you’ll have to increase the gain (input level) a little. Remember, also, that testing runs a little current through the wires (the wrong way) and will eventually deplate the tetrodes if you leave it connected too long. Neuralynx, Inc. 18-Drive Microdrive User Manual Rev 1.1 Last Revised: June 8, 2009 Page 35 19 Recycling the Drive 19.1 Tip Replacement 1. The tip needs to be broken for you to fully remove it from the shuttle guide. It is designed to break with minimal effort. If you would like to replace the tip, use the following directions. 2. Using a pair of wire cutters or a razor blade, score the edge of the tip. (See Figure 201.) Be careful not to go too deep because it can damage the main shuttle guide. The picture below is of a Neuralynx 9 Drive. The same techniques used on this drive will be used for the Neuralynx 18 Drive or 5 Drive. Figure 19-1 Scoring Drive for Removal Neuralynx, Inc. 18-Drive Microdrive User Manual Rev 1.1 Last Revised: June 8, 2009 Page 36 3. Take the wire cutters and firmly squeeze the bottom of the tip until it cracks. It should crack along the scored line. Then you can safely remove the tip. See Figure 20-2. Figure 19-2 Removing Drive from Body 19.2 Cleaning of the Whole Drive 1. If the drive can be cleaned, there is no reason why it cannot be used multiple times. The complete drive is also designed to be reused if applicable. Soaking the whole drive in boiling water should clean the acrylic used in the implantation of the drive. This should also remove any unwanted material that may be in the cannula. Neuralynx also sells a cleaning gel that will remove most material from the cannula. The only two things that you will need to replace are the shuttles and the tubing. 2. Warning: Neuralynx has not yet tested to see if the acrylic used will clean fully. We are testing now and will update this manual when testing is completed. Congratulations!! The drive is ready for implantation and recording. If you have any questions concerning this manual, please contact Neuralynx. 406-585-4542 Neuralynx, Inc. 18-Drive Microdrive User Manual Rev 1.1 Last Revised: June 8, 2009 Page 37 20 Appendix A Figure 3 EIB Pinout Neuralynx, Inc. 18-Drive Microdrive User Manual Rev 1.1 Last Revised: June 8, 2009 Page 38 21 Appendix B Table 1 Impedance Chart A/D_HS1 Impedance A/D_HS2 Impedance A/D 0 1 2 3 4 5 6 7 8 9 10 11 12 13 14 15 16 17 18 19 20 21 22 23 24 25 26 27 28 29 30 31 32 33 34 35 36 37 38 39 40 41 42 43 44 45 46 47 48 49 50 51 52 53 54 55 56 57 58 59 60 61 62 63 Impedance Reference 1 Reference 2 Neuralynx, Inc. 18-Drive Microdrive User Manual Rev 1.1 Last Revised: June 8, 2009 Page 39