1
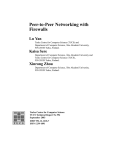
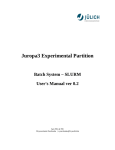
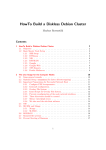
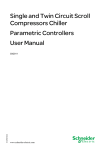
Intel Xeon Phi (MIC) User’s Manual Programming and Execution Manual Andreas Diavastos October, 2014 Version 1.0 INTEL XEON PHI (MIC) USER’S MANUAL October 31, 2014 Contents Contents ................................................................................................................................................................1 1 THE CYI XEON PHI CLUSTER ........................................................................................................................... 3 CYI XEON PHI CLUSTER TECHNICAL CHARACTERISTICS ...........................................................................................................4 2 LOADING LIBRARY MODULES ........................................................................................................................ 5 3 COMPILING FOR THE MIC PROCESSORS......................................................................................................... 7 4 EXECUTING ON MIC PROCESSORS ................................................................................................................. 8 EXECUTE USING MICNATIVELOADEX:...................................................................................................................................8 EXECUTE NATIVE (CO-PROCESSOR ONLY MODEL): ................................................................................................................8 5 INSTALL QPHIX FOR THE XEON PHI .............................................................................................................. 10 INSTALLATION GUIDE: ...................................................................................................................................................10 Installing libxml2 library ......................................................................................................................................11 Installing QMP ....................................................................................................................................................12 Installing QDP++ .................................................................................................................................................13 Installing QPhix ...................................................................................................................................................15 6 INSTALL QPHIX ON PROMETHEUS ............................................................................................................... 17 INSTALLATION GUIDE: ...................................................................................................................................................17 Installing libxml2 library ......................................................................................................................................18 Installing QMP ....................................................................................................................................................19 Installing QDP++ .................................................................................................................................................20 Installing QPhix ...................................................................................................................................................22 7 INSTALL QPHIX ON CY-TERA ........................................................................................................................ 23 INSTALLATION GUIDE: ...................................................................................................................................................23 Installing libxml2 library ......................................................................................................................................24 Installing QMP ....................................................................................................................................................25 Installing QDP++ .................................................................................................................................................26 Installing QPhix ...................................................................................................................................................28 8 INTEL XEON PHI CO-PROCESSOR SOFTWARE DEVELOPER’S GUIDE .............................................................. 29 HARDWARE POINT-OF-VIEW ..........................................................................................................................................29 Intel MIC Architecture Core .................................................................................................................................31 Cache Organization and Hierarchy .....................................................................................................................33 Performance Monitoring Unit – Performance Counters .....................................................................................35 Memory Controller ..............................................................................................................................................35 VPU and Vector Architecture ..............................................................................................................................35 Intel Xeon Phi Coprocessor SMC Control Panel ...................................................................................................36 Ganglia* Support ................................................................................................................................................36 The Cyprus Institute - CaSToRC Page 1 INTEL XEON PHI (MIC) USER’S MANUAL October 31, 2014 Table of Figures FIGURE 1: LOGICAL DESIGN OF THE CYI XEON PHI CLUSTER (PHI.CYTERA.CYI.AC.CY) FIGURE 2: QPHIX INSTALLATION LOGICAL DIAGRAM FIGURE 3: INTEL XEON PHI (KNIGHTS CORNER) HIGH-LEVEL MICRO-ARCHITECTURE FIGURE 4: INTEL MIC ARCHITECTURE CORE OVERVIEW FIGURE 5 : CORE PIPELINE COMPONENTS FIGURE 6 : GANGLIA* MONITORING SYSTEM DATA FLOW DIAGRAM 3 10 30 32 32 37 Table of Tables TABLE 1: DESCRIPTION OF CO-PROCESSOR COMPONENTS ........................................................................................30 TABLE 2 : CACHE HIERARCHY .......................................................................................................................................34 The Cyprus Institute - CaSToRC Page 2 INTEL XEON PHI (MIC) USER’S MANUAL October 31, 2014 1 The CYI Xeon Phi Cluster This manual was prepared for the GPU ClusterWare project at the Cyprus Institute (CYI). All information are based on the CYI Xeon Phi Cluster. So you will find information in this manual on how to connect, how to compile and how to execute on this specific cluster. Most of these information though are general and can be extrapolated for other similar systems. CYI Xeon Phi Cluster: phi.cytera.cyi.ac.cy Connect using an SSH client (putty, etc.) This will connect you to the head-node of the Phi Cluster (ph04). There are a total of 4 ph nodes (ph04, ph03, ph02, ph01). Each one of these has 3 MIC nodes connected to it (MIC0, MIC1, and MIC2). Ph04 also has 2 nodes with each one having 2 Kepler cards. Figure 1 present the logical design of the Xeon Phi Cluster. GPU GPU cwg01 GPU GPU cwg02 MIC0 MIC1 MIC0 MIC1 cwp01 cwp02 Communication switch ph01 MIC0 ph02 MIC1 MIC0 MIC2 MIC1 MIC2 ph03 MIC0 ph04 MIC1 MIC0 MIC2 MIC1 MIC2 Figure 1: Logical Design of the CYI Xeon Phi Cluster (phi.cytera.cyi.ac.cy) The Cyprus Institute - CaSToRC Page 3 INTEL XEON PHI (MIC) USER’S MANUAL October 31, 2014 CYI Xeon Phi Cluster Technical Characteristics ph0* nodes (ph04, ph03, ph02 and ph01): PROCESSOR FREQUENCY # OF CORES # OF THREADS (TOTAL) CACHE SIZE Intel Xeon CPU E5-2640 v2 2.0GHz (1.2GHz – 2GHz) 8 16 20MB cwg0* nodes (cwg01 and cwg02): PROCESSOR FREQUENCY # OF CORES # OF THREADS (TOTAL) CACHE SIZE Intel Xeon CPU E5-2650 2.0GHz 8 (cat /proc/cpuinfo shows 16) 16 (cat /proc/cpuinfo shows 32) 20MB MIC* nodes (MIC0, MIC1 and MIC2): PROCESSOR FREQUENCY # OF CORES # OF THREADS (TOTAL) CACHE SIZE Intel MIC 7120P 1.2GHz 61 244 512KB The Cyprus Institute - CaSToRC Page 4 INTEL XEON PHI (MIC) USER’S MANUAL October 31, 2014 2 Loading Library Modules If you want to compile and run applications on the Xeon Phi nodes then you must first load the modules needed for the MIC processor (compilation, execution, parallel libraries modules, etc.). To see which modules are available for loading: module avail To load the modules for MIC: module load ictce/6.1.5 To see the modules that are load now: module list To unload a specific module (in any case you need to do so): module unload ictce/6.1.5 The ictce/6.1.5 module contains the Intel compilers (icc and ifort), Intel MPI and Intel Kernel Library. Automatic load of modules when logging in: When you logout of your account from the Phi Cluster the modules that are loaded will be unloaded, thus you need to load the modules every time you login to the cluster. To avoid this you can do the following in order to automate this process and let the system automatically load the modules you want every time you login: 1. Login on the Phi Cluster 2. Go to your home directory (if not already there): cd ~ 3. Open the .bashrc file with a text editor: vim .bashrc The Cyprus Institute - CaSToRC Page 5 INTEL XEON PHI (MIC) USER’S MANUAL October 31, 2014 4. At the end of the file (where it says “# User specific aliases and functions” ), write the commands for loading the modules you want (just like you would execute them in a terminal): module load ictce/6.1.5 This is an example file of a simple .bashrc file with the module load commands: #.bashrc #Source global definitions if [ -f /etc/bashrc ]; then . /etc/bashrc fi #User specific aliases and functions module load ictce/6.1.5 The Cyprus Institute - CaSToRC Page 6 INTEL XEON PHI (MIC) USER’S MANUAL October 31, 2014 3 Compiling for the MIC Processors After loading the necessary modules you have to cross compile for the MIC processors. To do so you have to connect on one of the Phi Cluster nodes (ph04, ph03, ph02, ph01). Compile using the icc compiler and the “-mmic” flag. The Cyprus Institute - CaSToRC Page 7 INTEL XEON PHI (MIC) USER’S MANUAL October 31, 2014 4 Executing on MIC Processors Execute using micnativeloadex: This is a script that takes as a parameter the binary file to be executed on the MIC processors and returns the results. It offers several parameters. Execute micnativeloadex –h to see all available options. To use this script you first need to set the SINK_LD_LIBRARY_PATH to the location of the Intel compiler runtime libraries for Intel Xeon Phi. Example: export SINK_LD_LIBRARY_PATH=/home/buildsets/eb141118/software/impi /5.0.1.035-iccifort-2015.0.090/mic/lib micnativeloadex ./main –a “1024 1” ** Remember that these must be executed after loading the ictce/6.1.5 module ** Execute native (Co-Processor only Model): OpenMP Applications: To execute native on the MIC processors you have to be on one of the MIC boards (MIC0, MIC1 and MIC2). Use ssh to connect from the phi nodes to the MIC nodes. Example: ssh mic0 Then you have to add the above to your LD_LIBRARY_PATH. And then execute just like in any other Linux machine. Example: The Cyprus Institute - CaSToRC Page 8 INTEL XEON PHI (MIC) USER’S MANUAL October 31, 2014 export LD_LIBRARY_PATH=/home/buildsets/eb141118/software/impi/5.0.1.035 -iccifort-2015.0.090/mic/lib:$LD_LIBRARY_PATH export LD_LIBRARY_PATH=/home/buildsets/eb141118/software/icc/2015.0.090 /lib/mic/:$LD_LIBRARY_PATH ./main 1024 1 MPI Applications: Create a file with the IPs of the nodes in the cluster that you want to use o Name it ‘hostfile’ Execute the following commands on MIC0 of the cluster (if you export on MIC0 then there is no need to do the same on other MICs as the mpiexec default will be to pass all environment variables to all ranks participating in the execution): export LD_LIBRARY_PATH=/home/buildsets/eb141118/software/impi/5.0.1.035 -iccifort-2015.0.090/mic/lib export LD_LIBRARY_PATH=/home/buildsets/eb141118/software/icc/2015.0.090 /lib/mic/:$LD_LIBRARY_PATH export PATH=/home/buildsets/eb141118/software/impi/5.0.1.035iccifort-2015.0.090/mic/bin:$PATH export I_MPI_FABRICS=shm:tcp export OMP_NUM_THREADS=240 Execute this on MIC0 (for 2 MIC nodes): mpiexec -n 6 -machinefile hostfile ./hello My example for QPhix tests: mpiexec -n 2 -machinefile hostfile ./time_dslash_noqdp -x 32 -y 32 -z 32 -t 64 -by 4 -bz 4 -pxy 1 -pxyz 0 -c 60 -sy 1 -sz 1 -minct 1 -compress12 -geom 1 1 1 2 The Cyprus Institute - CaSToRC Page 9 INTEL XEON PHI (MIC) USER’S MANUAL October 31, 2014 5 Install QPhix for the Xeon Phi In Figure 2 we show the logical diagram of the QPhix Installation for a multi-node Xeon Phi Cluster. It basically shows the dependencies between the different libraries used. filedb libintrin qio c-lime xpath_reader QPhiX icpc – Intel C++ Compiler Intel MPI CML Proxy for multi-xeon Phi execution QDP++ libxml2 QMP Figure 2: QPhix Installation Logical Diagram Installation Guide: NOTE 1: The configuration and compilation scripts (makefiles) will be executed on the host machines (the Head Node of the CYI Xeon Phi Cluster) so for all the libraries and QPhix, the compilation must be done as cross-compile for the MIC processors. NOTE 2: These instructions are specific and only for the CYI Xeon Phi Cluster on 8 th October 2014. This is the time I had not root access on the cluster and the 4 ph0* nodes weren’t the same (meaning the machines didn’t have the same image installed – basically they didn’t have the same libraries e.g. autoconf, compilers, etc.) The Cyprus Institute - CaSToRC Page 10 INTEL XEON PHI (MIC) USER’S MANUAL October 31, 2014 Installing libxml2 library When running QPhix you will need the libxml2 library for parsing xml files that may be generated as results. If you don’t have root access on the machine then you can install this library locally on your personal account. These are the instructions to do so: 1. Connect on the CYI Xeon Phi Cluster Head Node (ph04) 2. Download the compressed library file from: http://xmlsoft.org/sources/ 3. Un-compress the file using: tar –xzvf libxml2-2.9.1.tar.gz 4. Configure the library prior while giving as input the new path to the library installation folder (if you don’t give the new path (with –prefix=) then the default installation folder will be /usr which you may not have permissions to install anything): my example: CC=icc CXX=icc CFLAGS="-mmic" CXXFLAGS="-mmic" LDFLAGS="-mmic" \ ./configure --prefix=/home/adiavastos/applications/libxml2-2.9.1/ --host=x86_64-k1om-linux --without-python 5. Compiler the library: make –j 6. Install the library: make install REFERENCES: http://scicom.cmm.uchile.cl/pmwiki.php/KB/Blast-XeonPhi http://xmlsoft.org/sources/ The Cyprus Institute - CaSToRC Page 11 INTEL XEON PHI (MIC) USER’S MANUAL October 31, 2014 Installing QMP 1. Connect on the Xeon Phi Cluster Head Node (ph04) 2. Connect using ssh on ph03 (this is because ph04 is missing the autotools for autoconf, automake, etc.) 3. Download the compressed library file from here: https://github.com/usqcd-software/qmp 4. Transfer the uncompressed file on the ph03 machine 5. Go into QMP directory cd qmp 6. Execute these commands: aclocal autoconf automake 7. Go back to the Cluster’s Head Node (ph04) 8. Create a build directory inside the qmp directory: mkdir qmp-build 9. Configure the library prior while giving as input the new path to the library installation folder (if you don’t give the new path (with –prefix=) then the default installation folder will be /usr which you may not have permissions to install anything): my example: ./configure CC=mpiicc --prefix=/home/adiavastos/applications/qmp/qmpbuild CFLAGS="-openmp -mmic -std=c99" --host=x86_64-k1om-linux --withqmp-comms-type=MPI 10. Compile QMP: make –j NOTE: Check for possible errors 11. Install QMP: make install NOTE: Check for possible errors The Cyprus Institute - CaSToRC Page 12 INTEL XEON PHI (MIC) USER’S MANUAL October 31, 2014 Installing QDP++ 1. Connect on the Xeon Phi Cluster Head Node (ph04) 2. Connect using ssh on ph03 (this is because ph04 is missing the autotools for autoconf, automake, etc.) 3. Download the compressed library file from here: http://usqcd-software.github.io/qdpxx/ 4. Transfer the uncompressed file on the ph03 machine 5. Go into QDP++ directory cd qdp++ 6. Execute these commands: aclocal autoconf automake 7. Go back to the Cluster’s Head Node (ph04) 8. Create a build directory inside the qdp++ directory: mkdir qdp++-build 9. Download and move THE (…./qdp++/other_libs): a. filedb: From Into folder b. libintrin: From Into folder c. qio: From Into folder d. c-lime: From Into folder e. xpath_reader: CONTENTS of these libraries into the appropriate folder : https://github.com/usqcd-software/filedb : .../qdp++/other_libs/filedb/ : https://github.com/usqcd-software/libintrin : .../qdp++/other_libs/libintrin/ : https://github.com/usqcd-software/qio : .../qdp++/other_libs/qio/ : https://github.com/usqcd-software/c-lime : .../qdp++/other_libs/qio/other_libs/c-lime/ The Cyprus Institute - CaSToRC Page 13 INTEL XEON PHI (MIC) From Into folder USER’S MANUAL October 31, 2014 : https://github.com/usqcd-software/xpath_reader : .../qdp++/other_libs/xpath_reader/ NOTE: The folders already exist but are empty. Just move the uncompressed CONTENTS of these files into the /qdp++/other_libs/.... folders without creating a new uncompressed folder. 10. Configure the library prior while giving as input the new path to the library installation folder (if you don’t give the new path (with –prefix=) then the default installation folder will be /usr which you may not have permissions to install anything): my example: ./configure CC=mpiicc CXX=mpiicpc -prefix=/home/adiavastos/applications/qdp++/qdp++-build/ --host=x86_64k1om-linux --with-qmp=/home/adiavastos/applications/qmp/qmp-build/ -enable-precision=double --enable-parallel-arch=parscalar --withlibxml2=/home/adiavastos/applications/libxml2-2.9.1/ --enable-openmp CFLAGS="-openmp -std=c99 -mmic" CXXFLAGS="-mmic -openmp -std=c++0x" LDFLAGS=-openmp 11. Compile QDP++: make –j NOTE: Check for any possible errors 12. Install QDP++: make install NOTE: Check for any possible errors The Cyprus Institute - CaSToRC Page 14 INTEL XEON PHI (MIC) USER’S MANUAL October 31, 2014 Installing QPhix 1. Connect on the Xeon Phi Cluster Head Node (ph04) 2. Connect using ssh on ph03 (this is because ph04 is missing the autotools for autoconf, automake, etc.) 3. Download the compressed library file from here: https://github.com/JeffersonLab/qphix 4. Transfer the uncompressed file on the ph03 machine 5. Go into QPhix directory cd qphix 6. Execute these commands: aclocal autoconf automake 7. Go back to the Cluster’s Head Node (ph04) 8. Create a build directory inside the qmp directory: mkdir qphix-build 9. Configure the library prior while giving as input the new path to the library installation folder (if you don’t give the new path (with –prefix=) then the default installation folder will be /usr which you may not have permissions to install anything): my example: ./configure CC=mpiicc CXX=mpiicpc -prefix=/home/adiavastos/applications/qphix/qphix-build --host=x86_64k1om-linux --with-qmp=/home/adiavastos/applications/qmp/qmp-build -with-qdp=/home/adiavastos/applications/qdp++/qdp++-build --enableparallel-arch=parscalar --enable-proc=MIC --enable-soalen=8 --enableclover --enable-openmp --enable-cean --enable-mm-malloc CXXFLAGS="openmp -mmic -vec-report -restrict mGLOB_default_function_attrs=\"use_gather_scatter_hint=off\" -g -O2 finline-functions -fno-alias -Drestrict=__restrict__ -std=c++0x" CFLAGS="-mmic -vec-report -restrict mGLOB_default_function_attrs=\"use_gather_scatter_hint=off\" -openmp -g -O2 -fno-alias -std=c99" LDFLAGS=-openmp The Cyprus Institute - CaSToRC Page 15 INTEL XEON PHI (MIC) USER’S MANUAL October 31, 2014 10. Compile QPhix: make –j NOTE: Check for possible errors 11. Install QPhix: make install NOTE: Check for possible errors The Cyprus Institute - CaSToRC Page 16 INTEL XEON PHI (MIC) USER’S MANUAL October 31, 2014 6 Install QPhix on Prometheus This section describes how to install QPhix library on Prometheus cluster at the CYI Installation Guide: NOTE 1: The configuration and compilation scripts (makefiles) will be executed on the login node of Prometheus. NOTE 2: These instructions are specific and only for the CYI Prometheus Xeon Cluster on 11th December 2014. NOTE 3: Xeon Nodes on Prometheus Characteristics: Product Frequency # of Cores # of Threads SSE | AVX | MMX Intel Xeon E5520 2.27 GHz 4 8 NONE The Cyprus Institute - CaSToRC Page 17 INTEL XEON PHI (MIC) USER’S MANUAL October 31, 2014 Installing libxml2 library When running QPhix you will need the libxml2 library for parsing xml files that may be generated as results. If you don’t have root access on the machine then you can install this library locally on your personal account. These are the instructions to do so: 7. Connect on the Prometheus Login Node 8. Download the compressed library file from: http://xmlsoft.org/sources/ 9. Un-compress the file using: tar –xzvf libxml2-2.9.1.tar.gz 10. Configure the library prior while giving as input the new path to the library installation folder (if you don’t give the new path (with –prefix=) then the default installation folder will be /usr which you may not have permissions to install anything): my example: CC=icc CXX=icc \ ./configure --without-python --prefix=/home/adiavastos/applications/libxml2-2.9.1/ 11. Compiler the library: make –j 12. Install the library: make install REFERENCES: http://scicom.cmm.uchile.cl/pmwiki.php/KB/Blast-XeonPhi http://xmlsoft.org/sources/ The Cyprus Institute - CaSToRC Page 18 INTEL XEON PHI (MIC) USER’S MANUAL October 31, 2014 Installing QMP 1. Connect to Prometheus Login Node 2. Download the compressed library file from here: https://github.com/usqcd-software/qmp 3. Go into QMP directory cd qmp 4. Execute these commands: aclocal autoconf automake 5. Create a build directory inside the qmp directory: mkdir qmp-build 6. Configure the library prior while giving as input the new path to the library installation folder (if you don’t give the new path (with –prefix=) then the default installation folder will be /usr which you may not have permissions to install anything): my example: ./configure CC=mpiicc --prefix=/home/adiavastos/applications/qmp/qmpbuild CFLAGS="-openmp -std=c99" --with-qmp-comms-type=MPI 7. Compile QMP: make –j NOTE: Check for possible errors 8. Install QMP: make install NOTE: Check for possible errors The Cyprus Institute - CaSToRC Page 19 INTEL XEON PHI (MIC) USER’S MANUAL October 31, 2014 Installing QDP++ 1. Connect to Prometheus Login Node 2. Download the compressed library file from here: http://usqcd-software.github.io/qdpxx/ 3. Go into QDP++ directory cd qdp++ 4. Execute these commands: aclocal autoconf automake 5. Create a build directory inside the qdp++ directory: mkdir qdp++-build 6. Download and move THE (…./qdp++/other_libs): a. filedb: From Into folder b. libintrin: From Into folder c. qio: From Into folder d. c-lime: From Into folder e. xpath_reader: From Into folder CONTENTS of these libraries into the appropriate folder : https://github.com/usqcd-software/filedb : .../qdp++/other_libs/filedb/ : https://github.com/usqcd-software/libintrin : .../qdp++/other_libs/libintrin/ : https://github.com/usqcd-software/qio : .../qdp++/other_libs/qio/ : https://github.com/usqcd-software/c-lime : .../qdp++/other_libs/qio/other_libs/c-lime/ : https://github.com/usqcd-software/xpath_reader : .../qdp++/other_libs/xpath_reader/ The Cyprus Institute - CaSToRC Page 20 INTEL XEON PHI (MIC) USER’S MANUAL October 31, 2014 NOTE: The folders already exist but are empty. Just move the uncompressed CONTENTS of these files into the /qdp++/other_libs/.... folders without creating a new uncompressed folder. 7. Configure the library prior while giving as input the new path to the library installation folder (if you don’t give the new path (with –prefix=) then the default installation folder will be /usr which you may not have permissions to install anything): my example: ./configure CC=mpiicc CXX=mpiicpc -prefix=/home/adiavastos/applications/qdp++/qdp++-build/ --withqmp=/home/adiavastos/applications/qmp/qmp-build/ --enableprecision=double --enable-parallel-arch=parscalar --withlibxml2=/home/adiavastos/applications/libxml2-2.9.1/ --enable-openmp CFLAGS="-openmp -std=c99 " CXXFLAGS="-openmp -std=c++0x" LDFLAGS=openmp 8. Compile QDP++: make –j NOTE: Check for any possible errors 9. Install QDP++: make install NOTE: Check for any possible errors The Cyprus Institute - CaSToRC Page 21 INTEL XEON PHI (MIC) USER’S MANUAL October 31, 2014 Installing QPhix 1. Connect to Prometheus Login Node 2. Download the compressed library file from here: https://github.com/JeffersonLab/qphix 3. Go into QPhix directory cd qphix 4. Execute these commands: aclocal, autoconf, automake 5. Create a build directory inside the qmp directory: mkdir qphix-build 6. Configure the library prior while giving as input the new path to the library installation folder (if you don’t give the new path (with –prefix=) then the default installation folder will be /usr which you may not have permissions to install anything): my example: ./configure CC=mpiicc CXX=mpiicpc -prefix=/fhgfs/prometheus/home/adiavastos/QPhix/qphix/qphix-build -with-qmp=/fhgfs/prometheus/home/adiavastos/QPhix/qmp/qmp-build --withqdp=/fhgfs/prometheus/home/adiavastos/QPhix/qdp++/qdp++-build --enableparallel-arch=parscalar --enable-proc=SCALAR –-enable-soalen=1 -enable-clover --enable-openmp --enable-cean --enable-mm-malloc CXXFLAGS="-openmp -vec-report -restrict mGLOB_default_function_attrs=\"use_gather_scatter_hint=off\" -g -O2 finline-functions -fno-alias -Drestrict=__restrict__ -std=c++0x" CFLAGS="-vec-report -restrict mGLOB_default_function_attrs=\"use_gather_scatter_hint=off\" -openmp g -O2 -fno-alias -std=c99" LDFLAGS=-openmp 7. Compile QPhix: make –j NOTE: Check for possible errors 8. Install QPhix: make install NOTE: Check for possible errors The Cyprus Institute - CaSToRC Page 22 INTEL XEON PHI (MIC) USER’S MANUAL October 31, 2014 7 Install QPhix on CY-TERA This section describes how to install QPhix library on CY-TERA machine at the CYI Installation Guide: NOTE 1: The configuration and compilation scripts (makefiles) will be executed on the login node of CY-TERA. NOTE 2: These instructions are specific and only for the CYI CY-TERA Xeon Cluster on 11th December 2014. NOTE 3: Xeon Nodes on CY-TERA Characteristics: Product Frequency # of Cores # of Threads SSE | AVX | MMX Intel Xeon X5650 2.67 GHz 6 12 SSE4.2 The Cyprus Institute - CaSToRC Page 23 INTEL XEON PHI (MIC) USER’S MANUAL October 31, 2014 Installing libxml2 library When running QPhix you will need the libxml2 library for parsing xml files that may be generated as results. If you don’t have root access on the machine then you can install this library locally on your personal account. These are the instructions to do so: 13. Connect on the CY-TERA Login Node 14. Download the compressed library file from: http://xmlsoft.org/sources/ 15. Un-compress the file using: tar –xzvf libxml2-2.9.1.tar.gz 16. Configure the library prior while giving as input the new path to the library installation folder (if you don’t give the new path (with –prefix=) then the default installation folder will be /usr which you may not have permissions to install anything): my example: CC=icc CXX=icc \ ./configure --without-python --prefix=/home/adiavastos/applications/libxml2-2.9.1/ 17. Compiler the library: make –j 18. Install the library: make install REFERENCES: http://scicom.cmm.uchile.cl/pmwiki.php/KB/Blast-XeonPhi http://xmlsoft.org/sources/ The Cyprus Institute - CaSToRC Page 24 INTEL XEON PHI (MIC) USER’S MANUAL October 31, 2014 Installing QMP 9. Connect to CY-TERA Login Node 10. Download the compressed library file from here: https://github.com/usqcd-software/qmp 11. Go into QMP directory cd qmp 12. Execute these commands: aclocal autoconf automake 13. Create a build directory inside the qmp directory: mkdir qmp-build 14. Configure the library prior while giving as input the new path to the library installation folder (if you don’t give the new path (with –prefix=) then the default installation folder will be /usr which you may not have permissions to install anything): my example: ./configure CC=mpiicc --prefix=/home/adiavastos/applications/qmp/qmpbuild CFLAGS="-openmp -std=c99" --with-qmp-comms-type=MPI 15. Compile QMP: make –j NOTE: Check for possible errors 16. Install QMP: make install NOTE: Check for possible errors The Cyprus Institute - CaSToRC Page 25 INTEL XEON PHI (MIC) USER’S MANUAL October 31, 2014 Installing QDP++ 10. Connect to CY-TERA Login Node 11. Download the compressed library file from here: http://usqcd-software.github.io/qdpxx/ 12. Go into QDP++ directory cd qdp++ 13. Execute these commands: aclocal autoconf automake 14. Create a build directory inside the qdp++ directory: mkdir qdp++-build 15. Download and move THE (…./qdp++/other_libs): a. filedb: From Into folder b. libintrin: From Into folder c. qio: From Into folder d. c-lime: From Into folder e. xpath_reader: From Into folder CONTENTS of these libraries into the appropriate folder : https://github.com/usqcd-software/filedb : .../qdp++/other_libs/filedb/ : https://github.com/usqcd-software/libintrin : .../qdp++/other_libs/libintrin/ : https://github.com/usqcd-software/qio : .../qdp++/other_libs/qio/ : https://github.com/usqcd-software/c-lime : .../qdp++/other_libs/qio/other_libs/c-lime/ : https://github.com/usqcd-software/xpath_reader : .../qdp++/other_libs/xpath_reader/ The Cyprus Institute - CaSToRC Page 26 INTEL XEON PHI (MIC) USER’S MANUAL October 31, 2014 NOTE: The folders already exist but are empty. Just move the uncompressed CONTENTS of these files into the /qdp++/other_libs/.... folders without creating a new uncompressed folder. 16. Configure the library prior while giving as input the new path to the library installation folder (if you don’t give the new path (with –prefix=) then the default installation folder will be /usr which you may not have permissions to install anything): my example: ./configure CC=mpiicc CXX=mpiicpc -prefix=/home/adiavastos/applications/qdp++/qdp++-build/ --withqmp=/home/adiavastos/applications/qmp/qmp-build/ --enableprecision=double --enable-parallel-arch=parscalar --withlibxml2=/home/adiavastos/applications/libxml2-2.9.1/ --enable-openmp CFLAGS="-openmp -std=c99 " CXXFLAGS="-openmp -std=c++0x" LDFLAGS=openmp 17. Compile QDP++: make –j NOTE: Check for any possible errors 18. Install QDP++: make install NOTE: Check for any possible errors The Cyprus Institute - CaSToRC Page 27 INTEL XEON PHI (MIC) USER’S MANUAL October 31, 2014 Installing QPhix 9. Connect to CY-TERA Login Node 10. Download the compressed library file from here: https://github.com/JeffersonLab/qphix 11. Go into QPhix directory cd qphix 12. Execute these commands: aclocal, autoconf, automake 13. Create a build directory inside the qmp directory: mkdir qphix-build 14. Configure the library prior while giving as input the new path to the library installation folder (if you don’t give the new path (with –prefix=) then the default installation folder will be /usr which you may not have permissions to install anything): my example: ./configure CC=mpiicc CXX=mpiicpc -prefix=/gpfs/h/cypro113u11/QPhix/qphix/qphix-build/ --withqmp=/gpfs/h/cypro113u11/QPhix/qphix/qphix-build/ --withqdp=/gpfs/h/cypro113u11/QPhix/qdp++/qdp++-build/ --enable-parallelarch=parascalar --enable-proc=SCALAR --enable-soalen=1 --enable-clover --enable-openmp --enable-cean --enable-mm-malloc CXXFLAGS="-openmp vec-report -restrict mGLOB_default_function_attrs=\"use_gather_scatter_hint=off\" -g -O2 finline-functions -fno-alias -Drestrict=__restrict__ -std=c++0x msse4.2" CFLAGS="-vec-report -restrict mGLOB_default_function_attrs=\"use_gather_scatter_hint=off\" -openmp g -O2 -fno-alias -std=c99 -msse4.2" LDFLAGS=-openmp 15. Compile QPhix: make –j NOTE: Check for possible errors 16. Install QPhix: make install NOTE: Check for possible errors The Cyprus Institute - CaSToRC Page 28 INTEL XEON PHI (MIC) USER’S MANUAL October 31, 2014 8 Intel Xeon Phi Co-processor Software Developer’s Guide Hardware Point-of-View The Intel Xeon Phi Coprocessor comprises of up to 61 processor cores connected by a high performance on-die bidirectional interconnect. In addition there are 8 memory controllers supporting up to 16 GDDR5 channels (2 per memory controller) delivering up to 5.5 GT/s with a theoretical aggregate bandwidth of 352GB/s. Each core is a fully functional, in-order core, which supports fetch and decode instructions from 4 hardware thread execution contexts. In order to reduce hot-spot contention for data among the cores, a distributed tag directory is implemented so that every physical address the coprocessor can reach is uniquely mapped through a reversible one-to-one address hashing function. This hashing function not only maps each physical address to a tag directory, but also provides a framework for more elaborate coherence protocol mechanisms than the individual cores could provide. ... Core TD TD Core L2 L2 L2 GDDR MC TD GDDR MC Core L2 TD L2 TD GDDR MC TD TD L2 L2 Core ... Core GDDR MC Core ... Core L2 Core ... TD The Cyprus Institute - CaSToRC Page 29 INTEL XEON PHI (MIC) USER’S MANUAL October 31, 2014 Figure 3: Intel Xeon Phi (Knights Corner) high-level Micro-architecture In Figure 3 we show the high-level micro-architecture of the Intel Xeon Phi coprocessor (Knights Corner version). Each of the 61 cores include the following units: 512-bit wide vector processor unit (VPU) The Core Ring Interface (CRI) Interfaces to the Core and the Ring Interconnect The L2 Cache and the L2 pipeline and associated arbitration logic The Tag Directory (TD) which is a portion of the distributed duplicate tag directory infrastructure Table 1: Description of Co-processor Components Name Description Core The processor core fetches and decodes instructions from four hardware threads. It supports 32-bit and 64-bit execution environment similar to those found in the Intel64 Architecture. 32KB, 8-Way set associative L1 I-cache and D-cache Execute 2 instructions/cycle No support for Intel SSE (SIMD) or MMX Vector Processing Unit (VPU) Includes the Extended Math Unit (EMU). It contains the vector register file (32 registers / thread context). It executes: 16 single-precision floating point / clock cycle 16 32-bit integer operations 8 double-precision floating point operations /cycle L2 Cache 512 KB, 8-way Tag Directory (TD) Distributed duplicate tag directory for cross-snooping L2 caches in all cores. The CPU L2 caches are kept fully coherent with each other by the TDs, which are referenced after the L2 cache miss. A TD tag contains the address, state and an ID for The Cyprus Institute - CaSToRC Page 30 INTEL XEON PHI (MIC) USER’S MANUAL October 31, 2014 the owner (one of the L2 caches) of the cache line. The TD that is referenced is not necessarily the one co-located with the core that generated the miss, but is based upon address (each TD gets an equal portion of the address space). A request is sent from the core that suffered the memory miss to the correct TD via the ring interconnect Ring Includes: Component Interfaces Ring Stops Ring turns Addressing Flow control The co-processor has 2 each for these rings – one travelling each direction. There is no queuing on the ring or in the ring turns; once a message is on the ring it will continue deterministically to its destination. In case, the destination does not have room to accept a message it may leave it on the ring and pick it up next time it goes by. This is known as bouncing. Intel MIC Architecture Core The Intel MIC Architecture processor cores run at 1GHz (up to 1.3GHz). The Intel MIC Architecture is based on the x86 ISA, extended with 64-bit addressing and new 512-bit wide SIMD vector instructions and registers. Each core also supports 4 hardware threads. Each core has a 32KB L1 data cache, a 32KB L1 instruction cache and a 512 L2 cache. The L2 caches of all cores are interconnected with each other and the memory controllers via a bidirectional ring bus, effectively creating a shared last-level cache of up to 32MB. The design of each core includes a short in-order pipeline. There is no latency in executing scalar operations and low latency in executing vector operations. Due to the short in-order pipeline, the overhead for branch misprediction is low. The core can execute 2 instructions per clock cycle, one on the U-pipe and one on the V-pipe. The V-pipe cannot execute all instruction types, and simultaneous execution is governed by pairing rules. Vector instructions can only be executed on the U-pipe. The Cyprus Institute - CaSToRC Page 31 INTEL XEON PHI (MIC) USER’S MANUAL October 31, 2014 Instruction Decode Scalar Unit Vector Unit Scalar Registers Vector Registers 32K L1 I-cache 32K L1 D-cache 512K L2 Cache Ring Figure 4: Intel MIC Architecture core overview Core Pipeline In this section we present the cores pipeline stages: PPF PF D0 D1 D2 E WB Figure 5 : Core Pipeline Components PPF PF D0 Thread Picker Instruction Cache Lookup Prefetch buffer write Thread Picker Instruction rotate Decode of 0f, 62, D6, REX prefixes The Cyprus Institute - CaSToRC Page 32 INTEL XEON PHI (MIC) D1 D2 E WB USER’S MANUAL October 31, 2014 Instruction Decode CROM loopup Sunit register file read Microcode control execution Address generation Data cache lookup Register file read Integer ALU execution Retire/stall/exception determination Integer register file write Condition code (flag) evaluation Most integer and mask instructions have a 1-clock latency, while most vector instructions have 4-clock latency with a 1-clock throughput. Instruction Decoder: One of the changes made to simplify the core was to modify the instruction decoder to be a two-cycle unit. While fully pipelined, the result of this change is that the core issue instructions from the same hardware context in back-to-back cycles. That is, if in cycle N the core issued instructions from context 1, then in cycle N+1 the core can issue instructions from any context except context 1. This allows for a significant increase in the maximum frequency, resulting in a net performance gain. For maximum utilization, at least two hardware contexts or threads must be run on each core. Since the scheduler cannot issue instructions in back-to-back from the same hardware context, running one thread on a core will result in, at best, 50% utilization of the core potential. Cache Organization and Hierarchy The L1 cache accommodates higher working set requirements for four hardware contexts per core. It has a 32KB L1 instruction and 32KB L1 data cache. Associativity was increased to 8-way, with a 64-byte cache line. The bank width is 8 bytes. Data return can now be out-of-order. The L1 cache has a load-to-use latency of 1 cycle – an integer value loaded from the cache can be used in the next clock by an integer instruction. However, Vector instructions experience different latencies than integer instructions. The L1 cache has an address generation interlock with at least a 3-clock cycle latency. The L2 cache is a 512 KB unified unit. The L2 raw latency is 11 cycles. The expected idle access time is approximately 80 cycles. The L2 has a streaming hardware prefetcher that can selectively prefetch code, read, RFO (Read-For-Owenership) cache lines into the L2 cache. The Cyprus Institute - CaSToRC Page 33 INTEL XEON PHI (MIC) USER’S MANUAL October 31, 2014 In the Intel Xeon Phi coprocessor cores, a miss in the L1 or L2 cache does not stall the entire core (as it would in the original in-order Intel Pentium processor). Misses to the cache will not stall the requesting hardware context of a core unless it is a load miss. Upon encountering a load miss, the hardware context with the instruction triggering the miss will be suspended until the data are brought into the cache for processing. The remaining hardware contexts in the core will continue execution with no interruption. Both L1 and L2 caches can support up to about 38 outstanding requests per core (combined read and write). In Table 2 we summarize the basic parameters of L1 and L2 caches. Duty cycles and Ports designation presented in the table are fields that are specific only to the Intel Xeon Phi coprocessor design. The L1 cache can be accessed each clock, whereas the L2 can only be accessed every other clock. Also, on any given clock, software can either read or write the L1 or L2, but it cannot read and write in the same clock. This design artifact has implications when software is trying to access a cache while evictions are taking place. Table 2 : Cache Hierarchy Parameter Coherence Size Associativity Line Size Banks Access Time Policy Duty Cycle Ports Inclusive / Exclusive Shared / Private L1 MESI 32KB + 32KB 8-way 64 bytes 8 1 cycle Pseudo LRU 1 per clock Read or Write Private L2 MESI 512KB 8-way 64 bytes 8 11 cycles Pseudo LRU 1 per clock Read or Write Inclusive of L1-I and L1-D Shared Each core contributes 512 KB of L2 to the total shared cache storage and it may appear as though a maximum of 31 MB of common L2 cache is available, but this is not the absolute case. If two or more cores are sharing data, the shared data is replicated among the individual cores’ various L2 caches. That is, if no cores share any data or code, then the effective total L2 size of the chip is 31 MB. Whereas, if every core shares exactly the same code and data in perfect synchronization, then the effective total L2 size of the chip is only 512 KB. The Cyprus Institute - CaSToRC Page 34 INTEL XEON PHI (MIC) USER’S MANUAL October 31, 2014 Performance Monitoring Unit – Performance Counters The Intel Xeon Phi coprocessor includes a performance monitoring unit (PMU). Most of the 42 event types from the original Intel Pentium processor exists but some updates exist to reflect more recent programming interfaces. Particular Intel Xeon Phi coprocessor-centric events have been added to measure memory controller events, vector processing unit utilization and statistics, local and remote cache read/write statistics and more. The coprocessor comes with support for performance monitoring at the individual thread level. Each thread has two performance counters and two event select registers. The events supported for performance monitoring are a combination of the legacy Intel Pentium processor events and new Intel Xeon Phi coprocessor-centric events. The Intel Xeon Phi coprocessor switched to the Intel Pentium Pro style PMU interface, which allows user-space applications to directly interact with and use the PMU features via specialized instructions. Memory Controller There are 8 on-die GDDR5-based memory controllers in the Intel Xeon Phi coprocessor. Each can operate two 32-bit channels for a total of 16 memory channels that are capable of delivering up to 5.5 GT/s per channel. DMA Capabilities Direct Memory Access (DMA) is a common hardware function within a computer system that is used to relieve the CPU from the burden of copying large blocks of data. The following data transfers are supported: Intel Xeon Phi to Intel Xeon Phi GDDR5 space (aperture) Intel Xeon Phi GDDR5 to Host System Memory Host System Memory to Intel Xeon Phi GDDR5 (aperture or non-aperture) Intra-GDDR5 Block Transfers within Intel Xeon Phi VPU and Vector Architecture The Intel Xeon Phi has a new SIMD 512-bit wide VPU with a corresponding vector instruction set. The VPU can be used to process 16 single precision or 8 double precision elements. This The Cyprus Institute - CaSToRC Page 35 INTEL XEON PHI (MIC) USER’S MANUAL October 31, 2014 new Vector Processing Unit (VPU) has a new SIMD instruction set that does not support prior vector architecture models like MMX, Intel SSE or Intel AVX. Intel Xeon Phi Coprocessor SMC Control Panel The SMC control panel (micsmc), located in /opt/intel/mic/bin after installing Intel MPSS, is the local host-side user interface for system management. The Control Panel is more practical for smaller setups like a workstation environment rather than for a large-scale cluster deployment. The Control Panel’s main responsibilities are: Monitoring Intel Xeon Phi card status, parameters, power, thermal, etc. Monitoring system performance, core usage, memory usage, process information Monitoring overall system health, critical errors or events Hardware configuration and setting, ECC, turbo mode, power plan setting, etc. Ganglia* Support Ganglia* is a scalable distributed monitoring system for high-performance computing systems such as clusters and grids. The implementation of Ganglia* is robust, has been ported to an extensive set of operating systems and processor architectures. Briefly, the Ganglia* system has a daemon running on each computing node or machine. The data from these daemons is collected by another daemon and placed in an rrdtool database. Ganglia* then uses PHP scripts on a web server to generate graphs as directed by the user. The typical Ganglia* data flow is shown in Figure 6. For integration with system management and monitoring systems like Ganglia*, the Manycore Platform Software Stack (MPSS): Provides an interface for the Ganglia* monitoring agent to collect monitoring state or data: sysfs or /proc virtual file system exposed by the Linux*-based coprocessor OS on each Intel Xeon Phi coprocessor device Provides a plug-in for custom made metrics about the nodes (the Intel Xeon Phi coprocessor cards) that are being monitored by Ganglia* Serves as a reference implementation for the whole Ganglia* monitoring environment setup The Cyprus Institute - CaSToRC Page 36 INTEL XEON PHI (MIC) USER’S MANUAL October 31, 2014 In Ganglia* each Intel Xeon Phi card can be treated as an independent computing node as each coprocessor is running a Linux*-based OS, thus one can run gmond monitoring agent on the coprocessor as is. Gmond supports configuration files and plug-ins so it is easy to add customized metrics. Gmetad can be run on the host. For gmetad, customization is not needed. All the front-end tools like rrdtool, scripts should be standard Ganglia* configuration. All the daemons in Ganglia* talk to each other over TCP/IP. Ganglia* has default collecting metrics, but Intel Xeon Phi has additional metrics that can be collected. To collect additional metrics follow these steps (more details in p. 51 of Manual 3): 1. Write a script or C/C++ program which retrieves the information. The script can be written in any scripting language. Python is used to retrieve default metrics. In case of a C/C++ program, the .so files are needed. 2. Register the program with the Ganglia* daemon (gmond) by issuing the Ganglia* command gmetric 3. Make the registration persistent b adding the modification to the configuration file: /etc/ganglia/gmond.conf Data Collector Data Consolidator Daemon one per node Only one copy with the Web Server /etc/gmond.conf gmond /etc/gmond.conf gmond gmetad /etc/gmetad.conf Rrdtool - database of stats /etc/gmond.conf gmond PHP Scripts Apache2 + PHP BROWSER: IE, Firefox, Chrome, etc. Figure 6 : Ganglia* Monitoring System Data Flow Diagram The Cyprus Institute - CaSToRC Page 37 INTEL XEON PHI (MIC) USER’S MANUAL October 31, 2014 The Cyprus Institute - CaSToRC Page 38