1
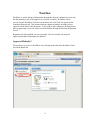
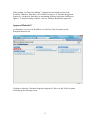
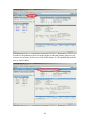
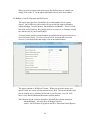
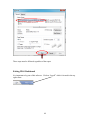
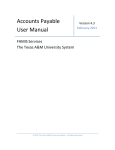
Purchasing Training Manual
IFAS Dashboard is a web-based portal. From the IFAS dashboard, purchase requisition
approvals/rejections are completed by the supervisor.
Starting IFAS:
To access the dashboard, click on the SunGard icon loaded on your desktop. (It must be
opened in Internet Explorer.) The following screen will appear:
If you do not remember your password, click on the “Forgot Login?” link. Doing so
causes a window to appear asking for your work email address. Once that is entered, the
system will generate a new password and it will send you an email containing both your
IFAS User Name as well as the new Password. The next time you log into SunGard, you
will need to use that password. It will then force you to change your password.
Enter your IFAS User Name and Password and either press ENTER or click on the Login
button. The initial IFAS screen will appear.
1
The system will always default to the Home tab. Click on the Principals/Directors tab.
2
3
Workflow
Workflow is used to advance a Requisition through the chain of command to a user who
has the authority to give final approval or rejection. Primarily, Workflow will be
accessed via the Workflow Tasks box on the Home tab or the Task List option on the
Principals/Directors tab. This assumes that any changes needing to be made prior to
approval will be done by the Requestor. If you wish to make changes to the Requisition
prior to approving it, you will need to access Workflow through the Purchase Requisition
screen.
Regardless of which method you use to open the Task List window, the steps for
approving Purchase Requisitions are identical.
Approval Method #1
The quickest way to access Workflow is by clicking on the link in the Workflow Tasks
box on the Home tab.
4
If the wording “No Tasks Outstanding” is displayed in the bottom section of the
Workflow Tasks box, then there is no workflow to approve. If “Purchase Requisition
Approvals” is displayed, then there are outstanding purchase requisition workflows to
approve. To start processing workflow, click on “Purchase Requisition Approvals”.
Approval Method #2
An alternative way to access Workflow is to select the Task List option on the
Principals/Directors tab.
Clicking on either the “Purchase Requisition Approvals” link or on the Task List option
will bring up the following screen:
5
Under the History heading in the right-hand column, notice the
, the
, and the
.
Click on the
to approve a Purchase Requisition. This will bring up a window
allowing comments to be added. To complete the approval, simply click on the SUBMIT
button.
Click on the
to reject a Purchase Requisition. Again, a window will appear allowing
comments or an explanation for the rejection to be entered. To complete the rejection,
click on the SUBMIT button.
The
allows a redirect of the approval process. For CCSU’s purpose, this button will
never be used.
The Summary section provides a synopsis of the Requisition, including the item(s) being
ordered, the Quantity, Cost and Account Number.
Since we wish to approve this PR, click on the
appears.
6
. Notice the Comments box that
This field is free-form text. It is generally used for notes pertaining to the approval or
rejection of the PR. In this case, approval notes are entered:
7
Click
to finish the approval process.
The following message will appear showing a successful approval.
This is an indication that the PR has begun the approval process. It tells a user who is
simply a requester that the PR has moved on to the next step in the approval process. It
tells a user who does the final approval that the PR is complete and ready to be printed.
A PR must be printed in order to turn it into a Purchase Order.
You may click on the next PR Number listed in the “All Approvals” section in order to
get information relevant to that PR to display on the right-hand side of the screen. Do not
click the check box to the left of “All Approvals” or use the
located in the “All
Approvals” section. Requisition approvals work best when done one at a time and from
the right-hand section of the screen.
8
For the time being, ignore the “Records waiting on your approval” section.
Out of Office Indicator
Placing yourself “Out of Office” in SunGard will allow purchase requisitions that would
normally flow to you for approval to move on to a backup approver. This allows orders
to continue to be placed while you are gone. There are two methods for placing yourself
“Out of Office” and no matter which one is used, it only applies to those purchase
requisitions not yet submitted. If there are purchase requisitions already awaiting
approval by a user, checking this box will not advance them to the backup approver.
Supervisors will still need to approve/reject those before placing yourself “Out of
Office”.
Method #1:
On the dashboard Home tab, there is a Workflow Tasks box. In the top section of this
box, you will notice a check box next to the wording “Out of Office?”.
When that box is checked, the system considers you out of office and will forward any
Workflow Tasks intended for you to a backup approver. Simply removing the check
from that box will place you back in office.
Method #2:
The second way to mark oneself Out of Office is to open the Task List (either from the
Workflow Tasks box on the Home tab or the Task List option itself on the
Principals/Directors tab).
Notice the “Set Out Of Office” button in the top left-hand side of the screen.
9
In order for Requisitions to flow to a backup approver when the primary approver is out
of town, it is necessary for the user to click on this button. It will automatically mark the
user as “Out of Office”.
10
Upon returning, the user must access this Task List screen and click on the “Set In
Office” button. Until that happens, requisitions will continue to flow to the backup
approver.
The button is a toggle. When a user is marked “In Office”, the button will give you the
option to mark yourself out. When you are marked “Out of Office”, the button will give
you the option to mark yourself back in.
11
Reporting:
Purchase Orders (Inquiry)
PO: Purchase Order Status (Long):
This report provides detailed information about individual Purchase Orders. It
includes the Status of a PO (Open, Partially Paid or Fully Paid) as well as a
breakdown of items ordered. There is an Encumbrance section which will list all
items ordered, but not yet paid. Once a payment has been made, an “Open Hold
Activity” section will appear. This section will show the items which have been
paid, the Account Number, the Check Number, Check Date and the amount of the
payment.
To narrow down which POs are included in the report, enter one or more
Selection Criteria. To receive a report for all POs that a user has access to, leave
the defaults and simply click on the Submit button. The following screen is an
example of how to fill out the selection criteria in order to receive a report for one
specific PO Number.
After clicking on Submit, the following window will appear:
12
If you need to cancel the report, please click on “Cancel” and do not close the window.
This is very important. The report will display when finished. This screen will appear
when each report is run.
PO: Open PO Listing by GL Account Number:
This report provides a listing of all Open POs that a user has access to. The POs
are grouped by GL Account Number so that at a quick glance, you can see what
each budget is being spent on. Each PO is listed in summary format, i.e., the total
is displayed, but not the individual items.
To narrow down which POs are included in the report, enter one or more
Selection Criteria. To receive a list of all Open POs that a user has access to,
leave the defaults and simply click on the Submit button.
13
Budget Reports (Budget Reports)
GL Account Information and Activity:
This report provides a breakdown by account number of how the budget has been
spent. The report will display the Approved Budget, Working Budget, YTD
Expenses, MTD Expenses, Open POs and Available Balance. If there are Open
POs, an Encumbrance Detail section will follow the summary amounts. This area
lists the PO Number, Vendor, Description, Date, Amount Encumbered and
Amount Paid (if any).
To narrow down which Account Numbers are included in the report, enter one or
more Selection Criteria. To receive a list of all GL Accounts that a user has
access to, leave the defaults and simply click on the Submit button.
This report contains a “drill down” feature. When you move the mouse over
specific fields, the cursor will turn into an electric drill. This means that the field
you are looking at is a summary bucket and if you click on it, you will “drill
down” to the detail information that makes up that number.
The following are the columns which have this drill down feature turned on:
Working Budget – this will show all Budget Transfers
YTD Expenses – this will show all payments and JEs up to the current
month (Transaction Detail Report)
14
When you need to return to the main report after drilling down to a detail one,
simply click on the “X” in the upper right-hand corner to close that window.
GL Budget to Actual w/Encumb and Drill Down:
This report again provides a breakdown by account number, but it is more
concise. On an Object by Object basis, the report lists the Approved Budget,
Adjusted Budget, Actual Expenses, Encumbrances and Balance. There is a total
line at the end of each Org. Key listing which is an easy way to determine exactly
how much is left of your overall budget.
To narrow down which Account Numbers are included in the report, enter one or
more Selection Criteria. To receive a list of all GL Accounts that a user has
access to, leave the defaults and simply click on the Submit button.
This report contains a “drill down” feature. When you move the mouse over
specific fields, the cursor will turn into an electric drill. This means that the field
you are looking at is a summary bucket and if you click on it, you will “drill
down” to the detail information that makes up that number.
The following are the columns which have this drill down feature turned on:
Adopted Budget – this will show all Budget Transfers
Actual – this will show all payments and JEs (Transaction Detail Report)
15
Encumbrance – this will show all Open POs including those that have had
a partial payment made against them (Encumbrance Detail Report)
When you need to return to the main report after drilling down to a detail one,
simply click on the “X” in the upper right-hand corner to close that window.
JL Budget to Actual w/Encumb and Drill Down:
This report provides a breakdown by JL Account Number. On an Object by
Object basis, the report lists the Approved Budget, Adjusted Budget, Actual
Expenses, Encumbrances and Balance. There is a total line at the end of each JL
Account Number listing which is an easy way to determine exactly how much is
left of your overall budget.
To narrow down which JL Account Numbers are included in the report, enter one
or more Selection Criteria. To receive a list of all JL Accounts that a user has
access to, leave the defaults and simply click on the Submit button.
This report contains a “drill down” feature. When you move the mouse over
specific fields, the cursor will turn into an electric drill. This means that the field
you are looking at is a summary bucket and if you click on it, you will “drill
down” to the detail information that makes up that number.
The following are the columns which have this drill down feature turned on:
Actual – this will show all payments and JEs (Transaction Detail Report)
Encumbrance – this will show all Open POs including those that have had
a partial payment made against them (Encumbrance Detail Report)
16
When you need to return to the main report after drilling down to a detail one,
simply click on the “X” in the upper right-hand corner to close that window.
GL: Quarterly Rev/Exp Comparison:
This report allows you to see a month by month comparison, as well as a quarterly
total, of Revenues and Expenses. For each Fund, totals will be listed by Object.
This report is a good tool to use to determine when the heaviest spending and
revenue intakes occur.
Printing Reports:
As an example, run the GL (or JL) Budget to Actual Report. Once you receive the
results, click on the Options button and select PRINT.
A list of your available printers will be displayed.
Choose the printer that you wish to use and click on the PRINT button.
17
These steps must be followed regardless of the report.
Exiting IFAS Dashboard
It is important to log out of this software. Click on “Logoff” which is located in the top
right corner.
18