1
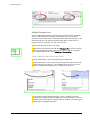
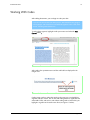
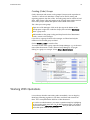
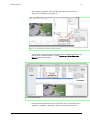
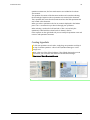
ATLAS.ti for Mac 1.0.x
Getting Started
2
ATLAS.ti for Mac – Getting Started
Copyright ©2015 by ATLAS.ti Scientific Software Development GmbH, Berlin. All rights reserved.
Manual Version: 216.20150112. Updated for program version: 1.0.14
Author: Dr. Susanne Friese (QuaRC)
Programming/Design/Layout: hypertexxt.com
Copying or duplicating this manual or any part thereof is a violation of applicable law. No part of this manual may be reproduced or
transmitted in any form or by any means, electronic or mechanical, including, but not limited to, photocopying, without written
permission from ATLAS.ti GmbH.
Trademarks: ATLAS.ti is a registered trademark of ATLAS.ti Scientific Software Development GmbH. Adobe Acrobat is a trademark of
Adobe Systems Incorporated; Microsoft, Windows, Excel, and other Microsoft products referenced herein are either trademarks of
Microsoft Corporation in the United States and/or in other countries. Google Earth is a trademark of Google, Inc. All other product
names and any registered and unregistered trademarks mentioned in this document are used for identification purposes only and remain
the exclusive property of their respective owners.
ATLAS.ti for Mac – Getting Started
3
Contents
Introduction..............................................................................................................................4
The Interface ...................................................................................................................................................................4
Creating A New Project....................................................................................................................................................7
Importing Projects From Other ATLAS.ti Applications.......................................................................................................8
Importing Survey Data......................................................................................................................................................8
Project Management......................................................................................................................................................11
Adding And Loading Documents....................................................................................................................................12
Working With Codes......................................................................................................................................................13
Working With Quotations..............................................................................................................................................16
Working With Memos....................................................................................................................................................19
Visualizing Your Thoughts And Ideas In Network Views.................................................................................................20
Further Analysis Tools.............................................................................................................24
Simple Retrieval In The Code Or Quotation Manager.....................................................................................................24
Working With Smart Codes............................................................................................................................................26
The Word Cruncher........................................................................................................................................................28
Code Cooccurence Analysis............................................................................................................................................29
Creating Output and Reports.................................................................................................31
Project Reports...............................................................................................................................................................31
Print With Margin...........................................................................................................................................................32
ATLAS.ti for Mac – Getting Started
INTRODUCTION
4
Introduction
This Getting Started Guide provides an overview of the main features of
ATLAS.ti for Mac 1.0.x, the younger sibling of ATLAS.ti for Windows. It is
written for users with no prior experience of working with ATLAS.ti, but also
for users new to the Mac version. If you prefer a more detailed description of
all features, please take a look at the full manual (http://manual.atlasti.com)
This very first version for Mac does not yet contain all features of the Windows
version, therefore we recommend it for the following user group:
• Single users who want to start working on a new project
• Single users who already started a project under Windows but are still in the
coding phase
• Single users who want to work within the Mac environment they love and
are familiar with who but do not have sophisticated analysis needs (see
“Further Analysis Tools“).
This version does not yet support team projects !
There are quite a number of neat new features in ATLAS.ti for Mac that are not
available under Windows, such as the inspectors, the quotation display in the
Quotation Manager, the way of handling audio and video data, the Undo
function :-), full Unicode support, and much more. For a full comparison of
features see the feature matrix table, available from http://mac.atlasti.com/
This table (and this guide) will be updated on a regular basis to reflect the
functionality and features as they are added to the Mac version in the coming
months.
In developing ATLAS.ti for Mac, the aim was to create a software for Mac users
that lets them feel at home, not just a copy the Windows version. Therefore,
the two versions will never be completely identical. However, some of the
features that are already available in the Mac version will also be implemented
in ATLAS.ti 8. The Windows version and the Mac version will “learn” from
each other and will continue to inspire future development.
The Interface
Below you see the main features of the ATLAS.ti for Mac interface:
ATLAS.ti for Mac – Getting Started
INTRODUCTION
5
Figure 1: The ATLAS.ti for Mac user interface
The main entities are symbolized by the following icons:
Figure 2: Entity representation
Personalize Your Screen
A number of panes that you see in the default interface view can be hidden like
for instance the navigator or the inspector. If this is possible, you see a small
icon or a text “Hide/Show” that you can click.
ATLAS.ti for Mac – Getting Started
INTRODUCTION
6
Figure 3: Hide or show optional panes
Multiple Document View
You can load multiple documents side-by-side or split your screen horizontally,
or both. And this does not only apply to documents, you can also open a
document and a network view or a document and a memo side-by-side, or two
documents side-by- side and a memo horizontally above or below (see for
instance Figure 21 and Figure 22). This is how it works:
Click on the plus sign to add a new region.
Right-click on the document tab and select DUPLICATE TAB (see left) to load an
already opened document into a new region. You also find the “Duplicate
Tab” option under the main menu WINDOWS / DUPLICATE TAB.
TO ADD A NEW REGION VIA DRAG-AND-DROP
First load a document, memo or network into the display area.
Grab the document / memo / network view tab that you want to move, leftclick and drag it to the right, left, top or bottom border of the main screen.
When a small purple bar appears, you can drop it (see Figure 4).
Figure 4: Loading documents side-by-side
If you want to replace another document / memo / network view that is
currently loaded, drag and drop the object tab on top of document / memo /
network view area (see below). Instead of just the small bar, the entire region
for this object is highlighted in purple.
ATLAS.ti for Mac – Getting Started
INTRODUCTION
7
OPENING MULTIPLE WINDOWS
To open a document, network or memo in a window of its own:
Drag and drop the object tab outside the ATLAS.ti window and drop it there
Or select the option MOVE TAB TO NEW WINDOW from the context menu or
the main menu Windows.
Finding Your Way Around The Software
If you are not sure where to find a function, just search for it under HELP. For
instance, you want to know where the Relation Manager is. Typing in the first
letters of a search term shows a list of hits.
When selecting an entry that seems to be the one that you are looking for, it
will show you where you can find it. Click on the selected hit in the list, and
ATLAS.ti for Mac will open up the function for you.
Figure 5: Finding software functions
Creating A New Project
When you open ATLAS.ti for Mac for the first time, you have two choices:
Create a new project, or import an existing one from other ATLAS.ti
applications.
Select CREATE A NEW ATLAS.TI PROJECT and enter a project name:
ATLAS.ti for Mac – Getting Started
INTRODUCTION
8
Figure 6: Creating a new project
Importing Projects From Other ATLAS.ti Applications
If you have previously used ATLAS.ti for Windows version and wish to import
your project from this version, your first step will need to be updating the
Windows version to version 7.5 or higher. Then export your projects via
PROJECT / EXPORT / MAC TRANSFER BUNDLE.
You can also export your iPad and Android projects to be used in ATLAS.ti for
Mac. Please update the apps if you have not recently done so.
On your Mac, double-click on the exported file or use the import option
shown above.
Importing Survey Data
These days a lot of surveys are conducted online. Positive side effects are that
(a) all data is immediately available in digital format, and (b) respondents are
often willing to provide lengthy answers to open-ended questions. This was
rarely the case with paper-and-pencil surveys . Statistical programs like SPSS™
offer some options to analyze open-ended questions, but basically require you
to encode each answer with a number. A proper qualitative analysis of the
answers is not possible with these tools. ATLAS.ti, however, does permit
comprehensive analysis with great ease and in great depth.
A typical work flow for working with survey data looks like this:
ATLAS.ti for Mac – Getting Started
INTRODUCTION
9
Figure 7: Work flow when importing survey data
Online surveys can be created using a variety of tools. What most of them
have in common is that they let you export data as Excel™ file. And this is
what you need to prepare for import in ATLAS.ti (see below).
Based on specific prefixes that you add to your variable names, ATLAS.ti
interprets the column headers and cells of the Excel™ table in various ways and
turns them into primary documents, the contents of the primary documents,
primary document families, quotations, codes, comments, and code families.
Data are imported case-based. This means each row of the Excel™ table that is
imported from the online survey tool is transformed into a primary document.
How Survey Data Is Treated In ATLAS.ti
To represent the results of an online survey within the framework of ATLAS.ti
in the most accurate and complete manner, a few basic requirements need to
be considered.
A survey broadly consists of the name of the survey, the questions, and the
answers from each respondent. Questions can be of different types, such as
single-choice questions (yes/no, or offering more than two options), multiplechoice questions, or open ended questions. Within the framework of ATLAS.ti
these concepts are mapped as follows:
Open-ended question:
question
answer
Code (and code
comment)
Content of a quotation
Single Choice 0/1
PD group
Single Choice > 2 options
PD group from
question plus value
Multiple Choice
PD group from
question plus value
A general recommendation is to include the following variables from the online
survey:
ATLAS.ti for Mac – Getting Started
INTRODUCTION
10
• Variables describing the respondents, i. e. the classical demographic variables
like age group, gender, profession, educational level, income groups, etc..
Turn those variables into PD families.
• Responses to open-ended questions. Turn those into coded segments.
• Selected other variables like answers to single or multiple choice questions
that are important in relation to analyzing the open-ended questions.
Preparing An Excel™ Table For Import
The following table shows the list of all available prefixes that you can to add
to the column headers in Excel™ in order for ATLAS.ti to interpret the cells in
various ways.
Prefixes and their interpretation
Prefix
Result
!
Defines the column to list the names of the primary documents. This column can be
omitted. If you do no want to provide a specific name for each document, ATLAS.ti
automatically creates this column. The default name for each document is case 1, case 2,
case 3 and so on.
^
Defines the column to list the primary document's author
&
Defines the primary document's date, expects ISO8601 format, see:
http://www.cl.cam.ac.uk/~mgk25/iso-time.html
Example: 4th of February 1995 or 1995-02-04 in ISO8601 format = YYYYMMDD =
19950204
<
Ignore this column, use to exclude stuff inserted by the survey tool
.
Creates a PD family from the field name. Currently the cell needs to contain the number 1,
or the words Yes or Ja to be applied. Use for single choice questions where respondents
can answer yes or no (or encoded as 1 and 0). Only the responses encoded with yes/ja or
1 become part of the PD family.
:
Creates a PD Family from the field name plus cell value. Use for single choice question like
gender.
#
Creates a PD Family from the field name plus the actual cell value. Use for single choice
questions with more than two answer options or for multiple choice questions.
Add no prefix to all open ended questions. The text in the column header is used as code.
To avoid very long code name, use a short form to indicate the question and add the full
question as comment (see next row)
::
All text entered after two colons is added to the object's comment field. This can be
applied to cells resulting in PD families or codes.
How To Import Survey Data
Prepare an Excel table as explained above. Save the table (as xls or xlsx
file).Close Excel (or at least the document that you want to import).
Open ATLAS.ti and select PROJECT / IMPORT SURVEY.
ATLAS.ti for Mac – Getting Started
INTRODUCTION
11
The import procedure starts and ATLAS.ti informs you when the data is fully
imported.
During the import, one primary document is created from every row. Unlike
“normal” PDs that get their contents from files, these primary documents need
to have their content (data source) created as well.
The creation of the textual contents is done as follows: Each row is scanned
from left to right, column by column. Each cell's content belonging to an openended question field is appended to the currently built document (case). In
addition, each piece of appended text is also referenced as a quotation
automatically coded with the current question.
Figure 8: Results of a survey import
Those columns defined as variables are turned into PD groups. Special families
are created for all imported PDs and codes to make filtering and analysis of the
survey material easy (see Figure 7 above).
Save the project.
If you import the same table repeatedly, rows with already existing PDs are
ignored. This way, you do not have to wait until the last respondent has
filled out the questionnaire.
Project Management
Project Management is simple. Similar to iTunes, ATLAS.ti is saving your project
data at a location that is provided for each application. This location is user
specific. If more than one user is using the same computer, you need to log in
under your personal user name to access your ATLAS.ti projects.
You can close, rename, duplicate, delete and export projects. You find these
options under the Project menu and in the Open Project window (PROJECT /
OPEN), when you right-click on a project name (see below):
ATLAS.ti for Mac – Getting Started
INTRODUCTION
12
Figure 9: Project management options
Project Backup And Transfer
To create a backup copy of your project, or to transfer a project to a different
computer, select PROJECT / EXPORT PROJECT...
Adding And Loading Documents
ATLAS.ti for Mac supports text (Word (doc and docx), RTF, OpenOffice (odt),
PDF, image, audio and video files (all formats supported by QuickTime).
Documents are imported and your project is saved silently.
To add documents, select PROJECT / IMPORT DOCUMENTS....
All loaded documents can be accessed via the navigator that you find on the
left-hand side of the screen, or via tabs. If you later on have memos and
network views, they can also be accessed this way.
Load one or more documents with a double-click on the document in the
navigator.
Figure 10: Loading documents
ATLAS.ti for Mac – Getting Started
INTRODUCTION
13
Working With Codes
After adding documents, you can begin to code your data.
If you do not wish to code your data just yet and instead first are going to
read, highlight, and comment on selected data segments, take a look at the
section “Working With Quotations.“
To code a data segment, highlight it with your mouse and select the ADD
CODING button:
Figure 11: Coding a selected data segment
After coding, the quotation name and the code label are displayed in the
margin area:
Figure 12: Display of coded segment in the margin area
Coding image, audio or video data works in the same way: You highlight a
segment with your mouse, click on the Add coding button (or right-click and
select Add Codes), and enter a code. When coding audio or video data, you
highlight a segment on the audio-wave form (see Figure 17 below).
ATLAS.ti for Mac – Getting Started
INTRODUCTION
14
The Code Manager
Open the Code Manager by clicking on the button CODES above the
document area, or select CODE / SHOW CODE MANAGER from the main menu.
In the Code Manager you can add code colors, write a comment for each
code, retrieve coded segments, create code groups or use it for drag & drop
coding.
Figure 13: The Code Manager
Click on the circle in the “color column” just before the code name and
select a color for each code. In Error: Reference source not found below you
see how code colors are displayed in the margin.
If you want the Code Manager to stay on top, click on the pin icon in the
top right-hand corner.
ATLAS.ti for Mac – Getting Started
INTRODUCTION
15
Figure 14: Setting code colors
Coding With Existing Codes
You can either drag & drop a code from the Code Manager onto a selected
data segment, or as shown in the Figure 15 below, from the navigator:
Figure 15: Coding via drag & drop
ATLAS.ti for Mac – Getting Started
INTRODUCTION
16
Creating (Code) Groups
Codes, documents and memos can be grouped. Groups are the equivalent to
“families” in ATLAS.ti for Windows. Groups can be used for sorting and
organizing purposes, but also as filter. Currently groups can be used to set local
filters, which means a filter only applies to the currently open window and not
to the entire project. Global filter options will be added in the future.
This is how you create groups:
Open one of the Managers. Click on the plus sign at the bottom of the
Groups pane or right-click inside the Groups pane and select NEW GROUP.
Enter a group name.
Add members to the group via drag and drop from the list of documents /
codes / memos in the manager.
If you click on a group, the items in the manager are filtered and only the
members of the selected group are listed.
Click on SHOW
ALL CODES to
reset the filter.
To remove an item from a group, open the Groups Manager, e.g. via the main
menu (Show Documents / Codes / Memos Group Manager), or by rightclicking on a group in a manager. Select: OPEN IN GROUP BROWSER.
Figure 16: Working with code groups
Working With Quotations
It is not always desired to start setting codes immediately. You can begin by
identifying interesting segments in your data, mark them and comment on
them. This is exemplified below based on a video document.
In a video or audio document, you create a quotation simply by highlighting
an area on the audio-wave form. For all other document types, you need to
click on the button QUOTATION FROM SELECTION. Soon you will also be able to
select this option from the context menu.
ATLAS.ti for Mac – Getting Started
INTRODUCTION
17
After creating a quotation, you can modify the default name and write a
comment in the inspector (see Figure 17).
Figure 17: Create quotations, add names and write comments
To keep track of your data and your thoughts open the Quotation Manager by
clicking on the Quotations button, or select QUOTATION / SHOW QUOTATION
MANAGER from the main menu:
Figure 18: Quotation Manager
Each quotation automatically receives an ID and a name. The default name is
quotation 1, quotation 2, quotation 3 and so on and can be renamed. If a
ATLAS.ti for Mac – Getting Started
INTRODUCTION
18
quotation contains text, the first 100 characters are included in the column
'text content'.
The quotation ID consists of the document number and a number indicating
the chronological sequence when a quotation was created in the document.
Thus, quotation 9:5 comes from document 9 and was the fifths quotation that
was created in this document.
When you select a quotation in the list, its content is displayed in the bottom
pane. This is a convenient way to browse through your quotations.
When selecting a code on the left-hand side, a filter is set and only the
quotation(s) coded with the selected code are shown in the list.
In the Inspector on the right-hand side you can modify the quotation name and
review or edit quotation comments.
Creating Hyperlinks
To link two quotations to each other, simply drag one quotation and drop it
on top of another quotation – either in the Quotation Manager or in the
margin area.
Next, select one of the offered relations. If the offered relations do not suit
your needs, you can create new relations in the Relations Manager:
QUOTATIONS / SHOW RELATIONS MANAGER.
Figure 19: Creating hyperlinks when two documents are loaded side-by-side
ATLAS.ti for Mac – Getting Started
INTRODUCTION
19
Figure 20: Linking two quotations to each other in the Quotation Manager
Working With Memos
Open the Memo Manager by clicking on the Memos button or select
MEMO / SHOW MEMO MANAGER from the main menu.
Click on the + sign to add a new memo. Enter a name.
Double-click to open it. It will open as new tab.
Figure 21: Open a memo, document or network in a new region
You can also open a memo into its own region, so that you can see both the
memo and your data. To do so, drag the memo tab to the right, left, top or
bottom edge of the document area. If you see a blue stripe, you can drop it:
You are free to split your screen vertically or horizontally:
ATLAS.ti for Mac – Getting Started
INTRODUCTION
20
Figure 22: Alternative arrangements of documents and memo
To link a memo to a data segment, drag & drop it from the Memo Manager
onto a quotation, or select a memo in navigator and drag & drop it from
there.
Figure 23: Working with memos
When selecting a memo in the margin area, the inspector on the right-hand
side is displaying the detailed information for this memo (see Figure 23).
Visualizing Your Thoughts And Ideas In Network Views
To create a new network view, select NETWORK / NEW NETWORK. Enter a
name.
Drag and drop items from the Managers, margin area, or the navigator into
the view.
The node types (document, quotation, code, memo, network view) can be
recognized by their entity specific icon (compare Figure 2). If you right-click on
a node, you see further options that are available ( Figure 24).
ATLAS.ti for Mac – Getting Started
INTRODUCTION
21
Figure 24: Node types and available options
Linking Nodes
To link for instance two codes to each other, select a code node. A circle
appears at the top left corner of the node. Drag the circle to another cpde
node and left-click. A list of relation opens. Select the one that best fits the
relation between the two codes.
You can also create your own relations in the Relation Manager (see
CODES / SHOW RELATION MANAGER).
Figure 25: Linking two code nodes
Named relations can be created between two codes and between two
quotations. The latter are called hyperlinks in ATLAS.ti (see also “Creating
ATLAS.ti for Mac – Getting Started
INTRODUCTION
22
Hyperlinks“). Other objects can be linked, but you cannot specify the relation
between them. This applies to
Code – Memo / Code – Quotation (this is the same as coding) / Memo –
Memo and Memo – Quotation links.
You can also display groups and their contained entities (see “Importing
Neighbors“ below), or add a new item to the group by linking it via drag and
drop. The difference is that you cannot name this link.
It is possible to display the quotations that are contained within a document,
via the importing neighbor option, but you cannot link a quotation to a
document in a network view. It would not make much sense. e.g. to link a
quotation from document 5 to document 3, as it does not belong to it. What
you can do is to link it to a quotation of document 3, which means creating a
hyperlink.
Importing Neighbors
Neighbors are all entities that are directly linked to a node. For codes these
could be other codes, memos, quotations or code groups. Depending on the
node type you click, you are offered the choices that apply.
To import neighbors in a network view, right-click on a node and make your
choice:
Figure 26: Importing code neighbors
The figure below offers a preview of how your network views might look like
one day. On the right-hand side you see the inspector, providing further
information on the network view.
ATLAS.ti for Mac – Getting Started
INTRODUCTION
23
Figure 27: Example of a more elaborated network view
ATLAS.ti for Mac – Getting Started
FURTHER ANALYSIS TOOLS
24
Further Analysis Tools
The analysis options in version 1.0.x of ATLAS.ti for Mac are yet not complete,
however will be extended continuously. The following options are currently
available:
• Simple retrieval by code in the Quotation and Code Manager
• AND and OR queries in the Quotation Manager
• The creation of smart codes offering the full range of operators (Boolean,
semantic and proximity operators)
• Code-Cooccurence Table
Not available yet are:
• Reports based on queries
• The full query tool including the scope option, i.e. code queries in
combination with variables (= PD groups)
• Codes-Primary Documents-Table
Simple Retrieval In The Code Or Quotation Manager
Select a code in the Code Manager. If not opened, open the inspector on the
right-hand side of the Manager. All linked quotations are listed in the
bottom pane of the inspector.
Click on the right-arrow to view each quotation in context.
Figure 28: Simple Retrieval, access of quotations via Link section in inspector
OR
ATLAS.ti for Mac – Getting Started
FURTHER ANALYSIS TOOLS
25
Open the Code Manager and double-click on a code. The list of quotations
coded by this code opens. Click on a quotation to view it full length and in
context.
Figure 29: Simple Retrieval via double click on a code
OR
Open the Quotation Manager. Select a code in the navigator on the lefthand side. This filters the list of quotations and only those quotations linked
to the selected code are shown. Click on each quotation to view its content
in the preview pane at the bottom.
Do view the quotations in context, make sure that the Quotation Manager
stays on top by selecting the pin (top right). Double-click on each quotation to
view it in context.
Figure 30: Simple retrieval in the Quotation Manager making use of the preview pane
ATLAS.ti for Mac – Getting Started
FURTHER ANALYSIS TOOLS
26
Simple AND (All) / OR (Any) Queries In The Quotation
Manager
The simple retrieval option in the Quotation Manager can be extended to
include also more than one code:
Open the Quotation Manager. At the bottom of the screen you see a VENN
diagram. You can set it to AND (= All must apply) or OR (any selected
apply).
Select two or more codes holding down the
CMD
key.
Figure 31 shows the result of an example AND query. The two codes '#fam:
have children' and '#fam:t-teenagers' have been selected holding down the
CMD key. The quotation list displays the resulting 6 quotations that contain all
comments written by parents of teenage kids.
The quotation content is displayed in the bottom pane.
Figure 31: Running an AND query in the Quotation Manager
Working With Smart Codes
"Intelligent"
Smart Codes
compute their
quotations “on
demand.”
Smart codes are a convenient way to store queries. They are very similar in look
and feel to normal codes, with one important difference: Instead of
“hardwired” connections to quotations, smart codes store a query to compute
their virtual references whenever needed. They “automatically” change their
behavior during the course of theory building. If you have a smart code based
on a query like
(Code A | Code B) COOCCUR Code C
and you add or delete quotations linked to either Code A, B or C, then the
quotations linked to the smart code will automatically be adjusted.
ATLAS.ti for Mac – Getting Started
FURTHER ANALYSIS TOOLS
27
Figure 32: Difference between a code and smart code: Codes are directly linked to quotations; smart codes are a stored query
Smart Codes can be selected in a code list (either in the Code Manager or the
navigators) like any other code and they will display their quotations in an
identical way.
Smart codes are displayed in the Code Manager and in the Navigator just like
regular codes and can be recognized by the filled icon (see left). The list of
quotations associated with a smart code can be displayed with a double-click,
just as for any other code.
Smart Codes are not displayed in the margin area and as they are stored
queries they can not be used for coding.
Smart Codes can however be added to code groups, to Network Views, and,
last but not least, as powerful operands in other queries, allowing you to
incrementally build complex queries.
Creating Smart Codes
To create a new smart code, select CODE / NEW SMART Code from the main
menu. Enter a name for your smart code and click CREATE.
Figure 34: Smart code example query
This opens the smart code editor where you can define the conditions for your
smart codes.
Three sets of operators are available:
Boolean operators allow combinations of keywords according to set operations.
They are the most common operators used in information retrieval systems.
Semantic operators exploit the network structures that were built from the
codes.
Figure 33: Set of operators
Proximity operators are used to analyze the spatial relations (e. g., distance,
embeddedness, overlapping, co-occurrence) between coded data segments.
ATLAS.ti for Mac – Getting Started
FURTHER ANALYSIS TOOLS
28
For a detailed description of all operators, see the full manual.
The Word Cruncher
This feature offers word “crunching” capabilities for a simple quantitative
content analysis. It creates a list of word frequency counts for the selected or all
(currently filtered) textual PDs. An exception list can be used to control the
analysis.
Figure 35: Example of a Word Cruncher output - comparing the word count of two
documents
To create such a table, select ANALYSIS / WORD CRUNCHER. The Word Cruncher
opens.
Select one or more documents in the Documents column on the left. The
table immediately fills with content. At the bottom of the table you have a
few further options:
Figure 36: Word Cruncher options
If you select “Separate counts by document” you get the total and relative
counts for all selected documents, and separate frequency counts for each
document.
Results can be improved by preparing adequate exceptions lists. You can add
words to the exception list by right-clicking on a word in the Word Cruncher,
or by editing the list. For further information, see the full manual
(http://manual.atlasti.com).
ATLAS.ti for Mac – Getting Started
FURTHER ANALYSIS TOOLS
29
Code Cooccurence Analysis
You find the Code Cooccurence Table under the ANALYSIS menu. The example
query shown in Figure 37 below compares the answers provided by
respondents with and without children (column codes) with regard to a
number of different issues (row codes):
Figure 37: Code Cooccurence Table
To create such a table select column and row codes on the left-hand side by
ticking the boxes in front of the codes. The table fills in automatically when
selecting row codes.
Click on a cell in the table to view the resulting quotations in the pane at the
bottom. Double-click to access a quotation in context.
Currently the output option consists of exporting the table as Excel-compatible
file in csv format. Other options including a full report of all cooccuring
quotations will follow.
The C-Coefficient
The calculation of the c-coefficient is based on approaches borrowed from
quantitative content analysis. Thus, interpreting such a coefficient is only
meaningful with a sizable data set and not for an interview study with 10
respondents.
The c-coefficient should vary between 0: codes do not co-occur, and 1: these
two codes co-occur wherever they are used. It is calculated as follows:
c := n12/(n1 + n2) – n12
ATLAS.ti for Mac – Getting Started
FURTHER ANALYSIS TOOLS
30
n12 = co-occurrence frequency of two codes c1 and c2, whereby n1 and n2
are their occurrence frequency.
ATLAS.ti for Mac – Getting Started
CREATING OUTPUT AND REPORTS
31
Creating Output And Reports
Project Reports
You find an output option under the main menu of each entity type:
Document, Quotation, Code, Memo and Network. Currently all output options
refer to the entire project. You cannot for instance export quotations of just
one code. Such reports will however be implemented soon.
Below, a few output options are shown as examples:
DOCUMENTS / OUTPUT / LIST OF DOCUMENT GROUPS AND THEIR MEMBERS
Figure 38: Report: Document groups and their members
QUOTATIONS / OUTPUT / QUOTATIONS BY CODE
ATLAS.ti for Mac – Getting Started
CREATING OUTPUT AND REPORTS
32
Figure 39: Report: Quotations by code
CODES / OUTPUT / CODE BOOK
Figure 40: Report: Code Book
Print With Margin
The Print with Margin option creates a WYSIWYG printout of coded
documents (What You See Is What You Get). Instead of printing a document,
you can also save it as PDF file, mail the PDF file or add it to iBooks, etc.
Print with Margin is available for textual primary documents, PDF and
image PDs.
ATLAS.ti for Mac – Getting Started
CREATING OUTPUT AND REPORTS
33
The printout resembles the screen display at the time of creating the output.
Only those margin objects are included that are currently displayed in the
margin. If not everything that you want to be visible is included, adjust the
margin area. To change the type of objects that are displayed, right click on a
white space in the margin area to open the context menu and select the objects
to be included in the output.
Load the primary document that you want to print.
Select PROJECT / PRINT DOCUMENT from the main menu.
The printer dialogue window opens. Make your choices.
For instance, select landscape orientation if your codes spread over several
columns. When changing the settings the preview adjusts automatically.
Figure 41: Print with margin settings
If you do not want to print the entire document, select start and end page. The
pages are shown in the preview.
ATLAS.ti for Mac – Getting Started