1
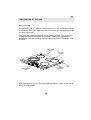
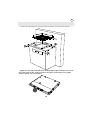
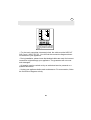
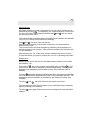
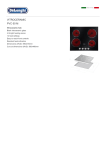
UK
Dear Customer,
Thank you for that you have chosen our product. We hope that
it will meet your requirements.
Carefully follow the recommendations laid out in this manual
and your appliance will work efficiently.
Do not hesitate to contact us in case of necessity. We always
will be close to you in order to assist you in need and give you
useful information for all products under Eurolux brand.
73
UK
CONTENTS:
DESCRIPTION OF THE HOB ........................................................ 3
SAFETY INSTRUCTIONS .............................................................. 4
INSTALLATON ............................................................................... 6
Locating Your Built-in Hob ........................................................... 6
Electrical Connection of Your Hob............................................... 8
USAGE ........................................................................................... 10
Turn On and Turn Off The Control ............................................... 11
Select Heater ................................................................................. 11
Turn on dual- and triple zones ..................................................... 12
Set Cooking Level With and Without Heat Boost ...................... 12
Turn Off Individual Heaters .......................................................... 13
Timer Function .............................................................................. 14
Key Lock ........................................................................................ 16
Child Lock ...................................................................................... 17
Stop & Go Function ....................................................................... 18
TOUCH CONTROL SAFETY FUNCTIONS .................................... 20
Sensor Safety Cut Off ................................................................... 20
Over Temperature Switch Off ....................................................... 21
Operating Time Limitations .......................................................... 21
Residual Heat Functions ............................................................... 22
CLEANING AND CARE .................................................................. 23
74
UK
DESCRIPTION OF THE HOB
Dear Customer,
It is important that you should read this manual for best performance and
to extend the life of your appliance. We recommend you to keep this manual
for future reference.
Your new hob is guaranteed and will give lasting service. This guarantee
is only applicable if the appliance has been installed and operated in
accordance with the operating and installation instructions detailed in this
manual.
SINGLE ZONE
HEATER
OVAL ZONE
HEATER
HOB
FRAME
VITROCERAMIC
SURFACE
TOUCH CONTROL
PANEL
Note: Appearance of your hob maybe different than the model shown above
due to its configuration.
75
UK
SAFETY INSTRUCTIONS
Please comply with these instructions. If you do not, any damage
resulting from improper, incorrect or negligent use or improper
connection or installation is not covered by the warranty.
· This appliance should be used only for normal domestic use.
· This appliance must only be used for the purpose of heating or cooking
food, any other use, for example heating rooms, working surface or storage
surface, is dangerous.
· Additions or modifications to the appliance are not permitted.
· Do not place or store flammable liquids, highly inflammable materials or
fusible objects on or near the appliance.
· Small children must be kept away from the appliance.
· The appliance may only be installed and connected by an authorised
service personal.
· The electrical safety of this hob is guaranteed only if it is connected to
a properly earthed system, which complies with the electrical safety standards.
· Built-in appliances may only be used after they have been built in to
suitable built-in units and work surfaces that meet the standards.
· Do not put pressure on the power supply cable while fitting the hob.
· Power supply cable length should not exceed 2m for isolation safety.
· In the event of faults with the appliance or damage to the glass ceramic
(cracks, scratches or splits), the appliance must be switched off and
disconnected from the electrical supply to prevent the possibility of an
electric shock.
· Repairs to the appliance must only be carried out by authorised service
personal.
· Make sure all the packaging has been removed before you use the
appliance.
· Cables from electrical appliances must not touch the hot surface of the
appliance or hot cookware.
76
UK
· Never leave the the appliance hob unattended when cooking with fat or
oil
. They can rapidly catch fire if overheated.
· Do not cut any food on the glass of the vitroceramic hob. Glass panels
should not be used as working surfaces.
· Be careful when using small household appliances, such as irons, near
the elements.
· Do not use the cooking zones with empty cookware or without cookware.
· Make sure all the controls are in the off position when not in use.
· For cleaning, the appliance must be switched off and cooled down.
· For safety reasons, the cleaning of the appliance with steam jet or highpressure cleaning equipment is not permitted.
. Use only stable flat-based pans.
77
UK
INSTALLATION
The electrical connection of this hob should be carried out by an
authorised service personal or a qualified electrician, according to the
instructions in this guide and in compliance with the current regulations.
· Prior to installation, ensure that the local distribution conditions and the
adjustment of the appliance are compatible.
· The laws, ordinances, directives and standards in force in the country of
use are to be followed (safety regulations, proper recycling in accordance
with the regulations, etc.)
Locating your built-in hob
After removing the packaging material from the appliance and its accessories,
ensure that the hob is not damaged. If you suspect any damage, do not use
the appliance and contact an authorised service personal or a qualified
electrician immediately.
· This built-in hob is to be inserted into a cut out of a worktop. It will be
electrically connected with the switch box below, especially provided for this
purpose.
78
UK
· Create an opening with the dimensions shown in the picture below.
· Apply the one-sided self-adhesive sealing tape supplied all the way round
the lower edge of the cooking surface along the outer edge of the glass
ceramic panel. Do not stretch it.
79
UK
Electrical connection of your hob
. Before proceeding with the electrical connection, verify that the current
carrying capacity of the system and the socket is adequate for the maximum
power rating of the hob.
· Electrical installation of the residence and the electrical current plug in
use must be earthed and conform with safety regulations.
· If there is no dedicated hob circuit and fused switch, they must be installed
by a qualified electrician before the hob is connected.
· Fused switch must be easily accessible once the hob has been installed.
· Do not use adaptors, multiple sockets and/or extension leads.
· This appliance conforms with the requirements ofthe following EEC
Directives:
1. Vitroceramic hob EEC/73/23 and 93/68, EEC/89/336 relating to
radio interference,
2. EEC/89/109 relating to contact with foods.
· A circuit breaker with a contact opening of at least 3 mm, rated 20 A and
delayed functioning type must be installed inside the supply circuit.
80
UK
2
2
2
* This appliance must be earthed.
* For this connetion a power lead
of wire type H05V V -F should be
used.
. For the touch controlled vitroceramic hob, the cable must be H05VV-F
3X2,5 mm² / 60227 IEC 53. You will find the connection diagram shown
on the back of your appliance.
· During installation, please insure that isolated cables are used. An incorrect
connection might damage your appliance. The guarantee will not cover
such damages.
· All repairs must be carried out by an authorised service personal or a
qualified electrician.
· Unplug your appliance before each maintenance. For reconnection, follow
the connection diagrams strictly.
81
UK
USAGE
The appliance is operated by touching buttons and the functions are
confirmed by displays and acoustic signals.
Stand-By-Mode
S-Mode
Operating-Mode
B-Mode
The mains are applied to the hob control
and all heater displays are off or a residual
heat display is active.
At least one heater display shows a heat
setting between ´0` and ´9`
Lock Mode
VR-Mode
The hob control is locked.
Mode Descriptions
82
UK
Turn On and Turn Off The Appliance
If the appliance is in Stand-By-Mode, it is put in Operating-Mode by pressing
the On/Off button
at least 1 second. A buzzer signal indicates the
successful operation acoustically.
On all heaters a ´0` appears and all Decimal Point of the heater flashes (1
sec on, 1 sec off).
If there is no operation within 10 sec, the display of all heaters will turn off.
If the displays are turned off, the heater will be set into Stand-By-Mode.
If
is pressed more than 2 sec (in Operating-Mode), the appliance is
switched off and is set into the S-Mode again. The appliance can be turned
off by pressing
at any time; even if other buttons are pressed
simultaneously.
If there is a residual heat of a heater remaining, this will be indicated in the
correspondent heat setting Heater Display.
Select Heater
If a single heater is chosen with the corresponding Active/Deactive Heater
Button
, the Decimal Point of the related Heater Display flashes. For the
selected heater, you can set the heat level between 1-9 by touching the
Heat Setting Buttons
or
.
The buttons must be pressed within 3 sec, otherwise the heater selection
is erased and heat setting dot will disappear (Decimal Point). If there is no
further operation within 10 sec, the heater falls back into the S-Mode.
The heat setting can always be changed by pressing
level 1-9.
or
between
Each button operation or each display change is quitted by a buzzer signal.
83
UK
Turn on dual and triple zones (available only in some models)
Turn on the dual zone
The activation of the dual zone is done after selecting the desired heater
by actuating . This is confirmed by a buzzer signal. At the same time, the
corresponding Dual Zone Indicator goes on statically. Touching
for a
second time, the status of the dual zone toggles: it changes from dual zone
on to dual zone off and back again.
The extension zone can be activated only, after a level between 1-9 is set
on the basic zone of the heater.
Turn on triple zones
A dual or triple zone can only be switched on, if the basic zone of a heater
is set to level 1–9 and the heater is selected, the dot is on.
If
is pressed, the buzzer signal sounds and the Dual Zone Indicator is
statically on. If
is pressed once again, there is another acoustical signal
and the triple heater is switched on. The Triple Zone Indicator will be
illuminated and the triple zone will be energized.
After touching once again, the triple zone of the heater will be switched
off again. Each operation causes a status change of the dual/triple zones
following in this manner (Dual zone on, triple zone on, all extended zones
off, dual zone on, triple zone on, dual zone on, etc. ...)
Set Cooking Level With and Without Heat Boost
All heaters are equipped with heat boost functionality.
If the heat boost is active, than the heater will be operated with maximum
power for the period of the heat boost time, that is dependent from the
selected heat setting. This is indicated through a flashing ´A`, alternating
with the heat setting value (e.g. 0,5 sec ´A` and 0,5 sec ´9`) in the heater
display. Once the heat boost time ended only the heat setting will be indicated.
If the heat boost should be used for a heater, heater level 9 must be operated
by pressing
starting from level 0. After setting the heat to level 9 , ´A`
will be indicated alternating. This means that level 9 and heat boost is active
now.
84
UK
The heat boost can be turned off by pressing
until heat setting ´0`
appears.
If the heat boost should be used, it can always be activated by actuating
again if the heat setting is set to level 9. In the heat display ´A/9` flashes.
Turn Off Individual Heaters
A selective heater can be turned off with 3 different ways:
. Simultaneous operation of
and
buttons
· Reduction of the heat setting to ´0` by operating
button
· Use of timer turn off function for the corresponding heater
Simultaneous operation of
and
buttons
The corresponding heater must be chosen with the Active/Deactive Heater
Button , the Decimal Point of the related Heater Display flashes. To turn
off the heater,
and
must be pressed at the same time. A buzzer
signal sounds and ´0` appears in the heat setting display.
If the timer is active for the selected heater, then ´0` will appear in the heater
display and also the related timer Cooking Zone Indicator Timer Function
and the Timer Display is turned off.
If there is a residual heat for this heater remaining, this will be indicated by
a static display ´H` in the heat setting display.
Reduction of the heat setting to ´0` by operating
button
The heater can also be turned off by reducing the operated heat setting to
´0`.
When Heater Display indicates ´0`, an associated Decimal Point of the
heater will also be turned off.
Turning off an active heater, not only the ´0` appears in the Heater Display,
but also the related timer Cooking Zone Indicator and the Timer Display is
turned off.
If there is a residual heat for this heater remaining, this will be indicated by
a static display ´H` in the heat setting display.
85
UK
Use of timer turn off function for corresponding heater (available only in
some models)
After reaching a remaining time of 0 minutes, the timer stops the linked
heater, showing the ´0` shown in the Heater Display and shuts down Timer
Display. In the Timer Display is shown ´00`. The related timer Cooking Zone
Indicator disappears.
An assigned Dual/Triple Zone Selection Indicator also disappears if it is
active.
Additionally the buzzer indicates acoustically the timer run out. After
confirmation of the timer run out by touching any button, the buzzer goes
silent.
Timer Function (available only in some models)
The timer provides following features:
The control can run max. 4 heater assigned timers and 1 minute minder
(which is assigned to no heater) simultaneously.
All timers can be used only in B-Mode. A heater timer can only be assigned
to a active heater, running in levels between 1-9. The minute minder is
independent of any heater.
In order to use both functions, timer function must be activated by the
Active/Deactive Timer button .
Touching for the fist time after activating the heaters, the control proposes
the minute minder (no Cooking Zone Indicator is flashing, they are all on
or off).
Touching
for the second time, the control proposes the assignment to
one of the activated heaters by flashing Cooking Zone Indicator. Now the
timer to the linked timer signalised.
Touching
again, the next timer in the in the clockwise direction, is
proposed for assignment of the next active heater. And so on…
86
UK
Minute Minder
No matter whether a heater is activated or not, the minute minder can be
operated by touching
. The appearing ´00` shows that timer is active and
the dot in the right Timer Display indicates that
and
are now linked
for setting the timer value.
The minute minder is selected when all Cooking Zone Indicators are statically
on or off (no Cooking Zone Indicator is flashing).
With and , the timer value can be set.
After successful setting of the minute minder time, the timer starts to
decrement the time.
The minute minder will not be stopped by switching off the appliance or
activating the key lock function, it will proceed increasing the minutes until
run out indication.
After reaching the ´00` of the timer, buzzer indicates the run out of time.
To stop the buzzer you have to confirm the ´run out` by touching any button.
Heater timer
Heater timers can be set only for activated heaters (heater level must be
set between 1-9)
First touch of , the minute minder is activated. After touching
for the
second time, the timer is assigned to the activated heater. The proposed
assignment is indicated by the related Cooking Zone Indicator, who is
flashing.
Touching
again after activating the fist heater timer, the control recommends
the next active heater assigned to the timer in the clockwise direction. The
assignment recommendation is indicated by the flashing Cooking Zone
Indicator.
Touching
and
, the timer value for the heater can be set.
The running timer of the first set heater timer is indicated by the statically
lighting Cooking Zone Indicator.
Touching
heaters.
once again further timers can be assigned to other activated
87
UK
10 sec after the last operation, the timer display changes to the timer that
will run out next.
The assignment of that timer is displayed always by a flashing Cooking
Zone Indicator. How many timer are running you can identify by the number
of Cooking Zone Indicator that are statically on.
By toggling , you can display the timer values for the heater timer and
the minute minder. The assignment is always indicated by the flashing
Cooking Zone Indicator. If no Cooking Zone Indicator flashes, the minute
minder time is shown in the 2-digit Timer Display.
All heater timers can be erased by switching off the appliance into the SMode using . A minute minder will not be erased, it will proceed operation
until run out.
To erase a timer in Operation Mode, you first have to select the timer by
toggling the Active/Deactive Timer Button until it is displayed. The value
can be erased then in 2 different ways:
· Decrement by touching until ´00` appears on the Timer Display.
· Touch and simultaneously for 0,5sec until ´00` is shown in Timer
Display.
After reaching the ´00` of a heater timer, the assigned heater level will be
set to ´0`.
The heater timer or minute minder run out is indicated acoustically by a
buzzer tone. This will be erased by touching any button for acknowledgement.
Key Lock
Key lock functionality is for blocking and set the appliance into a save
modus during operation. Touch modifications as for example rise heat
settings and others should not be possible. It is only possible to switch the
appliance off.
The lock function is active, if the Key Lock button is pressed at least 2
sec. This operation is acknowledged by a buzzer. After successful operation
of more than 2 sec, the Key Lock Indicator flashes and the heater is locked.
The heater can only be locked in Operating Mode (B-Mode).
88
UK
If the heater is locked, only can be operated, all other buttons are blocked.
If there is any other button operated in the blocked mode, the buzzer signal
sounds and the Key Lock Indicator flashes as indication for the activated
key lock functionality. Only the switch off by operation of
is possible. But
if you switched off the appliance, you can not restart it again without
unlocking.
After pressing 2 sec, the Key Lock Indicator disappears. Now, the hob
control is unlocked and can be operated in normal order.
Child Lock
Child lock functionality is foreseen to lock the appliance in a complicated
Multi-Step process.
Child locking and unlocking is only available in the S-Mode.
First has to be pressed until the buzzer beeps, then the and have
to be pressed for at least 0,5 sec, but max 1 sec. simultaneously. Following
that, the appliance can be locked by touching the
. All 4 heater displays
´L` is showed as a confirmation.
In the case the minute minder is still running, it will proceed until ´00` is
reached and the timer will beep. After confirmation of timer run out, the
appliance is fully locked. None of the buttons can be used as long as the
appliance is locked.
89
UK
The same way the child lock is activated, it can also get deactivated. After
pressing
until the beep, then the
and
have to be pressed
simultaneously for at least 0,5 sec, followed by touching only the . As
a confirmation for successful unlocking, ´L` symbol in the displays will be
erased immediately.
Stop & Go Function (available only in some models)
The Stop & Go functionality can be used only alternatively to Key lock
functionality. It is not possible to use both.
The Stop & Go function is activated by pressing
it is acknowledged acoustically by two beeps.
for 1 sec. Afterwards
The Stop-function is active and all heaters which are turned on will be
reduced to heat setting ´1` for 1 minute, then for the remaining 9 minutes
a running light with a horizontal bar starting from the bottom to the top is
displayed. Afterwards all heaters are reduced to heat setting „0“ for the rest
of the time. For all inactive heat settings, there is ´0` or the residual heat
´H` indicated.
The heater completely turns off after 10 minutes or after immediate operation
of .
If the heater is turned off via , the heater is in S-Mode and the Stopfunction is deleted. If the heater is turned on again, there is no Stop & Go
function.
90
UK
If the timer is used as minute minder, the time will continue during Stop &
Go function.
If the timer is used with the turn off functionality of an assigned heater, then
the timer stops decrementing the time during Stop & Go operation. After
deactivating the Stop & Go function, the timer will operate again.
If the heat boost for a heater is active, then the expired time of the heat
boost is stored and after deactivating the Stop & Go function, the remaining
heat boost time will expire (meaning the heat boost time does not continue
during the Stop & Go condition).
To deactivate the Stop & Go function, must be pressed for 1 sec. It is
acknowledged acoustically with a beep.
Afterwards release
and actuate any button within 10 sec (except
and
), than the operating conditions active before the Stop & Go operation
will be activated again. All reduced heater continue to work with the last
chosen heat setting. If no further button or
is actiavted within 10 sec,
the heater turns off.
91
UK
TOUCH CONTROL SAFETY FUNCTIONS
The following safety functions are available to avoid unintended operations
of the hob control.
Sensor Safety Cut Off
To prevent the appliance from unwanted, random sensor operation, a sensor
monitoring is included.
In case of one or more buttons are pressed longer than 12 sec, the sensor
monitoring routine indicates acoustically that wrong operation (pot or other
object placed on the button, sensor failure, etc.) and switches off the
appliance.
The safety turn off causes that the hob control is turned off to the S-Mode.
An ´F` will flash in all heater displays.
If residual heat is present, it will be displayed in all other heater displays.
The hob control will then go in S-Mode. At the same time a buzzer signal
appears. After 10 minutes the acoustic signaling will stop.
If there is no erroneous operation present any longer, both the visual and
the acoustic signal will disappear.
92
UK
Over Temperature Switch Off
Due to the placement of the control is very close to the heater in the middle
front of the hob, it can occur that a not correctly placed pot half on the
control and not sensed by the sensor safety cut off (not covering a button)
heats up the hob to a very high temperature, which makes the glass and
the buttons untouchable without get burned the finger.
To prevent the hob control unit from damage, the control monitors all the
time the temperature and switches off in case of overheating emergency.
It is indicated in the heater 4 heater display with the letter ´t` for all the time
until the temperature decreases.
After the temperature falling, the ´t` displays will be erased and the hob
control unit falls back into the S-Mode. This means that the user can
reactivate the appliance by touching .
Operating Time Limitations
The hob control unit has a limitation of the operating time. If the heat setting
for this heater has not been changed for a certain time, than the heater will
turn off automatically (for 10 sec a ´0` is displayed, afterwards the residual
heat). The limit of the operating time depends of the selected heat setting.
If a timer was associated with the heater than a ´00` will be displays on the
timer display for 10 sec. Afterwards the timer display turns off.
After an automatic turn off of the heater, as described above, the heater is
operable again and the maximum operating time for this heat setting is
applied.
93
UK
Residual Heat Functions
After all cooking processes there is some heat stored in the vitroceramic
glass called residual heat. The control can calculate roughly how hot the
glass is in the worst case. If the calculated temperature is higher than + 60
° C, then this will be indicated in the corresponding heater display after the
heater or the hob control was turned off. The residual heat display is shown
as long as the calculated heater temperature is > + 60 ° C.
The display of the residual heat has the lowest priority and is overwritten
by every other display value, during safety turn offs and displaying an error
code.
After reapplying the supply voltage to the hob control after an interruption
of the supply voltage occurred, causes that the residual heat display flashes,
if the corresponding heater had a residual heat of greater + 60 ° C before
the power interruption occurred. The display will flash until the max. residual
heat time has expired or the heater will be selected and activated.
94
UK
CLEANING AND CARE
Cookware with rough bottoms should not be used since these can scratch
the glass ceramic surface. The bottom of the good cookwares should be as
thick and flat as possible. Before use, make sure that cookware bottoms
are clean and dry.
Always place the cookware on the cooking zone before it is switched on.
If possible, always place the lids on the cookware. Bottom of cookwares
must not be smaller or larger than the cooking zones, they should be at the
proper size as indicated below, not to waste energy.
CORRECT
FALSE
FALSE
FALSE
Before cleaning the hob, first remove the plug from the electrical supply
socket. Then ensure that there is no residual heat stored in the appliance.
Vitroceramic glass is very resistant to high temperature and overheating.
If there is residual heat stored in the appliance, ´H` is flashing in the Heater
Display. In order to avoid burns, let the appliance cool down.
Remove all split food and fat with a window scrape. Then wipe the hob with
a suitable washing up liquid and a clean damp cloth. Rub the appliance
using a clean dry cloth.
If aluminium foil or plastic items are accidentally melt on the hob surface,
they should be immediately removed from the hot cooking area with a
scraper. This will avoid any possible damage to the surface. This also applies
to sugar or food containing sugar may be spilled on the hob.
In the event of other food melt on the hob surface, remove the dirt when the
appliance has cooled down. Use cleaner for glass ceramic or stainless steel
when cleaning the surface.
Do not use dishcloth or abrasive sponge to clean the vitroceramic surface.
These materials may damage the surface.
Do not use chemical detergents, sprays or spot removers on the vitroceramic
surface. These materials may cause fire or vitroceramic color fade. Clean
with water and washing up liquid.
95
The symbol on the product or on its packaging indicates that
this product may not be treated as household waste. Instead it shall
be handed over to the applicable collection point for the recycling
of electrical and electronic equipment. By ensuring this product is
disposed of correctly, you will help prevent potential negative
consequences for the environment and human health, which could
otherwise be caused by inappropriate waste handling of this
product. For more detailed information about recycling of this
product, please contact your local city office, your household
waste disposal service or the shop where you purchased the
product.
52009459