1
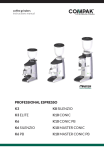
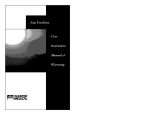
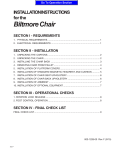
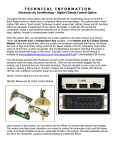
Panel PC User Manual
Panel PC Series
User manel
This
guide provides you
with
the
information of steps of "Setting up the Panel
PC", basic operation, software and hardware
setup,
safe
precautions
and
the
trouble-shooting help and etc. We have tried
our best to make the guide easily
understood and overall. Before using your
computer, it will be helpful to read this guide
first.
−1−
Panel PC User Manual
Notes, Notices and Cautions
Note: A NOTE indicates important information that helps you use
your panel pc better.
Notice: A NOTICE indicates either potential damage to hardware or
loss of data and tells you how to avoid this kind of problems.
Caution: A CAUTION indicates potential situations of property loss,
bodily injury, or even death.
−2−
Panel PC User Manual
TABLE OF CONTENTS
Safety Instructions and Information of Your Computer......... 4-4
Setting Up and Using Your Computer..................................... 5-11
Safety & Comfort Guide......................................................... 12-13
Guide of the computer system optimization......................... 14-15
General Troubleshooting and solutions................................ 16-17
−3−
Panel PC User Manual
1. Safety Instructions and Information of Your Computer
1.1 Safety Instructions
Use the following safety guidelines to help ensure your own personal safety and to
help protect your computer and working environment from potential damage.
●
Read all the relevant documents about your computer. If there are insert
pages, please read them firstly.
z
To help prevent electric shock, plug the computer and device power cables
into properly grounded electrical outlets. These cables are equipped with
3-prong plugs to help ensure proper grounding. Do not use adapter plugs or
remove the grounding prong from a cable. If you must use an extension cable,
use a 3-wire cable with properly grounded plugs.
To help avoid the potential hazard of electric shock, do not connect or
disconnect any cables or perform maintenance or reconfiguration of this
product during an electrical storm.
Before you move your computer, disconnect the computer from the electrical
outlet.
To help avoiding possible damage to the mainboard, wait 5 seconds after
turning off the computer before disconnecting a device from the computer.
To avoid damage to your operation system, mainboard and hard disk, do not
press the power and reset button constantly. Do not cut the power
unexpectedly because it will damage the system.
Do not attempt to service the computer yourself unless you are a trained
service technician. Always follow installation instructions closely.
Keep your computer away from radiators and heat sources. Do not push any
objects into the openings of your computer. Doing so can cause fire or electric
shock by shorting out interior components.
z
z
z
z
z
z
z
Warning: There is a danger of a new battery exploding if it is incorrectly
installed. Replace the battery only with the same or equivalent type
recommended by the manufacturer. Do not dispose of the battery along with
household waste. Contact your local waste disposal agency for the address of
the nearest battery deposit site.
1.2 Information of Your Computer
Please check out the items of product specification before you set up your
computer.
Product Name:
Panel PC
Product Components: Please read the product specification.
−4−
Panel PC User Manual
2. Setting up the Computer
2.1 Connecting the Computer
2.1.1 FOR THE 21.5 INCH PANEL PC
Front
1
2
3
1 Built-in Microphone
2 Built-in Web camera *
3 Status Indicator light
*on selected models only
Picture (1) Face Of 21.5
−5−
Panel PC User Manual
Back
10
9
6
7
1
2
3
4
5
8
11
Top
1 MOUSE input port
6 HDMI port
2 KEYBOARD input port
7 VGA port
3 USB ports*2
8 Prop-up stand
4 Network (LAN) port
5 AC INPUT port
9 Me m ory m od u le co mp a rtm en t co ve r
10
Air exhaustvent
11
Built-in Speakers(stereo)
Picture (2) Face Of 21.5
−6−
Panel PC User Manual
Right
Left
1
6
7
8
2
3
4
5
9
10
1
Optical disc drive
6 Card Reader
2
Up button
7 USB ports
3
Down button
8 USB ports
4
OK button
9 AUDIO ports
On selected models only .
5
10 KENSINGTON
LOCK HOLE
Power button
Picture(3)Side of 21.5
Notice
There is a tiny hole on the outside of the disc driver, that is an emergence eject hole for
you to manually eject a CD/DVD (eg. due to an unexpected power interruption)you
may push the end of a straightened paper clipinto the hole. Do not use a sharpened
pencil or similar object that may break and become lodged in the hole.
Follow the setup poster to set up your computer.
−7−
Panel PC User Manual
Pale Purple
Audio-amplifier/ Pale Green
Earphone
Mouse
Microphone
Green(PS/2)
Pink
Line In
USB
Black
Keyboard
Blue
Note
1. The number of connectors may vary by the PC specific
2. Locations and directions of some models may be different from the picture. It
will not affect the normal setup and using of your computer.
3. Connect the power at last.
4. The product is subject to material object, the product specification is subject to
change without notice.
−8−
Panel PC User Manual
NOTE: Before you get started, please read < Computer first-aid center user’s
guide>.
2.2 Driver Installation Guide (reference for your installation by yourself)
You must install the driver after your completing installation of OS. Please follow
the steps below: (for example: driver installation for Windows Windows 7)
2.2.1 OS Installation
You can install the OS what you need. Format your disk and install new OS.
2.2.3 Show the Setup Screen
Insert the attached CD into the CD-ROM drive. The auto run program screen will
appear as follow: (If there is no such screen, please double click "My Computer"
and click right button on CD-ROM icon)
Notice: There will be some differences from the actual screen because of different
OS and driver updating.
−9−
Panel PC User Manual
2.2.4 Mainboard Driver Installation
Please select the relevant driver to your mainboard model. Any questions you
should consult a qualified tecnician.
Intel chipset(HM55:You must install the driver of
"Chipset Driver"
2.2.5 Graphics Card Driver Installation
Open the setup screen again. Please select the relevant driver according to your
graphics card model.
2.2.6 Audio Card Driver Installation
Please click the ‘
Audio Driver’icon.
.
−10−
Panel PC User Manual
Because of the constant updating of driver and chipset, the interface content and
setup methods may be different. Please ask professional technician for help for
any questions during using your computer.
2.2.7 Wireless Lan Net Card Driver Installation
If a wireless lan netcard is fixed on your computer , you should install the right
driver in the"Wireless Driver
. "
−11−
Panel PC User Manual
3 Safety & Comfort Guide
This guide describes proper workstation setup, posture, and health work habits for
computer users. In addition, this guide contains electrical and mechanical safety
information applicable to all our computers.
Warning: there may be a risk of serious physical injuries from working at your
computer workstation.
3.1 Improve Your Posture
Rather than working in a single posture, find your comfort zone. Your comfort zone
is a range of positions that is generally appropriate and comfortable for your given
work situation.
I.
Back:
Use your chair to fully support your
body.
Distribute
your
weight
and use the entire seat and backrest
to support your body.
II. Legs:
Make sure your feet can rest solidly and
comfortably on the floor while sitting.
Use an adjustable work surface and
chair that allow your feet to rest firmly
on the floor, or use a footrest.
III. Shoulders and Elbows:
To minimize muscle tension, your shoulders
should be relaxed, not elevated or drooped, and
your elbows should be placed comfortably in
relation to your keyboard height.
−12−
Panel PC User Manual
IV. Wrists and Hands:
While typing and using a pointing device,
keep your wrists and hands in their neutral
comfort zone. When typing, don’
t anchor
or rest your wrists on your work surface,
your thighs, or a palm rest.
V.Neck:
Don’
t slouch forward. Keep the contour of your
spine.
VI. Eyes:
Rest your eyes.
Clean your monitor and glasses.
Have your eyes examined.
3.2 Take Breaks
When you work at your computer for long periods, take short breaks at least once
per hour and preferable more often. You may find that frequent, short breaks will
benefit you more than fewer, longer breaks.
During your breaks, stand up and stretch, especially any muscles and joints you
may have held in an extended static posture while using the computer.
3.3 Keep Health
Cultivate your health and fitness. Additionally, your overall health and tolerance for
the rigors of work typically can be improved by avoiding adverse health conditions
and by exercising regularly to improve and maintain your physical fitness.
−13−
Panel PC User Manual
4. Guide of the computer system optimization
5.1 Change Monitors Refresh Frequency
To protect your eyesight, it is intensely advised that you change the refresh
frequency of the monitor.
Use the mouse to right click on the desktop, choose "display properties"on
the pop-up menu to enter the setting screen, choose "Highest (32bit)"in the "Color
quality"panel, and the "Screen resolution”is recommended to be changed to
800*600 or 1024*768, click "apply”
Enter "Advance"to (Default Monitor) and properties, click “monitor"panel, to
change the refresh frequency (it is suggested the frequency be 75Hz,
immoderately high frequency will lead to display errors; and immoderately low
frequency will lead to the effect of flicker on the screen.)
5.2 BIOS Settings
The BIOS has been best optimized and the computer is in the excellent
performance. We don`t suggest the non-advanced user to change the setting. If
the change of setting leads to error, please recover the BIOS settings to default.
You may need to change the boot order if you are to reinstall OS or to run
some special program.
If the main board BIOS is Award BIOS, restart the computer , press "Delete”
key before the OS begins to run “choose "Advanced Bios Features",change the
First boot Device to the driver you need to boot with. If "Floppy"is chosen, the
computer will boot from the floppy driver, if "CDROM"the computer will boot from
CD-ROM driver and if "HDD-0"the computer will boot from the hard disk.
If the main board BIOS is AMI BIOS, you should set the boot order as the
following step:
restart the computer , press "Delete" key before the OS begins to run, choose
Boot Configuration Setup then "Boot Device Priority" then enter, choose the
First boot Device to the driver you need to boot with. The final step is to use"+"
key to adjust the target device to the top.
Booting from hard disk can accelerate the booting speed.
5.3 Open DMA channel
The open hard driver`s and optical driver`s DMA channel can accelerate the
files transfer speed, for example: installing PC games or copying large sized files
and documents.
Right click on "My Computer”--- Properties— Hardware— Device Manager
---IDE ATA/ATAPI controllers— Primary IDE Channel— Transfer mode— DMA if
available.
−14−
Panel PC User Manual
P.S: Windows XP users are not required to run this process, the system default
setting has already opened DMA.
5.4 IP address configuration
If you have already installed the LA N card driver, right click My Network
Places— Properties— Local Area Connection— Properties— (Double click) Internet
Protocol (TCP/IP). Choose use the follow ing IP address and fill in you IP, Subnet
mask, default gateway which your LAN administrator provides to you. (Users who
have not got Ethernets, may fill in 192.168.0.1 and 255.255.255.0, don’
t fill in
“Default gateway”)
By configuration of your IP address, you can accelerate the booting speed of
your computer.
−15−
Panel PC User Manual
5. General Troubleshooting and solutions
The computer stops responding
Turn off the computer -If your computer locks up and you are unable to get
a response by pressing a key on your keyboard or moving your mouse, press and
hold the power button for at least 8 to 10 seconds until the computer turns off.
Then press the power button again to turn on the computer. You might lose data if
you are unable to perform an operating system shutdown.
A program stops responding
End the program 1. Press <Ctrl><Shift><Esc> simultaneously.
2.Click Applications
.
3. Click the program that is no longer responding.
4.Click End Task
.
A program crashes repeatedly
NOTE: Software usually includes installationinstructions in its documentation or
on a floppy disk or CD.
Check the software documentation -Many software manufacturers
maintain websites with information that may help you solve the problems. Ensure
that properly installed and configured the program. If necessary, uninstall and
reinstall the program. Then press the power button again to turn on the computer.
The relevant program automatically runs during the start-up process. Follow the
instructions on the screen.
A solid blue screen appears
Turn the computer off - If the computer does not respond to a keystroke or a
proper shutdown, press the power button at least 8 to 10 seconds until the
computer turns off.
Other software problems
Check the software documentation or contact the software
manufacturer for troubleshooting information.
Check for viruses - Use a virus-scanning program to check the hard device,
floppy disk or CDs.
Restart your computer - Save and close any open files, exit any programs, and
then shut down your computer through the start menu instead of pressing the
−16−
Panel PC User Manual
power button.
Check for compatibility - Ensure that the program is compatible with the
operating system installed on your computer and that your computer meets the
minimum hardware requirements needed to run the software. See the software
documentation for information.
−17−