1
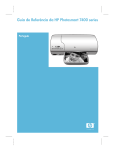
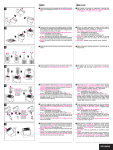
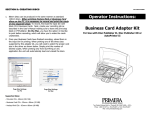
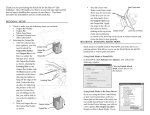
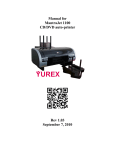
User Manual
Table of Contents
Specifications……………………………………………………. Page 2
Unpacking you Systor PMP……………………………………. Page 3
Using your Autoprinter for the first time………………………. Page 6
Windows XP printer driver installation…………………………Page 7
Using your Systor PrintMaster Plus Autoprinter………………Page 11
Printer driver settings and utilities……………………………...Page 13
Maintenance……………………………………………………...Page 17
Systor PrintMaster Plus CD/DVD Autoprinter Specifications:
Supported media:
Inkjet printable 120mm
Disc capacity:
100
Maximum Resolution:
4800 DPI
Supported cartridges: Black:
Tri-color:
HP56 (C6656A)
HP57 (C6657A)
Physical specifications: Width:
Height:
Length:
7.7 inches (450mm)
9.5 inches (240mm)
20.7 inches (525mm)
Electrical specifications:
Input voltage: 100-240V AC
Input frequency:50-60 Hz
PC minimum specifications:
OS:
Windows XP SP2
Processor:
Pentium 233Mhz
Memory:
256 MB
Free disc space:50MB
Unpacking your Systor PrintMaster Plus CD/DVD Autoprinter:
Fig. 1 This is what you should get in the box.
Your package contains the following parts:
Systor PrintMaster Plus CD/DVD auto-printer
4 CD Input tray holders
CD Output tray
Power cord
USB cable
Systor PrintMaster Plus Software disk
1 black ink cartridge
1 color ink cartridge
Systor PrintMaster Plus operating manual
Fig. 2 Mounting the input holders
Fig 4. Assembling the output bin
Fig. 3 Mounting the CD/DVD output tray
Fig. 5 Inserting the discs in the CD input holder
Using your Systor PrintMaster Plus CD/DVD auto-printer for
the first time
Step 1: Run the driver installation software on the driver CD.
Do not connect the printer to PC.
Step 2: Install the Discus Label software.
Step 3: Place the printer on the flat leveled surface.
Step 4: Screw 4 CD input holders (short black rods) to the back part
of the printer.
Step 5: Insert the CD output tray into the rails on the front bottom
part of the printer.
Step 6: Insert the female part of the AC power cable to into the
power supply brick.
Step 7: Insert the small plug of the power supply to the back of the
printer.
Step 8: Connect AC cord to the outlet (Green LED on the button on
the right side of the printer should come on).
Step 9: Lift printer cover.
Step 10: Unwrap and insert the black ink cartridge (HP 56) on the
right side of the carriage.
Step 11: Unwrap and insert the color ink cartridge (HP 57) on the
left side of the carriage.
Step 12: Wait until green orange LED's on the left side of the printer
stop blinking. This takes about 2 minutes
Step 13: Connect the printer to your computer using the USB cable.
The USB connector is located on the right side of the
printer.
Step 14: Your computer should detect the new printer is connected.
Step 15: Install the Systor PrintMaster Plus driver using the “Install
driver automatically” option.
Step 16: Place up to 50 inkjet printable discs in the input hopper.
Step 17: Start the Discus Label software or your favorite graphics
software.
Congratulations! You have successfully completed printer
installation. You can create your first label. After finishing your label
design just select “Print” from the software menu, enter the number
of copies and wait until all the printed discs land in the output tray.
Installation of your Systor PrintMaster Plus CD/DVD Autoprinter:
Systor PrintMaster Plus driver installation:
CAUTION:
Start the installation with the printer disconnected from your
computer.
1.
Insert the Systor PrintMaster Plus software CD into the disk
drive on your computer.
You should see the following dialog. Click “Install Systor
PrintMaster Plus driver” button.
The installation program should begin running and you should see the
following screen with a progress bar. If you don’t see it, it means that
autorun feature of Windows is disabled and you have to start this
program manually. In order to do it you have to go to “My
Computer”, right click on the CD/DVD drive that you are using, select
“Explore” and double click on Setup.exe.
2.
Connect your Systor PrintMaster Plus printer to the USB port
of the computer.
3.
A dialogue box will appear showing…..
Click “No, not at this time”.
4.
Click “Install software automatically (Recommended)”
Driver files will automatically be installed to your computer.
5.
Click on “Finish” button to complete the driver installation.
The installation process is now complete!
To confirm that the printer was properly installed, you can check in
“Printers and Faxes” to see if the Systor PrintMaster Plus is on the
list of installed printers.
To do this, click the Start button on the bottom left of the screen
until the menu appears.
Click Control Panel.
Double-click Printers and Other Hardware
View Installed Printers
Right click on the “Systor PMP” icon and select Printing
Preferences. Load CD/DVD and select “Utilities” tab and click on “Test
print” button. Your Systor PrintMaster Plus should start printing.
Using your Systor PrintMaster Plus CD/DVD auto-printer:
Installing ink cartridges:
1.
Turn the printer on.
The ink cartridge cradle will not move if the power is not on.
2.
Open the large printer cover.
3.
Wait until the ink cartridge cradle moves to the right side of
the printer and is idle and quiet.
4.
Remove the new ink cartridge from its packaging and carefully
remove the protective plastic tape. Hold the print cartridge so
that the copper strips are on the bottom and are closest to the
printer.
CAUTION:
5.
6.
Do not touch the print cartridge ink nozzles or
copper contacts. Touching these parts will
result in clogs, ink failure, and bad electrical
connections. Do not remove the copper strips.
They are required electrical contacts.
Snap open the blue (color ink) and gray (black ink) cartridge
covers.
Slide each print cartridge into its designated cradle at a
slight upward angle until the cartridge snaps into place.
Please do not force the ink cartridge. Snap the cartridge
covers closed.
7.
Close the printer cover and wait. The printer will take about a
minute to initialize the cartridges. If you are replacing a print
cartridge, press down on the print cartridge to be replaced,
and then slide it out of the print cartridge cradle.
Buttons and LED Lights indicators:
Cartridge Status LED
This LED will flash to indicate when the cartridges are low. It will also
flash to alert you to improper cartridge installation, or if the cover is
open.
Print Cancel
Pressing this button will cancel the current print.
Tray Open / Close
Press to open or close the disc tray.
Resume Print / LED
The LED serves to indicate attention is needed. Such as inserting a
new disc, or clearing an error.
When operating as a stand-alone printer, and multiple copies are
being printed, this LED will flash until the disc is removed, a new one
is put in the tray, and the resume button is pressed. The printer will
print the next disc.
Power On /Off
This button turns the printer on and off. The power LED flashes when
the printer is processing.
Printer Driver Settings:
Paper Quality Tab:
You can change the print quality setting using this tab. It is
important to understand that there is a trade-off between print
quality and print speed. The better print quality you want, the more
time it will take to print a disc. Please experiment by changing this
setting by selecting desired setting in the “Print quality” drop down
box.
Color Tab:
You can print your label in a grayscale and you don’t have to edit the
label in the editing software. Simply click the “Print In Grayscale”
and you will achieve the desired result.
NOTE: Please do not use the “Black Print Cartridge Only” because of
a known problem with HP driver module which has not been
resolved in the present release of Systor PrintMaster Plus
driver.
Utilities Tab:
“Test Print” button:
Please use the “Utilities” tab to test your printer.
“Clean” button:
Sometimes when you don’t use your printer for several weeks or
months you may need to clean the nozzles in the printer
cartridges.
“Test Print” button:
If you think that the cartridges need cleaning but you are not sure
you can tell the printer to print the diagnostics pattern.
“Ink Level” button:
When you click on this button the printer driver will be displaying
the ink level .
NOTE: This feature works only when you Systor PrintMaster Plusis
printing. The ink level is not displayed when the printer is in idle
state.
Alignment Tab:
Systor PrintMaster Plus and any other printer is a mechanical device.
This is why sometimes a minor misalignment may occur due to the
handling of the printer in shipping. Systor PrintMaster Plus allows
correcting the undesired offset of the printable area. The best
method is to use the “Test print” in the “Utilities” tab. The printed
disc has a circle of 116 mm diameter. If the circle is offset you can
simply enter the desired offset and click on “Offset” button.
Use negative value of X axis offset when you want to shift the image
to the left side and positive value when offset to the right side is
needed. Use negative offset of Y axis offset when you want to move
the printed image to the top and positive value when offset to the
bottom is required.
NOTE: Clicking on OK or Apply button does not change the center
offset.
Maintenance:
Cleaning the case interior
Inkjet printers print by spraying a fine mist of ink from the print head
onto the paper. In some situations, small amounts of ink from the
printing process may be deposited on the printer case and become
visible over time. If this situation occurs, the exterior of the printer
can be cleaned with a soft cloth, moistened with water to remove ink
deposits, dust, smudges, and fingerprints. A mild detergent may be
used if necessary on the exterior. Do not use harsh household
cleaners as they may damage the finish of the printer case.
Cleaning the printer interior
All inkjet printers produce a small amount of ink residue that may
build up inside the printer's case. This is normal. There is no need to
clean this residue. Alcohol or other cleaners may damage the printer
and should not be used. Cleaning the interior of the printer should be
limited to cleaning only the print cartridges. Do not clean anything
else inside the printer. Keep all liquids away from the inside of the
printer.
CAUTION: Do not clean or lubricate the carriage rod. Cleaning or
lubricating the rod may reduce its life. The ink present on the rod will
not hinder the operation of the product. The carriage rod is the shaft
inside the printer on which the print cartridges move back and forth.
Cleaning the ink cartridges
Clean the Inkjet print cartridges when lines or dots are missing
from printed text and graphics. The missing lines and dots will appear
as white lines throughout the text and graphics. This may be caused
by the spray nozzles being clogged or by the cartridge running out of
ink. If the inkjet print cartridge is running out of ink, replace the
catridge. If it is not low on ink, try one of the following solutions:
Solution 1
Using control panel:
Click the Windows Start button in the bottom left corner of
Desktop.
ck the Settings.
ck Control Panel.
uble-click Printers and Faxes icon.
ht-click on the Systor PrintMaster Plus icon.
ect Printing Preferences.
ck the Utilities tab.
Click the Clean button, then follow the on-screen instructions
Solution 2
Using print dialog box:
the software application you are trying to print from, click File,
Print. The Print dialog opens.
ck the Properties button and select the Services tab.
ck the Utilities tab.
ck the Clean button, then follow the on-screen instructions.
then
Having trouble with your products?
We are ready to help.
Systor Systems, Inc.
is here to assist you with your product.
We offer a one year product warranty
to guarantee your product performs smoothly.
Systor Systems Technical Support:
866-777-1766
[email protected]
Customer service and technical support
Representatives are available Monday through
Friday, 7:30 am to 5:30 pm (PST). Please have
your product ready to operate when you call.
Systor Systems Limited Warranty
Limited One-Year Parts & Labor Warranty
Systor Systems, Inc. or “Systor” warrants that the product purchased
is free of defects in material and workmanship under normal use
during the first year after the original purchase date. Should your
product prove to be defective during the first year, please contact by
phone or email Systor’s technical support to obtain an RMA (Return
Merchandise Authorization) number. Once the product is shipped in
its original packaging or an equivalent thereof with its corresponding
RMA number, Systor will repair or replace, without charge, any part
of the product. Transportation of the product to Systor or authorized
service center is the responsibility of the consumer. Transportation of
the product back to the consumer will be free to those within the
domestic United States. Consumers in Alaska, Hawaii, and United
States’ territories are responsible for transportation of the product
both ways.
Limited Two-Year Labor Warranty
During the second year of use, Systor’s technical support will repair
the product as needed. The consumer is responsible for all charges
for replacement parts and transportation to and from Systor or the
authorized service center.
The Above Warranties Do Not Apply To
mages or problems which result from delivery or improper installation.
mages or problems which result from misuse, abuse, alteration,
accident, neglect, vermin or incorrect electrical current or voltage.
mages or problems which result from fire, flood, lightning or other
acts of God.
mages or problems which result from service without direction from
Systor’s technical support or from service from an unauthorized
service center.
Damages or problems to any consumables (i.e. CDs, DVDs, ink
cartridges, etc.) lost in connection with its warranted product or any
claims under the warranty.
Some states do not allow exclusion or limitation of incidental or
consequential damages on how long an implied warranty lasts, so
the above warranties may not apply to you. This warranty gives
you specific legal rights and you may also have other rights which
vary from state to state.