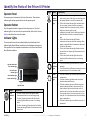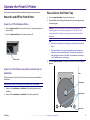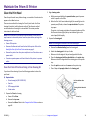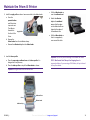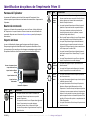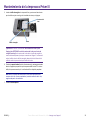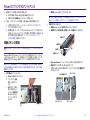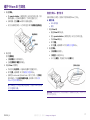
1
Prism III Printer User Guide
Corporate Headquarters:
Rimage Corporation
7725 Washington Avenue South
Minneapolis, MN 55439
USA
European Headquarters:
Rimage Europe GmbH
Albert-Einstein-Str. 26
63128 Dietzenbach
Germany
Asia/Pacific Headquarters:
Rimage Japan Co., Ltd.
2F., WIND Bldg.
7-4-8 Roppongi Minato-ku,
Tokyo 106-0032 JAPAN
800-553-8312 (North America)
Service: +1 952-946-0004
(Mexico/Latin America)
Fax: +1 952-944-6956
Tel: +49 6074-8521-14
Fax: +49 6074-8521-100
Tel: +81-3-5771-7181
Fax: +81-3-5771-7185
Rimage Corporation reserves the right to make improvements to the equipment and software described in this document at any time without any
prior notice. Rimage Corporation reserves the right to revise this publication and to make changes from time to time in the content hereof without
obligation of Rimage Corporation to notify any person or organization of such revisions or changes.
This document may contain links to web sites that were current at the time of publication, but may have moved or become inactive since. This
document may contain links to sites on the Internet that are owned and operated by third parties. Rimage Corporation is not responsible for the
content of any such third-party site.
© 2012, Rimage Corporation
Rimage® is a registered trademark of the Rimage Corporation. Rimage Prism III, AutoPrism™, and CD Designer™ are trademarks of the Rimage
Corporation. Dell™ is trademark of Dell Computer Corporation. FireWire™ is a trademark of Apple Computer, Inc. Windows® is a registered
trademark of Microsoft Corporation
All other trademarks and registered trademarks are the property of their respective owners
The most recent version of this document can be found at www.rimage.com/support.
2002605_A
For more information visit rimage.com/support
Contents
Introduction..................................................................................... 1
About this User Guide............................................................................................... 1
About the Prism III Printer........................................................................................ 1
Unpacking and Setup Instructions............................................................................ 1
Set your Printing Preferences......................................................... 12
Print in Color................................................................................................................................... 13
Strobe Settings ............................................................................................................................... 14
Maintain the Prism III Printer......................................................... 15
Important Information..................................................................... 2
Overview................................................................................................................. 15
Support Contact Information.................................................................................... 2
Learn More Online.................................................................................................... 2
Technical Support..................................................................................................... 2
Optical Disc Recording Software Disclaimer............................................................. 2
Safety and Compliance Information......................................................................... 3
Maintain the Prism III Printer......................................................... 16
Safety Precautions............................................................................................................... 3
Compliance Information...................................................................................................... 4
Cautionary Information..................................................................................................... 15
Preventative Maintenance Schedule................................................................................. 15
Clean the Print Head............................................................................................... 16
Clean the Prism III Print Head Using a Prism Cleaning Kit................................................. 16
Clean the Print Head – Alternate Method......................................................................... 17
Change the Print Ribbon......................................................................................... 18
Prism III Printer Requirements.......................................................... 5
Ribbon Requirements............................................................................................... 5
Label Design Requirements...................................................................................... 5
Print Requirements................................................................................................... 5
Identify the Parts of the Prism III Printer........................................... 6
Front View................................................................................................................. 6
Top View................................................................................................................... 6
Back View.................................................................................................................. 6
Identify the Parts of the Prism III Printer........................................... 7
Operator Panel.......................................................................................................... 7
Operator Button........................................................................................................ 7
Indicator Lights......................................................................................................... 7
Operate the Prism III Printer............................................................. 8
Power On and Off the Prism Printer......................................................................... 8
Power On or Off a Standalone Printer................................................................................. 8
Power On or Off a Printer Connected to an Autoloader or AutoPrinter............................. 8
Place a Disc on the Printer Tray................................................................................ 8
Set your Printing Preferences........................................................... 9
Set your Printing Preferences................................................................................... 9
Access Print Preferences..................................................................................................... 9
Access Print Properties........................................................................................................ 9
Layout and Paper/Quality Preferences................................................................................ 9
Change Masking Settings..................................................................................................... 9
Service Options.................................................................................................................. 10
Print PRN Files................................................................................................................................. 10
Center the Image on a Disc............................................................................................................. 10
Update the Firmware...................................................................................................................... 12
Set Device Settings for Monochrome or CMY Ribbons..................................................... 12
Print in Monocolor.......................................................................................................................... 12
2002605_A
For more information visit rimage.com/support
Introduction
This manual provides the information needed to configure, operate, and
maintain the Rimage Prism III printer.
For information specific to your autoloader or Rimage AutoPrinter refer
to the product’s User Guide found at www.rimage.com/support. From the
Support page select Prism III then the User Manuals tab.
Important! Your Prism III printer may not look exactly like the model
featured in this user guide.
About this User Guide
• While we try to maintain all versions of our manuals and
documentations, please note that the English version found on our web
site always contains the most up-to-date information.
• Unless otherwise indicated, all Windows navigation statements are
Windows 7 paths. Other Windows operating system navigation may
differ slightly.
• These notes and symbols are used throughout the manual to help clarify
information:
About the Prism III Printer
The Prism III printer is part of the Rimage series of printers. The Prism
III printer is a high speed printer used to print monochrome or color
information on CDs, DVDs, or Blu-ray DiscTM.
The printer can be used as a stand alone printer for manual operation, or
with a Rimage autoloader or Rimage AutoPrinter.
Unpacking and Setup Instructions
Unpacking and installation instructions are included with the Prism III
printer. Refer to the Rimage Prism III Setup and Installation Guide, as well as
the setup and installation guide included with your Rimage autoloader or
AutoPrinter.
Tip: A Tip suggests alternative methods that may not be obvious and helps
you understand the benefits and capabilities of the product.
Important!
• An Important note provides information essential to the completion of a
task.
•
Important supplemental information.
•
You can disregard information in a Tip and still complete a task, but do
not disregard an Important note.
nn Caution: A Caution indicates that failure to observe this guideline could
result in loss or damage to the equipment, product, software, or data.
nn Warning! A Warning indicates that failure to follow this guideline
could result in bodily injury to personnel operating or maintaining the
equipment.
2002605_A
For more information visit rimage.com/support
1
Important Information
This section provides support contact information, and cautions and
warnings, for the Prism III printer.
Technical Specifications for this product can be found at www.rimage.
com/support. From the Support page select: Printer Series > Prism > User
Manuals tab.
Support Contact Information
US, Canada, Latin America
Rimage Corporation
Email: [email protected]
7725 Washington Avenue South
Minneapolis, MN 55439
USA
Attn: Rimage Services
Telephone:
North America: 800-553-8312
Mexico/Latin America: 952-944-8144
Fax: 952-944-7808
Europe
Learn More Online
At www.rimage.com/support, you can experience Rimage’s world-class
Support and Services.
From the Support home page:
1.
Select your product series.
2.
Select your product.
3.
Learn more on the product page.
From your product page you can access:
•Information about the latest
software and firmware updates
•Product specifications
•The latest documents
•Current firmware and driver
downloads
Technical Support
Rimage offers a variety of service and support options for the Prism III
printer including Exchange Services. Please contact your Rimage Value
Added Reseller or Rimage for additional information and pricing.
Rimage Europe GmbH
Email: [email protected]
Albert-Einstein-Str. 26
Telephone: +49 6074-8521-14
63128 Dietzenbach
Fax: +49 6074-8521-100
Important! Make sure you register your autoloader so you are eligible for
parts and labor covered for 1 year and priority phone support. Registration
is available at http://www.rimage.com/support/warranty-registration.
Rimage Japan Co., Ltd.
Email: [email protected]
2F., WIND Bldg.
Telephone: +81-3-5771-7181
Optical Disc Recording Software Disclaimer
7-4-8 Roppongi Minato-ku,
Fax: +81-3-5771-7185
Germany
Asia/Pacific
Tokyo 106-0032 JAPAN
Contact Rimage Services
Website: www.rimage.com/support
Knowledge Base: http://rimage.custhelp.com
Log in and select the Ask a Question tab
When you contact Rimage
Services, please provide:
• System serial number and software
version
Copy this information from your Rimage product
for future reference.
Note: Make sure you update the Serial Number
here anytime you receive a replacement system.
• Functional and technical
description of the problem
Serial Number:
• Exact error message received
Date of Purchase:
2002605_A
This Product, Software, or Documentation may be designed to assist you
in reproducing material in which you own the copyright or have obtained
permission to copy from the copyright owner. Unless you own the copyright
or have permission to copy from the copyright owner, you may be violating
copyright law and be subject to payment of damages and other remedies. If
you are uncertain about your rights, you should contact your legal advisor. If
you are neither in possession of the copyright nor have authorization from
the owner of the copyright, unauthorized copying of copyrighted material
on an optical disc or any other media violates national and international
legislation and can result in severe penalties.
Product Name:
For more information visit rimage.com/support
2
Important Information
Safety and Compliance Information
Data Transmission System 13.56MHz, TI Model Number: TRF7960
This manual and the indications on the product allow proper and safe
operation. The indication marks below help protect you and other persons
from injury, and equipment from damage.
Refer to the Safety Precautions section below and the Compliance
Information section on page 4 for more information.
Safety Precautions
To ensure safety, read these precautions and familiarize yourself with their
meaning before using the equipment.
nn Warning!
• Use of controls or adjustments or performance of procedures
other than those specified herein may result in hazardous radiant
exposure.
• Do not disassemble or use tools on the printer. All service procedures
should be performed by a Rimage-authorized technician, or sent in
for Rimage-authorized repair.
• Do not service the printer with the power cord plugged in the AC
outlet.
• The interior of the printer contains sharp edges.
• The front bezel of the printer can be opened by hand. Do not insert
your fingers.
• Do not touch the heat roller.
2002605_A
nn Caution:
• All equipment with AC line voltage, or low DC voltages, such as
switches, power supplies, fuses, fans, and non-stepper motors, must
be replaced with Rimage-approved components to maintain the
safety approval issued by UL.
• Use only the supplied AC power cord. Fore more information or to
order a new power cord, contact Rimage Customer Service.
• This product is designed for an office environment.
• Do not use the printer if it is overheating or an abnormal smell is
detected. This may result in a fire and an electric shock. In case of
heating or abnormal smell, immediately disconnect the cable from
the outlet. Contact your Rimage-authorized dealer for repairs.
• Allow sufficient free space for opening the printer tray. Do not touch
the printer tray while it is in motion.
• If the side cover is opened while power is supplied, the printer will
stop. Do not reach into the printer while it is in operation. Do not
attempt to bypass the door interlock.
• Please do not use any voltage other than 110VAC or 220VAC. This
could result in a fire and an electric shock.
For more information visit rimage.com/support
3
Important Information
Compliance Information
Product
Prism III printer
Model
CDPR6
Notice for USA
NOTE: This equipment has been tested and found to comply with the limits for a Class A digital device, pursuant to part 15 of
the FCC Rules. These limits are designed to provide reasonable protection against harmful interference when this equipment
is operated in a commercial environment. This equipment generates, uses and can radiate radio frequency energy and, if
not installed and used in accordance with the instruction manual, may cause harmful interference to radio communications.
Operation of this equipment in a residential area is likely to cause harmful interference, in which case the user will be
required to correct the interference at his own expense.
This product complies with UL 60950-1, 2nd edition.
This Class A digital apparatus complies with Canadian ICES-003 Issue 4:2004. Cet appareil numerigue de la classe A est
conforme a la norme NMB-003 du Canade.
This product complies with CAN/CSA-C22.2 No. 60950-1-07 1st edition.
This product is in conformity with the EMC Directive (89/336/EEC) and the Low-Voltage Directive (73/23/EEC) through
compliance with the following European standards: EN 55022: 2010/AC: 2011 Class A Limit; EN 55024: 2010; EN 61000-32:2006+A1:2009+A2:2009; EN 61000-3-3:2008; EN 60950-1: 2006/ A11:2009. The CE mark has been affixed in accordance
with the CE Marking Directive 93/68/EEC.
This is a Class A product based on the standard of the Voluntary Control Council for Interference by Information Technology
Equipment (VCCI). If this equipment is used in a domestic environment, radio interference may occur, in which case, the user
may be required to take corrective action.
Translation:
この装置は、情報処理装置等電波障害自主規制協議会(VCCI)の基準に基づくクラス
A 情報技術装置です。
この装置を家庭環境で使用すると電波妨害を引き起こすことがありま
す。
この場合には使用者が適切な対策を講ずるよう要求されることがあります。
This product complies with AS/NZS CISPR22:2009.
Notice for Canada
Notice for Europe
Notice for Japan
Notice for Australia
Notice for Korea
It is certified that foregoing equipment has been certificated under the Framework Act on Telecommunications and Radio
Waves Act.
위 기기는 전기통신기본법, 전파법 에 따라 인증되었음을 증명 합니다.
Notice for Taiwan
2002605_A
This is class A digital device. It may cause radio-frequency interference when used in a residential area. In this case, the users
are advised to take appropriate precautions.
Translation:
警告使用者:
此為甲類資讯技術設備,於居住環境時,可能会造成射頻擾動,在此種情况下,使用者會被要求採取某些適當的對策。
For more information visit rimage.com/support
4
Prism III Printer Requirements
This section describes the ink, label design, and print requirements for the
Prism printer.
Ribbon Requirements
Important!
• Rimage supports only the use of Rimage brand ribbons in the Prism
printer. Printer issues that occur as a result of using ribbons by
manufacturers other than Rimage are not included under your Rimage
warranty or maintenance agreement.
•
For optimum results, store the Prism III ribbons at a temperature 23° to
104° F (-5° to 40° C) and at a relative humidity of 30% to 80% noncondensing.
•
Avoid moisture and direct sunlight.
•
Do not reuse ribbons.
•
Use only ribbons designed for the Prism III printer. Refer to the table
below.
The Prism printer requires ribbons designed specifically for use with the
printer. The Prism III printer will only operate with the following Rimage
ribbons:
Ribbon Type
2002364 Black
2002366 Red
2002367 Midnight Blue
2002365 Multicolor (CMY)
Number of Discs Printed
2100
2100
2100
500
Label Design Requirements
The Rimage Windows-compatible CD Designer™ label editor software
ships with each printer. CD Designer is installed on your PC during a typical
installation of the Rimage software. If you have a Windows-based PC, you
can use CD Designer to design your labels.
If you are using a Macintosh, or prefer to design labels in a software
application other than CD Designer, use the following criteria.
Important! CD Designer is not Macintosh-compatible.
• File format: For best results, save your labels as JPEG or TIFF files.
However, these file formats must be converted before printing. If you
use CD Designer to print labels, you must import the labels and save
them as CD Designer files (.btw) before printing. If you do not use CD
Designer to print labels, you must convert the labels to PDF files before
printing.
• Color mode: Labels that are imported into CD Designer must be in RGB
color mode.
• Resolution: Use pictures or logos set to
300x300 dpi (Dots Per Inch) or 300x600
dpi.
Printable Area
• Label Design Size: The width is 5.12”
116 mm
(1536 pixels) and the height is 4.52”
(1356 pixels).
• Printable Area: The printable area of a
Hub Size
disc when using a Prism printer is 116
38 mm
mm (4.567”) and the hub is 38 mm
(1.496”).
Print Requirements
All labels created and saved through CD Designer are in the correct file
format (.btw) for printing with the Prism printer. If you are creating and
saving labels with a software application other than CD Designer, save
your labels as PDF files before printing with the Prism printer. If you use a
standalone Prism printer or an AutoPrism AutoPrinter, you can print directly
from any application with print capability.
2002605_A
For more information visit rimage.com/support
5
Identify the Parts of the Prism III Printer
Front View
Back View
Printer Tray
Power
Switch
AC Power
Connection
Operator Panel
USB Cable
Port
Ribbon Clamp
AutoPrinter/AutoLoader
Control Connection
Top View
Ribbon Guides
Retaining Pins
Printer Tray and
Centering Pin
2002605_A
Take-up Roller
Supply Roller
For more information visit rimage.com/support
6
Identify the Parts of the Prism III Printer
Operator Panel
Image
The operator panel is located on the front of the printer. There are four
indicator lights and an operator button on the operator panel.
Operator Button
Press the operator button to open and close the printer tray. The Error
indicator light is in the center of the operator button. Refer to the Indicator
Lights section below for more information.
Indicator Lights
Name
Functionality
Disc Not •
Present
indicator
light
•
•
•
The name and function of each indicator light is described below. Each
indicator light reflects different conditions on the Standalone Prism printer.
Prism printers that are mounted on autoloaders or AutoPrism AutoPrinters
have different conditions.
•
•
Operator Button with
Error Indicator Light
Disc Not Present
Indicator Light
Active Indicator Light
Power Indicator Light
Image
Name
The Active indicator light flashes when the printer is
operating.
The Active indicator light flashes continuously at a slow
rate when the printer is in AutoPrinter mode.
Power
•
indicator
light
•
The Power indicator light illuminates when the printer
is powered on.
The Power indicator light flashes when the system
board has detected a fatal error.
The Power indicator light turns off when the printer
detects a bad pixel element in the print head. The
Power indicator light turns back on when a disc is
placed on the tray and you can continue to print discs.
If you continue to print, small lines may occur in your
print jobs. This is an indication that the print head may
require replacement.
The Power indicator light turns off when the printer is
powered off.
Functionality
Error
•
indicator
light
•
•
2001809_A
Active
•
indicator
light
•
•
Operator Panel
The Error indicator light on the operator button
illuminates when an error occurs during printing.
The Error indicator light and the Disc Not Present
indicator light flash when the printer is in cleaning
mode.
The Error indicator light illuminates and the Disc Not
Present indicator light flashes at a slow rate when the
ribbon is out.
The Disc Not Present indicator light flashes a fault code
when an error occurs. After the error is resolved, press
the operator button to turn off the indicator light.
The Disc Not Present indicator light illuminates when
the tray is empty or when the disc is not properly
clamped. When a disc is placed on the tray, the Disc
Not Present indicator light turns off.
In Multiple Copy mode, the Disc Not Present indicator
light illuminates until the disc is removed from the
pad.
The Disc Not Present indicator light flashes
continuously at slow rate when the remaining ribbon
capacity is below 100 discs for monocolor ribbons and
25 discs for CMY ribbons.
The Disc Not Present indicator light flashes at a slow
rate and the Error indicator light illuminates when the
ribbon is out.
The Disc Not Present indicator light and the Error
indicator light flash when the printer is in cleaning
mode.
•
For more information visit rimage.com/support
7
Operate the Prism III Printer
This section provides information needed to operate your Prism printer.
Power On and Off the Prism Printer
Power On or Off a Standalone Printer
1. Press the power switch on the rear of the printer. The printer powers on
and initializes.
2. Press the power switch again. The printer powers off.
Place a Disc on the Printer Tray
1. Press the operator button to open the printer tray.
2. Place one disc on the rubber pad between the two retaining pins and
the centering pin.
Important! Place the disc with the recording side facing down. The
recording side has a raised stacking ring close to the hub. If a disc
is inserted with the stacking ring facing up, the print head could be
damaged.
Tips:
• If the disc is resting on the retaining pins, the printer tray will not
close.
• The characteristics of the print pad and plate vary between the
standalone and automated models. The automated model has a
hole through the center of the plate; the standalone model does
not. All models have a centering pin.
Power Switch
3. Press the operator button. The printer tray moves to the disc clamped
position.
Power On or Off a Printer Connected to an Autoloader or
AutoPrinter
Plate
Follow these steps if your Prism III printer is connected to an autoloader or
AutoPrinter:
Tip: The power switch on the printer must remain in the ‘on’ position.
1. Power on the autoloader or AutoPrinter. The printer powers on and
initializes.
2. Power off the autoloader or AutoPrinter. The printer powers off.
Centering Pin
Retaining Pins
Printer Tray
2001809_A
For more information visit rimage.com/support
8
Set your Printing Preferences
Set your Printing Preferences
Change Masking Settings
Important: Unless otherwise indicated, all Windows navigation statements
are Windows 7 paths. Other Windows operating systems’ navigation may
differ slightly.
The Rimage CD Designer software is intended to print on 120mm optical
discs and will mask out areas that are not printable, such as inside the disc
hole and outside the outer circumference.
Access Print Preferences
1. Select: Start > Devices and Printers. The Devices and Printers dialog box
opens.
2. Right-click on Rimage Prism III.
3. Select Printing preferences from the dropdown list. The Rimage Prism III
Preferences window displays.
Masked (no print)
Areas
Access Print Properties
1. Select: Start > Devices and Printers. The Devices and Printers dialog box
opens.
2. Right-click on Rimage Prism III.
3. Select Printing properties from the dropdown list. The Rimage Prism III
Properties window displays.
Layout and Paper/Quality Preferences
Options found under the Layout and Paper/Quality tabs typically do not
need adjustments. Rimage Technical Support will identify when these
settings need adjustment and can assist with adjusting the settings found
under these tabs.
2001809_A
Some discs do not have a suitable print coating around the stacking ring.
Change the mask settings to accomodate printing on these discs.
Masked (no print)
Areas
For more information visit rimage.com/support
9
Set your Printing Preferences
1.
2.
3.
4.
5.
6.
Access Print Preferences. Refer to page 9.
Select the Masking Settings tab.
Select the Print on Hub option.
Measure the inner and outer diameters of the printable surface.
Enter the diameters in the Hub Settings section.
Select OK to save your changes.
Service Options
The Service tab provides information on your Prism III printer and offers a
series of tools to keep your printer current and functioning properly.
1. Access Print Preferences. Refer to page 9.
2. Select the Service tab.
The window that displays features information about your Prism III
printer.
• Driver: Displays information about the printer driver including the
name and version number.
• Printer: Displays information about the printer including the printer
name, serial number, and firmware version.
• Printer Status: Displays the status of the printer.
• Ribbon Status: Displays the ribbon type, the percentage of ribbon
used, the ribbon part number and color code, and the serial number
of the ribbon that is installed.
Center the Image on a Disc
The centering image tool is used to adjust the mechanical center of the
printer to match the standard CD Designer template.
Tip: Readjustment is typically not needed unless printer components are
replaced.
1. Access Print Preferences. Refer to page 9.
2. Select the Service tab.
3. Select Service Toolbox.
The Service Toolbox dialog box opens.
4. Select Center Image.
The Centering Image dialog box displays.
Print PRN Files
1. Access Print Preferences. Refer to page 9.
2. Select the Service tab.
3. Select Service Toolbox.
The Service Toolbox
dialog box opens.
4. Select Print PRN File.
A dialog box launches
that allowes users to
print selected PRN files.
2001809_A
For more information visit rimage.com/support
10
Set your Printing Preferences
5. Follow the steps outlined on the Centering Image dialog box:
a. Open the printer tray and place one 120mm white disc on the tray.
b. Select the Print Pattern button located on the Centering Image
dialog box.
A pattern prints on the disc.
c. Rotate the disc 180 degrees.
Tip: After you rotate the disc, the arrow that printed should be in
the center of the bezel and the printed line should align with the
edge of the printer tray.
Align with Edge
of Printer Tray
Arrow
Bezel
2001809_A
For more information visit rimage.com/support
11
Set your Printing Preferences
i. If the lines cross the horizontal and vertical scales at 0, no
adjustment is needed. Press OK.
2001809_A
d. If at least one line crosses away from 0, enter the horizontal and
vertical correction factors read from the disc. Select Save Settings.
For more information visit rimage.com/support
12
Set your Printing Preferences
Update the Firmware
1.
2.
3.
4.
7. Select Yes or No under the Double Print option. The default is No.
Access Print Preferences. Refer to page 9.
Select the Service tab.
Select Service Toolbox. The Service Toolbox dialog box opens.
Select Update Firmware.
Tip: Refer to the Update Firmware for the Rimage Prism III Printer
document for more information on updating your firmware version.
Set Device Settings for Monochrome or CMY Ribbons
You can print in one (monocolor) or more colors. Use these procedures to
set up the Prism to print in color or monocolor and adjust device settings for
the type of ribbon used.
Print in Monocolor
1. Install a monocolor ribbon in the printer. Refer to the Change the Print
Ribbon section on page 18.
Tip: The print color is automatically detected and set based on the type
of ribbon installed in the printer.
2. Access Print Properties. Refer to page 9.
3. Select the Device Settings tab.
4. Select Halftone Setup Properties to make changes that affect color
intensity, color balance, or pattern settings.
5. Select Media Type.
Tip: Some DVD media has a raised stacking ring on the printable side of
the disc. The direct thermal print process used in the Prism III printer
cannot print in this area. The DVD with Top Stacking Ring setting causes
the printer to skip over the stacking ring which results in an unprinted
band on the disc. Rimage recomends using discs without the stacking
ring on the printable surface.
Tips:
• If you select Yes under the Double Print option, the printer will print
each disc twice to darken the image.
• The Double Print option is only available for monocolor printing.
8. Select Yes or No under the Detect Media Change option. The default is
No. Retain the default setting for AutoPrinter or AutoLoader use.
Tip: If you select Yes, the printer will wait for the user to change the disc
before printing another disc.
9. If you have a standalone Prism III printer, disable the Perfect
Print option. The Perfect Print option is only available on Rimage
AutoPrinters.
Tip: Refer to the Rimage AutoPrinter user guide for more information on
the Perfect Print option.
10. Select OK to save the changes and close the Device Settings window.
Print in Color
1. Install a multicolor ribbon in the printer. Refer to the Change the Print
Ribbon section on page 18.
Tip: The print color is automatically detected and set based on the type
of ribbon installed in the printer.
2. Access Print Properties. Refer to page 9.
3. Select the Device Settings tab.
4. Select Halftone Setup Properties to make changes that affect color
intensity, color balance, or pattern settings.
6. Set the Master Print Strobe. Refer to the Strobe Settings section for
more information.
2001809_A
For more information visit rimage.com/support
13
Set your Printing Preferences
Strobe Settings
5. Select Media Type.
Tip: Some DVD media has a raised stacking ring on the printable side of
the disc. The direct thermal print process used in the Prism III printer
cannot print in this area. The DVD with Top Stacking Ring setting causes
the printer to skip over the stacking ring which results in an unprinted
band on the disc. Rimage recomends using discs without the stacking
ring on the printable surface.
6. Set the Master Print Strobe. Refer to the Strobe Settings section for
more information.
7. Enable Color Sub-Strobes. Refer to the Strobe Settings section for more
information.
Important! Color Sub-Strobes are only available with CMY ribbons and
are disabled by default. The Master Print Strobe has no effect when
Color Sub-Strobes are enabled.
8. Select Yes or No under the Detect Media Change option. The default is
No.
Tip: If you select Yes, the printer will wait for the user to change the disc
before printing another disc.
9. If you have a standalone Prism III printer, disable the Perfect
Print option. The Perfect Print option is only available on Rimage
AutoPrinters.
Tip: Refer to the Rimage AutoPrinter user guide for more information on
the Perfect Print option.
10. Select OK to save the changes and close the Device Settings window.
Strobe settings control the amount of energy used to print a pixel. Higher
settings use more energy. As the settings increase, the image becomes more
intense and the print-head life decreases. Rimage recommends using the the
lowest strobe setting that provides the desired image quality.
Notes:
• These are recommended settings for Rimage brand media.
• This may require multiple test printings on discs to fine-tune the color
hue. Set Enable Color Sub-Strobes to Enabled to lower an individual
color’s print strobe. For example, this setting can be used to lower the
Yellow Print Strobe setting when trying to eliminate a halo effect on a
printed disc.
1. Access Print Properties. Refer to page 9.
2. Select the Device Settings tab.
3. Set the Master Print Strobe setting.
Note: Rimage recommends the following settings for Rimage-brand
media:
• Media surface: Thermal-printable media
• Print strobe setting for black ribbon: 325 - 400
• Print strobe setting for red ribbon: 375 - 425
• Print strobe setting for blue ribbon: 350 - 400
4. Select Enabled to Enable Color Sub-Strobes.
Important! Color Sub-Strobe settings are only available with CMY
ribbons.
5. Select OK to save the changes and close the Device Settings window.
2001809_A
For more information visit rimage.com/support
14
Maintain the Prism III Printer
Use the information in this section to keep your Prism III printer in optimal
operating condition.
Overview
Regular preventative maintenance of your Prism III printer can help to
always produce clearly printed labels. Maintenance
involves cleaning the system.
Cautionary Information
nn Caution: To avoid damaging the Prism III printer during maintenance:
Tools
Task
Frequency
Instructions
• Lint-free
cloth
Clean the
printer
exterior.
Weekly
1. Power off the Prism.
2. Disconnect the power
cord.
3. Wipe down the
exterior of the printer.
Change
the print
ribbon.
Monochrome black:
2100 discs
Monochrome red:
2100 discs
Monochrome blue:
Refer to the Change the
Print Ribbon section on
page 18.
• Nonabrasive,
allpurpose
cleaner
• New print
ribbon
• Never use oils, silicone, or other lubricants on any part of the Prism.
• Use only non-abrasive cleaners to wipe down the surfaces of your
Prism printer.
• Avoid pouring cleaners directly onto the Prism printer. Instead, apply
the cleaner to a lint-free cloth.
2100 discs
3-color panel (CMY):
500 discs
Preventative Maintenance Schedule
Use the following table as a guideline for how often to perform preventative
maintenance tasks.
Important! Failure to follow the maintenance schedule outlined to the right
may void your warranty.
2001809_A
Print head
cleaning kit
Clean
the print
head.
For more information visit rimage.com/support
At every ribbon change
or as needed
Refer to the Clean the
Print Head section on
page 16.
15
Maintain the Prism III Printer
Clean the Print Head
Clean the print head at every ribbon change, or more often if streaks start to
appear or the ribbon has torn.
There are two methods for cleaning the Prism III print head—the Prism
cleaning kit method, and the alternate method. The alternate method
can be used when a cleaning kit is not available. This section provides
instructions for both methods.
Note: If the Prism printer is connected to an autoloader or AutoPrinter, it
may be easier to remove the printer from the system before you begin the
cleaning process.
• Power off the printer.
• Remove all cables and cords from the back of the printer. Refer to the
Identify the Parts of the Prism Printer section on page 6.
• Remove the printer from the system and place it on a flat surface near a
power outlet.
• Connect a separate power cord from the back of the printer to a power
outlet.
Clean the Prism III Print Head Using a Prism Cleaning Kit
If you have a Prism cleaning kit, use the following procedure to clean the
print head.
## Required tools:
• Prism cleaning kit (PN 210555-001)
• One disc
• 99% Isopropyl alcohol
• Cotton swabs
1. Prepare the Prism for cleaning.
a. Power off the Prism.
b. Remove the top cover.
c. Remove the ribbon. Refer to the Change the Print Ribbon section on
page 18.
2001809_A
2. Begin cleaning mode.
a. While pressing and holding the operator button, press the power
switch to power on the Prism.
b. When the Disc Not Present indicator light (the second light on the
operator panel) flashes, release the operator button. The printer
tray opens.
The printer is in cleaning mode when the operator button and Disc
Not Present indicator lights (the top two indicator lights on the
control panel) blink rapidly.
3. Prepare the cleaning pad.
Note: The cleaning pad is included in the Prism cleaning kit.
Remove the adhesive backing from the cleaning pad.
Attach the cleaning pad to the top of a disc.
Make sure that the edges of the pad are aligned with the disc.
Place the cleaning pad with the attached disc on the printer tray.
Make sure the disc is aligned with the retaining pins on the printer
tray.
e. Press the pad down and over the sensor on the printer tray.
f. Place 5 drops of isopropyl alcohol on the cleaning pad.
a.
b.
c.
d.
For more information visit rimage.com/support
Pad Pressed Down Over
Sensor
Cleaning Pad with Attached
Disc
Printer Tray
16
Maintain the Prism III Printer
4. Clean the print head.
a. Press the operator button to close the printer tray and start the
cleaning cycle. When the cleaning cycle is complete, the printer tray
opens.
b. If necessary, repeat step a to begin the cleaning cycle again.
c. When the print head is clean, remove the cleaning pad and
attached disc from the printer tray.
Front Ribbon
Guides
Cleaning Pad
Cleaning
Solution
5. Clean the front two ribbon guides.
a. Apply isopropyl alcohol to a clean cotton swab.
b. Run the swab against the ribbon guides to clean them.
6. Prepare the Prism for use.
a. Press the power switch off and on to exit cleaning mode and reset
the printer.
b. Reinstall the ribbon. Refer to the Change the Print Ribbon section on
page 18.
c. If you removed the printer form an autoloader or AutoPrinter, place
the printer on the system and connect all cables and cords. Refer to
the Identify the Parts of the Prism III Printer section on page 6
Note: If the printing pad on the tray is wet from cleaning, allow the
printing pad to completely dry before using the Prism.
2001809_A
Clean the Print Head – Alternate Method
If a cleaning kit is not available, use the following procedure to clean the
Prism print head.
## Required tools:
• 99% Isopropyl alcohol
• Cotton swabs
1. Prepare the Prism III.
a. Power on the Prism III.
b. Press the operator button to open the printer tray.
c. Power off the Prism III.
d. Remove the top cover.
e. Remove the ribbon. Refer to the Change the Print Ribbon section on
page 18.
2. Clean the print head.
a. Apply isopropyl alcohol to a cotton swab.
b. Insert the cotton swab into the drawer opening.
c. Lift the swab upward as you run the swab against the convex
surface of the print head.
Convex Surface of Print Head
Important! The bottom of the print head is shown to illustrate the area to
clean. Do not remove the print head from the printer.
For more information visit rimage.com/support
17
Maintain the Prism III Printer
3. Clean the front two ribbon guides.
a. Apply isopropyl alcohol to a clean cotton swab.
b. Run the swab against the ribbon guides to clean them.
4. After the alcohol on the print head dries, prepare the Prism for use.
a. Install the ribbon. Refer to the Change the Print Ribbon section on
page 18.
b. If your removed the printer from an autoloader or AutoPrinter,
place the printer on the system and connect all cables and cords to
the back of the printer. Refer to the Identify the Parts of the Prism
Printer section on page 6.
d. Lift up the supply roller to remove it.
Note: If you are replacing the ribbon, now is a good time to clean the
print head. Refer to the Clean the Print Head section on page 16
2. Load the print ribbon.
a. Slide the print ribbon onto the supply roller.
b. Align the two notches of the cardboard core with the metal pins on
the supply roller.
Print Ribbon
Change the Print Ribbon
Important! The Prism III printer only operates with genuine Rimage ribbons.
Rimage supports only the use of Rimage brand ribbons in our printers.
Printer issues that occur as a result of using ribbons by manufacturers other
than Rimage are not included under your Rimage warranty or maintenance
agreement.
Tip: If ribbons are stored in an environment much different from that of the
printer, allow time for them to become acclimated to the new environment.
Allow more time for greater temperature and/or humidity differences.
1. Access the ribbon area.
a. Power on the Prism.
b. Remove the top
cover from the
printer.
c. Lift up the take-up
roller so that the
end with the gear
comes up first,
then lift the takeup roller out of the
printer.
2001809_A
Cardboard Core
Notches
Metal Pins
Supply Roller
c. Press the operator button to close the print tray.
d. Peel the ribbon leader from the supply ribbon.
e. Slide the ribbon leader under the ribbon guide and into the ribbon
installation clamp.
Ribbon Installation
Clamp
Ribbon Guide
Take-up Roller
Supply Roller
Printer Tray
For more information visit rimage.com/support
Ribbon Leader
18
Maintain the Prism III Printer
3. Install the supply roller as shown. Leave some slack in the ribbon leader.
a. Press the
operator button
until the printer
tray comes out.
The ribbon is
threaded to
Supply Roller
the front of the
Prism.
b. Remove the
ribbon leader from the installation clamp.
c. Remove the adhesive strip from the ribbon leader.
4. Load the take-up roller.
a. Place the new empty cardboard core on the take-up roller. It is
designed to fit only one way.
b. Place the take-up roller on top of the ribbon leader as shown.
c. Pull the ribbon leader up
over the cardboard core.
d. Attach the adhesive
strip to the cardboard
core so that the edges
on the ribbon leader are
aligned to the edges of
the cardboard core.
e. Roll the ribbon leader so
that it is wrapped only
once around the roller.
Important! Do not roll past the marking on the leader that states
STOP - Wind Leader Onto Take-up Core Stopping Here for
monocolor ribbons. If you are using a CMY ribbon, roll up to the end
of the yellow leader.
Important! The gear must be on the correct side.
Gear
Cardboard Core
Ribbon Leader
Adhesive Strip
2001809_A
For more information visit rimage.com/support
19
Maintain the Prism III Printer
5. Install the take-up roller in the Prism and press down firmly until the
take-up roller snaps into place. The ribbon should be tight and there
should be no creases in the ribbon.
Ribbon Leader
Take-up Roller
Marking
Important! Do not roll the STOP – Wind Leader Onto Take-up Core
Stopping Here marking on the ribbon leader onto the take-up roller.
The marking should not be past the point shown in the picture. If the
marking is on the roller, pull the take-up roller out and roll back the
ribbon. Roll the supply roller back to take up the slack.
6. Press the operator button and hold for 5 seconds to allow the printer to
validate the ribbon. If the ribbon is valid the printer advances and the
Error indicator light stops blinking.
Note: During the ribbon validation process, the ribbon cycles past the
ribbon leader. After the ribbon validation process is complete, make sure
that the ribbon is wound tight.
7. Install the top cover.
2001809_A
For more information visit rimage.com/support
20
Prism III Drucker - Benutzerhandbuch
Hauptsitz:
Rimage Corporation
7725 Washington Avenue South
Minneapolis, MN 55439
USA
Europäischer Hauptsitz:
Rimage Europe GmbH
Albert-Einstein-Str. 26
63128 Dietzenbach
Deutschland
Hauptsitz für Asien/Pazifik:
Rimage Japan Co., Ltd.
2F., WIND Bldg.
7-4-8 Roppongi Minato-ku,
Tokio 106-0032 JAPAN
+1 800 553 8312 (Nordamerika)
Service: +1 952-946-0004
(Mexiko/Lateinamerika)
Fax: +1 952-944-6956
Tel: +49 6074-8521-14
Fax: +49 6074-8521-100
Tel: +81-3-5771-7181
Fax: +81-3-5771-7185
Rimage Corporation behält sich das Recht vor, jederzeit und ohne vorherige Ankündigung die in diesem Dokument beschriebenen Geräte und
die Software zu verbessern. Rimage Corporation behält sich das Recht vor, diese Veröffentlichung zu überarbeiten und von Zeit zu Zeit inhaltliche
Änderungen vorzunehmen, ohne Verpflichtung seitens Rimage Corporation, Personen oder Unternehmen über solche Überarbeitungen oder
Änderungen in Kenntnis zu setzen.
Dieses Dokument enthält möglicherweise Links zu Websites, die zur Zeit der Veröffentlichung aktuell waren, jedoch inzwischen verschoben oder
inaktiv wurden. Dieses Dokument enthält möglicherweise Links zu Websites, die das Eigentum von Drittanbietern sind und von diesen verwaltet
werden. Rimage Corporation ist für den Inhalt von Drittanbieter-Sites nicht verantwortlich.
© 2012, Rimage Corporation
Rimage® ist eine eingetragene Marke der Rimage Corporation. Rimage Prism III, AutoPrism™, und CD Designer™ sind Marken der Rimage
Corporation. Dell™ ist ein Warenzeichen des Unternehmens Dell Computer Corporation. FireWire™ ist eine Marke von Apple Computer, Inc.
Windows® ist eine eingetragene Marke der Microsoft Corporation
Sämtliche weiteren Marken und eingetragenen Marken sind das Eigentum ihrer jeweiligen Inhaber.
Die aktuelle Version des Dokuments finden Sie unter www.rimage.com/support.
2002605_A
Weitere Informationen finden Sie unter rimage.com/support
Inhalt
Einleitung......................................................................................... 1
Über dieses Benutzerhandbuch................................................................................ 1
Über den Prism III Drucker........................................................................................ 1
Anleitung zum Auspacken und Einrichten................................................................ 1
Festlegen der Druckvoreinstellungen.............................................. 12
Mehrfarbiger Druck........................................................................................................................ 13
Impulseinstellungen........................................................................................................................ 14
Warten des Prism III Druckers......................................................... 15
Wichtige Information....................................................................... 2
Übersicht................................................................................................................. 15
Support-Kontaktinformationen................................................................................. 2
Weitere Online-Informationen................................................................................. 2
Technischer Support................................................................................................. 2
Haftungsausschluss: Aufzeichnungssoftware für optische Discs.............................. 2
Informationen zu Sicherheit und Standards............................................................. 3
Warten des Prism III Druckers......................................................... 16
Sicherheitsmaßnahmen...................................................................................................... 3
Informationen zu Standards................................................................................................ 4
Vorsichtsmaßnahmen........................................................................................................ 15
Präventiver Wartungsplan................................................................................................. 15
Reinigen des Druckkopfs......................................................................................... 16
Reinigen des Prism III Druckkopfs mit einem Prism-Reinigungskit.................................... 16
Reinigen des Druckkopfs – alternative Methode............................................................... 17
Austauschen des Druckbands................................................................................. 18
Prism III Druckeranforderungen........................................................ 5
Band-Anforderungen................................................................................................ 5
Grafikdesign-Anforderungen.................................................................................... 5
Druckanforderungen................................................................................................. 5
Ansicht und Bedienelemente des Prism III Druckers ......................... 6
Vorderansicht............................................................................................................ 6
Ansicht von oben...................................................................................................... 6
Rückansicht............................................................................................................... 6
Ansicht und Bedienelemente des Prism III Druckers.......................... 7
Bediener-Display....................................................................................................... 7
Bedienertaste........................................................................................................... 7
Kontrollleuchten....................................................................................................... 7
Bedienung des Prism III Druckers ..................................................... 8
Ein- und Ausschalten des Prism-Druckers................................................................. 8
Ein- und Ausschalten eines eigenständigen Druckers......................................................... 8
Ein- und Ausschalten eines an eine Roboter-Station oder einen AutoPrinter
angeschlossenen Druckers.................................................................................................. 8
Einlegen einer Disc in die Druckerschublade............................................................ 8
Festlegen der Druckvoreinstellungen................................................ 9
Festlegen der Druckvoreinstellungen....................................................................... 9
Zugreifen auf die Druckeinstellungen.................................................................................. 9
Zugreifen auf die Druckeigenschaften................................................................................. 9
Layout und Papier-/Qualitätsvoreinstellungen.................................................................... 9
Ändern Sie die Abdeckungseinstellungen........................................................................... 9
Serviceoptionen................................................................................................................ 10
Ausdrucken PRN Dateien................................................................................................................ 10
Zentrieren des Disc-Image auf einer Disc........................................................................................ 10
Aktualisieren der Firmware............................................................................................................. 12
Einstellen Geräteeinstellungen für Schwarzweiß oder CMY-Bänder................................. 12
Einfarbiger Druck............................................................................................................................ 12
2002605_A
Weitere Informationen finden Sie unter rimage.com/support
Einleitung
In diesem Handbuch erhalten Sie Informationen über den Betrieb, die Konfiguration
und die Wartung des Rimage Prism III Druckers.
Informationen zur Roboter-Station oder zum Rimage-AutoPrinter finden Sie in den
entsprechenden Benutzerhandbüchern dieser Produkte unter www.rimage.com/
support. Wählen Sie auf der Seite Support Prism III und anschließend die Option
User Manuals (Benutzerhandbücher).
Wichtig! Ihr Prism III Drucker sieht möglicherweise etwas anders aus als das in
diesem Benutzerhandbuch dargestellte Modell.
Über dieses Benutzerhandbuch
•
•
•
Wir sind darum bemüht, alle Versionen unserer Benutzerhandbücher sowie
sämtliche Dokumentation auf dem neuesten Stand zu halten. Beachten Sie,
dass die auf unserer Website erhältliche englische Version stets die aktuellsten
Informationen enthält.
Sofern nicht anders angegeben, beziehen sich alle Anweisungen zur Navigation
in Windows auf Windows 7. Bei anderen Windows-Betriebssystemen kann die
Navigation geringfügig abweichen.
Diese Hinweise und Symbole werden im gesamten Handbuch zur Erläuterung
der entsprechenden Informationen eingesetzt:
Über den Prism III Drucker
Der Prism III Drucker ist Teil der Rimage-Druckerserie. Der Prism III Drucker ist ein
Hochgeschwindigkeitsdrucker zum ein- oder mehrfarbigen Bedrucken von CDs,
DVDs oder Blu-ray DiscTM.
Der Drucker kann als eigenständiges Gerät für den manuellen Betrieb eingesetzt
werden oder mit einer Rimage-Roboter-Station bzw. einem Rimage-AutoPrinter.
Anleitung zum Auspacken und Einrichten
Anleitungen zum Auspacken und Einrichten sind im Lieferumfang des Prism III
Druckers enthalten. Weitere Informationen finden Sie im Rimage Prism III Setup and
Installation Guide, (Rimage Everest 600 – Einrichtungs- und Installationsanleitung)
sowie in den Einrichtungs- und Installationsanleitungen zu Ihrer Rimage-RoboterStation bzw. zu Ihrem AutoPrinter.
Tipp: Es werden alternative Vorgehensweisen vorgeschlagen, die sich nicht auf den
ersten Blick erschließen. Tipps tragen dazu bei, dass Sie die Vorteile und
Möglichkeiten, die das Produkt bietet, besser verstehen.
Wichtig!
• Ein wichtiger Hinweis enthält Informationen, die zur Durchführung eines
Verfahrens oder einer Aufgabe unbedingt erforderlich sind.
•
Wichtige ergänzende Informationen.
•
Sie können Informationen in einem Tipp außer Acht lassen und eine Aufgabe
immer noch abschließen, aber die Informationen in einem wichtigen Hinweis
sollten Sie stets beachten.
nn Vorsicht: So gekennzeichnete Hinweise weisen darauf hin, dass bei
Nichtbeachtung dieser Richtlinie das Gerät, das Produkt oder die Software
beschädigt werden oder Daten verloren gehen können.
nn Warnung! Eine Warnung weist auf Situationen hin, in denen Personen, die ein
Gerät bedienen oder warten, verletzt werden können.
2002605_A
Weitere Informationen finden Sie unter rimage.com/support
1
Wichtige Information
In diesem Abschnitt finden Sie Kontaktinformationen sowie Sicherheits- und
Warnhinweise zum Prism III Drucker.
Technische Spezifikationen zu diesem Produkt finden Sie unter www.rimage.com/
support. Wählen Sie auf der Seite Support : Printer Series > Prism > User Manuals
(Benutzerhandbücher).
Support-Kontaktinformationen
USA, Kanada, Lateinamerika
Rimage Corporation
E-Mail: [email protected]
7725 Washington Avenue South
Minneapolis, MN 55439
USA
Attn: Rimage Services
Telefon:
Nordamerika: 800-553-8312
Mexiko/Lateinamerika: 952-944-8144
Fax: 952-944-7808
Europa
Rimage Europe GmbH
E-Mail: [email protected]
Albert-Einstein-Str. 26
Telefon: +49 6074-8521-14
63128 Dietzenbach
Fax: +49 6074-8521-100
Deutschland
Asien/Pazifik
Rimage Japan Co., Ltd.
E-Mail: [email protected]
2F., WIND Bldg.
Telefon: +81-3-5771-7181
7-4-8 Roppongi Minato-ku,
Fax: +81-3-5771-7185
Tokio 106-0032 JAPAN
Kontaktdaten von Rimage Services:
Webseite: www.rimage.com/support
Wissensdatenbank: http://rimage.custhelp.com
Melden Sie sich an und wählen Sie die Registerkarte Ask a Question (Frage stellen) aus.
Wenn Sie sich an Rimage Services
wenden, halten Sie bitte folgende
Informationen bereit:
• Seriennummer des Systems und
Softwareversion
• Funktionelle und technische
Beschreibung des Problems
• Genauer Wortlaut der angezeigten
Fehlermeldung
2002605_A
Notieren Sie sich diese Informationen Ihres
Rimage-Produkts zur späteren Verwendung.
Bemerkung: Tragen Sie hier immer, wenn Sie
ein neues System erhalten, die neue
Seriennummer ein.
Seriennummer:
Produktname:
Weitere Online-Informationen
Informieren Sie sich unter www.rimage.com/support, über den erstklassigen
Support und Kundendienst von Rimage.
Auf der Support-Homepage:
1.
Wählen Sie die Produktserie aus.
2.
Wählen Sie das Produkt aus.
3.
Lesen Sie die Angaben auf der
Produktseite.
Auf der Produktseite stehen folgende
Informationen zur Verfügung:
•Informationen über die neuesten
Software- und Firmware-Updates
•Produktspezifikationen
•Aktuelle Dokumente
•Downloads der aktuellen Firmware
und Treiber
Technischer Support
Rimage bietet eine Reihe verschiedener Service- und Support-Optionen für den
Prism III Drucker an, einschließlich Austausch-Services. Wenden Sie sich an Rimage
oder an Ihren Rimage-Wiederverkäufer, um mehr über den erhältlichen Support
und die entsprechenden Preise zu erfahren.
Wichtig! Registrieren Sie die Roboter-Station, um für ein Jahr Garantie für Ersatzteile
und Arbeitsstunden sowie telefonischen Prioritätssupport zu erhalten. Die
Registrierung können Sie unter http://www.rimage.com/support/warrantyregistration vornehmen.
Haftungsausschluss: Aufzeichnungssoftware
für optische Discs
Dieses Produkt, diese Software oder diese Dokumentation wurde konzipiert, um
Ihnen bei der Reproduktion von Material zu helfen, für das Sie das Copyright
besitzen oder die Kopiererlaubnis vom Copyright-Eigentümer erhalten haben.
Wenn Sie das Copyright nicht besitzen oder nicht die Kopiererlaubnis vom
Copyright-Eigentümer erhalten haben, verstoßen Sie möglicherweise gegen
Urheberrechtsgesetze und können zu Schadensersatzleistungen oder zur Zahlung
sonstiger Schäden angewiesen werden. Wenn Sie Ihre Rechte nicht kennen, wenden
Sie sich an Ihren Rechtsberater. Wenn Sie weder das Eigentum am Copyright
noch die Erlaubnis vom Copyright-Eigentümer haben, verstößt das Kopieren
urheberrechtlich geschützter Inhalte auf optischen Discs oder anderen Medien
gegen nationale und internationale Gesetze und kann strafrechtlich verfolgt werden.
Kaufdatum:
Weitere Informationen finden Sie unter rimage.com/support
2
Wichtige Information
Informationen zu Sicherheit und Standards
Data Transmission System 13.56MHz, TI Model Number: TRF7960
Dieses Handbuch und die Angaben zum Produkt ermöglichen einen
ordnungsgemäßen und sicheren Betrieb. Die folgenden Hinweiszeichen helfen
Ihnen, sich selbst und andere Personen vor Verletzungen zu schützen und Schäden
am Gerät zu vermeiden.
Weitere Informationen finden Sie in den Abschnitten Sicherheitsmaßnahmen unten
und die Informationen zu Standards page 4.
Sicherheitsmaßnahmen
nn Vorsicht:
•
•
•
•
Lesen Sie aus Sicherheitsgründen vor dem Verwenden des Geräts diese
Sicherheitsvorkehrungen durch und machen Sie sich mit deren Bedeutung vertraut.
nn Warnung!
•
•
•
•
•
•
•
Wenn Sie Steuerelemente auf eine nicht in diesem Dokument beschriebene
Art und Weise verwenden oder Anpassungen bzw. sonstige Tätigkeiten nicht
gemäß diesem Handbuch ausführen, könnten Sie schädlicher Strahlung
ausgesetzt werden.
Zerlegen Sie den Drucker nicht und setzen Sie keine Werkzeuge daran
ein. Alle Reparaturarbeiten müssen von einem von Rimage autorisierten
Techniker durchgeführt werden. Alternativ können Sie das Gerät zur
Reparatur an Rimage schicken.
Führen Sie keine Arbeiten am Drucker durch, wenn dieser am Netz
angeschlossen ist.
Im Inneren des Druckers befinden sich scharfe Kanten.
Die Blende an der Vorderseite des Druckers kann von Hand abgenommen
werden. Stecken Sie nicht Ihre Finger hinein.
Berühren Sie nicht die Heizrolle.
2002605_A
•
•
Damit die Sicherheitszulassung von UL aufrechterhalten werden kann, sind
sämtliche Gerätekomponenten, für die Wechselspannung oder niedrige
Gleichspannung verwendet wird (z. B. Schalter, Netzgeräte, Sicherungen,
Lüftungen oder Motoren, bei denen es sich nicht um Schrittmotoren
handelt), durch von Rimage zugelassene Komponenten zu ersetzen.
Verwenden Sie ausschließlich das im Lieferumfang enthaltene ACNetzkabel. Sollten Sie weitere Fragen haben oder ein neues Netzkabel
bestellen wollen, wenden Sie sich bitte an den Kundendienst von Rimage.
Dieses Produkt wurde für den Einsatz in Büros konzipiert.
Verwenden Sie den Drucker nicht, wenn er überhitzt ist oder unnormale
Gerüche abgibt. Andernfalls besteht die Gefahr eines Brandes oder
eines elektrischen Schlags. Ziehen Sie bei Überhitzung oder unnormalen
Gerüchen sofort das Netzkabel aus der Steckdose. Wenden Sie sich zur
Reparatur an einen von Rimage autorisierten Händler.
Achten Sie auf ausreichenden Platz zum Öffnen der Schublade des Druckers.
Berühren Sie nicht die sich bewegende Schublade.
Wenn die Seitenabdeckung geöffnet wird, solange der Drucker mit Strom
versorgt ist, wird der laufende Druckvorgang abgebrochen. Fassen Sie
während des Betriebs nicht in den Drucker. Versuchen Sie nicht, die
Türsperre zu umgehen.
Schließen Sie das Gerät nur an 110 oder 220 V~ an. Andernfalls besteht die
Gefahr eines Brandes oder eines elektrischen Schlags.
Weitere Informationen finden Sie unter rimage.com/support
3
Wichtige Information
Informationen zu Standards
Produkt
Prism III Drucker
Modell
CDPR6
Hinweis für USA
BEMERKUNG: Dieses Gerät wurde getestet und entspricht den Grenzwerten für ein digitales Gerät der Klasse A gemäß Teil 15 der
FCC-Bestimmungen. Diese Grenzwerte dienen dem angemessenen Schutz vor schädlichen Störungen beim Einsatz des Geräts in
Gewerbegebieten. Dieses Gerät erzeugt, verwendet und strahlt Funkfrequenzenergie aus und kann, falls nicht gemäß den Anweisungen
aufgestellt, installiert und verwendet, schädliche Störungen bei Funkkommunikationen verursachen. Beim Betrieb dieses Geräts in
Wohngebieten besteht die Wahrscheinlichkeit des Auftretens schädlicher Störungen. In diesem Fall muss der Benutzer
diese Störungen auf eigene Kosten beseitigen.
Dieses Produkt entspricht UL 60950-1, 2. Ausgabe.
Hinweis für Kanada
Dieses digitale Gerät der Klasse A entspricht der kanadischen Vorgabe ICES-003, Ausgabe 4:2004. Cet appareil numerigue de la classe A
est conforme a la norme NMB-003 du Canade.
Dieses Produkt entspricht CAN/CSA-C22.2 No. 60950-1-07, 1. Ausgabe.
Hinweis für Europa
Dieses Produkt entspricht der EMV-Richtlinie (89/336/EWG) und der Niederspannungsrichtlinie (73/23/EWG), da folgende europäische
Normen eingehalten werden: EN 55022: 2010/AC: 2011 Klasse A Limit; EN 55024: 2010; EN 61000-3-2:2006+A1:2009+A2:2009;
EN 61000-3-3:2008; EN 60950-1: 2006/ A11:2009. Das CE-Kennzeichen wurde in Übereinstimmung mit der Richtlinie für die CEKennzeichnung 93/68/EWG angebracht.
Hinweis für Japan
Dieses Produkt der Klasse A entspricht dem Standard des Voluntary Control Council for Interference by Information Technology
Equipment (VCCI). Wenn dieses Gerät in einer häuslichen Umgebung verwendet wird, können Funkstörungen auftreten. In diesem Fall
muss der Benutzer u. U. Korrekturen vornehmen.
Übersetzung:
この装置は、情報処理装置等電波障害自主規制協議会(VCCI)の基準に基づくクラス
A 情報技術装置です。
この装置を家庭環境で使用すると電波妨害を引き起こすことがありま
す。
この場合には使用者が適切な対策を講ずるよう要求されることがあります。
Hinweis für Australien
Dieses Produkt entspricht AS/NZS CISPR22:2009.
Hinweis für Korea
Hiermit wird bestätigt, dass oben genanntes Gerät gemäß den Vorgaben des Framework Act on Telecommunications und des Radio Waves
Act zertifiziert wurde.
위 기기는 전기통신기본법, 전파법 에 따라 인증되었음을 증명 합니다.
Hinweis für Taiwan
2002605_A
This is class A digital device. It may cause radio-frequency interference when used in a residential area. In this case, the users are advised
to take appropriate precautions.
Translation:
警告使用者:
此為甲類資讯技術設備,於居住環境時,可能会造成射頻擾動,在此種情况下,使用者會被要求採取某些適當的對策。
Weitere Informationen finden Sie unter rimage.com/support
4
Prism III Druckeranforderungen
In diesem Abschnitt werden die Voraussetzungen für die Druckertinte, das Erstellen
von Grafiken und das Drucken mit dem Prism-Drucker beschrieben.
Band-Anforderungen
Wichtig!
• Rimage unterstützt beim Prism-Drucker nur die Verwendung von OriginalRimage-Bändern. Druckerprobleme, die aufgrund der Verwendung von Bändern
anderer Hersteller entstehen, sind durch die Rimage-Garantie oder den
Wartungsvertrag nicht abgedeckt.
•
Für optimale Ergebnisse, lagern Sie die Prism III Bänder bei einer Temperatur
von 23° bis 104° F (-5° bis 40° C), und mit einer relativen Feuchtigkeit von 30 %
bis 80 % nicht kondensierend.
•
Vermeiden Sie Feuchtigkeit und direktes Sonnenlicht.
•
Verwenden Sie die Bänder nur einmal.
•
Verwenden Sie ausschließlich Bänder, die für den Prism III Drucker geeignet
sind. Welche Bänder geeignet sind, entnehmen Sie der nachfolgenden Tabelle.
Für den Prism-Drucker benötigen Sie Bänder, die speziell für diesen Drucker
entwickelt wurden. Der Prism III Drucker wird nur mit den folgenden Rimage
Bändern arbeiten:
Bandtyp
Anzahl bedruckter Discs
2002364 Schwarz
2100
2002366 Rot
2100
2002367 Mitternachtsblau
2100
2002365 Mehrfarbig (CMY)
500
Grafikdesign-Anforderungen
Die Rimage Windows-kompatible Grafikeditor-Software CD Designer™ wird mit
jedem Drucker ausgeliefert. CD Designer wird bei der normalen Installation der
Rimage-Software auf Ihrem PC installiert. Wenn Sie mit einem Windows-PC
arbeiten, können Sie mit CD Designer Ihre Grafiken entwerfen.
Wenn Sie einen Macintosh-Computer verwenden oder Grafiken mit einer anderen
Softwareanwendung als dem CD Designer erstellen möchten, verwenden Sie die
folgenden Kriterien.
Wichtig! CD Designer ist nicht kompatible mit Macintosh.
•
•
•
•
•
Dateiformat: Um optimale Ergebnisse zu erzielen, speichern Sie die Grafiken als
JPEG- oder TIFF-Dateien. Diese Dateiformate müssen jedoch vor dem Drucken
konvertiert werden. Wenn Sie zum Drucken von Grafiken den CD Designer
verwenden, müssen Sie die Grafiken vor dem Drucken importieren und als
CD Designer-Dateien (.btw) speichern. Wenn Sie zum Drucken von Grafiken
nicht den CD Designer verwenden, müssen Sie die Grafiken vor dem Drucken in
PDF-Dateien konvertieren.
Farbmodus: Grafiken, die in CD Designer importiert werden, müssen im RGBFarbmodus vorliegen.
Auflösung: Verwenden Sie Bilder oder
Logos mit 300 x 300 dpi (Punkte pro Zoll)
Bedruckbarer
oder 300 x 600 dpi.
Bereich
Grafikgröße: Die Breite beträgt 5,12 Zoll
116 mm
(1536 Pixel) und die Höhe 4,52 Zoll (1356
pixels).
Bedruckbarer Bereich: Der bedruckbare
Bereich einer Disc liegt bei Verwendung
Hub-Größe
des Prism-Druckers zwischen dem
38 mm
Außendurchmesser von 116 mm (4,567”)
und dem Innendurchmesser von 38 mm
(1,496”).
Druckanforderungen
Alle mit CD Designer erstellten und gespeicherten Grafiken haben das richtige
Dateiformat (.btw), um auf einem Prism-Drucker gedruckt zu werden. Wenn Sie
Grafiken nicht mit CD Designer, sondern mit einem anderen Programm erstellen
und speichern, müssen Sie die Grafiken vor dem Drucken auf dem Prism-Drucker
zuerst als PDF-Dateien speichern. Wenn Sie einen eigenständigen Prism-Drucker
oder einen AutoPrism AutoPrinter verwenden, können Sie aus jedem beliebigen
Programm mit Druckfunktion direkt drucken.
2002605_A
Weitere Informationen finden Sie unter rimage.com/support
5
Ansicht und Bedienelemente des Prism III Druckers
Vorderansicht
Rückansicht
Druckerschublade
Netzschalter
Netzanschluss
Bediener-Display
USB-Kabelanschluss
Bandbefestigung
Ansicht von oben
Auto-Drucker/
Roboter-Station
Kontrollverbindung
Bandführungen
Haltestifte
Druckerschublade und
Zentrierstift
2002605_A
Aufnahmerolle
Zuführungsrolle
Weitere Informationen finden Sie unter rimage.com/support
6
Ansicht und Bedienelemente des Prism III Druckers
Bediener-Display
Das Bedienfeld befindet sich an der Vorderseite des Druckers. Es enthält vier
Kontrollleuchten und eine Bedienertaste.
Bedienertaste
Mit der Bedienertaste öffnen und schließen Sie die Druckerschublade. In der Mitte
der Taste befindet sich eine gelbe Fehler-Kontrollleuchte. Weitere Informationen
hierzu finden Sie im nachfolgenden Abscleuchten.
DiscImage
Name
Funktion
Kon•
trollleuchte
„Disc nicht
vorhanden“
•
Kontrollleuchten
•
Im Folgenden werden Name und Funktion der einzelnen Kontrollleuchten
beschrieben. Jede Kontrollleuchte gibt Auskunft über den Zustand des
eigenständigen Prism-Druckers. Prism-Drucker an Roboter-Stationen oder
AutoPrism AutoPrintern verhalten sich unterschiedlich.
•
•
•
Bedienertaste mitFehlerKontrollleuchte
Kontrollleuchte „Disc nicht
vorhanden“
Kontrollleuchte „Aktiv“
Kontrollleuchte
„Versorgungsspannung“
Bediener-Display
DiscImage
Name
Funktion
Kontrollleuchte
„Fehler“
•
•
•
2002605_A
Kontrollleuchte
„Aktiv“
•
Netz-LED
•
•
•
Die Fehler-Kontrollleuchte in der Bedienertaste leuchtet
auf, wenn während des Druckvorgangs ein Fehler
auftritt.
Befindet sich der Drucker im Reinigungsmodus blinken
die Fehler-Kontrollleuchte und die Kontrollleuchte „Disc
nicht vorhanden“.
Ist das Band aufgebraucht, leuchtet die FehlerKontrollleuchte und die Kontrollleuchte „Disc nicht
vorhanden“ blinkt langsam.
•
•
Bei Auftreten eines Fehlers blinkt die Kontrollleuchte
„Disc nicht vorhanden“. Drücken Sie nach Beseitigung
des Fehlers die Bedienertaste, um die Kontrollleuchte
auszuschalten.
Die Kontrollleuchte „Disc nicht vorhanden“ leuchtet auf,
wenn die Schublade leer ist oder die Disc nicht richtig
gegriffen wird. Wird eine Disc auf die Schublade gelegt,
erlischt die Kontrollleuchte „Disc nicht vorhanden“.
Im Mehrfach-Druckmodus leuchtet die Kontrollleuchte
“Disc nicht vorhanden” so lange auf, bis die Disc von der
Unterlage genommen wird.
Die Kontrollleuchte „Disc nicht vorhanden“ blinkt
langsam und kontinuierlich wenn die verbleibende
Bandkapazität niedriger als 100 Discs für einfarbigen
Bänder und 25 Discs für CMY Bänder ist.
Ist das Band aufgebraucht, blinkt die Kontrollleuchte
„Disc nicht vorhanden“ langsam und die FehlerKontrollleuchte leuchtet auf.
Befindet sich der Drucker im Reinigungsmodus blinken
die Kontrollleuchte „Disc nicht vorhanden“ und die
Fehler-Kontrollleuchte.
Ist der Drucker in Betrieb, leuchtet die Kontrollleuchte
„Aktiv“.
Befindet sich der Drucker im AutoPrinter-Modus, blinkt
die Kontrollleuchte „Aktiv“ langsam und kontinuierlich.
Die Netz-LED leuchtet auf, wenn der Drucker
eingeschaltet wird.
Die Netz-LED blinkt wenn die Elektronik einen fatalen
Fehler entdeckt hat.
Die Netzanzeige erlischt, wenn der Drucker ein
fehlerhaftes Pixelelement im Druckkopf erkennt. Die
Netzanzeige leuchtet wieder auf, wenn eine Disc auf
die Unterlage gelegt wird und das Bedrucken von Discs
fortgesetzt werden kann. Beim weiteren Drucken kann
es vorkommen, dass im Druckergebnis kleine Striche
zu sehen sind. Dies ist ein Hinweis darauf, dass der
Druckkopf möglicherweise erneuert werden sollte.
Die Netzanzeige erlischt, wenn der Drucker
ausgeschaltet wird.
Weitere Informationen finden Sie unter rimage.com/support
7
Bedienung des Prism III Druckers
In diesem Abschnitt erhalten Sie alle erforderlichen Informationen für die
Bedienung des Prism-Druckers.
Ein- und Ausschalten des Prism-Druckers
Ein- und Ausschalten eines eigenständigen Druckers
Einlegen einer Disc in die Druckerschublade
1. Mit der operator button (Bedienertaste) öffnen Sie die Druckerschublade.
2. Legen Sie eine Disc auf die Gummiunterlage zwischen die Haltestifte und den
Zentrierstift.
1. Drücken Sie den Netzschalter an der Druckerrückseite. Der Drucker wird
dadurch eingeschaltet und initialisiert.
2. Drücken Sie den Netzschalter erneut. Der Drucker wird dadurch ausgeschaltet.
Wichtig! Legen Sie die Disc mit der zu bedruckenden Seite nach oben ein. Die
nicht zu bedruckende Seite (d. h. die Aufnahmeseite) weist einen erhabenen
Stapelring nahe dem inneren Kreis auf. Wird eine Disc mit dem Stapelring nach
oben eingelegt, kann der Druckkopf beschädigt werden.
Ein- und Ausschalten eines an eine Roboter-Station oder
einen AutoPrinter angeschlossenen Druckers
Tipps:
• Liegt die Disc auf den Haltestiften auf, wird die Schublade nicht
geschlossen.
• Die Eigenschaften von Druckunterlage und Druckplatte unterscheiden sich
bei den eigenständigen und den zur Automatisierung vorgesehenen
Modellen. Beim zur Automatisierung vorgesehenen Modell befindet sich
in der Mitte der Platte ein Loch, beim eigenständigen Modell nicht. Alle
Modelle sind mit einem Zentrierstift ausgerüstet.
3. Drücken Sie die operator button (Bedienertaste). Die Druckerschublade bewegt
sich in die Disc Befestigungsposition.
Netzschalter
Wenn Ihr Prism III Drucker mit einer Roboter-Station oder einem AutoPrinter
verbunden ist, gehen Sie wie folgt vor:
Platte
Tipp: Der Netzschalter am Drucker muss sich in der Stellung „Ein“ befinden.
1. Schalten Sie die Roboter-Station oder den AutoPrinter ein. Der Drucker wird
dadurch eingeschaltet und initialisiert.
2. Schalten Sie die Roboter-Station oder den AutoPrinter aus. Der Drucker wird
dadurch ausgeschaltet.
Zentrierstift
Haltestifte
Druckerschublade
2002605_A
Weitere Informationen finden Sie unter rimage.com/support
8
Festlegen der Druckvoreinstellungen
Festlegen der Druckvoreinstellungen
Wichtig: Sofern nicht anders angegeben, beziehen sich alle Anweisungen zur
Navigation in Windows auf 7. Bei anderen Windows-Betriebssystemen
unterscheiden sich die Navigationsmodalitäten.
Ändern Sie die Abdeckungseinstellungen
Die Rimage CD Designer Software ist bestimmt um auf optische Discs von 120 mm
zu drucken, und wird die Bereiche ausmarkieren welche nicht druckbar sind, wie
zum Beispiel im inneren Teil der Disc-Öffnung und außerhalb des Außenumfangs.
Zugreifen auf die Druckeinstellungen
1. Auswählen: Start > Devices and Printers (Geräte und Drucker). Das Dialogfeld
Geräte und Drucker wird geöffnet.
2. Klicken Sie mit der rechten Maustaste auf Rimage Prism III.
3. Wählen Sie im Dropdown-Menü Printing preferences (Druckeinstellungen). Das
Rimage Prism III Druckereinstellungen Fenster wird geöffnet.
Abgedeckte
Bereiche (kein
Druck)
Zugreifen auf die Druckeigenschaften
1. Auswählen: Start > Devices and Printers (Geräte und Drucker). Das Dialogfeld
Geräte und Drucker wird geöffnet.
2. Klicken Sie mit der rechten Maustaste auf Rimage Prism III.
3. Wählen Sie aus der Dropdownliste die Option Druckeigenschaften aus. Das
Rimage Prism III Druckereigenschaften Fenster wird geöffnet.
Layout und Papier-/Qualitätsvoreinstellungen
Einpaar Discs haben keine geeignete Druckoberfläche um dem Stapelring. Ändern
Sie die Registerkarteneinstellungen um den Druck auf diese Discs unterzubringen.
Die Optionen unter den Reiter Layout und Paper/Quality (Papier / Qualität)
brauchen keine Einstellungen. Der technische Support von Rimage wird
identifizieren, wenn diese Einstellungen eingestellt werden müssen, und kann bei
den Einstellungen helfen welche sich unter diesen Reiter befinden.
Abgedeckte
Bereiche (kein
Druck)
2002605_A
Weitere Informationen finden Sie unter rimage.com/support
9
Festlegen der Druckvoreinstellungen
1.
2.
3.
4.
5.
6.
Zugreifen Print Preferences (auf die Druckeinstellungen). Siehe Seite 9.
Klicken Sie auf die Registerkarte Masking Settings (Abdeckungseinstellungen).
Auswählen die Option Drucken auf einem Hub.
Messen Sie den Innen- und Außendurchmesser der bedruckbaren Oberfläche.
Geben Sie die Durchmesser in dem Abschnitt Hub Settings (Hubeinstellungen) ein.
Klicken Sie auf OK, um die Änderungen zu speichern.
Serviceoptionen
Der Service-Reiter liefert Information über Ihrem Prism III Drucker und bietet
eine Serie von Werkzeugen an, damit Ihren Drucker aktuell und ordnungsgemäß
funktioniert.
1. Zugreifen Print Preferences (auf die Druckeinstellungen). Siehe Seite 9.
2. Klicken Sie auf die Registerkarte Service (Dienst).
Das Fenster was Funktionsinformationen über Ihrem Prism III Drucker anzeigt.
• Treiber: Zeigt Information über den Druckertreiber, inklusive Name und
Versionsnummer an.
• Drucker: Zeigt Information über den Drucker, inklusive Druckername,
Seriennummer und Firmwareversion an.
• Druckerstatus: Zeigt den Druckerstatus an.
• Bandstatus: Zeigt den Bandtyp, den Prozentsatz der Bandbenutzung, die
Bandteilnummer und Farbcode, und die Seriennummer des Bandes was
installiert ist an.
Zentrieren des Disc-Image auf einer Disc
Das Zentrierungsbildwerkzeug wird benutzt um die Mechanismusmitte des Druckers
einzustellen, damit die Standard CD Designer Symbolleiste passt.
Tipp: Neujustierung ist nicht nötig es sei denn die Druckerkomponenten werden
ausgetauscht.
1. Zugreifen Print Preferences (auf die Druckeinstellungen). Siehe Seite 9.
2. Klicken Sie auf die Registerkarte Service (Dienst).
3. Klicken Sie auf Service ToolBox (Dienst-ToolBox).
Daraufhin wird das Dialogfeld Service ToolBox (Dienst-ToolBox) geöffnet.
4. Klicken Sie auf Center Image (Disc-Image zentrieren).
Das Dialogfeld „Centering Image“ wird geöffnet.
Ausdrucken PRN Dateien
1. Zugreifen Print Preferences (auf die Druckeinstellungen). Siehe Seite 9.
2. Klicken Sie auf die
Registerkarte Service
(Dienst).
3. Klicken Sie auf Service
ToolBox (Dienst-ToolBox).
Daraufhin wird das
Dialogfeld Service ToolBox
(Dienst-ToolBox) geöffnet.
4. Auswählen Print PRN File
(Ausdrucken PRN Dateien).
Ein Dialogfeld erscheint und erlaubt den Benutzer die ausgewählten PRN
Dateien zu drucken.
2002605_A
Weitere Informationen finden Sie unter rimage.com/support
10
Festlegen der Druckvoreinstellungen
5. Folgen Sie die Schritte welche auf dem Dialogfeld „Centering Image“ umrissen
sind:
a. Öffnen Sie die Druckerschublade und legen Sie eine weiße 120-mm-Disc in
die Schublade ein.
b. Wählen Sie die Taste Print Pattern (Druckmuster) im Dialogfeld Centering
Image (Disc-Image zentrieren).
Ein Muster wird auf die Disc gedruckt.
c. Die Disc um 180 Grad drehen.
Tipp: Nachdem Sie die Disc gedreht haben, der Pfeil was gedruckt wurde
sollte in der Mitte von der Blende sein, und die gedruckte Linie sollte
ausgerichtet mit der Kante der Druckerschublade sein.
Ausrichten mit
der Kante der
Druckerschublade
Pfeil
Blende
2002605_A
Weitere Informationen finden Sie unter rimage.com/support
11
Festlegen der Druckvoreinstellungen
i.
2002605_A
Wenn die Linien die vertikalen und horizontalen Skalen auf 0 kreuzen,
braucht man eine Einstellung. Drücken OK.
d. Wenn sich zumindest eine Linie über die 0 kreuzt, geben Sie die
horizontalen und vertikalen Berichtigungsfaktoren ein, welche von der Disc
gelesen werden. Save Settings (Einstellungen speichern) auswählen.
Weitere Informationen finden Sie unter rimage.com/support
12
Festlegen der Druckvoreinstellungen
Aktualisieren der Firmware
1. Zugreifen Print Preferences (auf die Druckeinstellungen). Siehe Seite 9.
2. Klicken Sie auf die Registerkarte Service (Dienst).
3. Klicken Sie auf Service ToolBox (Dienst-ToolBox). Daraufhin wird das Dialogfeld
Service ToolBox (Dienst-ToolBox) geöffnet.
4. Update Firmware (Firmware aktualisieren) auswählen.
Tipp: Beziehen Sie sich auf das Dokument Firmwareaktualisierung für den
Rimage Prism III Drucker für mehr Information um Ihre Firmwareversion zu
aktualisieren.
Einstellen Geräteeinstellungen für Schwarzweiß oder CMYBänder
Sie können wahlweise in einer oder in mehreren Farben drucken. Benutzen Sie
diesen Prozess um den Prism einzustellen, um in farbig oder einfarbig zu drucken,
und stellen Sie die Geräteeinstellungen für den benutzten Bandtyp ein.
Einfarbiger Druck
1. Legen Sie ein einfarbiges Band in den Drucker ein. Informationen hierzu finden
Sie unter Austauschen des Druckbands auf page 18.
Tipp: Die Druckfarbe wird automatisch gefunden und eingestellt auf dem
installierten Bandtyp im Drucker.
2. Navigieren Sie zu den Print Properties (Druckeigenschaften). Refer to page 9.
3. Klicken Sie auf die Registerkarte Device Settings (Geräteeinstellungen).
4. Wählen Sie Halftone Setup Properties (Halbton-Setup-Eigenschaften), um
Änderungen vorzunehmen, die sich auf Farbintensität, Farbbalance oder
Farbprofil auswirken.
5. Wählen Sie den Media Type (Medientyp aus).
Tipp: Manches DVD Medium hat einen erhöhten Stapelring auf der druckbaren
Disc-Seite. Der direkt thermisch benutzter Druckprozess im Prism III Drucker
kann nicht in diesem Bereich drucken. Die DVD mit oberen Stapelring
verursacht dass der Drucker den Stapelring überspringt, und somit gibt es ein
unbedrucktes Band auf der Disc. Rimage empfiehlt Discs ohne den Stapelring
auf der druckbaren Oberfläche zu benutzen.
7. Wählen Sie Yes (Ja) oder No (Nein) in der Option Double Print (Doppeldruck).
Die Standardeinstellung lautet No (Nein).
Tipps:
• Wenn Sie Yes (Ja) in der Option Double Print (Doppeldruck) auswählen,
wird der Drucker jede Disc zweimal bedrucken um das Bild zu verdunkeln.
• Die Option Doppeldruck ist nur für den Einfarbigen Druck verfügbar.
8. Wählen Sie Yes (Ja) oder No (Nein) in der Option Detect Media
Change (Medienwechsel erkennen). Der Standard ist No. Halten Sie die
Standardfunktion für die AutoPrinter oder Roboter-Station Benutzung.
Tipp: Wenn Sie ja auswählen, wird der Drucker auf dem Benutzer warten, um
die Disc auszuwechseln, bevor eine andere bedruckt wird.
9. Deaktivieren Sie bei einem eigenständigen Prism III Drucker die Option
Perfect Print. Die Option „Perfect Print“ steht nur bei Rimage AutoPrinter zur
Verfügung.
Tipp: Nähere Informationen hierzu entnehmen Sie dem Rimage AutoPrinter
Benutzerhandbuch auf der Perfect Print Option.
10. Wählen Sie OK, um die Änderungen zu speichern und das Fenster
Geräteeinstellungen zu schließen.
Mehrfarbiger Druck
1. Legen Sie ein mehrfarbiges Band in den Drucker. Informationen hierzu finden
Sie unter Austauschen des Druckbands auf page 18.
Tipp: Die Druckfarbe wird automatisch gefunden und eingestellt auf dem
installierten Bandtyp im Drucker.
2. Navigieren Sie zu den Print Properties (Druckeigenschaften). Beziehen Sie sich
auf page 9.
3. Klicken Sie auf die Registerkarte Device Settings (Geräteeinstellungen).
4. Wählen Sie Halftone Setup Properties (Halbton-Setup-Eigenschaften), um
Änderungen vorzunehmen, die sich auf Farbintensität, Farbbalance oder
Farbprofil auswirken.
6. Stellen Sie die Master Print Strobe (Druckimpulsdauer ein): Beziehen Sie sich
auf den Abschnitt Impulseinstellungen für mehr Information.
2002605_A
Weitere Informationen finden Sie unter rimage.com/support
13
Festlegen der Druckvoreinstellungen
Impulseinstellungen
5. Wählen Sie den Media Type (Medientyp aus).
Tipp: Manches DVD Medium hat einen erhöhten Stapelring auf der druckbaren
Disc-Seite. Der direkt thermisch benutzter Druckprozess im Prism III Drucker
kann nicht in diesem Bereich drucken. Die DVD mit oberen Stapelring
verursacht dass der Drucker den Stapelring überspringt, und somit gibt es ein
unbedrucktes Band auf der Disc. Rimage empfiehlt Discs ohne den Stapelring
auf der druckbaren Oberfläche zu benutzen.
6. Stellen Sie die Master Print Strobe (Druckimpulsdauer ein): Beziehen Sie sich
auf den Abschnitt Impulseinstellungen für mehr Information.
7. Farbunterimpulse verfügbar. Beziehen Sie sich auf den Abschnitt
Impulseinstellungen für mehr Information.
Wichtig! Farbunterimpulse sind nur verfügbar mit CMY Bänder und sind als
Standard nicht verfügbar. Die Druckimpulsdauer bewirkt nichts, wenn die
Farbunterimpulse verfügbar sind.
8. Wählen Sie Yes (Ja) oder No (Nein) in der Option Detect Media Change
(Medienwechsel erkennen). Die Standardeinstellung lautet No.
Tipp: Wenn Sie ja auswählen, wird der Drucker auf dem Benutzer warten, um
die Disc auszuwechseln, bevor eine andere bedruckt wird.
9. Deaktivieren Sie bei einem eigenständigen Prism III Drucker die Option
Perfect Print. Die Option „Perfect Print“ steht nur bei Rimage AutoPrinter zur
Verfügung.
Tipp: Nähere Informationen hierzu entnehmen Sie dem Rimage AutoPrinter
Benutzerhandbuch auf der Perfect Print Option.
10. Wählen Sie OK, um die Änderungen zu speichern und das Fenster
Geräteeinstellungen zu schließen.
Die Impulseinstellungen kontrollieren die benutzte Energiemenge um ein Pixel zu
drucken. Umso höher die Einstellung umso mehr Energie wird benutzt. Wenn die
Einstellungen höher werden, wird das Bild intensiver und die Lebensdauer des
Druckkopfes niedriger. Rimage empfiehlt die kleinste Impulseinstellung zu benutzen,
welche die gewünschte Bildqualität liefert.
Hinweise:
• Dies sind empfohlene Einstellungen für Original-Rimage-Medien.
• Zur Feineinstellung des Farbtons können mehrere Testdrucke erforderlich sein.
Aktivieren Sie den Unterpunkt zur farbabhängigen Einstellung der
Druckimpulsdauer. Beispielsweise kann hiermit die Einstellung Gelbdruckimpuls
verringert werden, um den Halo-Effekt auf einer bedruckten Disc auszuschalten.
1. Gehen Sie zu Print Properties (Druckmerkmale). Siehe Seite 9.
2. Wählen Sie den Reiter Device Settings (Geräteinstellungen).
3. Stellen Sie die Master Print Strobe (Druckimpulsdauer ein).
Bemerkung: Rimage empfiehlt die folgenden Einstellungen für Original-RimageMedien:
• Medienoberfläche: Thermodruckfähige Medien
• Druckimpulseinstellung für schwarzes Band: 325 - 400
• Druckimpulseinstellung für rotes Band: 375 - 425
• Druckimpulseinstellung für blaues Band: 350 - 400
4. Aktivieren Sie den Unterpunkt zur farbabhängigen Einstellung der
Druckimpulsdauer.
Wichtig! Die Farbunterimpulseinstellungen sind nur mit den CMY Bänder
verfügbar.
5. Wählen Sie OK, um die Änderungen zu speichern und das Fenster
Geräteeinstellungen zu schließen.
2002605_A
Weitere Informationen finden Sie unter rimage.com/support
14
Warten des Prism III Druckers
In diesem Abschnitt erfahren Sie, wie Sie Ihren Prism III Drucker in einem für den
Betrieb optimalen Zustand bewahren.
Übersicht
Eine regelmäßige präventive Wartung Ihres Prism III Druckers trägt dazu bei, dass sie
stets beste Druckergebnisse erzielen. Wartung umfasst eine Reinigung des Systems.
Vorsichtsmaßnahmen
nn Vorsicht: So vermeiden Sie eine Beschädigung des Prism III Druckers bei der
Wartung:
• Wenden Sie an keinem Teil des Prism-Druckers Öl, Silikon oder andere
Schmierstoffe an.
• Wischen Sie die Oberflächen des Prism-Druckers nur mit nicht-scheuernden
Reinigungsmitteln ab.
• Schütten Sie keine Reinigungsmittel direkt auf den Prism-Drucker. Tragen
Sie das Reinigungsmittel stattdessen auf ein fusselfreies Tuch auf.
Hilfsmittel
Maßnahme
Häufigkeit
Anleitung
• Fusselfreies
Tuch
Reinigen der
Außenflächen.
Wöchentlich
1. Schalten Sie den
Prism aus.
2. Ziehen Sie das
Netzkabel ab.
3. Wischen Sie die
Außenflächen des
Druckers ab.
• Neues
Druckband
Austauschen
des
Druckbands.
Einfarbig
Schwarz:
2100 Discs
Einfarbig Rot:
2100 Discs
Einfarbig Blau:
2100 Discs
3-farbiges Band
(CMY):
500 discs
Informationen hierzu
finden Sie unter Change
the Print Ribbon auf
page 18.
DruckkopfReinigungskit
Reinigen
Sie den
Druckkopf.
Bei jedem
Austausch des
Bands bzw. bei
Bedarf
Informationen hierzu
finden Sie unter
Reinigen des Druckkopfs
auf page 16.
• Nicht
scheuerndes
Allzweckreinigungsmittel
Präventiver Wartungsplan
Die folgende Tabelle dient als Richtlinie zur Durchführung von präventiven
Wartungsarbeiten.
Wichtig! Nichtbeachtung des folgenden Wartungsplans kann zum Erlöschen der
Gewährleistung führen.
2002605_A
Weitere Informationen finden Sie unter rimage.com/support
15
Warten des Prism III Druckers
Reinigen des Druckkopfs
Reinigen Sie den Druckkopf bei jedem Bandwechsel bzw. häufiger, wenn sich beim
Drucken Streifen zeigen oder das Band gerissen ist.
Zur Reinigung des Prism III Druckkopfs gibt es zwei Methoden: mit dem PrismReinigungskit oder mit der alternativen Methode. Die alternative Methode kann
angewendet werden, wenn kein Reinigungskit vorhanden ist. In diesem Abschnitt
finden Sie Anweisungen für beide Methoden.
Bemerkung: Wenn der Prism-Drucker an eine Roboter-Station oder einen
AutoPrinter angeschlossen ist, ist es unter Umständen einfacher, den Drucker vor
dem Reinigen vom System abzunehmen.
• Schalten Sie den Drucker aus.
• Entfernen Sie alleKabel von der Rückseite des Druckers. Informationen hierzu
finden Sie unter Ansicht der Bedienelemente auf page 6.
• Nehmen Sie den Drucker vom System ab, und stellen Sie ihn auf eine ebene
Oberfläche in der Nähe einer Steckdose.
• Schließen Sie ein gesondertes Netzkabel an der Druckerrückseite an, und
stecken Sie es in die Steckdose.
Reinigen des Prism III Druckkopfs mit einem PrismReinigungskit
Wenn Sie ein Prism-Reinigungskit haben, gehen Sie folgendermaßen vor, um den
Druckkopf zu reinigen.
2. Starten Sie den Reinigungsmodus.
a. Halten Sie die operator button (Bedienertaste) drückt und drücken Sie den
Netzschalter, um den Prism einzuschalten.
b. Wenn die Kontrollleuchte „Disc nicht vorhanden“ (die zweite Leuchte auf
dem Bedienfeld) blinkt, lassen Sie die operator button (Bedienertaste) los.
Die Druckerschublade wird geöffnet.
Wenn die Bedienertaste und die Kontrollleuchte „Disc nicht vorhanden“
(die zwei oberen Kontrollleuchten im Bedienfeld) schnell blinken, befindet
sich der Drucker im Reinigungsmodus.
3. Bereiten Sie das Reinigungsvlies vor.
Bemerkung: Das Reinigungsvlies ist im Reinigungskit enthalten.
a. Ziehen Sie die Klebefolie vom Reinigungsvlies ab.
b. Befestigen Sie das Reinigungsvlies auf einer Disc.
c. Stellen Sie sicher, dass die Seiten des Vlieses genau mit der Disc in Deckung
sind.
d. Legen Sie das Reinigungsvlies mit der anhaftenden Disc in die
Druckerschublade. Stellen Sie sicher, dass die Disc genau an den
Haltestiften in der Schublade ausgerichtet ist.
e. Drücken Sie das Vlies nach unten und auf den Sensor in der
Druckerschublade.
f. Geben Sie fünf Tropfen Isopropylalkohol auf das Reinigungsvlies.
## Erforderliche Hilfsmittel:
• Prism-Reinigungskit (PN 210555-001)
• Eine Disc
• Isopropylalkohol (99 %)
• Wattestäbchen
1. Bereiten Sie den Prism für die Reinigung vor.
a. Schalten Sie den Prism aus.
b. Nehmen Sie die obere Abdeckung ab.
c. Nehmen Sie das Band heraus. Informationen hierzu finden Sie unter
Austauschen des Druckbands auf page 18.
2002605_A
Weitere Informationen finden Sie unter rimage.com/support
Reinigungsvlies über den
Sensor legen
Reinigungsvlies mit Disc
Druckerschublade
16
Warten des Prism III Druckers
4. Reinigen Sie den Druckkopf.
a. Drücken Sie die operator button (Bedienertaste), um die Druckerschublade
zu schließen und den Reinigungszyklus zu starten. Nach Abschluss des
Reinigungszyklus wird die Druckerschublade geöffnet.
b. Falls nötig, wiederholen Sie den Schritt a, um den Reinigungszyklus zu
wiederholen.
c. Wenn der Druckkopf sauber ist, nehmen Sie das Reinigungsvlies mit der
Disc wieder aus der Druckerschublade.
Vordere Bandführungen
Reinigungsvlies
Reinigungsmittel
5. Reinigen Sie die zwei vorderen Bandführungen.
a. Geben Sie Isopropylalkohol auf ein sauberes Wattestäbchen.
b. Fahren Sie mit dem Wattestäbchen über die Bandführungen, um sie zu
reinigene.
6. Bereiten Sie den Prism für den Betrieb vor.
a. Schalten Sie den Drucker am Netzschalter aus und wieder ein, um den
Reinigungsmodus zu beenden und den Drucker neu zu starten.
b. Legen Sie das Band wieder ein. Informationen hierzu finden Sie unter
Austauschen des Druckbands auf page 18.
c. Wenn Sie den Drucker aus einer Roboter-Station oder einem AutoPrinter
entnommen hatten, setzen Sie ihn wieder in das System ein und schließen
Sie alle Kabel wieder an. Informationen hierzu finden Sie unter Ansicht der
Bedienelemente Prism III Drucker auf page 6.
Bemerkung: Wird die Druckunterlage in der Schublade beim Reinigen nass,
muss sie ganz trocknen, bevor der Prism wieder eingeschaltet wird.
2002605_A
Reinigen des Druckkopfs – alternative Methode
Wenn Sie kein Reinigungskit haben, gehen Sie folgendermaßen vor, um den PrismDruckkopf zu reinigen.
## Erforderliche Hilfsmittel:
• Isopropylalkohol (99 %)
• Wattestäbchen
1. Bereiten Sie den Prism III vor.
a. Schalten Sie den Prism III ein.
b. Mit der operator button (Bedienertaste) öffnen Sie die Druckerschublade.
c. Schalten Sie den Prism III aus.
d. Nehmen Sie die obere Abdeckung ab.
e. Nehmen Sie das Band heraus. Informationen hierzu finden Sie unter
Austauschen des Druckbands auf page 18.
2. Reinigen Sie den Druckkopf.
a. Geben Sie Isopropylalkohol auf ein Wattestäbchen.
b. Führen Sie das Wattestäbchen in die Schubladenöffnung ein.
c. Heben Sie das Wattestäbchen an und wischen Sie damit die Konvexe
Oberfläche des Druckkopfs.
Konvexe Oberfläche des
Druckkopfs
Wichtig! Hier ist die Unterseite des Druckkopfs abgebildet, um die zu reinigende
Fläche zu zeigen. Entfernen Sie den Druckkopf nicht vom Drucker.
Weitere Informationen finden Sie unter rimage.com/support
17
Warten des Prism III Druckers
3. Sie die zwei vorderen Bandführungen.
a. Geben Sie Isopropylalkohol auf ein sauberes Wattestäbchen.
b. Fahren Sie mit dem Wattestäbchen über die Bandführungen, um sie zu
reinigen.
4. Bandführungen, um sie zu reinigen. Nachdem der Alkohol auf dem Druckkopf
getrocknet ist, können Sie den Prism für den Betrieb vorbereiten.
a. Legen Sie das Band ein. Informationen hierzu finden Sie unter Austauschen
des Druckbands auf page 18.
b. Wenn Sie den Drucker aus einer Roboter-Station oder einem AutoPrinter
entnommen hatten, setzen Sie ihn wieder in das System ein und schließen
Sie alle Kabel wieder an der Druckerrückseite an. Informationen hierzu
finden Sie unter Ansicht der Bedienelementeauf page 6.
Austauschen des Druckbands
Rimage unterstützt bei seinen Druckern nur die Verwendung von original RimageBändern. Druckerprobleme, die aufgrund der Verwendung von Bändern anderer
Hersteller entstehen, sind durch die Rimage-Garantie oder den Wartungsvertrag
nicht abgedeckt.
Tipp: Werden Bänder an einem Ort gelagert, der sich in den
Umgebungsbedingungen deutlich vom Einsatzort des Druckers unterscheidet, ist
sicherzustellen, dass sich die Bänder zunächst an die neuen Bedingungen anpassen
können. Je größer der Temperatur- und/oder Feuchtigkeitsunterschied ist, desto
mehr Zeit muss berücksichtigt werden.
2002605_A
Bemerkung: Wenn Sie das Band erneuern, ist dies eine gute Gelegenheit, den
Druckkopf zu reinigen. Informationen hierzu finden Sie unter Reinigen des
Druckkopfs auf page 16.
2. Legen Sie das Druckband ein.
a. Schieben Sie das Druckband auf die Zuführungsrolle.
b. Richten Sie die beiden Kerben im Pappkern auf die Metallstifte auf der
Zuführungsrolle aus.
Druckband
Pappkern
Wichtig! Der Prism III Drucker läuft nur mit originale Rimage Bänder.
1. Vorbereitung zum Laden des Druckbandes.
a. Schalten Sie den
Prism ein.
b. Nehmen Sie die
obere Abdeckung
vom Drucker ab.
c. Heben Sie die
Aufnahmerolle
zunächst an der
Zahnradseite an und
heben Sie sie dann
aus dem Drucker
Aufnahmerolle
heraus.
d. Heben Sie die Zuführungsrolle aus dem Drucker heraus.
Zuführungsrolle
Metallstifte
Kerben
Zuführungsrolle
c. Drücken Sie die operator button (Bedienertaste) um die Druckerschublade
zu schließen.
d. Lösen Sie das Vorlaufband vom.
e. Schieben Sie das Vorlaufband unter der Bandführung und in die
Bandinstallationsbefestigung.
Bandinstallationsbefestigung
Bandführung
Druckerschublade
Vorlaufband
Weitere Informationen finden Sie unter rimage.com/support
18
Warten des Prism III Druckers
3. Zuführungsband ab. Setzen Sie die Zuführungsrolle wie gezeigt ein. Ziehen Sie
das Vorlaufband nicht ganz straff.
a. Drücken Sie die operator
button (Bedienertaste), bis die
Schublade ausgefahren wird.
Das Band wird zur Vorderseite
des Prism gezogen.
b. Entfernen Sie das Vorlaufband
aus der Installationsbefestigung.
c. Entfernen Sie den
Zuführungsrolle
Klebestreifenschutz vom
Vorlaufband.
4. Setzen Sie die Aufnahmerollee in.
a. Stecken Sie den neuen leeren Pappkern auf die Aufnahmerolle. Er kann
nur in einer Richtung aufgesteckt werden.
b. Setzen Sie die Aufnahmerolle auf das Vorlaufband, siehe Abbildung.
Wichtig! Das Zahnrad muss sich auf der richtigen Seite befinden.
Zahnrad
c. Ziehen Sie das Vorlaufband
nach oben über den
Pappkern.
d. Befestigen Sie den
Klebestreifen so am
Pappkern, dass sich die
Kanten des Vorlaufbands
mit den Kanten des
Pappkerns decken.
e. Drehen Sie die Rolle
so weit, dass sich das
Vorlaufband einmal um die
Rolle legt.
Wichtig! Wickeln Sie das Band nicht über die STOP-Markierung STOP Wind Leader Onto Take-up Core Stopping Here hinaus auf die einfarbigen
Bänder. Wenn Sie ein CMY Band benutzen, rollen Sie das Ende des gelben
Bandes auf.
Pappkern
Vorlaufband
Klebestreifen
2002605_A
Weitere Informationen finden Sie unter rimage.com/support
19
Warten des Prism III Druckers
5. Setzen Sie die Aufnahmerolle den Prism ein und drücken Sie sie fest bis zum
Einrasten herunter. Das Band muss straff sein und darf keine Falten werfen.
Vorlaufband
Aufnahmerolle
Markierung
Wichtig! Wickeln Sie die Markierung STOP – Wind Leader Onto Take-up Core
Stopping Here auf dem Vorlaufband nicht auf die Aufnahmerolle. Die
Markierung darf nicht hinter dem in der Abbildung gezeigten Punkt liegen.
Liegt die Markierung auf der Rolle, ziehen Sie die Aufnahmerolle heraus und
spulen das Band zurück. Drehen Sie die Zuführungsrolle zurück, um das Band zu
straffen.
6. Drücken Sie die operator button (Bedienertaste) und warten Sie für 5 Sekunden
damit der Drucker das Band erkennt. Wenn das Band vom Drucker erkannt
wurde, hört auf die Kontrollleuchte „Fehler“ zu blinken.
Bemerkung: Während der Bandüberprüfung wird das Band über das
Vorlaufband hinaus gewickelt. Vergewissern Sie sich nach der Bandüberprüfung,
dass das Band straff ist.
7. Setzen Sie die obere Abdeckung auf.
2002605_A
Weitere Informationen finden Sie unter rimage.com/support
20
Manuel d’utilisation de l’imprimante Prism III
Siège social :
Rimage Corporation
7725 Washington Avenue South
Minneapolis, MN 55439
États-Unis
Siège européen :
Rimage Europe GmbH
Albert-Einstein-Str. 26
63128 Dietzenbach
Allemagne
Siège Asie/Pacifique :
Rimage Japan Co., Ltd.
2F., WIND Bldg.
7-4-8 Roppongi Minato-ku,
Tokyo 106-0032 JAPON
800-553-8312 (Amérique du Nord)
Service : +1 952-946-0004
(Mexique/Amérique latine)
Télécopie : +1 952-944-6956
Tel. : +49 6074-8521-14
Télécopie : +496074-8521-100
Tel. : +81-3-5771-7181
Télécopie : +81-3-5771-7185
Rimage Corporation se réserve le droit d'apporter des améliorations à l'équipement et au logiciel décrits dans ce document à tout moment et sans
avis préalable. Rimage Corporation se réserve le droit de réviser cette publication et d’y apporter des modifications ponctuelles sur son contenu sans
obligation pour Rimage Corporation d’aviser quiconque de telles révisions ou modifications.
Ce document est susceptible de contenir des liens vers des sites Web existants au moment de la publication, mais qui peuvent avoir été déplacés ou
être devenus inactifs depuis lors. Il se peut que ce document contienne des liens vers des sites Internet qui appartiennent et sont exploités par des
tiers. Rimage Corporation n'est en aucun cas responsable du contenu de ces sites tiers.
© 2012, Rimage Corporation
Rimage® est une marque déposée de Rimage Corporation. Rimage Prism III, AutoPrism™ et CD Designer™ sont des marques commerciales de Rimage
Corporation. Dell™ est une marque commerciale de Dell Computer Corporation. FireWire™ est une marque commerciale de Apple Computer, Inc.
Windows® est une marque déposée de Microsoft Corporation.
Toutes les autres marques et marques déposées appartiennent à leurs propriétaires respectifs.
La version la plus récente de ce document est disponible à l'adresse www.rimage.com/support.
2002605_A
Pour plus de renseignements, consultez rimage.com/support
Sommaire
Introduction..................................................................................... 1
Définition des paramètres du périphérique pour les rubans monochromes ou CMJ....... 12
À propos de ce guide d'utilisation............................................................................. 1
À propos de l'imprimante Prism III........................................................................... 1
Instructions de déballage et de configuration.......................................................... 1
Configuration de vos préférences d'impression............................... 12
Informations importantes................................................................. 2
Informations relatives à l’assistance......................................................................... 2
Informations complémentaires en ligne................................................................... 2
Assistance technique................................................................................................ 2
Avis d’exclusion de responsabilité pour le logiciel d’enregistrement
sur CD optique.......................................................................................................... 2
Informations de sécurité et de conformité............................................................... 3
Consignes de sécurité.......................................................................................................... 3
Informations de conformité................................................................................................ 4
Spécifications de l’imprimante Prism III............................................ 5
Rubans...................................................................................................................... 5
Conception des étiquettes........................................................................................ 5
Impression................................................................................................................ 5
Impression monochrome................................................................................................................ 12
Impression en couleur.................................................................................................................... 13
Paramètres de l'impulsion stroboscopique d’impression............................................................... 14
Entretien de l'imprimante Prism III................................................. 15
Présentation............................................................................................................ 15
Informations importantes................................................................................................. 15
Programme de maintenance préventive........................................................................... 15
Entretien de l'imprimante Prism III................................................. 16
Nettoyage de la tête d'impression.......................................................................... 16
Nettoyage de la tête d'impression de l'imprimante Prism III à l'aide
d'un kit de nettoyage Prism............................................................................................... 16
Nettoyage de la tête d'impression – méthode alternative................................................ 17
Remplacement du ruban d'impression................................................................... 18
Identification des pièces de l'imprimante Prism III............................ 6
Vue de face............................................................................................................... 6
Vue du dessus........................................................................................................... 6
Vue arrière................................................................................................................ 6
Identification des pièces de l'imprimante Prism III............................ 7
Panneau de l’opérateur............................................................................................ 7
Bouton de commande.............................................................................................. 7
Voyants lumineux..................................................................................................... 7
Utilisation de l'imprimante Prism III................................................. 8
Mise sous et hors tension de l'imprimante Prism..................................................... 8
Mise sous ou hors tension d'une imprimante Stand-Alone................................................ 8
Mise sous ou hors tension d'une imprimante connectée à un chargeur
automatique ou à un robot d’impression AutoPrinter........................................................ 8
Positionnement d’un disque sur le plateau de l’imprimante.................................... 8
Configuration de vos préférences d'impression................................. 9
Configuration de vos préférences d'impression....................................................... 9
Accès aux préférences d’impression................................................................................... 9
Accès aux propriétés d'impression...................................................................................... 9
Préférences de mise en page et papier/qualité . ................................................................ 9
Modification des paramètres de masque............................................................................ 9
Options de gestion et de maintenance............................................................................. 10
Impression de fichiers PRN............................................................................................................. 10
Centrage de l’image sur le disque................................................................................................... 10
Mise à jour du micrologiciel............................................................................................................ 12
2002605_A
Pour plus de renseignements, consultez rimage.com/support
Introduction
Le présent manuel fournit les informations requises pour utiliser, configurer et
entretenir l'imprimante Rimage Prism III.
Pour des informations spécifiques concernant votre chargeur automatique ou
votre robot d’impression AutoPrinter Rimage, consultez le guide de l'utilisateur
du produit à l'adresse www.rimage.com/support. Allez sur la page Support
(Assistance), sélectionnez Prism III et ensuite l'onglet User Manuals (Guides de
l'utilisateur).
À propos de l'imprimante Prism III
Important ! Il est possible que votre imprimante Prism III ne ressemble pas
exactement au modèle illustré dans ce guide.
Instructions de déballage et de configuration
À propos de ce guide d'utilisation
•
•
•
Bien que nous fassions tout notre possible pour maintenir à jour l’ensemble
de nos documentations et de nos manuels, sachez que la version anglaise
disponible sur notre site Web contient les informations les plus récentes.
Sauf indication contraire, toutes les instructions de navigation Windows se
rapportent à des chemins d’accès Windows 7. La navigation dans les autres
systèmes d’exploitation Windows peut différer légèrement.
Les symboles et remarques suivants sont utilisés dans le manuel pour clarifier
les informations données :
La Prism III fait partie de la gamme d'imprimantes Rimage. Il s'agit d'une
imprimante ultra rapide permettant d'imprimer des informations monochromes
ou en couleur sur des CD, des DVD ou des disques Blu-ray DiscTM.
L'imprimante peut être utilisée en mode manuel en tant qu’imprimante StandAlone ou être couplée à un chargeur automatique ou un robot d’impression
AutoPrinter Rimage.
Les instructions de déballage et d'installation sont fournies avec l'imprimante
Prism III. Veuillez vous référer au guide d'installation et de configuration de
l'imprimante Prism III Rimage, ainsi qu'au guide d'installation et de configuration
fourni avec votre chargeur automatique ou robot d’impression AutoPrinter
Rimage.
Conseil : un conseil peut suggérer des méthodes différentes qui ne sont pas
forcément évidentes et vous aider à comprendre les avantages et les possibilités
du produit.
Important !
• Une remarque importante fournit des informations essentielles pour
l’exécution d’une tâche.
•
Informations importantes supplémentaires.
•
Si vous n'êtes pas obligé de tenir compte d’un conseil pour exécuter une
tâche, en revanche, vous ne pouvez ignorer une remarque importante.
nn Attention : indique que la non-observation de la directive correspondante
pourrait provoquer la perte ou l’endommagement de l’équipement, du
produit, du logiciel ou des données.
nn Avertissement ! Indique que la non-observation de cette directive
pourrait être à l’origine de blessures pour le personnel d’exploitation ou de
maintenance de l’équipement.
2002605_A
Pour plus de renseignements, consultez rimage.com/support
1
Informations importantes
Cette section contient les informations requises pour contacter l’assistance ainsi
que des mises en garde et des avertissements concernant l'imprimante Prism III.
Les spécifications techniques concernant ce produit sont consultables sur www.
rimage.com/support. Sur la page Support (Assistance), sélectionnez : Printer
Series (Série Impression) > Prism > User Manuals (Guides de l’utilisateur).
Informations relatives à l’assistance
États-Unis, Canada et Amérique latine
Rimage Corporation
Adresse électronique : [email protected]
7725 Washington Avenue South
Minneapolis, MN 55439
États-Unis
Attn: Rimage Services
Téléphone :
Amérique du Nord : 800-553-8312
Mexique/Amérique latine : 952-944-8144
Télécopie : 952-944-7808
Europe
Rimage Europe GmbH
Adresse électronique : [email protected]
Albert-Einstein-Str. 26
Téléphone : +49 6074-8521-14
63128 Dietzenbach
Télécopie : +49 6074-8521-100
Allemagne
Asie/Pacifique
Rimage Japan Co., Ltd.
Adresse électronique : [email protected]
2F., WIND Bldg.
Téléphone : +81-3-5771-7181
7-4-8 Roppongi Minato-ku,
Télécopie : +81-3-5771-7185
Tokyo 106-0032 JAPON
Pour contacter les Services Rimage :
Site Web : www.rimage.com/support
Base de connaissances : http://rimage.custhelp.com
Connectez-vous et cliquez sur l’onglet Ask a Question (Poser une question).
Lorsque vous contactez les
Services Rimage, veuillez fournir :
Copiez ces informations relatives à votre produit
Rimage pour référence ultérieure.
• le numéro de série du système et la
version du logiciel
Remarque : Veillez à mettre à jour le numéro de
série à chaque fois que vous recevez un système de
remplacement.
• une description fonctionnelle et
technique du problème
• le message d’erreur exact reçu
Numéro de série :
Informations complémentaires en ligne
Sur www.rimage.com/support, vous découvrirez les services et l’assistance de
classe mondiale offerts par Rimage.
À partir de la page d’accueil Assistance :
1.
Sélectionnez la série de votre produit.
2.
Sélectionnez votre produit.
3.
Apprenez-en plus sur la page du
produit.
À partir de la page du produit, vous pouvez
accéder aux éléments suivants :
•informations sur les dernières mises à
jour du logiciel et du micrologiciel
•caractéristiques du produit
•documents les plus récents
•téléchargements des pilotes et des
micrologiciels disponibles
Assistance technique
Rimage propose de nombreuses options de service et d’assistance pour
l'imprimante Prism III, notamment des services d'échange. Pour des informations
supplémentaires, notamment en ce qui concerne les tarifs de ces services, veuillez
contacter votre revendeur à valeur ajoutée Rimage ou notre groupe Rimage.
Important ! Veillez à enregistrer votre système Rimage pour obtenir une garantie
pièces et main-d'œuvre valable un an et bénéficier d'un accès prioritaire à
l'assistance téléphonique. Pour l’enregistrement, connectez-vous à la page http://
www.rimage.com/support/warranty-registration.
Avis d’exclusion de responsabilité pour le logiciel
d’enregistrement sur CD optique
Il se peut que ce produit, le logiciel ou la documentation aient été conçus pour
vous aider à la reproduction d'un matériel dont vous possédez les droits d'auteurs
ou pour lequel vous avez obtenu l’autorisation de copier auprès du propriétaire
des droits. En l’absence de détention de ces droits d’auteur ou d’une telle
autorisation, vous êtes susceptible d’enfreindre la loi sur les droits d’auteur et
d’être passible de dommages et intérêts ou d’autres réparations. En cas de doute
concernant vos droits, nous vous invitons à consulter votre conseiller juridique.
Si vous ne possédez ni les droits d’auteur ni l’autorisation du détenteur des droits
d’auteur, la copie non autorisée de contenu soumis à des droits d’auteur et
présent sur un disque optique ou tout autre support viole les lois nationales et
internationales et peut entraîner des sanctions pénales sévères.
Nom du produit :
Date d’achat :
2002605_A
Pour plus de renseignements, consultez rimage.com/support
2
Informations importantes
Informations de sécurité et de conformité
Data Transmission System 13.56MHz, TI Model Number: TRF7960
Ce manuel et les indications sur le produit assurent un fonctionnement adéquat
et en toute sécurité. Les indications ci-dessous vous aideront à vous prémunir,
vous et les autres personnes, contre d’éventuels accidents et à éviter tout
endommagement de l’équipement.
Pour plus d'informations, consultez la section ci-dessous ainsi que la section
Consignes de sécurité en page 4 et la section Informations de conformité.
Consignes de sécurité
nn Attention :
•
•
•
•
Pour garantir la sécurité, veuillez lire ces consignes et vous familiariser avec leur
signification avant d’utiliser cet équipement.
nn Avertissement !
•
•
•
•
•
•
•
L’utilisation de commandes ou de réglages, ou l’exécution de procédures
autres que celles ici spécifiées pourraient entraîner une exposition
dangereuse aux radiations.
Ne démontez pas l’imprimante et n’utilisez aucun outil. Toutes les
procédures d’entretien doivent être réalisées par un technicien agréé
Rimage ou le produit doit être envoyé en réparation dans un centre de
réparation agréé Rimage.
L'entretien de l'imprimante doit être effectué avec le cordon
d'alimentation débranché.
L’intérieur de l’imprimante contient des arêtes coupantes.
La partie avant de l'imprimante peut être ouverte manuellement.
N'insérez pas vos doigts.
Ne touchez pas au rouleau de chauffage.
2002605_A
•
•
Tous les équipements alimentés par courant alternatif (secteur) ou
par courant continu basse tension, comme les interrupteurs, les blocs
d’alimentation, les fusibles, les ventilateurs, les moteurs autres que pas à
pas, doivent être remplacés par des composants agréés par Rimage afin
de conserver l’agrément de sécurité émis par UL.
N’utilisez que le cordon d’alimentation secteur fourni. Pour de plus amples
informations ou pour commander un nouveau cordon d'alimentation,
contactez le service client Rimage.
Ce produit est conçu pour fonctionner dans un environnement de bureau.
N'utilisez pas l'imprimante en cas de surchauffe ou si une odeur anormale
s'en dégage. Un incendie peut se déclarer et il y a un risque de décharge
électrique. En cas de surchauffe ou d'odeur anormale, vous devez
immédiatement débrancher le câble de la prise de courant. Contactez
votre revendeur agréé Rimage pour toute réparation.
Laissez suffisamment d’espace libre pour l’ouverture du tiroir du plateau
de l’imprimante. Ne touchez pas au plateau de l’imprimante pendant son
déplacement.
Si le panneau latéral est ouvert pendant que l’imprimante est sous
tension, l’imprimante s’arrête. N’intervenez jamais à l’intérieur de
l’imprimante pendant qu’elle fonctionne. N’essayez jamais de forcer ou de
contourner le système de verrouillage de la porte.
Veuillez n'utiliser aucune autre tension que le 110 V CA ou le 220 V CA.
Un incendie est susceptible de se déclarer et il y a un risque de décharge
électrique.
Pour plus de renseignements, consultez rimage.com/support
3
Informations importantes
Informations de conformité
Produit
Imprimante Prism III
Modèle
CDPR6
Avis pour les États-Unis
REMARQUE : ce matériel a été testé et s’est révélé conforme aux normes des appareils numériques de la classe A, en vertu de la
section 15 de la réglementation FCC. Ces normes ont été établies afin de fournir une protection raisonnable contre toute interférence
nuisible en cas d’utilisation du matériel dans un environnement commercial. Ce matériel génère, utilise et peut émettre des
radiofréquences. S’il n’est pas installé et utilisé conformément aux instructions, il peut provoquer des interférences nuisibles aux
communications radio. Son utilisation dans une zone résidentielle peut également provoquer des interférences nuisibles. Dans ce cas,
il incombe à l'utilisateur de remédier à ce problème, à ses propres frais.
Ce produit est conforme à la norme UL 60950-1, 2e édition.
Avis pour le Canada
This Class A digital apparatus complies with Canadian ICES-003 Issue 4 : 2004. Cet appareil numérique de classe A est conforme à la
norme NMB-003 du Canada, édition 4 : 2004.
This product complies with CAN/CSA C22.2 No. 60950-1-07 1st Edition. Ce produit est conforme à la norme CAN/CSA C22.2 N° 609501-07 1e édition.
Avis pour l’Europe
Ce produit est conforme à la directive CEM (89/336/CEE) et à la directive basse tension (73/23/CEE) par le respect des normes
européennes suivantes : EN 55022: 2010/AC: 2011 limite de Classe A ; EN 55024: 2010; EN 61000-3-2:2006+A1:2009+A2:2009; EN
61000-3-3:2008; EN 60950-1: 2006/ A11:2009. La marque CE a été apposée conformément à la directive du marquage CE 93/68/CEE.
Avis pour le Japon
Cet équipement est un produit de classe A conforme à la norme du Voluntary Control Council for Interference (VCCI) relative aux
équipements informatiques. Si cet équipement est utilisé en milieu domestique, des interférences radio risquent de se produire,
auquel cas l’utilisateur devra prendre les mesures correctives qui s’imposent.
Traduction :
この装置は、情報処理装置等電波障害自主規制協議会(VCCI)の基準に基づくクラス
A 情報技術装置です。
この装置を家庭環境で使用すると電波妨害を引き起こすことがありま
す。
この場合には使用者が適切な対策を講ずるよう要求されることがあります。
Avis pour l’Australie
Ce produit est conforme à la norme AS/NZS CISPR22 : 2009.
Avis pour la Corée
Cet appareil est certifié conforme aux dispositions légales du Framework Act on Telecommunications et du Radio Waves Act.
위 기기는 전기통신기본법, 전파법 에 따라 인증되었음을 증명 합니다.
Avis pour Taiwan
2002605_A
This is class A digital device. It may cause radio-frequency interference when used in a residential area. In this case, the users are
advised to take appropriate precautions.
Translation:
警告使用者:
此為甲類資讯技術設備,於居住環境時,可能会造成射頻擾動,在此種情况下,使用者會被要求採取某些適當的對策。
Pour plus de renseignements, consultez rimage.com/support
4
Spécifications de l’imprimante Prism III
Cette section décrit les spécifications requises par l'imprimante Prism en matière
d'encre, de conception des étiquettes et d'impression.
Rubans
Important !
• Rimage ne prend en charge que les rubans de la marque Rimage dans ses
imprimantes Prism. Les problèmes d'imprimante résultant de l'utilisation de
rubans d'autres fabricants ne sont pas couverts par votre garantie ou votre
contrat de maintenance Rimage.
•
Pour des résultats optimaux, stockez les rubans Prism III à une température
comprise entre -5 °C et 40 °C (23 °F à 104 °F) et à un niveau d'humidité
relative (sans condensation) compris entre 30 % et 80 %.
•
Évitez l’humidité et la lumière directe du soleil.
•
Ne réutilisez pas les rubans.
•
N’utilisez que des rubans conçus pour votre imprimante Prism III. Reportezvous au tableau ci-dessous.
L'imprimante Prism nécessite des rubans conçus spécialement pour ce type
d'imprimante. L'imprimante Prism III est uniquement compatible avec les rubans
Rimage suivants :
Type de ruban
Nombre de disques imprimés
2002364 noir
2 100
2002366 rouge
2 100
2002367 bleu nuit
2 100
2002365 multicolore (CMJ)
500
Conception des étiquettes
CD Designer™, le logiciel d'édition d'étiquettes compatible Windows de Rimage,
est fourni avec chaque imprimante. Ce logiciel est installé sur votre PC au cours
d'une installation normale du logiciel Rimage. Si votre PC fonctionne sous
Windows, vous pouvez utiliser CD Designer pour concevoir vos étiquettes.
Si vous utilisez un ordinateur Macintosh ou si vous préférez concevoir vos
étiquettes avec une autre application que CD Designer, utilisez les critères suivants.
Important ! CD-Designer n'est pas compatible avec le système Macintosh.
•
•
•
•
•
Format fichier : pour obtenir des résultats optimaux, sauvegardez vos
étiquettes aux formats JPEG ou TIFF. Ces formats de fichiers doivent cependant
être convertis avant l’impression. Si vous utilisez CD Designer pour imprimer
des étiquettes, vous devez les importer et les enregistrer sous forme de
fichiers CD Designer (.btw) avant de les imprimer. Si vous n’utilisez pas CD
Designer pour imprimer les étiquettes, vous devez les convertir en fichiers PDF
avant de les imprimer.
Mode couleurs : les étiquettes importées dans CD Designer doivent être en
mode couleurs RGB.
Résolution : utilisez des images ou des
logos d'une définition de 300 x 300 PPP
(points par pouce) ou 300 x 600 PPP.
Dimensions de conception des étiquettes : Zone imprimable
116 mm
largeur de 1 536 pixels (130 mm ou
5,12 po) et hauteur de 1 356 pixels
(114,8 mm ou 4,52 po).
Zone imprimable : la zone imprimable du
Taille de la zone centrale
disque lors de l'utilisation d'une imprimante
38 mm
Prism est de 116 mm (4,567 po) et la zone
centrale est de 38 mm (1,496 po).
Impression
Toutes les étiquettes créées et enregistrées dans CD Designer sont au format de
fichier approprié (.btw) pour pouvoir être imprimées sur une imprimante Prism.
Si vous créez et enregistrez des étiquettes à l'aide d'un logiciel autre que CD
Designer, enregistrez ces étiquettes au format PDF avant de les imprimer grâce
à l'imprimante Prism. Si vous utilisez une imprimante Stand-Alone Prism ou un
robot d’impression AutoPrinter AutoPrism, vous pouvez imprimer directement à
partir de n'importe quelle application dotée d'une fonction d'impression.
2002605_A
Pour plus de renseignements, consultez rimage.com/support
5
Identification des pièces de l'imprimante Prism III
Vue de face
Vue arrière
Plateau de
l’imprimante
Interrupteur
d’alimentation
Raccordement
de l’alimentation
secteur
Panneau de
l’opérateur
Port pour
câble USB
Dispositif de maintien du ruban
Vue du dessus
Branchement pour
AutoPrinter/chargeur
automatique
Guides de ruban
Broches de rétention
Plateau de l'imprimante
et broche de centrage
2002605_A
Rouleau d'entraînement
Rouleau d'alimentation
Pour plus de renseignements, consultez rimage.com/support
6
Identification des pièces de l'imprimante Prism III
Panneau de l’opérateur
Image
Le panneau de l'opérateur est situé sur la face avant de l'imprimante. Vous
trouverez quatre voyants lumineux et un bouton de commande sur le panneau de
l'opérateur.
Bouton de commande
Appuyez sur le bouton de commande pour ouvrir et fermer le tiroir du plateau
de l'imprimante. Le voyant lumineux Erreur se trouve au centre du bouton de
commande. Reportez-vous à la section Voyants lumineux pour de plus amples
informations.
Voyants lumineux
Le nom et la fonction de chaque voyant lumineux sont décrits ci-dessous.
Chaque voyant signale des états différents de l'imprimante Stand-Alone Prism.
Les imprimantes Prism montées sur des chargeurs automatiques ou des robots
d’impression AutoPrinter AutoPrism peuvent présenter des états différents.
Bouton de commande avec
voyant lumineux Erreur
Voyant lumineux Disque
absent
Témoin
Alimentation
Voyant lumineux Actif
Voyant lumineux
Alimentation
2002605_A
•
•
•
Panneau de l’opérateur
Image
Nom
Fonctionnalité
Voyant
• Le voyant lumineux Disque absent clignote avec un code
lumineux
d'erreur quand une erreur se produit. Une fois l'erreur
Disque
résolue, appuyez sur le bouton de commande pour
absent
éteindre le voyant lumineux.
• Le voyant lumineux Disque absent s'allume lorsque le
plateau de l'imprimante est vide ou quand le disque
n'est pas correctement maintenu par les broches.
Lorsqu'un disque est placé sur le plateau, le voyant
lumineux Disque absent s'éteint.
• Dans le mode Copies multiples, le voyant Disque absent
reste allumé jusqu'au retrait du disque du plateau.
• Le voyant Disque absent clignote continuellement et
lentement lorsque la capacité restante du ruban est
inférieure à 100 disques pour les rubans monochromes
et 25 disques pour les rubans CMJ.
• Le voyant lumineux Disque absent clignote lentement
tandis que le voyant Erreur s'allume lorsqu’il n’y a plus
de ruban.
• Le voyant Disque absent et le voyant Erreur clignotent
lorsque l'imprimante est en mode nettoyage.
Voyant
• Le voyant Actif clignote lorsque l'imprimante est en
lumineux
fonctionnement.
Actif
• Le voyant Actif clignote continuellement et lentement
lorsque l'imprimante est en mode AutoPrinter.
Nom
Fonctionnalité
Voyant
• Le voyant lumineux Erreur situé sur le bouton de
lumineux
commande s'allume lorsqu'une erreur se produit
Erreur
pendant l'impression.
• Les voyants lumineux Erreur et Disque absent clignotent
lorsque l'imprimante est en mode nettoyage.
• Le voyant lumineux Erreur s'allume et le voyant
lumineux Disque absent clignote lentement lorsqu’il n’y
a plus de ruban.
•
Le voyant Alimentation s'allume lorsque l'imprimante
est mise sous tension.
Le voyant Alimentation clignote lorsque la carte système
a détecté une erreur fatale.
Le voyant Alimentation s'éteint lorsque l'imprimante
détecte un élément pixel défectueux dans la tête
d'impression. Il se rallume lorsqu'un disque est placé sur
le plateau et que vous pouvez continuer à imprimer des
disques. Si vous continuez à imprimer, de petites lignes
peuvent apparaître dans vos travaux d'impression. Cela
signifie qu'il faut peut-être prévoir un remplacement de
la tête d'impression.
Le voyant Alimentation s'éteint lorsque l'imprimante est
mise hors tension.
Pour plus de renseignements, consultez rimage.com/support
7
Utilisation de l'imprimante Prism III
Cette section fournit les informations nécessaires pour utiliser l'imprimante Prism.
Mise sous et hors tension de l'imprimante Prism
Mise sous ou hors tension d'une imprimante Stand-Alone
1. Appuyez sur l'interrupteur d'alimentation situé à l'arrière de l'imprimante.
L'imprimante démarre et s'initialise.
2. Appuyez de nouveau sur l'interrupteur d'alimentation. L'imprimante est mise
hors tension.
Positionnement d’un disque sur le plateau
de l’imprimante
1. Appuyez sur le operator button (bouton de commande) pour ouvrir le tiroir
du plateau de l'imprimante.
2. Placez un disque sur le support en caoutchouc entre les deux broches de
rétention et la broche de centrage.
Important ! Placez le disque avec la surface d'enregistrement tournée vers le
bas. La surface d'enregistrement possède un anneau d'empilage légèrement
surélevé à proximité de la zone centrale. Si vous insérez un disque avec l'anneau
d'empilage au-dessus, vous risquez d'endommager la tête d'impression.
Conseils :
• Si le disque repose sur les broches de rétention, le plateau de
l'imprimante ne se fermera pas.
• La plaque et le support d'impression diffèrent entre les modèles StandAlone et automatisés. Les modèles automatisés possèdent une ouverture
au milieu de la plaque ; le modèle Stand-Alone n'en possède pas. Tous les
modèles possèdent une broche de centrage.
Interrupteur
d’alimentation
Mise sous ou hors tension d'une imprimante connectée
à un chargeur automatique ou à un robot d’impression
AutoPrinter
3. Appuyez sur le operator button (bouton de l’opérateur). Le plateau de
l'imprimante se déplace sur la position de blocage du disque.
Procédez comme suit si votre imprimante Prism III est connectée à un chargeur
automatique ou à un robot d’impression AutoPrinter :
Conseil : l'interrupteur d'alimentation de l'imprimante doit être sur la position
« on ».
1. Mettez le chargeur automatique ou le robot d'impression AutoPrinter sous
tension. L'imprimante démarre et s'initialise.
2. Mettez le chargeur automatique ou le robot d'impression AutoPrinter hors
tension. L'imprimante est mise hors tension.
Socle
Broche de
centrage
Broches de
rétention
Plateau de
l’imprimante
2002605_A
Pour plus de renseignements, consultez rimage.com/support
8
Configuration de vos préférences d'impression
Configuration de vos préférences d'impression
Important: sauf indication contraire, toutes les instructions de navigation
Windows se rapportent à des chemins d’accès Windows 7. La navigation dans les
autres systèmes d’exploitation Windows peut différer légèrement.
Modification des paramètres de masque
Le logiciel CD-Designer Rimage est conçu pour imprimer des disques optiques
de 120 mm et masquera les zones non imprimables telles que la zone de l'orifice
central ou la circonférence externe du disque.
Accès aux préférences d’impression
1. Sélectionnez : Start (Démarrer) > Devices and Printers (Périphériques et
imprimantes). La boîte de dialogue Devices and Printers (Périphériques et
imprimantes) s'ouvre.
2. Cliquez avec le bouton droit de la souris sur Rimage Prism III.
3. Sélectionnez Printing preferences (Préférences d'impression) dans la liste
déroulante. La fenêtre Préférences d'impression Rimage Prism III s'ouvre.
Zones masquées
(non imprimées)
Accès aux propriétés d'impression
1. Sélectionnez : Start (Démarrer) > Devices and Printers (Périphériques et
imprimantes). La boîte de dialogue Devices and Printers (Périphériques et
imprimantes) s'ouvre.
2. Cliquez avec le bouton droit de la souris sur Rimage Prism III.
3. Sélectionnez Printing properties (Propriétés d'impression) dans la liste
déroulante. La fenêtre Propriétés d'impression Rimage Prism III s'ouvre.
Sur certains disques, la zone autour de l'anneau d'empilage n'est pas revêtue
d'un matériau imprimable. Modifiez les paramètres du masque pour adapter
l'impression à ce type de disques.
Préférences de mise en page et papier/qualité
Les options des onglets Layout and Paper/Quality (Mise en page et papier/
qualité), ne requièrent généralement aucun paramétrage. L'assistance technique
de Rimage vous aidera à identifier le moment où les réglages de ces paramètres
doivent être modifiés et vous aidera pour ces onglets.
2002605_A
Zones masquées
(non imprimées)
Pour plus de renseignements, consultez rimage.com/support
9
Configuration de vos préférences d'impression
1. Accédez aux Print Preferences (préférences d’impression). Reportez-vous à la
page 9.
2. Sélectionnez l'onglet Masking Settings (paramètres du masque).
3. Sélectionnez l'option Print on Hub (impression sur partie centrale).
4. Mesurez les diamètres interne et externe de la surface imprimable.
5. Entrez les diamètres dans la section Hub Settings (paramètres de la
zone centrale).
6. Cliquez sur OK pour enregistrer les modifications.
4. Sélectionnez Print PRN File (Impression de fichiers PRN).
Une boîte de dialogue, grâce à laquelle l'utilisateur pourra imprimer les
fichiers PRN sélectionnés, s'ouvre.
Options de gestion et de maintenance
Conseil : aucun nouvel ajustage n'est requis sauf si vous procédez au
remplacement de certains composants de l'imprimante.
L'onglet Service (Gestion et maintenance) vous permet de visualiser les
informations relatives à votre imprimante Prism III et vous propose toute une
série d'outils permettant de garantir le bon fonctionnement de votre imprimante.
1. Accédez aux Print Preferences (préférences d’impression). Reportez-vous à la
page 9.
2. Sélectionnez l'onglet Service (Gestion et maintenance).
La fenêtre qui s’affiche présente les informations relatives aux fonctions de
votre imprimante Prism III.
• Driver (Pilote) : affiche les informations relatives au pilote d'impression,
y compris le nom et la version.
• Printer (Imprimante) : affiche les informations relatives à l'imprimante,
y compris le nom de l'imprimante, le numéro de série et la version
du micrologiciel.
• Printer Status (État de l'imprimante) : affiche l'état de l'imprimante.
• Ribbon Status (État du ruban) : affiche le type de ruban, le pourcentage
de ruban utilisé, la référence et le code couleur du ruban ainsi que le
numéro de série du ruban installé.
Centrage de l’image sur le disque
L'outil de centrage de l'image sert à régler le centre mécanique de l'imprimante
afin qu'il corresponde au modèle standard de CD-Designer.
1. Accédez aux Print Preferences (préférences d’impression). Reportez-vous à la
page 9.
2. Sélectionnez l'onglet Service (Gestion et maintenance).
3. Sélectionnez Service Toolbox (Boîte).
La boîte de dialogue Service Toolbox (Boîte à outils de gestion et de
maintenance).
4. Sélectionnez Center Image (Centrer l’image).
La boîte de dialogue Centering Image (Centrage de l'image) s'affiche.
Impression de fichiers PRN
1. Accédez aux Print Preferences (préférences d’impression). Reportez-vous à la
page 9.
2. Sélectionnez l'onglet
Service (Gestion et
maintenance).
3. Sélectionnez Service
Toolbox (Boîte). La boîte de
dialogue Service Toolbox
(Boîte à outils de gestion et
de maintenance) s’affiche.
2002605_A
Pour plus de renseignements, consultez rimage.com/support
10
Configuration de vos préférences d'impression
5. Suivez les étapes décrites dans la boîte de dialogue Centering Image
(Centrage de l'image) :
a. Ouvrez le tiroir du plateau de l'imprimante et insérez-y un disque blanc
de 120 mm.
b. Cliquez sur le bouton Print Pattern (Imprimer motif) dans la boîte de
dialogue Centering Image (Centrage de l'image).
Un motif est imprimé sur le disque.
c. Faites pivoter le disque à 180 degrés.
Conseil : une fois que vous avez fait pivoter le disque, la flèche imprimée
doit se trouver au centre de l'encadrement et la ligne imprimée doit être
alignée avec le bord du plateau d'imprimante.
Alignement
avec le bord
du plateau de
l'imprimante
Flèche
Encadrement
2002605_A
Pour plus de renseignements, consultez rimage.com/support
11
Configuration de vos préférences d'impression
i.
Si les lignes coupent les gradations horizontales et verticales au
niveau du point 0, aucun réglage n'est requis. Appuyez sur OK.
Mise à jour du micrologiciel
1. Accédez aux Print Preferences (préférences d’impression). Reportez-vous à la
page 9.
2. Sélectionnez l'onglet Service (Gestion et maintenance).
3. Sélectionnez Service Toolbox (Boîte). La boîte de dialogue Service Toolbox
(Boîte à outils de gestion et de maintenance) s’affiche.
4. Sélectionnez Update Firmware (Mise à jour du micrologiciel).
Conseil : pour plus d'informations concernant la mise à jour de votre version
de micrologiciel, consultez le document relatif à la mise à jour du micrologiciel
de l'imprimante Prism III (Update Prism Firmware).
Définition des paramètres du périphérique pour les rubans
monochromes ou CMJ
Vous pouvez imprimer en monochrome ou en couleur. Suivez ces procédures pour
définir le mode d'impression de la Prism (monochrome ou couleur) et pour régler
les paramètres du périphérique relatifs au type de ruban utilisé.
Impression monochrome
d. Si au moins une des lignes ne coupe pas le point 0, entrez les facteurs de
correction horizontale et verticale donnés par le disque. Cliquez sur Save
Settings (Enregistrer les paramètres).
1. Installez un ruban monochrome dans l'imprimante. Reportez-vous à la
section en page 18 Remplacement du ruban d'impression.
Conseil : l'impression en couleur est détectée automatiquement et définie sur
base du type de ruban installé dans l'imprimante.
2. Accédez aux Print Properties (propriétés d'impression) Reportez-vous à la
page 9.
3. Sélectionnez l'onglet Device Settings (Paramètres du périphérique).
4. Sélectionnez Halftone Setup Properties (Propriétés de configuration des
demi-teintes) pour effectuer des modifications qui affectent les réglages
d'intensité des couleurs, de balance des couleurs ou de motifs.
5. Sélectionnez Media Type (Type de support).
Conseil : certains DVD présentent un anneau d'empilement sur le côté
imprimable du disque. Le processus d'impression thermique directe utilisé
par la Prism III est incapable de procéder à l'impression de cette zone. Le
fait de définir une zone d'anneau d'empilement pour un DVD permet à
l'imprimante d'ignorer cette zone, ce qui a pour effet de laisser une zone nonimprimée sur le disque. Rimage vous recommande d'utiliser des disques sans
anneau d'empilement sur la surface imprimable.
2002605_A
Pour plus de renseignements, consultez rimage.com/support
12
Configuration de vos préférences d'impression
6. Définissez Master Print Strobe (l'impulsion stroboscopique maîtresse
d’impression). Reportez-vous à la section Paramètres de l'impulsion
stroboscopique d’impression pour de plus amples informations.
7. Sélectionnez Yes (Oui) ou No (Non) dans l'option Double Print (Double
impression). La valeur par défaut est No (Non).
Conseils :
• Si vous sélectionnez Yes (Oui) dans l'option Double Print (Double
impression), l'imprimante imprimera deux fois chaque disque afin
d'assombrir l'image.
• L'option Double Print (Double impression) est uniquement disponible en
mode d'impression monochrome.
8. Sélectionnez Yes (Oui) ou No (Non) dans l'option Detect Media Change
(Détecter changement de support). La valeur par défaut est No (Non).
Conservez la valeur par défaut pour les modes AutoPrinter et chargeur
automatique.
Conseil : si vous sélectionnez Yes (Oui), l'imprimante attendra que l'utilisateur
change le disque avant de procéder à l'impression du disque suivant.
9. S'il s'agit d'une imprimante Stand-Alone Prism III, désactivez l'option Perfect
Print (Impression parfaite). L'option Perfect Print (Impression parfaite) n'est
disponible que sur les robots d’impression AutoPrinter Rimage.
Conseil : pour plus d'informations concernant l'option Perfect Print
(Impression parfaite), consultez le guide de l'utilisateur AutoPrinter Rimage.
10. Sélectionnez OK (Oui) pour enregistrer les changements et fermer la fenêtre
Device Settings (Paramètres du périphérique).
Impression en couleur
1. Installez un multicolor ribbon (ruban multicolore) dans l'imprimante.
Reportez-vous à la section en page 18 Remplacement du ruban
d'impression.
Conseil : l'impression en couleur est détectée automatiquement et définie sur
base du type de ruban installé dans l'imprimante.
2. Accédez aux Print Properties (ropriétés d'impression). Reportez-vous à la
page 9.
3. Sélectionnez l'onglet Device Settings (Paramètres du périphérique).
2002605_A
4. Sélectionnez Halftone Setup Properties (Propriétés de configuration des
demi-teintes) pour effectuer des modifications qui affectent les réglages
d'intensité des couleurs, de balance des couleurs ou de motifs.
5. Sélectionnez Media Type (Type de support).
Conseil : certains DVD présentent un anneau d'empilement sur le côté
imprimable du disque. Le processus d'impression thermique directe utilisé
par la Prism III est incapable de procéder à l'impression de cette zone. Le
fait de définir une zone d'anneau d'empilement pour un DVD permet à
l'imprimante d'ignorer cette zone, ce qui a pour effet de laisser une zone nonimprimée sur le disque. Rimage vous recommande d'utiliser des disques sans
anneau d'empilement sur la surface imprimable.
6. Définissez Master Print Strobe (l'impulsion stroboscopique maîtresse
d’impression). Reportez-vous à la section Paramètres de l'impulsion
stroboscopique d’impression pour de plus amples informations.
7. Activation des Color Sub-Strobes (impulsions stroboscopiques secondaires
de la couleur). Reportez-vous à la section Paramètres de l'impulsion
stroboscopique d’impression pour de plus amples informations.
Important ! Les impulsions stroboscopiques secondaires de la couleur sont
uniquement disponibles avec les rubans CMJ. L'option est désactivée par
défaut. L'impulsion stroboscopique maîtresse d’impression est inactive si les
impulsions stroboscopiques secondaires de la couleur sont activées.
8. Sélectionnez Yes (Oui) ou No (Non) dans l'option Detect Media Change
(Détecter changement de support). La valeur par défaut est No (Non).
Conseil : si vous sélectionnez Yes (Oui), l'imprimante attendra que l'utilisateur
change le disque avant de procéder à l'impression du disque suivant.
9. S'il s'agit d'une imprimante Stand-Alone Prism III, désactivez l'option Perfect
Print (Impression parfaite). L'option Perfect Print (Impression parfaite) n'est
disponible que sur les AutoPrinters Rimage.
Conseil : pour plus d'informations concernant l'option Perfect Print
(Impression parfaite), consultez le guide de l'utilisateur AutoPrinter Rimage.
10. Sélectionnez OK (Oui) pour enregistrer les changements et fermer la fenêtre
Device Settings (Paramètres du périphérique).
Pour plus de renseignements, consultez rimage.com/support
13
Configuration de vos préférences d'impression
Paramètres de l'impulsion stroboscopique d’impression
Les paramètres de l'impulsion stroboscopique d’impression permettent de définir
la quantité d'énergie utilisée pour imprimer un pixel. Des paramètres élevés
requièrent plus d'énergie. Plus les paramètres sont élevés, plus l'image devient
intense et plus la durée de vie de la tête d'impression se raccourcit. Rimage vous
recommande d'utiliser le paramètre d'impulsion stroboscopique d’impression le
plus faible vous permettant d'obtenir la qualité d'image souhaitée.
5. Sélectionnez OK pour enregistrer les changements et fermer la fenêtre Device
Settings (Paramètres du périphérique).
Remarques :
• Ces paramètres sont recommandés pour les supports de la marque Rimage.
• Il peut être nécessaire d'effectuer plusieurs tests d'impression sur des disques
pour obtenir un réglage fin de la teinte. Sélectionnez Enabled (Activé) pour
l’option Enable Color Sub-Strobes (Activation des impulsions stroboscopiques
secondaires de la couleur) afin de diminuer l’impulsion d'impression d’une
couleur particulière. Par exemple, ce paramètre peut être utilisé pour
diminuer le réglage de l'impulsion stroboscopique d’impression du jaune
lorsque vous essayez d'éliminer un effet de halo sur un disque imprimé.
1. Accédez aux Print Properties (propriétés d’impression). Reportez-vous à la
page 9.
2. Sélectionnez l’onglet Device Settings (Paramètres du périphérique).
3. Paramétrez Master Print Strobe (l’impulsion stroboscopique maîtrsse
d’impression).
Remarque : Rimage recommande d'utiliser les paramètres suivants pour les
supports de la marque Rimage :
• Surface du support : support imprimable par transfert thermique
• Paramètres d'impulsion stroboscopique d’impression pour le ruban noir :
325 - 400
• Paramètres d'impulsion stroboscopique d’impression pour le ruban
rouge : 375 - 425
• Paramètres d'impulsion stroboscopique d’impression pour le ruban bleu :
350 - 400
4. Sélectionnez Enabled pour l’option Enable Color Sub-Strobes (Activation des
impulsions stroboscopique secondaires de la couleur).
Important ! Les paramètres d'impulsions stroboscopique secondaires de la
couleur sont uniquement disponibles pour les rubans CMJ.
2002605_A
Pour plus de renseignements, consultez rimage.com/support
14
Entretien de l'imprimante Prism III
Servez-vous des informations présentées dans cette section pour maintenir votre
imprimante Prism III dans des conditions de fonctionnement optimales.
Présentation
Une maintenance préventive régulière de votre imprimante Prism III vous
aidera à conserver une qualité parfaite dans l'impression de vos étiquettes. La
maintenance implique le nettoyage du système.
Informations importantes
nn Attention : pour éviter d'endommager l'imprimante Prism III pendant la
maintenance :
• N'utilisez jamais d'huiles, de silicone ou d'autres lubrifiants sur aucune
des pièces de l'imprimante Prism.
• Utilisez un produit de nettoyage non abrasif pour essuyer les surfaces de
votre imprimante Prism.
• Évitez de verser le produit de nettoyage directement sur l'imprimante
Prism. Appliquez plutôt le produit sur un chiffon non pelucheux.
Outils
Tâche
Fréquence
Instructions
• Chiffon
non pelucheux
Nettoyage
des
parties
extérieures
de
l'imprimante.
Toutes les semaines
1. Mettez l'imprimante
Prism hors tension.
2. Débranchez le cordon
d'alimentation.
3. Essuyez l'extérieur de
l'imprimante.
• Nouveau
ruban
d'impression
Remplacement
du ruban
d'impression.
Monochrome noir :
2 100 disques
Monochrome rouge :
2 100 disques
Monochrome bleu :
2 100 disques
Ruban 3 couleurs
(CMJ) :
500 disques
Reportez-vous à la
section en page 18
Remplacement du ruban
d'impression.
Kit de
nettoyage
de la tête
d'impression
Nettoyage
de tête
d'impression.
À chaque changement
de ruban ou selon les
besoins.
Reportez-vous à la section
en page 16 Nettoyage
de la tête d’impression.
• Solvant
universel non
abrasif
Programme de maintenance préventive
Consultez le tableau qui suit pour prendre connaissance de la fréquence des
interventions de maintenance préventive.
Important ! Le non-respect du calendrier de maintenance présenté ci-contre (à
droite) peut entraîner l’annulation de votre garantie.
2002605_A
Pour plus de renseignements, consultez rimage.com/support
15
Entretien de l'imprimante Prism III
Nettoyage de la tête d'impression
Nettoyez la tête d'impression à chaque changement de ruban, ou plus souvent si
des marques commencent à apparaître ou en cas de déchirure du ruban.
Il existe deux méthodes de nettoyage de la tête d'impression Prism III : une
méthode employant le kit de nettoyage Prism et une méthode alternative.
La seconde méthode peut être utilisée lorsqu'aucun kit de nettoyage n'est
disponible. Cette section fournit des instructions relatives aux deux méthodes.
Remarque : si l'imprimante Prism est connectée à un chargeur automatique ou à
un robot d’impression AutoPrinter, il peut être plus simple de retirer l'imprimante
du système avant d'entamer la procédure de nettoyage.
• Mettez l'imprimante hors tension.
• Débranchez tous les câbles et cordons de l'arrière de l'imprimante. Reportezvous à la section en page 6 Identification des pièces de l'imprimante Prism.
• Retirez l'imprimante du système et placez-la sur une surface plane à proximité
d'une prise secteur.
• Raccordez un cordon d'alimentation distinct entre l'arrière de l'imprimante et
une prise de courant.
Nettoyage de la tête d'impression de l'imprimante Prism III
à l'aide d'un kit de nettoyage Prism
a. Tout en maintenant le operator button (bouton de commande) enfoncé,
mettez l'imprimante Prism sous tension.
b. Lorsque le voyant lumineux Disque absent (second voyant sur le panneau
de l'opérateur) clignote, relâchez le operator operator button (bouton de
commande). Le tiroir du plateau de l’imprimante s’ouvre.
L'imprimante est en mode nettoyage lorsque le bouton de commande
et le voyant lumineux Disque absent (les deux voyants supérieurs du
panneau de l'opérateur) clignotent rapidement.
3. Préparez le tampon de nettoyage
Remarque : le tampon de nettoyage est fourni dans le kit de nettoyage.
Retirez le ruban adhésif à l'arrière du tampon de nettoyage.
Fixez le tampon de nettoyage sur le dessus d'un disque.
Vérifiez que les bords du tampon sont alignés sur le disque.
Placez le tampon de nettoyage et le disque auquel il adhère sur le
plateau de l'imprimante. Vérifiez que le disque est aligné avec les
broches de rétention situées sur le plateau.
e. Pressez le tampon sur le capteur du plateau.
f. Déposez 5 gouttes d'alcool isopropylique sur le tampon de nettoyage.
a.
b.
c.
d.
Si vous disposez d'un kit de nettoyage Prism, procédez comme suit pour nettoyer
la tête d'impression.
## Outils requis :
• Kit de nettoyage Prism (PN 210555-001)
• Un disque
• Alcool isopropylique 99 %
• Cotons-tiges
1. Préparez l'imprimante Prism au nettoyage.
a. Mettez l'imprimante Prism hors tension.
b. Retirez le capot.
c. Retirez le ruban. Reportez-vous à la section en page 18 Remplacement
du ruban d'impression.
2. Lancez le mode nettoyage.
2002605_A
Pour plus de renseignements, consultez rimage.com/support
Tampon pressé sur le
capteur
Tampon de nettoyage avec
le disque auquel il adhère
Plateau de
l’imprimante
16
Entretien de l'imprimante Prism III
4. Nettoyez la tête d'impression.
a. Appuyez sur le operator button (bouton de commande) pour fermer le
tiroir du plateau de l'imprimante et démarrer le cycle de nettoyage. Dès
que le cycle de nettoyage est terminé, le tiroir du plateau s'ouvre.
b. Si nécessaire, répétez l'étape a pour relancer le cycle de nettoyage.
c. Une fois la tête d'impression nettoyée, retirez le tampon de nettoyage et
le disque auquel il adhère du plateau.
Guides avant du ruban
Tampon de nettoyage
Solution de
nettoyage
5. Nettoyez les deux guides avant du ruban.
a. Appliquez de l'alcool isopropylique sur un coton-tige propre.
b. Passez le coton-tige sur les guides du ruban pour les nettoyer.
6. Préparez l'imprimante Prism à l'utilisation.
a. Mettez l'interrupteur d'alimentation en position « Off » pour quitter le
mode nettoyage et réinitialiser l'imprimante.
b. Réinstallez le ruban. Reportez-vous à la section en page 18
Remplacement du ruban d'impression.
c. Si vous avez retiré l'imprimante d'un système de chargeur automatique
ou d’un robot d’impression AutoPrinter, réintégrez l’imprimante au
système et connectez tous les câbles et les cordons. Reportez-vous à la
section en page 6 Identification des pièces de l'imprimante Prism III
Remarque : si le tampon d'impression sur le plateau s’est humidifié lors
du nettoyage, laissez-le sécher complètement avant d'utiliser
l'imprimante Prism.
2002605_A
Nettoyage de la tête d'impression – méthode alternative
Si vous ne disposez d'aucun kit de nettoyage, procédez comme suit pour nettoyer
la tête d'impression.
## Outils requis :
• Alcool isopropylique 99 %
• Cotons-tiges
1. Préparez l'imprimante Prism III.
a. Mettez l'imprimante Prism III sous tension.
b. Appuyez sur le operator button (bouton de commande) pour ouvrir le
tiroir du plateau de l'imprimante.
c. Mettez l'imprimante Prism III hors tension.
d. Retirez le capot.
e. Retirez le ruban. Reportez-vous à la section en page 18 Remplacement
du ruban d'impression.
2. Nettoyez la tête d'impression.
a. Appliquez de l'alcool isopropylique sur un coton-tige.
b. Insérez le coton-tige dans l'ouverture du tiroir.
c. Soulevez le coton-tige tout en le frottant contre la surface convexe de la
tête d'impression.
Surface convexe de la tête
d'impression
Important ! Le dessous de la tête d'impression est illustré ici afin de vous montrer
la zone à nettoyer. Ne retirez pas la tête d'impression de l'imprimante.
Pour plus de renseignements, consultez rimage.com/support
17
Entretien de l'imprimante Prism III
3. Nettoyez les deux guides avant du ruban.
a. Appliquez de l'alcool isopropylique sur un coton-tige propre.
b. Passez le coton-tige sur les guides du ruban pour les nettoyer.
4. Lorsque l'alcool sur la tête d'impression est sec, préparez l'imprimante Prism
à l'utilisation.
a. Installez le ruban. Reportez-vous à la section en page 18
Remplacement du ruban d'impression.
b. Si vous avez retiré l'imprimante d'un système de chargeur automatique
ou d'un robot d’impression AutoPrint, réintégrez l’ imprimante au
système et connectez tous les câbles et les cordons. Reportez-vous à la
section en page 6 Identification des pièces de l'imprimante Prism.
Remplacement du ruban d'impression
Important ! L'imprimante Prism III est uniquement compatible avec les rubans
Rimage originaux.
Rimage ne prend en charge que les rubans de la marque Rimage dans ses
imprimantes. Les problèmes d'imprimante résultant de l'utilisation de rubans
d'autres fabricants ne sont pas couverts par votre garantie ou votre contrat de
maintenance Rimage.
Conseil : si les rubans sont stockés dans un environnement très différent de celui
de l'imprimante, laissez-leur le temps de s'acclimater au nouveau. Laissez plus de
temps pour les grands écarts de température ou d'hygrométrie.
1. Accédez à l'emplacement du ruban.
a. Mettez l'imprimante
Prism sous tension.
b. Retirez le capot de
l'imprimante.
c. Soulevez le rouleau
d'entraînement
de telle sorte que
l'extrémité avec
l'engrenage vienne
en premier et sortezRouleau
le de l'imprimante.
d'entraînement
2002605_A
d. Soulevez le rouleau d'alimentation pour le retirer.
Conseil : si vous remplacez le ruban, c'est le moment de procéder au
nettoyage de la tête d'impression. Reportez-vous à la section en page 16
Nettoyage de la tête d’impression.
2. Chargez le ruban d'impression.
a. Faites glisser le ruban d'impression sur le rouleau d'alimentation.
b. Alignez les deux encoches de la partie centrale en carton sur les broches
métalliques du rouleau d'alimentation.
Ruban d'impression
Partie centrale en carton
Encoches
Broches métalliques
Rouleau
d'alimentation
c. Appuyez sur le operator button (bouton de commande) pour fermer le
tiroir du plateau.
d. Décollez l'amorce du nouveau ruban.
e. Glissez l'amorce du ruban sous le guide du ruban et dans le dispositif de
maintien du ruban.
Dispositif de
maintien du ruban
Rouleau
d'alimentation
Plateau de l’imprimante
Pour plus de renseignements, consultez rimage.com/support
Guide de ruban
Amorce de ruban
18
Entretien de l'imprimante Prism III
3. Montez le rouleau d'alimentation comme illustré. Laissez du mou sur
l'amorce du ruban.
a. Appuyez sur le operator
button (bouton de
commande) jusqu'à ce
que le tiroir du plateau
de l'imprimante sorte
complètement. Le ruban
Rouleau
est enfilé vers l'avant de
d'alimentation
l'imprimante Prism.
b. Retirez l'amorce du ruban
du dispositif de maintien
du ruban.
c. Retirez la bande
adhésivede l'amorce du
ruban.
4. Chargez le rouleau d'entraînement.
a. Placez la nouvelle partie centrale en carton vide sur le rouleau
d'entraînement. Elle porte une encoche pour ne rentrer que dans un
sens.
b. Placez le rouleau d'entraînement sur l'amorce du ruban comme illustré.
c. Tirez l'amorce du ruban
par-dessus la partie
centrale en carton.
d. Collez la bande adhésive
au carton de sorte que
les bords de l'amorce du
ruban soient alignés avec
les bords du carton.
e. Enroulez l'amorce du
ruban de sorte qu'elle
n'entoure qu'une seule
fois le rouleau.
Important ! N'enroulez pas au-delà de la marque sur l'amorce qui indique
STOP - Wind Leader Onto Take-up Core Stopping Here (STOP - Enrouler
l'amorce sur le rouleau d'entraînement en arrêtant ici) sur les rubans
monochromes. Si vous utilisez un ruban CMJ, enroulez le ruban jusqu'au
bout de l'amorce jaune.
Important ! L'engrenage doit se trouver du bon côté.
Engrenage
Bande adhésive
2002605_A
Partie centrale
en carton
Amorce de
ruban
Pour plus de renseignements, consultez rimage.com/support
19
Entretien de l'imprimante Prism III
5. Installez le rouleau d'entraînement dans l'imprimante Prism et appuyez
dessus fermement jusqu'à ce que le rouleau s'enclenche en place. Le ruban
doit être tendu et ne présenter aucun pli.
Amorce de ruban
Rouleau d'entraînement
Marque
Important ! N'enroulez pas la marque sur l'amorce qui indique STOP – Wind
Leader Onto Take-up Core Stopping Here (STOP - Enrouler l'amorce sur
le rouleau d'entraînement en arrêtant ici) sur le rouleau d'entraînement.
La marque ne doit pas se trouver au-delà du point indiqué sur la figure.
Si la marque se retrouve sur le rouleau, vous devez extraire le rouleau
d'entraînement et ramener le ruban en arrière (l’enrouler). Ramenez le
rouleau d'alimentation en arrière (l’enrouler) pour réduire le mou.
6. Appuyez sur le operator button (bouton de commande) et maintenez-le
pendant 5 secondes afin que l'imprimante puisse procéder à l’examen du
ruban. Si le ruban est valide, l'imprimante passe à l’étape suivante et le voyant
lumineux d'erreur arrête de clignoter.
Remarque : Pendant le processus de validation du ruban, le ruban s'enroule
au-delà de l'amorce du ruban. Le processus de validation du ruban étant
terminé, assurez-vous que ce dernier est bien tendu.
7. Remettez le capot en place.
2002605_A
Pour plus de renseignements, consultez rimage.com/support
20
Guía del usuario de la impresora Prism III
Oficinas centrales corporativas:
Rimage Corporation
7725 Washington Avenue South
Minneapolis, MN 55439
EE.UU.
Oficinas centrales en Europa:
Rimage Europe GmbH
Albert-Einstein-Str. 26
63128 Dietzenbach
Alemania
Oficinas centrales en Asia/Pacífico:
Rimage Japan Co., Ltd.
2F., WIND Bldg.
7-4-8 Roppongi Minato-ku,
Tokyo 106-0032 JAPAN
800-553-8312 (América del Norte)
Servicio: +1 952-946-0004
(México/Latinoamérica)
Fax: +1 952-944-6956
Tel.: +49 6074-8521-14
Fax: +49 6074-8521-100
Tel.: +81-3-5771-7181
Fax: +81-3-5771-7185
Rimage Corporation se reserva el derecho a realizar mejoras, en cualquier momento y sin previo aviso, al equipo y al software que describe este
documento. Rimage Corporation se reserva el derecho de revisar esta publicación y de realizar cambios ocasionalmente en el contenido de la
misma, no siendo obligación de Rimage Corporation avisar a ninguna persona u organización acerca de dichas revisiones o cambios.
Este documento contiene vínculos a sitios web que eran actuales al momento de la publicación, pero que pueden haber cambiado o caducado
desde entonces. Este documento puede contener vínculos a sitios de Internet que son propiedad de terceros y están administrados por ellos.
Rimage Corporation no se responsabiliza por el contenido de estos sitios de terceros.
© 2012, Rimage Corporation
Rimage® es una marca registrada de Rimage Corporation. Rimage Prism III, AutoPrism™ y CD Designer™ son marcas comerciales de Rimage
Corporation. Dell™ es una marca registrada de Dell Computer Corporation. FireWire™ es una marca comercial de Apple Computer, Inc. Windows®
es una marca registrada de Microsoft Corporation.
Todas las demás marcas comerciales y marcas comerciales registradas son propiedad de sus respectivos dueños.
Puede encontrar la versión más reciente de este documento en www.rimage.com/support.
2002605_A
Para obtener más información, visite rimage.com/support
Contenido
Introducción..................................................................................... 1
Acerca de esta Guía del usuario................................................................................ 1
Acerca de la impresora Prism III............................................................................... 1
Instrucciones de desembalaje y configuración......................................................... 1
Configuración de las preferencias de impresión.............................. 12
Impresión a color............................................................................................................................ 13
Configuración del estroboscopio.................................................................................................... 14
Mantenimiento de la impresora Prism III........................................ 15
Información importante................................................................... 2
Descripción general................................................................................................ 15
Información de contacto de soporte........................................................................ 2
Más información en línea......................................................................................... 2
Soporte técnico......................................................................................................... 2
Exención de responsabilidad del software de grabación de discos ópticos.............. 2
Información de seguridad y conformidad................................................................. 3
Mantenimiento de la impresora Prism III........................................ 16
Precauciones de seguridad.................................................................................................. 3
Información de conformidad............................................................................................... 4
Requisitos de la impresora Prism III.................................................. 5
Información de precaución................................................................................................ 15
Programa de mantenimiento preventivo.......................................................................... 15
Limpieza del cabezal de impresión......................................................................... 16
Limpieza del cabezal de la impresora Prism con un kit de limpieza
de la impresora Prism III.................................................................................................... 16
Limpieza del cabezal de impresión: método alternativo................................................... 17
Cambio de la cinta de impresión............................................................................ 18
Requisitos de cinta.................................................................................................... 5
Requisitos para el diseño de etiquetas..................................................................... 5
Requisitos de impresión........................................................................................... 5
Identificación de las piezas de la impresora Prism III......................... 6
Vista delantera.......................................................................................................... 6
Vista superior............................................................................................................ 6
Vista trasera.............................................................................................................. 6
Identificación de las piezas de la impresora Prism III......................... 7
Panel operador......................................................................................................... 7
Botón de funcionamiento......................................................................................... 7
Luces indicadoras...................................................................................................... 7
Funcionamiento de la impresora Prism III......................................... 8
Encendido y apagado de la impresora Prism............................................................ 8
Encendido o apagado de una impresora independiente..................................................... 8
Encendido o apagado de una impresora conectada a un Autoloader o una AutoPrinter... 8
Colocación de un disco en la bandeja de la impresora............................................. 8
Configuración de las preferencias de impresión................................ 9
Configuración de las preferencias de impresión....................................................... 9
Acceso a las preferencias de impresión............................................................................... 9
Acceso a las propiedades de impresión.............................................................................. 9
Preferencias de diseño y papel/calidad............................................................................... 9
Modificación de la configuración de máscara..................................................................... 9
Opciones de servicio......................................................................................................... 10
Impresión de archivos PRN............................................................................................................. 10
Centrado de la imagen en el disco.................................................................................................. 10
Actualización del firmware.............................................................................................................. 12
Configuración del dispositivo para cintas monocromo o CMY.......................................... 12
Impresión en un solo color............................................................................................................. 12
2002605_A
Para obtener más información, visite rimage.com/support
Introducción
Este manual proporciona la información necesaria para operar, configurar y
mantener la impresora Rimage Prism III.
Para obtener información específica sobre su autoloader o Rimage AutoPrinter,
consulte la guía del usuario correspondiente en www.rimage.com/support. En la
página Support (Soporte), seleccione Prism III y después la ficha User Manuals
(Manuales de usuario).
Acerca de la impresora Prism III
¡Importante! Es posible que su impresora Prism III no se vea exactamente igual al
modelo que aparece en esta guía del usuario.
Instrucciones de desembalaje y configuración
Acerca de esta Guía del usuario
•
•
•
Si bien intentamos mantener todas las versiones de nuestros manuales y
documentos actualizadas, tenga presente que la versión en inglés que aparece
en nuestro sitio web contiene siempre la información más reciente.
A menos que se indique lo contrario, todas las instrucciones de navegación de
Windows corresponden a rutas de Windows 7. Las rutas de navegación de otros
sistemas operativos de Windows pueden presentar algunas diferencias.
Estas notas y símbolos se utilizan a lo largo de todo el manual para ayudar a
aclarar la información:
La impresora Prism III es parte de la serie de impresoras Rimage. La impresora Prism
III se utiliza para imprimir a alta velocidad información monocromática o a color en
CD, DVD o Blu-ray DiscTM.
La impresora puede ser utilizada como impresora independiente para la operación
manual, con un autoloader o una AutoPrinter de Rimage.
Las instrucciones de desembalaje y configuración están incluidas con la impresora
Prism III. Consulte la Guía de configuración e instalación de Rimage Prism III y la guía
de configuración e instalación incluida con su autoloader o AutoPrinter de Rimage.
Sugerencia: Una sugerencia indica métodos alternativos que probablemente no
sean obvios, y le ayudan a comprender los beneficios y las capacidades del
producto.
¡Importante!
• Una nota "Importante" brinda información esencial para llevar a cabo una
tarea.
•
Información complementaria importante.
•
Usted puede pasar por alto la información de una "Sugerencia" y aun así
completar una tarea, pero no debe ignorar la información de una nota
"Importante".
nn Precaución: Indica que no cumplir con las pautas indicadas podría provocar
pérdidas o daños al equipo, el producto, el software o los datos.
nn ¡Advertencia! Indica que la falta de cumplimiento de las pautas indicadas
podría provocar lesiones corporales al personal que opera o realiza el
mantenimiento del equipo.
2002605_A
Para obtener más información, visite rimage.com/support
1
Información importante
Esta sección ofrece información sobre contacto de soporte, precauciones y
advertencias de la impresora Prism III.
Puede encontrar las especificaciones técnicas de este producto en www.rimage.
com/support. En el menú Support (Soporte), seleccione: Printer Series (Serie de la
impresora) > Prism > ficha User Manuals (Manuales del usuario).
Información de contacto de soporte
EE.UU., Canadá, Latinoamérica
Rimage Corporation
Correo electrónico: [email protected]
7725 Washington Avenue South
Minneapolis, MN 55439
EE.UU.
Atn.: Rimage Services
Teléfono:
Norteamérica: 800-553-8312
México/Latinoamérica: 952-944-8144
Fax: 952-944-7808
Europa
Rimage Europe GmbH
Correo electrónico: [email protected]
Albert-Einstein-Str. 26
Teléfono: +49 6074-8521-14
63128 Dietzenbach
Fax: +49 6074-8521-100
Alemania
Asia/Pacífico
Rimage Japan Co., Ltd.
Correo electrónico: [email protected]
2F., WIND Bldg.
Teléfono: +81-3-5771-7181
7-4-8 Roppongi Minato-ku,
Fax: +81-3-5771-7185
Tokio 106-0032 JAPAN
Comuníquese con Servicios Rimage
Sitio web: www.rimage.com/support
Base de conocimientos: http://rimage.custhelp.com
Inicie sesión y seleccione la ficha Ask a Question (Formular una pregunta).
Cuando se comunique con Rimage Copie esta información sobre su producto Rimage
Services, proporcione la siguiente para referencia futura.
Nota: Asegúrese de actualizar el Número de serie
información:
• El número de serie del sistema y la
versión del software
• La descripción funcional y técnica
del problema
• El mensaje de error exacto recibido
2002605_A
cada vez que reciba un sistema de reemplazo.
Número de serie:
Más información en línea
En www.rimage.com/support, encontrará el soporte y los servicios de primera línea
de Rimage.
En la página principal de Soporte:
1.
Seleccione la serie de su producto.
2.
Seleccione su producto.
3.
Obtenga información adicional en la
página del producto.
Desde la página del producto puede acceder
a:
•Información acerca del software
más reciente y actualizaciones de
firmware
•Especificaciones del producto
•Los documentos más recientes
•Firmware actual y descarga de
controladores
Soporte técnico
Rimage ofrece una variedad de opciones de servicio y soporte para la impresora
Prism III, incluidos los servicios de intercambio. Para obtener más información
y conocer los precios, comuníquese con Rimage o con su distribuidor de valor
agregado de Rimage.
¡Importante! Asegúrese de registrar su autoloader para que pueda solicitar partes y
mano de obra con cobertura durante 1 año y tener prioridad de soporte telefónico.
Puede registrarlo en http://www.rimage.com/support/warranty-registration.
Exención de responsabilidad del software de
grabación de discos ópticos
Este producto, el software o la documentación se diseñaron para ayudarle a
reproducir material del cual usted posee los derechos de autor u obtuvo permiso
para copiar de parte del propietario de tales derechos. A menos que usted posea los
derechos de autor o cuente con la autorización del propietario de estos derechos,
es posible que infrinja las leyes de derecho de autor y que, por lo tanto, esté sujeto
al pago de daños y a otras acciones legales. Si no conoce con certeza sus derechos,
deberá comunicarse con su asesor legal. Si usted no posee los derechos de autor
ni cuenta con autorización del propietario, la copia no autorizada de material
protegido por derechos de autor en un disco óptico o en otro medio infringirá la
legislación nacional e internacional, y puede originar sanciones graves.
Nombre del producto:
Fecha de la compra:
Para obtener más información, visite rimage.com/support
2
Información importante
Información de seguridad y conformidad
Data Transmission System 13.56MHz, TI Model Number: TRF7960
Este manual y las indicaciones del producto permiten un funcionamiento correcto
y seguro. Las indicaciones que aparecen abajo evitan que usted y otras personas
sufran lesiones y que se produzcan daños en el equipo.
Para obtener más información, consulte la sección Safety Precautions (Precauciones
de seguridad) a continuación y la sección Compliance Information (Información de
conformidad) en la página 4
nn Precaución:
•
•
•
•
Precauciones de seguridad
Para garantizar la seguridad, lea las precauciones y familiarícese con sus significados
antes de utilizar el equipo.
nn ¡Advertencia!
•
•
•
•
•
•
El uso de controles o ajustes, o la ejecución de procedimientos que no
sean los especificados en este documento pueden provocar la exposición a
radiaciones peligrosas.
No desarme la impresora ni utilice herramientas en ella. Todos los
procedimientos de servicio deben ser realizados por un técnico autorizado
por Rimage, o se debe enviar el equipo al servicio de reparación autorizado
por Rimage.
No intente reparar la impresora con el cable de alimentación conectado a la
toma de corriente de CA.
En el interior de la impresora hay bordes afilados.
El bisel delantero de la impresora se puede abrir con la mano. No
introduzca los dedos.
No toque el rodillo térmico.
2002605_A
•
•
•
Todos los equipos con voltaje de CA o voltaje de CC bajo, como
interruptores, suministros de energía, fusibles, ventiladores y motores no
graduales, deben reemplazarse con componentes autorizados por Rimage
para mantener la aprobación de seguridad emitida por la norma UL.
Utilice únicamente el cable de alimentación de CA suministrado. Para
obtener más información o para solicitar un nuevo cable de alimentación,
comuníquese con el Servicio de Atención al Cliente de Rimage.
Este producto está diseñado para un ambiente de oficina.
No utilice la impresora si se ha sobrecalentado o si detecta algún olor
anormal. Esto podría provocar un incendio o una descarga eléctrica. En
caso de sobrecalentamiento u olor anormal, desconecte de inmediato el
cable de la toma de corriente. Para la reparación, comuníquese con su
distribuidor autorizado por Rimage.
Deje suficiente espacio libre para abrir la bandeja de la impresora. No
toque la bandeja de la impresora mientras esté en movimiento.
Si se abre la cubierta lateral mientras la impresora está conectada al
suministro eléctrico, ésta se detendrá. No trate de acceder al interior de la
impresora cuando esté en funcionamiento. No trate de pasar por alto el
bloqueo de la puerta.
No utilice otro voltaje que no sea 110 VCA o 220 VCA porque podría
provocar un incendio o una descarga eléctrica.
Para obtener más información, visite rimage.com/support
3
Información importante
Información de conformidad
Producto
Impresora Prism III
Modelo
CDPR6
Aviso para los EE.UU.
NOTA: Este equipo ha sido sometido a pruebas y se ha determinado que cumple con los límites establecidos para un dispositivo digital
Clase A, conforme a la parte 15 de las Normas de la FCC. Estos límites están diseñados para proporcionar protección razonable contra
interferencias perjudiciales cuando el equipo se utiliza en un entorno comercial. Este equipo genera, utiliza y puede irradiar energía de
frecuencia radial y, de no ser instalado y utilizado de acuerdo con el manual de instrucciones, puede provocar interferencias perjudiciales
a las comunicaciones de radio. Es probable que el funcionamiento de este equipo en un área residencial cause interferencias nocivas, de
modo que se le solicitará al usuario que corrija la interferencia por cuenta propia.
Este producto cumple con la norma UL 60950-1, segunda edición.
Aviso para Canadá
Este aparato digital Clase A cumple con la norma ICES-003 canadiense, Edición 4:2004. Cet appareil numerigue de la classe A est conforme
a la norme NMB-003 du Canade.
Este producto cumple con la norma CAN/CSA C22.2 N.º 60950-1-07, primera edición.
Aviso para Europa
Este producto cumple con la Directiva de EMC (89/336/EEC) y la Directiva de bajo voltaje (73/23/EEC) de conformidad con las siguientes
normas europeas: EN 55022: 2010/AC: 2011 Clase A Límite; EN 55024: 2010; EN 61000-3-2:2006+A1:2009+A2:2009; EN 61000-3-3:2008;
EN 60950-1: 2006/ A11:2009. La marca CE ha sido adherida al producto de acuerdo con la Directiva de marcas de la CE 93/68/EEC.
Aviso para Japón
Este es un producto Clase A que cumple con los estándares del Consejo de control voluntario de interferencia causada por equipos de
tecnología de Ia información (VCCI). Si este equipo se utiliza en el hogar, puede producirse interferencia; en tal caso, es posible que el
usuario deba tomar medidas correctivas.
Traducción:
この装置は、情報処理装置等電波障害自主規制協議会(VCCI)の基準に基づくクラスA 情報技術装置です。
この装置を家庭環境
で使用すると電波妨害を引き起こすことがあります。
この場合には使用者が適切な対策を講ずるよう要求されることがあります。
Aviso para Australia
Este producto cumple con la norma AS/NZS CISPR22:2009.
Aviso para Corea
Está confirmado que el equipo que precede ha sido certificado conforme a la Framework Act on Telecommunications (Ley marco sobre
telecomunicaciones) y la Radio Waves Act (Ley de ondas de radio).
위 기기는 전기통신기본법, 전파법 에 따라 인증되었음을 증명 합니다.
Aviso para Taiwan
2002605_A
This is class A digital device. It may cause radio-frequency interference when used in a residential area. In this case, the users are advised
to take appropriate precautions.
Translation:
警告使用者:
此為甲類資讯技術設備,於居住環境時,可能会造成射頻擾動,在此種情况下,使用者會被要求採取某些適當的對策。
Para obtener más información, visite rimage.com/support
4
Requisitos de la impresora Prism III
Esta sección describe los requisitos de tinta, diseño de etiquetas e impresión para la
impresora Prism.
Requisitos de cinta
¡Importante!
• Rimage solo admite el uso de cintas de marca Rimage en la impresora Prism.
Los problemas de la impresora ocasionados por el uso de cintas de otros
fabricantes no están contemplados en la garantía de Rimage ni en el contrato
de mantenimiento.
•
Para obtener resultados óptimos, guarde las cintas Prism III a una temperatura
entre 23 y 104 °F (-5 y 40 °C) y a una humedad relativa del 30 % al 80 % sin
condensación.
•
Evite la humedad y la luz directa del sol.
•
No vuelva a utilizar las cintas.
•
Use únicamente cintas diseñadas para la impresora Prism III. Consulte la tabla
que aparece a continuación.
La impresora Prism requiere cintas diseñadas específicamente para usar con la
impresora. La impresora Prism III solo funcionará con las siguientes cintas Rimage:
Tipo de cinta
Cantidad de discos impresos
2002364 Negro
2100
2002366 Rojo
2100
2002367 Azul noche
2100
2002365 Multicolor (CMY)
500
Requisitos para el diseño de etiquetas
El software editor de etiquetas CD Designer™ de Rimage compatible con Windows
se envía con cada impresora. CD Designer se instala en el equipo durante una
instalación típica del software de Rimage. Si tiene Windows en su equipo, puede
utilizar CD Designer para diseñar sus etiquetas.
Si utiliza un equipo Macintosh, o si prefiere diseñar etiquetas en una aplicación de
software que no sea CD Designer, utilice los siguientes criterios.
¡Importante! CD Designer no es compatible con Macintosh.
•
•
•
•
•
Formato del archivo: Para obtener mejores resultados, guarde sus etiquetas
como archivos JPEG o TIFF. Sin embargo, estos formatos de archivo se deben
convertir antes de la impresión. Si utiliza CD Designer para imprimir etiquetas,
debe importar las etiquetas y guardarlas como archivos de CD Designer (.btw)
antes de la impresión. Si no utiliza CD Designer para imprimir etiquetas, debe
convertir las etiquetas a archivos PDF antes de la impresión.
Modo color: Las etiquetas que se importan a CD Designer deben estar en modo
color RGB.
Resolución: Use imágenes o logotipos
configurados en 300x300 dpi (puntos por
pulgada) o 300x600 dpi.
Área de
Tamaño del diseño de la etiqueta: El ancho
impresión
es de 5,12 in (1536 píxeles) y el alto es de
116 mm
4,52 in (1356 píxeles).
Área de impresión: Cuando se utiliza una
impresora Prism el área de impresión de un
disco es de 116 mm (4,567 in) y el hub es de
Tamaño del hub
38 mm (1,496 in).
38 mm
Requisitos de impresión
Todas las etiquetas que se hayan creado y guardado con CD Designer estarán en el
formato de archivo correcto (.btw) para imprimir con la impresora Prism. Si usted
crea y guarda etiquetas con una aplicación de software que no sea CD Designer,
guarde las etiquetas como archivos PDF antes de imprimirlas con la impresora
Prism. Si utiliza una impresora Prism independiente o una AutoPrism AutoPrinter,
puede imprimir directamente desde cualquier aplicación con capacidad de
impresión.
2002605_A
Para obtener más información, visite rimage.com/support
5
Identificación de las piezas de la impresora Prism III
Vista delantera
Vista trasera
Bandeja de la
impresora
Interruptor de
encendido
Conexión de la
alimentación
de CA
Panel operador
Puerto del
cable USB
Abrazadera de la cinta
Conexión de control de
AutoPrinter/AutoLoader
Vista
superior
Guías de cinta
Pasadores de
retención
Bandeja de la impresora
y pasador de centrado
2002605_A
Rodillo de recogida
Rodillo de suministro
Para obtener más información, visite rimage.com/support
6
Identificación de las piezas de la impresora Prism III
Panel operador
Imagen
En el panel de funcionamiento, ubicado en el frente de la impresora, se encuentran
cuatro luces indicadoras y un botón de funcionamiento.
Botón de funcionamiento
Presione el botón de funcionamiento para abrir y cerrar la bandeja de la impresora.
La luz indicadora Error está ubicada en el centro del botón de funcionamiento. Para
obtener más información, consulte la sección Indicator Lights (Luces indicadoras)
que figura a continuación.
Nombre
Funcionalidad
Luz
indicadora
Disc Not
Present
(Ausencia de
disco)
•
•
•
Luces indicadoras
•
A continuación, se describe el nombre y la función de cada luz indicadora. Cada luz
indicadora refleja condiciones diferentes en la impresora independiente Prism. Las
impresoras Prism que se instalan en autoloaders o AutoPrism AutoPrinter tienen
condiciones diferentes.
•
•
Botón de funcionamiento con
luz indicadora de Error
Luz indicadora Disc Not
Present (Ausencia de disco)
Luz indicadora Active
(Activada)
Luz indicadora de
alimentación
Panel operador
Imagen
Nombre
Funcionalidad
Luz
indicadora
Error
•
•
•
2002605_A
Luz
•
indicadora de
activación
•
La luz indicadora Active parpadea cuando la impresora
está funcionando.
La luz indicadora Active parpadea en forma continua a
una velocidad lenta cuando la impresora está en modo
AutoPrinter.
Luz
•
indicadora de
alimentación •
La luz indicadora de alimentación se ilumina al encender
la impresora.
La luz indicadora de alimentación parpadea cuando la
placa del sistema ha detectado un error fatal.
La luz indicadora de alimentación se apaga cuando la
impresora detecta un elemento de píxel defectuoso
en el cabezal de impresión. La luz indicadora de
alimentación se vuelve a encender cuando se coloca
un disco en la bandeja. Puede continuar imprimiendo
los discos. Si continúa imprimiendo, pueden aparecer
pequeñas líneas en los trabajos de impresión. Esta es
una indicación de que posiblemente se deba reemplazar
el cabezal de impresión.
La luz indicadora de alimentación se apaga al apagar la
impresora.
•
La luz indicadora Error, ubicada en el botón de
funcionamiento, se enciende cuando ocurre un error
durante la impresión.
La luz indicadora Error y la luz indicadora Disc Not Present
(Ausencia de disco) parpadean cuando la impresora está
en modo limpieza.
La luz indicadora Error se enciende y la luz indicadora Disc
Not Present parpadea lentamente cuando la cinta está
afuera.
La luz indicadora Disc Not Present parpadea un código
de error cuando ocurre un error. Luego de solucionarlo,
presione el botón de funcionamiento para apagar la luz
indicadora.
La luz indicadora Disc Not Present se enciende cuando
la bandeja está vacía o cuando el disco no está
correctamente instalado. Cuando se coloca un disco en
la bandeja, la luz indicadora Disc Not Present se apaga.
En el modo Multiple Copy (Copia múltiple), la luz
indicadora Disc Not Present (Ausencia de disco) se
enciende hasta que se retira el disco de la bandeja.
La luz indicadora Disc Not Present (Ausencia de disco)
parpadea de forma continua a una velocidad lenta
cuando la capacidad restante de la cinta está por debajo
de los 100 discos para cintas monocolor y por debajo de
los 25 discos para cintas CMY.
La luz indicadora Disc Not Present parpadea a una
velocidad lenta y la luz indicadora Error se enciende
cuando la cinta está afuera.
La luz indicadora Disc Not Present y la luz indicadora
Error parpadean cuando la impresora está en modo
limpieza.
•
Para obtener más información, visite rimage.com/support
7
Funcionamiento de la impresora Prism III
En esta sección encontrará la información necesaria para utilizar la impresora Prism.
Encendido y apagado de la impresora Prism
Encendido o apagado de una impresora independiente
1. Presione el interruptor de encendido en la parte trasera de la impresora. La
impresora se encenderá y se inicializará.
2. Vuelva a presionar el interruptor de encendido. La impresora se apagará.
Colocación de un disco en la bandeja de la
impresora
1. Presione el operator button (botón de funcionamiento) para abrir la bandeja de
la impresora.
2. Coloque un disco sobre la almohadilla de goma entre los dos pasadores de
retención y el pasador de centrado.
¡Importante! Coloque el disco con el lado de grabación hacia abajo. El lado de
grabación tiene un anillo de apilamiento elevado cerca del hub. Si se inserta un disco
con el anillo de apilamiento hacia arriba, se podría dañar el cabezal de impresión.
Sugerencias:
• Si el disco se coloca sobre los pasadores de retención, la bandeja no se
cerrará.
• Las características de la almohadilla y la placa de impresión varían entre los
modelos independiente y automatizado. El modelo automatizado tiene un
orificio en el centro de la placa; el modelo independiente no lo tiene. Todos
los modelos tienen un pasador de centrado.
Interruptor de encendido
3. Presione el operator button (botón de funcionamiento). La bandeja de la
impresora se mueve a la posición de disco fijo.
Encendido o apagado de una impresora conectada a un
Autoloader o una AutoPrinter
Placa
Siga los pasos que aparecen a continuación si su impresora Prism III está conectada
a un autoloader o una AutoPrinter:
Sugerencia: El interruptor de encendido de la impresora debe permanecer en
posición "on" (encendido).
Pasador de
centrado
1. Encienda el autoloader o la AutoPrinter. La impresora se encenderá y se
inicializará.
2. Apague el autoloader o la AutoPrinter. La impresora se apagará.
Pasadores de
retención
Bandeja de la
impresora
2002605_A
Para obtener más información, visite rimage.com/support
8
Configuración de las preferencias de impresión
Configuración de las preferencias de
impresión
Importante: A menos que se indique lo contrario, todas las instrucciones de
navegación de Windows corresponden a rutas de Windows 7. Las rutas de
navegación de otros sistemas operativos de Windows pueden presentar algunas
diferencias.
Modificación de la configuración de máscara
El software CD Designer de Rimage fue creado para imprimir en discos ópticos de
120 mm y enmascarará áreas que no puedan imprimirse, tales como el interior del
orificio del disco y el exterior de la circunferencia externa.
Acceso a las preferencias de impresión
1. Seleccione: Start (Inicio) > Devices and Printers (Dispositivos e impresoras).
Se abre el cuadro de diálogo Devices and Printers (Dispositivos e impresoras).
2. Haga clic con el botón derecho en Rimage Prism III.
3. En la lista desplegable, seleccione Printing preferences (Preferencia de
impresión). Se abre la ventana Rimage Prism III Preferences (Preferencias de
Rimage Prism III).
Áreas
enmascaradas
(no imprimir)
Acceso a las propiedades de impresión
1. Seleccione: Start (Inicio) > Devices and Printers (Dispositivos e impresoras).
Se abre el cuadro de diálogo Devices and Printers (Dispositivos e impresoras).
2. Haga clic con el botón derecho en Rimage Prism III.
3. En la lista desplegable, seleccione Printing properties (Propiedades de
impresión). Se abre la ventana Rimage Prism III Properties (Propiedades de
Rimage Prism III).
Preferencias de diseño y papel/calidad
No es necesario ajustar las opciones en las fichas Layout (Diseño) y Paper/Quality
(Papel/Calidad). El Soporte técnico de Rimage identificará cuando estos ajustes
deben modificarse y puede brindarle ayuda con el ajuste de la configuración de
estas fichas.
2002605_A
Algunos discos no tienen un recubrimiento de impresión adecuado alrededor
del anillo de apilamiento. Modifique la configuración de máscara para adaptar la
impresión en estos discos.
Áreas
enmascaradas
(no imprimir)
Para obtener más información, visite rimage.com/support
9
Configuración de las preferencias de impresión
1.
2.
3.
4.
5.
6.
Acceda a Print Preferences (Preferencias de impresión). Consulte la página 9.
Seleccione la ficha Masking Settings (Configuración de máscara).
Seleccione la opción Print on Hub (Imprimir en hub).
Mida los diámetros interno y externo de la superficie que se puede imprimir.
Ingrese los diámetros en la sección Hub Settings (Configuración de hub).
Seleccione OK (Aceptar) para guardar los cambios.
Opciones de servicio
La ficha Service (Servicio) proporciona información sobre su impresora Prism III
y ofrece una serie de herramientas que permiten que su impresora esté actualizada
y funcione correctamente.
1. Acceda a Print Preferences (Preferencias de impresión). Consulte la página 9.
2. Seleccione la ficha Service (Servicio).
La ventana que se muestra incluye información sobre su impresora Prism III.
• Controlador: muestra información sobre el controlador de la impresora,
incluido el nombre y número de versión.
• Impresora: muestra información sobre la impresora, incluido el nombre de
la impresora, número de serie y versión de firmware.
• Estado de la impresora: muestra el estado de la impresora.
• Estado de la cinta: muestra el tipo de cinta, el porcentaje utilizado de cinta,
el número de pieza de la cinta y el código de color, además del número de
serie de la cinta instalada.
Centrado de la imagen en el disco
La herramienta de centrado de la imagen se utiliza para ajustar el centro mecánico
de la impresora de modo que coincida con la plantilla estándar de CD Designer.
Sugerencia: Por lo general, no es necesario un nuevo ajuste, a menos que se
reemplacen los componentes de la impresora.
1. Acceda a Print Preferences (Preferencias de impresión). Consulte la página 9.
2. Seleccione la ficha Service (Servicio).
3. Seleccione Service Toolbox (Caja de herramientas de servicio).
Se abre el cuadro de diálogo Service ToolBox (Caja de herramientas de servicio).
4. Seleccione Center Image (Centrar imagen).
Se abre el cuadro de diálogo Centering Image (Centrado de imagen).
Impresión de archivos PRN
1. Acceda a Print Preferences (Preferencias de impresión). Consulte la página 9.
2. Seleccione la ficha Service
(Servicio).
3. Seleccione Service Toolbox
(Caja de herramientas de
servicio). Se abre el cuadro
de diálogo Service ToolBox
(Caja de herramientas de
servicio).
4. Seleccione Print PRN File
(Imprimir archivo PRN).
Se abre un cuadro de diálogo que permite a los usuarios imprimir archivos PRN
seleccionados.
2002605_A
Para obtener más información, visite rimage.com/support
10
Configuración de las preferencias de impresión
5. Siga los pasos descritos en el cuadro de diálogo Centering Image (Centrado de
imagen):
a. Abra la bandeja de la impresora y coloque un disco blanco de 120 mm en la
bandeja.
b. Seleccione el botón Print Pattern (Imprimir patrón) en el cuadro de diálogo
Centering Image (Centrado de imagen).
Se imprime un patrón en el disco.
c. Gire el disco 180 grados.
Sugerencia: Después de girar el disco, la flecha que se imprime debe estar
en el centro del bisel y la línea impresa debe estar alineada con el borde de
la bandeja de la impresora.
Alinear con
el borde de la
bandeja de la
impresora
Flecha
Bisel
2002605_A
Para obtener más información, visite rimage.com/support
11
Configuración de las preferencias de impresión
i.
2002605_A
Si las líneas cruzan las escalas horizontal y vertical en 0, no es
necesario realizar ajustes. Presione OK (Aceptar).
d. Si, como mínimo, una línea cruza el 0, ingrese los factores de corrección
horizontal y vertical leídos del disco. Seleccione Save Settings (Guardar
configuración).
Para obtener más información, visite rimage.com/support
12
Configuración de las preferencias de impresión
Actualización del firmware
1. Acceda a Print Preferences (Preferencias de impresión). Consulte la página 9.
2. Seleccione la ficha Service (Servicio).
3. Seleccione Service Toolbox (Caja de herramientas de servicio). Se abre el
cuadro de diálogo Service ToolBox (Caja de herramientas de servicio).
4. Seleccione Update Firmware (Actualizar firmware).
Sugerencia: Consulte el documento Actualización del fimware para la
impresora Rimage Prism III para obtener más información sobre la actualización
de su versión de firmware.
Configuración del dispositivo para cintas monocromo o CMY
Puede imprimir en un solo color o en varios colores. Utilice estos procedimientos
para configurar la impresora Prism para imprimir a color o en un solo color y ajustar
la configuración del dispositivo para el tipo de cinta utilizado.
Impresión en un solo color
1. Instale una cinta de un solo color en la impresora. Consulte la sección Cambio
de la cinta de impresión en página 18.
Sugerencia: El color de impresión se detecta automáticamente y se ajusta a
partir del tipo de cinta instalado en la impresora.
2. Acceda a Print Properties (Propiedades de impresión). Consulte la página 9.
3. Seleccione la ficha Device Settings (Configuración de dispositivo).
4. Para realizar cambios que afectan la intensidad del color, el equilibrio de
colores o la configuración de patrones, seleccione Halftone Setup Properties
(Propiedades de configuración de medios tonos).
5. Seleccione Media Type (Tipo de medios).
Sugerencia: Algunos medios de DVD tienen un anillo de apilamiento elevado en
el lado imprimible del disco. El proceso de impresión térmica directo utilizado
en la impresora Prism II no puede imprimir en esta área. El DVD con la
configuración Anillo de apilamiento superior hace que la impresora omita el
anillo de apilamiento. Esto genera una banda sin impresión en el disco. Rimage
recomienda usar discos sin el anillo de apilamiento en la superficie imprimible.
7. Seleccione Yes (Sí) o No en la opción Double Print (Impresión doble). El valor
predeterminado es No.
Sugerencias:
• Si selecciona Yes (Sí) en la opción Double Print (Impresión doble), la
impresora imprimirá cada uno de los discos dos veces para oscurecer la
imagen.
• La opción Double Print (Impresión doble) solo está disponible para la
impresión en un solo color.
8. Seleccione Yes (Sí) o No en la opción Detect Media Change (Detectar cambio
de medios). El valor predeterminado es No. Conserve la configuración
predeterminada para usar AutoPrinter o AutoLoader.
Sugerencia: Si selecciona Yes (Sí), la impresora esperará hasta que el usuario
cambie el disco antes de imprimir otro disco.
9. Si tiene una impresora independiente Prism III, desactive la opción Perfect Print
option (Impresión perfecta opción). Esta opción solo se encuentra disponible en
determinadas AutoPrinters de Rimage.
Sugerencia: Consulte la Guía del usuario de la AutoPrinter de Rimage para
obtener más información sobre la opción Perfect Print (Impresión perfecta).
10. Seleccione OK (Aceptar) para guardar los cambios y cerrar la ventana Device
Settings (Configuración del dispositivo).
Impresión a color
1. Instale una cinta multicolor en la impresora. Consulte la sección Cambio de la
cinta de impresión en página 18.
Sugerencia: El color de impresión se detecta automáticamente y se ajusta en
base al tipo de cinta instalado en la impresora.
2. Acceda a Print Properties (Propiedades de impresión). Consulte la página 9.
3. Seleccione la ficha Device Settings (Configuración de dispositivo).
4. Para realizar cambios que afectan la intensidad del color, el equilibrio de
colores o la configuración de patrones, seleccione Halftone Setup Properties
(Propiedades de configuración de medios tonos).
6. Configure Master Print Strobe (Estroboscopio de impresión maestro). Para
obtener más información, consulte la sección Configuración de estroboscopio.
2002605_A
Para obtener más información, visite rimage.com/support
13
Configuración de las preferencias de impresión
5. Seleccione Media Type (Tipo de medios).
Configuración del estroboscopio
Sugerencia: Algunos medios de DVD tienen un anillo de apilamiento elevado en
el lado imprimible del disco. El proceso de impresión térmica directo utilizado
en la impresora Prism II no puede imprimir en esta área. El DVD con el
ajuste Anillo de apilamiento superior hace que la impresora omita el anillo
de apilamiento, que genera una banda sin impresión en el disco. Rimage
recomienda usar discos sin el anillo de apilamiento en la superficie imprimible.
6. Configure Master Print Strobe (Estroboscopio de impresión maestro). Para
obtener más información, consulte la sección Configuración de estroboscopio.
7. Habilite Color Sub-Strobes (Subestroboscopios de color). Para obtener más
información, consulte la sección Configuración de estroboscopio.
¡Importante! Color Sub-Strobes (Subestroboscopios de color) solo están
disponibles con cintas CMY y están deshabilitados de forma predeterminada. El
Estroboscopio de impresión maestro no tiene efecto cuando están habilitados
los Subestroboscopios de color.
8. Seleccione Yes (Sí) o No en la opción Detect Media Change (Detectar cambio de
medios). El valor predeterminado es No.
Sugerencia: Si selecciona Yes (Sí), la impresora esperará que el usuario cambie
el disco antes de imprimir otro disco.
9. Si tiene una impresora independiente Prism III, desactive la Perfect Print option
(Impresión perfecta opción). Esta opción solo se encuentra disponible en
determinadas AutoPrinters de Rimage.
Sugerencia: Consulte la Guía del usuario de la AutoPrinter de Rimage para
obtener más información sobre la opción Perfect Print (Impresión perfecta).
10. Seleccione OK (Aceptar) para guardar los cambios y cerrar la ventana Device
Settings (Configuración del dispositivo).
La configuración del estroboscopio controla la cantidad de energía utilizada para
imprimir un píxel. Los ajustes más altos usan más energía. A medida que se aumenta
la configuración, la imagen se vuelve más intensa y la vida del cabezal de impresión
disminuye. Rimage recomienda usar la configuración más baja del estroboscopio
que proporcione la calidad de imagen deseada.
Notas:
• Estas son configuraciones recomendadas para los medios de la marca Rimage.
• Es posible que esto necesite varias pruebas de impresión en discos para ajustar
el matiz de color. Configure Enable Color Sub-Strobes (Activar
subestroboscopios de color) como Enabled (Activado) para disminuir
el estroboscopio de impresión de un color particular. Por ejemplo, esta
configuración se puede utilizar para disminuir la configuración Yellow Print
Strobe (Estroboscopio de impresión amarillo) cuando se intenta eliminar un
efecto de aureola en un disco impreso.
1. Acceda a Print Properties (Propiedades de impresión). Consulte la página 9.
2. Seleccione la pestaña Device Settings (Configuración del dispositivo).
3. Configure Master Print Strobe (Estroboscopio de impresión maestro).
Nota: Rimage recomienda las siguientes configuraciones para los medios de la
marca Rimage:
• Superficie de medios: medios de impresión térmica
• Configuración de estroboscopio de impresión para cinta negra: 325 - 400
• Configuración de estroboscopio de impresión para cinta roja: 375 - 425
• Configuración de estroboscopio de impresión para cinta azul: 350 - 400
4. Seleccione Enabled (Activado) en Enable Color Sub-Strobes (Activar
subestroboscopios de color).
¡Importante! La configuración Color Sub-Strobe (Subestroboscopio de color)
solo está disponible con cintas CMY.
5. Seleccione OK (Aceptar) para guardar los cambios y cerrar la ventana Device
Settings (Configuración del dispositivo).
2002605_A
Para obtener más información, visite rimage.com/support
14
Mantenimiento de la impresora Prism III
Utilice la información de esta sección para mantener su impresora Prism III en
óptimas condiciones de funcionamiento.
Descripción general
El mantenimiento preventivo regular de su impresora Prism III contribuye a producir
siempre etiquetas claramente impresas. Mantenimiento incluye la limpieza del
sistema.
Información de precaución
nn Precaución: Para evitar que la impresora Prism III se dañe durante el
mantenimiento:
• Nunca utilice aceites, silicona ni otros lubricantes en ninguna pieza de la
impresora Prism.
• Utilice solo limpiadores no abrasivos para limpiar las superficies de la
impresora Prism.
• Evite rociar directamente la impresora Prism con líquidos de limpieza. En
cambio, aplique el líquido de limpieza con un paño sin pelusas.
Herramientas
Tarea
Frecuencia
Instrucciones
• Paño sin
pelusas
Limpieza
de la parte
exterior
de la
impresora.
Una vez por
semana
1. Apague la impresora
Prism.
2. Desconecte el cable
de alimentación.
3. Limpie la parte
exterior de la
impresora.
• Cinta de
impresión
nueva
Cambio de
la cinta de
impresión.
Monocromo
(negro):
2100 discos
Monocromo (rojo):
2100 discos
Monocromo (azul):
2100 discos
Panel de 3 colores
(CMY):
500 discos
Consulte la sección Cambio
de la cinta de impresión en
página 18.
Kit de
limpieza del
cabezal de
impresión
Limpie el
cabezal de
impresión.
Cada vez que se
cambia la cinta
o cuando sea
necesario
Consulte la sección
Limpieza del cabezal de
impresión en la.página
16.
• Limpiador
no abrasivo
multiuso
Programa de mantenimiento preventivo
Utilice la siguiente tabla como pauta para conocer la frecuencia con la que debe
realizar tareas de mantenimiento preventivo.
¡Importante! Si no se respeta el programa de mantenimiento detallado a la derecha,
la garantía puede quedar sin efecto.
2002605_A
Para obtener más información, visite rimage.com/support
15
Mantenimiento de la impresora Prism III
Limpieza del cabezal de impresión
Limpie el cabezal de impresión cada vez que cambie la cinta, o con mayor frecuencia
si comienzan a aparecer rayas o si la cinta se rompe.
Existen dos métodos para limpiar el cabezal de la impresora Prism III: el método
con el kit de limpieza de la impresora Prism y el método alternativo. El método
alternativo se puede utilizar cuando no se encuentra disponible un kit de limpieza.
En esta sección encontrará las instrucciones para ambos métodos.
Nota: Si la impresora Prism está conectada a un autoloader o una AutoPrinter, es
posible que deba extraer la impresora del sistema antes de comenzar con el proceso
de limpieza.
• Apague la impresora.
• Extraiga todos los cables de la parte trasera de la impresora. Consulte la sección
Identificación de las piezas de la impresora Prism en página 6.
• Extraiga la impresora del sistema y colóquela en una superficie plana cerca de
una toma de corriente.
• Conecte un cable de alimentación por separado desde la parte trasera de la
impresora hasta una toma de corriente.
Limpieza del cabezal de la impresora Prism con un kit de
limpieza de la impresora Prism III
Si dispone de un kit de limpieza de la impresora Prism, siga el procedimiento que se
detalla a continuación para limpiar el cabezal de impresión.
## Herramientas necesarias:
2. Inicie el modo limpieza.
a. Mientras mantiene presionado el operator button (botón de
funcionamiento), presione el interruptor de encendido para encender la
impresora Prism.
b. Cuando la luz indicadora Disc Not Present (la segunda luz del panel
de funcionamiento) parpadee, suelte el operator button (botón de
funcionamiento). Se abre la bandeja de la impresora.
La impresora está en modo limpieza cuando las luces indicadoras del
botón de funcionamiento y Disc Not Present (las dos luces indicadoras
que se encuentran en la parte superior del panel de control) parpadean
rápidamente.
3. Prepare la almohadilla de limpieza.
Nota: La almohadilla de limpieza se incluye en el kit de limpieza de la impresora
Prism.
Retire la cubierta adhesiva de la almohadilla de limpieza.
Pegue la almohadilla de limpieza en la parte superior de un disco.
Asegúrese de que los bordes de la almohadilla estén alineados con el disco.
Coloque la almohadilla de limpieza adherida al disco en la bandeja de la
impresora. Asegúrese de que el disco esté alineado con los pasadores de
retención de la bandeja de la impresora.
e. Presione la almohadilla hacia abajo y sobre el sensor de la bandeja de la
impresora.
f. Coloque 5 gotas de alcohol isopropílico en la almohadilla de limpieza.
a.
b.
c.
d.
• Kit de limpieza de la impresora Prism (PN 210555-001)
• Un disco
• Alcohol isopropílico al 99 %
• Hisopos
1. Prepare la impresora Prism para su limpieza.
a. Apague la impresora Prism.
b. Retire la cubierta superior.
c. Extraiga la cinta. Consulte la sección Cambio de la cinta de impresión en
página 18.
2002605_A
Para obtener más información, visite rimage.com/support
Almohadilla presionada
sobre el sensor
Almohadilla de limpieza
adherida al disco
Bandeja de la
impresora
16
Mantenimiento de la impresora Prism III
4. Limpie el cabezal de impresión.
a. Presiones el operator button (botón de funcionamiento) para cerrar la
bandeja de la impresora e iniciar el ciclo de limpieza. La bandeja de la
impresora se abre cuando finaliza el ciclo de limpieza.
b. Si es necesario, repita el paso a para volver a iniciar el ciclo de limpieza.
c. Una vez que el cabezal de impresión esté limpio, extraiga la almohadilla de
limpieza y el disco adherido de la bandeja de la impresora.
Guías de cinta delanteras
Almohadilla de limpieza
Solución de
limpieza
5. Limpie las dos guías de cinta delanteras.
a. Aplique alcohol isopropílico en un hisopo limpio.
b. Pase el hisopo por las guías de cinta para que se limpien.
6. Prepare la impresora Prism para su uso.
a. Presione el interruptor de encendido dos veces para salir del modo
limpieza y restablecer la impresora.
b. Vuelva a instalar la cinta. Consulte la sección Cambio de la cinta de
impresión en página 18.
c. Si extrajo la impresora de un autoloader o una AutoPrinter, vuelva a color
la impresora en el sistema y conecte todos los cables. Consulte la sección
Identificación de las piezas de la impresora Prism III en la página 6.
Limpieza del cabezal de impresión: método alternativo
Si no dispone de un kit de limpieza, siga el procedimiento que se detalla a
continuación para limpiar el cabezal de la impresora Prism.
## Herramientas necesarias:
• Alcohol isopropílico al 99 %
• Hisopos
1. Prepare la impresora Prism III.
a. Encienda la impresora Prism III.
b. Presione el operator button (botón de funcionamiento) para abrir la
bandeja de la impresora.
c. Apague la impresora Prism III.
d. Retire la cubierta superior.
e. Extraiga la cinta. Consulte la sección Cambio de la cinta de impresión en
página 18.
2. Limpie el cabezal de impresión.
a. Aplique alcohol isopropílico en un hisopo.
b. Inserte el hisopo en la abertura de la gaveta.
c. Levante el hisopo para frotar la superficie convexa del cabezal de
impresión.
Superficie convexa del cabezal
de impresión
Nota: Si la almohadilla de impresión de la bandeja está húmeda por la
limpieza, déjela secar completamente antes de volver a utilizar la
impresora Prism.
¡Importante! Se muestra la parte inferior del cabezal de impresión para ilustrar el
área que se debe limpiar. No extraiga el cabezal de impresión de la impresora.
2002605_A
Para obtener más información, visite rimage.com/support
17
Mantenimiento de la impresora Prism III
3. Limpie las dos guías de cinta delanteras.
a. Aplique alcohol isopropílico en un hisopo limpio.
b. Pase el hisopo por las guías de cinta para que se limpien.
4. Cuando el alcohol se seque, prepare la impresora Prism para su uso.
a. Instale la cinta. Consulte la sección Cambio de la cinta de impresión en
página 18.
b. Si extrajo la impresora de un autoloader o una AutoPrinter, coloque la
impresora en el sistema y conecte todos los cables en la parte trasera de la
impresora. Consulte la sección Identificación de las piezas de la impresora
Prism en la página 6.
Cambio de la cinta de impresión
Rimage solo admite el uso de cintas de marca Rimage en nuestras impresoras. Los
problemas de la impresora ocasionados por el uso de cintas de otros fabricantes no
están contemplados en la garantía de Rimage ni en el contrato de mantenimiento.
Sugerencia: Si las cintas se guardan en un ambiente diferente al de la impresora,
permita que se aclimaten al nuevo entorno antes de instalarlas. Si hay mayores
diferencias de temperatura o humedad, espere un tiempo prudente.
2002605_A
2. Cargue la cinta de impresión.
a. Deslice la cinta de impresión en el rodillo de suministro.
b. Alinee las dos muescas del tubo de cartón a los pasadores de metal del
rodillo de suministro.
Cinta de impresión
Tubo de cartón
¡Importante! La impresora Prism III solo funciona con cintas Rimage originales.
1. Acceda al área de la cinta.
a. Encienda la
impresora Prism.
b. Retire la cubierta
superior de la
impresora.
c. Levante el rodillo de
recogida de modo
que el extremo del
engranaje salga
primero y luego
extráigalo de la
Rodillo de
impresora.
recogida
d. Levante el rodillo de
suministro para extraerlo.
Nota: Si va a cambiar la cinta, es un buen momento para limpiar el cabezal de
impresión. Consulte la sección Limpieza del cabezal de impresión en la página
16.
Muescas
Pasadores metálicos
Rodillo de suministro
c. Presione el operator button (botón de funcionamiento) para cerrar la
bandeja de impresión.
d. Despegue el comienzo de la cinta de la cinta de suministro.
e. Deslice el comienzo de la cinta en la guía de la cinta y en la abrazadera de
instalación de la cinta.
Abrazadera de
instalación de la
Guía de la cinta
cinta
Rodillo de
suministro
Bandeja de la impresora
Para obtener más información, visite rimage.com/support
Comienzo de la cinta
18
Mantenimiento de la impresora Prism III
3. Instale el rodillo de suministro, tal como se indica. Deje un poco suelto el
comienzo de la cinta.
a. Presione el operator
button (botón de
funcionamiento) hasta
que salga la bandeja de
la impresora. La cinta
se enrolla en la parte
Rodillo de
delantera de la impresora suministro
Prism.
b. Retire el comienzo de la
cinta de la abrazadera de
instalación.
c. Retire la tira adhesiva del
comienzo de la cinta.
4. Cargue el rodillo de recogida.
a. Coloque el nuevo tubo de cartón vacío en el rodillo de recogida. Está
diseñado para calzar en una sola posición.
b. Coloque el rodillo de recogida en la parte superior del comienzo de la
cinta, tal como se indica.
c. Tire del comienzo de la cinta sobre el tubo de cartón.
d. Pegue la tira adhesiva al tubo de cartón de modo que los bordes del
comienzo de la cinta se
alineen con los bordes
del tubo de cartón.
e. Enrolle el comienzo de
la cinta de modo que se
envuelva solo una vez
alrededor del rodillo.
¡Importante! No enrolle más allá de la marca del comienzo que indica
STOP - Wind Leader Onto Take-up Core Stopping Here (Deténgase: enrolle
el comienzo de la cinta en el centro de recogida hasta aquí) para las cintas
de un solo color. Si utiliza una cinta CMY, enrolle hasta el extremo del
comienzo amarillo.
¡Importante! El engranaje debe estar en el lado correcto.
Engranaje
Tira adhesiva
2002605_A
Tubo de cartón
Comienzo de
la cinta
Para obtener más información, visite rimage.com/support
19
Mantenimiento de la impresora Prism III
5. Instale el rodillo de recogida en la impresora Prism y presione con fuerza hasta
que el rodillo se ajuste en su lugar. La cinta debe estar tensa y sin pliegues.
Comienzo de la
cinta
Rodillo de recogida
Marca
¡Importante! No enrolle la marca STOP – Wind Leader Onto Take-up Core
Stopping Here (DETÉNGASE: enrolle el comienzo de la cinta en el centro de
recogida hasta aquí) en el comienzo de la cinta hacia el rodillo de recogida. La
marca no debe sobrepasar el punto que se muestra en la figura. Si la marca está
sobre el rodillo, retire el rodillo de recogida y desenrolle la cinta. Desenrolle el
rodillo de suministro para retirar la parte suelta de la cinta.
6. Presione el operator button (botón de funcionamiento) y mantenga presionado
durante 5 segundos para permitir que la impresora valide la cinta. Si la cinta es
válida, la impresora avanzará y la luz indicadora de Error dejará de parpadear.
Nota: Durante el proceso de validación de la cinta, esta avanza más allá del
comienzo de la cinta. Una vez completado el proceso de validación de la cinta,
asegúrese de que la cinta esté tensa.
7. Instale la cubierta superior.
2002605_A
Para obtener más información, visite rimage.com/support
20
Prism III プリンタ ユーザー ガイド
本社:
Rimage Corporation
7725 Washington Avenue South
Minneapolis, MN 55439
USA
ヨーロッパ本社:
Rimage Europe GmbH
Albert-Einstein-Str.26
63128 Dietzenbach
Germany
アジア/太平洋本社:
リマージュジャパン株式会社
〒106-0032
東京都港区六本木 7-4-8
WIND ビル 2F.
+1-800-553-8312 (北アメリカ)
サービス:+1 952-946-0004
(メキシコ/ラテンアメリカ)
ファックス:+1 952-944-6956
電話:+49 6074-8521-14
ファックス:+49 6074-8521-100
電話:+81-3-5771-7181
ファックス:+81-3-5771-7185
Rimage Corporation は、本書に記載されている機器およびソフトウェアを予告なしに改訂する権利を所有しています。Rimage Corporation
は、あらゆる個人または組織に通知する義務なく、本書を改訂または記載内容を随時改訂する権利を所有します。
このドキュメントには、発行時に有効であった Web サイトへのリンクが含まれていますが、現在そのサイトが移動している、
または無効であ
る場合もあります。本書には、第三者によって所有および運営されているインターネット上のサイトへのリンクが記載されている場合もありま
す。Rimage Corporation は、第三者のサイトの内容に関しては、責任を負いかねます。
©2012, Rimage Corporation
Rimage® は、Rimage Corporation の登録商標です。Rimage Prism III、AutoPrism™、CD Designer™ は Rimage Corporation の商標
です。Dell™ は、Dell Computer Corporation の商標です。FireWire™ は、Apple Computer, Inc. の商標です。Windows® は、Microsoft
Corporation の登録商標です。
他のすべての商標および登録商標は、それぞれの所有者の財産です。
本ドキュメントの最新版は www.rimage.com/support から入手できます。
2002605_A
詳細はrimage.com/support をご覧ください。
目次
概要................................................................................................1
本ユーザー ガイドについて................................................................................................1
Prism III プリンタについて..................................................................................................1
開梱およびセットアップ取扱説明書.................................................................................1
重要情報.........................................................................................2
サポート連絡先.......................................................................................................................2
オンラインでご覧いただける詳細情報...........................................................................2
テクニカル サポート..............................................................................................................2
光ディスク記録ソフトウェアの免責条項..........................................................................2
安全性および法令順守に関する情報..............................................................................3
安全のための予防措置.................................................................................................................... 3
法令順守に関する情報..................................................................................................................... 4
Prism III プリンタの要件.................................................................5
印刷オプションの設定.................................................................. 12
単色印刷..............................................................................................................................................................13
カラー印刷..........................................................................................................................................................13
ストローブ設定..................................................................................................................................................14
Prism III プリンタのメンテナンス.................................................. 15
概要.......................................................................................................................................... 15
注意事項..............................................................................................................................................15
予防メンテナンス スケジュール...................................................................................................15
Prism III プリンタのメンテナンス.................................................. 16
印刷ヘッドの清掃................................................................................................................ 16
Prism クリーニング キットを使った Prism III 印刷ヘッドの清掃.......................................16
印刷ヘッドの清掃 – 代替方法......................................................................................................17
印刷リボンの交換................................................................................................................ 18
リボンの要件............................................................................................................................5
ラベル デザインの要件.........................................................................................................5
印刷の要件...............................................................................................................................5
Prism プリンタ部品の確認..............................................................6
正面図.........................................................................................................................................6
上面図.........................................................................................................................................6
背面図.........................................................................................................................................6
Prism III プリンタ部品の確認..........................................................7
オペレータ パネル..................................................................................................................7
オペレータ ボタン..................................................................................................................7
表示ランプ................................................................................................................................7
Prism III プリンタの操作.................................................................8
Prism プリンタの電源オンとオフ.......................................................................................8
スタンドアローン プリンタのオンとオフ..................................................................................... 8
オートローダまたは AutoPrinter に接続されたプリンタの電源のオンまたはオフ..... 8
プリンタ トレイにディスクを装着する..............................................................................8
印刷オプションの設定.....................................................................9
印刷オプションの設定...........................................................................................................9
印刷オプションへのアクセス.......................................................................................................... 9
印刷プロパティへのアクセス.......................................................................................................... 9
レイアウトおよび紙/品質の環境設定.......................................................................................... 9
マスク設定の変更............................................................................................................................... 9
サービス オプション.........................................................................................................................10
印刷 PRN ファイル............................................................................................................................................10
ディスク上の画像の中央揃え.......................................................................................................................11
ファームウェアの更新......................................................................................................................................12
単色または CMY のリボンのデバイス設定..............................................................................12
2002605_A
詳細はrimage.com/support をご覧ください。
概要
本マニュアルは、Rimage Prism III プリンタの設定、操作、
メンテナンスに必要
な情報を説明しています。
ご利用の Autoloader や Rimage AutoPrinter に関する情報は、
www.rimage.com/supportサイトにある製品ユーザー ガイドをご確認くだ
さい。[Support (サポート)] ページから [Prism III] > [User Manuals (ユーザ
ー マニュアル)] タブの順に選択します。
重要!ご購入いただいた Prism III プリンタの外観は、本ユーザー ガイド内に記
載されたモデルとは異なる場合があります。
本ユーザー ガイドについて
•
•
•
当社ではすべてのバージョンのマニュアルおよび説明書を維持するように
努めていますが、当社ウェブサイトで閲覧できる英語バージョンでは常に
最新の情報を提供しています。
特に明記のない限り、Windows のナビゲーションの説明は Windows 7 の
パスを示しています。Windows 7 以外の Windows オペレーティング シス
テムのナビゲーションは多少異なる場合があります。
本マニュアルでは、情報のタイプに応じて以下の記号が使用されていま
す。
Prism III プリンタについて
Prism III プリンタは Rimage シリーズのプリンタです。Prism III プリンタは、CD
または DVD、Blu-ray DiscTM に情報をモノクロまたはカラー情報を印刷するた
めの高速プリンタです。
プリンタは、
スタンドアローンで手動で操作することもできますし、Rimage オー
トローダまたは Rimage AutoPrinter に取り付けて使うこともできます。
開梱およびセットアップ取扱説明書
開梱および設置の説明書は、Prism III プリンタに付属しています。
『Rimage
Prism III Setup and Installation Guide』、ならびに Rimage オートローダまた
は AutoPrinter に付属しているセットアップおよび設置ガイドを参照してくだ
さい。
ヒント:あまり知られていない別の方法が示され、本製品の利点や機能の理解
に役立つ情報が記載されています。
重要!
• 「重要!」には、
タスクの完了に欠かせない情報が提供されます。
•
重要な追加情報。
•
「ヒント」の情報を読まなくてもタスクを完了できますが、
「重要!」の記載
は必ず読むようにしてください。
「注意」は、記載されたガイドラインの順守を怠る場合、機器または
nn 注意:
製品、
ソフトウェア、データに損失または損傷が生じる恐れがあることを示
します。
「警告!」は、記載されたガイドラインの順守を怠る場合、機器の操作
nn 警告!
または保守担当者に身体的傷害が生じる恐れがあることを示します。
2002605_A
詳細はrimage.com/support をご覧ください。
1
重要情報
本セクションでは、Prism III プリンタに関し、サポートのための問い合わせ先お
よび注意や警告、製品仕様について説明します。
本製品に関する技術的仕様は、
www.rimage.com/supportをご参照くだ
さい。[Support
(サポート)
] ページで:[Printer Series (プリンタ・シリーズ] >
[Prism] > [User Manuals (ユーザー マニュアル)] タブの順に選択してください。
サポート連絡先
サービスを受けることができます。
製品ページから、以下の情報にアクセスす
ることができます。
1. ご使用の製品シリーズを選択します。
[Support (サポート)] ページから、
3. 製品ページで詳細をご覧ください。
Rimage Corporation
電子メール:[email protected]
7725 Washington Avenue South
Minneapolis, MN 55439
USA
Attn: Rimage Services
電話:北アメリカ:800-553-8312
メキシコ/ラテンアメリカ:952-944-8144
ファックス:952-944-7808
ヨーロッパ
電子メール:[email protected]
Albert-Einstein-Str. 26
電話:+49 6074-8521-14
63128 Dietzenbach
ファックス:+49 6074-8521-100
Germany
アジア/太平洋
リマージュジャパン株式会社
www.rimage.com/support で、Rimage の世界でトップレベルのサポートと
2. ご使用の製品を選択します。
米国、
カナダ、
ラテンアメリカ
Rimage Europe GmbH
オンラインでご覧いただける詳細情報
電子メール:[email protected]
〒106-0032
電話:+81-3-5771-7181
東京都港区六本木 7-4-8
ファックス:+81-3-5771-7185
WIND ビル 2F.
Rimage Services 連絡先
ウェブサイト:www.rimage.com/support
ナレッジ ベース:http://rimage.custhelp.com
ログインして、[Ask a Question (質問する)] タブを選択
Rimage サービスにお問い合わせ 将来参照するために Rimage 製品に記載さ
になる際は、以下の情報をご用意く れた次の情報を書き留めておいてください。
注:製品を交換した場合は、必ずシリアル番
ださい。
• ソフトウェアおよびファームウェア
の最新情報
• 製品仕様
• 最新ドキュメント
• 最新のファームウェアおよびドライ
バのダウンロード
テクニカル サポート
Rimage では、Exchange Services を含めて、Prism III プリンタのサービスおよ
びサポートのさまざまなオプションをご提供しています。詳細情報および価格
については、Rimage の付加価値再販業者や Rimage 社までお尋ねください。
重要!1 年間の部品および作業のサポートおよび、優先電話サポートが受けら
れるように、
ご購入のオートローダを登録してください。登録は、http://www.
rimage.com/support/warranty-registration から行えます。
光ディスク記録ソフトウェアの免責条項
本製品、
ソフトウェアおよび説明書は、著作権の所有者もしくは著作権者から
書面によるコピーの許可を受けている場合、複製することができます。使用者
が著作権を所有する、
もしくは、著作権者から複写の許可を取得していない限
り、使用者には、著作権法違反ならびに損害賠償および他の賠償の支払いが
課せられる恐れがあります。
ご自身の権利に関して不明確な場合は、法律の専
門家にご相談ください。使用者が著作権を所有せず、
また著作権所有者からの
許可も得ていない場合、光ディスク、その他のメディア上の著作権のあるマテ
リアルを無断で複製することは国内および国際上の法令を侵害することにな
り、厳しい処罰が科せられる場合があります。
号を更新してください。
• システムのシリアル番号とソフトウェ
シリアル番号:
アのバージョン
• エラーの機能的および技術的説明
製品名:
• 表示された正確なエラー メッセージ ご購入日:
2002605_A
詳細はrimage.com/support をご覧ください。
2
重要情報
安全性および法令順守に関する情報
Data Transmission System 13.56MHz, TI Model Number: TRF7960
本マニュアルおよび製品に関する指示により、適切で安全な操作が可能になり
ます。以下の表示マークは、ユーザーならびに他の人の身体的傷害および機器
損傷の防止を支援します。
詳細は、下の 安全のための予防措置セクションおよび ページ 4 ページ
の 法令順守に関する情報 セクションを参照してください。
nn 注意:
•
•
•
•
安全のための予防措置
安全の確保のため、以下の注意事項をよくお読みになり、内容をご理解された
上で機器をご使用ください。
nn 警告!
•
•
•
•
•
•
•
•
本書に規定されている以外の方法で、制御または調整機能を使用した
り、処置を実施したりすると、有害な放射露光が生じる恐れがあります。
プリンタを分解したり、工具を使用しないでください。すべてのサービ
ス手順は、Rimage が承認した技術者によって行われるようにするか、
またはRimage が承認する修理店にお送りください。
電源コードを交流コンセントに差し込んだまま、
プリンタを修理点検し
ないでください。
プリンタの内部には、鋭角な箇所があります。
プリンタの前面カバーは手で開けられます。指を差し込まないでくだ
さい。
ヒーター ローラーには触れないでください。
2002605_A
•
スイッチ、電源、ヒューズ、
ファン、非ステッピング モーターなどの交流
線電圧または直流低電圧を有するすべての機器は、UL 規格によって
発行された安全承認を維持するために、Rimage に承認されたコン
ポーネントと交換する必要があります。
付属の AC 電源コードのみ使用してください。詳細または、新しい電源
コードにつきましては、Rimage のカスタマ サービスまでお問い合わ
せください。
本製品はオフィス用機器として設計されています。
プリンタが過熱していたり、異臭がしたりする場合は、使用しないでく
ださい。そのまま使用を継続すると、火事に至ったり、電気ショックが生
じたりする場合があります。過熱していたり、異臭がしたりする場合は、
直ちに、
コンセントからケーブルを抜いてください。修理を依頼すると
きは、Rimage が承認する販売業者に問い合わせてください。
プリンタ トレイを開くための十分なスペースを確保してください。
プリ
ンタ トレイが動いているときは触らないでください。
電源が入っている間に、サイド カバーを開くと、
プリンタは停止しま
す。作動中のプリンタには触れないでください。
ドアのインターロック
装置を無効にしないでください。
交流の 110V または 220V 以外の電圧は使用しないでください。
これ
により火事や電気ショックが発生する可能性があります。
詳細はrimage.com/support をご覧ください。
3
重要情報
法令順守に関する情報
製品
Prism III プリンタ
モデル
CDPR6
米国における注意
注:本機は、FCC 規則の第 15 章に基づいて検査され、A クラスのデジタルデバイスの制限に適合すると判断されています。
これら
の制限は、本機が商業環境において操作される場合、有害な妨害に対して妥当な保護を提供することを目的にしています。本機
は、電磁波を発生、使用し、放射することがあり、取扱説明書に従って設置および使用されない場合、無線通信に有害な妨害を引
き起こす恐れがあります。住宅地域で本機を動作させると、ユーザーが、
自費で修正を要求される有害な妨害を引き起こす恐れ
があります。
本製品は、UL 規則 60950-1 第 2 版に適合します。
カナダにおける注意
本 A クラスデジタル装置は、
カナダの ICES-003 第4:2004号 に適合します。Cet appareil numerigue de la classe A est conforme
a la norme NMB-003 du Canade.
本製品は、CAN/CSA-C22.2 No. 60950-1-07 第 1 版に適合します。
ヨーロッパにおける注意
本製品は、以下のヨーロッパ標準に準拠する、EMC 指令 (89/336/EEC) および低電圧指令 (73/23/EEC) に適合します。
:EN
55022: 2010/AC: 2011 Class A Limit; EN 55024: 2010; EN 61000-3-2:2006+A1:2009+A2:2009; EN 61000-3-3:2008; EN 609501: 2006/ A11:2009.CE マークは、CE マーキング指令 93/68/EEC に従って貼られています。
日本における注意
情報処理装置等電波障害自主規制協議会 (VCCI) の基準に基づく A クラス製品です。本機器は、家庭環境で使用すると電波妨害
が発生する恐れがあります。
この場合、使用者が適切な対策を講ずるよう要求されることがあります。
翻訳:
本製品は、情報処理装置等電波障害自主規制協議会(VCCI)の基準に基づくクラス
A 情報技術装置です。
この装置を家庭環境で使用すると電波妨害を引き起こすことがありま
す。
この場合には使用者が適切な対策を講ずるよう要求されることがあります。
オーストラリアにおける注意
本製品は、AS/NZS CISPR22:2009 に適合します。
韓国における注意
前述の機器は、電気通信基本法および電波法に基づき認定されています。
위 기기는 전기통신기본법, 전파법 에 따라 인증되었음을 증명 합니다.
Notice for Taiwan
This is class A digital device. It may cause radio-frequency interference when used in a residential area. In this case, the users
are advised to take appropriate precautions.
Translation:
警告使用者:
此為甲類資讯技術設備,於居住環境時,可能会造成射頻擾動,在此種情况下,使用者會被要求採取某些適當的對策。
2002605_A
詳細はrimage.com/support をご覧ください。
4
Prism III プリンタの要件
本セクションでは、Prism プリンタのインク、
ラベルのデザイン、印刷の要件に
ついて説明します。
リボンの要件
重要!
• Rimage の製品では、Rimage ブランドのリボンの使用のみがサポートさ
れています。Rimage 以外のメーカーが製造したリボンを使用した結果、
プ
リンタに問題が発生しても、Rimage 保証やメンテナンス契約の対象外に
なります。
•
最適な結果を得るために、Prism III のリボンは、必ず温度が 23°
~104°F
(-5°to 40°C) で相対湿度が 30%~80%、結露しない場所に保管してくだ
さい。
•
湿気と直射日光は避けてください。
•
リボンの再使用は避けてください。
•
お使いの Prism III プリンタ専用のリボンをご使用ください。以下の表を参
照してください。
Prism プリンタでは、
このプリンタ専用のリボンが必要です。Prism III プリンタ
は、必ず以下の Rimage 製リボンでご利用ください:
リボンタイプ
ディスクの印刷枚数
2002364 ブラック
2100
2002366 レッド
2100
2002367 ミッドナイト ブルー
2100
2002365 マルチカラー (CMY)
500
ラベル デザインの要件
Rimage の Windows 対応 CD Designer™ ラベル エディタ ソフトウェアは、各
プリンタと一緒に出荷されます。CD Designer は、Rimage ソフトウェアの標準
インストール時に PC にインストールされます。Windows が動作しているパー
ソナル コンピュータをご使用の場合、CD Designer を使用してラベルをデザイ
ンできます。
Macintosh をご使用の場合、
またはCD Designer 以外のソフトウェアでラベル
をデザインされる場合は、つぎの基準に従ってください。
重要!CD Designer は Macintosh には対応していません。
•
•
•
•
•
ファイル形式:最適な結果を得るために、
ラベルは JPEG ファイルまたは
TIFF ファイルとして保存します。ただし、印刷の際にはこれらのファイル フ
ォーマットを変換する必要があります。
ラベルの印刷に CD Designer を使
用しする場合は、印刷前にラベルをインポートして CD Designer ファイル
(.btw) として保存する必要があります。
ラベルの印刷に CD Designer を使
用しない場合は、印刷前にラベルを PDF ファイルに変換してください。
カラー モード:CD Designer にインポートされたラベルは、RGB カラー モー
ドでなければなりません。
解像度:解像度: 300 ×300 dpi (1 インチ
あたりのドット数) または 300 × 600 dpi
に設定した画像を使用します。
ラベル デザインのサイズ:幅は 5.12 イン
印刷可能領域
116 mm
チ (1536 ピクセル)、高さは 4.52 インチ
(1356 ピクセル) です。
印刷可能領域:Prism プリンタを使用す
るときのディスクの印刷範囲は、116mm
ハブ サイズ
(4.567 インチ) で、ハブは 38mm (1.496
38 mm
インチ) です。
印刷の要件
CD Designer を用いて保存または作成したラベルを Prism プリンタで印
刷するには、
ファイルを正しい形式 (.btw) に設定する必要があります。CD
Designer 以外のソフトウェア アプリケーションを用いて保存または作成した
ラベルを Prism プリンタで印刷するには、
ラベルを PDF ファイルとして保存し
てください。
スタンドアローンの Prism プリンタまたは AutoPrism AutoPrinter
を使用している場合は、印刷機能を備えたアプリケーションから直接印刷する
ことができます。
2002605_A
詳細はrimage.com/support をご覧ください。
5
Prism プリンタ部品の確認
正面図
背面図
プリンタト
レイ
電源スイ
ッチ
交流電源接続
オペレータ パ
ネル
リボン クランプ
USB ケー
ブルポート
上面図
AutoPrinter/AutoLoader
のコントロール接続
リボン ガイド
押さえピン
プリンタトレイとセンタリ
ング ピン
2002605_A
巻き取りローラー
供給ローラー
詳細はrimage.com/support をご覧ください。
6
Prism III プリンタ部品の確認
オペレータ パネル
オペレータ パネルは、
プリンタの正面に設置されています。オペレータ パネル
には、4 個の表示ランプとオペレータ ボタンがあります。
オペレータ ボタン
イメー
ジ
名前
機能
ディスク •
配置ラン
プ
•
オペレータ ボタンを押して、
プリンタ トレイの開閉を行います。エラー表示ラ
ンプはオペレーション ボタンの中央にあります。詳細については「表示ラン
プ」を参照してください。
•
表示ランプ
各表示ランプの名称と機能については、以下をご覧ください。各表示ランプは、
スタンドアローンの Prism プリンタの状態を反映します。オートローダまたは
AutoPrism AutoPrinters に取り付けられている Prism プリンタについては、本
書の記載内容とは異なる場合があります。
•
•
•
エラー表示ランプ付きオペ
レータ ボタン
ディスク配置ランプ
アクティブ表示ランプ
電源表示ランプ
アクティ •
ブ表示ラ
•
ンプ
プリンタの動作時には、
アクティブ ランプが点滅し
ます。
プリンタが AutoPrinter モードのときは、
アクティブ
ランプがゆっくり連続して点滅します。
電源イン •
ジケータ
•
ライト
プリンタの電源がオンになると、電源ランプが点灯
します。
システム ボードが重大なエラーを検出すると、電源
ランプが点滅します。
印刷ヘッドに不良のピクセル素子を検出すると、電
源ランプが消灯します。ディスクがトレイに配置さ
れ、ディスクの印刷を続行できるようになると、電源
ランプが再度点灯します。印刷を続けていると、印刷
結果に小さな線が複数発生することがあります。
こ
れは、印刷ヘッドの交換が必要な可能性があること
を意味します。
プリンタの電源がオフになると、電源表示ランプが
消灯します。
•
オペレータ パネル
イメー
ジ
名前
機能
エラー表 •
示ランプ
•
•
2002605_A
エラーが発生すると、ディスク配置ランプが故障コー
ドで点滅します。エラーが解決された後、オペレータ
ボタンを押して表示ランプを消します。
トレイが空であったりディスクが正しく固定されて
いないと、ディスク配置ランプが点灯します。ディス
クがトレイに置かれると、ディスク配置ランプが消灯
します。
多重コピー モードのとき、ディスク配置ランプは、デ
ィスクがパッドから取り除かれるまで点灯していま
す。
リボンの残量が、単色のリボンで 100 ディスク、CMY
リボンで 25 ディスク以下になると、ディスク配置ラ
ンプがゆっくり点滅します。
リボンが無くなると、ディスク配置ランプがゆっくり
点滅し、エラー表示ランプが点灯します。
プリンタが清掃モードのときは、ディスク配置ランプ
とエラー表示ランプが点滅します。
印刷中にエラーが発生すると、オペレータ ボタンの
上にある黄色のエラー表示ランプが点灯します。
プリンタが清掃モードのときは、エラー表示ランプお
よびディスク配置ランプが点滅します。
リボンが無くなるとエラー表示ランプが点灯し、ディ
スク配置ランプがゆっくり点滅します。
詳細はrimage.com/support をご覧ください。
•
7
Prism III プリンタの操作
本セクションでは、Prism プリンタの操作に必要な情報について説明します。
Prism プリンタの電源オンとオフ
プリンタトレイにディスクを装着する
1. Operator button (オペレータ ボタン) を押して、
プリンタトレイを開きます。
2. ディスクをゴム パッド上の 2 個のクランピング ピンと押さえピンの間に置
きます。
スタンドアローン プリンタのオンとオフ
1. プリンタの背面の電源スイッチを押します。
プリンタの電源がオンになり、
初期化が行われます。
2. もう一度電源スイッチを押します。
プリンタの電源がオフになります。
重要!ディスクは、記録面を下に向けて置きます。記録面には、ハブの近く
に盛り上がったスタッキング リングがあります。
スタッキング リングを上に
向けてディスクを挿入すると、印刷ヘッドが破損することがあります。
ヒント:
• ディスクが押さえピンの上にあると、プリンタ トレイは閉じません。
•
印刷パッドおよびプレートの性質は、
スタンドアローン モデルと自動
式モデルとでは異なります。
自動式モデルではプレートの中央を通る
穴があり、
スタンドアローン モデルにはありません。すべてのモデルに
センタリング ピンがあります。
3. Operator button (オペレータ ボタン) を押します。
プリンタのトレイが、デ
ィスク クランプ位置に移動します。
電源スイッチ
オートローダまたは AutoPrinter に接続されたプリンタの
電源のオンまたはオフ
プレート
Prism III プリンタがオートローダまたは AutoPrinter に接続されている場合
は、次の手順に従います。
センタリング
ピン
ヒント:プリンタの電源スイッチは「オン」の位置になければなりません。
1. オートローダまたは AutoPrinter の電源をオンにします。
プリンタの電源
がオンになり、初期化が行われます。
2. オートローダまたは AutoPrinter の電源をオフにします。
プリンタの電源
がオフになります。
押さえピン
プリンタトレイ
2002605_A
詳細はrimage.com/support をご覧ください。
8
印刷オプションの設定
印刷オプションの設定
マスク設定の変更
重要:特に明記のない限り、Windows のナビゲーションの説明は Windows 7
のパスを示しています。他の Windows オペレーティング システムのナビゲー
ションは多少異なる場合があります。
Rimage CD Designer ソフトウェアは、120mm の光ディスクへの印刷用であ
り、ディスク孔の内側や外周の外側など印刷できないエリアはマスクします。
印刷オプションへのアクセス
1. 次の順に選択します。[Start (スタート)] > [Devices and Printers (デバイ
スとプリンタ)][デバイスとプリンタ] ダイアログ ボックスが開きます。
2. Rimage Prism III を右クリックします。
3. ドロップダウン リストから [印刷オプション] を選択します。[Rimage Prism
III Preferences] ウィンドウが表示されます。
マスクされたエリ
ア (印刷なし)
印刷プロパティへのアクセス
1. 次の順に選択します。[Start (スタート)] > [Devices and Printers (デバイ
スとプリンタ)][デバイスとプリンタ] ダイアログ ボックスが開きます。
2. Rimage Prism III を右クリックします。
3. ドロップダウン リストから [印刷プロパティ] を選択します。[Rimage Prism
III プロパティ] ウィンドウが表示されます。
レイアウトおよび紙/品質の環境設定
[Layout (レイアウト)]や[Paper/Quality (紙/品質)]のタブにあるオプションは、
通常は調整不要です。
これらの設定の調整が必要な場合、Rimage テクニカル
サポートがその必要性を判断し、
これらのタブでの設定の調整を支援いたしま
す。
2002605_A
一部のディスクは、
スタッキング リングの周辺に適切な印刷用コーティングが
されていません。マスク設定を変更することで、
こうしたディスクでも印刷でき
ます。
マスクされたエリ
ア (印刷なし)
詳細はrimage.com/support をご覧ください。
9
印刷オプションの設定
1. [Print Preferences (印刷オプション)] へのアクセス9 ページを参照してく
ださい。
2. [Mask Settings (マスク設定)] タブを選択します。
3. [Print on Hub (ハブで印刷)] オプションを選択します。
4. 印刷可能な表面部分の内径および外径を測定します。
5. 直径を、[Hub Settings (ハブ設定)] セクションに入力します。
6. [OK] を選択して変更を保存します。
サービス オプション
[Service (サービス)] タブには、Prism III プリンタに関する情報があり、
プリンタ
を最新かつ適切な動作に保つために必要なツールがあります。
1. [Print Preferences (印刷オプション)] にアクセス9 ページを参照してくだ
さい。
2. [Service (サービス)] タブを選択します。
使用しているPrism III プリンタの特徴に関する情報のウィンドウが表示さ
れます。
• ドライバー:名前やバージョン番号を含めて、
ドライバーに関する情報
を表示します。
• プリンタ:プリンタ名、
シリアル番号、
ファームウェアのバージョンを含
めて、
プリンタに関する情報を表示します。
• プリンタ ステータス:プリンタのステータスを表示します。
• リボン ステータス:リボンのタイプ、使用済みパーセンテージ、
カラー
コード、設置されているリボンのシリアル番号などを表示します。
ディスク上の画像の中央揃え
画像の中央揃えツールを使用して、
プリンタの機械的な中心が標準 CD
Designer テンプレートと一致するように調整します。
ヒント:通常は、
プリンタのコンポーネントを交換しない限り、再調整は不要です。
1. [Print Preferences (印刷オプション)] にアクセス9 ページを参照してくだ
さい。
2. [Service (サービス)] タブを選択します。
3. [Service Toolbox (サービス ツールボックス)] を選択します。
[サービス ツールボックス] ダイアログ ボックスが表示されます。
4. [Center Image (画像の中央揃え)] を選択します。
[画像の中央揃え] ダイアログ ボックスが表示されます。
印刷 PRN ファイル
1. [Print Preferences (印刷オプション)] にアクセス9 ページを参照してくだ
さい。
2. [Service (サービス)] タブ
を選択します。
3. [Service Toolbox (サービ
ス ツールボックス)] を選
択します。[サービス ツー
ルボックス] ダイアログ ボ
ックスが表示されます。
4. [Print PRN File (印刷 PRN
ファイル) ] を選択します。
選択した PRN ファイルをユーザーが印刷できるダイアログボックスが起動
します。
2002605_A
詳細はrimage.com/support をご覧ください。
10
印刷オプションの設定
5. [画像の中央揃え ] ダイアログ ボックスに表示されるステップに従います:
a. プリンタ トレイを開けて、120mm 白色のディスクをトレイに載せます。
b. [画像の中央揃え] ダイアログ ボックスにある [Print Pattern (パター
ン印刷) ボタンを選択します。
ディスクにパターンが印刷されます。
c. ディスクを180度回転させます。
ヒント:ディスクを回転させた後、印刷された矢印が溝の中心になるよ
うにすると、印刷されるラインがプリンタ トレイの端と揃います。
プリンタトレイ
の端と揃える
矢印
カバー
2002605_A
詳細はrimage.com/support をご覧ください。
11
印刷オプションの設定
i.
ラインが水平および垂直のスケールの 0 と交差する場合は、調整
は不要です。[OK] を押します。
ファームウェアの更新
1. [Print Preferences (印刷オプション)] にアクセス9 ページを参照してくだ
さい。
2. [Service (サービス)] タブを選択します。
3. [Service Toolbox (サービス ツールボックス)] を選択します。[サービス ツ
ールボックス] ダイアログ ボックスが表示されます。
4. [Update Firmware ([ファームウェアの更新)] を選択します。
ヒント:ファームウェアのバージョンに関する詳細情報は、
『Update
Firmware for the Rimage Prism III Printer』のドキュメントを参照してくだ
さい。
単色または CMY のリボンのデバイス設定
一色 (単色) または複数の色で印刷できます。
この手順を使用すると、Prism が
カラーまたは単色で印刷できるようにセットアップし、使用するリボンのタイプ
に応じてデバイスを設定できます。
単色印刷
d. 少なくとも 1 本のラインが 0 から離れている場合、ディスクから読み取
った補正係数を入力します。[Save Settings ([設定の保存)] を選択し
ます。
1. プリンタに単色のリボンを装着します。ページ 18 ページのセクション「
印刷リボンの交換」を参照してください。
ヒント:印刷カラーは自動的に検出され、
プリンタに設置されているリボン
のタイプに応じて設定されます。
2. [Print Properties (印刷プロパテ)]ィにアクセスページ 9 ページを参照し
てください。
3. [Device Settings ([デバイスの設定)] タブを選択します。
4. 色の強さ、
カラー バランスまたはパターンに影響を与える変更を行うに
は、[Halftone Setup Properties (ハーフトーン セットアップのプロパテ
ィ)] を選択します。
5. [Media Type ([メディア タイプ)] を選択します。
ヒント:DVD メディアの種類によっては、
スタッキング リングがディスクの
印刷可能面に上がっていることがあります。Prism III プリンタで使用されて
いるダイレクトサーマル方式では、
こうしたエリアには印刷できません。
ト
ップ スタッキング リングが設定されている DVD では、
プリンタがスタッキ
ング リングをスキップするため、結果としてディスク上に印刷されない帯
ができてしまいます。Rimage では、印刷可能面にスタッキング リングがな
いディスクを使用されることを推奨いたします。
6. [Master Print Strobe (マスター印刷ストローブ)] を設定します。詳細につ
いては「ストローブの設定」を参照してください。
2002605_A
詳細はrimage.com/support をご覧ください。
12
印刷オプションの設定
7. [Double Print (ダブル印刷)] オプションの [Yes (はい)] または [No (いい
え)] を選択します。デフォルト設定は [No (いいえ)] です。
ヒント:
• [Double Print (ダブル印刷)] オプションで [Yes (はい)] を選択すると、
プリンタは各ディスクに 2 回印刷して画像を濃くします。
•
[ダブル印刷] オプションが使用できるのは単色印刷だけです。
8. [Detect Media Change (メディア検出)] オプションで [Yes (はい)] または
[No (いいえ)] を選択します。デフォルト設定は [いいえ] です。AutoPrinter
または AutoLoader での使用のデフォルト設定を保持します。
ヒント:[はい] を選択すると、
プリンタは他のディスクを印刷する前に、ユー
ザーがディスクを交換するのを待ちます。
9. スタンドアローンの Prism III プリンタの場合は、[Perfect Print option
(完全印刷オプション)] を無効にします。[完全印刷オプション] は、Rimage
AutoPrinter を選択した場合にのみ使用できます。
ヒント:[完全印刷オプション] に関する詳細情報は、Rimage AutoPrinter
のユーザーガイドを参照してください。
10. [OK] を選択して、変更を保存し、[デバイス設定] ウィンドウを閉じます。
カラー印刷
1. プリンタにマルチカラー リボンを装着します。ページ 18 ページのセクシ
ョン「 印刷リボンの交換」を参照してください。
ヒント:印刷カラーは自動的に検出され、
プリンタに設置されているリボン
のタイプに応じて設定されます。
2. [Print Properties (印刷プロパティ)]ィにアクセスページ 9 ページを参
照してください。
3. [Device Settings ([デバイスの設定)] タブを選択します。
4. 色の強さ、
カラー バランスまたはパターンに影響を与える変更を行うに
は、[Halftone Setup Properties (ハーフトーン セットアップのプロパテ
ィ)] を選択します。
2002605_A
5. [Media Type ([メディア タイプ)] を選択します。
ヒント:DVD メディアの種類によっては、
スタッキング リングがディスクの
印刷可能面に上がっていることがあります。Prism III プリンタで使用されて
いるダイレクトサーマル方式では、
こうしたエリアには印刷できません。
ト
ップ スタッキング リングが設定されている DVD では、
プリンタがスタッキ
ング リングをスキップするため、結果としてディスク上に印刷されない帯
ができてしまいます。Rimage では、印刷可能面にスタッキング リングがな
いディスクを使用されることを推奨いたします。
6. [Master Print Strobe (マスター印刷ストローブ)] を設定します。詳細につ
いては「ストローブの設定」を参照してください。
7. カラー サブストローブを有効にします。詳細については「ストローブの設
定」を参照してください。
重要!カラー サブストローブが使用できるのは、CMY リボンを使用する場
合だけであり、デフォルトでは無効になっています。
カラー サブストローブ
が有効になっていると、[マスター印刷ストローブ] は有効になりません。
8. [Detect Media Change (メディア検出)] オプションで [Yes (はい)] または
[No (いいえ)] を選択します。デフォルト設定は [いいえ] です。
ヒント:[はい] を選択すると、
プリンタは他のディスクを印刷する前に、ユー
ザーがディスクを交換するのを待ちます。
9. スタンドアローンの Prism III プリンタの場合は、[Perfect Print option
(完全印刷オプション)] を無効にします。[完全印刷 オプション]は、Rimage
AutoPrinter を選択した場合にのみ使用できます。
ヒント:[完全印刷オプション] に関する詳細情報は、Rimage AutoPrinter の
ユーザーガイドを参照してください。
10. [OK] を選択して、変更を保存し、[デバイス設定] ウィンドウを閉じます。
詳細はrimage.com/support をご覧ください。
13
印刷オプションの設定
ストローブ設定
ストローブ設定は、ピクセルを印刷するために使用するエネルギーの量を
制御します。高い値を設定するほど、エネルギーを消費します。設定値を上
げると、イメージはより鮮明になりますが、印刷ヘッドの寿命は短くなりま
す。Rimage では、必要な画質が得られる範囲で、最も低いストローブに設定す
ることを推奨しています。
注:
• ここに示されているのは、Rimage ブランドのメディアに対する推奨設定
です。
•
色調を微調整するために、ディスク上に複数の印刷テストを必要とする場
合があります。[カラー サブストローブを有効にする] を [有効] に設定し、
個々の色の印刷ストローブを下げます。たとえば、印刷されたディスクの後
光効果を除去しようとするとき、
この設定は黄色印刷ストローブ設定を下
げるのに使用できます。
1. [Print Properties (印刷プロパティ)]にアクセスページ 9 ページを参照
してください。
2. [Device Settings (デバイスの設定)] タブを選択します。
3. [Master Print Strobe (マスター印刷ストローブ)] を設定します。
注:ここに示されているのは、Rimage ブランドのメディアに対する推奨設
定です。
• メディアの表面:感熱式印刷が可能なメディア
•
黒リボン用の印刷ストローブ設定:325 - 400
•
赤リボン用の印刷ストローブ設定:375 - 425
•
青リボン用の印刷ストローブ設定:350 - 400
4. [カラー サブストローブを有効にする] で [Enabled (有効)] を選択します。
重要!カラーサブストローブの設定が使用できるのは、CMY リボンを使用
する場合だけです。
5. [OK] を選択して、変更を保存し、[Device Settings (デバイス設定)] ウィン
ドウを閉じます。
2002605_A
詳細はrimage.com/support をご覧ください。
14
Prism III プリンタのメンテナンス
このセクションの情報を使用して、Prism III プリンタを最適な動作状態に保ち
ます。
概要
Prism III プリンタの事前メンテナンスを定期的に行えば、常に鮮明な印刷ラベ
ルが得られます。
メンテナンスでは、
システムをクリーニングします。
注意事項
nn 注意:メンテナンス時に Prism III プリンタが破損しないようにするために
は、
• Prism には、オイル、
シリコン、
またはその他の潤滑剤は絶対に使用し
ないでください。
• Prism プリンタの表面を拭く場合は、研磨剤入りのクリーナーを使用し
ないでください。
• Prism プリンタに直接クリーナーを付けないでください。そのかわり、
まず糸くずの出ない布にクリーナーを付けます。
ツール
タスク
頻度
指示
• 糸くずの
出ない
布
外側を
清掃しま
す。
毎週
1. Prism の電源をオフ
にします。
2. 電源コードをコンセ
ントから抜きます。
3. プリンタの外側を拭
きます。
• 新しい印
刷リボン
印刷リボ
ンの交
換。
モノクロ (ブラック):
ディスク 2100 枚
モノクロ (レッド):
ディスク 2100 枚
モノクロ (ブルー):
ディスク 2100 枚
3色リボン (CMY):
ディスク 500 枚
印刷ヘッド
クリーニン
グ キット
印刷ヘッ
ドを清掃
します。
リボン交換のたび、
ま
たは必要に応じて
• 研磨剤
の入って
いない万
能クリー
ナー
予防メンテナンス スケジュール
事前メンテナンスの作業間隔のガイドラインとして以下の表を使用します。
重要!右で説明するメンテナンスのスケジュールが守られていないと、
システム
への保証が無効になる場合があります。
2002605_A
詳細はrimage.com/support をご覧ください。
ページ 18 ペ
ージのセクション
「印刷リボンの交換」を
参照してください。
ページ 16 ページのセ
クション「印刷ヘッドの
クリーニング」を参照し
てください。
15
Prism III プリンタのメンテナンス
印刷ヘッドの清掃
リボン交換のたびに印刷ヘッドを清掃します。
また、すじが見え始めたり、
リボ
ンが裂けた場合にも印刷ヘッドを清掃します。
Prism III の印刷ヘッドの清掃には、Prism クリーニング キットを使う方法と代
替方法の 2 種類があります。
クリーニング キットが手元にない場合は代替方
法を使って清掃を行ってください。
このセクションでは以上 2 種類の清掃手順
を説明します。
注:Prism プリンタがオートローダまたは AutoPrinter に接続されている場合
は、清掃を開始する前にプリンタをシステムから取り外すとスムーズに作業を
行うことができます。
• プリンタの電源をオフにします。
•
プリンタの背面からケーブルおよびコードをすべて 取り外します。ページ
6 ページの「Prism プリンタ部品の確認」を参照してください。
•
プリンタをシステムから取り外したら、表面が平らでコンセントに近い場所
に置きます。
•
プリンタ背面の個別の電源コードをコンセントに差し込みます。
Prism クリーニング キットを使った Prism III 印刷ヘッドの
清掃
Prism クリーニング キットをお持ちの場合は、以下の方法で印刷ヘッドの清掃
を行ってください。
2. 清掃モードを開始します。
a. Operator button (オペレータ ボタン)を押した状態のまま、電源スイ
ッチを押して Prism の電源をオンにします。
b. ディスク配置ランプ (オペレータ パネルの 2 番目のランプ) が点滅し
たら operator button (オペレータ ボタン)から指を離します。
プリンタ
トレイが開きます。
プリンタが清掃モードのときは、オペレータ ボタンとディスク配置ラン
プ (コントロール パネル上の表示ランプのうち上から一番目と二番目)
が素早く点滅します。
3. クリーニング パッドを用意します。
注:クリーニング パッドは Prism クリーニング キットに含まれています。
a. クリーニング パッドから保護シートをはがします。
b. クリーニング パッドをディスクの表面に取り付けます。
c. この際、パッドとディスクの縁がきちんと揃っているか確認してくだ
さい。
d. クリーニング パッドとディスクをプリンタトレイに載せます。
この際、
プ
リンタ トレイの押さえピンとディスクがきちんと揃っているか確認して
ください。
e. プリンタ トレイのセンサーの上でパッドを押し下げます。
f. クリーニング パッドの上にイソプロピル アルコールを 5 滴垂らします。
## 必要なツール:
Prism クリーニング キット (PN 210555-001)
• 1 枚のディスク
• 99% のイソプロピル アルコール
• 綿棒
1. Prism の清掃準備をします。
a. Prism の電源をオフにします。
b. 上端カバーを取り外します。
•
センサの上にパッドを押し
下げる
クリーニング パッドとディ
スク
プリンタトレイ
c. リボンを取り外します。ページ 18 ページのセクション「印刷リボン
の交換」を参照してください。
2002605_A
詳細はrimage.com/support をご覧ください。
16
Prism III プリンタのメンテナンス
4. 印刷ヘッドを清掃します。
a. Operator button (オペレータ ボタン)を押してプリンタ トレイを閉じ、
清掃サイクルを開始します。清掃サイクルが完了すると、
プリンタ トレ
イが開きます。
b. 必要に応じ、ステップを繰り返して清掃サイクルを再開します。
c. 印刷ヘッドの清掃が完了したら、
プリンタ トレイからクリーニング パッ
ドとディスクを取り外します。
前面リボン ガイド
クリーニング パッド
クリーニング液
5. 前面部の 2 つのリボン ガイドを清掃します。
a. イソプロピル アルコールを清潔な綿棒に塗布します。
b. リボン ガイドに綿棒を当てるようにして清掃します。
6. Prism の使用準備をします。
a. 電源スイッチを押して電源を切り清掃モードを終了させたら、再度電
源を入れてプリンタを再起動します。
印刷ヘッドの清掃 – 代替方法
Prism クリーニング キットが手元にない場合は、以下の方法で印刷ヘッドの清
掃を行ってください。
## 必要なツール:
99% のイソプロピル アルコール
綿棒
1. Prism III を準備。
a. Prism III の電源を入れます。
b. Operator button (オペレータ ボタン)を押して、
プリンタ トレイを開き
ます。
c. Prism III の電源を入れます。
d. 上端カバーを取り外します。
•
•
e. リボンを取り外します。ページ 18 ページのセクション「印刷リボン
の交換」を参照してください。
2. 印刷ヘッドを清掃します。
a. イソプロピル アルコールを綿棒に塗布します。
b. トレイの開口部に綿棒を挿入します。
c. 綿棒を持ち上げ、印刷ヘッドの凸面に当たるよう動かします。
プリンタ ヘッドの凸面
b. リボンを再装着します。ページ 18 ページのセクション「印刷リボン
の交換」を参照してください。
c. 清掃開始前にオートローダまたは AutoPrinter からプリンタを取り外
した場合は、
システムの上にプリンタを設置しすべてのケーブルとコー
ドを接続します。ページ 6 ページの「Prism プリンタ部品の確認」
を参照してください。
注:清掃後トレイ上の印刷パッドが湿っている場合は、印刷パッドが完
全に乾燥してから Prism をご使用ください。
2002605_A
重要!清掃部分がわかるように、印刷ヘッドの底面が示されています。
プリンタ
から印刷ヘッドを取り外さないでください。
詳細はrimage.com/support をご覧ください。
17
Prism III プリンタのメンテナンス
3. 前面部の 2 つのリボン ガイドを清掃します。
a. イソプロピル アルコールを清潔な綿棒に塗布します。
b. リボン ガイドに綿棒を当てるようにして清掃します。
4. 印刷ヘッドのアルコールが乾燥した後、Prism の使用準備をします。
a. リボンを取り付けます。ページ 18 ページのセクション「印刷リボン
の交換」を参照してください。
b. 清掃開始前にオートローダまたは AutoPrinter からプリンタを取り外し
た場合は、
システムの上にプリンタを設置し、
すべてのケーブルとコード
をプリンタの背面に接続します。ページ 6 ページの「Prism プリン
タ部品の確認」を参照してください。
d. 供給ローラーを持ち上げて取り外します。
注:リボン交換中は、印刷ヘッドの清掃に良い時です。ページ 16 ページ
のセクション「印刷ヘッドのクリーニング」を参照してください。
2. 印刷リボンを装着します。
a. 供給ローラーの上まで印刷リボンをスライドさせます。
b. 厚紙の芯の 2 か所の溝を、供給ローラーの金属ピンに合わせます。
印刷リボン
印刷リボンの交換
厚紙の芯
重要!Prism III プリンタは、必ず以下の Rimage 純正リボンでのみご利用くだ
さい.
Rimage の製品では、Rimage ブランドのリボンの使用のみがサポートされて
います。Rimage 以外のメーカーが製造したリボンを使用した結果、
プリンタに
問題が発生しても、Rimage 保証やメンテナンス契約の対象外になります。
ヒント:リボンの保存環境がプリンタの保存環境と大きく異なる場合、順応する
まで多少時間がかかる場合があります。温度や湿度の差が大きいときは、更に
時間がかかります。
1. リボン部分にアクセスします。
a. Prism の電源をオンにします。
b. プリンタから上端
カバーを取り外し
ます。
c. 歯車の付いた端の
部分が最初に上に
くるように巻き取り
ローラーを持ち上
げ、
プリンタの外に
出します。
巻き取りロー
ラー
2002605_A
溝
金属ピン
供給ローラー
c. Operator button (オペレータ ボタン)を押してトレイを閉じます。
d. 供給リボンからリボン リーダーを剥がします。
e. リボン リーダーをリボン ガイドの下へスライドさせ、
リボン設置クラン
プに挿入します。
リボン設置クランプ
プリンタトレイ
リボン ガイド
リボン リーダー
供給ローラー
詳細はrimage.com/support をご覧ください。
18
Prism III プリンタ
のメンテナンス
3. 図のように供給ローラーを取
り付けます。
リボンリーダーに
幾分たるみを残します。
a. プリンタトレイが現れるま
で operator button (オ
ペレータ ボタン)を押し続
けます。
リボンが、Prism
の前面に出て来ます。
供給ローラー
b. 設置クランプからリボン
リーダーを取り外します。
c. リボンリーダーから粘着
シートを剥がします。
c. リボン リーダーを厚紙の
芯の上に引き上げます。
d. リボン リーダーの端が
厚紙の芯の端と合うよう
に、粘着シートを貼り付
けます。
e. リボンリーダーをローラ
ーの回りに 1 回だけ包ま
れるように回します。
4. 巻き取りローラーを装着します。
a. 新しい、使用していない厚紙の芯を巻き取りローラーに取り付けます。
一方向にのみ合うように設計されています。
b. 図のように、
リボンリーダーの上端に巻き取りローラーを取り付けま
す。
重要!
「ストップ - 巻き取り芯への巻き上げリーダーはここまで」
という、
リーダー上のマークを越えて巻かないでください。CMY リボンを使用
している場合、黄色のリーダーの端まで巻き上げてください。
重要!ギアの側が正しくなければなりません。
ギア
粘着シート
2002605_A
厚紙の芯
リボン リー
ダー
詳細はrimage.com/support をご覧ください。
19
Prism III プリンタのメンテナンス
5. 巻き取りローラーを Prism に取り付け、巻き取りローラーが所定の位置に
はまるまでしっかりと下方向に押します。
リボンはピンと張った状態にし、
しわが無いようにする必要があります。
マーク
巻き取りローラー
リボン リーダー
重要!
「ストップ - 巻き取り芯への巻き上げリーダーはここまで」
というリー
ダー上のマークを越えて巻き取りローラーに巻かないでください。マーク
が、図に示されている位置を越えないようにしてください。マークがロー
ラーにある場合は、巻き取りローラーを引き出し、
リボンを巻き戻します。
供給ローラーを巻き戻してたるみを取ります。
6. Operator button (オペレータ ボタン)を約 5 秒押し続けると、
プリンタが
リボンを認識します。
リボンが有効であれば、
プリンタは次の処理に進み、
エラー表示ランプの点滅が止まります。
注:リボン認識プロセス中、
リボンはリボンリーダーを越えるように回りま
す。
リボン認識プロセスの後は、
リボンがピンと張った状態になっているこ
とを確認します。
7. 上端カバーを取り付けます。
2002605_A
詳細はrimage.com/support をご覧ください。
20
Manuale per l'utente della stampante Prism III
Sede centrale:
Rimage Corporation
7725 Washington Avenue South
Minneapolis, MN 55439
USA
Sede europea:
Rimage Europe GmbH
Albert-Einstein-Str. 26
63128 Dietzenbach
Germania
Sede generale Asia/Pacifico:
Rimage Japan Co., Ltd.
2F., WIND Bldg.
7-4-8 Roppongi Minato-ku,
Tokyo 106-0032 JAPAN
800-553-8312 (numero verde Nord America)
Assistenza tecnica: +1 952-946-0004
(Messico/America Latina)
Fax: +1 952-944-6956
Tel.: +49 6074-8521-14
Fax.: +49 6074-8521-100
Tel.: +81-3-5771-7181
Fax.: +81-3-5771-7185
Rimage Corporation si riserva il diritto di apportare migliorie all'apparecchio e al software descritti nel presente documento, in qualsiasi momento
e senza preavviso. Rimage Corporation si riserva il diritto di rivedere il presente documento e di modificarne i contenuti senza alcun obbligo di
notificare tali revisioni o modifiche a persone o organizzazioni.
Il presente documento potrebbe contenere collegamenti a siti web che erano validi al momento della pubblicazione, ma che potrebbero essere stati
successivamente spostati o rimossi. Il presente documento può contenere collegamenti a siti web che sono di proprietà di terzi dei cui contenuti
pubblicati Rimage Corporation non è responsabile.
© 2012, Rimage Corporation
Rimage® è un marchio registrato di Rimage Corporation. Rimage Prism III, AutoPrism™ e CD Designer™ sono marchi registrati di Rimage
Corporation. Dell™ è un marchio registrato di Dell Computer Corporation. FireWire™ è un marchio registrato di Apple Computer, Inc. Windows® è
un marchio registrato di Microsoft Corporation
Tutti gli altri marchi, registrati e non, appartengono ai rispettivi proprietari.
La versione più recente del presente documento è disponibile all'indirizzo www.rimage.com/support.
2002605_A
Per maggiori informazioni visitare il sito web rimage.com/support
Indice
Introduzione..................................................................................... 1
Informazioni sul presente manuale.......................................................................... 1
Informazioni sulla stampante Prism III...................................................................... 1
Disimballaggio e istruzioni di configurazione............................................................ 1
Impostazione delle preferenze di stampa........................................ 12
Stampa a colori............................................................................................................................... 13
Impostazioni dell'impulso............................................................................................................... 14
Manutenzione della stampante Prism III......................................... 15
Informazioni importanti................................................................... 2
Panoramica............................................................................................................. 15
Informazioni sul servizio di assistenza...................................................................... 2
Ulteriori informazioni online..................................................................................... 2
Assistenza tecnica..................................................................................................... 2
Liberatoria per il software di masterizzazione dei dischi ottici................................. 2
Manutenzione della stampante Prism III......................................... 16
Informazioni importanti................................................................... 3
Informazioni sulla sicurezza e sulla conformità........................................................ 3
Informazioni sulla conformità.............................................................................................. 4
Informazioni di avvertenza................................................................................................ 15
Pianificazione della manutenzione preventiva.................................................................. 15
Pulizia della testina di stampa................................................................................. 16
Pulizia della testina di stampa della stampante Prism III con il kit di pulizia Prism........... 16
Metodo alternativo per la pulizia della testina di stampa................................................. 17
Sostituzione del nastro di stampa........................................................................... 18
Requisiti della stampante Prism III.................................................... 5
Requisiti del nastro................................................................................................... 5
Requisiti del modello di etichetta............................................................................. 5
Requisiti di stampa.................................................................................................... 5
Identificazione delle parti della stampante Prism III.......................... 6
Vista anteriore.......................................................................................................... 6
Vista superiore.......................................................................................................... 6
Vista posteriore......................................................................................................... 6
Identificazione delle parti della stampante Prism III.......................... 7
Pannello operatore................................................................................................... 7
Pulsante operatore................................................................................................... 7
Spie........................................................................................................................... 7
Funzionamento della stampante Prism III......................................... 8
Accensione e spegnimento della stampante Prism.................................................. 8
Accensione e spegnimento di una stampante autonoma................................................... 8
Accensione e spegnimento di una stampante collegata a un Autoloader o AutoPrinter.... 8
Collocazione di un disco sul vassoio della stampante............................................... 8
Impostazione delle preferenze di stampa.......................................... 9
Impostazione delle preferenze di stampa................................................................. 9
Accesso alle preferenze di stampa...................................................................................... 9
Accesso alle proprietà di stampa......................................................................................... 9
Preferenze del layout e della carta/qualità.......................................................................... 9
Modifica delle impostazioni di maschera............................................................................ 9
Opzioni di manutenzione.................................................................................................. 10
Stampa dei file PRN......................................................................................................................... 10
Centramento dell'immagine su un disco......................................................................................... 10
Aggiornamento del firmware.......................................................................................................... 12
Configurazione delle impostazioni della periferica per i nastri in bianco e nero o CMY... 12
Stampa in bianco e nero................................................................................................................. 12
2002605_A
Per maggiori informazioni visitare il sito web rimage.com/support
Introduzione
Il presente manuale fornisce le informazioni necessarie per configurare,
utilizzare ed eseguire la manutenzione della stampante Rimage Prism III.
Per informazioni specifiche sull’Autoloader o Rimage AutoPrinter fare
riferimento al manuale per l'utente del prodotto, disponibile sul sito web
www.rimage.com/support. Dalla pagina Support (Supporto) selezionare Prism
III, quindi selezionare la scheda User Manuals (Manuali per l'utente).
Informazioni sulla stampante Prism III
Importante: la stampante Prism III può risultare lievemente diversa rispetto al
modello presentato nel presente manuale.
Disimballaggio e istruzioni di configurazione
Informazioni sul presente manuale
•
•
•
Sebbene il nostro sforzo di tenere aggiornata tutta la documentazione e i manuali
sia costante, la versione in inglese presente sul sito web contiene sempre le
informazioni più aggiornate.
Se non diversamente indicato, tutte le istruzioni di navigazione sono relative ai
percorsi Windows 7. La navigazione negli altri sistemi operativi Windows potrebbe
essere leggermente diversa.
Questi simboli e note sono utilizzati nel corso di tutto il manuale per contribuire a
chiarire le informazioni:
La stampante Prism III fa parte della serie di stampanti Rimage. La stampante
Prism III è una stampante ad alta velocità usata per stampare informazioni in
bianco e nero o a colori su CD, DVD o Blu-ray DiscTM.
È possibile utilizzare la stampante come una stampante autonoma per il
funzionamento manuale o con un Autoloader o AutoPrinter Rimage.
Le istruzioni relative a disimballaggio e installazione sono incluse con la
stampante Prism III. Fare riferimento alla Guida per la configurazione e
l'installazione di Rimage Prism III, nonché alla guida per la configurazione e
l'installazione fornita con l’Autoloader o AutoPrinter Rimage.
Suggerimento: Un suggerimento contiene metodi alternativi, che possono non
sembrare ovvi, e contribuisce a far comprendere vantaggi e funzionalità del
prodotto.
Importante:
• una nota importante fornisce informazioni essenziali al completamento di
un'operazione.
•
Informazioni supplementari importanti.
•
Trascurando un suggerimento, si può comunque portare a termine
un'attività, cosa che non accade se si trascura una nota importante.
nn Attenzione: una nota di attenzione indica che la mancata osservanza
dell'istruzione può causare la perdita o il danneggiamento dell'apparecchio,
del prodotto, del software o dei dati.
nn Avvertenza: una nota di avvertenza indica che la mancata osservanza di
quanto riportato può provocare lesioni a persone addette alla macchina o
che ne eseguono la manutenzione.
2002605_A
Per maggiori informazioni visitare il sito web rimage.com/support
1
Informazioni importanti
Questa sezione contiene le informazioni su come contattare il servizio di
assistenza, le avvertenze e gli avvisi della stampante Prism III.
Le specifiche tecniche di questo prodotto sono disponibili sul sito web
www.rimage.com/support. Dalla pagina Support (Supporto) selezionare: Printer
Series (Serie stampanti) > Prism > scheda User Manuals (Manuali per l'utente).
Informazioni sul servizio di assistenza
Stati Uniti, Canada, America Latina
Rimage Corporation
E-mail: [email protected]
7725 Washington Avenue South
Minneapolis, MN 55439
USA
Att: Servizi Rimage
Telefono:
Nord America: 800-553-8312
Messico/America Latina: 952-944-8144
Fax: 952-944-7808
Europa
Rimage Europe GmbH
E-mail: [email protected]
Albert-Einstein-Str. 26
Telefono: +49 6074-8521-14
63128 Dietzenbach
Fax: +49 6074-8521-100
Germania
Asia/Pacifico
Rimage Japan Co., Ltd.
E-mail: [email protected]
2F., WIND Bldg.
Telefono: +81-3-5771-7181
7-4-8 Roppongi Minato-ku,
Fax: +81-3-5771-7185
Tokyo 106-0032 JAPAN
Contatti per i Servizi Rimage
Sito web: www.rimage.com/support
Knowledge Base: http://rimage.custhelp.com
Accedere e selezionare la scheda Ask a Question (Domande)
Contattando i Servizi Rimage, si
prega di fornire quanto segue:
• Numero di serie del sistema e
versione del software
Copiare le informazioni dal prodotto Rimage per
riferimenti futuri.
Nota: aggiornare il numero di serie ogni volta che
si riceve un sistema sostitutivo.
• Descrizione tecnica e funzionale del
problema
Numero di serie:
• Messaggio esatto di errore ricevuto
Data di acquisto:
2002605_A
Nome del prodotto:
Ulteriori informazioni online
All'indirizzo www.rimage.com/support, è possibile conoscere l'ottima qualità del
supporto e dei servizi Rimage.
Dalla pagina iniziale Support (Supporto):
1.
Selezionare Product Series (Serie
prodotti).
2.
Selezionare il prodotto.
3.
Ulteriori informazioni sono disponibili
sulla pagina del prodotto.
Dalla pagina del prodotto è possibile
accedere a quanto segue:
• Informazioni sugli ultimi
aggiornamenti di software e
firmware
• Specifiche del prodotto
• I documenti più recenti
• Download di firmware e driver
aggiornati
Assistenza tecnica
Rimage offre una serie di opzioni di servizi e assistenza per la stampante Prism
III, tra cui un servizio di sostituzione. Per ulteriori informazioni e per conoscere i
prezzi, contattare il rivenditore Rimage Value Added o Rimage.
Importante: registrare l’Autoloader per avere diritto alla garanzia di
1 anno su ricambi e manodopera e al supporto telefonico prioritario.
Registrazione disponibile all'indirizzo
http://www.rimage.com/support/warranty-registration.
Liberatoria per il software di masterizzazione
dei dischi ottici
Il presente Prodotto, Software o la presente Documentazione possono essere
stati ideati per assistere l'utente nella riproduzione di materiale del quale
possiede il copyright o per cui ha ottenuto il permesso di copia dal detentore del
copyright. Nel caso l'utente non detenga il copyright o non ne abbia ottenuto
il permesso, potrebbe violare le leggi sul diritto d'autore ed essere passibile
di risarcimento danni e di altre azioni riparatrici. In caso di dubbio sui propri
diritti, contattare il proprio consulente legale. La riproduzione di dischi ottici
o di supporti di altro tipo contenenti materiale di cui non si possiede il copyright
o senza l'autorizzazione dei rispettivi proprietari rappresenta una violazione
delle leggi nazionali e internazionali e può comportare severe sanzioni.
Per maggiori informazioni visitare il sito web rimage.com/support
2
Informazioni importanti
Informazioni sulla sicurezza e sulla conformità
Data Transmission System 13.56MHz, TI Model Number: TRF7960
Il manuale e le indicazioni sul prodotto ne consentono un uso corretto e sicuro.
I simboli riportati di seguito servono a proteggere l'utente e altre persone da
infortuni e l'apparecchiatura da danni.
Per ulteriori informazioni, fare riferimento alla sezione Norme precauzionali
di sicurezza riportata di seguito e alla sezione Informazioni sulla conformità a
pagina 4.
nn Attenzione:
•
•
•
•
Norme precauzionali di sicurezza
•
Per garantire la sicurezza, leggere le seguenti norme precauzionali, assicurandosi
di conoscerle bene e di averle comprese prima di utilizzare l'apparecchio.
•
nn Avvertenza:
•
•
•
•
•
•
L'utilizzo di comandi o di regolazioni o l'esecuzione di procedure diverse da
quelle qui specificate possono causare una pericolosa esposizione a radiazioni.
Non smontare la stampante né utilizzare attrezzi su di essa. Affidare
l'esecuzione di tutte le procedure di intervento a un tecnico autorizzato
Rimage oppure inviare la stampante a un centro autorizzato Rimage per la
riparazione.
Non intervenire sulla stampante con il cavo di alimentazione inserito nella
presa CA.
L'interno della stampante contiene bordi taglient.
Il quadro anteriore della stampante può essere aperto a mano. Non inserire le
dita.
Non toccare il rullo di riscaldamento.
2002605_A
•
Tutte le apparecchiature con tensione di rete ac.a. o a basse tensioni a c.c.,
quali interruttori, alimentatori, fusibili, ventole, motori non passopasso,
devono essere sostituite con componenti approvati da Rimage per poter
mantenere l'approvazione sulla sicurezza emessa da UL.
Utilizzare esclusivamente il cavo di alimentazione CA fornito. Per ulteriori
informazioni o per ordinare un nuovo cavo di alimentazione, rivolgersi
all'assistenza clienti Rimage.
Il prodotto è stato progettato per l'uso in ufficio.
Non usare la stampante in caso di surriscaldamento o di odori insoliti per
non rischiare incendi o scosse elettriche. Se questo si verifica, scollegare
immediatamente il cavo dalla presa e contattare il rivenditore autorizzato
Rimage per la riparazione.
Fornire uno spazio sufficiente per l'apertura del vassoio della stampante. Non
toccare il vassoio della stampante in movimento.
Se il coperchio laterale viene aperto quando la stampante è accesa, la
stampante smette di funzionare. Non operare all'interno della stampante
mentre è in funzione. Non cercare di eludere il dispositivo di blocco.
Non utilizzare tensioni diverse da 110 V c.a. o 220 V c.a. per evitare il rischio di
incendi o di scosse elettriche.
Per maggiori informazioni visitare il sito web rimage.com/support
3
Important Information
Informazioni sulla conformità
Prodotto
Stampante Prism III
Modello
CDPR6
Avviso per gli USA
NOTA: l'apparecchiatura è stata testata e dichiarata conforme ai limiti di un dispositivo digitale di Classe A, secondo i dettami
della Parte 15 della normativa FCC. Questi limiti sono stati pensati per fornire ragionevole protezione contro dannose interferenze
quando l'apparecchiatura è in funzione in ambienti commerciali. Questa apparecchiatura genera, usa e può emettere energia
a radiofrequenze e, se non installata e utilizzata conformemente alle istruzioni del manuale, può causare interferenze che
danneggiano alle comunicazioni radio. Il funzionamento di questa apparecchiatura in un'area residenziale può causare interferenze
pericolose, nel qual caso l'utente sarà tenuto a rimediarvi assumendosene gli oneri.
Il prodotto è conforme alla norma UL 60950-1, 2a edizione.
Avviso per il Canada
Questa apparecchiatura digitale di Classe A è conforme alla normativa canadese ICES-003 Versione 4:2004. Questa apparecchiatura
digitale di classe A è conforme alla normativa canadese NMB-003.
Questo prodotto è conforme a CAN/CSA C22.2 N. 60950-1-07, 1a edizione.
Avviso per l'Europa
Il presente prodotto è conforme alla direttiva sulla compatibilità elettromagnetica (89/336/CEE) e alla direttiva sulla bassa tensione
(73/23/CEE), in quanto rispetta i seguenti standard europei: EN 55022: 2010/AC: 2011 Class A Limit; EN 55024: 2010; EN 61000-32:2006+A1:2009+A2:2009; EN 61000-3-3:2008; EN 60950-1: 2006/ A11:2009. Conformemente alla Direttiva CE 93/68/CEE, sulla
marchiatura è stato affisso il marchio CE.
Avviso per il Giappone
Si tratta di un prodotto di Classe A, in base allo standard del VCCI (Voluntary Control Council for Interference) quale apparecchiatura
informatica. Se questo apparecchio viene utilizzato in ambienti domestici, si possono verificare interferenze radio, in tal caso può
essere necessario intraprendere un'azione correttiva.
Traduzione:
この装置は、情報処理装置等電波障害自主規制協議会(VCCI)の基準に基づくクラスA 情報技術装置です。
この装置を家
庭環境で使用すると電波妨害を引き起こすことがあります。
この場合には使用者が適切な対策を講ずるよう要求されることが
あります。
Avviso per l'Australia
Questo prodotto è conforme alla norma AS/NZS CISPR22:2009.
Avviso per la Corea
Le apparecchiature di cui sopra sono state certificate in base al Framework Act on Telecommunications and Radio Waves Act.
위 기기는 전기통신기본법, 전파법 에 따라 인증되었음을 증명 합니다.
Avviso per Taiwan
2002605_A
This is class A digital device. It may cause radio-frequency interference when used in a residential area. In this case, the users are
advised to take appropriate precautions.
Translation:
警告使用者:
此為甲類資讯技術設備,於居住環境時,可能会造成射頻擾動,在此種情况下,使用者會被要求採取某些適當的對策。
Per maggiori informazioni visitare il sito web rimage.com/support
4
Requisiti della stampante Prism III
In questa sezione sono riportati i requisiti relativi a inchiostro, modello di
etichetta e requisiti di stampa per la stampante Prism.
Requisiti del nastro
Importante:
• Rimage supporta solo l'utilizzo di nastri a marchio Rimage per la stampante
Prism. I problemi che si verificano nella stampante in seguito all'utilizzo
di nastri non prodotti da Rimage non sono coperti dalla garanzia o dagli
accordi di manutenzione Rimage.
•
Per risultati ottimali, conservare i nastri Prism III a una temperatura
compresa tra 23 e 104 °F (-5 e 40 °C) e a un'umidità relativa di 30 %-80 %,
senza condensa.
•
Evitare l'umidità e la luce solare diretta.
•
Non riutilizzare i nastri.
•
Utilizzare solo nastri progettati per la stampante Prism III. Consultare la
tabella seguente.
La stampante Prism necessita di nastri progettati in modo specifico per l'uso
in questa stampante. La stampante Prism III funziona solo con i seguenti nastri
Rimage:
Tipo di nastro
Numero di dischi stampati
2002364 Nero
2100
2002366 Rosso
2100
2002367 Blu notte
2100
2002365 Multicolore (CMY)
500
2002605_A
Requisiti del modello di etichetta
Con ogni stampante viene fornito un editor di etichette compatibile con
Windows, ovvero il software CD Designer™. CD Designer viene installato sul PC
durante l'installazione standard del software Rimage. Se si possiede un PC con
sistema operativo Windows, è possibile utilizzare CD Designer per progettare le
proprie etichette.
Se si utilizza un Macintosh o si preferisce creare le etichette con un'applicazione
diversa da CD Designer, utilizzare i criteri che seguono.
Importante: CD Designer non è compatibile con Macintosh.
•
•
•
•
•
Formato file: per ottenere i migliori risultati, salvare le etichette in formato JPEG o
TIFF. Tuttavia, è necessario convertire questi formati di file prima della stampa. Se
si utilizza CD Designer per stampare le etichette, è necessario importare le
etichette e salvarle come file di CD Designer (.btw) prima della stampa. Se non si
utilizza CD Designer per stampare le etichette, è necessario convertire le etichette
in file PDF prima della stampa.
Modalità colore: le etichette importate in CD Designer devono essere in modalità
colore RGB.
Risoluzione: utilizzare immagini o loghi
impostati a 300x300 dpi (punti/pollice)
o a 300x600 dpi.
Dimensioni etichetta: la larghezza è di 1536
Area di
pixel (5,12") e l'altezza di 1356 pixel (4,52").
stampa
116 mm
Area di stampa: quando si utilizza la
stampante Prism, l'area di stampa per un
disco è di 116 mm (4,567") e il diametro al
centro è 38 mm (1,496").
Requisiti di stampa
Dimensioni centro
38 mm
Tutte le etichette create e salvate con CD
Designer sono in formato (.btw) adatto per la
stampa sulla stampante Prism. Se si utilizza un software diverso da CD Designer,
salvare le etichette in formato PDF prima di stamparle con la stampante Prism.
Se si utilizza una stampante Prism autonoma o AutoPrism AutoPrinter, è
possibile stampare direttamente da qualsiasi applicazione che disponga della
funzione di stampa.
Per maggiori informazioni visitare il sito web rimage.com/support
5
Identificazione delle parti della stampante Prism III
Vista anteriore
Vista posteriore
Vassoio
stampante
Interruttore di
accensione
Collegamento
alimentazione
CA
Pannello
operatore
Porta del
cavo USB
Morsetto del nastro
Vista superiore
Collegamento controllo
AutoPrinter/autoloader
Guide nastro
Perni di fissaggio
Vassoio della stampante
e perno di centraggio
2002605_A
Rullo di avvolgimento
Rullo di alimentazione
Per maggiori informazioni visitare il sito web rimage.com/support
6
Identificazione delle parti della stampante Prism III
Pannello operatore
Immagine
Il pannello operatore è situato nella parte anteriore della stampante. Sul
pannello operatore sono presenti quattro spie e un pulsante operatore.
Pulsante operatore
Per aprire e chiudere il vassoio della stampante, utilizzare il pulsante operatore.
Al centro del pulsante operatore vi è una spia di errore. Per maggiori
informazioni, fare riferimento alla sezione Spie riportata di seguito.
Spie
Nella seguente tabella sono descritti il nome e la funzione di ciascuna spia.
Ciascuna spia indica una diversa condizione della stampante Prism autonoma.
Le stampanti Prism collegate ad Autoloader o AutoPrism AutoPrinters hanno
condizioni diverse.
Pulsante operatore con spia
di Errore
Spia di Disco non presente
Spia di Attiva
Spia di alimentazione
Pannello operatore
Immagine
2002605_A
Nome
Spia di
Errore
Funzione
• La spia di Errore sul pulsante operativo si accende
quando si verifica un errore durante la stampa.
• La spia di Errore e la spia Disco non presente
lampeggiano quando la stampante è in modalità di
pulizia.
• La spia di errore e la spia Disco non presente
lampeggiano lentamente se il nastro è consumato.
Nome
Funzione
Spia di
• Quando si verifica un errore, la spia di Disco non
Disco non
presente lampeggia con un codice di errore. Dopo
presente
aver eliminato la condizione di errore, premere il
pulsante operatore per spegnere la spia.
• La spia di Disco non presente si illumina quando il
vassoio è vuoto o quando il disco non è agganciato
correttamente. Quando viene collocato un disco sul
vassoio, la spia si spegne.
• In modalità Multiple Copy (Copia multipla), la spia di
Disco non presente si accende quando viene rimosso
il disco dal tappetino.
• La spia di Disco non presente lampeggia lentamente
in modo continuo quando la capacità restante del
nastro è inferiore a 100 dischi per i nastri bianco e
nero e quando è inferiore a 25 dischi per i nastri CMY.
• Quando il nastro è consumato, la spia di Errore si
accende e quella di Disco non presente lampeggia
lentamente.
• La spia di Errore e la spia di Disco non presente
lampeggiano quando la stampante è in modalità
di pulizia.
Spia di
• La spia di Attiva lampeggia quando la stampante è in
Attiva
funzione.
• La spia di Attiva lampeggia lentamente in modo
continuo quando la stampante è in modalità
AutoPrinter.
Spia di
• La spia di alimentazione si illumina quando viene
alimentaaccesa la stampante.
zione
• La spia di alimentazione lampeggia quando la scheda
di sistema ha rilevato un errore irreversibile.
• La spia di alimentazione si spegne quando la
stampante rileva un elemento pixel guasto nella
testina di stampa. La spia di alimentazione si
riaccende quando viene collocato un disco sul vassoio
e si può continuare a stampare dischi. Se si continua
a stampare, è possibile che la stampa presenti piccole
righe. Questo indica che è necessario sostituire la
testina di stampa.
• La spia di alimentazione si spegne quando viene
spenta la stampante.
Per maggiori informazioni visitare il sito web rimage.com/support
7
Funzionamento della stampante Prism III
La presente sezione fornisce le informazioni necessarie per l'uso della
stampante Prism.
Accensione e spegnimento della
stampante Prism
Accensione e spegnimento di una stampante autonoma
1. Premere l'interruttore di accensione sul retro della stampante. La
stampante si accende ed esegue le operazioni di inizializzazione.
2. Premere nuovamente l'interruttore di accensione. La stampante si spegne.
Collocazione di un disco sul vassoio
della stampante
1. Per aprire il vassoio della stampante, premere il operator button (pulsante
operatore).
2. Collocare un solo disco sul tappetino di gomma tra i due perni di fissaggio e
il perno di centraggio.
Importante: collocare il disco con il lato da masterizzare rivolto verso il
basso. Il lato da masterizzare prevede un anello di impilazione
impercettibile al tatto. Se si inserisce il disco con l'anello rivolto verso l'alto,
la testina di stampa potrebbe danneggiarsi.
Suggerimenti:
• Se il disco poggia sui perni di fissaggio, il vassoio non si chiude.
• Il tappetino e il vassoio dei modelli autonomi e di quelli automatici sono
diversi. Il modello automatico ha un foro che attraversa il centro del
vassoio, che il modello autonomo non ha. Tutti i modelli hanno un
perno di centraggio.
Interruttore di accensione
3. Premere il operator button (pulsante operatore). Il vassoio della stampante
si sposta in posizione di blocco del disco.
Accensione e spegnimento di una stampante collegata a
un Autoloader o AutoPrinter
Per le stampanti Prism III collegate a un Autoloader o AutoPrinter, seguire la
procedura seguente:
Suggerimento: l'interruttore di accensione sulla stampante deve essere in
posizione "on".
1. Accendere l'Autoloader o l'AutoPrinter. La stampante si accende ed esegue
le operazioni di inizializzazione.
2. Spegnere l'Autoloader o l'AutoPrinter. La stampante si spegne.
Piastra
Perno di
centraggio
Perni di fissaggio
Vassoio della
stampante
2002605_A
Per maggiori informazioni visitare il sito web rimage.com/support
8
Impostazione delle preferenze di stampa
Impostazione delle preferenze di stampa
Importante: se non diversamente indicato, tutte le istruzioni di navigazione
sono relative ai percorsi Windows 7. La navigazione negli altri sistemi operativi
Windows potrebbe essere lievemente diversa.
Modifica delle impostazioni di maschera
Il software Rimage CD Designer è progettato per stampare su dischi ottici da
120 mm e copre le aree non stampabili, come l'interno del foro del disco e
l'esterno della circonferenza.
Accesso alle preferenze di stampa
1. Selezionare: Start (Fare clic per iniziare) > Devices and Printers (Dispositivi e
stampanti).
2. Viene visualizzata la finestra di dialogo Dispositivi e stampanti.
3. Fare clic con il pulsante destro del mouse su Rimage Prism III.
4. Dall'elenco a discesa, selezionare Preferenze stampa. Viene visualizzata la
finestra Rimage Prism III Preferences (Preferenze Rimage Prism III).
Aree coperte
(non stampabili)
Accesso alle proprietà di stampa
1. Start (Fare clic per iniziare) > Devices and Printers (Dispositivi e stampanti).
Viene visualizzata la finestra di dialogo Dispositivi e stampanti.
2. Fare clic con il pulsante destro del mouse su Rimage Prism III.
3. Dall'elenco a discesa, selezionare Proprietà stampante. Viene visualizzata la
finestra Rimage Prism III Properties (Proprietà Rimage Prism III).
Alcuni dischi non sono dotati di un adeguato rivestimento di stampa intorno
all'anello per l'impilaggio. Modificare le impostazioni della maschera per
facilitare la stampa su questi dischi.
Preferenze del layout e della carta/qualità
Le opzioni delle schede Layout e Paper/Quality (Carta/Qualità) generalmente
non hanno bisogno di essere modificate. Il supporto tecnico Rimage
identificherà quando tali impostazioni devono essere regolate e può offrire
assistenza per la regolazione delle impostazioni di queste schede.
2002605_A
Aree coperte
(non stampabili)
Per maggiori informazioni visitare il sito web rimage.com/support
9
Impostazione delle preferenze di stampa
1.
2.
3.
4.
5.
6.
Accedere a Print Preferences (Preferenze stampa). Vedere pagina 9.
Selezionare la scheda Masking Settings (Impostazioni maschera).
Selezionare l'opzione Print on Hub (Stampa su mozzo).
Misurare il diametro interno ed esterno della superficie stampabile.
Immettere i diametri nella sezione Hub Settings (Impostazioni mozzo).
Selezionare OK per salvare le modifiche.
Opzioni di manutenzione
La scheda Service (Manutenzione) fornisce informazioni sulla stampante Prism
III e offre una serie di strumenti per mantenere il corretto funzionamento della
stampante.
1. Accedere a Print Preferences (Preferenze stampa). Vedere pagina 9.
2. Selezionare la scheda Service (Manutenzione).
La finestra che viene visualizzata fornisce le informazioni sulla stampante
Prism III.
• Driver: mostra le informazioni sui driver della stampante, inclusi il nome e il
numero della versione.
• Printer (Stampante): mostra le informazioni sulla stampante, inclusi il nome
della stampante, il codice e la versione del firmware.
• Printer Status (Stato stampante): mostra lo stato della stampante.
• Ribbon Status (Stato nastro): mostra il tipo di nastro, la percentuale di nastro
usato, il codice e il codice del colore del nastro e il numero di serie del nastro
installato.
Centramento dell'immagine su un disco
Lo strumento per il centramento dell'immagine viene utilizzato per regolare il
centro meccanico della stampante in modo che corrisponda al modello standard
di CD Designer.
Suggerimento: generalmente non è necessaria una nuova regolazione fino a
quando non vengono sostituiti i componenti della stampante.
1. Accedere a Print Preferences (Preferenze stampa). Vedere pagina 9.
2. Selezionare la scheda Service (Manutenzione).
3. Selezionare Service ToolBox (Casella degli strumenti manutenzione).
Viene visualizzata la finestra di dialogo Service ToolBox (Casella degli
strumenti manutenzione).
4. Selezionare Center Image (Centra immagine).
Viene visualizzata la finestra di dialogo Centering Image (Centramento
immagine).
Stampa dei file PRN
1. Accedere a Print Preferences (Preferenze stampa). Vedere pagina 9.
2. Selezionare la scheda
Service (Manutenzione).
3. Selezionare Service
ToolBox (Casella degli
strumenti manutenzione).
Viene visualizzata la
finestra di dialogo Service
ToolBox (Casella degli
strumenti manutenzione).
4. Selezionare Print PRN File (Stampa file PRN).
Viene visualizzata una finestra di dialogo che consente agli utenti di
stampare i file PRN selezionati.
2002605_A
Per maggiori informazioni visitare il sito web rimage.com/support
10
Impostazione delle preferenze di stampa
5. Seguire la procedura riportata sulla finestra di dialogo Centering Image
(Centramento immagine):
a. Aprire il vassoio della stampante e posizionare un disco bianco da
120 mm sul vassoio.
b. Selezionare il pulsante Print Pattern (Stampa motivo) situato sulla
finestra di dialogo Centering Image (Centramento immagine).
Viene stampato un motivo sul disco.
c. Ruotare il disco di 180 gradi.
Suggerimento: dopo aver ruotato il disco, la freccia stampata deve
trovarsi al centro del quadro e la riga stampata deve essere allineata
con il bordo del vassoio della stampante.
Allineare con
il bordo del
vassoio della
stampante
Freccia
Quadro
2002605_A
Per maggiori informazioni visitare il sito web rimage.com/support
11
Impostazione delle preferenze di stampa
d. Se le righe attraversano le scale orizzontali e verticali a 0, non è
necessaria alcuna regolazione. Premere OK.
Aggiornamento del firmware
1. Accedere a Print Preferences (Preferenze stampa). Vedere pagina 9.
2. Selezionare la scheda Service (Manutenzione).
3. Selezionare Service ToolBox (Casella degli strumenti manutenzione). Viene
visualizzata la finestra di dialogo Service ToolBox (Casella degli strumenti
manutenzione).
4. Selezionare Update Firmware (Aggiorna firmware).
Suggerimento: per ulteriori informazioni sull'aggiornamento della versione
del firmware fare riferimento al documento Update Firmware for the
Rimage Prism III Printer (Aggiornamento del firmware per la stampante
Rimage Prism III).
Configurazione delle impostazioni della periferica per i
nastri in bianco e nero o CMY
È possibile stampare in bianco e nero o a colori. Utilizzare questa procedura per
impostare la stampa a colori o in bianco e nero della stampante Prism e regolare
le impostazioni del dispositivo per il tipo di nastro utilizzato.
e. Se almeno una riga non corrisponde a 0, immettere i fattori di
correzione orizzontale e verticale presi dal disco. Selezionare Save
Settings (Salva impostazioni).
Stampa in bianco e nero
1. Installare un nastro bianco e nero nella stampante. Fare riferimento alla
sezione Sostituzione del nastro di stampa a pagina 18.
Suggerimento: la stampa a colori viene rilevata automaticamente e
impostata in base al tipo di nastro installato nella stampante.
2. Accedere alle Print Properties (proprietà di stampa). Vedere pagina 9.
3. Selezionare la scheda Device Settings (Impostazioni periferica).
4. Per effettuare modifiche che interessano l'intensità del colore, il
bilanciamento o le impostazioni del modello, selezionare Halftone Setup
Properties (Proprietà di configurazione mezzi toni).
2002605_A
Per maggiori informazioni visitare il sito web rimage.com/support
12
Impostazione delle preferenze di stampa
5. Selezionare Media Type (Tipo di supporto).
Suggerimento: alcuni supporti DVD hanno un anello per l'impilaggio
impercettibile al tatto sulla parte stampabile del disco. Il processo di
stampa termico diretto utilizzato nella stampante Prism III non è in grado di
stampare in questa area. Il DVD con le impostazioni dell'anello di impilaggio
posto sulla parte superiore consente alla stampante di saltare l'anello di
impilaggio senza però stampare una traccia sul disco. Rimage consiglia di
utilizzare dischi senza anello di impilaggio sulla superficie stampabile.
6. Impostare Master Print Strobe (Impulso di stampa master). Per ulteriori
informazioni, fare riferimento alla sezione Impostazioni impulso.
7. Sotto l'opzione Double Print (Stampa doppia), selezionare Yes (Sì) o No.
L'impostazione predefinita è No.
Suggerimenti:
• Se sotto l'opzione Double Print (Stampa doppia) si seleziona Yes (Sì), la
stampante stampa ogni disco per due volte per scurire l'immagine.
• L'opzione Double Print (Stampa doppia) è disponibile solo per la stampa
in bianco e nero.
8. Sotto l'opzione Detect Media Change (Rileva sostituzione supporto),
selezionare Yes (Sì) o No. L'impostazione predefinita è No. Per utilizzare
AutoPrinter o autoloader, mantenere l'impostazione predefinita.
Suggerimento: se si seleziona Yes (Sì), la stampante attenderà che l'utente
cambi il disco prima di stampare un altro disco.
9. Se si dispone di una stampante Prism III autonoma, disattivare l'opzione
Perfect Print (Stampa perfetta). L'opzione Perfect Print (Stampa perfetta) è
disponibile solo su Rimage AutoPrinters.
Suggerimento: fare riferimento al Manuale per l'utente di Rimage
AutoPrinter per ulteriori informazioni sull'opzione Perfect Print (Stampa
perfetta).
10. Selezionare OK per salvare le modifiche e chiudere la finestra Device
Settings (Impostazioni perferica).
2002605_A
Stampa a colori
1. Installare un nastro multicolore nella stampante. Fare riferimento alla
sezione Sostituzione del nastro di stampa a pagina 18.
Suggerimento: la stampa a colori viene rilevata automaticamente e
impostata in base al tipo di nastro installato nella stampante.
2. Accedere alle Print Properties (proprietà di stampa). Vedere pagina 9.
3. Selezionare la scheda Device Settings (Impostazioni periferica).
4. Per effettuare modifiche che interessano l'intensità del colore, il
bilanciamento o le impostazioni del modello, selezionare Halftone Setup
Properties (Proprietà di configurazione mezzi toni).
5. Selezionare Media Type (Tipo di supporto).
Suggerimento: alcuni supporti DVD hanno un anello per l'impilaggio
impercettibile al tatto sulla parte stampabile del disco. Il processo di
stampa termico diretto utilizzato nella stampante Prism III non è in grado di
stampare in questa area. Il DVD con le impostazioni dell'anello di impilaggio
posto sulla parte superiore consente alla stampante di saltare l'anello di
impilaggio senza però stampare una traccia sul disco. Rimage consiglia di
utilizzare dischi senza anello di impilaggio sulla superficie stampabile.
6. Impostare Master Print Strobe (Impulso di stampa master). Per ulteriori
informazioni, fare riferimento alla sezione Impostazioni impulso.
7. Attivare Enable Color Sub-Strobes (Attiva i sotto-impulsi colore). Per
ulteriori informazioni, fare riferimento alla sezione Impostazioni impulso.
Importante: i sotto-impulsi colore sono disponibili solo con i nastri CMY e,
per impostazione predefinita, sono disattivati. Master Print Strobe (Impulso
di stampa master) non ha effetto quando sono attivati i sotto-impulsi colore.
8. Sotto l'opzione Detect Media Change (Rileva sostituzione supporto),
selezionare Yes (Sì) o No. L'impostazione predefinita è No.
Suggerimento: se si seleziona Yes (Sì), la stampante attenderà che l'utente
cambi il disco prima di stampare un altro disco.
Per maggiori informazioni visitare il sito web rimage.com/support
13
Impostazione delle preferenze di stampa
9. Se si dispone di una stampante Prism III autonoma, disattivare Perfect
Print option (Stampa perfetta l’opzione). L'opzione Perfect Print (Stampa
perfetta) è disponibile solo su Rimage AutoPrinters.
Suggerimento: fare riferimento al Manuale per l'utente di Rimage AutoPrinter
per ulteriori informazioni sull'opzione Perfect Print (Stampa perfetta).
10. Selezionare OK per salvare le modifiche e chiudere la finestra Device
Settings (Impostazioni periferica).
4. Selezionare Enabled (Attivato) per Enable Color Sub-strobes (Attiva i sottoimpulsi colore).
Importante: le impostazioni dei sotto-impulsi colore sono disponibili solo
con i nastri CMY.
5. Selezionare OK per salvare le modifiche e chiudere la finestra Device
Settings (Impostazioni periferica).
Impostazioni dell'impulso
Le impostazioni dell'impulso controllano la quantità di energia utilizzata per
stampare un pixel. Le impostazioni superiori utilizzano più energia. All'aumento
delle impostazioni, l'immagine diventa più intensa e la durata della testina di
stampa diminuisce. Rimage consiglia di utilizzare le impostazioni di impulso
minime che forniscono la qualità desiderata dell'immagine.
Note:
• Le impostazioni seguenti sono consigliate per i supporti a marchio Rimage.
• Questo potrebbe richiedere diverse prove di stampa su dischi per mettere a
punto la tonalità di colore. Selezionare Enabled (Attivato) per Enable
Color Sub-strobes (Attiva i sotto-impulsi colore) per abbassare un singolo
impulso di stampa colore. Ad esempio, questa impostazione può servire per
abbassare l'impulso di stampa giallo, cercando di eliminare un effetto alone
su un disco stampato.
1. Accedere a Print Preferences (Preferenze stampa). Vedere pagina 9.
2. Selezionare la scheda Device settings (Impostazioni periferica).
3. Impostare Master Print Strobe (Impulso di stampa master).
Nota: Rimage raccomanda le impostazioni seguenti per i supporti a marchio
Rimage:
• Superficie del supporto: supporto stampabile con procedura termica
• Impostazione impulso di stampa per nastro nero: 325 - 400
• Impostazione impulso di stampa per nastro rosso: 325 - 400
• Impostazione impulso di stampa per nastro blu: 350 - 400
2002605_A
Per maggiori informazioni visitare il sito web rimage.com/support
14
Manutenzione della stampante Prism III
Utilizzare le informazioni nella presente sezione per mantenere la stampante
Prism III in condizioni di funzionamento ottimali.
Panoramica
Una manutenzione preventiva regolare della stampante Prism III può contribuire
a produrre etichette stampate in modo nitido. La manutenzione riguarda la
pulizia del sistema.
Informazioni di avvertenza
nn Attenzione: per evitare di danneggiare la stampante Prism III durante le
operazioni di manutenzione:
• Non utilizzare oli, silicone o altri prodotti lubrificanti sulle parti della
stampante Prism.
• Utilizzare solo detergenti non abrasivi per pulire le superfici della
stampante.
• Evitare di versare detergenti direttamente sulla stampante Prism.
Applicarli, invece, su un panno privo di lanugine.
Pianificazione della manutenzione preventiva
Utilizzare la tabella seguente come guida per la frequenza di esecuzione delle
attività di manutenzione preventiva.
Strumenti
Operazione
Frequenza
Istruzioni
• Panno
privo di
lanugine
Pulizia della
superficie
esterna
della
stampante
Settimanale
1. Spegnere la
stampante Prism.
2. Scollegare il cavo di
alimentazione.
3. Pulire tutte le
superfici esterne
della stampante.
• Nuovo
nastro di
stampa
Sostituzione del
nastro di
stampa.
Monocromatico nero:
2100 dischi
Monocromatico
rosso:
2100 dischi
Monocromatico blu:
2100 dischi
Pannello a 3 colori
(CMY):
500 dischi
Fare riferimento alla
sezione Sostituzione
del nastro di stampa a
pagina 18.
Kit di pulizia
della testina
di stampa
Pulizia della
testina di
stampa.
Alla sostituzione del
nastro o secondo
necessità
Fare riferimento alla
sezione Pulizia della
testina di stampa a
pagina 16.
• Detergente non
abrasivo,
multiuso
Importante: il mancato rispetto della manutenzione pianificata può rendere
nulla la garanzia.
2002605_A
Per maggiori informazioni visitare il sito web rimage.com/support
15
Manutenzione della stampante Prism III
Pulizia della testina di stampa
Pulire la testina a ogni sostituzione di nastro, o più spesso, se cominciano ad
apparire delle strisce o se il nastro si è strappato.
Esistono due metodi per pulire la testina di stampa della stampante Prism III,
ovvero con il kit di pulizia Prism o con un metodo alternativo. Quest'ultimo può
essere usato se il kit di pulizia non è disponibile. In questa sezione vengono
fornite le istruzioni per entrambi i metodi.
Nota: se la stampante Prism è collegata a un Autoloader o AutoPrinter,
potrebbe essere più facile rimuovere la stampante dal sistema prima di iniziare
la procedura di pulizia.
• Spegnere la stampante.
• Scollegare tutti i cavi dalla parte posteriore della stampante. Fare
riferimento alla sezione Identificazione delle parti della stampante Prism a
pagina 6.
• Rimuovere la stampante dal sistema e posizionarla su una superficie in
piano vicino a una presa elettrica.
• Collegare un cavo di alimentazione separato dalla stampante alla presa
elettrica.
Pulizia della testina di stampa della stampante Prism III
con il kit di pulizia Prism
2. Avviare la modalità di pulizia.
a. Premere l'interruttore di accensione per accendere la stampante e allo
stesso tempo tenere premuto il operator button (pulsante operatore).
b. Quando lampeggia la spia di Disco non presente (la seconda spia sul
pannello operatore), rilasciare il operator button (pulsante operatore).
Il vassoio della stampante verrà aperto.
La stampante è in modalità pulizia quando le spie del pulsante
operatore e Disco non presente (le due spie superiori sul pannello di
controllo) lampeggiano rapidamente.
3. Preparare il tampone per la pulizia.
Nota: il tampone di pulizia è incluso nel kit di pulizia Prism.
Rimuovere il rivestimento adesivo dal tampone di pulizia.
Attaccare il tampone di pulizia alla parte superiore di un disco.
Assicurarsi che i bordi del tampone siano allineati con il disco.
Collocare il tampone di pulizia applicato al disco sul vassoio della
stampante. Assicurarsi che il disco sia allineato con i perni di fissaggio
sul vassoio della stampante.
e. Premere il tampone verso il basso e sul sensore sul vassoio della
stampante.
f. Versare 5 gocce di alcol isopropilico sul tampone di pulizia.
a.
b.
c.
d.
Se si dispone del kit di pulizia Prism, adottare la procedura descritta di seguito
per pulire la testina di stampa.
## Strumenti necessari:
• Kit di pulizia Prism (Cod. 210555-001)
• Un disco
• Alcol isopropilico al 99 %
• Tamponi di cotone
1. Preparare la stampante Prism per la pulizia.
a. Spegnere la stampante Prism.
b. Rimuovere il coperchio superiore.
c. Rimuovere il nastro. Fare riferimento alla sezione Sostituzione del
nastro di stampa a pagina 18.
2002605_A
Per maggiori informazioni visitare il sito web rimage.com/support
Tampone premuto sul
sensore
Tampone di pulizia fissato
sul disco
Vassoio stampante
16
Manutenzione della stampante Prism III
4. Pulire la testina di stampa.
a. Premere il operator button (pulsante operatore) per chiudere il vassoio
della stampante e avviare il ciclo di pulizia. Il vassoio si apre quando il
ciclo di pulizia è terminato.
b. Se necessario, ripetere il passo a per avviare un altro ciclo di pulizia.
c. Quando la testina della stampante è pulita, rimuovere il tampone di
pulizia applicato al disco dal vassoio della stampante.
Guide anteriori nastro
Tampone di pulizia
Soluzione
detergente
5. Pulire le due guide del nastro anteriori.
a. Inumidire il tampone di cotone con alcool isopropilico.
b. Passare il tampone sulle guide del nastro per pulirle.
6. Preparare la stampante Prism per l'uso.
a. Premere l'interruttore di accensione portandolo sulle posizioni off e on
per uscire dalla modalità pulizia e resettare la stampante.
b. Reinstallare il nastro. Fare riferimento alla sezione Sostituzione del
nastro di stampa a pagina 18.
c. Se la stampante è stata precedentemente rimossa da un Autoloader
o AutoPrinter, posizionare la stampante sul sistema e collegare tutti
i cavi. Fare riferimento alla sezione Identificazione delle parti della
stampante Prism a pagina 6.
Nota: se il tappetino di stampa sul vassoio si inumidisce durante la
pulizia, lasciarlo asciugare completamente prima di utilizzare la
stampante Prism.
2002605_A
Metodo alternativo per la pulizia della testina di stampa
Se non si dispone del kit di pulizia Prism, adottare la procedura descritta di
seguito per pulire la testina di stampa.
## Strumenti necessari:
• Alcol isopropilico al 99 %
• Tamponi di cotone
1. Preparare la stampante Prism III.
a. Accendere la stampante Prism III.
b. Per aprire il vassoio della stampante, premere il operator button
(pulsante operatore).
c. Spegnere la stampante Prism III.
d. Rimuovere il coperchio superiore.
e. Rimuovere il nastro. Fare riferimento alla sezione Sostituzione del
nastro di stampa a pagina 18.
2. Pulire la testina di stampa.
a. Applicare alcol isopropilico su un tampone di cotone.
b. Inserire il tampone di cotone nell'apertura del cassetto.
c. Sollevare il tampone mentre lo si passa sulla superficie convessa della
testina di stampa.
Superficie convessa della
testina di stampa
Importante: la parte inferiore della testina di stampa è illustrata per indicare la
superficie da pulire. Non rimuovere la testina di stampa dalla stampante.
Per maggiori informazioni visitare il sito web rimage.com/support
17
Manutenzione della stampante Prism III
3. Pulire le due guide del nastro anteriori.
a. Inumidire il tampone di cotone con alcool isopropilico.
b. Passare il tampone sulle guide del nastro per pulirle.
4. Quando l'alcool sulla testina di stampa si asciuga, preparare la stampante
Prism per l'uso.
a. Installare il nastro. Fare riferimento alla sezione Sostituzione del nastro
di stampa a pagina 18.
b. Se la stampante è stata precedentemente rimossa da un Autoloader
o AutoPrinter, posizionare la stampante sul sistema e collegare tutti
i cavi. Fare riferimento alla sezione Identificazione delle parti della
stampante Prism a pagina 6.
Sostituzione del nastro di stampa
Importante: la stampante Prism III funziona solo con nastri Rimage originali.
Rimage supporta solo l'utilizzo di nastri a marchio Rimage per le stampanti.
I problemi che si verificano alla stampante in seguito all'utilizzo di nastri
non prodotti da Rimage non sono coperti dalla garanzia o dagli accordi di
manutenzione Rimage.
Suggerimento: se i nastri sono conservati in ambienti molto diversi da quelli
della stampante, lasciare che raggiungano la temperatura del nuovo ambiente.
In caso di maggiori differenze di temperatura e/o di umidità, lasciare trascorrere
più tempo.
1. Accedere all'area del nastro.
a. Accendere la
stampante Prism.
b. Rimuovere il
coperchio superiore
dalla stampante.
c. Sollevare il rullo
di avvolgimento,
in modo che
l'ingranaggio esca
per primo, quindi
estrarre il rullo dalla
stampante.
2002605_A
d. Per rimuovere il rullo di alimentazione, è sufficiente sollevarlo.
Nota: quando si sostituisce il nastro, è buona norma procedere alla pulizia
della testina di stampa. Fare riferimento alla sezione Pulizia della testina di
stampa a pagina 16.
2. Caricare il nastro di stampa.
a. Far scorrere il nastro di stampa sul rullo di alimentazione.
b. Allineare le due tacche del rullo interno di cartone ai perni di metallo
sul rullo di alimentazione.
Nastro di stampa
Anima di cartone
Tacche
Perni metallici
Rullo di alimentazione
c. Premere il operator button (pulsante operatore) per chiudere il vassoio
della stampante.
d. Staccare la parte iniziale del nastro dal nastro di alimentazione.
e. Far scorrere la parte iniziale del nastro sotto la guida del nastro e
all'interno del morsetto di installazione del nastro.
Morsetto di
installazione del
Guida nastro
nastro
Rullo di
avvolgimento
Rullo di
alimentazione
Vassoio della stampante
Per maggiori informazioni visitare il sito web rimage.com/support
Parte iniziale del nastro
18
Manutenzione della stampante Prism III
3. Installare il rullo di alimentazione come illustrato. Lasciare la parte iniziale
del nastro leggermente allentata.
a. Tenere premuto il
pulsante operatore
finché non esce il vassoio
della stampante. Il nastro
viene guidato verso la
parte anteriore della
Rullo di
Prism.
alimentazione
b. Rimuovere la parte
iniziale del nastro dal
morsetto di installazione.
c. Rimuovere la striscia
adesiva dalla parte
iniziale del nastro.
4. Caricare il rullo di avvolgimento.
a. Collocare la nuova anima vuota di cartone sul rullo di avvolgimento. È
stata disegnata per essere installata in un solo senso.
b. Collocare il rullo di avvolgimento sulla parte superiore della parte
iniziale del nastro, come illustrato.
c. Accostare la parte iniziale
del nastro sull'anima di
cartone.
d. Fissare la striscia adesiva
all'anima di cartone, in
modo che i bordi della
parte iniziale del nastro
coincidano con i bordi
dell'anima di cartone.
e. Avvolgere la parte iniziale
del nastro una sola volta
intorno al rullo.
Importante: non avvolgere oltre il segno sulla parte iniziale marcato
con STOP - Wind Leader Onto Take-up Core Stopping here (Arrestare
qui l'avvolgimento della parte iniziale sull'anima del rullo di
avvolgimento) per i nastri in bianco e nero. Se si utilizza un nastro CMY,
avvolgere il nastro fino alla fine della parte iniziale gialla.
Importante: l'ingranaggio deve trovarsi sul lato corretto.
Ingranaggio
Striscia adesiva
2002605_A
Anima di
cartone
Parte iniziale
del nastro
Per maggiori informazioni visitare il sito web rimage.com/support
19
Manutenzione della stampante Prism III
5. Installare il rullo di avvolgimento nella stampante Prism e premere con
decisione verso il basso finché non si insedia con uno scatto. Il nastro deve
Parte iniziale del nastro
Rullo di avvolgimento
Marcatura
essere teso e non ci devono essere grinze.
Importante: non avvolgere oltre il segno STOP - Wind Leader Onto Take-up
Core Stopping here (Arrestare qui l'avvolgimento della parte iniziale
sull'anima del rullo di avvolgimento) sull'anima del rullo di avvolgimento.
Il segno non deve oltrepassare il punto indicato sulla figura. Se il segno si
trova sul rullo, estrarlo nuovamente e riavvolgere il nastro. Per eliminare
l'allentamento, riavvolgere il rullo di alimentazione.
6. Premere il operator button (pulsante operatore) per 5 secondi per
consentire alla stampante di convalidare il nastro. Se il nastro è valido, la
stampante avanza e la spia di Errore smette di lampeggiare.
Nota: durante il processo di validazione del nastro, questo passa oltre la
parte iniziale del nastro stesso. Al termine del processo di validazione,
accertarsi che il nastro sia teso.
7. Installare il coperchio superiore.
2002605_A
Per maggiori informazioni visitare il sito web rimage.com/support
20
Prism III 打印机用户指南
公司总部:
Rimage Corporation
7725 Washington Avenue South
Minneapolis, MN 55439
USA
欧洲总部:
Rimage Europe GmbH
Albert-Einstein-Str.26
63128 Dietzenbach
德国
亚太总部:
Rimage Japan Co., Ltd.
2F., WIND Bldg.
7-4-8 Roppongi Minato-ku,
Tokyo 106-0032 JAPAN
800-553-8312(北美洲)
服务:+1 952-946-0004
(墨西哥/拉丁美洲)
传真:+1 952-944-6956
电话:+49 6074-8521-14
传真:+49 6074-8521-100
电话:+81-3-5771-7181
传真:+81-3-5771-7185
Rimage Corporation 保留在不事先通知的情况下随时改进本文档所述的设备和软件的权利。Rimage Corporation 保留在不通知任何个人
或组织的情况下随时修改本出版物及其内容的权利。
本文档可能包含发布之时可以访问的网站链接,但是可能随时移除或变为非运行状态。本文档可能包含指向某些网站的链接,各网站由第
三方所有并运营。Rimage Corporation 对这类第三方网站的内容不承担任何责任。
©2012,Rimage Corporation
Rimage® 是 Rimage Corporation 的注册商标。Rimage Prism III、AutoPrism™ 和 CD Designer™ 是 Rimage Corporation 的商标。Dell™
是 Dell Computer Corporation 的商标。FireWire™ 是 Apple Computer, Inc. 的商标。Windows® 是 Microsoft Corporation 的注册商标。
所有其它商标和注册商标都是其各自所有者的财产。
如欲获取本文档最新版本,请访问www.rimage.com/support。
2002605_A
如需更多信息,请访问 rimage.com/support
目录
简介............................................................................................. 1
设置打印首选项......................................................................... 12
关于本用户指南............................................................................................. 1
关于 Prism III 打印机..................................................................................... 1
打开包装和设置指令...................................................................................... 1
彩色打印............................................................................................................................13
选通设置............................................................................................................................14
维护 Prism III 打印机................................................................. 15
重要信息...................................................................................... 2
概述............................................................................................................. 15
支持联系信息................................................................................................. 2
在线了解更多信息......................................................................................... 2
技术支持........................................................................................................ 2
光盘刻录软件免责声明.................................................................................. 2
安全和合规信息............................................................................................. 3
维护 Prism III 打印机................................................................. 16
安全预防措施...........................................................................................................3
合规信息..................................................................................................................4
更换打印色带............................................................................................... 18
告诫信息................................................................................................................15
预防性维护时间表.................................................................................................15
清洁打印头.................................................................................................. 16
使用 Prism 清洁工具包清洁 Prism III 打印头.........................................................16
清洁打印头 - 替代方式.........................................................................................17
Prism III 打印机要求.................................................................... 5
色带要求........................................................................................................ 5
标签设计要求................................................................................................. 5
打印要求........................................................................................................ 5
识别 Prism III 打印机的部件........................................................ 6
正视图........................................................................................................... 6
俯视图........................................................................................................... 6
后视图........................................................................................................... 6
识别 Prism III 打印机的部件........................................................ 7
操作员面板.................................................................................................... 7
操作员按钮.................................................................................................... 7
指示灯........................................................................................................... 7
操作 Prism III 打印机................................................................... 8
Prism 打印机的通电和断电............................................................................ 8
独立打印机的通电和断电.........................................................................................8
与 Autoloader 或 AutoPrinter 相连的打印机的通电和断电......................................8
将光盘放在打印机托盘上............................................................................... 8
设置打印首选项........................................................................... 9
设置打印首选项............................................................................................. 9
访问打印首选项.......................................................................................................9
访问打印属性。.......................................................................................................9
布局和纸张/质量首选项...........................................................................................9
更改遮罩设置...........................................................................................................9
维修选项................................................................................................................10
打印 PRN 文件:...............................................................................................................10
将图像置于光盘中央..........................................................................................................10
升级固件............................................................................................................................12
设定单色或 CMY 色带的设备设置.........................................................................12
单色打印............................................................................................................................12
2002605_A
如需更多信息,请访问 rimage.com/support
简介
本手册提供配置、操作和维护 Rimage Prism III 打印机所需的信息。
有关 autoloader 或 Rimage AutoPrinter 的具体信息,请访问
www.rimage.com/support 查阅产品的用户指南。在 在Support(支
持)页面上选择 Prism III,然后选择 User Manuals(用户手册)选项
卡。选项卡。
关于 Prism III 打印机
重要事项!您的 Prism III 打印机外观可能与本用户指南中所描述的型
号不完全一样。
打开包装和设置指令
关于本用户指南
Prism III 打印机随附了拆封和安装说明。请参阅 Rimage Prism III 设置
和安装指南,以及在您的 Rimage autoloader 或 AutoPrinter 中随附的
设置和安装指南。
• 尽管我们努力维护手册和文档的所有版本,但请注意我们网站上提
供的英文版本始终包含最新的信息。
• 除非另有说明,所有有关 Windows 导航的说明均以 Windows 7 系
统路径为准。其它 Windows 操作系统的导航路径可能稍有差异。
• 本手册采用下列附注和符号来帮助阐明信息:
Prism III 打印机属于 Rimage 打印机系列。Prism III 打印机属于高速打印
机,可用于在 CD、DVD 或 Blu-ray DiscTM 上打印单色或彩色信息。
该打印机既可用作手动操作的独立打印机,也可以与 Rimage
autoloader 或 Rimage AutoPrinter 配合使用。
提示:“提示”还用于提出可能不明显但有助于您理解产品的优点和功
能的替代方法。
重要事项!
• “重要事项”注释用于提供对完成任务至关重要的信息。
• 重要补充信息。
• 如忽略“提示”中的信息仍可完成任务,但切勿忽略“重要提示”。
nn注意事项:“注意事项”表示不遵守此指导原则可能导致设备、产
品、软件或数据损坏。
nn警告!“警告”表示不遵守此指导原则可能导致操作或维护设备的
人员遭受人身伤害。
2002605_A
如需更多信息,请访问 rimage.com/support
1
重要信息
本部分提供有关 Prism III 打印机的支持联系信息、注意和警告事项。
该产品的技术规格信息位于 www.rimage.com/support。请在
Support(支持)页面上依次选择:Printer Series(打印机系列)>
Prism > User Manuals(用户手册)选项卡。
支持联系信息
在线了解更多信息
在www.rimage.com/support上,您可以体验到 Rimage 的世界级支持
和服务。
在 Support(支持)主页:
1. 选择您的产品系列。
2. 选择您的产品。
美国、加拿大及拉丁美洲
3. 了解关于产品页面的更多信息。
可从产品页面访问:
•关于最新的软件和固件更新的信息
•产品规格
•最新的文档
•当前的固件和驱动程序下载
Rimage Corporation
电子邮件:[email protected]
7725 Washington Avenue South
Minneapolis, MN 55439
USA
收件人 (Attn):Rimage Services
电话:北美:800-553-8312
墨西哥/拉丁美洲:952-944-8144
传真:952-944-7808
技术支持
Rimage Europe GmbH
电子邮件:[email protected]
Albert-Einstein-Str.26
电话:+49 6074-8521-14
63128 Dietzenbach
传真:+49 6074-8521-100
重要事项!确保您注册了 autoloader,注册后可享有 1 年的部件及人工
质保服务和优先级电话支持。请访问 http://www.rimage.com/support/
warranty-registration 进行注册。
欧洲
德国
Rimage 为 Prism III 打印机提供众多服务和支持选项,其中包括交换
服务。有关更多信息和定价事宜,请联系您的 Rimage 增值经销商或
Rimage。
光盘刻录软件免责声明
亚太地区
Rimage Japan Co., Ltd.
电子邮件:[email protected]
2F., WIND Bldg.
电话:+81-3-5771-7181
7-4-8 Roppongi Minato-ku,
传真:+81-3-5771-7185
Tokyo 106-0032 JAPAN
联系 Rimage 服务部
本产品、软件或文档设计用于帮助您对您拥有版权或已获得版权所有者
的复制许可的材料进行复制。除非您拥有版权或已获得版权所有者的复
制许可,否则可能违反法律并应承担损害赔偿和其它补偿。如果您不明
确自己的权利,应该联系您的法律顾问。如果您既不拥有版权,也未获
得版权所有者授权,则未经授权而复制光盘或其它介质上的受版权保护
的材料可能违反国家和国际法令,并招致严厉惩罚。
网站:www.rimage.com/support
知识库:http://rimage.custhelp.com
登录并选择 Ask a Question(提问)选项卡
联系 Rimage 服务部时,请提
供:
• 系统序列号和软件版本
从 Rimage 产品上复制此信息以备将来使用。
注:每次收到替换的系统后,请确保更新此处
的序列号。
• 对问题的功能性和技术性描述
序列号:
• 收到的错误消息原文
产品名称:
购买日期:
2002605_A
如需更多信息,请访问 rimage.com/support
2
重要信息
安全和合规信息
nn注意事项:
Data Transmission System 13.56MHz, TI Model Number: TRF7960
本手册和产品上的指示信息用于实现正确安全的操作。下列指示标记有
助于保护您和他人免于受伤,并保护设备免受损坏。
请参阅以下“安全预防措施”部分和第 4 页的“合规信息”,了解
详细信息。
安全预防措施
为了确保安全,请在使用设备前阅读这些安全预防措施并熟悉其含义。
nn警告!
• 不遵照本文规定使用控制装置、调节装置或执行规程可能导致
危险的辐射。
• 切勿拆解打印机或在打印机上使用工具。所有维修规程均应由
Rimage 的授权技术人员进行,或送返 Rimage 授权维修机构进
行。
• 切勿在电源线插在 AC 插座上的情况下维护打印机。
• 打印机内部包含锐利的边缘。
• 打印机的前挡板可以用手打开。切勿插入手指。
• 切勿触碰加热辊。
2002605_A
• 带有 AC 线路电压或低压 DC 电压的所有设备(例如开关、电
源、保险丝、风扇和非步进电机)更换时必须采用 Rimage 认
可的零部件,以维持由 UL 认可的安全性。
• 仅使用随附的 AC 电源线。要了解详细信息或订购新的电源
线,请联系 Rimage 客户服务部。
• 本产品设计用于办公环境。
• 如果检测到过热或异常气味,请勿使用打印机。这可能导致火
灾和电击。如果出现过热或异常气味,请立即从插座断开电
缆,并联系 Rimage 的授权经销商进行维修。
• 打开打印机托盘时请留出足够的空间。切勿在打印机托盘运动
时触碰该托盘。
• 如果在通电状态下侧盖打开,则打印机会停机。切勿在打印机
工作期间伸入其内部。切勿尝试绕开门联锁装置。
• 请勿使用 110VAC 或 220VAC 之外的任何电压。这可能导致火
灾和电击。
如需更多信息,请访问 rimage.com/support
3
重要信息
合规信息
产品
Prism III 打印机
型号
CDPR6
用于美国的公告
注:根据FCC的第15条,经测试,本设备符合A类数码设备的规定。设计这些规定的目的是当本设备在商用环境中操
作时提供抗有害干扰的合理保护。本设备会产生、使用以及放射射频能量,如果没有按照说明手册安装,那么其有
可能对无线电通讯造成有害干扰。在居民区操作此设备同样有可能产生有害干扰,在此情况下,要求用户自费纠正
此干扰。
本产品符合UL60950-1,第二版。
此A类数码电器符合加拿大ICES-003 期号:4:2004. Cet appareil numerigue de la classe A est conforme a la norme
NMB-003 du Canade.
本产品符合CAN/CSA-C22.2 编号.60950-1-07,1st edition。
本产品因满足以下欧洲标准而符合 EMC 指令(89/336/EEC)及低压指令(73/23/EEC):EN 55022: 2010/AC:
2011 Class A Limit; EN 55024: 2010; EN 61000-3-2:2006+A1:2009+A2:2009; EN 61000-3-3:2008; EN 609501: 2006/ A11:2009。所有符合 CE 标志指令 93/68/EEC 的设备均带有 CE 标志。
本A类产品符合信息技术设备干扰自愿控制委员会(VCCI)的标准。在本地环境中使用本设备有可能造成无线电干
扰,若发生此种情况,那么要求用户采取正确措施。
译文:
この装置は、情報処理装置等電波障害自主規制協議会(VCCI)の基準に基づくクラス
A 情報技術装置です。
この装置を家庭環境で使用すると電波妨害を引き起こすことがありま
す。
この場合には使用者が適切な対策を講ずるよう要求されることがあります。
本产品符合AS/NZS CISPR 22:2009.
用于加拿大的公告
用于欧洲的公告
用于日本的公告
用于澳大利亚的公告
用于韩国的公告
兹证明上述设备已通过 Framework Act on Telecommunications(《电信框架法案》)和 Radio Waves Act
(《无线电波法案》)之认证。
위 기기는 전기통신기본법, 전파법 에 따라 인증되었음을 증명 합니다.
Notice for Taiwan
2002605_A
This is class A digital device. It may cause radio-frequency interference when used in a residential area. In this case, the users
are advised to take appropriate precautions.
Translation:
警告使用者:
此為甲類資讯技術設備,於居住環境時,可能会造成射頻擾動,在此種情况下,使用者會被要求採取某些適當的對策。
如需更多信息,请访问 rimage.com/support
4
Prism III 打印机要求
本部分介绍 Prism 打印机的墨水、标签设计以及打印要求。
色带要求
重要事项!
• Rimage 只支持在 Prism 打印机上使用 Rimage 品牌色带。因使用
非 Rimage 生成的色带导致的打印机问题不在 Rimage 保修或维护
协议范围内。
• 若想获得最佳效果,可在 23° 到104°F(-5°到 40° C)、相对
湿度 30% 到 80% 无冷凝的条件下存放 Prism III 色带。
• 避免潮湿和阳光直射。
• 切勿重复使用色带。
• 仅使用指定用于 Prism III 打印机的色带。请参阅下表。
Prism 打印机必须使用专门针对打印机设计的色带。Prism III 打印机仅
可以操作以下 Rimage 色带:
色带类型
2002364 黑
2002366 红
2002367 深蓝
2002365 多色(CMY)
可打印的光盘片数
2100
2100
2100
500
标签设计要求
每台打印机均随附兼容 Windows 的 Rimage CD Designer™ 标签编
辑器软件。CD Designer 会在 Rimage 软件的普通安装过程中,安装
在您的 PC 上。如果您的 PC 上装有 Windows 系统,则可使用 CD
Designer 设计您的标签。
如果使用的是 Macintosh,或希望在 CD Designer 之外的其它软件应
用程序中设计标签,请遵循以下标准:
重要事项!CD Designer 不与 Macintosh 兼容。
• 文件格式:为获得最佳效果,请将标签保存为 JPEG 或 TIFF 文
件。但是,打印前必须转换这些文件格式。如果您使用 CD
Designer 来打印标签,则打印前,必须导入标签并将它们保存为
CD Designer 文件(.btw)。如果您不想使用 CD Designer 来打印
标签,则打印前,必须将标签转换为 PDF 文件。
• 颜色模式:导入 CD Designer 的标签必须采用 RGB 颜色模式。
• 分辨率:使用设置为 300x300 dpi(每英寸点数)或 300x600 dpi
的图片或标志。
• 标签设计尺寸:宽为 5.12”(1536 像
素),高为 4.52”(1356 像素)。
• 可打印区域:在使用 Prism 打印机
可打印区域:
116 毫米
时,光盘的可打印区域为 116 毫
米(4.567”),盘心为 38 毫米
(1.496”)。
打印要求
盘心尺寸
38 毫米
使用 CD Designer 创建并保存的所有标
签均应采用正确的文件格式 (.btw),以便
使用 Prism 打印机打印。如果您使用 CD Designer 之外的软件应用程
序创建和保存标签,请将标签保存为 PDF 文件,然后再使用 Prism 打
印机打印。如果您使用独立 Prism 打印机或 AutoPrism AutoPrinter,
则可从具有打印功能的任何应用程序直接打印。
2002605_A
如需更多信息,请访问 rimage.com/support
5
识别 Prism III 打印机的部件
正视图
后视图
打印机托盘
电源开关
AC 电源连接
操作员面板
USB 缆线
端口
AutoPrinter/
AutoLoader 控制连接
俯视图
色带夹
色带导辊
定位销
打印机托盘和中心销
2002605_A
收紧辊
进给辊
如需更多信息,请访问 rimage.com/support
6
识别 Prism III 打印机的部件
操作员面板
映像
操作员面板位于打印机的正面。操作员面板上有四个指示灯和一个操作
员按钮。
名称
功能
光盘不
存在指
示灯
•
操作员按钮
•
•
按压操作员按钮以打开和关闭打印机托盘。错误指示灯位于操作员按钮
的中心。参阅以下的 指示灯部分以了解更多信息。
•
指示灯
•
各指示灯的名称和功能在下文描述。每个指示灯都反映了独立式 Prism
打印机的不同状态。安装在 autoloaders 或 AutoPrism AutoPrinters 上
的 Prism 打印机有不同的状态。
有错误指示灯的操作员按钮
光盘不存在指示灯
•
活动指
示灯
•
•
当打印机正在操作时,活动指示灯会闪烁。
当打印机处于 AutoPrinter 模式时,活动指示灯会
一直缓慢地闪烁。
电源指
示灯
•
•
在打印机通电时,电源指示灯会亮起。
当系统版探测到严重错误时,电源指示灯会一直
闪烁。
如果打印机检测到打印头有坏像素元素,电源指示
灯便会关闭。在将光盘放到托盘中、使您可以继续
打印光盘之后,电源指示灯便会重新亮起。如果您
继续打印,您的打印任务中可能会出现细线。这说
明打印头需要更换。
在打印机电源关闭时,电源指示灯会熄灭。
•
活动指示灯
电源指示灯
•
操作员面板
映像
名称
功能
错误指
示灯
•
•
•
2002605_A
当出现错误时光盘不存在指示灯会闪烁出故障码。
在错误解决后,按操作员按钮以关闭指示灯。
当托盘为空或光盘未正常夹紧时,光盘不存在指示
灯会亮起。在将光盘放到托盘中之后,光盘不存在
指示灯便会熄灭。
在多份复制模式时,光盘不存在指示灯会一直亮
起,直至从托盘垫上取下光盘为止。
当剩余的单色色带容量低于 100 张光盘、CMY 色
带容量低于 25 张光盘时,光盘不存在指示灯便会
一直缓慢闪烁。
当色带耗尽时,光盘不存在指示灯会缓慢闪烁,错
误指示灯亮起。
当打印机处于清洁模式时,光盘不存在指示灯和错
误指示灯都会闪烁。
如果打印时出现错误,操作员按钮上的错误指示灯
便会亮起。
当打印机处于清洁模式时,错误指示灯和“光盘不
存在”指示灯便会闪烁。
当色带耗尽时,错误指示灯会亮起,“光盘不存
在”指示灯则会缓慢闪烁。
如需更多信息,请访问 rimage.com/support
7
操作 Prism III 打印机
将光盘放在打印机托盘上
本部分提供操作您的 Prism 打印机所需的信息。
Prism 打印机的通电和断电
1. 按压 operator button (操作员按钮)以打开打印机托盘。
2. 将光盘放在两个定位销和中心销之间的橡胶垫上。
独立打印机的通电和断电
1. 按打印机背面的电源开关。打印机电源开启并启动。
2. 再次按电源开关。打印机电源关闭。
重要事项!放置光盘时请使刻录面朝下。刻录面接近盘心的位置有
一个突起的堆积环。如果光盘在插入时堆积环面向上,打印头会被
损坏。
提示:
• 如果光盘在定位销处静止,打印机托盘将无法关闭。
• 打印垫和磁碟根据独立和自动式打印机型号的不同而有所区别。
自动型打印机在磁碟中心有一个孔洞;独立打印机则没有。所有
型号都有中心销。
3. 按 operator button (操作员按钮)。打印机托盘会移动到光盘夹紧
电源开关
磁碟
与 Autoloader 或 AutoPrinter 相连的打印机的通电和
断电
中心销
如果您的 Prism III 打印机连接到 autoloader 或 AutoPrinter,请按照以
下步骤操作:
定位销
提示:打印机上的电源开关必须保持在“开”位置。
1. 打开 autoloader 或 AutoPrinter 的电源。打印机电源开启并启
动。
2. 关闭 autoloader 或 AutoPrinter 的电源。打印机电源关闭。
打印机托盘
位置。
2002605_A
如需更多信息,请访问 rimage.com/support
8
设置打印首选项
设置打印首选项
更改遮罩设置
重要事项:除非另有说明,所有有关 Windows 导航的说明均以
Windows 7 系统路径为准。其它 Windows 操作系统的导航路径可能稍
有差异。
Rimage CD Designer 软件可以在 120 毫米的光盘上打印,并能遮蔽不
可打印的区域,例如光盘孔内部和外周之外。
访问打印首选项
1. 选择:Start(开始)> Devices and Printers(设备和打印机)。
。设备和打印机对话框将打开(Devices and Printers)。
2. 右键点击 Rimage Prism III。
3. 从下拉列表中选择 Printing preferences(打印首选项)。显示
Rimage Prism III 首选项窗口。
遮蔽(无打印)
区域
访问打印属性
1. 选择:Start(开始)> Devices and Printers(设备和打印机)。
设备和打印机对话框将打开(Devices and Printers)。
2. 右键点击 Rimage Prism III。
3. 从下拉列表中选择 Printing properties(打印属性)。显示
Rimage Prism III 属性窗口。
一些光盘在堆积环周围没有适合的打印涂层。更改遮罩设置以适应光盘
打印方式。
布局和纸张/质量首选项
在 Layout(布局)和 Paper/Quality(纸张/质量)选项卡下的选项通
常不需要调整。Rimage 技术支持会识别需要调整设置的时间,然后帮
助您调整上述选项卡下的设置项。
2002605_A
遮蔽(无打印)
区域
如需更多信息,请访问 rimage.com/support
9
设置打印首选项
1.
2.
3.
4.
5.
6.
访问 Print Preferences 打印首选项。请参阅第 9 页。
选择 Mask Settings(遮罩设置)选项卡。
选择 Print on Hub(在盘心打印)选项。
测量可打印面的内径和外径。
在 Hub Settings(盘心设置)部分输入直径。
选择 OK(确定)保存更改。
维修选项
Service(维修)选项卡提供有关您的 Prism III 打印机的信息,以及一
系列工具以维护您当前的打印机,使其正常运行。
1. 访问 Print Preferences 打印首选项。请参阅第 9 页。
2. 选择 Service(维修)选项卡。
窗口会显示有关您的 Prism III 打印机的特征信息。
• 驱动程序:显示有关打印机驱动程序的信息,包括名称和版本
编号。
• 打印机:显示打印机的相关信息,包括打印机名称、序列号和
固件版本。
• 打印机状态:显示打印机的状态。
• 色带状态:显示色带类型、已使用色带比例、色带部件编号和
颜色代码以及安装的色带序列号。
将图像置于光盘中央
置中图像工具可用于调整打印机的机械中心,以匹配标准 CD Designer
模版。
提示:除非更换了打印机组件,否则通常无需再次调整。
1. 访问 Print Preferences 打印首选项。请参阅第 9 页。
2. 选择 Service(维修)选项卡。
3. 选择 Service ToolBox(维修工具箱)。
Service ToolBox(维修工具箱)对话框将打开。
4. 选择 Center Image(置中图像)。
置中图像对话框将显示。
打印 PRN 文件
1. 访问 Print Preferences 打印首选项。请参阅第 9 页。
2. 选择 Service(维修)
选项卡。
3. 选择 Service
ToolBox(维修工
具箱)。Service
ToolBox(维修工具箱)
对话框将打开。
4. 选择 Print PRN File(
打印 PRN 文件)
屏幕上会弹出一个对话框,以使用户打印选定的 PRN 文件。
2002605_A
如需更多信息,请访问 rimage.com/support
10
设置打印首选项
5. 按照置中图像对话框中列出的步骤操作:
a. 打开打印机托盘,在托盘上放一张 120 毫米的空白光盘。
b. 选择位于置中图像 (Centering Image) 对话框内的 Print
Pattern(打印模式)按钮。
在光盘上打印的模式。
c. 旋转光盘 180 度。
提示:在您旋转光盘之后,打印箭头应处在挡板的中心,打印
行应与打印机托盘的边缘对齐。
与打印机托盘
边缘对齐
箭头
挡板
2002605_A
如需更多信息,请访问 rimage.com/support
11
设置打印首选项
i. 如果打印行穿过水平和垂直标尺的 0 刻度处,则无需调整。
按 OK(确定)。
升级固件
1. 访问 Print Preferences 打印首选项。请参阅第 9 页。
2. 选择 Service(维修)选项卡。
3. 选择 Service ToolBox(维修工具箱)。Service ToolBox(维修工
具箱)对话框将打开。
4. 选择 Update Firmware(升级固件)。
提示:参阅升级 Rimage Prism III 打印机固件文件,以了解有关升
级固件版本的更多信息。
设定单色或 CMY 色带的设备设置
您可以以一种(单色)或多种颜色打印。根据以下流程,将 Prism 设置
为彩色或单色打印,调整设备设置,以适应使用的色带类型。
单色打印
1. 将单色色带安装到打印机中。请参阅第 18 页的更换打印色带部
分。
d. 如果至少一行离开了 0 刻度处,输入光盘上读出的水平和垂直
校正系数。选择 Save Settings(保存设置)。
提示:根据安装在打印机中色带的类型,打印颜色为自动检测和设
置。
2. Locate Print Properties(访问打印属性)。请参阅第 9 页。
3. 选择 Device Settings(设备设置)选项卡。
4. 选择 Halftone Setup Properties(Halftone 设置属性),以更改
颜色强度、色彩平衡或模式设置。
5. 选择 Media Type(介质类型)。
提示:一些 DVD 介质在光盘的可打印侧有突起的堆积环。Prism III
打印机采用的直接热打印流程无法在此区域打印。有顶部堆积环
设置的 DVD 会使打印机跳过堆积环,进而造成光盘上出现未打印
带。Rimage 建议使用在可打印表面上没有堆积环的光盘。
6. 设置 Master Print Strobe(主打印选通)参阅以下的 选通设置部
分以了解更多信息。
2002605_A
如需更多信息,请访问 rimage.com/support
12
设置打印首选项
7. 选择 Double Print(叠印)选项下的 Yes(是)或 No(否)。默
认选项为 No(否)。
提示:
• 如果您在 Double Print(叠印)选项下选择了 Yes(是),打
印机会重复打印每张光盘两次,以加深图像。
• 叠印选项仅适用于单色打印。
8. 选择 Detect Media Change (检测介质更改)选项下的 Yes
(是)或 No(否)。默认选项为 No(否)。保留默认设置以供
AutoPrinter 或 autoLoader 使用。
提示:如果您选择 Yes(是),打印机在打印另一张光盘前会等待
用户更换光盘。
9. 如果您使用独立 Prism III 打印机,禁用 Perfect Print option(完
全打印)选项。完全打印选项仅适用于 Rimage AutoPrinter。
提示:参阅 Rimage AutoPrinter 用户指南,以了解有关完全打印选
项的更多信息。
5. 选择 Media Type(介质类型)。
提示:一些 DVD 媒体在光盘的可打印侧有突起的堆积环。Prism III
打印机采用的直接热打印流程无法在此区域打印。有顶部堆积环设
置的 DVD 会造成的打印机跳过堆积环,进而造成光盘上出现未打
印带。Rimage 建议使用在可打印表面上没有堆积环的光盘。
6. 设置 Master Print Strobe(主打印选通)参阅选通设置部分以获
取更多信息。
7. 启用 Color Sub-Strobes(彩色副选通)。参阅选通设置部分以获
取更多信息。
重要事项!彩色副选通仅适用于 CMY 色带,并且默认为禁用。当
彩色副选通启用时,主打印选通便失去效果。
8. 选择 Detect Media Change (检测介质更改)选项下的 Yes
(是)或 No(否)。默认扩展名为 No。
提示:如果您选择 Yes(是),打印机在打印另一张光盘前会等待
用户更换光盘。
9. 如果您使用独立 Prism III 打印机,禁用 Perfect Print option(完
全打印)选项。完全打印选项仅适用于 Rimage AutoPrinter。
10.选择 OK(确定)保存更改并关闭设备设置窗口。
彩色打印
1. 将 multicolor ribbon(彩色色带)安装到打印机中。请参阅第
18 页的更换打印色带部分。
提示:根据安装在打印机中色带的类型,打印颜色为自动检测和
设置。
提示:参阅 Rimage AutoPrinter 用户指南,以了解有关完全打印选
项的更多信息。
10.选择 OK(确定)(Locate Device Settings) 保存更改并关闭设备设置
窗口。
2. Locate Print Properties(访问打印属性)。请参阅第 9 页。
3. 选择 Device Settings(设备设置)选项卡。
4. 选择 Halftone Setup Properties(Halftone 设置属性),以更改
颜色强度、色彩平衡或模式设置。
2002605_A
如需更多信息,请访问 rimage.com/support
13
设置打印首选项
选通设置
选通设置控制打印像素时使用能量。较高设置会耗费较多能量。在设置
提高时,图像密度更高,打印头使用寿命缩短。Rimage 建议使用能够
提供预期图像质量的最低选通设置。
附注:
• Rimage 品牌介质有多种推荐设置。
• 这可能需要对光盘进行多次测试打印,以微调色调。将 Enable
Color Sub-Strobes(启用彩色副选通)设置为 Enabled(启用),
以降低个别颜色的打印选通。例如,在尝试消除打印光盘上的晕轮
效应时,可以用这种设置来降低黄色打印选通设置。
1. 访问 Print Properties (打印属性)。请参阅第 第 9 页 页。
2. 选择 Device Settings(设备设置)标签。
3. 设置 Master Print Strobe(主打印选通)。
注:Rimage 建议 Rimage 品牌介质应使用以下设置:
• 介质表面:热打印介质
• 黑色色带的打印选通设置:325 - 400
• 红色色带的打印选通设置:375 - 425
• 蓝色色带的打印选通设置:350 - 400
4. 选择 Enabled(启用)以启用彩色副选通
重要事项!彩色副选设置仅适用于 CMY 色带。
5. 选择 OK(确定)保存更改并关闭设备设置窗口。
2002605_A
如需更多信息,请访问 rimage.com/support
14
维护 Prism III 打印机
使用本部分中的信息让您的 Prism III 打印机处于最佳操作状态。
概述
对您的 Prism III 打印机进行一般预防性维护可以帮助您生成清楚的打
印标签。维护也包括清洁系统。
告诫信息
nn注意事项:为了防止在维护过程中损坏 Prism III 打印机:
• ·切勿在 Prism 的任何部件上使用油、硅酮或其它润滑剂。
• ·仅使用非磨蚀性的清洁用品来擦拭 Prism 打印机的表面。
• ·避免将清洁剂直接倾倒在 Prism 打印机上。而应该将清洁剂
涂在不掉毛的布片上。
工具
任务
频度
说明
• 不掉毛
的布
清洁打印
机外部。
每周
1. 关闭 Prism 电源。
2. 断开电源线连接。
3. 擦拭打印机的外表面。
更换打印
色带。
单色黑:
2100 片光盘
单色红:
2100 片光盘
单色蓝:
请参阅第 18 页的更换
打印色带部分。
• 非磨蚀
性通用清
洁剂
• 新打印
色带
2100 片光盘
3 色面板
(CMY):
500 片光盘
预防性维护时间表
使用以下时间表作为指南,以了解进行预防性维护任务的频率。
重要事项!不遵守右侧列出的维护时间表可能使您的保修失效。
打印头清洁
工具包
2002605_A
清洁打
印头。
如需更多信息,请访问 rimage.com/support
每次更换色带时或
根据需要清洁
请参阅第 16 页的清洁
打印头部分。
15
维护 Prism III 打印机
清洁打印头
在每次更换色带时清洁打印头,或如果开始出现条纹或者色带已经磨
损,便应提高更换清洁打印头的频率。
有两种方式可以清洁 Prism III 打印头 - Prism 清洁工具包和使用替代
方式。当无法使用清洁工具包时便可以选择替代方式。此部分针对这两
种方式提供说明。
注:如果 Prism 打印机与 autoloader 或 AutoPrinter 相连,在您开始
清洁程序之前将打印机中从系统中拆除会使程序简单得多。
• 关闭打印机的电源。
• 拆下打印机背面的所有电线电缆。参阅第 6 页的 识别 Prism 打
印机部件部分。
• 从系统中拆下打印机,并将其放在一个平整、靠近电源插座的地
方。
• 将打印机背面的电源线连接到电源插座。
使用 Prism 清洁工具包清洁 Prism III 打印头
2. 开始清洁模式。
a. 按压并按住 operator button(操作员按钮),同时按电源开关
以打开 Prism 的电源。
b. 当光盘不存在指示灯(操作员面板上的第二个指示灯)闪烁时,
放开 operator button(操作员按钮)。打印机托盘将打开。
当操作员按钮和光盘不存在指示灯(控制面板最上边的两个指
示灯)开始快速闪烁时,打印机便已处于清洁模式。
3. 准备清洁垫。
注:清洁垫附于 Prism 清洁工具包内。
a.
b.
c.
d.
从清洁垫背面取下粘合底布。
将清洁垫贴在光盘的顶部。
确保清洁垫的边缘和光盘对齐。
将贴有清洁垫的光盘放在打印机托盘上。确保光盘与打印机托
盘的定位销对齐。
e. 按下清洁垫,使其超过打印机托盘上的传感器。
f. 在清洁垫上滴 5 滴异丙醇。
如果您有清洁工具包,按照以下程序来清理打印头。
## 所需工具:
• Prism 清洁工具包(PN 210555-001)
• 一张光盘
• 99% 异丙醇
• 棉签
1. 准备 Prism 以进行清洁。
a. 关闭 Prism 电源。
b. 卸下顶盖。
c. 卸下色带。请参阅第 18 页的更换打印色带部分。
2002605_A
如需更多信息,请访问 rimage.com/support
压下清洁垫,并超过传
感器
贴有清洁垫的光盘
打印机托盘
16
维护 Prism III 打印机
4. 清洁打印头。
a. 按 operator button(操作员按钮)以关闭打印机光盘,并开
始清洁循环。在完成清洁循环后,打印机托盘会打开。
b. 如果需要,重复步骤 a 以再次开始清洁循环。
c. 在打印头清理完毕后,从打印机托盘上取下贴有清洁垫的光盘。
前色带导辊
清洁垫
清洗液
5. 清洁前面
两个色带导辊。
a. 将异丙醇蘸到干净的棉签上。
b. 沿着色带导辊用棉签擦拭清洁。
6. 准备 Prism 以供使用。
a. 关闭再开启电源开关,以退出清洁模式并重置打印机。
b. 卸下色带。请参阅第 18 页的更换打印色带部分。
c. 如果您从 autoloader 或 AutoPrinter 上拆下打印机,将打印机
放在系统内,并连接所有电缆和电线。参阅第 6 页的 识别
Prism III 打印机部件部分。
清洁打印头 - 替代方式
如果没有清洁工具包,按照以下程序来清理 Prism 打印头。
## 所需工具:
• 99% 异丙醇
• 棉签
1. 准备 Prism III。
a. 接通 Prism III 的电源。
b. 按压 operator button(操作员按钮)以打开打印机托盘。
c. 关闭 Prism III 电源。
d. 卸下顶盖。
e. 卸下色带。请参阅第 18 页的更换打印色带部分。
2. 清洁打印头。
a. 将异丙醇蘸到棉签上。
b. 将棉签插入抽屉开口处。
c. 向上抬起棉签,并沿着打印头的凸面擦拭。
打印头的凸面
注:如果托盘上打印垫在清洁时被弄湿,在使用 Prism 前必须
让打印垫彻底干燥。
重要事项!如图所示的打印头底部标明了需要清洁的区域。切勿从打印
机上拆下打印头。
2002605_A
如需更多信息,请访问 rimage.com/support
17
维护 Prism III 打印机
3. 清洁前面两个色带导辊。
a. 将异丙醇蘸到干净的棉签上。
b. 沿着色带导辊用棉签擦拭清洁。
4. 在打印头上的酒精干燥之后,准备好 Prism 以供使用。
a. 安装色带。请参阅第 18 页的更换打印色带部分。
b. 如果您从 autoloader 或 AutoPrinter 上拆下打印机,将打印机放
在系统内,并连接打印机背面的所有电缆和电线。参阅第 6
页的 识别 Prism 打印机部件部分。
d. 抬起进给辊,以将其拆下。
注:如果您要更换色带,现在便是清洁打印头的良好时机。请参阅
第 16 页的清洁打印头部分。
2. 装载打印色带。
a. 将打印色带滑到进给辊中。
b. 将纸板核的两个凹槽与进给辊上的金属销对齐。
更换打印色带
打印色带
重要事项!Prism III 打印机仅可以操作正品 Rimage 色带。
纸板核
Rimage 只支持在我们的打印机上使用 Rimage 品牌的色带。因使用非
Rimage 生成的色带导致的打印机问题不在 Rimage 保修或维护协议范
围内。
提示:如果存放色带的环境与存放打印机的环境大不相同,留出一定时
间以使二者适应新的环境。温度和/或湿度差越大,所需时间越长。
1. 进入色带区域。
a. 打开 Prism 电源。
b. 从打印机上拆下
顶盖。
c. 抬起收紧辊,以便
使带齿轮的一段首
先露出,然后将收
紧辊抬出打印机。
凹槽
金属销
进给辊
c. 按压 operator button(操作员按钮)以关闭打印机托盘。
d. 从进给辊上剥下色带牵引带。
e. 滑动色带导辊下的色带牵引带,使其进入色带安装架内。
色带安装夹
收紧辊
进给辊
打印机托盘
2002605_A
色带导辊
如需更多信息,请访问 rimage.com/support
色带牵引带
18
维护 Prism III 打印机
3. 根据图示安装进给辊。在色带牵引带上留下一些空余空间。
a. 按 operator button
(操作员按钮),直
至打印机托盘出来
为止。色带会穿到
Prism 的前方。
b. 从安装夹上取下色带
牵引带。
进给辊
c. 从色带牵引带上取下
粘合带。
4. 装载收紧辊。
a. 将新的空纸板核放在收紧辊上。其设计为仅适合一侧。
b. 如图所示,将收紧辊放于色带牵引带的顶部。
重要事项!齿轮必须位于正确的一侧。
齿轮
c. 向上拉色带牵引带,使
其超出纸板核。
d. 将粘合带粘到纸板核
心,让色带牵引带的边
缘对齐纸板核心的边
缘。
e. 滚动色带牵引带,让它
只在辊子上缠绕一次。
重要事项!使用单色色带时,不要卷过牵引带上标注了 STOP
- Wind Leader Onto Take-up Core Stopping Here(停止
- 收紧辊核上的缠绕牵引带在此处停止)的地方。如果您使用
CMY 色带,卷起直到黄色牵引带的末端。
纸板核
色带牵引带
粘合带
2002605_A
如需更多信息,请访问 rimage.com/support
19
维护 Prism III 打印机
5. 在 Prism 上安装收紧辊,按压紧实,直至收紧辊被压紧到位为止。
色带应缠绕紧密,并且色带上没有褶皱。
色带牵引带
标记
收紧辊
重要事项!不要将色带牵引带上标注了 STOP - Wind Leader
Onto Take-up Core Stopping Here(停止 - 收紧辊核上的缠绕
牵引带在此处停止)的地方缠绕到收紧辊上。标志不应超过图片中
标明的点位置。如果标志位于辊上,将收紧辊拉出,并向后卷动色
带。向后滚动进给辊以收紧松弛部分。
6. 按 operator button(操作员按钮),并保持 5 秒,以允许打印机
检验色带。如果色带已经校验,打印机会前进,并且错误指示灯会
停止闪烁。
注:在色带校验过程中,色带会缠绕过色带牵引带。在完成色带校
验程序之后,确保色带已经缠绕紧密。
7. 安装顶盖。
2002605_A
如需更多信息,请访问 rimage.com/support
20