1
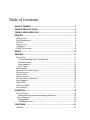
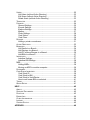
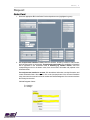
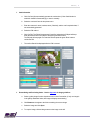
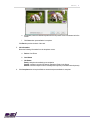
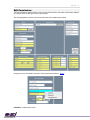
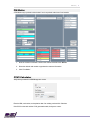
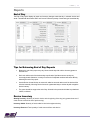
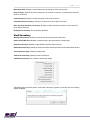
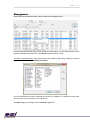
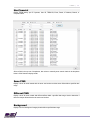
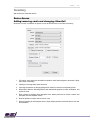
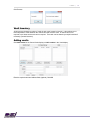
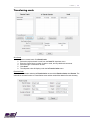
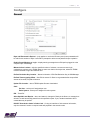
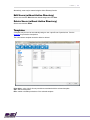
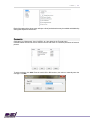
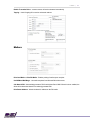
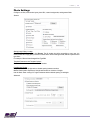
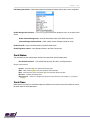
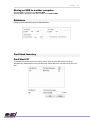
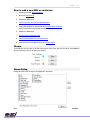
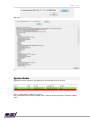
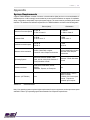
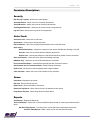
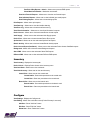
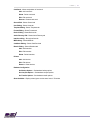
TRISM IV User Manual Version 4.3.2006.086 1212 Royal Parkway Euless, TX 76040 817.494.9300 • www.demoteller.com Table of Contents WHAT IS TRISM IV? ........................................................................................ 1 TRISM IV DESKTOP ICONS ........................................................................... 2 TRISM IV USER INTERFACE .......................................................................... 2 REQUEST ........................................................................................................ 3 ORDER CARD .................................................................................................. 3 EDIT PERMISSIONS .......................................................................................... 6 RE-PIN .......................................................................................................... 7 READ A CARD.................................................................................................. 8 PIN MAILER .................................................................................................... 9 CVV2 CALCULATOR ........................................................................................ 9 QUEUE ........................................................................................................... 10 REPORTS ...................................................................................................... 11 END OF DAY .................................................................................................. 11 Tips for Balancing End of Day Reports .................................................... 11 Device Inventory ...................................................................................... 11 Vault Inventory......................................................................................... 12 Spoil Cards .............................................................................................. 13 MANAGEMENT ............................................................................................... 14 HISTORICAL CARD BALANCING ....................................................................... 16 DEVICE ACCESS ............................................................................................ 16 SPOILED CARD .............................................................................................. 16 BRANCH ACTIVITY.......................................................................................... 16 DEVICE ACCESS CARDSTOCK ......................................................................... 16 NON-FINANCIAL ............................................................................................. 17 SAME PINS .................................................................................................. 17 DIFFERENT PINS .......................................................................................... 17 BACKGROUND ............................................................................................... 17 INVENTORY ................................................................................................... 18 DEVICE ACCESS ............................................................................................ 18 Adding/removing cards and changing ribbon/foil ..................................... 18 VAULT INVENTORY ......................................................................................... 19 Adding vaults ........................................................................................... 19 Transferring cards ................................................................................... 20 CONFIGURE .................................................................................................. 21 GENERAL ...................................................................................................... 21 USERS .......................................................................................................... 22 Add Users (without Active Directory) ....................................................... 22 Edit Users (without Active Directory) ....................................................... 23 Delete Users (without Active Directory) ................................................... 23 TEMPLATES ................................................................................................... 23 FORMATS ...................................................................................................... 24 General Settings ...................................................................................... 25 Encode Settings ...................................................................................... 25 Emboss Settings...................................................................................... 26 Mailers ..................................................................................................... 27 Photo Settings ......................................................................................... 28 Card Status.............................................................................................. 29 Card Class ............................................................................................... 29 DEVICES ....................................................................................................... 30 Adding a printer or embosser .................................................................. 31 ACTIVE DIRECTORY ....................................................................................... 33 BRANCHES .................................................................................................... 34 Add Vaults to a Branch ............................................................................ 34 Add Devices to a Branch ......................................................................... 36 Add PC’s/Users/Ranges to a Branch ....................................................... 36 Add BINs to a Branch .............................................................................. 37 INTERFACES .................................................................................................. 37 Interface Settings..................................................................................... 37 Interface BIN Settings .............................................................................. 38 MSR ............................................................................................................ 38 Adding MSRs........................................................................................... 38 Moving an MSR to another computer: ..................................................... 39 DATABASES .................................................................................................. 39 CARD STOCK INVENTORY ............................................................................... 39 Card Stock ID .......................................................................................... 39 Card Stock to BIN .................................................................................... 40 Card Stock to Vault/Device ...................................................................... 40 How to add a new BIN or cardstock ........................................................ 41 THEME.......................................................................................................... 41 QUEUE SETUP............................................................................................... 41 HELP .............................................................................................................. 42 ABOUT .......................................................................................................... 42 SUPPORT DOCUMENTS .................................................................................. 42 DATA LOG ..................................................................................................... 43 ERROR LOG .................................................................................................. 44 CLIENT INFORMATION..................................................................................... 44 LICENSE ....................................................................................................... 44 SYSTEM STATUS ........................................................................................... 45 APPENDIX ..................................................................................................... 46 SYSTEM REQUIREMENTS ................................................................................ 46 CARD LAYOUTS ............................................................................................. 47 CUSTOM IMAGE GUIDELINES........................................................................... 48 PERMISSION DESCRIPTIONS ........................................................................... 49 What is TRISM IV? TRISM IV is the latest card issuance suite developed by DemoTeller Systems, Inc. This unique hardware and software system provides all the tools needed for the creation and distribution of financial cards of any kind. Initially introduced in the late 1990’s, TRISM provides instant and central issuance of Visa® and Mastercard® credit and debit cards to financial institutions worldwide. TRISM works seamlessly with the PCI-certified and listed Hardware Security Module (HSM) to ensure complete privacy of cardholders’ information. From centrally issued, pre-printed cards to customer created cards available for immediate use, TRISM IV boasts the versatility to meet any institution’s most specific demands. P A G E TRISM IV Desktop Icons TRISM Manager HSM Manager Pick-Ur-Kard Server Print Controller TRISM IV User Interface 3 1 2 4 1. Main toolbar – clicking each item displays a dropdown menu 2. Quick-launch toolbar 3. System status lights – displays the status of services. Mouse-over each light to display the service it indicates. Green = status table in database is running Red = status table has not been updated in the number of minutes specified in General Configure menu 4. Dual Control Login – some TRISM features require dual control login. A user with the appropriate permissions other than the one currently logged in must enter their login credentials to access these features. | 2 P A G E | 3 Request Order Card 1. Select the appropriate BIN in the Select Product dropdown menu (highlighted in green) 2. If a core/processor interface is used, select the interface, search by member or card number, and enter the member or card number. If searching by card number, the cardholder’s information will be populated in the information fields. If searching by member number, select the corresponding account in the bottom menu, then the account’s information will populate in the information fields. If a core/processor interface is not used, fill in the address information, security information, and contact information fields. After step 3a, click on the Accounts button in the Account Information menu, then enter the customer’s account number and ChkSavDesignator. One account must have the Primary box checked. ChkSavDesignator Values D = checking S = savings P A G E | 4 3. Card Information a. Click Get Card # to automatically generate the card number (if Auto Card Number is enabled in the BIN’s format settings), or enter it manually. b. Select the card stock from the drop down menu. c. Enter the customer’s name, business name (if desired), and the card’s expiration date, if not automatically generated. d. Select the PIN method. e. Click Get PIN. The PIN will be generated if specified, otherwise the PIN pad will beep. Enter the desired PIN on the PIN pad. Press the green Enter button. The PIN pad will beep again. Re-enter the PIN and press the green Enter button to confirm the PIN. f. The card’s offset will be displayed after the PIN is entered. 4. Personalizing and Previewing Cards – See the Appendix for image guidelines a. Select a gallery image from the dropdown menu or click Personalize. (If only one image is in the gallery destination folder, that image will display automatically.) b. Click Browse and navigate to the folder containing the custom image. c. Select the image and click Open. d. To crop the image, click and drag an area on the image on the left. P A G E | 5 e. If applicable, select the desired template from the drop down menu in the bottom left of the screen. f. Click Save when personalization is complete. Click Back to preview the back of the card. 5. Job Information Select the following information from the dropdown menus: a. Device: Card Printer b. Card Status c. Job Status: Ready: card prints immediately upon completion Paused: card does not print until state is changed to Ready in the Queue Manual: card does not print until it is manually fed into printer (not available with all printers) 6. Click Complete when all required fields are entered and personalization is complete. P A G E | 6 Edit Permissions The Edit Permissions window allows a user to make certain fields in the Order Card window editable or required. Select a card type to edit its permissions. The field highlighted in yellow in the screenshot below have editable permissions. Change the colors of Editable, Required, and Single Required fields in Theme. Is Editable - enables input of text P A G E | 7 Is Required – field must be filled to complete request Is Single Required – one out of all Single Required fields per panel must be filled in. Example: In the Security Information panel, Mother’s Maiden Name, SS#/Tax ID, and Driver’s License are single required, so one of these three fields must be completed to process the request. Re-PIN A dialogue box will prompt you to swipe the card to re-PIN. If card readers are not used or the card is not available, close the Swipe Card message and enter the customer’s information. Select the PIN method, enter or generate the PIN, and click Complete. P A G E Read a Card Swipe a card to display its track data (card number, format code, expiration date, etc.) | 8 P A G E PIN Mailer A PIN Mailer may be printed in this window if one is not printed at the time of card creation. 3 1. Enter the customer’s member number in the Search Criteria and click Search. 2. Select the desired card number to populate the customer information. 3. Click “Print Mailer.” CVV2 Calculator Verify the keys entered in HSM Manager are correct. Enter the BIN, card number, and expiration date of an existing card and click Calculate. If the CVV2 on the card and the CVV2 generated match, the keys are correct. | 9 P A G E | 1 0 Queue The queue displays all cards that have been ordered and have not yet printed. Double-clicking an item in queue will display the Card Information: Change job status: ready photo, paused photo, manual photo, or card verified. Delete a card in the queue by selecting it and pressing the Delete key on your keyboard. If a Card Information window is open at another workstation or branch, the card cannot be printed, deleted, or changed. Click Purge Requests to close all Card Information windows. P A G E | 1 1 Reports End of Day The End of Day report displays all cards and inventory changes made that day in selected devices and vaults. The table with the headers “BIN” and “Amount” show the quantity of each card type issued that day. Tips for Balancing End of Day Reports Balance the end-of-day report every day. Never start the day with a device inventory greater or less than zero. Don’t wait until the end of the business day to spoil cards. Spoil them as soon as they are incorrectly printed. Otherwise, it is easy to lose track of misprinted cards and will cause difficulty balancing the end of day report. Use the Device Access function to account for added or removed cards even if the device will be unlocked manually. Not using Device Access is a guaranteed way to end the day with a negative device inventory. The queue should be empty at the end of day. All cards in the queue should either be printed and verified, or deleted. Device Inventory Starting Inventory: Quantity of cards in device at the beginning of the day (only greater than zero if cards are not removed at end of previous day) Inventory Added: Quantity of cards added to device throughout the day Inventory Removed: Total quantity of cards removed from vault device P A G E | 1 2 Manually Added: Quantity of cards added manually during the order card process Used Inventory: Quantity of cards not destroyed or returned to inventory; successfully printed cards issued to customers Cards Destroyed: Quantity of cards destroyed in the Spoil Card menu Cards Returned to Inventory: Quantity of cards returned in the Spoil Card menu Other Cards Removed from Inventory: Quantity of cards removed from device not accounted for by the Spoil Card menu Ending Device Inventory: Sum of the above quantities Vault Inventory Starting Vault Inventory: Quantity of cards in vault since last processed end-of-day Vault Inventory Received: Quantity of cards received in the Vault Inventory Transfer page Removed to Device(s): Quantity of cards added to devices in Device Access Returned from Device(s): Quantity of cards removed from devices via Device Access and returned to vault Current Vault Inventory: Quantity of cards in vault Total Cards in Device(s): Quantity of cards in all devices Total Branch Inventory: Sum of cards in devices and vault(s) If the Ending Device Inventory and/or Total Cards in Device(s) is greater or less than zero, the following window will appear: P A G E | 1 3 Click Yes to process End-of-Day. Click No to return to the End-of-Day Report screen. Spoil Cards A misprinted card that cannot be issued is considered “spoiled.” A spoiled card will be highlighted in red. Right-click a card in the End of Day report to display the following menu: Select Spoil This Card to display the following window: Enter a description of the spoiled card and the reason for spoilage. Select from the following options: Return to Inventory – the card was ejected clean/unencoded, and can be used again. Will add 1 back into Vault Inventory. Card Successful - the card did print, or a card was accidentally printed. Subtracts 1 from Vault Inventory. Card Destroyed - the card was damaged during printing, or was destroyed after. Subtracts 1 from Vault Inventory. Click OK when finished. Spoil Other If inventory needs adjusting without the need to spoil a printed card, this can be achieved through selecting Spoil Other. Right click anywhere in the field where printed cards will appear, and select Spoil Other. The same process as a regular spoil applies. To add a card back to the Vault Inventory, select Return to Inventory or Card Successful. To subtract a card from the Vault Inventory, select Card Destroyed. P A G E | 1 4 Management Reports with user-specified information may be created in the Management tab. Select the Start Date and End Date to specify a range of cards to display. The Start Date should be set one day prior to the date of card verification. Click Search to populate the list of cards. To create a customized report: Select which columns are printed by right clicking anywhere in the card information field and selecting Add/Remove Columns. Check the desired boxes to select or deselect the columns to be displayed. To change the column order, select a column name and click the up or down arrows. Click Save to apply your changes, then click Search to apply them. P A G E | 1 5 To filter columns: Select a column field from the first Filter dropdown menu. Enter the filter criterion in the field below (only one criterion per filter). Filters must match the intended field name exactly. Only one filter field is enabled initially. Following filters will be enabled once preceding filters are designated. Click Search to apply the specified filters. To view card information: Right click a card and select Details. P A G E | 1 6 Historical Card Balancing Reports summarizing cards printed per branch, device, card stock, and/or operator can be printed in the Historical Card Balancing menu. Sample Sample Sample Sample Select a date range, branch, vault, device, and/or product in the dropdown menus to filter by and click Search to generate the historical report. Reset Date/Time – change start and end dates to current date Device Access Display a list of all Device Access activity for a specified printer/embosser within a specified date range. Spoiled Card Create a report of all spoiled cards for a specified branch within a specified date range. Branch Activity Create a report of all cards printed at the branch in which the workstation creating the report is located. Device Access Cardstock Display a list of all Device Access activity for a specified printer/embosser and card stock within a specified date range. P A G E | 1 7 Non-Financial Display TRISM activity per PC Operator, User ID, TRISM ID, Event, Result, IP Address, Branch, or Computer Name. Select a field in the top row of dropdowns, then select or manually enter search criteria in the dropdown below it. Click Search to display results. Same PINS Display a list of all cards created with the same card number and the same offset within a specified date range. Different PINS Display a list of all cards created with different offsets within a specified date range. Used to determine if there are multiple offsets linked to the same card number. Background Display a list of all background images printed within a specified date range. P A G E | 1 8 Inventory Add card stock to vaults and devices. Device Access Adding/removing cards and changing ribbon/foil Each time a printer or embosser is opened, it must be accounted for in the Device Inventory. 1. The branch, vault, and device will default to whatever values were assigned to the branch. Select other values if necessary. 2. If adding or removing cards, select card stock. 3. If opening an embosser to change topping and/or indent foil, check the corresponding boxes. 4. Select Add or Remove. Selecting Remove will automatically generate a reason, description, and number of cards. 5. Enter a reason for opening and a description of the actions performed, or choose a reason and description from the dropdown menus. 6. Enter the quantity of cards to add or remove, if any. 7. Select a time delay for unlocking the device. Longer delays should be used if the device is not near the workstation. P A G E | 1 9 Click Process. Vault Inventory Vault Inventory shows the number of cards in each vault (central or branch). It also allows you to track shipments of cards between the central vault and a branch vault. A central vault is not required, but at least one branch vault is required. That vault can be shared by multiple branches if necessary (Central Issuance). Adding vaults Click Add Central in the Central Vault display or Add Location in the Vault display. Enter the required name and address fields (optional). Click OK. P A G E | 2 0 Transferring cards Sent Cards 1. Select a central vault. Click Send Cards. 2. Select the recipient branch’s vault from the Send To dropdown menu. 3. Enter the Carrier Name, number of cards to send, and any additional comments. 4. Select the type of cards stock to send. 5. Click Send. 6. The shipment order will display under the In-Transit Carrier menu. Received Cards Select the received order under the In-Transit Carrier menu and click Receive Cards, then Process. The order will be removed from the In-Transit Carrier menu and the cards will be added to the vault inventory. P A G E | 2 1 Configure General Days until Password is Expired – (only applies to non-Active Directory users) user passwords will be valid for this number of days. Users will be prompted to select a new password upon expiration Enable Pinpad Warning on Login – display warning message that no PIN pad is plugged in to the computer upon TRISM login Minutes before Lockout – after the specified number of minutes, user must re-enter login credentials to continue using TRISM. Must be same user that is currently active, otherwise TRISM must be restarted to login as a different user. Pin Pad Derivation Key Location – Numerical location of PIN Pad Derivation Key in HSM Manager Pin Pad Timeout getting Offset – after PIN is entered: if offset is not generated after the specified amount of seconds, PIN pad will timeout Update File Location – where TRISM update files are downloaded Citrix Per User – select port if assigned per user Entire System - select port if assigned for entire system PIK – Thost PIK Allow Spoilable and Reprint – when card status is changed to Ready in the Queue, a message box will ask if a card has already printed from the specified request. If yes, another transaction will be created that may be spoiled. DO NOT Show Active Cards in Order Card – If using an interface to find customer information, only the customer’s inactive or expired cards will populate in the search results. P A G E | 2 2 Users The following user configuration is not used when Active Directory is enabled, except for the administrative users access1, installer1, and installer2. Print Rights – print a list of all the selected user’s template permissions Print User Template – print a list of all TRISM users and their corresponding templates Reset All Passwords – all users must choose a new password upon login Add Users (without Active Directory) Click Add, and enter the user ID, Name, and select a template. Click Save. New User Password Selection When the new user logs in, they must use the default password 1234567. When Login is clicked, a window will open prompting the user to change their password. All passwords must be at least 8 characters long and include at least three of the following: capital letters, lowercase letters, numbers, and special characters (!@#$%^&*). Enter the new password in the provided fields and click OK. The user must then enter their new password in the login screen. P A G E Alternatively, users may be entered using the Active Directory function. Edit Users (without Active Directory) Select a user and click Edit. Make the desired changes and click Save. Delete Users (without Active Directory) Select a user and click Delete. Templates A template may be used to automatically assign a user a specific set of permissions. See the Appendix for permission descriptions. The administrator template cannot be edited or deleted. Print rights – print a list of all user permissions associated with the selected template Add – add new templates Edit - enable or disable permissions of the selected template | 2 3 P A G E | 2 4 Each of the options in the above menu will open a list of permissions that may be enabled and disabled by clicking their respective check boxes. Formats Card types (e.g. Mastercard, Visa, Visa EMV, etc.) are added in the Formats menu. Card and mailer formats can also be edited in the Formats menu to customize placement of text and pictures. To add a card type, click Add. Enter the card’s ISO or BIN number, then select or manually enter the card type. Click OK. P A G E | 2 5 General Settings The following menus are displayed by selecting a card type and clicking Edit. BINs cannot be added to branches until their formats are completed. Print Report for Every Queued Transaction – all transactions sent to the queue will print a hard-copy report to the printer selected in the dropdown Additional Transaction Report Directory – all items in the selected folder will be printed in addition to transaction reports Encode Settings The Encode Settings determine the information and placement of information written to the cards’ magnetic stripe. Track 1/Track 2 Layout To edit these settings, double-click the field to be changed to display the following window: P A G E | 2 6 Click OK when editing is completed. Track 1/Track2 Parameters Auto Card Number Card numbers may be generated automatically by TRISM in the Auto Card Number menu. Check the Enable Auto Card Number Generation box to edit card number settings. Beginning Card Number – first card number used Current Card Number – last card number printed Increment By – determines what increment card numbers increase by Allow Name Change – allows modification to an existing customer’s name Emboss Settings Enter the size of the indentation applied to text on the card. Check Use Masking to hide certain lines of text from displaying on the Order Card window when cards are being created. P A G E | 2 7 Disable Truncation Rules – customer names will not be shortened automatically Topping – check if topping foil is used on embossed card text Mailers Print Card Mailer or Print PIN Mailer - Enables printing of mailers upon card print. Use MSWord Mail Merge - Use mailer templates from Microsoft Word documents. Calc Natural PIN - Automatically generate a PIN for which the offset is 0000. When this is not enabled, the offset will be determined based on a randomly generated PIN. Print Return Address - Include the branch’s address on the PIN mailer. P A G E | 2 8 Photo Settings Configure .xml files, card number layout, photo ID’s, custom backgrounds, and signature fields. General Setting Image Gallery Location By the Template Directory Field, click Browse. The file location should be accessible to every user. It is recommended the image gallery is saved in a folder with a name matching the BIN, within the specified card type folder. For example: \\Server Name\Images\Card Type\BIN Template Parameters and Template Options Check the fields that the card format .xml file contains. Card Number Printing No Spaces: Select for 18-digit cards to disable spacing between numbers Masked Card Number: Separate a 16-digit card number into 4 blocks of 4 digits Use Alt. Mask: Enter a string of “#” signs consistent with the desired spacing of card digits. Advanced P A G E | 2 9 File Naming Convention – select which cardholder information indicator will be used to name image files Enable Background Selection – enable the gallery card selection dropdown menu in the Order Card screen Enable Custom Backgrounds – show the Personalize button in the Order Card screen Custom Background Search Path – folder in which custom backgrounds will be saved Enable Photo ID – show Take Photo button in the Order Card screen Enable Signature Capture – show Signature button in the Order Card screen Card Status The card status for each format will be chosen in the Order Card Job Information panel. Use Default Selection – Use default statuses New, Re-Issue, and Replacement Sample card statuses: Instant - activates card and updates offset/exp.date Mail - adds skeletal card record and updates offset/exp.date New - adds skeletal record, activates card, and updates offset/exp.date Re-Issue - updates offset/exp.date Replacement - makes no changes and doesn't communicate any new data (i.e. just prints a card) Card Class When there is more than one card class assigned to a BIN, the card class for each format will be chosen in the Order Card Job Information panel. P A G E | 3 0 HOW TO ADD A CARD CLASS TO A BIN 1. Click Add and enter the card class name. Click OK. 2. Navigate to the BIN’s template directory in Windows Explorer and create a folder with a name exactly matching the card class name. 3. Add the desired images the card class folder, and xml’s if using different xml’s for each image. 4. If another BIN will use the same card class, copy the card class folder and paste it inside of the other BIN folder. It is important that each card class folder is updated when the contents of one are modified. 5. Devices The Devices tab displays a list of all printers and embossers configured with TRISM. Each device must be licensed. See Help>License for instructions on adding a device license. After the license is added, click Rebuild Devices. P A G E | 3 1 Adding a printer or embosser Skip to step 10 if using an embosser. 1. Install the printer according to manufacturer instructions. 2. Open the DSI Print Service Controller located in C:\Program Files\Demoteller. 3. Select the internal IP address (IP computer being used is on) 4. Enter the port assigned to the printer 5. Check Enable 6. Select the printer from the Installed Printers dropdown menu 7. Unless otherwise recommended, keep the Startup Delay at 0 seconds 8. Select the printer type from the Printer Properties dropdown menu. If your printer type is not listed, select “Other”. 9. Click Print Size. Set the length and width to 6, then click OK. Do not change the Card Size unless otherwise specified. 10. Click Save Settings, then exit. 11. In the TRISM 4 Devices window, click Add. P A G E | 3 2 12. If the printer will be accessed via network or wireless connection, select Network. 13. Enter the printer’s name, IP address, port, and type (photo printer, embosser), name of EMV encoder (if EMV chip cards are being printed), and UNC path of the card mailer printer (if applicable). 14. If an embosser is being used, select the desired options from the Options menu: Secure Mode: enter embosser’s data encryption key to encrypt information sent to embosser Extended Errors: View a detailed log of any embosser errors Topper: Check if a foil topping will be imprinted on card numbers and names Auto Verify: After a card is printed, it will be verified that is has printed correctly automatically. This is recommended when printing large quantities of cards. Read First: If a printer encodes information on a card’s magnetic stripe prior to embossing, checking Read First enables the embosser to use that information to determine what is embossed on the card. 15. When all required information has been added, click OK. An unlicensed device will be highlighted in red. Select the device from the Devices list and click License Device. A licensed device will be highlighted in blue. 16. Click Rebuild Devices after adding, deleting, or changing a device. P A G E | 3 3 Active Directory All users part of a network’s Active Directory may be automatically entered in TRISM. If Active Directory is enabled, usernames and passwords cannot be changed using TRISM IV. The computer in use must be part of a domain, not a workgroup. If the computer is part of a workgroup, do not change any active directory settings. When Active Directory is enabled, the only non-active directory logins that may be used are: Access1 Installer1 Installer2 Check the Enable Active Directory box. TRISM IV will automatically search for and enter the domain name. Click Get Domain Groups to display all groups in the Users window. Select a group in the Users window and choose a template from the dropdown menu. Click Set to save the template to the selected domain group. The domain group selected will appear in the Template Group field. P A G E | 3 4 Branches Each branch must be licensed. See Help>License for instructions on adding a branch license. Select an unlicensed branch highlighted in red and click License Branch. A licensed branch will be highlighted in blue. Add Vaults to a Branch 1. Select a branch and click Edit. 2. Click Add under the list of vaults. P A G E | 3 5 3. Click Add New. Dual control is enforced for accessing vaults, so a second user must enter their login credentials. 4. To add a central vault (vault in which inventory is usually stored for distribution to branches), click Add Central. To add a non-central vault (no inventory will be taken from a non-central vault and sent to other branches), click Add Location. 5. Enter the vault’s name and location, then click OK. 6. To add card stock to a vault, select the vault and click Add. 7. Select the card stock to add, enter the quantity of cards, and any comments as required by your financial institution. Click Add. 8. The vault inventory will be updated. P A G E | 3 6 Add Devices to a Branch 1. Click Add under the list of devices. 2. Select an existing device and click OK, or Click Add New to set up a new device (see Adding a printer or embosser) Add PC’s/Users/Ranges to a Branch The following procedure to add users is only used when Active Directory is enabled. 1. Click Add under the PC’s/Users/Ranges list 2. Select the method and enter the PC Name, IP Address/Range, or User Name, then click OK. P A G E | 3 7 Add BINs to a Branch Prior to adding BINs to a branch, they must be set up in Formats. The following procedure is only used if different branches use different BINs. If all branches use the same BINs, do not add BINs to any branches. When the BINs list below is blank, the branch will automatically display all BINs when ordering a card. 1. Click Add under the BINS list 2. Select a BIN and click OK. Interfaces Interface Settings Interface settings and values will be determined by each individual interface and generally not edited by financial institution personnel. P A G E | 3 8 Interface BIN Settings Interface BIN settings determine what actions may be performed by each BIN. Interface BIN settings and values will be determined by each individual interface and generally not edited by financial institution personnel. MSR Magnetic stripe readers (MSRs), if used, must be licensed and linked to PIN pads. Adding MSRs Follow the instructions for adding a license in Help>License. Click Test/Find MSR. The MSR will appear on the table highlighted in red. Select the MSR and click License MSR. The MSR will now be highlighted in blue. P A G E | Moving an MSR to another computer: Select the MSR to remove and click Release MSR. When the MSR is plugged in to the new computer, click Test/Find MSR. Databases Change compact and backup options for SQL databases. Card Stock Inventory Card Stock ID To add different card stocks to the inventory menus, enter the new card stock’s ID (may be alphanumeric) and description in the provided fields. Check EMV if the card has a chip, then click Add. 3 9 P A G E | 4 0 Card Stock to BIN To set the BIN number to be printed on each card stock type, select the desired card stock in the drop down menu. Select the BIN in the drop down menu, then click Add. Card Stock to Vault/Device Track the addition of certain card types to printers and embossers. Select the vault that contains the card stock to be added, then select the card stock from the drop down menu. Select the printer or embosser in which card stock will be added. Select the card stock’s default state/status. Unless modified in Formats>Cardstatus, the default selections will be listed: Ready: card prints immediately upon completion Paused: card does not print until state is changed to Ready or Manual in the Queue Manual: card does not print until it is manually fed into printer (not available with all printers) Click Add, then OK. P A G E | 4 1 How to add a new BIN or cardstock 1. If adding a new BIN, add a new format. 2. Add a new card stock ID. 3. Restart the TRISM client. 4. Link the new card stock ID to the appropriate BIN. 5. If using different BINs for different branches: Add the BIN to the branch. If using same BINs for all branches, proceed to next step. 6. Restart the TRISM client. 7. Add card stock to the branch vault. 8. Link the new card stock to the vault and device. 9. Card stock can now be added to devices in Device Access. Theme Customize the text box color of the Edit Permissions, Order Card, and Re-PIN menus. Click Select to choose a color, then click OK to apply your changes. Queue Setup Change the order in which columns are displayed in the Queue. Select a field and click the arrows to change its order. The ID field must be first and must be checked. P A G E Uncheck a field to hide it in the Queue. Click Save when finished. Help About View the version of TRISM IV currently installed. Click Log Directory to view TRISM data and error logs. Support Documents View TRISM support documents such as the user manual and daily procedures. | 4 2 P A G E | 4 3 Data Log View the log of all actions performed by third party services. Select the dates to search by in the Start Date and End Date dropdown menus, then select the service in which to view the log. Click Search. Purge - delete the log Export – export log to a notepad file P A G E | 4 4 Error Log View the log of all errors encountered by third party services. Select the dates to search by in the Start Date and End Date dropdown menus, then select the service in which to view the log. Click Search. Click Purge to delete the log. Client Information Client Information displays a list of each TRISM workstation and the following information with which it is associated: User ID TRISM Version Last Login Last Logout PIN Pad Serial Number License All licenses (e.g. device, PIN pad, MSR, workstation, etc.) are loaded into TRISM in this window. Click Browse to navigate to the license file. P A G E | After it is selected, click OK. Click Save PIK. System Status Display the version, start time, last update time, and last status time of services. Green = status table in database is running Red = status table has not been updated in the number of minutes specified in General Configure menu 4 5 P A G E | 4 6 Appendix System Requirements A typical TRISM installation consists of a server or virtual machine (Host) and one or more workstations. A dedicated server or VM is strongly recommended to prevent network downtime as aspects of installation, setup, configuration, and updates may require system reboots. The server must be provided by the financial institution. The hardware and software requirements for TRISM installation are listed in the following table. Server (Host) Workstation Minimum Processor Speed 2 GHz 3 GHz or faster 1.0 GHz 2.0 GHz or faster Available RAM 2 GB 5 GB or more 2 GB 5 GB or more Available hard disk space 20 GB 50 GB 5 GB 10 GB Minimum video resolution SVGA (1024x768) or higher resolution video adapter and monitor SVGA (1024x768) or higher resolution video adapter and monitor Operating System Microsoft Windows 2008®, 2008 R2®, 2012®, 2012 R2®, Windows 7Pro®, Windows 8-Pro® Windows 7-Pro®, Windows 8-Pro® Database software SQL Server 2008 R2®, 2012®, 2014® Standard, Express, or Enterprise N/A N/A Logitech C920**, C615**, C525, Pro 9000 **C920 & C615 have tripod mounts. Tripods are available upon request. Webcam (OPTIONAL) Minimum Recommended Note: Your operating system may have higher requirements for some components, such as processor speed and RAM. Refer to your operating system documentation for OS-specific requirements. P A G E | 4 7 Card Layouts Refer to the following guidelines when setting up card formats. Card size Bleed Clearance 3 3/8 x 2 1/8” 1/8” optimal; 3/32” minimum Text/logos at least 3/32” from edge of card, brand marks, magnetic stripe, EMV chip, or signature panel Visa Specifications Visa® brand mark 9.75mm x 20.5mm Distance from right of brand mark to right edge of card 2mm Distance from bottom of brand mark to bottom edge of card 2mm MasterCard Specifications MasterCard® brand mark 11.3 x 19.25mm Distance from right of brand mark to right edge of card 2mm Distance from bottom of brand mark to bottom edge of card 3mm Custom Images Image file type Aspect ratio Minimum resolution .jpeg, .bmp 3:2 1015 x 640 P A G E | 4 8 Custom Image Guidelines Your financial institution reserves the right to determine, in its sole discretion, whether a submitted image will be accepted or rejected. All images submitted must have the consent of the owner including those images downloaded from the internet. Any images that contain the below items will not be accepted: Company names, logos, slogans, third party brands, trademarks, copyrighted items, or any image which may be protected by trademark or copyright. Professional athletes, politicians, celebrities, public figures (excluding permission based photos of you, your family members, or friends photographed with a famous person). Depictions of illegal activities or otherwise inappropriate behavior. Addresses, phone numbers, social security numbers or other personal identification numbers, URL addresses. Items that may be considered obscene, offensive, indecent, provocative, nude, semi-nude, lewd, or otherwise inappropriate images, including profanity. Political affiliations or other socially sensitive images. Racially sensitive material. Artwork which was created by a third party for which you have not obtained permission from the owner to use. Cartoon or other characters for which express permissions have not been obtained. This includes images that you have not created and/or do not have permission to use. Any other image which is deemed unacceptable and reflects negatively on the branding message of your financial institution. P A G E | 4 9 Permission Descriptions Security Edit Security Template - Allows user to edit templates View All Branches – Allows user to see records for all branches View all Branches – Allows user to see the records for all branches View Regional Branches – Allows user to see the records at a regional level Log into Thost – Allows user to log into the Thost application Order Cards View Order Card – Allows user to order cards View Actions – Grant access to the Request menu Edit Permissions – Allow user to change field permissions on the order card screen Repin a Card With PIN Verification – Require the customer to enter in their old PIN before selecting a new PIN Override – Allow user to override the PIN verification requirement Enforce Card – Card must be swiped to re-PIN. Re-PIN will not be possible if card is not present. Order Card Express – Order card screen opens automatically upon login PIN Mailer Only – Allows user to order a PIN mailer without a card mailer Print Transactional Report – A transactional report will print after each card is ordered Hide Customer Info on Transaction Report – Masks customer information Read a Card – Allows user to read the magnetic stripe using the PINpad CVV2 Calculator – Allows user to use CVV2 calculator for key verification Queue View Queue - Displays the Queue tab Edit Card - Edit card records in queue Delete Cards - Allows card deletion in the Queue Delete from any Branch - Allows cards in queue to be deleted from any branch Purge Queue Requests - Shows Purge Queue Requests button Reports View Reports – Displays the Report tab View Local Reports – Allows user to see the predefined reports as well as custom reports that have been saved. Run End of Day Reports – This allows you to see the option in the dropdown and the button Run End of Day Reports – User – Allows user to view and print EOD reports P A G E | 5 0 Run End of Day Reports – Admin – Allows user to process EOD reports Show Mask Card Number – Masks the card number View Non-Financial Reports – Allows user to view the non-financial report View Individual Reports – Allows user to view individual (pre-made) reports View Existing Reports – Allows user to view existing reports Print Reports – Allows user to print reports View Data Log – Allows user to view the interface data log View Error Log – Allows user to view the interface error log View Client Information – Allows user to view client information in reports Device Access – Allows user to view and create Device Access reports Vault Supply - Allows user to view and create Vault Supply reports Device Error - Allows user to view and create Device Error reports Spoiled Card - Allows user to view and create Spoiled Card reports Branch Activity - Allows user to view and create Branch Activity reports Device Access Report (CardStock) - Allows user to view and create Device Access CardStock reports Background - Allows user to view and create Background reports Same PINS - Allows user to view and create Same PINS reports Different PINS - Allows user to view and create Different PINS reports Inventory View Inventory - Displays the Inventory tab Device Unlock – Displays Device Access in the Inventory menu View Card Stock - Allows user to view card stock View Vault Inventory - Allows user to view vault inventory Central View - Allows user to view central vault Central Admin - Grant admin permission to the central vault Central User - Grant user permission to the central vault Branch View - Allows user to view branch vault Branch Admin - Grant admin permission to the branch vault Branch User - Grant user permission to the branch vault Configure View Settings - Displays the Configure tab User Editing - Allows user to edit other users (if Active Directory is not used) Add User - Show “Add User” button Edit User - Show “Edit User” button Delete User - Show “Delete User” button P A G E Card Stock - Allows manipulation of card stock Add - Add card stock Delete - Delete card stock Edit - Edit card stock Rename - Rename card stock General Edit - Shows General tab User Editing - Shows Users tab Template Editing - Shows Templates tab Format Editing - Shows Formats tab Device Editing - Shows Devices tab Active Directory Edit - Shows Active Directory tab Interface editing – Shows Interface tab MSR editing – Shows MSR tab CardStock Editing – Shows Card Stock tab Branch Editing – Shows Branches tab Add - Add branches Edit - Edit branches Delete - Delete branches Printers Add - Add devices Edit - Edit devices Remove - Delete devices Database Configuration Set Backup Options – Set database backup options Set Compact Options – Set database compact options Set Transfer Options – Set database transfer options Show Healthbar – Display red and green service status icons in T4 toolbar | 5 1