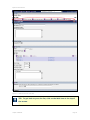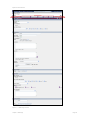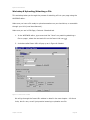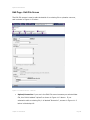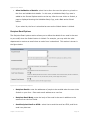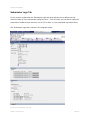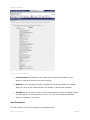
1
Full Manual v0.1.9.doc.doc
MySource User Manual
Contents Overview
Chapter 1
Introduction ..................................................................................9
Chapter 2
What is MySource? ....................................................................... 12
Chapter 3
MySource Concepts ...................................................................... 15
Chapter 4
Getting Started ............................................................................ 21
Chapter 5
The Web System .......................................................................... 27
Chapter 6
Edit Site...................................................................................... 33
Chapter 7
Edit Page .................................................................................... 49
Chapter 8
Content ...................................................................................... 60
Chapter 9
All About Links............................................................................. 70
Chapter 10
More on Tables and Formatting ...................................................... 79
Chapter 11
Attachments ................................................................................ 91
Chapter 12
MySource Cell Types..................................................................... 98
Chapter 13
MySource Page Templates ........................................................... 108
Chapter 14
Custom Form............................................................................. 124
Chapter 15
The Users System ...................................................................... 168
Chapter 16
Access Groups ........................................................................... 179
Page 2
MySource User Manual
Full Contents
Chapter 1
Introduction ..................................................................................9
Who should read this manual ...........................................................................9
What this manual covers .................................................................................9
What you need before you start...................................................................... 10
System Requirements ................................................................................... 10
Chapter 2
What is MySource? ....................................................................... 12
MySource, Web Servers and the Internet ......................................................... 12
Maintaining Your Site With MySource............................................................... 14
Chapter 3
MySource Concepts ...................................................................... 15
How MySource Displays a Page....................................................................... 15
MySource Core and Modules........................................................................... 16
MySource Users and Administrative Levels ....................................................... 17
MySource Security ........................................................................................ 19
Chapter 4
Getting Started ............................................................................ 21
Logging In ................................................................................................... 21
Navigation ................................................................................................... 22
Web System Breadcrumb Trail........................................................................ 23
MySource Common Icons............................................................................... 24
Chapter 5
The Web System .......................................................................... 27
The Web System .......................................................................................... 27
Page 3
MySource User Manual
Sites ........................................................................................................... 28
Security ...................................................................................................... 30
Designs....................................................................................................... 31
Wizards....................................................................................................... 32
Chapter 6
Edit Site...................................................................................... 33
Site Properties ............................................................................................. 35
Workshops 2 - 4 ........................................................................................... 40
Security ...................................................................................................... 44
Chapter 7
Edit Page .................................................................................... 49
Page Properties ............................................................................................ 51
Security ...................................................................................................... 56
Wizards....................................................................................................... 59
Chapter 8
Content ...................................................................................... 60
Contents: Standard Tab................................................................................. 60
Chapter 9
All About Links............................................................................. 70
URL Info...................................................................................................... 71
Pages and Files ............................................................................................ 72
Anchors on Current Page ............................................................................... 72
Options ....................................................................................................... 72
Chapter 10
More on Tables and Formatting ...................................................... 79
Edit Table Properties ..................................................................................... 79
Duplicating a Table ....................................................................................... 83
Page 4
MySource User Manual
Edit Cell Properties ....................................................................................... 83
Chapter 11
Attachments ................................................................................ 91
More About Loading and Linking to Files........................................................... 91
Edit Page - Attachments Tab .......................................................................... 92
Edit Page - Edit File Screen ............................................................................ 94
Chapter 12
MySource Cell Types..................................................................... 98
Selecting a Cell Type..................................................................................... 98
Raw HTML Cell Type...................................................................................... 99
File/Image Cell Type ................................................................................... 102
iFrame Cell Type......................................................................................... 105
Nest Content Cell Type ................................................................................ 106
Chapter 13
MySource Page Templates ........................................................... 108
Selecting a Page Template ........................................................................... 108
Forbidden (login page) ................................................................................ 110
Pull Content Page Template.......................................................................... 114
Redirect Page Template ............................................................................... 118
Sub Page Listings Template.......................................................................... 119
Chapter 14
Custom Form............................................................................. 124
Custom Form Tabs...................................................................................... 124
About Forms .............................................................................................. 125
Contents: Custom Form............................................................................... 126
Form Tab .................................................................................................. 128
Page 5
MySource User Manual
Options Tab ............................................................................................... 146
Format Tab................................................................................................ 152
Submission Logs Tab................................................................................... 155
Load/Save Parameters Tab .......................................................................... 158
Chapter 15
The Users System ...................................................................... 168
General Tab ............................................................................................... 169
Edit User Screen......................................................................................... 171
Edit Organisation ........................................................................................ 174
Wizards Tab............................................................................................... 178
Chapter 16
Access Groups ........................................................................... 179
Edit Access Group ....................................................................................... 180
Attributes .................................................................................................. 181
Page 6
MySource User Manual
Workshops
Workshop 1 Creating a New Site........................................................................ 29
Workshop 2 Creating Pages .............................................................................. 40
Workshop 3 Reordering Pages ........................................................................... 42
Workshop 4 Moving Pages ................................................................................ 43
Workshop 5 Adding content to a page ................................................................ 61
Workshop 6 Copying and Pasting into the WYSIWYG Editor ................................... 64
Workshop 7 Inserting Images ........................................................................... 65
Workshop 8 Uploading/Attaching a File ............................................................... 68
Workshop 9 Linking to an Internal Page.............................................................. 73
Workshop 10 Linking to an External Site ............................................................. 74
Workshop 11 Linking to a File that you Upload..................................................... 74
Workshop 12 Linking to a File that is already attached to another MySource page..... 75
Workshop 13 Setting up Anchor Links ................................................................ 76
Workshop 14 Inserting a Link to an Email Address ............................................... 77
Workshop 15 Removing and Editing a Link .......................................................... 78
Workshop 16 Formatting Tables ........................................................................ 85
Workshop 17 Copying and Pasting a Table .......................................................... 89
Workshop 18 Overwriting a File Attachment ........................................................ 96
Workshop 19 Creating a Pull Content Page ........................................................ 117
Workshop 20 Defining a Simple Form ............................................................... 161
Workshop 21 Adding a Complex Layout to a Form.............................................. 164
Page 7
MySource User Manual
Workshop 22 Creating and Populating a Site Access Group. ................................. 182
Workshop 23 Building a Member’s Area for your Site .......................................... 184
Page 8
MySource User Manual
Chapter 1
Introduction
The purpose of this user manual is to explain the core functionality of the MySource
Content Management System (V2.8.*). In this manual we work through the various
screens and tabs, providing detailed explanations and useful tips. We also provide a
series of practical workshops.
Who should read this manual
This manual is primarily aimed at users with little or no prior MySource training, who
have a basic understanding of the Internet and web publishing using a content
management system such as MySource. Although MySource is intended to be simple
and intuitive to use, it is a powerful system and there is a lot to learn. This manual
takes the beginner through the step-by-step processes involved in creating new pages,
adding content, images and links, to get your MySource site up and running quickly
and easily.
More experienced users will also find this manual useful in extending their knowledge
of the MySource system, as it contains explanations of the different cell types available
for editing, (e.g. Raw HTML) and the more advanced page templates (e.g. Custom
Form).
Finally, this manual is also targeted at MySource users at a Super User level, and
covers all the functionality available in the core system, plus a description of who can
do what, depending on their user level. Super Users may find this manual useful for
training other users of the system e.g. Page Editors.
What this manual covers
This manual covers the core MySource system. It does NOT cover advanced topics
such as MySource Modules, other than explaining what these are and how they plug
into the core system.
Chapter 1 Introduction
Page 9
MySource User Manual
What you need before you start
It is assumed you have a fully installed and operational MySource system that you can
access via a valid login and password, a connection to the Internet and a recent
version of a web browser such as Internet Explorer 5.5+.
System Requirements
MySource has been optimised to operate on a PC running Internet Explorer version 5.5
or above. MySource can be operated using an older version of Internet Explorer, or on
a Macintosh or Linux environment, however the WYSIWYG editor will not be available
for use when editing content.
TIP: Please note that content managed by MySource can be viewed
by users with older web browsers on any of the major platforms just
not edited using the WYSIWYG editor.
Table 1-1 below shows which operating systems and browsers can be used for editing
in MySource:
Chapter 1 Introduction
Page 10
MySource User Manual
Operating System
Browser Version
Version 5.5
Full Support
Not Supported
Not Supported
Limited Support
Limited Support
Not Supported
Limited Support
Limited Support
Limited Support
Limited Support
Limited Support
Limited Support
or above
Version 5.0
or below
Version 4.0.6
or above
Version 1.0
or above
Table 1-1 MySource Supported Operating Systems and Browsers
Key
Support Type
Meaning
Full Support
Access to the full MySource System
Limited Support
Access to the MySource System excluding WYSIWYG Editor
Not Supported
No Access to the MySource System
TIP: you can download the latest version of Internet Explorer
(which at the time of writing is v6.0) for free from
www.microsoft.com
Chapter 1 Introduction
Page 11
MySource User Manual
Chapter 2
What is MySource?
In this chapter, we talk you through the role of MySource as a Content Management
System (CMS). It is important that you have at least a basic understanding of how a
CMS works, before we move on to the details of how to create your website.
A Content Management System such as MySource has many functions, however the
two we will focus on are:
1. The ability to deliver your web pages to a web surfer’s browser, and
2. Tools to allow you to maintain the content of your web site.
To understand these two functions more clearly, we will explain how MySource works
with a web server and the Internet. We will then show you how maintaining your
website content fits into the equation.
MySource, Web Servers and the Internet
The Internet is a vast network of computers around the world, swapping information. A
web site is a collection of linked files that can be viewed on the Internet by going to
the address of the site (URL) through a web browser. The files comprising a website
reside on a web server, which is constantly connected to the Internet.
How Browsing a Non-MySource Website works:
1
A web surfer connects to the Internet typically through an ISP (Internet Service
Provider), so when a surfer tries to browse a page, the request firstly goes via
their ISP to the Internet (World Wide Web).
Chapter 2 What is MySource?
Page 12
MySource User Manual
2
The web server receives the request for the page, retrieves it from its file
system, and sends the requested information back to the web surfer’s browser,
via their ISP.
3
The browser program (e.g. Internet Explorer) displays this information in the
form of a web page.
TIP: If you use a common web publishing tool such as
DreamWeaver, you edit your website files in your local
development environment and then transfer them over to your
web server.
How Browsing a MySource website works:
If you are using MySource to maintain your website, it is installed on the web server
computer along with the web server software (usually Apache).
1
When the web server receives the request for the page, it requests the page from
the MySource system.
2
The web server sends the MySource page back to the web surfer’s browser.
Looking at your MySource site via a browser, is sometimes referred to as looking at
your site at the “front-end”.
Chapter 2 What is MySource?
Page 13
MySource User Manual
Maintaining Your Site With MySource
When you use MySource to maintain the content of your website, you are editing the
pages that will be returned to the web surfer’s browser via the web server. You define
how your website is structured, and the contents of the pages within the MySource
user interface. This is sometimes referred to as editing the site in the “back-end”.
In this manual, we talk about editing pages in MySource (i.e. in the back-end), and
their appearance in your website (i.e. in the front-end).
Chapter 2 What is MySource?
Page 14
MySource User Manual
Chapter 3
MySource Concepts
In this chapter, we go through the basic concepts used within MySource. It is
important to understand these concepts, before we move on to the details of how to
create your website in Chapter 5 and beyond.
How MySource Displays a Page
MySource uses the three components of design, dynamic menu/navigation &
content to display a page:
Design
This is the component that dictates where the fixed design (e.g. company logo),
dynamic menu/navigation and content area appear on each page of the site
(sometimes referred to as a “skin”).
Designs are a complicated component, requiring design and HTML and MySource
coding skills and for the purposes of this manual, it is assumed that a MySource design
has already been created and loaded to your system.
Dynamic Menu/Navigation
The menu consists of pages that exist in your site and allows web surfers to navigate
through your site. It is dynamic in that how you build your pages and structure your
sitemap in the back-end is what gets reflected on the front-end as your site’s
Chapter 3 MySource Concepts
Page 15
MySource User Manual
menu/navigation system. Pages can easily be renamed and reordered in the back-end
and this will be dynamically generated on the front-end.
Content
Content refers to all other components of a page including text, images, links etc. You
can control the layout and formatting of the content for each page in your site using an
editing interface such as the user-friendly WYSIWYG (What You See Is What You Get)
editor.
MySource Core and Modules
MySource is made up of core components and optional module plug-ins, as shown in
the diagram below:
MySource Core
MySource core has the following components:
•
MySource:
this component has information about latest releases, links to
report bugs etc.
•
Users:
this component allows you to create, edit and delete MySource
user accounts.
•
Web:
this component is where you edit your content. This includes
creating, editing and deleting sites, pages and files. Designs are
Chapter 3 MySource Concepts
Page 16
MySource User Manual
also created in this area and most MySource Modules are also
accessed through the Web component.
•
Config:
this component contains a list of configuration settings that
apply to your entire MySource system (e.g. the name of the
MySQL database, webmaster email address, etc). This
component is for the use of super users only, and is not
discussed in detail in this document.
Modules:
MySource modules are extensions to the core MySource system that provide more
advanced functionality e.g. bulk email, e-commerce etc. MySource modules are not
described in detail in this document.
MySource Users and Administrative Levels
There are three types of users that access your MySource site:
•
The Web Surfing Public: those “surfing the net” who visit pages of your site.
•
Members: you can create a member’s area for your site, where access can
only be gained by logging in. These members must have a user account within
your MySource system and be assigned to an appropriate Access Group.
Chapter 16 explains how to set up Access Groups and a member’s area.
•
Back-end Administrators: MySource facilitates various levels of back-end
administrators, from Super Users to Page Editors, all with varying levels of
permissions.
Table 3-1 below shows the different MySource administrative accounts and who
can do which tasks. This will also be covered in greater detail in Chapter 6 and
Chapter 7 where we explain how to assign users to be Site Editors, Page
Administrators etc, and in Chapter 15 where we look at the Users component of
MySource.
Chapter 3 MySource Concepts
Page 17
MySource User Manual
User Level
Create/ edit/ delete a MySource user
account
Create/edit/ delete a MySource design
Change page status to Live/edit a live
page
Change page status to Safe Edit/safeedit a live page
Re-order or move pages
9
9
9
Page editor
9
Front end
9
Page Editor
Create/ delete a page
Page Admin
9
Site Editor
9
Page
Site Admin
Web Master
Create/ delete a site
Site
User Master
Task
Super User
System
9
9
9
9
9
9
9
9
9
9
9
9
9
9
9
9
9
Read-only all pages in the backend
9
Assign/demote a web master
9
Assign/demote a user master
9
Assign/demote a site administrator
9
9
Assign/demote a site editor
9
9
9
Assign/demote a page administrator
9
9
9
Assign/demote a page editor
9
9
9
9
9
Assign/demote a read-only editor
9
9
9
9
9
Table 3-1 User Levels and Tasks
Chapter 3 MySource Concepts
Page 18
MySource User Manual
MySource Security
Security is an integral part of the MySource system, and you can restrict access to
your site (i.e by users at the front-end) and to your MySource system (i.e. the backend).
TIP: Granting access to users is referred to as granting Read Access.
Granting access to back-end administrators is referred to as granting
Write Access.
Read Access
You can allow or restrict public access for specific pages (e.g. a Member’s Area), or an
entire site (e.g. an Intranet). If the site is inaccessible by the public, you must choose
the groups of users to whom you wish to grant access. These groups of users are
known as Access Groups in MySource, and you can define them either at the Web
System or Site level, and grant access to them at the Site and Page level:
•
Web System Level: you can define General Access Groups on the Web System
Security tab which you can use to grant access for any site or page in your
MySource system.
•
Site Level: you can define Site Access Groups on the Security tab for a
particular site, which can be used to grant access to pages within that site. You
can also grant access to a General Access Group at the site level.
TIP: Granting an Access Group access at the Site level allows that
group of users access to every page in the site. You do not need to
grant access to individual pages.
•
Page Level: you can grant access to either a General Access Group or Site
Access Groups on the Security tab for a particular page.
Write Access
Write access is granted at the System, Site and Page level:
•
System Level: you specify which users are Super Users, Web Masters and
User Masters at the System level on the Config tab.
Chapter 3 MySource Concepts
Page 19
MySource User Manual
•
Site Level: on the Security tab at the Site level, you can specify which users
are Site Administrators and Site Editors for that particular site.
•
Page Level: on the Security tab at the Page level, you can specify which users
are Page Administrator, Page Editor and Frontend Page Editors for that
particular page.
The tasks which can be performed by Site Admins/Editors, Page Admins/Editors and
Frontend Page Administrators are shown in Table 3-1 above.
Chapter 3 MySource Concepts
Page 20
MySource User Manual
Chapter 4
Getting Started
Now that you know a few of the fundamentals, you are ready to get started!
All you need is a connection to the Internet, the URL of the site you want to work on
(e.g. testsite.beta.squiz.net) and a valid login and password to the MySource system.
Logging In
To access the MySource system, the first thing you need to do is login. To login, add
the suffix “/_edit” to the end of the site URL as shown below:
Figure 4-1 Accessing Your MySource System
TIP: It doesn’t matter what page of your site you are in, when you
add /_edit you will be taken to that particular page in the MySource
system.
Once you have hit enter, you will be presented with a login screen as shown below:
Figure 4-2 The Login Screen
When you are logged in successfully, you will enter MySource in the Web System,
either at the Site Properties screen of the site, or the Page Properties screen of the
page – depending on whether you entered the URL of a site or a page. These screens
are discussed in Chapter 6 and Chapter 7.
Chapter 4 Getting Started
Page 21
MySource User Manual
TIP: If you are inactive for a long period of time when you will be
prompted to login again, so for security reasons it is good practice
to log out at the end of each session.
Navigation
At the top of every screen in MySource you will find the navigation bar for the four
main areas of the core system, and a module drop down list. You will also see your
login name and the log out icon (open door) on the right as shown below:
Figure 4-3 The MySource Navigation Bar
The four main areas of the core MySource system are as follows:
Clicking on the MySource icon takes you to the MySource system
summary page, featuring news and links to general MySource bug
reporting and community forums.
Clicking on the Users icon takes you to the Users section of
MySource where you create, edit and delete MySource user
accounts. This area of the system is restricted to authorised users
(User Masters or Super Users) only.
Clicking on the Web icon takes you to the content management area
of MySource. This area is also restricted to authorised users, but the
majority of users have some form of access to this area.
Clicking on the Config icon takes you to the system configuration
area where the MySource settings can be configured. Access to this
area is limited to Super Users only.
This drop down list allows you to go to one
of the modules installed in your system.
Chapter 4 Getting Started
Page 22
MySource User Manual
TIP: If you roll your mouse over any of the icons found throughout
MySource, a tool tip will be displayed telling you what will happen
when you click on that particular icon. Rolling over icons when you
are new to the system or unfamiliar with an area will help you to
familiarise yourself with the MySource environment.
TIP: Always use MySource icons for navigation rather than using
the Back button of your browser.
(As for any browser based application, the browser Back button
causes a page expiry error, because the page content will be resubmitted to MySource each time you use the Back button to revisit
a page).
Web System Breadcrumb Trail
When you are in the Web System, a navigational tool known as a breadcrumb trail
appears in the grey bar just underneath the main MySource navigation bar. This is
particularly useful when you have a complex hierarchy of pages, with parent pages and
sub-pages.
An example is given in Figure 4-4 below, where we are currently editing a sub-subpage of “Page 2”, within a site named “Test site”.
Chapter 4 Getting Started
Page 23
MySource User Manual
Figure 4-4 Breadcrumb Trail
You can click on the “sub-page 1” or “page 2” to edit the parent pages, or click on
“Test site” to edit the site.
You can click on the Web System icon
to return to the Web System
screen.
Editing sites and pages is discussed in detail in Chapter 6 and Chapter 7 respectively.
MySource Common Icons
There are a number of icons that are common across the Edit Site, Edit Page and Edit
File screens. These screens have icons on the top right hand side and a Commit
button at the bottom, which are described below:
Preview
Clicking the Preview icon opens a new browser window and displays
the site, page or file that you are currently editing.
Delete
Clicking the Delete icon deletes the current site, page, file or access
group that you are editing.
If you are editing a site or page, any attachments and sub-pages that
are related to the page or site are also deleted. Whatever you delete
is unrecoverable, so BE VERY CAREFUL. The system has two or
three inbuilt warning messages to reduce the risk of losing data by
mistake.
Chapter 4 Getting Started
Page 24
MySource User Manual
If you proceed, a progress bar will appear to show you when the
deletion is complete.
Duplicate
Clicking on the Duplicate icon will create a copy of the site or page as
well as any sub-pages, file attachments, site administrators etc.
This function may take some time to complete, particularly if there
are many attachments or sub-pages. A screen prompt is displayed to
ensure that you wish to proceed and if you do, a progress bar
appears giving you an estimate of the time remaining for the
duplication process to be completed
At the very bottom of most screens in MySource, you will find the
Commit button. Click this button to save any changes that you make
to the system. If you are using Internet Explorer, you can use ALT +
S as a keyboard shortcut.
Message Window
Any changes you make to the MySource system are logged in a window called
Messages as shown below:
Figure 4-5 The Messages Window
You can refer to the Messages window at any point to check the changes commited to
your system.
Chapter 4 Getting Started
Page 25
MySource User Manual
TIP: If you close this window, it will pop up every time you commit
changes, which can be distracting. It is therefore a good idea to
minimise the Messages window.
In the next chapter, we provide an introduction to the Web System which is where you
manage the content of your MySource site.
Chapter 4 Getting Started
Page 26
MySource User Manual
Chapter 5
The Web System
In this chapter we introduce you to the Web System and in particular, the Sites tab
where you access existing sites within your MySource system and create new sites.
In the first workshop, we create a new site. The chapter then concludes with an
explanation of the other tabs within the Web System: Security, Designs and Wizards.
If you are only concerned with editing content at this stage, skip the final part of this
chapter and move on to the next Chapter 6, where you learn how to create new pages
and restructure the site map.
The Web System
The Web System can be accessed at any time by clicking the Web icon in the
MySource navigation bar:
Figure 5-1 Web System
As seen in Figure 5-1 Web System above, within the Web System you have the
following tabs:
•
Sites: When you first enter the Web System, you are taken directly to the Sites
tab, which allows you to manage your site and its contents.
Chapter 5 The Web System
Page 27
MySource User Manual
•
Security: this tab allows you to define the General Access Groups to be used to
grant read access to any of the sites within your MySource System. This tab is
described in more detail in the following sections, and in Chapter 16.
•
Designs: the Designs tab contains a list of MySource designs that have been
loaded into your system, and is where you can edit existing designs and create
new ones. However, this requires skill in creating designs and a knowledge of
HTML code and specific MySource tags, which is not covered within the scope of
this document.
•
Wizards: the Wizards tab contains a list of wizards that have been loaded to
your system. Wizards are an integral part of the MySource System, and come
in the form of reports and tools.
TIP: Whichever tab you are in will be highlighted to show where
you are.
Sites
The Sites tab lists all the sites within your MySource system; as shown in Figure 5-1
above.
For each site you can see following:
•
Public checkbox: a site marked with a
is public and therefore visible to the
web surfing public.
A site marked with a
is private and therefore not visible to the public, only to
members of a particular Access Group with appropriate permissions. We
explain how to set up Site Access Groups in Chapter 16.
•
the site ID
•
the site name
•
the number of pages
•
a link to preview that site
Chapter 5 The Web System
Page 28
MySource User Manual
TIP: If there is no link to preview a site, it is because no
corresponding URL has been set up in the Site Properties – this is
one of the first things you should do after creating a new site. We
show you how to do this in the first workshop.
To edit a site, click on the name of the site you want to edit and you are taken to the
Edit Site screen with the Site Properties tab selected. This screen is covered in detail
in Chapter 6.
Workshop 1 Creating a New Site
Firstly, make sure you are on the Web System screen. If not, click on the Web icon in
the MySource navigation bar.
1. Type the name of the new site into the Site Name text box e.g. Test Site. Note
that you can easily change this later.
2. Select a design from the drop down list (again this can be changed easily later).
3. Click the Create New Site icon.
A message window pops up to confirm the addition of the new site to your
system and the Site Properties screen for the site you have just created is
displayed. The Site Properties screen is covered in detail in the next chapter.
4. At the very bottom of the Site Properties screen, enter the URL for the new site
e.g. www.mysite.com/testsite, and click the Commit button.
TIP: You must enter the full URL including your website URL.
5. Click on the Web icon again to get back to the Web System screen and the new
site is now listed along with a link to preview it.
♣ You have now successfully completed Workshop 1 ♣
Chapter 5 The Web System
Page 29
MySource User Manual
Security
The Security tab is shown in the diagram below:
Figure 5-2 Web System Security Tab
The Security tab within the Web System contains a list of all current General Access
Groups that have been created for your MySource system. General Access Groups can
be used to grant read access for any site you have defined within MySource.
Read Access
•
Gen. Access Groups: the ID and the Access Group Name are shown for each
General Access Group defined. Clicking on the name of a General Access Group
will take you to the Edit Access Group screen for that Access Group.
•
New General Group: type the name into the text box and click on the Commit
button. You will be taken to the Edit Access Group screen.
Access Groups and the Edit Access Group screen are explained in more detail in
Chapter 16.
Chapter 5 The Web System
Page 30
MySource User Manual
Designs
The Designs tab is shown in the diagram below:
Figure 5-3 Web System Designs Tab
The Designs tab contains a list of all current Designs that have been created for your
MySource system.
Site Designs
•
Existing Designs: the ID, Name, Last Modified Date, and Last Modified By
details are shown for each design defined. Clicking on the name of a design will
take you to the Edit Site Design screen for that design.
•
Create New Design: type the name of the new design into the text box and
click on the Commit button. You will be taken to the Edit Design screen.
Creating designs is outside of the scope of this MySource core user manual.
Chapter 5 The Web System
Page 31
MySource User Manual
Wizards
The Wizards tab is shown in the diagram below:
Figure 5-4 Web System Wizards Tab
The Wizards tab allows you to run all of the reports and tools available within the
MySource system.
To use the Wizards, simply click on the description of the Wizard you want to use and
follow the prompts.
Chapter 5 The Web System
Page 32
MySource User Manual
Chapter 6
Edit Site
In this chapter we guide you through the Edit Site screen and in particular the
Site Properties tab.
The workshops allow you to put this information to use in creating new pages and
restructuring the sitemap. This chapter then concludes with a brief explanation of the
other tabs within the Edit Site screen.
If you are only concerned with editing content at this point, skip this part and move on
to Chapter 7 and Chapter 8, where you learn about Page Properties and how to add
content, including text and images to pages.
The Edit Site screen is displayed:
•
When you first create a site, and
•
When you click on the name of an existing site in the Web System Sites list to edit
that site.
The Edit Site screen is shown in Figure 6-1 below:
Chapter 6 Edit Site
Page 33
MySource User Manual
Figure 6-1 Edit Site Screen and Tabs
TIP: To get back to your site list, click on the Web icon at the top of
the screen.
Chapter 6 Edit Site
Page 34
MySource User Manual
As seen in Figure 6-1 above, the Edit Site screen has the following tabs:
•
Site Properties: when you first enter the Edit Site screen, you are taken to the
Site Properties tab. You set the site name, design, and URL on this tab. You can
also see the pages of your site, add new pages and change the order of the pages.
•
Custom Design: this tab allows you to change certain parameters of the design.
However as this requires understanding of design and HTML code, this is not
covered within the scope of this manual.
•
Internationalisation: this tab allows you to activate a specific character set for
your website (or a specific page of your site) so that you can add content in that
language. No translation functionality is provided; it merely allows you to enter
text in the appropriate character set (e.g. Chinese characters).
•
Metadata: this tab allows you to create your own metadata definitions, or use a
pre-existing template such as Dublin Core. Like MySource Designs, metadata is an
advanced topic in MySource and we will not go into any further detail in this
manual.
•
Security: this tab allows you to set the access permissions for this site.
•
Wizards: this tab allows you to run useful reports and tools that apply to each
individual site. This is a subset of the reports and tools to those that can be run
across the entire system found in the Web System Wizards tab.
•
Site Search: this tab allows you to search for files or pages within your MySource
site by name or ID.
Site Properties
As shown in Figure 6-1 above, the Site Properties tab of the Edit Site screen consists of
four main sections:
•
Identification
•
Page Tree
•
Custom Design
•
URLs
Identification
The identification section is where you name and describe your site.
Chapter 6 Edit Site
Page 35
MySource User Manual
•
Site Name: you can edit the name of your site here. The Site Name is used to
identify the site throughout the Web system. Whatever you enter here, will be
displayed at the beginning of the title of the browser window.
•
Description of Site: you can enter a meaningful description of your site here
for internal administrative purposes. This is useful for example, if you have
many sites within one MySource system. It will not be seen by the user and
should not be confused with the <meta name="description"> tag used by
search engines.
Custom Design
•
Design: by default, every page in your site will inherit the design that is
selected from this drop down. You need only change the design for a page that
will not follow this convention e.g. the Home page which usually has its own
‘front’ design and then every inside page will inherit an ‘inside’ design.
Page Tree
The Page Tree section is where you create new pages and control the hierarchy of the
pages within the site.
•
Count: this shows how many pages your site currently contains and allows a Super
User to set a maximum limit. The default “–“ sign in the text box, shows there is
no maximum limit set.
•
Reorder Main Pages: clicking on this icon brings up a pop-up window, which you
can use to re-order your pages. Click on the up and down arrows to re-order the
sequence of the pages in your site. The new order will be reflected in the
Menu/Navigation system generated for your site.
•
Site Map: this section shows the hierarchical structure of all the pages in your site
and allows you to select pages for editing as shown in Figure 6-2 below:
Chapter 6 Edit Site
Page 36
MySource User Manual
Figure 6-2 Site Map
Clicking on the page name takes you to the Page Properties screen for that
page - Page Properties are discussed in 0. If you click on a contents link, you
are taken directly into the Contents tab for that page - see Chapter 8 for more
on the Contents tab.
The following icons are at the top of the Site Map:
Clicking on this icon expands the site map so that all sub pages
are also shown.
Clicking on this icon collapses the site map so only the top level
pages are shown.
Clicking on this icon undocks the site map and launches it into a
new window.
A very useful feature of the undocked site map is that you can make changes to
the status of several pages at once as in Figure 4-1 below:
Chapter 6 Edit Site
Page 37
MySource User Manual
Figure 6-3 The Undocked Site Map
You can select pages in the undocked site map by ticking the tick boxes next to
their name, or select Check/Uncheck All and Affect Children as required.
From the With Selected drop down list you can choose an action to be applied
to all of the selected pages at once. This is particularly useful when making
your site live or putting a section of the site under construction.
To re-dock the site map, click on the Dock icon in the un-docked site map or on
the Edit Site Page Properties tab.
TIP: The PC keyboard shortcut for undocking the site map is Alt+H.
•
Index Page: you can select the index page of your site here i.e. the first page
displayed when someone visits the site. This is otherwise known as the home
page.
TIP: When you first create a new site in MySource, a default index
page is created called “Welcome to Site Name”. If you delete the
automatically created index page, be sure to set the new index page.
Chapter 6 Edit Site
Page 38
MySource User Manual
•
Not Found Page: the Not Found Page indicates the page to display if someone
requests a page in your site that does not exist. You may wish to create a page
specifically for this purpose, or more typically, select your site’s home page.
TIP: Search engines only update their records intermittently, so if
you delete a page it is likely some search engines will still display a
link to that page. Specifying a Not Found Page ensures that a user
still comes to your site if they click on a deleted link.
•
Forbidden Page: this indicates the page to display if someone requests a page
that they do not have permission to view.
•
Create New Pages?: this is where you create new top level pages for your
site. The drop down list shows the different page templates available. Page
templates are covered in detail in Chapter 13.
TIP: You can add sub-pages to your top-level pages on the Edit
Page screen, as described in Chapter 7.
URLs
The appropriate URLs or domain names for your site must be added to this list, so that
users can view the site. You can enter as many addresses as you like pointing to this
site, as long as they are set up on your web server.
For example, you may have the following URL’s all for the same site:
MyCompany.com, MyCompany.com.au, MyCompany.net
These URLs must all be set up on both your web server and within MySource.
TIP: If you have not entered at least one URL for your site, you will
not be able to preview your pages.
Chapter 6 Edit Site
Page 39
MySource User Manual
Workshops 2 - 4
The following workshops will help you understand the Page Tree and Site Map and
how these relate to your site's navigation menu. You will practice adding new pages to
your site, reordering those pages and previewing your changes.
Workshop 2 Creating Pages
Firstly, make sure you are in the Site Properties tab within the Edit Site screen.
1. Scroll down to Create New Pages? within the Page Tree section as shown in
Figure 6-4 below:
Figure 6-4 Page Tree Section
2. Make sure the page template is set to Standard.
3. Type the name of the new page into the text box, e.g. page 4
(You can create multiple pages at once - just enter each page name on a new
line in the text box).
4. Scroll down to the bottom of the screen and click the Commit button (or use the
PC shortcut Alt+S).
Chapter 6 Edit Site
Page 40
MySource User Manual
TIP: If you create only one page, you are taken to the Page
Properties screen for that page.
If you create multiple pages at once, you remain on the Site
Properties screen. Clicking on the name of the page you want to
edit in the site map takes you to the Page Properties screen for that
page.
5. Click the name of your site in the link in the breadcrumb trail at the top of the
screen under the main navigation bar to return to the Site Properties screen.
6. Scroll down to the Page Tree section and the new page or pages you just
created are now shown within the site map.
7. To create a sub-page of “page 1”, click on “page 1” in the site map and you are
taken to the Page Properties screen for “page 1”.
8. Scroll down to the Position section and find the New Subpages? area as shown
in Figure 6-5 below.
Figure 6-5 Position Section
9. Make sure the page template is set to Standard.
Chapter 6 Edit Site
Page 41
MySource User Manual
10. Type the name of the new sub page into the text box, e.g. “sub-page 2”.
(Again, you can create multiple sub pages at once - just enter each sub-page
name on a new line in the text box).
11. Click the Commit button (or Alt+S).
12. Return to the Site Properties screen using the navigation links, as before.
13. Now click preview
to see how the new page affects the site navigation
menu. Hold your mouse over the “page 1” menu item, and your new sub-page
appears as a sub-menu item.
TIP: By default all pages are created as a main menu item or a subpage of another menu item. If you do not want your page to appear
as a menu item, but as a link from another page you must uncheck
the Show In Menu option on the Page Properties tab, as described
in Chapter 7.
♣ You have now successfully completed Workshop 2 ♣
Workshop 3 Reordering Pages
Again, make sure you are in Site Properties within the Edit Site screen.
1. Click on the Reorder Main Pages icon
which brings up the pop-up window
shown below:
Chapter 6 Edit Site
Page 42
MySource User Manual
Figure 6-6 Reorder Main Pages Window
2. Click on the up and down arrows to reorder the sequence of the pages in your
site. You can also order your pages alphabetically A-Z or Z-A.
3. Commit and Preview your changes on the front end.
♣ You have now successfully completed Workshop 3 ♣
Workshop 4 Moving Pages
It is easy to move pages around, if for example, you have created a page and want to
move it to a different section of the site hierarchy.
1. Click on the page icon
(public) or
(private) of the page you want to move.
The prompt box below is shown, asking you to choose a parent page to which
to connect:
Chapter 6 Edit Site
Page 43
MySource User Manual
Figure 6-7 Move Page Window
2. Click OK in the prompt box and then click on the page icon of the page you
want to move the original page underneath. If you want the page to be a top
level page, click on the site icon at the top of the Site Map.
3. The page refreshes and you will see that your page has moved.
4. Now click
to preview your changes in your site.
♣ You have now successfully completed Workshop 4 ♣
Security
Under Security at the site level, you can do the following:
•
Close off access to your site by the public, and grant access by a Site or
General Access Group.
•
Create, edit and delete Site Access Groups that are specific to this site.
•
Define Site Administrator and Site Editor accounts.
•
Control which Site Extensions, Page Templates and Site Designs your Site
Editors and Administrators are allowed to use.
TIP: Access Groups contain MySource user accounts and can be
used to create a private Members Area or Intranet. For more
information on editing and populating Access Groups see Chapter
16.
Chapter 6 Edit Site
Page 44
MySource User Manual
The Site Security screen is made up of three main sections – Read Access Grants,
Allowed Usage and Write Access Permissions as shown in Figure 6-8:
Figure 6-8 Site Security Screen
Chapter 6 Edit Site
Page 45
MySource User Manual
Read Access Grants
This section allows you to define who can access your site. That is, you can define
whether it is a public website, or a private intranet or extranet.
TIP: The settings in this section have nothing to do with who can
edit your site in MySource. This is defined in the Write Access
Permissions.
•
Public: tick this checkbox to make the site available to the web surfing public.
•
Gen. Access Groups: a list of all the General Access Groups already created in
the Web System, Security tab are shown here.
Ticking the checkbox next to the Access Group makes it accessible in your site
by only the users in this group. Clicking on the name of an existing General
Access Group takes you to the Edit Access Group screen for that Access Group.
•
Site Access Groups: a list of all the Site Access Groups for the site that you
are editing is shown here.
•
Create New Site Group?: you can create a new Site Access Group by typing a
name into this textbox and hitting Commit. The new Site Access Group then
appears in the list.
As for General Access Groups, ticking the checkbox next to the Access Group
will make it accessible in your site by only the users in this group. If you click
on the name of the Access Group will take you to the Edit Access Group screen
for that Access Group.
Allowed Usage
This section shows a list of all the Site Extensions, Page Templates and Site Designs
currently defined in your MySource system.
If you check any item in the list, your Site or Page Administrators and Editors can use
that item. For example, if you check the Custom Form page template, your Site or
Page Administrators and Editors are able to select the Custom Form page template
from the Page Template drop down list on the Page Properties screen (see Chapter 7).
Chapter 6 Edit Site
Page 46
MySource User Manual
Write Access Permissions
This section allows you to define Site Administrators and Site Editors for the site you
are currently editing.
•
Site Admins: this section displays a list of all Site Administrators for this site.
For each Site Administrator you can see the ID, Login, Name, Email, and
Account Status.
You can click on the Name to display the Edit Users screen to edit the details of
that user (see page 171 for more on the Edit Users screen).
If an email address has been entered, you can click on the address to email
that person directly.
You can tick the checkbox to delete this Site Administrator’s write access
permissions.
TIP: Ticking this checkbox does not delete that user’s MySource
account – you are merely demoting someone from being a Site
Administrator.
Tick the Email? checkbox to notify the Site Admininistrator whenever a Site or
Page Editor changes the status of a page from Under Construction to Apply for
Approval (see Chapter 7 for more on Page Status).
•
New Admin?: use this textbox to create a new Site Administrator.
TIP: To create a new Site Administrator, a MySource user account
must be created first. (Creating MySource user accounts is covered
in detail in Chapter 15.)
Type the login or email address of the MySource user that you want to make a
Site Administrator into the textbox and click on Commit.
•
Site Editors: this section displays a list of all Site Editors for this site. The
information is the same shown for Site Administrators except for the Email?
Function that is provided for Site Editors.
Chapter 6 Edit Site
Page 47
MySource User Manual
•
New Editor?: this section works in the same way as the New Admin? section
described above.
Site Search
The Site Search tab allows you to search for files or pages within your MySource site
by name or ID. This is particularly useful in large sites with several hundred pages.
Enter a query into either the Pages or Files fields and click the Search button. A list of
matching files is displayed as shown in Figure 6-9 below:
Figure 6-9 Site Search Tab
You can click on the page name to go to the Edit Page screen for that page, or click on
the parent name to go to the Edit Page screen for the parent page.
Chapter 6 Edit Site
Page 48
MySource User Manual
Chapter 7
Edit Page
In this chapter we guide you through the Edit Page screen and in particular
Page Properties tab. We also provide a brief description of the Internationalisation,
Metadata, Security and Wizard tabs, highlighting how they relate to pages rather than
to sites as described in Chapter 6.
The Content and Attachment tabs are covered in detail later in Chapter 8 and Chapter
11 respectively.
The Edit Page screen is displayed both when you:
•
Create a new page, or
•
Click on the name of a page in the Site Map, Search or other screens.
The Edit Page screen is shown Figure 7-1 below:
Chapter 7 Edit Page
Page 49
MySource User Manual
Figure 7-1 Edit Page Screen
Chapter 7 Edit Page
Page 50
MySource User Manual
As seen in Figure 7-1 above, the Edit Page screen has the following tabs:
•
Page Properties: this is the default tab when you first enter the Edit Page
screen. You set the name, template, status and other details for your page.
You can also see the sub-pages of this page and its parent. This tab is
described in more detail in the next section.
•
Internationalisation: this tab allows you to activate a specific character set
for your website (or a specific page of your site) so that you can add content in
that language. No translation functionality is provided; it merely allows you to
enter text in the appropriate character set (e.g. Chinese characters). This page
was discussed in Chapter 6.
•
Attachments: this tab allows you to view and edit the file attachments for this
page. We will discuss this tab in detail in Chapter 11.
•
Metadata: this tab allows you to create your own metadata definitions, or use
a pre-existing template such as Dublin Core. Like MySource designs, metadata
is an advanced topic in MySource, and we will not be discussing metadata any
further in this document.
•
Security: this tab allows you to set the access permissions for your site.
It is
discussed in more detail below.
•
Wizards: this tab allows you to run useful reports and tools that apply to this
page. This is a subset of the reports and tools to those that can be run across
the entire system found in the Web System Wizards tab, or for the site found in
the Site Wizards tab.
•
Contents: this tab allows you to enter the body copy for your page. We
discuss this tab in detail in Chapter 8.
Page Properties
When you first enter the Edit Page screen, you are taken to the Page Properties tab.
The Edit Page screen is very similar to the Edit Site screen that we discussed in
Chapter 6
Chapter 7 Edit Page
Page 51
MySource User Manual
As you can see in Figure 7-1 above, the Page Properties tab has five main sections:
Status, Identification, Custom Design, Position and Virtual Paths.
Status
This section allows you to set the current and future status of a page. The status of a
page determines the options available for editing that page.
Each possible page status in MySource is described below:
Under
When a page is created, it has a status of Under Construction by
Construction
default.
(Blue)
web surfing public, and can only be seen by people who are logged
A page that is Under Construction cannot be seen by the
into MySource.
When Site Admininistrators preview Under Construction pages, the
appear with double brackets around them to distinguish them from
Live pages.
Live
A Live page can be viewed by anyone through a web browser, unless
(Green)
the page has been made private. In this case, it will only be visible to
people with an appropriate login name and password – this will be
described in more detail in Chapter 15 and Chapter 16.
Site and Page Administrators can edit Live pages in MySource, and
changes are visible in your site as soon as you have clicked Commit.
Safe Edit
This status allows you to make changes to a live page of your site
(Pink)
within MySource, without the changes being seen in your site until
you are ready to approve them. It allows you to make changes to an
existing site over a period of time, and only make the changes visible
when you are ready.
Pending
A page that has a status of is pending approval from an
Approval
Administrator.
(Purple)
Chapter 7 Edit Page
Page 52
MySource User Manual
Disable
A page that has a status of Disable has been disabled and cannot be
(Olive)
edited or previewed without changing its status to Under
Construction.
Archive
A page that has a status of Archive has been archived and cannot be
(Grey)
edited or previewed until its status is changed to Restore and Keep
Working or Restore and Make Live.
TIP: The site map is colour-coded, the colour of each page
indicating its status.
The fields in this section are as follows:
•
Currently: the current status is shown at the top of this section.
•
Change?: to change the current status of a page, select the desired page
status from the drop-down box.
•
Future Statuses: this section shows any scheduled new statuses.
•
New Future Status: you can specify a future date and time for the status of a
page to change. MySource will change the status of the page automatically
when that time comes. An example of when this would be useful is changing
the status of a page about a new product from Under Construction to Make
Live, on the day of the product launch.
Identification
You name and describe your page in this section.
•
Name: enter the name for your page in this text box. The title of the browser
window will be the Page Name appended to the Site Name as, e.g. MySite PageName.
•
Short Name: enter the short name for your page. This is the name that will be
shown in the navigation menu of the site.
Chapter 7 Edit Page
Page 53
MySource User Manual
•
Show in Menu: tick this box for the page to appear in the site navigation
menu. If it is not ticked, the page will not form part of the navigation and you
should create a link to it from somewhere else in your site. All pages are
created as menu items by default.
•
SSL Encryption: SSL stands for Secure Socket Layer Encryption and relates to
secure encryption of information e.g. credit card details. Selecting this function
forces the page into SSL mode, which requires an SSL certificate to be installed.
•
Image: this drop down list contains a list of all the images attached to the
page. An image can be used as part of the navigation e.g. an icon next to the
name of the page but the design must be coded to allow for this.
•
Description: enter the description for your page into the textbox. Each page
should have a meaningful description, which should consist of a one or two
sentence summary of the contents of the page. The description is used in the
<meta name="description"> tag that is used by search engines.
•
Keywords: enter the keywords that best describe the contents of the page in
this textbox. This are used for the <meta name="keywords"> tag. Both
Search Engines and the MySource Site Search function search through these
words to find your page.
TIP: After you have added content to a page, you can click on the
Extract Keywords icon
(tick the Process and Remove Duplicates
box) and Commit. The keywords from the content of the page will
be extracted into this text box.
•
Template: all pages must use a template, which determines the behaviour of
the page e.g. the Standard template allows you to load text and images, and
the Custom Form template enables you to build online forms. The core
MySource templates will be described in detail in Chapter 13.
•
Thumbnail: this is only used by the Sub-Page Listing template – see Chapter
13 for more information on Page Templates.
Chapter 7 Edit Page
Page 54
MySource User Manual
Custom Design
•
Design: select the design for your page from the drop down list.
By default, a page will inherit the design of its parent page, or if it is a top-level
page, it will inherit the design specified in the Site Properties page.
You only need to change the design for a page that will not follow this
convention e.g. if there is a separate design for a products page.
Position
•
Page Lineage: this shows you where the current page sits in the site
hierarchy.
•
Future Page Lineages: in a similar way to setting a future status, you can
specify a future date and time for a page to move from one place in the site to
another. An example might be a fact sheet page moving from a page called
“Current” to a page called “Archive” from one week to the next.
If a future page lineage has already been set, the date and time it has been set
to change is shown, along with a tick box to delete the setting.
•
New Future Page Lineage: select a page within your site from the drop down
list to be the new parent, and set the date and time you would like the page to
change lineage. Select Commit.
•
Page Descendents: this section shows if the page has any sub-pages. A subset of the site map appears, and you can undock the site map from this screen
by clicking on the Undock icon.
•
New Subpages: this allows you to add sub-pages to the page you are
currently editing, and works in exactly the same way as creating top level pages
in the Site Properties tab of the Edit Site screen (which we practiced in
Workshop 2 in Chapter 6).
Enter the name of your new page in the text box and select the template you
want to use for the page you are just about to create from the drop down list.
Chapter 7 Edit Page
Page 55
MySource User Manual
Virtual Paths
•
Text Box: enter the URL for your page into the textbox.
Each page in the site must have a virtual path, which is an extension to the site
URL e.g. http://www.yoursite.com/yourpage.
When you create a new page, the virtual path field is automatically populated
with the page name. When you duplicate a page, the virtual path will have a
number extension e.g. yourpage2. You can then change the automatically
generated virtual path if required.
Your MySource system should have virtual paths turned on by default, but if
this is not the case (indicated by an extension e.g.
http://www.yoursite.com/./?p=123 which is the PHP naming convention) a
super user can turn them on in the Config tab.
TIP: There is an Update Virtual Paths wizard, which you can run at
Web System level to replace the PHP naming convention with the
name or short name of each page in the site.
•
URLs (for testing): this section shows the full address of the page including
the virtual path specified in the URLs component specified for the site in the
Site Properties tab.
Security
The Edit Page, Security tab allows you to perform two main functions:
•
Close-off public access to your site for the page you are editing, and grant
access to a Site or General Access Group.
•
Define Page Administrators and Page Editors for the page you are editing.
We will now go through the Edit Page, Security tab seen in Figure 7-2 below:
Chapter 7 Edit Page
Page 56
MySource User Manual
Figure 7-2 Edit Page Security tab
Read Access Grants
•
Public: ticking this checkbox allows the web surfing public to see this page of
your site. If this checkbox is not ticked, you should tick the checkbox of the
Access Group or Groups to which you want to give access.
TIP: You can create a Member’s Area by using this feature. See
Chapter 16 and Workshop 23 for more details.
Chapter 7 Edit Page
Page 57
MySource User Manual
•
Gen. Access Groups: this section shows a list of General Access Groups in
your MySource system. To give access to a General Access Group, select the
checkbox.
•
Site Access Groups: this section shows a list of Site Access Groups for the site
that you are editing. To give access to a particular Site Access Group, select
the checkbox.
•
Front-end Page Editors: if there are any existing Front-end Page Editors, they
will be listed in a table in this section. A Front-end Page Editor can access any
page, either as a user of the website or in the MySource System. However,
they cannot alter the contents of any page.
You can tick the Delete box to remove this user as a Front-end Page Editor.
•
New Front-end Editor?: you can create a new Front-end Page Editor, by
typing the login or email address of an existing MySource user.
Write Access Permissions
This section allows you to define Page Administrators and Page Editors for the page
you are currently editing.
•
Page Administrators: this section shows a list of all the Page Administrators
for the page you are currently editing. For each Page Administrator, you can
see the ID, login, Name, Email, and Account Status.
You can click on the name of each Page Administrator to go to the Edit Users
screen for this user. If an email address has been entered, you can click on it
to email that person directly.
You can tick the checkbox to remove use as a Page Administrator.
TIP: This does not delete the user’s MySource account – you are
merely demoting someone from being a Page Administrator
•
Email?: this allows you to specify if the Page Administrator will be notified by
email whenever a Page Editor changes the status of a page from Under
Construction to Apply for Approval.
Chapter 7 Edit Page
Page 58
MySource User Manual
•
New Administrator?: you can make an existing MySource user a new Site
Administrator here. Type the login or email address of the MySource user that
you want to make a Page Administrator for this page into the textbox.
•
Page Editors: this section shows a list of all Page Editors for this page. It is
the same as the Page Administrator list except for the Email? Function which is
not provided for Page Editors.
•
New Editor?: this section works in exactly the same way as the New Admin?
section described above.
Wizards
These are useful reports and tools that apply to each individual page in your site. The
Edit Page Wizards tab is shown in below:
Figure 7-3 Edit Page, Wizards
To use the wizards, simply click on the description of the wizard you want to use and
follow the prompts.
Chapter 7 Edit Page
Page 59
MySource User Manual
Chapter 8
Content
This chapter discusses the Edit Page, Contents tab for a page created with the
Standard page template - other page templates are covered in Chapter 13 and
Chapter 14.
The Contents tab is where you enter the body of your page, and the workshops in this
chapter teach you how to add text and images and how to upload a file, using the
WYSIWYG (What You See Is What You Get) cell type - an interface that allows you to
enter content in a similar way to a word processing program. You also practice
copying and pasting text from another source into your page.
Contents: Standard Tab
The Standard template allows you to add a page with text and images, and edit or
delete content.
When you first create a page using the standard template and click on the Contents:
Standard tab you see the screen shown below:
Figure 8-1 Contents: Standard Tab
•
Title: this is where you enter the title of your page.
Chapter 8 Content
Page 60
MySource User Manual
TIP: By default, this will not appear on your page within your site,
but if you want the title of the page to be printed on each page as a
heading, the design can be coded to do this.
•
Bodycopy: this is the area where the content is added to your page. All
content in MySource must be laid out using tables. The following workshop
goes through the step-by-step process of creating a new table.
Workshop 5 Adding content to a page
This workshop takes you through adding basic content to a page.
Make sure you are looking at the Edit Page, Contents: Standard tab.
1. The first thing to do is create a new table.
2. Click the Create New Table icon
to bring up the Insert Table pop up window
as shown below:
Figure 8-2 Insert Table pop up window
Chapter 8 Content
Page 61
MySource User Manual
3. You can select the number of Columns and Rows you would like your table to
have, depending on how you want to lay things out. For now, leave the
number of Columns and Rows as “1”.
4. Enter “100%” for the Width, so the page content will stretch to 100% of the
browser window screen. (You must use the % sign or the system will interpret
the measurement in pixels).
5. If you want to add a Background Colour you can either add the #(hex) value or
click on the * and a colour picker window will pop up.
6. Leave the Default Cell Type as “WYSIWYG”.
7. Click Save. The screen refreshes and shows your new table ready for content to
be added, as shown below:
Figure 8-3 A MySource Table
TIP: Remember that if you hover your mouse over any of the icons,
a tool tip will be displayed to tell you what will happen when you
click on that particular icon.
8. Click on the Edit Contents icon
on the right hand side of the screen, to bring
up the WYSIWYG editor as in Figure 8-4 below:
Chapter 8 Content
Page 62
MySource User Manual
Figure 8-4 The WYSIWYG Editor
You will see there are icons for cut, copy, paste, bold, italics, underline, centre,
numbered lists, bulleted lists, undo, redo etc similar to those you would find in
a word processing program such as Microsoft Word.
9. Type in some text and click Save.
10. The bar above your table will turn blue shown below:
Figure 8-5 Blue bar indicates that your change has not yet been committed to the system
This indicates that you need to Commit the change. Click on Commit or Alt+S.
Chapter 8 Content
Page 63
MySource User Manual
TIP: This is a new feature added in MySource version 2.8 which
facilitates the editing of multiple tables in one go, rather than
having to Commit multiple times.
11 The text in the table you created is now displayed, as shown below:
Figure 8-6 Table displaying content
12
Now click preview
to see how this looks on your site.
Workshop 6 Copying and Pasting into the WYSIWYG Editor
This workshop takes you through the process of copying and pasting text from an
existing website or document into your MySource site. This is very useful if you are
migrating content from your old site into a new MySource site.
Make sure you are at Edit Page Contents: Standard Tab
1. Go through the same steps as Workshop 5 to create a new table and open the
WYSIWYG editor.
2. Go to your existing site or document and select the text you want to copy.
TIP: Use the keyboard shortcut Control+C to copy the text.
Chapter 8 Content
Page 64
MySource User Manual
3. Open Notepad (or an equivalent text editor) on you computer (click on Start,
Programs, Accessories, Notepad) and paste the text into it. By doing this you
will strip out any pre-formatted styles or code.
TIP: Use the PC keyboard shortcut Control+V to paste the text.
TIP: You should never copy and paste directly from a Word
document or website into the WYSIWYG editor as any existing code
e.g. links, images and formatting will conflict with the MySource
code and style sheet.
4. Now copy the text again from Notepad and paste it into the WYSIWYG editor.
5. The stylesheet that is created as part of your site design will be applied to your
text. You can then change the format of your text, selecting styles e.g.
Headings, from the drop down list or applying bold or italics etc.
Workshop 7 Inserting Images
This workshop takes you through the process of inserting an image into your page
using the WYSIWYG editor. Building on Workshop 6 we now add an image underneath
the text.
Make sure you have an image ready to upload somewhere on your hard drive, or
accessible through your LAN (Local Area Network). Images for the web need to be
either jpeg or gif format.
You can either insert the image into the same table as the one you created to enter
text, or create a new table underneath the existing one. In this example we insert the
image into a new table underneath the existing table.
Make sure you are in Edit Page, Contents: Standard Tab.
1. In the WYSIWYG editor, move your cursor to where you want to insert the
image and click on the Insert Image icon
Chapter 8 Content
.
Page 65
MySource User Manual
2. A window called Insert Image will pop up as in Figure 8-7 Insert Image window
below:
Figure 8-7 Insert Image window
3. Go to New Image: and click Browse, and a Choose File window will pop up.
4. Select the image and then click Upload. This will attach the image to the page
you are on.
5. Wait until the image has finished uploading, and it reads “Upload Complete”.
The time to complete depends on the file size.
6. You now see the image in the drop down list Images Attached to this page.
7. You can choose to Align the image to the left or right of any text.
8. You can choose to put a Border around the image.
9. You can add some space around the image to pad it out from the text, using
the Hspace and Vspace settings.
Chapter 8 Content
Page 66
MySource User Manual
10. Enter a short description or just the name of the image into the Image ALT Text
box.
TIP: Alt tags are used by search engines to read the image, and are
displayed when you hover the mouse over the image.
11. Now click Insert and the image is inserted into the WYSIWYG window.
12. Click Save, the blue bar shows on the table indicating you need to Commit to
save the change.
13. The image then appears in the table on your page as shown in Figure 8-8
below.
Figure 8-8 MySource tables with text and image
16.
Now click preview
to see how this looks in your site. In particular, roll your
mouse over the image to see the Alt tag.
Chapter 8 Content
Page 67
MySource User Manual
Workshop 8 Uploading/Attaching a File
This workshop takes you through the process of attaching a file to your page using the
WYSIWYG editor.
Make sure you have a file ready to upload somewhere on your hard drive, or accessible
through your LAN (Local Area Network).
Make sure you are in Edit Page, Contents: Standard tab.
1. In the WYSIWYG editor, type some text like “Here I am practicing attaching a
file to a page”, select the text and click on the Insert Link icon
.
2. A window called Insert URL will pop up as in Figure 8-9 below:
Figure 8-9 Insert URL window
We will go through the Insert URL window in detail in the next chapter – All About
Links, but for now, we will just practice browsing to upload a new file.
Chapter 8 Content
Page 68
MySource User Manual
3. In the Pages and Files section of the Insert URL window, click the New File
Browse button to locate the file that you want to link to. Click the Upload
button.
4. The file then appears in the Files: drop down list.
5. Select Yes in the New Window drop down list to display the document in a new
window.
6. Click Insert, Save, and Commit.
7. Now click preview
and check the link in your site.
♣ You have now successfully completed Workshops 5-8 ♣
This leads us nicely onto Chapter 9, which is all about links. Here we learn more about
the Insert URL properties and practice creating links within your pages. Later in
Chapter 11, we learn more about Attachments.
Chapter 8 Content
Page 69
MySource User Manual
Chapter 9
All About Links
This chapter takes you through all you need to know about Links, from setting up a
link to an external site, to creating links within a page. We take you through the Insert
URL window in detail and end the chapter with workshops that give you an opportunity
to put this into practice.
The different types of links we practice are as follows:
•
External link (e.g. to an external website or email address)
•
Internal link (to something within your MySource site) including:
–
To a file that is already attached to a MySource page
–
To a new file that you must first upload
–
To a specific place on a page within your MySource site (an anchor link)
To understand the different processes involved in creating each type of link, it is
important that you understand all the options that appear in the Insert URL window as
shown below:
Chapter 9 All About Links
Page 70
MySource User Manual
Figure 9-1 Insert URL window
URL Info
This section is used if you want to link to a destination external to your MySource site.
•
Protocol: select the protocol from the following options:
http://
Used to create a link to a web page with a normal connection
https:// Used to create a link to a web page with a secure connection using SSL
ftp://
Used to create a link to an ftp server
mailto: Used to create a link to an email address
•
Link: this is where you enter the address of the link as appropriate for the
protocol you select. E.g. if the protocol is http:// the link might be
http://www.squiz.net. If the protocol you select is mailto: the link might be
[email protected]
•
#Anchor: an anchor is a link to a particular place within a page (e.g. a ‘back to
top’ link). The anchor is marked with the <a name=”name”>. We practice
creating an anchor link in Workshop 13 later in this chapter.
Chapter 9 All About Links
Page 71
MySource User Manual
Pages and Files
This section is used to create a link to any site, page or file within your MySource
system.
•
Site: use the drop down list to select the site. If you want to insert a link to a
site, leave the blank item selected in the Pages drop down list, and select
Insert. If you want to link to a particular page within this site, go to the Pages
drop down list and select the appropriate page.
•
Pages: a list of pages within the selected site is made available in this drop
down list. However, when you first select a site, the blank page item is
selected to indicate that you want to link to the default index page of this site.
You can select a particular page to which to link and select Insert.
•
Files: if you have selected a page in the Pages drop down list, a list of files
within the selected page are made available in this drop down list. However,
when you first select a page, the blank file item is selected to indicate that you
want to link only to the page. You can select a particular file to which to link
and select Insert.
•
New File: this field appears if you have the current Site and Page selected,
allowing you to upload a file to this page. Select Browse to the find the new
file, and select Upload. The file is now available on the Files drop down list.
Anchors on Current Page
You can also link to any anchor that exists on the current page.
•
Anchors: select the anchor to which to link from this drop down list.
Workshop 13 takes you through adding an anchor and linking to it.
Options
•
Status Bar Text: this is text that appears in the grey bar in the bottom left
hand corner of the browser when you hover your mouse over the link.
Chapter 9 All About Links
Page 72
MySource User Manual
•
New Window: if you select this option your link opens in a new browser
window. For a new window, you can choose whether or not to show the tool
bar, menu bars, location bar, status bar or scroll bars and whether the window
is resizable or not. You can determine the exact size (height and width in
pixels) of the new browser window.
TIP: It is good practice to open your file in a new window rather
than in the same browser window as the one displaying the web
page. This allows users to resize and in particular print the
document separately.
Workshop 9 Linking to an Internal Page
This workshop takes you through linking a page to another page within your site.
Make sure you are on the Contents: Standard tab of the Edit Page screen.
1
In your test page, click on the Edit Contents icon
to bring up the WYSIWYG
editor.
2
Type in the text “This is a link to another page in my site” and then select the
text and click the Insert Link icon
.
3
This will bring up the Insert URL window as detailed in Figure 8-1.
4
Make sure the Sites drop down list is on “[THIS SITE]”.
5
Select a page within your site that you want link from the Pages drop down list.
6
Click Insert - the sentence is now a link (hover your mouse over it to check the
URL of the link).
7
Click Save and Commit.
8
Click Preview
to see your page and test the link.
TIP: If you have more than one site in your MySource system, you
can create an internal link to any page in any of the sites within
Chapter 9 All About Links
Page 73
MySource User Manual
your system.
Workshop 10 Linking to an External Site
This workshop takes you through linking to an external site.
You can link to the home page of any external website, or to a specific page within that
website by using the full URL of that page. Let’s use the Squiz site as an example and
practice linking to the News page.
1. In your test page, click on the Edit Contents icon
to bring up the WYSIWYG
editor.
2. Type in the text “This is a link to a external website” and then select the text
and click the Insert Link icon
.
3. This will bring up the Insert URL window as detailed above.
4. In the URL Info, set the Protocol to http://
5. In the Link textbox type in www.squiz.net/news
6. Select Yes for a New Window and tick all the checkboxes.
7. Click Insert – The sentence is now a link (hover your mouse over it to see the
URL).
8. Click Save and Commit.
9. Click Preview
to see your page and test the link.
Workshop 11 Linking to a File that you Upload
This workshop takes you through linking to a new file that must be uploaded to the
MySource system.
For this workshop, you will need to have a .doc or .pdf file available on your hard-drive
or accessible on your LAN (Local Area Network).
Chapter 9 All About Links
Page 74
MySource User Manual
1. In your test page, click on the Edit Contents icon
to bring up the WYSIWYG
editor.
2. Type in the text “This is a link to download a file that I am going to firstly
upload” and then select the text and click the Insert Link icon
.
3. This will bring up the Insert URL window as detailed above.
4. Ensure this site is selected in the Sites: drop down list and your homepage is
selected in the Pages: drop down list.
5. Next to New File, click the Browse button to find the file that you are going to
link to and click the Upload button. This will attach the file to this page.
6. Click Insert - The sentence will now be a link (hover your mouse over it to see
the URL).
6. Click Save and Commit.
7. Click Preview
to see your page and test the link.
Workshop 12 Linking to a File that is already attached to another
MySource page
This workshop takes you through linking to a file that is already attached to another
page.
Now that you have a page that has a file attached to it, (referred to here as
“attachment_one”), we will practice linking to that file from another page. If you
created more than one test page in Workshop 2 , click on the Contents tab of one of
those pages now. If not, create a “test page 2” now and click on the Contents tab.
1. In your second test page, click on the Edit Contents icon
to bring up the
WYSIWYG editor.
2. Type in the text “This is a link to download a file attached to test page one” and
then select the text and click the Insert Link icon
.
3. This will bring up the Insert URL window as detailed above.
Chapter 9 All About Links
Page 75
MySource User Manual
4. Under the Pages and Files headings, find “test page one” in the Pages drop
down list.
5. Under the Files drop down list, you will see a list of files that are attached to
test page one. Choose the “attachment_one” (or the name of the file you
uploaded).
6. Click Insert - the sentence will now be a link (hover your mouse over it to see
the URL).
7. Click Save and Commit, and then preview
to see your page and test the
link.
TIP: This is useful if you have many references throughout your site
to one particular file – it saves you having to attach that file to
every page.
Workshop 13 Setting up Anchor Links
In this workshop we will practice creating a “Back to Top” anchor link. Anchor links are
very useful for getting to a particular section on a page quickly without having to scroll
to find it.
Firstly you need to create the anchor itself:
1. In the WYSIWYG editor, type “#top#” (you can name it anything you like but
each anchor has to have a unique name) and some text next to the anchor like
“this is an anchor at the top of this page”.
TIP: The hash keys ensure the anchor doesn’t appear on your page
in the browser and it doesn’t appear in MySource either unless you
view it in the WYSIWYG editor.
2. Click Save, then Commit. You won’t be able to see #anchor# in your table, but
it is now be available in the Anchors on Current Page drop down list, in the
Insert URL screen.
Now make a link to your anchor:
Chapter 9 All About Links
Page 76
MySource User Manual
3. Again in the WYSIWYG editor, click on Enter a few times to take you quite far
down the page and then enter some text that says “Back to Top”.
4. Highlight the text and click on the Insert Link icon
.
5. From the Anchors on Current Page drop down list, select ‘”Top”.
6. Click Insert, Save and Commit.
7. Click Preview
to view your page and test the link.
8. Practice this in reverse by creating another anchor called “bottom#” at the
bottom of the page and a text link at the top of the page that says “This is a
link to a very important place further down this page!!”.
Workshop 14 Inserting a Link to an Email Address
This workshop takes you through creating a link to an email address using the mailto:
protocol, which will open the user’s email program and create a new email addressed
to the email address specified.
1. In the WYSIWYG editor, type some text next like “email to someone”, and click
on the Insert Link icon
.
2. Select the mailto: protocol and enter an email address into the Link textbox e.g.
[email protected]
3. Click Insert, Save, and Commit.
4. Click Preview
Chapter 9 All About Links
to view your page and test the link.
Page 77
MySource User Manual
Workshop 15 Removing and Editing a Link
To remove a link:
1. In the WYSIWYG editor, highlight the text or image that you wish to unlink in
the WYSIWYG editor and click on the 'remove link'
icon.
This will only delete the link - not the text, nor the linked image itself. A text
link will be converted back to its original style.
5. Click Insert, Save, Commit.
6. Click Preview
to view your page and test the changes.
♣ You have now successfully completed Workshops 9-15 ♣
Chapter 9 All About Links
Page 78
MySource User Manual
Chapter 10 More on Tables and Formatting
This chapter provides more detail about how you can edit the properties of tables in
MySource, to format content and control the layout of pages.
In the first workshop of Chapter 6, we created a simple table with one column and one
row for the purpose of adding some text to a page. You can add columns or rows to
tables at any time, and edit the properties of the table as a whole or of each individual
cell to format the content on your pages.
In this chapter, we will look firstly at the Edit Table Properties window before
moving on to editing individual cells and the Edit Cell Properties window.
Edit Table Properties
The Edit Table Properties window is displayed when the Edit Table Properties icon at
the top left hand side of the table is clicked as highlighted in Figure 10-1 below:
Edit Table
Properties
Edit Cell
Properties
Figure 10-1 Selecting the Edit Table Properties Icon
Chapter 10 More on Tables and Formatting
Page 79
MySource User Manual
The Edit Table Properties window is shown below:
Figure 10-2 Edit Table Properties
•
Width: this attribute defines how wide the table is on the page. You can enter a
value that is either the exact width of the table (in pixels), or a percentage of
the current screen width.
TIP: If you enter a percentage of the current screen width, the
width of the table will change if the window is resized.
•
Height: enter the height of the table in pixels or as a percentage of the current
screen height.
•
Background Colour: select a background colour to apply to the whole table.
Click on the star to bring up the colour picker.
Chapter 10 More on Tables and Formatting
Page 80
MySource User Manual
•
Background Image: select an image to use as the background for the table.
An image must first be attached to this page to allow you to select it from the
dropdown.
•
Alignment: select from Left, Centre or Right to align your table on the page, if
its width is less than 100%. By default, tables and cells are aligned to the left.
•
Border: this attribute indicates the width of the table border in pixels. You can
set the value to 0 to display the table with no border.
TIP: If no border setting is entered, newer browsers will display a
one-pixel border by default.
•
Cell Spacing – this attribute defines the amount of space between the cells in
the table. Enter a pixel value for the desired amount of cell spacing.
•
Cell Padding: this attribute defines the amount of space between the edges of
the cells and the contents of the cell. Enter a pixel value for the desired amount
of cell padding.
•
Change All Cell Types: this attribute defines the default cell type for all cells
within the table.
•
Show if Conditions: these conditions dictate the pre-requisites for the table to
be displayed on the page.
By default, this is set to Always Show, which means the table appears on your
page.
–
The other conditions in the drop down list are:
Access Groups: if you click the Customise button, you can choose from a list
of Access Groups, to specify that the table only appears on your page if the
user is logged in, and is a member of this Access Group.
–
Logged In: the table will only appear on your page if a user is logged-in to
your site.
–
Page Admin: the table will only appear on your page if a user is an
administrator for this page.
Chapter 10 More on Tables and Formatting
Page 81
MySource User Manual
–
Page Write Access: the table will only appear on your page if a user is an
administrator or editor for this page.
–
Show if special user data: you can set up additional data fields to be entered
for your users in the Special User Data tab of the Users area. If this option
is selected, you can specify criteria for displaying the page, based on the
special user data of the current user.
Click the Customise button, and select the organisation for which you will
specify the special user data conditions. Firstly, the user must be affiliated
with this organisation for the table to be displayed.
A list of any special user data fields of type Drop Down/List Box or Tickbox
List will be shown, along with the allowed values. You can then select “And”
from the drop down list and check the values that must all be checked for
the user, in order for the table to be displayed. You can also select “Or” and
the check the values, any one of which must be checked for the user, in
order for the table to be displayed.
–
Site Admin: the table will only appear on your page if a user is an
administrator for this site.
–
Site Write Access: the table will only appear on your page if a user is an
administrator or editor for this site.
TIP: Other options specific to the modules you have loaded in your
system may appear in the drop down list.
•
Show if Conditions: these are the conditions that apply to the Show If type
selected. They apply to the Show If types: Access Groups and Show if special
user data.
Deleting a Table
To delete a table, click on the Edit Table Properties icon of that table and in the Edit
Table Properties window, click on the Delete icon
Chapter 10 More on Tables and Formatting
as shown in Figure 10-2 above.
Page 82
MySource User Manual
Duplicating a Table
To duplicate a table, click on the Edit Table Properties icon of that table and in the Edit
Table Properties window, click on the Duplicate icon
as shown in Figure 10-2
above. Then go to the page that you want to paste the table and click on the paste
table icon. We will practice this in Workshop 17 later in this chapter.
Edit Cell Properties
To display the Edit Cell Properties screen click on the Edit Cell Properties icon at the
top right hand side of the cell in your table, as highlighted in Figure 10-2 above.
The Edit Table Cell Properties window is shown below:
Figure 10-3 Edit Cell Properties
The fields on the Edit Table Cell Properties window are very similar to those on the Edit
Table Properties window, but they are applied to this particular cell rather than the
table as a whole.
Chapter 10 More on Tables and Formatting
Page 83
MySource User Manual
•
Width: as with table width, cells can be an exact pixel width or a percentage.
However for cells, if a percentage is entered, it specifies the percentage of the
full table width. Setting the width for a cell is useful when you want to have
multiple columns of identical widths.
TIP: As with table widths, using percentages rather than specific
pixel widths is a better idea because it allows your table to be
displayed regardless of the window size (screen resolution).
•
Height: this attribute defines the height of the cell in pixels or as a percentage
of the table height. Again, column heights are useful when you want to have
multiple rows of identical heights regardless of their contents.
•
Colspan: this attribute is used to create cells that span multiple columns within
the table. This is similar to merging cells in either Microsoft Excel or Word.
Select the number of columns you want the cell to span from the drop down
list. The data within that cell then fills the width of the combined cells.
TIP: Cells always span to the right, so the Colspan has to be applied
to the leftmost cell in the span.
We will experiment with this in Workshop 16 later in this chapter.
•
Background Colour: select a background colour to apply to the individual cell.
Click on the star to bring up the colour picker.
•
Alignment: this attribute relates to the horizontal alignment and defines
whether the data in the cell is aligned with the left cell margin (Left), the right
cell margin (Right), or centered within the two (Centre).
•
Vertical Alignment: this attribute defines the vertical alignment of the data
within the cell, meaning whether the data is aligned with the top of the cell
(Top), with the bottom of the cell (Bottom), or vertically centered within the cell
(Middle). We will experiment with this in Workshop 16 later in this chapter.
Chapter 10 More on Tables and Formatting
Page 84
MySource User Manual
TIP: By default, cells are centered vertically, so you may have to
reset the vertical alignment of cells to Top if you have one cell that
contains more content than another but you want them both to
align to the top.
•
No Text Wrap: this attribute defines whether the text inside a cell stays on
one line and or wraps onto more than one line. This can be particularly useful
for things such as form elements within table cells where you want the label
and the input field to stay together.
•
Cell Type: set the cell type of an individual cell using this drop down list. (Cell
Types are covered in detail in Chapter 12).
•
Show If and Show If Conditions – these conditions have already been
covered above in Edit Table Properties section above. Set the value here for
individual cells rather than to the table as a whole.
We will now experiment with the Colspan, Vertical Alignment and Width properties in
the following workshop to create a table like the one in Figure 10-4 below.
Figure 10-4 Formatting Tables
Workshop 16 Formatting Tables
1. For the purposes of this exercise, create a new table with 2 columns and 1 row
in your test page, again using the default WYSIWYG cell type.
Chapter 10 More on Tables and Formatting
Page 85
MySource User Manual
2. Enter some text into the first cell and copy and paste it on about 10 lines as in
the example below.
TIP: You can either use soft returns by using Shift+Enter or hard
returns using only the Enter key.
3. Next, insert a small image into the column on the right.
Figure 10-5 Formatting Tables
4. To align the image to the top of the text, click Edit Cell Properties
for the
Cell containing the image, as shown in Figure 10-5 above. Select Top from the
Vertical Alignment drop down list.
5. Click Save and Commit.
For the second part of this exercise, we will insert a new row, which has one cell
spanning the two columns above it:
Chapter 10 More on Tables and Formatting
Page 86
MySource User Manual
6. Click the grey downward arrow
, as shown in Figure 10-5 above. The new
row has 2 columns.
7. Click on the Edit Cell Properties icon
in the first cell in the second row to
bring up the Edit Cell Properties window.
8. In the Colspan textbox, type in 2 to span the cell across 2 columns.
9. Click Save and Commit.
10. The page will refresh and you will see that the two cells have now merged into
one, to span the width of the two columns in the top row as shown in Figure
10-6 Merged Cell below:
11. You can now add more text in this one merged cell.
Figure 10-6 Merged Cell
Chapter 10 More on Tables and Formatting
Page 87
MySource User Manual
The image in the second cell in the top row is aligned to the edge of the text in the first
cell. For the last part of this exercise, we will create a space between them, as in
Figure 10-7 Inserted Column below:
Figure 10-7 Inserted Column
12. Insert a new column by clicking the grey sideways arrow
between the image
and text cells as highlighted in Figure 10-6 Merged Cell above.
13. Once the new column has been created, click on Edit Cell Properties
in the
new cell.
14. In the Width box type 10 (remember measurements are interpreted as pixels
by default unless you stipulate percentage by adding the % sign).
15. In the Contents tab, enter a space or insert a blank image (a transparent gif
file).
Chapter 10 More on Tables and Formatting
Page 88
MySource User Manual
TIP: If you have a cell with only a space in it, the browser will
register this in character width. A better alternative is to insert a
transparent image.
16. Click Save and Commit.
17. Click
Preview to see the changes to your page and experiment by changing
the width to your preference.
TIP: You can also amend the cell spacing and cell padding by
manipulating these settings in the Edit Cell or Edit Table Properties.
TIP: This is a very easy table. If you would like to now try
something more complicated, there is a workshop at the end of the
Chapter 14 – Custom Form that takes you through building a table
using more complex formatting.
Workshop 17 Copying and Pasting a Table
Now that you have a formatted table with content, we will now practice copying and
pasting that table so that you don’t have to create it again from scratch – this is very
useful for setting up ‘template’ style pages in your site e.g. a media release page or a
products page where you want each page to follow a consistent format.
1. Click on the Edit Table Properties
icon of the table that you want to copy.
2. In the Edit Table Properties window, click on the Duplicate icon
in the top
left hand corner.
3. The page refreshes and the Edit Table Properties window closes.
4. Next go to the page where you would like to paste the table.
Chapter 10 More on Tables and Formatting
Page 89
MySource User Manual
TIP: You can copy and paste tables between any page or site within
one MySource system.
5. Click on the paste icon
within your chosen page.
6. The page refreshes and your table is pasted on that page. You can now edit
over the contents of the table as required.
TIP: If you have more than one formatted table and you want to
copy all of them into a new page that is easy too! Simply click the
Copy All Tables icon
(at the top right hand side of the screen)
and then click on Paste Table in the new page.
7. You can also reorder the tables within a page, click on the Reorder Tables icon
which brings up the Reorder window table and move it up or down, by
clicking on the arrows.
8. Click Save and Commit.
9. Click Preview
to view the changes to your page.
♣ You have now successfully completed Workshops 16-17 ♣
Chapter 10 More on Tables and Formatting
Page 90
MySource User Manual
Chapter 11 Attachments
This chapter is all about the Edit Page, Attachments tab and the Edit File screen. It
is important that you understand how file attachments work in MySource so that you
can easily maintain them.
In Chapter 8 Content, we looked at ways of uploading images and files through the
WYSIWYG editor, so that they can be inserted on a page. The Attachments tab of the
Edit Page screen allows you to view and maintain all file attachments that have been
uploaded to a particular page.
More About Loading and Linking to Files
When you upload an image or file using the WYSIWYG editor, the file is added to the
File List in the Attachments tab and given a unique File ID.
If you then insert a link to that file using the WYSIWYG editor, you are in fact creating
a reference to that file on the page.
TIP: Only files loaded to the page you are currently editing are
shown on the Attachments tab for that page. A page may reference
a file loaded to another page within MySource, and such a
referenced file is not listed in the Attachments tab for this page.
When you delete an image or remove a link to a file in the WYSIWYG editor, you are
actually removing the reference to the image or file. The image or file is still listed in
the Attachments tab, because it is still loaded to the page.
However, if you delete a file through the Attachments tab, you are removing the file
itself from the MySource system, and it no longer appears listed on the Attachments
tab. Any references to the file in the Contents tab of any other page will show a
broken link or image on the page. If you remove a file within the Attachments tab,
you should also remove the broken links on pages.
Chapter 11 Attachments
Page 91
MySource User Manual
Edit Page - Attachments Tab
When you click on the Attachments tab of the Edit Page screen, you see a list of all the
files attached to that page in the File List. MySource supports most common file types,
such as Word Docs, PDFs, Excel Files, JPEGs, GIFs, ZIP files, Shockwave Files,
Quicktime Movies, Flash Files, etc.
Figure 4-1 below shows the Attachments tab for a page to which there is two files
attached:
Figure 11-1 Attachments Tab
The fields in the File Attachments section are as follows:
•
Reorder: you can re-order the files in the list by clicking on this icon. The
Reorder Files pop-up window is displayed. Click on the arrows to re-order the
files as required.
•
File List: the File List section lists all files currently attached to the page you
are editing. For each file attachment you can see a green tick
or red cross
indicating whether the file is visible or not (see the Visible? Section within the
Edit File screen description below), the File ID, a File Type icon, the File Name,
and a Delete checkbox.
You can click on the name of a file to display the Edit File screen for that
particular file. The Edit File screen is shown in Figure 11-2 and discussed
below.
Chapter 11 Attachments
Page 92
MySource User Manual
You can delete one or more files by ticking the Delete tickbox and clicking the
Delete icon at the bottom right of the File List.
TIP: If you delete a file on the File Attachments tab without
deleting the existing links in the content of other pages, this will
result in broken links on those pages. You can run the Broken Links
wizard after deleting a file, allowing you to find broken links and fix
them.
TIP: Deleting a file on the File Attachments tab deletes that file
from within MySource, thus freeing disk space on the server. If you
remove all links to a loaded file, it is good practice to delete the file
on the File Attachments tab to conserve disk space.
•
New File: clicking on the ‘New File’ icon
takes you to an empty Edit File
screen showing [New] at the top, allowing you to upload the new file and add
its details. The Edit File screen is discussed below.
Chapter 11 Attachments
Page 93
MySource User Manual
Edit Page - Edit File Screen
The Edit File screen is used to edit the details of an existing file or upload a new one,
and is shown in Figure 11-2 below:
Figure 11-2 Edit File Screen – New File
•
Upload/Overwrite: if you are in the Edit File screen because you selected New
File, this field is labeled “Upload” as shown in Figure 11-2 above. If you
selected to edit an existing file, it is labeled “Overwrite”, as seen in Figure 11-3
below in Workshop 18.
Chapter 11 Attachments
Page 94
MySource User Manual
Use this field to browse your computer's hard drive or LAN to locate the file to
attach to this page.
TIP: If a file has changed you need to reload it into MySource for
the changes to be visible in your site. “Overwrite” the existing files
in this case. DO NOT upload a new file because you will have to relink all your pages to it.
•
Move to page: if you want the file to sit on another page within MySource,
from this drop down list select another page in your site to which to attach it.
•
Filename: if you want to change the name of the file to be different in
MySource to that of the file when it was uploaded, type the new name into this
textbox. You can use any characters in your filename, but if you enter spaces
in the filename, they will be replaced with underscores.
TIP: If you do not enter a filename in this box, the name of the
original file will be used.
•
Keywords: all keywords that are entered here will be compared with the query
string entered by the user in external search engines. In addition, if you have
the MySource Site Search module installed in your system, these keywords will
also be searched.
•
File Type, File Size, Last Updated: these fields are all automatically
populated when you upload the file.
•
Log Hits: if you have the MySource Statistics reporter enabled in the
Configuration, you can set the Log Hits option to Yes to record the individual
hits to this file attachment. Note however, turning this option on increases the
speed of downloading the file and increases the amount of disk space your site
takes up on the web server, which may affect your hosting bill!
•
Visible?: if the file is set to visible and your MySource site design has been set
up accordingly, this file will be displayed on your site as a link allowing users to
download it. In addition, a graphic to indicate the type of file it is and a note of
Chapter 11 Attachments
Page 95
MySource User Manual
the size of the file and when it was last updated are displayed. This is where
the re-ordering of attachments function might be useful.
If you attach a file using the Attachments tab this field is set to “Visible” by
default. However, if you attach a file using the WYSIWYG editor, it is by default
set to “Not visible”.
TIP: Making a file visible also makes it visible to search engines, but
you must enter the appropriate keywords.
•
Thumbnail: if your MySource site design is set up to display a thumbnail of the
file attachment, you can upload your own graphic here to be used instead of the
the default graphics stored in MySource for a particular file type (e.g. Word
docs and PDFs). The graphic must be a thumbnail with a maximum size of 100
x 100 pixels.
Click Browse to find the thumbnail file to upload. You can click the Preview
button to preview the thumbnail, and enter a caption for the thumbnail into the
textbox.
Workshop 18 Overwriting a File Attachment
In this simple workshop we practice overwriting a file that is already attached to a
page, with a new version of the file.
In Workshop 8 in Chapter 8, we practiced attaching a file to a page using the
WYSIWYG editor. This is the most common way to attach files to a page. However if
you want to update the file that is attached to a page, you must overwrite the
uploaded file. We will practice overwriting a file in this workshop:
1. Go back to the page created in Workshop 8 and preview the page. Click on the
link to the file on your page and make a mental note of the document you are
viewing currently. Make an obvious change to the linked file and resave it
somewhere on your hard drive or LAN.
2. In the Edit Page: Attachments tab, bring up the Edit File screen for the file that
you want to overwrite to by clicking on its name.
Chapter 11 Attachments
Page 96
MySource User Manual
3. Note the Last Updated details.
4. Click the Browse button next to the Overwrite option and browse your hard
drive or LAN for the updated version of the file you want to overwrite within
MySource.
5. The file name and any keywords or description that you entered for the original
file will be kept.
Figure 11-3 Edit File – Existing File
6. Edit any of the details of the file you want to change and Commit your changes.
7. The contents of the file itself have now been overwritten and the Last Updated
details are updated.
8. Click
Preview to see your changes. Test the link to the file on your page to
make sure it opens the updated version of the file.
TIP: When you preview the new file, if you still see the older
version, try refreshing the page by clicking on the Refresh button in
the browser window. The keyboard shortcut for refresh is Shift+F5.
♣ You have now successfully completed Workshop 18 ♣
Chapter 11 Attachments
Page 97
MySource User Manual
Chapter 12 MySource Cell Types
So far, we have been adding content to pages using the WYSIWYG editing interface,
which is the most commonly used method. However, the WYSIWYG functionality is
only supported in Internet Explorer 5.5 and higher in a Windows environment, and is
not supported by Netscape or in the Macintosh/Linux environment.
The WYSIWYG cell type is the best to use if you just want to add text and images to
pages. However, you may want to do something a bit more complicated than this,
such as embed multimedia content or pull content from, or redirect to, another page.
There are therefore several other cell types available within the MySource system,
each with their own editing interface. The cell types available are:
•
Raw HTML
•
Rich Text
•
WYSIWYG
•
File/Image
•
iFrame
•
Nest Content
We have already looked at the functionality of the WYSIWYG editing interface in earlier
chapters, this chapter will explain the other available editing interfaces, and how and
when to use them.
Selecting a Cell Type
You can change the Cell Type on either the Edit Table Cell Properties screen for an
individual cell, or on the Edit Table Properties screen to change the cell type for all cells
in the table.
The drop down list for the Cell Type is shown in Figure 12-1 below:
Chapter 12 MySource Cell Types
Page 98
MySource User Manual
Figure 12-1 Select Cell Type
Select the required cell type, and then select Save, followed by Commit. The
appropriate editing interface is then displayed, when you next select the Edit Cell
Contents icon.
Raw HTML Cell Type
The Raw HTML cell type allows an author to write HTML code directly.
TIP: There is an HTML Cheatsheet in the Appendix of this manual.
Select Raw HTML from the Cell Type drop down list. You need to Save and Commit
this change and then click the Edit Contents
icon to open the Raw HTML Editing
Interface as shown in Figure 12-2 below:
Chapter 12 MySource Cell Types
Page 99
MySource User Manual
Figure 12-2 Raw HTML Editing Interface
Type in or copy and paste the HTML code into the textbox and click Save.
TIP: You do not need to include <html> <head> <title> or
<body> tags as they are set in the design. Use only the code that
would go between the <body> tags.
Preview your HTML code on your page by selecting the Preview icon
.
Rich Text Cell Type
The Rich Text cell type provides shortcut syntax for automatic hyperlinking of URLs.
Rich text editing is currently little used, but you may find it useful when the WYSIWYG
functionality is not supported.
If the Cell Type is set to Rich Text, the editing interface shown in Figure 12-3 is
displayed when you select the Edit Contents
Chapter 12 MySource Cell Types
icon.
Page 100
MySource User Manual
Figure 12-3 Rich Text Editing Interface
The top section of this window shows the rich text of your page. The rest of the
window helps you to easily insert images and create links without having to remember
the HTML syntax for these labels.
The bottom two sections help you to select an image or file to insert on your page, and
create links. HTML code is automatically generated in the Copy text box for your
images and links, and you can edit it and copy it into the Text text box containing your
rich text at the top of the screen.
The fields are as follows:
•
Text: enter any plain text to appear in this cell. You can also paste in the
appropriate HTML code generated for selected images or links from the Copy
text box.
Chapter 12 MySource Cell Types
Page 101
MySource User Manual
•
Copy: when you insert an image or create a link as described below, the HTML
code is automatically inserted into this text field. You can then copy and paste
this HTML code into the Text box above, in the position in which you want the
image or link to appear. Remember to replace the linked text provided for a
link, or the alt-text.
•
New Image/File: click the New button to upload a new image and insert it in
the rich text. On the Upload window displayed, browse to select the image to
upload. Click Commit, and the HTML code for this image is generated in the
Copy text box above.
•
Attached Images: click this button to insert any images already attached to
this page. The HTML code for this image is generated in the Copy text box
above.
•
Use currently selected image when creating links: if this box is ticked,
when a link is created, it creates the HTML for a link to the currently selected
image in the Copy text box.
If this box is not ticked, it creates the HTML for a text link in the Copy text box.
You should replace the “[LINKED TEXT HERE]” in the HTML created.
•
Site Pages: select a page in your site to which to link.
•
Attached Files: select from files already attached to this page to which to link.
•
Other URL: type in an external URL to which to link.
TIP: Be careful not to type over the http:// protocol tags.
File/Image Cell Type
The File/Image cell type allows you to attach files and images to a page, if for
example, the WYSIWYG interface is not available.
More commonly, this cell type is used to embed multimedia files to the page.
MySource supports most file types but common examples include:
Chapter 12 MySource Cell Types
Page 102
MySource User Manual
•
Word Docs,
•
PDFs,
•
Excel Files,
•
JPEGs,
•
GIFs,
•
ZIP Files,
•
Shockwave Files,
•
(MOV) Quicktime Movies,
•
(SWF) Flash Files.
If the Cell Type is set to File/Image, when you select the Edit Contents
icon the editing
interface shown in Figure 12-4 below is displayed:
Figure 12-4 File/Image Editing Interface
•
New File/Image: click the New button to upload a new file to this page.
•
Existing File/Image: you can select a file that is already attached to this page to
insert in this cell, by selecting it from the drop down list, or entering the File ID into
the text box.
Chapter 12 MySource Cell Types
Page 103
MySource User Manual
TIP: If the file is a Word document, PDF or Excel file a link to the
file, the size of the file and the date it was last updated will be
inserted in your page.
•
mbed Object: select Yes to embed the file in the page if it is an embeddable file
type e.g. Flash or MIDI files.
TIP: If public access is restricted to a page, .wmv, .asf and .asx
files cannot run as embedded files, since MySource cannot check
the permissions of these file types.
•
Embed Options: you can specify the visible size of the embedded file, whether it
will start automatically or not, if the controls are shown or not and whether it will
loop or not.
iFrame Cell Type
The iFrame cell type allows you to display an external website inside a single cell.
TIP: This cell type does NOT work in Netscape 4 or lower since
these browsers do not support the use of Frames.
If the Cell Type is set to iFrame, the editing interface shown in Figure 12-5 below is
displayed when you select Edit Contents
Chapter 12 MySource Cell Types
icon:
Page 104
E
MySource User Manual
Figure 12-5 iFrame Properties Interface
•
URL: enter the URL of the website you want to display in the iFrame cell.
•
Width and Height: enter the dimensions for the iFrame.
•
Enable Scrollbars: select whether scrollbars are displayed for the iFrame. If you
select Auto from this drop down list, the scroll bars are only displayed when the user
resizes the window and the scroll bars are required.
Nest Content Cell Type
The Nest Content cell type allows you to include the entire contents of another page from
within your MySource site into one single cell.
An example of where this could be useful is if you had a section on company news within
your home page. You could create a standard page called “News” and nest that page into a
cell within the home page. To keep the content of the home page fresh, you only have to
update the “News” page.
TIP: The Nest Content cell type nests another page into a single cell
on your page. Use the Pull Content page template to pull another
page into a full page.
Chapter 12 MySource Cell Types
Page 105
MySource User Manual
If the Cell Type is set to Nest Content, when you select Edit Contents
icon, the editing
interface shown in Figure 12-6 below is displayed:
Figure 12-6 Nest Content Interface
•
Nest Page: select the page from your site that you want to nest into this cell from
the drop down list.
•
Submit Variables: enter the variables to be submitted to this page, as KEY:VALUE
pairs. Enter each KEY:VALUE pair on a new line.
You must also select the method by which these variables should be passed to the
nested page in the drop down list on the right hand side. Select from Global,
GET/POST, GET, POST, or SESSION.
•
Keep Internal Links in this page?: if you select Yes, when a user clicks on a link
in the nested content, the linked page is also displayed as nested content of this
page. If you select No in this drop down list, when a user clicks on a link in the
nested content, the user is taken to the linked page.
Chapter 12 MySource Cell Types
Page 106
MySource User Manual
Chapter 13 MySource Page Templates
All pages in MySource must use a page template which determines the functional properties
of the page. Up until now, we have been adding content to pages using the Standard page
template which is the most common and easy to use.
However, there are several other page templates available as part of the core MySource
system. The core page templates in MySource v2.8 and above are:
•
Custom Form
•
Forbidden (login page)
•
Frames
•
Metadata Harvest Control List
•
Pull Content
•
Redirect
•
Standard
•
Sub Page Listings
In this chapter we will go through the Forbidden, Pull Content, Redirect, and Sub Page
Listing templates. The Custom Form template is more complex and will be covered in more
detail in Chapter 14. Frames are not generally used any more, and the Metadata Harvest
Control List is a very specialised template and these template types will not be explained
further in this manual.
Selecting a Page Template
You can either select the page template you want to use when you first create a new page
or sub-page, or you can change the template of an existing page from one type to another
on the Page Properties tab, under the Identification section as shown in Figure 13-1 below.
TIP: Please note that if you change the page template, you will lose
any existing content on that page.
Chapter 13 MySource Page Templates
Page 107
MySource User Manual
Figure 13-1 Changing the Page Template
TIP: You may see more templates in the drop down list depending
on the modules that have been installed in your system, as different
modules include different template types.
Chapter 13 MySource Page Templates
Page 108
MySource User Manual
TIP: When you change template type and click on Commit, the
Contents tab displays the name of the previous template type until
you click on the Contents tab.
Forbidden (login page)
This template is used to define the page displayed when users log in and log out.
The Forbidden (login page) template screen is shown in Figure 13-2 Forbidden Page below:
Chapter 13 MySource Page Templates
Page 109
MySource User Manual
Figure 13-2 Forbidden Page
Chapter 13 MySource Page Templates
Page 110
MySource User Manual
Title
•
Title: enter the title for the page into this textbox.
TIP: By default, this will not appear on your page within your site, but if
you want the title of the page to be printed on each page as a heading,
the design can be coded to do this.
Keyword Replacement
This section shows a summary of the available keyword replacements available for use in
the copy section. There are five that are very useful:
•
%firstname%: this keyword replacement prints the first name of the person who is
logged in. It is for use in the Logged In field in the Copy section.
•
%username_input%: this keyword replacement prints a text box for the user to
type in their username/login. It is for use in the Login Invite field in the Copy
section.
•
%password_input%: this keyword replacement prints a text box for the user to
type in their password. It is for use in the Login Invite field in the Copy section.
•
%login_button%: this keyword replacement prints a "login button". It is for use
in the Login Invite field in the Copy section.
•
%logout_button%: this keyword replacement prints a "logout button". It is for
use in the Logged In field in the Copy section.
Options
•
Login Redirect: select a page to which to re-direct a user as soon as they log in
from this drop down list.
•
Display Disclaimer: select the options for your disclaimer from this drop down list.
You can select no disclaimer, or to display it before, after or on the same page as the
login page.
Chapter 13 MySource Page Templates
Page 111
MySource User Manual
TIP: If this option is set to any value other than None, a Disclaimer
section will be shown in the Copy section at the bottom of the screen.
You can enter the copy for your disclaimer in this section.
•
Username Input Size: enter the size of the user name input box into this textbox.
•
Password Input Size: enter the size of the password input box into this textbox.
•
Login Button Label: enter the label to appear on the login button into this textbox.
•
Logout Button Label: enter the label to appear on the logout button into this
textbox.
•
Session Message Label: enter the label to be printed before the session message
into this textbox.
•
Access Reject Label: enter the label to be printed before the access reject message
into this textbox.
Copy
•
Login Invite: the body copy defined here is displayed when a user is not logged in
to your site. This typically contains a message that tells the user that they are not
logged in, and a login area for them to login.
•
Logged In: the body copy defined here is displayed when a user is logged in to your
site. As described above, this typically contains a message to tell the user they are
logged in, and a button to log out.
For each copy section, create a table and reference the relevant fields such as the text box
for a password (%password_input%) and for a logout button (%logout_button%). The
keyword replacements are discussed above.
TIP: To test both the Login Invite and Logged In copy, make sure that this
page is Live.
Chapter 13 MySource Page Templates
Page 112
MySource User Manual
Pull Content Page Template
This template allows you to have exactly the same content on two or more pages in your
MySource system. This can be very useful, as you only have to update the content in one
place.
An example of this might be if you have a “News” section of your site and want it to stand
alone as well as be part of a “Marketing” section. The “Marketing” section can use a Pull
Content template, to pull its content from the “News” section.
TIP: The Pull Content page template nests another page into a whole
page. You can use the Nest Content cell type to nest another page into
a single cell on your page.
The Pull Content page template is shown in Figure 13-3 below:
Chapter 13 MySource Page Templates
Page 113
MySource User Manual
Figure 13-3 Pull Content Page Contents
Target Page
•
Page Title: the Page Title is only applicable if your design has been set up to display
the page title at the top of each page. In this case, enter the page name in this
field. If you do not enter the page title, the title of the pulled page will be used,
which may not be appropriate for this new page.
•
Site: choose the site in your MySource system from which you will select the page to
pull.
•
Page: this drop down list contains the pages for the selected site. Choose the page
from which you want to pull content from this drop down list.
Chapter 13 MySource Page Templates
Page 114
MySource User Manual
•
Emulate Subpages: if you tick this box, any sub-pages of the page you are pulling
will be duplicated to become sub-pages of this page too. The sub-pages will also use
the pull content page template.
•
Remove Subpages: this function works in conjunction with the Emulate Sub-pages
function. If you tick this box, if you have selected to emulate the sub-pages of the
pulled page, any existing sub-pages of this page will be deleted. A warning message
will pop up to ensure you want to delete the existing sub-pages.
•
Edit the contents of the pulled page: this is a link to the Contents tab of the
pulled page. The pulling page has no contents of its own, and hence you update the
content of the pulling page by editing the content of the pulled page. To edit the
pulled page you can either use this link, or go directly to the pulled page and edit its
content.
•
Extra Page Information: this information is currently not used.
Custom Variables to Submit
TIP: These field are the same as found for the Nest Content cell type.
•
Submit Variable: enter the variables to be submitted to this page, as KEY:VALUE
pairs. Enter each KEY:VALUE pair on a new line.
You must also select the method by which these variables should be passed to the
nested page in the drop down list on the right hand side. Select from Global,
GET/POST, GET, POST, or SESSION.
•
Keep Internal Links in this page?: if you select Yes, when a user clicks on a link
in the nested content, the linked page is also displayed as nested content of this
page. If you select No in this drop down list, when a user clicks on a link in the
nested content, the user is taken to the linked page.
Chapter 13 MySource Page Templates
Page 115
MySource User Manual
Workshop 19 Creating a Pull Content Page
This workshop gives you the opportunity to practice using the pull content page template.
Make sure you are in the Site Properties screen.
1. Create a new page called 'Pull Content Test' and select Pull Content from the
Template drop down list above the Create New Pages? text box.
2. When you click Commit, you are taken to the Page Properties of this new page.
3. Click on the Contents tab.
4. Enter a title for this new page in the Page Title.
5. Select the site and page from which you want to pull content (make sure you select
a page to which you have added content, so you will be able to see the results when
you preview the page).
6. If you are selecting a page that contains sub-pages and want them to be emulated
here, click Emulate Subpages. (For the purposes of this exercise, ignore the
remaining options).
7. Commit your changes, check your site map and click preview to see the pull content
page in your site.
8. Now go back to the Contents: Pull Content tab and click on the
Edit the contents of the pulled page link
9. You are then taken to the Content tab of the pulled page.
10. Make an obvious change to this page and select Commit. Again, preview both your
test pull content page and your pulled page. The change is reflected on both pages,
but you have only had to make the change in one place!
♣ You have now successfully completed Workshop 19 ♣
Chapter 13 MySource Page Templates
Page 116
MySource User Manual
Redirect Page Template
This template allows you to forward traffic from this page to another page either within your
MySource site, or to an external site.
The Redirect template is shown below in Figure 13-4:
Figure 13-4 Redirect Page Contents
•
Site: choose the site in your MySource system to which you wish to redirect traffic.
•
Page: choose the page to which you would like to redirect traffic.
•
Extra URL Info: you can specify extra data to send as part of the URL query string
in this field (e.g. linking to other MySource modules such as Frontitia). Enter your
key value pairs separated by an ampersand e.g. “action=send&redirectID=5”.
•
or URL: specify an external site to which you would like to redirect traffic.
(e.g. www.google.com).
•
Pop up a new window? if set to Yes, the redirect will pop up in a new browser
window, and if set to No it will be displayed in the current window. If it is set to Yes,
a list of checkboxes is displayed which allow you to configure how the pop up window
appears (e.g. 750x500px, scrollbars, etc). The default selection for this drop down
list is No.
Chapter 13 MySource Page Templates
Page 117
MySource User Manual
Sub Page Listings Template
This template provides a listing of the sub-pages of the page you are currently editing,
which acts like a mini-site map. You can define the format for the sub-page listing, and this
page is automatically re-generated when changes are made to the page hierarchy of your
sub-pages.
This page template also utilises keyword replacements.
The Sub Page Listings contents screen is shown in Figure 13-5 below:
Chapter 13 MySource Page Templates
Page 118
MySource User Manual
Figure 13-5 Sub Page Listing Contents
Chapter 13 MySource Page Templates
Page 119
MySource User Manual
Format
There are two copies to be set for a Sub Page Listings page:
•
Body Copy: this allows you to define the copy to appear at the top or bottom of
each sub-page listing, which can include both text and images.
You can specify where your copy appears on the page by setting the Subpage Listing
Position drop down list in the Display Options section:
−
If Subpage Listing Position is set to “Above/Below Body Copy”, the listing of
the sub-pages appears above or below this body copy. In this case, you do
not need to use the %subpage_list% keyword replacement.
−
If you want to put copy both above and below the sub-page listing, you can
use the %subpage_list% to indicate the position for the list within the copy.
You must then set Subpage Listing Position to “Keyword Replace in Body
Copy”.
You can also use the keyword replacement "%page_count%" to display how many
sub-page listings there are.
•
Page Copy: this allows you to define the attributes that are shown for each page in
the sub-page listing. There are five keyword replacements for page attributes that
you can use. They are:
%name%: this keyword replacement prints the name of the sub-page and appears
as a link to that page.
%short_name%: this keyword replacement prints the short name of the sub-page,
and appears as a link to that page.
%thumbnail%: this keyword replacement displays the thumbnail of the sub-page
image, and appears as a link to that page.
%description%: this keyword replacement displays the description field sub-page.
%contents%: this keyword replacement displays the contents of the sub-page.
Chapter 13 MySource Page Templates
Page 120
MySource User Manual
TIP: You must include at least one of the five keyword
replacements described above in your Page Copy.
TIP: The page copy you enter will be displayed for each page, from
left to right on the screen.
Use the Subpage(s) Per Row and Subpage(s) Per Page settings to
determine the layout of your page.
Display Options
These settings control the look and feel of your Sub Page Listing page.
•
Title: enter the title for your page here.
TIP: By default, this will not appear on your page within your site,
but if you want the title of the page to be printed on each page as a
heading, the design can be coded to do this.
•
Show Horizontal Dividers: select Yes from this drop down list to display a
Horizontal rule (a thin grey line) separating each row of listings.
•
Show Vertical Dividers: select Yes from this drop down list to display a vertical
rule separating the page copy for each page.
•
Subpage(s) Per Row: enter how many listings are to appear per row.
TIP: If you leave this field blank or set it to zero, MySource will
display the page copy for each of your sub-pages in one row. The
page copy will be wrapped at a width allowing all the sub-pages to
appear on one row, so if you choose this option and you have many
sub-pages, you should keep your copy short.
Chapter 13 MySource Page Templates
Page 121
MySource User Manual
•
Subpage(s) Per Page: enter how many listings are to appear per page. If there are
more sub-pages than you specify here, a Next and Previous link automatically
appear to allow you to navigate between sets of listings.
•
Subpage Listing Position: as described above, this setting dictates where the subpage listings appear: above or below the Bodycopy of the page, or as a keyword
replacement in the Bodycopy.
•
Link Colour: you can set a different link colour from that set in the style sheet here.
If you have set a link colour, a tick appears in the box to the right of this field.
•
Have Anchors: set this drop down list to Yes to create anchors in the HTML of your
page for each sub-page. You can then include references to the anchors in the HTML
of your page for your Bodycopy or other pages.
•
Open Links in New Popup Window: set this drop down list to Yes, to open a link
in a new window upon clicking on a sub-page link on the Sub Page Listing page.
Pop-up Window Options
This section allows you to define the settings for the window in which your sub-page listing
pops up.
Page Exclusions
•
Exclude Page Types: this section allows you to exclude certain sub-pages from
appearing on your Sub Page Listing page. You can exclude sub-pages according to
their status – for example, you may wish to exclude Under Construction, Disabled
and Archived pages.
•
Exclude Specific Sub-Pages: you can also exclude specific sub-pages. Each of the
sub-pages of this page appear in this box, and by holding CTRL or SHFT and clicking
on the sub-page names, you can specify the sub-pages to exclude from appearing on
your Sub Page Listing page.
Chapter 13 MySource Page Templates
Page 122
MySource User Manual
Chapter 14 Custom Form
This chapter covers the Custom Form Page Template, which is used to build online forms
to allow users to submit information, gather feedback, conduct surveys, create online order
forms or add people to mailing lists.
To help you understand creating custom forms, this chapter covers in detail the Contents:
Custom Form tab including the Form, Format, Options, Submission Logs and Load/Save
Parameters tabs. Please note that the Page Properties, Internationalisation, Attachments,
Metadata and Security tabs will not be covered again in this chapter – if you need a
refresher on these, please refer to Chapter 7.
TIP: This chapter covers each of the sections on each of the tabs, in
a reference-style format.
As some of these tabs are quite long and complex, you may wish to
firstly go through the two workshops at the end of this chapter, and
then come back to some of the more complicated settings later.
The first workshop takes you through creating a simple form with
no formatting, and the second workshop goes on to add a more
complex format to that form.
Custom Form Tabs
Five new tabs are available as part of the Contents: Custom Form screen which allow you to
define the details of your form. The additional tabs are shown in the figure below:
Figure 14-1 Custom Form Tabs
They are:
•
Form
•
Format
Chapter 14 Custom Form
Page 123
MySource User Manual
•
Options
•
Submission Logs
•
Load/Save Parameters
About Forms
Before we take you through the new tabs and defining a form, we will describe a few things
about forms in general, as well as what happens when a user completes a form and hits the
Submit button, so that you can understand the concepts involved.
A form consists of questions, grouped into sections. For example, you may have a section
titled “Personal Details”, which has the questions: “Name”, “Address” and “Date of Birth”.
The questions for your form are defined on the Form tab.
You can have your questions appear on the page sequentially in the order of the sections, or
you can define a complex format using tables to define the layout and background colour.
This is done on the Format tab.
After the user has answered the questions on your form, MySource does several things with
the results. The diagram below shows what happens after a user has clicked the Submit
button on your form:
Staff
Your Form
Thank You
Message
Recipient Email
Submit
Submission
MySource
logged
Database
Receipt Email
As shown in the diagram above, when the user clicks the Submit button, the following
happens:
Chapter 14 Custom Form
Page 124
MySource User Manual
•
The form page is updated with a Thank You Message
•
The user receives a Receipt Email
•
A member (or members) of your staff receive Recipient Email
•
The submission is logged to the MySource database
All of the actions above are optional and you define your Thank You Message, Receipt Email
and Recipient Emails and other details about your form on the Options Tab. You can export
the submissions logged to the MySource database in the Submission Log tab.
Each of the tabs is now described in detail, followed by two workshops which take you
through creating a simple form, and adding a more complex layout.
Contents: Custom Form
When you click on Contents: Custom Form tab, the Summary page shown in Figure 14-2 is
displayed.
The Summary page is different to the Contents screen for other page templates, as it
contains shortcut links to allow you to get directly to the different sections that define your
custom form. No new information is entered on this page.
TIP: You can either use the tabs to get to the different screens to
define your form, or navigate to different sections of the tab
screens using the hyperlinks on this screen.
Chapter 14 Custom Form
Page 125
MySource User Manual
Figure 14-2 Custom Form Summary Page
Chapter 14 Custom Form
Page 126
MySource User Manual
Form Tab
When you click on the Form tab, the following page is displayed:
Figure 14-3 The Form Builder
This page is used to build the contents of your form and the questions it contains. It has
three main sections:
•
Form – Details
•
Form – Sections
•
Form – Rules
Chapter 14 Custom Form
Page 127
MySource User Manual
We will now go through each of these sections in detail.
Details
This section defines the general details for your form:
•
Form Title: enter a title in this field and tick the Show box to print the title at the
top of your form.
•
Form Alignment: this option determines the alignment of the form on the page:
left, right or centre.
•
Question Column Width: this optional field allows you to set the width of the
question column. The width can be expressed in pixels (numerals with no suffix) or
as a percentage (%).
•
Answer Column Width: this optional field allows you to set the width of the answer
column. The width can be expressed in pixels (numerals with no suffix) or as a
percentage (%).
•
Section Index: select the format in which your sections will be auto-numbered, e.g.
I, II, III or 1, 2, 3 or A, B, C. If the show? tickbox is unchecked, your sections will
not have any numbering or markings.
•
Question Index: this is the same as the Section Index, but is for questions within
sections. As with the Section Index above, if the show? tickbox is unchecked, your
questions will not have any numberings or markings.
•
Submit Button Text: this option allows you to change the text that appears on the
form’s Submit button. If left blank, the default text is "Submit".
•
Reset Button Text: this option allows you to change the text that appears on the
Reset button. If left blank, no Reset button will appear on the form.
•
Back Button Text: this option allows you to over-write the default text of “Back” for
the Back button. The Back button only appears if the form is paginated, i.e. if it runs
over more than one page. Pagination is set on the Options tab and is described later
in this chapter.
Chapter 14 Custom Form
Page 128
MySource User Manual
•
Next Button Text: as for the Back button, the Next button only appears if the form
is paginated. This option allows you to over-write the default text of “Next”.
Sections
For any form to function properly, you must have at least one Section, and at least one
Question. A Section can contain as many Questions as you like, and you can create as many
Sections as you like (e.g. Section A – Personal Details, Section B – Interests, etc).
Each Section of your form can appear on a page of its own. If a form has more than one
page, it is called a paginated form. You can set a form to be paginated on the Options tab,
and this is described later in this chapter.
For each section in your form, the following fields appear:
•
Section Title: this is where you enter the name for the section (e.g. "Personal
Details" or "Work History"). If you do not wish to split your form up into multiple
sections, leave this field blank.
•
Section Note: you can add additional information relating to the section here (e.g.
"Please list only qualifications for courses or certificates that have been completed.")
The Section Note appears underneath the Section Title on your form, however you
may still have a Section Note if you have left the Section Title blank.
•
Section Order: this is a number field, which is used to set out the order in which
the user will view the sections of the form. For example, if you created the section
"Qualifications" before "Personal Details" but would like "Personal Details" to be listed
on the page before "Qualifications", you can change the section order of "Personal
Details" to 1, and "Qualifications" to 2.
•
More Questions?: this is where you add questions to your form. Select the number
of questions that you wish to add to the section from the drop down list. Select the
type of field to be used for the question in the next drop down list, which can be
changed later.
After you click on Commit, extra fields will be created in this section, based on the
number and type of the questions that you requested.
Chapter 14 Custom Form
Page 129
MySource User Manual
The types of question fields that can be created are as follows:
−
Text Box: this question type is a box in which the user can enter any details
they want. A text box can be single or multiple rows, and can be limited to a
set amount of characters.
−
Dropdown/List Box: this question type is used when you want the user to
select one of the options that you have specified from a drop down list.
−
Tick-box list: this question type is used when you want the user to select
more than one option from a list of options. Users can see all options on the
page and can select the tick-box next to their choice. Tick-boxes can have a
default setting of ticked or un-ticked.
−
Date/Time: this question type contains the option to include date and time
fields (in the form of drop down or text box fields). This will be explained in
more detail later.
−
Email address: this question type is a text box that can be used for email
addresses. The validity of an email address entered is automatically verified only alpha-numeric characters and "." are acceptable and it must contain the
"@" character.
−
Country: this question type is a pull-down list containing a pre-existing list of
country names.
−
Login/Username: this question type is a text entry field that can be used
for login or user names. The validity of a login name entered is automatically
verified - only alphanumeric characters are acceptable.
−
Password: this question type is a text entry field that allows users to enter
passwords and displays this to the user as "*****".
−
Hidden Field: this field type is used for passing information between forms,
and is an advanced HTML concept requiring knowledge of scripting. We will
not go into any more detail here.
Chapter 14 Custom Form
Page 130
MySource User Manual
You will be presented with different editing options depending on the type of
question you select. However, there are several fields that are common to all
question types and are shown in Figure 14-4 below.
Common Question Fields
Figure 14-4 Common Question Fields
•
Auto Answer: this field allows you to choose from a number of values to be
automatically filled in, for example User’s Name, User’s Email Address. MySource
can only do this if the user has a MySource account and is logged in. If you
select No Auto Answer, the question will appear blank.
•
Special Information: the Special Information field is a flag to MySource that
the answer to this question has a special meaning. It can have the following
values:
−
User’s Name/Firstname/Surname/Email: if one of these types is
chosen for a question, the answers are used in the From field for the
Recipient Email, which is sent when the user clicks Submit. Recipient
email is discussed in the Options tab later in this chapter.
TIP: You should set a User’s Name for a single field, or a User’s
Firstname and Surname field if you are asking separate questions for this
information.
Chapter 14 Custom Form
Page 131
MySource User Manual
TIP: If you have not created questions set as special information, or the
user leaves these fields blank, the values in the Recipient Email will
default to the webmaster details that have been set in the Config tab.
−
Send a note to these friends’ email addresses: an email will be sent
to each of the email addresses entered into this field. The details for the
email sent are defined on the Options tab, in the Send to Friends Options
section, which is described later in this chapter.
•
Field Type: this drop down list indicates the type of question field. In Figure
14-4 above, this is a Text Box question. You can change the type of your
question by selecting a new item from this drop down list. When you next click
on Commit, the screen will be updated with the fields appropriate to that
question.
•
Order: this option is the same as Section Order, but applies to individual
questions within a section.
•
Remove?: tick this box to delete this question from the form the next time you
click on Commit.
•
Title: enter the title for the question in this field.
•
Note: enter more information on the question in this field (e.g. "This is a
compulsory question).
The fields that are presented for the different question types are now discussed.
Please note that there are several fields that are common to several question types,
and these will be described the first time they appear only.
Chapter 14 Custom Form
Page 132
MySource User Manual
Text Box Question Fields
The fields that are required for a Text Box question type are shown in the diagram
below:
Figure 14-5 Text Box Question Fields
The fields that are specific to the Text Box question type are described below:
•
Default: enter text that will be the default answer for this question in this box.
•
Select the text on entry: if this box is checked, the cursor will automatically be
placed in the text box question when the page is displayed to a user.
•
Width: specify the width of the text box question on your page. This is measured
in characters.
•
Height: you can specify that this is a multi-line text box question, by entering a
value of more than 1 in this field. If you specify a value of 1, this is a single line
text box question.
•
Maximum Length: enter a limit for the number of characters that can be typed
into this text box question on your page.
•
Extra: this field allows you to enter an additional HTML parameter for your text
question. For example you may wish to specify “class=smallprint” to reference a
style from your stylesheet – please note this is fairly advanced and requires
knowledge of HTML.
Chapter 14 Custom Form
Page 133
MySource User Manual
Drop Down/List Box Question Fields
The fields that are required for a Dropdown/List Box question type are shown in the
diagram below:
Figure 14-6 Dropdown/List Box fields
Default, Width, Height were discussed in the previous section for the Text Box
question type. The fields that are specific to the Dropdown/List Box question type
are discussed below:
•
Options: enter each option available for the question, one per line.
•
Multiple: if you tick this box, users will be able to select multiple options from
the list provided.
Tickbox Question Fields
The fields that are required for a Tickbox question type are shown in the diagram
below:
Chapter 14 Custom Form
Page 134
MySource User Manual
Figure 14-7 Tickbox Question Fields
Options, Default, Multiple were discussed in the previous section. The fields that are
specific to the Tickbox question type are discussed below:
•
Other: This provides an "Other" tickbox that the user can select if none of the
above options apply. A textbox is automatically provided next to the “Other"
option, so that the user can type in any relevant information.
•
Columns: specify the number of columns used to display your tickbox options.
Date/Time Question Fields
The fields that are required for a Date/Time question type are shown in the diagram
below:
Chapter 14 Custom Form
Page 135
MySource User Manual
Figure 14-8 Date and Time Question Fields
The fields that are specific to the Date and Time question type are discussed below:
•
Config: this drop down allows you to select blank or allow “circa”. If you select
allow “circa”, a question will be displayed on your page alongside the date
question, which has two options: blank and circa. This allows your user to
indicate that the date entered into the main answer is circa rather than a definite
date.
If you select blank from this drop down list, no additional drop down list appears
next to your date.
•
Format: select the format required for the date entered into this question. You
can choose from the international format “dd/mm/yyyy” or the American
“mm/dd/yyyy” format.
The following options are available for each option of Day, Month, Year, Hour,
Minute, Second:
Chapter 14 Custom Form
Page 136
MySource User Manual
•
Show: select whether to show this component of the date/time.
•
Allow Blank: select whether this component of the date/time can be left blank.
•
Select/Text box: these are radio buttons allowing you to choose whether this
question appears as a Text or Select box. If this is set to Text the user must
type in text, and if this is set to Select the user can pick a value from a drop
down list.
•
Min: allows you to set a minimum parameter for this component of the date/time
•
Max: allows you to set a maximum parameter for this component of the
date/time
Email Address Question Fields
The fields that are required for an Email Address question type are shown in the
diagram below:
Figure 14-9 Email Address Question Fields
This question type has the same fields as a Textbox question. However, if used in
conjunction with the Rule "This question must be answered correctly", it will validate
the email address as having an appropriate structure - only characters and "." are
acceptable and it must contain a "@" character.
See the section on Rules below for
more information.
Chapter 14 Custom Form
Page 137
MySource User Manual
Country Question Fields
The fields that are required for a Country question type are shown in the diagram
below:
Figure 14-10 Country Question Fields
This question type has the same fields as a Dropdown/List box question, but is prepopulated with a list of countries. You can select a subset of these countries to be
displayed in your drop down list by clicking on Ctrl as you click on each new option,
or using your mouse (highlight and drag) to select them all.
Chapter 14 Custom Form
Page 138
MySource User Manual
Login/Username Question Fields
The fields that are required for a Login/Username question type are shown in the
diagram below:
Figure 14-11 Login/Username Question Fields
This question type has the same fields as a Textbox question. However, if it is used
in conjunction with the Rule "this question must be answered correctly", the
username will automatically be validated to be 6 characters or more with no spaces.
See the section on Rules below for more information.
Password Question Fields
The fields that are required for a Password question type are shown in the diagram
below:
Figure 14-12 Password Question Fields
Chapter 14 Custom Form
Page 139
MySource User Manual
This question type has the same fields as a Text Box question, but anything the user
types into the text box will appear displayed as asterisks ("*").
You can specify that a minimum length required for users entering a password, and if
you check the Require Verification tick box, another password box will appear
underneath the first box. The two passwords typed into the boxes must match
before the form will be submitted.
New Section
To add a new section to your form, enter a title for the section and click on the Commit
button. A new section is added to your screen showing the fields for the new form section
as described above.
Rules
Rules are used to stop people submitting information that is incomplete or incorrect. By
default, there are no rules established for a form.
This section at the bottom of the Form tab shows the rules you have defined for your form.
The diagram below shows one rule entered for Question 1:
Figure 14-13 Rules
To create a new rule, tick the box next to New Rule? and select the question on your form
from the drop down list to which the new rule will apply. Click on Commit, and a set of
criteria that you can use to create your rule is displayed:
Chapter 14 Custom Form
Page 140
MySource User Manual
•
Remove?: checking this box will remove the rule the next time the page is
committed.
•
Question: when you first add a rule, you select a question to which the rule is to
apply. You can change the question to which this rule applies at any time, by
selecting the appropriate question from this drop down list.
•
Rule: in the first drop down list, select whether the answer given in the form Must
or Must Not conform to the specified condition. Select the condition for the rule from
second drop down list.
The condition can be selected from one of the following:
−
Be answered: select this option to specify that the form will not be
submitted if this question is left blank.
−
Be answered correctly: select this option to specify that the form will not
be submitted if this question is not answered correctly. This is used for the
Email Address and Login/Username question types for which the format of a
valid answer is pre-determined:
o
An email address must contain characters and “.” characters and a
single "@" character
o
a login must contain alphanumeric characters only.
Note: A question to which this rule condition has been applied must not be
left blank.
−
Be correct, if answered: select this option to specify that the question may
be answered or not, but if it is answered, it must be answered correctly – as
specified in the previous option.
−
Be a number: select this option to specify that the form will not be
submitted if the answer contains characters other than 0-9.
For the following fields, if you select the specified value in the Rule drop down
list, additional fields are displayed allowing you to enter additional data for the
rule when you click on Commit. These additional fields are also detailed in the
explanations below:
Chapter 14 Custom Form
Page 141
MySource User Manual
−
Equal: select this option to specify that the answer must be equal to a
particular value. You can enter a value that the answer must be equal to into
the Value field, or select another question in the form that the value must be
equal to.
−
Contain: select this option to specify that the answer must contain a
particular value. Enter a value that the answer must contain into the Value
field.
−
Be found in: select this option to specify that the answer must be found in a
particular value. Enter the value that the answer must be found in into the
Value field.
−
Be greater than: select this option to specify that the answer must be
greater than a particular value. Enter the value that the answer must be
greater than into the Value field.
−
Be less than: select this option to specify that the answer must be less than
a particular value. Enter the value that the answer must be less than into the
Value field.
−
Match the extended regexp: select this option to specify that the answer
must match this regular expression. Enter the value that the answer must be
equal to into the Value field.
TIP: A regular expression allows you to define a pattern which the
answer must match – for example, you could specify “*apples” to specify
that the answer may contain any number of characters followed by the
string “apples”.
•
Default Description: this field shows you the description that is displayed if a user’s
input does not comply with any of the rules. The default description is of the format:
Rule Broken: Q (a) (Question Name) (must/must not) (match rule).
For example, in Figure 14-13 above, the default description is “Rule Broken:
Question (I-a) must be answered”.
Chapter 14 Custom Form
Page 142
MySource User Manual
•
Alt. Desc: this field allows you to provide an alternative description to be used
instead of the default description, shown above. Enter the new description into the
field.
Selective Emails
If you have a question which is of the type Dropdown/List Box or Tickbox List, the following
section will be displayed at the bottom of the Form tab:
Figure 14-14 Selective Emails
When you have a question with preset options for the answers such as the Dropdown/List
Box or Tickbox List, you can opt to send the form submissions to different people based on
the answer to this question.
In the example above the form will be sent to “[email protected]” if the user selects “Sales”,
or to “[email protected]” if the user selects “Technical” or to “[email protected]” if the
user selects “Accounts”. This way the user’s enquiry can be answered by the correct
department without setting up multiple forms.
Formelements Keyword
The Formelements Keyword section is displayed at the bottom of the Form tab:
Chapter 14 Custom Form
Page 143
MySource User Manual
Figure 14-15 Formelements Keyword
A text box is displayed for each question that you have created. You can enter a keyword
here so that the answer can be referred to in the body copy of your thank you message.
The thank you message is discussed below on the Options tab, and is the copy that is
shown once the user has clicked Submit.
An example of the use of Formelement Keywords is if you have a question that asks the
user to enter their name, you could enter a Formelement Keyword of “Name”. You could
then enter a thank you message copy of
“Thank you %name%, your order has been submitted.”
Chapter 14 Custom Form
Page 144
MySource User Manual
Options Tab
In the previous section we discussed how to use the Form tab of the Contents: Custom
Form tab to define the questions for your form, and the rules to be applied to the answers.
In this section we describe the Options tab which allows you to define some of the options
for your form, such as whether it should be broken down into pages, and who should be
emailed with the answers.
The options are divided into the following sections, each of which is explained below:
•
General
•
Recipient Email
•
Receipt Email
•
Send to Friends
General Options
The General Options section is shown in the figure below:
Figure 14-16 General Options
Chapter 14 Custom Form
Page 145
MySource User Manual
•
Title: enter the title for your form page into this text box. This is not printed on your
page unless it is coded to do so in your site design.
•
Main Body Copy: enter the body copy to be displayed at the top of your form page.
TIP: You enter both the body copy for your form page and the thank you
message copy using tables and the WYSIWYG editor, just as you do for
the contents of a standard page. Please refer to Chapter 8 if you need a
refresher on this.
•
Thank You Message: enter the copy to be displayed as a thank you message after
the user has clicked on Submit.
TIP: If Hide Results is set to Yes, only the thank you message is shown
after Submit is clicked. If Hide Results is set to No, the thank you
message is shown at the top of the page as well as the form answers.
•
Paginate: select Yes to show the different sections you have defined on a separate
page. Next and Previous buttons are automatically displayed on your pages. If you
select No, your sections will be displayed on a single page with a scrollbar if
necessary.
TIP: The form uses the sections you have defined to determine where the
page breaks should be. If your form has only one section, the Paginate
option has no effect.
•
Log Form Submission: select Yes to log the form submission along with all of the
answers. If you select No, the form submission will not be logged.
TIP: Submissions are logged to the MySource database. You can export
the submission log to CSV or XML format on the Submission Log tab,
which is described later in this chapter.
•
Hide Results: select Yes to remove the form questions and display only the thank
you message after the user has clicked Submit. If you select No, the entered
answers remain displayed on the page after the user has clicked on Submit.
Chapter 14 Custom Form
Page 146
MySource User Manual
•
Allow Validation of Details: select Yes to allow the user the option to go back to
the form and validate their details. In this case, a Validation Body Copy area is
added to the General Options section at the top. After the user clicks on Submit, a
page is displayed showing the Validation Body Copy, and a Back and a Submit
button.
If you select No, the form is submitted as soon as the Submit button is clicked.
Recipient Email Options
The Recipient Email options section allows you to define the details for an email to be sent
to your staff, when the Submit button is clicked. For example, you may wish the sales
department to receive an email when an order form is submitted. This section is shown in
the figure below:
Figure 14-17 Recipient Email Options
•
Recipient Emails: enter the addresses of people to be emailed when the user clicks
Submit on your form. Enter each email address on a new line.
•
Recipient Email Body: enter the body of the email to be sent in addition to the
answers from the form fields.
•
Send Recipient Email as HTML: select Yes to send the email as HTML, and No to
send it as plain text.
Chapter 14 Custom Form
Page 147
MySource User Manual
•
Send Form Information: select Yes to send the following form information in the
email: title, submission date, sending URL, site name and ID, page name and ID.
Select No to omit the form information from the email.
•
Suppress Form Answers: select No to send the form answers in the email, and Yes
to suppress them.
Receipt Email Options
The Receipt Email Options section allows you to define an email to be sent back to the user,
when the Submit button is clicked. The section is shown in the figure below:
Figure 14-18 Receipt Email Options
•
Receipt Email: select Yes in this drop down list to send an email to the user with a
copy of the answers, after the Submit button is clicked. If you select No, an email
will not be sent.
•
From Email Address: enter the email address that the email will be sent from.
TIP: If you do not specify an email address in this field, the email address
of the webmaster will be used.
•
Subject: enter the subject title to be used for the email.
Chapter 14 Custom Form
Page 148
MySource User Manual
•
Receipt Email Body: enter the body of the email to be sent in addition to the
answers to the form questions.
•
Send Receipt as HTML: select Yes to send the email as HTML, or No to send it as
plain text.
•
Suppress Form Answers: select No to send the form answers in the email, and Yes
to suppress them.
Send to Friends Options
The Send To Friends section allows you to define an email to be sent to the user’s friends,
when the Submit button is clicked. If the form contains a question that has the Special
Information option set to "send a note to these friends’ email addresses", all the email
addresses entered into that field will receive an email when the form is submitted.
TIP: The Special Information option is set for a question on the Form tab,
which is described earlier in this chapter under Sections.
The section is shown in the figure below:
Figure 14-19 Send To Friends Options
Chapter 14 Custom Form
Page 149
MySource User Manual
•
From Email Address: enter the email address from which the Send To A Friend
email will be sent. e.g. 'Webmaster <[email protected]>'.
•
Subject: enter the subject for the Send To A Friend email.
•
Message: enter the text for the Send To A Friend email.
Chapter 14 Custom Form
Page 150
MySource User Manual
Format Tab
The Format tab allows you to define the layout of your form. You can define a complex table
structure, just as you do for the body copy of a standard page, and then use keyword
replacements to reference all of the elements of your form (i.e: questions, section titles,
etc) using the WYSIWYG editor.
TIP: You do not have to use the format tab when creating a form. Whilst
you can achieve greater control of the layout of your form, it can take you
considerably longer to set up the form.
The Format tab is shown in the diagram below:
Figure 14-20 Format Tab
Chapter 14 Custom Form
Page 151
MySource User Manual
Note
This section shows the keywords you can use in the body copy of your form, to reference
the elements of your form that you defined on the Form and Options tab described
previously in this chapter.
TIP: A set of keywords will be available for each section and question
that you have created – that is, you can use the following keywords for
Section X, Question Y:
%section_X_index%
%section_X_question_Y_title%
%section_X_title%
%section_X_question_Y_note%
%section_X_note%
%section_X_question_Y_answer%
%section_X_question_Y_index%
%section_X_question_Y_answer_text%
As an example, let’s consider a form that contains one section with four questions:
•
First Name
•
Surname
•
Email
•
Comments
To reference the text for your first question (First Name), you can use the keyword
replacement:
%section_1_question_1_title%
To reference the text box where people type in their answer, you use the keyword
replacement:
%section_1_question_1_answer%
You can reference the other fields in a similar manner.
Chapter 14 Custom Form
Page 152
MySource User Manual
Define Format
This section allows you to create one or more tables to define the layout of your form. You
do this in exactly the same way as you did for a standard page, as described in Chapter 8
previously.
TIP: Define the questions for your form using the Form tab initially,
preview it and then print the page out so that you can reference the
different section and question numbers easily.
Workshop 21 at the end of this chapter takes you through defining a complex layout for an
example form.
Chapter 14 Custom Form
Page 153
MySource User Manual
Submission Logs Tab
In this section we describe the Submission Logs tab which allows you to define the logs
which are kept of user submissions using this form. From this tab, you can either export all
submissions made through the form into a CSV or XML, or view individual log submissions.
The Submission Logs tab is shown in the diagram below:
Figure 14-21 Submission Logs Tab
Chapter 14 Custom Form
Page 154
MySource User Manual
Export
•
From/To: select the To and From dates that define the period for the submissions to
be included in the export. Leave the From date blank if you want to include all
submissions.
•
Export Type: select the format of export file to be created:
−
CSV is a comma separated file, which you can then open up in Microsoft Excel
or a similar spreadsheet program.
−
XML will export your data into a format that is readable by a number of other
XML compliant applications.
•
Show Headers: this option is only relevant for an export to CSV format. Set this
option to Yes to give the columns of information in the CSV file headers describing
the contents of the column. Set this option to No to omit the headers.
•
Show Fields: by default, all fields in the form are selected for inclusion in the export
file. Uncheck the box next to any options that you do not wish to export.
Log History
This section displays the individual submissions made through the form.
•
ID: this is the identifier of the submission made.
•
Submission Time: this is the time of the submission.
•
User: this is the user who submitted the form, if the user has logged into a
MySource account (either in the MySource system, or as a user in a member’s area).
TIP: If no user information is available to MySource, the user will appear
as “Anonymous”.
•
Delete: check this box to delete this submission log entry when you click on the
Commit button.
•
View Log: click this button to view the details of the individual log in the section
below.
Chapter 14 Custom Form
Page 155
MySource User Manual
Individual Log
This section displays the details of the chosen log from Log History.
•
Submission Time: this is the time of the submission.
•
Submission By: this is the user who submitted the form, if the user has logged into
a MySource account (either in the MySource system, or as a user in a member’s
area).
•
Answers: this section shows the question title and the answer given to each of the
questions on the form.
Commit
When you click on the Commit button, a dialog box will appear prompting you to select
where you would like to save your export file.
Chapter 14 Custom Form
Page 156
MySource User Manual
Load/Save Parameters Tab
The Load/Save Parameters tab allows you to save the settings for your custom form to a file
with file extension .param. You can then upload this file to the load/save parameters tab of
another custom form page template.
TIP: This can be used to copy forms across separate MySource systems,
or if you have several forms that are similar, you can change specific
sections of the form once and upload them to the other forms.
You can save your parameters either internally within MySource (this is referred to as
loading/saving to an account), or to an external file (this is referred to as
loading/downloading).
Load Parameters
The Load section of this tab is shown in the diagram below:
Chapter 14 Custom Form
Page 157
MySource User Manual
Figure 14-22 Load Parameters
•
From Account: this drop down list shows each of the previous saves to your
account. Select the account you wish to upload.
•
Upload: click on the Browse button to locate the previously saved file to upload.
When you click on the Commit button, the settings in this file are uploaded.
•
Include: as you can see in Figure 14-22 Load Parameters above, a checkbox exists
for every section of every tab on your form. Tick the box to load the specified
section of settings to your form.
Save Parameters
The Save section of this tab is shown in the diagram below:
Chapter 14 Custom Form
Page 158
MySource User Manual
Figure 14-23 Save Parameters
•
To Account: enter a name for the account to which your settings are to be saved
within MySource. The default account name comprises your account ID, followed by
the date.
TIP: If you want to save your settings to your account more than on a
particular date, change the account name by adding a suffix for example.
If you use the name of an existing account it will be overwritten.
•
Download: type in the name of the file to which to download your settings.
TIP: MySource saves your settings using this filename, and the suffix
“.param”.
Chapter 14 Custom Form
Page 159
MySource User Manual
When you click on the Commit button, you will be prompted to specify whether you
want to open the file, or save it. If you select Save, you are prompted to select the
directory into which the file is saved. Click Save to save the settings.
•
Include: as you can see in Figure 14-23 Save Parameters above, a checkbox exists
for every section of every tab on your form. Tick the box to save the specified
section of settings from your form.
Workshop 20 Defining a Simple Form
This workshop takes you through the process of creating a simple “Contact Us” form, which
contains eight simple questions. The “Contact Us” form will have a simple layout, and we
will not use the Format tab during this workshop.
The “Contact Us” form we will create is as follows:
Figure 14-24 Simple Custom Form
1. Create a page in your site and choose Custom Form from the Page Template drop down
list.
Firstly we will set up the options for your form:
2. Click on the Options tab.
3. Enter some text for the Main Body Copy to appear at the top of the form, and a Thank
You Message to appear when the user has pressed Submit.
Chapter 14 Custom Form
Page 160
MySource User Manual
4. Make sure Paginate, and Allow Validation of Details are set to No.
5. Set Hide Results and Log Form Submissions to Yes.
6. Enter your email address in the Recipient Emails section so that you receive an email
when a user presses Submit. Leave the remaining options in this section as they are.
7. In the Receipt Email Options section, set Receipt Email to No so that the user doesn’t
receive an email when they click on Submit. Leave all remaining options as they are.
Now let’s add questions to the form:
8. Click on the Form tab.
9. Under the Form – Details section, uncheck the show? check box for Form Title, Section
Index and Question Index. Leave the other settings in this section as they are.
10. In Form – Section I, enter “Contact Us” for the Section Title and “* notes compulsory
field.” for the Section Note.
11. Go to the More Questions field and select “8” from the first drop down list, and “Text
Box” from the second drop down list. Click Commit to add the questions.
12. For “Question I-a”, set the Auto Answer drop down list to “User’s Name”, to
automatically place the user’s name in this field. Set the Special Information drop down
list to “User’s Name” to flag the answer to this question as a user name – this will
appear in the Recipient Email that you receive.
13. Change the Title to “Name:*”. Leave all other settings for “Question I-a” as they are.
14. For “Question I-b”, set the Auto Answer drop down list to “User’s Email”. Set the Special
Information drop down list to “User’s Email”. Change the Field Type drop down list from
“Text Box” to “Email Address”. Change the Title to “Email:*”. Leave all other settings for
“Question I-b” as they are.
15. For “Question I-c”, change the Title to “Company:”. Leave all other settings for
“Question I-c” as they are.
16. For “Question I-d”, change the Title to “Phone:”. Leave all other settings for “Question Id” as they are.
Chapter 14 Custom Form
Page 161
MySource User Manual
17. For “Question I-e”, change the Field Type drop down list from “Text Box” to “Country”.
Change the Title to “Country:”. Leave all other settings for “Question I-e” as they are.
18. For “Question I-f”, change the Title to “Comments:”. Set the Width, Height and
Maximum Length to be “90”, “7” and “3000” respectively. Leave all other settings for
“Question I-f” as they are.
19. For “Question I-g”, change the Field Type drop down list from “Text Box” to “Tickbox
List”. Change the Title to “How did you hear about us?”. Leave all other settings for
“Question I-g” as they are.
20. For “Question I-h”, change the Field Type drop down list from “Text Box” to
“Dropdown/List Box”. Change the Title to read “Would you like to join our mailing list?”.
Leave all other settings for “Question I-h” as they are.
21. Click on Commit, and further fields will be added for the non-text box questions.
22. For “Question I-e”, choose “Australia” from the Default drop down list.
23. In “Question I-g”, add “Search Engine”, “Word of Mouth” and “Trade Show” to the
Options drop down. Check the Multiple Allowed and Other tickboxes. Set Columns to “2”.
24. In “Question I-h”, add “Yes” and “No” to the Options drop down list. Click on Commit.
Now let’s add some rules to the questions:
25. Go to the Form - Rules section near the bottom of the page, to add some rules. Check
the New Rule? box with the drop down list next to it set to “Q.(i-a): Name:*”. Click on
Commit, and the fields for the new rule appear.
26. Check the New Rule? box with the drop down list next to it set to “Q.(i-b): Email:*”.
Click on Commit to show the fields for the new rule.
27. For “Rule 1”, make sure that the Rule drop down lists are set to “must” and “be
answered”. The Alt. Desc.: should read “Please enter your name”.
28. For “Rule 2”, make sure that the rule drop down lists are set to “must” and “be
answered correctly”. The Alt. Desc.: should read “Please enter a valid email address”.
Click on Commit.
Chapter 14 Custom Form
Page 162
MySource User Manual
29. Now preview the page and test your form as follows:
−
Your body copy appears at the top of the page.
−
Your user name and email address are automatically filled into the Name and Email
question.
−
Australia appears as default in the Country question.
−
You can select multiple options for the How did you hear about us? question.
−
Your thank you message is displayed when you click on Submit.
−
You receive a recipient email from your MySource account.
Workshop 21 Adding a Complex Layout to a Form
This workshop builds on the simple contact us form we created in the previous workshop,
We go on to use the Format tab to define a more complex layout for a simple form
containing 8 questions.
The “Contact Us” form we will create is as follows:
Figure 14-25 Formatted Form
Starting with the form created in the previous workshop:
1. Preview the page and print it out. Number the questions from 1-8 on the print out.
Chapter 14 Custom Form
Page 163
MySource User Manual
2. Now go to the Format tab and create a table with 4 columns, 7 rows and 100% width.
Click on Save followed by Commit, and a 4x7 table is shown on your page.
We will firstly set up the correct structure, background colours, widths, etc and then set up
the keyword replacement fields to reference the components of the form.
Form Structure
3. Click on the Table Properties icon
, and set Background Colour to “000000”,
Alignment to “Centre”, Cell Spacing to “1” and Cell Padding to “4”. Click on Save
followed by Commit.
4. Click on the Row Properties icon
for Row 2, and set Background Colour to “d3d3d3”.
Click Save followed by Commit. Repeat this step for Rows 3-7 inclusive.
5. Click on the Cell Properties icon
for row-1, column-1, (R1-C1). Set Colspan to “4”,
Background Colour to “708090” , Alignment to “Centre”, and Vertical Alignment to
“Top”.
6. In the Cell Properties window for the following cells, set Width to “25%” and Vertical
Alignment to “Top”:
Row 2: C1-C4
Row 3: C1-C4
Row 4: C1
7. In the Cell Properties window for R4-C2, set Colspan to “3”, Alignment to “Centre” and
Vertical Alignment to “Top”.
8. In the Cell Properties window for Row 5: C1-C4, set Width to “25%” and Vertical
Alignment to “Top”.
9. In the Cell Properties window for R6-C1, set Colspan to “2” and Vertical Alignment to
“Top”. Repeat this step for R6-C3.
10. In the Cell Properties window for R7-C1, set Colspan to “4”, Alignment to “Centre” and
Vertical Alignment to “Top”.
Chapter 14 Custom Form
Page 164
MySource User Manual
Keyword Replacements
For the following steps, click on the Cell Contents icon
of the specified cell and paste the
specified replacement keyword in the WYSIWYG editor. Click Save to exit the WYSIWYG
editor.
TIP: You may need to refer to your form print-out to find the question
numbers.
11. For R1-C1 paste the replacement keyword “%section_1_title% %section_1_note%“.
TIP: You can also copy and paste the keyword replacements from the list
at the top of the page.
Select the keyword replacements and click on the Bold icon
and click on the Text Colour
to make the text bold,
icon to set its colour to white.
12. For R2-C1 paste the replacement keyword “%section_1_question_1_title%”.
13. For R2-C2 paste the replacement keyword “%section_1_question_1_answer%”.
14. For R2-C3 paste the replacement keyword “%section_1_question_2_title%”.
15. For R2-C4 paste the replacement keyword “%section_1_question_2_answer%”.
16. For R3-C1 paste the replacement keyword “%section_1_question_3_title%”.
17. For R3-C2 paste the replacement keyword “%section_1_question_3_answer%”.
18. For R3-C3 paste the replacement keyword “%section_1_question_4_title%”.
19. For R3-C4 paste the replacement keyword “%section_1_question_4_answer%”.
20. For R4-C1 paste the replacement keyword “%section_1_question_6_title%”
21. For R4-C2 paste the replacement keyword “%section_1_question_6_answer%”.
22. For R5-C1 paste the replacement keyword “%section_1_question_5_title%”.
Chapter 14 Custom Form
Page 165
MySource User Manual
23. For R5-C2 paste the replacement keyword “%section_1_question_5_answer%”.
24. For R5-C3 paste the replacement keyword “%section_1_question_8_title%”.
25. For R5-C4 paste the replacement keyword “%section_1_question_8_answer%”.
26. For R6-C1 paste the replacement keyword “%section_1_question_7_title%”.
27. For R6-C2 paste the replacement keyword “%section_1_question_7_answer%”.
28. For R7-C1 paste the replacement keyword “%submit_button%”.
29. Click on the Commit button.
30. Now preview the page and look at the new formatting of your form.
♣ You have now successfully completed Workshops 20 and 21 ♣
Chapter 14 Custom Form
Page 166
MySource User Manual
Chapter 15 The Users System
In this chapter, we introduce you to the Users System and show you how to create, edit
and delete MySource user accounts. We also explain how Organisations, are used to
group MySource Users in MySource. Finally we will describe the Wizards that can be run
through the User System at the end of this chapter.
The User System can be accessed at any time by clicking the Users icon in the MySource
navigation bar. You will be taken to the User System screen which has two tabs, as shown
in Figure 15-1 below:
Figure 15-1 Users System Screen
Chapter 15 The Users System
Page 167
MySource User Manual
TIP: Only Super Users and User Masters are able to access the User
System. Webmasters, and Site/Page Admins and Editors do not have
access to the Users tab.
General Tab
The User System General tab consists of three main sections:
•
Users
•
Organisations/Divisions/Categories
•
Locations
Users
You can either search for an existing MySource User or create a new MySource User account
in this section.
•
Find : enter the login, email address or name (in full or in part) of an existing
MySource User and click the Find User icon.
TIP: You can see all users by hitting the Find User icon without entering
any criteria into the search box.
A list of Users found is displayed, showing their ID, login, name, email and account
status. Clicking on the name of the User displays the Edit User screen (detailed
below) for that User. Clicking on the email address of a User will open your default
Email program.
•
Only unaffiliated users: tick this checkbox to narrow your search to exclude Users
that are affiliated with an Organisation.
•
Create New User: enter the login for a new User and click on the Create New User
icon
. You are taken to the Edit User screen for the newly created user account.
Chapter 15 The Users System
Page 168
MySource User Manual
TIPS On MySource Logins and Passwords:
•
Login names must only contain alpha-numeric characters – i.e. a-z
in upper or lower case and digits 0-9.
•
A login name must be unique and be a minimum of 2 characters.
•
Logins are case insensitive.
•
Passwords are case sensitive.
•
Passwords cannot be the same as the login name.
•
Passwords are stored using a one-way encryption algorithm, so you
cannot see an existing password, only overwrite it.
Organisations, Divisions or Categories
Organisations can be used to group MySource Users into a logical grouping in whatever way
you like. You may refer to Organisations as Divisions or Categories and there is no
difference between the three. As an example, you might use Organisations to represent the
departmental structure of your company.
Tree – Organisations, like pages, are structured in a tree-like hierarchy of Organisations
and sub-organisations, and the Tree works in a similar fashion to the Site Map on the Edit
Site screen (see Chapter 6).
•
New Global: (organisation name): type in a name for the new Organisation you
want to create and click on the Create icon
. You are then taken to the Edit
Organisation screen (see below).
Locations
You can use this section to search the locations that are in the system.
•
Find: enter the Street, Suburb/Town, State/Province, Post/Zip Code or country to
search for, and click the Find Location icon
Chapter 15 The Users System
.
Page 169
MySource User Manual
The matching Locations are displayed in a list above the search fields. For each Location,
you can see the Street, Suburb/Town, State/Province, Country, Post/Zip Code.
TIP: If only one location matches your search, you are to the Edit Location
screen for that location.
Edit User Screen
Whether you create a new user or edit an existing one, you are taken to the Edit User
screen shown in Figure 15-2 below.
Chapter 15 The Users System
Page 170
MySource User Manual
Figure 15-2 Edit User Screen
Chapter 15 The Users System
Page 171
MySource User Manual
A link to the Active User is shown at the top of the Edit User screen. This is a navigational
link back to the Edit User screen of that particular user, and can be used when in other
parts of the User System.
TIP: Click on the Users icon in the top navigation bar to get back to
the General tab again.
Attributes
In this section you can edit the various attributes of a particular user:
•
Firstname
•
Mobile
•
Surname
•
Account Expiry
•
Login
•
Web Status
•
Change Password
•
User Picture
•
(Verify)
•
Comments
•
Email
The login and password fields are the only compulsory fields; other than these, you can
enter as much or as little information as you want - you can even upload a picture of a user
and enter comments about them!
TIP: Due to the secure way in which passwords are stored, you
cannot view them, only change them.
The Account Expiry attribute could be useful, for example, if you have temporary staff and
want their account to expire when their employment with your company ceases.
When a new user account is created, their Web Status is set to Active by default. However,
if that user attempts to login to MySource using an incorrect password more than three
times, the system will automatically set their Web Status to Locked. (This number three is
the default setting and can be changed in the Config tab).
Towards the top of the screen on the right hand side you will see two icons:
•
Clicking on the
icon displays a new window where you can search for another
MySource user account.
Chapter 15 The Users System
Page 172
MySource User Manual
•
Clicking on the
icon deletes the user you are currently editing. This is
irreversible, so please use caution when deleting a MySource user account.
Affiliated Organisations
This section lists any Organisations with which this user is ‘affiliated’.
•
Title Textbox: the text in this textbox is the Title of the User within that
Organisation (this is the link between the two components).
•
Delete?: you can delete the affiliation between the User and the Organisation by
ticking this checkbox and clicking Commit.
Create New Affiliation
You can make the User you are editing a member of an Organisation (i.e. create an
Affiliation) by entering the following information:
•
Title: enter a title for the user in these Organisations in the textbox
•
Select Organisations: select the Organisation(s) with which you want to affiliate
the user. You can hold down the SHIFT or CTRL key for multiple selections.
Click Commit, and the newly created affiliations are shown in the Affiliated Organisations list
above.
Depending on the user you are editing and how your Organisations and Affiliations are set
up, you may see an extra tab next to the General tab labeled Special User Data. This is an
advanced MySource User System concept, which is beyond the scope of this Manual.
Edit Organisation
Whether you create a new Organisation or edit an existing one, you are taken to the Edit
Organisation screen, which is shown in Figure 15-3 below:
Chapter 15 The Users System
Page 173
MySource User Manual
Figure 15-3 Edit Organisation Screen
Chapter 15 The Users System
Page 174
MySource User Manual
This interface contains three tabs:
•
General
•
Special User Data
•
User Export
By default you will be taken to the General tab. The General and User Export Data tabs are
described below. The Special User Data tab allows you to specify additional data to be
entered for the users that you add to MySource. This is an advanced MySource User
System concept which is beyond the scope of this manual.
At the top of the Edit Organisation screen, you will see a link to the Active Organisation.
This is a navigational link back to the Edit Organisation screen of that particular
organisation, while you are navigating other parts within the User System.
General Tab
On the right hand side of the tab is a delete icon, which is used for deleting an entire
Organisation and removing all its affiliated users.
TIP: You cannot delete an organisation that contains sub-organisations.
In this case, you must first delete the sub-organisations, then delete the
parent organisation.
•
Attributes: edit some of the attributes of the Organisation such as its Name,
Description and Postal Address.
•
Organisational Context: this section illustrates where the Organisation you are
editing fits within the organisational tree.
TIP: ‘World’ in this context refers to the root of the organisational tree.
You can also create sub-organisations of the Organisation you are currently editing
here. Type the name of the sub-organisation in the New Child textbox and click the
Create icon. You are then taken to the Edit Organisation screen for the new
Organisation you just created.
Chapter 15 The Users System
Page 175
MySource User Manual
•
Affliated Users: if the Organisation you are currently editing has any MySource
Users affiliated with it, they are displayed in this section. Affiliated Users are
categorised into Managers and Users. You can make a User a Manager and vice
versa by ticking the Grant Management or Revoke Management checkboxes and
clicking Commit.
•
New User: (login & title): this section provides you with an alternative way to
create a new MySource User account and an affiliation with the Organisation you are
currently editing. Type in the login of the User in the first textbox, tick the checkbox
if they are to be a Manager, then type in a title which links them to the Organisation
in the next textbox and click the Create icon. You are then taken to the Edit User
screen for the user you just created.
TIP: If you want to make an existing user affiliated with this
organisation you must go to the Create Affiliation section of the Edit User
screen for that User.
•
Premises: these define a link between an Organisation and a Location. Locations
allow you to place MySource Users into Locations and create Premises. However this
is a little used function in MySource so for the purposes of this manual we will not go
into any further detail on Premises and Locations.
User Export
You can use this facility to download a list of all the MySource user accounts that are
affiliated with the Organisation you are editing to an Excel (CSV) or XML file.
Simply select an Export Type from the drop down list, whether or not to show headers (that
is whether the first row on the exported file should include column names) and which fields
you want to include in the export and click on Commit.
The system creates a file for you to download to your hard drive or LAN.
Chapter 15 The Users System
Page 176
MySource User Manual
Wizards Tab
The Wizards tab displays a list of wizards that have been loaded to your system:
•
Created Accounts: view a list of all accounts created in a given period of time.
•
Expired Accounts: view a list of all accounts that are due to expire today and in the
future.
•
User List: view/export a list of all expired, active, locked, pending or ALL user
accounts. Choose from Organisations(s)/Access Group(s).
To run a Wizard, simply click on the link next to the name of the Wizard and follow the
screen prompts.
Chapter 15 The Users System
Page 177
MySource User Manual
Chapter 16 Access Groups
In this chapter we discuss MySource Access Groups in depth. Access Groups are a group of
MySource user accounts, and are used for creating an Intranet, Extranet or a Member’s
Area – that is, an area of your web site where access is restricted to a particular group of
people.
As we have seen in earlier chapters, there are two types of Access Groups:
•
General Access Groups: this type of access group is available for use across any
site in your MySource system.
•
Site Access Groups: this type of access group is only available for use in the site
that you are currently editing and cannot be used by other sites in your MySource
system.
You can reach the Edit Access Group screen by clicking on the name of an access group on
the Security tab of the following screens:
•
Web System
•
Edit Site
•
Edit Page
These screens are described in Chapter 5 to Chapter 7.
The editing screen for an access group is the same for both General Access Groups and Site
Access Groups, and is shown in Figure 16-1 below.
Chapter 16 Access Groups
Page 178
MySource User Manual
Edit Access Group
The Edit Access Group screen is shown in Figure 16-1 below:
Figure 16-1 Edit Access Group Screen
Chapter 16 Access Groups
Page 179
MySource User Manual
Attributes
•
Scope: this indicates whether this is a General Access Group or a Site Access Group.
If this is a General Access Group, the scope is shown as General. If this is a Site
Access Group, the name and ID of the site to which the access group applies is
shown.
•
Name: the name of the Access Group is shown in this text box. Edit the text to
change the name.
•
Description: enter your description for the Access Group in this text box. This is for
your own internal use only and does not affect the way Access Groups function.
User Memberships
•
Add Users: to adding existing MySource Users to an access group, type either their
login or email address into the text box.
TIP: If you have already created an Organisation containing the
appropriate list of users, you can add this to the access group instead of
typing them all in individually. Organisation Memberships are discussed
below.
•
Current Users: a list of all the MySource Users that are members of this Access
Group is shown here. Clicking on the name of the user takes you to the Edit User
screen for that User (see Chapter 16).
Organisation Memberships
•
Add Organisations: you can add an Organisation to your Access Group as well as
individual Users. When an Organisation is added to an Access Group, all the Users
that are affiliated with that Organisation become members of the Access Group you
are editing. (For more on Organisations see Chapter 15).
Any Organisations defined in your MySource system appear in this text box. To add
an organisation to your access group, select them from the list. You can hold down
the SHIFT or CTRL key for multiple selections. Click the Add Organisation icon
to
add the Organisation to your Access Group.
Chapter 16 Access Groups
Page 180
MySource User Manual
TIP: To add an Organisation, you must click the Add Organisation icon
rather than the Commit button.
•
Current Organisations: a list of the Organisations that are members of this Access
Group is shown here. The ID, name and Number Of Users in the Organisation is
shown for each Organisation.
Click on the Delete button to delete the Organisation
from this Access Group.
TIP: Deleting an Organisation from an Access Group does not delete the
Organisation from your MySource system.
Workshop 22 Creating and Populating a Site Access Group.
In this workshop we create a new Site Access Group and add MySource Users and
Organisations.
Make sure you are in the Edit Site screen.
1. To create a Site Access Group select the Security tab of the Edit Site screen.
2. Add the name of your new Site Access Group, in the Create New Site Group? text
box shown in Figure 4-1 below:
Figure 16-2 Creating and Populating a Site Access Group
Chapter 16 Access Groups
Page 181
MySource User Manual
3. Click the Commit button.
The page will refresh and will open up in the Edit Access Group screen for your new
access group.
Now, let’s populate your Site Access Group with MySource Users:
4. Add the Login names or email address of some of your users in the Add Users text
box.
TIP: You can add more than one MySource User at a time, if necessary.
5. Click the Commit button.
If you have an organisation already set up, it can easily be added to your Site Access
Group:
6. Scroll down to the Edit Access Group screen to the Add Organisation text box.
7. Select your Organisation and click the Add Organisation icon as shown in Figure 16-3
below:
Figure 16-3 Creating and Populating a Site Access Group
Chapter 16 Access Groups
Page 182
MySource User Manual
The page will refresh and your new Organisation will be shown on the page, as
shown in Figure 16-4 below:
Figure 16-4 Creating and Populating a Site Access Group
♣ You have now successfully completed Workshop 20 ♣
Workshop 23 Building a Member’s Area for your Site
In this workshop we create a Member’s Area for your site.
Make sure you are in the Site Properties screen for your site.
1. Scroll down to the Site Map section, and click on the page that you wish to be the
Member’s Area.
2. On the Edit Page screen, click on the Security tab, and go to the Read Access Grants
section as shown in Figure 16-5 below:
Chapter 16 Access Groups
Page 183
MySource User Manual
Figure 16-5 Read Access Grants
TIP: The Access Groups created in the previous workshop appear in the
Site Access Groups section.
3. Uncheck the Public checkbox, and check the General Access and Site Access Groups
to whom you wish to give access to your Member’s Area.
4. Click on Commit.
5. Click on the Preview icon
to test your Member’s Area.
6. If you are not a member of the Access Group who has access to the page, the login
screen is displayed.
Chapter 16 Access Groups
Page 184
MySource User Manual
TIP: If you are logged in to MySource as a member of the Access Group
who has access to the page, the Member’s Area page will be shown
immediately without the login screen. MySource uses the login that you
used to login to MySource to authenticate your login to the Member’s
Area.
In this case, you will need to display a separate browser window, and
type the URL for the Member’s Area page into the Address field. The login
window will be displayed.
7. Login as a member of the Access Group who has access to the page, and the
Member’s Area page is shown.
TIP: If you create an intranet or extranet, you can make a whole site a
Member’s Area. Go to the Security tab of the Site, and repeat the process
outlined above.
Chapter 16 Access Groups
Page 185
MySource User Manual
Appendix 1 HTML Cheatsheat
HTML Tag
Description
<HTML></HTML>
Creates an HTML document.
<HEAD></HEAD>
Creates the header section containing the title and
other information that is n0t displayed on the web
page itself.
<BODY></BODY>
Creates the body section containing the visible portion
of the document.
<A HREF="URL"></A>
Creates a hyperlink.
<A HREF="mailto:EMAIL"></A>
Creates a mailto: link.
<A NAME="NAME"></A>
Creates a target location or anchor within a document.
<A HREF="#NAME"></A>
Links to that target location or anchor from elsewhere
in the document.
<TITLE></TITLE>
Sets the name of the document in the title bar.
<BODY BGCOLOR=?>
Sets the background color, using name or hex value.
<BODY TEXT=?>
Sets the text color, using name or hex value.
<BODY LINK=?>
Sets the color of links, using name or hex value.
<body vlink=?>
Sets the color of followed links, using name or hex
value.
<BODY ALINK=?>
Sets the color of links on click.
<P></P>
Creates a new paragraph.
<P ALIGN=?>
Aligns a paragraph to the left, right, or center.
<BR>
Inserts a line break.
<BLOCKQUOTE></BLOCKQUOTE>
Indents text from both sides.
<DL></DL>
Creates a definition list.
<DT>
Precedes each definition term.
<DD>
Precedes each definition.
<OL></OL>
Creates a numbered list.
<LI></LI>
Creates a numbered or bulleted list item.
<UL></UL>
Creates a bulleted list.
<DIV ALIGN=?>
A generic tag used to format large blocks of HTML.
Also used for stylesheets.
<PRE></PRE>
Creates preformatted text.
<Hl></Hl>
Creates a level 1 heading.
Appendix 1 HTML Cheatsheat
Page 186
MySource User Manual
HTML Tag
Description
<H6></H6>
Creates a level 6 heading.
<B></B>
Creates bold text.
<I></I>
Creates italic text.
<TT></TT>
Creates teletype, or typewriter.
<CITE></CITE>
Creates a citation, usually italic.
<EM></EM>
Emphasizes a word (with italic or bold).
<STRONG></STRONG>
Emphasizes a word (with italic or bold).
<FONT SIZE=?></FONT>
Sets size of font, from 1 to 7.
<FONT COLOR=?></FONT>
Sets font color, using name or hex value.
<IMG SRC="NAME">
Adds an image.
<IMG SRC="NAME" ALIGN=?>
Aligns an image: left, right, center; bottom, top.
<IMG SRC="NAME" BORDER=?>
Sets size of border around an image.
<HR>
Inserts a horizontal rule.
<HR SIZE=?>
Sets size (height) of rule.
<HR WIDTH=?>
Sets width of rule, in percentage or absolute value.
<HR NOSHADE>
Creates a rule without a shadow.
Appendix 1 HTML Cheatsheat
Page 187