1
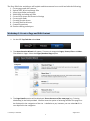
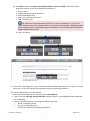
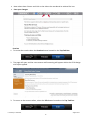
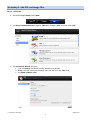
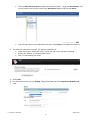
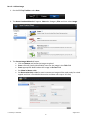
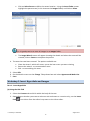
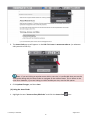
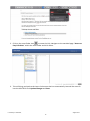
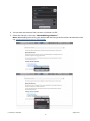
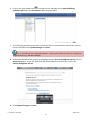
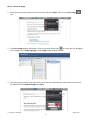
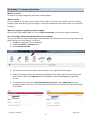
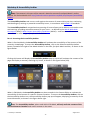
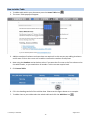
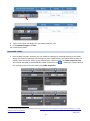
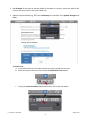
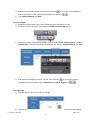
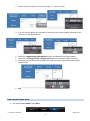
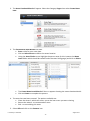
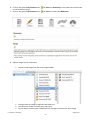
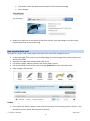
Web Services UNIVERSITY OF TASMANIA UTAS CMS Edit PLUS Workshop V1 University of Tasmania, Service Delivery & Support, IT Resources April 2013 Web Service, Service Delivery & Support UWCMS Easy Edit Suite PLUS Workshop: v1 Contents What is Easy Edit Suite? ................................................................................................................................. 3 Writing for the Web Workshop ...................................................................................................................... 3 To access the MyLO module: ..................................................................................................................3 Getting access to a site .................................................................................................................................. 3 Before we start ............................................................................................................................................. 3 Features ........................................................................................................................................................ 3 Caveats ......................................................................................................................................................... 3 Known issues ............................................................................................ Error! Bookmark not defined. Contact Web & Learning Services ................................................................................................................... 3 Where to from here....................................................................................................................................... 3 Workshops .................................................................................................................................................... 3 Workshop 1: Create a Page and Edit Content ................................................................................................. 4 Workshop 2: Add PDF and Image Files ......................................................................................................... 11 Part 1 – Add a PDF .................................................................................................................................11 Part 2 – Add an Image ...........................................................................................................................13 Workshop 3: Insert Hyperlinks and Images ................................................................................................... 14 Part 1 - Insert Hyperlinks .......................................................................................................................14 (a) Using the URL field ...........................................................................................................................14 Part 2 – Insert an image ........................................................................................................................19 Workshop 4: Publishing ............................................................................................................................... 21 Status .....................................................................................................................................................21 Part 1 - Approve and make live .............................................................................................................21 Part 2 - Safe Edit ....................................................................................................................................22 Part 3 - To Publish changes ...................................................................................................................22 Workshop 5 Creating People Assets ............................................................................................................. 23 Add a Person .........................................................................................................................................23 Add a Person Image...............................................................................................................................26 Workshop 7: Creating Research Area and Research Project Assets ................................................................ 27 Research Area........................................................................................................................................27 Research Project ....................................................................................................................................29 Workshop 7: Common Questions ................................................................................................................. 32 What is an asset?...............................................................................................................................32 What is a lock?...................................................................................................................................32 Why is my image not appearing on the live page? ...........................................................................32 Can I edit a page, without letting the public see my changes?.........................................................32 Why are there double brackets around my page title? ....................................................................33 Why is my edited content not showing up in the live site? ..............................................................33 Workshop 8: Accessibility Auditor ................................................................................................................ 34 Workshop 9: Further Editing Techniques ...................................................................................................... 38 University of Tasmania, August 2013 1 UTAS Classes ......................................................................................................................................38 How to search for an asset ................................................................................................................38 How to Add a Table ...........................................................................................................................39 How to Edit a Table ...........................................................................................................................40 How to add a News Item ...................................................................................................................43 How to add a Quick Link ....................................................................................................................46 How to add a Banner Image ..............................................................................................................47 How to Add an Anchor ......................................................................................................................47 How to optimise an image for the web.............................................................................................48 How to add an image asset and insert into content .........................................................................51 Contact us ................................................................................................................................................... 52 About this document ................................................................................................................................... 52 University of Tasmania, August 2013 2 What is Easy Edit Suite? Easy Edit Suite is a simple editing interface within MySource Matrix, developed by Squiz. EES allows users to update and maintain web content easily and efficiently within a simple interface, without the need for extensive training and knowledge of web practices. Writing for the Web Workshop Before access can be granted to edit websites in the UWCMS you must complete the Writing for the Web module through MyLO. To access the MyLO module: Go to: https://mylo.utas.edu.au/ Type in your UTAS username and password MyLO will open. In the Course List section, click: Writing for the Web Read the course materials and complete the quiz. You must score 70% or greater to pass Getting access to a site Once you’ve passed the writing for the web module and attended the EES workshop you will need to request editing access to your site. This can be done through a request to the IT Helpdesk by email to [email protected] or phone x1818. Before being able to edit a site, your access must be approved by your head of section. Please forward written authorisation through with your request. Before we start To edit a page, simply add /_edit to the end of the URL and a login screen will be displayed. Eg: http://www-cms.utas.edu.au/train01 becomes http://www-cms.utas.edu.au/train01/_edit Login using username and passwords provided and the Edit Plus interface will load. Features The Easy Edit Suite allows site editors to add and edit the following: Standard pages, People, Research and Redirect pages Images PDF files, MS Word, Excel and PowerPoint documents News items and Events Folders Caveats Easy Edit Suite is under development. There are a number of features planned, and we are seeking input and feedback. If you have any suggestions, please contact Web & Learning Services. Contact Web & Learning Services Email: [email protected] Where to from here All content editors should be familiar with the Web Publishing Policy and Guidelines: http://www.utas.edu.au/it/web-services/guidelines There is a style guide to help you create consistent content: http://www.utas.edu.au/it/web-services/editorial-style-guide2 There are also video tutorials and a user manual developed by Squiz Matrix to assist you using Edit + and the editing interface: http://vimeopro.com/squizaustralia/easy-edit-suite/video/40918557 http://manuals.matrix.squizsuite.net/edit-plus/chapters/edit-plus-for-squiz-matrix Workshops University of Tasmania, August 2013 3 The Easy Edit Suite workshops will explain and demonstrate how to add and edit the following: 1. Create pages and edit content 2. Upload PDF, Word and image files 3. Insert hyperlinks and images 4. Publishing, including safe edit 5. Create News items and Events in listings 6. Create quick links 7. Creating People Assets 8. Creating Research Areas 9. Common questions 10. Further editing techniques Workshop 1: Create a Page and Edit Content 1. On the EES Top Task Bar select New 2. The Asset Creation Wizard will appear. There are 4 categories Pages, Events, Files and Other. The default is Pages. Select the Pages/Standard Page option 3. The Page Details section will be displayed. Enter the name of the new page (e.g. Training Workshop) in the field provided. You also have the option of selecting whether the page is to be displayed in the navigation of the site - it defaults to yes, however you can select No if it is not required in the navigation University of Tasmania, August 2013 4 4. Click on Select New Location or Select Current Asset to define the create location for the new asset. Using the Asset Finder screen highlight the parent asset and click on Select. In this example the site has been selected as being the parent, the parent has 13 child assets 5. The Standard Page screen will appear showing where the asset will be created, click on Create to complete the process 6. The asset has now been created. The options available are: Close the wizard - which will return you to the last screen you were viewing Restart the wizard - to create another asset Edit - to start editing this asset University of Tasmania, August 2013 5 7. Click on the Edit button. The details tab will be displayed, showing the current status of the asset, the page name and the thumbnail details. To edit content select the Content tab. 8. If you click on the title of the asset in the top menu bar, you will see a pop-up window detailing the newly created asset information: Asset name, date published, last updated, and by whom. It also gives you the option to move the asset to the trash. 9. Click in the area where it reads, “This area contains no content yet. Click here to start editing”. The cursor will appear in this window. Now type ‘Web Services supports website authors at UTAS by providing training sessions in specific topics.’ When complete, click Save. University of Tasmania, August 2013 6 10. Place the cursor at the end of the last sentence and press Enter to start a new paragraph. 11. Locate a MS Word document on your computer. If you can’t find one, open a blank document and copy and paste some content in it from a web page then save to your desktop. Now copy this content from the Word doc and return to Easy Edit Suite and paste it into the editor. 12. The editor automatically removes all of the MS embedded styling for the content, but it will retain any hyperlinks. 13. To remove all of the formatting, including the hyperlinks from this text, you can click the Remove Format icon. 14. If there are heading, bold or italicised text in the content you will need to manually add these using the inline editor menu. 15. Select the text you want to format. Eg., you want to add a header style to the heading of your text. An inline editor pops up with basic formatting options. 16. There are three options for the inline editor, detailed below. The inline toolbars provide breadcrumb style navigation of the elements in your selected content. This allows you to specify exactly the content you are editing. In the figure below you can see the Div > P > Selection breadcrumb at the top of the box. (a) The first is when you select a section of text. The inline editor appears as below. In this case you have the options to: Make the selected text bold Italicise the text Insert a class Insert a link Insert an anchor University of Tasmania, August 2013 7 (b) The second is when you select the entire paragraph or div. The inline editor appears as below. In this case you have the option to: Insert a class Change the paragraph to a division Add a blockquote style Add a ‘pre’ element to the text Insert a link Insert an anchor University of Tasmania, August 2013 8 (c) The third is when you select a pre-styled element, such as a header. The inline editor appears as below. In this case you have the option to: Insert a class Change the paragraph to a division Add a blockquote style Add a ‘pre’ element to the text Add a heading style Tip: Web Services recommends H4 and H5. Do not use Headings 1, 2 or 3 in the main content as these are already used in the rest of the web template. Adding Heading styles in logical order is required for page accessibility. It can also help with SEO (Search Engine Optimisation) results. Insert an anchor 17. If you have a spelling error in your content the word will be underlined in red. There is no spell check tool, so you will need to pay attention to any text with red underline. 18. Create a bulleted list as shown below: Place the cursor after the last sentence press Enter/Return Type in the text Training, Access and Sites and press return, now highlight the text and make it a H4 heading Type in the following items, pressing return after each one: o Book a training session o Access to Easy Edit Suite o Web Policy and Web Publishing Guideline University of Tasmania, August 2013 9 Now select these 3 items and click on the either the unordered or ordered list icon Save your changes Preview 1. To review the results select the Preview button located on the Top Task bar. 2. The page will open and the new content and formatting will appear within the UTAS design with styles applied. 3. To return to the content editor, select the Edit button located on the Top Task bar. University of Tasmania, August 2013 10 Workshop 2: Add PDF and Image Files Part 1 – Add a PDF 1. On the EES Top Task bar select New. 2. The Asset Creation Wizard will appear. Select the Category Files and then select PDF. . 3. The Create PDF Wizard will open: Click on Browse and locate the PDF document to upload Enter a friendly (easily identifiable) name for the file in the Title field Set Show in Menu to No University of Tasmania, August 2013 11 Click on Select New Location to define the assets location. Using the Asset Finder, click on the parent asset (in this instance the Documents folder) and click on Select. You will now return to the PDF Wizard screen. Click Create to complete the process. 4. The asset has now been created. The options available are: Close the wizard - which will return you to the last screen you were viewing Restart the wizard - to create another asset Edit - to start editing this asset 5. Select Edit. 6. On the details screen use the Change ? drop down box and select Approve and Make Live. 7. Save. University of Tasmania, August 2013 12 Part 2 – Add an Image 1. On the EES Top Task bar select New. 2. The Asset Creation Wizard will appear. Select the Category Files and then select Image. . 3. The Create Image Wizard will open: Click on Browse and locate the image to upload Enter a friendly (easily identifiable) name for the image in the Title field Enter appropriate details about the image in Alt Text field Set Show in Menu to No Set Decorative Only to No (in some instances an image will be used purely for visual appeal and thus is considered decorative and does not requre ‘alt’ text) University of Tasmania, August 2013 13 Click on Select Parent to define the assets location. Using the Asset Finder screen highlight the parent asset (in this instance the Images folder) and click on Select Tip: It’s good practice to store all images in an Images folder. The Image Wizard screen will appear showing the details and where the asset will be created, click on Create to complete the process 4. The asset has now been created. The options available are: Close the wizard - which will return you to the last screen you were viewing Restart the wizard - to create another asset Edit - to start editing this asset 5. Select Edit. 6. On the details screen use the Change ? drop down box and select Approve and Make Live. 7. Save. Workshop 3: Insert Hyperlinks and Images Part 1 - Insert Hyperlinks (a) Using the URL field 1. Select the Content tab and click within the body of the text. 2. Depending on whether you want to select an entire element or a section only, use the Insert Link icon either from the editor’s top menu or the inline editor. University of Tasmania, August 2013 14 3. The Insert Link pop up will appear. In the URL field enter in www.utas.edu.au (or whatever URL you wish to link to). Note: If you are linking to another asset within your site, it is preferable that you use the asset picker along with the asset finder to navigate to the relevant asset. This is shown in the next item. However, if you are linking to a URL outside your site, use the URL option. 4. Click Update Changes, and then Save. (b) Using the Asset Finder 1. Highlight the text “Access to Easy Edit Suite” and click the Insert Link University of Tasmania, icon. August 2013 15 2. Click on the asset finder icon to create the link. Navigate to the standard page “Access to Easy Edit Suite” within the asset finder and click Select. 3. This will bring you back to the Insert Link screen that has automatically inserted the asset ID into the URL field. Click Update Changes and Save. University of Tasmania, August 2013 16 4. You can also use the asset finder to insert a link that is a PDF. 5. Select the link text, in this case: “Web Publishing Guidelines”. Note. When adding links to files, you need to add the file type and size after the document title e.g., Web Publishing Guidelines (PDF 492KB). University of Tasmania, August 2013 17 6. Click on the asset finder icon to create the link. Navigate to the web-publishingguidelines.pdf within the Documents folder and click Select. 7. This will bring you back to the Insert Link screen that has automatically inserted the asset ID into the URL field. Click Update Changes and Save. Tip: In accordance with UTAS Web policies – ensure you include the file size and type for all documents (e.g., MS Word 492KB) 8. Scroll to the bottom of the content and highlight contact [email protected] click the Insert Link button. In the URL field enter the email address to wish to link, in this case [email protected]. 9. Click Update Changes and Save. University of Tasmania, August 2013 18 Part 2 – Insert an image 1. Place the cursor at the end of the first sentence and press Enter. Click on the Insert Image icon. 2. The Insert Image pop up will appear. Click on the asset finder icon to create the link. Navigate to the image asset “UTAS_logo.jpg” in the Images folder and click Select. 3. This will bring you back to the Insert Link screen that has automatically inserted the asset ID into the URL field. Click Update Changes and Save. University of Tasmania, August 2013 19 Note: The alt field is automatically filled in with the alt text you provided when you initially added the image. Alt text is mandatory for all informative images in your website (but not for decorative). 4. Add Image Class if required (eg. img-r; img-l; img-border) 5. Preview the Training Workshop page. University of Tasmania, August 2013 20 Workshop 4: Publishing Status Under Construction Live Safe Edit Archived The asset is being built and not available to the public The asset is available to the public A snapshot of the Live asset is delivered by the system, and edits may be made without being visible to the public The asset is hidden from the public and is not editable Part 1 - Approve and make live 1. Return to the details screen of the Training page. In the Changes ? drop down select Approve and Make Live and click Save. Note: You may have only been given ‘Write’ access to the site and therefore cannot make assets live. This is a decision made by the heads of some sections. If this is the case, you will need to ask your site administrator to make your assets live. University of Tasmania, August 2013 21 Part 2 - Safe Edit 2. From the Details screen of the Training page, click on the Initiate safe edit button. Any changes you now make to the content will not be visible to the public. Part 3 - To Publish changes 1. Return to the Details screen of the Training page. Drop down Changes ? and select Approve. Click Save. The status of the asset will change to Safe Edit Approved To Go Live. Drop down the Changes field again, select Make Live and Save. Or to cancel the changes, return to the details screen, drop down Changes ? and select Cancel Safe Edit. University of Tasmania, August 2013 22 Workshop 5 Creating People Assets Add a Person 8. On the EES Top Task bar select New. 9. The Asset Creation Wizard will appear. Select the Category Pages, and then select Person. 10. The Create Person Wizard will open: Enter the name of the Person (first then last name) Set Show in Menu to No Select New Location – using the Asset Finder screen highlight the People folder and click on Select Click on the Create button to complete the process 11. The asset has now been created. The options available are: University of Tasmania, August 2013 23 Close the wizard - which will return you to the last screen you were viewing Restart the wizard - to create another asset Edit - to start editing this asset 12. Select Edit ‘John Doe’. 13. On the details screen you will notice the warning message advising the asset cannot be made Live because some mandatory metadata fields are empty. 14. Select the Metadata tab. 15. Scroll down to the People metadata area and enter the relevant information. The mandatory fields are listed under Basic Attributes and Contact Details and are signified by the red stars. Note: To enter details into these fields you must uncheck the Use Default boxes. Once complete click Save. University of Tasmania, August 2013 24 University of Tasmania, August 2013 25 Add a Person Image 16. To add an image – under the Related Image section of the Details screen, click on select. Using the Asset Finder find the People Images folder, highlight the relevant image and click on Select 17. The person asset can now be made live. On the Details screen use the Change? Drop down box and select Approve and Make Live. 18. Use the asset finder to open up the person asset. On the details screen you will notice that the warning message is no longer visible. The Person can now be made Live. On the Details screen use the Change? Drop down box and select Approve and Make Live. University of Tasmania, August 2013 26 Workshop 7: Creating Research Area and Research Project Assets Research Area 19. On the EES Top Task bar select New. 20. The Asset Creation Wizard will appear. Select the Category Pages, and then select Research Area. 21. The Create Research Area Wizard will open: Enter the name of the Research Area. Set Show in Menu to Yes Select New Location – using the Asset Finder screen highlight Research assets and click on Select Click on the Create button to complete the process University of Tasmania, August 2013 27 22. The asset has now been created. The options available are: Close the wizard - which will return you to the last screen you were viewing Restart the wizard - to create another asset Edit - to start editing this asset 23. Select Edit ‘Research Area’. 24. On the details screen you will notice the warning message advising the asset cannot be made Live because some mandatory metadata fields are empty. Click on the Metadata hyperlink contained in the warning message; Or select the Metadata tab; 25. Enter the relevant information into the required fields, remembering to uncheck the Use Default boxes. Once complete click Save. University of Tasmania, August 2013 28 26. Return to the Details tab, the Research Area can now be made Live. On the Details screen use the Change? Drop down box and select Approve and Make Live. Research Project 1. On the EES Top Task bar select New. 2. The Asset Creation Wizard will appear. Select the Category Pages, and then select Research Project. University of Tasmania, August 2013 29 3. The Create Research Project Wizard will open: Enter the name of the Research Project Set Show in Menu to Yes Select New Location – using the Asset Finder screen highlight the appropriate Research Area asset and click on Select Click on the Create button to complete the process 4. The asset has now been created. The options available are: Close the wizard - which will return you to the last screen you were viewing Restart the wizard - to create another asset Edit - to start editing this asset 5. Select Edit ‘Research Project’. 6. Select the Metadata tab. University of Tasmania, August 2013 30 7. Enter the relevant information into the required fields, remembering to uncheck the Use Default boxes. Once completed click Save. 8. Return to the Details tab, the Research Project can now be made Live. On the Details screen use the Change? Drop down box and select Approve and Make Live. University of Tasmania, August 2013 31 Workshop 7: Common Questions What is an asset? An asset is any page/ image file/ document or other object. What is a lock? A lock is applied to any asset that you open in edit mode. A lock prevents another user from making changes to the asset whilst you are doing so. A lock will automatically be released after ten minutes of inactivity. Why is my image not appearing on the live page? Check to see if the image is Live. If it is still ‘Under construction’ it will not be visible to the public. Can I edit a page, without letting the public see my changes? Yes, you can. You can do this by initiating safe edit mode. This allows you to edit your page without the public seeing any of the changes. To do this: 1. Navigate to page that is to be modified 2. Select the Details or Contents icons 3. Select Initiate safe edit 4. The status of the asset is visible on the top menu to the right of the Edit button. 5. Make your changes. When you are finished editing and are happy with the preview go to the details screen and choose Approve from the dropdown options and Save (top right hand corner). 6. The status of the asset will be Safe Edit Approved to go Live. Select Make Live from the dropdown options and save. The asset will now be live with the changes you have made visible to the public. University of Tasmania, August 2013 32 7. If you do not wish to keep the changes choose “Cancel Safe Edit” from the dropdown options and save. The asset will now be live, without any changes. Why are there double brackets around my page title? You will see double brackets only if you are logged into EES. The double brackets mean that the page is still under construction i.e. it is not live and therefore not visible to the public. Why is my edited content not showing up in the live site? The most common reason that you will not see changes on your live site once editing is completed is due to the matrix cache. Matrix cache gets cleared every 3 hours - so your content may not be visible for up to 3 hours. If after this time the content is still not appearing, it may be due to the cache on your computer- press Control F5 to clear the cache. If you require the information to be available instantly contact Web services and they can do this for you. University of Tasmania, August 2013 33 Workshop 8: Accessibility Auditor Note: The content in this part of the manual is based on content from Squiz Matrix’s online Manual. For further details visit: http://manuals.matrix.squizsuite.net/edit-plus/chapters/accessibilityauditor The Accessibility Auditor tool runs an audit against the content of assets within your site, evaluating and detailing any existing or potential accessibility issues, in accordance with WCAG 2.0 standards. The Accessibility Auditor's comprehensive reporting of issues allows you to address and resolve errors and warnings, providing accessible content for your users -- as defined by the World Wide Web Consortium (W3C)'s Web Content Accessibility Guidelines (WCAG) -- and to ensure all content is accessible to a wider range of people with disabilities. Part 1: Accessing the Accessibility Auditor When in Preview Mode, the Accessibility Auditor will evaluate the accessibility of the content of the currently viewed page. To access the Accessibility Auditor, click on the Show Accessibility Auditor button, located to the right of the Mode Switcher in the Edit+ for Squiz Matrix tool bar, as shown in the figure below. Clicking this button will display the Accessibility Auditor pop-up, which will evaluate the content of the page and display a summary outlining any issues, as shown in the figure below (left). When in Edit Mode, the Accessibility Auditor can be accessed via the Content Editor to evaluate the accessibility of the content of a specific Content Container. To access the Accessibility Auditor, click on the Accessibility Auditor icon; the Accessibility Auditor pop-up will appear, displaying a summary of the issues discovered, as shown in the figure above right. Note: The Accessibility Auditor, when used within Edit Mode, will only audit the content of the selected Content Container and not all content on the asset. University of Tasmania, August 2013 34 Part 2: The Accessibility Report When the Accessibility Auditor is first accessed, it will evaluate the content of your asset and provide a report on the following three categories of issues: Errors: these issues must be addressed to meet the accessibility standards Warnings: these issues should be addressed to meet the accessibility standards (best practice) Notices: these issues require manual checking and may need to be addressed to meet the accessibility standards You can modify the standard against which accessibility is audited upon in the Standards field, selecting either A, AA or AAA WCAG 2.0 standards. By default, the Accessibility Auditor will initially check against WCAG2AA standards. Click the View Report button to provide a report of the issues found within the audited content, as shown in the figure below. You can specify which categories of issues to include in the accessibility report using the toggles available, below each issue notice. So, for example, you could choose to include only Errors within the accessibility report, or you could choose to include both Errors and Warnings. The accessibility report will be displayed as a list of existing accessibility issues, identified by their category colour. Clicking on an issue will provide a report of the individual issue, outlining the Principle and Technique that the issue addresses within the WCAG 2.0 standards, as shown in the figure below. Clicking on these links will direct you to the appropriate WCAG 2.0 documentation. University of Tasmania, August 2013 35 When using the Accessibility Auditor tool within Preview Mode, each individual issue report will include a Code Snippet section displaying the section of code that the issue applies to, as shown in the figure above right. Clicking the Point to Element button in this section will display an icon pointing to the relevant element within the content of the page. Please note that in some cases, the Point to Element button will not be available as the relevant element may be hidden on the page. Part 3: Resolving and Dismissing Issues When auditing the accessibility of content within Edit Mode, each issue report will include a Resolution section detailing the steps to resolving the relevant issue, as shown in the figure below. Clicking the Point to Element button in this section will display an icon pointing to the relevant element within the content of the Content Container. Please note that, in some cases, the Point to Element button will not be available as the relevant element may be hidden on the container. The Show in Source View button will display the Source Editor of the Content Container, highlighting the section of code that the issue applies to and allowing you to edit and apply changes to the code. University of Tasmania, August 2013 36 The Refresh Issue button will refresh the issue in the Accessibility Auditor. This is useful if you have made changes to fix a particular issue and want to check whether it has been resolved. If the issue has been resolved, the issue will be marked with a tick; if it has not, an error message will be displayed, as shown in the figure below. In some cases, additional fields may be available allowing you to resolve issues within the Accessibility Auditor, for example, adding a summary for a table, as shown in the figure below left. Use the available fields to address the issue and click the Apply Changes button. If the issue has been resolved, it will be marked with a tick. You can dismiss individual Warning and Notice issues by clicking the Dismiss button at the bottom of the Accessibility Auditor, as shown in the figure above right. Please note that as Error issues require mandatory resolution, in accordance with WCAG 2.0 standards, these issues cannot be dismissed. University of Tasmania, August 2013 37 Workshop 9: Further Editing Techniques UTAS Classes Classes are global styles which are used across all UWCMS sites. They help increase the uniformity of UTAS sites and are an easy way for editors to improve web page layout and visual appeal. IMAGES img-l – positions image to the left of the page, text wraps to the right img-r – positions images to the right of the page, text wraps to the left img-border – adds a border and padding around the image (remove ‘0’ on border thickness) TABLES row-border – background colour and border between rows col-border – background colour and border between columns alt_rows – alternates row background colour and hover effect PARAGRAPH intro – larger text for intro paragraphs note information – green background, full width note notice – red background, full width note general – blue background, full width How to search for an asset 1. Click on the Search icon located on the Top Task Bar (top right hand corner) 2. The Asset Finder screen will appear, each asset displays the number of child assets it has. Select the asset you require by drilling down the tree and selecting the parent asset. In the example below Forms has five children – in order to view and select GP Management Plan you need to first select Forms. 3. The Details screen of the asset will appear. University of Tasmania, August 2013 38 How to Add a Table 1. To add a table within your document press the Insert Table icon 2. The Insert Table popup will appear. 3. Add the number of columns and rows that are required. In this case we are adding 4 columns and 3 rows. Click on the row or cell to add or remove the number of cells/rows. 4. Now using the Headers section below, select if you want the first row or the first column to be the table header, or you need other as headers. In this case we require both. 5. Click Insert Table. 6. Fill in the headings and all of the cellular data. Please see the figure above as an example. 7. To add a class to your table select the whole table and click the Add Class icon University of Tasmania, . August 2013 39 8. Type in the classes col-border (or row-border) and alt_cols. 9. Click Update Changes and Save. 10. Preview your table. How to Edit a Table 1. Once a table has been inserted, you can modify its settings by selecting/clicking on the table within the Content Container and clicking the Insert Table button; you will be able to select to modify either the entire table, or the selected row, column or cell. The Table Properties icon will now be available in the WYSIWYG toolbar. Select this icon the various ways to edit your table using Table Properties. . 1 Below are screen shots of 1 This text and figure below are from Squiz Matrix Manual (http://manuals.matrix.squizsuite.net/edit-plus/chapters/viper - creatingediting-and-maintaining-tables) University of Tasmania, August 2013 40 2. For Example: If you want to edit the width of the table or a column, select the table of the column and then click on the Insert Table icon. 3. Add the required width (eg. 70%) and a Summary for the table. Click Update Changes and Save. To insert row: a. In the table select the row above where you want to add the new row b. Select the Insert Table icon and choose the Show Row Tools option c. Using the Insert Row After icon shown below, add a new row below University of Tasmania, August 2013 41 d. Alternatively to delete a row use the Trash Can icon or to move a row elsewhere within the table, use the upward or downward arrow icons e. Click Update Changes and Save To insert column: a. Select the column where you want to add the new row before or after b. Select the Insert Table icon and choose the Show Column Tools option c. When the Column Tools popup appears, choose either Insert Column Before or Insert Column After. You can also specify the width of the column. Update Changes and Save d. Alternatively to delete a column, use the Trash Can icon or to move a column elsewhere within the table, use the Move Left and Move Right icons To merge cells: a. Click on one of the cells you wish to merge b. Click on the Insert Table icon shown above, the Show Row/Column option will appear University of Tasmania, August 2013 42 c. Select whichever option you wish to merge, i.e., row or column d. Click on the Cell option (the last item at the top of the column popup indicated by the red arrow in the figure above) e. Select the Toggle Merge/Split Options button as indicated in the figure above f. Use either the Merge Down or Merge Left buttons to create the required merge g. Now you can also split these merged cells using the options Split Horizontally option shown below h. Save your changes How to add a News Item 1. On the EES Top Task Bar select New. University of Tasmania, August 2013 43 2. The Asset Creation Wizard will appear. Select the Category Pages then select Create News Item. 3. The Create News Item Wizard will load: Enter a title for your news item Click on Select Parent to define the assets location Using the Asset Finder screen highlight the parent asset (in this instance the News Items folder which should be nested under the news listing page) and click on Select The Create News Item Wizard will then re-appear showing the create location details Click on Create to complete the process 4. The asset has now been created. The options available are: Close the wizard - which will return you to the last screen you were viewing Restart the wizard - to create another asset Edit - to start editing this asset 5. Select Edit and click on the Content icon. University of Tasmania, August 2013 44 6. Click on the green Edit Contents icon to 120 characters only). 7. Click on the green Edit Contents icon to enter the Summary for the news item (restricted to enter the news item Body text. 8. Add an image to your news item. Create a new image into the news images folder Change status of image to Approve and make live Use the Asset Finder to locate your news item On the details screen under Thumbnail click change and select the news image University of Tasmania, August 2013 45 The details screen will now show the details of the thumbnail image Save changes 9. Make your news live on the details screen then refresh your home page to see the newly created news item in the news listing. How to add a Quick Link Using EES it is easy to add a new page to the quick links area of the navigation menu 1. Create new page (This asset can be standard page or redirect page) with parent location the Quick Links folder 2. Populate the page with contents and make it live 3. For redirect pages, add the redirect URL to the details screen 4. Go to the Linking screen of the asset and type quick-link into the Link Value field 5. Save changes and preview Problem solving 1. If the quick link doesn’t appear, check that the link value in the Linking screen is correct. Any deviations, even a space, will disrupt this function. University of Tasmania, August 2013 46 2. Matrix cache may also be preventing the link from appearing. You may need to wait up to three hours to view the change. How to add a Banner Image 1. 2. 3. 4. 5. Select an image that will suit the horizontal banner space Crop image to dimensions 983px width by 155px height Add image to the Home > nested content > banner images folder Make image live Go to the Linking screen and add feature-image to the Link Value Field You can add several banner images to each site; each time the browser is refreshed it will randomly select one banner image to display. How to Add an Anchor An anchor allows you to link to a particular part of your page. 6. To create an anchor place your cursor where you want your anchor point to be, and then press the anchor icon, which is found in the WYSIWYG menu. The anchor item also appears as part of the inline editor when you select text within the content container. 7. The Insert Anchor popup screen will appear. Enter a simple anchor ID into the text field as shown. Update Changes. 7. Highlight your text where you wish to create a link to your anchor. Select the link icon. 6. Use the Asset Picker to navigate to the page you want your anchor to be on and click Select. University of Tasmania, August 2013 47 7. Enter the name of the anchor in the Anchor Name field and click Update Changes. The name you enter in this field must match the name you entered when you created the anchor. When you click on this link it will take you to the start of the content that you entered. If you want to delete an anchor, highlight the text that has been anchored and the inline editor will appear. Click on the Remove Anchor icon and Save. 8. You have now created a link that will go to your anchor point. How to optimise an image for the web 1. Locate the image you need to edit 2. Right click on the image and go to: Open With > Microsoft Office Picture Manager 3. Microsoft Office Picture Manager will open NB: Picture Manager can also be found in your program menu by going to: Start > All Programs > Microsoft Office > Microsoft Office Tools > Microsoft Office Picture Manager Crop 1. In the top toolbar, go to: Picture > Crop 2. A crop menu will appear on the right hand side of the screen and the image will now have black crop lines surrounding it 3. To crop, drag the lines until you have the desired result 4. Once finished, select the OK button in the Crop menu 5. To exit the crop function, close the crop menu University of Tasmania, August 2013 48 Resize 1. In the top toolbar, go to: Picture > Resize 2. A resize menu will appear on the right hand side of the screen 3. To resize, choose one of the methods below: a. At the bottom of the screen you will see a scale indicator. Move the bar from side-toside to resize your image. Once it is the desired size, select OK in the Resize menu University of Tasmania, August 2013 49 b. If you know exactly what size you would like the image to be, enter the desired height and width in pixels into the Custom Width by Height option c. Alternatively, enter the Percentage of original width x height 4. Once finished, select the OK button in the Resize menu 5. To exit the resize function, close the crop menu Save for Web 1. In the top toolbar, go to: Picture > Compress Pictures 2. A compress pictures menu will appear on the right hand side of the screen 3. Select the radio button for Web pages 4. Select OK 5. To exit the crop function, close the crop menu University of Tasmania, August 2013 50 How to add an image asset and insert into content 1. Refer to page 18 instructions on how insert images into content. University of Tasmania, August 2013 51 Contact us For further queries or problems relating to the use of Edit+ please contact the Service Desk: Email: [email protected] Phone: x1818 About this document Author Web Services Date 13/08/2013 Version Status 1.0 University of Tasmania, August 2013 52