1
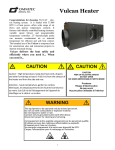
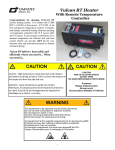
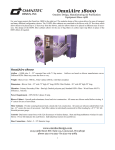
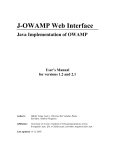
OmniAire 2000C Operations
and Maintenance
Manual
WARNING
This equipment to be operated only by trained personnel.
Do not use with combustible or explosive material.
Do not expose to water or rain.
Connect only to grounded outlet with GFCI device.
Disconnect power for cleaning and servicing.
CONFORMS TO UL STD 507
CERTIFIED TO CAN/CSA STD
C22.2 NO. 113-M1984
SPECIFICATIONS
Motor: 1.25hp, 115 V 12.0 amps, thermal protected
Controls: HIGH/LOW/OFF Switch, CHANGE FILTER Light
Airflow: 400 - 1600 cfm.
Final Filter: HEPA 99.97% @ 0.3 micron,, particle board frame, 18”x 24”x11.5”
Pre-filter: 2-stage poly pad, 35% efficiency, 20”x 25”x 2”
Housing: Galvanized Steel
Weight with Filters: 125 lbs.
Dimensions: 34”L x 20”W x 31”H
ORDERING INFO................................... PART #
OmniAire OA2000C ............................................. OA2000C
HEPA Filter 99.97%, 0.3µ .................................... OAH2418
HEPA Filter 99.99%, 0.3µ .................................... OAH2418G
Primary/Secondary Filter (qty 20) ........................ OFP2518
Intake Manifold, 12” ............................................. OAIM2000-12
Quick Clamp, 12” ................................................. QCW12
Flexible Duct, 12”x25’ ......................................... OAD25
OdorGuard 600 Carbon Filter ............................... OG2418D
The OmniAire OA20000C
comes standard with a particle
board 99.97% 0.3µ HEPA filter
and can be upgraded to a metal
frame Certified 99.99% 0.3µ
HEPA.
OPERATING INSTRUCTIONS
Unpacking: Visually inspect the unit for damage. Remove the primary/ secondary filter and
ensure that the HEPA filter has not been dislodged during shipping. The HEPA filter should be
sitting on the filter guides and the filter tabs that hold the HEPA filter in place should be tight.
See Figure 1.
If the filter is not seated correctly then remove the filter tabs, reposition the filter, and reinstall
the filter tabs before operation to ensure that there is no bypass around the filter.
If the filter tabs are loose verify that the filter is in the correct position and retighten the filter
tab nuts.
HEPA filter element
mounting tab
Filter Guides
Figure 1
To create negative pressure inside the containment, more air has to be exhausted out than
leaks into the containment. Place the machine inside the containment and hook a flexible duct
to the outlet ring of the machine exhausting to outside the containment. (See Figure 2) All of
the air being exhausted has been treated by the HEPA filter so no contaminants are being
exhausted from the containment.
Figure 2
To create positive pressure inside the containment, more air has to be pumped in than leaks
out of the containment. Place the machine outside the containment and hook a flexible duct to
the outlet ring of the machine ducting the exhaust into the containment. (See Figure 3)
Figure 3
MAINTENANCE INSTRUCTIONS
REPLACEMENT OF THE PREFILTER
Once the “CHANGE FILTER” light comes on with the machine in HIGH SPEED then the
prefilter must be replaced. When replacing the prefilter ensure that the orange side of the
prefilter is facing the HEPA filter. At this time the “CHANGE FILTER” light will go off.
When the “CHANGE FILTER” light does NOT go off after replacing the prefilter then the
HEPA filter is full and must be replaced to maintain airflow.
Please note that even though the HEPA filter is fully loaded the filter is still removing the
particulates from the air, but at a reduced airflow which will affect the ability of the machine to
provide positive or negative pressure within the containment.
REPLACEMENT OF THE HEPA FILTER
To replace the HEPA filter remove the screen/manifold and remove the prefilter. You will see 4
filter tabs holding the HEPA filter in place. See figure 4 below. These tabs are secured with 1/420 Nylock nuts, which require a 7/16” wrench or socket to remove them. Remove all 4 filter tab
retaining nuts and remove the filter tabs as well. Slide the HEPA filter out along the filter
guides and remove it from the machine.
ALWAYS TREAT THE USED HEPA FILTER AS HAZMAT AND PROCESS
IT ACCORDING TO YOUR ESTABLISHED HAZMAT PROCEDURES.
To replace the HEPA filter ensure that the gasket on the HEPA filter faces inwards toward the
flange, slide the filter in place along the filter guides and re-install the filter tabs and filter tab
securing nuts. The nuts should initially be tightened to where the stud is flush with the end of
the nut. This will compress the gasket on the filter approximately 1/2 of the thickness. This
allows for the filter to be reseated and tightened at a later time if necessary.
HEPA filter element
mounting tab
Filter Guides
Figure 4
Troubleshooting
Your Omnitec Design machine is designed and engineered to provide years of trouble free
service. Occasionally though problems do occur. Here are some helpful tips and solutions to
common problems.
The machine does not start or just hums when turned on
1. Check the circuit you have the machine on and ensure that it has power.
2. Remove the HEPA filter and push the blower wheel by hand. If it does not move freely or if
you hear a grinding/scraping noise as you spin it then the blower wheel is touching the side
of the blower housing. The most common reason for this is that due to an impact of some
kind the motor mounts have been bent. Remove the motor/blower assembly and replace the
bent motor mounts.
3. If the blower wheel spins freely the next thing to check is the capacitor. With the HEPA
filter still removed from the machine push the blower wheel and as it is spinning turn the
power switch on. If the machine runs at this point then the problem is in the capacitor.
Ensure that the wiring connected to the capacitor is plugged in and not broken. If the wiring
is correct, then the capacitor is faulty. Replace the capacitor.
The machine will run for a few minutes then turn off
1. This machine MUST be run with a HEPA filter in place. If you are trying to run it without a
filter in place the motor will overheat within a few minutes and the thermal overload in the
motor will engage. Let the motor cool off for 30 minutes, install the filter and try running
the machine again.
2. If the filter is in place and the machine still shuts off after a few minutes then the motor is
faulty. Replace the motor.
The machine vibrates excessively when running
1. This is an indication that the motor bearings are worn. If the machine is allowed to continue
running at this point the vibration will cause the center hub of the blower wheel to separate
from the wheel requiring replacement of both the motor and blower. Replace the motor.
If the machine does require electrical servicing of the motor or switches the following page
contains a wiring diagram to aid in repair or troubleshooting.
Omnitec Design, Inc.
4640 Campus Place, Suite 110 Mukilteo, WA 98275
Visit us @ www.omnitecdesign.com
Office: 425-290-3922
OMNITEC DESIGN, INC.
LIMITED WARRANTY
Omnitec Design, Inc. warrants that all products, component parts and accessories, excluding filters, will be for a period of
twelve (12) months from the date of purchase, be free from defects in material and workmanship under normal use and
service.
THE PURCHASER’S SOLE AND EXCLUSIVE REMEDY UNDER THIS WARRANTY IS LIMITED TO THE REPAIR
OR REPLACEMENT OF DEFECTIVE PARTS F.O.B., OMNITEC DESIGN, INC. 4640 CAMPUS PLACE #110
MUKILTEO, WA 98275 Ph # 425-290-3922, Fax # 425-290-3964
In order to keep this in effect, the purchaser must (i) return this signed LIMITED WARRANTY to Omnitec Design within
30 days of purchase date, (ii) have promptly informed Omnitec Design’s Customer Service of any defects and (iii) properly
used and maintained the Product.
This warranty does not cover normal wear and tear or defects due to (i) improper or negligent handling or unauthorized
modifications; (ii) defective or improper premises, chemical or electrical influences; or (iii) weather or other influences of
nature.
LIMITATIONS OF WARRANTY
THIS WARRANTY IS EXPRESSLY IN LIEU OF ANY AND ALL OTHER WARRANTIES AND OBLIGATIONS OF
OMNITEC DESIGN OR ITS SUPPLIERS, EXPRESSED OR IMPLIED, AND OMNITEC DESIGN EXPRESSLY
DISCLAIMS ANY WARRANTY OF MERCHANTABILITY OR FITNESS FOR ANY PARTICULAR PURPOSE.
LIMITATION OF REMEDY
Under no circumstance shall Omnitec Design or any supplier of Omnitec Design be liable for any loss or damage, including,
but not limited to, loss or damage arising out of the failure of the Products to operate for any period of time, inconvenience,
the use of rental or replacement equipment, loss of profits or other economic loss, or general, direct, special, indirect,
incidental or consequential damages or property damages.
PRODUCT SUITABILITY
Many states and localities have codes and regulations governing sales, construction, installation, and/or use of products for
certain purposes, which may vary from those in neighboring areas. While Omnitec Design attempts to assure that its
Products comply with such codes, it cannot guarantee compliance, and cannot be responsible for how the Products are
installed or used. Omnitec Design recommends that before purchasing and using a Product, purchasers review the Product
application, and federal, state and local regulations, to be sure that the Products, installation and use will comply with them.
KEEP THIS TOP PORTION FOR YOUR RECORDS.
LIMITED WARRANTY REGISTRATION
The undersigned has read and understood the above Warranty, Limitation of Warranty and Limitation of Remedy
PRODUCT Purchased: (Please Circle)
MiniForce II - MF100C; OA600N Nitro; OA600V; OA1000V; OA1200PAC; OA1200V; OA1300V; OA1600PAC; OA2000V;OA2000C;
OA2200UL; OA2200C; OmniForce II - OF100V; OWF115; OVH230; OWDP-Watchman
SERIAL #___________________ PURCHASED FROM_______________________________DATE_________________
CUSTOMER:
COMPANY____________________________________________________________________PHONE_______________
STREET____________________________________________________________________________________________
CITY________________________________________STATE___________________ZIP CODE_____________________
BY_______________________________________________DATE_____________________________________________
SEND TO: OMNITEC DESIGN, INC. ~ 4640 Campus Place #110 ~ Mukilteo, WA 98275