1
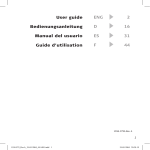
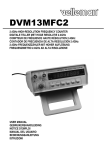
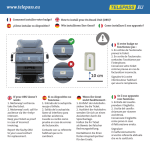
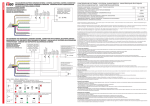
Intercom
baehr ULTIMA XL
User’s Manual
More Safety
Because the eyes stay on the road, you can fully focus on driving during the
ride.
Better Communication
with the pillion through the high output levels of the ULTIMA XL up to 200
km/h and through radio connection with other riders.
More fun during the ride
Now you can share your impressions straight away.
ULTIMA XL
More comfort
You can connect almost any Mobile phone, radio, playing or recording
device.
Less stress
The automatic speech control of the ULTIMA XL only switches on the
system while you are actually talking.
More entertainment
With the smart audio-input ‘high end’, which has built-in radio interference
compression and an electronically potential separation you can plug in
almost anything that sounds like music.
Ideal communication even while listening to the radio
The audio-speech automatic fades the music during your conversation!
Adjustments on the control device of the
intercom
On the control device of the ULTIMA XL you will find a sticker that shows the possible different
settings of the system.
SGS-09-03
Ser.Nr. XXX
Windgeräusch
NOISE
Lautstärkeautomatik
AUTO VOLUME LEVEL
Ausgangspegel Schnittstelle 4
OUTPUTLEVEL INTERFACE 4
Ausgangspegel Schnittstelle 3
OUTPUTLEVEL INTERFACE 3
Ausgangspegel Schnittstelle 2
OUTPUTLEVEL INTERFACE 2
Ausgangspegel Schnittstelle 1
OUTPUTLEVEL INTERFACE 1
Steuergerät der Sprechanlage ULTIMA XL
Fahrer Sozius
Fahrer Sozius
DRIVER
DRIVER
PILLION
PILLION
FADER
VOLUME
L Fahrer R
DRIVER
VOLUME
L Sozius R
PILLION
ULTIMA XL
On one side of the control device there are 13 black rubber
plugs to avoid water entering the system.
Turn plug while carefully pulling to get access to the ‘hidden’
regulators. To adjust the systems please always use the
provided screwdriver or a similar very small flat screwdriver.
Otherwise you will risk damaging the system.
The regulators are adjusted to average level. You can turn them left or right only for a half turn
maximum. When you look closely you will be able to see the little arrow on the regulators
(except for the ‘FADER’) and thereby verify your adjustments.
The adjustments described in the following text are the basic adjustments of the
intercom.
Your ULTIMA XL works fully automatic, so don’t be afraid you have to do the basic settings
only once. Then you can simply forget about the regulators. A new setting will only be
necessary when you fit the system to another bike, use a new helmet or connect different
device (mobile phone, radio, etc.).
Seite 2
Possible settings and related functions (advantages) of your intercom
All 13 regulators are set on medium level at the time of delivery. This setting was chosen in
way that already fits for many motorcycles/helmet combinations. Therefore, you can take off for
a ride immediately and optimise your settings later or not at all.
For all DIYs amongst us, let’s start with the first 4 regulators on the left-hand side.
Ausgangspegel Schnittstelle 4
OUTPUTLEVEL INTERFACE 4
Ausgangspegel Schnittstelle 3
OUTPUTLEVEL INTERFACE 3
Ausgangspegel Schnittstelle 2
OUTPUTLEVEL INTERFACE 2
Ausgangspegel Schnittstelle 1
OUTPUTLEVEL INTERFACE 1
These are the 4 UNIVERSAL INTERFACES of your ULTIMA XL.
Each interface can be connected to almost any Mobile phone, radio,
receiving or recording device with the corresponding adapter cable.
All signal input interfaces are designed for stereo. Although the
output signal is exclusively the microphone’s signal of the driver’s
helmet (the driver’s voice). The level of this signal can be
independently adjusted for each of the connected devices. This is
often particularly necessary, as devices are very different and even
in radios of the same brand these levels can differ.
Example: Your Mobile phone is connected to interface 2. During a call your dialog partner
might mention that he cannot hear you properly. You can now (and in the future) simply speak
louder or you can, on your next stop, turn the regulator slightly to the right and wait what your
next caller thinks of talking to you while you ride your bike.
All interfaces are fitted with identical 6-pin plugs, but have different priority settings (automatic
priority!) this prevents interference of simultaneously incoming signals. An incoming signal on
a higher priority interface will so automatically inhibit signals with lower priority. You can freely
choose, by changing the interfaces, which of the signals (meaning devices) gets priority.
As not to confuse you (and us) completely, following is the simplified correlation:
Interface 1 has priority 1, which means antecedence to all other signals
Interface 2 has priority 2, which means antecedence to 3 and 4 but not to 1.
Interface 3 has priority 3, which means antecedence to 4 but not to 1 and 2.
Interface 4 has priority 4, which means antecedence only to listening to music but not to the
other interfaces
If you intend to connect different devices you should find an interface seizure that makes sense
for your needs. Here is some helpful advise from our own (subjective) point of view:
For some of us the constant reacharbility of the Mobile phone has become very important.
But the message of your friend driving in front of you: “Caution! Gravel in curve!” might - at that
moment - be much more important for you than any urgent phone call. And your partner on the
Mobile phone will certainly be more willing to repeat part of the conversation. The gravel might
not make any compromises.
Interface 1 with priority 1 has, as already mentioned, absolute priority. It is the only interface
where incoming signals even suppress the internal communication with your pillion short term.
A further reason to connect a radio device with its generally slightly worse transfer qualities is
that if you lower the volume of the helmet microphones, the wind noise will also decrease and
thus make the ‘emergency message’ even clearer to hear.
Seite 3
The driver’s output signal will not be affected by these automatisms and is available for all
interfaces at all times.
In general, you should not overrate the priority settings. This whole technique only takes effect
when 2 or more signals arrive absolutely simultaneous. Normally, driver and pillion will hear
only what is.
Unassigned interfaces will stay passive. If you leave one of the middle interfaces empty, the
priorities of the lower ones will go up one level.
Now, the next 2 regulators:
This picture shows the wind noises. If one helmet is in a
streamlined flow (see left helmet) the wind noise will be equally
constant and - in high quality helmets - rather muted. These
conditions can mostly be found on ‘naked bikes’ or on bikes
with minimal panels and small, flat windscreens. Under these
conditions the intercom’s automatic can easily tell wind noise
outside the helmet from talk within the helmet. In this case the
best position of the switch will be between 8 and 12 o’clock.
Unfortunately, you will not find these ideal wind conditions very often with touring bikes
The difference in height between driver and pillion seat is often quite significant. Sometimes
the helmets are very unlike or the size and posture of driver and pillion is significantly different.
For that reason we have fitted 2 automatic units into your intercom, which work and
adjust completely separate.
Curly wind (see right helmet) creates an extremely loud and patchy noise that is slightly similar
to human speech patterns. The ideal position for the adjusting switch is between 12 and 3
o’clock.
The next 2 regulators:
Lautstärkeautomatik
AUTO VOLUME LEVEL
With increasing surrounding noise (higher speed) the transmission level of speech, radio and
other signals, like incoming calls, must be adjusted to ensure a clear transmission. The Auto
Volume Level does this adjustment.
Here you will find one regulator for the driver and one for the pillion helmet, so you
can define a personal setting as to when this adjustment takes effect. If you turn the
corresponding regulator to the left the adjustment is made at a lower noise level. A
turn to the right decreases the noise sensibility.
There are some circumstances when no adjustment takes place, no matter which
setting you have chosen. This does not mean that your intercom is broken; an
adjustment is just not necessary. The 1.7m driver of a super-touring bike (let’s say a
GL 1800 Goldwing) has such a huge encasement with front screen it simply does not make a
difference whether he is driving 50 or 150 km/h.
Seite 4
Last but not least – the last 5 regulators:
This symbol means ‘listening to music’.
With this regulator you can adjust the volume distribution
between rider and pillion. Turning left increases the volume for
the rider, turning right increases the volume for the pillion.
This symbol stands for the volume in the respective helmet, with
volume increasing to the right, decreasing to the left.
This volume control regulates all sources of sound: voice, radio, CD, MP3, Walkman, mini disk,
or whatever you have connected to the radio input or the other 4 universal interfaces.
After one or two rides you will have found your ideal personal settings and it is now time to put
back in the plug that stops water from entering the system while riding in the rain (push it in by
slightly turning it).
Water damage of the control device (of whatever kind) is not included in our 2- year warranty!
Special settings
‘Automatic Sing-Along’ setting (‘Mitsingautomatik’)
Normally the automatic speech control of the ULTIMA XL will fade the music the moment you
or your pillion start talking.
As your ULTIMA XL is serially fitted with automatic sing-along the intercom reacts as follows:
When you are riding with a pillion everything works as usual.
When you are riding on your own, the system will recognise the missing pillion and turn off the
automatic voice recognition completely.
When you now e.g. open your visor (cracking noise), comment on other drivers’/riders’ style or
sing along with the music then the volume will stay the same. Even the strongest wind noise
will now no longer interrupt your favourite song.
Seite 5
12V Automatic Power Switch-off
As soon as the driver helmet is disconnected the intercom internally switches-off completely, it
you practically stops wasting power.
Caution!
This automatic function can lead to errors if the 5-pin driver-helmet connection gets wet. For
motorbikes that always have to stay outside at night or drive in wintry conditions often we
suggest to connect the power (12 V, red cable) not directly to the positive pole of your battery
but behind the ignition e.g. to your taillight.
This offers several advantages: Mostly the cables are easy to reach, you will never again drive
without your headlight on, as your intercom would then be switched off as well, and you can be
sure that the battery will not discharge as the lights switch off when you cut off the ignition.
But CAUTION! There are exceptions to this recommendation:
With new BMW models (e.g. BMW R1150RT or K1200LT) the filament of the taillight is
electronically supervised by the (integral) ABS control box.
In this case, to avoid malfunction, please do NOT draw power from the taillight (parking light
bulb).
Your main motto should be: “Hands off the anti-skid system!”
If you are not sure, check your vehicle’s manual, ask your motorcycle dealer, or leave
installation to a professional.
Seite 6
Seite 7