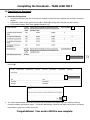
1
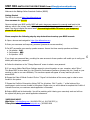
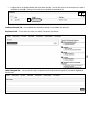
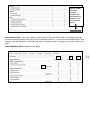
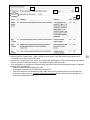
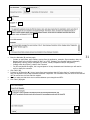
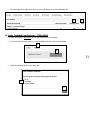
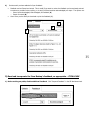
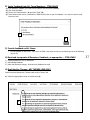
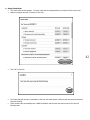
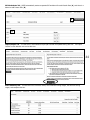
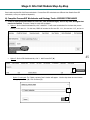
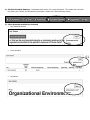
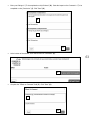
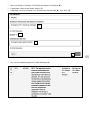
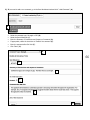
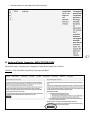
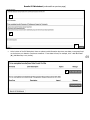
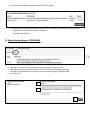
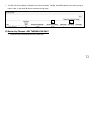
Baldrige Online Scorebook Solution (BOSS) TEAM LEADER Users Guide Handbook ____________________________________ www.thepartnershipforexcellence.org Welcome to the official TPE scorebook software for examiners, the Baldrige Online scorebook Solution (BOSS). Thank you for volunteering to serve as a TPE Examiner this year! BOSS USERS GUIDE HANDBOOK TABLE OF CONTENTS Description Page BOSS Overview 3 BOSS Tip Sheet 4 3 Step Login Process 6 Navigating the Independent Review Module 8 Navigating the IR Module – TL ONLY 14 Stage 1: Independent Review Step-by-Step 15 Moving the Team to Consensus – TL ONLY 24 Navigating the Consensus Module 25 Navigating the Consensus Module – TL ONLY 28 Stage 2: Consensus Step-by-Step 29 Moving the Team to Site Visit – TL ONLY 40 Navigating the Site Visit Module 43 Stage 3: Site Visit Module Step-by-Step 45 Completing the Scorebook – TL ONLY 73 BOSS Troubleshooting 74 2 BOSS OVERVIEW WHAT IS BOSS? During the examiner process, you will use the Baldrige Online Scorebook Solution (BOSS) to enter your evaluation into a scorebook. You can access BOSS online at https://tpe.allianceboss.org. BOSS is an intuitive program and there is no special training required. You will practice using the software during your case study/prework and then will utilize BOSS fully during the actual examination. GETTING STARTED IN BOSS: 1. You will receive 2 separate emails from TPE: One with your username and detailed instructions on logging into BOSS, and a second with a temporary password that you’ll need to re-set within 72 hours. 2. Follow the instructions to login and then get familiarized with BOSS, its functionality, and the available tools and features. 3. Locate the BOSS user’s manual and other helpful tools in the TPE Examiner Learning Resource Center on our website (http://www.thepartnershipforexcellence.org/resources_training.html) to reference throughout your work on the case study and full application assignments. BOSS FEATURE HIGHLIGHTS: Availability - Access BOSS from any Internet-connected computer at any time Customizable Format - Adjust the size of columns, panes, and fonts, and sort many columns Criteria - Available within BOSS; toggle the Criteria pane on and off as you complete your review Glossary - Available within BOSS; click on a term to see the definition in a popup window Self-Service Password - Change or reset your password independently by answering three security questions (we provide you standard answers). Spellcheck - Check spelling within specific fields (rather than the full document) Team Files - Upload and view files to share with your examiner team (e.g. team agendas, timelines, etc.) NEED BOSS HELP? Mike Belter | [email protected] | 614-583-6724 (w), 614-746-2223 (c) Tiffany Edmonds | [email protected] | 614-893-0006 3 BOSS TIP SHEET to reference throughout the cycle: Baldrige Framework (Criteria) Browser Compatibility The 2015-16 Baldrige Excellence Framework (which includes the Baldrige Criteria for Performance Excellence, core values and concepts, and guidelines for evaluating an organization’s processes and results) has been loaded into the BOSS system for your reference. The Criteria appear on the right hand side of the screen under the Key Factors, Independent Review, CR Worksheets (Consensus), Item Worksheets (SV module), and Key Themes tabs. BOSS is optimized for computers using IE 10 (and above), Google Chrome, Firefox, and Safari. Character Count Limits are set in most of the cells. When you reach the maximum number of characters in a cell, the cell border will change to RED and you will need to adjust the amount of text. You also have a character counter that shows the number of characters as you type. Confidentiality Remember to never enter the name of the applicant organization anywhere in BOSS. The Team Lead will make the final edits to the Feedback Report and substitute the name at that time. Use either “the applicant” or “the organization” in place of the name; your Team Lead will tell you which to use. Copy/Paste You can copy and paste text from documents (including the application), the Criteria, and glossary terms. Shortcuts include Ctrl C (copy), Ctrl V (paste). If copying and pasting from a Word document, check that the text does not exceed the character count in BOSS. Download You can download your work from BOSS by clicking on this icon. 4 Drag/Drop This functionality is not available in BOSS. Editing Click on the Pencil icon (below) to make edits. Note: In Consensus Review, you can only edit items for which you are the lead. (Team Leads can edit all items.) Feedback Ready Comments In Independent Review, you will enter feedback ready strength comments and feedback ready OFI comments. These are referred to as “FBR” on the Scorebook Progress page. Help Logging Time For BOSS software/technology/how-to questions, contact Mike Belter: [email protected] 614-583-6724 (w), 614-746-2223 (c) For BOSS account set-up and login, contact Tiffany Edmonds: [email protected] 614-893-0006 You can enter the hours worked on the application (in or out of the BOSS software); the system will not log it automatically. Once entered, you cannot delete it. Your Team Lead can view how many hours you have logged. Click “Log Time”, which is located in the orange bar at the top of the page. Notifications The Overview/Notification screen appears immediately after the Scorebook loads. Always check the Notification screen for new postings. Only Administrators and Team Leads can post notifications. Administrators can post to all Examiners; Team Leaders can only post notifications to their team members. Password Reset If you fail to log in to BOSS within 72 hours of receiving your username and temporary password, you will need to contact the TPE office at [email protected] or call (614) 893-0006 to reset your temporary password. If you forget your password after completing your initial log-in, select “Forgot your Password?” on the BOSS log-in screen to have a new temporary password sent to the email address on file. Printing from BOSS Most of your work in BOSS can be printed. Click on “View” and then “Print.” You can also download it as a PDF file. Save The BOSS does not have an auto save feature built into the application at this time. You will need to click “Save” to save your work. Be sure to save your work on a regular basis. The session timeout is currently 60 minutes, and your work will not be saved if your session times out and you did not click the save button. PLEASE SAVE OFTEN! Spell Check This version of BOSS uses the browser spell check. Timeout BOSS will timeout after 60 minutes of inactivity and will not auto-save your work. Please be sure to “save” often to avoid losing your work! Trash Can Icon Clicking on this icon will delete your work. This cannot be undone. Troubleshooting Problems logging in to BOSS could be attributed to issues with your browser (i.e. Internet Explorer, Google Chrome, Apple Safari, or Firefox) or your computer’s firewall settings. Here are a few potential remedies: 1. Clear your cache. To do this within Internet Explorer, open your browser, select Tools, and select Internet Options. Under Browsing History, ensure that Delete Temporary Internet Files is checked and select Delete before logging in to BOSS. 2. Ensure you have the latest version of your browser installed on your computer. 3. Try using a different browser. 4. Access BOSS from a different computer. 5. Check your computer’s firewall settings with your organization’s IT department. Undo Not available in BOSS. Word File Output Your work can be extracted to a Word document. Click on the icon Scorebook Summary at the top right of the ribbon or the Worksheet “View” icon. 5 STEP ONE: WATCH FOR THIS FIRST EMAIL from [email protected] Welcome to the Baldrige Online Scorebook Solution (BOSS)! Getting Started The URL for the site is https://tpe.allianceboss.org Your username is: XXXXXXX Once we activate your BOSS profile, BOSS will send a temporary password in a second email sent to this address, which is the primary email address we have on file for you in our database. Be sure to check your spam if you do not receive the second email. You must login within 72 hours or your temporary password will deactivate. Please complete the following step-by-step instructions to set-up your BOSS account: 1. Open a browser and navigate to https://tpe.allianceboss.org 2. Enter your username and temporary password (passwords are case sensitive). 3. Do NOT personalize your security question answers. Answer the three security questions as follows: a. 1st question - AAA b. 2nd question - BBB c. 3rd question - CCC If you forget your password later, providing the same answers to these questions will enable you to verify your identity and reset your password. 4. Follow the directions on the "Change Password" screen to select a new password. 5. If you see an Adobe Flash Player Settings request to store information on your computer, select "Allow." This allows BOSS to store data (e.g. the Criteria for Performance Excellence, glossary text, etc.) locally on your machine in order to run more efficiently. This one-time request will appear on every machine you use to access BOSS. 6. Bypass the Code of Ethical Conduct. Click on "I Agree" at the bottom of the screen page in order to move forward in the system. 7. Bypass the Conflict of Interest by clicking "NO" for all options. Click "I certify...." at the bottom of the screen page in order to move forward in the system. Please note: you will be asked to complete this Conflict of Interest form when you receive an actual application in December. 8. Explore BOSS and its functionality. You will be practicing with it during your case-study work and will use the system fully during your actual application assessment. *NEED BOSS HELP? Mike Belter | [email protected] | 614-583-6724 (w), 614-746-2223 (c) Tiffany Edmonds | [email protected] | 614-893-0006 6 STEP TWO: WATCH FOR THIS SECOND EMAIL from [email protected] STEP THREE: FOLLOW the INSTRUCTIONS in BOSS to RE-SET YOUR PASSWORD 7 Navigating the Independent Review Module Let’s take a tour of the Independent Review Module. After logging into BOSS for the first time, the Overview Tab will be displayed. Overview Tab --This is the “home screen” that you will see each time you log in. 8 Notifications from the Team Lead or the Administrator are shown at the bottom of the Overview Tab; please be sure to read them promptly. Click on the link under “Subject” to read the notification. A bolded subject line indicates that it has not been read. Read the notification and click “Close.” A subject that is not bolded indicates that it has been read (A). You can also click on the envelope icon to mark a notification as read (B). Clicking on the trash can icon deletes the notification (C). C B A Conflict of Interest Tab --You completed this information already. It is available as a reference. Key Factors Tab -- This is where you enter your team’s “Consensus” key factors. 9 Initial Thoughts Tab -- You can use this screen to capture your first impressions thoughts as you read the application the first time. Item Worksheets Tab -- This is where you will document your Independent Review as you evaluate the applicant for each Item. Each item worksheet contains panels for entering relevant key factors, strengths, OFIs, and the score. The Criteria appear on the right side of the screen for easy reference. Use these buttons to view other Items Clicking on a term that is in ALL CAPS displays the Baldrige definition. 10 Scorebook Progress Tab -- This screen provides an overview of your Scorebook progress, including the number of strengths and opportunities for improvement (OFIs), the number of Feedback Ready Comments, and the score you have given to each item. Warning: Do NOT click “Mark Scorebook complete” until instructed by your Team Lead. This action cannot be undone. Score Summary Tab -- This screen displays, for each Item, the Total Points Possible (A), the Percentage Score (B), and the corresponding numerical Score (C) from your Independent Review. The scores are automatically tallied to show Category Totals (D), Subtotals for Process (E, next page) and Results items (F, next page), and the Grand Total (G, next page). Score Summary Tab (continued on next page) A D B C 11 Score Summary Tab . E D F D G D Below is a close-up of the links located in the upper right part of the Independent Review module screen. A D B D C D D D E D 12 F D Log Time (A)—You may use this feature to track all of the time that you spend doing Examiner work. Click “+Add Time” (1) and then enter the number of hours (2, whole numbers only), select the date (3), click “Save” (4) and “Close” (5). Your time is now displayed (6, next page) and you can remove it if necessary (7, next page). This information is used to calculate the average time the examiners spend on their applications. 2 1 4 3 6 3 5 7 3 Team Files (B, pg. 19) -- This is where you can securely download a copy of the application and other team files (1). You can also upload files (2), such as your Draft Key Factors. You do not need to password protect files that are uploaded into BOSS, but please remember not to use the name of the applicant in ANY files. 2 3 1 Scorebook (C, pg. 19) -- This feature allows you to download your Independent Review Scorebook as a Word Document. Suggestions (D, pg. 19) -- The purpose of this is to allow Examiners to send their feedback about BOSS to NIST. This feature may not be functional for state/regional examiners. 13 Help (E, pg. 19)—Displays some of the topics that are included in this manual. Logout (F, pg. 19)—This ends your BOSS session. Navigating the Independent Review Module – TEAM LEAD ONLY Team Leads have a few additional features available. Scorebook Status—Team Leads can view the following for each Team Member: Scorebook status (A, In Progress or Completed), number of hours tracked (B), and date/time of last login (C). Clicking on the document icon under “View” (D) downloads the examiner’s independent scorebook into Word. Consensus – Clicking “Begin Consensus Review” (E) ends Independent Review and moves all team members to consensus, meaning that examiners may NOT make any additional changes to Independent Review. DO NOT CLICK THIS BUTTON UNTIL THE TEAM IS READY TO MOVE TO CONSENSUS! This cannot be undone. A 3 F 3 B 3 C B 3 D B 3 14 E 3 Notifications—Enables the Team Lead to send messages in BOSS to all Team Members. Click “Create Notification” (F, previous page), enter the Subject (G) and Message (H), and click “Send” (I). G 3 H E 3 I E 3 Stage 1: Independent Review Step-by-Step A) Getting Started 1) Review the Criteria 2) Read the entire Application Click on Team Files and download the application. Optional: Enter your first impressions on the Initial Thoughts tab. B) Key Factors 1) Draft a list of Key Factors Following the instructions you received in training, compile a list of Key Factors (these will be referred to as Draft Key Factors). DO NOT ENTER DRAFT KEY FACTORS INTO BOSS! Your Team Lead will provide you with a template, usually Word or Excel, in which to enter your Draft Key Factors. Name this file according to your Team Lead’s instructions and upload it into Team Files. Team Members’ Draft Key Factors are used as inputs for Key Factors consensus. 2) Input Consensus Key Factors After your team comes to consensus, the Team Lead or Assistant Team Lead will upload the Consensus Key Factors into BOSS. Copy and paste each Consensus Key Factor into BOSS by following the instructions below. Go to the Key Factors tab, and click Add New Key Factor 15 Select the appropriate choice for Preface (A). Copy and Paste the Key Factor Name exactly as it appears on the Consensus Key Factor list (B). Copy and paste the Key Factor Description exactly as it appears on the Consensus Key Factor list (C). Click "Save" (D). A B C D As you add them, the Consensus Key Factors will appear on the Key Factor tab (below). C) Complete Independent Review There are 17 items, and you will need to repeat the following 6-step process for each Item. The screen shots below are for 1.1, Senior Leadership. Completing Results items is very similar to Process items, but a few key differences are noted. 1) C - Read the Criteria Item (A). Refresh your memory and make sure you understand the item requirements. 2) KF -Select the Key Factors. Choose the most relevant Key Factors for the Item. The guideline is around 4 to 6 Key Factors. On the Item Worksheets tab (A), use the Select Items drop-down list (B) and choose the Item you are working on. Click on the Relevant Key Factors panel (C). Click on the button “+ Add Relevant Key Factor.” (D) A B D A C A 16 Step 1: Select a Key Factor from the list by double clicking on it. Double click in the box. Step 2: You have the option of selecting all or part of the Key Factor. o Step2, Option A: If the entire Key Factor is relevant to the item, click Select All. 17 o Step 2, Option B: If only part of the Key Factor applies to the Item, highlight the text that you want to use and then click Select Text. Repeat 2) to add the other relevant Key Factors. 3) A –Read the Application Item 4) STR/OFI -- Analyze the Responses and Determine Strengths and OFI’s. Remember, you need “around 6 Strengths and OFI’s” for each Item. The screen shot examples below show how to enter a Strength, but the process is very similar for an OFI. *Tip: Enter your Strengths and OFIs in order of importance to the applicant because they cannot be re-ordered. Select the Strengths (or Opportunities for Improvement) panel (A). Click “+ Add Strength”, (B) or “+ Add Opportunity for Improvement.” A B A 18 Select the Key Factor(s) (C) that are most relevant to the Strength or OFI. You must choose at least 1 Key Factor for each Strength/OFI. Click in the box “Item Reference” (D). A pop-up window appears (next page). C 19 D Select the criteria (E) that corresponds to your Strength or OFI. You may choose more than 1 if appropriate. Click “Save changes” (F). E C F C If you want to mark this as a double strength (or double OFI), select “Double?” (G). Under Comment, type your comment (H), which does not need to be in feedback-ready format at this time. *Tip: Save your work frequently, and then click the pencil icon to edit. Under “As Evidenced by…” (I) provide support from the application to explain why it is a Strength or OFI. As appropriate, include page numbers, figure numbers, descriptions, examples, data, and/or quotes from the application. Select at least 1 Evaluation Factor (J) that relates to your comment: Approach, Deployment, Learning, and/or Integration (for Results, select Levels, Trends, Comparisons, and/or Integration). Click “Save” (K). G H I 20 J K After saving your work, the Item Worksheet looks like this: Repeat 4) to enter additional Strengths and OFIs. 5) FBR – Draft 2 Feedback Ready Comments Enter a Feedback Ready Strength. o Click on the Strength panel and enter it in the box marked Feedback Ready Comment (A). o For Item Reference (B), select the relevant criteria in the pop-up box that appears. o To double the comment, select “Double?” (C). o Correct any misspelled words (D). o Click “Save” (E). Click on the OFI panel and repeat these steps to create a Feedback Ready OFI comment. B A G C G D E G 6) % -- Determine the Scoring Range and Score for the item Click on the Score panel (A) and scroll down to the bottom of the screen. Following the scoring guidelines from examiner training, decide on the most appropriate scoring range and select it using the dropdown arrow (B). Determine the most appropriate Item Score (C). Click “Save” (D). A B C D 21 D) Finishing Independent Review 1) Check the Scorebook Progress tab (A) to make sure you haven’t missed anything. Each of the 17 Items should have: Around 6 Strengths (B) and Opportunities for Improvement (C). 2 Feedback Ready Comments (D, shown as “+FBR”). A Score (E). A Range (F). A B C E F D 1.2 is missing OFIs and a FBR comment 2) Do NOT click “Mark Scorebook complete” until instructed by your Team Lead. This action cannot be undone. When instructed by your team lead to do so, “Mark Scorebook Complete” (A). Click “Yes” (B) in the pop-up box to confirm. Caution: Reminder, there is no way to undo this! Scorebook Progress Tab (bottom of window) A B A 22 3) The bottom of the Scorebook Progress tab indicates that you have marked your Independent Review scorebook Complete. Your Team Lead will need to do a few things in BOSS before you can access the Consensus module. 23 Moving the Team to Consensus - TEAM LEAD ONLY E. Moving the Team to Consensus 1) Begin Consensus Review—The Team Lead can monitor everyone’s Scorebook Status on the Overview tab. When a team member marks their scorebook as complete, their status will change from “In progress” to “Complete.” After ALL team members are in the “Complete” status, the Team Lead advances the team members’ scorebooks to Consensus by clicking “Begin Consensus Review.” Overview Tab 2) Assign Team Roles This window appears after clicking “Begin Consensus Review.” Note: The Team Lead automatically has access to all items, the Key Themes, and scorebook editing. The user names of all team members are available in the drop-downs. Assign a Key Theme Lead (A) and a Scorebook Editor (B). Assign an Item Lead (C) and an Item Backup (D) to each Item. *Tip: Changes to roles can be made later through the Overview Tab of the Consensus module. Click “Continue to Consensus Review” (E). A B C D 24 E 3) A Confirmation about moving to Consensus appears. Click “Yes” to move to Consensus. There is no way to undo this! 4) After the Team Lead logs into BOSS, all Team Members will be able to access the Consensus module. BOSS automatically sends a notification to all team members. The Team Lead receives an automated e-mail from the Administrator stating that the team has been moved to Consensus. Navigating the Consensus Module There are several different tabs and features in the Consensus module compared to Independent Review (IR). Overview Tab – This looks very similar to the Overview Tab in the IR module. You will receive a BOSS notification after the Team Lead moves the team to Consensus (below). 25 Conflict of Interest Tab – This is the same as the one in Independent Review. Key Factors Tab– Allows you to view, but not edit, the Consensus Key Factors (these are the ones entered by the Team Lead, which should be identical to the ones everyone else added). These are the ones that are used in the Consensus process. This list of Key Factors can be edited by the Team Lead. Key Themes Tab—This is where the Key Themes Lead enters and edits the Process and Results Key Themes. CR Worksheets Tab —Similar to the Independent Review worksheets, this is where the bulk of the work is done in Consensus. At the bottom of the screen, you can view the IR work of your team members. CR Worksheets Tab (continued from previous page) Scorebook Progress Tab – This tab contains different information than in Independent Review. On this screen, you can see who is assigned to each role, and your name is bolded. At the beginning of the Consensus stage, Feedback Status is Closed for all items. “Mark Complete” will appear under Selection when the item has been assigned a score. Warning: Do NOT click Mark Complete until your Team Lead instructs you to. There is no way to undo this. 26 Score Summary Tab – This displays the Consensus scoring. Other features of the Consensus Module: Scorebook—This allows you to download a copy of the Consensus Scorebook (not your IR Scorebook). Feedback – In the CR Worksheets tab, clicking on this panel (A) displays the Feedback window (B), where you can invite feedback on the Items that you are Item Lead for, and send feedback to your team members on their Items after you are invited to do so. A B 27 Navigating the Consensus Module – TEAM LEAD ONLY Team Lead Scorebook Progress Tab--Similar to the screen for other examiners, except the option to mark items complete (A) exists at the beginning of Consensus. Additionally, only Team Leads can “Mark Scorebook Final” (B). Warning: Do NOT click “Mark Complete” or “Mark Scorebook Final” until the end of the Cosensus phase. B A Feedback—The Team Lead can open or close Feedback for an Item, even if he/she is not the Item Lead or Backup. Overview Tab—Click on “Manage Team Roles” to make changes to Lead and Backup assignments. After marking “update,” it will display the message “Changes have been saved.” 28 Stage 2: Consensus Step-by-Step A) Prepare a first draft of the CR Worksheet – ITEM LEADS The Team Lead will assign you to be the Item Lead for one or more Items. For those Item(s), please complete the following steps. 1) C - Read the Criteria Item. 2) KF – Determine Key Factors for the Item. Choose “around 4 to 6” Consensus Key Factors for the item. The Item Lead must choose the Key Factors at this point. *Tip: You will be able to change them after your team’s consensus call. The Consensus Key Factors are added in the same way that you added them to Items in Independent Review (example below). 29 3) A – Read the Application Item. 4) STR/OFI – Determine around 6 Strengths and OFIs. The example below is for Strengths, but the process for entering OFIs is the same. On the CR Worksheets tab, scroll down to the bottom of the page to view your teammates’ IR Inputs. There are separate panels for Strengths, OFIs, and Scores. The Feedback Ready comments are mixed in with the rest of the comments. *Tips: Click on the table headers to sort; sorting by Item Reference (A) is particularly useful. Use the Search function (B) to find comments with key words. View the IR’s of all team members or only a few by selecting and unselecting the boxes by the examiner names (C). o o o C B B B D A B A B o Group thoughts into similar ideas. *Tip: Clicking the arrow under “View” (D, previous page) allows you to download or print all IR inputs for the Item. Scroll back to the upper part of the screen. The Strength and Opportunities for Improvement panels are similar to the ones you used in Independent Review. Enter each Strength (or OFI) as follows: Go to the Strength (or Opportunity for Improvement) panel (A, below) and click Add New Strength (or Add New Opportunity for Improvement). o Select the appropriate Item Reference(s) (B). o If applicable, check the box to “Double” the comment (C). o Enter the comment in the Comment field (D). *Tip: You can copy and paste text from the IR Inputs box. o At the end of each comment, include the initials of the examiners (E) who identified it as a Strength (or an OFI) during Independent Review. 30 A A B B A B D A B C A B E D A B F D A B Enter the Rationale (F, previous page) o Include, as appropriate, page numbers, quotes from the application, examples, figure numbers, data, etc. o Because there are no boxes to check for ADLI (or LeTCI), indicate if the comment relates to Approach, Deployment, Learning, and/or Integration (or Levels, Trends, Comparisons and/or Integration). o Indicate which Key Factor(s) relate to the Comment. o For OFIs and double Strengths, this is a good place to list any documents and interviews you will need to verify or clarify the comment. Click “Save” (G). In Notes for All Strengths (H), list any inputs from team members that fell “below the line,” meaning that they were not captured in any of the consensus comments. Important: The information that you record in this field will NOT be carried over into the Site Visit module! Check to make sure that there are no conflicts between your strengths and OFI’s. Click “Save” (G) again. H E D A B G E D A B 31 5) Write Feedback Ready Comments. Revise the “around 6” Strength and OFI comments so that they are in Feedback Ready form. Begin each Strength with STR-#, so that the most important strength is STR-1, the next important is STR-2, and so on. Begin each OFI with OFI-#, numbering in order of importance to the applicant. 6) Determine and record a consensus scoring range and score for the item. Follow the scoring guidelines you received in training. *Tip: There is a panel on Independent Review inputs (bottom of CR Worksheets tab) that displays the score assigned by each examiner . Select Choose the Scoring Range (A). Enter the Item Score (B). Explain your rationale in “Why shouldn’t the score be in the range above or below the selected one?” (C). Click “Save” (D). A D A B B D A B C D A B D A D A B 32 The Percentage Score (E) and the Score in points (F) appear on the Score Summary tab. E D A B F D A B B) Invite Feedback from Backups – ITEM LEADS For Items which you are Item Lead, you will get input from the Item Backup. Go into the CR worksheet and click on the Feedback panel, then click Invite Feedback. A G E D A B B E D A B 33 Select Item Backup (C) and click “Send” (D). C E D A B D E D A B The Feedback panel displays these options. Do not click either; you will use these later in the Consensus process. The Item Backup will receive a Notification in BOSS that the Item is open for feedback. *Tip: Send the Backup an e-mail as well. C) Provide Feedback to Item Leads – ITEM BACKUPS 34 For Items that you are Item Backup for, provide input to the Item Lead. 1) Go into the CR worksheet and review the Item Lead’s work on all 4 panels: Relevant Key Factors, Strengths, Opportunities for Improvement, and Score. 2) Click Add Feedback (A). A E D clicking Save). *Tip: Include the 3) Type your feedback (B) and click Save (C). (You cannot undo Feedback after STR-# or OFI-# in the Feedback. A B B E D A B C E D A B 4) Continue until you have added all of your feedback. Feedback can be filtered and sorted. This is useful if you want to review the feedback you have already entered to make sure you didn’t miss anything, or to see if the Item Lead has acknowledged your input. The options are: o Show: Not Acknowledged, Acknowledged, All Feedback (A). o Search for words (B). View: Gives you the ability to download or print the feedback (C). B E D A B A E D A B C E D A B 35 D) Read and incorporate the Item Backup’s feedback, as appropriate – ITEM LEADS 1) Before making any edits, disable additional feedback. Click” Suspend Feedback” in the CR Worksheets tab. 2) To be able to view the feedback from the Item Backup, you need to click Invite Feedback (A), Select “No one” (B), and click “Send” (C). A E D A B B A E D A B 3) Read the feedback, and then “Acknowledge” the feedback by clicking the box. C A E D A B 36 As an Item Lead, you can add your own comments to the “Feedback” panel, even when Feedback is open to “no one.” 4) Make edits, as appropriate, to the Key Factors, Strengths, OFIs, and/or Score. If you disagree with, or decide not to use, some of the feedback, make a note in the Rationale, the Notes for all Strengths, or the Notes for all Opportunities for Improvement, as appropriate. Save the changes as you go. TIP: If you need to work on another Item, select the Criteria panel and choose that item. E) Invite Feedback from ALL Team Members – ITEM LEADS 1) 2) 3) 4) Click Suspend Feedback (you need to do this before you can Invite Feedback). Click Invite Feedback. Choose “All Team Members” (A) and Click “Send” (B). Team members will receive a notification in BOSS that the item is open for feedback. You may also want to send them an e-mail. A C E D A B F) Provide feedback on ALL Items B C E D A B input as an Item Backup Provide feedback on the Items. The process in BOSS is the same as when you provided (pg. 61-62). G) Read and incorporate all Examiners’ feedback, as appropriate – ITEM LEADS 1) Suspend feedback on the CR worksheet. 2) Acknowledge feedback. 3) Make and document changes. Document any feedback not used. H) Draft the Key Themes—KEY THEMES LEAD ONLY Draft Process and Results Key Themes under the Key Themes Tab. 1) Select the appropriate Process or Results area (A). A C E D A B 37 KEY THEMES LEAD ONLY 2) Enter the text in “Key Theme Description” (B). 3) Click “Save” (C). B C E D A B C C The Key Themes Lead has the ability to open Key Themes for feedback (because there is not aEbackup for Key D Themes, the feedback is automatically opened to all Team Members). A B I) After the Consensus Call—ITEM LEADS 1) Edit your Items to reflect the Team’s decisions in Consensus. This includes Key Factors, Strengths, Opportunities for Improvement, and Scoring. 2) When you are sure that no more changes need to be made, go to the Scorebook progress tab. You will see a box in the Selection column for each Item that you are the Lead for. Select the items(s) that are finished and click “Mark Complete.” (The Team Lead also has the ability to mark items Complete). Warning: after marking items Complete, you cannot make any more edits in the Consensus Scorebook, and this cannot be undone . 38 3) BOSS gives you a Confirmation. Click "Yes" to mark the Item(s) Complete. 4) On the Scorebook Progress tab, these items now reflect the status of Complete. 39 J) After the Consensus Call—KEY THEMES LEAD ONLY After making final edits, the Key Themes Lead must go to the Scorebook Progress tab and click “Mark Complete” under Selection for Key Themes. After this is done, the Key Themes Lead will not be able to make further edits in the Consensus stage. Moving the Team to Site Visit – TEAM LEAD ONLY K) After the Consensus Call – TEAM LEAD ONLY 1) The Team Lead needs to mark the Key Factors as Complete on the Scorebook Progress tab. 2) BOSS automatically calculates subtotal scores for Process and Results, and a Grand Total score. Based on the subtotals, the Process (A) and Results (B) scoring bands are automatically assigned. A C E D A B 40 B C E D 3) The Team Lead can adjust the scoring band, if applicable, to reflect the Team’s decision in Consensus. Click on the A arrow beside the appropriate Scoring Band (C) to change it, and then click “Save Updated Scoreband” (D). B D C E D A B C C E D A B L) Moving to Site Visit Module 1) Mark Key Themes and Key Factors Final. In the Scorebook Progress tab, the Team Lead clicks “Mark Final” for Key Themes (A) and Key Factors (B). BOSS will ask the Team Lead to confirm this by clicking “Yes.” This cannot be undone. A B B 2) Mark all Items as Final. C The Team Lead then clicks “Mark Complete” for each of the 17 items. BOSS asks for a confirmation after each E one. These cannot be undone. D A 3) Click Mark Scorebook Final. After clicking “Mark Scorebook Final” (C), click "Yes" to confirm (D). This cannot be undone. B C 41 D All Examiners receive a notification that Consensus Review has been completed. This status is also shown on the Scorebook Progress tab. 4) The Administrator moves the team to Site Visit Unlike moving from Independent Review to Consensus, the Team Lead CANNOT advance BOSS to the Site Visit Module. After logging out of BOSS, the Team Lead contacts the Administrator, and he/she will move the team to Site Visit. The Team Lead must log back into BOSS before the SV module is accessible to other team members. 5) Assign Team Roles The Team Roles window appears. The team roles that were assigned during Consensus will be carried over. Make any changes and click “Continue to Site Visit.” 42 Click “OK” to Confirm. The Team Lead will receive an automated e-mail from the Administrator confirming that the team has moved to Site Visit Planning. Team members are automatically sent a BOSS notification that the team has been moved to the Site Visit Planning state. Navigating the Site Visit Module There are a few key differences about this module to be aware of. Item Worksheets Tab– This is organized differently. BOSS automatically assigns each Comment an ID (A). From CR, BOSS over the Item References (B), and Comments (C). o Strength and OFI comments are listed in the same panel: first the Strengths in order of importance, followed by the OFIs in order of importance. There are new columns: o SVI (Site Visit Issue) (D). o Summary of Conclusions and Impact on Comments (To be completed on-site) (E). o Comments after Site Visit (To be completed on-site) (F). G D I D H D E D A D o o B D C D F D D D There are buttons to Add Comment (G, previous page) and Add SVI (H, previous page). The “Search” button (I, previous page), gives you the options to Show All Comments, Strengths only, or Opportunities for Improvement only (J). You can also filter by comments that were doubled at Consensus or Site Visit (K), and search for comments containing key words (L). J D K D L D 43 SVI Worksheets Tab – BOSS automatically creates a separate SVI worksheet for each Results Item (A), and there is a button to Add Process SVIs (B). B A D Import/Export Tab – This tab allows Team Members import pdf files that are updated during Site Visit. The Export funciton on this tab does not work at this time. 44 Score Summary Tab – This tab shows the Consensus scores, the Consensus scoring ranges, the Site Visit scoring ranges, and compares the two. Stage 3: Site Visit Module Step-by-Step Item Leads complete Site Visit Issue worksheets. Process Item SVI worksheets are different than Results Item SVI worksheets, so they are explained separately. A) Complete Process SVI Worksheets and Strategy Tools—PROCESS ITEM LEADS 1) Create a separate SVI Worksheet for each OFI, each Double Strength, and for any other Strengths that need to be verified. There are 2 ways to create the worksheet: Option 1: On the Item Worksheets tab, click “+Add SVI.” It will create a worksheet for the item that you are viewing, in this case 1.1. For this item, BOSS will number the first one SV1 1.1-1, the next one 1.1-2, and so on. 45 Option 2: On the SVI Worksheets tab, click “+ Add Process SVI” (A). A B o Option 2, continued: The “Select a primary Item” window will appear. Use the drop down box and choose the appropriate Item (B). Click Continue (C). B A B C 2) Complete SVI worksheets--Select the “SVI Worksheet” panel and complete the following: Not Evaluated at Consensus – leave this unchecked unless the Team has not discussed the issue yet (A). Issue – Describe what needs to be verified or clarified. Copy and paste part or all of the Comment or summarize it. Using complete sentences and being clear will help you and your Team Members later (B). *Tip: Including the Comment number and Team Member initials is helpful for when you are on Site Visit. A B B B 46 C B Comments Affected – If applicable, this is where you list any other comments (Process Items or Key Themes) that may be impacted by verifying or clarifying this SVI. Click “Edit Comments Affected” (C, previous page). o This window appears. o o o Click on the appropriate panel: “Comments” (D) for Process Item comments or “Key Themes” (E). Locate the Comment and click the “+” button (F). * Tip: Use the Find button (G) to search for key words. G A D B A B E B F B o o o The Comment (or Key Theme) ID (H) appears under Selected Comments at the bottom of the Comments Affected window. Select the appropriate Evaluation Factor(s) (I). Click “Save” (J). H I 47 J o BOSS asks you to confirm by clicking “OK” (K). K o The affected comments will appear on the SVI worksheet. Analysis Required – In this section, enter the key questions that need to be answered in order to verify or clarify the SVI. Click “Add a Question” (A). 48 A o In the pop-up box, enter your question (B). Analysis Required box, continued on next page B o Check the appropriate Evaluation Factor(s) (C). Click “Save” (D). (Evidence and Conclusion will be completed during Site Visit). C If applicable, D questions. Here’s an completed SVI Worksheet. Effect on Comments will be completed during Site Visit. add additional example of a 49 SVI Worksheet D 50 3) Create Strategy Tools The Strategy tool is the second panel in the SVI Worksheets tab. Create a Strategy Tool for each Process SVI. Not Evaluated at Consensus – leave this unchecked unless the Team has not discussed the issue yet (A). People/Groups to Interview – Click “Add interview” (B). A B The Interview window appears. o Enter the name of the individual or group you will speak to (C). If applicable, include the Title (D). If known, enter the location of the interview (E) initials of the interviewers (F). There is a Note field (G) for any miscellaneous information. Click “Add question” (H). C D E F 51 G H G o In the next pop-up box, type the interview question (I), and click “Save” (J). I J o o Add addional questions if needed. The completed Interview window appears below. Click “Save” (K). 52 K o The Interview is added to the Strategy tool (below). Add additional interviews as needed. 53 Documents to Review – If you need to review a document to clarify or verify the SVI, click “Add Document” (L) and enter the name or description of the document and click “Save” (not shown). You can add multiple documents if needed. Walk-Around Questions - If any walk-around questions are related to the SVI, you can enter them in the Walk Around Questions section (M). Click “Save and Close” (N) when you have finished completing the Strategy Tool. L M N The SVI appears on the SVI worksheet tab as follows. Under Manage, there are 2 Download icons. The first one (A) downloads the SVI worksheet, and the second one (B) downloads the Strategy Tool. *Tip: These pdf files can be edited during Site Visit and uploaded back into BOSS so that the completed fields populate. A B B) Complete Results SVI Worksheets—RESULTS ITEM LEADS Go to the SVI Worksheets Tab and scroll down to Results SVIs. For Results, BOSS creates a single SVI worksheet for an entire Item. Click the pencil icon to edit the SVI worksheet. 54 On this worksheet, add all of the Strengths to verify and OFIs to clarify for the Item. Click “Add Strength” (A) or “Add OFI” (B) as appropriate. A A B A This is an example of adding an OFI to clarify, but the process is the same to add a Strength to verify. Click on the drop-down box and select the number of the OFI (C) (or Strength). Click “Continue” (D). C A D A o o o Brief Summary – Enter a short description of the SV issue (E, below). Figures – If applicable, reference the figure numbers in the application that contain the results (F). Poor Levels? (Or Good to Excellent Levels?) – Check this box if appropriate (G). E D A F G E D A 55 o List Adverse Trends (or List Beneficial Trends) – complete this section if the comment involves trends. Click “Add Trend” (I). In the new window, enter the Description of the trend (J) and the Figure number (K), if applicable. Click ”Save” (L). The Notes field (M) can be used to enter what needs to be done during Site Visit. Click “Save” (located at the bottom of the screen, not shown here). If needed, repeat to add another trend. I D A M E D A J E D A 56 K E D A L E D A o List Lack of or Unfavorable Comparisons (or List Favorable Comparisons) – complete this section if the comment involves comparisons. Click “Add Comparison” (N). In the new window, enter the Description of the comparison (O) and the Figure number (P), if applicable. Click “Save” (Q). The Notes field (R) can be used to enter what needs to be done during Site Visit. Click “Save” (located at the bottom of the screen, not shown here). N E D A R E D A 57 O E D A P E D A Q E D A o List Lack of or Unfavorable Segmentation/Linkage (or List Appropriate Segmentation and Linkages) – complete this section if the comment involves Integration. Click “Add Linkage” (S). In the new window, enter the Description of the comparison (T, next page) and the Figure number (U, next page), if applicable. Click ”Save” (V, next page). The Notes field (W) can be used to enter what needs to be done during Site Visit. Click “Save” (located at the bottom of the main SVI screen, not shown here). S P E D A W E D A 58 T P E D A o U E D A V E D The remaining fields in Clarify (or Verify) Results will be completed on Site. These fields are 1) List Figures A With No Updated Results; 2) List Figures with Updated Results; 3) Describe Changes; and 4) Summary of Findings and Impact on Comments. Repeat this process to add all SVIs for the Item. Returning to the main part of the Results SVI Worksheet: People/Groups To Interview – If there is anyone that you need to talk in order to clarify or verify the Comment, click “Add Interview” (A) and enter the name of the person or group). Documents to Review – Complete this section if there are documents that the team needs to look at during Site Visit (B). A E D A B 59 New Data Found On-Site – This will be completed during Site Visit (C). Newly Recognized Gaps Discovered On-Site – This field is only used during Site Visit (D). Click “Back to SVI Worksheets” (E) when you have completed this one. C D E C) Prepare for Site Visit During or after Site Visit, Item Leads can get their findings into BOSS in two ways: 1) Direct input into BOSS (which requires an internet connection), or 2) Entering information into pdf files and uploading them into BOSS. Even if the organization you are examining has guest internet access, it is highly recommended that the team take hard copies or PDF files of all BOSS documents, including SVI worksheets and Strategy Tools. These have to be downloaded and printed and/or saved one-by-one. 1) Download Process documents – For the Process Items for which you are Item Lead, download each Process SVI Worksheet (A) and Strategy Tool (B). A A B A 2) Download Results documents – For any Results Items for which you are Item Lead, download the Results SVI Worksheet(s). 60 3) Download Item Worksheets – For the Process and/or Results Items for which you are Item Lead, download or print the Item Worksheet(s). 4) Site Visit Scorebook Summary - Download a Word version of the entire Scorebook. This includes the Consensus Key Factors, Key Themes, and all comments (the layout is similar to the SVI Worksheets screen). 5) Other documents available for download Key Themes Worksheet Score Summary 61 Key Factors D) Verify and Clarify Comments—PROCESS ITEM LEADS During or after Site Visit, the team will verify Strengths and clarify OFIs, and document these findings, including the impact on comments. These updates can be made in BOSS or by entering them in the BOSS-generated pdf files and importing them into BOSS. OPTION 1: Enter information into PDF file(s) and import into BOSS. 62 OPTION 2: Enter the updates directly into BOSS. 1) Document your investigation of each SVI. From the SVI Worksheet tab, click on the pencil icon to edit the SVI. Scroll down to the Analysis Required section. Click the pencil icon to edit (A). A A Enter your findings in “(To be completed on-site) Evidence” (B). State the impact on the Comment in "(To be completed on-site) Conclusion” (C). Click “Save” (D). B C A D At the bottom of the window, click “Add an Effect on Comments” (E). 63 E Complete the “Effects on Comment” field (F). Click “Save” (G). F G A The bottom of the SVI Worksheet now looks like this: 64 2) Update the comment, if applicable. On the Item Worksheets tab, find the Comment you verified or clarified, and click the pencil icon (A) to edit. A A Enter your findings in Summary of Conclusions and Impact on Comments (B). If appropriate, select the box beside "Double" (C). If applicable, revise the Comment in the Comment after Site Visit field (D). Click “Save” (E). B A C A A D A E A This is how the updates appear on the Item Worksheets tab. 65 3) If you need to add a new comment, go to the Item Worksheets tab and click “+Add Comment” (A). A A Select the comment type, Strength or OFI (B). Select the Item Reference (C). Enter the Summary of Conclusions and Impact on Comments (D). If appropriate, select the check box to "Double" the comment (E). Enter the comment after Site Visit (F). Click “Save” (G). B A 66 C A D A E A F A G A The new comment is now added to the Item worksheet. 67 E) Verify and Clarify Comments—RESULTS ITEM LEADS Results Item Leads – Document your investigation of each SVI and update the Comments. OPTION 1: Enter information into pdf file(s) and import into BOSS. OPTION 2: Type the information directly into BOSS. On the SVI Worksheet tab, click the corresponding pencil icon to edit the Results SVI Worksheet. Click the pencil icon next to the comment. 68 Complete the following fields: o List Figures with No Updated Results (A). o List Figures with Updated Results (B). o Describe Changes (C, next page). o (To be completed on site) Summary of Findings and Impact on Comments (D, next page). o Click “Save” (E, next page). Results SVI Worksheet A A B A Results SVI Worksheet (continued from previous page) C A D A E A At the bottom of the SVI Worksheet, there are places to add information about any new data or new gaps found on site that are not related to Consensus comments. If new data is found, for example, click “+Add New Data” (A). (Add New Gap is very similar). A A 69 o o o o Summarize the findings in New Data (B). Enter the Description (C) Enter the Impact on comments (D, next page). Click “Save” (E). B A 70 C A A D A E A A This is how the New Data information looks on the SVI Worksheet On the Item Worksheets tab, complete the following for the Comment (it is identical to the Process Items). o Summary of Conclusions and Impact on Comments. o Comments after Site Visit F) Select Scoring Ranges—ITEM LEADS In the Item Worksheet, click on the Score panel. 71 Based on your findings on site, the Scoring Range may change or stay the same. After the team comes to consensus, select the Site Visit Overall Scoring Range (A, below). Complete Provide rationale for the change to overall item scoring range, if appropriate (B) Click “Save” (C). A A A B A A C A A The Site Visit Scoring Range is reflected on the Score Summary Tab (D), and BOSS indicates if the scoring range is higher, lower, or the same (E) as the consensus scoring range. D A A E A A G) Revise Key Themes –KEY THEMES LEAD ONLY Revise the Key Themes under the Key Themes tab. 72 Completing the Scorebook – TEAM LEAD ONLY H) Completing the Scorebook 1. Select the Scoring Bands On the Score Summary tab, the Team Lead can manually override the Scoring Band(s) per the team’s consensus decision. If applicable, select the appropriate Process (A) or Results (B) scoring band using the drop down arrows. If f you made changes, Click “Save Updated Scorebook” (C). A A A B A A C A A 2. Mark Scorebook Complete—On the Scorebook Leads tab, click “Mark Scorebook Complete” (A). Click “Yes” to confirm (B). A E A A B E 3. The Team Lead downloads the Scorebook Summary Word document and makes final A edits, including removing A Lead on how to format the comment numbers and examiner names. The Monitor/Administrator will advise the Team report before it goes to the mentor for review. Congratulations! Your work in BOSS is now complete. 73 BOSS Troubleshooting Help Topics: BOSS Connectivity BOSS is typically accessed using a Windows or Mac laptop or desktop. Connectivity and response rate may vary based on your Internet service provider and network conditions. Browser Back and Forward Buttons Not available in BOSS; if you click on the back or forward arrows, you will be forced out of the BOSS application and will need to log back into the system. Character Count Limits are set in most of the cells. When you reach the maximum number of characters in a cell, the cell border will change and you will need to adjust the amount of text. You also have a character counter that shows the number of characters as you type. The comment cell maximum is 1000 characters. Copy/Paste You can copy and paste from documents, the criteria, glossary terms. Shortcuts include: Ctrl C (copy), Ctrl V (paste). If copying and pasting from a Word document, check that the text does not exceed the character count in BOSS. Consensus Editing – In Consensus Review, you can only edit Items for which you are the Lead. Feedback – In Consensus Review, use the button at the upper right to “invite Feedback” or “Suspend Feedback”. Feedback can be printed. Drag/Drop of text, pages, files, etc. is not available in BOSS Key Factors (KF) Develop KF in a Word document and send to your Team Leader. Your Team Leader will send you a list of consolidated KF. Once received, do not edit this consolidated list. Examiners will individually enter each KF from the consolidated list into BOSS by cutting/copying & pasting. (If working on the KF for the case study, send your KF list to [email protected]) Notifications The Overview/Notification screen appears immediately after the Scorebook loads. Always check the Notification screen for new postings. Only Administrators and Team Leaders can post notifications. Admins can post to all Examiners; Team Leaders can only post notifications to their team members. Save The BOSS does not have an auto save feature. You will need to click on the SAVE icon to save your work. Be sure to save your work on a regular basis. The session timeout is currently 60 minutes and your work will not be saved if your session times out and you did not click the save button. Spell Check This version of BOSS uses the browser spell check. Timeout Timeout is set at 60 minutes in accordance with security requirements. Undo Not available in BOSS. 74 Troubleshooting continued… Problems logging in to BOSS could be attributed to issues with your browser (i.e. Internet Explorer, Google Chrome, Apple Safari, or Firefox) or your computer’s firewall settings. Here are a few potential remedies: 1. Clear your cache. To do this within Internet Explorer, open your browser, select Tools, and select Internet Options. Under Browsing History, ensure that Delete Temporary Internet Files is checked and select Delete before logging in to BOSS. 2. Ensure you have the latest version of your browser installed on your computer. 3. Try using a different browser. 4. Access BOSS from a different computer. 5. Check your computer’s firewall settings with your organization’s IT department. Additional BOSS resources, including webinars, are available on our website at www.thepartnershipforexcellence.org 75 For further BOSS troubleshooting help, you may contact: Mike Belter | [email protected] | 614-583-6724 (w), 614-746-2223 (c) Tiffany Edmonds | [email protected] | 614-893-0006