1
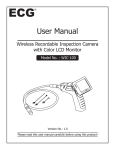
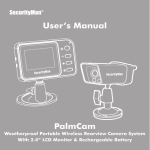
ECG
®
User Manual
Wireless Recordable Inspection Camera
with Color LCD Monitor
Model No. : WIC-100
99 Washington Street
Melrose, MA 02176
Phone 781-665-1400
Toll Free 1-800-517-8431
Visit us at www.TestEquipmentDepot.com
W
WICIC-1-R
00
®
EC
G
Version No.: 1.0
Please read this user manual carefully before using this product!
Contents
Introduction..........................................................1
Features.............................................................1,2
Parts List ..............................................................1
Installation............................................................3
Operation..............................................................6
Basic Operation................................................6
Other Operations and Monitor Settings..............8
Record Videos...........................................8
Taking Pictures..........................................9
Play Videos /Pictures..................................9
Delete Videos/Pictures .............................11
Language Setting.....................................12
Video System Setting...............................13
Format....................................................13
Default Setup..........................................14
View Version Information.........................14
Frame Rate Setting..................................15
Time Stamp Setting.................................15
Date/Time Setting....................................16
Event Playback........................................16
CD Installation and SD Card Use . .........................17
Specifications......................................................18
Warnings & Warranty...........................................19
FCC Information...............................................Back
INTRODUCTION
Thank you for choosing our Wireless Inspection Camera with recordable LCD monitor! Please read this user manual carefully before using this
product.
WIC-100 is designed as a remote inspection device. It can be used
to look into tight spots and beam back real-time video to the monitor
which records videos and takes pictures!
Typical applications include HVAC inspection, automotive inspection, cable
routing, automotive/boat/aircraft inspection, electrical/contracting, pest
control, and home inspection.
FEATURES
• 3.5” LCD monitor with a resolution of 320 (RGB) x 240.
• Supports many kinds of languages and features simple operation.
• The camera and shaft are water resistant when the unit is fully assembled,
but the monitor and base unit are not.
• Wired or Wireless Compatible Operation.
• WIC-100 records videos and takes pictures.
• Can accept up to 16GB Micro SD Card.
PARTS LIST
Base Unit and Shaft
w/ 9mm Camera Head
Software
LCD Monitor
AC Adapter
Micro SD Card
(2GB)
Micro to Standard
SD Adapter
Video Output
Cable
USB Cable
Hook, Magnet &
Mirror Accessories
-1-
Magnetic
Monitor Base
FEATURES
Camera, Shaft and Base Unit
Power Indicator
Signal Output
Flexible
Shaft
Camera
with 4 SMD LEDs
3.5” LCD Monitor
OK
Up
Menu
Down
Power ON/OFF
Power Indicator
USB Socket
Video Output
SD Card Slot
AC Adapter Input
DC5V
Reset
Signal Input
-2-
INSTALLATION
Please install the batteries and insert the SD card first before using this
product.
To Install Batteries:
1. Using a screwdriver, remove the screw and battery cover.
2. Remove the battery compartment and insert four new AA batteries into
the proper slots in the battery compartment. Proper battery orientation is
indicated on the battery compartment.
3. Reinstall the battery compartment, battery cover, and screw.
Before installation or replacement of batteries, make sure your
hands are dry.
To Install The Camera With Flexible Shaft:
Connect the camera shaft to the base unit, making sure the keyed ends
are properly aligned. Once they are aligned, finger tighten the knurled
knob to secure the connection.
-3-
Keyed Ends
Finger tighten the knurled knob
CAUTION! Make sure to only tighten and untighten the knurled knob and
NOT the shaft.
Installing Accessories:
The three included accessories, (mirror, hook, and magnet) all attach to
the shaft head the same way.
Installing LCD Monitor:
Slide the
monitor
downward.
Installed
Correctly
Installing Magnetic Monitor Base (Wireless):
Install as follows. The magnetic monitor base features a rotational set to
view from all angles!
-4-
Inserting SD Card:
After the SD Card is inserted
successfully into the SD card
slot, the screen of the monitor will display the “
“ icon;
otherwise, it will display the
“
“ icon.
Connecting USB Cable:
Use the USB cable to connect
the monitor to a PC. The USB
online icon will appear on your
PC. Open My Computer, and
find the Mobile Disk.
Monitor Charging:
Connect the AC adapter into a wall outlet and then to the monitor. The
power indicator will light red, which indicates it is charging, and it will turn
off after fully charged. The battery icon blinks when turned on and plugged
in. The monitor can be used while plugged in and charging.
AC
Adapter
-5-
VIDEO OUT:
Insert the video interconnect cable into the monitor area labeled VIDEO OUT.
Insert the other end of the cable into the VIDEO IN jack of a TV or another
monitor. THE LCD monitor will output a high quality video which can be
recorded!
• Video Out feature requires TV to be in line or video input mode.
• Video Out feature may output a black and white signal.
OPERATION:
Basic Operation:
1. Roll the ON/OFF switch to turn ON the camera, and the red power
indicator will light. The switch then acts as a dimmer for the LEDs that
surround the camera and provide high quality lighting.
ON
F
OF
Four SMD LEDs
provide lighting
2. Press and hold the Power ON/OFF button of the monitor for 2 seconds, and the power indicator will light green. Then press the
button to select a suitable channel and the picture will display on the
monitor. Press the
button to select video or picture status.
Select video or picture
mode
Select channel
-6-
3. Roll the ON/OFF switch of the
base unit for brightness adjustment.
The switch acts
as a dimmer.
4. When in use, the shaft will easily maneuver itself into any position.
wireless
wired
The flexible shaft can be bent into many shapes. This helps you to explore into
very small areas.
5. The included, handy accessories of our wireless inspection
camera can be used to retrieve
small items like dropped rings or
small screws.
-7-
Other Operations and Monitor Settings:
Record Videos:
1. In the realtime monitoring status, press the
Video status as follows:
Battery Capacity
button to enter the
Current Channel
Video
Icon
SD Card Icon
Current
Date
Time Left
2. Press the OK button to record as follows:
3. Press the OK button again to stop recording.
* Videos will be automatically saved as a file every 30 minutes.
* The SD Card is full when the SD card icon changes to “
“.
-8-
Taking Pictures:
1. In the realtime monitoring mode, press the
still mode as follows:
Battery Capacity
button to enter the
Current Channel
Still
Icon
SD Card Icon
Current
Date
2. Press the OK button to take pictures.
The SD card is full when the SD card icon changes
to “
“.
Playing Videos and Pictures:
1. In the realtime monitoring mode, press the
the following interface:
2. Press the
or
button to enter it.
button to enter into
button to select a folder, and then press the OK
-9-
The file with
quotation marks is
the picture file. The
file without quoatation marks is the
video file.
For Videos:
Press the
or
play as follows:
button to select video, then press the OK button to
Pause: Press the OK button in play mode to pause;
Press again to resume.
Fast Forward: Press the
button in play mode.
Fast Reverse: Press the
button in play mode.
Stop/Exit: Press the
button.
For Pictures:
Press the
or
button to select picture, then press the OK button to
display and press the OK button again to exit.
-10-
Deleting Videos and Pictures:
1. In the realtime monitoring mode, press the
into the following interface:
button once to enter
2. Press the
or
button to select a folder, then press the OK
button to enter into the following interface:
3. Press the
or
button to select a file, then press and hold the
button for two seconds and you will enter into the following interface:
4. Press the
or
button to select “YES”, then press the OK button
to delete a file. Select “NO” to exit.
-11-
Delete Folder:
The delete folder is the same as the delete file, however the folder
needs to be empty, otherwise it will not delete, and a warning will
appear.
How to enter the Setting Mode:
In the realtime monitoring mode, press and hold the
button
for approximately 1 - 2 seconds to enter into the setting mode as
follows:
Language Setting:
1. In the setting mode, press the
or
buttons to select “SYSTEM SETTING”, then press the OK button to enter.
2. Press
or
button to select “Language”, then press the OK
button to enter the following interface: (see diagram at top of
next page)
-12-
3. Press the
or
button to select a suitable language.
4. Press the OK button to confirm and exit.
Video System Setting:
1. In the setting mode, press the
or
button to select “SYSTEM SETTING”, then press the OK button to enter.
2. Press the
or
buttons to select “Video System”, then press
the OK button to enter into the following interface:
S
NTSC = N. America
PAL = Europe
3. Press the
or
button to select the right type, then press the
OK button to confirm and exit.
Format:
1. In the setting mode, press the
or
buttons to select “SYSTEM SETTING”, then press the OK button to enter.
2. Press the
or
buttons to select “Format”, then press the
OK button to enter into the following interface:
-13-
3. Press the
or
button to select “YES”, then press the OK
button to erase all data; selecting “NO” will exit.
Default Setup:
1. In the setting mode, press the
or
button to select “SYSTEM SETTING”, then press the OK button to enter.
2. Press the
or
button to select “Default Setup”, then press
the OK button to enter into the following interface:
3. Press the
or
button to select “YES”, then press the OK
button to restore default; selecting “NO” will exit.
View Version Information:
1. In the setting mode, press the
or
button to select “SYSTEM SETTING”, then press the OK button to enter.
2. Press the
or
button to select “Version”, then press the OK
button to view the version of this product. Version = v905130-G0
-14-
Frame Rate Setting:
1. In the setting mode, press the
or
button to select “RECORDER SETTING”, then press the OK button to enter.
2. Press the
or
button to select “Frame Rate”, then press the
OK button to enter the following interface.
3. Press the
or
button to select a suitable frame rate.
4. Press the OK button to confirm and exit.
Time Stamp Setting:
1. In the setting mode, press the
or
button to select “RECORDER SETTING”, then press the OK button to enter.
2. Press the
or
button to select “Time Stamp”, then press
the OK button to enter the following interface.
3. Press the
or
button to select “OFF” or “ON”, then press
the OK button to confirm and exit.
-15-
Recording Type:
1. In the setting mode, press the
or
button to select
“RECORDER SETTING”, then press the OK button to enter.
2. Press the
or
button to select “Recording Type”, then press
the OK button to enter into the following interface:
3. Press the
or
button to select “STILL” or “VIDEO”, then
press the OK button to confirm and exit.
Date/Time Setting:
1. In the setting mode, press the
or
button to select “Date/
Time”, then press the OK button to enter into the following interface:
2. Press the OK button to select Date or Time.
Press the
or
buttons to modify.
Press the
button to confirm and exit.
Event Playback:
1. In the setting mode, press the
or
button to select “EVENT
PLAYBACK”, then press the OK button to enter.
2. For other operations, see “Play Videos & Pictures”, “Delete Videos & Pictures”, & “Delete Folder” sections.
-16-
CD Installation/SD Card Use:
The WIC-100 Recordable Wireless Inspection Camera allows you
to record video of your inspection session on to the enclosed SD
video card in AVI format for later viewing on your PC. If your PC
does not have an AVI viewer, you can install the Media Player
Classic - Home Cinema application contained on the CD that
comes with your WIC-100. This viewer is compatible with all current Windows Versions. (Mac users, Quicktime should handle AVI
files by default.)
CD Installation Instructions
(ONLY needed if your PC has no AVI video viewer!)
1. Insert the CD into your PC.
2. From your desktop, click START, then RUN.
3. Type the following: “yourCDdrive:\klcodec453f.exe” where “yourCDdrive” is the actual drive letter (e.g. D:\klcodec453f.exe.)
and click “OK”
4. Follow the on-screen instructions for installing the software.
5. Remove the CD.
SD Card Instructions:
SD Card Instructions:
1. Remove the Micro SD Card from the Monitor’s SD card slot.
2. Insert the Micro SD card into the included Standard SD Adapter.
3. Insert the SD Standard Adapter into your PC’s SD card slot or
other SD Card viewing device to view your Pictures and Videos on
your computer.
-17-
SPECIFICATIONS:
Imaging Sensor
CMOS
Total Pixels
640 x 480
CAMERA
Horizontal View Angle
45º
Transmission Frequency
2468MHz
Modulation Type
FM
Bandwidth
18MHz
Power Supply
4 x AA Batteries
Unobstructed Effective Range
Waterproof Capacity
IP67 (Camera and Shaft ONLY)
Weight
1.17lbs
Screen Type
MONITOR
30 feet
3.5” TFT-LCD
Effective Pixels
320 (R.G.B.) x 240
Video System
PAL/NTSC
Transmission Frequency
2414MHz, 2432MHz, 2450MHz, 2468MHz
Exterior Supply Voltage
5 VDC
Consumption Current (Max.)
500mA
Charge Time
3 hours
Run Time (full charge)
2 hours
Video Output Level
0.9-1.3Vp-p@75ohm
Receiving Sensitivity
<-85dBm
Weight
.31lbs
Operating Temperature
-10ºC~+50ºC/+14ºF~+122ºF
Operating Humidity (Max.)
15~85%RH
* Actual transmission range may vary according to the weather, location,
interference, and building construction.
* All specifications are subject to change without prior notice.
-18-
WARNINGS!
• The monitor shall not be exposed to dripping or splashing liquid.
No objects filled with liquids shall be placed on the unit.
• Turn off the Camera/Monitor when the system is not in use.
• The AC adapter is used only for charging the monitor.
• Do not cut the DC power cable of the AC adapter to fit with any other power source.
• Attention should be drawn to the environmental aspects of the battery
disposal.
• Remove the batteries when cleaning the unit.
Remove the batteries before storing the unit for an extended period of time.
• When necessary, replace all four batteries in this unit with new ones.
• Use only the size and type of batteries specified.
• Be sure to install the batteries with the correct polarity as indicated in the
battery compartment.
• WIC-1 AC Adapter is NOT Compatable with WIC-100 Monitor.
*ONLY WIC-100 5VDC Adapter should be used to charge the WIC-100
Monitor.
WARRANTY
1 Year Waranty: This product is guaranteed to be free from defects
in materials and workmanship and meet applicable specifications when
tested to ratings. This warranty is in lieu of any other warranty express,
implied, or statutory. NTE’s liability under this warranty is limited to repairing, replacing, or issuing credit (at the discretion of NTE) for such products
that become defective or fail to meet specification during the warranty
period of one year from the date of sale. The technical data shown is intended to provide safe areas of operation for this product. Determination
as to whether a product is actually defective rests with NTE. In no event
will NTE be liable for consequential or special damages.
Please be sure to fill out and return your
Warranty Registration Card and return to:
NTE Electronics, Inc.
44 Farrand Street
Bloomfield, NJ 07003
If your Wireless Inspection Camera did not come with a Warranty Registration card, please call (973) 748-5089 immediately.
-19-
FCC INFORMATION
This device complies with part 15 of FCC Rules. Operation is subject to the
following two conditions:
(1) This device may not cause harmful interference.
(2) This device must accept any interference received, including interference
that may cause undesired operation.
Changes or modifications not expressly approved by the party responsible
for compliance could void the users authority to operate the equipment.
Environmental Protection
Electrical waste products should not be
disposed of with household waste. Please
recycle where facilities exist.
Check with your Local Authority or retailer
for recycling advice.
Test Equipment Depot - 800.517.8431 - 99 Washington Street Melrose, MA 02176
TestEquipmentDepot.com
ECG
®
is a registered trademark of