1
Allen-Bradley
Thermocouple/mV
Isolated Input
Module
(Cat. No. 1746-INT4 Series B)
User
Manual
Important User Information
Solid state equipment has operational characteristics differing from those
of electromechanical equipment. “Safety Guidelines for the Application,
Installation and Maintenance of Solid State Controls” (Publication
SGI-1.1) describes some important differences between solid state
equipment and hard–wired electromechanical devices. Because of this
difference, and also because of the wide variety of uses for solid state
equipment, all persons responsible for applying this equipment must
satisfy themselves that each intended application of this equipment is
acceptable.
In no event will the Allen-Bradley Company be responsible or liable for
indirect or consequential damages resulting from the use or application
of this equipment.
The examples and diagrams in this manual are included solely for
illustrative purposes. Because of the many variables and requirements
associated with any particular installation, the Allen-Bradley Company
cannot assume responsibility or liability for actual use based on the
examples and diagrams.
No patent liability is assumed by Allen-Bradley Company with respect to
use of information, circuits, equipment, or software described in this
manual.
Reproduction of the contents of this manual, in whole or in part, without
written permission of the Allen-Bradley Company is prohibited.
Throughout this manual we use notes to make you aware of safety
considerations.
!
ATTENTION: Identifies information about practices or
circumstances that can lead to personal injury or death, property
damage, or economic loss.
Attentions help you:
• identify a hazard
• avoid the hazard
• recognize the consequences
Important: Identifies information that is especially important for
successful application and understanding of the product.
SLC, SLC 500, and SLC 5/02 are trademarks of Allen-Bradley Company, Inc.
Summary of Changes
Summary of Changes
This publication contains new and revised information not included in the
previous version.
New Information
The Thermocouple/mV Isolated Input module, cat. no. 1746-INT4 is now a
series B module. The series B module is identical to the series A module
with the exception that the series B module is CE certified and has CSA
hazardous location approval (refer to Appendix A for complete ratings).
Compliance with European Union Directives
This series B module complies with the directives outlined in Chapter 1 of
this document.
CSA Hazardous Location Approval
This series B module complies with CSA classifications as outlined under
Specifications in Appendix A.
Revised Information
This publication also contains information formally included in a document
update, publication 1746-6.16–DU1.
Change Bars
The areas in this manual which are different from previous editions are
marked with change bars (as shown to the right of this paragraph) to indicate
the addition of new or revised information.
Publication 1746-6.16 – January 1999
SOC–1
Summary of Changes
SOC–2
Publication 1746-6.16 – January 1999
Preface
Preface
Read this preface to familiarize yourself with the manual.
This preface covers the following topics:
• who should use this manual
• purpose and contents of this manual
• format conventions used in this manual
• terms and abbreviations
• Allen-Bradley support
Who Should Use this Manual
Use this manual if you are responsible for the design, installation,
programming, or maintenance of an automation control system that uses
Allen-Bradley small logic controllers.
You should have a basic understanding of SLC 500 products. You should
understand electronic process control and be able to interpret the ladder logic
instructions required to control your application. If you do not, contact your
local Allen-Bradley representative for training before using this product.
Purpose and Contents
of this Manual
Publication 1746-6.16 – January 1999
This manual is a learning and reference guide for the 1746-INT4
Thermocouple/mV Isolated Input Module. It contains the information you
need to program, install, wire, and troubleshoot the module.
P–1
Preface
Contents of this Manual
Format Conventions
Used in this Manual
P–2
Chapter
Title
Content
1
Overview
2
Quick Start
3
Installation and Wiring
Provides installation information and wiring
guidelines.
4
Preliminary Operating
Considerations
Describes the module ID code, I/O image words
used by the module, input channel characteristics,
and response to slot disabling.
5
Accessing Files
to Configure I/O
Describes how to use the software to create a new
file and configure I/O for system hardware.
6
Channel Configuration,
Data, and Status
Describes configuration and status words used by
the module. Explains how the module uses
configuration data and generates status during
operation.
7
Ladder Programming
Examples
8
Module Diagnostics and
Troubleshooting
Explains how to interpret LEDs and correct
problems that may occur while using the module.
9
Application Programming
Examples
Describes how to write ladder logic to achieve
desired results for two example applications.
Appendices
Title
Describes module hardware features, and
operation.
Serves as a Quick Start Guide for this module.
Gives ladder logic examples for configuring and
operating the module that include verifying changes
in configuration, using the PID instruction,
monitoring status bits, and enabling autocalibration.
Content
A
Module Specifications
Provides physical, electrical, environmental, and
functional specifications for the module.
B
Channel Configuration
Worksheets
Provides a worksheet to help you configure each
channel for operation.
C
Thermocouple Descriptions
Gives you information about thermocouples and
the environments in which they perform best.
D
Channel Calibration
E
List of Terms and
Abbreviations
F
CSA Hazardous Information
Gives you the procedure to calibrate input
channels.
Gives you the terms and abbreviations used in this
manual.
Gives you the definition of the CSA hazardous
classification.
The following conventions are used throughout this manual:
• Bulleted lists such as this one provide information, not procedural steps.
• Numbered lists provide sequential steps or hierarchical information.
• Text in this font indicates words or phrases you should type.
• Key names appear in bold, capital letters within brackets (for example,
[ENTER]).
Publication 1746-6.16 – January 1999
Preface
Related Documentation
The following documents contain information that may be helpful to you as
you use Allen-Bradley SLC products. To obtain a copy of any of those
listed, contact your local Allen-Bradley office or distributor.
For
Read this Document
Document
Number
An overview of the SLC 500 family of products
SLC 500 System Overview
1747-2.30
A description on how to install and use your Modular SLC 500
programmable controller
Installation & Operation Manual for Modular
Hardware Style Programmable Controllers
1747-6.2
A description on how to install and use your Fixed SLC 500
programmable controller
Installation & Operation Manual for Fixed Hardware
Style Programmable Controllers
1747-NI001
A procedural manual for technical personnel who use APS to
develop control applications
Allen-Bradley Advanced Programming Software
(APS) User Manual
9399-APSUM
A reference manual that contains status file data, instruction
set, and troubleshooting information about APS
Allen-Bradley Advanced Programming Software
(APS) Reference Manual
1747-6.15
An introduction to APS for first–time users, containing basic
concepts but focusing on simple tasks and exercises, and
allowing the reader to begin programming in the shortest time
possible
Getting Started Guide for APS
9399-APSQS
A training and quick reference guide to APS
SLC 500 Software Programmer’s Quick Reference
Guideavailable on PASSPORT at a list price of
$50.00
ABT-1747–TSG001
A procedural and reference manual for technical personnel
who use an HHT to develop control applications
Allen-Bradley Hand–Held Terminal User Manual
1747-NP002
An introduction to HHT for first–time users, containing basic
concepts but focusing on simple tasks and exercises, and
allowing the reader to begin programming in the shortest time
possible
Getting Started Guide for HHT
1747-NM009
A resource manual and user’s guide containing information
about the analog modules used in your SLC 500 system.
SLC 500 Analog I/O Modules User Manual
1746-NM003
An article on wire sizes and types for grounding electrical
equipment
National Electrical Code
Published by the
National Fire
Protection
Association of
Boston, MA.
A complete listing of current Allen–Bradley documentation,
including ordering instructions. Also indicates whether the
documents are available on CD-ROM or in multi–languages.
Allen-Bradley Publication Index
SD499
A glossary of industrial automation terms and abbreviations
Allen-Bradley Industrial Automation Glossary
AG-7.1
Publication 1746-6.16 – January 1999
P–3
Preface
Allen-Bradley
Support Services
Allen-Bradley offers support services worldwide, with over 75 Sales/Support
offices, 512 authorized Distributors and 260 authorized Systems Integrators
located throughout the United States alone, plus Allen-Bradley
representatives in every major country in the world.
Local Product Support
Contact your local Allen-Bradley representative for:
• sales and order support
• product technical training
• warranty support
• support service agreements
Technical Product Assistance
If you need to contact Allen-Bradley for technical assistance, please review
the information in the Module Diagnostics and Troubleshooting chapter first.
Then call your local Allen-Bradley representative.
P–4
Publication 1746-6.16 – January 1999
Table of Contents
Module Overview
Chapter 1
General Description . . . . . . . . . . . . . . . . . . . . . . . . . . . . . . . . . .
Input Ranges . . . . . . . . . . . . . . . . . . . . . . . . . . . . . . . . . . . . . . .
Hardware Features . . . . . . . . . . . . . . . . . . . . . . . . . . . . . . . . . .
Diagnostic LEDs . . . . . . . . . . . . . . . . . . . . . . . . . . . . . . . . . . . .
System Overview . . . . . . . . . . . . . . . . . . . . . . . . . . . . . . . . . . .
System Operation . . . . . . . . . . . . . . . . . . . . . . . . . . . . . . . . . . .
Module Operation . . . . . . . . . . . . . . . . . . . . . . . . . . . . . . . . . . .
Module Addressing . . . . . . . . . . . . . . . . . . . . . . . . . . . . . . . . . .
Compatibility with Thermocouple and Millivolt Devices and Cables .
Block Diagram of Isolated Channel Input Circuits . . . . . . . . . . . . .
Quick Start
Chapter 2
Required Tools and Equipment . . . . . . . . . . . . . . . . . . . . . . . . . .
Procedures . . . . . . . . . . . . . . . . . . . . . . . . . . . . . . . . . . . . . . . .
Installation and Wiring
Publication 1746-6.16 – January 1999
2–1
2–2
Chapter 3
Electrostatic Damage . . . . . . . . . . . . . . . . . . . . . . . . . . . . . . . . .
Power Requirements . . . . . . . . . . . . . . . . . . . . . . . . . . . . . . . . .
Considerations for a Fixed Controller . . . . . . . . . . . . . . . . . . . . . .
Module Installation and Removal . . . . . . . . . . . . . . . . . . . . . . . . .
Terminal Block Removal . . . . . . . . . . . . . . . . . . . . . . . . . . . . . . .
Module Installation Procedure . . . . . . . . . . . . . . . . . . . . . . . . . . .
Wiring the Module . . . . . . . . . . . . . . . . . . . . . . . . . . . . . . . . . . .
Cold Junction Compensation (CJC) . . . . . . . . . . . . . . . . . . . . . . .
Wiring Considerations . . . . . . . . . . . . . . . . . . . . . . . . . . . . . . . .
Preparing and Wiring the Cables . . . . . . . . . . . . . . . . . . . . . . . . .
Installing the Ferrite Collar . . . . . . . . . . . . . . . . . . . . . . . . . . . . .
Preliminary Operating
Considerations
1–2
1–2
1–3
1–4
1–4
1–4
1–5
1–5
1–5
1–6
3–1
3–1
3–2
3–3
3–3
3–3
3–4
3–5
3–5
3–6
3–8
Chapter 4
Module ID Code . . . . . . . . . . . . . . . . . . . . . . . . . . . . . . . . . . . .
Module Addressing . . . . . . . . . . . . . . . . . . . . . . . . . . . . . . . . . .
Output Image – Configuration Words . . . . . . . . . . . . . . . . . . . . . .
Input Image – Data Words and Status Words . . . . . . . . . . . . . . . .
Input Channel Characteristics . . . . . . . . . . . . . . . . . . . . . . . . . . .
Channel Cut-off Frequency, Update Time, and Step Response . . .
Effective Resolution of a Channel and Input Device . . . . . . . . . . .
Response to Slot Disabling . . . . . . . . . . . . . . . . . . . . . . . . . . . . .
Input Response . . . . . . . . . . . . . . . . . . . . . . . . . . . . . . . . . . . . .
Output Response . . . . . . . . . . . . . . . . . . . . . . . . . . . . . . . . . . . .
Notes: . . . . . . . . . . . . . . . . . . . . . . . . . . . . . . . . . . . . . . . . . . . .
4–1
4–2
4–2
4–3
4–3
4–3
4–4
4–5
4–5
4–5
4–6
ii
Table of Contents
Accessing Files to Configure
I/O
Chapter 5
Channel Configuration, Data,
and Status
Chapter 6
Ladder Programming
Examples
Chapter 7
Module Diagnostics and
Troubleshooting
Chapter 8
Create a New File . . . . . . . . . . . . . . . . . . . . . . . . . . . . . . . . . . .
Configure I/O . . . . . . . . . . . . . . . . . . . . . . . . . . . . . . . . . . . . . . .
Return to an Existing File . . . . . . . . . . . . . . . . . . . . . . . . . . . . . .
Notes: . . . . . . . . . . . . . . . . . . . . . . . . . . . . . . . . . . . . . . . . . . . .
Channel Configuration . . . . . . . . . . . . . . . . . . . . . . . . . . . . . . . .
Selecting the Correct Data Format . . . . . . . . . . . . . . . . . . . . . . .
Channel Configuration Procedure . . . . . . . . . . . . . . . . . . . . . . . .
Using Channel Data Words . . . . . . . . . . . . . . . . . . . . . . . . . . . .
Using Channel Status Words . . . . . . . . . . . . . . . . . . . . . . . . . . .
Detected Faults Indicated by Bits 12-15 . . . . . . . . . . . . . . . . . . . .
Processor Basics . . . . . . . . . . . . . . . . . . . . . . . . . . . . . . . . . . . .
Load Channel Configurations for Transfer to the Module . . . . . . . .
Procedure . . . . . . . . . . . . . . . . . . . . . . . . . . . . . . . . . . . . . . . . .
Change a Channel Configuration . . . . . . . . . . . . . . . . . . . . . . . .
Verify Changes to a Channel Configuration . . . . . . . . . . . . . . . . .
Process a Channel Input with the PID Instruction . . . . . . . . . . . . .
Monitor Channel Status Bits . . . . . . . . . . . . . . . . . . . . . . . . . . . .
Module and Channel Diagnostics . . . . . . . . . . . . . . . . . . . . . . . .
Module Diagnostics at Power-up . . . . . . . . . . . . . . . . . . . . . . . . .
Channel Diagnostics . . . . . . . . . . . . . . . . . . . . . . . . . . . . . . . . .
LED Indicators . . . . . . . . . . . . . . . . . . . . . . . . . . . . . . . . . . . . . .
Channel-status LEDs (Green) . . . . . . . . . . . . . . . . . . . . . . . . . . .
Open-circuit Detection (Bit 12) . . . . . . . . . . . . . . . . . . . . . . . . . .
Out-Of-Range Detection (Bit 13 for under range,
bit 14 for over range) . . . . . . . . . . . . . . . . . . . . . . . . . . . . . .
Invalid Channel Configuration (Bit 15) . . . . . . . . . . . . . . . . . . . . .
Module Status LED (Green) . . . . . . . . . . . . . . . . . . . . . . . . . . . .
Troubleshooting Flowchart . . . . . . . . . . . . . . . . . . . . . . . . . . . . .
Replacement Parts . . . . . . . . . . . . . . . . . . . . . . . . . . . . . . . . . .
Contacting Allen-Bradley . . . . . . . . . . . . . . . . . . . . . . . . . . . . . .
Notes: . . . . . . . . . . . . . . . . . . . . . . . . . . . . . . . . . . . . . . . . . . . .
5-1
5-3
5-5
5-6
6–1
6–3
6–4
6–4
6–6
6–8
7–1
7–2
7–2
7–3
7–4
7–5
7–6
8–1
8–1
8–1
8–2
8–3
8–3
8–3
8–3
8–3
8–4
8–5
8–5
8–6
Publication 1746-6.16 – January 1999
Table of Contents
Application Programming
Examples
Module Specifications
Chapter 9
Basic Example (to display a temperature) . . . . . . . . . . . . . . . . . .
Channel Configuration . . . . . . . . . . . . . . . . . . . . . . . . . . . . . . . .
Supplementary Example (select display in oC or oF) . . . . . . . . . . .
Channel Configuration . . . . . . . . . . . . . . . . . . . . . . . . . . . . . . . .
Program Setup . . . . . . . . . . . . . . . . . . . . . . . . . . . . . . . . . . . . .
Program . . . . . . . . . . . . . . . . . . . . . . . . . . . . . . . . . . . . . . . . . .
Channel Configuration
Worksheets
Appendix B
Thermocouple
Descriptions
Appendix C
Channel Calibration
Appendix D
Channel Configuration Worksheets . . . . . . . . . . . . . . . . . . . . . . .
Thermocouple Descriptions . . . . . . . . . . . . . . . . . . . . . . . . . . . .
J Type Thermocouple . . . . . . . . . . . . . . . . . . . . . . . . . . . . . . . . .
K Type Thermocouple . . . . . . . . . . . . . . . . . . . . . . . . . . . . . . . .
T Type Thermocouple . . . . . . . . . . . . . . . . . . . . . . . . . . . . . . . .
E Type Thermocouple . . . . . . . . . . . . . . . . . . . . . . . . . . . . . . . .
S and R Type Thermocouples . . . . . . . . . . . . . . . . . . . . . . . . . . .
C and D Type Thermocouples . . . . . . . . . . . . . . . . . . . . . . . . . . .
About the Procedure . . . . . . . . . . . . . . . . . . . . . . . . . . . . . . . . .
Calibration Logic . . . . . . . . . . . . . . . . . . . . . . . . . . . . . . . . . . . .
Calibration Codes and Status . . . . . . . . . . . . . . . . . . . . . . . . . . .
Calibration Procedure . . . . . . . . . . . . . . . . . . . . . . . . . . . . . . . .
Notes: . . . . . . . . . . . . . . . . . . . . . . . . . . . . . . . . . . . . . . . . . . . .
Publication 1746-6.16 – January 1999
A–1
A–1
A–2
A–2
A–3
A–4
A–5
A–5
A–6
B–1
C–1
C–1
C–2
C–3
C–4
C–5
C–6
D–1
D–1
D–2
D–3
D–4
Appendix E
Terms and Abbreviations . . . . . . . . . . . . . . . . . . . . . . . . . . . . . .
CSA Hazardous Location
Approval
9–1
9–1
9–3
9–4
9–5
9–6
Appendix A
Electrical Specifications . . . . . . . . . . . . . . . . . . . . . . . . . . . . . . .
Physical Specifications . . . . . . . . . . . . . . . . . . . . . . . . . . . . . . . .
Environmental Specifications . . . . . . . . . . . . . . . . . . . . . . . . . . .
Input Specifications . . . . . . . . . . . . . . . . . . . . . . . . . . . . . . . . . .
Overall Accuracy . . . . . . . . . . . . . . . . . . . . . . . . . . . . . . . . . . . .
Thermocouple Resolution . . . . . . . . . . . . . . . . . . . . . . . . . . . . . .
Type J Thermocouple . . . . . . . . . . . . . . . . . . . . . . . . . . . . . . . . .
Type K Thermocouple . . . . . . . . . . . . . . . . . . . . . . . . . . . . . . . .
Type E Thermocouple . . . . . . . . . . . . . . . . . . . . . . . . . . . . . . . .
Terms and Abbreviations
iii
E–1
Appendix F
CSA Hazardous Location Approval . . . . . . . . . . . . . . . . . . . . . . .
F–1
iv
Table of Contents
Publication 1746-6.16 – January 1999
Chapter
1
Module Overview
This chapter describes the thermocouple/millivolt isolated input module and
explains how the SLC controller reads thermocouple or millivolt analog
input data from the module. Included is information about:
• compliance with European Union Directives
• general description and hardware features
• an overview of system and module operation
• block diagram of channel input circuits
Compliance with
European Union Directives
If this product has the CE mark, it is approved for installation within
the European Union and EEA regions. It has been designed and tested to meet
the following directives.
EMC Directive
This product is tested to meet Council Directive 89/336/EEC Electromagnetic
Compatibility (EMC) and the following standards,
in whole or in part, documented in a technical construction file:
EN 50081-2EMC – Generic Emission Standard, Part 2 – Industrial
Environment
EN 50082-2EMC – Generic Immunity Standard, Part 2 – Industrial
Environment
This product is intended for use in an industrial environment.
Low Voltage Directive
This product is tested to meet Council Directive 73/23/EEC Low Voltage, by
applying the safety requirements of EN 61131–2 Programmable Controllers,
Part 2 – Equipment Requirements and Tests.
For specific information required by EN 61131-2, see the appropriate sections
in this publication, as well as the following Allen-Bradley publications:
Industrial Automation Wiring and Grounding Guidelines
(for noise immunity), publication 1770-4.1
Automation Systems Catalog, publication B111
This equipment is classified as open equipment and must be mounted in an
enclosure during operation to provide safety protection.
Publication 1746-6.16 – January 1999
1–1
Chapter 1
Module Overview
General Description
The module stores digitally converted thermocouple and/or millivolt (mV)
analog data in its image table for retrieval by all fixed and modular SLC 500
processors. The module supports connections from any combination of up to
four thermocouple and/or mV analog sensors.
Input Ranges
The following tables define thermocouple types and associated temperature
ranges and the millivolt analog input signal ranges that each of the module’s
input channel will support. To determine the practical temperature range of
your thermocouple, refer to the specifications in appendix A.
Thermocouple Temperature Ranges
°C Temperature Range
Type
C
0oC
°F Temperature Range
to
2317oC
32oF
to
4201oF
D
0oC
to
2317oC
32oF
to
4201oF
J
–210°C
to
760°C
–346°F
to
1400°F
K
–270°C
to
1370°C
–454°F
to
2498°F
T
–270°C
to
400°C
–454°F
to
752°F
B
300°C
to
1820°C
572°F
to
3308°F
E
–270°C
to
1000°C
–454°F
to
1832°F
R
0°C
to
1768°C
32°F
to
3214°F
S
0°C
to
1768°C
32°F
to
3214°F
N
0°C
to
1300°C
32°F
to
2372°F
CJC Sensor
0°C
to
85°C
32°F
to
185°F
Millivolt Input Ranges
–50 to +50 mV
–100 to +100 mV
Each input channel is individually configurable for a specific input device, and
provides open-circuit, over-range, and under-range detection and indication.
1–2
Publication 1746-6.16 – January 1999
Chapter 1
Module Overview
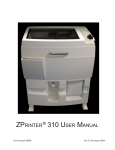
Hardware Features
The module fits into any single slot for I/O modules in either an SLC 500
modular system or an SLC 500 fixed system expansion chassis (1746-A2). It
is a Class 1➀ module (uses 8 input words and 8 output words).
➀ Requires use of Block Transfer in a remote configuration.
The module contains a removable terminal block providing connections for
four thermocouple and/or analog input devices. There are two cold-junction
compensation (CJC) sensors that compensate for the cold-junction at ambient
temperature rather than at freezing (0oC). There are no output channels on
the module. You configure the module with software rather than with
jumpers or switches.
Side Label
Channel Status
LEDs (Green)
INPUT
ISOLATED
CHANNEL
STATUS
2
3
Door Label
ISOLATED THERMOCOUPLE / mV INPUT MODULE
Module Status
LED (Green)
0
1
MODULE STATUS
THERMOCOUPLE/mV
Removable
Terminal Block
CJC A+
Do Not
Remove CHL0+
CJC A–
Do Not
Remove CHL0–
Do Not
Connect CHL1+
Do Not
Connect
CHL1–
Do Not
Connect CHL2+
CJC Sensors
Cable Tie Slots
Do Not
Connect CHL2–
Do Not
Connect CHL3+
CJC B–
Do Not
Remove CHL3–
CJC B+
Do Not
Remove Do Not
Connect
Do not connect
to this terminal
Self-Locking Tabs
Hardware Features
Hardware
Publication 1746-6.16 – January 1999
Function
Channel Status LED Indicators
Display operating and fault status of channels 0, 1, 2, and 3
Module Status LED
Displays operating and fault status of the module
Side Label (Nameplate)
Provides module information
Removable Terminal Block
Provides electrical connection to input devices.
Door Label
Permits easy terminal identification
Cable Tie Slots
Secure input wiring at the module
Self-Locking Tabs
Secure module in chassis slot
1–3
Chapter 1
Module Overview
Diagnostic LEDs
The module contains diagnostic LEDs that help you identify the source of
problems that may occur during power-up or during normal operation.
Power-up and channel diagnostics are explained in chapter 8, Module
Diagnostics and Troubleshooting.
System Overview
The module communicates with the SLC 500 processor and receives +5Vdc
and +24Vdc power from the system power supply through the parallel backplane interface. No external power supply is required. You may install as
many thermocouple modules in the system as the power supply can support.
Thermocouple Modules
SLC Processor
Each module channel can receive input signals from a thermocouple or a mV
analog input device. You configure each channel to accept either one. When
configured for thermocouple input types, the module converts analog input
voltages into cold-junction compensated and linearized, digital temperature
readings. The module uses the National Bureau of Standards (NBS)
Monograph 125 and 161 based on IPTS-68 for thermocouple linearization.
When configured for millivolt analog inputs, the module converts analog
values directly into digital counts. The module assumes that the mV input
signal is linear.
System Operation
At power-up, the module checks its internal circuits, memory, and basic
functions. During this time the module status LED remains off. If the
module finds no faults, it turns on its module status LED.
Channel Data Word
Channel Status Word
Thermocouple or mV
Analog Signals
Thermocouple
Input
Module
SLC 500
Processor
Channel Configuration Word
1–4
Publication 1746-6.16 – January 1999
Chapter 1
Module Overview
After completing power-up checks, the module waits for valid channel
configuration data from your SLC ladder logic program (channel status
LEDs are off). After channel configuration data is transferred and channel
enable bits are set for one or more channels, the module turns on its channel
status LEDs. Then it continuously converts the thermocouple or millivolt
input to a value within the range you selected for the channel.
Each time the module reads an input channel, the module tests that data for a
fault, i.e. open-circuit, over-range, or under-range condition. If it detects
such a condition, the module sets a unique bit in the channel status word and
causes the channel status LED to blink.
The SLC processor reads the converted thermocouple or millivolt data from
the module at the end of the program scan, or when commanded by the
ladder program. After the processor and module determine that the data
transfer was made without error, the data can be used in your ladder program.
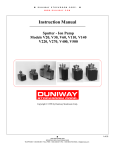
Module Operation
The module’s input circuitry consists of four differential analog inputs, each
with its own analog-to-digital (A/D) convertor. The A/D convertors read the
analog input signals and convert them to digital counts. The input circuitry
also continuously samples the CJC sensors and compensates for temperature
changes at the cold junction (terminal block). The figure on the following
page shows a block diagram for the analog input circuitry.
Module Addressing
The module requires eight words each in the SLC processor’s input and
output image tables. Addresses for the module in slot e are as follows:
I:e.0-3 thermocouple/mV data for channels 0-3, respectively
I:e.4-7 status data for channels 0-3, respectively
O:e.0-3 configuration data for channels 0-3, respectively
O:e.4-7 reserved for future use. Do not use.
Compatibility with Thermocouple and Millivolt Devices and Cables
The module is compatible with the following NBS MN-125 and -161 standard
types of thermocouples: B, C, D, E, J, K, N, R, S, and T and extension wire.
Refer to appendices A and C for details. The module is also compatible with a
variety of mV devices with an output of "50 or "100 mV.
Publication 1746-6.16 – January 1999
1–5
Chapter 1
Module Overview
To minimize interference from radiated electrical noise, we recommend
twisted-pair and highly shielded cables such as the following:
Block Diagram
of Isolated
Channel Input Circuits
For This Type of Device
We Recommend This Cable (or equivalent)
Thermocouple Type J
EIL Corp. J20-5-502
Thermocouple Type K
EIL Corp. K20-5-510
Thermocouple Type T
EIL Corp. T20-5-502
other Thermocouple types
consult with EIL Corp or other manufacturers
mV devices
Alpha Suprashield XTRA-GUARD 1
5121 (1pr), 5122 (2pr), 5131 (3pr), 5141 (4pr)
Terminal Block
Module Circuitry
+
CJCA Sensor
Channel 0
–
+
2
–
4
+
6
–
8
+
10
–
12
+
14
–
16
Open Circuit
Detection
Multiplexer
Analog to
Digital
Convertor
8 Hz
Digital
Filter
Digital Value
Channel 0 &
CJC Sensor
Signal
Analog to
Digital
Convertor
8 Hz
Digital
Filter
Digital Value
Channel 1
Analog to
Digital
Convertor
8 Hz
Digital
Filter
Digital Value
Channel 2
Analog to
Digital
Convertor
8 Hz
Digital
Filter
wire braid
I/O Chassis
Ground
Multiplexer
Digital Value
Channel 3 &
CJC Sensor
Signal
+
CJCB Sensor
–
18
I/O Chassis
Ground
1–6
Publication 1746-6.16 – January 1999
Chapter
2
Quick Start
Use this chapter as an abbreviated procedure for getting the module into
operation or as an overview if you need the additional steps described in
subsequent chapters. This chapter assumes that you understand:
• SLC 500 products
• electronic process control
• ladder logic instructions
Because this chapter is a start-up guide, it does not contain detailed
explanations. It does, however, refer to other chapters or to other SLC
publications for more information.
If you are unsure of terms used or concepts presented in this chapter, always
read the referenced chapters before trying to apply the information.
This chapter will:
• tell you what equipment you need
• explain how to install and wire the module
• show you how to set up one channel for thermocouple input
• examine the state of the LEDs at normal startup
• examine the channel status word
Required Tools and
Equipment
Publication 1746-6.16 – January 1999
Have the following tools and equipment ready:
• medium blade screwdriver
• medium cross-head screwdriver
• thermocouple or millivolt sensor
• thermocouple extension wire (if needed)
• the module
• I/O chassis
• SLC processor and power supply
• programming equipment
(Programming examples in this manual demonstrate the use of
Allen-Bradley’s Advanced Programming Software for personal
computers.)
2–1
Chapter 2
Quick Start
Procedures
1.
Unpack the Module
Reference
Important:: Follow these precautions to prevent damaging the module from electrostatic discharge:
• Before handling the module, rid yourself of electric charge by touching a grounded object
• Avoid touching connector terminations and circuit components.
• When not in use, keep the module in its electrostatic shielded bag.
Unpack the module making sure that the contents include:
• module (Catalog Number 1746-INT4)
• removable terminal block (factory–installed on module) with CJC sensors attached
• this user manual (publication number 1746-6.16)
–
If the contents are incomplete, call your local Allen-Bradley representative for assistance.
2.
Review Power Requirements
Reference
Review the power requirements of the modules drawing power from the chassis power supply.
• The fixed, 2-slot chassis supports 2 1746-INT4 modules. If combining an INT4 module with
a different type of module, refer to Considerations for a Fixed Controller in chapter 3.
• For a modular system, compute the total load on the system power supply using the
procedure described in the SLC Installation & Operation Manual for Modular Controllers
(publication 1747-6.2) or the SLC 500 Family System Overview (publication 1747-2.30).
3.
Install the Module
!
Chapter 3
(Installation and
Wiring)
Appendix A
(Specifications)
Reference
ATTENTION: Never install, remove, or wire
modules with power applied to the chassis or
devices wired to the module.
Chapter 3
(Installation and
Wiring)
Make sure system power is off; then insert the the module into the I/O chassis.
In this example procedure, the module is inserted into slot 1.
Top and Bottom
Module Release(s)
Card
Guide
2–2
Publication 1746-6.16 – January 1999
Chapter 2
Quick Start
4.
Connect a Thermocouple
Reference
Connect thermocouple wires to channel 0 on the module’s terminal block. Make sure both cold
junction compensation (CJC) devices are securely attached.
Chapter 3
(Installation and
Wiring)
Terminal Block
CJC A
Device
CHL 0+
CHL 0–
CHL 1+
CHL 1–
5.
Important:
Ground the thermocouple’s cable shield
to the I/O chassis with 3/8” braid wire.
(Refer to Figure 3.2.)
Thermocouple
Wire
Configure the Software to Accept the Module
Reference
Enter the module’s ID and assigned slot (slot 1 in this example) into the system I/O configuration.
If using APS software, select Other at the bottom of the list of modules and enter the module ID
code (3515) at the prompt on the I/O configuration display. No manual entry of special I/O configuration (SPIO CONFIG) information is required, as the module ID code automatically assigns the
number of input and output words required by the module. Additional information on using Advanced
Programming Software [APS] to configure your system can be found in The Getting Started Guide for
APS [publication 9399-APSQS].
Chapter 4
(Preliminary
Operating
Considerations)
Example of Software Prompt:
Press ENTER to select I/O Module
Enter Module ID Code> 3515
offline
SLC 5/03
File EXAMPLE
SELECT
MODULE
F2
Publication 1746-6.16 – January 1999
2–3
Chapter 2
Quick Start
6.
Set Up Channel 0
Reference
Chapter 4
(Preliminary
Operating
Considerations)
O:1.0
O:1.1
O:1.2
O:1.3
Word 0
Word 1
Channel 0 Configuration Word
Channel 1 Configuration Word
Word 2
Channel 2 Configuration Word
Word 3
Channel 3 Configuration Word
.
.
.
Calibration Word 5
.
.
.
O:1.7 Word 7
Words 4, 6, & 7
(reserved)
Chapter 5
(Channel
Configuration,
Data, and Status)
Input Type
Data Format
Open Circuit
Address
Temperature Units
Output Image
(8 words)
Unused
Input Image
Unused
SLC 500 Controller
Data Files
Channel Enable
Determine the operating parameters for channel 0. This example shows the channel 0 configuration
word defined with all defaults (0) except for the channel enable (bit 11=1). Module assumed in slot 1.
(For details on channel configuration, refer to the configuration worksheet on page 2-6)
0 0 0 0 0 0 0 0 0 0 0 0 0 0 0 0
Use Default Settings For:
Bit 15
• Type J Thermocouple
• Engineering Units x 1
• Data Word = 0 If Open Circuit
• Degrees Celsius
Bit 0
0 0 0 0 1 0 0 0 0 0 0 0 0 0 0 0
Example Settings for Channel 0.
Set this bit (11) to enable channel. Address = O:1.0/11.
7.
Program the Transfer of the Configuration Word
Reference
Program the transfer of the configuration word (from step 6) to the module.
1. Using the memory map function, create integer file N10. Integer file N10 should contain one
element for each channel used. (For this example we used N10:0.)
2. Enter configuration parameters for channel 0 (from step 6) into N10:0.
In this example all the bits of N10:0 are zero except for the channel enable bit (N10:0/11).
3. Program a ladder logic instruction to copy the contents of N10:0 to output word O:1.0.
Chapter 6
(Ladder
Programming
Examples)
Chapter 8
(Application
Examples)
Data Table Display of Integer File N10:0
address
N10:0
15
data
0
0000 1000 0000 0000
address
Ladder Logic to Transfer N10:0 to the Module:
First Pass Bit
COP
S:1
COPY FILE
] [
15
Source
# N10:0
Dest
Length
2–4
# O:1.0
1
15
data
0
On power up, the first pass bit (S:1/15)
is set for one scan, enabling the COPY
instruction to transfer the configuration
word to the processor’s output image
table. From there it is transferred to the
module in the processor’s I/O scan.
Publication 1746-6.16 – January 1999
Chapter 2
Quick Start
8.
Write Ladder Logic to Process Input Data
Reference
Chapter 5
(Channel
Configuration,
Data, and Status)
Write ladder logic to process the thermocouple input data for your application.
(For information on programming, refer to the APS User Manual, publication 9399-APSUM.)
SLC 500 Controller
Data Files
Input Image
(8 words)
Chapter 6
(Ladder
Programming
Examples)
Output Image
Address
I:1.0
0 0 0 0 0 0 0 0 0 0 0 0 0 0 0 0
Address
I:1.0
I:1.1
I:1.2
I:1.3
Word 0
Word 1
Word 2
Word 3
.
.
.
.
.
.
I:1.7 Word 7
Channel 0 Data Word
Channel 1 Data Word
Channel 2 Data Word
Channel 3 Data Word
Channel 0 Status Word
Channel 1 Status Word
Channel 2 Status Word
Channel 3 Status Word
9.
(Variable Thermocouple Input Data)
Bit 15
Chapter 8
(Application
Examples)
Bit 0
In this example, the module is located in slot 1.
Apply Power and Download Your Program
Reference
Chapter 7
(Module
Diagnostics and
Troubleshooting)
Apply power. Download your program to the SLC and put the controller into Run mode. In this
example during a normal start up, the module status LED and channel status 0 LED turn on.
INPUT
ISOLATED
CHANNEL 0
2
1
3
STATUS
Channel LEDs
Module Status LED
MODULE STATUS
THERMOCOUPLE/mV
10.
Troubleshooting
Reference
Monitor the status of input channel 0 to determine its configuration setting and operational status.
This is useful for troubleshooting when the blinking channel LED indicates that an error has been
flagged. If the Module Status LED is off, or if the Channel 0 LED is off or blinking, refer to chapter 7.
SLC 500 Controller
Data Files
Word 7
Publication 1746-6.16 – January 1999
Channel 0 Status Word
Channel 1 Status Word
Channel 2 Status Word
Channel 3 Status Word
Chapter 8
(Application
Examples)
Input Type
Channel 3 Data Word
Data Format
Channel 2 Data Word
Word 3
Open Circuit Type
Word 2
Temperature Units
Channel 0 Data Word
Channel 1 Data Word
Zero (not used)
Output Image
Word 0
Word 1
.
.
Chapter 7
(Module
Diagnostics and
Troubleshooting)
Configuration Error
Over Range Error
Under Range Error
Open Circuit Error
Channel Status
Input Image
(8 words)
Chapter 5
(Channel
Configuration,
Data, and Status)
0 0 0 0 1 0 0 0 0 0 0 0 0 0 0 0
Bit 15
Address
Bit 0
I:1.4
For this example, during normal operation only bit 11 is set.
2–5
Chapter 2
Quick Start
Channel Configuration Worksheet
Select your bit configurations. Write them at the bottom of the worksheet. Use one worksheet for each channel.
ÉÉÉ
ÉÉÉ
ÉÉÉ
ÉÉÉ
ÉÉÉ
ÉÉÉ
ÉÉÉ
ÉÉÉ
ÉÉÉ
ÉÉÉ
ÉÉÉ
ÉÉÉ
ÉÉÉÉÉ
ÉÉÉ
ÉÉÉÉÉ
ÉÉÉ
ÉÉÉÉÉ
ÉÉÉ
ÉÉÉ
ÉÉÉ
ÉÉÉ
ÉÉÉ
ÉÉÉ
ÉÉÉ
ÉÉÉ
ÉÉÉ
ÉÉÉ
ÉÉÉ
ÉÉÉÉÉ
ÉÉÉ
ÉÉÉ
ÉÉÉÉÉ
ÉÉÉ
ÉÉÉ
ÉÉÉ
ÉÉÉ
ÉÉÉ
ÉÉÉ
ÉÉÉ
ÉÉÉ
ÉÉÉ
ÉÉÉ
ÉÉÉ
Channel Configuration Word (O:e.0 through O:e.3) – Bit Descriptions
ts
Bit(s)
0–3
44, 5
6, 7
e ne
Define
elect
To Select
Input
T
Type
pe
TC Type J
TC Type K
TC Type T
TC Type E
TC Type R
TC Type S
TC Type B
TC Type N
"50mV
"100mV
TC Type C
TC Type D
Invalid
Invalid
Invalid
CJC Temp.
Data
Format
Open
Circuit
rcu t
Mode
Set these bits in the Channel Configuration Word
15-12
11
10
9
Units
oF,
F oC
9, 10
Unused
11
12-15
5
4
0 0
Engr. Units x10
0 1
Scaled-for-PID
1 0
Counts
1 1
Zero
0 0
Upscale
0 1
ÉÉ
ÉÉ
ÉÉ
ÉÉ
Downscale
1 0
1 1
Degrees C
0
Degrees F
Unused
Channel Off
0
Channel On
1
Unused
Enter Your Bit Selections >>
2–6
6
Engr. Units x1
Chnl
Enable
Unused
7
3
2
1
0
0
0
0
0
0
0
0
0
1
1
1
1
1
1
1
1
0
0
0
0
1
1
1
1
0
0
0
0
1
1
1
1
0
0
1
1
0
0
1
1
0
0
1
1
0
0
1
1
0
1
0
1
0
1
0
1
0
1
0
1
0
1
0
1
escr pt on
Description
Project ________________________
Slot
lot Number _____
annel Number _____
Channel
Configure
on ure tthee cchannel
annel for
or tthee input
nput ttype
pe connecte
connected to it.
t.
V i iinputs
Valid
p s are
re thermocouples
er c p es and analog iinput
p si
signalss
of ±50mV and ±100mV. You can configure the channel to
re
- c i (CJC)
C C temperature.
e per re. When
e reading
re i
read thee ccold-junction
thee CJC
C C temperature,
e per re thee channel
c
e ignores
i res thee physical
p sic
input signal.
ÉÉ
ÉÉ
ÉÉ
ÉÉ
ÉÉ
ÉÉ
ÉÉ
ÉÉ
ÉÉ
ÉÉ
ÉÉ
ÉÉ
Invalid
8
8
1
0
0
Select the channel data format from:
Engineering units (EU) x1 or x10
1 values
v es are
re in
i 0.1
.1 degrees
e rees orr 0.01mV.
. 1 V.
Forr EU x1,
Forr EU x10,
1 vvalues
es are
re in
i whole
w e oC orr oF orr 0.1mV.
.1 V.
Scaled-for-PID
cale - or-PI (value
alue iss tthee same for
or an
any input
nput ttype)
pe
Proportional input signal range is scaled to 0-16,383 counts.
Proportional
any input
Proport onal counts (value
alue iss same for
or an
nput ttype)
pe
Proportional input signal range is scaled to ±32,767 counts.
For more information, refer to next page.
Select module response to a detected open circuit from:
Zero to force the channel data word to zero.
Upscale to force the channel data word to full scale.
Downscale to force channel data word to low scale.
Important: A bit
bi selection
se ec i orr 1 1 is invalid.
i v i .
For an open CJC thermistor, mV channels are not affected.
Important: The
T e modulee requires
re ires 500
5 msec
sec orr onee modulee
update to flag the error while it ramps the channel input.
Select °C/°F for thermal inputs. Ignored for mV inputs.
Important: Forr EU x11 and °°F (0.1°F),
.1° an over-range
ver-r e error
err r
will occur above 3276.7°F (cannot exceed 32767 counts).
These bits must be zero for a valid configuration.
Disable unused channels for faster response.
When set, the module configures the channel and reads the
channel input before setting bit 11 in the status word.
If you change the configuration word, the status word must
re ec thee change
reflect
c
e before
be re new
ew data is valid.
v i . If you clear
c e r thee
configuration word, the module clears channel and status
words. For a new configuration word, channel data and
status words remain cleared until the module sets this bit
(11) in the status word.
0000
These bits must be zero for a valid configuration.
0000
For the Channel Configuration Word
Publication 1746-6.16 – January 1999
Chapter
3
Installation and Wiring
This chapter tells you how to:
• avoid electrostatic damage
• determine the module’s chassis power requirement
• install the module
• wire signal cables to the the module’s terminal block
• install the ferrite collar
Electrostatic Damage
Electrostatic discharge can damage semiconductor devices inside this module
if you touch backplane connector pins. Guard against electrostatic damage
by observing the following precautions:
!
ATTENTION: Electrostatic discharge can degrade performance
or cause permanent damage. Handle the module as stated below.
• Touch a grounded object to rid yourself of charge before handling the
module.
• Wear an approved wrist strap when handling the module.
• Handle the module from the front, away from the backplane connector.
Do not touch backplane connector pins.
• Keep the module in its static-shield bag when not in use.
Power Requirements
The module receives its power through the SLC500 chassis backplane from
the fixed or modular +5 V dc/+24 V dc chassis power supply. The maximum
current drawn by the module is shown in the table below.
5V dc Amps
24Vdc Amps
0.11
0.085
When using the module in a modular system, add the values shown above to
the requirements of all other modules in the SLC chassis to prevent
overloading the chassis power supply.
When using the module in a fixed controller, be sure not to exceed the power
supply rating for the pair of modules in the 2-slot I/O chassis.
Publication 1746-6.16 – January 1999
3–1
Chapter 3
Installation and Wiring
Fixed Controller Compatibility Table
IA4
yes
IA8
yes
0.050
–
IA16
yes
yes
0.085
–
0.035
–
0.050
–
IM16
yes
yes
0.085
–
IM4
IM8
INT4
OA8
yes
0.185
–
OA16
yes
0.370
–
IB8
yes
0.050
–
IB16
yes
0.085
–
IV8
yes
0.050
–
IV16
yes
yes
0.085
–
IG16
0.140
–
OV8
yes
0.135
–
OV16
yes
0.270
–
OB8
yes
yes
0.135
–
OG16
0.180
–
OW4
yes
0.045
0.045
OW8
yes
0.085
0.090
0.170
0.180
OW16
IO4
yes
0.030
0.025
I08
yes
0.060
0.045
IO12
yes
yes
0.090
0.070
0.025
0.085
NI4
NIO4I
0.055
0.145
NIO4V
0.055
0.115
DCM
0.360
–
HS
yes
0.300
–
OB16
yes
0.280
–
IN16
yes
0.085
–
INT4
yes
0.110
0.085
BAS
yes
0.150
0.040
0.452
–
OB32
OV32
0.452
–
IV32
yes
0.106
–
IB32
yes
0.106
–
OX8
yes
0.085
0.090
NO4I
0.055
0.195
NO4V
0.055
0.145
–
ITB16
yes
0.085
ITV16
yes
0.085
–
KE
yes
0.150
0.040
0.150
0.145
KEn
3–2
24V dc
AMPS
–
5V dc
AMPS
0.035
Module
OBP16
yes
0.250
–
NT4
yes
0.060
0.040
FIO4I
0.055
0.150
FIO4V
0.055
0.120
Considerations for a Modular System
Place your module in any slot of an SLC500 modular, or modular expansion
chassis, except for the left-most slot (slot 0) reserved for the SLC processor
or adapter modules.
Considerations for a Fixed Controller
The power supply in the 2-slot SLC 500 fixed I/O chassis (1746-A2) can
support only specific combinations of modules. Refer to the table at the left
or to the Chart Method below to determine whether the power supply can
support the pair of modules.
Chart Method
Use the chart to determine a valid pair of modules as follows:
1. For both modules, add the current rating at 5V dc and again at 24V dc.
2. On the chart, draw a horizontal line for the total 5V dc current rating.
3. On the chart, draw a vertical line for the total 24V dc current rating.
4. Observe the intersection. If within the chart boundary, the pair is OK.
450
(455, 0)
400
(85)
Module
OA8
INT4
Total
✖
(295)
5V dc
0.185
0.110
0.295
24V dc
0
0.085
0.085
350
300
(295, 85)
5V dc
Current
250
(mA)
(255, 180)
200
150
100
50
(0, 180)
50
100
150
200
24V dc Current (mA)
Important: Some analog I/O modules such as the FIO4I, FIO4V, NO4I,
and NO4V may require an additional 24V dc power supply.
For those modules, as needed, refer to the user manual.
Publication 1746-6.16 – January 1999
Chapter 3
Installation and Wiring
Module Installation
and Removal
When installing the module in a chassis, it is not necessary to remove the
terminal block from the module. However, if the terminal block is removed,
use the write-on label located on the side of the terminal block to identify the
module location and type.
SLOT ____
•
RACK ____
MODULE _______________
Terminal Block Removal
!
ATTENTION: Never install, remove, or wire modules with
power applied to the chassis or devices wired to the module.
To remove the terminal block:
1. Loosen the two terminal block release screws. To avoid cracking the
terminal block, alternate between screws as you remove them.
2. Grasp the terminal block at the top and bottom and pull outward and
down. When removing or installing the terminal block be careful not to
damage the CJC sensors.
CJC Sensors
Terminal
Block Release
Screws
Module Installation Procedure
1. Align the circuit board of the thermocouple module with the card guides
located at the top and bottom of the chassis (Figure 3.1).
2. Slide the module into the chassis until both top and bottom retaining clips
are secured. Apply firm even pressure on the module to attach it to its
backplane connector. Never force the module into the slot.
3. Cover unused slots with the Card Slot Filler, Catalog Number 1746-N2.
4. To remove, press the releases at the top and bottom of the module, and
slide the module out of the chassis slot.
Publication 1746-6.16 – January 1999
3–3
Chapter 3
Installation and Wiring
Figure 3.1
Installing the Module into the I/O Chassis
Card
Guides
Top and Bottom
Releases
Wiring the Module
The module contains a green, 18-position, removable terminal block.
(Terminal Block Spare Part Catalog Number 1746-RT32)
Release Screw
CJC A+
CJC Assembly
Channel 0+
CJC A–
Channel 0–
Channel 1+
Do NOT
use these
connections
Channel 1–
Channel 2+
See Figure 3.2
Channel 2–
Channel 3+
CJC B–
CJC Assembly
Release Screw
!
3–4
Channel 3–
CJC B+
n/c
Do not connect
to this terminal
ATTENTION: Disconnect power to the SLC before
attempting to install, remove, or wire the terminal block.
Publication 1746-6.16 – January 1999
Chapter 3
Installation and Wiring
Cold Junction Compensation (CJC)
!
ATTENTION: Do not remove or loosen the cold junction
compensating thermistors located on the terminal block. Both
thermistors are critical to ensure accurate thermocouple input
readings at each channel. The module will not operate in the
thermocouple mode if a thermistor is removed.
In case of accidental removal of one or both thermistors, replace them by
connecting them across the CJC terminals located at the top and/or bottom
left side of the terminal block. Always connect the red lug to the (+)
terminal (to CJC A+ or CJC B+).
Thermistor
Always attach red lug to
the CJC+ terminal.
Bottom of Terminal Block
Wiring Considerations
Thermocouple inputs are highly susceptible to electrical noise due to the
small signal amplitudes (microvolt/°C). Most applications require that the
processor and I/O chassis be installed in an industrial enclosure to reduce the
effects of electrical interference. Consider the following conditions when
selecting a slot location for the module. Position the module away from
other modules that:
• connect to sources of electrical noise such as relays, and AC motor drives
• generate significant heat, such as 32-point I/O modules
Publication 1746-6.16 – January 1999
3–5
Chapter 3
Installation and Wiring
Follow these guidelines to wire your input signal cables:
• To limit the pickup of electrical noise, keep thermocouple and millivolt
signal wires as far from power and load lines as possible .
• For high immunity to electrical noise, use Alpha 5121 (shielded, twisted
pair) or equivalent wire for millivolt sensors; or use shielded, twisted pair
thermocouple extension lead wire specified by the thermocouple
manufacturer. Using the incorrect type of thermocouple extension wire or
not following the correct polarity may cause invalid readings.
• Ground the shield drain wire at only one end of the cable.
The preferred location is at the I/O chassis ground (Figure 3.2).
(Refer to IEEE Std. 518, Section 6.4.2.7 or contact your sensor
manufacturer for additional details.)
• keep all unshielded wires as short as possible
• Tighten screw terminals with care. Excessive tightening can strip a screw.
• The open-circuit detector generates approximately 20 nano-amperes into
the thermocouple cable. A total lead resistance of 25 ohms (12.5 one-way)
will produce 0.5 mV of error.
• Follow system grounding and wiring guidelines found in your SLC 500
Installation and Operation Manual.
Preparing and Wiring the Cables
To prepare and connect cable leads and drain wires, follow these steps.
Cable
Signal Wires
(At the module-end of the cable, extract
the drain wire but remove the foil shield.)
Drain Wire
(Remove foil shield and drain wire
from sensor-end of the cable.)
Signal Wires
1. At each end of the cable, strip some casing to expose individual wires.
2. Trim signal wires to 5-inch lengths beyond the cable casing. Strip about
3/16 inch (4.76 mm) of insulation to expose the ends of the wires.
3. At the module-end of the cables (Figure 3.2):
– extract the drain wire and signal wires
– remove the foil shield
– bundle the input cables with a cable strap
4. Connect drain wires together and solder them to a 3/8” wire braid, 12” long.
Keep drain wires as short as possible.
5. Connect the 3/8” wire braid to the nearest chassis mounting bolt.
3–6
Publication 1746-6.16 – January 1999
Chapter 3
Installation and Wiring
6. Connect the signal wires of each channel to the terminal block .
Important: Only after verifying that your connections are correct for each
channel, trim the lengths to keep them short. Avoid cutting leads too short.
7. At the source–end of cables from mV devices (Figure 3.2):
– remove the drain wire and foil shield
– apply shrink wrap as an option
– connect to mV devices keeping the leads short
Important: If noise persists, try grounding the opposite end of the cable,
instead. (Ground one end only.)
Figure 3.2
Cable Preparation and Connections to Minimize Electrical Noise Interference
Ungrounded End at Source Device
Grounded End at I/O Chassis
Terminal Block
3/8”
Wires
3/8”
Remove drain wire and
foil shield at casing.
Keep the length
of unshielded wires
as short as possible.
Cables
3/8” braid
Signal
Wires
Solder drain
wires to braid
at casings.
Connect I/O chassis bolt
to earth ground.
Cables
Keep the length
of unshielded wires
as short as possible.
Limit braid length to 12” or less.
Solder braid to lug attached to
bottom row of I/O chassis bolts.
Publication 1746-6.16 – January 1999
3–7
Chapter 3
Installation and Wiring
Installing the Ferrite Collar
For immunity to electrical noise with this CE-marked module, insert a ferrite
collar (Fair-Rite Inc. part number 0443164151) around the input cables
immediately beneath the module in the I/O chassis.
Do this as follows:
1. Bundle the cables at the module end.
2. Fold the collar so that it encircles the cables.
3. Press the plastic housing until the collar snaps together.
4. Check that the collar is fully latched.
5. If the collar slides on the cables, use a cable tie to secure it.
module in
I/O chassis
ferrite collar
before folding
bundle of cables
in open collar
ferrite collar:
part number
0443164151
Fair-Rite Inc.
PO Box J
1 Commercial Rd
Wallkill, NY 12589
(914) 895-2055
Place ferrite
collar here
ferrite collar after
folding and latching
Notes:
3–8
Publication 1746-6.16 – January 1999
Chapter
4
Preliminary Operating Considerations
This chapter explains how the module and the SLC processor
communicate through the processor’s I/O image tables. It also
describes the module’s input filter characteristics. Topics discussed
include:
• module ID code
• module addressing
• input channel characteristics
• response to slot disabling
Module ID Code
The module ID code is a unique number assigned to each type of
1746 I/O module. The ID defines for the processor the type of I/O
module and the number of words used in the processor’s I/O image
table.
With APS software, use the system I/O configuration display to
manually enter the module ID when assigning the slot number during
configuration. Do this by selecting (other) from the list of
modules on the system I/O configuration display and enter 3515, the
ID code for the 1746-INT4 module.
No special I/O configuration (SPIO CONFIG) is required. The
module ID automatically assigns the correct number of input and
output words.
If you are using a different programming software package, refer to
the documentation that came with your software.
Publication 1746-6.16 – January 1999
4–1
Chapter 4
Preliminary Operating Considerations
Module Addressing
The following memory map shows you how the SLC processor’s
output and input image tables are defined for the module.
Bit 15
Thermocouple
Module
Image Table
SLC 5/0X
Data Files
Slot e
Output
Scan
Bit 0
Channel 0 Configuration Word
Word 0
Channel 1 Configuration Word
Word 1
Channel 2 Configuration Word
Word 2
Channel 3 Configuration Word
Word 3
.
Output Image
Output Image
8 Words
Output Image
Ad
Calibration Word
Word 5
Words 4, 6, & 7
(not defined)
Word 7
O
.
Input
Scan
Slot e
Ad
Input Image
8 Words
Input Image
Input Image
(Class 1)
Channel 0 Data Word
Word 0
Channel 1 Data Word
Word 1
Channel 2 Data Word
Word 2
Channel 3 Data Word
Word 3
Channel 0 Status Word @
Word 4
Channel 1 Status Word @
Word 5
Channel 2 Status Word @
Word 6
Channel 3 Status Word @
Bit 15
Word 7
Bit 0
@ returns calibration status during calibration
Output Image – Configuration Words
Eight words of the SLC processor’s output image table are reserved
for the module. Output image words 0-3 are used to configure the
module’s input channels 0-3. Each output image word configures a
single channel, and can be referred to as a configuration word. Word
5 is used for calibration. Each word has a unique address based on
the slot number assigned to the module. (The remaining three
words are not used.)
Example Address – If you want to configure channel 2 on the
module located in slot 4 in the SLC chassis, your address would be
O:4.2.
Slot
File Type
Word
O:4.2
Element
Delimiter
Word
Delimiter
Chapter 6, Channel Configuration, Data, and Status, gives you
detailed bit information about the data content of the configuration
word.
4–2
Publication 1746-6.16 – January 1999
Chapter 4
Preliminary Operating Considerations
Input Image – Data Words and Status Words
Eight words of the SLC processor’s input image table are reserved
for the module. Input image words 0-3 (data words) hold the the
temperature values of thermocouple analog inputs for channels 0-3.
The data is valid only when the channel is enabled, no errors are
detected, and not during calibration.
Input words 4-7 (status words) contain the status of channels 0-3.
Status bits for a particular channel reflect the configuration settings
that you entered into the configuration (output image) word for that
channel. To receive valid status, the channel must be enabled and
the module must have stored a valid configuration word for that
channel. During calibration, these words return calibration status.
Each input image word has a unique address based on the slot
number assigned to the module.
Example Address – To obtain the status of channel 2 (input word 6)
of the module located in slot 4 in the SLC chassis, use address I:4.6.
Slot
File Type
Word
I:4.6
Element
Delimiter
Word
Delimiter
Chapter 6, Channel Configuration, Data, and Status, gives you
detailed bit information about the content of the data word and the
status word.
Input Channel Characteristics
Each channel has an 8 Hz digital filter for input noise rejection, a
multiplexer for processing cold-junction-compensation (CJC) values,
and an analog-to- digital (A/D) converter to provide digital values for
SLC processing.
Channel Cut-off Frequency, Update Time, and Step Response
The channel cut-off frequency is defined as the point on the frequency
response curve where frequency components of the input signal are
passed with 3 dB of attenuation by the input filter. All frequency
components above cut-off frequency are increasingly attenuated, as
show in the graph (next page). Cut-off frequency is also defined as the
Normal Mode Rejection (NMR) in dB of attenuation at 50 Hz
(European) or at 60 Hz (American).
We define module update time as the time required for the module to
sample and convert channel input signals, multiplex them with the
CJC reference value, and make the resulting values available to the
SLC processor. It is typically 200 ms for multiplexing and 200 ms for
sampling and converting.
Publication 1746-6.16 – January 1999
4–3
Chapter 4
Preliminary Operating Considerations
When sampling occurs after the signal reaches 99.9% of final value,
the update time defines the minimum time (400 ms) for processing an
input signal.
4–4
Publication 1746-6.16 – January 1999
Chapter 4
Preliminary Operating Considerations
When sampling occurs just before the signal reaches 99.9% of final
value,
we define step response (worst-case) as the sum of the times
required for the analog input signal to change from 0 to 99.9% of
its expected final value (see graph). It includes the times required
for:
• input filter
• CJC multiplexer
• A/D converter
180 ms
200 ms
200 ms
This defines the maximum time required for processing an input
signal.
Frequency Response of the 8 Hz Filter
Converter
–3 dB 00 db
100%
90%
80%
&0%
% of 60%
Final 50%
Value 40%
30%
20%
10%
✖
–25db
Atten- –50db
uation
Step Response (worst case) for Filter, Multiplexer, and A/D
✖
✖
–75db
Multiplex CJC Values
(200 ms)
A/D Conversion
(200 ms)
–100db
1
5
10
50
0
100
60
120
180
300
240
360
420
480
540
600
Time (ms)
Frequency – Hz
The following table summarizes the input channel characteristics:
Corner Frequency
50/60 Hz NMR
Filter Time
Update Time
Step Response (worst)
8 Hz
50-60 dB
180 ms
400 ms
600 ms
Effective Resolution of a Channel and Input Device
The effective resolution of an input channel depends upon the type of
input device connected to it.
For thermocouples, we define resolution as the smallest increment of
temperature that can be sampled after A/D conversion. It varies with
temperature and with the type of thermocouple. We present a
Publication 1746-6.16 – January 1999
4–5
Chapter 4
Preliminary Operating Considerations
resolution graph for each type of thermocouple in Appendix A,
Module Specifications.
Millivolt devices are generally considered linear, and the effective
resolution is that of the channel itself.
Type of Device
thermocouple
millivolt sensor
4–6
Resolution
0.05oC-0.75oC @ 300oC
depending on the thermocouple
3.4mV/bit
Publication 1746-6.16 – January 1999
Chapter 4
Preliminary Operating Considerations
Response to Slot Disabling
!
By writing to the status file in your modular SLC processor you can
disable any chassis slot. Refer to your SLC programming manual for
the slot disable/enable procedure.
ATTENTION: Always understand the implications of disabling
the module before using the slot disable feature.
Input Response
When the slot for this module is disabled, the module continues to
update its inputs. However, the SLC processor does not read from a
module whose slot is disabled. Therefore, inputs appearing in the
processor image table remain in their last state, and the module’s
updated inputs are not read. When the processor re-enables the
module slot, the current state of module inputs are read by the
controller during the subsequent scan.
Output Response
When the slot for this module is disabled, configuration words in the
SLC processor’s output image table are held in their last state and
not transferred to the module. When the slot is re-enabled, output
image table words are transferred to the module during the
subsequent scan.
Publication 1746-6.16 – January 1999
4–7
Chapter 4
Preliminary Operating Considerations
Notes:
4–8
Publication 1746-6.16 – January 1999
Chapter
5
Accessing Files to Configure I/O
This chapter shows how to apply Advanced Programming Software (APS) to:
• Create a new file
• Configure I/O
• Return to an existing file
For additional information on applying APS, refer to the User Manual for
Advanced Programming Software, publication 9399-APSUM.
If you are using a different programming software package, refer to the
documentation that came with your software.
Create a New File
We assume that you have already loaded APS into your computer.
1. Boot your software and access this Main Menu screen.
2. To create a new program file offline, press OFFLINE PRG/DOC [F3].
You see the following screen.
3. Press these two keys in succession:
CHANGE FILE [F4] followed by CREATE FILE [F6].
You see the following processor selection screen:
4. Type the name of the file you want to create and press [ENTER].
The screen inserts the file name in the lower pop-up window.
5. Identify the type of processor you are using in the upper pop-up window.
Use the cursor keys to highlight the processor and press [ENTER].
The screen displays processor ID information in the lower pop-up window.
6. What you do next depends on the processor you select.
Publication 1746-6.16 – January 1999
If you select an:
And:
Then:
SLC 5/03 (or later) processor
and press [ENTER]
the screen displays
another pop-up window
Go to step 7
SLC 5/01 or 5/02 processor
n/a
Go to the section
Configure I/O
(on next page)
5-1
Chapter 5
Accessing Files to Configure I/O
7. Identify the processor’s operating system. Read it on the label found on
the side of the processor. Then, in the upper pop-up window, cursor to the
correct operating system and press [ENTER].
Now you are ready to configure the I/O of your SLC system.
You do this by telling the software what hardware your system is using.
5-2
Publication 1746-6.16 – January 1999
Chapter 5
Accessing Files to Configure I/O
Configure I/O
To configure your I/O, start with the processor selection screen
(shown in step 3 on previous page).
1. Press CONFIGR I/O [F5].
You see the following I/O configuration screen:
2. What you do next depends on what you want to do.
If you want to:
and your SLC System:
use the APS Read Config feature
is installed and wired
for SLC 5/03 (and later) processors
manually configure the software
• is a fixed hardware system
• uses an SLC 5/01 or 5/02, or
• is NOT installed or wired
Then press:
and:
READ CONFIG
[F1]
1. Follow prompts to configure
for SLC system hardware.
2. Then return to step 10.
MODIFY RACKS
[F4]
Go to step 3 next.
3. To configure the first I/O rack, press RACK 1 [F1].
Observe this pop-up window:
4. Cursor to the description of the I/O rack you are using and press [ENTER].
The screen displays the rack description for rack 1 (top of screen),
and removes the pop-up window.
5. If using more I/O racks, repeat steps 3 and 4 for rack 2 followed by rack 3.
Publication 1746-6.16 – January 1999
5-3
Chapter 5
Accessing Files to Configure I/O
Important: At this point, the software does the following automatically:
allocates slot numbers consecutively for the configured set of I/O racks.
For example, slots 1-7 if you configured racks 1 and 2 at 4 slots each.
places an asterisk (*) next to each slot number configured in steps 3-5.
6. To designate the I/O module for the subject slot in the I/O rack,
cursor to the subject slot number and press MODIFY SLOT [F5].
The screen lists the types of I/O modules.
7. With [PAGE] and [±] [°] keys, cursor to the module type for the
subject slot and press SELECT MODULE [F2].
The screen displays the module type in the row for the subject slot.
8. To assign I/O modules to remaining I/O slots, repeat steps 6 and 7.
9. If the subject I/O module is not listed (step 6), cursor to the bottom of the list
and select OTHER. Then type the module ID code and press [ENTER].
the ID code for 1746-INT4 is 3515
The screen inserts the module ID code in the row for the subject slot.
10.After configuring your I/O, to exit press:
EXIT [F8]
SAVE & EXIT [F8]
You get the prompt: SAVE TO FILE [F9]
You get the prompt: [ESC]
RETURN TO MAIN MENU [F3]
5-4
Publication 1746-6.16 – January 1999
Chapter 5
Accessing Files to Configure I/O
Return to an Existing File
If you already created the program file for your application and want to add
or edit ladder logic, return to it from the main menu screen as follows:
1. To return to a program file offline, press OFFLINE PRG/DOC [F3].
You see the screen.
2. Get the list of existing program files by pressing CHANGE FILE [F4].
You see a pop-up window with the list of existing program files.
3. Cursor to the file you want to open and press OFFLINE PRG/DOC [F1].
The screen displays the name of the subject file in the header
and removes the pop-up window.
4. To open the file so you can write or edit your ladder logic,
press MONITOR FILE [F8].
The screen displays the ladder logic of the subject program file.
5. To edit the logic, use function keys and follow the prompts as needed.
6. When finished programming, press EXIT [F3].
7. If you want to save your work, press SAVE [F2].
Then, follow the prompts and use function keys as needed to save the file.
Publication 1746-6.16 – January 1999
5-5
Chapter 5
Accessing Files to Configure I/O
Notes:
5-6
Publication 1746-6.16 – January 1999
Chapter
6
Channel Configuration, Data, and Status
This chapter examines channel configuration and status words, and explains
how you use them. It gives you information about how to:
• configure a channel
• check a channel’s status
Channel Configuration
Channel configuration words appear in the SLC controller’s output image
table as shown below. Words 0-3 correspond to module channels 0-3.
Words 4-7 are not used.
After module installation, you must configure each channel to establish the
way the channel operates (e.g., thermocouple type, temperature units, etc.).
You configure the channel by setting bits in the configuration word using
your programmer. We present bit descriptions next. (For information on
addressing. using your software, and programming, refer to chapters 4, 5
and 7, respectively.)
SLC Output Image (Configuration) Words
CH 0 Configuration Word
O:e.0
15
14
13
12
11
10
9
8
7
6
5
4
3
5
4
3
5
4
5
4
2
1
0
2
1
0
3
2
1
0
3
2
1
0
CH 1 Configuration Word
O:e.1
15
14
13
12
11
10
9
15
14
13
12
11
10
9
8
7
6
CH 2 Configuration Word
O:e.2
8
7
6
CH 3 Configuration Word
O:e.3
15
14
13
12
11
10
9
8
7
6
O:e.4
.
.
Not Used
O:e.7
e = slot number of the module
The configuration word default settings are all zero. Next, we describe
how you set configuration bits of a channel configuration word to set up
the following channel parameters:
•
•
•
•
•
Publication 1746-6.16 – January 1999
type of thermocouple or mV input
data format such as engineering units, counts, or scaled for PID
how the channel should respond to a detected open input circuit
temperature units in oC or oF
whether the channel is enabled or disabled
6–1
Chapter 6
Channel Configuration, Data, and Status
Channel Configuration Word (O:e.0 through O:e.3) – Bit Descriptions
Bit(s)
ts
0–3
4 5
4,
6, 7
ÉÉÉ
ÉÉÉ
ÉÉÉ
ÉÉÉ
ÉÉÉ
ÉÉÉ
ÉÉÉ
ÉÉÉ
ÉÉÉ
ÉÉÉ
ÉÉÉ
ÉÉÉ
ÉÉÉÉÉ
ÉÉÉ
ÉÉÉÉÉ
ÉÉÉ
ÉÉÉ
ÉÉÉÉÉ
ÉÉÉ
ÉÉÉ
ÉÉÉ
ÉÉÉ
ÉÉÉ
ÉÉÉ
ÉÉÉ
ÉÉÉ
ÉÉÉ
ÉÉÉ
ÉÉÉÉÉ
ÉÉÉ
ÉÉÉ
ÉÉÉÉÉ
ÉÉÉ
ÉÉÉ
ÉÉÉ
ÉÉÉ
ÉÉÉ
ÉÉÉ
ÉÉÉ
ÉÉÉ
ÉÉÉ
ÉÉÉ
ÉÉÉ
ÉÉÉ
Define
e ne
To Select
elect
Input
T
Type
pe
TC Type J
TC Type K
TC Type T
TC Type E
TC Type R
TC Type S
TC Type B
TC Type N
"50mV
"100mV
TC Type C
TC Type D
Invalid
Invalid
Invalid
CJC Temp.
Data
Format
Open
Circuit
rcu t
Mode
Set these bits in the Channel Configuration Word
15-12
11
10
9
Units
oF,
F oC
9, 10
Unused
11
12-15
5
4
0 0
Engr. Units x10
0 1
Scaled-for-PID
1 0
Counts
1 1
Zero
0 0
Upscale
0 1
ÉÉ
ÉÉ
ÉÉ
ÉÉ
Downscale
1 0
1 1
Degrees C
0
Degrees F
Unused
2
1
0
0
0
0
0
0
0
0
0
1
1
1
1
1
1
1
1
0
0
0
0
1
1
1
1
0
0
0
0
1
1
1
1
0
0
1
1
0
0
1
1
0
0
1
1
0
0
1
1
0
1
0
1
0
1
0
1
0
1
0
1
0
1
0
1
Description
escr pt on
on ure tthee cchannel
annel for
or tthee input
nput ttype
pe connecte
t.
Configure
connected to it.
Valid
signalss of
V i iinputs
p s are
re thermocouples
er c p es and analog iinput
p si
±50mV and ±100mV. You can configure the channel to
re thee cold-junction
c - c i (CJC)
C C temperature.
e per re. When
e reading
re i
read
thee C
CJC
C temperature,
e per re thee cchannel
e iignores
res thee pphysical
sic iinput
p
si
signal.
.
1
0
0
Select the channel data format from:
Engineering units (EU) x1 or x10
Forr EU x1,
1 values
v es are
re in
i 0.1
.1 degrees
e rees orr 0.01mV.
. 1 V.
For EU x10, values are in whole oC or oF or 0.1mV.
Scaled-for-PID
cale - or-PI (value
alue iss tthee same for
or an
any input
nput ttype)
pe
Proportional input signal range is scaled to 0-16,383 counts.
Proportional counts (value is same for any input type)
Proportional input signal range is scaled to ±32,767 counts.
For more information, refer to next page.
Select module response to a detected open circuit from:
Zero to force the channel data word to zero.
Upscale to force the channel data word to full scale.
Downscale to force channel data word to low scale.
Important: A bit selection or 1 1 is invalid.
For an open CJC thermistor, mV channels are not affected.
Important: The
T e modulee requires
re ires 500
5 msec
sec orr onee modulee
update to flag the error while it ramps the channel input.
Select °C/°F for thermal inputs. Ignored for mV inputs.
.1° an over-range
ver-r e error
err r
Important: Forr EU x11 and °°F (0.1°F),
will occur above 3276.7°F (cannot exceed 32767 counts).
These bits must be zero for a valid configuration.
0000
0000
Selected Configuration Word
0
Channel On
1
Unused
3
Disable unused channels for faster response.
When set, the module configures the channel and reads the
channel input before setting bit 11 in the status word.
If you change the configuration word, the status word must
re ec thee change
reflect
c
e before
be re new
ew data is valid.
v i . If you clear
c e r thee
configuration word, the module clears channel and status
words. For a new configuration word, channel data and
status words remain cleared until the module sets this bit
(11) in the status word.
These bits must be zero for a valid configuration.
Channel Off
Enter Your Bit Selections >>
6–2
6
Engr. Units x1
Chnl
Enable
Unused
7
ÉÉ
ÉÉ
ÉÉ
ÉÉ
ÉÉ
ÉÉ
ÉÉ
ÉÉ
ÉÉ
ÉÉ
ÉÉ
ÉÉ
Invalid
8
8
Publication 1746-6.16 – January 1999
Chapter 6
Channel Configuration, Data, and Status
Selecting the Correct Data Format
Using Scaled-for-PID and Proportional Counts
To provide the highest display resolution, select Scaled-for-PID or
Proportional Counts. To use either one, you may have to convert channel
data to/from Engineering Units, manually or logically.
The following examples show you how to do this. You must obtain the
minimum (SLOW) and maximum (SHIGH) values of the temperature or
millivolt range for the channel’s input type, and use them in your
computations. We present these values in the section Using Channel Data
Words (page 6-5) in the table Format for Channel Data Word.
Scaling Examples: Converting Between Units
Convert from Scaled-for-PID to Equivalent Engineering Units in oC
Equation:
Engr Units Equivalent = SLOW + [ (SHIGH – SLOW) x (Scaled-for-PID value displayed / 16384) ]
Assume type J input type, scaled-for-PID, channel data = 3421.
From Channel Data Word Format table, SLOW = –210°C and SHIGH = 760°C.
Solution:
Engr Units Equivalent = –210°C + [ (760°C – (–210°C) ) x (3421 / 16384) ] = –7.46°C.
Convert from Engineering Units in oC to Equivalent Scaled-for-PID Count
Equation:
Scaled-for-PID Equivalent = 16384 x [ (Engineering Units desired – SLOW) / ( SHIGH – SLOW ) ]
Assume type J input type, scaled-for-PID, desired channel temp. = 344°C.
From Channel Data Word Format table, SLOW = –210°C and SHIGH = 760°C.
Solution:
Scaled-for-PID Equivalent = 16384 x [ (344°C – (–210°C) ) / ( 760°C – (–210°C ) ) ] = 9357.
Convert from Proportional Counts to Equivalent Engineering Units in oF
Equation:
Engr Units Equivalent = SLOW + { (SHIGH – SLOW) x [ ( Proportional Counts value displayed + 32768) / 65536 ] }
Assume type E input type, proportional counts, channel data = 21567 counts.
From Channel Data Word Format table, SLOW = –454°F and SHIGH = 1832°F.
Solution:
Engr Units Equivalent = –454°F + { [1832°F – (–454°F) ] x [ ( 21567 + 32768) / 65536 ] } = 1441.3°F
Convert from Engineering Units in oF to Equivalent Proportional Counts
Equation:
Proportional Counts Equivalent = { 65536 x [ ( Engineering Units desired – SLOW ) / ( SHIGH – SLOW ) ] } – 32768
Assume type E input type, proportional counts, desired channel temp. = 1000°F.
From Channel Data Word Format table, SLOW = –454°F and SHIGH = 1832°F.
Solution:
Proportional Counts Equivalent = { 65536 x [ ( 1000°F– (–454°F) ) / (1832°F– (–454°F ) ) ] } – 32768 = 8916 counts.
Publication 1746-6.16 – January 1999
6–3
Chapter 6
Channel Configuration, Data, and Status
Channel Configuration
Procedure
Use this procedure once for each channel to set configuration bits that
determine channel operation. Use the table of bit descriptions and the blank
configuration worksheet in Appendix B. Copy it as needed to write down
configuration selections of all your channels.
1. Determine the input device type (thermocouple or mV) for a channel and
enter its respective 4-digit binary code in bit field 0-3.
2. Select the data format for the data word. Your selection determines how
the analog input from the A/D converter will be expressed in the data
word. Enter your 2-digit binary code in bit field 4-5.
3. Determine the desired change to the channel data word when the module
detects an open input circuit. Enter the 2-digit binary code in bit field 6-7.
4. If the channel is configured for thermocouple inputs, determine if you want
channel data in degrees Fahrenheit or Celsius, and set bit 8 accordingly.
Important: If the channel is configured for a mV analog sensor, zero bit 8.
5. Enable the channel by setting bit 11. (Default disables the channel.)
6. Ensure that bits 9, 10, and 12-15 are zero.
7. Repeat steps 1-6 for each channel used.
8. After entering your ladder logic to transfer data to the module, switch the
SLC controller to run mode to download channel configurations.
Using Channel Data Words
Thermocouple or millivolt input data reside in I:e.0-I:e.3 of the SLC
controller’s input image file (where e is the slot number assigned to the
module). The values depend on the input type and data format that you
select. When an input channel is disabled, its data word is reset (0).
SLC Controller’s Input Image File (Data Word)
CH 0 Channel Data Word
I:e.0
15
14
13
12
11
10
9
15
14
13
12
11
10
9
7
6
5
4
3
5
4
3
5
4
5
4
2
1
0
2
1
0
3
2
1
0
3
2
1
0
CH 1 Channel Data Word
I:e.1
8
7
6
CH 2 Channel Data Word
I:e.2
15
14
13
12
11
10
9
8
7
6
CH 3 Channel Data Word
I:e.3
15
6–4
8
14
13
12
11
10
9
8
7
6
Publication 1746-6.16 – January 1999
Chapter 6
Channel Configuration, Data, and Status
Format of a Channel Data Word
Data Format
Input T
Type
pe
Engineering Units x 10
° Celsius
° Fahrenheit
Engineering Units x 1
° Celsius
° Fahrenheit
C
0 to 2317
32 to 4201
0 to 23170
D
0 to 2317
32 to 4201
Scaled-for-PID
cale - or-PI
Proportional
Counts
320 to 32767
0 to 16383
–32768 to +32767
0 to 23170
320 to 32767
0 to 16383
–32768 to +32767
J
–210 to 760
–346 to 1400
–2100 to 7600
–3460 to 14000
0 to 16383
–32768 to 32767
K
–270 to 1370
–454 to 2498
–2700 to 13700
–4540 to 24980
0 to 16383
–32768 to 32767
T
–270 to 400
–454 to 752
–2700 to 4000
–4540 to 7520
0 to 16383
–32768 to 32767
E
–270 to 1000
–454 to 1832
–2700 to 10000
–4540 to 18320
0 to 16383
–32768 to 32767
R
0 to 1768
32 to 3214
0 to 17680
320 to 32140
0 to 16383
–32768 to 32767
S
0 to 1768
32 to 3214
0 to 17680
320 to 32140
0 to 16383
–32768 to 32767
B
300 to 1820
572 to 3308
3000 to 18200
5720 to 32767➀
0 to 16383
–32768 to 32767
N
0 to 1300
32 to 2372
0 to 13000
320 to 23720
0 to 16383
–32768 to 32767
±50 mV
–50 to 50➁
–50 to 50➁
500➁
0 to 16383
–32768 to 32767
10000➁
0 to 16383
–32768 to 32767
0 to 16383
–32768 to 32767
±100 mV
–1000 to
CJC Sensor
1000➁
0 to 85
–1000 to
–500 to
1000➁
32 to 185
–10000 to
500➁
10000➁
–500 to
–10000 to
0 to 850
32 to 1850
➀ Type B, C, and D thermocouples cannot be represented in engineering units x 1 (°F) above 3276.7°F. Software treats it as an over-range error.
➁ When millivolts are selected, the temperature setting is ignored. Analog input data is the same for either °C or °F selection.
Resolution of a Channel Data Word
Data Format
Input T
Type
pe
Engineering Units x 10
° Celsius
° Fahrenheit
Engineering Units x 1
° Celsius
° Fahrenheit
Scaled-for-PID
° Celsius
° Fahrenheit
Proportional Counts
° Celsius
° Fahrenheit
C
1°C/step
1°F/step
0.1°C/step
0.1°F/step
0.1414°C/step
0.2564°C/step
0.0353°C/step
0.0641°C/step
D
1°C/step
1°F/step
0.1°C/step
0.1°F/step
0.1414°C/step
0.2564°C/step
0.0353°C/step
0.0641°C/step
J
1°C/step
1°F/step
0.1°C/step
0.1°F/step
0.0592°C/step
0.1066°F/step
0.0148°C/step
0.0266°F/step
K
1°C/step
1°F/step
0.1°C/step
0.1°F/step
0.1001°C/step
0.1802°F/step
0.0250°C/step
0.0450°F/step
T
1°C/step
1°F/step
0.1°C/step
0.1°F/step
0.0409°C/step
0.0736°F/step
0.0102 °C/step
0.0184°F/step
E
1°C/step
1°F/step
0.1°C/step
0.1°F/step
0.0775°C/step
0.1395°F/step
0.0194°C/step
0.0349°F/step
R
1°C/step
1°F/step
0.1°C/step
0.1°F/step
0.1079°C/step
0.1942°F/step
0.0270°C/step
0.0486°F/step
S
1°C/step
1°F/step
0.1°C/step
0.1°F/step
0.1079°C/step
0.1942°F/step
0.0270°C/step
0.0486°F/step
B
1°C/step
1°F/step
0.1°C/step
0.1°F/step
0.0928°C/step
0.1670°F/step
0.0232°C/step
0.0417°F/step
N
1°C/step
1°F/step
0.1°C/step
0.1°F/step
0.0793°C/step
0.1428°F/step
0.0198°C/step
0.0357°F/step
±50 mV➀
0.1mV/step
0.1mV/step
0.01mV/step
0.01mV/step
6.104 mV/step
6.104 mV/step
3.40 mV/step
3.40 mV/step
mV➀
0.1mV/step
0.1mV/step
0.01mV/step
0.01mV/step
13.6 mV/step
13.6 mV/step
3.40 mV/step
3.40 mV/step
1°C/step
1°F/step
0.1°C/step
0.1°F/step
0.0052°C/step
0.0093°F/step
0.0013°C/step
0.0023°F/step
±100
CJC Sensor
➀ When millivolts are selected, the temperature setting is ignored. Analog input data is the same for either °C or °F selection.
Publication 1746-6.16 – January 1999
6–5
Chapter 6
Channel Configuration, Data, and Status
Using Channel Status Words
Channel status words are stored in the SLC controller’s input image file
at addresses I:e.4-I:e.7 (where e is the slot number assigned to the module).
Status words 4-7 correspond to and reflect the configuration of channels 0-3
(O:e.0-O:e.3).
Whenever a channel is disabled (O:e.x/11 = 0), its corresponding status word
is zero. This condition tells you that input data contained in the channel data
word is invalid and should be ignored.
Important: The status word from a disabled channel is always zero.
The status word of an enabled channel indicates the following status:
• bits 0-10 reflect the channel configuration
• bit 11 indicates whether the channel is enabled or disabled (configuration)
• bits 12-15 indicate detected faults should they occur
We present status words as they appear in the input image table at I:e.4-I:e.7.
Module Input Image (Status Words)
CH 0 Channel Status Word
I:e.4
15
14
13
12
11
10
9
15
14
13
12
11
10
9
8
7
6
4
3
5
4
3
5
4
5
4
2
1
0
2
1
0
3
2
1
0
3
2
1
0
CH 1 Channel Status Word
I:e.5
8
7
6
CH 2 Channel Status Word
I:e.6
15
14
13
12
11
10
9
8
7
6
CH 3 Channel Status Word
I:e.7
15
14
13
12
11
10
9
8
7
6
1 = detected open input condition
1 = detected under-range input value
1 = detected over-range input value
1 = detected invalid channel configuration
6–6
5
reflect the configuration word
Publication 1746-6.16 – January 1999
Chapter 6
Channel Configuration, Data, and Status
Channel Status Word, Channels 0-3 (I:e.4 through I:e.7) – Bit Definitions
Bit(s)
ts
0–3
Reflect/
Indicate
In cate
Input
Type
T
pe
Configured
or
for
With this bit code
15
14
13
12
11
10
9
TC Type J
TC Type K
TC Type T
TC Type E
TC Type R
TC Type S
TC Type B
TC Type N
"50mV
"100mV
TC Type C
TC Type D
Invalid
Invalid
Invalid
CJC Temp.
Engr. Units x1
Engr. Units x10
Scaled-for-PID
Counts
Zero
Upscale
Downscale
Invalid
8
7
6
5
ÉÉÉÉÉ
ÉÉÉÉÉ
ÉÉÉÉÉ
4 5
4,
Data
Format
6, 7
Open
Input
Mode
8
oF,
F oC
9, 10
Unused
11
Chnl
Enable
Units
0
0
1
1
0
0
1
1
0
Degrees F
1
Unused
0
Channel Off
0
Channel On
1
Di
Diagnostics
s ics
13
Under
an e
Range
Di
Diagnostics
s ics
14
Over
an e
Range
Di
Diagnostics
s ics
1
15
Invalid
on
Config
Di
Diagnostics
s ics
Publication 1746-6.16 – January 1999
0
1
0
1
0
1
0
1
0
1
0
1
ÉÉ
ÉÉ
ÉÉ
ÉÉ
Degrees C
Open
Input
Reflects Configuration Bits 0–11, and
In
cates Detected
etecte Faults in
n Bits
ts 12-1
Indicates
12-15
3
2
1
0
0
0
0
0
0
0
0
0
1
1
1
1
1
1
1
1
0
0
0
0
1
1
1
1
0
0
0
0
1
1
1
1
0
0
1
1
0
0
1
1
0
0
1
1
0
0
1
1
0
1
0
1
0
1 Reflects the type of channel input.
0
1
0
1
0
1
0 The module faults when it
e ec s an iinvalid
v i cconfiguration.
i r i .
1 detects
0
1
ÉÉ
ÉÉ
ÉÉ
ÉÉ
ÉÉ
ÉÉ
ÉÉ
ÉÉ
ÉÉ
ÉÉ
ÉÉ
ÉÉ
ÉÉÉÉÉ
ÉÉÉÉÉ
12
4
0
0
1
0
1
Reflects
e ec s thee type
pe of data format.
r .
Reflects module response to a detected
pe iinput
p circ
i p types
pes
open
circuiti (forr all input
i c i CJC
including
C C thermistor).
er is r .
The module faults when it detects an
invalid configuration.
Reflects
e ec s temperature
e per re units.
i s.
Faults when it detects a non–zero value.
Reflects enabled/disabled channel status.
Status word of a disabled channel is zero.
C
Channel
e data and sstatuss words
w r s remain
re i
cleared until the module sets this bit. in
response to a new configuration word.
Condition not detected.
Detected open input.
Condition not detected.
Detected under-range input.
Condition not detected.
Detected over-range input.
Condition not detected.
Detected invalid configuration.
6–7
Chapter 6
Channel Configuration, Data, and Status
Detected Faults Indicated by Bits 12-15
When the module detects any of the conditions described for bits 12-15, it:
• sets the corresponding bit
• blinks the status LED on the front panel for the channel having the fault
The module is designed to detect the following fault conditions:
Open-circuit Detection (Bit 12)
The module tests all enabled channels for an open-circuit condition each time
it scans its inputs. Possible causes of an open circuit include:
• broken thermocouple or CJC thermistor
• thermocouple or CJC thermistor wire cut or disconnected
Out-Of-Range Detection (Bit 13 for under range, bit 14 for over range)
The module tests all enabled channels for an out-of-range condition each
time it scans its inputs. Possible causes of an out-of-range condition include:
• the temperature is too hot or too cold for the thermocouple being used
• a type B, C, or D thermocouple may be registering a °F value in EU x1
beyond the range allowed by the SLC processor (beyond 32,767) for the
data word
• a CJC thermistor may be damaged or the temperature within the cabinet
containing the module may be outside the CJC thermistor range limits
Invalid Channel Configuration (Bit 15)
The module sets this fault bit when it detects the following invalid configurations:
• configuration bits 0-3: invalid input type = 1 1 0 0 , or 1 1 0 1, or 1 1 1 0
• configuration bits 6, 7: invalid code for open circuit mode = 1 1
• configuration bits 9-10, and 12-15: invalid non-zero bit setting
6–8
Publication 1746-6.16 – January 1999
Chapter
7
Ladder Programming Examples
Earlier chapters explained how configuration words define channel
operation. This chapter shows examples of ladder logic that you write to:
• load configurations into the output image file to be scanned to the module
• change the configuration of a channel
• verify that the change in configuration occurred
• process a channel input value with a PID instruction
• monitor channel status
We start with some basic concepts of the SLC processor.
Processor Basics
For the examples in this chapter, we have assigned the module to slot 3 and
have addressed ladder logic files in the SLC processor as follows:
• configurations are stored in words 0-3 of integer file #N10
• configurations are scanned to the module from output image words
O:3.0-O:3.3
• channel data words and channel status words are scanned from the
module into input image words I:3.0-I:3.3 and I:3.4-I:3.7, respectively
During the program scan, the SLC processor follows the ladder logic
instructions that you create to perform such functions as:
• copy or move configurations from integer file #N10 to the output image
file to be scanned to the module during the next I/O scan
• verify a change in configuration by comparing the channel status word
with the channel configuration word for equality
• examine channel status bits to see if the module flagged a fault condition
• autocalibrate a channel by cycling the channel enable bit on and off
During the I/O scan, the SLC processor scans configuration words from its
output image file to the module, and scans data and status words from the
module to its input image file. The SLC processor scans its I/O following
each program scan.
Publication 1746-6.16 – January 1999
7–1
Chapter 7
Ladder Programming Examples
We repeat the configuration word because it is used often in the examples.
ÉÉÉÉÉ
ÉÉÉÉÉ
Configuration Word
15 14 13 12
11
Not Used
10 9
Channel Not Used
Enable
0 = Disable
1 = Enable
8
7
6
5
4
3
0
0
Load Channel Configurations
for Transfer to the Module
0
1
0
1
Temp
Units
Response to Data
Open Circuit Format
Type
of Input
0 = oC
1 = oF
0 0 = zero
0 1 = FS
1 0 = LS
0 0 0 0 = Type J
0 0 0 1 = Type K
0 0 1 0 = Type T
0 0 1 1 = Type E
0 1 0 0 = Type R
0 1 0 1 = Type S
0
0
1
1
0=
1=
0=
1=
EU x1
EU x10
Scaled PID
Prop Counts
Example Configuration Word with These Parameters:
channel enabled, oC, zero for open circuit, EU x10, Type K thermocouple
0
2
0
1
0
0
0
1
0
0
0
0
0 1 1 0 = Type B
0 1 1 1 = Type N
1 0 0 0 = "50 mV
1 0 0 1 = "100 mV
1 0 1 0 = Type C
1 0 1 1 = Type D
1
This example shows you how to set configuration bits and transfer configuration
data of all four channels to the module with a single File Copy instruction.
Procedure
1. Using the memory map function, create integer file N10 with four
elements (N10:0 through N10:3).
2. Using the APS software data monitor function, enter configuration
parameters for all four thermocouple channels into integer file #N10.
address
N10:0
N10:1
N10:2
N10:3
15
0000
0000
0000
0000
data
1001 0001
1001 0001
1001 0001
1001 0001
0
0001
0001
0001
0001
1
Press a key or enter value
N10:3/0 =1
offline
no forces
address
binary data
15
data
decimal addr
CHANGE
RADIX
SPECIFY
ADDRESS
NEXT
FILE
PREV
FILE
F1
F5
F7
F8
0
File EXMPL
3. Program a rung of ladder logic to copy the integer file #N10 into output
image file O:3.0-O:3.3.
First Pass Bit
Initialize NT4
S:1
] [
15
COP
COPY FILE
Source
#N10:0
Dest
#O:3.0
Length
4
On power up, bit S:1/15 is set for the first program scan. It enables the Copy instruction to
load configurations into the output image file for transfer to the module in the next I/O scan.
7–2
Publication 1746-6.16 – January 1999
Chapter 7
Ladder Programming Examples
Change a
Channel Configuration
The following example explains how to change the channel configuration
word when the channel is currently enabled.
Example: Change the channel configuration word to read the temperature is
inside the control cabinet as read by the CJC thermistor. Then restore the
original channel configuration.
We use #N10:4 to store the new configuration word.
Consider input I:1.0/0 as a pushbutton switch for changing configurations.
The one-shot instruction OSR enables the Copy instruction once no matter
how long the operator presses the pushbutton switch.
Program
Rung 2:0
Set up all four channels
COP
COPY FILE
Source
#N10:0
Dest
#O:3.0
Length
4
S:1
] [
15
Rung 2:1
Set channel 2 to CJC
I:1.0
] [
0
Rung 2:2
MOV
B3
[OSR]
0
MOVE
Source
N10:4
Dest
O:3.2
Set channel 2 back to type K
I:1.0
]/[
0
MOV
B3
[OSR]
1
MOVE
Source
N10:2
Dest
O:3.2
Rung 2:3
END
Data Table
address
N10:0
N10:1
N10:2
15
data
0
0000 1001 0001 0001
0000 1001 0001 0001
0000 1001 0001 0001
address
N10:3
N10:4
15
data
0
0000 1001 0001 0001
0000 1001 0001 1111
Important: While the module changes the channel configuration, it does not
monitor inputs to any channel. For the delay in reading inputs,
refer to Channel Update Time in chapter 4.
Publication 1746-6.16 – January 1999
7–3
Chapter 7
Ladder Programming Examples
Verify Changes to a
Channel Configuration
When changing a channel configuration, there is always a delay until the
ladder logic reads the new data word based on the new configuration.
Therefore, it is important to verify that a the module successfully stored the
new channel configuration word. The following example explains how to
verify a change to a channel configuration.
Example: Change the channel configuration word and verify the change by
comparing the resulting status word with the configuration word for equality.
We do this by adding rung 2:3 to the rungs in the previous example.
Program
Rung 2:0
Set up all four channels.
COP
COPY FILE
Source
#N10:0
Dest
#O:3.0
Length
4
S:1
] [
15
Rung 2:1
Set channel 2 to CJC.
I:1.0
] [
0
Rung 2:2
MOVE
Source
N10:4
Dest
O:3.2
Set channel 2 back to type K.
I:1.0
]/[
0
Rung 2:3
MOV
B3
[OSR]
0
MOV
B3
[OSR]
1
Check that the configuration written to channel 2 is
being echoed back in channel 2’s status word.
EQU
EQUAL
Source A
I:3.6
Source B
O:3.2
MOVE
Source
N10:2
Dest
O:3.2
Data valid
B3
( )
3
Rung 2:4
END
Data Table
address
N10:0
N10:1
N10:2
7–4
15
data
0
0000 1001 0001 0001
0000 1001 0001 0001
0000 1001 0001 0001
address
N10:3
N10:4
15
data
0
0000 1001 0001 0001
0000 1001 0001 1111
Publication 1746-6.16 – January 1999
Chapter 7
Ladder Programming Examples
Process a Channel Input
with the PID Instruction
The module was designed to input a channel directly to a PID instruction of
an SLC 5/02t or later processor without the need of an intermediate scale
operation.
Example: Use channel data as the process variable for the PID instruction.
1. Select scaled-for-PID as the data type in the channel configuration word.
2. Specify channel data word as the process variable for the PID instruction.
In this example, the value 2081 is the numeric equivalent of configuration
word N10:0 for channel 0. It is configured for a type K thermocouple,
scaled-for-PID, zero the signal for an open input, oC, and channel enabled.
Program
Rung 2:0
Initialize Channel 0
First Pass Bit
MOV
MOVE
Source
S:1
] [
15
Dest
Rung 2:1
N10:0
2081
O:3.0
0
Channel 0
Status
PID
I:3.4
] [
11
PID
Control
Process
Control
Control
Block
N11:0
Variable
I:3.0
Variable
N11:23
Block Length
23
Rung 2:2
SCL
SCALE
Source
N11:23
Rate [/10000]
Offset
Dest
Rate and Offset values depend on your application. The Destination will typically be an analog output channel.
For specific examples of the SCL instruction, refer to the APS User Manual or Analog I/O Modules User Manual.
Rung 2:3
END
Data Table
address
N10:0
15
data
0
0000 1000 0010 0001
address
15
data
0
(numerical equivalent = 2081)
Publication 1746-6.16 – January 1999
7–5
Chapter 7
Ladder Programming Examples
Monitor Channel Status Bits
This example shows how you could monitor the open-circuit error bit of each
channel and set an alarm bit if the module detects an open input. An opencircuit error can occur if a thermocouple or CJC thermistor wire breaks or
becomes disconnected from the terminal block.
In this example, we monitor the channel enable bit (bit 11) and the
open-input bit (bit 12) in channel status words I:3.4-I:3.7, and use output
image bits O:2.0/0-3 as alarm bits.
Important: If a CJC thermistor is not installed or is damaged, all four
alarms are set, and all four channel LEDs blink.
Program
Rung 2:0
First Pass Bit
Initialize NT4
S:1
] [
15
COP
COPY FILE
Source
#N10:0
Dest
#O:3.0
Length
4
Rung 2:1
Channel 0
Status
I:3.4
] [
11
Channel 0
Open
I:3.4
] [
12
Channel 0
Alarm
O:2.0
( )
0
Rung 2:2
Channel 1
Status
I:3.5
] [
11
Channel 1
Open
I:3.5
] [
12
Channel 1
Alarm
O:2.0
( )
1
Rung 2:3
Channel 2
Status
I:3.6
] [
11
Channel 2
Open
I:3.6
] [
12
Channel 2
Alarm
O:2.0
( )
2
Rung 2:4
Channel 3
Status
I:3.7
] [
11
Channel 3
Open
I:3.7
] [
12
Channel 3
Alarm
O:2.0
( )
3
Rung 2:5
END
Data Table
address
N10:0
N10:1
N10:2
7–6
15
data
0
0000 1001 0001 0001
0000 1001 0001 0001
0000 1001 0001 0001
address
N10:3
15
data
0
0000 1001 0001 0001
Publication 1746-6.16 – January 1999
Chapter
8
Module Diagnostics and Troubleshooting
This chapter describes troubleshooting with channel-status and module-status
LEDs. It explains the types of conditions that might cause the module to flag
an error, and suggests what corrective action you could take. Topics include:
• module and channel diagnostics
• LED indicators
• troubleshooting flowchart
• replacement parts
• contacting Allen-Bradley
Module and Channel
Diagnostics
The module operates at two levels:
• module level
• channel level
Module level operation includes functions such as power-up, configuration,
and communication with the SLC processor. ON indicates the module is OK.
OFF indicates a fault.
Channel level operation includes functions such as data conversion and opencircuit detection. ON indicates the channel is OK. Blinking indicates a fault.
The module performs internal diagnostics at both levels, and immediately
indicates detected error conditions with either of its status LEDs. When a
status LED is continuously ON, the status is OK.
Module Diagnostics at Power-up
At module power-up, the module performs a series of internal diagnostic
tests. If the module detects a failure, its module status LED remains off.
Channel Diagnostics
When a channel is enabled, the module checks for a valid configuration.
Then on each scan of its inputs, the module checks for out-of-range and
open-circuit fault conditions of its inputs including the CJC thermistor.
When the module detects a failure of any channel diagnostic test, it causes
the channel status LED to blink and sets the corresponding channel fault bit.
(bits 12-15 of the channel status word). Channel fault bits and LEDs are
self-clearing when fault conditions are corrected.
Important: If you clear the channel enable bit, channel status bits are reset.
Publication 1746-6.16 – January 1999
8–1
Chapter 8
Module Diagnostics and Troubleshooting
LED Indicators
The module has five LEDs:
• four channel-status LEDs, numbered to correspond with each channel
• one module-status LED
INPUT
ISOLATED
CHANNEL
STATUS
0
2
1
3
LEDs for Channels 0-3
MODULE STATUS
LED for Module Status
THERMOCOUPLE/mV
LED Troubleshooting Tables
Module-status LED
If Module
Status LED is:
On
Off
Then:
Take This Corrective Action:
The module is OK.
No action required.
The module is turned off,
or it detected a module fault.
Cycle power. If the condition persists, call your local
distributor or Allen-Bradley customer service for assistance.
Module-status and Channel-status LEDs
If Module
Status LED is:
On
8–2
And Channel
Status LED is:
On
Then:
Take This Corrective Action:
The channel is enabled.
No action required.
Blinking
The module detected:
open-circuit
pe -circ i condition
c ii
under-range condition
ver-r e ccondition
ii
over-range
channel configuration error
Examine error bits in the status word
if bit 12 = 1, the input has an open circuit
if bit 13 = 1, the input value is under
range
iif bi
p vvaluee is over
ver rrangee
bit 14 = 11, thee iinput
if bit 15 = 1, the configuration is invalid
O
Off
The module is in power up,
or the channel is disabled.
N action
No
c i re
required.
ire .
Publication 1746-6.16 – January 1999
Chapter 8
Module Diagnostics and Troubleshooting
Channel-status LEDs (Green)
The channel-status LED operates with status bits in the channel status word
to indicate the following faults detected by the module:
• invalid channel configuration
• an open-circuit input
• out-of-range errors
When the module detects any of the following fault conditions, it causes the
channel-status LED to blink and sets the corresponding fault bit in the
channel status word. Channel fault bits (bits 12-15) and channel-status
LEDs are self-clearing when fault conditions are corrected.
Open-circuit Detection (Bit 12)
The module tests all enabled channels for an open-circuit condition each time
it scans its inputs. Possible causes of an open circuit include:
• broken thermocouple or CJC thermistor
• thermocouple or CJC thermistor wire cut or disconnected
Out-Of-Range Detection (Bit 13 for under range, bit 14 for over range)
The module tests all enabled channels for an out-of-range condition each
time it scans its inputs. Possible causes of an out-of-range condition include:
• the temperature is too hot or too cold for the thermocouple being used
• a type B thermocouple may be registering a °F value in EU x1 beyond the
range allowed by the SLC processor (beyond 32,767) for the data word
• a CJC thermistor may be damaged or the temperature within the cabinet
containing the module may be outside the CJC thermistor range limits
Invalid Channel Configuration (Bit 15)
The module sets this fault bit when it detects any of the following invalid
configurations:
• configuration bits 0-3: invalid input type = 1 1 0 0 , or 1 1 0 1, or 1 1 1 0
• configuration bits 6, 7: invalid code for open circuit mode = 1 1
• configuration bits 9-10, and 12-15: invalid non-zero bit setting
Module Status LED (Green)
The module-status LED indicates when the module detects a non-recoverable
fault at power up or during operation. For this type of fault, the module:
• no longer communicates with the SLC processor
• disables all channels
• clears all data and status words
A module failure is non-recoverable and requires the assistance of your local
distributor or Allen-Bradley Support Services (see Preface).
Publication 1746-6.16 – January 1999
8–3
Chapter 8
Module Diagnostics and Troubleshooting
Troubleshooting Flowchart
Check LEDs
on module.
Module
Status LED off
Module
Status LED on
Module fault
condition
Normal module
operation
Check to see
that module is
seated properly
in chassis.
Cycle power.
Channel
Status LED(s)
blinking
Fault
condition
Are
faulted channel(s)
configured for mV or
thermocouple
input?
End
Channel
Status LED
off.
Channel
Status LED
on.
Channel is
not enabled.
Channel enabled
and working
properly
Enable channel if
desired by setting
channel config.
word (bit 11 = 1).
Retry.
mV
thermocouple
End
Is more than one
LED blinking?
No
Yes
CJC fault
has occurred
Check that wiring is secure
at both CJC assemblies and
that the temperature within
the enclosure is in the range
limits of the CJC sensor.
(Refer to page 1-1.) Retry.
Check channel
status word
bits 12–15.
Bit 15
set (1)
Bit 14
set (1)
Is problem
corrected?
No
Yes
End
Yes
Is problem
corrected?
No
Bit 13
set (1)
Contact your
local distributor
or
Allen–Bradley.
8–4
Contact your
local distributor
or
Allen–Bradley.
Bit 12
set (1)
Configuration error. Check
configuration word bits 0-3
for valid input type
configuration as well as bits
6 and 7 for valid
configuration setting.
Retry.
Over-range condition
exists. The input signal is
greater than the high scale
limit for the channel or the
CJC connections. Correct
and Retry.
Under-range condition
exists. The input signal is
less than the low scale limit
for the channel or the CJC
connections. Correct and
Retry.
An open-circuit condition is
present. Check channel and
CJC wiring for open or loose
connections. Retry.
Yes
Is problem
corrected?
No
Contact your
local distributor
or
Allen–Bradley.
Publication 1746-6.16 – January 1999
Chapter 8
Module Diagnostics and Troubleshooting
Replacement Parts
The module has the following replaceable parts:
Part
Contacting Allen-Bradley
Publication 1746-6.16 – January 1999
Part Number
Replacement Terminal Block
1746-RT32
Replacement Terminal Cover
1746-R13 Series B
1746-INT4 User Manual
1746-6.16
If you need to contact Allen-Bradley for assistance, please have the
following information available when you call:
• a clear statement of the problem including a description of what the
system is doing, LED status, and bit status of I/O image words (channel
configuration and status) for the module
• fault code if the SLC processor is faulted
• processor type and firmware (FRN) number from label on processor
• a list of things you have already tried to remedy the problem
• hardware types in the system including I/O modules and chassis
8–5
Chapter 8
Module Diagnostics and Troubleshooting
Notes:
8–6
Publication 1746-6.16 – January 1999
Chapter
9
Application Programming Examples
This chapter provides two application examples to help you use the module:
• basic example
• supplementary example
The basic example lets you display a temperature.
The supplementary example lets you manually select the display of
temperature in °C or °F.
Basic Example
(to display a temperature)
Application Setup
This example lets you display the temperature of a bath °F on an LED
display device. The display device requires BCD data, so the program must
convert the temperature reading to BCD.
SLC 5/02
1746-OB16
1746-INT4
Thermocouple Type J
Bath
LED Display
(DC sinking inputs, BCD format)
Channel Configuration
Configure the thermocouple channel with the following setup:
• type J thermocouple (bits 3-0)
• °F displayed in whole degrees with EU = x10 (bits 8, 5, 4)
• zero the data word in the event of an open circuit (bits 7, 6)
Publication 1746-6.16 – January 1999
9–1
Chapter 9
Application Programming Examples
ÉÉÉÉÉ ÉÉÉ
ÉÉÉÉÉ ÉÉÉ
Configuration Word
15 14
13 12
Not Used
10 9
11
Channel Not Used
Enable
0 = Disable
1 = Enable
8
7
6
5
4
3
0
0
0
1
0
0
1
Temp
Units
Response to Data
Open Circuit Format
Type
of Input
0 = oC
1 = oF
0 0 = zero
0 1 = FS
1 0 = LS
0 0 0 0 = Type J
0 0 0 1 = Type K
0 0 1 0 = Type T
0 0 1 1 = Type E
0 1 0 0 = Type R
0 1 0 1 = Type S
0
0
1
1
0=
1=
0=
1=
EU x1
EU x10
Scaled PID
Prop Counts
Example Configuration Word with These Parameters:
channel enabled, oF, zero for open circuit, EU x10, Type J thermocouple
0
2
1
0
0
0
1
0
0
0
0
0 1 1 0 = Type B
0 1 1 1 = Type N
1 0 0 0 = 0-100 mV
1 0 0 1 = "100
1 0 1 0 = Type C
1 0 1 1 = Type D
0
Program
Rung 2.0
First Pass Bit
Initialize Channel 0
MOV
S:1
] [
15
MOVE
Source
N10:0
Dest
O:3.0
Rung 2.1
Convert the channel 0 data word (degrees F) to BCD and write this to the LED display.
TOD
TO BCD
Source
I:3.0
Dest
N7:0
MVM *
MASKED MOVE
Source
Mask
Dest
N7:0
0FFF
O:2.0
* Note: The use of the masked move instruction with the 0FFF mask lets you use outputs 12, 13,
14, and 15 for other output devices in your system. The 7-segment display uses outputs 0-11.
Rung 2.2
END
Data Table
address
N10:0
9–2
15
data
0
0000 1001 0001 0000
address
15
data
0
Publication 1746-6.16 – January 1999
Chapter 9
Application Programming Examples
Supplementary Example
(select display in oC or oF)
Application Setup
This example shows how to display the temperature of several different
thermocouples at display panel. A selector switch (I:2/0) lets the operator
choose between displaying temperatures in °C or °F. A second selector
switch (I:2/1) lets the operator switch a display between the ambient
temperature near the bath and the temperature inside the control cabinet
containing the SLC controller. Each display is a 4-digit, 7-segment LED
display with the last digit representing tenths of a degree. The displays have
DC-sinking inputs and use a BCD data format.
1746-IB8
1746-INT4
(5).1746-OB16
SLC 5/02
Ambient
Temperature
Thermocouple
Type T
Display Panel
Chilled H2O Pipe
Cabinet
Ambient
.
Bath
Steam
.
Cabinet
.
.
°C °F
Ambient
Type J
Chilled H2O
Chilled Thermocouple
Bath
Thermocouple
Type J
Type K
Steam Thermocouple
Steam Pipe
Selector Switches
(I:2/1) and (I:2/0)
Publication 1746-6.16 – January 1999
9–3
Chapter 9
Application Programming Examples
Channel Configuration
All channels are configured for:
• display temperature to tenths of a degree
• zero data word in the event of an open circuit
Configuration setup for ambient thermocouple:
• channel 0
• type T thermocouple
Configuration setup for bath thermocouple:
• channel 1
• type J thermocouple
Configuration setup for steam thermocouple:
• channel 2
• type K thermocouple
Configuration setup for chilled H2O thermocouple:
• channel 3
• type J thermocouple
Configuration setup for cabinet temperature:
• channel 0
• CJC temperature
ÉÉÉÉÉ ÉÉÉÉ
ÉÉÉÉÉ ÉÉÉÉ
Configuration Word
15 14
13 12
Not Used
11
10 9
Channel Not Used
Enable
0 = Disable
1 = Enable
8
7
6
5
4
2
1
Temp
Units
Response to Data
Open Circuit Format
Type
of Input
0 = oC
1 = oF
0 0 = zero
0 1 = FS
1 0 = LS
0 0 0 0 = Type J
0 0 0 1 = Type K
0 0 1 0 = Type T
0 0 1 1 = Type E
0 1 0 0 = Type R
0 1 0 1 = Type S
0
0
1
1
0=
1=
0=
1=
EU x1
EU x10
Scaled PID
Prop Counts
Configuration Words for this Example
9–4
3
0
0 1 1 0 = Type B
0 1 1 1 = Type N
1 0 0 0 = 0-100 mV
1 0 0 1 = "100
1 0 1 0 = Type C
1 0 1 1 = Type D
1 1 1 1 = CJC temp
0
0
0
0
1
0
0
x
0
0
0
0
0
0
1
0
Channel 0
(Ambient)
0
0
0
0
1
0
0
x
0
0
0
0
0
0
0
0
Channel 1
(Bath)
0
0
0
0
1
0
0
x
0
0
0
0
0
0
0
1
Channel 2
(Steam)
0
0
0
0
1
0
0
x
0
0
0
0
0
0
0
0
Channel 3
(Chilled H2O)
0
0
0
0
1
0
0
x
0
0
0
0
1
1
1
1
Channel 3
(Cabinet)
Publication 1746-6.16 – January 1999
Chapter 9
Application Programming Examples
Program Setup
1. Set up two configuration words for each channel in file N10, one for °C
and the other for °F. Include two configuration words for the CJC
temperature in the cabinet containing the SLC controller.
Channel
annel
Configuration Word Addresses
°F
°C
0
N10:0
N10:4
1
N10:1
N10:5
2
N10:2
N10:6
3
N10:3
N10:7
CJC
N10:8
N10:9
2. Write ladder logic to send channel configurations to the module when the
operator changes the oC/oF or the ambient/cabinet selector switch. The
OSR instruction (one-shot rising) makes these configuration changes
edge-triggered, i.e. the module is reconfigured once each time the
operator changes a switch position.
3. Write ladder logic to monitor the channel 0 status word to determine
whether ambient or cabinet temperature is being displayed, and energize
the appropriate pilot light.
4. Write ladder logic to convert thermocouple data words to BCD and send
them to the LED displays.
Publication 1746-6.16 – January 1999
9–5
Chapter 9
Application Programming Examples
Program
The first six rungs change channel configurations based on the position of the two selector switches.
Rung 2.0
If the degrees selector switch is switched to Fahrenheit, configure all four channels to read in degrees Fahrenheit.
The default for channel 0 is to read the ambient temperature thermocouple.
Degrees
Selector Switch =
Fahrenheit
I:2.0
] [
0
Configure Channels
COP
B3
OSR
0
COPY FILE
Source
Dest
Length
#N10:0
#O:1.0
4
Rung 2.1
If the ambient/cabinet selector switch is switched to ambient, and the degrees selector switch is switched to
Fahrenheit, configure channel 0 to read the ambient temperature thermocouple in degrees Fahrenheit.
Degrees
Selector Switch =
Fahrenheit
Ambient/Cabinet
Selector Switch =
Ambient
I:2.0
] [
0
I:2.0
] [
1
Configure Channels
B3
OSR
1
MOV
MOVE
Source
N10:0
Dest
O:1.0
Rung 2.2
If the ambient/cabinet selector switch is switched to cabinet, and the degrees selector switch is switched to
Farenheit, configure channel 0 to read the CJC sensor in degrees Fahrenheit.
Degrees
Selector Switch =
Fahrenheit
Ambient/Cabinet
Selector Switch =
Ambient
I:2.0
] [
0
I:2.0
]/[
1
Configure Channels
B3
OSR
2
MOV
MOVE
Source
N10:8
Dest
O:1.0
Rung 2.3
If the degrees selector switch is switched to Celsius, configure all four channels to read in degrees Celsius.
The default for channel 0 is to read the ambient temperature thermocouple.
Degrees
Selector Switch =
Celsius
I:2.0
]/[
0
9–6
Configure Channels
B3
OSR
3
COP
COPY FILE
Source
Dest
Length
#N10:4
#O:1.0
4
Publication 1746-6.16 – January 1999
Chapter 9
Application Programming Examples
Rung 2.4
If the ambient/cabinet selector switch is switched to ambient, and the degrees selector switch is switched to
Celsius, configure channel 0 to read the ambient temperature thermocouple in degrees Celsius.
Degrees
Selector Switch =
Celsius
I:2.0
]/[
0
Ambient/Cabinet
Selector Switch =
Ambient
I:2.0
] [
1
Configure Channels
B3
OSR
4
MOV
MOVE
Source
N10:4
Dest
O:1.0
Rung 2.5
If the ambient/cabinet selector switch is switched to cabinet, and the degrees selector switch is switched to
Celsius, configure channel 0 to read the CJC sensor in degrees Celsius.
Degrees
Selector Switch =
Celsius
Ambient/Cabinet
Selector Switch =
Cabinet
I:2.0
] [
0
I:2.0
]/[
1
Configure Channels
B3
OSR
5
MOV
MOVE
Source
N10:9
Dest
O:1.0
Rung 2.6
If channel 0 is configured to read the ambient thermocouple, energize the ambient pilot light on the panel.
Ambient Light
MEQ
O:7.0
( )
0
MASKED EQUAL
Source
I:1.4
Mask
Compare
FEFF
N10:4
Rung 2.7
If channel 0 is configured to read the CJC sensor, energize the cabinet pilot light on the panel.
Cabinet Light
MEQ
MASKED EQUAL
Source
I:1.4
Mask
Compare
Publication 1746-6.16 – January 1999
O:7.0
( )
1
FEFF
N10:9
9–7
Chapter 9
Application Programming Examples
Rung 2.8
Convert data words to BCD format and send them to the LED displays.
Write Ambient or Cabinet
Temperature to the Display
TOD
Rung 2.9
TO BCD
Source
I:1.0
Dest
O:3.0
Write Bath Temperature
to tthe Display
TOD
Rung 2.10
TO BCD
Source
I:1.1
Dest
O:4.0
Write Steam Temperature
to the Display
TOD
Rung 2.11
TO BCD
Source
I:1.2
Dest
O:5.0
Write Chilled Temperature
to the Display
TOD
TO BCD
Source
I:1.3
Dest
O:6.0
Rung 2.12
END
Data Table
address
N10:0
N10:1
N10:2
N10:3
N10:4
9–8
15
0000
0000
0000
0000
0000
data
1101 0000
1101 0000
1101 0000
1101 0000
1100 0000
0
0010
0000
0001
0000
0010
address
N10:5
N10:6
N10:7
N10:8
N10:9
15
0000
0000
0000
0000
0000
data
1100 0000
1100 0000
1100 0000
1101 0000
1100 0000
0
0000
0001
0000
1111
1111
Publication 1746-6.16 – January 1999
Appendix
A
Module Specifications
This appendix lists the specifications for the 1746-INT4 Thermocouple/mV
Isolated Input Module.
Electrical Specifications
Backplane Power Consumption
110 mA at 5 VDC
85 mA at 24 VDC
0.6W maximum (0.55W @ 5 VDC, 2W @ 24 VDC)
Number of Channels
4 (backplane and channel-to-channel isolated)
I/O Chassis Location
Any I/O module slot except slot 0
A/D Conversion Method
Sigma-Delta Modulation
Input Filtering
Analog filter with low pass digital filter
Normal Mode Rejection (between
[+] input and [–] input)
Common Mode Rejection (between
inputs and chassis ground)
Channel Bandwidth (–3db)
Greater than 50 dB at 50 Hz
Greater than 60 dB at 60 Hz
Greater than 120 dB at 50/60 Hz
(with 1K ohm imbalance)
8 Hz
Calibration
once yearly, if required
Isolation
1000 V transient or 150 VAC continuous
channel-to-channel or channel-to-backplane
LED Indicators
5, green status indicators, one for each of 4 channels and one
for module status
Module ID Code
3515
Recommended Cable:
for thermocouple inputs . . .
for mV inputs . . .
Shielded twisted pair thermocouple extension wire➀
Alpha 5121 or equivalent
Maximum Wire Size
Two 14 AWG wires per terminal
Maximum Cable Impedance
150 ohms maximum loop impedance, for <1LSB error
Terminal Strip
Removable, Allen-Bradley spare part Catalog Number
1746-RT32
Backplane Current Consumption
Physical Specifications
➀ Refer to the thermocouple manufacturer for the correct extension wire.
Publication 1746-6.16 – January 1999
A–1
Appendix A
Specifications
Environmental Specifications
Operating Temperature
0°C to 60°C (32°F to 140°F)
Storage Temperature
−40°C to +85°C (−40°F to +185°F)
Relative Humidity
Agency Certification
(when product is marked)
5% to 95% (without condensation)
• CSA certified
• CSA Class I, Division 2, Groups A, B, C, D certified Hazardous Locations
• UL listed
• CE marked for all applicable directives
Input Specifications
Type of Input (Selectable)
Thermocouple Type C
Thermocouple Type D
Thermocouple Type J
Thermocouple Type K
Thermocouple Type T
Thermocouple Type E
Thermocouple Type R
Thermocouple Type S
Thermocouple Type B
Thermocouple Type N (14 AWG)
0°C to 2317°C
0°C to 2317°C
–210°C to 760°C
–270°C to 1370°C
–270°C to 400°C
–270°C to 1000°C
0°C to 1768°C
0°C to 1768°C
300°C to 1820°C
0°C to 1300°C
(32°F to 4201°F)
(32°F to 4201°F)
(–346°F to 1400°F)
(–454°F to 2498°F)
(–454°F to 752°F)
(–454°F to 1832°F)
(32°F to 3214°F)
(32°F to 3214°F)
(572°F to 3308°F)
(32°F to 2372°F)
Millivolt (–50 mV dc to +50 mV dc)
Millivolt (–100 mV dc to +100 mV dc)
Thermocouple Linearization
IPTS–68 standard, NBS MN–125, NBS MN–161
Cold Junction Compensation
Accuracy ±1.5°C, 0°C to 70°C (32°F to 158°F)
Input Impedance
Greater than 10MW
Temperature Scale (Selectable)
°C or °F and 0.1°C or 0.1°F
DC Millivolt Scale (Selectable)
0.1 mV or 0.01 mV
Open Circuit Detection
Leakage Current
Open Circuit Detection (Selectable)
Upscale, Downscale, or zero
Time to Detect Open Circuit
5 seconds, typical
Input Step Response
0 to 99.9% in 600 ms (worst case)
Input Resolution
Display Resolution
Overall Module Accuracy
@ 25°C (77°F)
Overall Module Accuracy
(0°C to 60°C, 32°F to 140°F)
Overall Module Drift
A–2
20 nA typical
See Input Resolution Graphs on following pages. They show the smallest
measurable value based on combined hardware and software tolerances.
See Channel Data Word Resolution table on page 6–5.
See Module Accuracy Table, page A–3
See Module Accuracy Table, page A–3
See Module Accuracy Table, page A–3
Module Update Time
Less than 500 ms
Channel Turn–Off Time
Up to one module update time
Publication 1746-6.16 – January 1999
Appendix A
Specifications
Overall Accuracy
We define overall accuracy to include variances in cold-junction
compensation, calibration, non-linearity, and resolution.
J
Maximum Error➀
@ 25°C
±1.60°C
Maximum Error➀
@ 77°F
±2.88°F
Temperature Drift➀
(0°C–60°C)
±0.042°C/°C, °F/°F
K
±3.80°C
±6.84°F
±0.096°C/°C, °F/°F
Input Type
T
±2.05°C
±3.69°F
±0.025°C/°C, °F/°F
E
±2.40°C
±4.32°F
±0.058°C/°C, °F/°F
S
±2.38°C
±4.29°F
±0.131°C/°C, °F/°F
R
±2.23°C
±4.02°F
±0.130°C/°C, °F/°F
B
±3.83°C
±6.90°F
±0.109°C/°C, °F/°F
N
±1.79°C
±3.23°F
±0.080°C/°C, °F/°F
C
±2.28°C
±4.11°F
±0.270°C/°C, °F/°F
D
±2.52°C
±4.54°F
±0.280°C/°C, °F/°F
±50 mV
±50 mV
±50 mV
±0.5 mV/°C ±50 ppm/°C
±100 mV
±50 mV
±50 mV
±0.5 mV/°C ±50 ppm/°C
➀ Assumes the module terminal block temperature is stable.
Publication 1746-6.16 – January 1999
A–3
Appendix A
Specifications
Thermocouple Resolution
Type C Thermocouple
0.4
0.32oC @ 2000oC
✖
0.3
Resolution
(°C)
✖
0.26oC @ 0oC
0.20oC @ 1000oC
✖
0.2
0.1
0
0
250
500
750
1000
1250
1500
1750
2000
2250
Temperature (°C)
Type D Thermocouple
0.4
✖
0.34oC @ 0oC
0.27oC @ 2000oC
0.3
✖
Resolution
(°C)
0.20oC @ 1100oC
✖
0.2
0.1
0
0
250
500
750
1000
1250
1500
1750
2000
2250
Temperature (°C)
A–4
Publication 1746-6.16 – January 1999
Appendix A
Specifications
Type J Thermocouple
0.20 .25
0.16 .20
✖
0.18oC @ –200oC
0.12 .15
Resolution
(°C)
0.08 .10
0.06oC @ 275oC
0.04 .05
0.00
0.05oC @ 750oC
✖
0
–300
–150
0
150
✖
300
450
600
750
900
Temperature (°C)
Type K Thermocouple
4.8 4.0
4.2
✖
3.4oC @ –250oC
3.6 3.0
3.0
Resolution
(°C)
2.4 2.0
1.8
1.2 1.0
0.6
0.0
0.08oC @ 550oC
0
–300
0.10oC @ 1350oC
✖
–150
0
150
300
450
600
✖
750
900
1050
1200
1350
1500
Temperature (°C)
Publication 1746-6.16 – January 1999
A–5
Appendix A
Specifications
Type E Thermocouple
4 2.0
✖ 1.70oC @ –250oC
3 1.5
Resolution
(°C)
2 1.0
1 0.5
0.05oC @ 1000oC
0.04oC @ 365oC
0
0
–300
✖
✖
–150
0
150
300
450
600
750
900
1050
1200
Temperature (°C)
Type R Thermocouple
0.75
✖
0.68oC @ 0oC
0.4 0.60
Resolution
(°C)
0.45
0.26oC @ 885oC
0.2 0.30
✖
0.28oC @ 1750oC
✖
0.15
0.0
0
–300 –150
0
150
300
450
600
750
900
1050 1200 1350 1500 1650 1800
Temperature(°C)
A–6
Publication 1746-6.16 – January 1999
Appendix A
Specifications
Type S Thermocouple
0.75
✖
0.68oC @ 0oC
0.4 0.60
0.45
Resolution
(°C)
0.31oC @ 1750oC
0.31oC @ 885oC
✖
✖
0.2 0.30
0.15
0.0
0
–300 –150
0
150
300
450
600
750
900
1050 1200 1350 1500 1650 1800
Temperature (°C)
Type T Thermocouple
2.9 2.0
2.5
✖
1.7oC @ –250oC
2.2 1.5
1.8
Resolution
(°C) 1.4 1.0
1.1
0.7 0.5
0.4
0.08oC @ 65oC
0.0
0
–300
0.05oC @ 400oC
✖
–150
0
✖
150
300
450
600
Temperature (°C)
Publication 1746-6.16 – January 1999
A–7
Appendix A
Specifications
Type B Thermocouple
0.41.20
✖ 1.13oC @ 300oC
0.30.90
Resolution
(°C)
0.20.60
0.38oC @ 1060oC
0.31oC @ 1800oC
✖
✖
0.10.30
0.0
0
–300 –150
0
150
300
450
600
750
900 1050 1200 1350 1500 1650 1800 1950
Temperature (°C)
Type N Thermocouple
0.170
0.100.150
✖
0.13oC @ 0oC
0.125
Resolution
(°C) 0.07
0.100
0.09oC @ 500oC
0.09oC @ 1100oC
✖
✖
0.075
0.03
0.050
0.025
0.00
0
–300
–150
0
150
300
450
600
750
900
1050
1200
1350
1500
Temperature (°C)
A–8
Publication 1746-6.16 – January 1999
Appendix
B
Channel Configuration Worksheets
Select your bit configurations. Write them down at the bottom of the worksheet. Use one worksheet for each channel.
Bit(s)
ts
0–3
4 5
4,
6, 7
ÉÉÉ
ÉÉÉ
ÉÉÉ
ÉÉÉ
ÉÉÉ
ÉÉÉ
ÉÉÉ
ÉÉÉ
ÉÉÉ
ÉÉÉ
ÉÉÉ
ÉÉÉ
ÉÉÉÉÉ
ÉÉÉ
ÉÉÉÉÉ
ÉÉÉ
ÉÉÉ
ÉÉÉÉÉ
ÉÉÉ
ÉÉÉ
ÉÉÉ
ÉÉÉ
ÉÉÉ
ÉÉÉ
ÉÉÉ
ÉÉÉ
ÉÉÉ
ÉÉÉ
ÉÉÉÉÉ
ÉÉÉ
ÉÉÉ
ÉÉÉÉÉ
ÉÉÉ
ÉÉÉ
ÉÉÉ
ÉÉÉ
ÉÉÉ
ÉÉÉ
ÉÉÉ
ÉÉÉ
ÉÉÉ
ÉÉÉ
ÉÉÉ
Define
e ne
To Select
elect
Input
T
Type
pe
TC Type J
TC Type K
TC Type T
TC Type E
TC Type R
TC Type S
TC Type B
TC Type N
"50mV
"100mV
TC Type C
TC Type D
Invalid
Invalid
Invalid
CJC Temp.
Data
Format
Open
Circuit
rcu t
Mode
Set these bits in the Channel Configuration Word
15-12
11
10
9
Units
oF,
F oC
9, 10
Unused
11
12-15
6
5
4
Engr. Units x1
0 0
Engr. Units x10
0 1
Scaled-for-PID
1 0
Counts
1 1
Zero
0 0
Upscale
0 1
Downscale
ÉÉ
ÉÉ
ÉÉ
ÉÉ
1 0
1 1
Degrees C
0
Degrees F
1
Unused
0
Channel Off
0
Channel On
1
Chnl
Enable
Unused
7
Unused
Enter Your Bit Selections >>
Publication 1746-6.16 – January 1999
3
2
1
0
0
0
0
0
0
0
0
0
1
1
1
1
1
1
1
1
0
0
0
0
1
1
1
1
0
0
0
0
1
1
1
1
0
0
1
1
0
0
1
1
0
0
1
1
0
0
1
1
0
1
0
1
0
1
0
1
0
1
0
1
0
1
0
1
Description
escr pt on
Project ________________________
Slot
lot Number _____
Channel
annel Number _____
Configure
on ure the
t e channel
c annel for
or the
t e input
nput type
t pe connected
connecte to it.
t.
Valid
signalss
V i iinputs
p s are
re thermocouples
er c p es and analog iinput
p si
of ±50mV and ±100mV. You can configure the channel to
re
- c i (CJC)
C C temperature.
e per re. When
e reading
re i
read thee ccold-junction
thee C
CJC
C temperature,
e per re thee cchannel
e iignores
res thee physical
p sic
input signal.
ÉÉÉ
ÉÉ
ÉÉ
ÉÉÉ
ÉÉ
ÉÉ
ÉÉÉ
ÉÉ
ÉÉ
Invalid
8
8
0
Select the channel data format from:
Engineering units (EU) x1 or x10
Forr EU x1,
1 values
v es are
re in
i 0.1
.1 degrees
e rees orr 0.01mV.
. 1 V.
Forr EU x10,
1 values
v es are
re in
i whole
w e oC orr oF orr 0.1mV.
.1 V.
Scaled-for-PID
cale - or-PI (value
alue iss tthee same for
or an
any input
nput ttype)
pe
Proportional input signal range is scaled to 0-16,383 counts.
Proport onal counts (value
Proportional
alue iss same for
or an
any input
nput ttype)
pe
Proportional input signal range is scaled to ±32,767 counts.
For more information, refer to chapter 6..
Select module response to a detected open circuit from:
Zero to force the channel data word to zero.
Upscale to force the channel data word to full scale.
Downscale to force channel data word to low scale.
Important: A bit
bi selection
se ec i orr 1 1 is invalid.
i v i .
For an open CJC thermistor, mV channels are not affected.
Important: The
T e modulee requires
re ires 500
5 msec
sec orr onee modulee
update to flag the error while it ramps the channel input.
Select °C/°F for thermal inputs. Ignored for mV inputs.
Important: Forr EU x11 and °°F (0.1°F),
.1° an over-range
ver-r e err
errorr
will occur above 3276.7°F (cannot exceed 32767 counts).
These bits must be zero for a valid configuration.
Disable unused channels for faster response.
When set, the module configures the channel and reads the
channel input before setting bit 11 in the status word.
If you change the configuration word, the status word must
re ec thee change
c
e before
be re new
ew data is valid.
v i . If you clear
c e r thee
reflect
configuration word, the module clears channel and status
words. For a new configuration word, channel data and
status words remain cleared until the module sets this bit
(11) in the status word.
0000
These bits must be zero for a valid configuration.
0000
For the Channel Configuration Word
B–1
Appendix B
Channel Configuration Worksheets
Select your bit configurations. Write them down at the bottom of the worksheet. Use one worksheet for each channel.
Channel Configuration Word (O:e.0 through O:e.3) – Bit Descriptions
Bit(s)
ts
0–3
4 5
4,
6, 7
ÉÉÉ
ÉÉÉ
ÉÉÉ
ÉÉÉ
ÉÉÉ
ÉÉÉ
ÉÉÉ
ÉÉÉ
ÉÉÉ
ÉÉÉ
ÉÉÉ
ÉÉÉÉÉ
ÉÉÉ
ÉÉÉÉÉ
ÉÉÉ
ÉÉÉÉÉ
ÉÉÉ
ÉÉÉ
ÉÉÉÉÉ
ÉÉÉ
ÉÉÉ
ÉÉÉ
ÉÉÉ
ÉÉÉ
ÉÉÉ
ÉÉÉ
ÉÉÉ
ÉÉÉ
ÉÉÉÉÉ
ÉÉÉ
ÉÉÉÉÉ
ÉÉÉ
ÉÉÉÉÉ
ÉÉÉ
ÉÉÉ
ÉÉÉ
ÉÉÉ
ÉÉÉ
ÉÉÉ
ÉÉÉ
ÉÉÉ
ÉÉÉ
ÉÉÉ
ÉÉÉ
ÉÉÉ
Define
e ne
To Select
elect
Input
T
Type
pe
TC Type J
TC Type K
TC Type T
TC Type E
TC Type R
TC Type S
TC Type B
TC Type N
"50mV
"100mV
TC Type C
TC Type D
Invalid
Invalid
Invalid
CJC Temp.
Data
Format
Open
Circuit
rcu t
Mode
Set these bits in the Channel Configuration Word
15-12
11
10
9
Units
oF,
F oC
9, 10
Unused
11
12-15
5
4
0 0
Engr. Units x10
0 1
Scaled-for-PID
1 0
Counts
1 1
Zero
0 0
Upscale
0 1
ÉÉ
ÉÉ
ÉÉ
ÉÉ
ÉÉ
ÉÉ
Downscale
1 0
1 1
Degrees C
0
Degrees F
Unused
Channel Off
0
Channel On
1
Unused
Enter Your Bit Selections >>
B–2
6
Engr. Units x1
Chnl
Enable
Unused
7
3
2
1
0
0
0
0
0
0
0
0
0
1
1
1
1
1
1
1
1
0
0
0
0
1
1
1
1
0
0
0
0
1
1
1
1
0
0
1
1
0
0
1
1
0
0
1
1
0
0
1
1
0
1
0
1
0
1
0
1
0
1
0
1
0
1
0
1
Description
escr pt on
Project ________________________
Slot
lot Number _____
Channel
annel Number _____
Configure
on ure tthee cchannel
annel for
or tthee input
nput ttype
pe connecte
connected to it.
t.
Valid
signalss
V i iinputs
p s are
re thermocouples
er c p es and analog iinput
p si
of ±50mV and ±100mV. You can configure the channel to
read thee ccold-junction
re
- c i (CJC)
C C temperature.
e per re. When
e reading
re i
thee CJC
C C temperature,
e per re thee channel
c
e ignores
i res thee physical
p sic
input signal.
ÉÉ
ÉÉ
ÉÉ
ÉÉ
ÉÉ
ÉÉ
ÉÉ
ÉÉ
ÉÉ
ÉÉ
ÉÉ
ÉÉ
ÉÉ
ÉÉ
ÉÉ
ÉÉ
Invalid
8
8
1
0
0
Select the channel data format from:
Engineering units (EU) x1 or x10
Forr EU x1,
1 values
v es are
re in
i 0.1
.1 degrees
e rees orr 0.01mV.
. 1 V.
Forr EU x10,
1 vvalues
es are
re in
i whole
w e oC orr oF orr 0.1mV.
.1 V.
Scaled-for-PID
cale - or-PI (value
alue iss tthee same for
or an
any input
nput ttype)
pe
Proportional input signal range is scaled to 0-16,383 counts.
Proport onal counts (value
Proportional
alue iss same for
or an
any input
nput ttype)
pe
Proportional input signal range is scaled to ±32,767 counts.
For more information, refer to chapter 6..
Select module response to a detected open circuit from:
Zero to force the channel data word to zero.
Upscale to force the channel data word to full scale.
Downscale to force channel data word to low scale.
Important: A bit
bi selection
se ec i orr 1 1 is invalid.
i v i .
For an open CJC thermistor, mV channels are not affected.
Important: The
T e modulee requires
re ires 500
5 msec
sec orr onee modulee
update to flag the error while it ramps the channel input.
Select °C/°F for thermal inputs. Ignored for mV inputs.
Important: Forr EU x11 and °°F (0.1°F),
.1° an over-range
ver-r e error
err r
will occur above 3276.7°F (cannot exceed 32767 counts).
These bits must be zero for a valid configuration.
Disable unused channels for faster response.
When set, the module configures the channel and reads the
channel input before setting bit 11 in the status word.
If you change the configuration word, the status word must
re ec thee change
reflect
c
e before
be re new
ew data is valid.
v i . If you clear
c e r thee
configuration word, the module clears channel and status
words. For a new configuration word, channel data and
status words remain cleared until the module sets this bit
(11) in the status word.
0000
These bits must be zero for a valid configuration.
0000
For the Channel Configuration Word
Publication 1746-6.16 – January 1999
Appendix B
Channel Configuration Worksheets
Select your bit configurations. Write them down at the bottom of the worksheet. Use one worksheet for each channel.
Channel Configuration Word (O:e.0 through O:e.3) – Bit Descriptions
Bit(s)
ts
0–3
4 5
4,
6, 7
ÉÉÉ
ÉÉÉ
ÉÉÉ
ÉÉÉ
ÉÉÉ
ÉÉÉ
ÉÉÉ
ÉÉÉ
ÉÉÉ
ÉÉÉ
ÉÉÉ
ÉÉÉÉÉ
ÉÉÉ
ÉÉÉÉÉ
ÉÉÉ
ÉÉÉÉÉ
ÉÉÉ
ÉÉÉ
ÉÉÉÉÉ
ÉÉÉ
ÉÉÉ
ÉÉÉ
ÉÉÉ
ÉÉÉ
ÉÉÉ
ÉÉÉ
ÉÉÉ
ÉÉÉ
ÉÉÉÉÉ
ÉÉÉ
ÉÉÉÉÉ
ÉÉÉ
ÉÉÉÉÉ
ÉÉÉ
ÉÉÉ
ÉÉÉ
ÉÉÉ
ÉÉÉ
ÉÉÉ
ÉÉÉ
ÉÉÉ
ÉÉÉ
ÉÉÉ
ÉÉÉ
ÉÉÉ
Define
e ne
To Select
elect
Input
T
Type
pe
TC Type J
TC Type K
TC Type T
TC Type E
TC Type R
TC Type S
TC Type B
TC Type N
"50mV
"100mV
TC Type C
TC Type D
Invalid
Invalid
Invalid
CJC Temp.
Data
Format
Open
Circuit
rcu t
Mode
Set these bits in the Channel Configuration Word
15-12
11
10
9
Units
oF,
F oC
9, 10
Unused
11
12-15
6
5
4
0 0
Engr. Units x10
0 1
Scaled-for-PID
1 0
Counts
1 1
Zero
0 0
Upscale
0 1
ÉÉ
ÉÉ
ÉÉ
ÉÉ
ÉÉ
ÉÉ
Downscale
1 0
1 1
Degrees C
0
Degrees F
1
Unused
0
Channel Off
0
Channel On
1
Chnl
Enable
Unused
7
Engr. Units x1
Invalid
8
8
Unused
Enter Your Bit Selections >>
Publication 1746-6.16 – January 1999
0
3
2
1
0
0
0
0
0
0
0
0
0
1
1
1
1
1
1
1
1
0
0
0
0
1
1
1
1
0
0
0
0
1
1
1
1
0
0
1
1
0
0
1
1
0
0
1
1
0
0
1
1
0
1
0
1
0
1
0
1
0
1
0
1
0
1
0
1
Description
escr pt on
Project ________________________
Slot
lot Number _____
Channel
annel Number _____
Configure
on ure the
t e channel
c annel for
or the
t e input
nput type
t pe connected
connecte to it.
t.
Valid
signalss
V i iinputs
p s are
re thermocouples
er c p es and analog iinput
p si
of ±50mV and ±100mV. You can configure the channel to
read thee ccold-junction
re
- c i (CJC)
C C temperature.
e per re. When
e reading
re i
thee C
CJC
C temperature,
e per re thee cchannel
e iignores
res thee physical
p sic
input signal.
ÉÉÉ
ÉÉ
ÉÉ
ÉÉÉ
ÉÉ
ÉÉ
ÉÉ
ÉÉÉ
ÉÉ
ÉÉÉ
ÉÉ
ÉÉ
Select the channel data format from:
Engineering units (EU) x1 or x10
Forr EU x1,
1 values
v es are
re in
i 0.1
.1 degrees
e rees orr 0.01mV.
. 1 V.
Forr EU x10,
1 values
v es are
re in
i whole
w e oC orr oF orr 0.1mV.
.1 V.
Scaled-for-PID
cale - or-PI (value
alue iss tthee same for
or an
any input
nput ttype)
pe
Proportional input signal range is scaled to 0-16,383 counts.
Proport onal counts (value
Proportional
alue iss same for
or an
any input
nput ttype)
pe
Proportional input signal range is scaled to ±32,767 counts.
For more information, refer to chapter 6..
Select module response to a detected open circuit from:
Zero to force the channel data word to zero.
Upscale to force the channel data word to full scale.
Downscale to force channel data word to low scale.
Important: A bit
bi selection
se ec i orr 1 1 is invalid.
i v i .
For an open CJC thermistor, mV channels are not affected.
Important: The
T e modulee requires
re ires 500
5 msec
sec orr onee modulee
update to flag the error while it ramps the channel input.
Select °C/°F for thermal inputs. Ignored for mV inputs.
Important: Forr EU x11 and °°F (0.1°F),
.1° an over-range
ver-r e err
errorr
will occur above 3276.7°F (cannot exceed 32767 counts).
These bits must be zero for a valid configuration.
Disable unused channels for faster response.
When set, the module configures the channel and reads the
channel input before setting bit 11 in the status word.
If you change the configuration word, the status word must
re ec thee change
reflect
c
e before
be re new
ew data is valid.
v i . If you clear
c e r thee
configuration word, the module clears channel and status
words. For a new configuration word, channel data and
status words remain cleared until the module sets this bit
(11) in the status word.
0000
These bits must be zero for a valid configuration.
0000
For the Channel Configuration Word
B–3
Appendix B
Channel Configuration Worksheets
Select your bit configurations. Write them down at the bottom of the worksheet. Use one worksheet for each channel.
Channel Configuration Word (O:e.0 through O:e.3) – Bit Descriptions
Bit(s)
ts
0–3
4 5
4,
6, 7
ÉÉÉ
ÉÉÉ
ÉÉÉ
ÉÉÉ
ÉÉÉ
ÉÉÉ
ÉÉÉ
ÉÉÉ
ÉÉÉ
ÉÉÉ
ÉÉÉ
ÉÉÉÉÉ
ÉÉÉ
ÉÉÉÉÉ
ÉÉÉ
ÉÉÉÉÉ
ÉÉÉ
ÉÉÉ
ÉÉÉÉÉ
ÉÉÉ
ÉÉÉ
ÉÉÉ
ÉÉÉ
ÉÉÉ
ÉÉÉ
ÉÉÉ
ÉÉÉ
ÉÉÉ
ÉÉÉÉÉ
ÉÉÉ
ÉÉÉÉÉ
ÉÉÉ
ÉÉÉÉÉ
ÉÉÉ
ÉÉÉ
ÉÉÉ
ÉÉÉ
ÉÉÉ
ÉÉÉ
ÉÉÉ
ÉÉÉ
ÉÉÉ
ÉÉÉ
ÉÉÉ
ÉÉÉ
Define
e ne
To Select
elect
Input
T
Type
pe
TC Type J
TC Type K
TC Type T
TC Type E
TC Type R
TC Type S
TC Type B
TC Type N
"50mV
"100mV
TC Type C
TC Type D
Invalid
Invalid
Invalid
CJC Temp.
Data
Format
Open
Circuit
rcu t
Mode
Set these bits in the Channel Configuration Word
15-12
11
10
9
Units
oF,
F oC
9, 10
Unused
11
12-15
5
4
0 0
Engr. Units x10
0 1
Scaled-for-PID
1 0
Counts
1 1
Zero
0 0
Upscale
0 1
ÉÉ
ÉÉ
ÉÉ
ÉÉ
ÉÉ
ÉÉ
Downscale
1 0
1 1
Degrees C
0
Degrees F
Unused
Channel Off
0
Channel On
1
Unused
Enter Your Bit Selections >>
B–4
6
Engr. Units x1
Chnl
Enable
Unused
7
3
2
1
0
0
0
0
0
0
0
0
0
1
1
1
1
1
1
1
1
0
0
0
0
1
1
1
1
0
0
0
0
1
1
1
1
0
0
1
1
0
0
1
1
0
0
1
1
0
0
1
1
0
1
0
1
0
1
0
1
0
1
0
1
0
1
0
1
Description
escr pt on
Project ________________________
Slot
lot Number _____
Channel
annel Number _____
Configure
on ure tthee cchannel
annel for
or tthee input
nput ttype
pe connecte
connected to it.
t.
Valid
signalss
V i iinputs
p s are
re thermocouples
er c p es and analog iinput
p si
of ±50mV and ±100mV. You can configure the channel to
read thee ccold-junction
re
- c i (CJC)
C C temperature.
e per re. When
e reading
re i
thee CJC
C C temperature,
e per re thee channel
c
e ignores
i res thee physical
p sic
input signal.
ÉÉ
ÉÉ
ÉÉ
ÉÉ
ÉÉ
ÉÉ
ÉÉ
ÉÉ
ÉÉ
ÉÉ
ÉÉ
ÉÉ
ÉÉ
ÉÉ
ÉÉ
ÉÉ
Invalid
8
8
1
0
0
Select the channel data format from:
Engineering units (EU) x1 or x10
Forr EU x1,
1 values
v es are
re in
i 0.1
.1 degrees
e rees orr 0.01mV.
. 1 V.
Forr EU x10,
1 vvalues
es are
re in
i whole
w e oC orr oF orr 0.1mV.
.1 V.
Scaled-for-PID
cale - or-PI (value
alue iss tthee same for
or an
any input
nput ttype)
pe
Proportional input signal range is scaled to 0-16,383 counts.
Proport onal counts (value
Proportional
alue iss same for
or an
any input
nput ttype)
pe
Proportional input signal range is scaled to ±32,767 counts.
For more information, refer to chapter 6..
Select module response to a detected open circuit from:
Zero to force the channel data word to zero.
Upscale to force the channel data word to full scale.
Downscale to force channel data word to low scale.
Important: A bit
bi selection
se ec i orr 1 1 is invalid.
i v i .
For an open CJC thermistor, mV channels are not affected.
Important: The
T e modulee requires
re ires 500
5 msec
sec orr onee modulee
update to flag the error while it ramps the channel input.
Select °C/°F for thermal inputs. Ignored for mV inputs.
Important: Forr EU x11 and °°F (0.1°F),
.1° an over-range
ver-r e error
err r
will occur above 3276.7°F (cannot exceed 32767 counts).
These bits must be zero for a valid configuration.
Disable unused channels for faster response.
When set, the module configures the channel and reads the
channel input before setting bit 11 in the status word.
If you change the configuration word, the status word must
re ec thee change
reflect
c
e before
be re new
ew data is valid.
v i . If you clear
c e r thee
configuration word, the module clears channel and status
words. For a new configuration word, channel data and
status words remain cleared until the module sets this bit
(11) in the status word.
0000
These bits must be zero for a valid configuration.
0000
For the Channel Configuration Word
Publication 1746-6.16 – January 1999
Appendix
C
Thermocouple Descriptions
The descriptions of thermocouples J, K, T, E, R, and S were extracted from
NBS Monograph 125 (IPTS–68) issued March 1974. We also describe types
C and D.
J Type Thermocouple
(Iron vs. Copper–Nickel <Constantan➀>)
The J thermocouple “is the least suitable for accurate thermometry because
there are significant nonlinear deviations in the thermoelectric output from
different manufacturers. ... The total and specific types of impurities that
occur in commercial iron change with time, location of primary ores, and
methods of smelting.”
“Type J thermocouples are recommended by the ASTM [1970] for use in the
temperature range from 0 to 760C in vacuum, oxidizing, reducing or inert
atmospheres. If used for extended times above 500C, heavy gauge wires are
recommended because the oxidation rate is rapid at elevated temperatures.”
“They should not be used in sulfurous atmospheres above 500C. Because of
potential rusting and embrittlement, they are not recommended for subzero
temperatures. They should not be cycled above 760C even for a short time if
accurate reading below 760C are desired at a later time.”
“The negative thermoelement, a copper–nickel alloy, is subject to substantial
composition changes under thermal neutron irradiation, since copper is
converted to nickel and zinc.”
“Commercial iron undergoes a magnetic transformation near 769C and <an
alpha – gamma> crystal transformation near 910C. Both of these
transformation, especially the latter, seriously affect the thermoelectric
properties of iron, and therefore, the Type J thermocouples. ... If Type J
thermocouples are taken to high temperatures, especially above 900C, they
will lose accuracy of their calibration when they are recycled to lower
temperatures.”
“ASTM Standard E230–72 in the Annual Book of ASTM Standards [1972]
specifies that the standard limits of error for Type J commercial
thermocouples be ±2.2C between 0 and 277C and ±3/4 percent between 277
and 760C. Limits of error are not specified for Type J thermocouples below
0C or above 760C. Type J thermocouples can also be supplied to meet
special limits of error, which are equal to one half the limits given above.
The recommended upper temperature limit for protected thermocouples,
760C, applies to AWG 8 (3.3mm) wire. For smaller wires the recommended
upper temperature decreases to 593C for AWG 14 (1.6mm), and 371C for
AWG 24 or 28 (0.5 or 0.3mm).”
➀ It should be noted that the Constantan element of Type J thermoelements is NOT interchangeable with the
Constantan element of Types T or N due to the different ration of copper and nickel in each.
Publication 1746-6.16 – January 1999
C–1
Appendix C
Thermocouple Descriptions
K Type Thermocouple
(NIckel–Chromium vs. Nickel–Aluminum)
“This type is more resistant to oxidation at elevated temperatures than the
Types E, J or T thermocouples and consequently it finds wide application at
temperatures above 500C.”
“Type K thermocouples may be used at “liquid hydrogen” temperatures.
However, their Seebeck coefficient (about 4uV/K at 20K) is only about
one–half of that of E thermocouples. Furthermore, the thermoelectric
homogeneity of KN thermoelements is generally not quite as good as that of
EN thermoelements. Both the KP and the KN thermoelements do have a
relatively low thermal conductivity and good resistance to corrosion in moist
atmospheres at low temperatures.”
“Type K thermocouples are recommended by the ASTM [1970] for
continuous use at temperatures within the range –250 to 1260C in oxidizing
or inert atmospheres. Both the KP and the KN thermoelements are subject to
oxidation when used in air above about 850C, but even so, Type K
thermocouples may be used at temperatures up to about 1350C for short
periods with only small changes in calibration.”
“They should not be used in sulfurous, reducing, or alternately reducing and
oxidizing atmospheres unless suitably protected with protecting tubes. They
should not be used in vacuum (at high temperatures) for extended times
because the Chromium in the positive thermoelement vaporizes out of
solution and alters the calibration. They should also no be used in
atmospheres that promote “green–rot” corrosion (those with low, but not
negligible, oxygen content).”
“ASTM Standard E230–72 in the Annual Book of ASTM Standards [1972]
specifies that the standard limits of error for Type K commercial
thermocouples be ±2.2C between 0 and 277C and ±3/4 percent between 277
and 1260C/ Limits of error are not specified for the Type K thermocouples
below 0C. Type K thermocouples can also be supplied to meet special limits
of error, which are equal to one half the standard limits of error given above.
The recommended upper temperature limit for protected Type K
thermocouples, 1260C, applies for AWG 8 (3.3mm) wire. For smaller wires
it decreases to 1093C for AWG 14 (1.6mm), 982C for AWG 20 (0.8mm),
and 871C for AWG 24 or 28 (0.5 or 0.3mm).”
C–2
Publication 1746-6.16 – January 1999
Appendix C
Thermocouple Descriptions
T Type Thermocouple
(Copper vs. Copper–Nickel <Constantan➀>)
“The homogeneity of most Type TP and TN (or EN) thermoelements is
reasonably good. However, the Seebeck coefficient of Type T
thermocouples is moderately small at subzero temperatures (about 5.6uV/K
at 20K), being roughly two–thirds that of Type E thermocouples. This,
together with the high thermal conductivity of Type TP thermoelements, is
the major reason why Type T thermocouples are less suitable for use in the
subzero range than Type E thermocouples.”
“Type T thermocouples are recommended by the ASTM [1970] for use in the
temperature range –184 to 371C in vacuum or in oxidizing, reducing or inert
atmospheres. The recommended upper temperature limit for continuous
service of protected Type T thermocouples is set at 371C for AWG 14
(1.6mm) thermoelements, since Type TP thermoelements oxidize rapidly
above this temperature. However, the thermoelectric properties of Type TP
thermoelements are apparently not grossly affected by oxidation since Roeser
and Dahl [1938] observed negligible changes in the thermoelectric voltage of
Nos. 12, 18, and 22 AWG Type TP thermoelements after heating for 30
hours in air at 500C. At this temperature the Type TN thermoelements have
good resistance to oxidation and exhibit only small changes in thermal emf
with long exposure in air, as shown by the studies of Dahl [1941].” ...
“Operation of Type T thermocouples in hydrogen atmospheres at
temperatures above about 370C is not recommended since severe
embrittlement of the Type TP thermoelements may occur.”
“Type T thermoelements are not well suited for use in nuclear environments,
since both thermoelements are subject to significant changes in composition
under thermal neutron irradiation. The copper in the thermoelement is
converted to nickel and zinc.”
“Because of the high thermal conductivity of Type TP thermoelements,
special care should be exercised in the use of the thermocouples to insure
that both the measuring and reference junctions assume the desired
temperatures.”
ASTM Standard E230–72 in the Annual Book of ASTM Standards [1972]
specifies that the standard limits of error for Type T commercial
thermocouples be ±2 percent between –101 and –59C, ±0.8C between –59
and 93C and ±3/4 percent between 93 and 371C. Type T thermocouples can
also be supplied to meet special limits of error, which are equal to one half
the standard limits of error given above (plus a limit of error of ±1 percent is
specified between –184 and –59C). The recommended upper temperature
limit for protected Type T thermocouples, 371C, applies to AWG 14
(1.6mm) wire. For smaller wires it decreases to 260C for AWG 20 (0.8mm)
and 240C for AWG 24 or 28 (0.5 or 0.3mm).”
➀ It should be noted that the Constantan element of Type J thermoelements is NOT interchangeable with the
Constantan element of Types T or N due to the different ration of copper and nickel in each.
Publication 1746-6.16 – January 1999
C–3
Appendix C
Thermocouple Descriptions
E Type Thermocouple
(Nickel–Chromium vs. Copper–Nickel <Constantan➀>)
“Type E thermocouples are recommended by the ASTM Manual [1970] for
use in the temperature range from –250 to 871C in oxidizing or inert
atmospheres. The negative thermoelement is subject to deterioration above
about 871C, but the thermocouple may be used up to 1000C for short
periods.”
“The ASTM Manual [1970] indicates the following restrictions ... at high
temperatures. They should not be used in sulfurous, reducing or alternately
reducing and oxidizing atmospheres unless suitable protected with protecting
tubes. They should not be used in vacuum (at high temperatures) for
extended times, because the Chromium in the positive thermoelement
vaporizes out of solution and alters the calibration. They should also not be
used in atmospheres that promote “green–rot” corrosion (those with low, but
not negligible, oxygen content).”
“The negative thermoelement, a copper–nickel alloy, is subject to
composition changes under thermal neutron irradiation since the copper is
converted to nickel and zinc.”
“ASTM Standard E230–72 in the Annual Book of ASTM Standards [1972]
specifies that the standard limits of error for the Type E commercial
thermocouples be ±1.7C between 0 and 316C and ±1/2 percent between 316
and 871C. Limits of error are not specified for Type E thermocouples below
0C. Type E thermocouples can also be supplied to meet special limits of
error, which are less than the standard limits of error given above: ±1.25C
between 0 and 316C and ±3/8 percent between 316 and 871C, applies to
AWG 8 (3.3mm) wire. For smaller wires the recommended upper
temperature decreases to 649C for AWG 14 (1.6mm), 538C for AWG 20
(0.8mm) and 427C for AWG 24 or 28 (0.5 or 0.3mm).”
➀ It should be noted that the Constantan element of Type J thermoelements is NOT interchangeable with the
Constantan element of Types T or N due to the different ration of copper and nickel in each.
C–4
Publication 1746-6.16 – January 1999
Appendix C
Thermocouple Descriptions
S and R Type Thermocouples
S (Platinum–10% Rhodium vs. Platinum)
R (Platinum–13% Rhodium vs. Platinum)
“The ASTM manual STP 470 [1970] indicates the following restrictions on
the use of S {and R} type thermocouples at high temperatures: They should
not be used in reducing atmospheres, nor in those containing metallic vapor
(such as lead or zinc), nonmetallic vapors (such as arsenic, phosphorous or
sulfur) or easily reduced oxides, unless suitable protected with nonmetallic
protecting tubes. They should never be inserted directly into a metallic
primary tube.”
“The positive thermoelement, platinum–10% rhodium {13% rhodium for R},
is unstable in a thermal neutron flux because the rhodium converts to
palladium. The negative thermoelement, pure platinum, is relatively stable
to neutron transmutation. However, fast neutron bombardment will cause
physical damage, which will change the thermoelectric voltage unless it is
annealed out.”
“The thermoelectric voltages of platinum based thermocouples are sensitive
to their heat treatments. In particular, quenching from high temperatures
should be avoided.”
“ASTM Standard E230–72 in the Annual Book of ASTM Standards [1972]
specifies that the standard limits of error for Type S {and R} commercial
thermocouples be ±1.4C between 0 and 538C and ±1/4 percent between 538
and 1482C. Limits of error are not specified for Type S {or R}
thermocouples below 0C. The recommended upper temperature limit for
continuous use of protected thermocouples, 1482C, applies to AWG 24
(0.5mm) wire.”
Publication 1746-6.16 – January 1999
C–5
Appendix C
Thermocouple Descriptions
C and D Type Thermocouples
C (Tungsten-5% Rhenium vs. Tungsten-26% Rhenium)
D (Tungsten-3% Rhenium vs. Tungsten-25% Rhenium)
Types C and D thermocouples are recommended for use in the temperature
range from 0 to 2320oC in non-oxidizing inert atmospheres. They are not
practical for use below 750oF. Beware of embrittlement.
Code
C–6
Color code
Max Useful Temp Range
EMF Over Useful Range
Std Limits of Error
C
jacket:: wht-red trace
+ = wht, – = red
TC grade: 32-4208oF (0-2320oC)
Ext grade: 32-1600oF (0-870oC)
0-37.066 mV
4.5-450oC
1.0% to 2320oC
D
jacket:: wht-yel trace
+ = wht, – = red
TC grade: 32-4208oF (0-2320oC)
Ext grade: 32-500oF (0-260oC)
0-39.506 mV
4.5-450oC
1.0% to 2320oC
Publication 1746-6.16 – January 1999
Appendix
D
Channel Calibration
This appendix shows you how to calibrate the module’s input channels.
About the Procedure
The purpose of the procedure is to store a pair of calibration values in
EEPROM for each channel to set channel accuracy at 0.05% of full range
regardless of channel circuit tolerances. The module is designed so you can
calibrate its input channels individually or in groups. The thermocouple/mV
operation of all channels is suspended during calibration.
With your programming terminal, you will enter calibration codes in word 5
of the configuration file and read status in words 4 and 5 of the status file. A
rung of ladder logic copies calibration codes into the output image table for
transfer to the module, and another rung copies calibration status from the
module (input image table) into the data table. You perform calibration with
the SLC processor in run mode. For more information on addressing
calibration words, refer to chapter 4.
Calibration Logic
Before starting the procedure, enter the following calibration rungs into
processor memory:
Copy Calibration Codes to the Module
COP
COPY FILE
Source
Dest
Length
Copy Calibration Status into the Data Table
COP
COPY FILE
Source
Dest
Length
Publication 1746-6.16 – January 1999
#N7:10
#O:6.0
8
#I:6.0
#N7:0
8
D–1
Appendix D
Channel Calibration
Calibration Codes and Status
Use the following format for entering calibration code words and reading
calibration status bits. You will enter calibration values in Hex. You can
read channel status OK bits at different steps in the calibration procedure,
one bit for each channel you are calibrating.
Use Word 5 (Output Image – Configuration Word) for Entering Calibration Codes
15
12
11
08
07
04
03
00
Code
Word 5
1
0
0
Use Words 4 and 5 (Input Image – Status Words) for Reading Calibration Status
15
12 11
08 07
04
03
Status
Word 4
0
0
0
0
0
0
0
Calibration
Codes in Hex
1
00
Channel Status
During Calibration
0
OK status bits (1 = OK) for channels 3, 2, 1, 0
(high-end calibration) @
OK status bits (1 = OK) for channels 3, 2, 1, 0
(low-end calibration) @
15
Status
Word 5
0
0
0
12
11
0
0
0
0
08
07
0
0
04
0
0
03
00
Channel Status
at Completion of
Calibration
0
OK status bits (1 = OK) for channels 3, 2, 1, 0
(at completion of calibration) @
Channel status words 6 and 7 display “CAL4” during calibration
D–2
@ Reads F Hex if all four channels are OK.
Publication 1746-6.16 – January 1999
Appendix D
Channel Calibration
Calibration Procedure
To perform this calibration procedure, you will need a precision dc voltmeter
and precision power supply that can display and maintain a calibration
voltage to 1/1000 of a millivolt: at 0.000 mV and 90.000 mV.
Prepare for calibration by removing the thermocouple leads from the input
terminals of the channels that you want to calibrate. Switch the SLC
processor to run mode so it can execute the calibration ladder logic. For
convenience, we suggest that you calibrate all four channels at the same time.
1. With your programming terminal, enter calibration code 1001 Hex into
the data table address for configuration word 5.
2. Observe status words 0-3, 6 and 7.
The module returns the code “CAL4” Hex in status words 6 and 7.
It also clears channel data words 0-3.
3. Short circuit the pairs of input terminals for the channels you want to
calibrate. Make the jumper as short as possible.
4. With your programming terminal, enter calibration code 1002 Hex into
the data table address for configuration word 5.
5. Observe bits 0-3 in status word 4.
If all the channels you are calibrating see zero voltage, the module returns
status-OK bits set, one bit for each channel (F Hex for all four channels).
Otherwise, the module returns channel status bits set to zero.
6. Apply 90.000 mV to the pairs of input terminals, all in parallel, for the
channels you are calibrating. Make your leads as short as possible.
7. With your programming terminal, enter calibration code 1004 Hex into
the data table address for configuration word 5.
8. Observe bits 4-7 in status word 4.
If all the channels you are calibrating see 90.000 mV, the module returns
status-OK bits set, one bit for each channel (F Hex for all four channels).
Otherwise, the module returns channel status bits set to zero.
9. Remove the 90.000 mV calibration voltage.
10.With your programming terminal, enter calibration code 1008 Hex into
the data table address for configuration word 5.
11. Observe bits 0-3 in status word 5.
After the module burns the calibration values into its EEPROM, it returns
status-OK bits set, one bit for each channel (F Hex for all four channels).
If the module could not complete the calibration of one or more channels,
it returns a zeroed status bit for that channel (non-F Hex returned)
12.To end the calibration procedure, enter calibration code 0000 Hex into the
data table address for configuration word 5 with your programming
terminal. During thermocouple/mV operation, word 5 must be zero.
Publication 1746-6.16 – January 1999
D–3
Appendix D
Channel Calibration
Notes:
D–4
Publication 1746-6.16 – January 1999
Appendix
E
Terms and Abbreviations
Terms and Abbreviations
The following terms and abbreviations are used throughout this manual. For
definitions of terms not listed here refer to Allen–Bradley’s Industrial
Automation Glossary, Publication AG-7.1.
A/D – Refers to the analog-to-digital converter within the module. The
converter produces a digital value whose magnitude is proportional to the
instantaneous magnitude of an analog input signal.
attenuation – The reduction in the magnitude of a signal as it passes through
a system. The opposite of gain.
channel – Refers to one of four, small-signal analog input interfaces to the
module’s terminal block. Each channel is configured for connection to a
thermocouple or DC millivolt (mV) input device, and has its own
configuration and status words.
chassis – A hardware assembly that houses devices such as I/O modules,
adapter modules, processor modules, and power supplies.
CJC – (Cold Junction Compensation) The means by which the module
compensates for the offset voltage error introduced by the temperature at the
junction between the thermocouple lead wire and the input terminal block
(the cold junction).
common mode rejection ratio – The ratio of a device’s differential voltage
gain to common mode voltage gain. Expressed in dB, CMRR is a
comparative measure of a device’s ability to reject interference caused by a
voltage common to its input terminals relative to ground.
CMRR=20 Log10 (V1/V2)
common mode voltage – A voltage signal induced in conductors with
respect to ground (0 potential).
configuration word – Contains the channel configuration information
needed by the module to configure and operate each channel. The module is
designed for software rather than hardware configuration.
cut–off frequency – The frequency at which the input signal is attenuated
3dB by the digital input filter. Frequency components of the input signal
below the cut-off frequency are passed with under 3dB of attenuation.
dB – (decibel) A logarithmic measure of the ratio of two signal levels.
data word – A 16-bit integer that represents the value of the analog input
channel. The channel data word is valid only when the channel is enabled
and there are no channel errors. When the channel is disabled the channel
data word is cleared (0).
digital filter – A low-pass filter of the A/D converter. The digital filter
provides high-frequency noise rejection.
Publication 1746-6.16 – January 1999
E–1
Appendix E
Terms and Abbreviations
effective resolution – The number of bits in the channel data word used to
represent useful information.
full scale error – (gain error) The difference in slope between the actual and
ideal analog/thermocouple transfer functions.
full scale range – (FSR) The difference between the maximum and
minimum specified analog/thermocouple input values.
gain drift – The change in full scale transition voltage measured over the
operating temperature range of the module.
input data scaling –Depends on the data format that you select for the
channel data word. You can select from scaled-for-PID or Engineering Units
for millivolt, thermocouple, or CJC inputs, which are automatically scaled.
You may also select proportional counts, which you must compute to fit your
application’s temperature or voltage resolution.
local system – A control system with I/O chassis within several feet of the
processor, and using1746-C7 or 1746-C9 ribbon cable for communication.
LSB – (Least Significant Bit) The bit that represents the smallest value
within a string of bits. Refers to a data increment defined as the full scale
range divided by the resolution.
multiplexer – An switching system that allows several input signals to share
a common A/D converter.
normal mode rejection – (differential mode rejection) A logarithmic
measure in dB, of a device’s ability to reject electrical noise between
differential inputs, but not between an input and ground or ground reference.
remote system – A control system where the chassis can be located several
thousand feet from the processor chassis. Chassis communication is via the
1747-SN Scanner and 1747-ASB Remote I/O Adapter.
resolution – The smallest detectable change in a measurement, typically
expressed in engineering units (e.g. 0.15C) or as a number of bits. For
example, a 12-bit value has 4,096 possible counts. It can therefore be used to
measure 1 part in 4096.
sampling time – The time for an A/D converter to sample an input channel.
status word – Contains status information about the channel’s current
configuration and operational state. You can use this information in your
ladder program to determine whether the channel data word is valid.
step response time – This is the time required for the module to process an
input signal to reach 99.9% of its expected final value, given a large step
change in the input signal.
update time – The time for the module to sample and convert a channel
input signal and make the resulting value available to the SLCt processor.
E–2
Publication 1746-6.16 – January 1999
Appendix
F
CSA Hazardous Location Approval
CSA Hazardous Location Approval
Approbation d’utilisation dans des emplacements dangereux par la
CSA
CSA certifies products for general use as well as for use in hazardous locations.
Actual CSA certification is indicated by the product label as shown below, and
not by statements in any user documentation.
La CSA certifie les produits d’utilisation générale aussi bien que ceux qui
s’utilisent dans des emplacements dangereux. La certification CSA en vigueur
est indiquée par l’étiquette du produit et non par des affirmations dans la
documentation à l’usage des utilisateurs.
Example of the CSA certification product label
Exemple d’étiquette de certification d’un produit par la CSA
I
I
To comply with CSA certification for use in hazardous locations, the following
information becomes a part of the product literature for CSA-certified Allen-Bradley
industrial control products.
• This equipment is suitable for use in Class I, Division 2,
Groups A, B, C, D, or non-hazardous locations only.
• The products having the appropriate CSA markings (that is, Class I Division 2,
Groups A, B, C, D), are certified for use in other equipment where the suitability
of combination (that is, application or use) is determined by the CSA or the local
inspection office having jurisdiction.
Pour satisfaire à la certification de la CSA dans des endroits dangereux, les
informations suivantes font partie intégrante de la documentation des produits
industriels de contrôle Allen-Bradley certifiés par la CSA.
• Cet équipement convient à l’utilisation dans des emplacements de Classe I,
Division 2, Groupes A, B, C, D, ou ne convient qu’à l’utilisation dans des endroits
non dangereux.
• Les produits portant le marquage approprié de la CSA (c’est à dire, Classe I,
Division 2, Groupes A, B, C, D) sont certifiés à l’utilisation pour d’autres
équipements où la convenance de combinaison (application ou utilisation) est
déterminée par la CSA ou le bureau local d’inspection qualifié.
Important: Due to the modular nature of a PLC control system, the product with
the highest temperature rating determines the overall temperature code rating of a
PLC control system in a Class I, Division 2 location. The temperature code rating is
marked on the product label as shown.
Important: Par suite de la nature modulaire du système de contrôle PLC, le
produit ayant le taux le plus élevé de température détermine le taux d’ensemble du
code de température du système de contrôle d’un PLC dans un emplacement de
Classe I, Division 2. Le taux du code de température est indiqué sur l’étiquette du
produit.
Temperature code rating
Taux du code de température
I
I
Look for temperature code
rating here
The following warnings apply to products having CSA certification for use in
hazardous locations.
!
ATTENTION: Explosion hazard —
• Substitution of components may impair suitability for Class I,
Division 2.
• Do not replace components unless power has been switched off
or the area is known to be non-hazardous.
• Do not disconnect equipment unless power has been switched
off or the area is known to be non-hazardous.
• Do not disconnect connectors unless power has been switched
off or the area is known to be non-hazardous. Secure any
user-supplied connectors that mate to external circuits on an
Allen-Bradley product using screws, sliding latches, threaded
connectors, or other means such that any connection can
withstand a 15 Newton (3.4 lb.) separating force applied for a
minimum of one minute.
CSA logo is a registered trademark of the Canadian Standards Association
PLC is a registered trademark of Allen-Bradley Company, Inc.
Publication 1746-6.16 – January 1999
Le taux du code de
température est indiqué ici
Les avertissements suivants s’appliquent aux produits ayant la certification CSA
pour leur utilisation dans des emplacements dangereux.
!
AVERTISSEMENT: Risque d’explosion —
• La substitution de composants peut rendre ce matériel
inacceptable pour lesemplacements de Classe I, Division 2.
• Couper le courant ou s’assurer quel’emplacement est désigné
non dangereux avant de remplacer lescomposants.
• Avant de débrancher l’équipement, couper le courant ou
s’assurer que l’emplacement est désigné non dangereux.
• Avant de débrancher les connecteurs, couper le courant ou
s’assurer que l’emplacement est reconnu non dangereux.
Attacher tous connecteurs fournis par l’utilisateur et reliés aux
circuits externes d’un appareil Allen-Bradley à l ’aide de vis,
loquets coulissants, connecteurs filetés ou autres moyens
permettant aux connexions de résister à une force de
séparation de 15 newtons (3,4 lb. - 1,5 kg) appliquée pendant
au moins une minute.
Le sigle CSA est la marque déposée de l’Association des Standards pour le Canada.
PLC est une marque déposée de Allen-Bradley Company, Inc.
F–1
Appendix F
CSA Hazardous Location Approval
F–2
Publication 1746-6.16 – January 1999
Index
A
A/D, D–1
abbreviations, D–1
D
data word, 4–3, D–1
resolution, 6–5
addressing, 4–2
configuration word, 4–2
addressing example, 4–2
data word, 4–3
addressing example, 4–3
status word, 4–3
addressing example, 4–3
data word format, scaling ranges by input
type, 6–5
alarms, 7–6
diagnostics, 8–1
application examples, 9–1
differential mode rejection, D–2
See also normal mode rejection
attenuation, D–1
dB, D–1
decibel, D–1
default setting of configuration word, 6–1
definition of terms, D–1
digital filter, D–1
B
bit allocation, 6–1
in configuration word, 2–6, 6–2, B–2, B–3,
B–4
in status word, 6–7
disabling a channel, 2–6, 6–2, B–1, B–2,
B–3, B–4
door label, 1–3
E
effective resolution, D–2
C
electrical noise, 3–5, 3–6
cable tie slots, 1–3
electrical specifications, A–1
channel, D–1
electrostatic damage, 3–1
channel configuration error, 6–8, 8–3
engineering units input, 2–6, 6–2, B–1, B–2,
B–3, B–4
channel filter frequency, 4–3
effects on noise filtering, 4–3
effects on update time, 4–3
chassis, D–1
CJC, 3–5, D–1
CMRR, D–1
cold junction compensation, 3–5, D–1
common mode rejection ratio, D–1
common mode voltage, D–1
configuration word, 4–2, 6–1, D–1
factory default setting, 6–1
configuring a channel, 6–1
current draw, 3–1
cut–off frequency, 4–3, D–1
environmental specifications, A–2
equipment required for installation, 2–1
errors, 8–3
detecting channel–related errors, 8–3
configuration error, 6–8, 8–3
open circuit, 6–8, 8–3
over–range error, 6–8, 8–3
under–range error, 6–8, 8–3
detecting module–related errors, 8–3
conditions tested at power–up, 8–3
over–range error, 6–8, 8–3
examples, 9–1
basic application example, 9–1
how to address configuration word, 4–2
how to address data word, 4–3
how to address status word, 4–3
how to use PID instruction, 7–5
using alarms to indicate status, 7–6
verifying channel configuration changes,
7–4
extension wire, 1–5
Publication 1746-6.16 – January 1999
I–2
Index
F
N
FSR, D–2
noise filtering, 4–3
full scale error, D–2
normal mode rejection, D–2
full scale range, D–2
O
G
gain drift, D–2
gain error, D–2
See also full scale error
getting started, 2–1
procedure, 2–2
tools required, 2–1
open–circuit, 6–8, 8–3
defining conditional state of channel data
downscale enable, 2–6, 6–2, B–1, B–2,
B–3, B–4
upscale enable, 2–6, 6–2, B–1, B–2,
B–3, B–4
zero, 2–6, 6–2, B–1, B–2, B–3, B–4
error condition, 6–8, 8–3
out–of–range error, 6–8, 8–3
H
hazardous environment classification, A–2
output image, 4–2
output response to slot disabling, 4–5
heat considerations, 3–5
P
I
physical specifications, A–1
ID code, 4–1
PID input type, 2–6, 6–2, B–1, B–2, B–3,
B–4
input channel multiplexing, 1–5
PID instruction, 7–5
input data scaling, D–2
power requirements, 3–1
input image. See status word and data word
power–up sequence, 1–4
input response to slot disabling, 4–5
programming, 7–1
alarms, 7–6
application examples, 9–1
configuration settings, making changes,
7–3
PID instruction, 7–5
verifying channel configuration changes,
7–4
input specifications, A–2
installation, 3–1, 3–3
equipment required, 2–1
getting started, 2–1
L
LEDs, 1–3
channel status indicators, 1–3
module status indicator, 1–3
state tables, 8–2
local configuration, D–2
LSB, 2–6, 6–2, B–1, B–2, B–3, B–4, D–2
proportional counts input, 2–6, 6–2, B–1,
B–2, B–3, B–4
R
remote configuration, D–2
removable terminal block, 1–3
removing the module, 3–3
M
resolution, 4–4, D–2
module ID code, 4–1
how to enter, 4–1
module operation, 1–5
multiplexing, 1–5
multiplexor, D–2
Publication 1746-6.16 – January 1999
Index
S
sampling time, D–2
I–3
start–up instructions, 2–1
status word, 6–4, 6–6, D–2
See also input image
scaled–for–PID, 2–6, 6–2, B–1, B–2, B–3,
B–4
step response, D–2
scaling input data, D–2
system operation, 1–4
self–locking tabs, 1–3
slot disabling, 4–5
specifications, A–1
electrical, A–1
environmental, A–2
input, A–2
physical, A–1
Publication 1746-6.16 – January 1999
T
temperature units, representing data from
type B thermocouple, 2–6, 6–2, B–1,
B–2, B–3, B–4
terminal wiring, 3–4
cold junction compensation, 3–5
I–4
Index
thermocouple types, 1–2, A–2
restrictions, C–1
temperature ranges, 1–2, A–2
tools required for installation, 2–1
troubleshooting, 8–1
flowchart, 8–4
LED examination, 8–2
U
update time, D–2
effects of filter time setting, 4–3
V
Verification of dynamic configuration change,
7–4
W
wiring, 3–1
terminal wiring, 3–4
cold junction compensation, 3–5
worksheets, B–1
Publication 1746-6.16 – January 1999
Allen-Bradley, a Rockwell Automation Business, has been helping its customers improve
productivity and quality for more than 90 years. We design, manufacture and support a broad
range of automation products worldwide. They include logic processors, power and motion
control devices, operator interfaces, sensors and a variety of software. Rockwell is one of the
world’s leading technology companies.
Worldwide representation.
Argentina • Australia • Austria • Bahrain • Belgium • Brazil • Bulgaria • Canada • Chile • China, PRC • Colombia • Costa Rica • Croatia • Cyprus • Czech Republic •
Denmark • Ecuador • Egypt • El Salvador • Finland • France • Germany • Greece • Guatemala • Honduras • Hong Kong • Hungary • Iceland • India • Indonesia •
Ireland • Israel • Italy • Jamaica • Japan • Jordan • Korea • Kuwait • Lebanon • Malaysia • Mexico • Netherlands • New Zealand • Norway • Pakistan • Peru •
Philippines • Poland • Portugal • Puerto Rico • Qatar • Romania • Russia–CIS • Saudi Arabia • Singapore • Slovakia • Slovenia • South Africa, Republic • Spain •
Sweden • Switzerland • Taiwan • Thailand • Turkey • United Arab Emirates • United Kingdom • United States • Uruguay • Venezuela • Yugoslavia
Allen-Bradley Headquarters, 1201 South Second Street, Milwaukee, WI 53204 USA, Tel: (1) 414 382-2000 Fax: (1) 414 382-4444
Publication 1746-6.16 – January 1999
Supercedes Publication 1746-6.16 – December 1997
PN955132–48
Copyright 1999
Allen-Bradley
Company,1999
Inc. Printed in USA
Publication
1746-6.16
– January