1
-
Océ
Posterizer™ Pro
POP into retail
o
User manual
Quick Reference
Manual
Copyright
© copyright-2010 Océ
All rights reserved. No part of this work may be reproduced, copied, adapted, or transmitted
in any form or by any means without written permission from Océ.
Océ makes no representation or warranties with respect to the contents hereof and specifically disclaims any implied warranties of merchantability or fitness for any particular purpose.
Further, Océ reserves the right to revise this publication and to make changes from time
to time in the content hereof without obligation to notify any person of such revision or
changes.
Edition: 2010-12
Contents
Contents
Chapter 1
Create and print your first poster......................................................................5
Presentation................................................................................................6
Designer: Basic operations to open and adjust your template..............8
Create your first template....................................................................8
Prepare your first template for use in the data entry module........10
Data Entry: Basic operations to create and send your first poster for
print...........................................................................................................12
Create and send your first poster to the Print Manager..................12
You can also........................................................................................14
Print Manager: Basic operations to print your first job.........................16
Set up your first printer and queue, and print your first job..........16
3
Contents
4
Chapter 1
Create and print your first
poster
Presentation
Presentation
Introduction
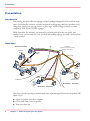
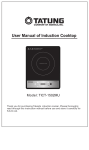
Introducing the most efficient signage software package designed for the retail environment. Posterizer Pro software is a fully integrated retail signage solution to produce everything from short-term pricing posters to price tags, window clings, banners or other
temporary POS (Point of Sales) signage.
With Posterizer Pro software, an internal or external print provider can easily and
quickly create just-in-time, low-cost, professional-looking signage for small - and medium
- sized retailers.
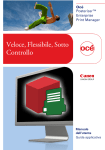
Illustration
Print Provider Shop
FTP server
(anywhere on the Internet, possibly
hosted by Print Provider)
Templates Customer 1
Templates Customer 2
Data Entry
Module
s
ter
Templates
s
Po
Tem
plate
s
Pos
ter
s
Designer
Module
Wide Format
s
er
st
Po
Print Manager
Jo Module
b
s
Small
Format
Client
module
Client
module
Posters
Products
database server
Retail Store – Customer 1
Products
table
Retail Store – Customer 2
This Posterizer Pro getting started manual aims at presenting the first basic steps that will
allow you to:
■
■
■
6
Open and adjust your first template
Create and send your first poster
Print your first job
Chapter 1 - Create and print your first poster
Presentation
To take advantage of all the features and capacities of Posterizer Pro, refer to the complete
documentation set:
■
■
■
■
The Posterizer Pro Administration Manual ('Administration settings and tasks')
The Designer 'Application guide'
The Data Entry 'Application guide'
The Print Manager 'Application guide'
The Client module
The Océ Posterizer Client is typically run at the retailer place to streamline the workflow
with his printed POP (Point Of Purchase) signage provider, when the print provider is
equipped with Posterizer Pro software.
Refer to the Posterizer Pro Administration Manual ('Administration settings and tasks')
to get all information on the creation and configuration of this external workflow (configuration of the FTP exchanges, creation of the installation package for the Client
module).
Refer to the Client 'Application guide' to get complete a complete description of the
Client software features as well as the procedures to take full advantage of it.
Chapter 1 - Create and print your first poster
7
Create your first template
Designer: Basic operations to open and
adjust your template
Create your first template
Introduction
You can easily create a first template for use in the other Posterizer Pro modules.
Purpose
Use the Demo chart provided by default in Posterizer Pro.
Create your first template from the templates of the Demo chart.
When to do
After the installation of Posterizer Pro.
After the import of the Demo chart into Designer Module.
Note:
Several templates are available from the Demo chart. They are stored in the sub-folders
of the 'Templates' folder.
Open a template stored in a chart
1. From the 'File' menu, select 'Open'.
The 'Open template' window opens.
2. From the tree structure on the left-hand side, navigate to the folder where the template
is stored.
Thumbnails of the templates appear for the selected folder.
3. Select a template.
4. Click 'Open'.
Result
The template opens in the design panel of the Designer Module.
8
Chapter 1 - Create and print your first poster
Create your first template
Insert an object
1. From the 'Objects palette', or from the 'Object' menu, select an object.
The form of your cursor changes in the design panel.
2. On the template indicate, with this cursor, the location you want for the selected object.
The object is inserted in the template.
A frame surrounds it.
Note:
When the object is selected, the 'Object properties' panel is automatically populated. It
contains the properties of the selected object.
Define the properties of an object
1. Select an object.
2. From the 'Object properties' panel, edit the properties of the selected object.
Define an explicit name for the object.
3. You can also define:
■ its format,
■ its content,
■ its appearance in the data entry module,
■ a possible link to a database.
4. Define the properties of all the objects of the template.
Chapter 1 - Create and print your first poster
9
Prepare your first template for use in the data entry module
Prepare your first template for use in the data entry module
Introduction
You can easily create a first template for use in the other Posterizer Pro modules.
Purpose
Save the template for use in the data entry module.
When to do
After the creation of a template.
Save your template
1. Access to the 'Save template' window.
2. From the 'Save template' window, enter a name for your template in the 'File name' field.
Note:
If you created a template from the default templates proposed in the Demo chart, make
sure you do not erase that default template.
3. Verify, from the tree structure, that the storage folder is correct.
Change it if needed.
4. Click 'Save'.
Upload a chart to FTP
1. From the ' FTP ' menu, select 'Chart' - 'Upload chart to FTP folder...'.
2. Click 'Yes' to confirm.
The chart is uploaded to the FTP server.
A pop-up message gives you the status of the upload.
Result
When you upload a chart to the FTP server, the chart content (including the newly created templates) becomes available for the user of the data entry module.
10
Chapter 1 - Create and print your first poster
Prepare your first template for use in the data entry module
Preview a template in Data Entry
1. From the 'Objects palette', click .
Or, from the 'File' menu, select 'Execute Posterizer Data Entry'.
The Data Entry module opens.
2. Preview the template in the design panel.
3. You can change the content of the objects, if allowed.
Result
When you preview a template in the Data Entry module, you get the same view as the
user of the data entry module.
You can also use the Data Entry module to create posters.
Chapter 1 - Create and print your first poster
11
Create and send your first poster to the Print Manager
Data Entry: Basic operations to create
and send your first poster for print
Create and send your first poster to the Print Manager
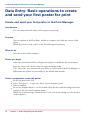
Introduction
You can easily make and send your first poster for printing.
Purpose
Open a template in the Data Entry module to complete and check the content of the
poster.
When the poster is ready, send it to the Print Manager for printing.
When to do
After the creation of the template.
Before you begin
Select the environment folder to display the templates available for this environment.
Enter the 'Store code' the first time you open the Model name.
This 'Store code' is an internal code you define. It will be used in the Print Manager to
differentiate the posters sent internally, by the Model name module.
Select a template to create the poster
1.
2.
3.
4.
12
In the top menu select 'File'
Select 'New poster...' to open the 'Select a poster template' panel
Select a template
In case the template allows it, set the double sided, the sleeve and the background color
settings (in the associated templates panel)
When one of these settings is marked with a cross, you cannot change its value (locked
in the template).
Chapter 1 - Create and print your first poster
Create and send your first poster to the Print Manager
Fill in the poster data
1. In the poster data panel, select a field to update
2. In the poster preview panel, check if the object highlighted is the correct one
3. In the poster data panel, fill in the content of each field to be filled in:
- you must supply the content of a field displayed in red
- you can change the content of a field in black
4. Check the changes in the poster preview panel
Send a poster to the Print Manager
1. Check and preview each poster when needed
When the poster data comes from a database you can easily display and print separately
each poster: on top of the poster data panel (content of the poster fields) select the 'Previous' or 'Next' arrow.
2. At the bottom of this panel, check the number of copies
3. Click 'Sent to Print Manager'
The selected poster is sent to the Print Manager
Chapter 1 - Create and print your first poster
13
You can also...
You can also...
Select associated templates
1. In the 'Select a poster template' panel, click on the selected template to display the complete list of available templates
2. Double click on the selected template to open it
The application opens the template and displays a preview.
The top panel displays the associated templates. The content and the name of these associated templates are the same, only the indication between '[ ]' signs changes (size, color,
format). The eye icon shows which selected template is displayed in the preview panel.
Double click on an associated template to set it as the main one.
3. In the top panel, check one or several associated templates
4. Enter the requested number of copies for each template
5. In case the template allows it, set the double sided, the sleeve and the background color
settings
When one of these settings is marked with a cross, you cannot change its value (locked
in the template).
Connect to a .xls or .csv file to fill in the poster fields
1.
2.
3.
4.
5.
6.
7.
In the top menu, click 'Database'
Select 'Connect'
Select the database file format
Browse to the location of the database file
Open the file
Select the table/sheet when requested
Validate to open the database content
Send a collection of posters to the Print Manager
1. From the 'Database' tab, select a data record to print
Check the poster preview in the preview panel
2. Click on the arrow to move each selected record to the list of posters to print (to the
bottom part of the window)
The application will create one poster per selected record and per selected associated
template. It will automatically fill in the fields of the poster with data from the database.
Click on the double arrow ('Select all records') to select all the records from the database.
All the records are added to the list of selected records.
3. Click 'Send selected records to Print Manager'
14
Chapter 1 - Create and print your first poster
You can also...
All selected posters are sent to the Print Manager according to the settings set in the associated templates panel (templates selected, number of copies for each template...)
Print locally
You can print posters to a local printer not declared in the Print Manager
Display the poster on the main screen
In the top menu, select 'File'
Select 'Print preview...'
In the 'Print preview' window, check the printer name, the poster settings and the position
of the poster on the page
5. When needed adjust the configuration of the printer ('Printer configuration...') and the
poster settings
6. Click the 'Print' button
The application prints the poster on the local printer.
1.
2.
3.
4.
Chapter 1 - Create and print your first poster
15
Set up your first printer and queue, and print your first job
Print Manager: Basic operations to print
your first job
Set up your first printer and queue, and print your first job
Introduction
Right after the installation of Print Manager you can easily add a printer and print your
first job.
Purpose
Add a printer to complete the workflow and print a job.
Before you begin
Remain logged in with the Administrator profile.
16
Chapter 1 - Create and print your first poster
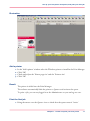
Set up your first printer and queue, and print your first job
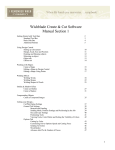
Illustration
Add a printer
1.
2.
3.
4.
In the 'Add a printer' window select the Windows printer to install in the Print Manager
Click 'OK'
Check and adjust the 'Printer page size' and the 'Printout size'
Click 'OK'
Result
The printer is added into the Print Manager.
The software automatically links the printer to Queue1 and activates the queue.
To print a job, you can stay logged in as the Administrator or you can log as a user.
Print the first job
1. Bring the mouse over the Queue1 icon to check that the queue status is 'Active'
Chapter 1 - Create and print your first poster
17
Set up your first printer and queue, and print your first job
2. In the top menu select 'Configuration' - 'Job dispatcher' to check the status is 'Activate'
3. Send the first job from Data Entry to the spooler.
The job dispatcher receives the job in Queue15.
The job goes to the 'Active Jobs' list.
4. From the jobs zone, select the job to display a preview in the 'Job preview' tab
5. Click 'Auto' or 'Manual' to start the printing
Result
The job is sent to the printer and moves from the 'Active Jobs' tab to the 'Inactive Jobs'
tab.
You can delete the job, modify it or reprint it.
You can also add other printers, create new queues and configure the dispatcher and the
optimization settings.
Suspend a queue
1. Right click on the queue to display the contextual menu
2. Select 'Suspend' to hold the queue
The queue icon is grayed out.
All the jobs in the queue are removed from the active and inactive jobs tabs. These jobs
will not be processed at the start of the spooler.
Select 'Activate' to restart the queue and process the jobs it contains.
18
Chapter 1 - Create and print your first poster
Index
Index
Chart
Upload ...........................................................10
D
Database
Database .........................................................14
CSV, XLS .......................................................14
P
Poster
Create .............................................................12
Preview
Data Entry ......................................................10
Print
Local ...............................................................15
Print Manager ................................................12
Q
Queue 1
Queue 1 .........................................................16
T
Template
Create ...............................................................8
Open ................................................................8
Prepare ...........................................................10
Preview ...........................................................10
Save ................................................................10
Templates
Associated templates .......................................14
19
-
Beyond the Ordinary
o
Printing for
Professionals
Professionals everywhere look to Océ for digital printing
and document management. In the office, Océ systems
keep the information of business and government
flowing. In manufacturing, architecture, engineering,
and construction, Océ wide-format printers set the
standard, while our display graphics systems help people
produce banners, billboards, and other large, colorful
applications. In corporate print facilities, marketing
service bureaus, and the graphic arts industry, Océ
systems print transaction documents, mailings,
newspapers, manuals, and books - on demand and at the
highest speeds. And Océ Business Services manages the
complete document workflows of customers around the
world. It all helps you go “Beyond the Ordinary” in
printing and document management.
Océ. Illustrations and specifications do not necessarily apply to products
and services offered in each local market. Technical specifications are
subject to change without prior notice. All other trademarks are the
property of their respective owners.
For more information visit us at:
2010-12
www.oce.com
US