1
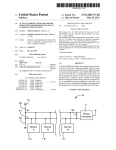
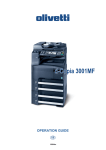
User’s Manual
User’s Manual
Version 3.1
4
Contents
1.1 System requirements
- Hardware/software . . . . . . . . .page 7
- Settings . . . . . . . . . . . . . . . . . . .page 7
2.1 Login
- Company . . . . . . . . . . . . . . . . . .page 9
- User name . . . . . . . . . . . . . . . . .page 9
- Password . . . . . . . . . . . . . . . . . .page 9
- SSL encryption . . . . . . . . . . . . .page 9
- Remember . . . . . . . . . . . . . . . . .page 9
- Login . . . . . . . . . . . . . . . . . . . . . .page 9
- Language . . . . . . . . . . . . . . . . . .page 9
3.1 Company page
- Message . . . . . . . . . . . . . . . . . .page 11
- Projects . . . . . . . . . . . . . . . . . . .page 11
- Users . . . . . . . . . . . . . . . . . . . . .page 11
- Help . . . . . . . . . . . . . . . . . . . . . .page 11
- Software . . . . . . . . . . . . . . . . . .page 11
- Project logoff . . . . . . . . . . . . . .page 11
4.1 Folder structure
- Creating folders . . . . . . . . . . .page 13
- Renaming folders . . . . . . . . . .page 14
- Deleting folders . . . . . . . . . . .page 14
- Watching folders . . . . . . . . . .page 15
6.1 Project information
- History . . . . . . . . . . . . . . . . . . .page 23
- Watched folders . . . . . . . . . . .page 24
- Users . . . . . . . . . . . . . . . . . . . .page 24
- Weblinks . . . . . . . . . . . . . . . . .page 25
5.1 Files
- Deleting files . . . . . . . . . . . . . .page 17
- Uploading files . . . . . . . . . . . .page 18
- Downloading files . . . . . . . . .page 18
- Copying files . . . . . . . . . . . . . .page 19
- Moving files . . . . . . . . . . . . . . .page 19
- Searching . . . . . . . . . . . . . . . . .page 20
- Removing ”New file” mark .page 20
- Sending to plot . . . . . . . . . . . .page 21
6.2 File information
- File preview . . . . . . . . . . . . . . .page 27
- File information (IFF) . . . . . .page 28
- File note and Locking . . . . . .page 28
- File history . . . . . . . . . . . . . . .page 29
7.1 Support
- Technical support . . . . . . . . .page 30
5
6
1.1 System requirements
Hardware/software
Settings
The software and hardware of the user must meet certain Docia.com
requirements.
To get the full benefit of the Docia functionalities the following
minimum standards should be observed:
The following browser settings must be observed:
Hardware:
In most cases the browser is set in that way.
If this is, however, not the case, please contact the company system
administrator for help.
Software:
Computer must have a processor such as the
Intel Pentium 233MHz and 64 Mb RAM
(128 Mb RAM is recommended)
Microsoft Internet Explorer 4.x/5.x
(recommended) - or Netscape 4.x.
Whip 4.0 plugin
WinZip 8.0 compression program
Adobe Acrobat Reader.
- Cookies must be permitted
- JavaScript must be permitted
Finally, the date of the user computer has to be correct.
The above software can be downloaded for free from www.docia.com.
NB Always contact the company administrator before installing
new software.
The speed of the Internet connection doesn’t influence the use of
Docia.com. However, an ISDN connection or something faster is
recommended.
7
2.1 Login
1
2
3
4
5
6
8
7
2.1 Login
Login
You log in from the web address www.docia.com
Click "Project login" above the left menu (both users and
administrators).
1 Company
Write company name. What is typed in must be exactly the same as
the company name which was specified in the first place.
name
2 User
Write user name. What is typed in must be exactly the same as the
user name which was specified in the first place.
3 Password
Write user password. Again what is typed in must be exactly the
same as the password which was specified in the first place.
SSL encryption
4 Use
It is possible to encrypt all communication between the user
computer and Docia. In this way no unauthorized user can intercept
and abuse your data. Docia has been certified by Thawte who is one
of the world’s biggest authorized providers of SSL certificates.
login
5 Remember
If this field is ticked off your browser will remember your company
and user name. So next time you will only have to state your
password.
6 Login
When you have filled out all fields correctly, click ”Login” to access
Docia.com.
7 Language
The user can go from one language to another by clicking ”English”
or ”Danish”.
9
3.1 Company page
6
1
2
3
4
5
10
3.1 Company page
Company page
The company page contains information about your project
cooperation and the exchange of files. Besides, the user has access
to different services related to the use of Docia.com.
1 Message
It is possible to send and read messages from other persons
involved in the projects accessible to the user. The sender can either
send a message to all or select certain project participants. Sent
messages will be shown next time the receiver logs on to Docia.com.
2 Projects
Here all projects accessible to the user are listed. There is
information about the start and closing dates of the projects as well
as the number of new files related to the individual projects.
If you click a project name, the file exchange of the project opens.
3 Users
Here all the users of the company are listed. If you click your own
user name, you can edit user information (name, title, telephone
number, user name and password) and select a language.
4 Help
Online manuals and support.
5 Software
Links to the latest software packages of special relevance when
using Docia.com.
Browsers, plug-ins, compression programs etc can all be
downloaded from the Internet.
logoff
6 Project
Cuts the user’s connection to Docia.com. To reconnect you will have
to type in password, user and company name again.
For security reasons the project server disconnects after 30
minutes without activity.
11
4.1 Folders
1234
12
4.1 Folders
Folder structure
When you select a project from the company page, the file exchange
of the project is shown in a separate window. The folder structure is
just like the folder structure of a normal computer. Folders can be
created, renamed and deleted by users with the permission to do so.
These permissions are distributed by the project administrator –
folder by folder. The user has no permission if the icons in the
upper menu bar are not activated when a folder is selected.
1 Creating folders
1. Select the location of the new folder. In the example from the
previous page the folder will be located as a subfolder of the
folder ”Drawing files” (check the marking*).
2. Click the ”Create folder” icon in the upper menu bar.
3. Write the folder name in the window that just opened.
4. Confirm this by clicking ”OK”.
The folder will now be created.
*) Internet Explorer and Netscape indicate open folders in different
ways. They both show an open folder. But Internet Explorer also
colors the background of the folder name blue.
13
4.1 Folders
2 Renaming folders
1. Find your folder and select it by clicking the folder icon
(the folder name is marked*).
2. Click the ”Rename folder” icon in the upper menu bar.
3. State the new folder name in the window that just opened.
4. Confirm this by clicking ”OK”.
3 Deleting folders
1. Find your folder and select it by clicking the folder icon
(the folder name is marked*).
2. Click the ”Delete folder” icon in the upper menu bar.
3. Confirm that the folder is meant to be deleted by clicking ”OK”.
Now the folder and its content will be deleted.
The folder will now be renamed.
14
4.1 Folders
4 Watching folders
1. Find your folder and select it by clicking the folder icon
(the folder name is marked*).
2. Click the ”Watch folder” icon in the upper menu bar.
3. Decide whether the subfolders are to be watched too by clicking
next to ”Include subfolders”.
4. Confirm this by clicking ”OK”.
When a folder is watched the user is immediately mailed about all
movements in the folder.
15
5.1 Files
12345678
16
5.1 Files
File management
Files can be deleted, sent, downloaded, copied and moved.
In addition to this you can search for files or remove files from the
”Since the last time” folder and send them to plot.
When files are downloaded, they are automatically compressed and
delivered as zip files. Then the zip files must be decompressed with
WinZip (a freeware program which can be downloaded for free if
you click ”Software” on the company page).
When files are uploaded the zip compression is optional. In case
files are compressed in a zip file this file will automatically be
decompressed by the server and the original files are placed in the
selected folder.
1 Deleting files
1. Find your file and select it by clicking the file icon (the file name
is marked**). Several files can be selected at the same time if
you keep the CTRL key down while selecting.
2. Click ”Delete files” in the upper menu bar.
3. Confirm that the files are meant to be deleted by clicking ”OK”.
Now the files will no longer be present at Docia.com.
Sorting files
The content of a folder can be sorted by, say, file name or date.
This is done by clicking the preferred parameter in the grey bar
above the file list.
**) Internet Explorer and Netscape indicate open folders in
different ways. Internet Explorer colors the background of the folder
name blue while Netscape ticks off the file icon.
17
5.1 Files
2 Uploading files
1. Find the receiver folder and select it by clicking the folder icon
(the folder name is marked*).
2. Click the ”Send files” icon in the upper menu bar.
3. Click ”Browse” next to the ”File 1” field in the window that just opened.
4. Select the file in the dialog box and click ”Open”.
You can send up to 4 files at a time (if you use all 4 fields).
5. You can inform other users of the file upload by selecting
”Inform other users pr email”
6. Write your message and select the users supposed to receive the
email.
7. Confirm this by clicking ”OK”.
The selected files are now uploaded and if there’s a message it is sent.
18
3 Downloading files
1. Find your file and select it by clicking the file icon (the file name
is marked**). More files can be selected at the same time by
keeping down the CTRL key while selecting.
2. Click the ”Download files” icon in the upper menu bar.
3. Decide whether extra file information should be attached.
4. Accept the file size.
5. Select a computer folder for saving the file.
A zip file with a copy of the files is downloaded to the computer
5.1 Files
4 Copying files
1. Find your file and select it by clicking the file icon (the file name is
marked**). More files can be selected at the same time by
keeping down the CTRL key while selecting.
2. Click the ”Copy files” icon in the upper menu bar.
3. Click ”Select destination folder”.
4. Find your folder in the folder structure that just appeared.
5. Confirm this by clicking ”OK”.
5 Moving files
1. Find your file and select it by clicking the file icon (the file name
is marked**). More files can be selected at the same time by
keeping down the CTRL key while selecting.
2. Click the ”Move files” icon in the upper menu bar.
3. Click ”Select destination folder”.
4. Find your folder in the folder structure that just appeared.
5. Confirm this by clicking ”OK”.
19
5.1 Files
6 Searching
1. Find the folder to be searched and select it by clicking the folder
icon (the folder name is marked**). More files can be selected at
the same time by keeping down the CTRL key while selecting.
2. Click the ”Search folder” icon in the upper menu bar.
3. Type in the entire file name or part of it and decide whether to
search subfolders or not (if there are any).
4. Confirm this by clicking ”OK”.
7 Removing ”New file” marks
New files are marked when they are uploaded to Docia.com.
Thanks to this marking the files will get a shortcut in the ”Recent”
folders of the other project participants. In this way the users can
see which new files the other project participants have uploaded
lately. The shortcut is kept for the project participants until the mark
has been removed from each file in the ”Recent” folder.
1. Find your shortcut and select it by clicking the file icon (the file
name is marked**). More shortcuts can be selected at the same
time by keeping down the CTRL key while selecting.
2. Click the ”Checkmark” icon in the upper menu bar.
3. Confirm this by clicking ”OK”.
Now the shortcuts will no longer be shown in the ”Recent” folder in
question.
Please note that the ”Recent” folder contains only shortcuts to files
which have been uploaded by other project participants.
20
5.1 Files
8 Sending to plot
1. Find your file and select it by clicking the file icon (the file name
is marked**). More files can be selected at the same time by
keeping down the CTRL key while selecting.
2. Click the ”Send to plot” icon in the upper menu bar.
3. Fill out the form that just appeared.
4. A distribution list can be attached if you want: Just click
”Browse”. Select the file in the dialog box and click ”Open”
(the file has to be selected from the user’s own computer).
5. Confirm this by clicking ”OK”.
The files are now sent to plot in Vester Kopi.
Please note that the comments field can be used for other
purposes: For instance for a delivery address, a description of
importance to Vester Kopi or in case you don’t want the IBB
standard pen thickness.
21
6.1 Project information
1
2
3
4
22
6.1 Project information
1 History
Docia.com keeps track of every project history using log files which
are easy to access. For instance the user can see when project
participants downloaded the minutes of their latest meeting or
whether a drawing has been updated since the last time the user
logged in etc.
Upload: Registration of all files (incl. exact time and user ID)
uploaded in the project cooperation since its beginning.
1. Click ”History” in the bottom left menu bar.
2. Now it is possible to sort your information.
The dropdown menu confronts you with the following options:
Updated: Registration of all files (incl. exact time and user ID)
updated in the project cooperation since its beginning.
Recent: Registration of all actions (incl. exact time and user ID)
carried out in the project cooperation since the last time the user
was there.
Download: Registration of all files (incl. exact time and user ID)
downloaded in the project cooperation since its beginning.
If the list contains more information than is displayed the user can
browse by clicking ”Next” and ”Previous” at the top of the window.
Show all: Registration of all actions (incl. exact time and user ID)
carried out in the project cooperation since its beginning.
Deleted: Registration of all files (incl. exact time and user ID)
deleted in the project cooperation since its beginning.
23
6.1 Project information
2 Watched folders
Lists all folders that the individual user has chosen to watch.
1. Click the ”Watched folders” icon in the menu situated in the
bottom left corner.
2. Click the ”Watch folder” icon next to the folder path.
3. Click ”Delete” to delete the folder from the list or select
”Include subfolders”
4. Confirm this by clicking ”OK”.
24
3 Users
Lists all the users of the project – including names, telephone
numbers, email addresses etc.
Works as the mailing list of the project thanks to all the information
entered by the company administrators. The list is automatically
updated every time the information of the company page is
changed.
6.1 Project information
4 Weblinks
Lists all links to web sites having to do with the project.
The individual user can also create links here:
1. Click ”Weblinks” in the menu situated in the bottom left corner.
2. Click the ”Create new weblink”.
3. Fill out the fields and confirm this by clicking ”OK”.
25
6.2 File information
1
26
2
3
4
6.2 File information
File information
Important file information can be attached to a file. The file
information is shown at the bottom of the window every time a file
is selected. The information is organized in 4 tabs: ”View file”,
”File information”, ”File note” and ”File history”.
To change category, just click one of the four tabs.
1 View file
Preview
Files created in MS Word, Excel, PowerPoint, WordPerfect, Lotus 123,
etc are automatically converted into PDF files by Docia.com. If you
click the ”Preview” icon the PDF files can be seen in the browser
and printed even if the user has not installed the program the files
were originally created in. The only thing required is that the user
has installed a PDF plugin which can be downloaded by clicking
”Software” on the company page.
The PDF files are saved along with the original files which makes it
possible for the user to download the original files later.
DWG files are converted into DWF files which can also be seen in
the browser. To do this the user must have installed a Whip plugin
which can be downloaded by clicking ”Software” on the company
page.
1. Find your file and select it by clicking the file icon
2. Click ”View file” if the tab is not already open.
3. Click ”Preview” to see the content of the file in a separate window.
The thumbnail function in the bottom right corner displays files in
the most normal image formats: GIF, JPG, TIF, BMP, PCT, PCX, PSD
and DWD (ACAD version 13 and later versions).
27
6.2 File information
2 File information (IFF)
Open file
It is possible to open files directly from Docia.com, which means
that you can avoid the zip compression. The original files can be
viewed if the user has installed the right viewer or the program in
which the file was created in the first place.
1. Find your file and select it by clicking the file icon.
2. Click “View file” if the tab has not already been opened.
3. Click "Open file".
Now the file has been opened (provided the installed viewer and
programs are acceptable).
Xref files
Docia.com lists the Xref files of the Autocad drawings. The lists not
only show the original Xref names in the drawings, but also where
the Xref drawings are to be found in the Docia project. In the same
way you can select missing Xref files.
1. Find your file and select it by clicking the file icon.
2. Click “View file” if the tab has not already been opened.
3. Click "Xref files”.
28
Docia.com observes the IBB standards and therefore gives you the
opportunity to attach a text description of your file. This description
is compatible with IFF files and can be uploaded, downloaded and
used in, say, Point.
Users with no permission to send files cannot write or make
corrections in the text description.
1. Find your file and select it by clicking the file icon (the file name
is marked**)
2. Click the tab ” File information”.
3. Fill in the fields.
4. Click ”Update info”
6.2 File information
3 File note and Locking a file
It is possible to attach a note to a selected file and to lock it. If a file
is locked it cannot be downloaded. Only users with permission to
download and send files can unlock it.
1. Find your file and select it by clicking the file icon (the file name
is marked**)
2. Click the tab ” File note”.
3. Fill out the note field and click ”Update note”.
4. To lock the file click ”Lock file”.
4File history
It is possible to read the history of every file.
1. Find your file and select it by clicking the file icon (the file name
is marked**)
2. Click the tab ” File history”.
3. The latest changes are shown. Click ”Display history” to see the
entire file history.
4. If there are more versions of the same file, the history of any
version can be seen if you select a version number in the
dropdown menu right.
If there’s a note attached to the file, a note icon is displayed on the
left of the file name. If you move your cursor over the icon, the note
can be read. In a similar way it is marked that the file is locked.
Notes must be attached before they are locked.
29
7.1 Technical support
Byggeweb A/S offers hotline support in case you have technical
problems using Docia.com
Byggeweb A/S
Ryesgade 19A
DK-2200 København N
Hotline: +45 70 21 52 52
Email: [email protected]
Web address: www.byggeweb.dk
30