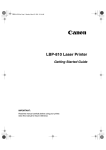
1
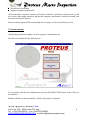
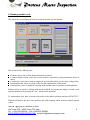
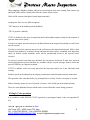
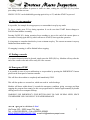
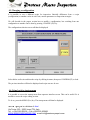
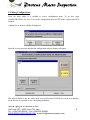
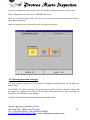
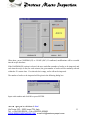
Gifk\
k\l
lj
jD
DXZif
f@@ejg\Zk`fe
USER MANUAL
Rev. 1.0
Jan. 2002
J\d`Zfe JpeXgj`j is a division of Astel
Via Torino, 253 -10015 Ivrea (TO)- Italy
Tel. ++ 39-0125-230105 – Fax ++39-0125-633482
WWW.SEMICONSYNAPSIS.COM e-mail [email protected]
1
Gifk\
k\l
lj
jD
DXZif
f@@ejg\Zk`fe
AUTOMATIC WAFER MACRO INSPECTION MACHINE
Proteus Macro Inspection is a simple and effective tool for wafer visual control.
It have been especially studied for all that cases where it is required a simple, fast and cost effective
solution in wafer inspection.
An inspection unit, featuring wafer tilt and rotation, is provided for the proper inspection phase.
It is possible to provide versions with single or double cassette, laser mapping and centering/aligning
system with optical edge detection.
The system is computer controlled, and its use and programming is really easy and user friendly. It is
possible, if needed, to edit and recall recipes, and each recipe includes inspection strategies (all wafers,
fixed wafers and random access for statistical inspection) and handling parameters.
Proteus Macro Inspection is mounted on a vibration free granite base, and can be supplied also with
different kinds of inspection lamps for any different need.
J\d`Zfe JpeXgj`j is a division of Astel
Via Torino, 253 -10015 Ivrea (TO)- Italy
Tel. ++ 39-0125-230105 – Fax ++39-0125-633482
WWW.SEMICONSYNAPSIS.COM e-mail [email protected]
2
Gifk\
k\l
lj
jD
DXZif
f@@ejg\Zk`fe
1. Introduction
Proteus Macro Inspection system have been especially designed to be used as a tool for silicon wafer
macro inspection.
It is composed of three different parts:
w Mechanical part;
w Motion and I/O controller;
w Computer with display and keyboard.
The whole system have been designed to be easy to use and maintain, and in particular the provided
computer interface have been studied to allow a simple use and configuration.
In the following we will introduce the basic use of Proteus System, i.e. the basic installation
procedure, the operator interface and the use of its configuration software.
2. Installation and Facilities
Installing Proteus system can be done in three simple steps.
First of all, place the three parts (mechanics, control and computer) in its place. In doing so, pay
attention to respect the lenght of tubing and connection cables between controller and mechanics.
Following the indications on the rear panel of controller and numbers placed on tubes, connect each
unit into the proper position.
Basically there will be the following connections to do:
w
w
w
w
w
w
w
w
w
serial connection to PC: standard 9 pins male-female cable;
220 AC mains supply, to PC and from PC to controller (Monitor supply cable);
Standard PC connections (keyboard, mouse, display);
indexer serial connection to controller: standard 9 pins male-female cable;
arm connection to controller: standard 9 pins male-female cable;
inspection unit to controller: standard 15 pins male-female cable;
arm up/down limits to controller: mini din 3 pins cable;
pneumatics and vacuum: follow numbers;
air intake (4 to 6 bar- 6 mm tubing)
J\d`Zfe JpeXgj`j is a division of Astel
Via Torino, 253 -10015 Ivrea (TO)- Italy
Tel. ++ 39-0125-230105 – Fax ++39-0125-633482
WWW.SEMICONSYNAPSIS.COM e-mail [email protected]
3
Gifk\
k\l
lj
jD
DXZif
f@@ejg\Zk`fe
w vacuum line (6 mm tubing).
w Inspection keyboard with its cable.
After connections, switch on computer and verify if controller is switched on (main switch is in the
rear section, aside supply connector) and that the emergency stop button is released (if needed, turn
the button clockwise to release).
Proteus control program will be automatically run at startup; wait for its introductory screen.
3. System startup
After having switched on computer, Proteus program is automatically run.
The first screen displayed is the following one:
To run machine with the last configuration used, press the INSPECTION button, or the F4 key on
the keyboard.
Machine will then run the next interface, which is the proper user interface.
J\d`Zfe JpeXgj`j is a division of Astel
Via Torino, 253 -10015 Ivrea (TO)- Italy
Tel. ++ 39-0125-230105 – Fax ++39-0125-633482
WWW.SEMICONSYNAPSIS.COM e-mail [email protected]
4
Gifk\
k\l
lj
jD
DXZif
f@@ejg\Zk`fe
4. Running machine cycle
This will be the screen displayed when accessing the normal cyle run interface:
This screen has five different parts:
w a button section, where all the functional button are placed;
w a cassette display section, where the current cassette is represented, giving information about its
status;
w a counter bar, where three counters (inspected, good and discarded) give the status of inspection;
w an information bar, where are given: wafer size and configuration (recipe) name;
w a message line, where is displayed a message with machine status or operator recommendations.
Buttons can be accessed by clicking with mouse-trackball, by pressing the display if touch screen
optoin is included or by pressing the “Fxx” button on the keyboard.
To start machine cycle, place a cassette with wafers on the indexer platform, and press START [F5]
Platform will then be driven to home position, and wafer mapping will be started to identify present
wafers.
J\d`Zfe JpeXgj`j is a division of Astel
Via Torino, 253 -10015 Ivrea (TO)- Italy
Tel. ++ 39-0125-230105 – Fax ++39-0125-633482
WWW.SEMICONSYNAPSIS.COM e-mail [email protected]
5
Gifk\
k\l
lj
jD
DXZif
f@@ejg\Zk`fe
When mapping is finished, machine will proceed extracting the first wafer starting from cassette top
and found wafers will be colored jellow into the cassette status section.
Wafer will be extracted and placed on the inspection chuck.
At this point, there are two different options:
-TILT button is in the default position (disabled);
-TILT is pressed (enabled).
If TILT is disabled, wafer stops on inspection chuck and machine remains waiting for the response of
operator about wafer quality.
If wafer is accepted, operator must press the black button on the inspection keyboard to send it back
into the cassette.
If wafer is rejected, the operator must press the red button on the inspection keyboard. Wafer is then
released from machine by removing vacuum and operator must remove it manually from inspection
chuck (in double cassette machines, wafer will be automatically driven to the rejected wafers
cassette).
To proceed, operator must then press the black key on operator keyboard. If wafer have not been
removed and operator presses the black key, machine will give an error message. Remove wafer and
press ENTER key on computer keyboard.
If TILT is enabled, wafer is not only placed on the inspection chuck, but is also tilted and starts
rotating.
Rotation speed can be adjusted by moving the potentiometer aside the inspectoin unit connections.
The operation is the same than before, by pressing black or red key if wafer is accepted or rejected.
Before releasing vacuum in case of rejection, of course, wafer will be put in horizontal position.
There are some additional features which can be accessed from this screen during operation.
4.1Single Cycle operation
It is possible to enable SINGLE CYCLE operation, by pressing its button or the correspondent F3
key.
J\d`Zfe JpeXgj`j is a division of Astel
Via Torino, 253 -10015 Ivrea (TO)- Italy
Tel. ++ 39-0125-230105 – Fax ++39-0125-633482
WWW.SEMICONSYNAPSIS.COM e-mail [email protected]
6
Gifk\
k\l
lj
jD
DXZif
f@@ejg\Zk`fe
This will force the machine to process a wafer at a time, waiting for a START (F1) key before
proceeding with the next one.
SINGLE CYCLE can be disabled by pressing again its key or F3, and then START to proceed.
4.2 Step by step operation
It is possible, for example for setup purposes, to run machine in step by step mode.
To do so, simply press F1 key during operation. It can be seen that START button changes to
PAUSE when machine is running.
Pressing PAUSE (F1) during operation forces machine to stop at the end of the current phase or
movement. Pressing again the key (which will turn to START) starts again the operation.
It is important to remember that this key is not an instant stop key. The current movement is anyway
finished and then machine stops.
If a mapping is running, it will be finished before stopping.
4.3 Ending a cassette
If a cassette inspection must be aborted, simply press the END (F6) key. Machine will stop after the
end of the current wafer and will be ready for a new cassette.
4.4 Emergency STOP
It is possible, in case of severe malfunction, to stop machine by pressing the EMERGENCY button
placed on the front panel of motion controller.
This will force the machine to completely and immediately STOP.
This will also produce a vacuum loss, which can result in wafer breakage.
Machine will detect within about 10 seconds the emergency condition, giving a message and then
stopping the program from runnig. In this case program must be lauched again manually by double
clicking on its icon on computer desktop.
WARNING: USE EMERGENCY STOP BUTTON ONLY IN CASE OF REAL NEED, SINCE
ITS IMPROPER USE CAN RESULT IN WAFER BREAKAGE
J\d`Zfe JpeXgj`j is a division of Astel
Via Torino, 253 -10015 Ivrea (TO)- Italy
Tel. ++ 39-0125-230105 – Fax ++39-0125-633482
WWW.SEMICONSYNAPSIS.COM e-mail [email protected]
7
Gifk\
k\l
lj
jD
DXZif
f@@ejg\Zk`fe
4.5 Changing a configuration
It is possible to run a different recipe for inspection. Basically differences from a recipe
(configuration) to another can be in wafer size, motion parameters or inspection strategies.
We will describe in the proper section how to modify a configuration, but switching from one
configuration to another can be done by pressing CHANGE (F2) key.
The configuration selection screen will then be displayed.
Select before wafer size and then the recipe by clicking its name, then press CONFIRM (F5) to load.
The previous interface will then be displayed and recipe can now be run.
4.6 Going back to startup menu
It is possible to access the startup menu from operator interface screen. This can be useful if it is
needed to access the recipe editing section.
To do so, press the MENU (Esc) key. The startup menu will then be displayed.
J\d`Zfe JpeXgj`j is a division of Astel
Via Torino, 253 -10015 Ivrea (TO)- Italy
Tel. ++ 39-0125-230105 – Fax ++39-0125-633482
WWW.SEMICONSYNAPSIS.COM e-mail [email protected]
8
Gifk\
k\l
lj
jD
DXZif
f@@ejg\Zk`fe
5. Editing Configurations
From the Main menu, it is possible to access configuration menu. To do this, press
CONFIGURATION (F1) key. To access the configuration menu in EDIT mode, a password will be
required.
A dialog box as showed will then be displayed.
Input the correct password and then the configuration selectoin display will appear.
This menu is similar to the one which can be accessed from the CHANGE key on the user interface,
but in this case it is possible to act with editing capabilities.
J\d`Zfe JpeXgj`j is a division of Astel
Via Torino, 253 -10015 Ivrea (TO)- Italy
Tel. ++ 39-0125-230105 – Fax ++39-0125-633482
WWW.SEMICONSYNAPSIS.COM e-mail [email protected]
9
Gifk\
k\l
lj
jD
DXZif
f@@ejg\Zk`fe
To select a configuration, select before wafer size and then configuration name by clicking on it.
When configuration is selected, press CONFIRM (F5) to edit.
There are two sections inside editor. The first one is about inspection strategies and the second is
about motion parameters.
Inspection strategies can be selected from the following given options.
5.1 Choosing inspection strategies
It is then possible to program ALL (F6) wafers for inspection, and this option will not imply any
further choice.
If the FIXED (F7) mode is selected, only specified wafers will be inspected, and these wafers must
be selected in a further screen as follows, by selecting it with up/down arrows and by pressing, the
ENABLE or DISABLE key (only clicking).
Selected wafer will then be marked and will remain until deselected.
J\d`Zfe JpeXgj`j is a division of Astel
Via Torino, 253 -10015 Ivrea (TO)- Italy
Tel. ++ 39-0125-230105 – Fax ++39-0125-633482
WWW.SEMICONSYNAPSIS.COM e-mail [email protected]
10
Gifk\
k\l
lj
jD
DXZif
f@@ejg\Zk`fe
When done, press CONFIRM (F5) or CLOSE (ESC). If confirmed, modifications will be recorded
into the recipe data base.
If the RANDOM (F8) option is selected, the user can define a number of wafers to be inspected, and
each time the recipe is run (for each cassette) the given number of wafers will be randomly selected
within the 25 cassette slots. If a selected slot is empty, wafer will not be inspected.
The number of wafers to be inspected will be given in the following dialog box.
Input wafer number and click OK or press ENTER.
J\d`Zfe JpeXgj`j is a division of Astel
Via Torino, 253 -10015 Ivrea (TO)- Italy
Tel. ++ 39-0125-230105 – Fax ++39-0125-633482
WWW.SEMICONSYNAPSIS.COM e-mail [email protected]
11
Gifk\
k\l
lj
jD
DXZif
f@@ejg\Zk`fe
5.2 Changing motion parameters
From the parameters section of recipe editing it is possible to change motion parameters.
This section can be accessed by clicking on the PARAMETERS folder bar from the default editing
screen.
When selected, this screen will appear as follows:
It is strongly recommended not to change any value if machine is correctly running.
On any machine each value isdescribed ito the description section, to allow a correct understanding
of its meaning.
To change it, select by clicking, then click MODIFY (F4), input new value and then ckick MODIFY
(F4) again to accept modifications.
When done click CONFIRM (F5) to accept or DISCARD (Esc).
J\d`Zfe JpeXgj`j is a division of Astel
Via Torino, 253 -10015 Ivrea (TO)- Italy
Tel. ++ 39-0125-230105 – Fax ++39-0125-633482
WWW.SEMICONSYNAPSIS.COM e-mail [email protected]
12
Gifk\
k\l
lj
jD
DXZif
f@@ejg\Zk`fe
IF THERE ARE DOUBTS IN MODIFYING PARAMETERS, CREATE A COPY OF THE
ORIGINAL CONFIGURATION AND ACT ON THIS ONE BEFORE. ERRORS MAY RESULT
IN WAFER BREAKAGE: BE CAREFUL!!!!!!!!!
5.3 Creating a new configuration
To create a new configuration, when accessing in edit mode to the configuration menu, press NEW
(F2) key.
This will access the dialog box where the name of new configuration can be given.
Write the name and press CONFIRM (F5) to accept. DISCARD (Esc) will abort new configuration
creation.
After this, access the Strategies and parameters sections. Values will be, at this point, the same than
DEFAULT configuration, and can be modified according to needs.
5.4 Deleting a configuration
To delete a configuration, select configuration to delete by clicking on the list and then choose
DELETE (DEL) on the configuration selection screen.
J\d`Zfe JpeXgj`j is a division of Astel
Via Torino, 253 -10015 Ivrea (TO)- Italy
Tel. ++ 39-0125-230105 – Fax ++39-0125-633482
WWW.SEMICONSYNAPSIS.COM e-mail [email protected]
13
Gifk\
k\l
lj
jD
DXZif
f@@ejg\Zk`fe
6. Password change
Password is required to access recipe editing menu.
There is a simple system to manage password change. When accessing to the password request box,
press CHANGE (F2) key to access the password change dialog box as follows:
Simply insert the old password in the first line, then the new one in the second and confirm it in the
last one.
When done, press CONFIRM (F5) or DISCARD (Esc) to accept or reject new password.
J\d`Zfe JpeXgj`j is a division of Astel
Via Torino, 253 -10015 Ivrea (TO)- Italy
Tel. ++ 39-0125-230105 – Fax ++39-0125-633482
WWW.SEMICONSYNAPSIS.COM e-mail [email protected]
14
Gifk\
k\l
lj
jD
DXZif
f@@ejg\Zk`fe
7. Parameters
Please note in the following area each parameter of DEFAULT recipe for both 5 and 6”
configurations, before making any modification.
PARAMETER NAME
VALUE 5”
VALUE 6”
COMMENTS
________________________________________________________________________________
J\d`Zfe JpeXgj`j is a division of Astel
Via Torino, 253 -10015 Ivrea (TO)- Italy
Tel. ++ 39-0125-230105 – Fax ++39-0125-633482
WWW.SEMICONSYNAPSIS.COM e-mail [email protected]
15
Gifk\
k\l
lj
jD
DXZif
f@@ejg\Zk`fe
8. Errors and malfunctions
There are some conditions which can result in errors.
These conditions are especially related with sensor verification, and especially vacuum sensor and
position sensors.
Basically, when an expected sensor is not activated, or deactivated, within a given time (timeout), an
error occurs.
In this case, a dialog box with the error message will be displayed.
There are two possibilities:
ERROR IS NOT RECOVERABLE: click on YES or press Enter and program will be quit and
machine must be restarted, preferably by switching controller OFF and then ON and verifying if error
conditions are solved (e.g.if vacuum or air pressure are present, if mechanics is free and so on).
In this case restart program by double clicking its icon on computer desktop.
ERROR IS RECOVERABLE OR HAVE BEEN ALREADY SOLVED: (this condition can happen
for example in case of a momentary loss in vacuum, or other similar conditions) click on NO to make
the program continue.
WARNING: BEFORE CONTINUING IN CASE OF ERROR, BE ABSOLUTELY SURE THAT
MACHINE IS IN A SAFE CONDITION, TO AVOID WAFER BREAKAGE. IN CASE OF
DOUBT, QUIT PROGRAM AND RESTART.
If arm is in a dangerous position, such a s inside a full cassette, it can be manually moved. In this
case, RESTART MACHINE.
For a complete troubleshooting refer to SERVICE MANUAL.
J\d`Zfe JpeXgj`j is a division of Astel
Via Torino, 253 -10015 Ivrea (TO)- Italy
Tel. ++ 39-0125-230105 – Fax ++39-0125-633482
WWW.SEMICONSYNAPSIS.COM e-mail [email protected]
16
Gifk\
k\l
lj
jD
DXZif
f@@ejg\Zk`fe
TABLE OF CONTENTS
1. Introduction
Page 3
2. Installation and Facilities
Page 3
3. System startup
Page 4
4. Running machine cycle
4.1 Single cycle operation
4.2 Step by step operation
4. 3 Ending a cassette
4.4 Emergency stop
4.5 Changing a configuration
4.6 Going back to startup menu
5. Editing Configurations
5.1 Choosing inspection strategies
5.2 Changing motion parameters
5.3 Creating a new configuration
5.4 Deleting a configuration
Page 5
Page 6
Page 7
Page 7
Page 7
Page 8
Page 8
Page 9
Page 10
Page 12
Page 13
Page 13
6. Password Change
Page 14
7. Parameters
Page 15
8. Errors and malfunctions
Page 16
J\d`Zfe JpeXgj`j is a division of Astel
Via Torino, 253 -10015 Ivrea (TO)- Italy
Tel. ++ 39-0125-230105 – Fax ++39-0125-633482
WWW.SEMICONSYNAPSIS.COM e-mail [email protected]
17
Gifk\
k\l
lj
jD
DXZif
f@@ejg\Zk`fe
NOTE
J\d`Zfe JpeXgj`j is a division of Astel
Via Torino, 253 -10015 Ivrea (TO)- Italy
Tel. ++ 39-0125-230105 – Fax ++39-0125-633482
WWW.SEMICONSYNAPSIS.COM e-mail [email protected]
18