Download User Manual of LCD-show Alarm System
Transcript
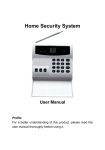
Wireless Auto-dial Intruder Alarm System User Manual User’s Manual Profile For a better understanding of this product, please read this user manual thoroughly before using it. Features and Function 1. Anti-interfere function. When someone interferes it with same frequency, the main panel will activate siren to alarm. 2. Support anti-decode of remote control and it can shield the disarm signal if needed. 3. 6 programmable Defense zone available, with status LED. The main panel can register 99 wireless detectors/sensors. Every defense zone can set independently arm, disarm, time-delay alarm and so on. 4. Have the function of “one-key arm”. User can start “Home arm” or “Out arm” freely by keeping pressing one key on remote control 5. Can set the reminder sound of defense zones. Will remind users of remembering to arm the system when leaving the house. 6. Can be compatible with other products of our company. Such as wireless big outdoor siren and mini siren . 7. It stores 2 groups of monitoring center and 6 groups of user phone numbers to dial out and play the recorded message if there is an alarm. 8. Can arm/disarm with remote control or keypad on the main panel 9. Can arm/disarm/listen-in by calling the host phone number (The phone numbers of main panel). 10. Have the function of reminder for circuitry failure. For example, if telephone line is cut or short, the main panel will alarm. 11. Have the superior of calling out. When it meets alarm, it will cut the talking and ensure alarm information comes first. 12. Have in-built backup battery and can continue to work and last for 8---10 hours when electricity is cut or in failure. How Do I install the alarm system? I Installation of Main panel a. Insert the siren to the port of main panel, and connect telephone line with the port of “Line” and “Phone” with the telephone set. That is to say, the telephone must be connected with main panel. The telephone can work normally. b. Power the system on and switch it to “ON”, the power status will be blinking and sound “beep” which shows the main panel works normally. It will sound three “beep beep beep” every 30 seconds, which helps users remind of setting alarm phone numbers. The sound “beep” will disappear when you finish the alarm phone number setting. Please press “ ” to make the system disarmed to avoid it activate the siren to alarm when registering sensors. Attention: a. Try to install the main panel in the center of defense zone and pull antenna and make it up for getting more wireless receiving distance. b. Installation position should be far away with huge metal objects and wireless device. c. Connect the trunk line with main panel in order that it can dial out in the first second when there is an alarm. d. Should be installed in a shelter. II. Installation of door sensors: Door sensors are used for detecting the status of open and close of windows and doors. It will detect it and send the signal to main panel. Fix the transmitter box and magnet to door case and door. (You’d better fix it again with bolt if you want it fixed strongly.) Caution: A Magnet should be close to signal status and make the transmitter box and magnet as close as possible (<10mm). B. In order to get the best receiving distance, you should pull the antenna and make it upwards C. If the indicator light of door sensor are still blinking, it shows battery fails. So please replace it as soon as possible. III. Installation of Wireless PIR motion Sensors: PIR Sensors are used for detecting if someone moves within in a certain place. Fix it on the wall, 2—2.2meters high and you should adjust the position to make it face to the defense zone. Caution: How Can I set up the main panel? Before any operation, please enter passwords and #.(Default is 1234). Two beeps show that the operation is successful, four short beeps shows fails. You have to try again in this case. Please press # to exist the programmed status. System will exist automatically if there is no any order within 30 seconds. 1. Record alarm message. Input 6 # to record message within in 10 seconds and you will hear a beep. It will exist with two beeps automatically after 10 seconds. Every recorded message will replace the last message. The message should be short and clear. For example: “This is xxxxx building and room xxx, please come to offer help ”. Play the recorded message through the telephone, please press 6 *on the main panel. 2. How do I Register sensors or detectors with main panel? First, as we all know, every detector has its unique ID. It must be registered with the main panel so that it can be identified during working. When it detects unwonted status, it will send signal to main panel .If it did not register with main panel, the main panel would not identify it and could not receive the signal, so the alarm will be failed. Before registering, please input 7#, with a beep, the arm status flashing, it shows on the status of registering. Now you can start to register sensors. Please collect all detectors including door sensors, PIR detectors, and gas/smoke detectors together with the main panel and make sure their battery inside and can work normally. Switch on main panel (power LED is on), and trigger the sensors or detectors you are going to check in. 3. How to trigger sensors or detectors? When the main panel is powered, start to register them. For door sensors, just remove the two parts of door sensor and remove back, it will beep and the status LED flashes, which shows successful. And for PIR Sensors, you can turn the switch to “on” and the system will beep, which shows successful and then turn it to “off” to avoid wrong alarm. For remote controllers, you can press any key on its panel (three keys on it), and the system also beeps. For gas and smoke detectors, there is a black switch on the left side; you can press it to register it with main panel. For break sensor, you can put it on a desk and then shake the desk, it will send a signal to main panel. The main panel will response with a beep sound, which shows successful. After finishing registering, please enter # to exist (two beeps.). 4. How to delete all coded information if you want to recheck-in? Under the status of registering, please input 7*. It will sound “beep, beep” two times, all coded information has been deleted. IV. How Can I setup the Alarm Phone Numbers? (The phone Nos. that will be dialed out when there is an alarm). Command: 31* the 1st User phone number # 32* the 2nd User phone number # 33* the 3rd User phone number # 34* the 4th User phone number # 35* the 5th User phone number # 36* the 6th User phone number # 38* the 1st phone number of monitoring center # 39* the 2nd phone number of monitoring center # Note: Do not setup the last monitoring center numbers if you do not have monitoring center. You can enter a blank order if you want to delete a Alarm Phone Number. Fox example: You want delete the 4th Alarm Phone Number, only input 34* #. Operation sketch: Input password (origin 1234 # ) Record Voice Message 6# 6* Record message ReplayThe message Sensors Register 7# Register sensors with main panel. 7* Delete all stored information Alarm Phone No. Settings. 31* the 1st User phone number # 32* the 2nd User phone number # 33* the 3rd User phone number # 34* the 4th User phone number # 35* the 5th User phone number # 36* the 6th User phone number # 38* the 1st phone number of monitoring center # 39* the 2nd phone number of monitoring center # There are six-defense zones, so you can install sensors in any of defense zone. You will know what sensors are triggered from the screen of main panel. You can input 0X+# and then trigger sensors and then enter into the this defense zone. For example,if you want to code the detectors and sensors into the 2nd or 4th desense zone,do as following Enter 7# and trigger sensors Zone 2: Enter 02 # and trigger sensors Zone 4: Enter 04 # and trigger sensors… -and so on V. How to Modify passwords? Command: 10* passwords # (passwords must be 4 digitals, such as 2345) This password is used for remote control. Users should setup it confidently VI. Defense Zone Setting: You can set your sensors or detectors into “a special defense zone”, which can let some detectors not work when there is an alarm. Command: * Zone No.+ 2 +X + [#]. X is zone type,such as : 0-- for Closed Zone. It is closed temporarily and is used for arming in sub-defense zone. 1--- for Immediate Zone. It can activate the siren and order the main panel to dial out Alarm phones immediately if the detectors in this defense zone detect some unwonted status. 2--- for Delay Zone. Activate siren and dial out in 30 seconds when detectors in this zone find something unwonted. 3 --for Urgent Zone. It will activate siren and dial out users phone numbers no matter it is arming or disarming when the detectors in this defense zone are triggered. 5 ---for Inner Zone. It will not activate siren and dial out users phone numbers in the status of Home Arm. E.g.: If you want the second defense zone to be inner zone. You can input: *0225#. Reminder for application: Usually, we setup the door/window sensors installed in windows, veranda and doors as “Immediate Zone”. The detectors in this area will activate alarm in any mode of arming; If you setup wireless PIR detectors as the “Inner Zone”, they will work in the mode of “Out Arm”, but do not work in the mode of “Home Arm”; You can setup the doors in the main gates as “Delay Zone” if you do not want to take remote control when going out. In this case, you can disarm the system within 30 seconds after opening the door, but the main panel will not have enough time to activate siren and dial out alarm phone numbers. 6. Start/close reminder for defense zone. If you start the reminder for defense zone, it will “ beep beep beep” for three times to remind users of arming. Command: Start: * Zone No.+ 71 # Close: * Zone No.+ 70 # 7. Start/close the function of anti-interfere. When starting the function of anti-interfere in arming status, it will activate siren to alarm (not calling users) if someone interferes the alarm system with same frequency. Command: Start: 17 * 1 # Close: 17 * 0 # 8. Start/close the function of anti-decode. In order to Prevent someone from decoding the alarm system, we often start this function. Once starting this option, the signal from remote control is screened and only the keypad in the main panel can arm the system Command: Start: 18 * 1 # Close: 18 * 0 # 9. Start/close the reminder for phone line trouble. It will tell you when the phone line is cut or short. It will sound “beep” three times every 10 minutes. Command: Start: 22 * 1 # Close: 22 * 0 # 10.Setup the times of ring. If you want to remote control the main panel, you can set the ringing times of the calling, the times canbe 00-12. For example, if you set the times into 04, then when you dial the number of the main panel, it will automatically get through after you hearing 4 times of the ringing, 00 means the host will not get through Command: 12 *XX #. XX shows times of ring, from “00--12”. 11.Setup the time of siren. You can setup the siren to make it last 5 minutes, 10 minutes or 30 mins. Command: 29 * XX #. (XX is 00---30minutes.) 13. Start/close the reminder of arm/disarm system. User can do start it if he wants to siren to make sound when he arms/disarms the system. Command: Start: 8# (default) Close: 8* 14. Reset: You can delete all registered information including passwords in order to return the original status before living factory. Command: 0000 #. VI. How to use controllers 1.The remote controller has four buttons: Out Arm button: set alarm works when no one is at home, all the detectors will be in working status, the light on panel will slowly flash green. Home Arm button: set alarm works when there is someone at home, detectors which inside of the house(in inner defense zone) will not work, only the detectors outside of the house(in outside defense zone) will work, for the people inside can move conveniently, but others who break in from outside will trigger the alarm. Disarm button: set main panel disarm, all the detectors are disarmed, the light on panel will keep in still green. Alarm button: set emergency alarm, the light on panel will flash red, the system will make alarm, and the unit will send the SMS and dial out phone numbers. 2. The process of receiving an alarm. What should I do when I receiving the phone call from the main panel? When detecting something unwonted, the detectors will activate the siren and dial out alarm phone numbers and the status LED will be on. User can answer the phone and do it according the following steps: Press * to start the function of listen-in for 30 seconds. (you will hear what is happening around the main panel.) Press # to confirm that you have already received the signal of alarm and stop alarm. If you do not input “#”, the main panel will continue to dial out all alarm phone numbers circularly. 3. Remote control by phone: You can call the host phone number to control the system to make the host arm or disarm by input passwords+ #. If the password is correct, the system will sound “beep” two times. If wrong, it sounds “beep” four times. And then you can control the system with following command: Press “1” to arm . (Make sensors working) Press “2” to disarm (make sensors stop working) Press “*” to enter into the mode of 30 seconds of listen-in. Press “#” to exist. Note: The system will hang off automatically if passwords are wrong for 5 times or no any order in 20 seconds. The Use of Electronic Clock ADJ (Adjust): To shift time and date; to change the data. SET: Enter/exit the setting of Date & Time. Procedure: Use a needle or something shaped like stitch, or injection to do the following steps. Press SET for two times to set the month, you can press ADJ to adjust the month. After that, press SET again to be in the date and time setting condition. After setting, press SET and ADJ for one time to finish. Standard pack components main panel wireless PIR detector wireless door sensor Min siren remote controllers, 12v DC adapter instruction manual 1 pcs 1 pcs 1 pcs 1 pcs 2 pcs 1 pcs 1 pcs The following sensors can be optional: Optional sensors/detectors are packed separately. It includes remote controllers, wireless PIR, wireless gap sensor, wireless gas detector, wireless smoke detector, panic button, baluster, according your specific needs. Explanation of alarm systems: 1. Working elements: An alarm system contains two parts—a main panel and some sensors. When sensors detect unwonted situation, they will send signal to main panel. When main panel receives the signal, it will activate siren to make 110dB sound to inform people around and dial out preset phone numbers for help. 2. Function of each sensors/detectors and main panel. Sensors/detectors include Door/window contacts (sensor), PIR Sensor/detectors and smoke/gas detectors, remote controls. 1). Window/door sensors are used to induct the close and open of doors or windows. If a door is opened, it will send signal to main panel. 2). PIR Sensors: detect the motioning object with infrared activities 3). Smoke/gas detectors: detect smoke or gas leak. When detecting smoke or gas , it will send signal to main panel. 4). Main panel: like a brain of the alarm system. It will activate siren to make 110dB sound to attract attention from people pass by and auto-dial preset phone numbers to call police and owners. 5). Siren: To make 110 dB sounds. 3. We sell at a standard package. Customers can add more sensors/detectors if needed. 4. Wireless sensors do not need wire to communicate with main panel. They use wireless communication; so wireless sensors/detectors have to be registered with main panel before working so that main panel can identify them when they send signal to main panel. Technical Parameters Main panel Operating voltage: DC 9V (Back-up battery inside) Static current: <50mA Operating Frequency: 315MHZ or 433.HZ Wireless receiving distance: 100m-250m Anti-interfere ability: 1V/m (20—1000Mhz) Outer Alarm Siren Volume: 110 db Working Condition: Temperature –10℃~+ 40℃ Humidity ≤ 90% Capacity for Wireless Device: 99 pcs. Wireless Gap Detector Power Supply: DC12V (inner 12V battery) Static Current: ≤20 uA Transmission Current: ≤15mA Transmission Frequency: 315/433MHZ±0.5MHZ Transmission Distance: No obstacle 80m Interval Distance: 15 mm Working Condition: Temperature –10℃~+ 40℃ Humidity ≤ 90% Wireless P.IR Detector Power Supply: DC9V (inner 9V battery) Static Current: ≤100 uA Transmission Current: ≤20mA Transmission Frequency: 315/433MHZ±0.5MHZ Transmission Distance: No obstacle 80m Detective Speed: 0.3~3m/s Detective Distance: 5~12m Detective Range: Horizontal 110°Vertical 60° Working Condition: Temperature –10℃~+ 40℃ Humidity ≤ 90% Remote Controller Power Supply: DC12V (inner DC12V battery) Static Current: 0 Transmission Current: ≤15mA Transmission Frequency: 315/433MHZ±0.5MHZ Transmission Distance: No obstacle 80m Working Condition: Temperature –10℃~+ 40℃ Humidity ≤ 90% FAQ Symptoms Causes 1. 2. Cannot alarm by phone 3. 4. 5. 6. Remote controlling distance is too short and the light indicator is not on strong enough Hasn’t armed Less than 30 seconds after arming. Set wrong phone num The two parts of door\window sensor is installed too far from each other. Haven’t activated PIR. Hasn’t checked code 1. Remedies 1. 2. Make arming Operate after 30 seconds 3. Set the num again according to the manual 4. Adjust the installation place of the door sensor 5. Activate the PIR 6. Check code again The battery of remote controller rustily 2. Low battery 1. Clean the rust 2. Change battery the alarm panel always makes beep voice 1 donot Connect telephone line to main panel 2 donot setup user number 3 donot record 10s voice message 1 Connect telephone line to main panel 2 setup user number 3 record 10s voice message Light indicator of door sensor and PIR is always on. Low battery Change battery Dial alarm num slowly The main panel has stored others num Set it again according to the operation manual The main panel cannot receive accessories signals Hasn’t checked code Check the code again Notice: ■Don’t install the system beside the strongly disturbing equipments like motor, computer etc. ■Should be installed in a concealed place. ■Don’t mis-plug the“out line”and “telephone” line of the phone ■Should be plug firmly and ensure well dissipation ■Only designed for indoor


