1
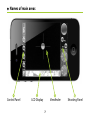
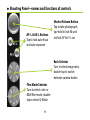
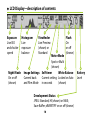
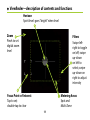
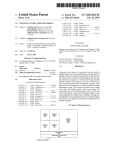
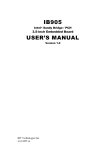
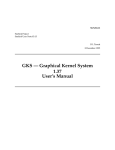
645PRO
1
Congratulations on acquiring Jag.gr 645 PRO
Jag.gr is dedicated to producing iOS camera
software for serious photographers. 645 PRO is
its latest acheivement, optimised for iPhone 4S,
providing unprecendented access to—and control
over—iPhone camera hardware together with truly
unparalleled image quality.
The many advantages delivered by this camera
software should serve you well, as they have been
designed for professional use. However, please read
this operating manual carefully before you put 645
PRO to work. It will help you prepare, compose and
take the best possible photographs.
2
This operating manual
covers the major aspects
of 645 PRO usage.
If you need additional
information
please
visit Jag.gr’s website at
http://jag.gr/ or e-mail
[email protected].
Connect with Jag.gr
online:
facebook.com/jaggrpage
@jaggrtweets on Twitter.
Contents
12 special aspects of 645 PRO................4
Changing Film Mode.............................20
Names of main areas...............................7
Changing or rotating camera Body......22
Control Panel—names and functions of
controls.....................................................8
Changing focusing screen....................23
Locking white balance..........................24
Shooting Panel—names and functions of
controls.....................................................9
Flash photography................................25
Setting Viewfinder.................................26
LCD Display—description of contents.10
Setting Night Mode...............................27
Viewfinder—description of contents and
functions................................................11
Managing development.......................28
Shutter Release Button.........................12
Using zoom............................................31
Using Self Timer mode..........................14
Viewing and sharing photographs......32
Focus and Exposure...............................16
Advanced settings.................................34
Changing Backs.....................................19
License information...............................36
3
12 special aspects of 645 PRO
1.
4.
Maximum image quality
645 PRO develops HI-quality JPEGs
with the option of MAX-quality
JPEGs. You also have the choice to
save “developed RAW”—dRAW—
image data for later processing.
Spot metering
With 645 PRO you can choose
between the standard Multi-Zone
metering approach and more
targeted Spot metering.
2.
Intuitive handling
645 PRO has all its controls “oncamera”, providing instant access to
everything.
Low-light performance
Using Night Mode, 645 PRO has
shutter speeds of up to 1 second,
which can open up even the darkest
evening scene.
3.
6.
5.
Interchangable bodies
Choose the look you want for your
camera—the verve of Rosso or
understated Classic.
Ultimate control
If it can be controlled, 645 PRO
lets you control it. Exposure, focus,
white balance, and more...
4
7.
8.
Interchangable backs
With seven backs, 645 PRO can deliver
all the leading medium format ratios
from square to panoramic:
6x6 for classic square (1:1) images
6x7 is, at 1.17:1, many magazine
photographers’ favourite
6x7+prints straight on 10x8
645 delivers the essential 4:3 ratio
6x9 has, at 3:2, the same
proportions as 35mm film
6x12gives you a wider, 2:1, view
6x17provides a luxurious,
panoramic (2.83:1) format
Professional film modes
645 PRO has seven film modes
inspired by classic film stock:
F4 subtle, fine-grain B&W
H5 high-contrast, high-grain
B&W
T3 classic medium-grain
medium-contrast B&W
C42 fine-grain color ideal for
portraits
E6K a cooler transparency
FC5 rich, saturated: great for
nature
K14 warm as toast, with intense
blacks
5
9.
11. Real-time histogram
Live Preview
The Viewfinder can show you
exactly what you will capture, so
you can work precisely with the
particular characteristics of your
chosen film mode.
See how your image is balanced
across five stops of exposure—
even before you’ve taken it!
12. Essential information
focusing
10. Interchangable
screens
With its always-on LCD Display, 645
PRO shows you everything you
need to know about your camera,
from the ISO and shutter speed to
the current flash and battery status.
Choose between crosshairs, Rule
of Thirds or an architectural grid,
keeping everything horizontal with
the split-screen spirit level.
6
Names of main areas
Control Panel
LCD Display
Viewfinder
7
Shooting Panel
Control Panel—names and functions of controls
Flash Switch
Slide to turn flash on or
off
Meter Button
Tap to set metering
mode (spot/multi);
tap-hold to toggle Live
Preview
Grid Button
Tap to set focusing screen;
tap-hold to cycle through
development options
White Balance Button
Tap to toggle white
balance lock; tap-hold to
toggle Night Mode
Timer Button
Tap to toggle self timer;
tap-hold to set duration;
View/Share Button
double-tap to reset (10 sec)
Tap to view/share Camera
Roll images & dRAW TIFFs;
tap-hold to view User Manual
8
Shooting Panel—names and functions of controls
AF–L & AE–L Buttons
Tap to lock auto-focus
and auto-exposure
Shutter Release Button
Tap to take photograph;
tap-hold to lock AE and
set/lock AF for 1½ sec
Back Selector
Turn to select image ratio;
double-tap to switch
between camera bodies
Film Mode Selector
Turn to select color or
B&W film mode; doubletap to select Q-Mode
9
LCD Display—description of contents
Exposure
Live ISO
and shutter
speed
Night Mode
On or off
(shown)
Histogram
Live
exposure
balance
Viewfinder
Live Preview
(shown) or
Standard
Flash
On
or off
(shown)
Meter Mode
Spot or Multi
(shown)
Image Settings Self timer
White Balance
Current back
Current setting Locked or Auto
and Film Mode in seconds
(shown)
Development Status
JPEG: Standard, HI (shown) or MAX;
Save Buffer; dRAW TIFF on or off (shown)
10
Battery
Level
Viewfinder—description of contents and functions
Horizon
Spirit level: goes “bright” when level
Zoom
Pinch to set
digital zoom
level
Filters
Swipe leftright to toggle
on/off; swipe
up-down
on left to
select; swipe
up-down on
right to adjust
intensity
Focus Point-of-Interest
Tap to set;
double-tap to clear
Metering Areas
Spot and
Multi-Zone
11
Shutter Release Button
Operating the Shutter Release Button
Photographs are taken using the Shutter Release Button A.
1. The Shutter Release Button has a two-step operating
process. Pressing and holding the button locks the
A
exposure, and sets and then locks the focus at the current
Focus Point-of-Interest (the center of the viewfinder if it
has not been specifically set elsewhere).
B
The red LEDs on the AE–L and AF–L Buttons B will
illuminate to show that exposure and focus (respectively)
have been locked, and 645 PRO will emit a small beep.
2. When you release the Shutter Release Button, you have 1½ seconds
in which to release the shutter. After this time, the focus and exposure will
unlock, and will return to automatic.
3. To release the shutter, tap the Shutter Release Button. 645 PRO will take
a photograph and unlock the focus and exposure for you to compose your
next shot.
12
4. If you tap the Shutter Release Button and you have not previously locked
the focus and exposure as described above, you can still take a photograph,
using auto-focus and auto-exposure. Please be aware that there may be a brief
delay before the shutter is released, while the auto-focus and auto-exposure
operate.
NOTE: if either AE–L or AF–L have been activated manually in advance, the use
of the Shutter Release button will not affect their status. For example, if the AF–L
button has been pressed and the AF–L LED is showing, pressing and holding
the Shutter Release Button will NOT cause the camera to re-focus; nor will the
exposure be unlocked and returned to automatic without manually tapping on
the AE–L button.
If both AE–L and AF–L are activated, there is no need to press and hold the Shutter
Release Button to set up the shot—is is only necessary to tap the Shutter Release
Button to take a photograph.
13
Using Self Timer mode
Delaying the Shutter Release
B The Timer Button A is used to activate or deactivate Self Timer mode. This delays the shutter
A
C release and is useful for minimizing camerashake when taking long exposures in low light,
or taking group shots that include the photographer.
The red LED B to the top right of the Shutter Release Button C will flash when
Self Timer mode has been activated.
2. When Self Timer mode has been activated and you release the Shutter
Release Button, a period of time elapses (10 seconds as standard) before the
shutter is released.
3. After the shutter has been released, Self Timer mode will be de-activated
automatically. if you wish to take another photograph using Self Timer Mode
you will need to re-activate it.
14
Setting Self Timer mode delay
The standard delay used in Self Timer mode is 10 seconds.
However, this can be customized. To set the Self Timer
A
B mode delay, press and hold the Timer Button A. The self
timer indicator B in the LCD display will show “1” (indicating
a 1 second delay) and will then increment, a second at a time. When you have
reached the number of seconds you require, release the Timer Button. After
the indicator reaches 99 seconds it starts at 1 second again.
NOTE: to reset the Self Timer mode delay to the default 10 seconds, double-tap on
the Timer Button.
15
Focus and Exposure
Choosing the right Focus and Exposure
645 PRO features lockable auto-focus and auto-exposure. This means you can
let the camera automatically find the most appropriate exposure level and
focus distance, and then lock the settings to prevent them changing.
The exposure level is read from the viewfinder. Two exposure-metering modes
are available: Spot and Multi-Zone.
Multi-Zone metering reads exposure information from a selection of areas
around the center of the viewfinder, and produces a balanced reading that is
ideal for most circumstances.
Spot metering reads only from a small circle in the center of the viewfinder
(roughly the size of the split-screen spirit level) and is extremely useful when
you wish to set the exposure for a small area of the scene.
An example might be shooting though a window in a dark room. Multi-Zone
would average out the outdoor and indoor light levels for a somewhat bland
result; Spot metering could be used to expose specifically for one or the other.
16
Setting exposure mode
To set the exposure mode delay, tap Meter Button A. Each
tap will toggle between Multi-Zone and Spot.
A
B
The meter mode indicator B in the LCD display reflects the
exposure mode, toggling between the Multi-Zone icon (shown) and the Spot
icon (greyed out).
Locking exposure
When you have selected an appropriate exposure level for
C
your scene, you can lock it using the AE–L Button C. Once
the exposure has been locked you can devote your attention to composing
your photograph, without worrying that the exposure level will change.
Tapping again unlocks the exposure. When the exposure level is locked, a red
LED in the center of the AE–L button is illuminated.
If you prefer not to lock the exposure until the last minute, perhaps because
of fluctuating light levels, you can use the Shutter Release Button’s temporary
AE locking function.
17
Setting focus Point-of-Interest
By default, the focus reading is taken from the center of the
A
viewfinder. You can set the focus by pointing the center of
the viewfinder at an object that is the desired distance away,
letting the auto-focus settle on it, and then locking the focus (see below).
Alternatively, a different focus “Point-of-Interest” may be selected by tapping
on the desired area of the viewfinder. This will lead to the display of the focus
Point-of-Interest indicator A. Double-tapping the viewfinder resets the focus
Point-of-Interest, and clears the indicator.
Locking focus
B When you have selected an appropriate focus distance
level for your scene, you can lock it by tapping the AF–L
Button B. When the focus is locked, a red LED in the center of the AF–L button
is illuminated. Tapping again unlocks the focus.
If you prefer not to lock the focus until the last minute, you can use the Shutter
Release Button’s temporary AE locking function.
18
Changing Backs
Setting image ratio
The Back Selector A is used to switch between the five
different image ratios provided by 645 PRO, ranging from
A square (1:1) to panoramic (2.83:1).
To change the Back that is in use, rotate the Back Selector
by sliding your finger up or down on it until the desired Back is positioned
beside the white dot to its left. The Viewfinder will adjust itself automatically
to reflect your selection.
To protect against accidentally moving the Back Selector during shooting, tap
and hold the button in the center of the dial to lock it. Tap and hold again to
unlock the Back Selector.
NOTE: the numbers used to describe the Backs are indicative of the image ratio,
not its size. The actual image size will be the maximum possible using the given
ratio within the constraints imposed by your iPhone’s imaging sensor. The 4:3
ratio 645 back will provide the largest total image size, as this maps on exactly to
the ratio of the imaging sensor.
19
Changing Film Mode
Setting color/B&W options
The Film Mode Selector A is used to switch between the
seven different film modes provided by 645 PRO, ranging
A from delicate monchrome to rich, saturated color.
To change the Film Mode that is in use, rotate the Film Mode
Selector by sliding your finger up or down on it until the desired Film Mode
is positioned beside the white dot to its left. If you are using Live Preview, the
Viewfinder will adjust itself automatically to reflect your selection.
Adding filters
You can further control the color balance of your photographs by selecting
filters. Swipe the viewfinder left or right to toggle filters on or off; swipe up or
down on the left-hand side to select the filter; swipe up or down on the righthand side to adjust the filter intensity.
To protect against accidentally moving the Film Mode Selector during
shooting, tap and hold the button in the center of the dial to lock it. Tap and
hold again to unlock the Film Mode Selector.
20
Q-Mode—Bypassing Film Modes and Backs
You can enter Q-Mode, which bypasses the Film Modes and Backs (and the
filters) for unadjusted JPEG output that can be fed into an iPhone-based
workflow by double-tapping the Film Mode Selector A. Q-Mode can also be
used to save unprocessed dRAW TIFF files only, by selecting the appropriate
option in the main Settings app (see p.34) and a TIFF development mode (see
p.28). In Q-Mode, the normal functions of the Film Mode Selector and the
Back selector are disabled.
Double-tap the (disabled) Film Mode Selector to leave Q-Mode.
21
Changing or rotating camera Body
Setting the look of 645 PRO
645 PRO allows you to choose between interchangable
camera Bodies. You can switch between sporty Rosso and
A the understatement of Classic by double-tapping the Back
Selector A.
NOTE: the change of Bodies does not alter 645 PRO’s functionality in any way, nor
alter any settings that are in use. The Body cannot be changed while in Q-Mode,
as the Back Selector is disabled.
Rotating the camera body through 180°
645 PRO allows you to rotate the camera Body through 180°. You can lock
the orientation to either the standard orientation or a 180° orientation via the
main Settings app (see p.34).
22
Changing focusing screen
Choosing the best focusing aid
The Grid Button A is used to select the focusing screen in use. Tap
the button to cycle through the three available focusing screens.
A
These are the standard crosshairs, the most uncluttered option, a
Rule of Thirds grid and an architectural compostion grid.
The different focusing screens provide you with alternatives to help you
compose your photograph most effectively. The crosshairs are ideal when
your subject sits in the center of the composition. The Rule of Thirds grid can
be ideal for framing elements of a landscape in a visually-pleasing manner.
The architectural grid (as its name implies) is a great help when composing
photographs that include buildings.
At the center of each focusing screen is a split-image spirit level that provides a
constant reminder of the horizon. When 645 PRO is level, this becomes bright.
23
Locking white balance
Dealing with different light temperatures
By default, 645 PRO has Auto White Balance (AWB). This means
that it compensates automatically for different light temperatures,
A
from the relatively cool light of a winter exterior to the warmth of a
tungsten-lit interior. However, there are times when you may wish to override
this—particularly if a composition includes both daylight and artificially-lit
elements and you wish to expose for just one.
The White Balance Button A is used to lock the white balance. Make sure the
viewfinder is filled with the light source you wish to favor, then tap the White
Balance Button. The white balance will then be locked at the desired color
temperature until you tap the button again.
If you are unhappy with the white balance, you have the option to adjust the
color balance of your photographs by using warming or cooling filters (see
p.20).
24
Flash photography
Turning flash on or off
645 PRO has the option to take photographs with the
assistance of the iPhone’s flash. While this LED flash is
A
B
not particularly powerful and has a very limited range,
it can still be useful in low-light situations and also to
provide “fill flash” when photographing close-up, back-lit subjects.
The Flash Switch A is used to turn the flash on or off. Slide the switch up to
turn the flash on; slide it down again to turn the flash off. On the LCD Display,
the flash indicator B is a reminder of the current flash status: on or off (shown).
25
Setting Viewfinder
Choosing what you see when you compose
645 PRO provides two Viewfinder choices. The default is
Live Preview, which shows you exactly what you will shoot
A
B
in each of the seven available film modes. However, some
photographers prefer to compose all their photographs
with a consistent color balance, and they have the option of switching to the
Classic Viewfinder.
To change the Viewfinder, press and hold the Meter Button A. A beep will
indicate that the Viewfinder has changed from Live Preview to Classic, or back
again. On the LCD Display, the viewfinder indicator B is a reminder of the
current Viewfinder, Classic or Live Preview (shown).
26
Setting Night Mode
Photography in extremely low light
In its standard Auto Mode, 645 PRO is able to deal with
most light levels. As the levels drop, the shutter speed will
A
B
drop to 1/15 sec, while the ISO level will rise. However, once
the ISO has reached its upper limit (which varies between
different forms of iPhone hardware, but is typically 800 or 1000), no more light
can reach the image sensor. That’s where Night Mode comes in, allowing the
shutter speed to drop as low as 1 second and allowing for 15 times more light.
To toggle Night Mode, press and hold the White Balance Button A. A beep
will indicate that you have moved in to (or out of ) Night Mode. On the LCD
Display, the Night Mode indicator B is a reminder of the current status, Night
or Auto (shown).
NOTE: in Night Mode, the viewfinder displays the scene with the actual shutter
speed that will be used, leading to “juddering” images at slower speeds (a shutter
speed of 1/4 sec means Viewfinder video output at 4 frames per second).
27
Managing development
Taking control of image quality
B 645 PRO provides unparalleled control over the final image
quality of your photographs. There are two different JPEG
A
C quality options, as well as the ability to save a “developed
RAW”—dRAW—image for later post-processing.
To cycle through the development options, press and hold the Grid Button A.
On the LCD Display, the JPEG quality indicator B and the raw status indicator
C will change to reflect the four settings available (HI or MAX-quality JPEGs,
with or without the additional dRAW TIFF being saved). The higher the quality,
the better the image, but the longer the development time and the larger the
final image file(s).
The number of bars shown below the JPEG quality indicator is your guide to
the JPEG quality selected. One bar is Standard (as used by most iPhone apps,
not currently available on 645 PRO); two bars is HI, while three is MAX – which
contains no visible compression “artifacts”.
28
Working with “developed RAW” images
If you choose to save dRAW files in addition to a HI or MAX JPEG, the image
data will be saved by default* to 645 PRO’s Documents Folder.
If you have saved dRAW TIFFs to the Documents Folder you can view and
share them, open them in editing applications on your iPhone, copy them to
Camera Roll and delete them, via the View/Share button (see p.31).
Saving dRAW files to your computer
To copy 645 PRO’s dRAW TIFFs from the Documents Folder to your computer,
you must use iTunes on your computer.
Open up iTunes, attach your iPhone and then select it from the bar on the left.
Choose the Apps option at the top of the screen and then scroll down to the
File Sharing section. Select 645 PRO to view the saved files. You can then save
these to the hard disk of your computer for processing in your image-editor
of choice. You can also delete them—select the files and press the Delete key.
The dRAW TIFF files have “datestamped” filenames that reflect the date and
time they were taken in the format “yyyymmddhhmmss.TIFF”.
* see p.34 if you would rather save TIFFs to the Camera Roll, with filenames in sequence with your JPEGs
29
The RAW files produced by many better digital cameras need to be “developed”
(usually on the desktop) then—typically—saved as TIFFs.
On 645 PRO this process takes place in-camera. Film Mode processing is not
applied to dRAW TIFF files: they contain unmodified pixels and, critically, have
not been subject to any JPEG compression at any stage.
30
Using zoom
Managing the image crop
645 PRO provides a 2X digital zoom that can be activated by “pinching” the
Viewfinder. While digital zoom is not recommended for everyday use due to
its negative imact on image quality, there are occasions when it is useful.
Many users of Jag.gr cameras like to mount addional external lenses to
extend or reduce the effective focal length of the standard iPhone camera
lens. Unfortunately, many of these wide angle and telephoto converters can
introduce an element of hard vignetting. The judicious use of minimal digital
zoom can remove that vignetting with a relatively small impact on the final
image quality, which is helpful of there isn’t the opportunity (or the desire) to
crop out the problem in post-processing.
Equally, on those occasions where getting “closer” is more important than the
ultimate image quality, the zoom may be used.
31
Viewing and sharing photographs
Reviewing shots and sending them on
645 PRO provides tools for reviewing all the photographs on your
A
Camera Roll, and also for sharing them via e-mail and a selection of
online services.
To review your photographs, tap the View/Share Button A. You can then scroll
through your images by swiping left or right. Tapping on the screen at any
point will provide you with the share options, allowing a full-resolution image
to be sent to Flickr, a lower-resolution image to Facebook or Twitter, for the
image to be e-mailed (with options offered regarding the image size to be
sent), opened in an editing application (if installed) or copied to Dropbox (if
installed).
Do be aware that large (especially MAX-quality) images can take some time to
e-mail or upload to Flickr and may result in network charges being incurred.
To return to your camera, just tap the View/Share button again.
If you have saved dRAW TIFF files to 645 PRO’s Documents Folder (see p.34)
you will see a small icon in the top-left of your View/Share view, a folder with
32
“TIFFs” written on it. Tapping this opens up the TIFF Management module,
which lists all your dRAW TIFFs and allows you to view each one, open it in
editing applications (if installed), copy it to Camera Roll or delete it.
NOTE: if you press and hold the View/Share Button you open up this User Manual.
33
Advanced settings
Setting additional configuration options
Additional configuration options may be set using your iPhone’s Settings app. Select
this from your iPhone springboard (typically, it is found on the first screen) and scroll
down until you see the 645 PRO secttion.
You have the following options:
1. You can opt to use iPhone’s torch as an AF Assist lamp in high-ISO conditions to
speed up autofocus
2. You may choose an optional Hi-Vis Shutter Release Button for bright conditions
3. You can opt to lock 645 PRO’s auto-rotation feature to either standard rotation or
180° rotation
4. You can opt to flip the viewfinder to compensate for the use of external DSLR
lenses that themselves invert the image being captured
5. You can opt to save 645 PRO’s dRAW TIFF files to the Camera Roll rather than to
645 PRO’s Documents folder (noticeably slower, but sometimes more convenient)
6. You can opt to save either JPEG+TIFF or TIFFs only when saving TIFFs in Q-Mode
7. You can opt to mute the audio feedback provided by 645 PRO
34
8. You can opt to disable GPS tagging for photographs, even when Location Services
are enabled for 645 PRO
9. You can opt to disable 645 PRO’s photo filters
10.You may enter an Artist Name and Copright/License information, that will be
added to the EXIF metadata for any photographs taken using 645 PRO
This screen also displays the current Release version of 645 PRO.
35
License information
Copyright © 2011-2012 Jag.gr. All rights reserved.
THE SOFTWARE IS PROVIDED “AS IS”, WITHOUT WARRANTY OF ANY KIND, EXPRESS OR IMPLIED, INCLUDING BUT NOT LIMITED TO THE WARRANTIES OF
MERCHANTABILITY, FITNESS FOR A PARTICULAR PURPOSE AND NONINFRINGEMENT. IN NO EVENT SHALL THE AUTHORS OR COPYRIGHT HOLDERS BE LIABLE
FOR ANY CLAIM, DAMAGES OR OTHER LIABILITY, WHETHER IN AN ACTION OF CONTRACT, TORT OR OTHERWISE, ARISING FROM, OUT OF OR IN CONNECTION
WITH THE SOFTWARE OR THE USE OR OTHER DEALINGS IN THE SOFTWARE
VFR Reader
Copyright © 2011-2012 Julius Oklamcak. All rights reserved.
Permission is hereby granted, free of charge, to any person obtaining a copy of this software and associated documentation files (the “Software”), to deal in
the Software without restriction, including without limitation the rights to use, copy, modify, merge, publish, distribute, sublicense, and/or sell copies of the
Software, and to permit persons to whom the Software is furnished to do so, subject to the following conditions:
The above copyright notice and this permission notice shall be included in all copies or substantial portions of the Software.
MHRotaryKnob
Copyright © 2010-2012 Matthijs Hollemans
With contributions from Tim Kemp (slider-style tracking).
Permission is hereby granted, free of charge, to any person obtaining a copy of this software and associated documentation files (the “Software”), to deal
in the Software without restriction, including without limitation the rights to use, copy, modify, merge, publish, distribute, sublicense, and/or sell copies of
the Software, and to permit persons to whom the Software is furnished to do so, subject to the following conditions:
The above copyright notice and this permission notice shall be included in all copies or substantial portions of the Software.
ShareKit
Created by Nate Weiner
ShareKit is open source as described by the MIT license:
Permission is hereby granted, free of charge, to any person obtaining a copy of this software and associated documentation files (the “Software”), to deal in
the Software without restriction, including without limitation the rights to use, copy, modify, merge, publish, distribute, sublicense, and/or sell copies of the
Software, and to permit persons to whom the Software is furnished to do so, subject to the following conditions:
The above copyright notice and this permission notice shall be included in all copies or substantial portions of the Software.
This product uses the Flickr API but is not endorsed or certified by Flickr.
iOS, iPad, iPhone, iPod touch are registered trademarks of Apple Inc. All other trademarks and service marks are the properties of their respective owners.
09/2012, Release 2.1
36