1
HibSoft Label Enterprise Designer
User Manual
HibSoft Label Enterprise
Designer
Version 1.0
Copyright Hibiscus PLC - 2006
Page : 1
HibSoft Label Enterprise Designer
User Manual
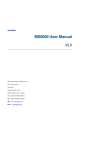
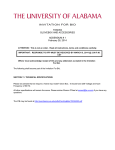
HibSoft Label Enterprise Designer Screenshot
Page : 2
HibSoft Label Enterprise Designer
User Manual
1.0 Introduction
The HibSoft Label Enterprise Designer is a part of a suite of programs
providing an advanced hazardous labelling solution and allows you to
design your own unlimited range of label templates. You can design
labels utilising a comprehensive range of label objects including database
fields, warning diamonds, IOD symbols, fixed and variable text fields,
logos and barcodes*.
The core functionality of HibSoft Label Enterprise Designer is accessible
from two simple toolbars making it extremely easy to use and allowing
you to create new templates in a very short period of time.
* Add-on module.
Page : 3
HibSoft Label Enterprise Designer
User Manual
1.1 Table of Contents
What is covered in this manual and where to find it.
Contents
Description
Page
1.0
Introduction
Overview.
3
1.1
Table of Contents
This page.
4
1.2
Glossary of terms.
7
1.3
Terms Used in this
Manual
Opening the Software
Logging in to the software
8
2.0
The Main Tool Bar
Introducing the main tool bar.
9
2.1
New Template
Introduction to Label
Designer.
10
2.2
Open Template
Loading an existing template.
11
2.3
Save Template
Saving a template design.
13
2.4
Print Template
Printing a template design.
15
2.5
Edit Layout
Editing a label layout.
16
2.6
Cut
Cutting data to the clipboard.
20
2.7
Copy
Copying data to the clipboard.
20
2.8
Paste
Pasting data from the
clipboard.
20
2.9
Zoom In
Zooming in the display.
20
2.10
Zoom 1:1
'ormalising the display.
20
2.11
Zoom Out
Zooming out the display.
20
Page : 4
HibSoft Label Enterprise Designer
User Manual
Contents
Description
Page
2.12
Toggle Grid
Turning the sizing grid on and
off.
21
2.13
About
About the program
21
3.0
Label Objects
Introducing label objects
22
3.1
The Fields Palette and
Menu Bar
Selecting and creating label
objects
23
3.2
Manipulating label objects
24
3.3
Moving, Resizing &
Deleting Objects
Substance Text
Substance text fields
26
3.4
R&S Text
Risk and Safety text fields
29
3.5
IOD Symbols
Indication of danger symbols
32
3.6
PH Text
GHS Precautionary and
Hazard Phrases
35
3.7
GHS Pictograms
GHS Hazard Symbols
38
3.8
Warning Diamonds
Warning diamond symbols
41
3.9
Fixed Text
Fixed text fields
44
3.10
Popup Text
Popup (variable) text fields
47
3.11
Embedded Bitmaps
Embedded bitmap images
50
3.12
Embedded EMF
Embedded EMF images
53
3.13
Barcode
Barcode data fields
56
3.14
Custom Symbol
Custom symbols (eg. logo's)
60
3.15
Advanced Substance
Text
Advanced Substance Text
fields
63
Page : 5
HibSoft Label Enterprise Designer
User Manual
Contents
Description
Page
3.16
Function Text
Function (programmable) text
fields
66
3.17
Function Bitmap
Function (programmable)
Bitmap fields
69
3.18
Function EMF
Function (programmable)
EMF fields
72
3.19
The Font Tab
The font tab function
75
3.20
The Frame Tab
The frame tab functions
78
4.0
Advanced Label
Design
Advanced design and
management features
81
4.1
Designing in Layers
Designing labels using layers
82
4.2
Managing Templates
Organising templates
86
4.3
Importing Templates
Importing templates from
earlier versions
88
4.4
The Menu Bar
Functions of the Menu Bar
89
A.0
Appendices
A.1
How do I...?
Some common questions
answered.
92
A.2
Code Samples
Some code samples for
common functions in function
text fields.
94
91
Page : 6
HibSoft Label Enterprise Designer
User Manual
1.2 Terms Used in this Manual
Template
A label design, made up of a number of label objects - defines the
information that will be contained on the label and the layout of the
finished label.
Label Objects - A placeholder for a piece of information to included in a
template design, ie. an IOD symbol, set of RS phrases etc.
Note that when designing a Template the actual substantive content of the
information that will appear on the label, except in the case of fixed text
fields, is irrelevant. The Template only defines where the data will appear
on the label. When you subsequently merge the Template with a
substance record, the actual information pertaining to the chosen
substance will be filled in the defined locations.
Page : 7
HibSoft Label Enterprise Designer
User Manual
1.3 Opening the Software
To open the HibSoft Label Enterprise Designer Program, click on the
desktop icon or Click on the Start button then choose Programs / HibSoft
/ HibSoft DesignerEnt (may vary on different versions of Windows).
You will be required to log-in to the database using a username and
password provided to you by your system administrator.
User
Your user login name - identifies you to the system and
determines your access rights.
Password
Protects your login against unauthorised. Do not give
out your password to anyone else.
Server
Identifies the database to which you wish to connect.
NB: Tampering with this setting could disable the
program.
[Logon]
Click this button to proceed - user name and password
are validate and if accepted the program will open.
[Cancel]
Click this button to cancel - program terminates.
Once you have successfully logged onto the database, the program will
open up at the label design screen.
Page : 8
HibSoft Label Enterprise Designer
User Manual
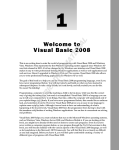
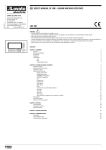
2.0 The Main Tool Bar
The Main Toolbar provides basic functions such as loading or saving a
label template, printing a template, selecting template size etc.
1
1
2
3
4
5
6
7
8
9
10
11
12
13
2
3
4
5
6
7
8
9 10 11
12 13
New Template (start a new template design)
Open Template (open an existing template design for editing)
Save Template (save an amended template design)
Print Template (print a copy of a template design)
Layout (amend label layout)
Cut (cut a label element to the clipboard)
Copy (copy a label element to the clipboard)
Paste (paste a label element from the clipboard)
Zoom In (enlarge the label image)
Zoom 1:1 (zoom to standard size)
Zoom Out (reduce the label image)
Toggle Grid (show/hide design grid)
About (display information about the program
Page : 9
HibSoft Label Enterprise Designer
User Manual
2.1 New Template ( File / New )
Click this button to start creating a new label template. This clears the
design area and loads a default sized design grid. To create your new
label:
1) Set-up the page size and label size characteristics for your label stock
(Edit Layout button – see 2.5).
The design grid is adjusted to reflect the available working area for
the specified label size. The black outline represents the actual edge
of the label, there is no automatic border. This allows you to use the
entire label area. If you want a border around your finished label
do not place objects against the edge of the design area.
2) Draw your label objects (Database Fields, IOD Symbols, RS Phrases
etc.) onto the label design grid and set their respective properties.
Do not worry initially about getting the size and positioning of your
label objects exactly right. These features are very easy to adjust
later and you will probably want to move things around once you
have created all your objects to get the best fit.
3) Test print your rough initial design (Print Button).
This is important to test the positioning of your objects in relation to
pre-printed areas (if any) on your label stock. For example, your
label stock may be pre-printed with an orange block to provide a
regulation background for your IOD symbols. These are the first
objects you need to get correctly sized and positioned to best fit that
area on your label stock. Other label objects can then be rearranged around them.
4) Test print and adjust your label objects until you are happy with the
appearance of the printed label.
5) Save your label template (use meaningful filenames that will allow
you to easily recognise your label templates when you want to begin
using them).
Page : 10
HibSoft Label Enterprise Designer
User Manual
2.2 Open Template ( File / Open )
Click this button to open an existing label template for further
amendment. This opens a standard windows navigation box which you
can use to locate your desired template.
[Refresh]
Refreshes the display to show any changes you have
made.
[Open]
Click this button to open the currently selected
template..
[Cancel]
Click this button to cancel - close the window.
How templates are stored:
1)
The left hand list box in the Select Template dialogue box displays
the list of folders into which your templates are organised.
'B: you can create a new folder whenever you save a template in
order to group your templates logically and make them easier to
find when you next want to use them (see Save Label).
Page : 11
HibSoft Label Enterprise Designer
User Manual
2)
Click on any folder in the left hand list box and the names of the
templates stored within that folder are immediately displayed in the
right list box.
3)
To open a template, click once on the template name to select it then
click on the [Open] button (or double click on the template name to
open it instantly).
4)
When you open a template, the template layout and contents are
displayed on screen. If you amend any of the contents of the
template do not forget to re-save it.
Page : 12
HibSoft Label Enterprise Designer
User Manual
2.3 Save Template ( File / Save & File / Save As)
Click this button to save your new template or any changes you have
made to an existing template.
When you are saving modifications to an existing template, the old
template is automatically updated and you may simply carry on working.
When you are saving a new template for the first time or when you
select File / Save As from the menu bar the 'Templat Save As' window
will appear.
Page : 13
HibSoft Label Enterprise Designer
[Add Section]
User Manual
Click this button to create a new section to organise
your templates (see 5.3.1).
[Delete Section] Click this button to delete the currently selected
section (see 5.3.2).
Template $ame Enter the name of the template.
NB: Use names that will enable you to easily identify
the templates when you need to retrieve them, eg.
'Small Label Non Haz'.
Click the [Save] button to save the template.
[Save]
Click this button to save the template under the name
entered above.
[Cancel]
Click this button to cancel - do not save the template.
Saving a new Template:
1)
Select the folder or 'Section' in which you wish to store the template.
2)
Type the name under which you wish to store the template in the
'Template Name' box – NB: Try to use descriptive names which will
make it easier to locate the correct templates later (eg. A
combination of size and usage).
3)
Click the [Save] button to save the template.
Adding and deleting sections, and moving templates between sections are
dealt with in Section 5.0 Managing Templates.
Page : 14
HibSoft Label Enterprise Designer
User Manual
2.4 Print Template ( File / Print )
Click this button to test print your label design. This will open the
standard windows printer control box. Select your printer from the dropdown list and click the Properties button to open your printers control
panel. Depending on your printer and label design, you may need to set
various options such as label size and orientation.
Page : 15
HibSoft Label Enterprise Designer
User Manual
2.5 Edit Layout
Click this button to open the label layout dialogue box (to adjust label
stock parameters).
Page : 16
HibSoft Label Enterprise Designer
User Manual
Page Layout
Page Size
A4 – Sets the page size to standard A4 (210mm x
297mm).
A5 – Sets the page size to standard A5 (148mm x
210mm).
Custom – Allows you to select the page size (width
and height) of non-standard stationery.
Width
Enter the width in millimetres of your stationery (this
will have been correctly set for you if you selected
standard A4 or A5 as your paper size).
$ote: This is the width of the stationery, irrespective
of how many labels may be mounted side by side on
the backing.
Height
Enter the height in millimetres of your stationery
(this will have been correctly set for you if you
selected standard A4 or A5 as your paper size).
Single sheet stationery - enter the height of one
sheet (irrespective of how many labels are mounted
vertically on each sheet).
Continuous stationery enter the height of a single
label (measured from leading edge to trailing edge as
it leaves the printer).
Portrait /
Landscape
Page : 17
HibSoft Label Enterprise Designer
User Manual
Select Portrait if your label appears upright as it
leaves the printer (irrespective of which is the longer
edge).
Select Landscape if your label appears on its side as
it leaves the printer .
Label Layout
Width
The width of an individual label measured as you
would normally view it to read.
Height
The height of an individual label measured as you
would normally view it to read.
Left Margin
If your labels do not extend to the left edge of the
backing you will need to set a left margin equivalent
to distance (in mm.) between the left edge of the
labels and the left edge of the backing.
Top Margin
If your labels do not extend to the top edge of the
backing you will need to set a top margin equivalent
to distance (in mm.) between the top edge of the
labels and the top edge of the backing.
Labels Across
Enter the number of labels mounted side by side
across the width of the backing (must be at least 1).
Labels Down
On Single sheet stationery, enter the number of labels
mounted horizontally on the backing. For continuous
stationery, always enter 1.
Horizontal Gap
Enter the distance (if any) between labels mounted
across the width of your stationery (set to 0 if your
labels are touching or mounted one wide).
Vertical Gap
Enter the distance (if any) between labels mounted
down the length of your stationery (set to 0 if labels
are touching). NB: Has no effect for continuous
stationery.
Page : 18
HibSoft Label Enterprise Designer
User Manual
[Ok]
Click this button to accept the changes you have
made to the template parameters.
[Cancel]
Click this button to cancel the changes you have
made to the template parameters.
Page : 19
HibSoft Label Enterprise Designer
User Manual
2.6 Cut ( Edit / Cut )
Cut an object to the system clipboard (object is removed from its original
location). Object can then be pasted in a new location or onto a new
template design.
2.7 Copy ( Edit / Copy )
Copy an object to the system clipboard (object is NOT removed from its
original location). Object can then be pasted in a new location or onto a
new template design.
2.8 Paste ( Edit / Paste )
Paste a previously cut or copied object to the current cursor position on
the current template.
2.9 Zoom In
Zoom in 10% on current template design, ie. enlarge the screen
representation of the current label design by 10%. Note that you can click
this button repeatedly to continue to zoom in on the label design by a
factor of 10% of the new size each each time. Useful when working with
small templates to enlarge the view of the working area.
2.10 Zoom 1:1
Resets zoom factor to standard display size (factor 1:1).
2.11 Zoom Out
Zoom out 10% from current template design, ie. reduce the screen
representation of the current label design by 10%. Note that you can click
this button repeatedly to continue to zoom out from the label design by a
factor of 10% of the new size each each time. Useful when working with
a large template to zoom out sufficiently to view the whole template on
screen simulataneously.
Page : 20
HibSoft Label Enterprise Designer
User Manual
2.12 Toggle Grid ( View / Show Grid )
Switch the design grid on/off. Notice that when the design grid is
switched on (visible) all objects are snap-to-grid, ie. When positioning
objects they will always automatically relocate to the nearest grid
coordinate. When the design grid is switched off all objects are freeform
(ie. remain where you place them and not relocate to grid coordinates).
2.13 About
Displays information about the current version of the program – has no
other function.
Page : 21
HibSoft Label Enterprise Designer
User Manual
3.0 Label Objects
Label objects are placeholders for items of information that you can
include in your label design, for example an IOD (Indication of Danger)
symbol or a set of Risk and Safety Phrases. The actual symbol or text that
will be inserted into that placeholder is determined by the substance you
select as being the subject for your label, ie. the information relevant to
that substance is retreived from the database and used to populate (ie. fillin) the corresponding label objects.
The following chapters will first introduce how to create and manipulate
label objects before going on to describe in detail each of the different
label objects that can be included in your label designs.
Sets of properties which are common to more than one type of template
object are discussed separately rather than repeated with each object.
Page : 22
HibSoft Label Enterprise Designer
User Manual
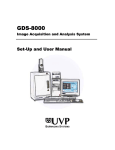
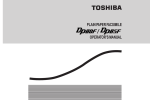
3.1 The Fields Palette and Menu Bar
The fields palette allows you to choose different label objects to include
in your template or label design.
1.
2.
3.
4.
5.
6.
7.
8.
Insert Substance Database field
Insert RS Text (CHIP Risk and safety data) field
Insert IOD Symbol (CHIP Indication of Danger)
field.
Insert PH Text (GHS Precaution and Hazard
phrases).
Insert GHS Pictogram (Hazard Symbol) field.
Insert Warning Diamond field
Insert Fixed Text Field
Insert Pop-upText Field
1
2
3
4
5
6
7
8
Some additional options are only available from the Fields drop-down on
the Menu Bar. These are:
9.
10.
11.
12.
Insert Embedded Bitmap Field
Insert Embedded EMF Field
Insert Barcode Field
Insert Advanced Field:
Custom Symbol
Advanced Substance Text
Function (Text)
Function (Bitmap)
Function (EMF)
Each of these field types are discussed in detail in the following chapters.
$ote That whenever you select a field type from either the Fields
Pallette or the Menu Bar a default template object representing that field
type is automatically drawn on the template. The default object may then
be relocated and/resized and allocated various properties to suit your
usage.
Page : 23
HibSoft Label Enterprise Designer
User Manual
3.2 Moving, Resizing and Deleting Objects
3.2.1 Selecting Objects
Click on any label object to select it. When selected, a label object gains
an extra dashed outline and a set of resizing nodes (small black squares in
each
corner
and
the
middle
of
each
face).
3.2.2 De-Selecting Objects
To de-select an object, click on the next object or anywhere outside of the
design grid.
3.2.3 Moving Objects
When you move the cursor over a selected object the cursor changes to a
four pointed arrow. This is the Movement Cursor. To move the object
simply hold down the left mouse button and drag the mouse left/right/up/
down to move the object. Release the mouse button when you have
moved the object to its required location.
3.2.4 Resizing Objects
When you move the cursor over one of the resizing nodes in an objects
outline the cursor changes to a two headed arrow. This is the Resize
Cursor.
•
To resize an object horizontally, move the cursor over the middle
resize node at either side. Be sure the cursor has changed to the
resize cursor and press down the left mouse button whilst
dragging ther mouse left/right to move the objects side-wall in/out.
Release the left mouse button when you are happy with the new
site.
•
To resize an object vertically, repeat as above using the node at
top center or bottom centre.
• To resize an object in both dimensions simultaneously, repeat as
above selecting any corner node.
Page : 24
HibSoft Label Enterprise Designer
User Manual
3.2.5 Deleting Objects
Make sure the object you wish to delete is selected then hit the delete key
on the keyboard.
3.2.6 Cutting and Pasting Objects
To create a second similar instance to an object previously created, rather
than start again you can make a copy of the first object with all of its
assigned attributes (size, orientation, font-style etc.)
1. To copy, select the object then choose Edit / Copy from the Menu
Bar.
2. To paste a copy of the object, choose Edit /Paste from the Menu
Bar. You may paste as many copies of the object as you require on
the current template.
Note that each copied object will be pasted at the default location, which
may overly an existing object. Therefore after pasting each copy use the
mouse to drag it to its desired location.
To customise the attributes of the copied object, double click on it to
bring up its Properties Box.
Page : 25
HibSoft Label Enterprise Designer
User Manual
3.3 Substance Text Fields (Fields / Insert / Substance Text)
Use Substance Text fields to import data from your hazard database into
your label design.
1) Click the Substance Text Fields button on the fields palette.
2) A Substance Text Field is drawn on the template at a default location.
You can resize the box by clicking on any of the resizing nodes (the
black squares on the corners and mid point of each side) and dragging
in or out with your mouse pointer. To relocate the entire box, simply
click anywhere inside the box and with the mouse button held down
drag the box to a new location.
3) Double-click on the box to set its properties.
Page : 26
HibSoft Label Enterprise Designer
User Manual
Field Properties (Substance Database Fields)
The Sub. Data tab of the field properties box contains options which
allow you to control the content of the Substance Database Field. The
Font and Frame tabs are common tabs which are dealt with later in this
manual.
Page : 27
HibSoft Label Enterprise Designer
Sub Field
Language
Prefix
User Manual
Select the database field from which the substance
database information is to retrieved to complete the
current field.
Select the language in which the information is to be
displayed from the list of available languages.
Any fixed text that should appear before the contents
of the data field.
Always: If ticked, the prefix will always appear, even
when the data field is empty.
Postfix
Any fixed text that should appear after the contents of
the data field.
Always: If ticked, the postfix will always appear,
even when the data field is empty.
[Ok]
Click this button to store any changes made and close
the window.
[Cancel]
Click this button to close the window without storing
any changes.
[Apply]
No function.
Page : 28
HibSoft Label Enterprise Designer
User Manual
3.4 Risk and Safety Text Fields (Fields / Insert / R&S Text)
Use Risk and Safety phrase fields to import risk and safety information
from your hazard database into your label design.
1) Click the Risk and Safety Field button on the fields palette.
2) A Risk and Safety Text Field is drawn on the template at a default
location.
You can resize the box by clicking on any of the resizing nodes
(black squares on corners and mid point of each side) and dragging in
or out with your mouse pointer. To relocate, simply click anywhere
inside the box and with the mouse button held down drag the box to a
new location.
3) Double-click on the box to set its properties.
Page : 29
HibSoft Label Enterprise Designer
User Manual
Field Properties (RS Text)
The RS Text tab of the field properties box contains options which allow
you to control the content, ie. Language and appearance, of the RS
information. The Font and Frame tabs are common tabs which are dealt
with later in this manual.
Page : 30
HibSoft Label Enterprise Designer
User Manual
Language
Select the language in which you wish the text to
appear.
'B: To display RS data in multiple languages, add
a separate RS Text box for each language and set
its language selection according.
Line Breaks
Tick this box if you wish the R&S phrases to be
displayed as each phrase beginning on a new line.
Use Phrase
Codes
Tick this box if you wish to display each R&S
phrase to be displayed complete with its relevant
R&S code (otherwise only the phrase itself is
displayed).
Bullet Point
Choose a bullet point symbol from the drop-down
list to precede each R&S phrase.
NB: Alternative to Phrase Codes, disabled when
phrase codes are selected.
Phrase Filter
You may filter phrases so that only those phrases
beginning with a specified code are included by
entering the code to be included in this box. To
exclude phrases beginning with a specified code
enter ^[^code]. ie. enter:
R to display only phrases beginning with R.
^[^R] to display all phrases except those beginning
with R.
[Ok]
Click this button to store any changes made and
close the window.
[Cancel]
Click this button to close the window without
storing any changes.
[Apply]
No function.
Page : 31
HibSoft Label Enterprise Designer
User Manual
3.5 IOD Symbol Fields ( Fields / Insert / IOD Symbol )
Use IOD symbol fields to import Identification of Danger symbols from
your hazard database into your label design.
1) Click the IOD Symbols Field button on the fields palette.
2) An IOD Symbol Field is drawn on the template at a default location.
3) You can adjust the size of the box you have drawn using the resizing
nodes.
4) Double-click on the box you have just drawn to set its properties.
Page : 32
HibSoft Label Enterprise Designer
User Manual
Field Properties (IOD Symbols)
The Symbol tab of the field properties box contains options which allow
you to control the content of the IOD Symbol Field. The Frame tab is a
common tab dealt with later in this manual.
Page : 33
HibSoft Label Enterprise Designer
IOD Symbol
Index:
User Manual
Click on the IOD Symbol database entry that you
wish to appear in the current location, ie. your
substance may require more than one symbol so you
will need to add a boxes for the maximum number
of symbols required where the first box is index 1,
the second is index 2 etc.
[Ok]
Click this button to store any changes made and
close the window.
[Cancel]
Click this button to close the window without
storing any changes.
[Apply]
No function.
$B:
1. IOD symbols should always be printed with their associated IOD
Text. To do this, create a Database Field under the symbol and set
its ‘Data Item’ property to ‘IOD Text n’ (where n is the symbol field
number).
2. IOD symbols are normally printed on an orange background and,
unless you are using a colour printer, will need to be carefully
positioned to overlay a pre-printed orange block on your label stock.
3. IOD symbols will only be printed on your finished label if they are
required by the selected substance.
Page : 34
HibSoft Label Enterprise Designer
User Manual
3.6 GHS Precautionary & Hazard Statements
(Fields / Insert / PH Text)
Use Precautionary and Hazard statement fields to import GHS P and H
phrases from your hazard database into your label design.
1) Click the PH Field button on the fields palette.
2) A Precautionary and Hazard statement Field is drawn on the template
at a default location.
You can resize the box by clicking on any of the resizing nodes
(black squares on corners and mid point of each side) and dragging in
or out with your mouse pointer. To relocate, simply click anywhere
inside the box and with the mouse button held down drag the box to a
new location.
3) Double-click on the box to set its properties.
Page : 35
HibSoft Label Enterprise Designer
User Manual
Field Properties (PH Statements)
The PH Text tab of the field properties box contains options which allow
you to control the content, ie. Language and appearance, of the RS
information. The Font and Frame tabs are common tabs which are dealt
with later in this manual.
Page : 36
HibSoft Label Enterprise Designer
User Manual
Language
Select the language in which you wish the text to
appear.
'B: To display RS data in multiple languages, add
a separate RS Text box for each language and set
its language selection according.
[Line Breaks
Tick this box if you wish the R&S phrases to be
displayed as each phrase beginning on a new line.
Use Phrase
Codes
Tick this box if you wish to display each R&S
phrase to be displayed complete with its relevant
R&S code (otherwise only the phrase itself is
displayed).
Bullet Point
Choose a bullet point symbol from the drop-down
list to precede each R&S phrase.
NB: Alternative to Phrase Codes, disabled when
phrase codes are selected.
Phrase Filter
You may filter phrases so that only those phrases
beginning with a specified code are included by
entering the code to be included in this box. To
exclude phrases beginning with a specified code
enter ^[^code]. ie. enter:
R to display only phrases beginning with R.
^[^R] to display all phrases except those beginning
with R.
[Ok]
Click this button to store any changes made and
close the window.
[Cancel]
Click this button to close the window without
storing any changes.
[Apply]
No function.
Page : 37
HibSoft Label Enterprise Designer
User Manual
3.7 GHS Pictogram Fields ( Fields / Insert / GHS Symbol )
Use GHS Pictogram fields to import GHS hazard symbols from your
hazard database into your label design.
1) Click the GHS Pictogram Field button on the fields palette.
2) A GHS Pictogram Field is drawn on the template at a default
location.
3) You can adjust the size of the box you have drawn using the resizing
nodes.
4) Double-click on the box you have just drawn to set its properties.
Page : 38
HibSoft Label Enterprise Designer
User Manual
Field Properties (GHS Pictograms)
The Symbol tab of the field properties box contains options which allow
you to control the content of the IOD Symbol Field. The Frame tab is a
common tab dealt with later in this manual.
Page : 39
HibSoft Label Enterprise Designer
User Manual
GHS Symbol
Index:
Click on the IOD Symbol database entry that you
wish to appear in the current location, ie. your
substance may require more than one symbol so
you will need to add a boxes for the maximum
number of symbols required where the first box is
index 1, the second is index 2 etc.
Border
$one - Select this option if you are printing onto
labels that have red pictogram borders pre-printed
on them.
Red - Select this option if you are printing labels
using a colour printer capable of printing red
diamond borders.
Black - Select this option if you are printing labels
using a monochrome printer onto labels without
any pre-printed red diamonds**.
** Black borders may be permissible in some
countries for domestic use ONLY. Check your
local regulations.
[Ok]
Click this button to store any changes made and
close the window.
[Cancel]
Click this button to close the window without
storing any changes.
[Apply]
No function.
$B:
1. GHS Pictograms are normally printed on an orange background
and, unless you are using a colour printer, will need to be carefully
positioned to overlay a pre-printed red diamond on your label stock.
2. GHS Pictograms will only be printed on your finished label if they
are required by the selected substance.
Page : 40
HibSoft Label Enterprise Designer
User Manual
3.8 Warning Diamonds ( Fields / Insert / Warning Diamond )
Use Warning Diamond fields to import warning diamonds from your
hazard database into your label design.
1) Click the Warning Diamonds button on the fields palette.
2) A Warning Diamond Field is drawn on the template at a default
location.
3) You can adjust the size of the box you have drawn using the resizing
nodes.
4) Double-click on the box you have just drawn to set its properties.
Page : 41
HibSoft Label Enterprise Designer
User Manual
Field Properties (Warning Diamonds)
The Symbol tab of the field properties box contains options which allow
you to control the content of the IOD Symbol Field. The Frame tab is a
common tab dealt with later in this manual.
Page : 42
HibSoft Label Enterprise Designer
User Manual
Diamond:
Select the diamond from the database (1, 2 or 3) to
display at this location.
Show Class
$umber:
Tick this box if you wish the Warning Diamond to
be printed overlayed with its class number
Show Diamond
Text:
Tick this box if you wish the Warning Diamond to
be overlayed with its descriptive text.
Language:
Choose the language inwhich you wish the
diamond text to appear.
Dashed Border:
Never - Never draw a dashed border around the
diamond symbol.
When Required - Draw a dashed border only when
the diamond symbol is used (substance requires a
diamond).
Always -Always draw a dashed border around the
area for the warning diamond.
Show
Background:
Show or disable the coloured background for the
diamond (when using thermal printers should
always be disabled).
[Ok]
Click this button to store any changes made and
close the window.
[Cancel]
Click this button to close the window without
storing any changes.
[Apply]
'o function.
$B: A warning diamond will only be printed on your label at print time
if it is required by your selected substance.
Page : 43
HibSoft Label Enterprise Designer
User Manual
3.9 Fixed Text Fields ( Fields / Insert / Fixed Text )
Use Fixed Text fields to add any unchanging text to your label design, eg.
Captions, headings and any other fixed information you wish to appear
on the label that is unchanging regardless of the substance being
labelled.
1) Click the Fixed Text Field button on the fields palette.
2) A Fixed Text Field is drawn on the template at a default location.
3) You can adjust the size of the box you have drawn using the resizing
nodes.
4) Double-click on the box you have just drawn to set its properties.
Page : 44
HibSoft Label Enterprise Designer
User Manual
Field Properties (Fixed Text Fields)
The Text tab of the field properties box contains the fixed text phrase
which you wish to appear in your label design. The Font and Frame
tabs are common tabs which contain options for controlling the
appearance of an object and are dealt with later in this manual.
Page : 45
HibSoft Label Enterprise Designer
Fixed Text
User Manual
Type in the text you wish to appear in the box.
Note that you can enter foreign language text,
including Cyrillic and other non-latin fonts*, and
even mix 'alien' fonts in the same text box.
*To enter text in any non-latin font requires either a
specialist keyboard, or virtual keyboard software to
convert data typed on a standard keyboard. We
recommend SC-Unipad (www.unipad.org) for this
purpose.
[Ok]
Click this button to store any changes made and
close the window.
[Cancel]
Click this button to close the window without
storing any changes.
[Apply]
'o function.
Page : 46
HibSoft Label Enterprise Designer
User Manual
3.10 Pop-up Text Fields ( Fields / Insert / Popup Text )
Use pop-up Text fields where you wish to include text in your label which
is variable according to the substance selected (contents of pop-up text
fields can be saved against the substance for future re-use) or which is
only determined at the start of a print run.
1) Click the Pop-Up Text button on the fields palette.
2) A Pop-Up Text Field is drawn on the template at a default location.
3) You can adjust the size of the box you have drawn using the resizing
nodes.
4) Double-click on the box you have just drawn to set its properties.
Page : 47
HibSoft Label Enterprise Designer
User Manual
Field Properties (Pop-Up Text Fields)
The Pop-up tab of the field properties box contains options which allow
you to control the usage the Variable Field. The Font and Frame tabs
are common tabs which contain options for controlling the appearance
of an object and are dealt with later in this manual.
Page : 48
HibSoft Label Enterprise Designer
User Manual
Popup Prompt:
The name by which you wish to refer to this text
item. This should be a meaningful description of
the information that will be entered into the box
before starting a print run and will be used as the
prompt to request the user to input the required
information.
Default Text:
This is the default text (if any) for the field - may
be overwritten at print time (although will remain
as the default for future print runs).
Prefix
Any fixed text that should appear before the
contents of the data field.
Always: If ticked, the prefix will always appear,
even when the data field is empty.
Postfix
Any fixed text that should appear after the contents
of the data field.
Always: If ticked, the postfix will always appear,
even when the data field is empty.
[Ok]
Click this button to store any changes made and
close the window.
[Cancel]
Click this button to close the window without
storing any changes.
[Apply]
'o function.
Page : 49
HibSoft Label Enterprise Designer
User Manual
3.11 Embedded Bitmap Fields ( Fields / Insert / Embedded Bitmap)
Use embedded Bitmap fields to include your own company logos or other
images in your label design. Image files must be stored as Windows
Bitmap (.BMP) format. Alternatively, for greater image resolution, use
Embedded EMF field.
1) Select Fields / Insert / Embedded Bitmap from the menu bar.
2) An Embedded Bitmap Field is drawn on the template at a default
location.
3) You can adjust the size of the box you have drawn using the resizing
nodes.
4) Double-click on the box you have just drawn to set its properties.
Page : 50
HibSoft Label Enterprise Designer
User Manual
Field Properties (Embedded Bitmap Fields)
The Embedded Bitmap tab of the field properties box contains options
which allow you to select and control the appearance of the bitmap
image you wish to add to your label design. The Frame tab is a common
tab which contains options for controlling the appearance of an object
and is dealt with later in this manual.
Page : 51
HibSoft Label Enterprise Designer
User Manual
Load Bitmap
File:
Click this button to open a standard Windows file
browser button to locate the image you wish to
import.
[Ok]
Click this button to store any changes made and
close the window.
[Cancel]
Click this button to close the window without
storing any changes.
[Apply]
'o function.
When you close the properties box your chosen image should now
appear in the embedded bitmap field. eg:
$B:
Coloured images require a colour printer. When printing labels from a
monchrome thermal printer any images should be optimised for black
and white (not greyscale).
The selected image is permanently imported into the label design held
within the software database.
Page : 52
HibSoft Label Enterprise Designer
User Manual
3.12 Embedded EMF Fields ( Fields / Insert / Embedded EMF)
Use embedded EMF fields to include your own company logos or other
images in your label design. Image files must be stored as Windows
EMF (.EMF) format. 'B: EMF files allow greater image resolution
Bitmap files (see Embedded Bitmap Fields).
1) Select Fields / Insert / Embedded EMF from the menu bar.
2) An Embedded EMF Field is drawn on the template at a default
location.
3) You can adjust the size of the box you have drawn using the resizing
nodes.
4) Double-click on the box you have just drawn to set its properties.
Page : 53
HibSoft Label Enterprise Designer
User Manual
Field Properties (Embedded EMF Fields)
The Embedded EMF tab of the field properties box contains options
which allow you to select and control the appearance of the bitmap
image you wish to add to your label design. The Frame tab is a common
tab which contains options for controlling the appearance of an object
and is dealt with later in this manual.
Page : 54
HibSoft Label Enterprise Designer
User Manual
Load EMF File:
Click this button to open a standard Windows file
browser button to locate the image you wish to
import.
[Ok]
Click this button to store any changes made and
close the window.
[Cancel]
Click this button to close the window without
storing any changes.
[Apply]
'o function.
When you close the properties box your chosen image should now
appear in the embedded EMF field. eg:
$B:
Coloured images require a colour printer. When printing labels from a
monchrome thermal printer any images should be optimised for black
and white (not greyscale).
The selected image is permanently imported into the label design held
within the software database.
Page : 55
HibSoft Label Enterprise Designer
User Manual
3.13 Barcode Fields ( Fields / Insert / Barcode)
OPTIO$AL MODULE
If you purchased any barcode modules, you can use barcode fields to
include data in barcoded format on your label designs.
1) Select Fields / Insert / Barcode from the menu bar.
2) A Barcode Field is drawn on the template at a default location.
3) You can adjust the size of the box you have drawn using the resizing
nodes.
4) Double-click on the box you have just drawn to set its properties.
(If you do not have any barcode modules installed, the program may
report an error at this point.)
Page : 56
HibSoft Label Enterprise Designer
User Manual
Field Properties (Barcodes)
The Barcode tab of the field properties box contains options which allow
you to the barcode format and the data to be encoded. The Frame tab is
a common tab which contains options for controlling the appearance of
an object and is dealt with later in this manual.
Page : 57
HibSoft Label Enterprise Designer
User Manual
Type:
Lists the barcode formats you currently have
installed. Choose the format required for the
current data item.
Data Source
Choose the data source within the application
where the data to be barcoded is to be taken from.
This may be Fixed, Sub Data or Misc. Data (see
below).
Fixed
Choose this option if the data to be barcoded is
fixed, ie. always remain the same when you print a
label using the current template.
Type the data to be barcoded into the box
alongside.
Sub Data
Choose this option if the data to be barcoded is to
be taken from one of the standard fields in the
substance data record.
Select the data item from which the barcode data is
to taken from the drop-down list. If the field is
language enabled (and you have multiple languages
installed) the language drop down will be enabled
from which to make your choice.
Misc Data
Choose this option if the data to be barcoded is to
be taken from a non-standard data field.
Enter the name of the data field then select the field
index (applies to data stored as multiple lines) and
the required language (if applicable) in the boxes to
the right.
'B: This is an advanced function. Please contact
Hibiscus PLC for full instructions if you wish to
use this facility.
[Ok]
Click this button to store any changes made and
close the window.
Page : 58
HibSoft Label Enterprise Designer
User Manual
[Cancel]
Click this button to close the window without
storing any changes.
[Apply]
'o function.
'B: When you close the dialogue the barcode does not yet appear on
your template design as a barcode. It will only take on the visual form
of a barcode when you load a substance into the template.
Page : 59
HibSoft Label Enterprise Designer
User Manual
3.14 Custom Symbol ( Fields / Insert / Advanced / Custom Symbol)
Custom Symbol fields allow you to incorporate pictograms or other
images in your label designs from a list that has been programmed into
your database (contact Hibiscus PLC to set up a range of custom
symbols).
1) Select Fields / Insert / Advanced / Custom Symbol from the menu
bar.
2) A Custom Symbol Field is drawn on the template at a default
location.
3) You can adjust the size of the box you have drawn using the resizing
nodes.
4) Double-click on the box you have just drawn to set its properties.
Page : 60
HibSoft Label Enterprise Designer
User Manual
Field Properties (Custom Symbol)
The Custom Symbol tab of the field properties box contains selectors to
choose the desired symbol set and the numbered symbol within the set.
The Frame tab is a common tab which contains options for controlling
the appearance of an object and is dealt with later in this manual.
Page : 61
HibSoft Label Enterprise Designer
User Manual
Symbol
Lists the custom symbol sets you currently have
installed (if any). Choose the symbol set required
for the current data item.
Index
Choose the numbered symbol from within the
selected symbol set.
[Ok]
Click this button to store any changes made and
close the window.
[Cancel]
Click this button to close the window without
storing any changes.
[Apply]
'o function.
Page : 62
HibSoft Label Enterprise Designer
User Manual
3.15 Advanced Substance Text Fields
( Fields / Insert / Advanced / Advanced Substance Text )
Advanced Substance Text fields differ from standard substance text in
that they enable you to display an indexed line from within the data
and/or, when reading data from an external database, select a data item
that is not part of the 'standard' data set.
1) Select Fields / Insert / Advanced / Advanced Substance Text
from the menu bar.
2) An Advanced Substance Text Field is drawn on the template at a
default location.
3) You can adjust the size of the box you have drawn using the resizing
nodes.
4) Double-click on the box you have just drawn to set its properties.
Page : 63
HibSoft Label Enterprise Designer
User Manual
Field Properties (Advanced Substance Text)
The Sub Data tab of the field properties box contains selectors to choose
and format the desired data item. The Frame tab is a common tab which
contains options for controlling the appearance of an object and is dealt
with later in this manual.
Page : 64
HibSoft Label Enterprise Designer
User Manual
Field $ame
Enter the name of the data item to be displayed
(consult the data dictionary for the appropriate
data source).
Field Index
Choose the line of data from within the data item.
Language ID
Choose the language identifier (0 if the field is not
multi-lingual).
Prefix
Choose a prefix (if any) to appear before the data.
Always: Display the prefix even if the data field is
empty.
Postfix
Choose a postfix (if any) to appear after the data.
Always: Display the postfix even if the data field
is empty.
[Ok]
Click this button to store any changes made and
close the window.
[Cancel]
Click this button to close the window without
storing any changes.
[Apply]
'o function.
Page : 65
HibSoft Label Enterprise Designer
User Manual
3.16 Function Text Fields ( Fields / Insert / Advanced / Function Text )
Use Function Text fields where you wish to perform some kind of
function, eg. a mathematical calculation, in the text field.
1) Select Fields / Insert / Advanced / Function Text from the menu
bar.
2) A Function Text Field is drawn on the template at a default location.
3) You can adjust the size of the box you have drawn using the resizing
nodes.
4) Double-click on the box you have just drawn to set its properties.
Page : 66
HibSoft Label Enterprise Designer
User Manual
Field Properties (Function Text Fields)
The Fixed Text tab of the field properties box allows you to enter a
program script (written in LUA) to perform a given operation. The Font
and Frame tabs are common tabs which contain options for controlling
the appearance of an object and are dealt with later in this manual.
Page : 67
HibSoft Label Enterprise Designer
Fixed Text:
User Manual
Enter your script (written in the LUA scripting
language) to perform whatever function is required.
'B: This is a highly advanced function and
requires programming expertise. Function text
fields can be used to perform a wide range of
functions such as mathematical computations
and/or reading additional data from outside
sources.
See Appendix A.2 for some coding examples.
Please contact Hibiscus PLC for any further
information on this function and/or a quote for any
custom scripting.
[Ok]
Click this button to store any changes made and
close the window.
[Cancel]
Click this button to close the window without
storing any changes.
[Apply]
'o function.
Page : 68
HibSoft Label Enterprise Designer
User Manual
3.17 Function Bitmap Fields
( Fields / Insert / Advanced / Function Bitmap )
Use Function Bitmap fields where you wish to display a programable
bitmap image.
1) Select Fields / Insert / Advanced / Function Bitmap from the
menu bar.
2) A Function Text Field is drawn on the template at a default location.
3) You can adjust the size of the box you have drawn using the resizing
nodes.
4) Double-click on the box you have just drawn to set its properties.
Page : 69
HibSoft Label Enterprise Designer
User Manual
Field Properties (Function Bitmap Fields)
The Fixed Text tab of the field properties box allows you to enter a
program script (written in LUA) to define and load the image to be
displayed. The Frame tab is a common tab which contains options for
controlling the appearance of an object and is dealt with later in this
manual.
Page : 70
HibSoft Label Enterprise Designer
Fixed Text:
User Manual
Enter your script (written in the LUA scripting
language) to select and load the desired image.
'B: This is a highly advanced function and
requires programming expertise. Function bitmap
fields can be used, for example, to load a logo
specific to the product selected. Please contact
Hibiscus PLC for any further information on this
function and/or a quote for any custom scripting.
[Ok]
Click this button to store any changes made and
close the window.
[Cancel]
Click this button to close the window without
storing any changes.
[Apply]
'o function.
Page : 71
HibSoft Label Enterprise Designer
User Manual
3.18 Function EMF Fields
( Fields / Insert / Advanced / Function EMF )
Use Function EMF fields where you wish to display a programable
EMF image.
1) Select Fields / Insert / Advanced / Function EMF from the menu
bar.
2) A Function Text Field is drawn on the template at a default location.
3) You can adjust the size of the box you have drawn using the resizing
nodes.
4) Double-click on the box you have just drawn to set its properties.
Page : 72
HibSoft Label Enterprise Designer
User Manual
Field Properties (Function EMF Fields)
The Fixed Text tab of the field properties box allows you to enter a
program script (written in LUA) to define and load the image to be
displayed. The Frame tab is a common tab which contains options for
controlling the appearance of an object and is dealt with later in this
manual.
Page : 73
HibSoft Label Enterprise Designer
Fixed Text:
User Manual
Enter your script (written in the LUA scripting
language) to select and load the desired image.
'B: This is a highly advanced function and
requires programming expertise. Function bitmap
fields can be used, for example, to load a logo
specific to the product selected. Please contact
Hibiscus PLC for any further information on this
function and/or a quote for any custom scripting.
[Ok]
Click this button to store any changes made and
close the window.
[Cancel]
Click this button to close the window without
storing any changes.
[Apply]
'o function.
Page : 74
HibSoft Label Enterprise Designer
User Manual
3.19 The Font Tab
The Font Tab is common to all text objects and provides options for
controlling the appearance of text on your label designs.
To access the Font Tab for a text object, double click on that object to
open the Field Properties box, then click on Font.
Page : 75
HibSoft Label Enterprise Designer
User Manual
Font $ame:
The Font browser lists all the fonts (character
styles) that are currently installed on your system.
User the slider bar to move up and down the list
then click on the desired font to select it.
Warning: When sharing template designs with
other users on other computers, ensure to use only
those fonts which are available to all users.
Font Size:
Select the Font Size at which you wish the text to
appear (alternatively select Size To Fit to
automatically adjust to best fit).
Size To Fit:
Tick this box to automatically adjust the size of the
text to best fit within the box.
From Layer:
Only available if 'Size To Fit' is selected.
Tick this box to automatically adjust the size of the
text to best fit in common with all other 'Size To
Fit' text boxes on the current layer - the largest
common font size that will fit all.
Min Font Size
Only available if 'Size To Fit' is selected.
The minimum acceptable font size for the field.
'Size To Fit' will not go below the minimum even
though the text may then overflow the field.
Max Font Size
Only available if 'Size To Fit' is selected.
The maximum acceptable font size for the field.
'Size To Fit' will not go above the maximum even
though the text may not then fill the field.
Colour
Opens a standard Windows colour palette browser.
Select the colour in which you wish the text to
appear.
Bold
Tick for Bold text.
Italic
Tick for text in Italics.
Underline
Tick for Underlined text.
Page : 76
HibSoft Label Enterprise Designer
User Manual
Wordwrap
Tick to allow wordwrapping, ie. allow the text to
occupy multiple lines.
Text Alignment
Tick the radio set button corresponding to the
required alignment position of the text within the
box, ie:
(Top Left)
(Mid Left)
(Btm Left)
(Top Centre)
(Mid Centre)
(Btm Centre)
Page : 77
(Top Right)
(Mid Right)
(Btm Right)
HibSoft Label Enterprise Designer
User Manual
3.20 Frame Tab
The Frame tab allows you to define and configure borders around label
objects and determine their orientation - applies to all object types.
To access the Borders Tab, double-click on a label obect to open the
Field Properties box, then click on Borders.
Page : 78
HibSoft Label Enterprise Designer
User Manual
Top
Shows the current left alignment of the object, ie.
distance from left edge of label outline.
Left
Shows the current top alignment of the object, ie.
distance from top edge of label outline.
Width
Shows the current width of the object
Height
Shows the current height of the object.
$ote that the Top, Left, Width and Height properties of any object are
set initially by using the mouse to drag the object to the desired
location, and by using the mouse to drag the resizing nodes to the
required size. Alternatively those properties may be typed in for
precise sizing and positioning.
Angle
Type in the angle of rotation of the object, ie.
upright = 0, inverted = 180. Free rotation is
allowed, ie. individual objects may be rotated to
any angle from 0 to 359 degrees.
Field Border
Tick the sides of the object (Top / Left / Right /
Bottom) on which you wish a solid lined border to
be drawn.
For curved corners, tick the corresponding Curve
box(es).
'B: Borders will not appear until you have also
selected a border width.
Border Width
Applies only if any Field Borders have been ticked
(above).
Type the width in mm (including fractions)
required for any selected borders.
Corner Width
The horizontal curvature distance of any selected
curved corners.
Corner Height
The vertical curvature distance of any selected
curved corners.
Page : 79
HibSoft Label Enterprise Designer
User Manual
Background
Colour
Tick this box if the object requires a coloured
background.
Set Colour
Available only if Background Colour is ticked.
Click this button to open a colour palette to select
the desired background colour for the object.
Page : 80
HibSoft Label Enterprise Designer
User Manual
4.0 Advanced Label Design
The previous chapters have discussed how to create a basic label
template and add label objects. This chapter will introduce some
advanced concepts to give you even greater control and ease of use in
working with your label designs.
Page : 81
HibSoft Label Enterprise Designer
User Manual
4.1 Designing In Layers
HibSoft Label Enterprise allows you to build up your label design in
layers sharing common attributes.
Uses of Layers:
1)
Assign a common 'Size To Fit' font size to a group of text objects.
The 'Size To Fit' function is a very powerful tool in label design as
it allows the best possible font size to always be applied to a
particular field regardless of the volume of information - ie. Risk
and Safety phrases are far more extensive for certain chemicals than
they are for others. Applying 'Size To Fit' to individual fields, even
of the same type however, can lead to lots of different font sizes
being used and give your label a patchwork appearance. Again,
assume you have included two R&S Text boxes, one in English and
one in German. German is generally more verbose than English, so
even though the boxes are drawn the same size a different font size
may be chosen for German because there is more to fit in. By
grouping text boxes on a layer, the program can assign one best fit
font size that suits all.
2)
Include non-printing objects on labels. It can be highly
advantageous to include an object on a label design that does not
actually print on the finished label. For example, if you are using a
monochrome thermal printer which cannot print coloured
backgrounds you may wish to use labels which have, say a
flammable diamond with red background pre-printed on them. In
this case you do not need to include the diamond in your template
design, but if you leave it off what you see on screen is a direct
match to the finished label. Non printing layers allow you to
overcome this by including the object in your label design without
attempting to print it. Another use is to include instructions for your
operators overlaid on the label design (which obviously should not
print on the actual label).
Page : 82
HibSoft Label Enterprise Designer
User Manual
The Layer Bar ( View / Layer Bar )
The layer bar displays the layers that are currently included in your
label design and their properties. A layer can be visible or hidden (eye
icon), and printing or non-printing (printer icon). Every label template
must have at least one layer.
Layer 1 = Printing / Visible
Layer 2 = Non-Printing / Visible
Layer 3 = Printing / Hidden
Layer 4 = Non-Printing / Hidden
Page : 83
HibSoft Label Enterprise Designer
User Manual
4.1.1 Adding Layers
To create a new Layer, click on the [New] button. A new numbered layer
is automatically created and added to the layer bar.
4.1.2 Adding Objects to Layers
To add objects to a layer, simply click on the layer title in the layer bar to
highlight it then add objects to your label design in the normal way. Any
new objects that you add to your label design are always added to the
currently selected layer.
4.1.3 Making Layers Printing/Non-Printing
The printer icon next to the layer name in the layer bar shows you its
current printing status.
Printing Layer - An unmarked printer icon means it is a printing layer
(objects on that layer will be printed on the finished label).
$on-Printing Layer - A printer icon with a red bar across it means it is a
non-printing layer (the objects on that layer will not be printed on the
actual label).
Changing Status - To change the printing status of the layer simply
double-click on the printer icon to toggle between the two states.
4.1.4 Making Layers Visible/Hidden
The eye icon next to the layer name in the layer bar shows you its current
visibility status.
Visible Layer - An unmarked eye icon means it is a visible layer (objects
on that layer are currently visible on the design grid).
Hidden Layer - a printer icon with a red bar across it means it is a
hidden layer (objects on that layer are not currently visible on the design
grid).
Changing Status - To change the visibility status of the layer simply
double-click on the eye icon to toggle between the two states.
4.1.5 Deleting Layers
To delete a layer, simply select the layer by clicking on the layer name to
highlight it, then click on the [Delete] button on the Layer Bar. Note that
you cannot delete a layer which currently contains objects - this is to
prevent you accidently deleting a (potentially) large part of your label
design. Therefore to delete a layer:
1) Set the layers visibility status to visible.
2) Set all other layers visibility status to hidden.
3) Delete all visible objects from the design grid.
Page : 84
HibSoft Label Enterprise Designer
User Manual
4) Click on the [Delete] button on the Layer Bar to remove the layer.
4.1.6 Moving Objects between Layers
You can move objects between layers using the Cut and Paste functions.
1) On the Layer Bar, select the Layer containing the object to be moved.
2) On the Design Grid, select the object to be moved to a new layer.
3) On the Menu Bar, select Edit / Cut - the object is cut (removed) from
the current layer and stored in the edit buffer.
4) On the Layer Bar, select the Layer to receive the object.
5) On the Menu Bar, select Edit / Paste - the object is pasted (added) to
the new layer at the default location, you will need to move it to its
proper location on the new layer.
$ote that objects can only be moved between layers one at a time, so
plan your use of layers carefully.
Page : 85
HibSoft Label Enterprise Designer
4.2 Managing Templates
User Manual
( File / Manage Templates )
HibSoft label stores your template designs within its own internal
database where they are available to all users of the software.
Furthermore, label templates are stored in folders which can be nested,
enabling you to organise your different label designs into categories and
sub-categories according to usage, thus making it much easier to locate
the correct template when the time comes to print a label.
4.2.1 Adding Sections
To create a new folder, simply click on the [Add] button, then type in a
name for the new folder in the dialogue box that appears.
NB: You can create new folders 'on the fly' when you use the tmeplate
'Save As' function.
Page : 86
HibSoft Label Enterprise Designer
User Manual
Enter a name
for the new
template
section
Type in a name for the template section. Use names
that are meaningful and descriptive of the templates
you intend to store in that section. Click [Ok] to create
the section.
[Ok]
Click this button to create the section named above.
[Cancel]
Click this button to cancel - close the dialog without
creating a new section.
4.2.2 Deleting Sections
To delete a folder, simply select the folder you wish to delete, ensure the
correct folder is highlighted, then click on the [Delete] button (below the
folders browser). Note that you cannot delete a section which contains
templates - you must first individually delete the templates or move them
to other sections.
4.2.3 Deleting Templates
To delete a template, simply click on the template name to select it,
ensure the correct template is highlighted, then click on the [Delete]
button (below the templates browser.
4.2.4 Moving Templates Between Folders
You can easily move templates between folders by using the drag and
drop method, ie:
1) In the left panel, open the folder containing the template to be
moved.
2) In the right panel, click on the template and, holding down the mouse
button, drag it over the folder in the left panel where you wish it to be
placed, then release the mouse button..
Page : 87
HibSoft Label Enterprise Designer
4.3 Importing Templates
User Manual
( File / Import Templates )
HibSoft Label Enterprise allows you to Import label templates from
other copies of the same software or from earlier versions.
Use the standard windows file browser to locate and select the required
templates.
'ote that you can only import files of type HSL or L2T.
*** Always check imported templates carefully ***
HibSoft Label Enterprise is far more versatile in its operations and when
importing templates from earlier versions which did offer the same
versatility may have to make 'educated guesses' as to how certain fields
are intended to be used.
Page : 88
HibSoft Label Enterprise Designer
User Manual
4.4 The Menu Bar
These features are all accessible from the Menu Bar.
File / Save As
Save a copy of the current template under a
different name - useful if you wish to create a
new template which is similar to an existing
design, ie. load the existing template and use
File / Save As to save a copy under a new
name, then simply amend the copy to meet
your new requirements (see 2.3).
Fields / Move
When you draw objects they are stacked in the
order in which you create them. This allows
you to create overlapping objects but can lead
to difficulties accessing an object which has
been covered over by others. The move option
allows you to move an object up or down the
stacking order.
/ Up - Move the selected object up one level in
the stack.
/ Down - Move the selected object down one
level in the stack.
/ To Top - Move the selected object to the top
of the stack.
/ To Bottom - Move the selected object to the
bottom of the stack.
Fields / Delete
Delete the selected object
View / Show Grid
Switch the design grid on/off.
View / Set Grid
Set spacing options on the design grid.
View / Zoom
50% - Zoom out to 50% of normal view size.
100% - Zoom the design grid view to normal
view size.
150% - Zoom the design grid view to 150% of
normal view size.
200% - Zoom the design grid view to 200% of
normal view size.
Page : 89
HibSoft Label Enterprise Designer
User Manual
View / Toolbar
Show/Hide the toolbar.
View / Palette
Show/Hide the design palette.
View / Status Bar
Show/Hide the status bar (bottom of screen).
Page : 90
HibSoft Label Enterprise Designer
A.0 Appendices
A.1 How do I...?
A.2 Code Samples
Page : 91
User Manual
HibSoft Label Enterprise Designer
User Manual
A.1 How do I…
.. separate R&S phrases so that I can display Risk phrases and Safety
phrases seperately?
Draw two R&S fields. Select the first R&S field and double-click to
open the properties box. In the box titled ‘Phrase Filter’, enter 'R’ to
display only Risk phrases. Close the properties box. Repeat for the
second R&S field, but this time entering ‘S’ in 'Phrase Filter' to
display only Safety phrases.
.. draw a box around a group of fields?
Draw a Fixed Text field. Position and scale the fixed text field so
that it fully encompasses your group of fields, then double-click on
it to access its properties. Delete the default text then select the
'Frame' tab and switch on all borders (you can also select curved
corners if required). You will now have a box drawn around your
group of fields. However you will find that the original fields are
now inaccessible for amendment because they are covered over by
the empty text box. Overcome this by sending the new field to the
bottom of the stack – whilst the field is selected, from the menu bar
choose Fields / To Bottom.
.. make a copy of a label design to easily create a new variant?
Open the label template that you wish to use as the basis of your new
variant. From the menu bar select File / Save As. Enter a new name
for the copy template and click save. The title bar of label designer
should now show the name you have just assigned to the copied
template (indicating you are now working on the copy). Make your
amendments and resave (Save buton).
.. adjust the level of magnification?
When working with large labels it is advantageous to be able to
‘Zoom Out’ (decrease magnification) to enable the whole label to be
viewed at once to get a better appreciation of the overall design.
Alternatively, when working with small objects it is advantageous to
be able to ‘Zoom In’ (increase magnification) to make those objects
easier to work with. For these reasons, Label Enterprise Designer has
Page : 92
HibSoft Label Enterprise Designer
User Manual
variable zoom levels which can be adjusted from the zoom buttons
on the menu bar (Magnifying glass icon with + to zoom in, - to zoom
out, 1:1 restore to default level).
Page : 93
HibSoft Label Enterprise Designer
A.2
User Manual
Code Samples
This section contains code samples for performing some common
functions in Advanced Function Text fields. To add any of the
following types of fields to your label design, create an 'Advanced
Function Text field and enter the code (shown in red) into the text box.
A.2.1 Simple Date Field
-- Current Date
local fobj = { }
local sep = "-" -- Seperator character
fobj.oninit = function(self)
self.value = "Current Date";
end
fobj.onsub = function(self)
self.value = os.date("%d"..sep.."%b"..sep.."%Y", os.time(date))
end
table.insert(fields, fobj)
return table.getn(fields)
In the line:
self.value = os.date("%d"..sep.."%b"..sep.."%Y", os.time(date))
you can replace %d, %b and %Y with any of the following formatting
options:
%a
%A
%b
%B
%D
%d
%H
%I
%M
%m
%p
abbreviated weekday name (e.g., Wed)
full weekday name (e.g., Wednesday)
abbreviated month name (e.g., Sep)
full month name (e.g., September)
date and time (e.g., 09/16/98 23:48:10)
day of the month (16) [01-31]
hour, using a 24-hour clock (23) [00-23]
hour, using a 12-hour clock (11) [01-12]
minute (48) [00-59]
month (09) [01-12]
either "am" or "pm" (pm)
Page : 94
HibSoft Label Enterprise Designer
%S
%w
%x
%X
%Y
%y
A.2
User Manual
second (10) [00-61]
weekday (3) [0-6 = Sunday-Saturday]
date (e.g., 09/16/98)
time (e.g., 23:48:10)
full year (1998)
two-digit year (98) [00-99]
Pick List
-- Displays a listbox
-- The name of the dialog box
local name="Pack Size"
-- The list of entries
local data = {
"5KG",
"4 x 5KG",
"25KG",
"200KG",
"1000KG"
}
-- The index of the entry to be preselected (0 if none)
local dflt = 0
-- Disable cancel (force user to make a selection - 1 = yes)
local cancel = 1
-- returns:
-- The data content of the selected entry
function ListBox(name, data, preselect)
-- Clone the data
local listData = {}
for i,v in ipairs(data) do
listData[i] = v
end
-- Set the default selection
listData.VALUE = preselect or 1
Page : 95
HibSoft Label Enterprise Designer
User Manual
local list = iup.list(listData)
local btnOK = iup.button{title="OK",SIZE="50x"}
local btnCancel = iup.button{title="Cancel",SIZE="50x"}
if cancel == 1 then
btnCancel = iup.button{title=" ",SIZE="50x"}
end
local dlg = iup.dialog{
iup.vbox{
list,
iup.hbox
{
iup.fill{},
btnOK,
btnCancel
;GAP=5
}
;GAP=5
,ALIGNMENT="ACENTER"
}
;title=name or "Selection"
,defaultenter=btnOK
,defaultesc=btnCancel
,MARGIN="5x5"
,NATIVEPARENT=hsl.getMainWnd()
,TOPMOST="YES"
}
local selected
function btnOK:action()
selected = tonumber(list.VALUE)
if selected > 0 then
dlg:hide()
return iup.DEFAULT
else
local ans = hsl.alert("Please make a selection", name)
end
end
function btnCancel:action()
Page : 96
HibSoft Label Enterprise Designer
if cancel ~= 1 then
selected = nil
dlg:hide()
return iup.DEFAULT
end
end
dlg:show()
iup.MainLoop()
return selected
end
---------------------------------------------------------local fobj = { }
fobj.oninit = function(self)
self.value = name
end
fobj.onsub = function(self)
local dflt = 0
local res = ListBox(name, data, dflt)
if not res then
self.value = "List box canceled"
else
self.value = data[res]
end
end
table.insert(fields, fobj)
return table.getn(fields)
Page : 97
User Manual