1
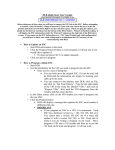
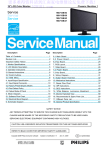
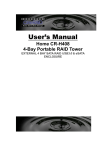
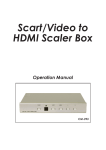
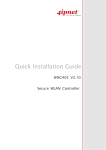
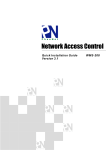
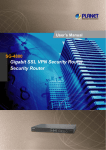
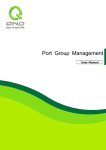
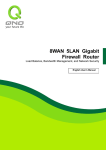
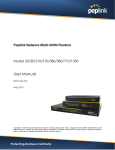
This product can be set up using
any current web browser, i.e.,
Internet Explorer 5x, Netscape
Navigator 4x.
DLB-1200
Network Load Balancer
Before You Begin
This Quick Installation Guide (QIG) provides instruction for installing the DLB-1200 and Ethernet configuration for other
PCs. The former part is going to show how to connect DLB-1200 with other Network equipments and Network
configuration of DLB-1200. The latter part is a description for configuring Network setting of other PCs on Ethernet to
make sure the normal function of whole Network.
Check Your Package Contents
♦ DLB-1200 Network Load Balancer
♦ CD-ROM(Containing Manual and Warranty)
♦ DLB-1200 Quick Installation Guide
♦ Ethernet(CAT5 UTP/Straight-Through) cablex2
♦ Ethernet(CAT5 UTP/Cross over) cablex1
Using a power
♦ Console Cable
supply with a
different voltage
rating will damage and void
♦ 5V DC,3A Power Adapter
the warranty for this product.
Connect the DLB-1200 to Your Ethernet
A、Ensure the DLB-1200 and DSL/Cable Modem are power OFF.
B、WAN port connection
Please use a standard cable or the cable supplied with your DSL/Cable Modem to connect DLB-1200 and DSL/Cable
Modem. If using only one Broadband modem, connect it to the "WAN 1 External Port".
If your WAN (DSL/Cable Modem) has been connected to internal Firewall or Router, please connect the DLB-1200 to the
Firewall or Router.
C、Ethernet port connection
Use 10Base T and 100Base T connections to connect your admin PC with the internal Switch or Hub that connected to the
Ethernet Port on DLB-1200. If you want directly connect the DLB-1200 to this PC, you have to use a Cross Over Line as
connection.
B. WAN Port
Please use a standard cable or the
cable supplied with your DSL/Cable
Modem to connect
to here.
C. Ethernet Port
Please use 10Base T and 100Base T connections to
connect to here. Another end has to be connected to
internal Switch or Hub.
Console Port
If you need to configure the admin password or user
name, please connect one PC to this port and
change above items with the terminal linking
applications of the PC.
DC Power Inlet
Connect the supplied power
adapter here.
D、Power up
Power the DSL/Cable modem or modems.
Connect the supplied power adapter to the DLB-1200 and power up.
E、Check the LED
The Power Indicator and WAN 1/2 Indicator should be ON, if the corresponding WAN External Port was connected to a
DSL/Cable Modem、Firewall or a Router.
Ethernet LED
Power LED
Status LED
WAN1 /WAN2 LED
Activity LED
The corresponding Ethernet Indicator should be ON while a PC connected to the Ethernet Port. If any error condition
shows up, the Error Indicator stays ON.
Connection Legend
Here comes a connection legend, you have to connect your DSL/Cable Modems to WAN 1 and WAN 2 Port with DLB-1200,
then you have to connect DLB-1200 with your internal Switch or Hub. If you need to connect DLB-1200 with administrator's
PC directly, you have to use Cross Line as a connection.
Configure the DLB-1200's IP Address on
Your Ethernet
Select "Control Panel"
-"Network and Dial-up
Connections", then click
"Properties"
Please choose the TCP/IP
component of this PC's NIC
(Network Interface Card) and
click "Properties".
Finally, please set up the PC's
IP as 192.168.0.X/
255.255.255.0, the "X" range
could be 0~255. For example
you can enter "192.168.0.1" in
IP Address item, then reboot
the Administrator's PC.
Configure PC on Your Ethernet
After DLB-1200 installation, for each PC, the following items may need to be configured:
TCP/IP Network Setting
Internet Access Configuration
A、TCP/IP Network Setting
If administrator's PC uses the default
Windows 95/98/ME/2000/XP setting,
no changes need to be made. Please
restart or reboot the PC. Then
DLB-1200 will act as a DHCP Server,
automatically providing a suitable IP
Address (and related information) to
each PC.
Reboot other PCs. For all
non-Server version of Window,
the default TCP/IP setting is to
act as a DHCP client. In
Windows, this called Obtain an
IP address automatically.
If using fixed IP
Address on your
LAN, or you want
to check your TCP/IP setting,
refer to Appendix - Windows
TCP/IP Setup.
B、Internet Access Configuration
If you hope any PC on Ethernet can link up Internet through DLB-1200, Please make configurations according to different
environment by following steps.
For Windows 9x/2000
1.
Select Star Menu - Setting - Control
Panel - Internet Option.
2.
Select the Connection Tab, and
click the setup button.
3.
Select "I want to set up my Internet
connection manually, or I want to
connect through a local area
Network (LAN)" and click Next.
4.
Select "I connect through a local
area network (LAN)" and click Next
5.
Ensure the entire box on the
following Local area network
Internet Configuration screen is
unchecked.
6.
Please check the "No" option when
prompted "Do you want to set up an
Internet mail account now?
7.
Click Finish to close the Internet
Connection Wizard to complete the
setup.
For Windows XP
1.
Select Star Menu - Control
Panel - Network and Internet
Connection.
2.
Select Set up or change your
Internet Connection.
3.
When Internet Properties
Dialogue Box pops up, click
"Setup" button and click "Next"
on the "New Connection
Wizard" screen.
4.
Select "Connect to the
Internet" and click "Next".
5.
Select "Set up my connection
manually" and click "Next".
6.
Check "Connect using a
broadband connection that is
always on" and click "Next".
7.
Click Finish to close the New
Connection Wizard to complete
the setup.
For Further Configuration
A、Open WEB Browser
If you have done above installation and
configurations, please open WEB Browser
like Microsoft Internet Explore and enter the
administrator's PC IP Address you set up. For
example, if you set the IP Address as
"192.168.0.1", please enter "192.168.0.1" in
the Address or Location Box.
B、Enter the Passwords
When entering the IP Address, you'll find the
following dialogue box on screen. Please
enter "123456" in the "Password" column.
C、Network Configuration
When
WEB
DLB-1200
management
pops
up,
interface
please
refer
of
to
DLB-1200 User Manual in Product Package
for further network configurations.
Appendix - Windows TCP/IP Setup
Before ensure your TCP/IP settings correct, please check DLB-1200's IP Address with your network administrator, and ask
your ISP for DNS Address or Address before making the following changes.
A、Checking TCP/IP Settings - Windows 9x/ME
1.
Select "Control Panel" -"Network
and Dial-up Connections", then
click "Properties".
2.
Select the TCP/IP protocol for
your network card.
3.
Click on the Properties button.
4.
If the DNS Server fields are
empty, select Use the following
DNS server addresses, and enter
the DNS address or addresses
provided by your ISP, then click
OK.
5.
On the Gateway tab, enter the
DLB-1200's IP address in the
New Gateway field and click Add.
(Your LAN administrator can
advise you of the IP Address they
assigned to the DLB-1200.)
B、Check TCP/IP Setting - Windows 2000
1.
Select "Control Panel" -"Network
and Dial-up Connections", then
click "Properties".
2.
Right
click
the
"Local
Area
Connection"
icon
and
select
"Properties",
then
select
the
TCP/IP protocol for your network
card.
3.
Click on the Properties button.
4.
If the DNS Server fields are
empty, select Use the following
DNS server addresses, and enter
the DNS address or addresses
provided by your ISP, then click
OK.
5.
On the Gateway tab, enter the
DLB-1200's IP address in the
New Gateway field and click Add.
(Your LAN administrator can
advise you of the IP Address they
assigned to the DLB-1200.)
C、Checking TCP/IP Setting - Windows XP
1.
Select Star Menu - Control
Panel - Network Connections
and click "Network
Connections".
2.
Right click the Local Area
Connection icon and select
Properties.
3.
Select the TCP/IP protocol
for your network card and
click the Properties button.
4.
If the DNS Server fields are
empty, select Use the
following DNS server
addresses, and enter the
DNS address or addresses
provided by your ISP, then
click OK.
5.
On the Gateway tab, enter the
DLB-1200's IP address in the
New Gateway field and click Add.
(Your LAN administrator can
advise you of the IP Address they
assigned to the DLB-1200.)
Technical Support
You can find the most recent software and user documentation on the D-Link website.
D-Link provides free technical support for customers within the United States for the
duration of the warranty period on this product.
U.S. customers can contact D-Link technical support through our web site or by phone.
D-Link Technical Support over the Telephone:
(800) 758-5489
24 hours a day, seven days a week
D-Link Technical Support over the Internet:
http://support.dlink.com
il
t@dli k