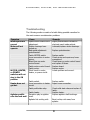
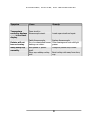
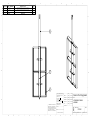
1
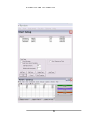
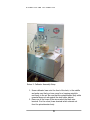
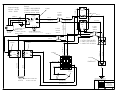
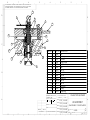
1 Volume CEMENT TEST EQUIPMENT, INC. Tulsa, Oklahoma, USA Atmospheric Consistometer Instruction Manual 1 CEMENT TEST EQUIPMENT, INC. Atmospheric Consistometer User’s Manual 2012 Cement Test Equipment, Inc. 5704 E. Admiral Blvd. Tulsa, OK 74115 Phone 918-835-4454 • Fax 918-835-4475 Table of Contents CHAPTER 1: INTRODUCTION 2 Uses of an Atmospheric Consistometer 2 Description of the Instrument 2 Instrument Specifications 4 Installation 5 CHAPTER 2: OPERATION AND CALIBRATION 7 Operating the Atmospheric Consistometer 7 Calibration of Non Recording Instrument 7 Operating the Recording Atmospheric Consistometer 9 Using the Archived Data From the USB Memory 12 Calibration of Recording Instrument 15 CHAPTER 3: MAINTENANCE, SERVICING, AND TROUBLESHOOTING 19 Maintenance 19 Rotator Bearing Maintenance 20 Troubleshooting 22 Parts List 24 Diagrams/Support Material 26 i 1 I N T R O D U C T I O N Chapter Introduction This chapter contains general information about the atmospheric consistometer and its uses as well as detailed specifications for the instrument. Uses of an Atmospheric Consistometer I C O N K E Y Important information Potential Danger or Safety Hazard Operational Warning The Model 200 Atmospheric Consistometer is designed for trouble free operation by minimizing the amount of water vapor that comes in contact with the electronics. C ements are a critical element in the drilling, completion, work over, and abandonment of wells. For each application, a cement slurry is designed with specific properties and is given additives that provide predictable slurry density, volume, viscosity, compressive strength, fluid loss, gas migration, and thickening time. The atmospheric consistometer is typically used in fluid loss testing and to condition the slurry prior to rheological testing. The typical test methods are listed in API Specification 10 on Oilwell Cements. Description of the Instrument The Model 200 Atmospheric Consistometer is able to test cement slurries at temperatures up to 200ºF/93ºC at atmospheric pressure using an oil bath as the heating media. CTE recommends the use of mineral oil as the heating media since it will not evaporate and condense on the electronics as water does over time. The CTE atmospheric consistometer uses metallic bearings instead of the old style nylon balls and water vapor decreases the service life of the bearings. 2 I N T R O D U C T I O N The consistometer consists of a liquid-tight stainless steel tank that is used to hold the heating bath. The stainless steel tank houses two rotating, cylindrical slurry cups and a stationary paddle assembly that are partly submerged in the heating bath. The instrument contains two rotators that engage the slurry cups and cause them to rotate when the motor is running. Heat is supplied by a 1500 W tubular heater immersed in the bath. A thermocouple is provided for determining the temperature of the heating bath and slurry. The slurry cup is rotated through the use of a DC electric motor and timing belt and pulley system. The rotational speed of the slurry cup is set at the factory at 150 rpm. The speed may be changed by the user using the potentiometer inside the cabinet, provided a satisfactory tachometer is available. The consistency of the cement slurry in a non-recording atmospheric consistometer is measured by a torsion spring and pointer mechanism found on the lid of the slurry cup. The pointer is coupled with a torsion spring to resist the rotating force of the paddle. The rotational force is proportional to the consistency of the cement slurry and is measured through the pointer as the spring deflects under load. The consistency is indicated by the pointer and dial on the slurry cup lid. The dial is graduated in units of consistency from 0-10. A reading of 7 on the lid corresponds to a Bearden Unit (Bc) value of 70. Bearden units are defined in API Specification 10. The consistency of the cement slurry in a recording consistometer is measured by a torsion spring and potentiometer mechanism found on the lid of the slurry cup. The potentiometer is coupled with a torsion spring to resist the rotating force of the paddle. The rotational force is proportional to the consistency of the cement slurry and is measured through the potentiometer as the spring deflects under load. The consistency is displayed on a recorder. The instrument is equipped with an agitator to circulate the heating media and provide a uniform temperature in the bath. Cooling coils 3 I N T R O D U C T I O N are also provided for rapid cooling of the heating bath at the completion of a test. The CTE atmospheric consistometer is equipped with a state-of-theart temperature controller that provides ease of use for the operator. The top display is the oil bath temperature and the bottom display is the set point temperature. The set point is selected by pressing the up or down arrows. The controller is self-tuning, so it is not necessary to enter tuning parameters. The front of the temperature controller is NEMA 4X rated to prevent contamination with liquids or dust as well as provide corrosion protection. The recording atmospheric uses a nanodac recorder/controller and archives data to a front panel mounted USB memory stick in .csv and .uhh format. This allows users to easily import data into spreadsheets for reports, graphs and charts or the supplied Eurotherm iTools Review software. The MOTOR, POWER, and HEATER switches on the front panel are circuit breakers and therefore make fuses unnecessary. Instrument Specifications The specifications below apply to all CTE, Inc. atmospheric consistometers. ELECTRICAL Input Voltage: Input Frequency: 230 VAC (+10%) 115 VAC (+10%) 1600W 7 A (230 VAC) 14 A (115 VAC) 50-60 Hz MECHANICAL Height: Width: Depth: 22.5 in. (57 cm) 15 in. (38 cm) 17 in. (43 cm) Input Power: Current: 4 I N T R O D U C T I O N Weight: 35 lb. (16 kg) ENVIRONMENTAL Operating Temperature: Operating Humidity: (32 to 105 F) 0-40 C 0-95% non-condensing HEATER Heater Power: Heater Type: Heater Control: 1,500 W Internal tubular with MgO insulation Solid state relay DRIVE UNIT Drive Motor: Drive Speed: 1/12 hp (62 W), 180 or 90 VDC 25-250 rpm (variable) UTILITIES – COOLING WATER Cooling Water Pressure: 100 psig (6.8 bar) maximum Utility Inlets: ¼ inch female NPT Installation Before operating the instrument, it is a good idea to check for loose screws or bolts that may have loosened and fallen out during shipment. This is particularly true for overseas shipments. Upon uncrating the instrument, verify that the instrument and any spare parts on the packing have been received and are undamaged. Notify CTE if anything is missing or damaged. Locate the instrument on a firm level surface. Once the instrument has been moved to its desired location, cooling water, overflow/drain, and electrical connections can be made. The overflow/drain connection is a ¼ inch tube fitting and is located on the lower rear of the instrument. The cooling water inlet and outlet are located on the upper right side of the instrument. Use of the cooling coils is optional. The connections are ¼ female NPT. A number of ¼ inch male NPT to 8mm tube fittings are included for international locations. The drain and cooling water connections may be made with either metal or plastic tubing. 5 I N T R O D U C T I O N Electrical connections are made using the three pronged receptacle on the rear of the instrument. An electrical cord is supplied with the instrument. Please observe the following precautions when making the wiring connections. Wiring should be done by a qualified installer in accordance with local electrical codes. The instrument should be securely connected to a separate earth ground. The ground wire must be larger in diameter than the supply conductors. A 10 gauge minimum ground wire is recommended. An 8BC or larger fire extinguisher to fight electrical and oil fires should be placed within 50 feet of the consistometer. 6 O P E R A T I O N A N D C A L I B R A T I O N Operation and Calibration 2 Chapter Chapter 2 will discuss in detail the steps required to operate and calibrate the instrument. The atmospheric consistometer is very easy to use. To operate the instrument, simply follow the steps listed below. Operating the Atmospheric Consistometer 1. Fill the tank with mineral oil if it is being used for the first time. The tank holds approximately four U.S. gallons (15 liters). Check the oil level in the tank periodically. The oil level will tend to fall based on the number of tests run. 2. Install the bottom into the slurry cup. Apply a light coating of grease to the o-ring in the slurry cup bottom prior to installation. 3. Install the paddle and slurry cup lid and check to see that the paddle does not rub the slurry cup when the slurry cup turns. The temperature controller has no ON/OFF button. It may be turned off by lowering the set point below ambient. 4. Use the up and down arrow buttons on the temperature controller front panel to select the desired set point. The red (upper) value is the actual temperature and the green (lower) value is the set point. The water bath may be preheated if desired by following steps 8 and 10. 5. Prepare the slurry in accordance with API Specification 10. Fill the slurry cup up to the scribed line inside the slurry cup. 6. Place the slurry cup lid over the paddle shaft and onto the slurry cup. Align the slot in the shaft with the pin in the bottom of the lid. Engage the pins on the lid with the slots in the slurry cup. 7 O P E R A T I O N A N D C A L I B R A T I O N 7. Place the slurry cups inside the rotators and lower them down into the tank. Align slots of the cup with the slots in the rotators. The large pin on the slurry cup lid should contact the stop anchor. The slurry cups turn counterclockwise. 8. Turn the POWER switch to the ON position. 9. Turn the MOTOR switch to the ON position. 10.Turn the HEATER switch to the ON position and start the temperature controller. 11. If the instrument is a recording atmospheric consistometer, connect the cord from each lid to the connector on the front panel. Calibration of Non Recording Instrument If the instrument is within tolerance after several calibration checks, extend the calibration interval. If it is out of tolerance, shorten the interval. The lid and thermocouple circuit should be re-calibrated on a regular basis. It is recommended that the thermocouple calibration be checked at least annually and anytime a new thermocouple is installed. The lid should be re-calibrated whenever the spring is adjusted or replaced. Temperature may be conveniently calibrated using the Digital Temperature Calibrator and Millivolt Source (part number C-0373.) The lid should be calibrated by using the potentiometer mechanism calibrator. This device applies a known torque to the lid spring, allowing the readout to be observed on the lid dial. Calibration of the lid is described in the example below. Note that a calibrator (part number 2-0090) is not normally furnished with non-recording consistometers. If one is desired, please contact CTE. 1. Set the calibrator near the front edge of a desk or table. 8 O P E R A T I O N A N D C A L I B R A T I O N 2. Place the lid on the calibrator. 3. Wind the cord around the lid frame clockwise and over the pulley on the calibrator. Place the hanger weight hook in the loop on the end of the cord. 4. Attach a total weight (hanger plus weights) of 300g on the weight hanger. The pointer should read approximately 7.4 (74 Bc). 5. If the pointer indicates a consistency greater than 74 Bc, loosen the set screw holding the spring in place and move it to the right. By applying additional weights between 0 and 400g and plotting consistency as a function of applied weight, the linearity of the lid may be assessed. 6. If the pointer indicates a consistency less than 74 Bc, loosen the set screw holding the spring in place and move it to the left. 7. After the spring has been adjusted, loosen the nut on top of the lid and move the pointer to the 0 position. 8. Repeat steps 4-7 until the displays read correctly at both zero and 74 Bc. Operating the Recording Atmospheric Consistometer Follow the steps outlined for a non recording atmospheric. However we shall make a few distinctions for programming temperature and archiving data. The nanodac allows the instrument to combine temperature control and data acquisition into one small and efficient package. Temperature control is similar in that it is setup as a set-point PID controller. Tuning parameters are set and there is no need to ever change those values. It is possible to network the nanodac and assign it an IP address. Refer to the nanodac user guide for more details. For transferring data via USB memory stick please follow the following: 9 O P E R A T I O N A N D C A L I B R A T I O N Picture 1: Temperature Set Point Control SP1. 1. Insert a USB memory stick into the USB port on the front panel. Recording cannot be accomplished without there being a drive to write to. Make sure you are logged out of `Engineer’ or any other. 2. There is no `On/Off’ switch for temperature control in the nanodac. As seen in Picture 1, highlight the field for SP1 and push the scroll button. Set the temperature for the value that you desire. Press the scroll button to save and then the page button to exit the highlight. The nanodac is now attempting to heat. 3. Make sure the `Heater’ and `Motor’ switches on the front panel are turned on. The heater is now heating the fluid contained in 10 O P E R A T I O N A N D C A L I B R A T I O N the tank and the motor is spinning the impellor and stirring the fluid for uniformity. 4. You may press the up and down keys on the nanodac to scroll through the different screens. 5. Archiving is automatic and does not require any input from the user. Do not remove the memory stick while transfer is in progress or this can lead to irreparable damage. Archiving is set to occur every hour on the hour. When transferring data, a caution symbols appears next to the USB symbol at the bottom of the screen. Refer to the nanodac user guide for more details. It is possible to log into `Engineer’ and force an immediate archive to the USB memory stick. However, recording is stopped for as long as you are logged in as Engineer. From the main menu, logged in as Engineer select Demand Archiving. Then highlight `Archive’ and choose the appropriate selection. Wait for the transfer to finish and then log out of Engineer. 6. To end a test, simply highlight the SP1 field and change the temperature back to ambient or below ambient. Turn off the heater and motor front panel switches. 7. Remove the slurry cups and disassemble. 8. The stainless steel fluid tank is outfitted with an internal cooling coil. If you wish, you may connect a chiller (not supplied but can be purchased through CTE) to the ¼” NPT brass fittings located on the right side. This will decrease the time it takes to cool the oil in the tank and therefore be ready for the next test faster. 11 O P E R A T I O N A N D C A L I B R A T I O N Using the Archived Data on the Memory Stick The data is archived both in .csv and .uhh format. .uhh is a proprietary format used by the nanodac. You may use the .csv format by importing into almost any spreadsheet software (ie ©Microsoft Excel) using the comma delimited, column separation arrangement. This method enables you to edit the data and usually provides more charting options. A second option is to install and use Eurotherm iTools Review software. A CD is furnished with the instrument that you may use to install the software to your computer. Additionally this software is available from the Eurotherm website. Follow these steps to chart nanodac data using the Review software: 1. Install iTools to your computer. 2. Launch Eurotherm iTools from your programs. 3. Click File->Transfer->From Removable Media 4. Have the USB memory stick plugged into a USB port on your computer. 5. Select the drive where the memory stick is located. 6. Select a `Master Archive Folder’. If this is the first time running the Review software it will ask you to create one. Select an easy to find Folder on your computer. 7. Select or deselect the “delete source file after transfer”. 8. Click File->New Chart 9. Click `Add Point’. Make sure `Model 250’ and associated Log Group are selected and there should be three point ID’s; consistency L, Consistency R, and Temperature. 10. Select ‘Add All’. 12 O P E R A T I O N A N D C A L I B R A T I O N 11. The Chart Setup screen will reappear. There are many options available here to create a unique chart output. Messages for example may need to be turned OFF as to reduce chart clutter. Click `OK’. 13 O P E R A T I O N A N D C A L I B R A T I O N 14 O P E R A T I O N A N D C A L I B R A T I O N 12. The time scale can be changed along with many other parameters. Refer to the on-board help menu for further chart options. 13. Click `Save’ and the chart is then stored as a .cpg (chart group file). Save this in a easy to find folder near to the transferred files folder. Naming it with an easier identifier such as the date and test number will be helpful in the future for when it is necessary to re-open the chart. Calibration of Recording Instrument The nanodac recorder/controller is capable of adjusting the input to a desired high and low value. We use calibration weights, a weight hanger, a thin wire with loops on either end, and a calibrator base with which to place the potentiometer mechanism. The calibrator base is a separate assembly which is taken on and off the middlefront of the machine using the screw that is located there. See Picture 2. 15 O P E R A T I O N A N D C A L I B R A T I O N Picture 2: Calibrator Assembly Setup. 1. Screw calibrator base onto the front of the tank, in the middle and make sure that you have room for a hanging weight to rest freely in the air. Be sure that the potentiometer body while mounted does not rub against the stop holder behind. 2. Place one of the loops of the wire around the black wire terminal. It is the round, brass terminal which extends out from the potentiometer body. 16 O P E R A T I O N A N D C A L I B R A T I O N 3. With the wire make one full wrap around the potentiometer body then over the pulley and finally ending at rest with the weight hanger at the other end loop. 4. It is necessary to move the wire so that it is not entangled with other wires and connectors and free to move with the potentiometer body. 5. Plug in the connector from the potentiometer to the proper side. Each potentiometer is marked right and left and has an associated left and right side connector on the front panel. It does not matter which potentiometer you calibrate first. It is only important to calibrate the left and right potentiometer to the correct connector. 6. From the main screen of the nanodac, go to the log-in screen and log-in as Engineer with password 100. 7. Return to the main screen and go to Instrument and then input adjust. 8. Channel 1 is temperature. Do not calibrate this. Channel 2 is the left side and Channel 3 is the right side. Scroll down to Apply Adjust and select `Yes’. 9. Use the scroll button to change either channel 2 or 3, from a cross to a check mark. 10.Highlight the `Start IP `Adjust’ and select `Yes’. 11.Enter your low target value. Since you have a 50g weight holder this is associated with 9Bc. For this example let’s use 9 as our low target value. Wait for all to be steady. 12.Set the `Confirm Low’ field to `Yes’, then operate the scroll button again. 13.The display then changes to the high value adjust page. 14.In this example we shall use a total of 400g and 100Bc as our high value. Place an additional 350g to the weight holder. 15.Enter the `High Target Value’ as 100. When all is steady, set `Confirm High’ to ‘Yes’. 16.You may confirm this calibration by placing random weights between 0 and 350g onto the weight holder to verify midpoints. 17.Remove weight hanger and wire loop from the potentiometer and repeat for the other potentiometer channel. 17 O P E R A T I O N A N D C A L I B R A T I O N 18.Remove calibrator base. 19.Log out of Engineer or the unit will not record and work properly. 20.Refer to the nanodac user guide section 4.1.9 Input Adjust for additional details and visual figures. 18 M A I N T E N A N C E , S E R V I C I N G , A N D T R O U B L E S H O O T I N G 3 Chapter Maintenance, Servicing, and Troubleshooting This chapter contains information about the necessary periodic maintenance of the instrument as well as common service and troubleshooting guidelines. Maintenance C onsistometers can be relatively reliable and trouble free provided they are serviced and maintained properly. Instruments that are neglected and receive infrequent service or are subject to abuse are certain to cause trouble. General Maintenance The instrument requires very little general maintenance. The small amount of maintenance that is required is listed below. 1. If the oil in the tank becomes dirty or contaminated with cement, it should be drained and the tank cleaned. 2. Thoroughly clean the slurry cup and paddle after each use to remove all traces of cement. 3. Lubricate the o-ring in the slurry cup base with grease before each use. 19 M A I N T E N A N C E , S E R V I C I N G , A N D T R O U B L E S H O O T I N G 4. Check the bushings (C-0346) that hold the water agitator periodically. If bushings become worn excessively they should be replaced. 5. Check the timing belt (part number C-0327) periodically for signs of wear. Replace if necessary. Rotator Bearing Maintenance Atmospheric consistometers manufactured after 2002 use metal single row ball bearings to support the rotators. Before this, loose Nylon balls were used to support the rotators. The metal ball bearings are more durable, quieter, and impossible to lose. Instructions on servicing both types of bearings are given below. The rotators are supported by Nylon bearings (part number C-0098) which have a low coefficient of friction. The bearings are designed to wear out periodically without causing damage to the more expensive bearing housing and rotator. To extend the life of the bearings, they may be lubricated periodically with light oil. This is probably not necessary if mineral oil is used in the heating tank. Follow the steps below when replacing the C-0098 Bearings. Each side of the atmospheric consistometer uses 37-38 balls. The rotator also uses bronze bearings to support the radial load on the rotator. Residue from water or cement slurry can sometimes cause the bearings to seize or become noisy. They should be lubricated periodically with light oil. This is probably not necessary if mineral oil is used in the tank. The use of mineral oil as the heating medium usually assures that the bearings are adequately lubricated. 1. Disconnect the unit from electrical power. 2. Loosen the bolts holding the motor in place and slide the motor forward. 3. Remove the timing belt from the motor sprocket. 20 M A I N T E N A N C E , When removing the tank cover, keep the cover and rotator assembly level. Failure to do so may cause up to 76 Nylon balls to fall out on the floor. S E R V I C I N G , A N D T R O U B L E S H O O T I N G 4. Remove the stainless steel tank cover and attached rotators. 5. Remove the 4 screws holding the rotator assembly to the tank cover and remove the tank cover. 6. Pull the rotator up and off to expose the bearings. Lubricate or replace as necessary. 7. Reassemble. 8. Make certain that the timing belt is not excessively tight. The belt should have approximately ½ inch (12.7 mm) slack. If the belt is too tight, it will cause premature failure of the C-0098 bearings and C-0346 bushings. The procedure for replacing the metal bearings (p/n C-0883) is identical to the procedures listed above. 21 M A I N T E N A N C E , S E R V I C I N G , A N D T R O U B L E S H O O T I N G Troubleshooting The following section consists of a table listing possible remedies for the most common consistometer problems. Symptom Cause Remedy Motor speed not correct Motor will not operate Speed control board out of adjustment. Rotator bearings have locked up. Bad speed adjustment potentiometer. Faulty MOTOR switch. Loose connection in motor wiring. Blown fuse on motor control board. Faulty motor control board. Faulty motor. Short circuit in motor, heater, or power circuit. Adjust potentiometer located on electrical panel inside cabinet. Lubricate/replace rotator bearings. Faulty switch. Loose connection in heater circuit. Faulty solid state relay. Replace switch. Repair loose connection. MOTOR, HEATER, or POWER switches will not stay in the ON position Heater does not get hot. Agitator paddle rubs the tank wall Faulty heater. Excessive play in agitator shaft. Agitator hits cooling coils Replace potentiometer. Replace switch Check wiring and repair any loose connections. Check fuses on motor control board and replace if blown. Replace board. Replace motor. Locate problem and correct. Check solid state relay and replace if faulty. Replace heater. Replace agitator shaft bushings. Bend cooling coils away from agitator 22 M A I N T E N A N C E , S E R V I C I N G , A N D T R O U B L E S H O O T I N G Symptom Cause Remedy Temperature controller displays - - - - in the lower display. Open circuit in thermocouple circuit. Locate open circuit and repair. Rotator will not turn or is noisy. Noisy slurry cup assembly. Faulty thermocouple. Replace thermocouple. Dry or contaminated bronze Clean bearings and coat with light bearings on rotator. grease. Bent paddle or paddle shaft. Slurry cup rubbing cooling coils Straighten paddle and/or shaft. Bend cooling coils away from slurry cup. 23 M A I N T E N A N C E , S E R V I C I N G , A N D T R O U B L E S H O O T I N G Parts List The following is a table of frequently used replacement parts along with the CTE part numbers. Description Thermocouple Paddle Casting Paddle Shaft Set Pin for Paddle Casting & Shaft Slurry Cup Slurry Cup Base Lid Assembly (non-recording) Rotator Assembly Idler & Stirrer Sprocket Stop Anchor Assembly (non-recording) Lid Calibrator Shear Pin Toggle Valve Timing Belt Motor Sprocket Temperature Controller Motor (240 V) Motor (115 V) Motor Controller (240 V) Motor Controller (115 V) Circuit Breaker Switch (non-recording) Circuit Breaker Switch (recording) Cooling Coil Solid State Relay O-ring Heater (115 VAC) Heater (230 VAC) Power Inlet Fuse, 25A 24 Part Number C-0343 9-0013 9-0018 C-0007 9-0014 9-0015 9-0030 9-0022 C-0326 9-0024 2-0090 C-0008 C-0570 C-0247 9-0016 C-0567 C-0039 C-0039-1 C-0565 C-0565-1 C-0075 C-0075-1 9-0041 C-0080 C-0288 9-0011-1 9-0011-2 C-0157 C-0482 M A I N T E N A N C E , S E R V I C I N G , A N D Description Fuse, 2A Idler Support Snap Ring Rotator Sprocket Agitator Tank Spring Collar Dial Dial Base Pointer Lid Lid Shaft (non-recording) Bearing Spring Agitator Support Bushing Roll Pin Potentiometer Shaft (recording) Spring Collar Bearing Potentiometer Frame Spacer Spring Clamp Stop Arm Resistor Wiper Holder Potentiometer Slider Washer, plastic Contact Pin Spring Fuse, ¼ A Bearing, Metal Rotator (after 2002) Bearing Housing 25 T R O U B L E S H O O T I N G Part Number C-0483 9-0021 C-0503 9-0029 9-0028 9-0051 9-0036 9-0035 9-0034 9-0033 9-0032 9-0031 C-0360 2-0060 C-0346 C-0512 9-0068 9-0065 C-0582 9-0066 9-0067 9-0064 9-0063 2-0062 9-0062 2-0077 C-0150 C-0583 C-0242 C-0883 9-0027 RED 18 C-0010 SPEED CONTROL POT YELLOW 14 2 2 +3 Line Line C-0574-1 FUSE HOLDER C-0467 FUSE 20A (115V) C-0988 FUSE 10A (230V) RED 14 C-0567 RED 18 4 SSR Load Load 98 -4 99 C-0271 WHITE T/C (+) POWER INLET Y1 RED 14 YELLOW 14 4 1 1 3 SSR RED 18 YELLOW 18 RED 18 3 C-0075 POWER SWITCH RED 18 YELLOW 18 ** MOUNTED ON ELECTRICAL PANEL INSIDE UNIT RED 18 C-0075 HEATER SWITCH SSR 2 3 ORANGE YELLOW 18 P3 C-0675 1 P2 YELLOW 18 C-0674 YELLOW 14 YELLOW 18 4 DC GEAR MOTOR Line L2 P1 BLUE Y C-0039 (230 VAC) Baldor 12521 C-0039-1 (115 VAC) Baldor 12501 Load 2 A- A+ RED 18 YELLOW 18 FUSE 2A RED 14 RED 14 L1 C-0674 1 BROWN 18 BLUE 18 GREEN 18 3 FUSE 25A SSR 1 2 C-0482 C-0075 MOTOR SWITCH 4 DC MOTOR CONTROL BOARD YELLOW 18 C-0565 YELLOW 14 Resistor: C-0565-3 (230V) BRO250 C-0565-2 (115V) BRO180 Jumper Settings: 230VAC - 180VDC 115VAC - 90VDC RED T/C (-) W1 C-0343 THERMOCOUPLE HEATER 9-0011-2 (230 VAC) 9-0011-1 (115 VAC) WHITE/RED 22 REV. D EFFECTIVE 01-23-08 REV. E EFFECTIVE 02-02-10 CEMENT TEST EQUIPMENT, INC APPROVALS WHITE/BLACK 22 DATES CCD 2-9-98 JB 1-23-08 DRAWN BY: ADAM NOFSINGER WIRING SCHEMATIC MODEL 200 ATMOSPHERIC CONSISTOMETER E 9-0005 C-0482 FUSE 20A L1 POWER SWITCH YELLOW 14 5 VOLT POWER SUPPLY LEFT SIDE P3 Y O SPEED CONTROL POT ** MOUNTED ON ELECTRICAL PANEL INSIDE UNIT DC GEAR MOTOR C-0039 (230 V)=12521 C-0039-1 (115 V)=12501 HEATER SWITCH C-1165 RED 18 RED 14 2 FUSE BLOCK C-0574-1 115V MODEL USE C-0467 230V MODEL USE C-0988 SSR 2 C-0132 3 1 + GREEN 18 YELLOW 18 2 4 RED 18 P2 RED 14 YELLOW 22 P1 BLUE 4 YELLOW 18 L2 POWER INLET 50/60 HZ Terminal Block C-0010 FUSE 2A C-0271 1 SSR 1 C-0132 YELLOW 14 C-1057 A- A+ 3 R-L Y-N RED T/C (-) C-0343 THERMOCOUPLE BLUE 22 BROWN 18 BLUE 18 GREEN 18 C-0565 MOTOR RED 18 SWITCH YELLOW 18 DC MOTOR CONTROL BOARD C-0075-1 Switch Number WHITE T/C (+) YELLOW 22 BLACK 22 C-1039 CABLE FRONT PANEL USB C-0222 YELLOW 14 03-0103 BRACKET C-0569 YELLOW USB 1+ 1A LEFT POT-MECH RED 14 11B 2+ C-0132 4 C-0080 1 2 2 SSR 4 3 + 4 - W/RED 22 3- BLACK RED 18 L YELLOW 18 SUPPLY VOLTAGE N EARTH GREEN 18 W/BLACK 22 WHITE/RED 22 WHITE/BLACK 22 BLUE 22 BLUE + C-0569 YELLOW 22 BLACK 22 C-0222 YELLOW 22 C-1165 RIGHT POT-MECH YELLOW 9-0011-2 (230 VAC) 9-0011-1 (115 VAC) 5 VOLT POWER SUPPLY RIGHT GREEN 18 HEATER RED 18 YELLOW 18 RED 14 YELLOW 14 23+ 1 SSR 3 BLACK 3 C-1049 NANODAC DIGITAL RECORDER BLUE Pot Mech Circuit 1-Blue 2-Black 3-Yellow REV C EFFECTIVE S/N 3 REV D EFFECTIVE 02-02-10 REV E EFFECTIVE 08-22-12 CEMENT TEST EQUIPMENT, INC APPROVALS DATES CCD 2-9-98 DRAWN BY: ADAM NOFSINGER WIRING SCHEMATIC MODEL 250 RECORDING ATMOSPHERIC CONSISTOMETER 9-0006 E 7 8 6 ITEM NO. QTY. 1 1 2 2 3 1 4 1 5 2 6 1 7 1 8 1 9 1 10 1 11 2 12 1 13 1 14 1 15 2 16 2 17 1 18 1 19 1 20 1 21 1 22 1 23 2 24 1 F E PART NO. 9-0051 9-0026 9-0027-1 9-0022-1 C-0884 9-0025 9-0014 9-0011 9-0020 9-0028 C-0883 9-0029 C-0039 C-0038 C-0288 C-0503 9-0054 9-0030 9-0024 9-0015 9-0012 C-0247 C-0008 C-0343 1 2 3 4 5 THE INFORMATION CONTAINED IN THIS DRAWING IS THE SOLE PROPERTY OF CEMENT TEST EQUIPMENT, INC. ANY REPRODUCTION IN PART OR WHOLE WITHOUT THE WRITTEN PERMISSION OF CEMENT TEST EQUIPMENT IS PROHIBITED. REVISIONS DESCRIPTION Tank Cross Bar Bearing Housing Rotator Snap Ring (not shown) Cross Bar Support Slurry Cup Sleeve Heater (-1 230V, -2 115V) Agitator Support Agitator Bearing Pulley Motor (240 VAC0 Motor Pulley O-ring Snap Ring Mounting Plate Lid Ass'y (non-recording) Stop Arm Ass'y Slurry Cup Base Paddle Timing Belt Shear Pin Thermocouple DESCRIPTION REV. APPROVED DATE F E 13 18 19 23 D D 12 1422 9 6 1 3 11 10 4 5 2 C 21 C 7 24 20 15 16 8 8 B B 1 UNLESS OTHERWISE SPECIFIED DIMENSIONS ARE IN INCHES TOLERANCES ARE: A FRACTIONS 1/32 DECIMALS .XX .01 .XXX .005 ANGLES CAD GENERATED DRAWING, DO NOT MANUALLY UPDATE APPROVALS CEMENT TEST EQUIPMENT CCD 2-25-98 CCD 2-25-98 RESP ENG CCD 2-25-98 1 DRAWN ATMOSPHERIC CONSISTOMETER CHECKED MATERIAL FINISH NEXT ASSY APPLICATION 8 7 6 5 4 3 MFG ENG USED ON DO NOT SCALE DRAWING 2 CCD 2-25-98 CCD 2-25-98 QUAL ENG A DATE SIZE DWG. NO. C SCALE 1:2 REV. 9-0010 B SHEET 1 OF 1 CAD FILE: 1 8 6 7 4 5 3 2 1 THE INFORMATION CONTAINED IN THIS DRAWING IS THE SOLE PROPERTY OF CEMENT TEST EQUIPMENT. ANY REPRODUCTION IN PART OR WHOLE WITHOUT THE WRITTEN PERMISSION OF CEMENT TEST EQUIPMENT IS PROHIBITED. 10 D 9 D 8 6 2 11 5 14 13 1 4 C C 2 15 12 12 7 3 B ITEM NO. QTY. 1 1 2 2 3 1 4 1 5 1 6 1 7 1 8 1 9 1 10 1 11 1 12 2 13 1 14 1 15 1 PART NO. 9-0032 C-0360 9-0031 9-0036 9-0034 9-0035 C-0361 C-0508 9-0033 C-0507 C-0510 C-0512 2-0060 C-0509 UNLESS OTHERWISE SPECIFIED DIMENSIONS ARE IN INCHES TOLERANCES ARE: FRACTIONS A 1/32 DECIMALS .XX .01 .XXX .005 ANGLES 1 MATERIAL FINISH NEXT ASSY APPLICATION 8 7 6 5 DO NOT SCALE DRAWING 4 B CAD GENERATED DRAWING, DO NOT MANUALLY UPDATE APPROVALS DRAWN CEMENT TEST EQUIPMENT DATE CCD 2-24-98 CHECKED CCD 2-24-98 RESP ENG CCD 2-24-98 MFG ENG USED ON DESCRIPTION Lid Bearing Lid Shaft Spring Collar Lid Base Ass'y Dial Roll Pin Lock Nut Pointer Acorn Nut Roll Pin Roll Pin Set Screw Spring Snap Ring CCD 2-24-98 QUAL ENG CCD 2-24-98 3 A LID ASSEMBLY ATMOSPHERIC CONSISTOMETER SIZE A DWG. NO. SCALE 1:1 2 REV. 9-0030 CAD FILE: A SHEET 1 1 OF 1 8 7 4 5 6 3 2 1 REVISIONS THE INFORMATION CONTAINED IN THIS DRAWING IS THE SOLE PROPERTY OF CEMENT TEST EQUIPMENT. ANY REPRODUCTION IN PART OR WHOLE WITHOUT THE WRITTEN PERMISSION OF CEMENT TEST EQUIPMENT IS PROHIBITED. REV. A DATE DESCRIPTION APPROVED 10 10 17 21 22 D D 7 18 16 1 5 17 21 22 3 9 2 15 4 19 6 C C 12 14 ITEM NO. QTY. 1 1 2 1 3 2 4 1 5 1 6 2 7 1 8 1 9 1 10 1 12 1 13 1 14 1 15 1 16 1 17 2 18 1 19 1 20 1 21 2 22 2 23 1 20 13 3 8 6 A B 23 SECTION A-A SCALE 1 : 1 UNLESS OTHERWISE SPECIFIED DIMENSIONS ARE IN INCHES TOLERANCES ARE: A FRACTIONS 1/32 DECIMALS .XX .XXX .01 .005 ANGLES 1 DO NOT MANUALLY UPDATE DRAWN CCD 3-16-98 CHECKED CCD 3-16-98 CCD 3-16-98 USED ON APPLICATION 8 7 6 5 4 DO NOT SCALE DRAWING 3 MFG ENG DESCRIPTION Lid Bearing Roll Pin Potentiometer Shaft Spring Collar Bearing Potentiometer Frame Spacer Spring Clamp Stop Arm Cover 1/4-20 hex nut 1/4-20 hex jam nut Wiper Holder Potentiometer Slider Plastic Washer Spring (not shown) Shear Pin (not shown) Snap Ring (not shown) Contact Pin Spring (not shown) Screw, 8-32 x 1/4 Resistor CEMENT TEST EQUIPMENT DATE APPROVALS RESP ENG NEXT ASSY 2-0062 CAD GENERATED DRAWING, MATERIAL FINISH PART NO. 9-0032 C-0360 C-0512 9-0068 9-0065 C-0582 9-0066 9-0067 9-0064 9-0063 9-0061 HEX_NUT_250 HEX_NUT_J_25 9-0062 2-0077 C-0150 2-0060 C-0008 C-0509 C-0583 LID ASSEMBLY RECORDING ATMOSPHERIC DWG. NO. CCD 3-16-98 SIZE B 9-0060 CCD 3-16-98 SCALE 1:1 CAD FILE: REV. A QUAL ENG 2 SHEET 1 OF 1 1 B A 8 ITEM NO. 1 2 3 PART NUMBER 09-0013 09-0018 C-0007 5 6 7 DESCRIPTION ATMOSPHERIC PADDLE CASTING ATMOSPHERIC PADDLE SHAFT ROLL PIN 4 2 3 1 QTY. 1 1 1 D D 2 C C B 3 B 1 UNLESS OTHERWISE SPECIFIED: DIMENSIONS ARE IN INCHES TOLERANCES: FRACTIONAL 1/32 ANGULAR: 1 TWO PLACE DECIMAL .01 THREE PLACE DECIMAL .005 A PROPRIETARY AND CONFIDENTIAL THE INFORMATION CONTAINED IN THIS DRAWING IS THE SOLE PROPERTY OF CTE, Inc. ANY REPRODUCTION IN PART OR AS A WHOLE WITHOUT THE WRITTEN PERMISSION OF CTE, Inc. IS PROHIBITED. INTERPRET GEOMETRIC TOLERANCING PER: MATERIAL NAME DATE DRAWN GRH 12-17-08 CHECKED GRH 12-17-08 ENG APPR. GRH 12-17-08 MFG APPR. GRH 12-17-08 Q.A. GRH 12-17-08 COMMENTS: 7 6 5 4 TITLE: ATMOSPHERIC PADDLE ASSEMBLY SIZE DWG. NO. B FINISH 3 2 A REV 09-0040 SHEET 1 OF 1 SCALE:1:2 WEIGHT: 0.12 DO NOT SCALE DRAWING 8 Cement Test Equipment 1