1
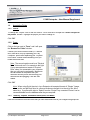
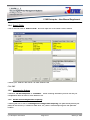
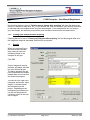
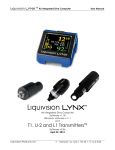
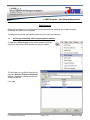
LYNX Enterprise - User Manual Supplement
Quick Acquire
Quick Acquire feature in Lynx Enterprise is a fast and easy way of getting your images acquired,
annotated, and filed into your projects.
The project must already be created in order for you to use Quick Acquire.
1.1
Acquiring, Annotating, and Filing using Quick Acquire
To open the “Quick Acquire“ entry screen choose File/Quick
Acquire or click on the Quick Acquire icon on your toolbar.
The first time you use Quick Acquire it will
open the “Select a Project to file photos”
window. Highlight the project you want to
Quick Acquire into.
Click “OK”
Lynx Enterprise User Manual
Page 1 of 5
January 5, 2009
LYNX Enterprise - User Manual Supplement
The blank Quick Acquire entry
box now opens.
File to: Project you want to file
your “Photos” into.
From: The Source location of
your “Photos”
Taken by: The name of the
person who took the “Photos”.
Once the name is input it will be
in the drop down menu from
then on.
Caption: This field is used as a
brief description or title of the
photo. This field can be edited
after it has been filed to your
project. The field can contain
up to 255 characters
Permanent Description: This
is used for any information that
you want permanently kept with
your photo. This field can not
be added to or edited after the photo is filed to your project. This field can contain more than 15,000
characters.
Notes: This field is used to add any type of information you want to include with your photos. This field
can be added to or edited after the photo is filed to your project. This field can contain more than
15,000 characters.
Search Fields: This field is used to collect and display specific information based on a defined Search
Field and its chosen value. Administrators can make individual fields “Required” and/or “Restricted” for
better collection of information. Each Search Field and Search Field Value can contain up to 50
characters. See below for more details on Search Fields and Search Field Values.
Compression Scheme: If you choose “Do Not Compress” then your “Photos” will be acquired full size.
If you choose “Automatic” your “Photos” will be compressed by a factor that you set prior to acquiring.
This is a mathematical factor not a percentage. Once you set the factor it stays at that number until you
change it again. All Exif/Meta Data included in the “Photo” image file is retained and saved with the
“Photo” regardless of whether or not you use compression.
Note: Any of the fields with the icon next to it will bring up another
window that will allow you to change any entries in the field.
Lynx Enterprise User Manual
Page 2 of 5
January 5, 2009
LYNX Enterprise - User Manual Supplement
1.2
Annotating Fields
1.2.1
File to:
To change the “Project” click on the icon next to “File to” and the it will open the “Select a Project to
file photos” window. Highlight the project you want to change to.
Click “OK”
1.2.2
From:
Click on the icon next to “From:” and it will open
the “Browse For Folder” window.
Choose your source location folder (i.e. camera
drive, hard drive, etc) by expanding your “My
Computer” option then expanding your “Physical
Drive Letter” location and subfolder(s) until you
locate the source data.
Note: The source location must be a “Physical
Drive” letter such as D:\ in example to the right.
If your camera does not create a “Physical
Drive” when it is connected to your computer
then you will need a card reader. Make sure
the card reader is compatible with your
camera’s card as you will be removing your
camera card and plugging it into the card
reader.
Click “OK”
Note: When using Quick Acquire in Lynx Enterprise all accepted formats of “Photos” (image,
video, audio, and pdf files) found in a source location are brought in to the roll of film at the
same time. If you have the right to “Delete” from the “Project” any unwanted “Photos” can be
removed/deleted from the database after they are acquired.
1.2.3
Taken by, Caption, Permanent Description, and Notes
Enter the information into these fields that you want associated with all your images being acquired.
Lynx Enterprise User Manual
Page 3 of 5
January 5, 2009
LYNX Enterprise - User Manual Supplement
1.2.4
Search Fields
Click on the icon next to “Search Fields:” and it will open the “Edit Search Fields” window.
Choose your “Search Field Values” for each Search Field.
Click “OK”
1.2.5
Compression Scheme
Choose to “Do Not Compress” or “Automatic”. When choosing Automatic you then can set you
compression factor or leave it at the default of 60.
1.2.6
Delete Source Images After Acquiring
Checking the box in front of “Deleting source images after acquiring” will permanently delete your
data from the source (i.e. camera or hard drive, etc.) after it is done acquiring from the specified
location.
Lynx Enterprise User Manual
Page 4 of 5
January 5, 2009
LYNX Enterprise - User Manual Supplement
Not checking the box in front of “Deleting source images after acquiring” will leave the data on the
source (i.e. camera or hard drive, etc.). If you choose “No” and your source is your camera, remember
to manually erase the images before using the camera again. Lynx Enterprise will not only bring in
your new images, but the ones you previously took and did not remove from the camera drive.
1.2.7
Closing Lynx Enterprise After Acquiring
Checking the box in front of “Close Lynx Enterprise after acquiring” will exit the program after all of
the images are acquired, annotated, and filed into your project
1.3
Results
When you are done filing in
the Quick Acquire window
entry fields you will have
something similar to the
example on the right.
Click “OK”
All your images will now be
acquired, annotated, and filed
into your selected project.
The above example also will
have compressed the images,
deleted them from the source,
and closed the program.
The next time you open Lynx
Enterprise and choose “Quick
Acquire” it will have saved
this information for this
project. Depending on the
information you selected you
can edit this information or
continue to use it for the next
set of images.
Lynx Enterprise User Manual
Page 5 of 5
January 5, 2009