1
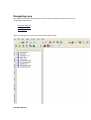
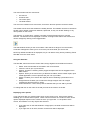
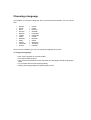
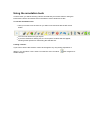
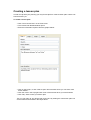
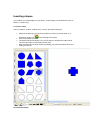
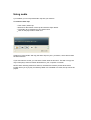
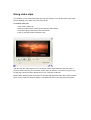
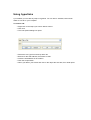
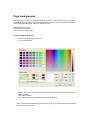
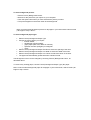
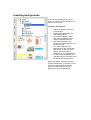
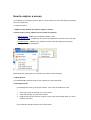
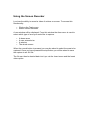
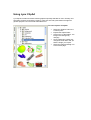
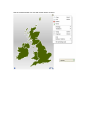
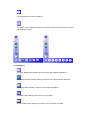
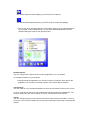
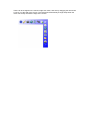
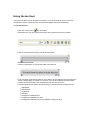
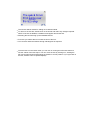
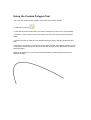
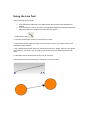
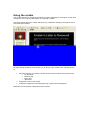
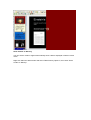
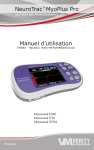
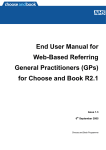
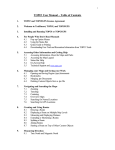
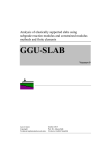
Lynx 4 Manual
Index
ABOUT LYNX..............................................................................................................3
HOW TO USE THE LYNX HELP SYSTEM ..............................................................4
NAVIGATING LYNX ..................................................................................................5
CHOOSING A LANGUAGE........................................................................................8
USING THE TOOLBARS ............................................................................................9
CREATING A NEW LESSON ...................................................................................10
OPENING AN EXISTING LESSON BOOK .............................................................11
DELIVERING A LESSON .........................................................................................12
USING THE ANNOTATION TOOLS .......................................................................13
CREATING A LESSON PLAN..................................................................................14
WORKING WITH POWERPOINT ............................................................................15
INSERTING SHAPES.................................................................................................16
INSERTING PICTURES ............................................................................................18
MANIPULATING IMAGES.......................................................................................19
USING AUDIO ...........................................................................................................20
USING VIDEO CLIPS ................................................................................................21
USING HYPERLINKS ...............................................................................................22
PAGE BACKGROUNDS............................................................................................23
INSERTING BACKGROUNDS .................................................................................25
HOW TO CAPTURE A SCREEN ..............................................................................26
USING THE SCREEN RECORDER..........................................................................28
USING LYNX CLIPART............................................................................................29
INSERTING MAPS.....................................................................................................31
ABOUT MY FOLDER................................................................................................33
ADDING NEW WEBSITES .......................................................................................34
ABOUT QUICK MEDIA ............................................................................................36
ABOUT LYNX HANDSET ........................................................................................37
USING LYNX HANDSET..........................................................................................38
USING THE TEXT TOOL..........................................................................................42
USING THE DRAWING PEN....................................................................................44
HANDWRITING RECOGNITION ............................................................................45
USING THE FILL TOOL ...........................................................................................46
USING THE CUSTOM POLYGON TOOL ...............................................................47
USING THE CUSTOM POLYGON TOOL ...............................................................48
USING THE LINE TOOL...........................................................................................50
USING THE ERASER ................................................................................................51
USING THE HIGHLIGHTER TOOLS.......................................................................52
USING THE CROP TOOLS .......................................................................................53
USING THE SPOTLIGHT TOOL ..............................................................................54
USING THE CURTAIN..............................................................................................55
LAUNCHING THE CALCULATOR .........................................................................57
LAUNCHING THE ON SCREEN KEYBOARD.......................................................58
About Lynx
Welcome to Lynx
Lynx is a multi-faceted software that has been created for use with any interactive whiteboard.
Here are some of the features that Lynx offers you:
• A selection of prepared lesson plans you can download from the Lynx website. The
Lynx website also offers updates to your software.
• Curriculum specific clip art and information resources for a wide range of subjects and
key stages.
• Annotation toolkit including pen, paintbrush, highlighting and area fill tools.
• Screen Capture allows you to prepare and build lessons easily and also allows
annotations and lessons to be saved for later discussions.
• Internet access with a single button.
• Easy to use virtual keyboard and calculator.
• Links with any Windows application so frequently used programs and resources are
available quickly and easily from the Lynx handset.
• A variety of subject specific screen backdrops are available to enhance lessons
including lined, graph, isometric, squared, hexagonal and music manuscript paper.
• A wide variety of high definition maps, both simple and labelled, are also provided –
ready to use for lesson preparation.
• Electronic coloured and plain VENN diagrams are also found in Lynx.
• A variety of interactive facilities are also provided within Lynx, including clocks..
• Arrange, transform, fill and group objects.
• Modify and customise shapes to your requirements.
• Use the curtain, spotlight and magnify facility.
• Use the keyboard to write, align, rotate and transform text.
How to use the Lynx Help system
You can navigate through the Help by using:
• the hypertext links within the text
• on the home page
• and in the top-right corner of all other pages.
Hypertext links within the text
Hypertext links are coloured and underlined pieces of text. Clicking on a link reveals new
information. This Help system uses three different types of link. In other words, when you click
on them they show the new information in different ways:
• Ones that take you either to another Help page or to a different place within the same
Help page
(The two links above are examples of the latter.)
The easiest way to get back to the page or place you were at is to click your browser's
Back button.
• Ones that open a small 'popup' window containing short pieces of Help information.
Close the popup by clicking anywhere on the Help page.
• Ones that reveal extra explanatory text in a paragraph directly below or next to the link.
You can hide this extra information by clicking on the link again.
Navigating Lynx
This topic gives you an overview of how to move around Lynx and to set up Lynx to suit your
working style and includes:-
• The Main Window
• Using the Side Bar
• Extra options
When you first open Lynx you see the main lesson book window:
The Main Window:
The main window has four main areas:
•
•
•
•
A menu bar
A toolbar area
The control pane
The slide window
The menu bar contains seven sub-menus, from which all menu options can be accessed.
The toolbar area is where the toolbars are initially docked. The toolbars can also be docked to
the left, right or bottom of the main window, if preferred, or they can be left "floating" in any
other position on the screen.
The side bar, or control pane, contains a number of useful functions that you can tab
between. The side bar can be displayed on the left- and right-hand sides of the window; this
can be changed by clicking on the toggle button.
The slide window shows you the current slide. If the slide is too large to fit in the window,
scroll bars will appear to allow you to move to the part of the slide you want to see.
NOTE: By default the side bar is displayed, but you can hide it at any time by selecting "Show
Side Bar" from the "View" menu.
Using the Side Bar:
The Side Bar, also known as the Control Pane, brings together seven different functions:
•
•
•
•
•
•
•
Slides: A list of thumbnails of the slides in the current lesson.
Lessons: a list of your Lynx4 lessons
Shapes: A toolbox containing useful polygonal shapes that can be dragged into the
slide window
Explore: Gives you access to the Lynx Resources folders, which contain clipart, quick
media applications, screen captures and your own Lynx folder.
Search: Enables you to search the clipart for items containing a particular word or
words.
Google Search: Enables you to search the Google Images online for images
containing a particular word or words.
Online Resources: a list of handy links to websites that you can add to yourself.
To change tab click on the name of the tab you want in the column on the left.
Displaying more options
If you right-click with your mouse button when moving around Lynx, other menus display
enabling you to choose further options. These menus are known as "context" menus, as the
options displayed depend on the context in which you right-click - ie. the position of the
mouse, and whether or not any objects are selected.
•
•
If you right-click on the slide window in empty space, the slide context menu will be
displayed.
If you right-click on an item, the item context menu will be displayed.
NOTE: You can also access the item context menu by selecting the item and clicking the
drop-down arrow that appears in the top-right corner of the object's selection box. This is
especially useful when working on a whiteboard where a right-click may be difficult to achieve.
The graphic below shows the menu that displays when you right-click on a shape object:
Please note that for Delivery Options the default settings are:
•
•
•
•
•
Moveable on Delivery - false
Hide on Delivery - false
Play on Delivery - false
Editable on delivery - false
Moveable in Prepration - true
Choosing a language
Lynx enables you to select a language when you first install the software. You can choose
from:
•
•
•
•
•
•
•
•
•
•
•
•
English
French
Dutch
German
Spanish
Turkish
Arabic
Estonian
Italian
Latvian
Lithuanian
Finnish
•
•
•
•
•
•
•
•
•
•
•
•
Danish
Polish
Russian
Swedish
Hungarian
Norwegian
Czech
Estonian
Gaelic
Afrikaans
Slovakian
Icelandic
Once you have installed Lynx you can change the language at any time.
To change the language:
• Click Tools | Options on the main toolbar.
• The Options window opens.
• Click onto the language box and a drop-down box will appear beside the language
name.
• Lynx updates with the new language setting.
• Change the language again by repeating the process.
Using the Toolbars
Lynx enables you to customise the look and feel of the working area in various ways.
•
•
•
You can move panes around, and close them if not required.
You can move toolbars around within the top part of the screen and also drag them
into the main window.
You can dock toolbars to any side of the main window.
Saving your toolbar positions
By default, any changes you make to the position of toolbars and panes, will not be
remembered by Lynx; when you close the application and restart it, all of these settings will
return to their defaults (i.e. how Lynx looked when you first installed it).
If you want Lynx to remember your changes for next time, you can do the following:
•
•
•
Click on Tools | Options
Go to "Remember Toolbar and Window Settings"
Set this property to "True".
Creating a new lesson
To create a new lesson:
•
•
•
•
•
•
Click File/New
A new lesson book is created.
Click File | Save As.
The Save Prepared Lesson window opens.
Enter a file name in the File name field and click the Save button.
Your new lesson book is saved and you can begin entering information to your lesson.
Tip: Remember, you can also download existing lesson from the Lynx website
(www.cleverlynx.com).
Opening an existing lesson book
To open an existing lesson book:
•
•
•
•
•
on the File toolbar.
Click File | Open or click the Open Lesson icon
The Open Existing File window opens.
Browse to the required lesson.
Click on the lesson you want and click the Open button.
The lesson you want opens in Lynx.
Note: If a lesson book has already been opened by another user you will not be able to
edit the lesson until they have finished.
Lessons can also be opened from the Lessons tab in the Control Pane. The Lessons tab lists
lessons that are stored in your default lesson folder. You can change the location of this folder
by clicking Tools | Options and changing the value in "Preferred Lessons Folder."
Delivering a lesson
After preparing your lesson you can switch to the deliver mode to see how your lesson will be
seen by your students.
To deliver a lesson:
• Click the Deliver Lesson icon
on the toolbar.
• The Deliver Lesson window opens enabling you to teach your lesson.
• Before delivering a lesson you can select delivery options by right-clicking on an object
and selecting Delivery Options. These enable you to choose:
• "Hide on Delivery", which makes an object invisible in delivery mode;
• "Play on Delivery" for media objects (sound and video);
• "Moveable on delivery", which enables objects to be moved in delivery mode (the
default is not moveable);
• "Editable on Delivery", which enables objects to be resized or rotated.
Using the annotation tools
In some cases, you will be teaching a lesson and find that you need to add to it during the
lesson itself. Use the Annotation tools in the Deliver Lesson window to do this.
To use the annotation tools:
• Hold your mouse over the tool icon you want to use and click with the left mouse
button.
• You can now use the tool you require.
• If you have selected a drawing tool, the "tool options" toolbars will also appear,
showing further options for customising the selected tool.
Locking a lesson:
If you want to ensure that a lesson cannot be changed in any way during preparation or
delivery, you can select "Lock Lesson" from the File menu or toolbar.
enable changes.
Click it again to re-
Creating a lesson plan
In order to help with your planning you may find it helpful to create a lesson plan. Here's how
to do that with Lynx.
To create a lesson plan:
• Click "View Lesson Plan" on the View menu.
• The Lesson Plan Details window opens.
• Enter the information required. See the graphic below:
.
• Click on the Page 2, 3 and 4 tabs to open other windows where you can enter more
lesson details.
• Click the cross in the top-right hand corner of the window when you have finished.
• Click File | Save to save your lesson plan.
Tip: You can return to your lesson plan at any time by clicking the view lesson plan icon
on the toolbar as described in the steps above.
Working with Powerpoint
To load a powerpoint document into Lynx:
• Click on the File menu
• Select Load
• Navigate and select the file
• Press the Open button
Note: The conversion process takes several seconds depending on the size of file being
imported.
To save a lesson as a powerpoint document:
•
•
•
•
•
Click on the File menu
Select Save As
Enter the name you want to call the document
Change the Save as type to PowerPoint Document
Press Save
Inserting shapes
Lynx enables you to add shapes to your lesson. These shapes can be filled with colour or
blank (i.e. outline only).
To insert a shape:
The Lynx Shapes Toolbox contains many common pre-defined polygons.
•
•
•
•
Select the shapes tab. You can do this either by clicking on the tab itself, or by
clicking the shape icon
on the drawing tools toolbar.
Click on the shape you want.
The object toolbars will appear. You can use these to change the border and fill
colours of the shape, its line width and line style.
Drag the shape into the slide window by holding your left mouse button down and
moving the mouse.
User-defined shapes:
If you want to create a shape that is not included in the toolbox, you can do so with the
Custom Polygon tool
on the drawing tools toolbar.
Inserting pictures
Lynx offers thousands of clipart images, but you may have images of your own that you want
to insert in lesson books. These could be photographs or other pictures that you have stored
on your computer.
To insert a picture:
•
•
•
•
•
Click Insert | Insert Picture.
The Open Image window opens.
Browse to the location of the picture on your computer.
Click the Open button.
The picture opens in your lesson book.
Manipulating Images
Lynx enables you to change elements of images once inserted.
To resize an image:
Resizing an image is much the same as resizing a shape.
•
•
Select the object you want to resize.
Click on the resize button (the double-ended arrow in the bottom-right corner) and
drag the object until you achieve the size you want. Move outwards to enlarge and
inwards to make smaller.
To rotate an image:
•
•
Select the image you want to resize.
Click on the rotate button (the two curved arrows) and move the mouse with the
button depressed. The image will rotate up to 360 degrees around its centre point.
Rotate as required to 360 degrees.
NOTE: To return the image to its original rotation, just double-click on the rotate button.
Using the Crop Tools
The crop tools (block crop and freehand crop) can be used anywhere in the slide window - on
images, shapes and text - to create a partial (cropped) copy of the original object.
Using audio
Lynx enables you to incorporate audio clips into your lessons.
To insert an audio clip:
•
•
•
•
Click Insert | Audio clip.
Browse for the location of the clip and click the Open button.
The audio clip is inserted into your lesson book.
Click on the play button to listen to it.
Clicking on "Insert Audio" will copy the audio clip into your Lynx lesson, which will increase
the size of the file.
If you don't want to do this, you can select "Insert Audio as shortcut". This will not copy the
clip, but will play it from its location elsewhere on your computer or network.
NOTE: When inserting audio as a shortcut, the audio file must be present at the same
location when you try to play it in Delivery Mode. If it is deleted or moved, the clip cannot be
played.
Using video clips
Lynx enables you to incorporate video clips into your lessons. You can also have a live video
source enabling you to have a live web cam link up.
To insert a video clip:
•
•
•
•
Click Insert | Video clip.
Browse for the location of the clip and click the Open button.
The video clip is inserted into your lesson book.
Click on the play button to watch the clip.
This will copy the video clip into your Lynx lesson, which will increase the size of the file. If
you don't want to do this, you can select "Insert Video as shortcut". This will not copy the clip,
but will play it from its location elsewhere on your computer or network.
NOTE: When inserting video as a shortcut, the video file must be present at the same location
when you try to play it in Delivery Mode. If it is deleted or moved, the clip cannot be played.
Using hyperlinks
Lynx enables you to make any object a hyperlink. You can link to: websites, lesson book
slides or to a file on your computer.
To insert a link:
• Right-click on the object you want to attach a link to.
• Click Link.
• The Link Options dialog box opens.
•
•
•
•
•
Select the Link Type from the drop-down list.
Browse for the web address, file location or slide.
Insert the web address or file location.
Click the Accept button.
When you deliver your lesson and click on the object the web site, file or slide opens.
Page backgrounds
You can make your lessons appear consistent by use of the same background. You could
use different backgrounds to denote different lessons or some lessons may be enhanced by
use of a background picture. This topic explains how to:
Set a background colour
Set a background picture
Set a background paper type
To set a background colour:
• Select Format | Background Colour.
• A colour chart opens.
• Click on the colour you require or click on the Add to Custom Colors button for further
colour options.
• Click the OK button.
• The colour appears in the lesson book as the background.
Note: to set the same background colour for all pages in your lesson book select Format
| All Pages in step 1 above.
To set a background picture:
•
•
•
•
Select Format | Background Picture.
Browse for the picture file you require on your computer.
Click the Open button when you have selected the picture you want.
The picture appears in the lesson book as the background.
Note: to set the same background picture for all pages in your lesson book select Format
| All Pages in step 1 above.
To set a background paper type:
•
•
•
•
•
•
Select Format | Background Paper Type
Choose the type of paper you require:
o lined or dotted;
o handwriting (various widths);
o graph paper (with axes, labels or minimal)
o squared, isometic (triangles) or hexagonal
o music
Select Format | Background Paper Grid Size to select the spacing of the lines.
Select Format | Background Paper Line Width to select the width of the lines.
Select Format | Background Paper Line Colour to select the colour of the lines.
The paper will automatically update with each selection made.
The background colour can be changed by choosing Format | Background Colour, as
described above.
To remove any existing paper, choose Format | Background Paper Type | No paper.
Note: to set the same background paper for all pages in your lesson book, select Format | All
Pages in step 1 above.
Inserting backgrounds
Lynx has many backgrounds you can
insert into a lesson, either labelled or not.
Here's how to do that.
To insert a background:
•
•
•
•
•
•
Select the "Explore" tab in the
Controls pane.
Expand the Clipart folder, and
select Backgrounds.
Click either Labelled or Plain.
The various backgrounds are
shown in alphabetical order.
Select the background you
require and drag-and-drop it on to
the lesson page.
To set the image to be the
background for the current slide,
right-click it (or click the menu
button) and select "Set as
Background". The background of
the slide will be changed to the
selected image. If necessary it will
be stretched to fill the screen.
NOTE: Any image, including your own
images and all of the Lynx clipart, can be
set to be a slide background. Simply
select the image and click "Set as
Background" as described above.
How to capture a screen
Lynx enables you to capture whole or part of a screen which you can insert quickly and easily
into your lesson book.
To capture screens:
1. Make sure the window you want to capture is visible.
2. Select Insert | Screen capture and one of the four options:
• Whole Screen - enables you to capture a whole screen.
• Rectangular Area - enables you to select a rectangular area from the screen you wish
to capture.
• Freehand Area - enables you to select an area the size and shape you require by
using a free-hand drawing tool.
Depending upon which option you selected you need to do the following:
3. Whole Screen
Lynx automatically inserts a whole screen capture into your lesson book.
4. Rectangular Area
Lynx displays the screen you want to capture. Your cursor is shown as a cross.
1.
2.
3.
Move your cursor to the area you want to select.
Click and hold with your left mouse button.
Drag the box over the area you require. Let go of the mouse button when you have
selected your area.
Lynx inserts the selected area into your lesson book.
5. Freehand Area
Lynx displays the screen you want to capture. Your cursor is shown as a cross.
1.
2.
3.
Move your cursor to the area you want to select.
Click and hold with your left mouse button.
Draw a line around the area you require. When the line crosses over itself, the area
enclosed will be selected. If you release the mouse button before this happens,
Lynx will complete the selection area automatically by connecting the start and and
points of your line.
Lynx inserts the selected area into your lesson book.
Using the Screen Recorder
Lynx has the ability to record a video of actions on screen. To access this
functionality:
•
•
Click on the Tools menu
Select Screen Recorder
A new window will be displayed. From this window the Area menu is used to
select which type of area you would like to capture.
•
•
•
•
A drawn area
A user entered size
A window
The whole screen
When the record button is pressed you may be asked to select the area to be
captured. Once you have pressed the stop button you will be asked to save
the capture to an AVI file.
The file can then be loaded back into Lynx via the Insert menu and the Insert
video option.
Using Lynx ClipArt
Lynx ClipArt contains several thousand graphics specially selected for use in Primary and
Secondary Schools, arranged by subject. There are also many thousands of images for
general purpose use in the folder "Miscellaneous".
To insert a piece of ClipArt:
•
•
•
•
•
Select the "Explore" tab in the
Controls pane.
Expand the Clipart folder.
Click on any of the folders - the
images are arranged by
category.
Some categories contain subcetegories. Drill down until you
find the image you require.
Select the image and drag it on
to the lesson page.
Alternatively:
•
•
•
•
Select the "Search" tab in the
Controls pane.
Enter one or more search terms
in the box, then click the Search
button.
If any images are found which
have been tagged with the
term(s) you entered, they are
displayed below.
Select the image and drag it on
to the lesson page.
Once the clipart is in the lesson book you can click on it using the left mouse button to show
any tools options. You can also see the outline of the clipart enabling you to change the size
of it by clicking on the squares and dragging. You can move the clipart by clicking on it,
holding the left mouse button down and dragging the clipart to a new position. If you right-click
on the clipart another menu of options displays.
Inserting maps
Lynx has various maps that you can use as part of your lessons.
To insert a map:
•
•
•
•
•
Select the "Explore" tab in the
Controls pane.
Expand the Clipart folder, and
select Maps.
The Maps folder contains various
sub-cetegories. Drill down until
you find the image you require.
Select the map you require and
drag-and-drop it on to the lesson
page.
To set the map to be the
background for the current slide,
right-click it (or click the menu
button) and select "Set as
Background". The background of
the slide will be changed to the
selected image. If necessary it will
be stretched to fill the screen.
Once the map is in the lesson book you
can click on it using the left mouse button
to show any tools options. You can also
see the outline of the map enabling you to
change the size of it by clicking on the
squares and dragging. You can move the
map by clicking on it, holding the left
mouse button down and dragging the
graphic to a new position. If you right-click
on the map another menu of options
displays.
See the example below of a map with all the options showing.
About My Folder
My Folder is found on the Explore tab. You can use My Folder as somewhere to keep your
work so you can access it quickly and easily.
For example: if you have a lesson that you use frequently you can save it in My Folder in
order to ensure that you have speedy access to it from Lynx. You can also store images,
application files, text documents and executable files in My Folder.
To save files in My Folder:
•
•
•
•
Find the "My Lynx" folder on your computer.
Open it to show the profile folder "Default".
Open the Default folder to show "My Folder".
Save files here.
Whatever you keep in here can be seen in My Folder in Lynx.
Adding new websites
Lynx has three ways of helping you navigate the web.
•
•
•
The Tools toolbar contains a link to launch a web browser.
You can add a hyperlink to an object in a slide, which will open that page when
clicked in delivery mode.
You can click on the links within the Online Resources tab. There are several links
provided with Lynx, and you can also add your own.
To add a new website:
• Click on the Online Resources tab in the Controls pane.
• Right-click within the list of resources.
• An options box opens.
• Click the Add New Website link.
• The Link Options window opens.
•
•
•
•
Enter a title for the resource in the Name field.
Enter the web site address in the URL field.
Click the OK button.
The web site is now added to the list of resources.
About Quick Media
The Quick Media section has a number of interactive applications, including an interactive
clock.
To use Quick Media:
•
•
•
Click on the Explore tab in the Controls pane.
Click on Quick Media. The available applications appear in the lower window.
Double-click the Quick Media feature that you want to use.
About Lynx handset
The Lynx remote handset contains many functions that enable you to work with an interactive
whiteboard:
•
•
•
•
•
•
•
•
•
right-click tool
annotation tools
clipart viewer
maps viewer
access to the curtain and spotlight
ability to launch a web browser
ability to launch the calculator and on screen keyboard
ability to place favourite shortcuts onto the six number buttons
screen capture tool
Lynx handset also enables you to launch Lynx tools while working with other programs.
To launch Lynx handset:
on the toolbar.
• Click the handset icon
• The Lynx handset launches.
Using Lynx handset
Moving your mouse over the buttons on the Lynx handset enables pop-up labels to open
showing you what each of the buttons does. Simply click on them to do any of the following:
The Lynx button takes you back to the lesson book window.
The screen capture button enables you to capture screen shots.
The Internet browser button launches your browser.
Annotate over desktop button launches the annotation tools.
Calculator launches the calculator.
Keyboard launches the on screen keyboard.
The right mouse button gives right mouse click functionality.
The Help button launches this Help file.
The "switch" button toggles between the "Controls" buttons (left) and a set of six userdefined buttons (right)
Control Buttons
The Quick Media button displays shortcuts to the Quick Media applications.
The Online Resources button displays shortcuts to the saved website addresses.
The Clipart button displays a shortcut to the Clipart application.
The Maps button displays shortcuts to the Lynx Maps.
The My Folder button displays a shortcut to your personal Lynx folder.
The Screen Captures button displays your saved screen captures.
The Effects button displays special Lynx effects such as curtain and spotlight.
• Click on any of the Controls options to show further options on the right-hand side of
Lynx handset. In the example below you can see that the Maps button has been
clicked showing the maps on the right-hand side.
Number Buttons
You can configure the numbers to launch other applications on Lynx handset.
To configure numbers on Lynx handset:
• Drag-and-drop the application icon onto the number you want to use to launch the
application. For example: use button number one to launch MS Powerpoint.
Transparency
You can make the Lynx Handset transparent so that it is less obtrusive when on the screen.
To do so, right-click anywhere on the handset and change the setting of "Brightness". You
can also change the size of the handset, its colour, and the layout of the remote.
Layout
You can change the layout of the remote so that it fits more easily into the side or corner of
the screen. There are six settings: top-left, top-right, bottom-left, bottom-right, horizontal and
vertical.
These can be changed on the remote's right-click menu, and also by dragging the remote into
a corner or to the side of the screen. The remote will automatically change shape when the
cursor has nearly reached the edge of the screen.
Using the text tool
The text tool enables you to annotate your lessons. You can change the colour of the text,
change the text size, change the font, as well as using bold, italics and underlining.
To use the text tool:
on the toolbar.
• Click the Text tool icon
• Select the font, font size, alignment and any other options from the text toolbar.
• Click in the lesson book and an outline box will appear.
• Enter the required text.
• Use the resize button to change the width of the text box.
• If the "constrain proportions" button is set to False, the text will stay the same size and
the box will get larger or smaller. If it is set to True, the box will stay the same shape
and the text will change its size automatically with the size of the box.
• The text inside the box (either the whole thing, or individual words or letters) can be:
•
•
•
•
•
•
•
Highlighted
Emboldened
Underlined
Italicised
Changed to a different font
Changed to a different font size
Changed to a different colour (only applies to the whole box).
• The text box will be locked for editing once clicked outside.
• To return to the text box, double click on the words and make any changes required.
NOTE: If the box is editable, a dotted line will appear around the text.
• Selecting the box will bring up the standard buttons:
• From this you will be able to increase the size of the font.
• You can also rotate the textbox through 360 degrees as required.
• Once the text is in the lesson book you can click on it using the left mouse button to
see the outline of the text object. You can move the text by clicking on it, holding the
left mouse button down and dragging the textbox to a new position. If you right-click on
the text, another menu of options displays.
Using the drawing pen
To use the drawing pen:
•
•
•
•
Click the Drawing pen icon
on the tool bar.
The tool options toolbars (colour, line width & style) open in the lesson book.
Select the required options.
Click with the left mouse button and draw onto the lesson book.
Handwriting Recognition
Lynx incorporates "handwriting recognition" which allows you to automatically turn a piece of
handwritten text into a textbox. You don't have to tell Lynx in advance that you want to
recognise handwriting - all drawn objects are checked to see if they contain handwriting when
they are first written, and can be "recognised" (ie. converted to typewritten text) at any later
point - even if the lesson book has since been saved and reopened.
1. Select either the pencil or brush tool.
2. Write your text clearly. You can use any combination of lower and upper-case letters, and
even joined-up writing.
3. Change to the select tool and right-click on the object.
4. The suggested recognition text is listed at the top of the pop-up menu. There may be
several suggestions if the writing is ambiguous; the options are listed with the most likely at
the top. (If no suggestions were found, the word "UNKNOWN" will appear instead.)
5. Click on the suggestion that matches what you wrote. The written object will change to a
textbox. You can now edit this textbox in case you want to make any additions or corrections.
Using the fill tool
You can use the Fill tool to fill in shapes and drawn items, and to change the background
colour.
To use the fill tool:
•
•
•
•
Click the Fill tool icon
on the toolbar.
The fill tool and the fill tool options box open.
Select the colour you require from the drop-down menu in the Tool option box.
Click the fill tool on the part of the screen where you want the colour to fill. For
example: you have a yellow triangle but you want to change it to red, use the fill tool to
change the colour quickly and easily.
NOTE: You can only fill shapes and fully enclosed areas of drawn items. If you try to fill an
area that is not fully enclosed, you will change the background colour instead.
Using the Custom Polygon Tool
The custom polygon tool can be used to create a polygon of any shape and size with any
number of sides.
1. Select the custom polygon tool.
2. Click the left mouse button where you want the first point of the polygon to be positioned.
3. Move the cursor to where you want the next point to be, and click the left mouse button
again.
4. Repeat step (3) until you have added all the points you want. For example, to draw a
quadrilateral you should click the left mouse button four times in total to set the four vertices,
5. When you have finished, click the right mouse button, and the final side of the polygon will
be drawn connecting the last point to the first point.
Using the Custom Polygon Tool
The curve tool can be used to create a curved line of any shape and size.
1. Select the curve tool.
2. Click the left mouse button where you want the start point of the curve to be positioned.
3. Move the cursor to where you want the end point to be, and click the left mouse button
again.
4. Move the mouse to create a curve between these two points, changing its direction and
pitch.
5. When you have finished, click the left mouse button and the object will be created; you will
not be able to amend the pitch of the curve after this, though you will still be able to resize or
rotate the object.
Below is an example of a curve when it has been initially created and when it has been
transformed later.
Using the Line Tool
The line tool has two functions:
•
•
It can be used to draw lines in the slide window that can then be manipulated as
objects
It can be used to create a "dynamic" connecting line between two shape objects that
stays anchored to the shapes even when they are moved.
1. Select the line tool.
2. Click the mouse button where you want the line to start.
3. Keeping the mouse button pressed, move the cursor to where you want the line to end.
Release the mouse button.
4. If the start and end points of the line were both located over "shape" items, the line will be
converted to a "connector" line. This will stay anchored to the two shapes and move with
them.
5. Otherwise, the line will become an object in its own right.
The example below shows a line item, and below it a connector item.
Using the eraser
Use the eraser as you would any board rubber - to rub out anything you don't need anymore.
The Eraser can rub out anything that you have drawn in the main window, though it won't
work on text.
To use the eraser:
•
•
•
•
Click the eraser icon
on the toolbar.
The eraser and an option box open in the lesson book window.
Select the thickness of the eraser from the drop-down list in the option box.
Left-click with the mouse button and move the eraser over what you want to rub out.
Note: The eraser tool will NOT rub out text. To delete text, double-click the text item to
make it editable and use the delete or backspace keys to make any required changes.
Using the highlighter tools
Lynx provides two types of highlighter tool: the highlighter pen and the block highlighter pen,
which draws a square around an object.
To use the highlighter pen:
•
•
•
•
Click the highlighter pen icon
on the toolbar.
The highlighter cursor and tool options toolbar appear in the lesson book window.
Select the required options from the option box.
Left click on the mouse button and draw over whatever you want to be highlighted.
To use the block highlighter pen:
• Click the block highlighter pen icon
on the toolbar.
• The block highlighter cursor and tool options toolbar appear in the lesson book
window.
• Select the required options from the option box.
• Click and drag the highlighter box over the area you want to highlight.
Using the Crop tools
Using the Crop Tools
The crop tools (block crop and freehand crop) can be used anywhere in the slide window - on
images, shapes and text - to create a partial (cropped) copy of the original object. The copy is
a static image and will include the background of the slide, if one is set.
Identify the object you wish to crop.
Block Crop tool
Click on the Crop Tool icon.
Draw a box to select the area that you wish to be cropped.
The cropped area will appear in the top-left corner of the page as a new picture object.
Repeat as often as required.
Freehand Crop tool
Click on the Freehand Crop Tool icon.
Draw around the area to be cropped. The area will be complete when the dotted-line joins up
with itself.
The cropped area will appear in the top-left corner of the page as a new picture object.
Repeat as often as required.
Using the spotlight tool
The spotlight tool lets you focus on different areas of a lesson while blanking out the rest of
the lesson book.
By right-clicking anywhere on the screen you an bring up the spotlight menu. This allows you
to:
•
•
•
•
select the shape and size of the spotlight
magnify the area you are looking at
change the colour of the background.
change the brightness of the background
Above we can see the spotlight on a desktop.
Show Spotlight on Delivery
You can set the spotlight to appear automatically when a slide is displayed in Deliver Lesson
mode.
Right-click within the slide window and select "Slide Delivery Options", then check "Show
Spotlight on Delivery".
Using the curtain
The curtain tool lets you reveal the contents of a lesson gradually by covering the screen with
a large box which can be pulled aside, as if opening a curtain.
The image below shows the curtain "half open" (ie. pulled back halfway), having been set to
open from top-to-bottom.
By right-clicking anywhere on the screen you an bring up the curtain menu. This allows you
to:
•
•
•
select the direction you want the curtain to travel, and on which side it is anchored:
o top to bottom
o bottom to top
o left to right
o right to left
change the colour of the curtain.
change the brightness of the background (ie. make it semi-transparent)
Below we can see another configuration of the curtain:
Show Curtain on Delivery
You can set the curtain to appear automatically when a slide is displayed in Deliver Lesson
mode.
Right-click within the slide window and select "Slide Delivery Options", then check "Show
Curtain on Delivery".
Launching the calculator
To launch Lynx calclator:
on the toolbar.
• Click the calculator icon
• The Lynx calculator launches.
Launching the on screen keyboard
The Lynx on screen keyboard is useful for entering information and text in applications when
using an interactive whiteboard.
To launch Lynx on screen keyboard:
on the toolbar.
• Click the keyboard icon
• The Lynx keyboard launches. Use it as you would any other keyboard.
Using Internet Browser
To browse the Internet you can use the Internet Browser or you can click on any of the links in
your Online Resources.
To use Internet Browser:
• Click the Internet Browser icon
• The Internet Browser launches.
on the toolbar.
Note: The Internet Browser automatically opens the Lynx web site home page. This is
a very useful resource for you as there are many lesson plans available for you to
download.