1
Installation to Single Wood Stud Wall
WARNING
• Installer must verify that the supporting surface will safely support the combined load of the equipment and all attached
hardware and components.
• Tighten wood screws so that wall plate is firmly attached, but do not overtighten. Overtightening can damage the
screws, greatly reducing their holding power.
• Make sure that mounting screws are anchored into the center of the stud. The use of an "edge to edge" stud finder is
highly recommended.
• Hardware provided is for attachment of mount through standard thickness drywall or plaster into wood studs. Installers
are responsible for providing hardware for other types of mounting situations.
A
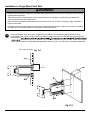
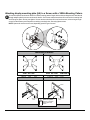
Using a stud finder, locate and mark the edges of the wood stud. Use of an edge to edge stud finder is highly
recommended. Use a level to draw a vertical line down the center of the stud. Use the wall plate of the mount(AA)
as a template to
as shown in figure A.1. Drill three 3/16" (5 mm) dia. pilot holes 2" (76 mm) deep. Attach the mount(AA)
to wall using three M6 X 60 cross slotted head screw (G) as shown in fig. A.2. Level the plate, then tighten all fasteners.
CS = center of screen
fig. A.1
STUD
5"
(127 mm)
STUD
CS
G
AA
AA
fig. A.2
4 of 8