1
Installation to Solid Concrete or Cinder Block
WARNING
• When installing the wall mount to cinder block, verify that you have a minimum of 1-3/8" of actual solid concrete
thickness in the hole to be used for the concrete anchors. Do not drill into mortar joints! Be sure to mount in a solid
part of the block, generally 1" minimum from the side of the block. Cinder block must meet ASTM C-90 specifications.
It is recommended that a standard electric drill set on a slow setting is used to drill the hole instead of a hammer
drill to avoid breaking out the back of the hole when entering a void or cavity.
• Concrete must have a 2000 psi density minimum. Lighter density concrete may not hold the concrete anchor.
• Make sure that the supporting surface will safely support the combined load of the equipment and all attached hardware and components.
B
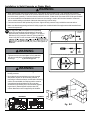
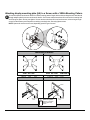
Use wall plate (AA) as template to mark mounting
holes.The top mounting hole should be 5" above the
desired screen center as shown in figure A.1 on page 4.
Drill three 5/16" (8 mm) dia. holes 2" (50 mm) deep as
shown in fig. B.1. Insert concrete anchor (H
secure with M6x 60 screws ( G ). Level, then tighten all
fasteners.
1
concrete
surface
H
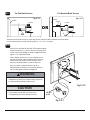
Drill holes and insert anchors (F).
2
WARNING
H
G
Place wall plate (D) over anchors (F) and secure with screws (E).
• Tighten screws so that wall plate is firmly attached,
but do not overti ghten. Overtightening can damage
screws, greatly reducing their holding power.
3
WARNING
Tighten all fasteners.
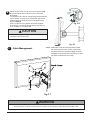
• Always attach concrete anchors directly to loadbearing concrete.
• Never attach concrete anchors to concrete covered
with plaster, drywall, or other finishing material. If
mounting to concrete surfaces covered with a finishing
surface is unavoidable, the finishing surface must be
counterbored as shown below. Be sure concrete
anchors do not pull away from concrete when tightening screws. If plaster/drywall is thicker than 5/8",
custom fasteners must be supplied by the installer.
so
lid
co
nc
ret
e
cinder
block
CORRECT
CUTAWAY VIEW
INCORRECT
concrete
wall plate
plaster/
drywall
wall plate
concrete
fig. B.1
plaster/
drywall
5 of 8