1
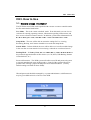
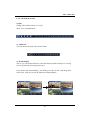
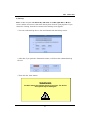
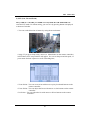
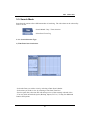
HD-SDI
User Manual
13433 NE 20th ST # T, Bellevue, WA 98005
Tel : 425-457-7790 Toll Free : 1-866-966-6766 Fax : 425-457-7791
Web : http://www.moosoo.com
eMail : [email protected]
CH 3 How to Use
CH3. How to Use
3-1. General Usage Information
The ULTIMA series DVR can be operated with a mouse or remote controller under
the four main modes listed below:
Live Mode – This is the “main or default” mode. From this mode you can view in
real time all currently operating cameras, information regarding camera status, and
have access to Pan/Tilt camera controls. In addition, system status information will
b shown
be
h
dduring
i live
li mode,
d andd other
th modes
d can be
b entered
t d from
f
Live
Li mode.
d
Setup Mode – The user will be able to customize settings for Live viewing,
Recording, Backup, and Camera related devices under the Setup Mode.
Search Mode – In Search Mode, the user will be able to review all recorded footage
in the case that an event must be reviewed using a calendar or event based search.
Backup Mode – In Backup
k Mode,
d the
h user will
ill be
b able
bl to archive
hi the
h desired
d i d data
d to
the preferred supported media of their choice (ex. CD, DVD, USB Backup, Remote
Client Software, etc.)
Password Protection – The DVR system will utilize a user ID and password system
to prevent unauthorized usage of this product. Control of the system will only be
possible after entering a proper ID and password as illustrated below. (Factory
Default settings are blank for these fields).
IDs and passwords should be managed by a system administrator, as different users
may be given different levels of access to the DVR.
17
CH 3 How to Use
3-2. LIVE Mode
IIn this
hi section
i you will
ill know
k
how
h to split
li the
h video
id mode
d into
i
1,
1 4,
4 6,
6 8,
8 9,
9 12,
12 16,
16 as
well as auto sequencing, PTZ Control, Mouse control, Setup configurations, Backup
3-2-1. LIVE Mode Control
1) Live View Status
You may use the Live Menu Bar located at the bottom for quick shortcuts and view
status of certain items.
Recording indicator
Event recording
di indicator
i di
Motion detection indicator
Sensor activation indicator
2) Live Menu Bar
You may use the Live Menu Bar located at the bottom for quick shortcuts and view
status of certain items.
18
CH 3 How to Use
Date
Time
Screen Split mode change
Sequence activation
Hard drive usage
Lock/ Unlock indicator
Scheduler activation indicator
Audio out channel indicator
Mute indicator
3) Live Popup Menu
By Right-Clicking anywhere on Live Screen, you may view the Live Popup Menu.
By using the Live Popup Menu, you can quickly jump to the necessary configuration
and settings.
19
CH 3 How to Use
3-2-2. LIVE Mode Feature
1) Split
Change video split mode for Live View.
20ch : 1/6/12/20 Split Mode
2) Audio Out
You can choose the audio out from this menu.
3) Instant Replay
This is very convenient function to catch the abrupt accident. During live viewing,
you can go directly to the playback screen.
If you choose the ‘Instant Replay’ , the DVR goes to the ‘PLAY’ with the present
time screen. And you can use the functions related playback.
20
CH 3 How to Use
4) Backup
Th are two
There
t ways to
t enter
t the
th backup.
b k
The
Th first
fi t one is
i that
th t right
i ht click
li k on the
th live
li
screen, and the second one is that enter directly from ‘Search’ upon playback. If you
choose the ‘backup’ from the live menu, below backup screen appears.
• You can set the backup device, time and channel from the backup screen.
• After that, if you push the ‘Estimation’ button, it will show the estimated backup
file size.
• Then click the ‘Start’ button.
WARNING
Do NOT remove the backup device till end sign. The device
and system may be damaged.
21
CH 3 How to Use
5) PTZ (Pan, Tilt and Zoom)
It is
i possible
ibl tto control
t l the
th pan andd tilt camera by
b itself.
it lf Press
P
the
th ‘PTZ’ button
b tt to
t
enter the PTZ mode. For Menu setting, you can set it by pressing button as displayed
at bottom of window.
• You can set the direction of camera by using the arrow buttons.
• Setup : If you press Setup using mouse (or Menu button on the remote controller)
in PTZ Menu, PTZ setup window will appear. You can set the pan and tilt speed, 32
preset name and tour sequence as well as dwelling time,
• Zoom In/Out : You can zoom in/out with mouse or play /backward buttons on the
remote controller.
• Focus In/Out : You can adjust the focus with mouse or slow buttons on the remote
controller.
• Iris In/Out : You can adjust the iris with mouse or ff/rew buttons on the remote
controller.
22
CH 3 How to Use
•Preset : You can enter the preset number using the keypad appearing the preset
button or ‘Enter’ button on the remote controller.
6) Zoom
Digital zoom of live screen for selected channel. It can be 2x zoom and also control
the position by mouse dragging.
23
CH 3 How to Use
7) Sequence
Sequence Mode On /Off: Switches screens as set on Dwell time under Screen Setup
8) OSD
This feature shows current settings of product through GUI (Graphic User
Interface) and INFO button at front side is used for this feature. When you
turn on power, this will show current date and time, System Lock Setting, HDD
usage, Video Loss Check, Sensor ON/OFF, Motion Detection Check, Recording Stat
us and Schedule Feature Usage. As you press INFO button once more, GUI
disappear->OSD disappear->GUI appear->OSD appear will happen sequentially.
※ GUI (Graphic User Interface): displaying current status on monitor as images
※ OSD (On Screen Display): displaying current status on monitor as character
9) Lock/Log In
Logs off current user and locks DVR from any further configuration and screen setup
until next Administrator logs in.
24
CH 3 How to Use
3-3. Search Mode
Search mode consists of two different modes of searching. The video data can be selected by
Time or Event.
Search Month / Day / Time selection.
Select from Event Log
3-3-1. Search Selection Type
1) Time Based search selection
- Select the Date you wish to view by selecting a Date from Calendar
- Select time you wish to view by selecting a time from Time Line
- Preview pane above the time bar will show preview of the currently selected video
- You may click on Refresh, Option, Backup, Import, To Live, To Play for additional
features and options
25
CH 3 How to Use
2) Event Based Search Selection
- Select search date from calendar
- Event log will be displayed according to the chosen date
- Preview pane above the Event Log will show preview of currently selected video
- You may click on Refresh, Option, Backup, Import, To Live, To Play for additional
features and options
3) Miscellaneous Search Options
R l d all
Reload
ll data
d t list.
li t
Search option.
Backup recorded data to external USB device.
Playback recorded data from external USB device
Move to Live video mode.
Load playback data to full screen mode.
26
CH 3 How to Use
3-3-2. Play Mode
If you choose ‘to play’, the full screen appear. You can control the play speed in here.
▶ Play Screen GUI
1. Split Screen
2. Sequence
q
3. FB (Fast Backward): FB×2, 4, 8, 16, 32, 64 times faster
4. Playback : Backward normal speed
5. SB (Slow Bacward):SBx1/2, SBx1/4
6. STILL (Pause) / Frame advance
7. SF (Slow Forward):SFx1/2, SFx1/4
8. Play : Forward normal speed
9. FF (Fast Forward): FF×2, 4, 8, 16, 32, 64 times faster
10. STOP : Stops playing and returns to LIVE Screen.
11. Status information
27
HOW TO SETUP REMOTE VIEW.
(WEB BROWSER VIEW AND MOBILE APPS)
WEB BROWSER VIEWING USING WINDOWS INTERNET EXPLORER®
VERSIONS 6, 7, 8, 9
*Please note you may need to permit Internet Explorer® to download Active X
controls.
Allow “ACTIVE X” ad-ons to “Enable” This may be found in the Security Settings of
Internet Explorer
WEB Browser Login Information:
- IP Address: 00.00.000.00
- ID: your id
- PASSWORD: your password
- CAMERA: #
Note: Enable All Active X Controls
<CATCHEYE>
FREE Mobile App Software for your iPhone or Android Mobile Devices!
Available through your mobile devices store application.
mobile® VIEWING INSTRUCTIONS
1. Download catcheye app from Apple iTunes or android store.
2. Open catcheye app from your mobile phone.
3. Click on the '+' button on the top-right corner of the screen to add a new server.
4. Enter server name of the DVR.
-> type in your server name
5. Enter the IP address of the DVR. If entering DDNS name, enter the full URL.
-> type in 00.00.000.00 or type in DDNS name
6. Enter the NETWORK PORT. You can get this information from Setup -> Network > NETWORK PORT from the DVR menu.
-> type in 8000
7. Enter the login ID and password.
-> user: your username
-> password: your password
8. Leave the server type (Default is Embedded DVR).
9. Click save button on the top-right corner of the screen to add a new server.
10.Click on the your server from the list.