1
Handbook
LabCon Handbook
Version 1.14
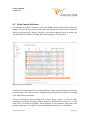
1 History
Version
Date
Changes
Status
V1.00
02.29.12
Developed
Release
V1.10
07.06.12
Various Modifications
Release
V1.11
29.08.12
Various Corrections
Release
Chapter 7 and 8 revision adjustment for
LabCon® Version 1.05.02 compatibility
V1.12
23.11.12
Revision of Chapters: Standalone ↔ System Release
operations under Nagios
V1.13
21.01.13
Chapter 12 revisions
Release
V1.14
08.04.13
An SW-Version 2.01.01 adjustments:
- Ch. 6.3.1 Addition of alert communities
- Ch. 6.3.2 Addition of warning ID
- Ch. 6.3.2 CSV further definition additions
- Ch. 6.4.3 additions
- Ch. 6.6 CSV Push additions
- Ch. 7.2.2 Added
- Ch. 7.2.4.4.1 Flags adjustment
- Ch. 7.3 newly generated
- Ch 12.4 extended configuration
- Ch. 12.5.1 Addition of timing intervals
Release
© 2013 pikkerton GmbH
Page 2 / 95
LabCon Handbook
Version 1.14
2 Legal
© 2013 pikkerton GmbH
All rights, including translation into foreign languages, are reserved. No part of this
publication may be reproduced in any form (by printing, photocopying or any other
method) or processed using electronic systems, copied or distributed without the
written permission of pikkerton GmbH. The passing on and copying of this document,
use and communication of its contents are prohibited unless explicitly permitted.
Violators are liable for all damages. All rights reserved in the event of patent, utility
model or design. Pikkerton GmbH is not liable for technical or editorial errors or
omissions contained herein. Furthermore, they shall not be liable for any damages that
are directly or indirectly attributable to the furnishing, performance or use of this
material.
Changes to the content herein is subject to change without notice. The Information in
this publication is given without responsibility for accuracy and completeness. In particular, it contains no such information to be guaranteed. The user carries all risk arising from the use of this information.
Please note that all manual software and hardware names, and trademarks of the
respective companies are generally subject to trademark, brand or patent protection.
pikkerton GmbH
Kienhorststr. 70
Fon
+49 (0) 30 3300724 - 0
13403 Berlin
Fax
+49 (0) 30 3300724 – 24
Germany
Website
www.pikkerton.de
© 2013 pikkerton GmbH
Page 3 / 95
LabCon Handbook
Version 1.14
3 Table of Contents
1 History.............................................................................................................................2
2 Legal ...............................................................................................................................3
3 Table of Contents............................................................................................................4
4 General...........................................................................................................................7
4.1 Target Group...........................................................................................................7
4.2 Criteria.....................................................................................................................7
4.3 Definition of Symbols..............................................................................................7
5 LabCon® Overview..........................................................................................................8
5.1 ZigBee Wireless Standard .....................................................................................9
5.1.1 Coordinator.............................................................................................................10
5.1.2 Router......................................................................................................................10
5.1.3 End-Device...............................................................................................................10
5.2 Device Overview...................................................................................................11
5.2.1 ZigBee-Gateway ZBG-100........................................................................................11
5.2.2 ZigBee Sensors & Actuators in the ZBS- family........................................................12
5.2.2.1 Smart Energy Meter.......................................................................................................12
5.2.2.2 ZigBee Multi-sensor.......................................................................................................14
5.2.2.3 Additional ZBS-Devices..................................................................................................15
5.2.3 Initial operation of the equipment and network design..........................................16
5.2.3.1 Gateway.........................................................................................................................16
5.2.3.2 Terminals........................................................................................................................17
5.2.4 Timing of Devices...................................................................................................18
5.2.4.1 Internal Configurable Intervals in the Terminals...........................................................18
5.2.3.3 Timeliness of the Measured Values (cyclic)...................................................................19
6 ZBG-100 Gateways Stand-alone Operation ...............................................................20
6.1 Criteria...................................................................................................................20
6.2 Delivery Status......................................................................................................21
6.3 Setting the ZBG-100 ............................................................................................22
6.3.1 Settings/Gateway....................................................................................................23
6.3.2 Settings / Phys. devices...........................................................................................27
6.4 Security.................................................................................................................32
6.4.1 Admin-Login / https.................................................................................................32
6.4.2 Communication via SNMP V3..................................................................................32
6.4.3 ZigBee Wireless Security via AES.............................................................................32
6.5 SNMP.....................................................................................................................34
6.5.1 Authorization Management....................................................................................35
6.5.1.1 SNMPv1 and v2c............................................................................................................35
6.5.1.2 SNMPv3..........................................................................................................................35
6.5.2 SNMP Manager.......................................................................................................35
6.5.3 Traps........................................................................................................................37
© 2013 pikkerton GmbH
Page 4 / 95
LabCon Handbook
Version 1.14
6.6 CSV-Recording / Pushing.......................................................................................38
6.7 Direct Control of Devices......................................................................................40
6.8 Webmin.................................................................................................................42
7 Operating under Nagios / Icinga...................................................................................43
7.1 Interface for Nagios/Icinga...................................................................................44
7.1.1 Communication Model............................................................................................44
7.1.2 Plugins.....................................................................................................................45
7.1.3 Summary of the Service Groups..............................................................................45
7.1.4 Timing End Devices → Gateway → Nagios (Event-based).......................................48
7.2 LabCon® Configuration.........................................................................................49
7.2.1 Flags........................................................................................................................49
7.2.2 Special Features of “Work Limit” and “Load Limit”.................................................50
7.2.3 Creating Nagios Configurations for Devices............................................................51
7.2.4 Creating and Configuring Groups............................................................................52
7.2.4.1
7.2.4.2
7.2.4.3
7.2.4.4
Adding groups................................................................................................................54
Assigning Services to Groups.........................................................................................57
Configuration of the group members............................................................................57
Templates for Actuators................................................................................................58
7.2.4.4.1 Flags............................................................................................................................................................59
7.2.4.4.2 Sending Emails...........................................................................................................................................59
7.2.4.4.3 ZBS Device Actuators.................................................................................................................................60
7.2.5 Example...................................................................................................................62
7.2.5.1 Air-flow Management – Hysterese Loop Circuit...........................................................62
7.2.5.2 Loop Control without Hysteresis...................................................................................63
7.2.5.3 Access Control / Door Opener.......................................................................................63
7.2.6 Group Settings.........................................................................................................63
7.2.7 Installations in Nagios..............................................................................................64
7.3 Virtual Devices......................................................................................................64
7.4 Monitoring............................................................................................................68
8 Index of Figures............................................................................................................71
9 Index.............................................................................................................................73
10 Additional Information..............................................................................................76
11 Appendix: Software and License Update...................................................................77
12 Apendix: Nagios Installation.......................................................................................78
12.1 Required Software..............................................................................................78
12.2 Initial Test...........................................................................................................80
12.3 pnp4nagios..........................................................................................................81
12.4 Pnp4nagios Configuration...................................................................................82
12.5 Integration of Gateways in Nagios / Icinga.........................................................84
12.5.1 Preparatory Measures...........................................................................................84
12.5.2 Nagios Adjustments (on the server side)..............................................................86
12.5.2.1
12.5.2.2
12.5.2.3
12.5.2.4
12.5.2.5
LabCon® Configurations...............................................................................................86
ZBG Name Resolution..................................................................................................87
Menu Integration.........................................................................................................88
SNMP-Trap Service.......................................................................................................91
Apache2 Configuration................................................................................................92
© 2013 pikkerton GmbH
Page 5 / 95
LabCon Handbook
Version 1.14
12.5.2.6 Customization for pnp4nagios.....................................................................................93
12.5.2.7 Content description of the archive <zbg_hostname>_custom_config.zip..................94
12.5.2.7.1 The subfolder config................................................................................................................................94
12.5.2.7.2 The subfolder icinga................................................................................................................................94
12.5.2.7.2 The subfolder mibs...................................................................................................................................94
12.5.2.7.3 The subfolder nagios................................................................................................................................95
12.5.2.7.4 The subfolder scripts................................................................................................................................95
© 2013 pikkerton GmbH
Page 6 / 95
LabCon Handbook
Version 1.14
4 General
This manual describes the integration of LabCon ® into a Nagios environment.
A Debian 6.0 Squeeze system platform has been selected for the installation of Nagios
LabCon®.
4.1 Target Group
This document is intended for system administrators integrating LabCon® in Nagios.
4.2 Criteria
•
•
the ZBG-100 gateway must be accessible (section 6.2)
Linux and the Bash shell experience.
4.3 Definition of Symbols
The attention symbol refers to actions, which can cause
damage to material or equipment.
The notice indicates necessary conditions for error-free
operation. It picks out important details, makes the job
easier, and gives tips and advice on the optimal use of
hardware and software.
© 2013 pikkerton GmbH
Page 7 / 95
LabCon Handbook
Version 1.14
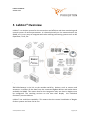
5 LabCon® Overview
LabCon® is a wireless system for the convenient and efficient real-time monitoring and
control system of various parameters. It is based primarily on the communication via
SNMP, so it is very easy to integrate with other existing monitoring systems such as HP
OpenView, Tivoli, etc.
Figure 1: LabCon® & Intreface Overview
ZBG-100-Gateway is the link to the outside world for devices, such as sensors and
actuators. It collects all the data from the connected ZigBee devices and makes them
available via SNMP. This means that for the integration only one host in Nagios must
be configured. The resulting services on the host then display the individual
functions / sensors devices.
LabCon® has multi-host capability. This means that the central installation of Nagios
further systems and sites can be run.
© 2013 pikkerton GmbH
Page 8 / 95
LabCon Handbook
Version 1.14
5.1
ZigBee Wireless Standard
Zigbee is based on IEEE802.15.4 standards and acts as WLAN and Bluetooth in the socalled ISM band (2.4 GHz). The use is royalty-free and available worldwide.
A theoretical maximum bandwidth of 250 kbit/s is sufficient for sensing and managing
applications. With an optional 128-bit AES encryption and further security features, it
is sufficiently secured against various attacks.
The strengths of ZigBee lie heavily in the meshing and routing. Thus, the network setup is transparent and independent, without affecting the user. Additional
infrastructure, such as repeaters or separate routers, are not necessary.
In the event of router-failure, the network will repair itself (spacial expansion and
wireless reception permitting). New routes will be established automatically.
This mechanism may take a few minutes during both the initial network setup and the
reorganization.
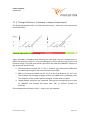
There are three different types of ZigBee devices:
Figure 2: ZigBee Overview
© 2013 pikkerton GmbH
Page 9 / 95
LabCon Handbook
Version 1.14
5.1.1 Coordinator
The Coordinator is the center (the so-called master) of the wireless network. It
includes two main functions:
a. accessions of routers and end-devices to the network, including key
management.
b. gateway to the outside world.
The coordinator is able to communicate with any number of routers and up to 20 enddevices. Other end-devices may require an additional router.
Both the coordinator and the routers require a permanent power supply.
supplies the LabCon® system.
ZBG-100
5.1.2 Router
The router's network continues to span the geographic scope. It saves notifications
delivered to the connected end-device, in case they are in sleep-mode and therefore
unable to accept incoming notifications. Devices with a permanent power supply are
generally ideal as routers. (ie. gadgets with energy-saving functions or including a
remote switch.)
ZBS-110V2/-111/-112 are the devises used in LabCon® system.
5.1.3 End-Device
End-devices are usually battery-powered and are rarely active if:
a. your configured sleep-time expires (default 28 seconds). Then inquire
through the router to which you are registered, whether you have
received any messages.
b. there are a local events are active. (eg. Pressing a key)
c. a previously defined measurement-interval (“MSI”) requests sensors, and
at least one threshold violation exists.
d.
a transmission interval of a previously defined transmission interval ("TXT")
forces the device to retrieve all local sensors and send the sensor data to the
coordinator.
ZBS-121/-130/-132/-140 are the devices used in LabCon System.
Battery-operated devices are constantly monitored on your battery voltage. If the
© 2013 pikkerton GmbH
Page 10 / 95
LabCon Handbook
Version 1.14
battery is empty, it is shown early enough to change the battery before the unit is no
longer available.
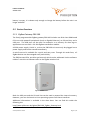
5.2 Device Overview
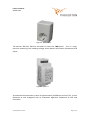
5.2.1 ZigBee-Gateway ZBG-100
The freely programmable ZigBee gateway ZBG-100 includes one GHz class ARM-based
CPU core with powerful peripherals (such as Gigabit Ethernet), an SD card slot, and a
USB port. The USB port can be used- for example- as a memory for data logs or
applications can use and a 2.4 GHz ZigBee coordinator module.
A 230V power supply is built in, so that the ZBG-100 unit must only be plugged into a
power supply and can be started immediately.
A web front-end is available for a quick and easy start. Through this web-front, all
ZigBee devices can be managed easily and reliably.
The ZBG has two LEDs, one blue and one red, which can be addressed via the software.
LabCon® uses this to indicate traffic on the ZigBee wireless link.
Figure 3: ZBG-100
Both the USB port and the SD card slot can be used to expand the internal memory.
However, you can also launch a Linux operating system from these interfaces.
Additional information is available in the data sheet. You can find this under the
following link:
http://www.pikkerton.de/zigbee/ZBG-100_ZigBee_Gateway.html
© 2013 pikkerton GmbH
Page 11 / 95
LabCon Handbook
Version 1.14
5.2.2 ZigBee Sensors & Actuators in the ZBS- family
This chapter lists the main equipment of the ZBS family. Further information can be
found under:
http://www.pikkerton.de/zigbee/ZigBee.html
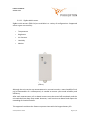
5.2.2.1 Smart Energy Meter
The following group of devices are used to measure and partially to switch currents:
•
ZBS-110V2,
•
ZBS-111
•
ZBS-112.
Figure 4: ZBS-112
Switchable devices, such as ZBS-110 and ZBS-111, include the pikkerton SART
technology. These enhance the service life of the relay contacts.
© 2013 pikkerton GmbH
Page 12 / 95
LabCon Handbook
Version 1.14
Figure 5: ZBS-110V2
The devices ZBS-110, ZBS-111 and ZBS-112 have the /NQ-Option. This is a highprecision measuring unit including voltage, which detects and reports fluctuations and
spikes.
Figure 6: ZBS-111
An automatic measurement is taken at approximately 14.000x per second. This is then
delivered to and integrated into an evaluation algorithm supported by DSP and
Controller.
© 2013 pikkerton GmbH
Page 13 / 95
LabCon Handbook
Version 1.14
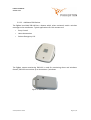
5.2.2.2 ZigBee Multi-sensor
ZigBee multi-sensors (ZBS-12x) are available in a variety of configurations. Supported
sensor types are currently:
•
Temperature
•
Brightness
•
Air Pressure
•
Humidity
•
Motion
Figure 7: ZBS-121
(indoor)
Although the unit carries out measurements in narrow intervals, a mere handful of rich
µA (a thousandths of a milliamperes) is needed to ensure year-round reliability and
efficiency.
After each measurement, all on-board sensors must be turned off completely and the
unit switched into deep sleep mode. However, it will continue to detect and report the
exceeding of threshold values.
This approach combines the fastest response times with the longest battery life.
© 2013 pikkerton GmbH
Page 14 / 95
LabCon Handbook
Version 1.14
5.2.2.3 Additional ZBS-Devices
The ZigBee hand-held ZBS-130 has a button which, when activated, sends a wireless
message to the coordinator. Typical applications for this actuator are:
•
Entry Control
•
Home Automation
•
Patient Emergency Call
Figure 8: ZBS-130
The ZigBee contact-monitoring ZBS-132 is used for monitoring doors and windows.
Overall, ZBS-132 can monitor up to three doors / windows.
Figure 9: ZBS-132
© 2013 pikkerton GmbH
Page 15 / 95
LabCon Handbook
Version 1.14
5.2.3 Initial operation of the equipment and network design
5.2.3.1 Gateway
Once the gateway is plugged in, the wireless module operates independently of the
boot / OS. It gives existing terminals, or routers the option to join a wireless network.
By default, the wireless traffic is unencrypted, and the coordinator / gateway
configured without further restrictions. Therefore, the devices should now find each
other automatically.
Wireless traffic is displayed using the two LEDs:
Here, the red LED indicates when messages are received.
The blue LED shows when messages are sent from the gateway.
© 2013 pikkerton GmbH
Page 16 / 95
LabCon Handbook
Version 1.14
5.2.3.2 Terminals
Depending on the terminal / router, the respective operating status is displayed on the
device-specific LEDs:
•
2 independent LEDs (green / orange)
•
1 multi-color LED or 2 LEDs in a window / plunger button (green / orange)
•
1 RGB-LED red/green)
In the following, both the orange and the red LED are collectively referred to as "red".
After starting a router or terminal, an automatic network scan is initiated, which
searches for complementing and open coordinators. Success / failure is indicated by
the LED flashing:
•
3x green: The device has logged in to the coordinator / gateway successfully.
•
3x red: The unit has not found a coordinator / gateway or can not log in
(Possible reasons for this: connected encryption, outside of the wireless range,
closed network, etc.)
The devices are configured so that this network login is cyclically repeated, if the
network scan was not successful. In the case of battery-operated devices, this scan
cycle will be extended only gradually to conserve battery. For the initial pairing of
devices, it may be helpful to reset the devices by rebooting them. The network scan
will begin again, and be immediately initiated. For this, press the key until the LED
responds (usually 5-10 seconds). The respective LED color varies from device to device.
If you are unsure whether a device has been added to the wireless network or not, you
can send a message to the gateway with a mere touch of the button. Whether the
message has been delivered successfully is also indicated by:
•
1x green: The message has been successfully delivered.
•
1x red: The message has not been delivered successfully.
The device specifics are described in their respective manuals and in the "CSE Manual".
© 2013 pikkerton GmbH
Page 17 / 95
LabCon Handbook
Version 1.14
5.2.4 Timing of Devices
This chapter provides an overview of the most important, internal intervals.
5.2.4.1 Internal Configurable Intervals in the Terminals.
All ZBS devices can be set to certain time intervals.
Figure 10: MSI and TXT-Interval Overview
MSI –Measurement Interval
The MSI is the length of the pause between two measurements. Measurements
usually mean less power consumption than sending wireless messages. Therefore, it is
advisable to send a message only if it is really necessary.
TXT – Transmit Interval
The TXT is the interval between two packets with service / readings.
© 2013 pikkerton GmbH
Page 18 / 95
LabCon Handbook
Version 1.14
5.2.3.3 Timeliness of the Measured Values (cyclic)
The ZigBee network works in relation to the data autonomously, and so is completely
asynchronous to Nagios or SNMP requests. This is especially due to the batteryoperated devices. These are usually in sleep mode and resume only after certain
intervals (MSI or TXT), then take measurements and data transmissions to minimize
the power consumption. The data transferred over the TXT interval data is stored in a
central data structure in order to answer SNMP requests quickly and without risk of
timeouts. The data requested by SNMP data may therefore have limited relevance and
must be considered accordingly. The timeliness of the data can be easily adjusted for
devices with permanent power supply via TXT closer intervals.
Alarm messages can also be set (see next section) and then transferred directly.
© 2013 pikkerton GmbH
Page 19 / 95
LabCon Handbook
Version 1.14
6 ZBG-100 Gateways Stand-alone Operation
6.1 Criteria
The operation is web-based. The operation of the front-end has been tested with the
following browsers respective current versions:
•
Firefox
•
Chrome
•
Internet Explorer
The browsers must have Javascript / DOM installed and activated.
© 2013 pikkerton GmbH
Page 20 / 95
LabCon Handbook
Version 1.14
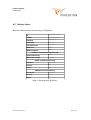
6.2 Delivery Status
ZBG-100 is delivered with the following configuration.
192.168.0.100
IP
255.255.255.0
Subnet
192.168.0.1
Gateway
ZBG-100
Hostname
rootroot
root-Password
admin
Web-User
admin
Web-Password
SNMP v1 und v2c Authentifizierung
public
Read-Community
private
Write-Community
SNMP v3 Authentifizierung
rootroot
Passwort
md5
Process
off
Status
SNMP v3 Verschlüsselung
rootroot
Password
sha
Process
oƒf
Status
Table 1: ZBG-100 State of delivery
© 2013 pikkerton GmbH
Page 21 / 95
LabCon Handbook
Version 1.14
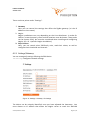
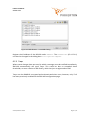
6.3 Setting the ZBG-100
The web interface of ZBG-100 allows you to make all necessary adjustments. Once
ZBG-10's homepage is open, select Settings from the left margin to manage the
settings. Optionally, this can also be changed via SNMP.
Figure 11: Settings Overview
© 2013 pikkerton GmbH
Page 22 / 95
LabCon Handbook
Version 1.14
There are three points under “Settings”:
1. Gateway
Here you can control the settings that affect the ZigBee gateway. (ei. the IP
address or host name.)
2. Nagios
Nagios installations can vary depending on the Linux distributor. In order for
LabCon® to work properly, some archive locations must be known. These paths
can be chosen freely, but must be considered when installing and configuring
Nagios. (Ch. 12 - Apendix: Nagios Installation)
3. Phys. Devices
Here, you can search other ZBS-family units, read their values, as well as
configure their thresholds and intervals.
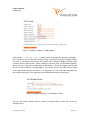
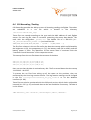
6.3.1 Settings/Gateway
You can manage all settings affecting the ZBG device.
IP Settings configures network settings.
Figure 12: Settings / Gateway / IP Settings
The device can be uniquely identified, once you have adjusted the hostname. You
must choose an IP address that allows the Nagios server to reach the ZBG-100
© 2013 pikkerton GmbH
Page 23 / 95
LabCon Handbook
Version 1.14
gateway. A device-restart is not necessary, as the settings are applied immediately by
pressing the "Apply" button.
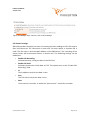
Your web password can be changed under Password Settings
The password change affects only the web password. The root
password, which- for example- is needed in ssh, will not be altered.
Figure 13: Settings / Gateway / Password Settings
Under SNMP Settings, you can manage communities and password settings. Here you
can also switch Traps on and off.
For safety reasons, the three communities must differ from each
other.
Currently, only one trap destination is supported, which you can also enter here.
© 2013 pikkerton GmbH
Page 24 / 95
LabCon Handbook
Version 1.14
Figure 14: Settings / Gateway / SNMP Settings
A so called Lost Message Counter (LMC) counts seemingly lost wireless messages –
this is similar to the "packet loss" during a "ping". Normally, there are no higher values.
The LMC is calculated internally by the system and is based on ZigBee internal event
counters that are transferred. These, however, are rarely sent. (ie. Heartbeat packets,
which are set in low-level configuration in ZBS devices.) These are largely switched off
due to a massive battery saving program. This allows for the next LMC interval value
to be requested solely by the device. It is important to note that data telegrams are
also requested, which in consequently cause additional power consumption.
Figure 15: Settings / Gateway / Lost Message Counter
The last two points explain how to restart the entire ZBG or save and restore its
configurations.
© 2013 pikkerton GmbH
Page 25 / 95
LabCon Handbook
Version 1.14
Figure 16: Settings / Gateway / Reboot & Save
© 2013 pikkerton GmbH
Page 26 / 95
LabCon Handbook
Version 1.14
6.3.2 Settings / Phys. devices
This page is used to display and configure ZigBee devices found in the ZBS family. After
a (re)start of ZBG-100, the ZBS device will need some time to log into the ZigBee
Gateway. This may take up to several minutes. Depending on the number of devices in
the ZigBee network, times may vary. You can speed up the process by triggering Node
Discover (ND). A wireless message is then sent, which forces all devices to log into the
network.
If not all devices are shown, the display can be updated by hitting Refresh.
Figure 17: Settings / Phys. devices / Overview
MAC
The ZigBee module has a specific MAC address located on the individual devices. This
allows each device to be clearly identified. To get to the respective sensor's page, click
on the MAC address link found behind the address. You can then find the current
measured values, adjust threshold values and intervals (TXT and MSI), as well as
control the device (ei. relay or LED status change).
PID
The PID is the relevant type of ZBS-family.
© 2013 pikkerton GmbH
Page 27 / 95
LabCon Handbook
Version 1.14
ID
The ID is the same as the serial number during delivery. You can choose any ID, which
is then used to simplify each device's identification and description. (ie. ID = ID =
Dataroom4 or Rack5a). It can be up to 12 characters long, but for compatibility
reasons, no symbols or spaces are allowed.
As soon as Nagios/Icinga is activated, no ID may be used more
than once.
Active
Here, you can see if the device is currently in the network.
Checkbox
Only devices with an activated checkbox can generate configuration files for Nagios
under "Generate".
It is also possible to enter clear text commands under "Command" and then send them
to the selected device using "Send Command”. These commands go automatically to
all devices where the checkbox has been activated. Since the device's response time
can take up to 30s when running on battery, the latest device response can be
retrieved manually at any time under “Collect Answers”.
Please see the relevant manuals for details. (Ch. 10 - Additional Information)
Enable Joining
To allow new ZBS-devices to log in, all routers and the coordinator must be “open”.
Node Discover
When a Node Discover is run, all devices currently logged into the network report to
the system.
Refresh
Updates the device list.
© 2013 pikkerton GmbH
Page 28 / 95
LabCon Handbook
Version 1.14
Remove Offline Devices
Deletes all devices from the list, which are marked as offline.
Default
By activating the default setting sends a defaults notification and restores all
highlighted devices back to their default settings. You can see which settings are
affected by in the respective ICD.
Figure 18: Settings / Phys. devices / Command
Send Command
Sends the command recorded in the right text field to all selected devices.
Collect Answers
Collects all responses from the devices.
The responses are the last received data from the devices. It may,
depending on your network settings, take up to 30 seconds until
the requested information is received.
Clear Output
Clears output window of all responses.
© 2013 pikkerton GmbH
Page 29 / 95
LabCon Handbook
Version 1.14
Figure 19: Settings / Phys. devices / CSV Control Settings
CSV Control settings
ZBG-100 provides the ability to store all incoming wireless readings as CSV files and to
then send them per TCP connection in clear text. For each device, a separate file is
used. The file name is also the MAC-Address of the ZBS-Device. The recording of the
sensor values will be discussed further in Section 6.6. The following settings can be
made here:
•
Enable CSV Recording
Activates back-up, saving the data in the CSV files.
•
Enable CSV Push
Activates transmission of the data via TCP. This option turns on the "Enable CSV
Recording" field.
•
IP
The IP address to which the data is sent.
•
Port
The TCP-Port to which the data is sent.
•
Rate
Time interval in seconds, in which the "push service" checks for new data.
© 2013 pikkerton GmbH
Page 30 / 95
LabCon Handbook
Version 1.14
Figure 20: Settings / Phys. devices / Nagios Configuration
Under “Nagios Configuration”, you can create the basic configurations for Nagios. The
button “Generate” creates the archive <zbg_hostname>_custom_config.zip. This
archive contains all the configuration and script files that are needed for a LabCon®
installation in Nagios / Icinga. In addition, the needed MIBs for a SNMP are also located
in this zip file.
As shown in the Figure 20, this file can be downloaded easily via http or scp.
© 2013 pikkerton GmbH
Page 31 / 95
LabCon Handbook
Version 1.14
6.4 Security
6.4.1 Admin-Login / https
To access ZBG-100's website, enter the username and password. During the state of
delivery, these are: admin. You find the password file ( pw.inc) in the root-directory of
the web server (/var/www).
The connection to ZBG-100's website can also be established via the https default port
443 with encrypted SSL.
6.4.2 Communication via SNMP V3
Encrypted and authentisized SNMPv3 packets allow for communication between
LabCon® and ZBG-100. For more information, please see Chapter 6.5.1.2 - SNMPv3.
6.4.3 ZigBee Wireless Security via AES
The ZigBee wireless network can be encrypted via AES-128.
Once the encryption has been activated in the ZigBee coordinator
(ZBG-100), only ZigBee routers and end-devices with activated
encryption and the same network key can be connected.
The encryption can be set via Settings → ZigBee Net . This page allows the
coordinator to be set in two different modes: Encrypted ( Encrypted Network) and
unencrypted (Open Network) communication.
Please note that the router and end-devices can only show the operation mode in
which they are currently.
To encrypt a wireless network, please do the following:
1. Choose a network-key
- max. 32 signs
- Hexadecimal (without leading 0x)
- eg. 3ac56d
© 2013 pikkerton GmbH
Page 32 / 95
LabCon Handbook
Version 1.14
2. Configure a Device to a secure network
Add to Secure Network.
3. Reconfigure a coordinator into an encrypted network
click on Encrypted Network.
4. Wait for the device to log in.
The settings are now automatically saved on the device.
5. To add further devices, you must configure the Coordinator for the encrypted
network. (Open Network) Steps 2 – 4 must be repeated.
© 2013 pikkerton GmbH
Page 33 / 95
LabCon Handbook
Version 1.14
6.5 SNMP
The LabCon® scripts on the Nagios server and the ZBG-100 communicate via SNMP.
According to its terminology, Nagios® LabCon have the following meanings:
1. First, ZBG-100 collects sensor data and makes it available, now becoming the
SNMP-Agent. Moreover, agents can send warning messages (so called Traps) to
instantly inform the previously configured SNMP-Manager.
2. The LabCon® scripts on the Nagios server, Nagios itself, and the pnp4nagos
plugin, represent the SNMP-Manager. This collects the information from the
agent at regular intervals and processes them. In addition, the manager
"listens" for incoming Traps.
Other LabCon® managers can also be used to control ZBG. These are introduced in ch.
6.5.2- SNMP Manager.
The organization of the variables in SNMP is displayed as a tree structure. Each node
has its own number. To retrieve a variable, the path is specified from the root. For
example, you can find the ZBG product name under the node:
.1.3.6.1.4.1.23596.10.1.0
To make things easier, there is the ”Management Information Base (MIB)” which
converts this numeric string into a name for the manager and vice-versa. Scalars 1
always end on zero, while tables always have an index.
ZBS family sensors are tabulated. The index serves as your MAC address.
1 A Skalar is a mathmatic size which is characterized solely by the indicated number value.
(Consequently, in Physics by Unit.)
© 2013 pikkerton GmbH
Page 34 / 95
LabCon Handbook
Version 1.14
6.5.1 Authorization Management
The ZBG-100 supports the protocols SNMPv1, SNMPv2c and SNMPv3. Unlike version 3,
versions 1 and 2c are unencrypted.
6.5.1.1 SNMPv1 and v2c
This version is supported by most SNMP managers. The user authentication is done via
the so-called "community". These are standard for reading public and for writing
private. These can be changed by preference. (ch. 6.3.1)
6.5.1.2 SNMPv3
SNMPv3 provides two security features:
1. Password-protected user authentication
2. Encryption of raw data in the data packet
You can assign individual passwords for authentication and encryption. These an be
switched on independently of one another.
If it is specified in the configuration that at least one security feature
of SNMPv3 is to be used, SNMP versions 1 and 2c are switched off
automatically.
6.5.2 SNMP Manager
The company, iReasoning, offers the SNMP Manager "MIB Browser" as a free version.
This is Java based, so it can be used on Windows, Mac OS, Linux or other Unix
platforms. Among other things, this version has the following features:
•
SNMP Walk, Get, Set
•
Tabular MIB view
•
Trap Receiver / Transmitter
•
SNMP v1 and v2c
•
can resolve up to 10 MIBs
The paid version has more features, such as SNMPv3.
© 2013 pikkerton GmbH
Page 35 / 95
LabCon Handbook
Version 1.14
There are also many other managers, HP OpenView and Net-SNMP being the best
known. This manual only briefly touches on iReasoning's MIB Browser. After the first
start-up, you will see:
Figure 21: iReasoning MIB Browser
Now load MIBs onto the browser from ZBG-100. You can find these in the archive
<zbg_hostname>_custom_config.zip. Chapter 6.3.2, pg. 31 explains how to create
and download these.
The MIB text files can then be loaded via the menu File->Load MIBs .
© 2013 pikkerton GmbH
Page 36 / 95
LabCon Handbook
Version 1.14
Figure 22: MIB Browser - Load MIBs Dialog
Register the IP address of the BG-100 under Address. The Communities (Ch. 6.5.1.1)
can then be changed in the dialog box Tools->Options->Agents.
6.5.3 Traps
When status changes have occurred in which a manager must be notified immediately,
ZBG-100 automatically will send Traps. This could be due to exceeded alarm
thresholds, or even a device of ZBS-family, which has just re-registered on ZBG.
Traps are also SNMPv3 encrypted and authenticated when sent, however, only if v3
has been previously enabled on the ZBG-100 configuration page.
© 2013 pikkerton GmbH
Page 37 / 95
LabCon Handbook
Version 1.14
6.6 CSV-Recording / Pushing
CSV-Recording provides the ability to store all incoming readings via ZigBee. The values
are tabulated in a .csv file which is located in the directory
/usr/local/labcon/zbs_logs.
These files are named according to the type and the MAC address of each ZigBee
sensor. For each log file, there is a another containing the sensor data details. This
ends with the designation _header.csv. The header file of a ZBS-121 ( ZBS121_0013a200408a1eba_header.csv) can look like this:
YEAR,MON,DAY,HOUR,MIN,SEC,BRI - lx,TEM - °C,BAT,UBAT – V,
The first four columns in the csv file are for the data time-stamp, which are followed by
the brightness in [lx], the temperature in [°C], the battery state (OK or LOW), and the
battery power in volts. The identifiers of the sensor data is consistent with the
"Interface Control Document" of the respective sensor.
This excerpt from the csv file shows the structure of the data:
2012,11,11,14,5,27,6,21.8,OK,4.19,
2012,11,11,14,5,37,4,21.7,OK,4.22,
2012,11,11,14,5,47,6,21.7,OK,4.22,
Here, we see that the data is received every 10s. The first record bears the time-stamp
11.11.2012 - 14:05:27.
Tc prevent the csv files from taking up all the space on the partition, they are
monitored by the Linux log rotation service. The log rotation settings can be changed
in the file /etc/logrotate.d/labcon_csv_log_rotation or via the Webmin
interface (ch. 6.8).
These files can also be monitored with the CVS push service, which checks adjustable
intervals (ch. 6.3.2, p. 27) and sends them to the set IP address if necessary. The data is
in this format:
<MAC Adresse>_<ID>.<Service>,<Zeitstempel>,<Wert>,<Einheit>
© 2013 pikkerton GmbH
Page 38 / 95
LabCon Handbook
Version 1.14
A current measurement can look like this:
0013a2004076843b_SR-FAN-R.IRMS,2013-04-08 11:24:55,121,mA
•
MAC Address
0013a2004076843b
•
ID
SR-FAN-R
•
Service
IRMS (current measurement)
•
Wert
121 mA
© 2013 pikkerton GmbH
Page 39 / 95
LabCon Handbook
Version 1.14
6.7 Direct Control of Devices
It is possible to directly read and control the ZigBee devices without the support of
Nagios. This can be done easily via the ZBG-100 configuration page. You can find this
either in the menu item "Sensor / Device" in the LabCon Nagios® menu or directly via
the IP address and name of the ZBG-100 under "Settings / Phys. Devices ".
Figure 23: Device Overview
Clicking on the MAC address of the desired device takes you to the page that lists the
current values, and where you can change settings and control the device. The page
uses ZBS-121 as an example:
The top information block includes the current sensor values, as well as other
information including the serial number, hardware, and firmware version etc. In this
block, the ID can also be changed. The ID appears on the summary page and in the
group configuration. The device is thus identified and is limited to 12 characters.
© 2013 pikkerton GmbH
Page 40 / 95
LabCon Handbook
Version 1.14
Figure 24: Information Block ZBS-121
The configuration block immediately follows the information block, and all limits
and intervals can be configured here. The grayed-out fields are not fixed options of
this device, such as the ZBS-121 without air pressure. In order for the changed values
to be applied, the data must be transferred to the device by hitting the "Apply"
button.. This button is located at the bottom of the page.
Figure 25: Configuration Block ZBS-110
© 2013 pikkerton GmbH
Page 41 / 95
LabCon Handbook
Version 1.14
The third block is the control block and it includes all control options for the respective
device. For example, ZBS-110 switch can be controlled here.
Figure 26: Control Block ZBS-121
6.8 Webmin
All configuration settings outside of the LabCon® system, can also be made via the web
front end Webmin. You can find this under https://<zbg_ip>:10000
Figure 27: Webmin Login
You can use the same username and password as for the login via SSH. When
delivered, these are:
Username: root
Password: rootroot
© 2013 pikkerton GmbH
Page 42 / 95
LabCon Handbook
Version 1.14
7 Operating under Nagios / Icinga
For optimum LabCon® functionality in Nagios, you must follow the instructions
described in ch. 12. This chapter deals exclusively with operating LabCon®. Points 1-3
are not considered here.
1. Configuring the ZBG-100 (ch. 6 - ZBG-100 Gateways Stand-alone Operation )
a) finding the devices
b) configuring the devices
2. Installing Nagios and Its components (ch. 12 - Apendix: Nagios Installation)
3. Integrating in Nagios
a) downloading the configuration directly from the ZBG-100
b) loading the scripts and customizing Nagios
4. Creating control loops
a) selecting the devices to be configured
b) creating groups
c) settings for sending emails
d) operating devices
5. Downloading the created configuration of control loops and providing scripts
for Nagios
6. Nagios restart
© 2013 pikkerton GmbH
Page 43 / 95
LabCon Handbook
Version 1.14
7.1 Interface for Nagios/Icinga
7.1.1 Communication Model
The following table shows the relationships between LabCon® and Nagios in regard to
the terms on the basis of two examples:
Nagios-/IcingaAdminCalculator
Host
Device
Service / Sensor
communication via SNMP
communication via ZigBee
Temperature
Power
ZBS-110
voltage
frequency
ZBG-100
...
Temperature
ZBS-121
humidity
movement
Some devices also provide an alarm which immediately forwards the message via an
SNMP trap to the Nagios / Icinga host. (ie. The transmission of recognized motions,
sensor readings showing exceeded thresholds, or of keystrokes on the devices.
© 2013 pikkerton GmbH
Page 44 / 95
LabCon Handbook
Version 1.14
7.1.2 Plugins
Integration takes place in Nagios / Icinga via plugins. These are available for download
after configuring ZBG-100 (ch. 7.2 and 6.3.2) .
7.1.3 Summary of the Service Groups
LabCon® provides various groups depending on the characteristics of the services /
actuators of the ZBS series. The following groups have been established:
•
Ambient Atmosphere (climate)
•
Energy Metering (energy acquisition)
•
Mains Analysis (230V Voltage analysis)
•
Access Control
•
Battery
However, you can also create your own groups in LabCon®. The following table shows
the CSE family in relation to their groups and depending on their sensors / actuators.
Legend
•
•
•
O
Optional
X
belongs to group
does not belong to group
© 2013 pikkerton GmbH
Page 45 / 95
LabCon Handbook
Version 1.14
Battery
Measures the current,
voltage,
frequency,
performance, and tasks
ZBS-110
Ability to switch loads
O
Smart
Energy
Optional
PIR
motion
Meter
detector
Optional
temperature
measurements
O
X
Measures the current,
frequency, X
Smart
Energy voltage,
Meter (DIN Rail)
performance, and tasks
X
X
Measures the current,
frequency, X
Cable voltage,
performance, and tasks
X
X
ZBS-111
ZBS-112
Smart
Meter
ZBS-12x
Multi-sensor
© 2013 pikkerton GmbH
Access Control
Mains Analysis
Description
Energy Metering
Name
Ambient Atmosphere
Picture
Temperature
movement (PIR, passive
Infrared)
humidity,
air pressure, and
brightness
X
X
Page 46 / 95
LabCon Handbook
Version 1.14
Contactmonitoring
ZBS-140
Client-specific
Non ZBS
X
X
Monitors
magnetic
volume,
breakage
X
X
contacts,
X
and
glass
Battery
ZBS-132
Pressing of button sends
messages
X
Blinking
as
possible
feedback
Access Control
Handheld
Mains Analysis
ZBS-130
Description
Energy Metering
Name
Ambient Atmosphere
Picture
Integration / connection
external of feedback / O
sensors
O O
O
O
All unknown or recently
registered ZigBee devices
X
(which have not yet been
identified)
X
X
X
X
Table 2: LabCon® ZigBee Devices
© 2013 pikkerton GmbH
Page 47 / 95
LabCon Handbook
Version 1.14
7.1.4 Timing End Devices → Gateway → Nagios (Event-based)
The following example refers to a ZBS-121 multi-sensor, which has a set temperature
threshold of 24°C.
Figure 28: ZBG Device → Nagios Timing
Figure 28 shows a complete cycle assuming the state that a service <Temperature> is
within the tolerance range (<= 24°C), exceeding this (> 24°C) and returning to the initial
tolerance range. The green and red bar represents the state that LABCON ® displays at
the respective points in time.
1. The temperature exceeds 24° C. This is, however only measured by ZBS after
the MSI interval expires and is sent wireless to the ZBG.
2. ZBG in turn sends an SNMP trap (ch. 6.5.3) to the Trap-Receiver (ch. 12.5.2.4 )
This forwards the message to Nagios, where it is added onto a command stack.
The reception of the wireless packet to Nagios usually takes a second.
3.
Nagios-Reaper processes the command, executes the configured alarm scripts
by LABCON®, and changes the status from "OK" to "Critical" (usually 1-2
seconds).
If the temperature falls back to 24°C , steps 1 to 3 are repeated.
© 2013 pikkerton GmbH
Page 48 / 95
LabCon Handbook
Version 1.14
7.2 LabCon® Configuration
This chapter describes the automated creation of LABCON® services and rules for
Nagios.
The individual actuators / sensors are sorted into groups, after which control loops can
be created and threshold values set. When these limits are violated, various scripts can
be run individually or combined in sequence:
•
•
•
•
sending an email
execute random scripts
control of actuators
setting or resetting of flags
7.2.1 Flags
Flags are an easy way to store conditions for later analysis or conditions. Any string of
characters can be stored in this flag. The file name corresponds to the global flagname, and these can be manually controlled via the website, script, external
applications, or time-based (ie. a CRON job). At the same time, they provide a simple
interface to the outside world or other applications.
Flags are used primarily either to stop running or to continue running the various
processes (running scripts on threshold violation). They can not, however, be used
to branch off further.
Within the script Set_Flag.py, a flag with any given name and content can be set. If
at this point (when the script Check_Flag.py has expired) the content of each script
does not correspond with the given condition, the running of the scripts will be
stopped immediately.
© 2013 pikkerton GmbH
Page 49 / 95
LabCon Handbook
Version 1.14
7.2.2 Special Features of “Work Limit” and “Load Limit”
An additional drop-down menu aids you when configuring limits for “load limit” and
“work limit”. Here the given choices:
•
MSG
When exceeding the limit just one trap message is sent.
•
off
Upon exceeding the limit, the ZBS immediately turns off the relay and sends a
trap message. This disables "self-switch-off". To reactivate, you must set a the
limit again.
© 2013 pikkerton GmbH
Page 50 / 95
LabCon Handbook
Version 1.14
7.2.3 Creating Nagios Configurations for Devices
Before groups or control loops can be created, you must determine which devices and
services are to be configured. For this purpose, please select the desired devices. With
the button "generate", the basic configurations are created and then downloaded by
clicking “download”.
Figure 29: Settings Download
At this point, the download will be useful only if the devices are to
be used solely for displaying and storing the sensor data, or if it is
the initial installation of LABCON® in Nagios.
Otherwise, the creation and configuration of groups, and rules
follows. This is described further in section 7.2.
Please see ch. 7.2.7 - Installations in Nagios, for instructions on how to integrate
devices.
When new devices are added to the network, the configuration
must be recreated. Old configurations for devices, which are
currently offline, are only maintained if the checkbox has been
activated.
© 2013 pikkerton GmbH
Page 51 / 95
LabCon Handbook
Version 1.14
7.2.4 Creating and Configuring Groups
The website for the configuration of each group is located in the LABCON® menu
"Configuration" on the Nagios page:
Figure 30: LabCon®
Menu
Under “sensor/device control config“, you can see the configuration of the devices as
explained in ch. 7.2.3 - Creating Nagios Configurations for Devices. This is a basic
requirement for the configuration of groups.
Pressing the link "group / event config" displays the following web page:
© 2013 pikkerton GmbH
Page 52 / 95
LabCon Handbook
Version 1.14
Figure 31: Service Groups
The 6 predefined groups:
• Ambient Atmosphere
Contains all the sensors that monitor the environment, such as air pressure,
temperature or humidity.
• Energy Metering
Contains all the power, energy and performance measurements.
• Mains Analysis
Voltage and frequency can be monitored.
• Access Control
All sensors, which are suitable for access control, can be set. These are,
amongst other things, the brightness measurement, the keystoke of the ZBS130 or the motion sensor from ZBS-121st.
• Battery
Monitors the voltage of the battery operated wireless devices, such as the CSE121, , or the CSE-130.
• Device Connectivity
Monitors the reach of all wireless devices.
© 2013 pikkerton GmbH
Page 53 / 95
LabCon Handbook
Version 1.14
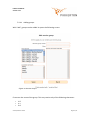
7.2.4.1 Adding groups
With "add", groups can be added. It opens the following screen:
Figure 32: Service Groups
First enter the name of the group. This may consist only of the following characters:
•
•
•
A-Z
a-z
0-9
© 2013 pikkerton GmbH
Page 54 / 95
LabCon Handbook
Version 1.14
•
underscore _
The description of the group in Nagios, however, is not restricted. Here you may also
use spaces and special characters.
Under “host device”, you find all devices already configured for Naggios, according to
ch. 7.2.3 - Creating Nagios Configurations for Devices. You can also find the created
virtual sensors. After the hostname, it is possible to see whether it is a virtual (v) or
physical (p) sensor.
If a device is selected in this window, you can see all services offered by this device
under “available service”. Actuators, such as the switching of relays is configured
elsewhere (ch. 7.2.4.3 - Configuration of the group members). The “apply” button
takes you back to group menu.
© 2013 pikkerton GmbH
Page 55 / 95
LabCon Handbook
Version 1.14
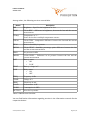
Among others, the following services are available:
Name
Description
BRI
Brightness - Specifies the brightness in Lux
DBRI
"Delta BRI" - difference in brightness, between the last and the current
measurement
TEM(x)
Temperature in "C."
Some devices have multiple temperature sensors
DTEM
"Delta TEM '- temperature difference between the last and the current
measurement
HUM
Relative humidity in percent
DHUM
"Delta HUM" - humidity percentage point difference between the last
and the current measurement
PRES
Air pressure in hPa
DPRES
„Delta PRES“ - Difference in air pressure between the last and the
current measurement
BAT
Battery status
• OK
• LOW
UBAT
Battery voltage in V
POW
Relay status:
• ON
• OFF
FREQ
Frequency in Hz
VRMS
Voltage in V
IRMS
Electricity in mA
LOAD
Performance in W
WORK
Consumption in kWh
BUTTON
Alert for keystrokes
Table 3: ZBS Services Overview
You can find further information regarding services in the information manuals for the
respective devices.
© 2013 pikkerton GmbH
Page 56 / 95
LabCon Handbook
Version 1.14
7.2.4.2 Assigning Services to Groups
Once a device has been highlighted under "host device", all available services are
shown then as "available services" (figure 32). Double clicking on the desired service
adds this to the group. All of the group's active services can be found under "device
service selected".
7.2.4.3 Configuration of the group members
You can easily reach the configuration page of the group members by clicking on the
icon under "setup" on the summery page. Here you can set the actions for threshold
violation and alerts (ie. press ZBS-130). Some services have two thresholds, as in
temperature. These stand for a value-corridor in which the sensor values are
interpreted as "good". When exiting and re-entering the corridor, various actions are
executed. If multiple scripts are set for one limit, they are processed consecutively
from top to bottom.
Figure 33: Configuring Group Members
© 2013 pikkerton GmbH
Page 57 / 95
LabCon Handbook
Version 1.14
Each column allows for four different events to be edited:
Crossing the upper threshold
Re-entering the normal range
Re-entering the normal range
Falling below the lower threshold
In the first column of the table (Figure 33 No. 2), the upper and lower limits can be set
for the corridor. In the next column (Figure 33 No. 3), the scripts for actions above
and below the limits are set. Any number of scripts can be set for boundary violations
and direction. The scripts need transfer parameters, which you can enter in the third
column. Using the last column, each script can be activated. Although an inactive script
remains in the overview, it is not included in the configuration of Nagios.
The limits and intervals are transmitted to the respective devices and the set scripts for
configuring Nagios on the ZBG-100 gateway are stored with "Submit".
7.2.4.4
Templates for Actuators
The actuators are needed for certain actions following a limit violation or an alert.
The individual parameters are separated by a comma. The order is
important.
© 2013 pikkerton GmbH
Page 58 / 95
LabCon Handbook
Version 1.14
7.2.4.4.1
Flags
Set_Flag.py
Actions can be enabled or disabled by means of flags. This can, for example, be used
when "arming" an alarm system. This script checks the flag with a string of characters.
Parameter
1. Flags name
2. Single string of characters
Check_Flag.py
Actions can be enabled or disabled by means of flags. This can, for example, be used
when "arming" of an alarm system. This script checks the flag with a sting of
characters.
Parameter
1. Flag name
2. Default value for the flag if it is not yet initialized, meaning if an other script
has not already set or cleared it:
1: Flag is set
0: Flag is not set
7.2.4.4.2
Sending Emails
Send_Mail.py
Sends email to recipient,
You must customize the script after the installation on the Nagios
server has concluded.
• Sender
• SMTP Server and
• Password
© 2013 pikkerton GmbH
Page 59 / 95
LabCon Handbook
Version 1.14
Must be specified.
Parameter
1. Email recipient
2. Subject text of the email
7.2.4.4.3
ZBS Device Actuators
ZBS_Buzzer.py
Controls the Piezo-Buzzer. This can be automatically and consecutively switched on
and off. Further information on the Piezo-Buzzer are found in the relevant device's
manual.
Parameter
1.
2.
3.
4.
5.
ID of the ZBS
Number of cycles of the buzzer (Sound, Pause, Pause, ...)
Duration of the buzzer sound in 100ms
Duration of the pause in 100 ms
The tone frequency in Hz ( ZBS-130 ideally uses 2-4 kHz)
Example (ZBS-130)
Button1, 5, 10, 20, 2000
With the ID "Button1" on ZBS, the buzzer switches on for 1s and off for 2s,
consecutively 5 times. The frequency is 2kHz.
© 2013 pikkerton GmbH
Page 60 / 95
LabCon Handbook
Version 1.14
ZBS_LED_Control.py
Enables an LED to be flashed on the device (ie. ZBS-110).
Parameter
1.
2.
3.
4.
5.
ZBS ID
LED number (0..1)
Number of cycles of the LED (On, Off, ...)
Duration of activated LEDs in 100ms
Duration of inactivated LED in 100ms
ZBS_PWR_Control.py
Switches ZBS-110's relay.
Parameter
1. ZBS ID
2. Status (ON / OFF)
ZBS_PWR_Cycle_OFF.py
Switches the relay for a certain duration of time, and then off (ZBS-110).
Parameter
1. ZBS ID
2. Measures waiting period in seconds
ZBS_PWR_Cycle_ON.py
Turns off the relay for a certain duration of time, and then on again (ie. ZBS-110).
Parameter
1. ZBS ID
2. Measures waiting period in seconds
© 2013 pikkerton GmbH
Page 61 / 95
LabCon Handbook
Version 1.14
7.2.5 Example
7.2.5.1 Air-flow Management – Hysterese Loop Circuit
An example of regulation with hysteresis is a temperature-dependent fan control. The
fan is connected to a ZBS-110 and the temperature is determined using a ZBS-121
multi-sensor. ZBS-110's ID, to which the fan is connected, is "zbs110_fan".
•
•
40°C On
30°C Off
The temperature values are transmitted every 60 minutes (TXT = 3600s), but every 10
minutes (MSI = 600s) a threshold violation measurement is taken in order to save the
battery power.
The sensor is found in the "ambient atmosphere". It is configured as follows:
Figure 34: Airflow Example
© 2013 pikkerton GmbH
Page 62 / 95
LabCon Handbook
Version 1.14
7.2.5.2 Loop Control without Hysteresis
The requirements are similar to the example "Air-flow management - Hysteresis
Control Loop" excluding the hysteresis. In this example, the vents should now be
running at a temperature of 40°C, and they should be turned off, if the temperature
drops below this.
The configuration looks like this:
Figure 35: Airflow Example without Hysterese
7.2.5.3 Access Control / Door Opener
If the user has been authorized, he can access a door by By pressing the ZBS-130 (ID =
zbs_mueller) button. The door opener is connected to a bell transformer, which in
turn, is connected to a ZBS-111 (ID = tuer_buero). For access authorization two flags
are checked. The first includes the authorization for the person, and the second, an
access restriction of certain times.
7.2.6 Group Settings
In addition to the fixed groups described in ch. 7.2.4, Creating and Configuring Groups,
many other custom groups can be created. This allows for an improved functional
overview. The group name can be chosen freely, so that a grouping by function,
location or use is possible.
© 2013 pikkerton GmbH
Page 63 / 95
LabCon Handbook
Version 1.14
7.2.7 Installations in Nagios
After all the services have been configured in the groups, the scripts must be
generated and downloaded. The "next" button takes you to the Generation &
Download page.
Figure 36: Generate & Download Configurations
The downloadable archive includes scripts and services offered for Nagios.
These must be then copied to the LABCON ® directory on the Nagios server.
7.3 Virtual Devices
ZBG-100 enables the creation of virtual sensors. These sensors are the mathematical
constructs of any number of physical and virtual sensors (ie. services). The available
mathematical functions are:
•
Sum (Sum)
•
Mean (Mean)
•
Difference (Diff)
•
Minimum (Min)
© 2013 pikkerton GmbH
Page 64 / 95
LabCon Handbook
Version 1.14
•
Maximum (Max)
Virtual sensors behave like physical sensors. They have an interval in which the
measured values are re-calculated, and, in addition, alert messages are sent when a
violation of threshold values occurs.
Figure 37: Virtual Device Overview
The virtual sensors can be created under the heading Setting → Virt. Devices →
Add. Existing Sensors can be configured under Edit.
© 2013 pikkerton GmbH
Page 65 / 95
LabCon Handbook
Version 1.14
Figure 38: Masks to Edit Virtual Sensor Settings
•
Virtual Device Name
ID of physical sensors
© 2013 pikkerton GmbH
Page 66 / 95
LabCon Handbook
Version 1.14
•
Virtual Device Service-Name
Service-name for sensors, (ei. Temperature and battery status)
•
Upper/Lower value threshold
Once a threshold is breached, an alert message is sent.
•
MSI time
Time interval in which the measured value is re-calculated.
•
Mathematical operation
Mathematical function of all measured values under Virtual device
services selected
•
Sensor Type
Filter for Host Device (Virtual or physical device)
•
Host Device
Here all configured sensors are listed with your ID
•
Available services
After selecting Host Devices Sensor/Device, all available measurements
(services) are shown. They can be added by double-clicking on the selected
readings.
•
Virtual device services selected
Displays all measurements used to calculate this virtual sensor. Measurement
from virtual (v) and Physical (p) devices can be mixed.
© 2013 pikkerton GmbH
Page 67 / 95
LabCon Handbook
Version 1.14
7.4 Monitoring
As demonstrated in ch. 12.3 - pnp4nagios, all LabCon® sensor values are saved in a
“Round Robin” database via the pnp4nagios plug-in. This data can be displayed using
the same plug-in.
Monitoring is possible via the LABCON ® side menu located on the Nagios page.
Figure 39: Nagios Menu
You can find an overview page, either via the link “Monitoring”, or via the specific
group name. Figure 40 shows the overview found under “Monitoring”.
© 2013 pikkerton GmbH
Page 68 / 95
LabCon Handbook
Version 1.14
Figure 40: LabCon® Monitoring Overview Page
The following figure shows a temperature profile compiled over a duration of 7 weeks.
Pnp4nagios allows for easy zoom of time ranges. These two temporal boundaries can
be moved left and right, by using the two arrows in either the bottom right or bottom
left corner. You can, however, also zoom using the mouse. Place it over the desired
starting value and hold down the right mouse button, bringing it over to the desired
end-time. Finally, release the right mouse button.
The rightmost button restores the zoom to its default settings (currently these are set
to the last seven weeks).
When ZBS-110 receives a message, the red line automatically indicates the upper limit.
This then runs LABCON® scripts. The period in which the temperature is outside the
limit is red.
© 2013 pikkerton GmbH
Page 69 / 95
LabCon Handbook
Version 1.14
Figure 41: Displays Temperature Flow over a Period of 7 Weeks
The transparent areas indicate that no values have been stored by pnp4nagios.
Possible causes for this include, that Nagios' service is not currently running, or that
ZBG is not accessible via LAN .
Figure 42: Displays Temperature Flow over a Period of 60h
© 2013 pikkerton GmbH
Page 70 / 95
LabCon Handbook
Version 1.14
8 Index of Figures
Figure 1: LabCon® & Intreface Overview..........................................................................8
Figure 2: ZigBee Overview................................................................................................9
Figure 3: ZBG-100............................................................................................................11
Figure 4: ZBS-112.............................................................................................................12
Figure 5: ZBS-110V2.........................................................................................................13
Figure 6: ZBS-111.............................................................................................................13
Figure 7: ZBS-121 (indoor)...............................................................................................14
Figure 8: ZBS-130.............................................................................................................15
Figure 9: ZBS-132.............................................................................................................15
Figure 10: MSI and TXT-Interval Overview......................................................................18
Figure 11: Settings Overview...........................................................................................22
Figure 12: Settings / Gateway / IP Settings.....................................................................23
Figure 13: Settings / Gateway / Password Settings.........................................................24
Figure 14: Settings / Gateway / SNMP Settings..............................................................25
Figure 15: Settings / Gateway / Lost Message Counter..................................................25
Figure 16: Settings / Gateway / Reboot & Save..............................................................26
Figure 17: Settings / Phys. devices / Overview................................................................27
Figure 18: Settings / Phys. devices / Command..............................................................29
Figure 19: Settings / Phys. devices / CSV Control Settings..............................................30
Figure 20: Settings / Phys. devices / Nagios Configuration.............................................31
Figure 21: iReasoning MIB Browser.................................................................................36
Figure 22: MIB Browser - Load MIBs Dialog....................................................................37
Figure 23: Device Overview.............................................................................................40
Figure 24: Information Block ZBS-121.............................................................................41
Figure 25: Configuration Block ZBS-110..........................................................................41
Figure 26: Control Block ZBS-121....................................................................................42
Figure 27: Webmin Login.................................................................................................42
Figure 28: ZBG Device → Nagios Timing..........................................................................48
Figure 29: Settings Download..........................................................................................51
Figure 30: LabCon® Menu................................................................................................52
Figure 31: Service Groups................................................................................................53
Figure 32: Service Groups................................................................................................54
Figure 33: Configuring Group Members..........................................................................57
Figure 34: Airflow Example..............................................................................................62
Figure 35: Airflow Example without Hysterese...............................................................63
Figure 36: Generate & Download Configurations...........................................................64
Figure 37: Virtual Device Overview.................................................................................65
Figure 38: Masks to Edit Virtual Sensor Settings.............................................................66
Figure 39: Nagios Menu...................................................................................................68
© 2013 pikkerton GmbH
Page 71 / 95
LabCon Handbook
Version 1.14
Figure 40: LabCon® Monitoring Overview Page..............................................................69
Figure 41: Displays Temperature Flow over a Period of 7 Weeks..................................70
Figure 42: Displays Temperature Flow over a Period of 60h.........................................70
Figure 43: Upload Masks for Update-Files......................................................................77
Figure 44: Nagios Menü without LabCon®......................................................................80
Figure 45: Temperature Curve via pnp4nagios...............................................................81
Figure 46: Nagios Settings in LabCon®............................................................................84
Figure 47: Generating ZIP Files .......................................................................................85
© 2013 pikkerton GmbH
Page 72 / 95
LabCon Handbook
Version 1.14
9 Index
A
Active..................................................................................................................28
B
BAT......................................................................................................................56
BRI......................................................................................................................56
BUTTON.............................................................................................................56
C
Check_Flag.py..............................................................................................49, 59
Checkbox............................................................................................................28
Clear Output........................................................................................................29
Collect Answers..................................................................................................29
config...................................................................................................................94
configuration block..............................................................................................41
control block........................................................................................................42
CSV Control settings...........................................................................................30
D
DBRI....................................................................................................................56
Default.................................................................................................................29
Delivery Status....................................................................................................21
DHUM.................................................................................................................56
DPRES................................................................................................................56
DTEM..................................................................................................................56
E
Enable Joining....................................................................................................28
F
Flags...................................................................................................................49
FREQ..................................................................................................................56
H
HUM....................................................................................................................56
© 2013 pikkerton GmbH
Page 73 / 95
LabCon Handbook
Version 1.14
I
icinga...................................................................................................................94
ID...................................................................................................................28, 40
information block.................................................................................................40
insert_to_menu.htm.txt.......................................................................................94
insert_to_side.php.txt....................................................................................88, 95
IP Settings ..........................................................................................................23
IRMS...................................................................................................................56
L
labCon_icinga_ClassicMenu.php.......................................................................94
labcon_menu.php.........................................................................................88, 95
LOAD..................................................................................................................56
Lost Message Counter........................................................................................25
M
MAC..............................................................................................................27, 40
menu.html...........................................................................................................94
MIB................................................................................................................34, 94
mibs.....................................................................................................................94
MSI –Measurement Interval................................................................................18
N
nagios..................................................................................................................95
nagios.cfg ...........................................................................................................82
Node Discover....................................................................................................28
Node Discover (ND)............................................................................................27
Non ZBS..............................................................................................................47
P
Password Settings .............................................................................................24
PID......................................................................................................................27
POW....................................................................................................................56
PRES..................................................................................................................56
R
Refresh................................................................................................................28
Remove Offline Devices.....................................................................................29
S
scp...........................................................................................................31, 76, 86
© 2013 pikkerton GmbH
Page 74 / 95
LabCon Handbook
Version 1.14
scripts..................................................................................................................95
Send Command..................................................................................................29
Send_Mail.py......................................................................................................59
Set_Flag.py...................................................................................................49, 59
side.php........................................................................................................88, 95
SNMP Settings....................................................................................................24
SNMP-Manager..................................................................................................34
snmptrapd.conf...................................................................................................91
T
TEM.....................................................................................................................56
Trapdienst...........................................................................................................91
Traps...................................................................................................................37
TXT – Transmit Interval.......................................................................................18
U
UBAT...................................................................................................................56
V
VRMS..................................................................................................................56
W
WORK.................................................................................................................56
Z
ZBS Services......................................................................................................56
ZBS_Buzzer.py...................................................................................................60
ZBS_LED_Control..............................................................................................61
ZBS_LED_Control.py..........................................................................................61
ZBS_PWR_Control.py........................................................................................61
ZBS_PWR_Cycle_OFF.py..................................................................................61
ZBS_PWR_Cycle_ON.py...................................................................................61
ZBS-110........................................................................................................46, 62
ZBS-111..............................................................................................................46
ZBS-112..............................................................................................................46
ZBS-121..............................................................................................................62
ZBS-12x..............................................................................................................46
ZBS-130..............................................................................................................46
ZBS-132..............................................................................................................47
ZBS-140..............................................................................................................47
© 2013 pikkerton GmbH
Page 75 / 95
LabCon Handbook
Version 1.14
<
<zbg_hostname>_custom_config.zip...........................................................31, 94
10 Additional Information
Icinga
http://www.icinga.org/
LabCon im Web
http://www.pikkerton.de/ITRZ/LabCon/LabCon.htm
MIB Browser
http://ireasoning.com/mibbrowser.shtml
Nagios
http://www.nagios.org/
scp
http://de.wikipedia.org/wiki/Secure_Copy
ZBS-Familie
http://www.pikkerton.de/zigbee/ZigBee.html
ZBG-100
http://de.wikipedia.org/wiki/SheevaPlug
http://www.pikkerton.de/zigbee/ZigBeeGateways.html
© 2013 pikkerton GmbH
Page 76 / 95
LabCon Handbook
Version 1.14
11 Appendix: Software and License Update
New updates can be made on the ZBG-100 configuration page via the link "Updates".
First, the new firmware files and the license files must be uploaded to the ZBG. You can
use the web front-end:
Figure 43: Upload Masks for Update-Files
After successfully uploading the file, you will be prompted to restart ZBG-100. This is
done under ZigBee / Gateway → Settings → Gateway → Reboot & Uptime
by clicking the box next to Reboot,and then by confirming by clicking Apply.
© 2013 pikkerton GmbH
Page 77 / 95
LabCon Handbook
Version 1.14
12 Apendix: Nagios Installation
This chapter describes the LABCON ® installation on Debian 6.0 Squeeze.
12.1 Required Software
The following packages are required:
−
−
−
−
−
−
−
−
−
−
−
−
−
−
−
apache2
libapache2-mod-php5
build-essential
libgd2-xpm-dev
postfix libsnmp-dev
rrdtool
librrds-perl
snmpd
php5-gd
nagios3
nagios-plugins
nagios-plugins-basic
nagios-plugins-standard
python
libsnmp-python
All modules can be installed via apt-get or aptitude.
Additionally, some modules are still needed, which are not included in the repository
of Debian:
−
−
−
−
pysnmp
pysnmp-mibs
pyasn
pnp4nagios
© 2013 pikkerton GmbH
Page 78 / 95
LabCon Handbook
Version 1.14
These are installed as follows:
wget http://downloads.sourceforge.net/project/pysnmp/pysnmp/4.2.3/pysnmp-4.2.3.tar.gz
tar xzf pysnmp-4.2.3.tar.gz
cd pysnmp-4.2.3/
python setup.py install
cd ..
wget http://downloads.sourceforge.net/project/pysnmp/pysnmp-mibs/0.1.4/pysnmp-mibs-0.1.4.tar.gz
tar xzf pysnmp-mibs-0.1.4.tar.gz
cd pysnmp-mibs-0.1.4/
python setup.py install
cd ..
wget http://downloads.sourceforge.net/project/pyasn1/pyasn1/0.1.4/pyasn1-0.1.4.tar.gz
tar xzf pyasn1-0.1.4.tar.gz
cd pyasn1-0.1.4/
python setup.py install
cd ..
wget http://downloads.sourceforge.net/project/pnp4nagios/PNP-0.6/pnp4nagios-0.6.19.tar.gz
tar xzf pnp4nagios-0.6.19.tar.gz
cd pnp4nagios-0.6.19/
./configure | tail -n 26 > ../pnp4nagios.txt
make all
make fullinstall
cd ..
© 2013 pikkerton GmbH
Page 79 / 95
LabCon Handbook
Version 1.14
12.2 Initial Test
The website http://localhost/nagios will display the following frame, after you have
entered the password:
Figure 44: Nagios Menü without
LabCon®
© 2013 pikkerton GmbH
Page 80 / 95
LabCon Handbook
Version 1.14
12.3 pnp4nagios
This Nagios plugin allows you to analyze the performance data delivered by all Nagios
plugins. It then stores it automatically into RRD databases to display them. RRD is the
abbreviation for "Round Robin Database" and refers to the way the data is stored by
RRDtool. When creating a database, a so-called "RRD file creates enough memory for a
specified period of time. After this period, the database is not extended (the file size is
not increased), but the oldest data is overwritten.
Figure 45: Temperature Curve via pnp4nagios
Figure 45 shows a temperature profile done over a period of 4 hours. The red line
stands for an upper limit, beyond which, one or more alerts can be triggered or actions
can be performed.
© 2013 pikkerton GmbH
Page 81 / 95
LabCon Handbook
Version 1.14
12.4 Pnp4nagios Configuration
The Apache module "rewrite" must be activated for pnp4nagios:
a2enmod rewrite
The file htaccess needs to be set to the /etsc/apache2/conf.d/pnp4nagios.conf.
file.
...
AuthUserFile /etc/nagios3/htpasswd.users
...
Apache must then be restarted.
The LABCON ® configuration is stored under /usr/local/labcon/conf. This must be
created so that Nagios does not output any error notifications after configuration.
mkdir -p /usr/local/labcon/config
This path must be entered under /etc/nagios3/nagios.cfg. Now add:
cfg_dir=/usr/local/labcon/config
The processing of performance data must also be activated in this file. Please note
that this directive is probably already in the configuration file (default is “0”).
process_performance_data=1
The processing of performance data must be deactivated for all hosts and services
which should not be processed.
define service {
...
process_perf_data 0
...
}
© 2013 pikkerton GmbH
Page 82 / 95
LabCon Handbook
Version 1.14
Nagios 3.x enables you to deactivate the export of environment variables in nagios.cfg.
However, these are absolutely necessary for the synchronous mode. Therefore you
must also set
enable_environment_macros=1
in nagios.cfg.
In addition, you will be prompted to process performance data in nagios.cfg.
service_perfdata_command=process-service-perfdata
In Nagios 3.x, it is quite useful to enable the processing of performance data for hosts.
Nagios 3 now checks the hosts regularly, due to the modified hostcheck-logic.
host_perfdata_command=process-host-perfdata
The referenced commands should now also publish Nagios. These changes to the
definitions in the file / etc/nagios3/commands.cfg should now be adjusted.
define command {
command_name
process-service-perfdata
command_line
/usr/bin/perl
/usr/local/pnp4nagios/libexec/process_perfdata.pl
}
define command {
command_name
process-host-perfdata
command_line
/usr/bin/perl
/usr/local/pnp4nagios/libexec/process_perfdata.pl -d HOSTPERFDATA
}
Note: ePN (embedded Perl Nagios) can not start process_perfdata.pl. Therefore
the script is explicitly accessed via /usr/bin/perl . If ePN is not used or if Nagios 3.x
is used, you do not need to indicate /usr/bin/perl.
In order to process SNMP-Traps by Nagios, a command file must be created. Please
enter the following settings:
check_external_commands=1
command_check_interval=-1
command_file=/var/lib/nagios3/rw/nagios.cmd
check_result_reaper_frequency=1
© 2013 pikkerton GmbH
Page 83 / 95
LabCon Handbook
Version 1.14
12.5 Integration of Gateways in Nagios / Icinga
12.5.1Preparatory Measures
First, set ZBG-100 to the Nagios server, since various Linux distributions may also have
different directory structures.
This can be done on the gateway website Settings / Nagios
Figure 46: Nagios Settings in LabCon®
© 2013 pikkerton GmbH
Page 84 / 95
LabCon Handbook
Version 1.14
Name
Description
PNP4Nagios
performace data path
This path leads to the various pnp4nagios databases. In a
standard Debian Squeeze installation, this is located under:
/usr/local/pnp4nagios/var/perfdata/
PNP4Nagios
server This configuration specifies the path where the PNP4Nagios is
path from www root
located via the web server, ei.:
http://localhost/pnp4nagios
Path
to
external The "external command file" is configured in nagios.cfg via
command
file the variable command_file .
(nagios.cmd)
Timing
Length
Intervall Nagios / Icinga works with a basic interval from which all
times are taken. In a standard Nagios installation, this interval
is 60s. This value is defined in nagios.cfg of the variables
interval_length.
Finally, the default setting and scripts can be regenerated and downloaded in
Settings / Phys. Devices
Figure 47: Generating ZIP Files
© 2013 pikkerton GmbH
Page 85 / 95
LabCon Handbook
Version 1.14
12.5.2 Nagios Adjustments (on the server side)
Here, you can find all settings regarding the integration of LABCON® into Nagios.
12.5.2.1 LabCon® Configurations
The files needed for the integration are now available for download on ZBG, however,
you must first complete the configuration of ZBG-100. The file can be accessed by
clicking on "Download" or directly via the following link:
http://<ip des ZBG>/tmp/<zbg_hostname>_custom_config.zip
You must first unzip the file, copy its contents into /usr/local/labcon/, make the
Python scripts executable.
unzip <zbg_hostname>_custom_config.zip
chmod a+x *.py
chmod a+x */*.py
mv * /usr/local/labcon/
When using Software-Version 1.05.02, you must load the file, ConfigZipper.py,into
the LabCon® directory and create a Flag file directory.
scp root@<ZBG-100 IP>:/var/www/ConfigZipper.py /usr/local/labcon/www/
mkdir /usr/local/labcon/flags
chmod 777 /usr/local/labcon/flags
© 2013 pikkerton GmbH
Page 86 / 95
LabCon Handbook
Version 1.14
12.5.2.2 ZBG Name Resolution
To indisputably identify the individual ZBG-100 Gateway, its hostname has to be
posted to Nagios-Server (ch. 6.3). This can be set up with two different paths. This
document describes the name resolution of the host file. An alternative is the
resolution on a DNS server.
To ensure that all services run correctly, the name resolution and
reverse name resolution must be guaranteed.
An easier alternative, however, is to set the name resolution via the host file.
/etc/hosts
You must assign the ZBG-100 IP address and hostname in the following notation:
#<IP-Address>
192.168.0.100
© 2013 pikkerton GmbH
<Full-Qualified-Hostname>
zbg-100.domain
<Short-Hostname>
zbg-100
Page 87 / 95
LabCon Handbook
Version 1.14
12.5.2.3 Menu Integration
Nagios
For the integration of LabCon® in Nagios, you must link the file labcon_menu.php
to the Nagios server file side.php
ln -s /usr/local/labcon/nagios/labcon_menu.php /usr/share/nagios3/htdocs/labcon_menu.php
The code from /usr/local/labcon/nagios/insert_to_side.php.txt has to be
copied to the file /usr/share/nagios3/htdocs/side.php. Here is a abstract of the
customized configuration file:
...
<div class="navbarsearch">
<form
method="get"
action="<?php
echo
$cfg["cgi_base_url"];?
>/status.cgi" target="<?php echo $link_target;?>">
<fieldset>
<legend>Quick Search:</legend>
<input type='hidden' name='navbarsearch' value='1'>
<input type='text' name='host' size='15' class="NavBarSearchItem">
</fieldset>
</form>
</div>
</div>
<?php
try
{
?>
include(dirname(__FILE__) . "/labcon_menu.php");
}
catch (Exception $e) {
echo 'Exception abgefangen: ', $e->getMessage(), "\n";
}
…
© 2013 pikkerton GmbH
Page 88 / 95
LabCon Handbook
Version 1.14
Icinga
The menu integration into Icinga Classic is similar to the integration into Nagios. You
have to link up to labCon_icinga_ClassicMenu.php:
ln -s /usr/local/labcon/icinga/labCon_icinga_ClassicMenu.php \
/usr/local/icinga/share/labCon_icinga_ClassicMenu.php
In the file /usr/local/icinga/insert_to_menu.htm.txt, program lines can be entered like this. These must be added to the file
/usr/local/icinga/share/menu.html. Here an excerpt from the customized file:
...
<h2>Reporting</h2>
<ul>
...
</ul>
<h2>LabCon</h2>
<ul name="labConHostMenu">
<li class="menuli_style1"><select onchange="setZbgHostContent()"
name="labConHostSelection"></select></li>
</ul>
<script
type="text/javascript"
src="/icinga/labCon_icinga_ClassicMenu.php"></script>
<script type="text/javascript">
getZbgHostList();
</script>
<h2>Configuration</h2>
...
The sequence of symbolic links must be activated in the Icinga configuration file of the
Apache2 server . This is done by entering Options FollowSymLinks into <Directory
“/usr/local/icinga/share/“>
the
block
of
the
file
/etc/apache2/conf.d/icinga.conf
Here an excerpt from the customized file:
...
<Directory "/usr/local/icinga/share/">
# SSLRequireSSL
Options None
Options FollowSymLinks
AllowOverride All
Order allow,deny
Allow from all
# Order deny,allow
# Deny from all
# Allow from 127.0.0.1
AuthName "Icinga Access"
AuthType Basic
AuthUserFile /usr/local/icinga/etc/htpasswd.users
© 2013 pikkerton GmbH
Page 89 / 95
LabCon Handbook
Version 1.14
Require valid-user
</Directory>
…
The script icingaWebLabConSetup.py in the directory
/usr/local/labcon/icingaUtils
generates the LabCon category and Cronks for the individual ZBG-100s. If Icinga-Web
and LabCon have been installed according to the instructions given, then the script,
icingaWebLabConSetup.py, can be executed without Arguments. If not, the source
directory (usually, /usr/local/labcon/config) must be specified with the Argument,
-s=<directory>, and the target directory (usually /usr/local/icinga-web)
specified with Argument -d=<directory>.
© 2013 pikkerton GmbH
Page 90 / 95
LabCon Handbook
Version 1.14
12.5.2.4 SNMP-Trap Service
You must register the Trap distributor with the SNMP service.
In order to do this, please link the Trap distributor file in the SNMP directory.
cd /usr/share/snmp
ln -s /usr/local/labcon/labcon_traphandler.py
Also, the file
/etc/snmp/snmptrapd.conf
must now be created or extended as follows:
…
# PLEASE: read the snmptrapd.conf(5) manual page as well!
#
# Beschreibung auth v3 TBD
# disableAuthorization yes
authCommunity log,execute,net public
traphandle .1.3.6.1.4.1.23596.51.*
/usr/share/snmp/labcon_traphandler.py
…
Before the SNMP service can be restarted, you must set the option TRAPDRUN in the file
/etc/default/snmpd to yes and the service must be added to the start-up
routines.
insserv snmpd
Now adjust the community named public to the Trap community, sending the Traps
to the sever.. This can be set via SNMP (ch.6.5.3).
Traps are sent to port 162/UDP. Make sure that your firewall is set
to allow this.
© 2013 pikkerton GmbH
Page 91 / 95
LabCon Handbook
Version 1.14
12.5.2.5 Apache2 Configuration
The LABCON® configuration for Apache2 must be linked to the directory conf.d of
Apache2:
cd /etc/apache2/conf.d/
ln -s /usr/local/labcon/apache2/labcon.conf
...
© 2013 pikkerton GmbH
Page 92 / 95
LabCon Handbook
Version 1.14
12.5.2.6 Customization for pnp4nagios
In order for the graphs to be displayed correctly, all files found under
/usr/local/labcon/pnp4nagios/share/templates
must be linked to a php4nagios sub-directory.
cd /usr/local/pnp4nagios/share/templates
...
ln -s /usr/local/labcon/pnp4nagios/check_snmp_cor.php
ln -s /usr/local/labcon/pnp4nagios/check_snmp_normal.php
...
...
© 2013 pikkerton GmbH
Page 93 / 95
LabCon Handbook
Version 1.14
12.5.2.7 Content description of the archive
<zbg_hostname>_custom_config.zip
Description:
Includes basic files for the integration of LabCon® into Nagios ®.
Download:
http://<ip des ZBG>/nagiosfiles/<zbg_hostname>_custom_config.zip
12.5.2.7.1 The subfolder config
This folder contains the LABCON® configuration or Nagios for all enabled ZBS-family
devices.
12.5.2.7.2 The subfolder icinga
Content:
•
labCon_icinga_ClassicMenu.php
PHP Skript for the menu integration of LabCon® in Icinga.
•
insert_to_menu.htm.txt
Contains additions for menu.html
needed for the integration of
LabCon® in Icinga.
12.5.2.7.2 The subfolder mibs
Contains further ZBG-100 Gateway MIBs (Management Information Base) and the
devices registered to it.
Content:
•
•
•
•
•
•
•
PIKKERTON-MIB.txt
PIKKERTON-ZBS-130-MIB.txt
PIKKERTON-ZBS-132-MIB.txt
PIKKERTON-ZBS-140-MIB.txt
PIKKERTON-ZBS-MIB.txt
PIKKERTON-ZBS-X1X-MIB.txt
PIKKERTON-ZBS-X2X-MIB.txt
© 2013 pikkerton GmbH
Page 94 / 95
LabCon Handbook
Version 1.14
12.5.2.7.3 The subfolder nagios
content:
• labcon_menu.php
PHP script for menu integration of LabCon® in Nagios.
• insert_to_side.php.txt
Includes an additional side.php to integrate LabCon® in Nagios.
12.5.2.7.4 The subfolder scripts
This folder contains the scripts that are needed to control the devices of the ZBS family
via Nagios / LabCon®.
© 2013 pikkerton GmbH
Page 95 / 95