1
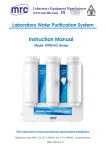
Operation Manual for Smart Pad Camera TaCam-2000 ! PLEASE READ THIS MANUAL CAREFULLY BEFORE OPERATION 3, Hagavish st. Israel 58817 Tel: 972 3 5595252, Fax: 972 3 5594529 [email protected] MRC.VER.01-12.11 S Notice Important safety precautions and proper operation instruction are included in this manual, in order to avoid any accidents, this manual should be read before using this product . Precision Instrument Handle with Care Do not disassemble, drop or crash CCD, or damage or abnormal display may be caused. Our company are out of responsibility of Man-made damage repair, please follow up the user manual for standard operation. Do not disassemble the product, do not use alcohol, thinner or benzene to clean the surface of the product 【Notes】: Pictures on this manual are only for reference purpose! Product specifications and appearance may be changed without notice! 1 Contents 1. Parameter....................................................................3 2. Diagram.......................................................................4 3. On First Use................................................................5 3.1 Battery Management & Charging............................5 3.2 Power On / Off...........................................................5 4. ScopePad Hardware Installation...............................6 4.1 Interface.....................................................................6 4.2 Optional Accessories................................................6 4.3 Connection Method of Eyepiece Adapter................7 5. Software Applications & Operation...........................7 5.1 Image Capture...........................................................7 5.2 Export File................................................................11 5.3 Network Configuration............................................16 5.4 Operating System ...................................................17 5.5 Third-party Software Download & Installation......17 5.6 Language Setting.....................................................18 6. Troubleshooting & FAQs...........................................18 7. Caution........................................................................19 2 1.Parameter 2 MegaPixels, 1/3 " CMOS Sensor, Full Resolution:1600 x 1200 Digital Parts Image-previewing Rate:15 fps at Full Resolution Connection:C-mount or Ocular Tube Adaptor 7" LED Backlight LCD Screen (800x 480) Display G-sensor, Multi-point Capacitance Touch Screen Operating System Android 2.2 CPU A8, 800MHz RAM 512MB DDR2-400 Storage Device 4G Flash, Support External TF Card, Maximum Capacity of 16GB Photo/Video/Browser/Setting/Explorer/Calculator/Calendar/Emails/ Application Software Music/Gallery/Search System Software Support Various Android, Download with Android Market Top Button:Turn on/off, Volume+, Volume – Buttons Front Main Button:Return, Home, Menu, Search Battery Rechargeable Li-Polymer Battery, Capacity:3800mAh Transformer’s 10hours Wi-Fi Support Wireless Data Network, Wireless lan 802.11b/g 3G Net Work Optional 3G Module, Support EVDO/WCDMA/TD Interface Audio Language Accessories Operating Temperature 1* Mini USB2.0, 1*HDMI, 1*Micro-SD Card Slot (Up to 16GB), 1* 3.5mm Stereo Headphone Slot 2* Built-in CLASS-D Digital Power Amplifier Loudspeaker, Built-in Microphone Multi Language Power Adapter (DC5V 2500mA), USB Cable, User Manual, Inspection Certificate, Warranty Card -30°C to +70°C 3 2. Diagram Return Home Menu Search 4 3. On First Use 3.1 Battery Management & Charging Before first use7a&DP-200 , mare sure battery is fully charged: - Plug charger / adapter cable into the DC jack for charging. - Keep the first two charging time in 10hours, and then charging time can be around 5hours after the first two times. The machine adopts built-in polymer battery, special battery charger must be used to charge the device: - In charging, the battery icon on screen would be scrolling. - When charging is finished, the battery icon on screen will turn green and stops scrolling. - To extend the life of the machine, for the first two charge-discharge circle, it is recommended to be charged only if there left no capacity of battery. - When leave the device unworked, be sure power off the device. 【Note】: 1 When leave the device stored away, in order to avoid battery damage caused by excessive consumption, make sure the machine within one month to complete a charge and discharge cycle time, so as to prevent battery depletion. 2 low power shutdown, plug in the charger, the device will hint low power ,in charging, please wait a minute, the device will automatically enter the main interface until get needed power. 3.2 Power On/Off Switch button on top, press and hold "switch" button 10seconds can power on / off 7DFDP-20 0 device, drag the unlock icon up, enter the system. 5 4.7D&DP Hardware Installation 4.1 Interface International Standard C-type Interface. It can be installed on the monocular, binocular, trinocular, stereo, video microscope, dissecting Microscope and various kinds of microscopes or telescopes. Installation Screw the Tacam onto the C-mount adapter first, and then inset the C-mount adapter into the trinocular tube.(Shown as picture 1) C-mount Adapter Picture 1 【Note】:The appearance and outlooking size of C-mount on various microscopes are different, however, as long as the screw is standard C-mount type, can work with this Scopepad. 4.2 Optional Accessories Includes: 0.5X Nose piece with Φ23mm, Φ30mm,Φ30.5mm adapter rings to the eyepiece. ( Picture 2) Picture 2 Picture3 6 4.3 Connection Method of Eyepiece Adapter 1 Screw the upper end of eyepiece adapter with the thread onto the Tacam interface(Shown as picture 3), and inset the bottom end of eyepiece adapter into ocular tube, which diameter is Φ23mm. 2 If the diameter of ocular tube is large, optional adapter ring need to be added on the ocular tube, there are 2types of adapter ring with diameter of Φ30mm or Φ30.5mm for option.(Shown as picture 4) Picture 4 3 Picture 5 Insert the eyepiece adapter into adapter ring and then insert the adapter ring onto the ocular tube.(Shown as picture 5) 5. Software Applications & Operation 5.1 Image Capture 5.1.1 Enter Capture Software Shown as picture 6, touch icon to enter main menu, and then touch icon to enter the capture image interface.(Shown as picture 7) Picture 6 7 Picture 7 5.1.2 Menu on the Capture Image Interface (Shown as picture 8) Image Preview Cross-line Control Photo & Video Functions Shift Shutter Function Instruction: 1 Image Preview: touch icon Picture 8 to enter the Gallery, left or right drag the screen by finger can choose the image or video to be previewed or simple managed.(Picture 9) Picture 9 8 2 Cross-line on/off Control: As system default, the crossing-line display on the capture image interface, touch the icon 3 to close or reopen the cross-line function. Photo & Video Functions Shift: Drag the round icon can switch between image capture and video record. 4 Shutter:Touch the icon to capture image or video, then the image can be saved in image Gallery of the RAM automatically. 5 Video Record: Drag the round icon to video record mode, touch to start recording, and touch again to stop recording, the video will be saved in image Gallery of the RAM automatically. 5.1.3 White Balance Adjustment (Shown as picture 10) 1 Auto White Balance Connect the7D&DP-20 0 device with a microscope, place a piece of white paper under , the microscope lens, then adjust the microscope to get clear imaging. Touch the icon there will pop up a menu shown as bellow picture10.The "Contrast "defaults to "Close" and 'white balance" defaults to "Auto white balance" . In the mode of "Auto white balance", the system would adjust the white balance automatically.The color and brightness of image can be adjusted to the best through changing the current lighting environment. 2 Manual White Balance Connect the7D&DP-200 device with a microscope, place a piece of white paper under the microscope lens, turn up the external light source onto the brightest, then adjust the microscope to get clear imaging. Touch the icon , there would pop up a menu shown as bellow picture10,select the bar 9 "The current value" ,the white balance will be defaulted to 'manual white balance ".The system would not adjust the white balance automatically but keep in the original adjusted state.The color and brightness of image can be adjusted through changing the external light source and exposure time value. Picture 10 【Note 1】: For biological microscope, it is better use for Manual white balance. For stereo and metallurgical microscope, the Auto white balance is better. 【Note 2】: Under Auto white balance, if the light source of microscope is too dark, the picture taken may be like below, it is not quality problem, just adjust the light source to bright enough will sole the problem: Picture 10 5.1.4 Exposure Time Adjustment (Shown as picture 11) The exposure time can only be adjusted in the mode of "Manual White Balance" .Under this mode, touch the icon ,choose the exposure time to adjust the brightness of 10 image.(the longer exposure time, the slower speed of frame rate) Picture 11 5.1.5 Contrast Adjustment (Shown as picture 12) After white balance adjustment, touch the icon and choose the bar "Open" on the , then drag the rectangle icon between 1x and 2x on menu, and then touch the icon the pop up parameter menu to adjust the contrast. Picture 12 5.2 Export File 5.2.1 Export the Images from RAM to External SD Card 1 Touch the icon "ES File Explorer" from system main menu and choose the 11 file named "DCIM" , and then touch the file named "Camera" , there are the images you took here.(Shown as picture 13, 14,15) Picture 13 Picture 14 Picture 15 2 Choose the image what you want to export, tap and hold the image a while, there will pop up the operations for option, touch the bar "Copy" (Shown as picture 16), and then back to the menu of "ES file Explorer " (Shown as picture 17).Touch the icon on the 12 left upper conner, then choose the file named "extsd" then drag the icon (Shown as picture 18), and up (Shown as picture 19), and choose the image what you want to paste, tap and hold the image, there would pop up bellow menu and choose the bar "Paste" on the clipboard options menu ( Shown as picture 20), and then the images will be pasted onto external SD card. Picture 16 Picture 17 Picture 18 13 Picture 19 Picture 20 Picture 21 【Note】: Function of image Copy & Paste, which can not only work for the single image, but also for all images.(Shown as picture 21) 14 5.2.2 Export the File onto Computer via USB Connect the data cable of scopepad with the USB2.0 interface of computer, and then enter the system main menu, then tap and drag the icon down, there would pop up bellow menu (Shown as picture 22, 23), and then touch the icon"USB connected", you can export the file to the computer directly once it's on the interface.(Shown as picture 24) Picture 22 Picture 23 Picture 24 15 5.3 Network Configuration 5.3.1 Manage the Wi-Fi Setting and Support Wireless Data Network Touch the icon of "setting" on system main menu,choose the "Wireless & networks" to enter into the Wi-Fi setting interface.(Shown as picture 25) Picture 25 Picture 26 【Note】: Unless other specified, it is the standard status as bellow: - If the ring icon shown as , it means currently, this function is unworking. - If the ring icon shown as , it means currently, this function is working. 16 5.3.2 Choose "Wi-Fi settings" can Enter bellow Interface (Shown as picture 27) Picture 27 【Note】: If the right icon of "Network notification" shown as , it means auto search network function is unworking. Touch the icon and when it turn into , the function starts to work.The device will search and open Wi-Fi network nearby automatically. Choose the searched Wi-Fi network (input the password if needed), the words "Connect to ..." will be displayed under the bar icon of "W-Fi" once the network is successfully connected. The system will record the connected Wi-Fi information, which can be connected automatically once click it next time. 5.4 Operating System Google Android 2.2 Operating System, Complete Application Functions. Download any of the tens of thousands of Android apps from the official Android Market and other websites. 5.5 Third-party Software Download & Installation Connect the7D&DP- 200 with the network, you can download free Third-party software from Android Market onto the pad, or transfer the software from computer to the SD card, and copy the software from SD card onto pad, and then you can install the software. 17 5.6 Language Setting Touch the icon of the setting on system main menu,touch the "Language & keyboard", and then touch the bar "Select Language" to select what the language you want to use.(Shown as picture 28,29) Picture 28 Picture 29 6. Troubleshooting & FAQs a. Can't Power On 1. Check the battery capacity 2. Plug out and in power adapter cable, and check again 3. If the scopepad can not power on even after full charged, please contact with the seller. 18 b. The Screen is Flashing after Power On or Shut Down Immediately. 1. Low battery, please charging. c. Hear Nothing 1. Please check the volume to see if it's 0. 2. Please check whether the media document file is destroyed or not, please try other document to test. . d. Can not Copy or Display Documents 1. Please make sure the computer and displayer are connected well. 2. Please check whether there is storage capacity or not. 3. Please check whether the USB cable is damaged or not. 4. Check if the USB is disconnected. 7. Caution 1.7D&DP-200 2. is imaging device, please keep the dust and moisture away. Do not wipe the lens directly if find dirty on it, please request the professionals to clean by special reagents and tools . 3. The adjustable tilting range is between 0-90 degrees, do not exceed this range, and do not adjust the screen angle too frequently to get damage. 4. This Scopepad is capacitive touch screen,please touch the screen by the belly of your fingers, but not use nails, pens, and other hard or sharp objects, or it will not only not work this way, but also get damaged. 19