1
ftpAxe manual
ftpAxe manual
1. About This Manual
2. Introducing to ftpAxe
What is in ftpAxe
3. The ftpAxe Requirements
4. Installing ftpAxe
Running INSTALL
Running UNINSTALL
Upgrading ftpAxe
Multi-user Installation
5. The ftpAxe Database
Keyboard Definition Files
6. Configuring ftpAxe
ComSetup Utility
Running ComSetup with Command Line Parameters
7. Telnet
Starting and Terminating Telnet
Telnet Menu Options
Terminal Emulation in Telnet
Running Telnet with Command Line Parameters
The "[TELNET]" Section of the ini-file
8. FTP
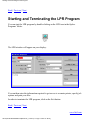
Starting and Terminating the FTP Program
Main FTP Window
The Server Menu
The Options Menu
Performing File Transfer
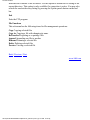
Connecting to the FTP Server
Disconnecting from the FTP Server
Changing to a User Name
file:///C|/riina/LABTAM/labfcom/ftpaxe/manual.html (1 of 2) [17.5.2001 11:48:22]
ftpAxe manual
Profile
Transfer Options
Operations with Files
Operations with Directories
The Quote Tab
Running FTP with Command Line Parameters
9. TFTP
Starting and Terminating the TFTP Program
TFTP Menu Options
10. Ping
Starting and Terminating the Ping Utility
Ping Menu Options
11. LPR - Remote Printing
Starting and Terminating the LPR Program
Entering LPR Info
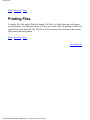
Printing Files
Configuring a Network Printer
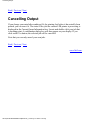
Cancelling Output
The lpr.inf File
12. LPD - Print Server
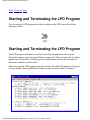
Starting and Terminating the LPD Program
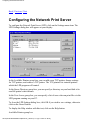
Configuring the Network Print Server
Printers Status
The "[LPDAEMON]" Section of the ini-file
Appendix A Keyboard Mapping File Format
Appendix B Description of Terminal Capabilities
file:///C|/riina/LABTAM/labfcom/ftpaxe/manual.html (2 of 2) [17.5.2001 11:48:22]
1. About This Manual
Back | Next
1. About This Manual
This User's Manual describes how to install, configure and use the ftpAxe
package on a 32-bit IBM PC or compatible personal computer running one of the
following operating system: MS Windows 95/98/2000 or MS Windows NT. A
small volume of the manual reflects simplicity of using this software tool created
nevertheless on the basis of up-to-date information technologies.
The following items will be covered:
Purpose and composition of ftpAxe
Hardware & Software requirements of ftpAxe
Installation procedure for ftpAxe
ftpAxe database composition
Configuring ftpAxe
ftpAxe working sessions.
Back | Next
file:///C|/riina/LABTAM/labfcom/ftpaxe/man_01.html [17.5.2001 11:48:28]
2. Introducing to ftpAxe
Back | Previous | Next
2. Introducing to ftpAxe
ftpAxe is a complicated product for integrating the Microsoft Windows and
TCP/IP network environments. ftpAxe is an inexpensive but effective way to
transform a standard PC running under MS Windows 95/98/2000 or MS
Windows NT into a multi-function terminal. Being based on the TCP/IP open
standards, the package integrates a PC into an interoperable computer network.
The network of dissimilar computers and operating systems becomes perfectly
transparent to you. ftpAxe enables on your PC's screen to work at once with
several applications executed simultaneously on various network nodes. As a
result, a heterogeneous network appears to you as a unified large computer
system arranged directly on your desktop.
Back | Previous | Next
file:///C|/riina/LABTAM/labfcom/ftpaxe/man_02.html [17.5.2001 11:48:29]
What is in nfsAxe
Back | Previous | Next
What is in nfsAxe
nfsAxe is an integrated and powerful 32-bit software tool consisting of the
following functional parts:
Telnet virtual terminal emulator
Telnet is a communications and terminal emulation program. It allows you to
connect to and communicate with hosts that support the Telnet protocol, to
initiate and control a remote login session. While you are using Telnet, you can:
- set some options for particular implementations of Telnet
- change fonts of text displayed in the Telnet window
- select a terminal emulation mode in the Telnet session.
The Telnet program can emulate XTERM, AT386, ANSI, VT52, VT100, VT125,
VT220 and VT240 terminals for character-mode applications. Advanced users
can edit the terminal capabilities description file to suit to the special
environment.
By using the Keyboard Mapping option (i.e., keymap editor invoking), you can
load, change (re-define keys and create a new keyboard layout), and save any
keyboard definition file.
ARPANET standard File Transfer Protocol (FTP) user interface
FTP program is a client implementation of the File Transfer Protocol. It allows
you to transfer both text and binary files between your PC and a remote computer
running the server implementation of FTP. By using the FTP program, you can:
- set up parameters and modes for operations
- make/change a directory on your PC (local) or FTP server
- remove local/remote directory
- view file lists in a remote directory
- transfer (copy/rename/delete) selected local/remote files
- append files to the remote machine.
While you are connected, you can perform a number of tasks (commands) on the
FTP server, using various server's options.
DARPA standard Trivial File Transfer Protocol (TFTP) user interface
TFTP program allows you to transfer both text and binary files between your PC
and a remote computer running the server implementation of TFTP.
file:///C|/riina/LABTAM/labfcom/ftpaxe/man_02a.html (1 of 2) [17.5.2001 11:48:30]
What is in nfsAxe
LPR remote printing program
LPR is a network printing program that allows access to printers attached to
remote computers on your network. The computers must support the Berkeley
Line Printer protocol. You can enter data required to get access to a remote
printer (choose a target printer), specify job options (number of copies, titles and
banner pages, file type) and print one or several files residing on your PC, view
print jobs in the queue, remove jobs from the queue.
LPD - Network Print Server
LPD is a Network Print Server (daemon) that allows access to printers (accessible
at your computer) across TCP/IP network. The remote computers must have the
LPR program that supports the Berkeley Line Printer protocol.
While using LPD, you can:
- change the Printer list and printer parameters (add/remove a network
printer, change settings of network printers)
- enable or disable printing of files from remote hosts
- specify the list of users which can print files on your networked printers.
The Ping program
You can test that the TCP/IP transport is installed and configured correctly by
using the Ping utility. While running, Ping sends a sequence of data packets to the
host with the time interval specified. When the connection between your PC and
the host exists, PC will receive a response after every packet sent. If Ping finds
the host or IP address, it will return the appropriate message.
Back | Previous | Next
file:///C|/riina/LABTAM/labfcom/ftpaxe/man_02a.html (2 of 2) [17.5.2001 11:48:30]
3. The ftpAxe Requirements
Back | Previous | Next
3. The ftpAxe Requirements
Your computer system must meet the following hardware, software, host and
network requirements for you to install and use ftpAxe.
PC Hardware & Software Requirements
A standard 32-bit (i386, i486 or Pentium) IBM PC or 100% compatible
8 Mbytes RAM (MS Windows 95/98/2000/NT)
Color graphics controller supporting SVGA video modes
Mouse Unit compatible with Microsoft Windows
Optional math coprocessor
8 Mbytes free hard disk space.
Note that this disk requirement does not account for the disk cluster size. The
larger the cluster size the greater the disk requirement.
In addition to the above requirements, you need one of the following operating
systems:
MS Windows 95/98/2000, MS Windows NT version 3.51 or higher TCP/IP
facility with Windows Sockets Interface.
Host Requirements
TCP/IP protocols over Ethernet or Serial port connection Optional server
implementations of FTP and TFTP
Virtual terminal protocol Telnet
Optional server implementation of Berkeley Line Printer protocol
Login account on the host machine.
Back | Previous | Next
file:///C|/riina/LABTAM/labfcom/ftpaxe/man_03.html [17.5.2001 11:48:31]
4. Installing nfsAxe
Back | Previous | Next
4. Installing ftpAxe
This chapter describes how to install the ftpAxe software. The chapter assumes
that you have Microsoft Windows 95/98/2000 or Windows NT operating system
installed as described in the corresponding user's guide for the product.
This chapter and the rest of the ftpAxe manual refer to the two directories whose
names can be changed by the user at the installation stage:
- the home directory,
- the configuration files directory.
If you install ftpAxe in a directory different from the default, simply supply your
directory name when appropriate directories are requested.
The installation of ftpAxe on PC is carried out by running the Setup program.
Back | Previous | Next
file:///C|/riina/LABTAM/labfcom/ftpaxe/man_04.html [17.5.2001 11:48:32]
Running INSTALL
Back | Previous | Next
Running INSTALL
To run the Setup program:
1) insert the first ftpAxe installation diskette in a floppy disk drive
2) click the Start button on the taskbar, and then point to Run
3) enter the following command:
x:\setup
where 'x' indicates your floppy disk drive.
As soon as you start the installation process, you will see a number of dialog
boxes with instructions for each installation step. These boxes have three buttons.
The Cancel button quits the installation process. The Back button returns you to
the previous step. When you press the Next button, the Setup program proceeds
to the next installation step.
For the first installation, the steps are as follows (with the dialog's names):
Welcome
It is strongly recommended that you exit all Windows programs before running
the Setup program.
Click Cancel to exit Setup and then close any programs you have running. Click
Next to continue with the Setup program.
Registration
Here you have to enter the Company name and the Person name.
Choose Destination Location
Here you can specify or choose the directory (folder) where the package will be
installed in.
To install to the specified directory, click Next.
To install to a different directory, click Browse and select another directory
(folder).
You can choose not to install the package by clicking Cancel to exit Setup.
If the directory (folder) specified for installation does not exist, the Setup
program will create it.
file:///C|/riina/LABTAM/labfcom/ftpaxe/man_04a.html (1 of 2) [17.5.2001 11:48:33]
Running INSTALL
Setup Type
You can choose what components of the package Setup will install.
Typical Program will be installed with the most common options .
Compact Program will be installed with minimum required options.
Custom You can choose the options as you wish.
For the Custom type of installation, the Select Components dialog box will
appear on your display. Select components that you wish to install. If the check
box is unchecked, that component will not be installed. Click Next to continue
installation. The components you can choose are as follows:
- Application Program Files
- Miscellaneous Data Files
- On-line Help Files
- Program Folder and Icons
Folder Selection
Setup will add program icons to the Program Folder specified. You can type a
new folder name, or select one from the Existing Folders list. Click Next to
continue.
Setup
Setup shows how files of the components are copied into the destination directory
(folder). When you see the Setup Needs the Next Disk dialog box, insert the
required disk. If the files on this disk can be found in another location, for
example, in another drive, enter its full path or click the Browse button to select
its path.
Information
Setup completed. You may run the installed programs by clicking program's
icons from the Program Folder.
Exit Setup
If you wish to break the installation process and press the Cancel button, the Exit
Setup dialog box appears. If you quit the Setup program, the package will not be
installed. You can run the Setup program at a later time to complete installation.
To continue installing the package, click Resume. To quit the Setup program,
click Exit Setup.
Back | Previous | Next
file:///C|/riina/LABTAM/labfcom/ftpaxe/man_04a.html (2 of 2) [17.5.2001 11:48:33]
Running UNINSTALL
Back | Previous | Next
Running UNINSTALL
You can uninstall the package by choosing the Uninstall item from the Program
Folder. The program will prompt you to confirm removing the package from your
computer.
When Uninstall completed, some elements might not be removed. You should
manually remove items related to the application.
Back | Previous | Next
file:///C|/riina/LABTAM/labfcom/ftpaxe/man_04b.html [17.5.2001 11:48:34]
Upgrading ftpAxe
Back to index | Previous | Next
Upgrading ftpAxe
If you specified the ftpAxe home directory where ftpAxe program files
already exist, the Setup program will detect it and offer you to upgrade or
configure it.
If you choose YES, i.e. to upgrade the installed package, the Setup program
displays the Upgrade Type window where you can choose Typical, Compact,
or Custom installation mode (like the step #4 of the installation sequence).
This allows you to reconfigure ftpAxe without reinstalling binary programs.
If you choose NO, the Setup program displays the Registration window (i.e.,
returns you to the step #2 of the installation sequence).
When you choose the Reinstall mode in the Choose Installation Type
window, the Setup program displays the Setup Type window (the step #4 of
the installation sequence). This allows you to reinstall the ftpAxe package
completely.
Most of the files on the ftpAxe diskettes are stored in a compressed format.
Setup decompresses the appropriate ftpAxe files and places them in the
destination directories you specified. You will be prompted to insert
additional ftpAxe diskettes as they are required.
Finally, the Setup program creates and shows the ftpAxe folder with Shortcuts
for ftpAxe programs. It also inserts the ftpAxe item on the Programs menu.
Back to index | Previous | Next
file:///C|/riina/LABTAM/labfcom/ftpaxe/man_04c.html [17.5.2001 11:48:35]
Multi-user Installation
Back to index | Previous | Next
Multi-user Installation
Multi-user installation is intended for installing a single copy of ftpAxe on a
disk that will be shared by multiple users. ftpAxe must be configured for each
PC it will be used on. Corresponding files that define the local ftpAxe
configuration will be created in a specified directory (Configuration Path).
Multi-user installation is carried out as follows:
1) By running the Setup program, install ftpAxe on a disk that will be used for
storing the shared copy (ftpAxe home directory).
The next step must be done by every user of the shared copy.
2) Run the Setup program. In the installation dialogs, you must specify the
ftpAxe home directory of the shared copy, and a local directory where files
defining a particular package configuration will be resident (Configuration
Path).
Back to index | Previous | Next
file:///C|/riina/LABTAM/labfcom/ftpaxe/man_04d.html [17.5.2001 11:48:37]
5. The ftpAxe Database
Back | Previous | Next
5. The ftpAxe Database
The package database is represented by two ASCII files
terminfo.ini
lpr.inf
and also by 30 keyboard definition files with the file name extension .KMF.
The terminfo.ini file contains information for terminal emulation and is described
in Appendix B.
The lpr.inf file is described in Chapter LPR - Remote Printing.
Back | Previous | Next
file:///C|/riina/LABTAM/labfcom/ftpaxe/man_05.html [17.5.2001 11:48:38]
Keyboard Definition Files
Back | Previous | Next
Keyboard Definition Files
ftpAxe has 30 keyboard definition files allowing you to use one of the 30
international PC keyboards. Each of them corresponds to the country your
keyboard was designed for.
Your Keyboard Definition file has the .KMF extension. It resides in the ftpAxe's
configuration files directory (in the location you specified when installing
ftpAxe).
The basic purpose of a keyboard file is to assign PC keys to generate specific
keysyms. A keysym is a key code that corresponds to a specific symbol supported
by the X protocol.
A Keyboard Definition file is an ASCII source file that defines what key
sequence is sent to a client when you press a given key on your PC's keyboard
(i.e., keyboard mapping).
You can customize a keyboard by one of two ways:
- by modifying a selected (on installation) keyboard file;
- by choosing the userkbd.kmf keyboard file and then editing it.
The Keyboard Mapping option of ftpAxe's Telnet allows you to modify keyboard
definition files.
These are some of the things you can do:
- Make any key on your keyboard send any supported X keysym to the
host.
- Make use of extra keys on non-standard keyboards to send special
keysyms to the host or to a client.
The Keyboard Mapping File format is described in Appendix A.
Back | Previous | Next
file:///C|/riina/LABTAM/labfcom/ftpaxe/man_05a.html [17.5.2001 11:48:40]
6. Configuring ftpAxe
Back | Previous | Next
6. Configuring ftpAxe
This chapter describes how to configure the ftpAxe package with the
configuration utility. The utility allows you to set up ftpAxe for your preferences,
your host system and your PC.
ftpAxe supplies the configuration utility, ComSetup, that allows you to make
communication settings relating to the networking aspects of ftpAxe that operate
with the TCP/IP transport interface.
Back | Previous | Next
file:///C|/riina/LABTAM/labfcom/ftpaxe/man_06.html [17.5.2001 11:48:41]
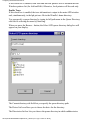
ComSetup Utility
Back | Previous | Next
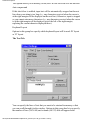
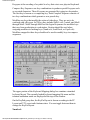
ComSetup Utility
You can start the ComSetup by double-clicking on the ComSetup icon in the
ftpAxe Programs' folder:
The Communication Setup / Windows Sockets dialog box will appear on your
display:
The following input fields are available:
Hosts File
This field is used to specify a location of the hosts file. This file contains a list of
hosts in the standard format. You may choose the one that is used by Windows
Sockets Interface or enter another name of the file for your own needs.
WinSock DLL
This field is used to locate the DLL executable which provides Windows Sockets
file:///C|/riina/LABTAM/labfcom/ftpaxe/man_06a.html (1 of 2) [17.5.2001 11:48:42]
ComSetup Utility
Interface to existing TCP/IP stack. By default, wsock32.dll of the Microsoft
Windows' TCP/IP will be used. You can specify to use any other TCP/IP stack by
entering its 32-bit Windows Sockets Interface DLL.
The If non-single IP address Box
If your PC has more than one IP address (i.e., 'multi-home' PC with non-single
TCP/IP stack, e.g. for Ethernet + modem), then you should specify a mode for
choosing one of them. The Always Use the First IP address and Always Use the
Last IP address modes allow ftpAxe's programs to automatically choose the local
IP address. You can set up the Ask to Choose mode to specify that you will
choose the address in the dialog box brought up by the programs. The default
mode is Ask to Choose.
The TCP/IP Info Box
When you click on the Refresh button, the ComSetup will search for available
TCP/IP information and, if found, display in the info field the IP address and
name of your PC according to mode settings. If the Create 'sp_ghbn.out' Info file
check box is enabled, then all information found will be stored in the file. This
allows you to check accessibility and obtain description of the TCP/IP stack used.
The Transport button lets you choose the network transport.
The Default button sets up the default values for all these parameters.
To close the Communication Setup dialog box, click OK if you wish to save new
settings, otherwise click on the Cancel button.
Back | Previous | Next
file:///C|/riina/LABTAM/labfcom/ftpaxe/man_06a.html (2 of 2) [17.5.2001 11:48:42]
Running ComSetup with Command Line Parameters
Back | Previous | Next
Running ComSetup with Command Line
Parameters
You can launch ComSetup with the command line parameter:
PATH\comsetup.exe -xini <IniFilePath>
where <IniFilePath> specifies a full path to a specific ini-file and PATH indicates
your ftpAxe home directory.
This feature allows you to run several ComSetup sessions each with its own
ini-file (i.e., settings).
In order to do so, you can create a new ComSetup shortcut (e.g., in the ftpAxe
Programs' folder) and fill in the Target field in Properties of it with the command.
By default, the field contains a call of ComSetup with no arguments, and the
xwp.ini file will be used in this case.
To create your specific ini-file, you can copy the xwp.ini file and then change
parameters with the ComSetup utility as you need by starting it with the
command line parameter.
Back | Previous | Next
file:///C|/riina/LABTAM/labfcom/ftpaxe/man_06b.html [17.5.2001 11:48:43]
7. Telnet
Back | Previous | Next
7. Telnet
This chapter describes how to start and use the Telnet program supplied with
ftpAxe.
Telnet is a communications and terminal emulation program. It allows you to
connect to and communicate with hosts that support the Telnet protocol and runs
a Telnet service.
To provide terminal emulation from a MS Windows computer, the remote host
must be configured with the TCP/IP program, the Telnet server program or
daemon, and a user account for the computer running MS Windows.
Once you have established a connection, you can use the Telnet program to start
X clients and perform other operations outside the X Window System
environment.
While you are using Telnet, your PC emulates one of the following terminal
types: XTERM, ANSI, AT386; DEC VT52, VT100, VT125, VT220 or VT240,
using connection-based services of TCP. You can specify the terminal emulation
settings for the current connection by making the appropriate settings on the
Settings option.
By using the Keyboard Mapping Option (i.e., keymap editor invoking), you can
load, change (re-define keys and create a new keyboard layout), and save any
keyboard definition file.
You can start more than one Telnet session, and use Telnet to open multiple
Telnet windows on a single host or different hosts at the same time.
Back | Previous | Next
file:///C|/riina/LABTAM/labfcom/ftpaxe/man_07.html [17.5.2001 11:48:44]
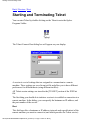
Starting and Terminating Telnet
Back | Previous | Next
Starting and Terminating Telnet
You can start Telnet by double-clicking on the Telnet icon in the ftpAxe
Programs' folder:
The Telnet Connect Host dialog box will appear on your display:
A session is a set of settings that are assigned to a connection to a remote
machine. These settings are saved in an ini-file and allow you to have different
preferences for different hosts (using different ini-files).
All Telnet session settings are stored in the [TELNET] section of the XWP.ini
file.
The first thing you should do to initiate a session is to establish a connection to a
remote machine. In the dialog, you can specify the hostname or IP address, and
the port number of the service.
Host
This field specifies a hostname or IP address (network node specification) of the
remote machine you want to connect to (and which provides the Telnet service).
file:///C|/riina/LABTAM/labfcom/ftpaxe/man_07a.html (1 of 3) [17.5.2001 11:48:45]
Starting and Terminating Telnet
When you click on the scroll arrow beside the Host box, a drop-down box will
display host definitions located in your hosts file. To select a host, click on an
appropriate definition.
Port
This field specifies the port number of the Telnet service on the remote machine
you want to connect to. The default port number of the Telnet service is decimal
23.
To establish Telnet connection, enter the network name or IP address of the host
you want to connect to, then change the default Telnet port number if required,
and press OK. Telnet connects and logs into the specified hostname.
Once you have connected to the host, the host name or IP address you specified
appears at the top of the Telnet window (with the terminal emulation mode), and
the host login prompt appears in the window:
You must prove your identity to the remote machine using some authentication
method (e.g., password authentication). Specify the login information required for
your host system. You can then interact with the host by choosing commands
from displayed menus, or by typing commands in the window and starting remote
applications.
You can customise your Telnet session with the Settings and/or Keyboard
Mapping items in the Options menu (described below).
The following sequence of commands can be used as an example of working in
the Telnet session:
login: arsexam
$ DISPLAY= xtp2:0; export DISPLAY
$ xterm&
$ mwm&
file:///C|/riina/LABTAM/labfcom/ftpaxe/man_07a.html (2 of 3) [17.5.2001 11:48:45]
Starting and Terminating Telnet
To capture the screen output of Telnet commands to a file, Telnet writes the log
to the telnet.out file in the home directory (in case of fatal errors or due to the
'trace' command line parameter).
You can terminate a Telnet session by choosing the Close command on the
Control Menu box, or by selecting Exit on the Telnet Commands menu.
If you select Exit while a connection to a remote system is still active, Telnet
disconnects you from the remote system automatically (properly closing all
applications used).
Back | Previous | Next
file:///C|/riina/LABTAM/labfcom/ftpaxe/man_07a.html (3 of 3) [17.5.2001 11:48:45]
Telnet Menu Options
Back | Previous | Next
Telnet Menu Options
The Telnet menu bar displays four menus: Commands, Edit, Options, and Help.
They are described below.
The Help Menu
The Help menu contains the following menu commands:
Contents
Displays the Telnet help file.
About
Displays copyright, version and program information about Telnet.
The Commands Menu
The Commands menu contains the following menu commands:
file:///C|/riina/LABTAM/labfcom/ftpaxe/man_07b.html (1 of 16) [17.5.2001 11:48:47]
Telnet Menu Options
Connect
The Connect item displays the Telnet Connect Host dialog box so you can
specify the remote system you want to communicate with. You can also connect
to a port or service to use other than the standard Telnet port. This is useful when
the Telnet client is being used to access something other than a Telnet daemon.
This command is not available when you are already connected to a remote
system.
Once you connect to the remote system, the title bar in the Telnet window shows
the remote system name.
Disconnect
The Disconnect item ends the connection to a remote system so you can connect
to another system or end your session. This command is not available when you
are not connected to a remote system.
Interrupt Process
This command sends the Telnet Interrupt Process command (IP control function)
to the remote host. This command (which suspends, interrupts, aborts, or
terminates the operation of a user process) tells the host to stop the current
process to which the terminal is connected. This function is frequently used when
a user believes his process is in an unending loop, or when an unwanted process
has been inadvertently activated.
Abort Output
file:///C|/riina/LABTAM/labfcom/ftpaxe/man_07b.html (2 of 16) [17.5.2001 11:48:47]
Telnet Menu Options
This command sends the Telnet Abort Output command (AO control function) to
the remote host. This command tells the host to run to completion the current
process, which is generating output, but without sending the output to the user's
terminal from the host. Further, this function typically clears any output already
produced but not yet actually sent to the user's terminal.
Break
This command sends the Telnet Break command (BREAK control function) to
the remote host. This command (intended to indicate that the Break Key or the
Attention Key was hit) tells the host to stop what it is doing.
Are You There
This command sends the Telnet Are You There command (AYT control function)
to the remote host. This command determines if the connection with the host is
still up and the system is running. This command tells the host to send back to the
user's terminal some visible evidence that the command was received. This
function may be invoked by the user when the system is unexpectedly 'silent' for
a long time, because of the unanticipated (by the user) length of a computation,
an unusually heavy system load, etc.
Pause Output
This command pauses output (it sends Ctrl+S to the host). The Resume Output
item then becomes active and can be selected.
Resume Output
This command resumes output (it sends Ctrl+Q to the host) after output has been
paused.
Exit
The Exit item terminates the Telnet session.
The Edit Menu
The Edit menu displays two commands that allow you to edit the lines you type
in a Telnet window: Erase Character and Erase Line. Also there are two standard
commands, Copy and Paste, for text operations with the Microsoft Windows'
clipboard.
file:///C|/riina/LABTAM/labfcom/ftpaxe/man_07b.html (3 of 16) [17.5.2001 11:48:47]
Telnet Menu Options
Erase Character
The host should delete the last preceding undeleted character or print position
from the data stream being supplied by the user. A print position may contain
several characters which are the result of overstrikes, or of sequences such as BS
...
Erase Line
The host should delete all the data in the current line of input, i.e., characters from
the data stream back to, but not including, the last CR LF sequence sent over the
TELNET connection.
Copy
To copy text onto the clipboard, leaving the original text intact and replacing the
previous clipboard contents, select the text you want to copy, and choose Copy.
This command is unavailable until you have selected text.
Paste
When there is text in the clipboard, you can use Paste to insert a copy of the
clipboard contents at the insertion point to the Telnet window, or to another
Microsoft Windows application. This command is not available if the clipboard is
empty.
The Options Menu
The Options menu displays two items: Settings and Keyboard mapping. You can
choose them to specify particular (or nonstandard) implementations of Telnet.
Normally they do not have to be changed.
file:///C|/riina/LABTAM/labfcom/ftpaxe/man_07b.html (4 of 16) [17.5.2001 11:48:47]
Telnet Menu Options
The Settings Option
You can specify the terminal emulation settings for the current connection by
making the appropriate settings on the Settings Option menu.
The Telnet Settings presents you with a dialog of four tab windows that allow
you to view and modify the current terminal emulation settings: Keys, Text,
Type, and User Defined. They are described below.
The Keys Tab
If Enter is pressed
Options in this group box define the end-of-line sequence sent when you press the
Return or Enter key.
If Backspace is pressed
Options in this group box specify whether the Backspace key will be interpreted
as Erase Character, Backspace, or Delete.
Add LF after CR received
file:///C|/riina/LABTAM/labfcom/ftpaxe/man_07b.html (5 of 16) [17.5.2001 11:48:47]
Telnet Menu Options
This option allows you to modify (or not) the CR code received over the network.
Auto wraparound
If this check box is enabled, input text will be automatically wrapped on the next
line when your string is too long (i.e., any characters received when the cursor is
at the right margin will be displayed on the next line). Otherwise, input is stopped
so you cannot enter more characters (i.e., any characters received when the cursor
is at the right margin will be displayed just to the left of the right margin,
replacing the current character displayed there).
Keyboard Layout
Options in this group box specify which keyboard layout will be used: PC layout
or VT layout.
The Text Tab
You can specify the lines of text that you want to be retained in memory so that
you can scroll through it in the window. Options in this group box let you specify
the number of lines (24/36/48) and columns (80/132) that will appear in the
file:///C|/riina/LABTAM/labfcom/ftpaxe/man_07b.html (6 of 16) [17.5.2001 11:48:47]
Telnet Menu Options
Telnet window.
DRCS 8-bit
When this radio button is enabled, you define to work in the 8-bit environment
and send the 8-bit control sequences and graphic characters (Multinational
character transmission mode), including supplemental characters.
In this mode, you can download soft character sets from the host system into the
terminal. The soft character set is also known as a dynamically redefinable
character set (DRCS). This feature lets you design your own soft character sets
for use with the terminal.
You can use the DECDLD control string command to down-line load one or
more characters of a specified 94- or 96-character DRCS with a specified logical
pixel pattern.
NRCS 7-bit
When this radio button is enabled, you choose to work in the 7-bit environment
only. Select one of the 7-bit character sets from the National Replacement
Character Sets (NRCS) pull-down list box to allow for country/region's
replacement characters to be sent in the 7-bit escape/control sequences (National
character transmission mode).
The following NRC sets are available:
ASCII
DEC Special Graphics
DEC Supplemental
British
Dutch
Finnish
Norwegian/Danish
Swedish
French
French Canadian
German
Italian
Spanish
Swiss
In VT100 mode, VT52 mode, or when 7-bit NRCS characters is selected (through
Set-Up or the DECNRCM command), only ASCII, NRC sets, and DEC Special
Graphic characters are available.
Default Font
Characters in the Telnet window appear in the specified font, size, and colors.
Options in this group box allow you to change font parameters used to display
file:///C|/riina/LABTAM/labfcom/ftpaxe/man_07b.html (7 of 16) [17.5.2001 11:48:47]
Telnet Menu Options
text in the Telnet window.
Browse...
When you press this button, the Font standard dialog box appears. This dialog
box changes the font, style, and font size of text displayed in the Telnet window.
Font
Type or select a font name. Telnet lists the fonts available for the various
emulation modes.
Font Style
Select a style. You can italicize and bold any of the fonts listed. To use the
default type style for a given font, select Regular.
Size
Type or select a size. The sizes available depend on the selected font. If the size
you type is not available, Telnet chooses the closest available size.
Script
In the Script list box, select a desired font script.
file:///C|/riina/LABTAM/labfcom/ftpaxe/man_07b.html (8 of 16) [17.5.2001 11:48:47]
Telnet Menu Options
Effects
In the Effects group box, choose Strikeout to put a dash through every letter on
the screen, or choose Underline to underline all the text.
Color
In the Color list box, select a color for the text.
The Sample box changes to reflect your selection.
When you press the Background... button, the Color standard dialog box appears.
You can define your color for your background. The Colors tab allows you to
customize the color of your screen by emulating the color of the host's attributes.
The colors you set in this tab are not altered by the colors settings you make in
the Windows Control Panel.
The Type Tab
Terminal Refresh
This group box allows you to change values of parameters that control the screen
file:///C|/riina/LABTAM/labfcom/ftpaxe/man_07b.html (9 of 16) [17.5.2001 11:48:47]
Telnet Menu Options
buffer output and modify the characteristics of your keyboard.
The Time delay (msec) parameter sets the time interval (20...1000) that defines
when to display lines with character(s) received.
The Screen Renovation Rate parameter sets the ratio (5%...100%) of screen
changes (e.g. characters entered or modified) to full screen that defines when the
screen area modified will be re-displayed.
Terminal Type
This option allows you to change emulation modes for the Telnet session by
selecting one of the available modes from the Terminal Type list. The mode must
correspond to that assigned in the TERM() command when logging in. Telnet
adjusts your system so that your computer, keyboard, and terminal perform just
as the specified terminal does. The modes are popular control sets used in
terminals originally manufactured by Digital Equipment Corporation (DEC). If
you are not sure which terminal to select, select VT-100 (ANSI escape
sequences).
The User Defined Tab
This tab allows any functional key to be programmed with a user-defined
sequence. User-defined keys (UDKs) are a subset of functional keys.
file:///C|/riina/LABTAM/labfcom/ftpaxe/man_07b.html (10 of 16) [17.5.2001 11:48:47]
Telnet Menu Options
The UDK group box contains a list box with currently defined keys for a current
emulation mode. This box allows you to map key symbols to the Unshifted,
Shifted, Mode Switched, and Shift-Mode Switched states of the key. You can
select a key symbol and then clear (with the Clear button), define or re-define its
function value (in the Definition edit field).
You can use UDKs like a macro defined for a functional key: whenever you want
to forward a user-defined control string to a host you press the key combination
to activate the value. (Also see the List Assigned Functions dialog box in the
Keyboard Mapping option below for already defined functional keys.)
Note: Some function key combinations are reserved by MS Windows and cannot
be redefined.
Upon terminating Telnet sessions or pressing OK, UDKs are stored in the
terminfo.ini file (in the emulation mode section; see Appendix B for details), so
they will be defaults for the next session when the file will be read in.
Lock against future definition
Use this check box to lock/unlock UDKs listed against future redefinition (from a
file:///C|/riina/LABTAM/labfcom/ftpaxe/man_07b.html (11 of 16) [17.5.2001 11:48:47]
Telnet Menu Options
remote host).
Definition
This edit field is used to enter new control string codes for UDKs. The string can
include any combination of escape sequences, control sequences, or text (without
any separating character). The string should be in valid format for the terminal
emulation mode. You can scroll the field left or right as needed to allow longer
strings to be entered.
Set
This button assigns the value entered in the Definition field to the UDK currently
selected in the list box (for the current terminal emulation mode). This key
combination will activate the value whenever it is pressed.
Clear
This button removes a value for a currently selected UDK.
Clear All
Click this button to delete the mapping for all UDKs listed.
OK
Pressing OK saves current UDK settings and quits the dialog box.
Cancel
You can cancel any changes you made to the dialog box by clicking on this
button.
The Keyboard Mapping Option
By using the Keyboard Mapping Option (i.e., keymap editor invoking), you can
load, change (re-define keys and create a new keyboard layout), and save any
keyboard definition file.
Keyboard files are text files that define the X Protocol Key Symbols (Keysyms)
which are mapped to keys on your keyboard. By default, they have the extension
KMF, and are located in the home directory. You specify the KMF file to be used
by all ftpAxe's programs in the XSettings utility's window.
The keyboard mapping file format uses scancodes which allow the terminal to
transmit make and break codes for each keystroke corresponding to the hardware
scan codes used by PC keyboards (scan set 1). Make means when the key is
pressed; break means when the key is released. The Keyboard Mapping File
Format is described in Appendix A.
The Keyboard Mapping dialog box allows you to map Keysyms, Characters, or
Compose Key Sequences to existing keys on your keyboard.
file:///C|/riina/LABTAM/labfcom/ftpaxe/man_07b.html (12 of 16) [17.5.2001 11:48:47]
Telnet Menu Options
Keysyms is the encoding of a symbol to a key that exists on a physical keyboard.
Compose Key Sequences are key combinations to produce special Keysyms such
as accented characters. These Keysyms are generated by typing two keystrokes.
The first key is known as a composing key. Each Compose Sequence consists of
two key combinations which generate a new pseudo key.
Modifiers are keys that modify the action of other keys. They are not to be
confused with a Keysym. In X Keys they include Shift, Lock, Control, and Mod1
through Mod5. Mod1 through Mod5 are the logical keynames for modifier keys
that vary from workstation to workstation. Caution should be used when
assigning modifiers to latching keys (NumLock, ScrollLock, or CapsLock).
Modifiers mapped to these keys should not be used to modify keys in compose
sequences.
The upper portion of the Keyboard Mapping dialog box contains a standard
keyboard layout. The currently loaded keyboard mapping file name and the
terminal emulation mode are displayed at the top of the window.
On the KeyPad group box, the KeyPad layout is shown according to the PC
Layout and VT Layout radio buttons states. You can toggle between them to
change the KeyPad layout.
NumLock
file:///C|/riina/LABTAM/labfcom/ftpaxe/man_07b.html (13 of 16) [17.5.2001 11:48:47]
Telnet Menu Options
If you enable the NumLock check box, the numeric keypad keys will work as
they normally do on your PC (local latched mode). If this option is not checked,
the behavior of NumLock is determined by the remote host.
Load
When you press this button, the Open standard dialog box to open files appears,
allowing you to select and load a keyboard mapping file for viewing and
modifying.
Save As
When you press this button, the Save As standard dialog box to save files
appears, which allows you to save your current keyboard mapping under a new
filename.
Select Function type:
On this list box, you can select one of the function types: XK_symbol, Character,
or Composer to display all values available for it in the Function: list box.
Function:
On this list box, you can select a value for:
- assigning it to a key with the Set button
- modifying it with the Edit function... button.
If the Function type selected is XK_symbol, a list is displayed containing all of
the XKeysyms available.
If the Function type selected is Character, a list is displayed containing all of the
characters available (including accented characters) with its (decimal/hex)
keycode pairs.
If the Function type selected is Composer, a list is displayed containing all of the
Compose Key Sequences available.
Set
When you click a key on the keyboard layout, it appears in the Current Key group
box with its current definitions:
- normal (unshifted/unmodified)
- shifted
- modified (with the Alt GR key).
When you have a value highlighted on the Function: list box (of type:
XK_symbol, Character, or Composer) and a key selected on the keyboard layout,
you can press the Set button to change current values assigned to the key and
displayed on the Current Key group box to the new value (according to the radio
buttons' states).
file:///C|/riina/LABTAM/labfcom/ftpaxe/man_07b.html (14 of 16) [17.5.2001 11:48:47]
Telnet Menu Options
Undo
Use this button to immediately restore the previous key value every time you
press the Set button.
List Assigned Functions
When you press this button, a dialog box appears that allows you to view a list of
functions already assigned to functional keys (for the current terminal emulation
mode). The list contains function names (X Keysyms), function values (code
sequences), and comments on them.
Edit function
When you have a highlighted function of either the XK_symbol or Composer
type, you can press the Edit function... button to change the value to define a new
key sequence for the function (and current terminal emulation mode). The New
value dialog box will appear on your screen.
file:///C|/riina/LABTAM/labfcom/ftpaxe/man_07b.html (15 of 16) [17.5.2001 11:48:47]
Telnet Menu Options
The Function group box shows the currently selected function.
Value:
This edit field is used to enter a new string for the selected function. The string
can include decimal codes (in the range of 0...255) separated with the comma
character (as in the List Assigned Functions dialog box). The string should be in
valid KMF format described in Appendix A.
Preview:
This field displays a comment value for a selected function.
Comments:
Use this field to enter a new comment for the function you define.
Set
This button stores new values you entered and exits the dialog.
Cancel
You can cancel any changes you made to the dialog box by clicking on this
button.
Back | Previous | Next
file:///C|/riina/LABTAM/labfcom/ftpaxe/man_07b.html (16 of 16) [17.5.2001 11:48:47]
Terminal Emulation in Telnet
Back | Previous | Next
Terminal Emulation in Telnet
The Telnet program can emulate XTERM, AT386, ANSI, VT52, VT100, VT125,
VT220 and VT240 terminals. The terminfo.ini file describes the capabilities of
these terminals. This description contains control sequences for them and is very
similar to the TERMINFO source code of the UNIX system. So users can edit the
file to suit to the special environment.
By editing the terminfo.ini file, users can define the terminal type, the screen size
(the number of lines and columns), the number of colors, the color palette (i.e.,
RGB values for each color number), sequences to be transferred to remote hosts
for each user-defined key on the keyboard.
Appendix B contains detailed information on how to describe the terminal
emulation capabilities.
Back | Previous | Next
file:///C|/riina/LABTAM/labfcom/ftpaxe/man_07c.html [17.5.2001 11:49:09]
Running Telnet with Command Line Parameters
Back | Previous | Next
Running Telnet with Command Line
Parameters
You can launch Telnet with the 'host' command line parameter to avoid
interactive input of it. 'Host' may be either a host name or IP address of the
remote machine you want to connect to.
Examples:
PATH\telnet.exe u2-1
PATH\telnet.exe 192.168.136.223
where PATH indicates your nfsAxe home directory.
You can launch Telnet with the command line parameter:
PATH\telnet.exe -xini <IniFilePath>
where <IniFilePath> specifies a full path to a specific ini-file.
This feature allows you to run several Telnet sessions each with its own ini-file
(i.e., settings).
In order to do so, you can create a new Telnet shortcut (e.g., in the nfsAxe
Programs' folder) and fill in the Target field in Properties of it with the command.
By default, the field contains a call of Telnet with no arguments, and the xwp.ini
file will be used in this case.
To create your specific ini-file, you can copy the xwp.ini file and then change
parameters with the Telnet utility as you need by starting it with the command
line parameter.
You can launch Telnet_S with the 'trace' command line parameter
PATH\Telnet_S.exe -trace
to collect debug information in the telnet.out file in the home directory.
Back | Previous | Next
file:///C|/riina/LABTAM/labfcom/ftpaxe/man_07d.html [17.5.2001 11:49:10]
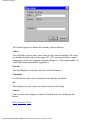
The "[TELNET]" Section of the ini-file
Back | Previous | Next
The "[TELNET]" Section of the ini-file
The "[TELNET]" section of the ini-file may have the following entry lines you
can customize for particular needs and applications.
ALTforEMACS=1
to allow the ALT key to be used in EMACS.
Back | Previous | Next
file:///C|/riina/LABTAM/labfcom/ftpaxe/man_07e.html [17.5.2001 11:49:11]
8. FTP
Back | Previous | Next
8. FTP
This chapter describes how to start and use the FTP program supplied with nfsAxe.
The FTP is a file transfer program which allows you to transfer files between your PC
and a remote computer using the ARPANET standard File Transfer Protocol. The
program can transfer files in two different format types: ASCII format is used for text
files, and Binary format is used for binary files.
The FTP also allows you to perform some basic file and directory management
operations, such as deleting, copying, and renaming.
The nfsAxe's FTP must run on a machine that is configured for TCP/IP network
communication or Internet access. Access can be gained through Winsock and the use of
any dial-up provider, a Remote Access Server (RAS), or a direct connection via a local
area network that supports TCP/IP. In order for the FTP to communicate with a remote
computer, that computer must have a server implementation of FTP (FTP server based
on the TCP/IP transports).
You can be connected to only one remote computer at a time during a FTP session.
However, you can run multiple FTP sessions (FTP clients) simultaneously in separate
windows, with each session connected to a different host.
Back | Previous | Next
www.labf.com
file:///C|/riina/LABTAM/labfcom/ftpaxe/man_08.html [17.5.2001 11:49:12]
Starting and Terminating the FTP Program
Back | Previous | Next
Starting and Terminating the FTP Program
You can start the FTP program by double-clicking on the FTP icon in the nfsAxe
Programs' folder:
The main FTP window will appear on your display:
In order to terminate FTP, choose Exit from within the Server menu. It is not necessary
to close a connection before terminating FTP; the system will shut everything down for
you.
file:///C|/riina/LABTAM/labfcom/ftpaxe/man_08a.html (1 of 2) [17.5.2001 11:49:14]
Starting and Terminating the FTP Program
Back | Previous | Next
www.labf.com
file:///C|/riina/LABTAM/labfcom/ftpaxe/man_08a.html (2 of 2) [17.5.2001 11:49:14]
Main FTP Window
Back | Previous | Next
Main FTP Window
On the upper portion of the main window, there is a Toolbar displaying short-cut
buttons that allow you to access commonly-used functions that appear on the FTP
menus:
Disconect
ASCII type transfer
Binary type transfer
Copy selected file(s)
Copy file with another name
Append file to another
Reget or Reput selected file
Rename selected file
Delete selected file(s)
Save current settings
View selected file to Notepad
Update panels
Help contents
The left part of the FTP main window consists of two list boxes displaying a current
local directory tree structure and a file list for the path above. You can select local files
for operations here.
The right part of the FTP main window contains four tabs that house the various
program options. These tabs are: Login as, Remote files, Settings and Quote.
The Login as tab is for making connection to a FTP server.
The Remote files tab displays the directory structure of the currently connected server.
The window is blank unless FTP is connected to a server, or a server's cached directory
information is displayed. Navigating through the server's various folders or directories
is accomplished by clicking individual folders with the mouse. Here you can browse
your active connection and select directories and files for operations.
When you press the right mouse button on the empty space inside the tab, the
drop-down menu will appear so you can use its available options.
The Settings tab is used to configure transfer options.
The Quote tab allows you to control a FTP server by command lines.
You can resize file panels and sort files by clicking on the column name at the top of
file:///C|/riina/LABTAM/labfcom/ftpaxe/man_08b.html (1 of 2) [17.5.2001 11:49:15]
Main FTP Window
the file listing.
On the lower portion of the main FTP window, the message box displays a listing of all
commands sent to the remote server and messages on how the FTP commands are
executed. The log can be useful for debugging or troubleshooting purposes. You can
scroll messages up and down, select them, and place the data in a log-file for future
reference (by pressing the right mouse button and choosing the option).
The status line displays a current path (if exists) to remote files, the L/R character to
indicate the (Local/Remote) active panel for operations, and descriptions of the
program's activities during its connection or file transfer operations.
Back | Previous | Next
www.labf.com
file:///C|/riina/LABTAM/labfcom/ftpaxe/man_08b.html (2 of 2) [17.5.2001 11:49:15]
The Server Menu
Back | Previous | Next
The Server Menu
Disconnect
Closes an active connection with a FTP server (see Disconnecting From FTP server for
details).
New Folder
Makes a directory on your PC or a FTP server (see Making Directory for details).
Remove Folder
Deletes a selected local/remote (empty) directory (see Removing Directory for details).
Copy Directory
Copies a selected directory to or from the host (see Copying Directory for details).
Update
file:///C|/riina/LABTAM/labfcom/ftpaxe/man_08c.html (1 of 2) [17.5.2001 11:49:16]
The Server Menu
Refreshes the contents of the list boxes. Use this option to reload the file listing of the
current directory. This option is only available if a connection is active. You may also
refresh the current directory listing by pressing the Update panels button on the tool
bar.
Exit
Exits the FTP program.
File Functions
This sub-menu has the following items for file management operations:
Copy Copying selected files
Copy As Copying a file with changing its name
ReTransfer Re-getting or re-putting a file
Append Appending one file to another
Rename Renaming a selected file
Delete Deleting selected files
Preview Viewing a selected file
Back | Previous | Next
www.labf.com
file:///C|/riina/LABTAM/labfcom/ftpaxe/man_08c.html (2 of 2) [17.5.2001 11:49:16]
The Options Menu
Back | Previous | Next
The Options Menu
ASCII type
Toggles to the ASCII transfer type.
Binary type
Toggles to the Binary transfer type.
Enable Save Password
Toggles enabling to save password on exit.
Save Settings on Exit
If enabled, settings will be saved on exit.
Save Settings Now
Settings are saved immediately.
file:///C|/riina/LABTAM/labfcom/ftpaxe/man_08d.html (1 of 2) [17.5.2001 11:49:17]
The Options Menu
Back | Previous | Next
www.labf.com
file:///C|/riina/LABTAM/labfcom/ftpaxe/man_08d.html (2 of 2) [17.5.2001 11:49:17]
Performing File Transfer
Back | Previous | Next
Performing File Transfer
A file transfer downloads files from a remote machine to your local PC, or uploads files
from your machine to a remote one. You can also delete and rename files on, and append
files to, a remote machine.
Before any file transfers can take place between your machine and the desired server, the
server's information must be entered. When connection is open, FTP allows you to
perform directory and file management operations on the remote computer. FTP allows
you to perform basic directory and file management operations on your PC as well. If no
connection to a remote computer is open, FTP will then recognize local commands only.
While you are connected, you can perform a number of tasks on the FTP server, using
various server options.
Next you can select files for transfer. Based on the files you have selected, you set up
transfer options. Transfer options control the format of the file transfer, and whether you
will be prompted before operations. With transfer options set, you can perform file
management operations.
While transferring multiple files, each copy is given the same name as the original.
Filenames are sent in lowercase.
When you are done, you can disconnect from the FTP server.
Back | Previous | Next
www.labf.com
file:///C|/riina/LABTAM/labfcom/ftpaxe/man_08e.html [17.5.2001 11:49:19]
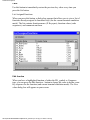
Connecting to the FTP Server
Back | Previous | Next
Connecting to the FTP Server
To create connection between your PC and a remote computer, carry out the following
on the Login as tab:
1) Select a FTP server (HostID) in the list box of hosts (defined in your hosts file).
Alternatively, you can enter the host address for the server (can be either the DNS entry
or its IP address) in the HostID edit field.
2) In the UserName edit field, enter your login name that is required by the selected
server to access your FTP account.
If you do not have an account with the selected server, and it accepts anonymous FTP
requests, enable the Anonymous option (explained below).
3) In the Password edit field, enter the password that is required by the server to access
your FTP account. The characters of the password will appear as asterisk (*) symbols for
security purposes unless you chose the anonymous login option.
4) Specify your Account (if required).
If the Account field is specified, the account command will be relayed to the remote
server after the login sequence is completed if the remote server did not require it for
logging in.
5) In the Initial Directory field, enter the path on the server in which you want to begin.
If this field does not contain a value, the root directory will be the default listing.
6) Select the operating system type of the remote computer from within the Server Type
list box. The UNIX system type is used by default. (Currently supported types are:
UNIX, DOS, VMS, MVS, OS/2, SI NT FTPD, IBM VM, AS/400).
7) Click the Connect button to establish the connection.
Alternatively, you can select a proper connection profile name and press the Connect
button (see the Profile section below).
Back | Previous | Next
www.labf.com
file:///C|/riina/LABTAM/labfcom/ftpaxe/man_08f.html [17.5.2001 11:49:19]
Disconnecting from the FTP Server
Back | Previous | Next
Disconnecting from the FTP Server
The Disconnect option is only available if a server is currently attached. Choosing this
option will break the connection from the server. To close a connection to the current
FTP server, you can choose Disconnect from within the Server menu. Alternatively,
press the Disconnect button on the tool bar.
Back | Previous | Next
www.labf.com
file:///C|/riina/LABTAM/labfcom/ftpaxe/man_08g.html [17.5.2001 11:49:20]
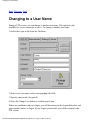
Changing to a User Name
Back | Previous | Next
Changing to a User Name
During a FTP session, you can change to another user name. This option is only
available if a server connection is active. To change to another user name:
1) Select the Login as tab from the TabForm.
2) Enter a new user name in the corresponding edit field.
3) Specify a password (if required).
4) Press the Change User button to confirm your Login.
If there are problems with your Login, you will be returned to the Login dialog box and
given another chance to Login. If your Login is successful, you will be returned to the
FTP session.
file:///C|/riina/LABTAM/labfcom/ftpaxe/man_08h.html (1 of 2) [17.5.2001 11:49:22]
Changing to a User Name
Alternatively, you can select a proper profile name and press the Change User button
(see the Profile section below).
To cancel changing user name, just select another tab from the TabForm.
Back | Previous | Next
www.labf.com
file:///C|/riina/LABTAM/labfcom/ftpaxe/man_08h.html (2 of 2) [17.5.2001 11:49:22]
Changing to a User Name
Back | Previous | Next
Changing to a User Name
During a FTP session, you can change to another user name. This option is only
available if a server connection is active. To change to another user name:
1) Select the Login as tab from the TabForm.
2) Enter a new user name in the corresponding edit field.
3) Specify a password (if required).
4) Press the Change User button to confirm your Login.
If there are problems with your Login, you will be returned to the Login dialog box and
given another chance to Login. If your Login is successful, you will be returned to the
FTP session.
file:///C|/riina/LABTAM/labfcom/ftpaxe/man_08i.html (1 of 2) [17.5.2001 11:49:22]
Changing to a User Name
Alternatively, you can select a proper profile name and press the Change User button
(see the Profile section below).
To cancel changing user name, just select another tab from the TabForm.
Back | Previous | Next
www.labf.com
file:///C|/riina/LABTAM/labfcom/ftpaxe/man_08i.html (2 of 2) [17.5.2001 11:49:22]
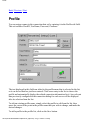
Profile
Back | Previous | Next
Profile
You can assign a name to the connection data set by entering it in the Profile edit field.
This set includes: HostID, UserName, Password, Confirms.
The text displayed in this field can either be the profile name that is selected in the list,
or it can be text that has just been entered. Click on an entry in the list to choose the
profile and automatically display the related connection information for it. Any relevant
data previously configured in the connection dialog for each server will be displayed
after its selection from the list.
To edit an existing profile name, simply select the profile to edit from the list, then
move the cursor to the point in the profile name that you wish to change, and make the
desired changes.
To add a profile to the profile list, click on the Save button.
file:///C|/riina/LABTAM/labfcom/ftpaxe/man_08j.html (1 of 2) [17.5.2001 11:49:23]
Profile
To remove a profile from the profile list, select it in the profile list box and press the
Delete button.
Back | Previous | Next
www.labf.com
file:///C|/riina/LABTAM/labfcom/ftpaxe/man_08j.html (2 of 2) [17.5.2001 11:49:23]
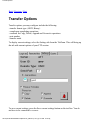
Transfer Options
Back | Previous | Next
Transfer Options
Transfer options you may configure include the following:
- transfer format type (ASCII, Binary)
- sound upon completing operations
- confirms for Copy, Delete, Append and Overwrite operations
- port number
- transfer mode
To display current settings, select the Settings tab from the TabForm. This will bring up
the tab with current options of your FTP session:
To save current settings, press the Save current settings button on the tool bar. You do
not have to be connected to a server.
file:///C|/riina/LABTAM/labfcom/ftpaxe/man_08k.html (1 of 2) [17.5.2001 11:49:24]
Transfer Options
Setting Transfer Options:
Transfer options will be in effect until you change them or close the server connection.
1) To set up transfer format type (ASCII, Binary), you can choose the necessary item
from within the Options menu. Alternatively, press the suitable button on the toolbar.
If the ASCII option is selected, all transfers to or from the remote server will be made
in the ASCII format. This is necessary for ASCII text, files on some servers, but cannot
be used for transfer of binary executables, or files other than those composed strictly of
ASCII text.
The Binary option makes FTP treat all transfers to and from the remote server in a
binary format, which is necessary for binary executables, or very generally, for files
that are not composed strictly of ASCII text.
There is no special checking on the selections to determine if this is appropriate. For
example, if you select a .exe file and select ASCII as the transfer type, you will not be
notified.
2) To toggle the Sound upon completing operations option, press the Red Bell button
on the Settings tab. This option will enable the system sound upon connect, and
successful download or upload of a file or files.
3) To change the confirmation settings, check the Copy, Append, Delete or Overwrite
check boxes if you want to be prompted to confirm whether to continue when you are
performing the corresponding file operation.
4) To specify a port number, enter it in the edit field (if you wish to communicate via a
specific port on the FTP server). Otherwise, leave this field's default as 21.
This port number will be used throughout the session. An optional port number may be
supplied, in which case FTP will attempt to contact a FTP server at that port. Most
servers accept FTP connection requests on port 21, but there are those that do not (for
security or other reasons). Port number 21 is usually used for FTP clients.
5) When the Passive Transfers check box is disabled, then a FTP server will (normally)
try to establish connection with your FTP client and perform operations. When enabled,
this mode makes a FTP server passive (with the PASV command) so your FTP client
will try to connect to a FTP server. This mode is useful when your PC is behind a
firewall or proxy server.
Back | Previous | Next
www.labf.com
file:///C|/riina/LABTAM/labfcom/ftpaxe/man_08k.html (2 of 2) [17.5.2001 11:49:24]
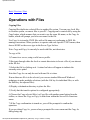
Operations with Files
Back | Previous | Next
Operations with Files
Copying Files
Copying files duplicates selected files to another file system. You can copy local files
to a remote system, or remote files to your PC. Copying can be carried out by using the
Copy button, which assumes that you want to use the same file name, or the Copy As
button, which will prompt you for a new name for the file.
Use Copy As to transfer UNIX files with a file name not conforming to DOS file
naming conventions. When you have to operate with such 'specific' UNIX names, then
choose NONE as the server type in the Server Type list box.
Note: Copy and Copy As can only be used with files, not directories.
To copy a file:
1) Connect to a server, using a valid server profile.
2) Navigate through either the local or remote directories to locate a file of your interest
in the file list.
3) Select the file by clicking on it. A status bar letter will appear to indicate the
currently active panel.
Note that Copy As can only be used with one file at a time.
If more than one file is to be selected, you can use standard Microsoft Windows'
techniques to make multiple selections (with the Ctrl key for individual files, or with
the Shift key for adjacent files).
4) Display a destination directory to place the files.
5) Verify that the transfer options be configured appropriately.
6) Choose the Copy selected file(s) or Copy file with another name button from the
toolbar, or choose the Copy or Copy As item from within the Server/File Functions
menu.
7) If the Copy confirmation is turned on, you will be prompted to confirm the
operation.
If you are doing Copy As, you are always prompted for a new name and the Copy As
dialog brings up.
file:///C|/riina/LABTAM/labfcom/ftpaxe/man_08l.html (1 of 4) [17.5.2001 11:49:25]
Operations with Files
8) If files exist with the same names as the selected source files in the destination
directory and the Overwrite confirmation is on, the Overwrite dialog will bring up.
You can choose Yes to overwrite the file, or choose NO to skip copying the file.
You can choose Yes to All to overwrite the rest of selected files.
9) While the transfer is in progress, the transfer status is displayed.
If you press the Cancel button, the Copy operation will be cancelled, but any files that
have already been copied will exist on the target file system.
You can Copy, not Copy As, by just dragging the selected files and dropping them onto
the target panel to begin the operation.
Appending One File to Another
Appending a file concatenates it to another file. You may append a local file to a
remote one.
Note: Appending can only be used with files, not directories.
To append a file:
1) Navigate through your local directories tree and a file list to locate a file of your
interest.
2) Select the local file by clicking on it.
3) Display a destination directory where to append the file.
4) Verify that the transfer options be configured appropriately.
5) Press the Append file to another button on the toolbar, or choose the Append item
from within the Server/File Functions menu.
6) If the Append confirmation is turned on, you will be prompted to confirm the
operation.
You can choose NO to skip appending a selected file.
The default is to use the same file name in the current directory on the remote file
system (to which you are moving the file).
Note: If you press the Cancel button on the transfer progress dialog, your destination
file will be invalid!
Renaming Files
Renaming a file changes the name of the file. Rename does not support simultaneous
moving that file. You may rename both local and remote files. Rename will prompt for
a new name for the highlighted file. The new name will replace the old one, providing
your login grants you permission to rename files on the server to which FTP is
file:///C|/riina/LABTAM/labfcom/ftpaxe/man_08l.html (2 of 4) [17.5.2001 11:49:25]
Operations with Files
attached.
Note: Rename can only be used for files, not directories.
To rename a file:
1) Select a file of your interest in the local or remote file list. You may not select
multiple files to be renamed.
2) Press the Rename selected file button on the toolbar, or choose the Rename item
from within the Server/File Functions menu. The file name will turn into edit field with
the file name highlighted.
3) Enter a new name for the file in the field, using standard Microsoft Windows'
techniques.
4) Press the Enter key to complete renaming, or ESC to cancel it.
Deleting Files
Deleting a file removes it from its file system. You can delete local and remote files.
This option will delete the currently highlighted remote files, provided that your
account on the server to which the FTP program is connected permits deletion.
To delete files:
1) Navigate through either the local or remote directories to locate files of your interest
in the file list.
2) Select one or several files.
If more than one file is to be selected, you can use standard Microsoft Windows'
techniques to make multiple selections.
3) Press the Delete selected files button on the toolbar, or choose the Delete item from
within the Server/File Functions menu. Alternatively, you can simply press the Delete
key on your keyboard.
4) If the Delete confirmation is turned on, you will be asked to confirm the operation.
You can choose Yes to remove the current file.
You can choose No to skip removing the current file.
You can choose Yes to All to remove the rest of selected files.
If you press the Cancel button, the removal will be cancelled, but any files that have
already been deleted cannot be restored.
Re-getting or Re-putting Files Transferred Partially
Retransfer acts like Copy except that if a selected file exists and is smaller than the file
on another side, the file is presumed to be a partially transferred copy of the file from
file:///C|/riina/LABTAM/labfcom/ftpaxe/man_08l.html (3 of 4) [17.5.2001 11:49:25]
Operations with Files
another side and the transfer is continued from the apparent point of failure. This option
is useful when transferring very large files over networks that are prone to dropping
connections.
To retransfer a file:
1) Select a file of your interest as for Copy. A status bar letter will indicate the
currently active panel.
2) Choose the reTransfer item from within the Server/File Functions menu, or press the
Reget or Reput selected file button on the toolbar.
Previewing Files
FTP allows you to display a portion (up to the first 32Kb) of specified client or server
files in the Preview window. To preview a file, select it from a file list box and click
the View selected file to Notepad button on the toolbar, or choose the Preview item
from within the Server/File Functions menu.
If you are previewing a server file, FTP transfers data from the server file to a
temporary file on your PC, cancels the transfer after receiving 32K bytes, and then calls
the Notepad program to display the contents of the temporary file. When you close the
window, temporary files are removed.
FTP always uses the ASCII file transfer method for previewing server files.
Undisplayable characters in a binary file are changed to a period.
Back | Previous | Next
www.labf.com
file:///C|/riina/LABTAM/labfcom/ftpaxe/man_08l.html (4 of 4) [17.5.2001 11:49:25]
Operations with Directories
Back | Previous | Next
Operations with Directories
Making Directories
You may create a directory on the FTP server or on one of your local drives. Use this
option to create a new folder in the directory that is being displayed in the active panel.
The remote option is only available if a server connection is active. Your user
permissions must include the right to create directories.
To create a directory:
1) Navigate through either the local or remote directories to locate a directory of your
interest where you wish to create a new one.
2) From within the Server menu, choose the New Folder item. The edit field will
appear with the default folder name highlighted.
Also, you can create a remote directory by pressing the right mouse button on the
empty space inside the Remote files tab and choose New Folder in the drop-down
menu.
3) Enter a new name for the folder in the field, using standard Microsoft Windows'
techniques.
Removing Directories
You may remove a directory on the FTP server or on one of your local drives. You can
delete a file directory only if it is empty. Removing a directory on the FTP server is
only available if a server connection is active. Your user permissions must include the
right to remove directories.
To remove a directory:
1) Navigate through either the local or remote directories to locate a directory of your
interest.
2) Select the directory or folder you wish to remove.
3) From within the Server menu, choose the Remove Folder item. The highlighted
directory will be removed without any confirmation (if empty).
Copying Directories
You may copy a directory from your PC onto the FTP server, or from the FTP server to
file:///C|/riina/LABTAM/labfcom/ftpaxe/man_08m.html (1 of 2) [17.5.2001 11:49:27]
Operations with Directories
your local drives. The remote option is only available if a server connection is active.
Your user permissions must include the right to create directories.
You can copy a full sub-tree structure (all files with all subdirectories) or the first-level
files only.
To copy a directory:
1) Navigate through either the local or remote directories to locate a directory of your
interest.
2) Verify that the transfer options be configured appropriately.
3) From within the Server menu, choose the Copy Directory... item. A dialog box will
appear on your screen prompting you to specify a destination directory and a mode of
operation.
4) Specify the destination directory if it differs from the current one.
5) Check the Include Subdirectories check box as you need. If checked, this check box
enables copying the selected directory sub-tree and all files from all subdirectories.
Otherwise, only the selected directory and its files will be copied.
6) Click the Copy button to begin copying, or Cancel to cancel the operation.
Back | Previous | Next
www.labf.com
file:///C|/riina/LABTAM/labfcom/ftpaxe/man_08m.html (2 of 2) [17.5.2001 11:49:27]
The Quote Tab
Back | Previous | Next
The Quote Tab
The Quote tab allows you to communicate with a FTP server in a command line mode
while your connection to the server is active.
To dismiss the Quote dialog, just select another tab from the main TabForm.
Determining Commands Supported by the Server
Different FTP servers can support different subsets of available FTP commands. This
may cause a server to be unable to execute certain commands. To determine commands
your FTP server supports:
1) Choose Show commands supported by the server.
2) Press Enter.
file:///C|/riina/LABTAM/labfcom/ftpaxe/man_08n.html (1 of 2) [17.5.2001 11:49:28]
The Quote Tab
A list of commands supported by that server will be displayed in the Response field.
Getting Help on Command
You can get help for any individual command. To get help for a specific FTP
command:
1) Choose Get help on command and enter the name of the command in the input field.
2) Press Enter.
The FTP server's help for that command will be displayed in the Response field.
Sending a String to the FTP Server
You can forward a command directly to the FTP server to execute it. To send a string:
1) Make sure your current local/remote directories are as you need.
2) Enter a command with proper arguments in the input field.
3) Press Enter to execute the command
A response from the server will be displayed in the Response field.
Note: commands that require a data connection, such as STOR, NLST, and LIST, will
not work with the current version of the FTP utility.
Back | Previous | Next
www.labf.com
file:///C|/riina/LABTAM/labfcom/ftpaxe/man_08n.html (2 of 2) [17.5.2001 11:49:28]
Running FTP with Command Line Parameters
Back | Previous | Next
Running FTP with Command Line
Parameters
Running FTP with Command Line Parameters
You can launch FTP with the command line parameter:
PATH\ftp.exe -xini <IniFilePath>
where <IniFilePath> specifies a full path to a specific ini-file and PATH indicates your
nfsAxe home directory.
This feature allows you to run several FTP sessions each with its own ini-file (i.e.,
settings).
In order to do so, you can create a new FTP shortcut (e.g., in the nfsAxe Programs'
folder) and fill in the Target field in Properties of it with the command. By default, the
field contains a call of FTP with no arguments, and the xwp.ini file will be used in this
case.
To create your specific ini-file, you can copy the xwp.ini file and then change parameters
with the FTP utility as you need by starting it with the command line parameter.
Back | Previous | Next
www.labf.com
file:///C|/riina/LABTAM/labfcom/ftpaxe/man_08o.html [17.5.2001 11:49:28]
9. TFTP
Back | Previous | Next
9. TFTP
This chapter describes how to start and use the TFTP program supplied with ftpAxe.
TFTP is a file transfer program that allows you to transfer files between your PC and a
remote computer using the DARPA standard Trivial File Transfer Protocol. The
program can transfer files in two different format types: the ASCII format is used for
text files, and the binary format is used for binary files.
In order for ftpAxe to communicate with a remote computer, that computer must also
have a server implementation of TFTP.
You can run multiple TFTP programs simultaneously in separate windows.
Back | Previous | Next
www.labf.com
file:///C|/riina/LABTAM/labfcom/ftpaxe/man_09.html [17.5.2001 11:49:30]
Starting and Terminating the TFTP Program
Back | Previous | Next
Starting and Terminating the TFTP Program
You can start the TFTP program by double-clicking on the TFTP icon in the ftpAxe
Programs' folder:
The TFTP window will appear on your screen:
You can terminate TFTP by double-clicking on the Control Menu box or by clicking
Exit on the TFTP menu bar.
Back | Previous | Next
www.labf.com
file:///C|/riina/LABTAM/labfcom/ftpaxe/man_09a.html [17.5.2001 11:49:32]
TFTP Menu Options
Back | Previous | Next
TFTP Menu Options
The TFTP menu bar displays five menus: Exit, Settings, PutFiles, GetFiles and Help.
The Exit menu terminates the TFTP program, and the Help menu displays any help
information available about the TFTP. The other three are described below.
The Settings Menu
The Settings menu allows you to set up parameters and modes of transfers. When you
select this menu, a dialog box will appear:
You can cancel any changes you make to the dialog box by clicking on Cancel. By
clicking on OK, any new settings you make become the defaults for future TFTP
sessions.
The following input fields and check boxes are available:
Host
This field is used to specify a network node name or address of the host used for
file:///C|/riina/LABTAM/labfcom/ftpaxe/man_09b.html (1 of 3) [17.5.2001 11:49:33]
TFTP Menu Options
transfers. When you click on the scroll arrow beside the Host box, a drop-down box
will display host definitions being in your hosts file. To select a host, click on an
appropriate definition.
File(s)
This field is used to specify one or more names of files you are about to transfer. File
names are separated by a space.
Remote Directory
This field is used to specify a file directory on the host.
Local Directory
This field is used to specify a file directory on your PC.
Per-packet retransmission timeout (sec)
This field lets you set the per-packet retransmission timeout, in seconds. The default
setting is 5 sec.
Total retransmission timeout (sec)
This field lets you set the total retransmission timeout, in seconds. The default setting
is 25 sec.
Binary Mode
This check box is used to toggle between ASCII and binary modes for transfers. The
default setting is disabled.
Trace
This check box allows to toggle packet tracing. The default setting is disabled.
Verbose
This check box is used to toggle verbose mode of transfers. The default setting is
disabled.
The PutFiles Menu
The PutFiles menu initiates putting a file or set of files to the remote directory, all
specified in the Settings dialog box. The remote host is assumed to be a UNIX
machine. Note, for every sent file the UNIX site file is to exist with the same name and
the permission to write for all user categories.
The GetFiles Menu
The GetFiles menu initiates getting a file or set of files from the remote directory, all
specified in the Settings dialog box. Note, every received file is to have the permission
to read for all user categories.
Back | Previous | Next
file:///C|/riina/LABTAM/labfcom/ftpaxe/man_09b.html (2 of 3) [17.5.2001 11:49:33]
TFTP Menu Options
www.labf.com
file:///C|/riina/LABTAM/labfcom/ftpaxe/man_09b.html (3 of 3) [17.5.2001 11:49:33]
10. Ping
Back | Previous | Next
10. Ping
This chapter describes how to start and use the Ping utility supplied with ftpAxe.
You can test that the TCP/IP transport is installed and configured correctly by using the
Ping utility. Ping can isolate network hardware problems and incompatible
configurations by allowing you to verify a physical connection to a remote host.
Ping communicates with only one remote host at a time. However, you can run multiple
Ping sessions simultaneously in separate windows with each session connected to a
different host.
Back | Previous | Next
www.labf.com
file:///C|/riina/LABTAM/labfcom/ftpaxe/man_10.html [17.5.2001 11:49:35]
Starting and Terminating the Ping Utility
Back | Previous | Next
Starting and Terminating the Ping Utility
You can start the Ping utility by double-clicking on the Ping icon in the ftpAxe
Programs' folder:
The Ping window will appear on your display:
You can close the Ping window by double-clicking on the Control Menu box, or by
selecting Exit on the Ping menu bar.
file:///C|/riina/LABTAM/labfcom/ftpaxe/man_10a.html (1 of 2) [17.5.2001 11:49:37]
Starting and Terminating the Ping Utility
Back | Previous | Next
www.labf.com
file:///C|/riina/LABTAM/labfcom/ftpaxe/man_10a.html (2 of 2) [17.5.2001 11:49:37]
Ping Menu Options
Back | Previous | Next
Ping Menu Options
The Ping menu bar displays five menus: Exit, Settings, Start, Stop and Help. The Exit
menu terminates the Ping utility, and the Help menu displays any help information
available about the Ping. The other three are described below.
The Settings Menu
The Settings menu allows you to set up parameters of the Ping session. When you
select this menu, a dialog box will appear:
You can cancel any changes you make to the dialog box by clicking on Cancel. By
clicking on OK, any new settings you make become the defaults for future Ping
sessions.
The following input fields and check boxes are available:
Host IP
This field is used to specify a network node name or address of the remote host, which
you wish to verify a physical connection to. When you click on the scroll arrow beside
the Host IP box, a drop-down box will display host definitions located in your hosts
file. To select a host, click on an appropriate definition.
Interval
This field lets you set a time interval between two neighboring data packets, in
seconds.
file:///C|/riina/LABTAM/labfcom/ftpaxe/man_10b.html (1 of 2) [17.5.2001 11:49:38]
Ping Menu Options
Trace
This check box allows to toggle packet tracing. The default setting is disabled.
The Start Menu
The Start menu initiates a Ping session with the host specified in the Settings dialog
box. Your PC sends a sequence of data packets to the host with the time interval
specified in the Settings dialog box. When the connection between your PC and the
host exists, the PC will receive a response after every packet sent. If the Ping finds the
host or IP address, it will return the message (or IP address) is alive. If you get this
message, then you know that the TCP/IP transport is set up correctly.
If there are any hardware problems, please check that your cable connection is good,
and check to see if the host can ping back to your PC.
The Stop Menu
The Stop menu terminates the Ping session with the remote host specified in the
Settings dialog box.
Back | Previous | Next
www.labf.com
file:///C|/riina/LABTAM/labfcom/ftpaxe/man_10b.html (2 of 2) [17.5.2001 11:49:38]
11. LPR - Remote Printing
Back | Previous | Next
11. LPR - Remote Printing
This chapter describes how to start and use the LPR program supplied with ftpAxe.
LPR is a network printing program that allows access to printers attached to remote
computer systems on your network. Of course, you will need to have access to a
computer that will accept print jobs from you. The computer must support the Berkeley
Line Printer protocol, and your PC name must be defined in the /etc/hosts.equiv or
/etc/hosts.lpd file.
You can specify a number of copies, titles and banner pages, print one or several files
residing on your PC, view print jobs in the queue, remove jobs from the queue.
You can run multiple LPR programs simultaneously in separate windows.
Back | Previous | Next
www.labf.com
file:///C|/riina/LABTAM/labfcom/ftpaxe/man_11.html [17.5.2001 11:49:39]
Starting and Terminating the LPR Program
Back | Previous | Next
Starting and Terminating the LPR Program
You can start the LPR program by double-clicking on the LPR icon in the ftpAxe
Programs' folder:
The LPR window will appear on your display:
You can then enter the information required to get access to a remote printer, specify job
options and print your files.
In order to terminate the LPR program, click on the Exit button.
Back | Previous | Next
www.labf.com
file:///C|/riina/LABTAM/labfcom/ftpaxe/man_11a.html (1 of 2) [17.5.2001 11:49:40]
Starting and Terminating the LPR Program
file:///C|/riina/LABTAM/labfcom/ftpaxe/man_11a.html (2 of 2) [17.5.2001 11:49:40]
Entering LPR Info
Back | Previous | Next
Entering LPR Info
This section describes the LPR items you can use to print your files. The following
items are available:
Printer
Your output is sent to the printer identified by a server/printer combination shown in
the Printer box. All server/printer combinations which the program can connect to are
stored in the list of defined network printers. When you click on the scroll arrow beside
the Printer box, a drop-down box will display the contents of the list. To select a new
current printer, click on an appropriate printer definition.
Person
This field is used to specify an owner of your print jobs. When your output is sent to
the printer, the contents of the Person field identifies your print jobs in the Current
Queue Information box. The person name must not contain any spaces. It defaults to
your machine name unless set in the Person field.
Number of copies
This field is used to specify a number of copies you want to produce. The default
number of copies is 1. Note that the remote computer you are sending your print files
to may impose limits on how many copies you can produce.
Page width
This field is used to specify the page width. The default is 132 characters.
Current Queue Information Box
Since several people may want to use the same printer at the same time, and each job
may take a length of time to print, a job that you send may not be printed immediately.
Instead, it may have to wait in a queue until the printer is available. The Current Queue
Information box helps you to find out if your output has been printed. The remote
computer will be queried every few seconds and the status of the jobs it is processing
will be displayed in the box. The queue information display includes your jobs as well
as other peoples' jobs.
file:///C|/riina/LABTAM/labfcom/ftpaxe/man_11b.html (1 of 2) [17.5.2001 11:49:41]
Entering LPR Info
The Current Queue Information box is also used for selecting the print job you want to
cancel (see Cancelling Output below).
Options Box
This box consists of items allowing you to specify your job options.
Burst page
Print jobs are normally separated by a 'burst page' which identifies the owner of the
output. Printed on the burst page are the job classification and the job name. The Burst
page check box is used to toggle the burst page. If you prevent the burst page from
being printed, the Class name and Job name fields will become unavailable.
Class name
This field is used to specify the job classification printed on the burst page. The class
name must not contain any spaces. It defaults to your machine name unless set in this
field.
Job name
This field is used to specify the job name printed on the burst page. The job name must
not contain any spaces. It defaults to the name of the file being printed unless set in the
field.
File Type
This list box lets you choose the mode of file printing.The syntax of the text commands
corresponding to these modes is described in the lpr.inf file (see below). You can
delete, add, or edit (legal) command lines in this file as you wish.
Page title
This field is used to specify the page title other than the file name. Note that there must
not be any spaces within your title. You can specify the page title only if the Pages
check box is set to the enabled state. Page title defaults to the file name unless set in
the field.
Status Box
This box displays the current program status.
Back | Previous | Next
www.labf.com
file:///C|/riina/LABTAM/labfcom/ftpaxe/man_11b.html (2 of 2) [17.5.2001 11:49:41]
Printing Files
Back | Previous | Next
Printing Files
To print a file, click on the Print File button. The File(s) to Print dialog box will appear
on your display. Use dialog box items to select one or more files for printing. Locate and
select files to print and click OK. The file(s) will be sent over the network to the current
LPR printer and then printed.
Back | Previous | Next
www.labf.com
file:///C|/riina/LABTAM/labfcom/ftpaxe/man_11c.html [17.5.2001 11:49:42]
Configuring a Network Printer
Back | Previous | Next
UUsi kuva uusi uva
Configuring a Network Printer
To configure a printer available on your network, click on the Configure Printer button.
The Configure Network Printer dialog box will appear on your display:
Then you can add a new printer to the LPR printer list, or remove a printer from the list.
To close the Configure Network Printer dialog box, click on the Close button.
Adding a New Network Printer
Before you add a new printer to the LPR printer list, you must define a server/printer
combination. You can designate one as the default printer. The default printer will be the
current printer each time you start the LPR program.
Use the following items:
Host
This field is used to specify a network name or address of the print server computer.
When you click on the scroll arrow beside the Host box, a drop-down box will display
host definitions stored in your hosts file. To select a host, click on the appropriate
definition.
Printer name
file:///C|/riina/LABTAM/labfcom/ftpaxe/man_11d.html (1 of 2) [17.5.2001 11:49:44]
Configuring a Network Printer
This field is used to specify a name of the printer attached to the host in the Host edit box.
Use as default printer
This check box allows you to assign the printer you just defined as the default LPR
printer.
To add the printer you just specified to the LPR printer list, click on the Add button. The
new server/printer combination will be displayed in the Network printer list box.
Make sure that your PC name is defined in the /etc/hosts.equiv file or /etc/hosts.lpd file on
the host UNIX system, and the Page Width setting corresponds to your remote printer. If
there is no entry in the host's /etc/hosts.equiv file or /etc/hosts.lpd file for the user, and the
user tries to print a file, LPR responds with the host error message that the user has no
access to a line printer.
Deleting a Network Printer
In order to remove a printer from the LPR printer list, select an appropriate server/printer
combination in the Network printer list box, and then click on the Delete button. The
combination selected will disappear in the Network printer list box, and the printer will
become unavailable for use with the LPR program.
You can select and delete more than one printer at once.
Back | Previous | Next
www.labf.com
file:///C|/riina/LABTAM/labfcom/ftpaxe/man_11d.html (2 of 2) [17.5.2001 11:49:44]
Cancelling Output
Back | Previous | Next
Cancelling Output
If you change your mind after sending a file for printing, but before it has actually been
printed, you can cancel it. The status of the jobs the current LPR printer is processing is
displayed in the Current Queue Information box. Locate and double-click your job that
is awaiting print. A confirmation dialog box will then appear on your display. If you
click on the Yes button, the selected job will be cancelled.
Note that you can only cancel your own jobs.
Back | Previous | Next
www.labf.com
file:///C|/riina/LABTAM/labfcom/ftpaxe/man_11e.html [17.5.2001 11:49:44]
The lpr.inf file
Back | Previous | Next
The lpr.inf file
The lpr.inf file supplied with the package contains five commands (for more details see
the document Request For Comments #1179):
f - Print formatted file
This command causes the data file to be printed as a plain text file, providing page
breaks as necessary. Any ASCII control characters which are not in the following list
are discarded: HT, CR, LF, FF, and BS.
l - Print file leaving control characters
This command causes the specified data file to be printed without filtering the control
characters (as is done with the 'f' command).
o - Print PostScript output file
This command prints the data file to be printed, treating the data as standard PostScript
input.
p - Print file with 'pr' format
This command causes the data file to be printed with a heading, page numbers, and
pagination. The heading should include the date and time that printing was started, the
title, and a page number identifier followed by the page number. The title is the name
of file as specified by the 'N' command, unless the 'T' command (title) has been given.
After a page of text has been printed, a new page is started with a new page number.
(There is no way to specify the length of the page.)
r - File to print with FORTRAN carriage control
This command causes the data file to be printed, interpreting the first column of each
line as FORTRAN carriage control. The FORTRAN standard limits this to blank, "1",
"0", and "+" carriage controls.
v - Raster file
This command causes the data file to be printed with no data conversion.
Back | Previous | Next
file:///C|/riina/LABTAM/labfcom/ftpaxe/man_11f.html (1 of 2) [17.5.2001 11:49:45]
The lpr.inf file
www.labf.com
file:///C|/riina/LABTAM/labfcom/ftpaxe/man_11f.html (2 of 2) [17.5.2001 11:49:45]
12. LPD - Network Print Server
Back | Previous | Next
12. LPD - Network Print Server
This chapter describes how to start and use the LPD (Line Printer Daemon) program
supplied with nfsAxe.
LPD is a Network Print Server (daemon) that provides access to your local (attached to
your PC) and Microsoft-network-accessible printers across TCP/IP. Remote computers
must have the LPR program that supports the Berkeley Line Printer protocol (see
Request For Comments #1179).
(This RFC describes an existing print server protocol widely used on the Internet for
communicating between line printer daemons (both clients and servers).
The Berkeley versions of the UNIX operating system provide line printer spooling with
a collection of programs: lpr (assign to queue), lpq (display the queue), lprm (remove
from queue), and lpc (control the queue). These programs interact with an autonomous
process called the line printer daemon.)
Back | Previous | Next
www.labf.com
file:///C|/riina/LABTAM/labfcom/ftpaxe/man_12.html [17.5.2001 11:49:46]
Starting and Terminating the LPD Program
Back | Previous | Next
Starting and Terminating the LPD Program
You can start the LPD program by double-clicking on the LPD icon in the nfsAxe
Programs' folder.
Starting and Terminating the LPD Program
The LPD program determines accessible local (System) and Microsoft-network
(Network) printers and creates the Windows printers list. Then it creates the Available
printers list and modifies it with the previous information from the ini-file and your
directions, and then iconifies itself.
When you start the LPD program from the task bar, the main LPD window will appear
on your display, showing all printers found (system, network, and TCP printers).
file:///C|/riina/LABTAM/labfcom/ftpaxe/man_12a.html (1 of 2) [17.5.2001 11:49:48]
Starting and Terminating the LPD Program
You can then enter information required to provide or change access to them.
The following menu items in the LPD window are available:
Exit
Used to terminate the Network Print Server (LPD).
Status
Used to view the Available printers list with their states.
Settings
Used to change LPD settings (the printers list, queue directory and users' access).
Fonts
Used to change fonts for displaying the LPD window.
Help...
Used to display the About LPD dialog box and this help text.
Back | Previous | Next
www.labf.com
file:///C|/riina/LABTAM/labfcom/ftpaxe/man_12a.html (2 of 2) [17.5.2001 11:49:48]
Configuring the Network Print Server
Back | Previous | Next
Configuring the Network Print Server
To configure the Network Print Server (LPD), click on the Settings menu item. The
LPD Settings dialog box will appear on your display.
In the Available Printers group box, you can add a new TCP printer, change settings
for TCP printers, and remove a TCP printer. The TCP printers list contains printers
which the LPD program will control.
In the Queue Directory group box, you can specify a directory on your hard disk to be
used for printer's data streams.
In the User Access group box, you can specify a list of users who can print files via the
LPD program running on your PC.
To close the LPD Settings dialog box, click OK if you wish to save settings, otherwise
click on the Cancel button.
To display the Help window with this text, click on the Help button.
Available Printers group box
file:///C|/riina/LABTAM/labfcom/ftpaxe/man_12b.html (1 of 7) [17.5.2001 11:49:50]
Configuring the Network Print Server
Every Windows printer found during searching can be included into the Available
Printers list which the LPD program will control. Printers included must be given the
TCP Printer Name - the name by which the LPD and LPR programs will identify the
printer over the network.
Adding a new network printer
When you press on the Add... button, the LPD - Add Printer dialog box will appear on
your display.
The following items are available:
Windows Printers
This list box contains names of Windows printers not yet included into the Available
Printers list.
TCP/IP Printer name
This edit field is used to specify a TCP/IP name for a new printer you want to add into
the Available Printers list.
file:///C|/riina/LABTAM/labfcom/ftpaxe/man_12b.html (2 of 7) [17.5.2001 11:49:50]
Configuring the Network Print Server
Enable Banner
If this check box is enabled, the printer will print the banner page for any job.
Pause printing
If this check box is enabled, the LPD program will not allow jobs to be printed on the
printer.
Enable form feed at print end
If this check box is enabled, the printer will begin every job with a new page.
Hex code Bypass
If this check box is enabled, then the LPD program will scan the data it receives, and if
it finds the so-called By-pass sequence in the data stream it will convert the next two
characters into a hexadecimal byte and send it to the printer.
For example, a user specified the By-pass sequence as ^^. If the data stream received
is:
123^^1B45678^^2b90
the data output in HEX should be as follows:
31 32 33 1B 34 35 36 37 38 2B 39 30
Note: the hex characters after the By-pass sequence are case insensitive.
Bypass character/s:
This edit field is for specifying the By-pass sequence (one or more characters).
To add a new printer:
1) from within the Windows Printers list box, select a printer to be used as the TCP
printer;
2) specify the TCP/IP Printer name under which the printer will be known in the
TCP/IP network (the full name of a network printer consists of the hostname of your
PC and the TCP/IP name of a printer);
3) check all check boxes as you wish;
4) click OK if you wish to add the printer, otherwise click Cancel.
Note: To run the lpr utility, operating systems first register lpr-printer names. For
example, you have to use the admintool utility of the SunSolaris 2.x operating system
to add/modify/remove lpr-printers. TCP/IP Printer name must be one of the registered
lpr-printer names.
Changing printer settings
When you select a TCP Printer Name from within the Available Printers list box and
then click on the Edit... button, the LPD - Edit Printer dialog box will appear on your
display.
file:///C|/riina/LABTAM/labfcom/ftpaxe/man_12b.html (3 of 7) [17.5.2001 11:49:50]
Configuring the Network Print Server
Then you can change any settings for the selected TCP printer almost the same way as
in the Add Printer dialog box.
To edit a TCP printer: 1) from within the Windows Printers list box, select a printer to
be used as the TCP printer under the TCP/IP Printer Name shown below; 2) check all
check boxes as you wish; 3) click OK if you wish to save settings for the printer,
otherwise click Cancel.
Deleting a printer
In order to remove a TCP printer, select an appropriate TCP Printer Name from within
the Available Printers list box and then click on the Remove button.
Queue Directory group box
This box specifies the directory path showing where to save control and data files to be
printed on network printers. The subdirectories with TCP printers names will be
created in this directory.
use Windows network printers
file:///C|/riina/LABTAM/labfcom/ftpaxe/man_12b.html (4 of 7) [17.5.2001 11:49:50]
Configuring the Network Print Server
If this check box is enabled, both local and network printers will be included into the
Windows printers list (for Add and Edit). Otherwise, local printers will be used only.
Enable Trace
If this check box is enabled, the trace information is output to the main LPD window
and, simultaneously, to the lpd.ptr trace file in the WinaXe's home directory.
You can specify a queue directory by typing its full path name in the Queue Directory
edit field or selecting the name by browsing.
When you press the Browse... button, the Select LPD queue directory dialog box will
appear on your display.
The Current directory edit field lets you specify the queue directory path.
The Drives list box allows you to choose the drive for the directory.
The Directories list box lets you choose the queue directory in which subdirectories
file:///C|/riina/LABTAM/labfcom/ftpaxe/man_12b.html (5 of 7) [17.5.2001 11:49:50]
Configuring the Network Print Server
with TCP printers names will be created for queuing.
To close the dialog box, click OK if you wish to use the Current directory as the queue
one, otherwise click on the Cancel button.
User Access group box
You can support a list of users who are allowed to print files (with the LPR program)
via the LPD program running on your PC. Also you can modify the User access list
(add and remove user names).
If the Allow ALL users access check box is enabled, any user can use LPD on your
PC.
When you click on the User Access... button, the User Access dialog box will appear
on your display.
The User access list shows those users who are currently allowed to print files on
LPR-accessible printers via your LPD program.
To add a new user to the User access list, specify the user name in the New User edit
field and then click on the Add... button.
To remove a user from the User access list, select an appropriate name on it and click
on the Remove button.
To close the dialog box, click OK if you wish to save the modified list, otherwise click
on the Cancel button.
file:///C|/riina/LABTAM/labfcom/ftpaxe/man_12b.html (6 of 7) [17.5.2001 11:49:50]
Configuring the Network Print Server
Back | Previous | Next
www.labf.com
file:///C|/riina/LABTAM/labfcom/ftpaxe/man_12b.html (7 of 7) [17.5.2001 11:49:50]
Printers Status
Back | Previous | Next
Printer Status
When you choose the Status menu item, the LPD - Printer Status dialog box will appear on
your display.
You can view current states of all Available TCP printers (pause, ready, print).
Back | Previous | Next
www.labf.com
file:///C|/riina/LABTAM/labfcom/ftpaxe/man_12c.html [17.5.2001 11:49:51]
The "[LPDAEMON]" Section of the ini-file
Back | Previous | Next
The "[LPDAEMON]" Section of the ini-file
The "[LPDAEMON]" section of the ini-file may have the following entry lines you can
customize for particular needs and applications.
EnableRembak=1
to enable the AIX "Rembak" print service. In this case, the "/usr/lib/lpd/rembak" binary
file is skipped (i.e., it is not sent).
TextUnixToDos=1
to provide conversion of text files from UNIX to DOS format (adding LF after CR).
FilterIsV=1
to specify the v type (as for raster files, i.e. no data conversion) to every incoming data
file (see the lpr.inf file).
FontFace=
to set up a preferred font face name (to dispay messages in windows). The , "Courier
New", "Courier", font face priority is supported.
Back | Previous | Next
www.labf.com
file:///C|/riina/LABTAM/labfcom/ftpaxe/man_12d.html [17.5.2001 11:49:53]
Axessh manual
Back | Previous | Next
Appendix A
Keyboard Mapping File Format
The Keyboard Mapping file has two sections, [KEYS] and [COMPOSERS_XKK], each
consisting of keysym statements and possible comments. Text entered after a ';' sign is
ignored and will be treated as a comment.
A keysym specification uses a set of standard X numbers to describe a symbol. For
example, a lowercase 'a' has a special number code.
The KEYS Section
In the [KEYS] section, each keysym statement associates a set of one to four keysyms
with a physical key.
Synopsis of a statement is:
KEYnn = keysym1 [, keysym2 [, keysym3 [, keysym4]]]
'nn' is the identifying number of a PC's key. Every PC's key has an entry in the section.
The entry name is the text KEY followed by the decimal ScanCode number
(key_number) and followed by the letter 'E' if the key has the extended flag set.
keysym1 is the keysym associated with the key in a non-shifted state (Normal). This is
the only parameter that must be entered.
keysym2 is the keysym associated with the key when the key is Shifted.
keysym3 is the keysym associated with the key when a Mode-Shift key is pressed
(Alt-Gr).
keysym4 is the keysym associated with the Shift + Mode-Shift sequence (Shift +
Alt-Gr).
A Mode-Shift is a physical key which has a keysym value of 0xFF7E, (predefined as
the ModeSwitch symbol), and which is assigned to one of the modifiers MOD1 to
MOD5.
A full keysym specification consists of four numbers, each of which is in the range of 0
through 255 decimal (or 0x00 through 0xFF hex). The standard predefined X keysyms
use only the third and fourth numbers. The first two numbers are assumed to be zero.
nfsAxe accepts keysyms in the following three formats:
1) In the dotted notation, where up to four numeric components are separated by periods
file:///C|/riina/LABTAM/labfcom/ftpaxe/appendix_a.html (1 of 5) [17.5.2001 11:49:54]
Axessh manual
'.'. Each numeric component represents one of the four numbers that defines a keysym.
If a component is omitted, it is assumed to be zero in the left-most position. If two
components are omitted, the two left-most components are assumed to be zero, etc. For
example, if you enter the numbers
32.255
two of the four possible components are omitted. The keysym will be interpreted as
0.0.32.255
In the dotted notation, the two lines below both represent the same keysym:
255.0xFE
0.0.255.0xFE
2) A single numeric value containing up to four bytes specifications. Unspecified
numbers are assumed to be zeroes in the left-most position. For example:
0xFF20
represents the values 0xFF and 0x20. The keysym is interpreted as follows:
0.0.0xFF.0x20
Predefined symbols can be used instead of the keysym formats described above. The
following three symbols are predefined:
ModeSwitch 0xFF7E
VoidSymbol 0xFFFFFF
NoSymbol
0
You can get a full list of X-keys via the xmodmap utility of UNIX by using the -pm
and/or -pk options.
The values of keysyms for keys may be obtained via the /usr/openwin/demo/xev
X-Window's UNIX utility.
3) A keysym value can be of a composer type, i.e. the COMPxx entry exists in the
[COMPOSERS_XKK] section with the keysym value 'xx'. See the
[COMPOSER_XKK] section below for details of how composers work.
Examples:
[KEYS]
KEY30 = 97, 65
; KEY30 = 0x61, 0x41
; LATIN LETTER a / A
; (XK_a, XK_A);
just the same as the previous line
KEY80E= 255.84, 255.84 ; cursor DOWN / cursor DOWN
; KEY80E=0xff54, 0xff54 ; (XK_Down, XK_Down); just the same
file:///C|/riina/LABTAM/labfcom/ftpaxe/appendix_a.html (2 of 5) [17.5.2001 11:49:54]
Axessh manual
Examples of remapping
Suppose that you selected to use the us.kmf file (with the Xsettings utility) and you
want to change the keyboard mapping for Up(8) and Down(2) keys of the additional
keyboard and for the F1 key. You can find the following lines in the us.kmf file for
them:
KEY59=0xffbe, 0xffbe ; (XK_F1,XK_F1)
..........
KEY72E = 0xff52, 0xff52 ; (XK_Up,XK_Up)
KEY80E = 0xff54, 0xff54 ; (XK_Down,XK_Down)
By using the "xev" or "xmodmap -pk" commands on the SUN Xserver, you can get
keysyms for all keys. For example, you choose:
Help=0xff6a;
Paste=0xffcf;
Copy=0xffcd;
If you modify the lines of the us.kmf file as follows:
KEY59=0xff6a, 0xff6a ;(Help,Help)
..........
KEY72E = 0xffcf, 0xffcf ; (Paste,Paste)
KEY80E = 0xffcd, 0xffcd ; (Copy,Copy)
you will emulate the "Help" (F1), "Copy" ("Down") and "Paste" ("Up") functions of the
SUN keyboard.
The COMPOSERS_XKK Section
In many European languages (especially in France, Belgium and Holland), users need to
enter some special characters by combining a Diacritic (or composer) character and a
normal letter. For example, the user enters first the '^' sign and then the 'a' character,
then this should result in the 'b' keysym.
The [KEYS] section does not determine composer characters. The Composers are only
defined in the [COMPOSERS_XKK] section.
In the [COMPOSERS_XKK] section, each composer statement associates a set of key_
number map pairings with a keysym value.
Synopsis of the composer statement is:
COMPxx = key_number > key_number[S] [, key_number > key_number[S] ... ]
In the composer entry, COMP is the entry name and 'xx' is a decimal keysym value for
a composer key (in the range of character codes). The '>' sign defines single code
mapping (from the left to the right), while a comma separates possible map pairings.
The 'S' character, if exists, allows both cases for a key_number mapping pair, otherwise
lower case only.
file:///C|/riina/LABTAM/labfcom/ftpaxe/appendix_a.html (3 of 5) [17.5.2001 11:49:54]
Axessh manual
If for a keysym value 'xx' of a key (say, KEYcc), a composer entry COMPxx exists in
the [COMPOSERS_XKK] section (i.e. the XServer can find it there), then the 'cc' value
will not be sent to the XClient (otherwise, it will).
In the composer case, the XServer will save the keysym value 'xx' until the user presses
the next key. If the next key (say, KEYyy) is in the COMPxx entry (like 'yy > zz' in a
pair), then the XServer will send the value 'zz' from the pair to the XClient. If 'yy' is not
found in the COMPxx entry, then the XServer will send the composer's key_number 'cc'
and the second key_number 'yy'.
Note that the values 'yy' and 'zz' are in the range of character codes.
Note that if Composer is pressed twice, then the XServer will send the single value 'cc'
to the XClient.
Example:
[KEYS]
KEY18 =
KEY22 =
KEY23 =
KEY24 =
KEY30 =
KEY41 =
0x65, 0x45
0x75, 0x55
0x69, 0x49
0x6f, 0x4f
0x61, 0x41
94, 176
;
;
;
;
;
;
(XK_e, XK_E)
(XK_u, XK_U)
(XK_i, XK_I)
(XK_o, XK_O)
(XK_a, XK_A)
Circumflex Accent (^) /
DEGREE SIGN, RING ABOVE
(XK_asciicircum, XK_degree)
(XK_acircumflex, XK_Acircumflex)
(XK_ecircumflex, XK_Ecircumflex)
(XK_icircumflex, XK_Icircumflex)
; KEY41 = 0x5e, 0xb0
KEY162 = 0xe2, 0xc2
KEY170 = 0xea, 0xca
KEY174 = 0xee, 0xce
;
;
;
;
KEY180 = 0xf4, 0xd4
KEY187 = 0xfb, 0xdb
; (XK_ocircumflex, XK_Ocircumflex)
; (XK_ucircumflex, XK_Ucircumflex)
[COMPOSERS_XKK]
; Definition of Circumflex Accent as a composer
COMP94=30>162S,18>170S,23>174S,24>180S,22>187S
In this example, if the user presses (normally) the key 41 which is the circumflex accent
(on German keyboard), the XServer will check if the keysym value 94 is found in the
[COMPOSERS_XKK] section (the COMP94 entry), and if yes, then the XServer will
wait until the user enters the next character. If the next character is in the COMP94
entry (in our case 30), then the XServer will send 162 to the Xclient (both cases are
allowed). If the second key_number is not found in the COMP94 entry, then the
XServer will send the composer's key_number (in our case 41) and the second
key_number.
file:///C|/riina/LABTAM/labfcom/ftpaxe/appendix_a.html (4 of 5) [17.5.2001 11:49:54]
Axessh manual
Back | Previous | Next
file:///C|/riina/LABTAM/labfcom/ftpaxe/appendix_a.html (5 of 5) [17.5.2001 11:49:54]
Axessh manual
Back | Previous
Appendix B
Description of Terminal Capabilities
terminfo.ini is the ASCII file that describes the emulation capabilities of terminals. The
description is very similar to the TERMINFO source code of UNIX system.
The file consists of terminal sections. Each section begins with a header string - a logical
terminal name enclosed in brackets. The name is used to select the terminal type in the Telnet
Options/Settings/Type tab.
The section header is followed by a set of entry records which describes the emulation
capabilities of the terminal. Each record consists of a capability keyword, a '=' separator, and
one or more capability values separated by a ',' delimiter. White spaces after the ',' separator as
well as after the last value are ignored.
Any line may contain a comment. A comment begins with a ';' character on a line and lasts to
the end of the current line.
Normally there may be several groups of records in each terminal section:
- a group of terminal capability definitions (e.g., Lines, Columns, Colors, UseCRT, MG0,
MG1, RGB, UseCSI, Use2W, Use2HW, Tab8, TabSet).
- a group of X-keys definitions (for non-standard keys of keyboards, e.g., auxiliary keypads or
function keys). A X-keysym name followed by a '=' separator begins the record. X-keys
definitions may have a single value for the PC-layout mode, or a single value for the
VT-layout mode, or both. A '/' sign must precede the VT-layout mode value. In case of both
modes, the first value is for the PC-layout mode. A value is a code sequence of one or more
key codes (separated by a ',' delimiter) to be transmitted when you use the X-key defined. A
code is a decimal number in the range of 0...255 (to represent valid escape or control
sequences for the terminal).
Examples for VT240:
XK_Home=155,72 / 155,50,126 ; CSI H / CSI 2 ~
XK_KP_Home=155,72/143,119
; CSI H / SS3 w
XK_KP_Space=/143,117
; / SS3 u
- a group of user defined keys (UDK) definitions. You can reprogram them in the Telnet
Options/Settings/User Defined tab. A UDK's name followed by a '=' separator begins the
record. A value may be a sequence of one or more characters and/or hex codes (without any
separator) to be transmitted when you use the UDK defined.
file:///C|/riina/LABTAM/labfcom/ftpaxe/appendix_b.html (1 of 3) [17.5.2001 11:49:55]
Axessh manual
Examples:
Alt-F10=PRINT
; five characters
Shift-F1=0x1bOp ; one hex code 0x1b with two characters O and p
Terminal Parameter Settings
You can set up terminal capabilities by records with the following keywords and values:
Lines=number
The record specifies a number of lines on a screen of a terminal. (Example: Lines=24)
Columns=number
The record specifies a number of characters in a line. (Example: Columns=80)
Colors=number
The record specifies the maximum number of colors on the screen. (Example: Colors=16)
RGB=R.G.B, ...
The record specifies the palette description for colors to be used for color terminals instead of
default colors of MS Windows. Each color number (beginning at 0 to Colors-1) is represented
by R, G and B - the relative intensities for red, green, and blue primaries (each in the range of
0...255 decimal) to be used for a certain color. The RGB values indicate normal locations in
color space. The primaries in a triple are '.' separated while triples are separated by a ','
delimiter.
UseCSI=1
The terminal can (UseCSI=1) or cannot (UseCSI=0) use 8-bit control sequences.
UseCRT=1
The record defines to use the terminal or application mode for arrows keys instead of ANSI
mode (as default).
Use2W=1
The terminal can (Use2W=1) or cannot (Use2W=0) use characters with double width. (See
the control sequence Esc#6 for DEC terminals.)
Use2HW=1
The terminal can (Use2HW=1) or cannot (Use2HW=0) use characters with double height and
width. (See control sequences Esc#3 and Esc#4 for DEC terminals.)
Tab8=1
The terminal can use the 8-space default tab stops (in case the TabSet record below does not
exist).
file:///C|/riina/LABTAM/labfcom/ftpaxe/appendix_b.html (2 of 3) [17.5.2001 11:49:55]
Axessh manual
TabSet=n1,n2,...
The record defines the horizontal tabulation stop set to be used as the default tabulation set for
the terminal. Decimal numbers separated by a ',' delimiter (n1,n2,...) are column numbers for
horizontal tab stops. No values means the tabulation set is empty.
MG0i=inp.out,...
MG1i=inp.out,...
The records define re-mapping tables for the main character set (MG0) and for the alternate
character set (MG1). Each table consists of code pairs separated by a ',' delimiter. A code pair
has an input code (to be remapped), a '.' sign, and an output code from the character set used
to display characters. The codes must be a hex number. Tables may continue onto multiple
lines. The 'i' suffix in the keywords (MG0i or MG1i) shows the value for 'line number - 1'.
Example for AT386 (9 pairs for MG0 on 2 lines):
MG00=0x90.0xC9,0x91.0xBB,0x92.0xBC,0x93.0xC8,0x94.0xCD;
MG01=0x95.0xBA,0x97.0xB9,0x98.0xCA,0x99.0xCC;
Example for DEC terminals and XTERM (15 pairs for MG1 on 3 lines):
MG10=0x6A.0xD9,0x6B.0xBF,0x6C.0xDA,0x6D.0xC0,0x6E.0xC5;
MG11=0x6F.0xC4,0x70.0xC4,0x71.0xC4,0x72.0xC4,0x73.0xC4;
MG12=0x74.0xC3,0x75.0xB4,0x76.0xC1,0x77.0xC2,0x78.0xB3;
Back | Previous
file:///C|/riina/LABTAM/labfcom/ftpaxe/appendix_b.html (3 of 3) [17.5.2001 11:49:55]