1
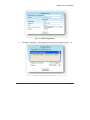
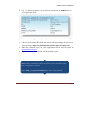
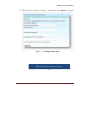
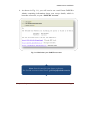
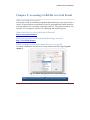
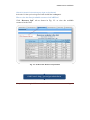
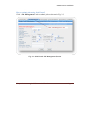
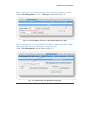
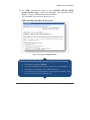
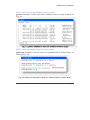
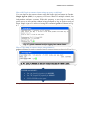
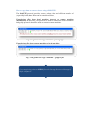
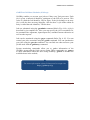
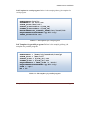
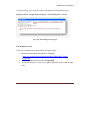
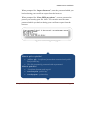
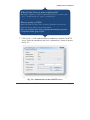
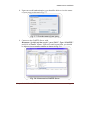
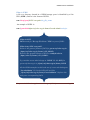
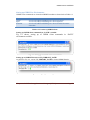
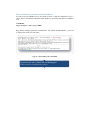
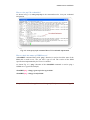
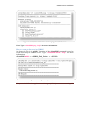
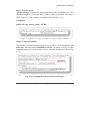
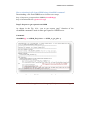
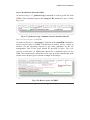
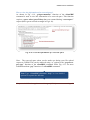
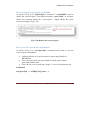
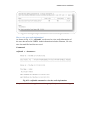
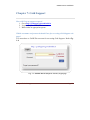
Garuda User’s Handbook First Edition GARUDA User’s Handbook Version 1.0 19 May 2011 CENTRE FOR DEVELOPMENT OF ADVANCED COMPUTING Acknowledgement Quite a few people are responsible, directly and indirectly, in the successful completion of this book to whom we owe our sincere gratitude. First of all, we would like to thank our respected Executive Director, Dr. Sarat Chandra Babu, for always being so enthusiastic and encouraging towards us. Special thanks to Dr. Subrata Chattopadhyay, for his direction and guidance in all our Garuda activities. Thanks are also due to Mr. R. Sridharan for having the faith in us and increasing our confidence time and again. We also wish to thank Dr. Prahalad Rao and Ms. Mangala, for lending their support to us whenever required. Many thanks to Ms. Divya and the whole Garuda operational team for their unending efforts for the Garuda project and in turn helping us in all our activities. Finally, we wish to express our appreciation for Ms. Prachi for helping us to construct meaningful grammatical sentences, which hopefully are also errorfree. Authors: S. Henry Sukumar & Santhosh J GARUDA Operational Team. Table of Contents Introduction .................................................................................................................. 1 Chapter 1: Steps to access GARUDA .......................................................................... 3 Chapter 2: Accessing GARUDA via Grid Portal ....................................................... 11 Chapter 3: Accessing GARUDA via Command line ................................................. 17 Chapter 4: Grid Command reference ......................................................................... 23 Chapter 5: GARUDA GridFTP Client ....................................................................... 45 Chapter 6: Garuda Storage Resource Manager (GSRM) ........................................... 53 Chapter 7: Grid Support ............................................................................................. 73 Appendix I: Glossary ................................................................................................. 78 Bibliography ............................................................................................................... 84 GARUDA User Handbook Introduction GARUDA is India's National Grid Computing initiative bringing together academic, scientific and Research communities for developing their data and compute intensive applications with guaranteed QoS. GARUDA grid is an aggregation of resources comprising of computational nodes, mass storage and scientific instruments distributed across the country. The nation-wide computational grid “GARUDA” spans across 17 cities with an aim to bring Distributed/Grid networked infrastructure to academic labs, research labs and industries in India. Reference: http://garudaindia.in Who This Book Is For This book is intended for the people who are interested in using the GARUDA Grid for meeting their computational needs. It expects basic knowledge about grid computing and UNIX. It provides an easy to follow user’s guide of Garuda with detailed step-by-step illustration of getting access to the Garuda and using it. Chapter Organization The first chapter focuses on steps to access Garuda i.e. getting a grid certificate and a Garuda account. The second and third chapters explain about the access mechanisms available in Garuda i.e. the Grid Job Submission Portal and the Command Line Interface. Introduction Page 1 GARUDA User Handbook The fourth chapter explains about the usage of the commonly used commands for the grid services. It is divided into three sections, which deal with Credential Management, Data Management and Job Management. The fifth chapter explains about the usage of Garuda Grid FTP client software. Garuda GridFTP Client is a GUI for performing file transfers using the GridFTP protocol. The sixth chapter explains about the usage of commonly used commands of Garuda Storage Resource Manager. The chapter seven explains about the mechanism by which users can report any problem they face while using Garuda. Introduction Page 1 Steps to access GARUDA GARUDA User Handbook Chapter 1: Steps to access GARUDA Getting access to GARUDA involves two steps: Step 1: Get Grid User Certificate from IGCA Visit http://ca.garudaindia.in/index.php/certificate/request-a-newcertificate/. Follow the steps mentioned below to apply for a user certificate. a. Download and fill up IGCA User Application Form : http://ca.garudaindia.in/docs/IGCA_User_Form_V1.pdf b. Register online to get a request no. : https://ca.garudaindia.in/cgibin/pub/pki?cmd=basic_csr (Supported browsers: Internet Explorer and Mozilla Firefox only). As depicted in Fig. 1.1: Enter the necessary details. Name: Full name of the applicant. E-Mail: Valid Email address for communication. Organization: Name of your institution/organization Telephone: Valid telephone no. for communication. Role: Default value “User”, for user certificate. Choose your nearest RA: Choose your RA for face to face meeting. Key size: Default value “2048”, is the strength of certificate. IGCA: Indian Grid Certification Authority RA: Registration Authority. Refer Appendix‐I for glossary and terms Chapter 1: Steps to access GARUDA Page 3 GARUDA User Handbook Fig. 1.1: Online Registration c. Clicking “Continue”, will generate a private key as shown in Fig. 1.2. Fig. 1.2: Key generation process Chapter 1: Steps to access GARUDA Page 4 GARUDA User Handbook d. Fig. 1.3: Shows the details of your request. Note down the SERIAL No. in your application form. Fig. 1.3: Get your request no “SERIAL” e. Choose your nearest RA from the below link and arrange for a Face to Face meeting. (http://ca.garudaindia.in/index.php/ra/contact-ra/) f. Mail the scanned copy of your application form and ID proof to [email protected] g. Your certificate information will be mailed to you. Note: Don’t uninstall browser or format your machine until your certificate is issued. Refer http://ca.garudaindia.in for more information. Chapter 1: Steps to access GARUDA Page 5 GARUDA User Handbook Step2: GARUDA Registration 1. Visit http://voms.garudaindia.in. Make sure you have your IGCA certificate uploaded in the web browser. 2. Upload your IGCA certificate file (.p12 format) using the browse button as shown in Fig. 1.4 and enter your password (the same password which you entered while exporting your certificate from the browser). “Garuda ID” is generated automatically by the system. Fig. 1.4: Garuda Credential upload. What if I don’t have a ‘.p12’ certificate file? Sol: Visit http://ca.garudaindia.in/index.php/information/faq/export‐the‐ certificates‐obtain‐pfxps12‐file/ Refer http://voms.garudaindia.in for more information. Chapter 1: Steps to access GARUDA Page 6 GARUDA User Handbook 3. The image below shows the acknowledgement page that you will receive once your certificate has been successfully uploaded to the GARUDA credential repository. Fig. 1.5: GARUDA Credential upload acknowledgement 4. Now you can see a list of available VO’s. Select your VO Name from the list. At least one VO registration is mandatory. E.g.: It can be the name of your working domain. Fig. 1.6: Select your VO What if my VO is not listed here? Sol: Send a mail to [email protected] Chapter 1: Steps to access GARUDA Page 7 GARUDA User Handbook 5. Fill the form as shown in Fig. 1.7 and click on “Register” button. Fig. 1. 7: VO Registration form VO stands for Virtual Organization Chapter 1: Steps to access GARUDA Page 8 GARUDA User Handbook 6. As shown in Fig. 1.8, you will receive an e-mail from GARUDA Admin containing information about your access details, which is hereafter referred to, as your “GARUDA Account”. Fig. 1.8: Mail about your GARUDA account Note: Save this mail for your future reference. For Garuda account related issues: grid‐[email protected] Chapter 1: Steps to access GARUDA Page 9 Accessing GARUDA via Grid Portal GARUDA User Handbook Chapter 2: Accessing GARUDA via Grid Portal What is job submission Portal? Grid portal is used for submitting sequential and parallel jobs to the grid. Grid is a cluster of heterogeneous workstations located at geographically distant locations, with the ultimate aim of sharing computing resources. The portal provides a web interface for viewing the resources, for submitting and monitoring jobs. What is the URL to access Grid Portal via Internet? http://portal.garudaindia.in How to access portal via NKN (National Knowledge Network)? http://192.168.60.40/gap2 Which username and password should I use to access portal? You need a GARUDA account for accessing Grid Portal. Refer Fig. 1.8 from chapter 1. Fig. 2.1: Shows the login form to access Grid Portal Note: You need to select a VO Name, only for the first time. Chapter 2: Accessing GARUDA via Grid Portal Page 11 GARUDA User Handbook Which VO should I select during my login to Grid Portal? Select the VO that you had registered with GARUDA in Chapter 1. How to view the list of available resources in GARUDA? Click “Resource Info” tab as shown in Fig. 2.2. to view the available resources in the Grid. Fig. 2.2: Grid Portal: Resource Information Grid Portal: http://portal.garudaindia.in Chapter 2: Accessing GARUDA via Grid Portal Page 12 GARUDA User Handbook How to submit jobs using Grid Portal? Click “Job Management” tab to submit jobs as shown in Fig. 2.3. Fig. 2.3: Grid Portal: Job Management Section Chapter 2: Accessing GARUDA via Grid Portal Page 13 GARUDA User Handbook How to check the status of the job and view or download output/error file? Click “Job Management” >>>> “Job Info” as shown in Fig. 2.4. Fig. 2.4: Get Job Status and view or download output/error files How to manage files stored in GRIDFS (GARUDA Head node) and GSRM (Garuda Storage Resource Manager) via Grid Portal? Click “File Management” tab as shown in Fig. 2.5. Fig. 2.5: Grid Portal: File Management Section Chapter 2: Accessing GARUDA via Grid Portal Page 14 Accessing GARUDA via Command line GARUDA User Handbook Chapter 3: Accessing GARUDA via Command line GARUDA Grid is connected across the country through NKN network of 1Gbps. Steps to access via NKN: 1. An interface node has been installed in each partner institution, which is hereafter referred to as “GARUDA INTERFACE NODE”. Any user, who wants to connect to GARUDA, should get an access to GARUDA INTERFACE NODE at his/her institution. 2. Contact your local system administrator to get the information about the GARUDA INTERFACE NODE located at your institution. Ex: IP address, reachability to gridfs.ctsf.cdac.org.in (GRIDFS). 3. Get the login access to GARUDA INTERFACE NODE in your institution; 4. Make sure you have IGCA certificate and GARUDA Grid account. (Refer Chapter 1) For WINDOWS Users: A. Download the program called “puTTY” from the below link: http://the.earth.li/~sgtatham/putty/latest/x86/putty.exe B. Double click and open putty.exe. This will open the puTTY configuration as shown in Fig. 3.1. Chapter 3: Accessing GARUDA via Command line Page 17 GARUDA User Handbook Fig. 3.1: PUTTY Interface for SSH connection C. Enter the “GARUDA INTERFACE NODE IP ADDRESS” in the “Hostname [or IP address]” text-box. Refer Fig. 3.1. D. Protocol: Select SSH. (Refer above Fig. 3.1) E. Click “open” button, you can see a terminal as shown in Fig. 3.2 F. Enter the username and password provided by the system administrator in your institute/organization. Chapter 3: Accessing GARUDA via Command line Page 18 GARUDA User Handbook Fig. 3.2: Login to GARUDA Interface Node. G. Make sure that you can reach GRIDFS using PING command as shown in Fig. 3.3. (gridfs.ctsf.cdac.org.in – GARUDA Grid Head Node). Fig. 3.3: Check for reachability to gridfs What is PuTTY? PuTTY is a program that allows windows users to connect to UNIX like machines. Chapter 3: Accessing GARUDA via Command line Page 19 GARUDA User Handbook H. Use SSH command to login to the GARUDA HEAD NODE (gridfs.ctsf.cdac.org.in) with your username and password (Refer Chapter 1: Step 2) obtained from the GARUDA. The command is given below. Refer Fig. 3.4. SSH <username>@gridfs.ctsf.cdac.org.in Fig. 3.4: Login to Gridfs machine GARUDA HEAD NODE: gridfs.ctsf.cdac.org.in (192.168.60.40) This node is called as GRIDFS. You need a GARUDA Account to access this node. (Chapter 1) This node is reachable only via NKN Network As per the policy, internet users cannot login to GRIDFS. They have to use Grid Portal. (Chapter 2) Chapter 3: Accessing GARUDA via Command line Page 20 Grid Command reference GARUDA User Handbook Chapter 4: Grid Command reference What is Globus Toolkit? Globus Toolkit is a popular grid middleware among the scientific grid computing platforms. Globus incorporates not just job management but also storage management, security provisioning, data movement, monitoring. It is also a toolkit for developing additional services based on the same infrastructure, including agreement negotiation, notification mechanisms; trigger services, and information aggregation. How to set necessary environment variables in command line? Fig. 4.1 depicts the necessary command to set up Globus environment variable (GLOBUS_LOCATION) at gridfs machine. Note: The installation path of globus may vary on different clusters and environment variable would have been already set by the administrator. If not set, users can set as shown in the below fig. 4.1 Fig. 4.1: Setting globus environment variable Exporting Globus commands: As shown in Fig. 4.2, source command is used for exporting the globus commands and libraries in “PATH” environment variable in gridfs machine. Note: The installation path of globus may vary on different clusters. Fig. 4.2: Exporting globus commands and libraries in path Chapter 4: GARUDA Command Reference Page 23 GARUDA User Handbook How to download my credentials for using grid? myproxy-logon command is used to download user credentials from the credentials repository as shown in Fig. 4.3. Later these credentials can be used for accessing grid services. Fig. 4.3: Download your proxy for grid usage How to check the status of my credential/proxy? grid-proxy-info command is used to verify the status of user credentials as shown in Fig. 4.4 Fig. 4.4: grid-proxy-info command to check the validity of your credential Chapter 4: GARUDA Command Reference Page 24 GARUDA User Handbook How to check the list of available resources in grid? gwhost command is used to check the available resources in grid as shown in Fig. 4.5. Fig. 4.5: gwhost command to check the available resources in grid How to check my authentication to remote cluster? globusrun command is used to check user authentication to remote cluster as shown in Fig. 4.6. Fig. 4.6: globusrun command to check user authentication to remote cluster. Chapter 4: GARUDA Command Reference Page 25 GARUDA User Handbook How will I login to remote cluster using my proxy certificate? You can login to the remote cluster using the single sign-on feature in Garuda. Single sign-on (SSO) is a property of access control of multiple related, but independent software systems. With this property a user logs in once and gains access to all systems without being prompted to log in again at each of them. Single sign-on is achieved using the command gsissh as shown in Fig. 4.7. Fig. 4.7: gsissh command used for logging into remote cluster How to copy data to remote cluster using GSISCP? gsiscp command is used to transfer data to remote cluster as shown in Fig. 4.8. Fig. 4.8: gsiscp command is used for transferring data to remote cluster. GSISSH and GSISCP: Use ‘‐p’ (small p) option for GSISSH Use ‘‐P’ (capital P) option for GSISCP 2222: GSISSH service port. Chapter 4: GARUDA Command Reference Page 26 How to copy data to remote cluster using GRIDFTP? The GridFTP protocol provides secure, robust, fast and efficient transfer of (especially bulk) data. Data can be transferred from, Transferring files from local machine (source) to remote machine (destination): In this case, file protocol is used to contact the source machine and gsiftp protocol should be used to contact remote machine. Fig. 4.9: globus-url-copy command – file to gsiftp Transferring files from remote machine to local machine: Fig. 4.10: globus-url-copy command – gsiftp to file For transferring data to GSRM (Garuda Storage Resource Manager): Refer chapter 6. Third Party Transfer: Transferring files between machine B and machine C from machine A. E.g. transferring files between “gg-hyd” (located in Hyderabad) and “gg-che” (located in Chennai) from GRIDFS (located in Bangalore). Fig. 4.11: globus-url-copy command – gsiftp to gsiftp In the above examples, the “local machine” refers to the machine from where the globus‐url‐copy command is invoked. GSIFTP GSIFTP provides more reliable and high performance file transfer for Grid computing applications. User should have valid proxy before invoking gsiftp transfer. globus‐url‐copy is the command used for invoking gsiftp transfers GSIFTP can also be called as GridFTP. For more information about globus and its usage visit http://globus.org GARUDA User Handbook GARUDA Grid Meta Scheduler (Gridway): GridWay enables you to treat your jobs as if they were Unix processes. Each job is given a numerical identifier, analogous to the PID of a process. This value is called the Job identifier, JID for short. If the job belongs to an array job, it will also have an array identifier, AID for short. A job index within an array is called the task identifier, TID for short. Jobs are submitted using the gwsubmit command (Refer Fig. 4.14). A job is described by its template file. Here you can specify the job's executable file, its command line arguments, input/output files, standard stream redirection as well as other aspects. Jobs can be monitored using the gwps command (Refer Fig. 4.15). You can control your jobs at runtime using the gwkill command. You can synchronize your jobs using the gwwait command. You can find out what resources your job has used with the gwhistory command. System monitoring commands allow you to gather information of the GridWay system and the Grids you are using. These commands are: gwuser to show information about the users using GridWay; gwhost to monitor the available hosts in the testbed; For more information about Gridway and its usage visit http://gridway.org Chapter 4: GARUDA Command Reference Page 29 GARUDA User Handbook What are the various states of my job? Fig. 4.12: Various states of a gridway job A job can be in one of the following dispatch states (DM state): Pending (pend): The job is waiting for a resource to run on. The job reaches this state when it is initially submitted by the user or when it is restarted after a failure, stop or self-migration. Hold (hold): The owner (or GridWay administrator) has held the job. It will not be scheduled until it receives a release signal. Prolog (prol): The job is preparing the remote system, by creating the execution directory in the remote host and transferring the input and restart (in case of migration) files to it. Pre-wrapper (prew): The job is making some advanced preparation tasks in the remote resource, like getting some data from a service, obtaining software licenses, etc. Chapter 4: GARUDA Command Reference Page 30 GARUDA User Handbook Wrapper (wrap): The job is executing the Wrapper, which in turns executes the actual application. It also starts a self-monitoring program if specified. This monitor, watches the raw performance (CPU usage) obtained by the application. Epilog (epil): The job is finalizing. In this phase it transfers the output and restart (in case of failure, stop or self-migration) files and cleaning up the remote system directory. Migrate (migr): The job is migrating from one resource to another, by canceling the execution of Wrapper and performing finalization tasks in the old resource (like in Epilog state) and preparation tasks in the new resource (like in Prolog state). Stopped (stop): The job is stopped. If restart files have been defined in the Job Template, they are transferred back to the client, and will be used when the job is resumed. Failed (fail): The job failed. Done (done): The job is done and the user can check the exit status. Overview of gridway job template Syntax: <VARIABLE> = ["]<VALUE>["] E.g. EXECUTABLE = /bin/ls Table 4.1 and 4.2 shows the sample job templates of a serial and parallel application respectively. Chapter 4: GARUDA Command Reference Page 31 GARUDA User Handbook Job Template for serial program: Below is the sample gridway job template for serial program. EXECUTABLE=/bin/ls ARGUMENTS=-la file.txt STDIN_FILE=/dev/null STDOUT_FILE=stdout.${JOB_ID} STDERR_FILE=stderr.${JOB_ID} ENVIRONMENT=LD_LIBRARY_PATH=/usr/local/lib REQUIREMENTS=HOSTNAME="gg-blr.tfg" INPUT_FILES=file.txt Table 4.1: Job template of a serial program Job Template for parallel program: Below is the sample gridway job template for parallel program. EXECUTABLE = /home/tfg/santhosh/test/pi STDIN_FILE = /dev/null STDOUT_FILE = ${JOB_ID}.out STDERR_FILE = ${JOB_ID}.err REQUIREMENTS = LRMS_TYPE != "Fork" REQUIREMENTS=HOSTNAME="gg-blr.tfg" TYPE = "mpi" NP = 80 Table 4.2: Job template of a parallel program Chapter 4: GARUDA Command Reference Page 32 GARUDA User Handbook Job template options overview General: Variable NAME Description Name of the job (filename of the Job Template by default). Execution: Variable EXECUTABLE Description The executable file. Example: EXECUTABLE = bin.${ARCH} EXECUTABLE = /bin/ls Executable file can be also be taken from GSRM, ARGUMENTS ENVIRONMEN T TYPE NP EXECUTABLE = gsiftp://gsrm.ctsf.cdac.org.in/dpm/ctsf.cdac.org.in/home/<VO _NAME>/<executable_file> Arguments to the above executable. Example: ARGUMENTS = “${TASK_ID}” User defined, comma-separated, environment variables. Example: ENVIRONMENT = SCRATCH_DIR /tmp, LD_LIBRARY_PATH=/usr/local/lib Type of job. Possible values are single (default), multiple and mpi, with similar behavior to that of GRAM jobs. Number of processors in MPI jobs. For multiple and single jobs it defines the count parameter in the RSL. Chapter 4: GARUDA Command Reference Page 33 GARUDA User Handbook I/O files: INPUT_FIL ES A comma-separated pair of local remote filenames. If the remote filename is missing, the local filename will be preserved in the execution host. Example: INPUT_FILES = param.${TASK_ID} param, inputfile INPUT_FILES = gsiftp://machine/tmp/input_exp1 input INPUT_FILES = file:///etc/passwd INPUT_FILES = test_case.bin INPUT_FILES = gsiftp://gsrm.ctsf.cdac.org.in/dpm/ctsf.cdac.org.in/home/<VO_NA ME>/input.txt OUTPUT_FI LES (Input files can be read from GSRM server given above) A comma-separated pair of remote filename local filename. If the local filename is missing, the remote filename will be preserved in the client host. Example: OUTPUT_FILES = output file, binary binary.${ARCH}.${TASK_ID} OUTPUT_FILES = output.bin /tmp/outfile GridFTP URL: The file will be copied to the given GridFTP url OUTPUT_FILES = out gsiftp://storage_servere/~/output.${TASK_ID} OUTPUT_FILES = test_case.bin OUTPUT_FILES = http://gsrm.ctsf.cdac.org.in/dpm/ctsf.cdac.org.in/home/<VO_NA ME>/output.out (Output files can be directly stored in GSRM server as given above) Chapter 4: GARUDA Command Reference Page 34 GARUDA User Handbook Standard streams: STDIN_FILE Standard input file. Example: STDIN_FILE = /dev/null STDOUT_FILE STDIN_FILE = In/input.${JOB_ID} Standard output file. Example: STDOUT_FILE = stdout_file.${JOB_ID} STDERR_FILE STDOUT_FILE = Out/ofile Standard error file. Example: STDERR_FILE = stderr_file.${JOB_ID} Resource selection: REQUIREMENTS A Boolean expression evaluated for each available host, if the evaluation returns true the host will be considered to submit the job. Example: REQUIREMENTS = ARCH = “i686” & CPU_MHZ > 1000 A numerical expression evaluated for each candidate host RANK (those for which the requirement expression is true). Those candidates with higher ranks are used first to execute your jobs. Example: RANK = (CPU_MHZ * 2) + FREE_MEM_MB Chapter 4: GARUDA Command Reference Page 35 GARUDA User Handbook How to set necessary environment variables to access gridway commands? Fig. 4.13 depicts the necessary commands to set up the gridway user environment at gridfs machine. Note: The path of gridway installation may vary on different clusters. Fig. 4.13: Exporting gridway location How to submit a job to gridway scheduler? gwsubmit is the command used to submit jobs in gridway as shown in Fig. 4.14. E.g. $ gwsubmit –vt <filename> Fig. 4.14: gwsubmit command to submit jobs in gridway Chapter 4: GARUDA Command Reference Page 36 GARUDA User Handbook How to check the status of my job? As shown in Fig. 4.15, gwps is the command used to check the status of gridway job. E.g. $ gwps <job_id> Fig. 4.15: gwps command to check the status of the job How will I troubleshoot my gridway job? Debugging job execution: GridWay reporting and accounting facilities provide information about overall performance which helps to debug job execution. Gridway generates log files under the $GW_LOCATION/var directory: Fig. 4.16: Gridway job log information directory Chapter 4: GARUDA Command Reference Page 37 GARUDA User Handbook The below table explains each file in detail, gwd.log: System level log. You can find log information of the activity of the middleware access drivers; and coarse-grain log information about jobs. $JOB_ID/job.log: Detailed log information for each job, it includes details of job state transitions, resource usage and performance. $JOB_ID/stdout.wrapper: Standard output of the wrapper executable. $JOB_ID/stderr.wrapper: Standard error output of the wrapper executable. By default, wrapper is executed with shell debugging options (-xv) active, so this is usually the best source of information in case of failure. IGCA Command Reference: For Linux Users: How to convert .p12 or .pfx files to .pem? Assume the file name as “igca-henry-new.p12”. As shown in Fig. 4.17, type the below command to extract usercert.pem. openssl pkcs12 -in igca-henry-new.p12 -out usercert.pem -nokeys -clcerts Fig. 4.17: Generation usercert.pem Chapter 4: GARUDA Command Reference Page 38 GARUDA User Handbook As shown in Fig. 4.18, type the below command to extract userkey.pem. openssl pkcs12 -in igca-henry-new.p12 -out userkey.pem -nocerts Fig. 4.18: Generating userkey.pem For Windows Users: If you are a windows user, then follow the below steps, 1. Download and Install OpenSSL for Windows. (http://www.slproweb.com/download/Win32OpenSSL_Light0_9_8r.exe) 2. Install OpenSSL into the folder C:\OpenSSL 3. As shown in Fig 4.19, place your .pfx or .p12 files in the folder C:\mycert Chapter 4: GARUDA Command Reference Page 39 GARUDA User Handbook Fig 4.19 Place your .p12 or .pfx files in c:\my-cert 4. As shown in Fig 4.20, open your command prompt and enter the folder C:\OpenSSL\bin Fig 4.20: Change directory to openssl installed folder. 5. Set the OpenSSL commands in the PATH as shown in Fig. 4.21 Fig 4.21: Set the OpenSSL command in the PATH 6. Change to the directory c:\my-cert, where your IGCA certificate (.p12) is stored. Chapter 4: GARUDA Command Reference Page 40 GARUDA User Handbook Fig 4.22: Change to the .p12 certificate directory 7. Extracting usercert.pem: As shown in Fig. 4.23, type the below command to extract usercert.pem. openssl pkcs12 –in igca-cert.p12 –out usercert.pem –nokeys –clcerts When prompted for “Import Password”, enter the password which you had set during your certificate export from the browser. Fig 4.23: Generate usercert.pem 8. Extracting userkey.pem: As shown in Fig: 4.24, type the below command to extract userkey.pem openssl pkcs12 –in igca-cert.p12 –out userkey.pem –nocerts Chapter 4: GARUDA Command Reference Page 41 GARUDA User Handbook When prompted for “Import Password”, enter the password which you had set during your certificate export from the browser. When prompted for “Enter PEM pass phrase”, set new password to protect your userkey.pem file. Note: You can also enter the same password which you had set during your certificate export from the browser Fig 4.24: Generating userkey.pem What is .p12 or .pfx file? .p12 or .pfx – Certificate format that contains both public and private key. This file is normally protected with a password. What is .pem file? Certificate format used in grid. usercert.pem –public key. userkey.pem – private key. Chapter 4: GARUDA Command Reference Page 42 GARUDA GridFTP Client GARUDA User Handbook Chapter 5: GARUDA GridFTP Client What is GARUDA GridFTP client? Garuda GridFTP Client is a GUI for performing file transfers using the Grid FTP protocol. It is intended to be an easy-to-use program for remote file operations such as upload/download, directory and file listing and file delete. The software is available in versions that will run on many different flavors of the Linux operating system, as well as on 32-bit flavors of Microsoft Windows (XP, Vista and 7). What are the Pre-requisites? You need Java (at least 1.6) to run this software. Also you need Garuda certificates properly setup on your machine, to connect to the remote resources of the grid. Please refer to http://portal.garudaindia.in/gridftp-gui for a detailed list of pre-requisites Where can I find online documentation for this tool? Online Documentation is maintained at http://portal.garudaindia.in/gridftpgui GridFTP GUI Usage: For Windows Users: 1. Download the Garuda Gridftp software for windows from the below link: http://gridfs.ctsf.cdac.org.in/gridftp-gui/download/GarudaGridFTP-Setup.exe 2. Install the Garuda GridFTP software by just double clicking the setup file. 3. Once installed you can invoke the program using: Start Menu Item -> Garuda -> Grid FTP GUI as shown in Fig. 5.1. Chapter 5: GARUDA GridFTP Client Page 45 GARUDA User Handbook Fig. 5.1: Invoking GridFTP GUI software 4. Step 3 will open a GUI window as shown in Fig. 5.2. Fig. 5.2: GridFTP GUI window 5. Upload your certificate to GridFTP client by clicking Tools -> Options as shown in Fig. 5.3. Fig. 5.3: Click Tools > Options Chapter 5: GARUDA GridFTP Client Page 46 GARUDA User Handbook Fig. 5.4: Click “Security” tab in Options dialog box. 6. Click the “Browse” to upload your certificate (usercert.pem) to the client GUI as shown in Fig. 5.4 & Fig 5.5: Fig. 5.5: Upload usercert.pem to the client tool Chapter 5: GARUDA GridFTP Client Page 47 GARUDA User Handbook What if I don’t have a .pem certificate file? Sol: Refer Chapter 4: IGCA command reference to convert your “.p12” certificate file to “.pem” certificate file. How to get my .p12 file? Sol: You need to export your certificate from the web browser. Refer the below link for more information, http://ca.garudaindia.in/index.php/information/faq/export-thecertificates-obtain-pfxps12-file/ 7. Click Tools -> Grid Authentication to authenticate with the GridFTP server. Enter the passphrase and click “Authenticate” button as shown in Fig. 5.6. Fig. 5.6: Authentication to the GridFTP server Chapter 5: GARUDA GridFTP Client Page 48 GARUDA User Handbook 8. Upon successful authentication, you should be able to view the status of your proxy as shown in Fig. 5.7. Fig. 5.7: View the status of your proxy 9. Connect to the GridFTP Server with Hostname=”gridfs.ctsf.cdac.org.in”, port=”2811”, Type=”GridFTP” and click “Connect” button. Upon successful connection, you should be able to view a transfer window as shown in Fig. 5.8. Fig. 5.8: Connected to GridFTP Server Chapter 5: GARUDA GridFTP Client Page 49 GARUDA User Handbook For Linux users: If you are a Linux user, then follow the below steps, a. Download the Zip file from http://portal.garudaindia.in/gridftpgui/download/garuda-gridftp.zip b. Extract the contents of the download zip file. The extracted folder will be the TOOL_HOME directory. Set Java to be available on the PATH. c. The extracted content will contain a folder called 'certificates'. This contains the CA certificate files. d. Login as root and move this folder to /etc/grid-security/. If the 'gridsecurity' folder is not present in /etc, then please create it. e. Use run.sh script available in the TOOL_HOME folder, to invoke the software. f. Refer the Fig. 5.2 to Fig 5.8 for more information tool usage. Where can I find, online documentation for this tool? Garuda GridFTP Client manual can be found from the below URL. http://portal.garudaindia.in/gridftp-gui/gridftp-gui.htm How to access GridFTP in command line? Refer Chapter 4. Chapter 5: GARUDA GridFTP Client Page 50 Garuda Storage Resource Manager (GSRM) GARUDA User Handbook Chapter 6: Garuda Storage Resource Manager (GSRM) What is GSRM? GARUDA Storage Resource Manager (GSRM) is a peer to peer data grid solution for GARUDA. An SRM can be defined as a middle ware component that manages the dynamic use of storage resources in the grid. GSRM provides, File and Directory management – Upload, download of files and directories. Dynamic space management: Reserving & release of storage spaces and setting lifetime for the files. User friendly interfaces like command line, APIs and web interface. Interfacing with the Compute Grid: Allows users to transfer their required data from compute grid to GSRM and vice versa. What are the steps to access GSRM? Below are the steps to access GSRM services, a) Login to GRIDFS machine. Refer Chapter 3. b) Generate valid credentials with VO attributes. c) Setting up of GSRM user environment. d) Access GSRM via GSRM client commands. What are the GSRM end points in GARUDA? GSRM end points are referred as GSRM servers. Below are the GSRM end points in GARUDA, Location Bangalore Hyderabad End point URL Hostname httpg:// gsrm.ctsf.cdac.org.in:8446/ gsrm httpg:// srmhyd.cdac.in:8446/ srmhyd Table 6.1: GSRM End points in GARUDA Note: End points use protocol httpg Chapter 6: GARUDA Storage Resource Manager (GSRM) Page 53 GARUDA User Handbook What is SURL? A file or a directory located in a GSRM storage space is identified by a Site URL (SURL). Below is the format of SURL, srm://host[:port]/StFN root path/site_file_name An example of SURL is: srm://gsrm:8446/dpm/ctsf.cdac.org.in/home/GarudaAdmin/weka.jar What is StFN? StFN stands for “Storage File Name”. SFN is a part of SURL. What is my StFN root path? Below is the general format of StFN for gsrm.ctsf.cdac.org.in , /dpm/ctsf.cdac.org.in/home/<VO_NAME> Below is the general format of SFN for srmhyd.cdac.in, /dpm/cdac.in/home/<VO_NAME> E.g. consider a user who belongs to “OSDD” VO. His StFN for gsrm.ctsf.cdac.org.in is /dpm/ctsf.cdac.org.in/home/OSDD All the GSRM examples in this book are of a user who belongs to “GarudaAdmin” VO. So the StFN will look like “/dpm/ctsf.cdac.org.in/home/GarudaAdmin”. Replace this with your corresponding StFN. Chapter 6: GARUDA Storage Resource Manager (GSRM) Page 54 GARUDA User Handbook Setting up GSRM User Environment: GSRM Client commands are located at GRIDFS machine as shown below Table 6.2. Clients storm dpm bestman Location /usr/local/GARUDA/GSRM/gsrm-clients/storm/bin /usr/local/GARUDA/GSRM/gsrm-clients/dpm/bin /usr/local/GARUDA/GSRM/gsrm-clients/bestman/bestmanclient/bin/ Table 6.2: Location of GSRM clients Setting up GSRM client commands in “PATH” variable: Fig. 6.1 shows, setting up of GSRM client commands in “PATH” environment variable. Fig. 6.1: Setting up a GSRM client environment Setting up of GSRM Libraries in LD_LIBRARY_PATH: As shown in Fig. 6.2, export LD_LIBRARY_PATH to locate GSRM libraries. Fig. 6.2 Setting LD_LIBRARY_PATH Chapter 6: GARUDA Storage Resource Manager (GSRM) Page 55 How to download credentials with VO attributes? In order to access GSRM services, user needs to have a valid VO credentials. Fig. 6.3 shows how to download credentials from MyProxy repository and add VO attributes to it. Command: myproxy-logon --voms <VO_NAME> E.g. Below example generates credentials for VO called “GarudaAdmin”; you need to replace this with your VO name. Fig.: 6.3 Generating VO credentials If you are not sure, which VO you belong to? Send a mail to [email protected] GARUDA User Handbook How to view my VO credentials? As shown in Fig. 6.4, voms-proxy-info is the command used to view your credential information. Fig. 6.4: voms-proxy-info command shows VO credentials information How to check the status of GSRM server? “clientSRM” command along with “ping” function is used to check the state of the SRM and it works as an “Are you alive” type of call. The version of the SRM specification implemented by the server is returned. As shown Fig. 6.5, “ping” function of the clientSRM command is used to ping a GSRM server (gsrm and srmhyd): clientSRM ping -e httpg://gsrm.ctsf.cdac.org.in:8446/ clientSRM ping -e httpg://srmhyd:8446/ Chapter 6: GARUDA Storage Resource Manager (GSRM) Page 57 GARUDA User Handbook Fig. 6.5: clientSRM command is used to ping the GSRM server Note: Type “clientSRM ping -help” for more information. How to create a directory in GSRM? As shown in Fig. 6.6, “mkdir” function of the clientSRM command is used to create directory in GSRM server. Type “clientSRM mkdir –help” for more information. clientSRM mkdir –e <GSRM_End_Point> -s <SURL> Fig. 6.6: Creating directory in GSRM server Chapter 6: GARUDA Storage Resource Manager (GSRM) Page 58 GARUDA User Handbook How to remove a directory in GSRM? As shown in Fig. 6.7, “rmdir” function of the clientSRM command is used to the remove directory in GSRM server. clientSRM rmdir -e <GSRM_End_Point> -s <SURL> Fig. 6.7 Remove the directory in GSRM Note: The above command is used to remove empty directory. Use “-r” option to remove the directory recursively. Type “clientSRM rmdir –help” for more information. How to remove a file in GSRM? As shown in Fig. 6.8, “rm” function of the clientSRM command is used to remove a specific file. clientSRM rm -e <GSRM_End_Point> -s <SURL> Fig. 6.8: Removing a specific file in a GSRM server Note: Type “clientSRM rm –help” for more information. Chapter 6: GARUDA Storage Resource Manager (GSRM) Page 59 GARUDA User Handbook How to list the files in a directory? As shown in Fig. 6.9, “ls” function of the clientSRM command is used to list the files in a directory. clientSRM ls -l -e <GSRM_End_Point> -s <SURL> Fig. 6.9: listing the files in a directory Note: Type “clientSRM ls –help” for more information. Chapter 6: GARUDA Storage Resource Manager (GSRM) Page 60 GARUDA User Handbook What are the various functions that can be performed using clientSRM command? “clientSRM” is one of the SRM client commands that can be used to perform various storage operations. As shown in Fig. 6.10, type “clientSRM” to view the help page. Fig. 6.10: clientSRM command and its various options Note: Type “clientSRM <function> -help” to view detailed options for a particular function. Chapter 6: GARUDA Storage Resource Manager (GSRM) Page 61 GARUDA User Handbook How to upload a directory to GSRM? As shown in Fig. 6.11, “putfiles-to-gsrm.sh” is the command used to upload a directory to GSRM server. Command: putfiles-to-gsrm.sh <Local_source_path> <SURL> Fig. 6.11: Uploading a directory to GSRM How to download a directory from GSRM? As shown in Fig. 6.12, “getfiles-from-gsrm.sh” is the command used to download a directory from GSRM server. Command: getfiles-from-gsrm.sh <SURL> <directory_level> <Local_destination_path> Fig. 6.12: Downloading a directory from GSRM Chapter 6: GARUDA Storage Resource Manager (GSRM) Page 62 GARUDA User Handbook How to upload a file to GSRM using clientSRM command? Uploading a file to GSRM storage server involves 3 steps, Step 1: Prepare to put request to GSRM. (clientSRM ptp) Step 2: Transfer the file. (globus-url-copy) Step 3: Verify the transfer. (clientSRM pd) Step 1: Prepare to put request to GSRM As shown in Fig. 6.13, clientSRM command with “prepare to put request (ptp)” function is used to make a put request to transfer a file named “sample_file” to Bangalore GSRM server (gsrm). Command: clientSRM ptp -e httpg://gsrm:8446/ -s srm://gsrm/dpm/ctsf.cdac.org.in/home/GarudaAdmin/sample_file –p Fig. 6.13: clientSRM command to make a ptp request. Chapter 6: GARUDA Storage Resource Manager (GSRM) Page 63 GARUDA User Handbook Step 2: Transfer the file “globus-url-copy” command is used to transfer the file to GSRM server. This command requires a Transport URL (TURL), which is obtained from step 1 (Refer Fig. 6.13). The complete command is shown in Fig. 6.14. Command: globus-url-copy <source_path> <TURL> Fig. 6.14: globus-url-copy is used to transfer the file to GSRM Step 3: Verify the transfer The transfer operation that performed in step 2 can be verified using the ‘put done (pd)’ function of the clientSRM command. As shown in Fig. 6.15, this command requires a request token, which is obtained during step 1 (Refer Fig. 6.13). Fig. 6.15: Verifying the transfer performed in step 2. Chapter 6: GARUDA Storage Resource Manager (GSRM) Page 64 GARUDA User Handbook How to download a file from GSRM using clientSRM command? Downloading a file from GSRM server involves two steps, Step 1: Prepare to get request from GSRM (clientSRM ptg) Step 2: Download the file. (globus-url-copy) Step 1: Prepare to get request from GSRM As shown in the Fig. 6.16, “put to get request (ptg)” function of the clientSRM command is used to make get request to GSRM server. Command: clientSRM ptg -e <GSRM_End_Point> -s <SURL_to_get_file> -p Fig. 6.16, Using ptg function to make a get request to GSRM Chapter 6: GARUDA Storage Resource Manager (GSRM) Page 65 GARUDA User Handbook Step 2: Download the file from GSRM As shown in Fig. 6.17, globus-url-copy command is used to get the file from GSRM. This command requires the transfer URL obtained in step 1 (Refer Fig. 6.16) Fig. 6.17: globus-url-copy command is used to download the file How to reserve a space in GSRM? As shown in Fig. 6.18, “reservespace” function of the clientSRM command is used to reserve space in GSRM. This function is used to reserve a space in advance for the upcoming requests to get some guarantee on the file management. Unit of the space should be specified in bytes. Fig. 6.18, reserves a total space of 10MB and requests for a minimum space of size 5MB. The returned space token have to be used in all the requests that work on this reserved space (green colored rectangle in the image). Fig. 6.18: Reserve space in GSRM Chapter 6: GARUDA Storage Resource Manager (GSRM) Page 66 GARUDA User Handbook How to view the information of a reserved space? As shown in Fig. 6.19, “getspacemetadata” function of the clientSRM command is used to view the information of a reserved space. This function requires a space token (spaceToken) that was returned during “reservespace” request (Refer green colored rectangle in Fig 6.18). Fig. 6.19: View the information of a reserved space. Note: The reserved space token can be made use during your file upload request to GSRM. This can be achieved using “-t” option to the “prepare-toput (ptp)” function of the clientSRM command. Refer Fig. 6.13 for more information about “ptp” function of a clientSRM command. Note: Type “clientSRM <function> -help” to view detailed options for a particular function Chapter 6: GARUDA Storage Resource Manager (GSRM) Page 67 GARUDA User Handbook How to release the reserved space in GSRM? As shown in Fig. 6.20, “ReleaseSpace” function of a clientSRM is used to release the reserved space. This function requires “spaceToken” as an input, which was returned during the “reservespace” request (Refer the green colored rectangle in Fig. 6.18). Fig. 6.20: Release the reserved space How to view the reserved space information? As shown in Fig. 6.21, “userSpaceInfo” command can be used to view the reserved space information. It allows the user to view the respective space usage details in KB/MB/GB. User can get the reserved space details of all the space tokens associated with the user. User can also view overall space usage i.e. reserved and unreserved. Command: userSpaceInfo -e <GSRM_End_Point> -s Chapter 6: GARUDA Storage Resource Manager (GSRM) Page 68 GARUDA User Handbook Fig 6.21: userSpaceInfo command to view reserved space tokens How to view user audit information? As shown in Fig. 6.22, “selfAudit” can be used to view audit information of the user data stored in GSRM. Audit information includes filename, file size, time last modified and last accessed. Command: selfAudit -s <hostname> Fig 6.22: selfAudit command to view the audit information Chapter 6: GARUDA Storage Resource Manager (GSRM) Page 69 GARUDA User Handbook Does GSRM have a web interface? Yes, GSRM web client can be accessed from https://gsrm.ctsf.cdac.org.in. https://srmhyd.cdac.in Note: The above URL can be accessed only via GARUDA NKN Network. Where can I find complete user manual for GSRM? GSRM User manual can be downloaded from, http://portal.garudaindia.in/GARUDAREPO/gsrmv1.1/gsrmv1.1_Manuals/gsrmv1.1_usermanual.pdf Whom should I contact, if I need a support for GSRM? You can reach our GSRM team at 080-66116692 and 080-66116457 GSRM End Points in GARUDA: Bangalore: httpg://gsrm.ctsf.cdac.org.in:8446 Hyderabad: httpg://srmhyd.cdac.in:8446 Note: The protocol used for contacting the end point is “httpg” Chapter 6: GARUDA Storage Resource Manager (GSRM) Page 70 Grid Support GARUDA User Handbook Chapter 7: Grid Support How will I log my support request? 1. Go to http://gridsupport.garudaindia.in 2. Login with your GARUDA Account. 3. Raise ticket in appropriate queue. Which username and password should I use for accessing Grid Support web page? You must have a GARUDA account for accessing Grid Support. Refer Fig. 1.8. Fig. 7.1: GARDUDA RT (Request Tracker) Login page Chapter 7: Grid Support Page 73 GARUDA User Handbook How to raise a problem ticket? 1. Select the queue for which you would like to raise a ticket. 2. Click “New ticket in” button as shown in Fig. 7.2. Fig. 7.2: How to raise a ticket? How to check the status of my ticket? User can check the status of their ticket using the ticket ID. E.g. [Ticket Id #12958] as shown in Fig. 7.3. Fig. 7.3: Status of the ticket What are the support queues available? Sl.no Project Name 2. 3. Any Grid related problem Grid Portal Chapter 7: Grid Support Support queue name GDeployment Email [email protected] Portal [email protected] Page 74 GARUDA User Handbook 4. 5. 6. 7. 8. 9. 10. 11. 12. 13. Service Oriented Architecture GARUDA VOMS Grid IDE Tool OSDD OSDD Galaxy GARUDA Network Related Paryavekshanam Gridhra Automatic Grid Service Generator GARUDA SRM Not sure about Queue SOA [email protected] Voms GridIDE OSDD Osddgalaxy Netops [email protected] [email protected] [email protected] [email protected] [email protected] Gridmon Gridhra AGSG [email protected] [email protected] GDS Other [email protected] [email protected] Table 7.1: GARUDA support queues Can I send my support request via email? Yes, refer Table 7.1, for corresponding email addresses. Can I speak to the GARUDA Operation team over phone? Why not! We will be glad to speak to you. The support phone nos. are given below. Grid Support: 080-66116511 | 080-66116472 | 080-66116474 Network Support: 080-66116510 | 080-66116473 Grid Portal: 080-66116493 | 08066116494 | 080-66116459 GSRM: 080-66116692 | 08066116457 Chapter 7: Grid Support Page 75 GARUDA User Handbook Help us to serve you better: We request you to kindly spare some of your valuable time and fill in the online survey form. Your input would help us to improve our services and allow us to serve you better. Online survey form: http://gridsupport.garudaindia.in/survey /index.php?sid=31228 Whom should I contact, if I have any question regarding this book? You can send a mail to [email protected]. Tips for Quick Response: Raise tickets in appropriate queue. Set your priority level to indicate the urgency of the problem. Describe your problem clearly. Attach screen shots if applicable. Maintain the same subject name, until the ticket is resolved. Chapter 7: Grid Support Page 76 Appendix I GARUDA User Handbook Appendix I: Glossary The following glossary defines some commonly used terms and acronyms associated with the GARUDA Environment. A AGSG – Automatic Grid Service Generator. Authentication - A system says how you identify yourself to the computer. The goal behind an authentication system is to verify that the user is actually who they say they are. Authorization - Authorization checks that authentic user have proper permission or not to access particular service. C Certificate - A certificate is a digital document that certifies that a certain public key is owned by a particular user. This document is signed by Certificate Authority (CA). Certificate Authority - Certification authority (CA) is an entity that issues digital certificates for use by other parties. CP/CPS – Certificate Policy and Privacy Statement. CRIN PIN (Certificate Revocation and Identification Number) - The CRIN mail contains a pin code that the user must enter when revoking their own certificates. The user should be able to decrypt the message as they would have created the private key during their certificate request process. The message is encrypted using the public key in the certificate request. Appendix I: Glossary Page 78 GARUDA User Handbook D DN – Distinguished Name. Unique name for each user in the grid. E End Entity Certificate – User certificate or Host certificate used by the enduser is called as End-Entity Certificate. G GARUDA – Global Access to Resources Using Distributed Architecture. GARUDA Account – An account used for accessing GARUDA Grid. GAP – Grid Access Portal Grid Computing – Grid computing is a term referring to the combination of computer resources from multiple administrative domains to reach a common goal. The grid can be thought of as a distributed system with non-interactive workloads that involve a large number of files. What distinguishes grid computing from conventional high performance computing systems such as cluster computing is that grids tend to be more loosely coupled, heterogeneous, and geographically dispersed. Although a grid can be dedicated to a specialized application, it is more common that a single grid will be used for a variety of different purposes. Grids are often constructed with the aid of general-purpose grid software libraries known as middleware. Globus Toolkit - The Globus Toolkit is a fundamental enabling technology for building grids that allow distributed computing power, storage resources, scientific instruments, and other tools to be shared securely across corporate, institutional, and geographic boundaries. Appendix I: Glossary Page 79 GARUDA User Handbook GRIDFS – Name of the machine that acts a GARUDA HEAD NODE (gridfs.ctsf.cdac.org.in). GARUDA INTERFACE NODE – NODE located at each partner institution which connects to garuda. Grid Portal - Grid portal is for submitting sequential, parallel. This portal provides a web interface for viewing the resources and submitting and monitoring jobs. GRAM – Grid Resource and Allocation Manager - GRAM is a Globus project that produces technologies which enable users to locate, submit, monitor and cancel remote jobs on Grid-based compute resources. GRAM enables remote execution management in contexts for which reliable operation, stateful monitoring, credential management, and file staging are important. GridFTP - GridFTP is a Globus project that produces high-performance, secure, reliable data transfer technologies optimized for high-bandwidth widearea networks. GSISSH - command to securely login to a remote machine. GSISCP - command to securely copy data to a remote machine. GSRM – GARUDA Storage Resource Manager. GRIDWAY - The GridWay Metascheduler enables large-scale, reliable and efficient sharing of computing resources: clusters, supercomputers, standalone servers… It supports different LRM systems (PBS, SGE, LSF, and Condor) within a single organization or scattered across several administrative domains. Appendix I: Glossary Page 80 GARUDA User Handbook H Host Certificate – Certificate issued by Certificate Authority for a particular host to participate in Grid. I IGCA - The Indian Grid Certification Authority (IGCA) provides X.509 certificates to support the secure environment in grid computing. IGCA is an accredited member of the APGridPMA (Asia Pacific Grid Policy Management Authority) for Grid Authentication. M Middleware – Middleware is an interface between the user and resources. Globus Toolkit is one of the grid middleware. MyProxy Credential Repository - MyProxy is a Globus project that develops software for managing X.509 Public Key Infrastructure security credentials (certificates and private keys). MPI – Message Passing Interface (MPI) is an API specification that allows processes to communicate with one another by sending and receiving messages. It is typically used for parallel programs running on computer clusters and supercomputers, where the cost of accessing non-local memory is high. N NKN – National Knowledge Network. The backbone of GARUDA Grid. Appendix I: Glossary Page 81 GARUDA User Handbook P Public Key – Certificate key to be shared with other party for communication. Private Key – Certificate key that should not be shared with anyone. PKI - Enables users to securely and privately exchange data and money through the use of a public and a private cryptographic key pair that is obtained and shared through a trusted authority. .PEM (Privacy Enhanced Mail) – Certificate format used in grid. .P12 & PFX - PKCS#12, contains certificate(s) (public) and private keys (password protected) PKCS – Public Key Cryptographic System Proxy Certificate – A short lived certificate for accessing grid services. Generated using public and private keys. Paryaveekshanam – Grid monitoring application for GARUDA. Q QOS - Quality of Service R Revoked Certificate - A certificate is said to be invalid once it is revoked. Re-key Certificate - The lifetime of IGCA user certificates and host certificates are valid for 12 months. User must rekey the related certificate when his or her certificate will expire. After you rekey the certificate, you will own the brand-new certificate and private key. The previous certificate and private key will be revoked. Appendix I: Glossary Page 82 Registration Authority - A Registration Authority (RA) is an authority in a network that verifies user request for a digital certificate and tells the Certificate Authority (CA) to issue certificate. S SOA – Service Oriented Architecture. U User Certificate – Certificate issued to user for accessing Grid. V VOMS - VOMS is a system for managing authorization data within multiinstitutional collaborations. VOMS provides a database of user roles and capabilities and a set of tools for accessing and manipulating the database and using the database contents to generate Grid credentials for users when needed. W WS-GRAM - The Grid Resource Allocation and Management (GRAM) web service provides a single interface for requesting and using remote system resources for the execution of "jobs". The most common use of GRAM is remote job submission and control. It is designed to provide a uniform, flexible interface to job scheduling systems. Bibliography References: 1. Garuda Official Website : http://garudaindia.in 2. Grid Portal : http://portal.garudaindia.in 3. Indian Grid Certification Authority : http://ca.garudaindia.in 4. GARUDA VOMS Registration : http://voms.garudaindia.in 5. Grid Support : http://gridsupport.garudaindia.in 6. Globus Toolkit : http://globus.org 7. Gridway : http://gridway.org 8. GARUDA GridFTP Client : http://portal.garudaindia.in/gridftp-gui 9. GSRM : http://storm.forge.cnaf.infn.it/documentation/client_examples 10. GSRM : http://csngwinfo.in2p3.fr/mediawiki/index.php/SRM_StoRM 11. GSRM : http://portal.garudaindia.in/GARUDAREPO/gsrmv1.1/gsrmv1.1_Manuals/gsrmv1.1_usermanual.pdf Important Links and Email-ids to remember Garuda Website: http://garudaindia.in [email protected] IGCA: http://ca.garudaindia.in [email protected] Grid Support: http://gridsupport.garudaindia.in