1
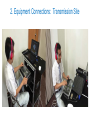
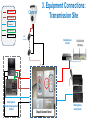
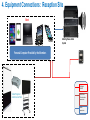
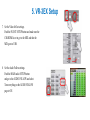
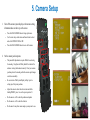
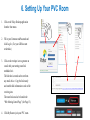
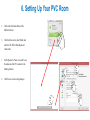
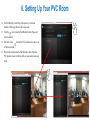
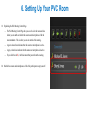
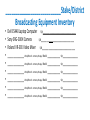
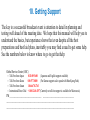
Asia North Area
Meetinghouse Broadcast
User Manual
Version 1 (201510)
Revision 1.0.0
This manual is to help technology specialists understand how to use the package of
broadcast equipment provided to the Stakes and Districts by the Asia North Area.
Table of Contents
1. Meetinghouse Broadcast Introduction
2. Equipment Connections: Transmission Site
3. Equipment Connections: Reception Site
4. VR-3EX Setup
5. Camera Setup
6. Setting up Your PVC Room
7. Checking and Setting Audio Levels
8. Recommended Best Practices
9. Meetinghouse Broadcast Equipment Inventory
10. Getting Support
1. Meetinghouse Broadcast Introduction
• The Stake or District President is responsible for the use of all technology, including meetinghouse
broadcast technology, within the Stake or District.
• The Stake or District Center buildings have been prepared with all of the cabling needed, including a
permanently mounted camera on the ceiling to facilitate the connection of the broadcast transmission
equipment. The facilities manager (FM) is responsible for maintaining the building wiring. The
Technology Specialist should not modify the wiring without concurrence of the FM.
• A cabinet to house and store the broadcasting equipment has also been provided to the Stake or District.
Use of this equipment should be defined in the Stake or District technology plan and should also conform
to church policies at https://mhtech.lds.org/. Use of the equipment should only be done by or under the
supervision of a Technology Specialist.
• Projection equipment has also been provided to the other buildings of the Stake or District.
• All of the broadcasting equipment has been purchased with sacred tithing funds and should be
maintained and protected by the Stake or District. It should not be left out for general access by the
members or others. Please take all care to protect and preserve the equipment.
2. Equipment Connections: Transmission Site
Camera
LAN Connection
HDMI Connection
3. Equipment Connections:
Transmission Site
Microphone
Connection
USB Connection
Power Connection
Meetinghouse
Broadcasting Equipment
Cabinet
HDMI
Extender
Meetinghouse
Internet
Chapel Connect Panel
Meetinghouse
Sound System
3. Equipment Connections: Transmission Site
• The computer and VR-3EX are housed in a portable cabinet.
• All of the connections to the cabinet are provided at a single point in the
building. (Refer to the Chapel Connect Panel in the illustration on the
previous page.)
• The Chapel Connect Panel may look quite different in your building.
• The connection to the camera uses an HDMI extender. Your building may
have a HDMI connection or a RJ45 connector (internet LAN type port)
depending on whether the receiver for HDMI Extender is located inside of
the chapel connection panel or inside of the portable cabinet.
• If you have two RJ45 connectors in the Chapel Connect Panel, take care to
connect the internet and camera cables to the correct location.
4. Equipment Connections: Reception Site
Best
Meeting House Audio
System
Personal Computer Provided by the Members
LAN cable
Or WIFI
Video Projector
and Screen or Monitor
HDMI Cable
Or other video
connection
Audio
connection
4. Equipment Connections: Reception Site
• Many different devices can be used to receive the broadcast signal.
• The cabling to connect to the monitor or projector will be different depending on
the equipment used.
• Any cabling purchased with church funds to facilitate broadcasts should be
identified and kept at the church to avoid losing it and having to repurchase.
• The receiving sites do not need a camera.
• The Stake/District Technology Specialist should contact each receiving location
to ensure audio and video connections are available for the receiving devices.
• The first time a device is used to connect to PVC, you will be required to install
the Vidyo Desktop Software.
• Once the software is loaded, after clicking on the meeting room link, you will be
presented with a login page. Fill in the name of your Ward or Branch and enter
the PVC room.
5. VR-3EX Setup
1.
Connect the Meetinghouse Broadcast Cabinet to the chapel connection panel of the
Stake or District Center. The connections at your building may look different from
the illustrations. You are responsible for understanding the connection at your
building.
2.
Check that the HDMI connection to the VR-3EX is in HDMI 4. HDMI 4 is the only
high definition video input. All other video inputs are 480p only.
3.
Move all of the slide bars on the VR-3EX to the bottom. This ensures that you don’t
get any loud audio blasting through the system at start up.
4.
The VR-3EX has a built in microphone that will capture audio directly from the
vicinity of the device. You can use it to send a message to all of the receiving
locations if needed, but to prevent extraneous audio from creeping interfering with
the broadcast, keep it turned to minimum.
5.
Power on the computer, camera, AV mixer and chapel sound system.
6.
Set the VR-3EX video quality to high definition (1080p).
Push the
MENU button
Push the MENU Button and set
HDMI 4 (Video CH4) to 1080p.
Push the MENU Button twice and
set Video Output to 1080p.
Push and turn
this button to
set HDMI 4
and VIDEO
OUTPUT
5. VR-3EX Setup
7. Set the Video In/Out settings.
Push the IN/OUT SETUP button and make sure the
CH4 HDMI is set to go to the MIX and that the
MIX goes to USB.
8. Set the Audio Follow settings.
Push the MAIN audio SETUP button
and go to the AUDIO FOLLOW and select.
Turn everything on the AUDIO FOLLOW
page to ON.
5. Camera Setup
1.
2.
Turn off the camera system display so that camera setting
information does not show up on the screen.
–
Press the DATA SCREEN button to bring up the menu.
–
Use the arrow keys on the remote and home button to select
and set the DISPLAY INFO to OFF.
–
Press the DATA SCREEN button twice to exit the menu.
Set the camera position presets.
–
The pan and tilt adjustments are quite difficult to use during
the meeting. Using them will likely disturb the video for the
audience viewing the broadcast remotely. Preset your camera
positions prior to the meeting so that the camera angle changes
can be done smoothly.
–
Be sure to turn off the System Display in Step 1 prior to
setting any of the preset positions.
–
Adjust the camera to show the entire rostrum and while
holding PRESET, press 1 to save the preset position #1.
–
Do the same to set #2 to show the podium and speaker.
–
Do the same to set #3 to show the chorister.
–
Do the same for any other camera angles you may want to use.
6. Setting Up Your PVC Room
1. Click on the Vidyo Desktop application
from the Start menu.
2. Fill in your Username and Password and
click Log In. (Use your LDS Account
credentials.)
3. Click on the envelope icon to generate an
e-mail with your meeting room link
embedded in it.
The link that is created can be sent from
any email device. Copy the link exactly
and send the link information to each of the
receiving sites.
The room link can also be found in the
“Web Meeting Control Page” (See Page 15).
4. Click My Room to join your PVC room.
6. Setting Up Your PVC Room
5.
Click on the Join Room button of the
My Room Screen.
6.
Click the Devices Icon (Gear Wheel) and
select the VR-3EX in Microphone and
Camera lists.
7.
Set the Speaker to “Same as system” to use
the audio out of the PC to connect to the
Meeting Audio in.
8.
Click Save to save the setting changes.
6. Setting Up Your PVC Room
9.
Click on Options and set the Language
and uncheck all of the options.
10. Click Save to save the settings changes.
11. And then click Cancel to close this
window and return to the meeting screen.
12. On the main meeting screen, click on
the Participants icon to display the
Participants Panel
13. Click on the Web Meeting Control icon
to open the Web Meeting Control Page.
Note: You must have at least one other
participant besides yourself in the room before
you can access the Web Meeting Control Page.
6. Setting Up Your PVC Room
14. The Web Meeting Control Page will open in a new browser
window with the page likely in full screen mode.
15. Click the
Icon to take the Web Meeting Control Page out of
full screen mode.
16. Next click on the
of full screen mode.
Icon for the PVC window to also take it out
17. Then resize and reposition the Web Meeting Control Page and
PVC window screens to both be visible on your monitor as shown
below.
6. Setting Up Your PVC Room
18. Explaining the Web Meeting Control Page.
–
The Web Meeting Control Page lets you see who is in the room and also
allows you to enable or disable the cameras and microphones of all the
room attendants. This is where you are in control of the meeting.
–
A green colored icon indicates that the camera or microphone is active.
–
A gray colored icon indicates that the camera or microphone is inactive.
–
If you click the red X, it will disconnect that person from the meeting.
20. Disable the cameras and microphones of all of the participants except yourself.
7. Checking and Setting Audio Levels
1.
With the receiving site(s) connected, have someone at the podium
speak into the microphone and adjust the volume in the
meetinghouse to a good level.
2.
Have someone play the Organ/Piano to set the sound level in the
meetinghouse to a good level.
3.
Have the person return to the podium and speak to adjust the
sound level for the remote audiences at the VR-3EX.
Move the gain and slide bar for the house input and adjust the
main output up to a comfortable yet loud level. A headset is
required to be able to monitor these sound levels.
4.
Do the same for any other microphones or audio sources that you
plan to use for the meeting.
5.
Have the receiving sites adjust the volume of their computers and
the volume of the receive site amplifiers to a comfortable level.
6.
When connecting audio to the VR-3EX, if you only have a
monolog audio source, be sure to connect it to the LEFT (white)
Audio Input Terminal.
Note: Cell phones are a good way to communicate with the various receiving sites.
The PVC chat function can also be used to communicate with the receiving sites.
8. Recommended Best Practices
• Prepare, prepare, PREPARE!! Preparation is the key to a successful broadcast event.
– Play around with the system and run four or five tests to familiarize yourself with the various settings of the system.
– Do a test with all of the receiving sites using all of the equipment that you plan to use on the day of the event at least
one week prior to the conference.
– Set a schedule well ahead of time with all of the tasks needed to be done to have a successful broadcast. Define the
meeting requirements and who is responsible for what by when.
• Have all participants, receiving locations, join your room well in advance of the meeting start time. We
strongly recommend that the transmission site is set up and connected to the PVC room at least 2 hours prior
to the broadcast start time, and for all remote receiving sites to connect at least 1 hour prior to start time.
• A wired connection to a PC is the best.
• Make sure all devices are connected to power. 2 hours into the meeting is not a good time for a battery to run
out of juice. PCs also operate with better performance on the CPU when plugged into power.
• Turn off the Wi-Fi access through the Technology Manager Website at https://tm.lds.org. We recommend
turning off the Wi-Fi access prior to opening your PVC room.
Note: You must be registered in MLS as a Technology Specialist to access this site using your LDSAccount credentials.
• Make sure windows updates are completed on all computers prior to the day of the event. Go live time is a
bad time to find that it is going to take 20 minutes for an update to complete installation.
• Turn off the screen saver for all computers involved in the broadcast.
• Have two people at the transmission station. This is not an absolute must, but with all that goes on here, it is
just a good idea to have at least two people on hand (bathroom breaks, etc.)
9. Meetinghouse Broadcast Equipment Inventory
• The broadcasting equipment is the responsibility of the Stake/District.
• An inventory of the equipment should be kept by the Technology Specialist. (See recommended form on the
following page.)
• The serial numbers and model numbers will be important for warranty repair and trouble shooting information.
• Upgrade, replacement and repair of this equipment is the responsibility of the stake/district.
• A separate copy of the broadcasting equipment inventory should be kept with the other equipment inventory
information.
___________________________Stake/District
Broadcasting Equipment Inventory
•
•
•
•
•
•
•
•
•
Dell E5440 Laptop Computer S/N__________________________
Sony SRG-300H Camera
S/N__________________________
Roland VR-3EX Video Mixer
S/N__________________________
_____________ Ward/Branch Monitor/Display Model __________ S/N____________
_____________ Ward/Branch Monitor/Display Model __________ S/N____________
_____________ Ward/Branch Monitor/Display Model __________ S/N____________
_____________ Ward/Branch Monitor/Display Model __________ S/N____________
_____________ Ward/Branch Monitor/Display Model __________ S/N____________
_____________ Ward/Branch Monitor/Display Model __________ S/N____________
10. Getting Support
The key to a successful broadcast event is attention to detail in planning and
testing well ahead of the meeting date. We hope that this manual will help you to
understand the basics, but experience shows that even despite all the best
preparations and best laid plans, inevitably you may find a need to get some help.
See the numbers below to know where to go to get that help.
Global Service Center (GSC)
–
–
–
–
Toll-Free from Japan
Toll-Free from Korea
Toll-Free from Guam
International Direct Dial
0120-895-600
(Japanese and English support available)
080-577-0880
(For Korean support ask to speak with Mun Kyung Park)
1-866-678-2763
+1-801-240-4357 (Currently no toll-free support is available for Micronesia)
FM __________________________________ _________________________________
________________________________________________________________________
________________________________________________________________________