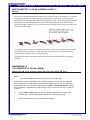
1
Multimedia Module
DIRECTOR 8.5 PART II:
INTRO TO INTERACTIVITY WITH DIRECTOR
INSTRUCTOR MANUAL
For information and permission to use these training modules, please contact:
Limell Lawson - [email protected] - 520.621.6576
or
Joe Brabant - [email protected] - 520.621.9490
Modules available on-line at http://mll.arizona.edu/workshops.shtml?tutorialpdfs
director2_Instructor.pmd
Last modified: 03/05/02
2
DIRECTOR 8.5 PART II Intro to Interactivity with Director - Instructor Manual
TABLE OF CONTENTS
Instructor Setup ............................................................................................................................. 3
Introduction ................................................................................................................................... 4
Exercise 1: Film Loops ................................................................................................................. 5
Exercise 2: Tweening .................................................................................................................... 5
Exercise 3: Full Sequence with Reverse Path, Create Down Motion .......................................... 6
Lecturette 1: Film Loops Part I ..................................................................................................... 7
Exercise 4: To Create a Film Loop ............................................................................................... 7
Lecturette 2: Film Loops Part II .................................................................................................... 8
Exercise 5: More on Creating Film Loops .................................................................................... 8
Lecturette 3: Behaviors Part I ....................................................................................................... 9
Exercise 6: Attaching Behaviors ................................................................................................. 10
Lecturette 4: Behaviors Part II .................................................................................................... 10
Exercise 7: Creating Behaviors .................................................................................................. 11
Lecturette 5: Behaviors Part III ................................................................................................... 11
Exercise 8: Creating a Simple Lingo Script ................................................................................ 12
Lecturette 6: Using the Message Window .................................................................................. 15
Exercise 10: Using the Message Window .................................................................................. 15
Lecturette 7: Examining Lingo Elements .................................................................................... 16
Exercise 11: Examining Lingo Elements .................................................................................... 17
Lecturette 8: Examining Types of Lingo Scripts ......................................................................... 18
Exercise 12: Creating Different Types of Scripts ........................................................................ 20
Lecturette 9: Creating Scripts Wrap-Up ...................................................................................... 23
Criterion Test ............................................................................................................................... 24
Filename: director2_Instructor.pmd
Last modified: 03/05/02
Copyright Arizona Board of Regents, 2002
University of Arizona
3
DIRECTOR 8.5 PART II Intro to Interactivity with Director - Instructor Manual
INSTRUCTOR SETUP:
Materials:
♦
♦
♦
Instructor Manual with disk of accompanying files
User Manual (1 copy per student)
Job Aids (1 copy per student)
Equipment:
♦
♦
♦
PC or Macintosh workstation (1 per student) with Macromedia Director 8.5
installed
Instructor PC or Mac workstation with Director 8.5
Overhead projector connected to instructor workstation
Setup:
♦
♦
♦
♦
♦
♦
Session length is 2 hours
Ensure the Instructor station is properly connected to the projector and you see a
clear projection on the screen.
Ensure each User station is working properly.
Pass out a copy of the User Manual to each student
Load the demo files from the accompanying disk onto the Instructor workstation.
These are the completed files that you will demo for the students. The students
will create their own files during the workshop.
The Instructor Manual is set up so that you can see the corresponding User
Manual page next to it. To make copies of the User Manual for the participants of
the workshop, print out the PDF version from http://mll.arizona.edu/
workshops.shtml?tutorialpdfs
Workshop Structure:
♦
This workshop is divided into sections of Lecturettes and Exercises. The
lecturettes are instructional sections that are to be delivered in a lecture like
form, while demonstrating applicable information contained in the lecturette to
the Users with the overhead projection. Keep in mind that the users do not have
all of this information in their User Manuals, so be sure to cover all points.
♦
The Exercises are practice exercises for the Users and they are found in their
User Manual as well as the Instructor Manual. First, be sure to demonstrate the
steps and/or demo file in the Exercise and then after you have demonstrated,
allows the users the time to complete the Exercise on their own.
♦
The first few sections of the workshop, mainly Film Loops and Tweening, are a
review from the Director 8.5 Part I workshop. If you wish to save time, you may
quickly go through these sections so as to spend more time on the new material.
Filename: director2_Instructor.pmd
Last modified: 03/05/02
Copyright Arizona Board of Regents, 2002
University of Arizona
4
DIRECTOR 8.5 PART II Intro to Interactivity with Director - Instructor Manual
INTRODUCTION:
Prerequisites to this workshop:
Having learned and practiced the skills covered in Director I workshop, you the student will be
able to:
♦
Create Film loops: to simplify the score and add an additional
animation motion.
♦
Create simple Director Behavior and Lingo scripts
♦
Know where to place these scripts so they execute in the correct
sequence
You will have passed the Criterion Test from the Director I Workshop, and will be expected to
have the following skills from that workshop:
♦
Tweening with motion and other properties
♦
Adjusting properties of sprites in the Timeline
♦
Use of Behaviors from the Library Palette such as; Rollover Member
Change, Hold on Current frame, and Jump to Marker Button.
♦
Use of Markers
♦
Use of the Property inspector
Filename: director2_Instructor.pmd
Last modified: 03/05/02
Copyright Arizona Board of Regents, 2002
University of Arizona
5
DIRECTOR 8.5 PART II Intro to Interactivity with Director - Instructor Manual
EXERCISE 1
FILM LOOPS:
Demo file (2 min), Follow along (3 min), Practice (5 min)
Film Loops provide the following:
♦
♦
♦
♦
another level of animation
similar to Movie clips in Flash
help to simplify the score by combining sprites and channels
can have scripts attached to them.
Creating a Film Loop:
Create cast members and use of these commands: copy sprites, paste sprites, and reverse
sequence to create a bouncing ball animation that will be used to create a film loop.
Steps:
1.
File > New > Movie
2.
Window > Paint
3.
With the paintbrush, draw a small ball appx. 20 pixels. Name the cast member
“smallBall” with out the quotes.
4.
Click the New Cast Member “+” button in the upper left of the Paint Window to
create a new cast.
5.
With the rectangle tool, draw a small gray box appx. 50 pixels wide. Name it
“grayBox”.
Place them in the score and Tween an animation of a ball bouncing on the grayBox by:
EXERCISE 2
TWEENING:
Demo file (2 min), Follow along (3 min), Practice (5 min)
Steps:
1.
Drag the smallBall cast member to the middle of the stage. It should appear in the first open
sprite channel with a duration of 28 frames.
2.
Select the final keyframe, and Insert > Keyframe.
Filename: director2_Instructor.pmd
Last modified: 03/05/02
Copyright Arizona Board of Regents, 2002
University of Arizona
6
DIRECTOR 8.5 PART II Intro to Interactivity with Director - Instructor Manual
3
Holding the shift key down, move the smallBall sprite up 20 or 30 pixels to the top of its
bounce. It should look like this:
4
Rewind and Play the movie with the score still visible. The ball should appear to bounce up
and then start over at the bottom.
EXERCISE 3
FULL SEQUENCE WITH REVERSE PATH—CREATE
DOWN MOTION:
Demo file (1 min), Follow along (3 min), Practice (6 min)
Steps:
1. Select and copy the sprite in the score.
2.
Paste after the first sprite in frame 29.
3.
While still selected, Modify > Reverse Sequence.
4.
Play to test. It should first go up and then down.
5.
In channel 2, frame 1, drag an instance of the grayBox cast member to the score. Adjust it so
that it just touches the smallBall at the bottom of the bounce.
6.
On its final keyframe in frame 28, Insert > Keyframe, and then extend the sprite. Dragging
the keyframe is one technique.
Question for Students:
What other techniques can be used to extend the sprite in the score?
Answer:
Property inspector field entry, score window field entry, menu > extend sprite, with a
Lingo command.
7.
Play the movie with the score open.
♦
Demo the use of selected looping in score
♦
Demo the use of Center Current Frame button in the score window
♦
Demo score coloring of selected sprites
The score should look like this:
8.
Add a “Hold on Current Frame” behavior from the Library Palette to the last frame in
the behavior (script) channel.
9.
Play the movie again to see the result. Notice, in the Control Panel, that the movie is
still running, even though the animation stops. If you had sounds or script processes
running, they would continue even though the movie appears stopped.
10.
Save As “loopExercise.dir” to your computer drive. The dot dir (.dir) extension naming
allows cross platform work.
Filename: director2_Instructor.pmd
Last modified: 03/05/02
Copyright Arizona Board of Regents, 2002
University of Arizona
7
DIRECTOR 8.5 PART II Intro to Interactivity with Director - Instructor Manual
LECTURETTE 1: FILM LOOPS PART 1:
2 min
A film loop is an animated sequence that you can use like a single cast member. For example,
to create an animation of a bird flying across the Stage, you can create a film loop of the
sequence of cast members that show the bird flapping its wings. You create a sprite containing
only the film loop and then animate it across as many frames as you need with the Paste
Relative command. When you run the animation, the bird flaps its wings and at the same time
moves across the Stage.
You can also use film loops to consolidate Score data. Film loops are especially helpful when
you want to reduce the number of sprite channels you’re using. You can combine several
Score channels into a film loop in a single channel.
Film loops are useful for animating repetitive motions and combining sprites to use fewer
channels
EXERCISE 4
TO CREATE A FILM LOOP:
Demo file (2 min), Follow along (3 min), Practice (5 min)
Steps:
1.
In the Score, select the sprites you want to turn into a film loop.
Use sprites in as many channels as you need in film loops—-even in the sound channel.
Select sequences in all the channels you want to be part of the film loop. You can select
sprite fragments if you first select a sprite and choose Edit > Edit Sprite Frames. Controlclick (Windows) or Command-click (Macintosh) to select sequences that aren’t in adjacent
channels.
2.
Choose Insert > Film Loop (you can also copy the selections to an empty cast
member slot). A dialog box appears asking you to name the film loop.
3
Enter a name for the film loop. Something descriptive.
Filename: director2_Instructor.pmd
Last modified: 03/05/02
Copyright Arizona Board of Regents, 2002
University of Arizona
8
DIRECTOR 8.5 PART II Intro to Interactivity with Director - Instructor Manual
LECTURETTE 2: FILM LOOPS PART 2:
2 min
Director stores all the Score data and cast member references as a new film loop cast member.
Note: Drag a selection from the Score to the Cast window to quickly create a film loop cast
member in that position.
If you delete any cast member used in the film loop from the Cast window, Director can’t run the
film loop. You can edit or reposition the cast members in the Cast window, but the cast members
in the film loop must remain in the same cast for the film loop to work.
A film loop behaves just like any other cast member, with a few exceptions:
♦
When you step through an animation that contains a film loop (either by using
Step Forward or Step Backward or by dragging the playback head in the Score),
the film loop doesn’t animate. Animation occurs only when the movie is running.
♦
You can’t apply ink effects to a film loop. If you want to use ink effects with a film
loop, you need to apply them to the sprites that make up the animation before you
turn the animation into a film loop.
♦
Lengthening or shortening a sprite containing a film loop doesn’t affect how fast
the film loop plays. It changes the number of times the film loop cycles.
Director provides three other ways of incorporating a completed animation into a movie as a
discrete element; you can export it as a digital video (QuickTime or AVI) or, save it as a .dir file
and import it as a linked Director movie, or play it in a window in another Director movie.
Note: If you need to edit a film loop that you’ve deleted the original Score data it was based on,
it’s possible to restore the Score data for editing. Copy the film loop cast member to the
Clipboard, select a cell in the Score, and then paste. Director pastes the original Score data
instead of the film loop.
EXERCISE 5
MORE ON CREATING FILM LOOPS:
Demo file (2 min), Follow along (3 min), Practice (5 min)
Create a Film Loop which will simplify your score, and also enable more complex motion and
interactivity.
Steps:
1.
Using the loopExercise.dir file you created, open the Behavior Inspector.
2.
Drag this behavior to the next to last frame of the sprites in the script channel. Enter in
frame 1 when the dialogue prompt box appears. Note: This behavior is now in cast
library also.
Filename: director2_Instructor.pmd
Last modified: 03/05/02
Copyright Arizona Board of Regents, 2002
University of Arizona
9
DIRECTOR 8.5 PART II Intro to Interactivity with Director - Instructor Manual
1.
Drag up in the score so you select all frames that have info in them. Copy.
2.
Paste into an empty cast member slot.
3.
Create Film loop prompt appears. Name the Film Loop fubar.
Add more animation:
4.
Select frame 60 in channel 1. Drag the cast member to the stage.
5.
Select frame 60 in the script channel. Add a “Go Loop” behavior from the Library
Palette to it.
6.
Select the final keyframe and Insert > Keyframe.
7.
Drag the marker label to frame 60.
8.
Select the final keyframe, hold down the shift key to constrain, and move the sprite to
the right.
9.
Play the movie. You should get two motions for one now.
Try the “copy reverse sequence, copy make film loop“ techniques to create a complete
sequence to play in only one frame.
LECTURETTE 3: BEHAVIORS PART I:
Many pre-written behaviors scripts are available looking in Library Palette (go to Window >
Library Palette).
Review the first ones you used in the Intro to Director Workshop (Jump to Marker Button,) by
creating a quick simple file that uses them with simple shapes and the use of Marker Labels.
If you attach a behavior from an included library of behaviors, Director copies the behavior to
an internal cast. This prevents you from accidentally changing the original behavior.
To attach the same behavior to several sprites at once:
1.
Select the sprites on the Stage or in the Score and drag a behavior to any one of
them.
To attach behaviors to sprites or frames using the Behavior Inspector:
1.
Choose Window > Inspectors > Behavior to open the Behavior Inspector.
2.
Select a sprite or frame.
3.
Choose a behavior from the Behavior pop-up menu.
Director attaches the behavior you chose to the sprite or frame.
Note: Some behaviors are written to work only when applied to either a sprite or a frame; read
the behavior descriptions to learn more.
Filename: director2_Instructor.pmd
Last modified: 03/05/02
Copyright Arizona Board of Regents, 2002
University of Arizona
10
DIRECTOR 8.5 PART II Intro to Interactivity with Director - Instructor Manual
To change parameters for a behavior that is already attached to a sprite or frame:
1.
Select the sprite or frame where the behavior is attached.
2.
Choose Window > Inspectors > Behavior to open the Behavior Inspector.
3.
Double-click the behavior name in the Behavior Inspector.
4.
Enter parameters for the behavior.
EXERCISE 6
ATTACHING BEHAVIORS:
Practice (5 min)
Attach a behavior to sprites or frames using the Behavior Inspector:
Steps:
1.
Choose Window > Inspectors > Behavior to open the Behavior Inspector.
2.
Select a sprite or frame.
3.
Choose a behavior from the Behavior pop-up menu.
LECTURETTE 4: BEHAVIORS PART II:
Interactivity with the behavior inspector lets you create scripts without having to type the Lingo
commands yourself.
If you create a new behavior, it appears in the currently selected cast. Select an empty cast
position first if you want the behavior to appear in a certain place.
To create or modify a behavior:
1.
2.
Do one of the following:
♦
Select a behavior in the Behavior Inspector, OR
♦
Click the Behavior pop-up menu, choose New Behavior, and enter a
name for the new behavior.
Click the arrow to expand the editing pane of the Behavior Inspector.
The editing pane shows the events and actions in the current behavior. If you’re creating
a new behavior, no events or actions appear. There are several steps you can take at this
point.
Filename: director2_Instructor.pmd
Last modified: 03/05/02
Copyright Arizona Board of Regents, 2002
University of Arizona
11
DIRECTOR 8.5 PART II Intro to Interactivity with Director - Instructor Manual
♦ To add a new event or action group to the behavior, choose an event from the Event
pop-up menu and then choose actions for the event from the Actions pop-up menu.
You can choose as many actions as you need for a single event.
♦ To change an existing event or action group, choose an event from the list and
then add or remove actions in the Actions list.
♦ To delete an event or action group, choose the event and press Delete.
♦ To change the sequence of actions in an event or action group, choose an event
from the Events list, choose an action from the Actions list, and then click the up and
down arrows above the Actions list to change the order of actions.
♦ To lock the current selection so nothing changes in the Behavior Inspector when new
sprites are selected, click the Lock Selection button.
♦ If you are familiar with Lingo, you can also edit a behavior’s script directly.
EXERCISE 7
CREATING BEHAVIORS:
Practice (5 min)
Steps:
1.
Click the Behavior pop-up menu.
2.
Choose New Behavior.
3.
Enter a name for the new behavior.
4.
Choose a new event from the Event pop-up menu.
5.
Choose an action for the event from the Actions pop-up
menu.
LECTURETTE 5: BEHAVIORS PART III:
Determining When Handlers Receive a Message
A movie can contain more than one handler for the same message. Director manages
this situation by sending the message to objects in a definite order. The general order in
which messages are sent to objects is as follows:
♦
Messages are sent first to behaviors attached to a sprite involved in
the event. If a sprite has more than one behavior attached to it,
behaviors respond to the message in the order in which they were
attached to the sprite.
♦
Messages are next sent to a script attached to the cast member
assigned to the sprite.
Filename: director2_Instructor.pmd
Last modified: 03/05/02
Copyright Arizona Board of Regents, 2002
University of Arizona
12
DIRECTOR 8.5 PART II Intro to Interactivity with Director - Instructor Manual
♦
Messages are then sent to behaviors attached to the current frame.
♦
Messages are sent last to movie scripts.
♦
When a message reaches a script that contains a handler corresponding to
the message, Director executes the handler’s instructions.
♦
After a handler intercepts a message, the message doesn’t automatically
pass on to the remaining locations. (You can use the pass command to
override this default rule and pass the message to other objects.) If no
matching handler is found after the message passes to all possible
locations, Director ignores the message.
♦
The exact order of objects to which Director sends a message depends on
the message. See the message’s Lingo Dictionary entry for details about the
sequence of objects to which Director sends specific messages.
Instructor Note: At this point, hand out the JOB AID to the students, which contains some of the information
just covered in the last few sections, to help them on the job.
EXERCISE 8
CREATING A SIMPLE LINGO SCRIPT:
Demo file (2 min), Follow along (3 min), Practice (5 min)
Every Lingo script is attached to an element of a Director movie: a sprite on the stage, a
member of the cast, a frame of the score, or the movie itself. In this task, you’ll create a
movie with a button cast member and then attach a script to that button.
Steps:
1.
Choose File > New > Movie (Windows Ctrl + N, Macintosh Command + N).
This opens a new Director Movie. You need to do this only if you already have
another movie open.
2.
Choose Modify > Movie > Properties. When the Property Inspector opens,
use the View Mode button to view the window in Graphics Mode. In the
Property Inspector window, make sure that the stage size is set to 640 by 480 pixels
and the stage location is set to Centered. Also make sure that the default palette is
set to the system palette for your system: System - Win for Windows and System Mac for the Macintosh.
3.
Choose Modify > Movie > Properties. When the Property Inspector opens,
use The View Mode button to view the window in Graphics Mode. In the
Property Inspector window, make sure that the stage size is set to 640 by 480 pixels
and the stage location is set to Centered. Also make sure that the default palette is
set to the system palette for your system: System - Win for Windows and System Mac for the Macintosh.
4.
If the Stage Location pull-down menu seems to have no effect, try selecting
Center and then choosing View > Standard View (Windows Ctrl+Alt+0,
Macintosh Command+Option+0) or View > Restore View. The Keyboard
shortcut for normalizing the stage (Windows Ctrl+Alt+0, Macintosh
Command+Option+0) is handy to remember if part of the canvas appears around
the stage and you don’t want to see it, or if you need to center the stage in the
Stage window.
Filename: director2_Instructor.pmd
Last modified: 03/05/02
Copyright Arizona Board of Regents, 2002
University of Arizona
13
DIRECTOR 8.5 PART II Intro to Interactivity with Director - Instructor Manual
5.
Control > Loop Playback to make sure the Loop Playback command is
checked (Windows Ctrl+Alt+L, Macintosh Command+Option+L). When the
Loop Playback command is checked, the playback head returns to frame 1 when it
reaches the end of the last sprite in the score. The movie will continue to loop until
you stop it.
6.
Open the score and select Channel 1, Frame 1. If you don’t see the sprite toolbar
at the top of the Score window, choose View > Sprite Toolbar (Windows Ctrl+Shift+H,
Macintosh Shift+Command+H).
7.
Open the tool palette by choosing Window > Tool Palette (Windows Ctrl+7,
Macintosh Command+7).
8.
Click the Button Tool in the tool palette.
9.
Click the Stage where you want to place the button. A button appears where you
click, with a blinking insertion point indicating where you can type the button name.
Remember that you can reposition the button sprite later if you want.
10.
Type Beep in the Button Text field. This names the button.
Note: Director is preset to add new sprites to the score with a duration of 28 frames.
The length of the sprite isn’t important in this task, so you need not worry if your
button spans a different number of frames. If you want to have your score look the
same as the illustrations, choose File > Preferences > Sprite and make sure the span
duration is set for 28 frames.
11.
Select the button sprite in Channel 1 of the score and choose New Behavior
from the Behavior pop-up menu in the sprite toolbar. You’re creating a Sprite
Script, which affects only this sprite.
The Script Window appears, already containing the Lingo commands on mouseUp
me and end. Whenever you create a Sprite Script, these lines will already be
entered in the Script window by default.
13.
Type Beep in the Script window, at the insertion point, below on mouseUp.
Beep is a Lingo command that sounds a system beep on the computer. This is how
the script should look:
on mouseUp me———————————— EVERY HANDLER STARTS WITH THE
WORD ON
beep
end————————————————————- EVERY HANDLER ENDS WITH THE
WORD END
Instructor Note: Lecture the following information to the students. These next few paragraphs do not
appear in their User Manual.
Filename: director2_Instructor.pmd
Last modified: 03/05/02
Copyright Arizona Board of Regents, 2002
University of Arizona
14
DIRECTOR 8.5 PART II Intro to Interactivity with Director - Instructor Manual
Here, and wherever you type a Lingo script, you’ll want to check the spelling carefully.
Director can’t interpret Lingo commands that are misspelled or incorrectly punctuated. You
can, however, use any combination of uppercase and lowercase letters in your commands.
Director does not pay attention to case and would understand this command typed as beep,
BEEP or Beep.
To make it easier to enter commands correctly, you can click the Alphabetical Lingo button or
Categorized Lingo button in the Script window and choose from the lists that are displayed.
The Alphabetical Lingo button displays a list of all Lingo commands in alphabetical order.
The Categorized Lingo button displays the commands organized in categories. When you
select a command, it is pasted into the Script window at the insertion point. Because you
don’t need to type the command, you are less likely to make typing and syntax errors.
The Lingo keyword me in the on mouseUp me line is a variable containing information
supplied by Director about the current object. For example, the me variable could determine
which element on the Stage was clicked to cause a script to run. Director automatically
supplies the me keyword in the default sprite and frame behaviors, but its use is optional.
13.
Save your work as Button 1 in a Projects folder.
EXERCISE 9
TESTING A SCRIPT:
Demo file (2 min), Follow along (3 min), Practice (5 min)
Any scripting language has certain elements you must use and rules you must follow. If you
follow the rules, you are rewarded when the script performs as you expect. If the script does
not work, you perform debugging to correct the syntax or change the elements to satisfy
Lingo’s rules. In this task, you will test the script you just created.
Steps:
1.
On the toolbar, click the Rewind and Play buttons to rewind and play the movie.
The movie loops because you turned on looping with the Control > Loop Playback
command.
2.
Click the button you created. You should hear a beep (or see the Menu bar flash).
If you don’t, repeat the steps for creating the script in the preceding task. Make sure
you type beep correctly and close the window when you’re done. Also, make sure
your speakers are turned on.
3.
Stop the movie.
Filename: director2_Instructor.pmd
Last modified: 03/05/02
Copyright Arizona Board of Regents, 2002
University of Arizona
15
DIRECTOR 8.5 PART II Intro to Interactivity with Director - Instructor Manual
LECTURETTE 6: USING THE MESSAGE WINDOW:
Now that you know what a script is and how it is created, it’s time to delve a little deeper into the
way Director and Lingo work together.
Director sends out messages whenever some event occurs in a movie. For instance, when the
user presses the mouse button to click something, this is a mouseDown event, and Director
responds by sending a mouseDown message. The message is then available for a while for use
in Lingo scripts. When the user releases the mouse button, this is a mouseUp event, and
Director sends a mouseUp message. All actions performed through Lingo are triggered by
events.
Lingo scripts can be thought of as a series of instructions to Director to execute specific actions
in response to events in a movie. Groups of instructions that relate to a specific event are called
handlers, because they handle messages issued as the result of events. For instance, in the
script you just wrote, you created a handler for the mouseUp event associated with the Beep
button. When the handler receives the mouseUp message, it handles that message by sounding
a beep.
In a Lingo Script, every handler:
♦
♦
♦
Begins with the word on followed by a message name
Includes the series of actions to be taken when that event occurs
Ends with the word end
If a script includes several instructions, Director executes the first instruction, then the next one,
and so on, until it reaches the end of the handler. Here again is the script you just created:
on mouseUp me
beep
end
Director automatically sends built-in message names for most common events that occur in a
movie. For example, Director sends a mouseDown message when you click the mouse button,
a mouseUp message when you release the mouse button, a keyDown message when you
press a key on the keyboard, and an enterFrame message when the playback head enters a
frame.
You can watch this event-occurrence and message-sending process by using the Message
window.
EXERCISE 10
USING THE MESSAGE WINDOW:
Follow along (3 min), Practice (5 min)
Steps:
1.
Choose Window > Message (Windows Ctrl + M, Macintosh Command + M). The
message window will appear.
2.
Turn on the Trace function by clicking the Trace button. When Trace is on, the
Message window displays messages and scripts as the movie plays.
Filename: director2_Instructor.pmd
Last modified: 03/05/02
Copyright Arizona Board of Regents, 2002
University of Arizona
16
DIRECTOR 8.5 PART II Intro to Interactivity with Director - Instructor Manual
3.
Rewind and play the movie. Then click the Beep button you created. When you
click the button on the stage, the Message window displays the messages Director
sends and the lines of the script it executes. The lines in the Message window preceded by == indicate Director messages that are generated automatically. The lines
preceded by - - > are the lines in the mouseUp handler you created. The actual content
in your Message window may differ from what is shown here, but it should include
Handler: mouseUp, beep, and end.
4.
Click the Trace button to turn off tracing. When left on, the Trace feature
dramatically slows the speed of the movie.
In addition to seeing the messages Director is sending, you can use the Message window to
“talk” to Director yourself, using Lingo. You can test commands by typing them directly in the
Message window; Director will run them immediately. You will use the Message window often for
creating, testing and debugging your Lingo scripts.
LECTURETTE 7: EXAMINING LINGO ELEMENTS:
The instructions included in a Lingo handler consist of a combination of elements that are like
words in an English sentence. The elements can be categorized according to what they do, and
rules determine how they can be combined. All Lingo elements are defined in the “Lingo Dictionary” section of Director’s on-line Help.
Commands Tell a movie to do something. For example, go to instructs the playback head to branc h to a specified frame.
Functions
Keywords
Properties
Operators
Constants
Return a value. For example, date returns the current
date as set in the computer.
Reserved words that have a special meaning in Lingo.
For example, all Lingo properties and many sprite properties and functions require that the keyword the precede the primary name. This keyword distinguishes the
property name from a variable or object name.
Attributes of an object. For example, the colorDepth is a
property of the computer's monitor. Properties may also
be expressed with dot syntax, as in sprite (4).visible,
where the property is associated with the object by a
period or dot.
Terms that change or compare one or more values. For
example, the > operator compares greater and lesser
values, and the + operator adds values.
Elements that don't change. For ex ample, TRUE always
has the same meaning. (In Lingo, you can also use
numbers to represent the values of TRUE and FALSE.
The value of TRUE is 1, and the value of FALSE is 0).
By default, the Script Editor automatically assigns different colors to different Lingo elements, so
you can distinguish between reserved keywords and variable names and simple comments. The
colors used, and whether they are used at all, can be determined in the Script Window Preferences dialog box (choose File > Preferences > Script).
Filename: director2_Instructor.pmd
Last modified: 03/05/02
Copyright Arizona Board of Regents, 2002
University of Arizona
17
DIRECTOR 8.5 PART II Intro to Interactivity with Director - Instructor Manual
Now you’ll use the Message window to see how some of the Lingo elements work.
The put command tells Director to display any results in the Message window. For example, the the
date function returns the current date according to the computer’s system clock. When you string
these two elements together, the result is the date displayed in the Message window. In this task,
you will use put to examine Lingo elements.
EXERCISE 11
EXAMINING LINGO ELEMENTS:
Demo file (2 min), Follow along (3 min), Practice (5 min)
Steps:
1.
In the Message window, type put the date and then press Enter. You should see the date
displayed in the Message window. The the time function returns the current time according to
the computer’s system clock. Check it out.
2.
Type put the time in the Message window and then press Enter. You should see the time
displayed in the Message window.
Properties return information about specific items. For instance, you can use properties to get
information about the background color of a sprite, the cast member number of a sprite in a particular
channel, or the last frame of a movie. You will next try using the the colorDepth property of the
computer monitor, which returns the current color depth setting.
3.
Type put the colorDepth in the Message window and then press Enter. The result should
be 8 (Assuming your monitor is set to 8-bit color).
The the loc of sprite property determines the coordinates (loc is short for location) of the specified
sprite. The coordinate value is returned as appoint (X, Y), where X is the horizontal location and Y is
the vertical location. Earlier you created a button called Beep and placed it in channel 1, frame 1. You
can use the the loc of sprite property to get that button’s location.
4.
Type put the loc of sprite 1 in the Message window and then press Enter. The result is
the horizontal and vertical coordinates of the button - for example, the point (181,293). (Your
result will likely be different because your button is probably in a different location).
Operators compare or change values. The + operator adds two numbers together, as you will see next.
5.
Type put 5 + 5 in the Message window and then press Enter. The result should be 10.
Try another operator.
6.
Type put 5 < 9 in the Message window and press Enter. The result is 1, or TRUE.
Remember that 1 represents True and 0 represents FALSE.
7.
Type put 5 > 9 in the Message window and press Enter. The result is 0, or FALSE.
Remember that TRUE and FALSE are constants, and their values never change.
8.
Type put TRUE in the Message window and press Enter. The result is 1 because TRUE is
a constant value and always equals 1.
9.
Close the message window.
You’ve just used the Message window to see how various Lingo elements work. This window is a great
tool for testing Lingo commands and functions to see how they work before you add them to your
scripts.
Filename: director2_Instructor.pmd
Last modified: 03/05/02
Copyright Arizona Board of Regents, 2002
University of Arizona
18
DIRECTOR 8.5 PART II Intro to Interactivity with Director - Instructor Manual
LECTURETTE 8: EXAMINING TYPES OF LINGO
SCRIPTS:
You can write several types of Lingo scripts. The type of script you choose to write depends on a
combination of factors:
♦
♦
♦
Where you store the script
The object (for example, a sprite or a cast member) to which you assign the
script
Where you want the script to be available (for example, within a single frame
or throughout the movie)
Here’s a brief overview of the types of scripts you can write:
Primary event
scripts
Score Scripts
More often called primary event handlers, are overriding, "assume
control" scripts. A primary event script can be established as the first,
or primary, receiver of an event. A primary event handler can intercept the event generated when a user clicks the mouse or presses a
key, or when a specified amount of time has elapsed since the last
mouse click or key press.
Can be invoked only by objects in the score. You can assign a score
script to a sprite or to a frame, and it is available only when the sprit e
or frame is active in the movie.
Cast Member
Scripts
Associated with a specific cast member. A cast member script runs in
response to an action affecting any sprite derived from that cast member.
Movie Scripts
Are assigned to the entire movie.
Parent Scripts Are the code framework, or class, for a Lingo object.
With the exception of Cast member scripts, all scripts take up a slot in the Cast window. Multiple
sprites and frames can use the same score script. Cast member scripts, on the other hand, cannot be
shared among different cast members - - they are stored with the cast member and are accessed by
clicking the Script button in the cast or in the Property Inspector. You will learn how to edit a cast
member script in later lessons.
You will use Score scripts, Cast member scripts and Movie scripts while developing. The rest of this
section describes these script types in greater detail. For more information about Primary event
handlers and Parent scripts, see the Learning Lingo manual included with Director.
Filename: director2_Instructor.pmd
Last modified: 03/05/02
Copyright Arizona Board of Regents, 2002
University of Arizona
19
DIRECTOR 8.5 PART II Intro to Interactivity with Director - Instructor Manual
There are two types of Score scripts: Sprite scripts and Frame scripts.
Sprite scripts, like the one you created earlier for the Beep button, are assigned to
a sprite in the score. If you need to control a cast member’s actions for only a short
time, or only in a particular section of the score, or only in one particular instance of
that cast member on the stage, create a Sprite script. A single sprite can have
multiple sprite scripts.
Frame scripts are assigned to a specific frame in the score. Use Frame scripts to
create handlers that you want always available at an individual frame or to control
the playback head without requiring input from the user. A frequent use of a Frame
script is to keep the playback head paused in a frame until a specific event (such as
a button click) occurs. A frame can have only a single frame script.
Cast member scripts are assigned to a cast member. Assigning a script to a cast member
is useful when you want the cast member always to execute the same Lingo code, regardless
of where the cast member appears in the score. If you are creating something like a Return
to Main Menu button that always performs the same action, create a Cast member script. A
cast member can have only a single script.
Movie scripts are available to the entire movie while the movie plays. Movie scripts can
control what happens when a movie starts, stops or pauses. If you want to access a script
from anywhere in a movie, place it in a Movie script. If every cast member or frame needs
access to functionality of a handler, place the handler in a Movie script. For example, a
handler in a Movie script that checks the color depth of the user’s monitor might run when the
movie starts. You can use as many Movie scripts as you like.
When an event (such as a mouse click) occurs, Director responds by issuing a message of
the same name. For example, when a user releases the mouse button, a mouseUp event is
generated. Director responds to the mouseUp event by issuing a mouseUp message. A
message travels, in order, through Sprite scripts, Cast member scripts, Frame scripts and
Movie scripts looking for a handler by the same name. In most cases a message runs the
first matching handler it encounters, and then the message stops. An exception occurs at
the sprite level. A sprite can have more than one script, and a message always looks at all
of a sprite’s scripts and runs any matching handlers it finds before stopping. For example, a
sprite can have two or more on mouseUp handlers; a mouseUp message that reaches the
sprite runs both handlers in the order in which you assigned the mouseUp scripts to the
sprite, and only then does the message stop.
Lingo is a flexible language, and it provides a way (through the pass and stopEvent commands) for
you to override the message. Parent scripts for the objects are not part of the message order. Consult
the Using Director manual that comes with Director for a comprehensive discussion of messages
and message order.
For beginning Lingo programmers, it’s important to understand that a movie can contain many handlers
with the same name. Your project design - how you assign scripts - determines which version of a
handler runs. It is common for a movie to have many different on mouseUp handlers. For example,
each on mouseUp handler might be attached to a different sprite in the score, and other on mouseUp
handlers might be assigned to cast members. Which on mouseUp handler actually runs depends on
when and where a user clicks.
Filename: director2_Instructor.pmd
Last modified: 03/05/02
Copyright Arizona Board of Regents, 2002
University of Arizona
20
DIRECTOR 8.5 PART II Intro to Interactivity with Director - Instructor Manual
EXERCISE 12
CREATING DIFFERENT TYPES OF SCRIPTS:
Demo file (5 min), Follow along (5 min), Practice (20min)
In this task, you will continue work on the Beep button you started earlier by creating four types
of scripts: a sprite script, cast member script, frame script, and movie script. You will then test
these scripts to observe how the message order affects which script runs.
As you work through these steps, you will notice that Director sometimes gives you a head start
by opening the Script window with a handler for the most common message already partially
entered for you. For a sprite script, Director enters on mouseUp me and end commands; for a
frame script, Director enters on exitFrame and end commands. You are not restricted to these
handlers only; Director defaults to them to be helpful.
Steps:
1.
Select the Beep button on the stage. Then choose Modify > Sprite > Script
(Windows Ctrl+Shift+’, Macintosh Shift+Command+’). You already assigned this
sprite a script that sounds a beep when the Beep button is clicked. You will now change
the script to do something else.
The alert command sounds a beep and displays an alert box containing a message you
specify. Replace the beep command with the alert command now.
Tip: Here and in the following steps, notice that the Script window’s title bar identifies the
script type. If you’re ever unsure of the type of script being displayed, check the title bar.
2.
Make the changes shown here in bold and then close the Script window.
On mouseUp me
Alert “This is the sprite script”
End
The quotation marks tell Director that this is the text of the message you want to display.
Now when you click on the Beep button, an alert box displays This is the sprite script.
3.
Play the movie and click the Beep button. You should see an alert box with you
message and an OK button.
4.
Click OK to dismiss the alert box.
5.
Stop the movie. Now you’re going to create a cast script for the Beep button.
6.
In the Cast window, select the Beep button (cast member 1), Then click the Cast
Member Script button.
The Script window appears, already containing the Lingo command on mouseUp and end.
Whenever you create a cast script, these lines appear in the Script window. (Recall that these
lines are also displayed whenever you create a sprite script.)
Tip: With a cast member selected, you can also create a cast member script by choosing Modify
> Cast Member > Script (Windows Ctrl+’, Macintosh Command+’) or by clicking the Script button
on the toolbar.
Filename: director2_Instructor.pmd
Last modified: 03/05/02
Copyright Arizona Board of Regents, 2002
University of Arizona
21
DIRECTOR 8.5 PART II Intro to Interactivity with Director - Instructor Manual
7.
Create the handler shown here and then close the Script window.
On mouseUp me
Alert “This is the cast script”
End
Take a look at the Cast window and you will see that there is no new cast member. That’s because
cast member scripts are included within the cast member to which the script is attached. You can
tell when a cast member has a script by the script icon at the lower left of the cast member’s
thumbnail.
Now you have a mouseUp handler in both the sprite script attached to the Beep button and the cast
script attached to the Beep button. According to the message order listed previously, the mouseUp
handler in the sprite script should take precedence, and the mouseUp handler in the cast script
should not be executed. Try out the button now.
8.
Play the movie and click the Beep button. As Expected, you see the alert box with the
sprite script message. This is because sprite scripts take precedence over the cast scripts.
9.
Click OK to dismiss the alert box and then stop the movie. Next you’ll remove the
sprite script to se how the mouseUp message passes through the sprite level to the cast
member level.
10.
Select the Beep button on the stage. Then choose Clear All Behaviors from the
Behaviors menu in the score. This removes the sprite script from the button sprite.
Take a look at the Cast window, though, and you’ll see that even though, you cleared the
script from the sprite, the behavior still exists as a cast member. The Clear All Behaviors
selection affects only the selected sprite - if other sprites have this behavior attached, they
are not affected, and the behavior’s cast member is not affected either. And nonce of this,
of course, had any affect on the script attached on the button cast member.
11.
Play the movie, click the Beep button. Now an alert box appears with the cast script
message. This is because there is no mouseUp handler at the sprite script level, so the
message was sent to the next level in the message order.
12.
Click OK to dismiss the alert box and then stop the movie. Next you’ll add a frame
script to the movie, but you need to make a minor adjustment first.
13.
If the button sprite in your score spans more than one frame, adjust the sprite’s
duration so that the sprite occupies, only frame 1.
As the previous steps demonstrated, when you select a sprite and assign a script to it, that script is
active for the sprite’s entire duration, regardless of the number of frames the sprite spans. Frame
scripts, however, are active only within the frame to which they are assigned. The following steps
will be easier if you reduce the sprite to a single frame; you can then attach a frame script to this
single frame, rather than assigning it to every frame within the button sprite’s duration.
14.
Double-click the script channel, frame 1.
The Script window appears, already containing the Lingo commands on exitFrame and end. To see
how the message order works in this task, you need to change the default handler name from on
exitFrame to on mouseUp.
Filename: director2_Instructor.pmd
Last modified: 03/05/02
Copyright Arizona Board of Regents, 2002
University of Arizona
22
DIRECTOR 8.5 PART II Intro to Interactivity with Director - Instructor Manual
15.
Select all the text in the Script window and delete it. Type the following and then
close the window.
On mouseUp
Alert “This is the frame script”
End
You now have a mouseUp handler in the cast member script attached to the Beep button
that displays an alert message when the Beep button is clicked. You also have a mouseUp
handler in the frame script attached to frame 1 that displays an alert message whenever the
mouse is clicked. For the frame script to go into action, the mouse doesn’t have to be
clicked on any particular object (such as a button). Try it out.
16.
Play the movie and click the Beep button. Because the cast script takes precedence
over the frame script, you see an alert box with the cast script message, and the mouseUp
handler in the frame script is not executed.
17.
Click OK to dismiss the alert box and then click anywhere except on the Beep
button. You see an alert box with the frame script message. This is because a
mouseUp message was generated by the mouse click. Even though the Beep button
contains a handler for the mouseUp message, you did not click the Beep button itself,
so that cast script is not executed because it never received the mouseUp message.
Sprites ( and casts) receive the mouseUp message only if the sprite (or cast member)
is the object being clicked. Because Director can't find a sprite or cast script to handle
the mouseUp message, the message is sent up to the next level in the message order,
the frame script level. Because you have a mouseUp handler in the frame script, that
handler is executed here.
18.
Click OK to dismiss the alert box and then stop the movie.
19.
Press Ctrl+Shift+U (Windows) or Command+Shift+U ( Macintosh) to open a new
movie script. You can also open a new movie script by clicking an empty cast slot
and then clicking the script button on Director’s tool bar or choosing Window > Script.
Notice that the Script button for a movie script contains no default Lingo commands,
and that the title bar for the window identifies it as a movie script. This is different than
when you create a sprite script, cast script, or frame script.
20.
Type the following and then close the window:
on mouseUp
alert “This is the movie script”
end
You now have a mouseUp handler in the cast member script attached to the Beep button. You
have a mouseUp handler in the frame script attached to frame 1. You also have a mouseUp
handler in the movie script. Test the handlers.
21.
Play the movie and click the Beep button. As expected, the cast script message is
displayed in the dialog box.
22.
Click OK to dismiss the dialog box and then click anywhere except on the Beep
button. According to the message order, the frame script takes precedence over the
movie script, so the frame script message is displayed in the alert box, and the
mouseUp handler in the movie script is not executed.
Filename: director2_Instructor.pmd
Last modified: 03/05/02
Copyright Arizona Board of Regents, 2002
University of Arizona
23
DIRECTOR 8.5 PART II Intro to Interactivity with Director - Instructor Manual
23.
Stop the movie. You’re going to clear the frame script to see how the mouseUp
message is forwarded to the movies script.
24.
Select the behavior channel, frame 1. Then choose Clear All Behaviors from the
Behaviors menu in the movie script.
25.
Play the movie and click the Beep Button. The cast script messages is displayed in
the alert box.
26.
Click Ok to dismiss the alert box and then click anywhere except on the Beep
button. Because you removed the frame script, the mouseUp message is sent to the
next level in the message order, and you see the movie script message.
27.
Stop the movie
LECTURETTE 9: CREATING SCRIPTS WRAP-UP
As you can probably guess, if a script is not working correctly, you can track the message
through the message order, and you may be able to find the problem that way. Understanding
message order can be very important when you are debugging scripts. It’s also useful for
creating scripts that temporarily override other scripts, as you’ve just seen this task. (For
example, you could create a cast member script for a button that usually performs one action
and also create a sprite script for the button so it performs differently in some cases.)
Look at the Cast window one more time and you will see evidence of the four scripts you have
created. The cast members in cast slot 1 is the button cast member, and the icon at the lower
left indicates that there is a cast script attached to it. The next two cast members are the scripts
that you created for the sprite and the frame. The cog icon at the bottom of these two cast
members indicates that they are behaviors and that they can be attached to sprites and frames.
The cast member in cast slot 4 is the movie script and has an icon at the bottom right that
designates it as such. You can’t attach a movies script to a sprite or a frame, even though, as in
this example, the scripts are nearly identical. You can, however, use, the Property Inspector to
change a movie script to a non-movie script at which point you can attach it to a sprite or a
frame.
Filename: director2_Instructor.pmd
Last modified: 03/05/02
Copyright Arizona Board of Regents, 2002
University of Arizona
24
DIRECTOR 8.5 PART II Intro to Interactivity with Director - Instructor Manual
CRITERION TEST
20 minutes
Instructor Note: Instruct the students to turn to the last page of their User’s Manuals. Inform
the students they have 20 minutes to complete the Criterion Test, which should be more than
enough time. At the end of the time allowed, check the students’ final products to ensure they
have passed successfully.
4 minutes:
Construct a Director movie where there are 4 labeled sections with marker labels on each. Put
text in each to identify it.
6 minutes:
The initial menu screen will have 4 choices. Create 4 simple buttons on this first screen. Put a
hold on current frame behavior in the script channel for this screen.
10 minutes:
Demonstrate the use of 3 of the 4 types of scripts to navigate to each section of the movie.
Provide a way to get back to the men (cast script, sprite script, frame script, and movie script).
Filename: director2_Instructor.pmd
Last modified: 03/05/02
Copyright Arizona Board of Regents, 2002
University of Arizona