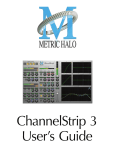
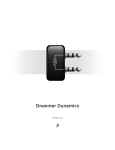
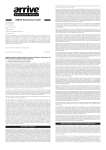
1
Audio Evolution
version 4.0
User Manual
revision 1.0
Technical support
[email protected]
Website
http://www.audio-evolution.com
Sales contact and distribution
Computer City
Zebrastraat 7 - 9
3064 LR Rotterdam
The Netherlands
Tel. +31 (0)10-4517722
Fax. +31 (0)10-4517748
Email: [email protected]
http://www.compcity.nl
Copyright
Copyright © 2003 by Davy Wentzler. All Rights Reserved.
No part of the Audio Evolution software or this manual may be reproduced, stored in a
retrieval system, transcribed or transmitted in any form without the prior written permission
of the copyright holder.
All trademarks mentioned in this document are the property of their respective owners.
All features and specifications are subject to change without notice.
Credits
Designed and programmed by Davy Wentzler.
Manual by Don Cox.
Icons by Martin “Mason” Merz.
Foreword
Thank you for choosing Audio Evolution 4 as your audio solution for the Amiga. From now
on you will be able to enjoy high quality audio recording and editing on your PowerPC
platform. A lot of work has been put into the development and testing of this product. I
would like to thank everyone who contributed to the project and all the users of previous
versions who had to wait a long time for this subsequent release. We hope you will enjoy
using it and as always please feel free to contact us if you have any questions!
With best regards,
Davy Wentzler
10. Aux Send and Return
INDEX
1.Introduction
page 4
2.Installation
page 4
3.Support
page 4
4.Getting started
page 4
5.Menus
page 17
11. Control Window
11.1 Playback
page 17
11.2 Recording
page 18
12. Effects
12.1 Gain Effects
page 19
12.2 Delay Effects
page 20
12.3 Frequency Effects
page 21
12.4 Modulation Effects (FX)
page 22
12.5 Reverb Effects
page 23
5.1 File Menu
page 4
5.2 Edit Menu
page 5
5.3 Windows Menu
page 5
5.4 Sync Menu
page 6
5.5 Automation Menu
page 6
Appendix A - Keyboard Short Cuts
page 24
5.6 Options Menu
page 6
Appendix B - ARexx port
page 25
5.7 Marker Menu
page 8
6. Timeline Window
6.1 Loading a sample
page 8
6.2 Vertical zoom
page 9
6.3 Edit modes
6.3.1 Move and Trim
page 9
6.3.2 Split sample
page 9
6.3.3 Automation editing
page 9
6.3.4 Range editing
page 10
6.4 Position display
page 11
6.5 Grid display
page 11
6.6 Horizontal zoom
page 11
6.7 Track panel
page 11
6.8 Timeline Sample Menu
page 12
7. Sample List Window
page 13
8. Sample Editor
page 14
9. Mixing and Effects
page 15
Page 3 of 25
1. Introduction
4. Getting started
Audio Evolution is a program for recording sound
samples, and for editing, mixing and arranging samples
for music, sound tracks or broadcasting. The two main
windows are a Timeline for assembling and arranging
sounds, and a Mixer which is a simulation of a hardware
mixing desk.
When starting Audio Evolution for the first time, you are
asked to select an AHI audio mode and a screen mode.
For the AHI mode, please choose a ‘Hifi 16-bit stereo++’
mode for optimal quality and functionality. Please choose
a 16 or 24-bit screen mode with a minimum resolution of
800x600. A resolution
of 1280x1024 is
recommended. For the
68k demo, an 8-bit
mode has to be
selected.
Up to 60 stereo tracks can be mixed, depending on the
computer hardware, and each track can hold many
samples. There is no limit to how long a mix can be.
Various effects such as equalisation or echo can be
applied to a track in real time.
The balance of sound between the tracks can be adjusted
manually, as the mix is played, or with an automation
system in which changes in levels, panning, etc are preset
by the user and then applied by the computer on
playback.
Links and controls are included to make it easy to combine Audio Evolution with other Amiga music programs.
Note that the look of the windows and buttons in the pictures in this document may vary slightly from what you
see on screen.
2. Installation
To install Audio Evolution 4, please double click on the
InstallAudioEvolution icon in the AudioEvolution4
drawer and follow the instructions. It is not recommended to copy and install the files by hand. When you
have purchased the full version of Audio Evolution, a
registration utility will start up at the end of the installation. Please fill in all fields including your name, email
address and serial number. After leaving the registration
utility, a file called ‘AE_registration’ is placed on your
Ram Disk. Please send this file by email to
[email protected] and your license will be
emailed to you as soon as possible. This can take anywhere between 5 minutes and a few days as your registration needs to be processed. Without registration, Audio
Evolution 4 will fall back to demo mode until a license
has been installed. We apologize for this inconvenience.
3. Support
Whether you use Audio Evolution in demo, lite or full
mode, please feel free to contact us at
[email protected] if you have any questions,
suggestions or bug reports. For sales information, please
contact Computer City at [email protected].
Please visit http://www.audio-evolution.com regularly for
news and updates or subscribe to the Audio Evolution
News Letter on the website.
When entering the
Audio Evolution
screen, you are
presented with a
welcome dialog where
you can choose to load
a previously created
project or start a new
one. When you enter
Audio Evolution for
the first time, please
select ‘New Project’
and enter a project
name. A directory with
that name will be
created in the Audio
Evolution directory. In
this directory, a project file is created as well as directories to store all samples that you are going to record
within this project.
The next chapters will give an explanation of all
windows and menus in the program.
5. Menus
5.1 File Menu
New/Load Project. Replaces the current project with
another. A list of recent projects is presented. You can
double-click on any of these, or select it and click the
button.
Save Project. Saves the current project, overwriting the
existing file.
Save Project As. Saves the current project with a new
name. You should do this after every few plain Saves to
reduce the risk of losing work. Also back up your project
files regularly to another drive. Project files do not inPage 4 of 25
clude any sample data, just a list of which samples are
used and at what times, together with other settings, so
the file size is small.
Save Range to Disk. Saves a selected Range to an AIFF
file. If the Range spans more than one track, multiple
AIFF files will be created for each track.
Delete Project. You will be asked if you also want to
delete the sample files used. The answer should usually
be Cancel.
5.3 Windows Menu
Master Project. This records the project to an AIFF file
on disk. Make sure there is enough space on your hard
drive before doing this - you will need about 10Megs for
each minute of music. Even if you finally want an MP3
file, it is better to save a full quality file such as an AIFF
first, and then convert it to MP3, because you may want
later to make another MP3 with higher quality.
Encode Dolby Pro Logic . Experimental Dolby Pro
Logic encoder which encodes the first 4 (mono) tracks of
the project into a stereo AIFF file which can then be
decoded into surround sound using a Dolby Pro Logic
amplifier. See the requester for more information.
Load Sample. Loads an AIFF sample or imports a WAV
sample into the project.
Online Help. Brings up this Help file, which is in PDF
format.
Audio Mode. To select the AHI mode in use. 16-bit hifi
stereo++ is a suitable choice for most purposes.
Screen Mode. Brings up the standard ASL screen mode
requester.
Save Preferences. Saves the above, the Preferences in
the Options menu, and window sizes and positions.
About. The usual information.
Quit.
5.2 Edit Menu
The Timeline, Mixer and Control windows are always
open. This menu enables the optional windows.
Subgroups Window. This window contains the level
controls for tracks that are
assigned to one of the four subgroups. Subgroups are used
when you want to work with
two or more tracks as a group.
For example, you may have
several drum tracks. Putting
them all in the same subgroup
allows you to raise or lower the
volume level of the drums as a
whole, while you can still adjust
individual drum tracks with the
main mixer sliders.
There are also solo and mute buttons affecting all tracks
in a subgroup.
Aux Returns Window. Contains level
controls and setups for up to four real
time effects which are shared by two or
more tracks. The corresponding sends are
in the expansion modules on each track in
the mixer.
Sample List window. Contains a list of
all the sample files used in the project. A
sample file can be shared by any number
of projects. Right clicking on the name of a sample
brings up a menu of things you
can do to a sample. Some of
these will change the file on disk.
Cut, Copy and Paste are for editing Ranges. To make a
range in a sample, hit the Ranges button; then click for
the beginning of the Range and alt-click for the end. The
sample should change colour to indicate the range. You
can paste a Range onto another track, or on top of another
sample (it will replace that section).
Cross-fade. Make a Range that extends across two
samples on one or more tracks. There can be a gap
between them. Applying Cross-fade will give a new
sample that fades smoothly from one to the other.
Undo. Undo the last editing action.
5.4 Sync Menu.
The Sync Menu contains various options for synchronising playback or recording between Audio Evolution and
Page 5 of 25
another program, on the same or another computer. See
also Tempo and Synchronisation.
documentation.
Ignore Ignores any MIDI start command or Midi
Machine Control (MMC) code. When the Play-button is
pressed in the Control window, the samples will be
played without waiting for anything.
5.5 Automation Menu
Send Sends a MIDI start command (and MMC-start
when this option is selected in the «Options» menu) after
loading the first sample- parts in memory when the Playbutton has been pressed. A Song Position Pointer is also
sent. The MIDI commands will be sent via the
‘serial.device’.
Receive If this option is selected, the program first waits
for an incoming MIDI start command before playing
when the Play- button has been pressed. Of course, the
first sample parts are loaded into memory first for optimal
synchronisation. The MIDI commands would be received
from the ‘serial.device’.
B&P Receive Waits for a start command from
Bars&Pipes. You have to add the ‘AudioEvolution.ptool’
in B&P to a track first. You will also have to start Audio
Evolution first before starting Bars&Pipes. First press
play or record in Audio Evolution, wait for the harddisk
activity to finish and then press play in B&P.
CAMD Receive If this option is selected,
AudioEvolution waits for a MIDI start or continue command via the camd.library. In this way, any program
using the camd.library can be synchronised to Audio
Evolution.
AREXX Receive This option waits for an ARexx start
command. Programs such as Bars and Pipes or
Mediapoint can send out ARexx commands at specific
times. It is also possible to send a command across an
Envoy network from one Amiga to another, using
EnvoyARexx from Aminet. The port name for AE is
“AE_AREXX”. The commands available so far are
“play”, “stop”, “locate” and “loadsample”. The last is
used with an argument, for example:
“loadsample FILENAME
Work:audio/samples/example.AIFF LOCATE 12500”
will load the AIFF file and place it at 12.5 secs on the
time line. The LOCATE parameter is in milliseconds.
See Appendix B for more information on AREXX.
Master Control Bus. Future synchronization and remote
control option. If this option is selected, AudioEvolution
waits for a command from the Master Control Bus server.
This allows several programs which are connected to the
MCB server to start and stop playing together. Thus you
can synchronise Audio Evolution to a MIDI or animation
player, for example. For more details, see the MCB
Automation Menu. The “Show” options set all the
tracks on the Timeline to show the same kind of automation - mute, volume, etc. You can also set single tracks
from a menu accessed by right-clicking on the track
name panel in the Timeline.
Latch Mode. This applies to recording the automation
lines by moving the mixer controls. In Latch mode, when
you release a slider or knob, the automation then stays at
whatever setting the control is at for the rest of the track.
You could use this to make a fade in, for instance.
Touch Mode. In this mode, as soon as you release a control, the automation goes back to whatever it was before.
This mode would be used for touching up the automation
in the middle of a track. The levels will only be changed
for the time when you are actually operating the controls.
Ignore Automation. Ignores automation on playback.
The Automation List option brings up the panel for setting automation events precisely.
5.6 Options Menu
MIDI Machine Control. If ‘Send’ is checked in the
Sync menu, an MMC-start command will be sent at start
of playback.
MIDI Bar Display. Changes the
Timeline calibration to bars
rather than minutes and seconds.
If the Grid is set to Bars, it will
match. Both are controlled by the
Tempo settings.
Soundcard I/O. This allows you to select which input on
your sound card you want to record from. The options
will depend on the card. The Listen button allows you to
check; switch it
off after use. If
there is a
Master option,
that will record
all the existing
tracks, the same
as “Master
Project” in the file menu. It could also be used for bouncing down tracks if your project is getting overloaded. The
right hand column allows you to select alternative outPage 6 of 25
puts. There may be only one option here.
Set Sample Rate. This can only be done in a new project
with no samples loaded. It sets the sample rate which will
be used for recording. If you record immediately, this rate
will be used. If you load a sample before recording, the
rate will change to that of the sample. Normally, the rate
of a new project is set by the first loaded sample. You
cannot combine samples of various rates in one project,
so any that don’t match will have to be resampled with a
sample processing program. It is best to keep all your
samples at 44.1KHz.
Tempo Settings. This item brings up a requester which
sets the tempo and
time signature for
the metronome
and the Timeline
grid. The
metronome can be
set to play only
when recording,
or when playing
back as well. It
uses two sounds,
which are stored
on disk as AIFF
files called
MetronomeHigh
and MetronomeLow in the Data directory. One is used
for the first beat of each bar and the other for the remainder. You can set any time signature by typing in the two
small boxes.
The tempo can be set with the slider, either by sliding or
by clicking either side of the bar. It can also be set by
measuring the beats in a sample. This is fairly easy for a
percussion sample. Before opening the Tempo requester,
click on the Ranges button at the top of the Timeline.
Inspect your sample at a high magnification. Click the
left mouse button at the beginning of a bar, and alt-click
at the end of the bar to mark the range. Then you can
open the requester and click “Get tempo from range”.
“Get tempo” expects you to have marked a period of 4
beats. If you marked some other number of beats, change
the number marked “Range equals” before clicking the
“Get tempo” button..
MIDI Remote Setup. Opens the requester for use with
external MIDI controllers.
MIDI remote control allows you to control the mixer and
the transport controls remotely, by connecting a special
MIDI controller such as the Kenton Control Freak,
(http://www.kenton.co.uk/productspecs/cfrkintro.html) or
the Peavey PC-1600X. Other MIDI devices such as synthesizers or MIDI pedal boards can be used as well.
To control parameters of a mixer channel, select the
Category “Channel” from the pull-down menu at the top
left of the window and enter the channel number in the
edit box right next to it. The parameters that you can control remotely, are displayed in the listview. For matching
a parameter to a MIDI controller, select a parameter in
the listview and enter the MIDI channel and control
change number of the MIDI controller you want to use at
the bottom of the window. Repeat this for all parameters
you wish to control remotely.
You can change parameters of other categories in the
same way. The ‘Bank up’ and ‘Bank down’ parameters in
the Misc category allow you to control banks of 8 channels. For example, if your controller has 8 sliders and 8
buttons, it can be set up to control the volumes and mutes
of channel 1 to 8. Pressing ‘Bank up’ will now control
channels 9 - 16.
Remote set-ups can be loaded and saved by the buttons at
the right. ‘Clear setup’ erases all parameters.
Note: The camd.library is required to use remote control.
Preferences.
The Performance section is intended to optimise AE for
use with faster or slower computers. The first two controls set how often the LED displays are updated. On a
slow computer, set a slow speed here to use less of the
processor’s time.
Audio Evolution uses a series of buffers to store data in
memory. The samples are kept on the hard drive, and as
playback proceeds through the song, parts of each sample
are loaded into RAM for mixing and effects calculations.
Loading from disk takes time. The big problem in a program of this kind is to do everything that is needed fast
enough to keep up with the music. This preference section gives you control over two buffering layers.
The buffering layers are:
1. Disk buffer (from 8K to 64K) : reading small pieces of
data each time is very inefficient (due to the overhead of
Page 7 of 25
seek times). That’s why bigger chunks of data are read
from disk and then passed on to the next layer. This value
sets the size of the disk buffer used for each track.
2. Middle layer for effects calculation. This is adjustable
from 1/50th to 1/10th second. 1/50th of a second (see 3)
can cause a high CPU load, but can be used if you have a
fast processor and/or not many tracks or effects. The
advantage of using a smaller buffer is that the real time
controls respond faster. With a large buffer there may be
a noticeable delay before anything happens.
3. AHI layer which uses a buffer of 1/50th of a sec. for
smooth volume and panning changes. This is not adjustable.
The Sound Card Delay Correction in the Timing section
is used for matching the timing of a recorded sample with
the samples already on the Timeline. It is common to
play back the existing tracks while recording a new track,
and without this adjustment they may be slightly out of
sync due to latency of the sound card.
To measure the delay from the sound card, connect the
line input directly to the line output. Load a sample with
easily recognisable peaks, such as a percussion loop.
Turn the monitor level well down, and make a short
recording.
Now find the exact time of some peak in the first sample.
To do this, drag the T marker so that it lines up exactly
with the point to be measured - while you are dragging it,
there will be a guide line over the sample. Then look at
the “Pos.” display at the top of the Timeline, to see the
time in milliseconds. (This display can be set to other
units - make sure it is in millisecs for delay setting.) Now
measure the time of the same peak in the newly recorded
copy sample. It will probably be 10-60 millisecs later.
That is the figure to enter in the Prefs.
The Mixer section of Preferences controls some CPUintensive display features: the LEDs next to the level
control sliders in the channels and the Master. You can
turn these off if your processor is reaching its limits.
The Timeline section has the option to not create a PCG
file automatically for big audio files. On a slow system,
this can take a while. Generally, this option should only
be enabled if you have a very slow Amiga.
5.7 Markers Menu
The Markers menu has the following options:
Punch In/Out This is used when recording. If checked,
the program records only during the time between the In
and Out markers.
Add Locator The Locators (or
Markers) are tags which can be
positioned at up to ten places in
the song. Hitting a number key
on the keyboard will then jump
the Time marker to that
point, and hitting the Play
button will make the program play from that point. A
Locator can also be added
by hitting the L key on the keyboard. More than ten
locators can in fact be set, but only the first ten will be
correctly numbered and can be jumped to. The extra ones
would be produced when you Regionise a sample.
After you have added a Locator, it will cover up the Time
marker. Drag to move the Time marker away.
Sort Locators This renumbers the Locators in order of
time.
Delete Locators This deletes all the Locators. To delete
one Locator, double click on it and then click on the
Delete button in the requester. You can also set it to an
exact time in this requester, and lock it to prevent accidental dragging.
Export to BurnIt This saves a text file which can be
used in BurnIt to split a long audio file into tracks for
burning an audio CD. The time codes of all locators are
used for export, as well as the file name of the first
sample on the first track.
6 Timeline Window
The Timeline can be used to arrange your samples into a
song, sound track, etc. Most of the operations can be undone by hitting U on the keyboard.
Top of the Timeline. The next six paragraphs explain
various buttons and controls along the top of the
Timeline (from left to right):
6.1 Loading a sample
Existing sound samples can be loaded into Audio
Evolution to build up a mix. The standard format is AIFF.
It is best if possible to convert all the samples you need
beforehand to AIFF and store them together on the hard
drive. Any samples on CD should be transferred to the
hard drive, as playback from CDs is too slow to be reliable. If you request a WAV sample, Audio Evolution will
automatically make a copy of it in AIFF format in the
current project drawer. This may not be convenient if the
Page 8 of 25
file is large, so it is best to prepare beforehand. But for
short samples such as percussion loops, the automatic
conversion is ideal.
Note that Audio Evolution does not accept 8-bit samples.
Any 8-bit AIFF files will have to be converted to 16-bit
before use.
6.2 Vertical zoom
The tracks in the Timeline can be viewed at various sizes
by using the two vertical zoom buttons or the horizontal
zoom slider. The vertical zoom buttons enlarge or reduce
all the tracks. Each track also has a menu, accessed by a
right click on the name panel, which allows you to set the
zoom for just that track.
make a cross-fade instead of just replacing it, for the
duration of the sections that overlap. When dragging a
sample while holding down the CTRL key on top of
another, longer sample, two cross-fades of 0.5 seconds
are automatically created at the begin- and endpoints.
The currently selected sample has a rectangle drawn
around its sample name at the upper left corner. For fine
adjustments, you can use the left and right arrow keys to
move the currently selected sample. Please refer to the
Shortcuts Appendix for more key combinations for
greater control over moving your samples by keyboard.
Editing on the Timeline is non-destructive. That is, the
sample files stored on your hard drive are not affected.
There are four editing modes, enabled by a group of
buttons at the top of the timeline.
To trim sound from the
beginning or end of a
sample,
click on the edge of the
sample. The pointer
should change to a drag
symbol. If it doesn’t,
you have clicked off
target and moving the mouse will move the sample instead of trimming it. Hit U to undo if you make a
mistake.
These are:
Trimming does not affect the sound sample file on disk.
Move and Trim
6.3.2 Split sample
6.3 Edit modes
Split Sample
Automation Editing
Range Editing
This allows you to split a
sample into two or more
parts. The sample file on
disk is not affected. Click
on a sample where you
want to split it. Then you
can move or remove
either part.
6.3.1 Move and Trim
This is the default setting when you start the program,
and it is best to return to this mode after using the other
functions.
To move a sample to a different time, click anywhere in
its display and drag to left or right. For precise timing,
use the grid, with snap enabled, or right click on the
sample to bring up the
menu and select “Move”.
The Move requester
allows you to position the
sample to any starting
point up to 999 minutes.
There is no limit to the
total length of a project,
but anything longer than a few hours may be awkward to
manage. A sample can also be dragged to another track.
When holding down the ALT key when releasing a
dragged sample, it will replace other samples or sample
parts that are underneath it. Using the CTRL key will
Hit U to undo.
Samples or sections of
samples on the Timeline
are called Regions.
6.3.3 Automation
editing
You can set automation
events for any track and
time. On playback or mastering,
these events will control Muting,
Volume, Panning or real-time
effects automatically, so that you
don’t have to operate the mixer in
real time.
Editing can be done either on the Timeline, using the
mouse or keyboard, by typing in exact values in a control
panel or by MIDI remote control.
Page 9 of 25
Editing with the mouse. Click the Automation button or
hit A on the keyboard. Then select from the Automation
menu whether you want to show and edit Mute, Volume
or Panning. Or, just select from the menu - the button will
be automatically activated. Or, if the button is activated,
hit P, M or V to set the type. So, hitting A, V will take
you to Volume Automation.
Alternatively, click on the button and then select the
automation mode from the Track Options menu. This
comes up when you right click on the track name panel.
Using this menu allows you to display a different
automation mode on each track.
Move the line UP to pan left, and DOWN to pan right.
To edit real-time insert effects , go to Automation Edit in
the Track pop-up menu. Here you can select one of the
parameters of the insert effects. At least one insert effect
has to be present in the mixer channel. Now you can edit
the selected parameter just like editing Volume events.
Creating an event on top of the track will set the parameter to its maximum setting, at the bottom will give the
minimum setting.
Automation List Select “Automation List” from the
Automation menu to bring up the list. This allows you to
set an exact time or value for any event.
To edit Muting, click near the bottom
of the sample display to start a mute
event, and near the top to end it. The
events are indicated by loudspeaker
icons. You can set as many as you like.
The muted part of a track is shown
with a grey background.
Once a Muting event has been set, it can be dragged to a
new position as desired. Shift-clicking on an event will
delete it.
To edit Volume, select Volume from the Automation
menu. A line will appear on each track, initially set to full
volume. At first, this line has just one edit point, at the
left end. You can either click and drag this point to set a
new level, or move it with the Mixer slider.
Then click anywhere to create a new volume event,
which is an editable point on the line. Shift-click to
remove one. Once there is more than one point on the
line, it can no longer be moved with the Mixer slider.
Once a Volume event has been created, it can be dragged
to a new time and/or volume level. Note that you must
release the mouse button after creating - you can’t click
and drag as one operation. Any event can also be edited
manually in the Automation List window.
To edit Panning, select
Panning from the
Automation menu. A line
will appear on each track,
initially set to a centre
position. Click the left
mouse button anywhere
to create a panning event. Shift-click on a panning event
to remove it.
As with volume, when there is only a single control
point, it can be adjusted from the Mixer.
Once a panning event has been created, it can be moved
by dragging with the mouse to set the exact time and pan.
All the events in the project are listed on the left side of
the panel. They can be identified by their track numbers,
times and event types. The complete list can be saved as
a file, and it can be replaced by loading a previously
saved list. The list is also saved with the project.
Click on an event in the list to select it. You can then
either delete it (which is the same as shift-clicking it in
the Timeline) or edit it.
Clicking “Edit Event” brings up the edit panel. At the left
is a list of the tracks or subgroups. You can move an
event to another track by clicking the track name. You
can change it into a different type of event. For example,
a volume setting on one track can be changed into a subgroup volume setting which would affect all the tracks in
a subgroup (selected with the blue buttons in the mixer),
or into a Master Volume setting which would affect all
tracks.
Recording events during playback. When you have setup a MIDI remote controller using the MIDI Remote
Setup option from the Options menu, you can record
automation events from the MIDI controller. If you don’t
have a MIDI controller you can record events using the
mouse. When in Automation mode, press play. Every
change in the mixer set-up either by mouse or MIDI
remote control will be recorded. After pressing stop, you
will see the changes in the timeline. The actual behaviour
depends on the latch or touch mode selected in the
Automation menu. Please refer to that section of the manual for an explanation of these controls.
6.3.4 Range Editing
Click on the Range button to enter the Range Editing
Mode.
Page 10 of 25
This allows non-destructive editing within samples. The
files on disk are not affected - only how they are played.
Click in a sample on the
Timeline to mark the
start of a range. Altclick at a later point to
mark the end. The latter
point can be on another
track so that your range
spans several tracks.
You can alt-click again to move the begin or end point.
The current positions are shown in the Begin and End
panels on top of the timeline.
Having marked a
Range, you can cut,
copy, paste or cross-fade
it by using the buttons
on the Timeline. The
keyboard short cuts X, C, V and F also work. (You don’t
have to hold down an Amiga key as in other programs).
Having cut out or copied a range, you can click the
mouse anywhere on any track to mark a destination. You
can click either in a sample or in a silent part of the track,
or on the next unused track. Hitting the Paste button or V
on the keyboard will then place the range at that point.
If there is already a sample there, it will be cut at that
point and replaced by the pasted range. If you paste into
the middle of a longer sample, you will end up with three
separate sections.
6.4 Position display
This shows the exact position of the mouse pointer on the
Timeline in Minutes, seconds and milliseconds, or in
other units as selected from the drop down menu.
6.5 Grid display
The current Timeline grid spacing is shown in a box at
the top of the Timeline. Next to this is a down arrow. Hit
the arrow to set up the grid. A “Grid Size” menu should
appear.
“Free” clears the grid.
The next 16 options are time intervals, including a
Custom setting in milliseconds. Then you can opt to
Show the grid. It will be visible on the Timeline only at
the higher settings of the horizontal zoom.
of a sample will always
end up exactly on the
nearest grid line after
you move it. Snap can
be turned on and off
both with the menu and
by hitting G on the keyboard.
Note that you can show
the grid without snapping to it. One use of
this is for lining up the
beats in a drum loop
with the grid - zoom in
until they are easy to
see, then move the
sample until the beats
are lined up with a one
beat grid by eye.
6.6 Horizontal zoom
The slider at the top right controls horizontal zooming of
the Timeline. The value displays the pixels per second.
6.7 Track panel
The currently selected track is shown with its name panel
in a darker grey. Also on the Track Name panel is a
symbol to indicate whether the sample is mono or stereo.
The track number is shown in the smaller panel next to
each name.
Right clicking on the name panel brings up the track
menu. The options are
Remove. Removes the track and all samples on it. This
does not affect the files on disk.
Zoom. Allows you to set the vertical zoom for that track
only. (The buttons above the Timeline affect all tracks).
Automation Edit. Sets which of the automation lines
will be shown on the track when the Automation button
above the Timeline is depressed. You can edit volume on
one track and panning on another, for example.
Automation Clear. Removes all events of the currently
selected automation mode.
The last option enables Snap. With this on, the beginning
Page 11 of 25
6.8 Timeline Sample Menu
Clicking in a sample on the Timeline with the right
mouse button brings up the Sample Actions menu. This
gives options for actions you can perform on samples in
the Timeline. These actions will not affect your sample
files on disk. Most can be undone by hitting the U key.
The options are:
Cut
Copy
Move
Remove
Repeat
Replace with Clipboard
Reset Offset
Attach to Previous Sample
Attach to Next Sample
Regionize
Save to Disk
Cut removes the sample from the track, and puts it in the
clipboard. If you hit the Ranges button, you can click
anywhere on a track and then on the Paste button or V
key to place a copy there.
Copy puts a copy of the sample in the clipboard. If you
hit the Ranges button, you can click anywhere on a track
and then on the Paste button to place a copy there. If the
sample has been trimmed, only the visible part is copied.
To copy the whole sample, use the option in the Sample
List window.
Move allows you to set the exact timing of the start of a
sample. You can type in a time and the sample will move
to that start point, if there is no conflict with another
sample. This operation will not make one sample overlay
another as Paste does. If there is a conflict, move the
sample to another track and try again.
Remove removes the sample from the track. It does not
affect the file on disk.
Repeat. This puts multiple copies of a sample on the
track. This is useful for repeating loop samples, and it can
be used to build up a rhythm from individual percussion
samples.
First, type in the number of new copies you want. For instance, if you want a loop to repeat 8 times altogether,
add 7 repeats to the
original.
Now set the time interval. This can either be
the length of the
silence space between
the repeats, or the interval between the starting times of
the samples. Uncheck the button to set the starting times.
The time can be entered in any unit - hit the down arrow
to get a units menu. The example shown has a loop with
no interval between repeats, and a single note sample
starting at two beat intervals. Note the grid, set to beats.
Clicking “Add Repeats” will add the requested number to
the track, provided no other sample is blocking the way.
If this is likely to happen, move the offending sample to
another track first.
Interesting effects can result from putting repeats on
various tracks with different time intervals.
Replace with Clipboard. If a sample or range has previously been cut or copied, it will be in the clipboard. This
option will remove the current sample and put whatever
is in the clipboard in its place. Note that you cannot paste
a mono sample to a stereo track or vice versa.
Reset Offset. This moves the sample to the beginning of
the track, if there is space for it there. In the case of a
sample which you recorded to the Timeline, it moves it to
its original position as recorded.
Attach to Previous Sample. This moves the sample so
that its starting point is in contact with the end of the previous sample on the track.
Attach to Next Sample. This moves the sample so that
its ending point is in contact with the start of the next
sample on the track.
Regionize. This splits a sample into sections. Its main
use is for dividing up a recording from a vinyl LP or a
tape into its tracks. You may find other uses.
Set the option at the bottom to “Add Markers” for testing.
Use “Delete Locators” in the Markers menu to clear any
that are already present.
The Threshold setting determines what is considered to
be silence. If
your vinyl has
a noisy
surface, set
this to a higher
number. If you
set it too high,
it will pick up
quiet passages
in the music.
This can be
avoided to
some extent by
setting the “Minimum duration for silence”. The gap
between tracks will usually be several seconds, longer
Page 12 of 25
than pauses within tracks. However, if there are clicks
between tracks, you will have to set a shorter time as the
click breaks the silence.
rently visible in the Timeline. Also, this Copy copies the
whole file, while the Timeline one copies only the visible
part if the sample has been trimmed or split.
Click the Detect button and a locator should appear on
the timeline at each gap in the sample. Check to make
sure that none of the locators are in the fadeout at the end
of a track. If so, clear the locators, set a lower Threshold,
and try again. When you are happy with the positions,
you can change to the “Split sample” option. This acts in
the same way as the Split button at the top of the
Timeline - it divides the sample into regions which you
can move around independently in AE, but does not
affect the sample file on disk.
Rename. This allows you to rename the sample file on
disk. A normal ASL file requester will come up. The new
name will be shown on the sample in the Timeline.
If a region turns out to be not quite correct, you can use
the trim function (Move and Trim button on Timeline) to
make it longer or shorter, if necessary moving it to
another track.
Save to Disk. This saves a sample file in AIFF format,
with any current trimming settings. What you get in the
file is the part of the original that is visible in the
Timeline. If no trimming or cutting has been done it will
be identical to the original.
7 Sample List Window
From the Windows menu, you can open the Sample List
window. This gives a list of the sample files in use in the
project. Each file appears once, however many copies of
it there may be on the Timeline. The list refers to files on
your drive, not to the display on the Timeline.
Warning. Some operations here will make changes to
files on your drive. If
in doubt, make
backups before doing
anything.
Copy to Clipboard.
This puts the file in
the clipboard ready to
be pasted to some
other place on the
Timeline. To paste,
click the Ranges
button (top of the
Timeline), click
where you want the
copy, then click the
Paste button. This
does not affect the file
on disk. It is similar to “Copy” in the sample popup
menu, but allows you to paste a sample which is not cur-
Duplicate. This will make a backup copy of the sample
file on disk. It is strongly recommended to do this before
using the Sample Editor. An ASL file requester will
appear.
Edit. This brings up the Sample Editor (see next chapter).
Create PCG. This will make a new pre-computed
graphics file. PCGs are files that hold graphical information on how a sample looks. They are computed and
stored at a given zoom factor, for example 256 pixels per
second. In this way, a sample can be shown quickly at
different zoom levels by using the PCG, because the
graphical data is already in memory and doesn’t have to
be computed from the actual sample each time you zoom
in or out. The size of these files is around 1/650th of the
real sample size for stereo samples at 44.1 Khz.
Normally, a PCG file is created when you first import a
sample, but there is an option in Preferences to not make
a PCG for large samples, to save time when importing.
However, there will then be a delay when you zoom.
Add Workspace. This adds silent time to the end of the
sample. This can be useful if you plan to apply a delay
effect to a sample, or paste over the silent part in the
editor. The sample file on disk will be changed.
Channel Splitter. This splits a stereo sample into two
mono AIFF files, writing new files to disk. An ASL file
requester will appear, asking for the names of the two
files. They new files can then, if you wish, be imported
into the project.
Effects. This sub-menu contains the non-realtime effects
you can apply on the selected sample. In each case a new
file will be created on disk, with the effect applied, and
the new sample is automatically imported to a new track.
You can apply another effect to the new sample if
desired.
The following effects can be applied:
Plugins. This gives a way to use all the real-time effects
and filters found in the PlugIns directory, but not in real
time. The advantage is that you are not limited by CPU
load problems; the disadvantage is that you cannot alter
the settings while the sample plays. However, you can
run an effect in real time to judge the best settings, and
Page 13 of 25
then apply those settings to the sample to create a new
file with the effect pre-applied.
To use the effects in this way, select the effect you want
via the Sample List window, adjust the settings, and close
the settings window. The new file will then be created on
disk. Details of all the plugins can be found in chapter
XXX.
Normalize. This inspects the whole sample to find the
highest level present, and then increases the level of the
whole sample so that the highest level present is the maximum for the system. There is no point in applying this
operation routinely to all samples, but it can be useful if
one sample is noticeably quieter than others, as it makes
mixing simpler. Note that normalizing a sample does not
improve the sound quality: it just makes it louder.
If you uncheck the “Normalize” button, this operator can
also be used to apply any fixed factor of amplification.
Fade In/Out. This applies a fade to either the beginning
or end of the sample, over a time of from 1 millisecond
up to 10 seconds.
Reverse. This will create a new AIFF file on disk with the
sample in reverse order.
Remove from Project. This removes the sample from the
project, but does not affect the sample file on disk.
Delete. This deletes the sample file from the hard drive.
Take care. It can only be brought back with an Undelete
utility.
8 Sample Editor
Editing a sample here will change the file on disk. You
should make a backup of the file, using the Duplicate option, before editing it. Operations in this editor cannot be
undone.
operations. For more advanced sample manipulation, use
a dedicated editing program such as SoundFX, or alternatively, use the non-destructive editing options on the
timeline and use the Save Range to Disk option to store
the result in an AIFF file.
Viewing. When first opened, the window shows (approximately) the whole sample. At the top right there is a
Magnification control for zooming in and out. Set a likely
number and click on “Display”. Numbers higher than 256
may give a slower display on slow computers.
Alternatively, you can mark a Range on the sample by
dragging with the left mouse button. The “Show Range”
button will then zoom in so that the selected range fills
the window. “Clear Range” cancels the selection. “Range
All” makes the Range equal the whole length of the
sample. “Range All” followed by “Show Range” will
zoom out to show the whole sample. A bar along the
bottom gives sideways scrolling.
The range can also be set while the sample is playing. Hit
Return/Enter on the keyboard for the beginning of the
range, and again for the end. This will be most useful for
long samples.
The three information panels at the top show the start and
end of the Range, in minutes, seconds and milliseconds.
“Position” is the current position of the cursor. These are
most useful when you are well zoomed in.
Editing is done with the six buttons on the right. First,
mark out a Range with the mouse. Remember that these
operations will change the sample file on disk. Erase
Range will make the Range silent, but not affect the
length of the sample.
Cut Range will remove the Range, closing up the gap so
that the sample becomes shorter. It creates a temporary
file on disk called TEMPSAMPLE. This is in the
Samples drawer of the current project. It is a normal
AIFF sample file and can be used as such. Save Buffer
will make a copy of it with a name of your choice.
Copy to Buffer copies the
marked range to the temporary file, without changing the sample.
This is a fairly basic editor, intended for routine
To use the other two options,
click once in the sample
with the left mouse button at
the exact point where you
want to paste the copied
range. Copy Over will
replace sound at that point
with the buffer contents, which does not change the
length of the sample. Insert will insert the contents at
Page 14 of 25
that point, which does increase the sample’s length.
As each operation is done you will see a progress bar indicating disk activity.
9. Mixing and Effects
The main purpose of Audio Evolution is to mix a number
of sound samples together to give a stereo output. There
are two ways to control how loud each sound is in the
final mix. One is to set up the automation lines on the
Timeline, and the other is to use the Mixer. The Mixer is
a simulation of a traditional hardware mixing desk and
can be used in real time as the music is playing. Besides
controlling the levels and the left-right panning, it allows
you to apply effects which can be changed in real time, as
the music is playing.
Tracks. Each module
of the Mixer corresponds to one track
on the Timeline. Any
track may be mono
or stereo (as indicated by the icons
under the track
names on the
Timeline). The name
and number of each
track are shown at
the left of the
Timeline and at the
bottom of the Mixer.
The number of tracks visible in the mixer can be set from
two upward, by resizing the Mixer window. To see other
tracks, scan forward or backward with the two arrows at
the top right of the Mixer. The size of the Mixer window
is saved with the Preferences.
Master Level Control. This is at the
right end of the Mixer and has a red slider.
It sets the final level of the stereo mixed
output. The LEDs on either side of the
slider show the current left and right
levels. If these are hitting the top, reduce
the level. The LEDs also contain peak
hold meters, which show where the
loudest peak has occured recently.
Level Controls. (Also known as volume controls or
faders.) These act by setting the amount of each track that
makes up the final mix. The normal setting is fully up.
This applies also to the automation line for volume in the
Timeline. Mixing should be done by making the less important sounds quieter, not by making the more important
sounds louder. The less important, the lower the level.
This approach avoids the temptation of trying to make
“everything louder than everything else”.
The volume of a track is set in turn by the track’s Level
Control, the Subgroup Level Control (if in use), and the
Master.
(If you do need to increase the level of a sample because
it was recorded too low, either use the real-time Amplifier
effect, or better, make a new sample file using
Normalise.)
Panning. The rotary knobs above the
sliders control panning from left to
right. If the track is mono, the same
Page 15 of 25
signal appears in both output channels, and the pan control sets the levels in each. If the track is stereo, the left
signal will appear only in the left output, and the right in
the right. The pan control now acts as a pair of level controls for the two channels. Even an extreme setting does
not make the left signal appear on the right output. (If
you want to do this, split the stereo sample file into two
mono samples using the channel splitter in the Sample
List window menu).
Shift-click on a Pan knob to centre it.
If there is an automation line for the panning of a track,
the control knob will follow it during playback.
Mute and Solo. The Mute and Solo buttons turn the
sound on and off for various combinations of tracks. If all
Mute and Solo buttons are OFF, in both the Mixer and
Subgroup windows, all the tracks will be heard.
Mute. This button, marked M, silences the track. It can
also be controlled by automation. During a section which
is muted by the automation in the Timeline, the Mute
button will be depressed. You can release it to override
the automation.
If the track is assigned to a Subgroup, it will be silent if
the Mute button is pressed in either the Subgroup or the
Mixer (or both).
Solo. This button, marked S, will silence all the other
tracks, so that you hear only the solo track. If two or
more tracks have the Solo button depressed, you will hear
all the Solo tracks but no others.
Combinations of Mute and Solo. The next diagram shows
what happens to a track when various Mute and Solo
buttons are on or off.
Subgroups. The four blue
buttons next to the fade slider in
each mixer unit allow you to
link the unit to one of four
Subgroups. For example, all
Mixer units with button 1
pressed will be controlled by
Subgroup 1.
Open the Subgroups window
from the windows menu. This
allows several tracks to be
locked together, so that moving the slider in the
Subgroups window fades all of them at once.
The Subgroup controls the volume, mute and solo settings of all the units that are linked to it. The Mixer volume setting is multiplied by the Subgroup setting to give
the result. For example, if the fader in Track 3 of the
Mixer is set to 50%, and Track 3 is assigned to a
Subgroup which also has a fader set to 50%, then the output will be 50% of 50%, which is 25% of full volume. Or,
0.5 * 0.5 = 0.25.
Real Time Effects. A set of three buttons and
LEDs at the top of each mixer module enables
the real-time effects for a track. The effects are
applied to the whole track, not to individual
samples. To apply an effect to one sample, not in real
time, use the Plugins option in the menu in the sample list
window.
Up to three effects can be applied to any track. Using too
many effects will overload the processor. You may be
able to avoid this by sharing an effect between several
tracks, which is done by using the Aux sends and returns.
The Aux route also allows you to apply exactly the same
settings of an effect to more than one track at a time.
Page 16 of 25
Click on one of the buttons to bring up the Effects
requester. The effects are grouped into six types. Each
effect is implemented as an Amiga library file, stored in
AE’s Plugins directory. This means that more can be
added as they become available.
The types are:
Gain Amplifiers and compressors
Delay Delays and Echoes
Frequency Equalisers and Filters
FX Effects such as Tremolo and Chorus
SFX Special effects such as Karaoke
Reverb Reverbs and Room Effects
Once a plugin has been selected, its button will show the
name. Clicking on the button again brings up the control
panel. All the plugins use a standard interface window,
with three control knobs. If there are more than three
controls, an Up arrow gives access to the others.
The LEDs next to the buttons on the Mixer act as On/Off
switches for the effects. To remove an effect, shift-click
on the button.
Please refer to chapter XXX to read more about the available realtime effect plug-ins.
Mixer Viewing. Resizing the Mixer window will allow
you to display more or fewer tracks. The size is recorded
if you save the Preferences from the File menu. The two
arrows at top right scroll the Mixer so that you can view
and control other tracks. The scrolling wraps so that
Track 60 is followed by Track 1.
The small Up arrow at the top right of each mixer module
opens up the Extension panel, which contains a 3-band
equaliser and the level controls for Aux sends.
10. Aux Send and Return
advantage or a disadvantage, depending on the project.
The proportions of the tracks that go into the Aux mix
can be set with the control knobs in the Expansion
window, so each track can have a different setting for the
strength of the effect.
Bring up the Send controls by clicking on the small Up
arrow on a Mixer track.
The four level control knobs allow you to
send this track to any of four Aux channels. This route splits off before the main
level control slider in the Mixer track
module, so this can be set at a very low
level if you want the sound to travel
mostly or entirely through the effect.
Alternatively, you might want just a slight
touch of the effect, in which case the main
level slider can be left at a high setting,
with the send control at a low setting.
Bring up the Return controls by either opening them from
the Windows menu or hitting F5 on the keyboard. Click
on one of the buttons to select the effect for that channel.
The LED acts as a switch to turn the effect on or off.
Click the button again to bring up the controls for each
effect.
Adjust the level control to decide how much of this channel contributes to the final mix for the song.
11. Control Window
11.1 Playback
The mix can be played either by hitting the Space Bar on
the keyboard, or the 5 key on the keypad, or by clicking
on the Play button (fourth from left) in the Control
window. Stop play by hitting the Space Bar or the keypad
5 again, or the S key, or the Stop button.
The purpose of the Auxiliary (or Aux for
short) sends and returns is to share realtime effects between several tracks. Output
from the tracks is mixed first, then the
effect is applied, and the resulting signal is
fed into the Master mix. The advantage is
that only one calculation has to be done to
apply the effect to several tracks. As the
Real-Time Effects need a lot of CPU
cycles, this makes it possible to apply
more effects than would otherwise be possible.
The settings will be the same for all the
tracks that share an effect. This could be an
The Time marker at the top of the Timeline shows the
Page 17 of 25
point from which playback will start. It
will move along as the mix plays, so you
can stop and then start again from the
same point. Or you can drag it to any
time that you want to be the start point, or simply click
above the top track at the place you want it to be.
like, if there is enough room on your hard drive, or only
during a specified short section of a song.
Double clicking on the
Time marker brings up
a requester for setting
an exact time.
The Rewind button in
the Control window moves the Time marker to the start
of the whole song. So do the B key on the keyboard
(Beginning) and the 7 key on the keypad. The Fast
Forward button moves the Time marker to the end of the
last sample. The 4 and 6 keys on the keypad move it forward and backward by one second.
The Play From Start button in the Control window
moves the Time marker to zero and then starts playback.
The Locators allow you to mark up to 10 time points in
the song. Move the Time marker to the desired time and
select Add Locator from the Markers menu, or hit L on
the keyboard. A new Locator will appear, covering the
Time marker. Drag to move the Time marker out from
under the Locator (or hit 4 or 6 on the keypad).
To record for a short time,
use the Punch In/Out
markers. These are
enabled from the Markers
menu. Set them to the
times when you want the
recording to start and stop.
This is useful for making a
new version of any part of
a song which was not right
the first time. The old version will not be destroyed.
The T marker, which sets the time point at which the
recording process starts, must be to the left of the IN
marker.
Before starting to record a new version, select the track
with the old version on it by clicking on the track name at
the left of the Timeline.
If you are not using Punch In/Out, the recording starts at
the T marker and is stopped manually in the Record
window.
Each Locator is numbered and the 1 to 0 keys on the
main keyboard will jump the Time marker to that position. This is useful for moving around in a long song. The
Locators can be sorted into numeric order with the Sort
Locators menu item.
Double clicking on any locator brings up a requester
allowing you to set an exact time or delete the locator.
The menu item “Delete Locators” will remove all of
them. The Regionise requester for samples also has a
button to clear all the locators.
When playing the mix, you will find that each additional
track is added to the total volume, just as when another
musician is added to a band in real life. If the total sound
level gets too high, reduce it with the Master fader, or
some of the track faders
11.2 Recording
Click on the red button in the Control window to open
the Record window. You can record for as long as you
If you are using the Punch In/Out markers, the Auto
Mute button is available. This affects the selected track
only. For example, it might be the vocal track, and you
may be re-recording a section that went wrong. With
Auto Mute on, you will hear all tracks up to the Punch In
point. Then the recording will start, and the vocal track
will be silent. At the Punch Out point, the recording stops
and the original vocal track becomes audible again.
Now you can hit the Stop button in the Recording
window.
There are three level controls. The sound card driver
decides which of these are active. The first is only
enabled for some sound cards or samplers, and adjusts
the input gain. The Volume control sets the overall output
level and the Monitor control sets the level for hearing
the input.
The LEDs show the input levels. If the button at the left
end is checked, the levels will also be shown during
recording. At the right end, the figures show the maxiPage 18 of 25
mum level so far, with a Reset button. Great care should
be taken when setting the levels for 16-bit digital recording, as the slightest overload will give severe distortion
(clipping), while recording at too low a level reduces
your data from 16 bit to 12 bit or even less, and raising
the level in the computer will not restore the lost quality.
If possible, run through the whole recording first to check
and set levels.
The LED next to the Record button indicates that the
sample is being correctly saved to disk. You will get a
warning message if the drive is nearly full. In that case it
is best to move your project to a drive with more space
and reload it. You will need a drawer called “Samples” in
the same place as the project file.
When you hit the Stop button, you will be asked if you
want to keep the recording.
If so, the temporary file on
the hard drive will be
renamed to whatever you
wish. If not, it is deleted.
12. Effects
which sounds are allowed through.
If the low level sounds are cut off immediately the music
drops below a certain level, the effect is audible. Adding
a delay (”Release Time”) allows more of the tail end of
the wanted sound to be heard. On the other hand, the gate
must always open instantly when the level rises above the
threshold, or the beginning of a note would be lost, so
there is no attack time setting.
Compressor. A compressor changes the relationship of
loud and quiet sounds in a sample. Any sound that is
quieter than the Threshold level set by the user will not
be affected by the compression. Any sounds above that
Threshold are reduced in volume. The ratio between the
original and the compressed sound (in dB) is set by the
user.
This section explains a number of effect plug-ins that can
be used either in real-time (see the Real Time Effects sections in chapter 9 and chapter 10 on using auxillaries) or
non real-time (see the Effects section in chapter 7). The
plug-ins can be found in the PlugIns directory. New plugins may come available from our website.
12.1 Gain Effects
Amplify. As expected, this can increase (or decrease) the
volume of a sample. Increasing the volume may be useful
for testing, but as real time effects use up CPU cycles, it
is usually better to make a normalized copy of the
sample.
There are more than three controls here - the others are
reached with the arrow buttons.
This graph shows the effect of varying the Ratio.
Noise Gate. A Noise Gate is a control which opens to let
through sound above a certain level. Sounds which are
quieter than this level are blocked. It is generally used to
cut out quiet noises which are heard when the instruments are not playing, such as background hiss or air
conditioner noise. The threshold setting is the level above
Page 19 of 25
in volume at the beginning of the loud sound. This is why
a compressor can make percussion sound more punchy.
This graph shows the effect of varying the Threshold
level.
12.2 Delay Effects
Delay. This adds a delayed copy of the signal, giving an
echo effect.
The compression does not start and stop instantaneously.
The Attack time setting controls how long it takes for the
full compression to build up after the sound level crosses
the threshold. This shows an original sample consisting
of a quiet sound (below the threshold), followed by a
loud sound, and then a return to the quiet sound.
After compression, the first quiet sound is unchanged.
The loud sound starts as normal, and then during the
Attack period is steadily reduced to its compressed level.
When the sound drops back to the quiet level, it is at first
still compressed, so the change of volume is still there.
Then it returns to normal during the Release period.
It is usual to have an amplifier stage after the compression stage. If we apply this (exaggerated in the diagram)
to raise the overall volume, there is now a sharp increase
You can set the delay time in milliseconds. If you set this
to match a beat, the delayed sound will be in time. For instance, 1 beat at 120 bpm is 500msec. The Mix percentage sets how much of the output will be the delayed
sound. Feedback gives more than one copy of the
delayed sound. The original sound will be followed by
several copies. The intervals between them are all the
same time, as set in milliseconds.
The Feedback setting controls how fast the repeats die
away. For instance, if you set it to 70%, each copy of the
sound will be 70% of the last, so the sounds rapidly die
Page 20 of 25
away like an echo. If you set it to 100%, in principle the
echoes will go on for ever (but not in practice).
Dual Delay. This works in the same way as the plain
Delay, but adds two copies, each with its own settings.
Reverse Delay. This works in the same way as the plain
Delay, but the copy is heard before the original sound instead of after it, giving an unnatural effect.
Ducking Delay. This is the same as the plain delay, but it
reduces the amplitude of the delayed sounds where the
main sound is loud. This is so that you can get a long
echo in the silence after the sound stops, but not too
much while it is playing.
12.3 Frequency effects
Comb Filter. A Comb Filter is an effect rather than an
adjustment - it is similar to a Flanger. A short delay is
applied (much shorter than would be used for an echo
effect). When the delayed signal is mixed with the main
signal, some frequencies come out 180 degrees out of
phase, and are cancelled out. The result is a filter with a
series of notches.
This family of effects controls the sound levels at various
frequencies.
Pass Filters. These pass through some frequencies while
cutting out others. A High Pass filter allows high frequencies, above the set frequency, to pass through unchanged,
while any lower than the set frequency are removed. A
Low Pass filter allows sounds with frequencies lower
than the set frequency to pass through. A Band Pass filter
has two set frequencies, and sounds between these are
allowed to pass though, all others being blocked.
Shelf Filters. A Shelf filter gives a uniform output within
one band, and a uniform output at a different level in the
other band. A Low Shelf filter will raise or lower the
levels in the low frequency band, covering all frequencies
below the set frequency. A high Shelf filter does the same
for frequencies above the set frequency.
3 Band Equaliser. An Equaliser gives an unequal
frequency response - some frequencies come out louder
or quieter than others. The name comes from the idea that
this can be used to correct unequal response in the
original signal, which is sometimes possible.
Levels can be boosted or cut independently for low,
middle and high sounds. The centre frequency for the
middle sounds can be varied - this is useful for pulling
some particular instrument out of a mixed recording, or
for adding “presence”, for which a centre frequency of
around 3KHz is best.
Each channel of the Mixer window has a little button on
the top right which opens the Expansion window. This
window gives you direct access to a 3-band EQ without
having to insert a plug-in.
Parametric Equaliser.
A Parameter is simply a setting. This equaliser has only
one band but it has an additional setting, Q. This is the
width of the band which is affected. For example, a
narrow band cut at mains frequency might be used to
Page 21 of 25
reduce hum, or at a higher frequency to reduce a feedback whistle.
Chorus. The Chorus is another delay effect. As with the
Flanger, the delay is continuously varying, over a range
of 20-30msecs. The frequency setting is how fast it
varies, and the depth is how much. There is no feedback.
A short delay gives a comb filter, a long delay gives an
echo, and the Chorus is somewhere between the two.
12.4 Modulation Effects (FX)
Tremolo. This varies the loudness of the track at a very
low frequency.
Flanger. Flanging was originally done by slowing down
a tape slightly by touching the flange (edge) of the reel.
In software, a very short delay (less than 10 msecs) is
applied to the signal, and the delayed signal is then mixed
with the main signal. The delay is continuously varied
according to a low frequency wave generated in the routine, giving an imitation of a finger applying varying
pressure. Mixing the delayed and main signals gives a
comb filter effect, and in a Flanger this is constantly
varying.
Ring Modulator. A Ring Modulator is a way of producing a distorted sound. A signal whose frequency can be
set by the user is amplitude modulated by the music
signal. This is similar to the way in which an AM radio
signal is produced, except that the basic frequency in a
radio signal is much higher than the music while the one
used in this effect is within the audio range. The result is
that extra frequencies (sidebands in radio) appear above
and below the musical note. As these are not musical harmonics, the result sounds distorted. Try it.
Page 22 of 25
12.5 Reverb Effects
Reverb. Reverb is an attempt to simulate the natural
reverberation of sound in any enclosed space. Typically, a
clear single echo is more likely to be heard in the open
air, when sound reflects off a single surface such as a
building or cliff. In a room or hall, each sound will reflect
off several surfaces at various distances, giving a very
large number of echoes which mix together to give the
natural reverberation of the environment.
Typically, the surfaces will colour the sound as they
reflect it, and if they are not flat they will reflect the
sound in several directions. Calculating all this accurately
would need a super-computer. A useful approximation
can be made with some comb filters (for the coloration)
and delays.
The Reverb in Audio Evolution offers three levels of
complexity:
1: 4 comb filters, 1 delay (allpass)
2: 5 comb filters, 2 allpass
3: 8 comb filters, 4 allpass
The more filters are used, the more CPU power is needed.
Even with a fast CPU, you will not be able to apply
Reverb to more than a few tracks in real time. If this is a
problem, you can either use an Aux channel, or master
the required tracks (not in real time).
The Wet control is the amount of Reverb that is mixed
with the main signal - a room with little reverberation is
said to be “dry”. The Trim control is a level control to be
used in case of overloading.
Page 23 of 25
Appendix A. Keyboard Short Cuts
The following keys are recognized and can be used in
most windows or in the Timeline Window:
Space bar : start or stop playback
F1 : Moves timeline window to front
F2 : Moves mixer window to front
F3 : Moves control window to front
F4 : Opens subgroups window if necessary and moves it
to the front
s : stop playback
b : reset time to Beginning (0:00)
g : enable/disable Grid snap
l : add a Locator at current time point
q : close window or quits the program
i : import/load sample
F5 : Opens aux returns window if necessary and moves it
to the front
F6 : Open Sample List window if necessary and moves it
to the front
-/= : horizontal zoom out / in
combined with ALT: zooms with left side at the same
position
u : undo
Keys on the keypad:
r : open recording window
4 : Forward one second
t : Move / Trim mode
5 : Start or stop playback
s : Split mode
6 : Backward one second
a : Automation edit mode
7 : Resets time to 0:00
e : Edit / Range mode
p : Show all panning automation events
m : Show all mute automation events
-/+ : horizontal Zoom out/in
Enter : Enter timecode in min.sec
v : Show all volume automation events
In Move / Trim mode:
[ : zoom in vertical
When releasing a sample region while holding down the
ALT key, the sample will replace everything that’s
beneath it. With CTRL, it will crossfade for the duration
of the overlap. A sample that is dragged on top of another
sample with both begin- and endpoints within the other
sample will get 2 cross-fades of 0.5 seconds.
] : zoom out vertical
; : previous track
‘ : next track
ESC : clear current sample region selection
. : scroll timeline to the right
, : scroll timeline to the left
combined withSHIFT
CTRL
SHIFT+CTRL
: faster scroll
: fastest scroll
: scroll one view width
Help : Displays help
arrow keys: move currently selected sample region
combined with SHIFT : faster move
CTRL : fastest move
TAB : go to next sample region
SHIFT-TAB : go to previous sample region
DEL : delete selected sample
1 - 0 (on the main keyboard) : Jumps to the corresponding locator
Page 24 of 25
Up arrow : Move the currently selected sample region
one track up if possible. May be combined with ALT or
CTRL.
Down arrow : Move the currently selected sample region
one track down if possible. May be combined with ALT
or CTRL.
In Automation Edit mode:
ESC: clear current automation event selection
arrow keys: move currently selected automation event
TAB : go to next automation event
SHIFT-TAB : goto prev automation event
In Edit Range mode:
x : cut
c : copy
v : paste
f : cross-fade
Appendix B ARexx port
Audio Evolution has a few ARexx commands.
The port name is “AE_AREXX” (case sensitive)
Recognised commands are:
play
stop
loadsample - this requires a filename argument and an
optional locate argument. So the full command is something like “loadsample FILENAME
Work:audio/samples/example.AIFF LOCATE 12500”.
This will load the AIFF file and place it at 12.5 secs on
the time line. The LOCATE parameter is in milliseconds.
locate - Sets the time marker to the time given in milliseconds.
An example ARexx file, which loads a sample, plays and
then stops after 5 seconds, will be found in the Data
drawer.
Page 25 of 25