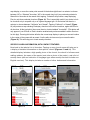
1
PoP Churches App
Presbytery of the Pacific (PoP) Churches
User’s Manual
26 June 2015
Copyright © 2015 by George R. Wilde
PoP Churches App
The PoP Churches App quickly shows the location of all churches within the bounds of the
Presbytery of the Pacific (PoP), a middle governing body of the Presbyterian Church (U.S.A.) or PC
(USA). The Presbytery of the Pacific includes churches within the greater Los Angeles area and the
state of Hawaii.
The PoP Churches App helps the user quickly locate nearby churches, or any selected church
within the Presbytery. It provides key information on every PoP church, including language
spoken, times of worship, a photo of the church, a detailed map of the church’s location, stepby-step directions to the church from the user’s current location, as well as phone and email
contacts and website, Facebook, and Twitter interfaces. The PoP churches App is a universal
iOS App that can run on any recent iPhone, iPad, or iPod Touch using iOS 7.1 or higher.
Information displayed on all devices is nearly identical, although the actual displays are
formatted slightly differently to take advantage of the larger displays on iPads and the aspect
differences as devices rotate.
Most users will probably prefer to use this App in portrait mode, especially on the iPhone, but
the App performs equally well in landscape mode. The App has also been designed to support
Multitasking on the iPad, which is available with iOS 9. Slide Over and Split View features are
fully supported on recent iPads running iOS 9.
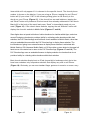
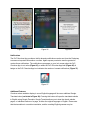
LAUNCH and OVERVIEW
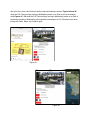
When first launching the App, the user is presented with a launch image (Figure 1) followed by
a tabular list of all churches within the Presbytery (Figure 2). When using iOS 8 and iOS 9, a
launch screen is presented instead of a launch image. The tabular list of churches is a scrollable
list which displays the name of each church, as well as the city and state that it is located in.
The user can select any church and go directly to the detailed information on that specific
church.
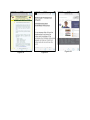
USING THE SEARCH FIELD
However, the real power of this tabular list is the search field at the top of the list. Just tap on
this search field and a keypad appears at the bottom of the screen.The user can type into this
search field a number of search terms to filter out the the desired churches.
Tap the search field, and as you enter case insensitive text the list of churches shrinks or
expands based on the filtered search. An empty search string will show all churches. To
Figure 1
Figure 2
Figure 3
clear an incorrect entry tap on the clear (“x”) button to the right of the search field entry. To
make corrections you can use the backspace key on the keypad. Tapping “Search” on the
keypad will display the filtered list of churches. To get back the entire list of churches once
you have filtered the content, just tap “Cancel”. When you tap “Cancel”, the original list of
churches appears with the search field again at the top. However, the App does remember
your last filtered search results as a selection for the “Map View” button in the upper right
hand corner of the screen.
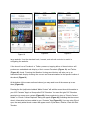
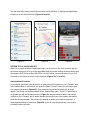
FILTERING SEARCHES
The filtered search feature contained in this App uses an advanced search algorithm which is
very powerful, but may not be intuitively clear to all users.
The search field contents will match a church name if all characters in the entered
search field are contained sequentially somewhere in the listed name of the church,
whereas the church city and church state will only match if all characters in the entered
search field are precisely identical to the listed church city or church state. In other
words, you can enter a few of the characters in the name of a church to identify all
churches whose names contain those characters. You must however enter the full name
of the church city or church state to get a match for all churches in that city or state. As
an example, if you enter "los" (Figure 3) you will get a list of two churches ("Covenant
Los Angeles" and "First Los Angeles"), but if you enter the full city name of "los angeles"
Figure 4
Figure 5
Figure 6
(Figure 4) you will get a list of all of the many Presbytery churches within the city of
LOS ANGELES. Likewise, if you enter the full state name of “california" (Figure 5), you
will get a list of all of the churches located in California. Selecting “All" (Figure 6) displays all
churches matched in the search, whereas selecting "English", "Spanish", "Korean", or
"Taiwanese" (Figure 7) matches only churches of that language type. You can view all churches
Figure 7
Figure 8
Figure 9
of a given language type, regardless of location, if you type a space character followed by
pressing the "Search" button. Then just press the desired language button to display all
churches of that language type (Figure 8).
MICROPHONE FEATURE
Note that search field entries can be dictated using the microphone button on the keypad
(Figure 3 arrow). This is especially useful when searching for city and state names. Play
around with the search feature for awhile and you will appreciate how quickly you can locate
specific churches or groups of churches. And don’t hesitate to use the microphone button on the
keypad. It is probably the quickest way to enter text into the search field (or for that matter the
contents of emails generated by this App). You can always use the keypad to easily make
corrections to your dictated text.
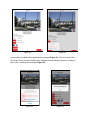
MAP FEATURE: All or Selected Churches
Now back to the “Map All” button at the top right of the screen. Tapping this button will take you
to a map display of all churches within the Presbytery located in California (Figure 9). Pins
appear precisely at the location of each Presbytery church. Tapping on any Pin will produce an
annotation indicating the church name. Some churches are hosted by other churches, and some
churches act as hosts. Whenever this occurs, the relationship is indicated on a subtitle of the
annotation. The map initially opens to a view in Portrait mode which displays all Presbytery
churches located in California. You can use standard finger gestures to expand or contract the
Figure 10
Figure 11
Figure 12
map display, or move the center point around. At the bottom right there is a selector to choose
between “All” or “Selected” churches. “All” is the normal view, but if you previously selected a
filtered list of churches in the search field, tapping “Selected” will produce a map displaying
Pins for only those selected churches (Figure 10). This is especially useful if you desire to look
for churches only in a specific city or of a given language type. On the bottom left there is a
selector to choose between “California” and “Hawaii”. Tapping “California” or “Hawaii” (Figure
11) will produce a map showing Presbytery churches in those two locations, again with Pins for
all churches. At the top right of the screen there is a button labeled ”Locate Me”. (This button will
only appear if your iPhone or iPad is location enabled and you have enabled Location Services
for this App). Pressing this button will alter the current map display to place your current location
in the center of the screen with an exact 10 mile radius circle around your current location
(Figure 12). This will help you to locate nearby churches.
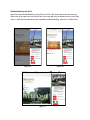
SPECIFIC CHURCH INFORMATION, WITH CONTACT FEATURES
Now back to the tabular list of churches. Tapping on any church name will take you to
a display of detailed information on that specific church (Figures 13 and 14). This
detailed display includes a high quality photo of the church, the church’s full name and
mailing address, the name of the pastor (and often a photo of the pastor), and a list of
worship times (with an indication of language type when worship services include nonEnglish services). This display includes a number of other buttons and information
Figure 13
Figure 14
Figure 15
items which will only appear if it is relevant to the specific church. The church phone
number is shown on the display. If you are using an iPhone, tapping the red “Phone”
button will (if you select “Call” in the following dialog) place a call directly to the
church on your iPhone (Figure 15). If the church has an email address, tapping the
red “Email” button will produce a filled out email form already addressed to the church.
Merely fill in the body of the email and press “Send” to immediately send out your
email (Figure 16). If the church has a website, tapping the red “Website” button will
display the church’s website in Mobile Safari (Figures 17 and 18).
Since Apple does not permit collection of online donations for charities within Apps, and since
several Presbytery churches do provide a facility for collecting online donations within their
websites, the PoP Churches App must link these church websites to Mobile Safari, rather than
using an embedded browser within the PoP Churches App to display these websites. The
inconvenience of going to an external browser to display these websites is minimized with
Mobile Safari on iOS 9 because Mobile Safari on iOS 9 provides a return button in the upper left
hand corner of the status bar to return to the PoP Churches App (Figures 17 and 18). The
PoP Churches App uses an embedded browser to display websites for churches that do not
provide a facility for collecting online donations within their websites.
Most church websites display best on iPads (especially in landscape view), but a few
have been coded as truly responsive websites that display very well on an iPhone
(Figure 18). Obviously you can use standard finger gestures to zoom in on even a very
Figure 16
Figure 17
Figure 18
Figure 19
Figure 20
Figure 21
large website. Use the standard back, forward, and refresh controls to assist in
navigating the website.
If the church has a Facebook or Twitter presence, tapping either of these buttons will
produce an embedded web display of their current Facebook (Figure 19) and Twitter
(Figure 20) feeds. Pressing the Weather Underground button will take you to an
embedded web display showing the current and forecast weather for the specific location of
the church (Figure 21).
At the bottom of this screen are three buttons (you may need to scroll the screen up to see
them) (Figure 22).
Pressing the first (red) button labeled “Make Contact” will add the current church information to
your iOS “Contacts” App in a Group called “PoP Churches. You must first give PoP Churches
permission to access your contacts (Figure 23). Once permission is given, a “Church Contact
Added” or “Church Contact Replaced” dialog will appear (Figure 24), indicating that the current
church information has been added to your “Contacts” App (Figure 25). If you are using iCloud
sync, the newly added church contact will appear on all of your Macs, iPhones, iPads and iPod
Touches.
Figure 22
Figure 23
Figure 24
Pressing the second (PC(USA) logo) button will produce an embedded web display of the
PC(USA) Ten-Year Trends report for this church in pdf format .
Figure 25
Figure 26
Figure 27
Pressing the third (red) button labeled “Report Errors” will generate an email form to report
errors in the displayed church information to facilitate making the information in this App as
correct as possible.
Finally, pressing the red “Church Map” button will take you to a detailed map of the church’s
location, with a Pin exactly at the church’s location. Tapping the Pin will produce an annotation
showing the church’s name and address (Figure 26). Selectors at the bottom left of the screen
allow you to view the map as a “Standard” map (Figure 26), a “Satellite” view (Figure 27), or a
“Hybrid” view combining the two views (Figure 28). At the top right of the screen (assuming your
device is location enabled) is a “Locate Me” button. Tapping this button will zoom the map display
out to show your current location as well as the location of the selected church (Figure 29). At the
bottom right of the screen, directly above the toolbar, is a red text field (Figure 26 arrow)
indicating the straight line distance in miles from your current location to the selected church (again
assuming your device is location enabled—if not the text field merely displays “Distance”).
DRIVING DIRECTIONS VIA APPLE MAPS APP
Finally, at the bottom right of the toolbar is a button labeled “Directions”. Tapping this button will
take you to the Apple Maps App with properly filled out starting and ending locations to take you
from your current location to the selected church (Figure 30). Several routes will be displayed
on the initial screen, with mileage and driving time indicated - based on current traffic conditions.
Figure 28
Figure 29
Figure 30
You can then select step-by-step directions (with verbal directions, if desired) and Apple Maps
will get you to the selected church (Figures 31 and 32).
Figure 31
Figure 32
Figure 33
RETURN TO PoP CHURCHES APP
When you are finished with the Apple Maps App, you can return to the PoP Churches App (to
the screen where you left to go to the Apple Maps App) by double clicking the Home button and
selecting the PoP Churches App. With iOS 9 it is much easier, you merely need to touch “PoP
Churches” in the upper left corner of the status bar (Figures 30, 31, and 32).
Authorization of Services
As previously mentioned in the discussion of adding church information to your “Contacts” App
(aka “Address Book”), the first time you press the “Make Contact” button you will need to give
your express permission (Figure 23). Once permission is granted, the dialog will no longer
appear. This setting can be later changed in the “Settings” App under “Privacy”. If permission is
not granted you will see the dialog shown in Figure 33, and you will not be able to add church
contacts to your “Contacts” App. A similar situation involves the use of your location information
within the two map screens. The first time you attempt to access your location information, a
dialog appears asking for permission (Figure34). If you do not grant permission, your location
information will not be used.
Figure 34
Figure 35
Figure 36
Notifications
The PoP Churches App provides a facility whereby notifications can be sent from the Presbytery
to announce important information or events. Again express permission must be granted to
receive these notifications. The notifications can appear on your lock screen when the PoP
Churches App is not active (Figure 35), or within the PoP Churches App itself (Figure 36). A
badge on the PoP Churches App icon indicates the number of unread notifications (Figure 37).
Figure 37
Additional Features
Churches whose websites display in a non-English language will show an additional Google
Translate button (red circle in Figure 38). Pressing this button will open the translated website
in English using Google Translate. Google Translate allows you to view the church website
pages, or individual sections of a page, in either the original language or English. Please note
that the translation is a machine translation, and the resulting English grammar may be
Figure 38
Figure 39
Figure 40
awkward. A Spanish language website is shown in Figure 40 and the Google translated version
is shown in Figure 39.
PoP Churches Help
Several graphical screens displaying information on using the PoP Churches App are available
by pressing the circled i in the church list navigation bar, as shown at the top of Figure 2. Just
swipe the screen to the left to go to successive information screens. Swipe the screen to the
right to go to previous screens, or press “Return to Info Start” to go back to the first screen.
iPhone and iPad Differences
Most screen views appear essentially the same on the iPhone and iPad in both portrait and
landscape modes (except for obvious differences in screen size and aspect ratios). A typical
Church Information Detailed Screen for the iPad is shown in Figure 41. The corresponding
iPhone screen is shown in Figure 22.
Action Sheets used for selection of desired user action if duplicate church contacts are found
when adding a church contact to the “Contacts” App appear differently on the iPhone and iPad.
This is due to Apple’s differing implementation of Action Sheets on the two devices. Figure 42
shows the implementation on an iPhone and Figure 43 shows the implementation on an iPad.
When the user clicks “Cancel” on the iPhone or clicks outside the popup on an iPad, no action is
taken. If the user clicks “Replace …” all existing contacts for the current church are deleted and
Figure 41
Figure 43
a new contact is added, with a resulting alert message (Figure 44). If the user clicks “Add …”
the current church contact is added as an additional contact leaving all previous contacts in
place, with a resulting alert message (Figure 24).
Figure 42
Figure 44
iPad Multitasking with iOS 9
Apple has introduced Multitasking on the iPad for iOS 9. This means that users can have two
Apps open at the same time on recent iPads, with each App using a different portion of the iPad
screen. Apple has introduced two new capabilities with Multitasking, referred to as Slide Over
Figure 46
Figure 45
Figure 47
and Split View, which can function in both portrait and landscape modes. Figures 45 and 46
show the PoP Churches App running in Multitasking mode on an iPad in portrait orientation,
while Figures 47 - 50 show the PoP Churches App running in Multitasking mode on an iPad in
landscape orientation. Multitasking offers significant advantages to PoP Churches users when
linking with Safari, Maps, and Contacts Apps.
Figure 48
Figure 49
Figure 50
Safari View Controller with iOS 9
Apple has introduced Safari View Controller with iOS 9. Safari View Controller permits
embedding web pages directly in the PoP Churches App (Figure 51) with all of the advantages
of Mobile Safari, such as storing bookmarks (Figure 52), sharing cookies with Mobile Safari,
password and contact autofill, sharing of webpages to social networks (Figure 53), viewing
webpages in Safari Reader (Figures 54 and 55), ability to add a webpage to your reading list,
and transferring to the actual Mobile Safari (Figure 56) if desired.
Figure 51
Figure 52
Figure 53
Figure 54
Figure 55
Figure 56