1
V+ Language
User’s Guide
Version 13.0
V+ Language
User’s Guide
Version 13.0
Part # 00963-01300, Rev. A
July 1998
5RVH 2UFKDUG :D\ 6DQ -RVH &$ 86$ 3KRQH )D[ 2WWR+DKQ6WUDVVH 'RUWPXQG *HUPDQ\ 3KRQH )D[ UXH GX 6DXOH 7UDSX 0DVV\ )UDQFH 3KRQH )D[ The information contained herein is the property of Adept Technology, Inc., and shall not be reproduced in whole or in part without prior written approval of Adept Technology, Inc. The information herein is subject to change without notice and should not be construed as a commitment by
Adept Technology, Inc. This manual is periodically reviewed and revised.
Adept Technology, Inc., assumes no responsibility for any errors or omissions in this document.
Critical evaluation of this manual by the user is welcomed. Your comments assist us in preparation
of future documentation. A form is provided at the back of the book for submitting your comments.
Copyright © 1994-1998 by Adept Technology, Inc. All rights reserved.
The Adept logo is a registered trademark of Adept Technology, Inc.
Adept, AdeptOne, AdeptOne-MV, AdeptThree, AdeptThree-XL, AdeptThree-MV, PackOne,
PackOne-MV, HyperDrive, Adept 550, Adept 550 CleanRoom, Adept 1850, Adept 1850XP,
A-Series, S-Series, Adept MC, Adept CC, Adept IC, Adept OC, Adept MV,
AdeptVision, AIM, VisionWare, AdeptMotion, MotionWare, PalletWare, FlexFeedWare,
AdeptNet, AdeptFTP, AdeptNFS, AdeptTCP/IP, AdeptForce, AdeptModules, AdeptWindows,
AdeptWindows PC, AdeptWindows DDE, AdeptWindows Offline Editor,
and V+ are trademarks of Adept Technology, Inc.
Any trademarks from other companies used in this publication
are the property of those respective companies.
Printed in the United States of America
Table of Contents
1
Introduction
. . . . . . . . . . . . . . . . . . . . . . . . . . . .
Compatibility . . . . . . . . . . . . . . .
Manual Overview . . . . . . . . . . . . .
Related Publications . . . . . . . . . . . .
Notes, Cautions, and Warnings . . . . . . .
Safety . . . . . . . . . . . . . . . . . . .
Reading and Training for System Users
System Safeguards . . . . . . . . .
Computer-Controlled Robots . . . .
Manually Controlled Robots . . . . .
Other Computer-Controlled Devices .
Notations and Conventions . . . . . . . .
Keyboard Keys . . . . . . . . . . .
Uppercase and Lowercase Letters . .
Numeric Arguments . . . . . . . . .
Output Control Commands . . . . . . . .
How Can I Get Help? . . . . . . . . . . .
2
Programming V+
19
.
.
.
.
.
.
.
.
.
.
.
.
.
.
.
.
20
21
22
23
24
24
25
25
25
26
27
27
28
29
30
32
. . . . . . . . . . . . . . . . . . . . . . . . .
33
.
.
.
.
.
.
.
.
.
.
.
.
.
.
.
.
.
.
.
.
.
.
.
.
.
.
.
.
.
.
.
.
.
.
.
.
.
.
.
.
.
.
.
.
.
.
.
.
Creating a Program . . . . . . . . . . . . . . .
Program and Variable Name Requirements
The Editing Window . . . . . . . . . . . .
Editing Modes . . . . . . . . . . . . . . .
Changing Editing Modes . . . . . . . .
The SEE Editor Environments . . . . . . . . . . .
Using Text Editors Other Than the SEE Editor .
The SEE Editor Window . . . . . . . . .
The Adept Windows Off-line Editor . . . . . . . .
Using the Editor . . . . . . . . . . . . . . . . .
Entering New Lines of Code . . . . . . . .
Exiting the Editor . . . . . . . . . . . . . .
Saving a Program . . . . . . . . . . .
+
V Program Types . . . . . . . . . . . . . . . .
V+ Language User’s Guide, Rev. A
.
.
.
.
.
.
.
.
.
.
.
.
.
.
.
.
.
.
.
.
.
.
.
.
.
.
.
.
.
.
.
.
.
.
.
.
.
.
.
.
.
.
.
.
.
.
.
.
.
.
.
.
.
.
.
.
.
.
.
.
.
.
.
.
.
.
.
.
.
.
.
.
.
.
.
.
.
.
.
.
.
.
.
.
.
.
.
.
.
.
.
.
.
.
.
.
.
.
.
.
.
.
.
.
.
.
.
.
.
.
.
.
.
.
.
.
.
.
.
.
.
.
.
.
.
.
.
.
.
.
.
.
.
.
.
.
.
.
.
.
.
.
.
.
.
.
.
.
.
.
.
.
.
.
.
.
.
.
.
.
.
.
.
.
.
.
.
.
.
.
.
.
.
.
.
.
.
.
.
.
.
.
.
.
.
.
.
.
.
.
.
.
.
.
.
.
.
.
.
.
.
.
.
.
.
.
.
.
.
.
.
.
.
.
.
.
.
.
.
.
.
.
.
.
.
.
.
.
.
.
.
.
.
.
.
.
.
.
.
.
.
.
.
.
.
.
.
.
.
.
.
.
.
.
.
.
.
.
.
.
.
.
.
.
.
.
.
.
.
.
.
.
.
.
.
.
.
.
.
.
.
.
.
.
35
35
36
36
37
38
38
40
41
41
41
42
42
43
5
Table of Contents
Executable Programs . . . . . . . . . . .
Robot Control Programs . . . . . . . .
Exclusive Control of a Robot . . . . . .
General Programs . . . . . . . . . . . . .
Format of Programs . . . . . . . . . . . . . . .
Program Lines . . . . . . . . . . . . . . .
Program Organization . . . . . . . . . . .
Program Variables . . . . . . . . . . . . .
Executing Programs . . . . . . . . . . . . . . .
Selecting a Program Task . . . . . . . . .
Program Stacks . . . . . . . . . . . . . . . . .
Stack Requirements . . . . . . . . . . . .
Flow of Program Execution . . . . . . . . . . . .
RUN/HOLD Button . . . . . . . . . . . . .
Subroutines . . . . . . . . . . . . . . . . . . .
Argument Passing . . . . . . . . . . . . .
Mapping the Argument List . . . . . . .
Argument Passing by Value or Reference
Undefined Arguments . . . . . . . . .
Program Files . . . . . . . . . . . . . . .
Reentrant Programs . . . . . . . . . . . .
Recursive Programs . . . . . . . . . .
Asynchronous Processing . . . . . . . . .
Error Trapping . . . . . . . . . . . . . . .
Scheduling of Program Execution Tasks . . . . .
System Timing and Time Slices . . . . . . .
Specifying Tasks, Time Slices, and Priorities .
Task Scheduling . . . . . . . . . . . . . .
Execution Priority Example . . . . . . . . .
Default Task Configuration . . . . . . . . . . . .
System Task Configuration . . . . . . . . .
Description of System Tasks . . . . . . .
User Task Configuration . . . . . . . . . .
3
The SEE Editor and Debugger
.
.
.
.
.
.
.
.
.
.
.
.
.
.
.
.
.
.
.
.
.
.
.
.
.
.
.
.
.
.
.
.
.
43
43
44
45
46
46
48
48
49
49
51
51
53
53
54
54
54
56
57
58
58
59
60
61
62
62
62
63
67
69
69
70
72
. . . . . . . . . . . . . . . . . .
73
Basic SEE Editor Operations . . . . . . . .
Cursor Movement . . . . . . . . . .
Deleting, Copying, and Moving Lines
Text Searching and Replacing . .
Switching Programs in the Editor . . .
6
.
.
.
.
.
.
.
.
.
.
V+ Language User’s Guide, Rev. A
.
.
.
.
.
.
.
.
.
.
.
.
.
.
.
.
.
.
.
.
.
.
.
.
.
.
.
.
.
.
.
.
.
.
.
.
.
.
.
.
.
.
.
.
.
.
.
.
.
.
.
.
.
.
.
.
.
.
.
.
.
.
.
.
.
.
.
.
.
.
.
.
.
.
.
.
.
.
.
.
.
.
.
.
.
.
.
.
.
.
.
.
.
.
.
.
.
.
.
.
.
.
.
.
.
.
.
.
.
.
.
.
.
.
.
.
.
.
.
.
.
.
.
.
.
.
.
.
.
.
.
.
.
.
.
.
.
.
.
.
.
.
.
.
.
.
.
.
.
.
.
.
.
.
.
.
.
.
.
.
.
.
.
.
.
.
.
.
.
.
.
.
.
.
.
.
.
.
.
.
.
.
.
.
.
.
.
.
.
.
.
.
.
.
.
.
.
.
.
.
.
.
.
.
.
.
.
.
.
.
.
.
.
.
.
.
.
.
.
.
.
.
.
.
.
.
.
.
.
.
.
.
.
.
.
.
.
.
.
.
.
.
.
.
.
.
.
.
.
.
.
.
.
.
.
.
.
.
.
.
.
.
.
.
.
.
.
.
.
.
.
.
.
.
.
.
.
.
.
.
.
.
.
.
.
.
.
.
.
.
.
.
.
.
.
.
.
.
.
.
.
.
.
.
.
.
.
.
.
.
.
.
.
.
.
.
.
.
.
.
.
.
.
.
.
.
.
.
.
.
.
.
.
.
.
.
.
.
.
.
.
.
.
.
.
.
.
.
.
.
.
.
74
75
77
78
79
Table of Contents
The Internal Program List . . . . . . . . . . . . . . . .
Special Editing Situations . . . . . . . . . . . . . . . . .
The SEE Editor in Command Mode . . . . . . . . . . . . .
SEE Editor Extended Commands . . . . . . . . . . . .
Edit Macros . . . . . . . . . . . . . . . . . . . . . .
Sample Editing Session . . . . . . . . . . . . . . . . . . . . . .
The Program Debugger . . . . . . . . . . . . . . . . . . . . .
Entering and Exiting the Debugger . . . . . . . . . . . . .
The DEBUG Monitor Command . . . . . . . . . . . . .
Using the Debug Key or the DEBUG Extended Command
Exiting the Debugger . . . . . . . . . . . . . . . . . .
The Debugger Display . . . . . . . . . . . . . . . . . . .
Debugger Operation Modes . . . . . . . . . . . . . . . .
Debugging Programs . . . . . . . . . . . . . . . . . . .
Positioning the Typing Cursor . . . . . . . . . . . . . .
Debugger Key Commands . . . . . . . . . . . . . . . .
Debug Monitor-Mode Keyboard Commands . . . . . . . .
Using a Pointing Device With the Debugger . . . . . . . .
Control of Program Execution . . . . . . . . . . . . . . .
Single-Step Execution . . . . . . . . . . . . . . . . .
PAUSE Instructions . . . . . . . . . . . . . . . . . . .
Program Breakpoints . . . . . . . . . . . . . . . . . .
Program Watchpoints . . . . . . . . . . . . . . . . . .
4
Data Types and Operators
.
.
.
.
.
.
.
.
.
.
.
.
.
.
.
.
.
.
.
.
.
.
.
. . . . . . . . . . . . . . . . . . .
Introduction . . . . . . . . . . . . . . . . . .
Dynamic Data Typing and Allocation . .
Variable Name Requirements . . . . . .
String Data Type . . . . . . . . . . . . . . . .
ASCII Values . . . . . . . . . . . . . .
Functions That Operate on String Data . .
Real and Integer Data Types . . . . . . . . . .
Numeric Representation . . . . . . . . .
Numeric Expressions . . . . . . . . . . .
Logical Expressions . . . . . . . . . . .
Logical Constants . . . . . . . . . .
Functions That Operate on Numeric Data
Location Data Types . . . . . . . . . . . . . .
Transformations . . . . . . . . . . . . .
Precision Points . . . . . . . . . . . . .
V+ Language User’s Guide, Rev. A
.
.
.
.
.
.
.
.
.
.
.
.
.
.
.
.
.
.
.
.
.
.
.
.
.
.
.
.
.
.
.
.
.
.
.
.
.
.
.
.
.
.
.
.
.
.
.
.
.
.
.
.
.
.
.
.
.
.
.
.
.
.
.
.
.
.
.
.
.
.
.
.
.
.
.
.
.
.
.
.
.
.
.
.
.
.
.
.
.
.
.
.
.
.
.
.
.
.
.
.
.
.
.
.
.
.
.
.
.
.
.
.
.
.
.
.
.
.
.
.
.
.
.
.
.
.
.
.
.
.
.
.
.
.
.
.
.
.
.
.
.
.
.
.
.
.
.
.
.
.
.
.
.
.
.
.
.
.
.
.
.
.
81
83
85
89
91
92
95
95
96
97
97
98
100
101
102
103
104
107
107
107
108
108
109
111
112
112
112
114
115
115
116
117
117
118
118
118
119
119
119
7
Table of Contents
Arrays . . . . . . . . . . . . .
Variable Classes . . . . . . . .
Global Variables . . . .
Local Variables . . . . .
Automatic Variables . . .
Scope of Variables . . .
Variable Initialization . .
Operators . . . . . . . . . . .
Assignment Operator . .
Mathematical Operators .
Relational Operators . . .
Logical Operators . . . .
Bitwise Logical Operators
String Operator . . . . . . . .
Order of Evaluation . . . . . .
5
Program Control
.
.
.
.
.
.
.
.
.
.
.
.
.
.
.
120
121
121
121
122
123
125
126
126
126
127
128
128
130
130
. . . . . . . . . . . . . . . . . . . . . . . .
131
.
.
.
.
.
.
.
.
.
.
.
.
.
.
.
.
.
.
.
.
.
.
.
.
.
.
.
.
.
.
.
.
.
.
.
.
.
.
.
.
.
.
.
.
.
.
.
.
.
.
.
.
.
.
.
.
.
.
.
.
.
.
.
.
.
.
.
.
.
.
.
.
.
.
.
.
.
.
.
.
.
.
.
.
.
.
.
.
.
.
.
.
.
.
.
.
.
.
.
.
.
.
.
.
.
Introduction . . . . . . . . . . . . . . . . .
Unconditional Branch Instructions . . . . . .
GOTO . . . . . . . . . . . . . . . . .
CALL . . . . . . . . . . . . . . . . .
CALLS . . . . . . . . . . . . . . . . .
Program Interrupt Instructions . . . . . . . .
WAIT . . . . . . . . . . . . . . . . .
WAIT.EVENT . . . . . . . . . . . . . .
REACT and REACTI . . . . . . . . . . .
REACTE . . . . . . . . . . . . . . . .
HALT, STOP, and PAUSE . . . . . . . . .
BRAKE, BREAK, and DELAY . . . . . . .
Additional Program Interrupt Instructions
Program Interrupt Example . . . . . .
Logical (Boolean) Expressions . . . . . . . .
Conditional Branching Instructions . . . . . .
IF...GOTO . . . . . . . . . . . . . . .
IF...THEN...ELSE . . . . . . . . . . . . .
CASE value OF . . . . . . . . . . . .
Example . . . . . . . . . . . . . .
Looping Structures . . . . . . . . . . . . . .
FOR . . . . . . . . . . . . . . . . . .
Examples . . . . . . . . . . . . .
8
.
.
.
.
.
.
.
.
.
.
.
.
.
.
.
.
.
.
.
.
.
.
.
.
.
.
.
.
.
.
.
.
.
.
.
.
.
.
V+ Language User’s Guide, Rev. A
.
.
.
.
.
.
.
.
.
.
.
.
.
.
.
.
.
.
.
.
.
.
.
.
.
.
.
.
.
.
.
.
.
.
.
.
.
.
.
.
.
.
.
.
.
.
.
.
.
.
.
.
.
.
.
.
.
.
.
.
.
.
.
.
.
.
.
.
.
.
.
.
.
.
.
.
.
.
.
.
.
.
.
.
.
.
.
.
.
.
.
.
.
.
.
.
.
.
.
.
.
.
.
.
.
.
.
.
.
.
.
.
.
.
.
.
.
.
.
.
.
.
.
.
.
.
.
.
.
.
.
.
.
.
.
.
.
.
.
.
.
.
.
.
.
.
.
.
.
.
.
.
.
.
.
.
.
.
.
.
.
.
.
.
.
.
.
.
.
.
.
.
.
.
.
.
.
.
.
.
.
.
.
.
.
.
.
.
.
.
.
.
.
.
.
.
.
.
.
.
.
.
.
.
.
.
.
.
.
.
.
.
.
.
.
.
.
.
.
.
.
.
.
.
.
.
.
.
.
.
.
.
.
.
.
.
.
.
.
.
.
.
.
.
.
.
.
.
.
.
.
.
.
.
.
.
.
.
.
.
.
.
.
.
.
.
.
.
.
.
.
.
.
.
.
.
.
.
.
.
.
.
.
.
.
.
.
.
.
.
.
.
.
.
.
.
.
.
.
.
.
.
.
.
.
.
.
.
.
.
.
.
.
.
.
.
.
.
.
.
.
.
.
.
.
.
.
.
.
.
.
.
.
.
.
.
.
.
.
.
.
.
.
.
.
.
.
.
.
.
.
.
.
.
.
.
.
.
.
.
.
.
.
.
.
132
132
132
133
134
135
135
135
136
137
138
138
138
139
142
143
143
143
145
146
147
147
148
Table of Contents
DO...UNTIL . . . . . . . . . . . . . . .
WHILE...DO . . . . . . . . . . . . . .
Summary of Program Control Keywords . . .
Controlling Programs in Multiple CPU Systems
6
Functions
.
.
.
.
148
150
152
155
. . . . . . . . . . . . . . . . . . . . . . . . . . . .
157
.
.
.
.
.
.
.
.
Using Functions . . . . . . . . . . . . . . . . .
Variable Assignment Using Functions . . . .
Functions Used in Expressions . . . . . . .
Functions as Arguments to a Function . . .
String-Related Functions . . . . . . . . . . . . .
Examples of String Functions . . . . . . . .
Location, Motion, and External Encoder Functions
Examples of Location Functions . . . . . .
Numeric Value Functions . . . . . . . . . . . .
Examples of Arithmetic Functions . . . . .
Logical Functions . . . . . . . . . . . . . . . .
System Control Functions . . . . . . . . . . . .
Example of System Control Functions . . .
7
Switches and Parameters
.
.
.
.
.
.
.
.
.
.
.
.
.
.
.
.
.
.
.
.
.
.
.
.
.
.
.
.
.
.
.
.
.
.
.
.
.
.
.
.
.
158
158
158
158
159
160
161
161
162
163
163
164
165
. . . . . . . . . . . . . . . . . . .
167
.
.
.
.
.
.
.
.
.
.
.
.
.
Introduction . . . . . . . . . . . . . . . . . . . .
Parameters . . . . . . . . . . . . . . . . . . . .
Viewing Parameters . . . . . . . . . . . . .
Setting Parameters . . . . . . . . . . . . .
Summary of Basic System Parameters . . . .
Graphics-Based System Terminal Settings
Switches . . . . . . . . . . . . . . . . . . . . . .
Viewing Switch Settings . . . . . . . . . . .
Setting Switches . . . . . . . . . . . . . . .
Summary of Basic System Switches . . . . .
8
.
.
.
.
.
.
.
.
.
.
.
.
.
.
.
.
.
.
.
.
.
.
.
.
.
.
.
.
.
.
.
.
.
.
.
.
.
.
.
.
.
.
.
.
.
.
.
.
.
.
.
.
.
.
.
.
.
.
.
.
.
.
.
.
.
.
.
.
.
.
.
.
.
.
.
.
.
.
.
.
.
.
.
.
.
.
.
.
.
.
.
.
.
.
.
.
.
.
.
.
.
.
.
.
.
168
169
169
170
170
172
172
172
173
173
Motion Control Operations .
. . . . . . . . . . . . . . . . . .
177
Introduction . . . . . . .
Location Variables . . .
Coordinate Systems
Transformations . .
Yaw . . . . . .
.
.
.
.
.
.
.
.
.
.
.
.
.
.
.
.
.
.
.
.
.
.
.
.
.
.
.
.
.
.
.
.
.
.
.
.
.
.
.
.
.
.
.
.
.
.
.
.
.
.
.
.
.
.
.
V+ Language User’s Guide, Rev. A
.
.
.
.
.
.
.
.
.
.
.
.
.
.
.
.
.
.
.
.
.
.
.
.
.
.
.
.
.
.
.
.
.
.
.
.
.
.
.
.
.
.
.
.
.
.
.
.
.
.
.
.
.
.
.
.
.
.
.
.
.
.
.
.
.
.
.
.
.
.
.
.
.
.
.
.
.
.
.
.
.
.
.
.
.
.
.
.
.
.
.
.
.
.
.
.
.
.
.
.
.
.
.
.
.
.
.
.
.
.
.
.
.
.
.
.
.
.
.
.
178
178
179
180
181
9
Table of Contents
Pitch . . . . . . . . . . . . . . . . . . . . . .
Roll . . . . . . . . . . . . . . . . . . . . . . .
Special Situations . . . . . . . . . . . . . . . .
Creating and Altering Location Variables . . . . . . . . .
Creating Location Variables . . . . . . . . . . . .
Transformations vs. Precision Points . . . . . . .
Modifying Location Variables . . . . . . . . . . .
Relative Transformations . . . . . . . . . . . .
Examples of Modifying Location Variables . . .
Defining a Reference Frame . . . . . . . . . . . .
Miscellaneous Location Operations . . . . . . . .
Motion Control Instructions . . . . . . . . . . . . . . . .
Basic Motion Operations . . . . . . . . . . . . . .
Joint-Interpolated Motion vs. Straight-Line Motion
Safe Approaches and Departures . . . . . . .
Moving an Individual Joint . . . . . . . . . . .
End-Effector Operation Instructions . . . . . . . .
Continuous-Path Trajectories . . . . . . . . . . . .
Breaking Continuous-Path Operation . . . . . . .
Procedural Motion . . . . . . . . . . . . . . . . .
Procedural Motion Examples . . . . . . . . . .
Timing Considerations . . . . . . . . . . . . .
Robot Speed . . . . . . . . . . . . . . . . . . .
Motion Modifiers . . . . . . . . . . . . . . . . . .
Customizing the Calibration Routine . . . . . . . .
Tool Transformations . . . . . . . . . . . . . . . . . . .
Defining a Tool Transformation . . . . . . . . . . .
Summary of Motion Keywords . . . . . . . . . . . . . .
9
Input/Output Operations
.
.
.
.
.
.
.
.
.
.
.
.
.
.
.
.
.
.
.
.
.
.
.
.
.
.
.
.
183
185
186
187
187
187
187
188
188
191
194
195
195
195
196
196
197
197
198
199
199
200
201
203
203
204
205
207
. . . . . . . . . . . . . . . . . . . .
215
Terminal I/O . . . . . . . . . . . . . .
Terminal Types . . . . . . . . . .
Input Processing . . . . . . . . .
Output Processing . . . . . . . .
Digital I/O . . . . . . . . . . . . . . .
High-Speed Interrupts . . . . . .
Soft Signals . . . . . . . . . . .
Digital I/O and Third Party Boards
Digital I/O and DeviceNet . . . .
Pendant I/O . . . . . . . . . . . . . .
10
.
.
.
.
.
.
.
.
.
.
.
.
.
.
.
.
.
.
.
.
.
.
.
.
.
.
.
.
.
.
.
.
.
.
.
.
.
.
.
.
V+ Language User’s Guide, Rev. A
.
.
.
.
.
.
.
.
.
.
.
.
.
.
.
.
.
.
.
.
.
.
.
.
.
.
.
.
.
.
.
.
.
.
.
.
.
.
.
.
.
.
.
.
.
.
.
.
.
.
.
.
.
.
.
.
.
.
.
.
.
.
.
.
.
.
.
.
.
.
.
.
.
.
.
.
.
.
.
.
.
.
.
.
.
.
.
.
.
.
.
.
.
.
.
.
.
.
.
.
.
.
.
.
.
.
.
.
.
.
.
.
.
.
.
.
.
.
.
.
.
.
.
.
.
.
.
.
.
.
.
.
.
.
.
.
.
.
.
.
.
.
.
.
.
.
.
.
.
.
.
.
.
.
.
.
.
.
.
.
.
.
.
.
.
.
.
.
.
.
.
.
.
.
.
.
.
.
.
.
.
.
.
.
.
.
.
.
.
.
.
.
.
.
.
.
.
.
.
.
.
.
.
.
.
.
.
.
.
.
.
.
217
218
218
220
220
221
221
222
222
223
Table of Contents
Analog I/O . . . . . . . . . . . . . . . . . .
Serial and Disk I/O Basics . . . . . . . . . . .
Logical Units . . . . . . . . . . . . . . .
Error Status . . . . . . . . . . . . . . .
Attaching/Detaching Logical Units . . . .
Reading . . . . . . . . . . . . . . . .
Writing . . . . . . . . . . . . . . . . .
Input Wait Modes . . . . . . . . . . . .
Output Wait Modes . . . . . . . . . . .
Disk I/O . . . . . . . . . . . . . . . . . . . .
Attaching Disk Devices . . . . . . . . .
Disk I/O and the Network File System (NFS)
Disk Directories . . . . . . . . . . . . .
Disk File Operations . . . . . . . . . . .
Opening a Disk File . . . . . . . . . .
Writing to a Disk . . . . . . . . . . .
Reading From a Disk . . . . . . . . .
Detaching . . . . . . . . . . . . . .
Disk I/O Example . . . . . . . . . . .
Advanced Disk Operations . . . . . . . . . .
Variable-Length Records . . . . . . . .
Fixed-Length Records . . . . . . . . . .
Sequential-Access Files . . . . . . . . .
Random-Access Files . . . . . . . . . .
Buffering and I/O Overlapping . . . . .
Disk Commands . . . . . . . . . . . . .
Accessing the Disk Directories . . . . . .
AdeptNET . . . . . . . . . . . . . . . .
Serial Line I/O . . . . . . . . . . . . . . . . .
I/O Configuration . . . . . . . . . . . .
Attaching/Detaching Serial I/O Lines . . .
Input Processing . . . . . . . . . . . . .
Output Processing . . . . . . . . . . . .
Serial I/O Examples . . . . . . . . . .
DDCMP Communication Protocol . . . . . . .
General Operation . . . . . . . . . . .
Attaching/Detaching DDCMP Devices . .
Input Processing . . . . . . . . . . . . .
Output Processing . . . . . . . . . . . .
Protocol Parameters . . . . . . . . . .
V+ Language User’s Guide, Rev. A
.
.
.
.
.
.
.
.
.
.
.
.
.
.
.
.
.
.
.
.
.
.
.
.
.
.
.
.
.
.
.
.
.
.
.
.
.
.
.
.
.
.
.
.
.
.
.
.
.
.
.
.
.
.
.
.
.
.
.
.
.
.
.
.
.
.
.
.
.
.
.
.
.
.
.
.
.
.
.
.
.
.
.
.
.
.
.
.
.
.
.
.
.
.
.
.
.
.
.
.
.
.
.
.
.
.
.
.
.
.
.
.
.
.
.
.
.
.
.
.
.
.
.
.
.
.
.
.
.
.
.
.
.
.
.
.
.
.
.
.
.
.
.
.
.
.
.
.
.
.
.
.
.
.
.
.
.
.
.
.
.
.
.
.
.
.
.
.
.
.
.
.
.
.
.
.
.
.
.
.
.
.
.
.
.
.
.
.
.
.
.
.
.
.
.
.
.
.
.
.
.
.
.
.
.
.
.
.
.
.
.
.
.
.
.
.
.
.
.
.
.
.
.
.
.
.
.
.
.
.
.
.
.
.
.
.
.
.
.
.
.
.
.
.
.
.
.
.
.
.
.
.
.
.
.
.
.
.
.
.
.
.
.
.
.
.
.
.
.
.
.
.
.
.
.
.
.
.
.
.
.
.
.
.
.
.
.
.
.
.
.
.
.
.
.
.
.
.
.
.
.
.
.
.
.
.
.
.
.
.
.
.
.
.
.
.
.
.
.
.
.
.
.
.
.
.
.
.
.
.
.
.
.
.
.
.
.
.
.
.
.
.
.
.
.
.
.
.
.
.
.
.
.
.
.
.
.
.
.
.
.
.
.
.
.
.
.
.
.
.
.
.
.
.
.
.
.
.
.
.
.
.
.
.
.
.
.
.
.
.
.
.
.
.
.
.
.
.
.
.
223
225
225
225
227
228
229
229
230
231
231
232
232
232
233
234
235
235
236
237
237
238
238
238
239
240
241
242
243
243
244
244
245
245
248
248
249
249
250
251
11
Table of Contents
Kermit Communication Protocol . . .
Starting a Kermit Session . . . .
File Access Using Kermit . . . .
Binary Files . . . . . . . . .
Kermit Line Errors . . . . . . .
V+ System Parameters for Kermit
DeviceNet . . . . . . . . . . . . . .
Summary of I/O Operations . . . . .
10
Graphics Programming
.
.
.
.
.
.
.
.
252
253
255
256
257
258
258
259
. . . . . . . . . . . . . . . . . . . .
263
.
.
.
.
.
.
.
.
.
.
.
.
.
.
.
.
Creating Windows . . . . . . . . . . . .
ATTACH Instruction . . . . . . . .
FOPEN Instruction . . . . . . . . .
FCLOSE Instruction . . . . . . . . .
FDELETE Instruction . . . . . . . . .
DETACH Instruction . . . . . . . .
Custom Window Example . . . . .
Monitoring Events . . . . . . . . . . . .
GETEVENT Instruction . . . . . . . .
FSET Instruction . . . . . . . . . .
Building a Menu Structure . . . . . . . .
Menu Example . . . . . . . . . .
Defining Keyboard Shortcuts . . . .
Creating Buttons . . . . . . . . . . . . .
GPANEL Instruction . . . . . . . .
Button Example . . . . . . . . . .
Creating a Slide Bar . . . . . . . . . . .
GSLIDE Example . . . . . . . . . .
Graphics Programming Considerations . .
Using IOSTAT( ) . . . . . . . . . .
Managing Windows . . . . . . . .
Communicating With the System Windows
The Main Window . . . . . . . . .
The Monitor Window . . . . . . . .
The Vision Window . . . . . . . . .
Additional Graphics Instructions . . . . .
11
12
.
.
.
.
.
.
.
.
.
.
.
.
.
.
.
.
.
.
.
.
.
.
.
.
.
.
.
.
.
.
.
.
.
.
.
.
.
.
.
.
.
.
.
.
.
.
.
.
.
.
.
.
.
.
.
.
.
.
.
.
.
.
.
.
.
.
.
.
.
.
.
.
.
.
.
.
.
.
.
.
.
.
.
.
.
.
.
.
.
.
.
.
.
.
.
.
.
.
.
.
.
.
.
.
.
.
.
.
.
.
.
.
.
.
.
.
.
.
.
.
.
.
264
264
265
265
265
266
266
267
268
269
270
270
272
273
273
273
275
276
278
279
280
281
281
281
282
284
. . . . . . . . . . . . . . . . . . . . .
287
Introduction . . . . . . . . . . . . . . . . . . . . . . . . . . . .
288
Programming the MCP
.
.
.
.
.
.
.
.
.
.
.
.
.
.
.
.
.
.
.
.
.
.
.
.
.
.
.
.
.
.
.
.
.
.
.
.
.
.
.
.
.
.
.
.
.
.
.
.
.
.
.
.
.
.
.
.
.
.
.
.
.
.
.
.
.
.
.
.
.
.
.
.
.
.
.
.
.
.
V+ Language User’s Guide, Rev. A
.
.
.
.
.
.
.
.
.
.
.
.
.
.
.
.
.
.
.
.
.
.
.
.
.
.
.
.
.
.
.
.
.
.
.
.
.
.
.
.
.
.
.
.
.
.
.
.
.
.
.
.
.
.
.
.
.
.
.
.
.
.
.
.
.
.
.
.
.
.
.
.
.
.
.
.
.
.
.
.
.
.
.
.
.
.
.
.
.
.
.
.
.
.
.
.
.
.
.
.
.
.
.
.
.
.
.
.
.
.
.
.
.
.
.
.
.
.
.
.
.
.
.
.
.
.
.
.
.
.
.
.
.
.
.
.
.
.
.
.
.
.
.
.
.
.
.
.
.
.
.
.
.
.
.
.
.
.
.
.
.
.
.
.
.
.
.
.
.
.
.
.
.
.
.
.
.
.
.
.
.
.
.
.
.
.
.
.
.
.
.
.
.
.
.
.
.
.
.
.
.
.
.
.
.
.
.
.
.
.
.
.
.
.
.
.
.
.
.
.
.
.
.
.
.
.
.
.
.
.
.
.
.
.
Table of Contents
ATTACHing and DETACHing the Pendant
Writing to the Pendant Display . . . . . . . .
The Pendant Display . . . . . . . . . .
Using WRITE With the Pendant . . . .
Detecting User Input . . . . . . . . . . . . .
Using READ With the Pendant . . . . . .
Detecting Pendant Button Presses . . .
Keyboard Mode . . . . . . . . . .
Toggle Mode . . . . . . . . . . . .
Level Mode . . . . . . . . . . . .
Monitoring the MCP Speed Bar . . . . .
Using the STEP Button . . . . . . . . .
Reading the State of the MCP . . . . .
Controlling the Pendant . . . . . . . . . . .
Control Codes for the LCD Panel . . . .
The Pendant LEDs . . . . . . . . . . .
Making Pendant Buttons Repeat Buttons
Auto-Starting Programs With the MCP . . . . .
WAIT.START . . . . . . . . . . . . . .
Programming Example: MCP Menu . . . . .
12
Conveyor Tracking
.
.
.
.
.
.
.
.
.
.
.
.
.
.
.
.
.
.
.
.
288
289
289
289
290
290
290
291
291
292
293
294
295
296
296
297
298
300
301
302
. . . . . . . . . . . . . . . . . . . . . . .
307
.
.
.
.
.
.
.
.
.
.
.
.
.
.
.
.
.
.
.
.
.
.
.
.
.
.
.
.
.
.
.
.
.
.
.
.
.
.
.
.
.
.
.
.
.
.
.
.
.
.
.
.
.
.
.
.
.
.
.
.
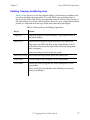
Introduction to Conveyor Tracking . . . . . . . . .
Installation . . . . . . . . . . . . . . . . . . . . .
Calibration . . . . . . . . . . . . . . . . . . . .
Basic Programming Concepts . . . . . . . . . . .
Belt Variables . . . . . . . . . . . . . . . .
Nominal Belt Transformation . . . . . . .
The Belt Encoder . . . . . . . . . . . . .
The Encoder Scaling Factor . . . . . . .
The Encoder Offset . . . . . . . . . . . .
The Belt Window . . . . . . . . . . . . .
Belt-Relative Motion Instructions . . . . . . .
Motion Termination . . . . . . . . . . . . .
Defining Belt-Relative Locations . . . . . . .
Moving-Line Programming . . . . . . . . . . . . .
Instructions and Functions . . . . . . . . . .
Belt Variable Definitions . . . . . . . . . .
Encoder Position and Velocity Information
Window Testing . . . . . . . . . . . . . .
V+ Language User’s Guide, Rev. A
.
.
.
.
.
.
.
.
.
.
.
.
.
.
.
.
.
.
.
.
.
.
.
.
.
.
.
.
.
.
.
.
.
.
.
.
.
.
.
.
.
.
.
.
.
.
.
.
.
.
.
.
.
.
.
.
.
.
.
.
.
.
.
.
.
.
.
.
.
.
.
.
.
.
.
.
.
.
.
.
.
.
.
.
.
.
.
.
.
.
.
.
.
.
.
.
.
.
.
.
.
.
.
.
.
.
.
.
.
.
.
.
.
.
.
.
.
.
.
.
.
.
.
.
.
.
.
.
.
.
.
.
.
.
.
.
.
.
.
.
.
.
.
.
.
.
.
.
.
.
.
.
.
.
.
.
.
.
.
.
.
.
.
.
.
.
.
.
.
.
.
.
.
.
.
.
.
.
.
.
.
.
.
.
.
.
.
.
.
.
.
.
.
.
.
.
.
.
.
.
.
.
.
.
.
.
.
.
.
.
.
.
.
.
.
.
.
.
.
.
.
.
.
.
.
.
.
.
.
.
.
.
.
.
.
.
.
.
.
.
.
.
.
.
.
.
.
.
.
.
.
.
.
.
.
.
.
.
.
.
.
.
.
.
.
.
.
.
.
.
.
.
.
.
.
.
.
.
.
.
.
.
.
.
308
309
310
311
311
312
314
314
315
316
318
319
319
320
320
320
320
321
13
Table of Contents
13
Status Information
System Switch . . . .
System Parameters .
Sample Programs . . . . .
.
.
.
.
.
.
.
.
321
321
321
322
MultiProcessor Systems .
. . . . . . . . . . . . . . . . . . . .
325
.
.
.
.
.
.
.
.
.
.
.
.
.
.
.
.
.
.
.
.
.
.
.
.
.
.
.
.
.
.
.
.
.
.
.
.
.
.
.
.
.
.
.
.
.
.
.
.
Introduction . . . . . . . . . . . . . . . . . . . . .
Requirements for Motion Systems . . . . . . . . . . .
Allocating Servos with an MI-3 or MI-6 Board
Allocating Servos with a EJI Board . . . . .
Conveyor Belt Encoders . . . . . . . . . . . .
Force Sensors . . . . . . . . . . . . . . . . .
Installing Processor Boards . . . . . . . . . . . . . .
Processor Board Locations . . . . . . . . . . .
Slot Ordering of Processor Boards . . . . . . .
Processor Board Addressing . . . . . . . . . .
Customizing Processor Workloads . . . . . . . . . .
Assigning Workloads With CONFIG_C . . . . .
Using Multiple V+ Systems . . . . . . . . . . . . . .
Requirements for Running Multiple V+ Systems .
Using V+ Commands With Multiple V+ Systems .
Autostart . . . . . . . . . . . . . . . . . .
Accessing the Command Prompt . . . . . .
Intersystem Communications . . . . . . . . .
Shared Data . . . . . . . . . . . . . . . . . .
IOTAS and Data Integrity . . . . . . . . . . . .
Efficiency Considerations . . . . . . . . . . .
Digital I/O . . . . . . . . . . . . . . . . . . .
Restrictions With Multiprocessor Systems . . . . . . .
High-Level Motion Control Tasks . . . . . .
Peripheral Drivers . . . . . . . . . . . . . .
A
Example V+ Programs
.
.
.
.
.
.
.
.
.
.
.
.
.
.
.
.
.
.
.
.
.
.
.
.
.
.
.
.
.
.
.
.
.
.
.
.
.
.
.
.
.
.
.
.
.
326
327
327
327
328
328
329
329
329
329
329
330
331
331
331
332
332
333
334
335
336
336
337
338
338
. . . . . . . . . . . . . . . . . . . . .
339
Introduction . . . . . . . . .
Pick and Place . . . . . . .
Features Introduced . .
Program Listing . . . .
Detailed Description
Menu Program . . . . . . . .
14
.
.
.
.
.
.
.
.
.
.
.
.
.
.
.
.
.
.
.
.
.
.
.
.
.
.
.
.
.
.
.
.
.
.
.
.
.
.
.
.
.
.
.
.
.
.
.
.
.
.
.
.
.
.
.
.
.
.
V+ Language User’s Guide, Rev. A
.
.
.
.
.
.
.
.
.
.
.
.
.
.
.
.
.
.
.
.
.
.
.
.
.
.
.
.
.
.
.
.
.
.
.
.
.
.
.
.
.
.
.
.
.
.
.
.
.
.
.
.
.
.
.
.
.
.
.
.
.
.
.
.
.
.
.
.
.
.
.
.
.
.
.
.
.
.
.
.
.
.
.
.
.
.
.
.
.
.
.
.
.
.
.
.
.
.
.
.
.
.
.
.
.
.
.
.
.
.
.
.
.
.
.
.
.
.
.
.
.
.
.
.
.
.
.
.
.
.
.
.
.
.
.
.
.
.
.
.
.
.
.
.
.
.
.
.
.
.
.
.
.
.
.
.
.
.
.
.
.
.
.
.
.
.
.
.
.
.
.
.
.
.
.
.
.
.
.
.
.
.
.
.
.
.
.
.
.
.
.
.
.
.
.
.
.
.
.
.
.
.
.
.
.
.
.
.
.
.
340
341
341
341
342
345
Table of Contents
Features Introduced . . . .
Program Listing . . . . . .
Teaching Locations With the MCP
Features Introduced . . . .
Program Listing . . . . . .
Defining a Tool Transformation . .
B
C
.
.
.
.
.
.
345
346
347
347
347
349
External Encoder Device
. . . . . . . . . . . . . . . . . . . .
351
Introduction . . . . .
Parameters . . . . .
Device Setup . . . .
Reading Device Data
.
.
.
.
.
.
.
.
.
.
.
.
.
.
.
.
.
.
.
.
.
.
.
.
.
.
.
.
.
.
.
.
.
.
.
.
.
.
.
.
.
.
.
.
.
.
.
.
.
.
.
.
.
.
.
.
.
.
.
.
.
.
.
.
.
.
.
.
.
.
.
.
.
.
.
.
.
.
.
.
.
.
.
.
.
.
.
.
.
.
.
.
.
.
.
.
.
.
352
353
354
356
. . . . . . . . . . . . . . . . . . . . . . . . .
359
. . . . . . . . . . . . . . . . . . . . . . . . . . . . . . .
373
Character Sets
Index
.
.
.
.
.
.
.
.
.
.
.
.
.
.
.
.
.
.
.
.
.
.
.
.
.
.
.
.
.
.
.
.
.
.
.
.
.
.
.
.
.
.
.
.
.
.
.
.
.
.
.
.
.
.
V+ Language User’s Guide, Rev. A
.
.
.
.
.
.
.
.
.
.
.
.
.
.
.
.
.
.
.
.
.
.
.
.
.
.
.
.
.
.
.
.
.
.
.
.
15
List of Figures
Figure 1-1
Figure 1-2
Figure 2-1
Figure 2-2
Figure 2-3
Figure 2-4
Figure 2-5
Figure 3-1
Figure 4-1
Figure 4-2
Figure 5-1
Figure 8-1
Figure 8-2
Figure 8-3
Figure 8-4
Figure 8-5
Figure 8-6
Figure 8-7
Figure 8-8
Figure 8-9
Figure 9-1
Figure 10-1
Figure 11-1
Figure 11-2
Figure 12-1
16
Impacts and Trapping Points . . . .
Arm Power Light . . . . . . . . . .
The SEE Editor Window . . . . . . .
Argument Mapping . . . . . . . .
Call by Value . . . . . . . . . . .
Task Scheduler . . . . . . . . . . .
Priority Example 1 . . . . . . . . .
Example Program Debugger Display
Variable Scoping . . . . . . . . . .
Variable Scope Example . . . . . .
Priority Example 2 . . . . . . . . .
Adept Robot Cartesian Space . . .
XYZ Elements of a Transformation . .
Yaw . . . . . . . . . . . . . . . .
Pitch . . . . . . . . . . . . . . . .
Roll . . . . . . . . . . . . . . . .
Relative Transformation . . . . . . .
Relative Locations . . . . . . . . .
Recording Locations . . . . . . . .
Tool Transformation . . . . . . . . .
Analog I/O Board Channels . . . .
Sample Menu . . . . . . . . . . .
MCP Button Map . . . . . . . . . .
Pendant LCD Display . . . . . . . .
Conveyor Terms . . . . . . . . . .
.
.
.
.
.
.
.
.
.
.
.
.
.
.
.
.
.
.
.
.
.
.
.
.
.
.
.
.
.
.
.
.
.
.
.
.
.
.
.
.
.
.
.
.
.
.
.
.
.
.
.
.
.
.
.
.
.
.
.
.
.
.
.
.
.
.
.
.
.
.
.
.
.
.
.
.
.
.
.
.
.
.
.
.
.
.
.
.
.
.
.
.
.
.
.
.
.
.
.
.
V+ Language User Guide, Rev A
.
.
.
.
.
.
.
.
.
.
.
.
.
.
.
.
.
.
.
.
.
.
.
.
.
.
.
.
.
.
.
.
.
.
.
.
.
.
.
.
.
.
.
.
.
.
.
.
.
.
.
.
.
.
.
.
.
.
.
.
.
.
.
.
.
.
.
.
.
.
.
.
.
.
.
.
.
.
.
.
.
.
.
.
.
.
.
.
.
.
.
.
.
.
.
.
.
.
.
.
.
.
.
.
.
.
.
.
.
.
.
.
.
.
.
.
.
.
.
.
.
.
.
.
.
.
.
.
.
.
.
.
.
.
.
.
.
.
.
.
.
.
.
.
.
.
.
.
.
.
.
.
.
.
.
.
.
.
.
.
.
.
.
.
.
.
.
.
.
.
.
.
.
.
.
.
.
.
.
.
.
.
.
24
25
39
55
57
66
68
98
123
124
141
179
181
182
184
185
190
191
204
205
224
272
294
297
317
List of Tables
Table 1-1
Table 2-1
Table 2-2
Table 2-3
Table 2-4
Table 3-1
Table 3-2
Table 3-3
Table 3-4
Table 3-5
Table 3-6
Table 3-7
Table 3-8
Table 3-9
Table 3-10
Table 4-1
Table 4-2
Table 4-3
Table 4-4
Table 4-5
Table 4-6
Table 5-1
Table 6-1
Table 6-2
Table 6-3
Table 6-4
Table 7-1
Table 7-2
Table 8-1
Table 9-1
Table 9-2
Table 9-3
Table 9-4
Table 9-5
Table 9-6
Table 9-7
Table 10-1
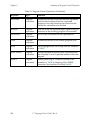
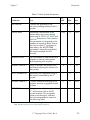
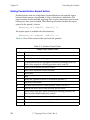
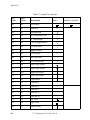
Related Publications . . . . . . . . . . . . . . . . .
Stack Space Required by a Subroutine . . . . . . . .
Description of System Tasks . . . . . . . . . . . . . .
System Task Priorities . . . . . . . . . . . . . . . . .
Default Task Priorities . . . . . . . . . . . . . . . . .
Cursor Movement Keys With a VGB based Keyboard .
Cursor Movement Keys With an AdeptWindows based
Keyboard . . . . . . . . . . . . . . . . . . . . . .
Cursor Movement Keys With a ASCII terminal based
Terminal . . . . . . . . . . . . . . . . . . . . . . .
Shortcut Keys for Editing Operations . . . . . . . . . .
The SEE Editor Function Key Description . . . . . . . .
Cursor Movement in Command Mode . . . . . . . .
SEE Editor Command Mode Operations . . . . . . . .
Function Keys Associated With Macros . . . . . . . .
Definition of Terms . . . . . . . . . . . . . . . . . .
Debugger Commands . . . . . . . . . . . . . . . .
Integer Value Representation . . . . . . . . . . . . .
Mathematical Operators . . . . . . . . . . . . . . .
Relational Operators . . . . . . . . . . . . . . . . .
Logical Operators . . . . . . . . . . . . . . . . . .
Bitwise Logical Operators . . . . . . . . . . . . . . .
Order of Operator Evaluation . . . . . . . . . . . . .
Program Control Operations . . . . . . . . . . . . .
String-Related Functions . . . . . . . . . . . . . . .
Numeric Value Functions . . . . . . . . . . . . . . .
Logical Functions . . . . . . . . . . . . . . . . . .
System Control Functions . . . . . . . . . . . . . . .
Basic System Parameters . . . . . . . . . . . . . . .
Basic System Switches . . . . . . . . . . . . . . . .
Motion Control Operations . . . . . . . . . . . . . .
Special Character Codes . . . . . . . . . . . . . . .
Special Character Codes Read by GETC . . . . . . .
IOSTAT Return Values . . . . . . . . . . . . . . . . .
Disk Directory Format . . . . . . . . . . . . . . . . .
File Attribute Codes . . . . . . . . . . . . . . . . . .
Standard DDCMP NAK Reason Codes . . . . . . . . .
System Input/Output Operations . . . . . . . . . . .
List of Graphics Instructions . . . . . . . . . . . . . .
V+ Language User’s Guide, Rev A
.
.
.
.
.
.
22
52
70
71
72
75
. .
75
.
.
.
.
.
.
.
.
.
.
.
.
.
.
.
.
.
.
.
.
.
.
.
.
.
.
.
.
.
.
.
.
.
.
.
.
.
.
.
.
.
.
76
77
79
85
86
91
104
105
117
126
127
128
128
130
152
159
162
163
164
171
174
207
218
219
226
241
242
249
259
284
17
Table of Contents
Table 11-1
Table B-1
Table B-2
Table C-1
Table C-2
18
Pendant Control Codes . . .
Command Parameter Values
Select Parameter Values . .
ASCII Control Values . . . .
Adept Character Set . . . .
. .
.
. .
. .
. .
.
.
.
.
.
.
.
.
.
.
.
.
.
.
.
V+ Language User’s Guide, Rev A
.
.
.
.
.
.
.
.
.
.
.
.
.
.
.
.
.
.
.
.
.
.
.
.
.
.
.
.
.
.
.
.
.
.
.
.
.
.
.
.
.
.
.
.
.
298
354
356
360
362
1
Introduction
Compatibility . . . . . . . . . . . . . . .
Manual Overview . . . . . . . . . . . . .
Related Publications . . . . . . . . . . . .
Notes, Cautions, and Warnings . . . . . . .
Safety . . . . . . . . . . . . . . . . . . .
Reading and Training for System Users
System Safeguards . . . . . . . . .
Computer-Controlled Robots . . . .
Manually Controlled Robots . . . . .
Other Computer-Controlled Devices .
Notations and Conventions . . . . . . . .
Keyboard Keys . . . . . . . . . . .
Uppercase and Lowercase Letters . .
Numeric Arguments . . . . . . . . .
Output Control Commands . . . . . . . .
How Can I Get Help? . . . . . . . . . . .
.
.
.
.
.
.
.
.
.
.
.
.
.
.
.
.
.
.
.
.
.
.
.
.
.
.
.
.
.
.
.
.
.
.
.
.
.
.
.
.
.
.
.
.
.
.
.
.
.
.
.
.
.
.
.
.
.
.
.
.
.
.
.
.
.
.
.
.
.
.
.
.
.
.
.
.
.
.
.
.
V+ Language User’s Guide, Rev A
.
.
.
.
.
.
.
.
.
.
.
.
.
.
.
.
.
.
.
.
.
.
.
.
.
.
.
.
.
.
.
.
.
.
.
.
.
.
.
.
.
.
.
.
.
.
.
.
.
.
.
.
.
.
.
.
.
.
.
.
.
.
.
.
.
.
.
.
.
.
.
.
.
.
.
.
.
.
.
.
.
.
.
.
.
.
.
.
.
.
.
.
.
.
.
.
.
.
.
.
.
.
.
.
.
.
.
.
.
.
.
.
.
.
.
.
.
.
.
.
.
.
.
.
.
.
.
.
20
21
22
23
24
24
25
25
25
26
27
27
28
29
30
32
19
Chapter 1
Compatibility
V+ is a computer-based control system and programming language designed
specifically for use with Adept Technology industrial robots, vision systems, and
motion-control systems.
As a real-time system, continuous trajectory computation by V+ permits complex
motions to be executed quickly, with efficient use of system memory and
reduction in overall system complexity. The V+ system continuously generates
robot-control commands and can concurrently interact with an operator,
permitting on-line program generation and modification.
V+ provides all the functionality of modern high-level programming languages,
including:
• Callable subroutines
• Control structures
• Multitasking environment
• Recursive, reentrant program execution
Compatibility
This manual is for use with V+ version 13.0 and later. This manual covers the
basic V+ system. If your system is equipped with optional AdeptVision VXL, see
the AdeptVision Reference Guide and the AdeptVision User’s Guide for details on
the vision enhancements to basic V+.
20
V+ Language User’s Guide, Rev A
Chapter 1
Manual Overview
Manual Overview
The V+ Language User’s Guide details the concepts and strategies of
programming in V+. Material covered includes:
• Functional overview of V+
• A description of the data types used in V+
• A description of the system parameters and switches
• Basic programming of V+ systems
• Editing and debugging V+ programs
• Communication with peripheral devices
• Communication with the manual control pendant
• Conveyor tracking feature
• Example programs
• Using tool transformations
• Requirements for the system terminal
• Accessing external encoders
Many V+ keywords are shown in abbreviated form in this user guide. See the V+
Language Reference Guide for complete details on all V+ keywords.
V+ Language User’s Guide, Rev A
21
Chapter 1
Related Publications
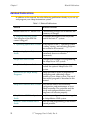
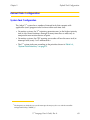
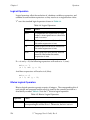
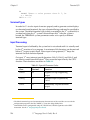
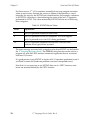
Related Publications
In addition to this manual, have the following publications handy as you set up
and program your Adept automation system.
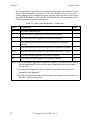
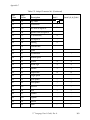
Table 1-1. Related Publications
Manual
Material Covered
Release Notes for V+ Version 13.0
Late-breaking changes not in manuals and
summary of changes.
V+ Language Reference Guide
This link goes to the PDF file
named vlang.pdf.
A complete description of the keywords
used in the basic V+ system.
V+ Operating System User’s Guide A description of the V+ operating system.
Loading, storing, and executing programs
are covered in this manual.
Descriptions of the V+ operating system
V+ Operating System Reference
22
Guide
commands (known as monitor
commands).
AdeptVision User’s Guide
Concepts and strategies for programming
the AdeptVision VXL system.
AdeptVision Reference Guide
The keywords available with systems that
include the optional AdeptVision VXL
system.
Instructions for Adept Utility
Programs
Adept provides a series of programs for
configuring and calibrating various
features of your Adept system. The use of
these utility programs is described in this
manual.
Adept MV Controller User’s Guide
This manual details the installation,
configuration, and maintenance of your
Adept controller. The controller must be
set up and configured before control
programs will execute properly.
AdeptMotion VME Developer’s
Guide
Installation, configuration, and tuning of
an AdeptMotion VME system.
Manual Control Pendant User’s
Guide
Basic use and programming of the manual
control pendant.
V+ Language User’s Guide, Rev A
Chapter 1
Notes, Cautions, and Warnings
Notes, Cautions, and Warnings
There are three levels of special notation used in this equipment manual. In
descending order of importance, they are:
WARNING: If the actions indicated in a WARNING are not
complied with, injury or major equipment damage could result. A
WARNING will typically describe the potential hazard, its possible
effect, and the measures that must be taken to reduce the hazard.
CAUTION: If the action specified in the CAUTION is not complied
with, damage to your equipment could result.
NOTE: A NOTE provides supplementary information, emphasizes
a point or procedure, or gives a tip for easier operation.
V+ Language User’s Guide, Rev A
23
Chapter 1
Safety
Safety
The following sections discuss the safety measures you must take while operating
an Adept robot.
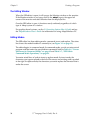
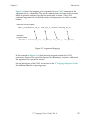
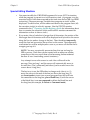
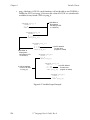
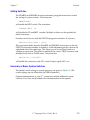
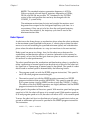
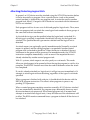
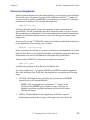
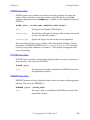
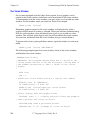
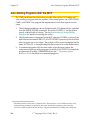
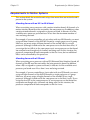
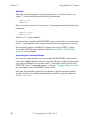
Reading and Training for System Users
Adept robot systems include computer-controlled mechanisms that are capable of
moving at high speeds and exerting considerable force. Like all robot systems and
industrial equipment, they must be treated with respect by the system user.
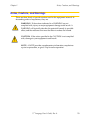
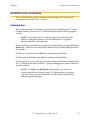
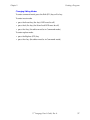
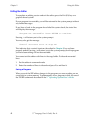
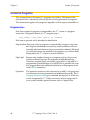
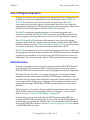
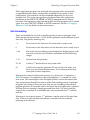
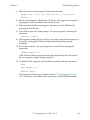
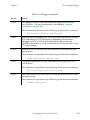
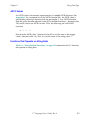
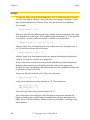
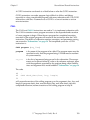
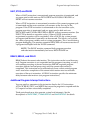
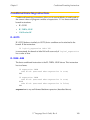
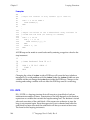
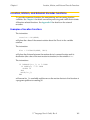
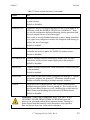
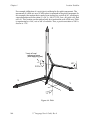
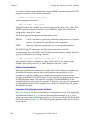
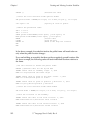
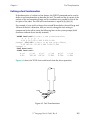
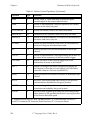
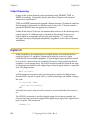
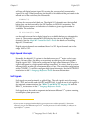
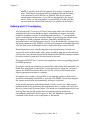
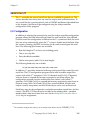
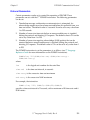
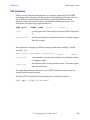
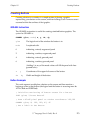
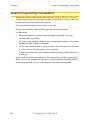
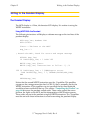
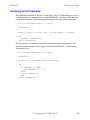
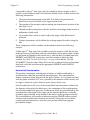
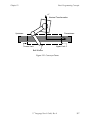
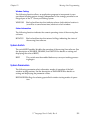
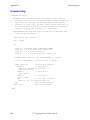
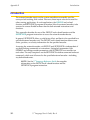
Impact!
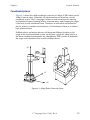
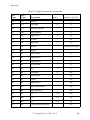
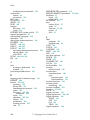
Trapping (Pinch)
Points
Figure 1-1. Impacts and Trapping Points
Adept recommends that you read the American National Standard for Industrial
Robot Systems−Safety Requirements, published by the Robotic Industries
Association in conjunction with the American National Standards Institute. The
publication, ANSI/RIA R15.06-1986, contains guidelines for robot system
installation, safeguarding, maintenance, testing, startup, and operator training.
The document is available from the American National Standards Institute, 1430
Broadway, New York, NY 10018.
24
V+ Language User’s Guide, Rev A
Chapter 1
Safety
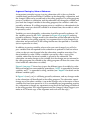
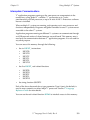
System Safeguards
Safeguards should be an integral part of robot workcell design, installation,
operator training, and operating procedures. Adept robot systems have various
communication features to aid you in constructing system safeguards. These
include remote emergency stop circuitry and digital input and output lines.
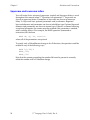
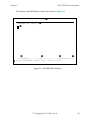
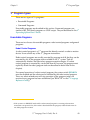
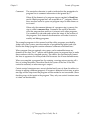
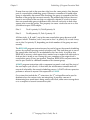
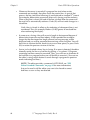
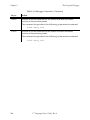
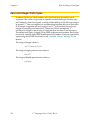
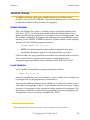
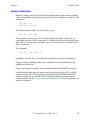
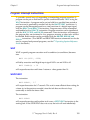
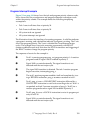
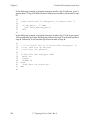
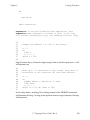
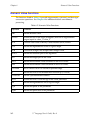
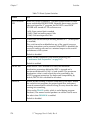
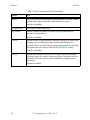
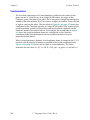
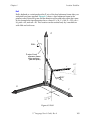
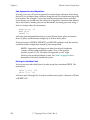
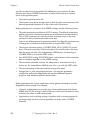
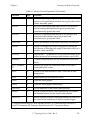
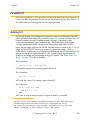
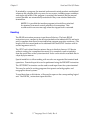
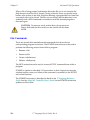
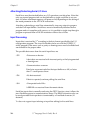
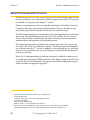
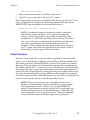
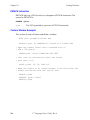
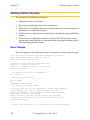
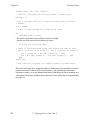
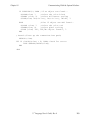
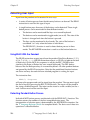
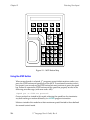
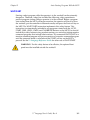
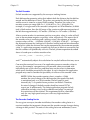
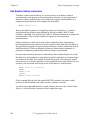
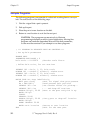
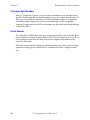
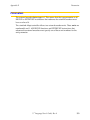
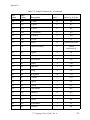
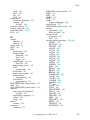
Computer-Controlled Robots
Adept robots are computer controlled, and the program that is running the robot
may cause it to move at times or along paths you may not anticipate. Your system
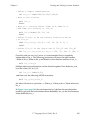
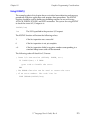
should be equipped with indicator lights that tell operators when the system is
active. The controller interface panel (CIP) provides these lights. When the White
HIGH POWER enable light on the CIP is illuminated, do not enter the workcell
because the robot may move unexpectedly.
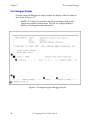
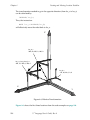
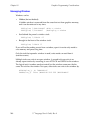
Manual / Automatic Switch
Manual Control Pendant Connector Manual Mode
Auto Mode
Network Switch
High Power
Enable Switch Emergency Stop
System Power Switch
Figure 1-2. High Power Enable Light
Manually Controlled Robots
Adept robots can also be controlled manually when the white HIGH POWER
enable light on the front of the controller is illuminated. When this light is lit,
robot motion can be initiated from the terminal or the manual control pendant
(see Chapter 11 for more information). Before you enter the workspace, turn the
keyswitch to manual mode and take the key with you. This will prevent anyone
else from initiating unexpected robot motions from the terminal keyboard.
V+ Language User’s Guide, Rev A
25
Chapter 1
Safety
Other Computer-Controlled Devices
In addition, these systems can be programmed to control equipment or devices
other than the robot. As with the robot, the program controlling these devices
may cause them to operate at times not anticipated by personnel. Make sure that
safeguards are in place to prevent personnel from entering the workcell.
WARNING: Entering the robot workcell when the white
HIGH POWER enable light is illuminated can result in severe injury.
Adept Technology recommends the use of additional safety features such as light
curtains, safety gates, or safety floor mats to prevent entry to the workcell while
HIGH POWER is enabled. These devices may be connected using the robot’s
remote emergency stop circuitry (see the Adept MV Controller User’s Guide).
26
V+ Language User’s Guide, Rev A
Chapter 1
Notations and Conventions
Notations and Conventions
This section describes various notations used throughout this manual and
conventions observed by the V+ system.
Keyboard Keys
The system keyboard is the primary input device for controlling the V+ system.
Graphics-based systems use a PC-style keyboard and high-resolution graphics
monitor.
NOTE: The word terminal is used throughout this manual to refer
either to a computer terminal or to the combination of a graphics
monitor and a PC-style keyboard.
Input typed at the terminal must generally be terminated by pressing the Enter or
Return key. (These keys are functionally identical and are often abbreviated with
the symbol ↵.)
S+F9 means to hold down the Shift key while pressing the F9 key.
Ctrl+R means to hold down the Ctrl key while pressing the R key.
The keys in the row across the top of the keyboard are referred to as function keys.
The V+ SEE program editor and the V+ program debugger use some of them for
special functions.
NOTE: The Delete and Backspace keyboard keys can always be
used to erase the last character typed. The Delete options associated
with the F14 key on a Wyse terminal are used only by the SEE editor
and the program debugger.
V+ Language User’s Guide, Rev A
27
Chapter 1
Notations and Conventions
Uppercase and Lowercase Letters
You will notice that a mixture of uppercase (capital) and lowercase letters is used
throughout this manual when V+ operations are presented. V+ keywords are
shown in uppercase letters. Parameters to keywords are shown in lowercase.
Many V+ keywords have optional parameters and/or elements. Required
keyword elements and parameters are shown in boldface type. Optional keyword
elements and parameters are shown in normal type. If there is a comma following
an optional parameter, the comma must be retained if the parameter is omitted,
unless nothing follows. For example, the BASE operation (command or
instruction) has the form
BASE dx, dy, dz, rotation
where all of the parameters are optional.
To specify only a 300-millimeter change in the Z direction, the operation could be
entered in any of the following ways:
BASE 0,0,300,0
BASE,,300,
BASE,,300
Note that the commas preceding the number 300 must be present to correctly
relate the number with a Z-direction change.
28
V+ Language User’s Guide, Rev A
Chapter 1
Notations and Conventions
Numeric Arguments
All numbers in this manual are decimal unless otherwise noted. Binary numbers
are shown as ^B, octal numbers as ^, and hexadecimal numbers as ^H.
Several types of numeric arguments can appear in commands and instructions.
For each type of argument, the value can generally be specified by a numeric
constant, a variable name, or a mathematical expression.
There are some restrictions on the numeric values that are accepted by V+. The
following rules determine how a value will be interpreted in the various
situations described.
1
2
1.
Distances are used to define locations to which the robot is to move. The unit
of measure for distances is the millimeter, although units are never explicitly
entered for any value. Values entered for distances can be positive or
negative.1
2.
Angles in degrees are entered to define and modify orientations the robot is to
assume at named locations, and to describe angular positions of robot joints.
Angle values can be positive or negative, with their magnitudes limited by 180
degrees or 360 degrees depending on the usage.
3.
Joint numbers are integers from one up to the number of joints in the robot,
including the hand if a servo-controlled hand is operational. For Adept
SCARA robots, joint numbering starts with the rotation about the base,
referred to as joint 1. For mechanisms controlled by AdeptMotion VME, see
the device module documentation for joint numbering.
4.
Signal numbers are used to identify digital (on/off) signals. They are always
considered as integer values with magnitudes in the ranges 1 to 8, 33 to 512,
1001 to 1012, 1032 to 1512, 2001 to 2512, or 3001 to 3004. A negative signal
number indicates an off state.
5.
Integer arguments can be satisfied with real values (that is, values with integer
and fractional parts). When an integer is required, the value is rounded and
the resulting interger is used.
6.
Arguments indicated as being scalar variables can be satisfied with a real
value (that is, one with integer and fractional parts) except where noted.
Scalars can range from –9.22*1018 to 9.22*1018 in value (displayed as –9.22E18
and 9.22E18).2
See the IPS instruction for a special case of specifying robot speed in inches per second.
Numbers specifically declared to be double-precision values can range from -1.8*10–307 to
1.8*10307.
V+ Language User’s Guide, Rev A
29
Chapter 1
Output Control Commands
Output Control Commands
The following special commands control output to the system terminal. For all
these commands, which are called control characters, the control (Ctrl) key on the
terminal is held down while a letter key is pressed. The letter key can be typed
with or without the Shift key. Unlike other V+ commands, control characters do
not need to be completed by pressing the Enter or Return key.
Ctrl+C
Aborts some commands (for example, DIRECTORY, LISTP, I/O).
If any input has been entered at the keyboard since the current command was initiated, then the first Ctrl+C cancels that pending input
and the second Ctrl+C aborts the current command.
Ctrl+C cannot be used to abort program execution. Enter the
ABORT or PANIC command at the keyboard to stop the robot program or press one of the panic buttons to turn off Robot Power.
Ctrl+S
Stops output to the monitor or terminal so it can be reviewed. The
operation producing the output is stopped until output is resumed
by Ctrl+Q.
Ctrl+Q
Resumes output to the monitor or terminal after it has been stopped
with a Ctrl+S.
Ctrl+O
Suspends output to the ASCII terminal even though the current
operation continues (that is, the output is lost). This is useful for disregarding a portion of a lengthy output. Another Ctrl+O will cause
the output to be displayed again.
NOTE: This output control command only works with the ASCII
terminal.
The Ctrl+O condition is canceled automatically when the current
operation completes, or if there is an input request from an executing program.
Ctrl+W
Slows output to the monitor or terminal so it can be read more easily. A second Ctrl+W will terminate this mode and restore normal
display speed.
The Ctrl+W condition will be canceled automatically when the current operation completes or if there is an input request from an executing program.
30
V+ Language User’s Guide, Rev A
Chapter 1
Output Control Commands
Ctrl+Z
If typed in response to a program prompt, terminates program execution with the message *Unexpected end of file*. This is sometimes
useful for aborting a program.
Ctrl+U
Cancels the current input line. Useful if you notice an error earlier in
the line or you want to ignore the current input line for some other
reason.
V+ Language User’s Guide, Rev A
31
Chapter 1
How Can I Get Help?
How Can I Get Help?
Refer to the How to Get Help Resource Guide (Adept P/N 00961-00700) for
details on getting assistance with your Adept software or hardware.
You can obtain this document through Adept On Demand. The phone numbers
are:
(800) 474-8889 (toll free)
(503) 207-4023 (toll call)
Please request document number 1020.
32
V+ Language User’s Guide, Rev A
2
Programming V+
Creating a Program . . . . . . . . . . . . . . .
Program and Variable Name Requirements
The Editing Window . . . . . . . . . . . .
Editing Modes . . . . . . . . . . . . . . .
Changing Editing Modes . . . . . . . .
The SEE Editor Environments . . . . . . . . . . .
Using Text Editors Other Than the SEE Editor .
The SEE Editor Window . . . . . . . . .
The Adept Windows Off-line Editor . . . . . . . .
Using the Editor . . . . . . . . . . . . . . . . .
Entering New Lines of Code . . . . . . . .
Exiting the Editor . . . . . . . . . . . . . .
Saving a Program . . . . . . . . . . .
+
V Program Types . . . . . . . . . . . . . . . .
Executable Programs . . . . . . . . . . .
Robot Control Programs . . . . . . . .
Exclusive Control of a Robot . . . . . .
General Programs . . . . . . . . . . . . .
Format of Programs . . . . . . . . . . . . . . .
Program Lines . . . . . . . . . . . . . . .
Program Organization . . . . . . . . . . .
Program Variables . . . . . . . . . . . . .
Executing Programs . . . . . . . . . . . . . . .
Selecting a Program Task . . . . . . . . .
Program Stacks . . . . . . . . . . . . . . . . .
Stack Requirements . . . . . . . . . . . .
Flow of Program Execution . . . . . . . . . . . .
RUN/HOLD Button . . . . . . . . . . . . .
Subroutines . . . . . . . . . . . . . . . . . . .
Argument Passing . . . . . . . . . . . . .
Mapping the Argument List . . . . . . .
Argument Passing by Value or Reference
Undefined Arguments . . . . . . . . .
Program Files . . . . . . . . . . . . . . .
.
.
.
.
.
.
.
.
.
.
.
.
.
.
.
.
.
.
.
.
.
.
.
.
.
.
.
.
.
.
.
.
.
.
.
.
.
.
.
.
.
.
.
.
.
.
.
.
.
.
.
.
.
.
.
.
.
.
.
.
.
.
.
.
.
.
.
.
V+ Language User’s Guide, Rev A
.
.
.
.
.
.
.
.
.
.
.
.
.
.
.
.
.
.
.
.
.
.
.
.
.
.
.
.
.
.
.
.
.
.
.
.
.
.
.
.
.
.
.
.
.
.
.
.
.
.
.
.
.
.
.
.
.
.
.
.
.
.
.
.
.
.
.
.
.
.
.
.
.
.
.
.
.
.
.
.
.
.
.
.
.
.
.
.
.
.
.
.
.
.
.
.
.
.
.
.
.
.
.
.
.
.
.
.
.
.
.
.
.
.
.
.
.
.
.
.
.
.
.
.
.
.
.
.
.
.
.
.
.
.
.
.
.
.
.
.
.
.
.
.
.
.
.
.
.
.
.
.
.
.
.
.
.
.
.
.
.
.
.
.
.
.
.
.
.
.
.
.
.
.
.
.
.
.
.
.
.
.
.
.
.
.
.
.
.
.
.
.
.
.
.
.
.
.
.
.
.
.
.
.
.
.
.
.
.
.
.
.
.
.
.
.
.
.
.
.
.
.
.
.
.
.
.
.
.
.
.
.
.
.
.
.
.
.
.
.
.
.
.
.
.
.
.
.
.
.
.
.
.
.
.
.
.
.
.
.
.
.
.
.
.
.
.
.
.
.
.
.
35
35
36
36
37
38
38
40
41
41
41
42
42
43
43
43
44
45
46
46
48
48
49
49
51
51
53
53
54
54
54
56
57
58
33
Chapter 2
Reentrant Programs . . . . . . . . . . .
Recursive Programs . . . . . . . . .
Asynchronous Processing . . . . . . . .
Error Trapping . . . . . . . . . . . . . .
Scheduling of Program Execution Tasks . . . .
System Timing and Time Slices . . . . . .
Specifying Tasks, Time Slices, and Priorities
Task Scheduling . . . . . . . . . . . . .
Execution Priority Example . . . . . . . .
Default Task Configuration . . . . . . . . . . .
System Task Configuration . . . . . . . .
Description of System Tasks . . . . . .
User Task Configuration . . . . . . . . .
34
V+ Language User’s Guide, Rev A
.
.
.
.
.
.
.
.
.
.
.
.
.
.
.
.
.
.
.
.
.
.
.
.
.
.
.
.
.
.
.
.
.
.
.
.
.
.
.
.
.
.
.
.
.
.
.
.
.
.
.
.
.
.
.
.
.
.
.
.
.
.
.
.
.
.
.
.
.
.
.
.
.
.
.
.
.
.
.
.
.
.
.
.
.
.
.
.
.
.
.
.
.
.
.
.
.
.
.
.
.
.
.
.
.
.
.
.
.
.
.
.
.
.
.
.
.
.
.
.
.
.
.
.
.
.
.
.
.
.
.
.
.
.
.
.
.
.
.
.
.
.
.
58
59
60
61
62
62
62
63
67
69
69
70
72
Chapter 2
Creating a Program
Creating a Program
V+ programs are created using the SEE editor. This section provides a brief
overview of using the editor. Chapter 3 provides complete details on the SEE
editor and program debugger.
NOTE: See the AdeptWindows User’s Guide for instructions on
using AdeptWindows PC.
The editor is accessed from the system prompt with the command:
SEE prog_name
If prog_name is already resident in system memory, it will be opened for editing.
If prog_name is not currently resident in system memory, the SEE editor will
open and the bottom line will ask
"prog_name" doesn’t exist. Create it? Y/N.
If you answer Y, the program will be created, the SEE editor cursor will move to
the top of the editing window, and you can begin editing the program. If you
answer N, you will be returned to the system prompt.
If prog_name is omitted, the last program edited will be brought into the editor
for editing.1
Program and Variable Name Requirements
Program and variable names can have up to 15 characters. Names must begin
with a letter and can be followed by any sequence of letters, numbers, periods,
and underline characters. Letters used in program names can be entered in either
lowercase or uppercase. V+ always displays program and variable names in
lowercase.
1
Unless an executing program has failed to complete normally, in which case the failed program
will be opened.
V+ Language User’s Guide, Rev A
35
Chapter 2
Creating a Program
The Editing Window
When the SEE editor is open, it will occupy the Monitor window on the monitor.
If the Monitor window is not open, click on the adept logo in the upper left
corner of the monitor and select Monitor from the displayed list.
Once the SEE editor is open, it functions nearly uniformly regardless of which
type of Adept system it is used on.
For graphics-based systems, see the V+ Operating System User’s Guide and see
the AdeptWindows User’s Guide for information on using AdeptWindows PC.
Editing Modes
The SEE editor has three editing modes: command, insert, and replace. The status
line shows the mode the editor is currently in (see Figure 2-1 on page 39).
The editor begins in command mode. In command mode, you do not enter actual
program code but enter the special editor commands listed in Table 3-6, “Cursor
Movement in Command Mode,” on page 85 and Table 3-7, “SEE Editor
Command Mode Operations,” on page 86.
You enter actual lines of code in insert or replace mode. In insert mode, the
characters you type are placed to the left of the cursor, and existing code is pushed
to the right. In replace mode, the characters you enter replace the character that is
under the cursor.
36
V+ Language User’s Guide, Rev A
Chapter 2
Creating a Program
Changing Editing Modes
To enter command mode press the Edit (F11) key or Esc key.
To enter insert mode:
• press the Insert key (the key’s LED must be off)
• press the 0/Ins key (the Num Lock LED must be off)
• press the i key (the editor must be in Command mode)
To enter replace mode:
• press the Replace (F12) key
• press the r key (the editor must be in Command mode)
V+ Language User’s Guide, Rev A
37
Chapter 2
The SEE Editor Environments
The SEE Editor Environments
The SEE editor appears in two environments: in a window on a graphics-based
system or in a window within the AdeptWindows PC application program.
Regardless of the environment the SEE editor runs under, the majority of the
functions are identical. The differences in the SEE editor running under
AdeptWindows PC are described in the AdeptWindows User’s Guide.
Using Text Editors Other Than the SEE Editor
Programs can be written using any editor that creates a DOS ASCII text file. These
programs can then be stored on a V+ compatible disk (see the FORMAT
command in the V+ Language Reference Guide), LOADed into system memory,
and opened by the SEE editor. When the program is loaded, a syntax check is
made. Programs that fail the syntax check will be marked as nonexecutable. These
programs can be brought into the SEE editor and any nonconforming lines will be
marked with a question mark. Once these lines have been corrected, the program
can be executed.
In order for program files created outside of the SEE editor to LOAD correctly, the
following requirements must be met:
• Each program must begin with a .PROGRAM() line.
• Each program must end with a .END line (this line is automatically added by
the SEE editor but must be explicitly added by other editors).
• Each program line must be terminated with a carriage-return/line-feed (ASCII
13/ASCII 10).
• The end of the file (not the end of each program) must be marked with a
Control-Z character (ASCII 27).
• Lines that contain only a line-feed (ASCII 10) are ignored.
38
V+ Language User’s Guide, Rev A
Chapter 2
The SEE Editor Environments
The features of the SEE editor window are shown in Figure 2-1.
2-1
.PROGRAM see_sample()
➊
➋
➌
➍
➑
➎
➏
➐
-----see_sample----------- Step 2 of 1 ----- Command mode----3aProgram "SEE.SAMPLE doesn't exist. Create it (Y?N)?
Figure 2-1. The SEE Editor Window
V+ Language User’s Guide, Rev A
39
Chapter 2
The SEE Editor Environments
The SEE Editor Window
The items in the following numbered list refer to the numbers in Figure 2-1.
➊
On ASCII terminals, this area shows the row and column of the cursor location.
➋
This line displays the program name and the program’s parameter
list. The program name cannot be edited, but program parameters
can be added between the parentheses (see “Special Editing Situations” on page 83 for a description of a special case where you cannot edit this list).
➌
The typing cursor.
•In insert mode, characters entered at the keyboard will be entered
at the cursor position. Existing characters to the right of the
cursor will be pushed right.
•In replace mode, the character under the cursor will be replaced.
•In command mode, Copy, Paste, and similar commands will take
place at the cursor location.
With a graphics-based system, clicking with the pointer device will
set the typing cursor at the pointer location. (The cursor cannot be
set lower than the last line in a program.) Also, the scroll bars on the
monitor window can be used to scroll through the program.
1
40
➍
Shows the name of the program currently being edited. If the program is open in read-only mode, /R will be appended to the name.1
➎
Shows the program step the cursor is at and the total number of
lines in the program.
➏
Shows the current editor mode.
➐
Shows the number of lines in the copy (attach) buffer. Whenever a
program line is Cut or Copied, it is placed in the copy buffer. When
lines are pasted, they are removed from the copy buffer and pasted
in the reverse order they were copied. The F9 and F10 keys are used
for copying and pasting program lines.
➑
This is the message line. It displays various messages and prompts.
Programs are open in read-only mode when /R is appended to the SEE command when the
program is opened or when a currently executing program is open.
V+ Language User’s Guide, Rev A
Chapter 2
The Adept Windows Off-line Editor
The Adept Windows Off-line Editor
The Adept Windows Off-line Editor (AWOL) is a Microsoft Windows95 or NTbased program that emulates the V+ SEE editor. AWOL performs the same syntax
checking as the SEE editor. Programs created in the SEE editor can be edited by
AWOL, and programs created by AWOL are ready for loading and execution on
an Adept controller. AWOL provides additional program management features
not available to the SEE editor, such as direct access to Adept’s electronic
documentation. For details on using AWOL, see the AdeptWindows User’s Guide.
Using the Editor
The following sections tell you how to use the SEE editor.
Entering New Lines of Code
Once you have opened the editor and moved to insert or replace mode, you can
begin entering lines of code. Each complete line of code needs to be terminated
with a carriage return (↵). If a line of code exceeds the monitor line width, the
editor will wrap the code to the next line and temporarily overwrite the next line.
Do not enter a carriage return until you have typed the complete line of code.
When you press the return (↵) key after completing a line of code, the SEE editor
will automatically check the syntax of the line. Keywords are checked for proper
spelling; instructions are checked for required arguments; parentheses are
checked for proper closing; and in general the line is checked to make sure the V+
system will be able to execute the line of code. (Remember, this check is solely for
syntax, not for program logic.)
If the program line fails the syntax check, the system will place a question mark
(?) at the beginning of the line (and usually display a message indicating the
problem). You do not have to correct the line immediately, and you can exit the
editor with uncorrected program lines. You will not, however, be able to execute
the program.
V+ Language User’s Guide, Rev A
41
Chapter 2
Using the Editor
Exiting the Editor
To complete an editing session and exit the editor, press the Exit (F4) key on a
graphics-based system.
If your program is executable, you will be returned to the system prompt without
any further messages.
If any lines of code in the program have failed the syntax check, the status line
will display the message:
*Program not executable* Press RETURN to continue.
Pressing ↵ will return you to the system prompt.
You may also get the message:
*Control structure error at step xx*
This indicates that a control structure (described in Chapter 5) has not been
properly ended. Pressing ↵ will return you to the system prompt, but the program
you have been editing will not be executable.
You cannot exit the editor with lines in the copy buffer. To discard unwanted
lines:
1.
Put the editor in command mode.
2.
Enter the number of lines to discard and press Esc and then k.
Saving a Program
When you exit the SEE editor, changes to the program you were working on are
saved only in system memory. To permanently save a program to disk, use one of
the STORE commands described in the V+ Operating System User’s Guide.
42
V+ Language User’s Guide, Rev A
V+ Program Types
Chapter 2
V+ Program Types
There are two types of V+ programs:
• Executable Programs
• Command Programs
Executable programs are described in this section. Command programs are
similar to MS_DOS batch programs or UNIX scripts. They are described in the V+
Operating System User’s Guide.
Executable Programs
There are two classes of executable programs: robot control programs and general
programs.
Robot Control Programs
A robot control program is a V+ program that directly controls a robot or motion
device. It can contain any of the V+ program instructions.
Robot control programs are usually executed by program task #0, but they can be
executed by any of the program tasks available in the V+ system. Task #0
automatically attaches the robot when program execution begins. If a robot
control program is executed by a task other than #0, however, the program must
explicitly attach the robot (program tasks are described in detail later in this
chapter).
For normal execution of a robot control program, the system switch DRY.RUN
must be disabled and the robot must be attached by the robot control program.
Then, any robot-related error will stop execution of the program (unless an
error-recovery program has been established [see”REACTE” in the V+ Language
Reference Guide]).1
1
If the system is in DRY.RUN mode while a robot control program is executing, robot motion
instructions are ignored. Also, if the robot is detached from the program, robot-related errors do
not affect program execution.
V+ Language User’s Guide, Rev A
43
V+ Program Types
Chapter 2
Exclusive Control of a Robot
• Whenever a robot is attached by an active task, no other task can attach that
robot or execute instructions that affect it, except for the REACTI and BRAKE
instructions (see pages 136 and 138, respectively, for more information about
these instructions).
• When the robot control task stops execution for any reason, the robot is
detached until the task resumes, at which time the task automatically attempts
to reattach the robot. If another task has attached the robot in the meantime, the
first task cannot be resumed.
• Task #0 always attempts to attach robot #1 when program execution begins. No
other tasks can successfully attach any robot unless an explicit ATTACH
instruction is executed.
• Since task #0 attempts to attach robot #1, that task cannot be executed after
another task has attached that robot. If you want another task to control the
robot and you want to execute task #0, you must follow this sequence of
events:
•
Start task #0.
•
Have task #0 DETACH the robot.
• Start the task that will control the robot. (The program executing as task
#0 can start up another task.)
•
Have that task ATTACH the robot.
See page 288 for more information on the ATTACH and DETACH
instructions.
• Note that robots are attached even in DRY.RUN mode. In this case, motion
commands issued by the task are ignored, and no other task can access the
robot.
44
V+ Language User’s Guide, Rev A
V+ Program Types
Chapter 2
General Programs
A general program is any program that does not control a robot. With a robot
system, there can be one or more programs executing concurrently with the robot
control program. For example, an additional program might monitor and control
external processes via the external digital signal lines and analog signal lines.
General programs can also communicate with the robot control program (and
each other) through global variables and software signals. (General programs can
also have a direct effect on the robot motion with the BRAKE instruction,
although that practice is not recommended.)
With the exception of the BRAKE instruction, a general program cannot execute
any instruction that affects the robot motion. Also, the BASE or TOOL settings
cannot be changed by general programs.
Except for the robot, general-purpose control programs can access all the other
features of the Adept system, including the AdeptVision option (if it is present in
the system), the (internal and external) digital signal lines, the USER serial lines,
the system terminal, the disk drives, and the manual control pendant.
Note that except for the exclusion of certain instructions, general-purpose control
programs are just like robot control programs. Thus, the term program is used in
the remainder of this chapter when the material applies to either type of control
program.
V+ Language User’s Guide, Rev A
45
Chapter 2
Format of Programs
Format of Programs
This section presents the format V+ programs must follow. The format of the
individual lines is described, followed by the overall organization of programs.
This information applies to all programs regardless of their type or intended use.
Program Lines
Each line or step of a program is interpreted by the V+ system as a program
instruction. The general format of a V+ program step is:
step_number step_label operation ;Comment
Each item is optional and is described in detail below.
Step Number Each step within a program is automatically assigned a step number. Steps are numbered consecutively, and the numbers are automatically adjusted whenever steps are inserted or deleted. Although
you will never enter step numbers into programs, you will see them
displayed by the V+ system in several situations.
46
Step Label
Because step numbers change as a program evolves, they are not
useful for identifying steps for program-controlled branching.
Therefore, program steps can contain a step label. A step label is a
programmer-specified integer (0 to 65535) that is placed at the start
of a program line to be referenced elsewhere in the program (used
with GOTO statements).
Operation
The operation portion of each step must be a valid V+ language keyword and may contain parameters and additional keywords. The V+
Language Reference Guide gives detailed descriptions of all the keywords recognized by V+. Other instructions may be recognized if
your system includes optional features such as AdeptVision.
V+ Language User’s Guide, Rev A
Chapter 2
Comment
Format of Programs
The semicolon character is used to indicate that the remainder of a
program line is comment information to be ignored by V+.
When all the elements of a program step are omitted, a blank line
results. Blank program lines are acceptable in V+ programs. Blank
lines are often useful to space out program steps to make them easier to read.
When only the comment element of a program step is present, the
step is called a comment line. Comments are useful to describe
what the program does and how it interacts with other programs.
Use comments to describe and explain the intent of the sections of
the programs. Such internal documentation will make it easier to
modify and debug programs.
The example programs in this manual, and the utility programs provided by
Adept with your system, provide examples of programming format and style.
Notice that Adept programs contain numerous comments and blank lines.
When program lines are entered, extra spaces can be entered between any
elements in the line. The V+ editors add or delete spaces in program lines to make
them conform with the standard spacing. The editors also automatically format
the lines to uppercase for all keywords and lowercase for all user-defined names.
When you complete a program line (by entering a carriage return, moving off a
line, or exiting the editor), the editor checks the syntax of the line. If the line
cannot be executed, an error message is output.
Certain control structure errors are not checked until you exit from the editor (or
change to editing a different program). If an error is detected at that time, an error
message will be output and the program will be marked as not executable. (Error
checking stops at that point in the program. Thus, only one control structure error
at a time can be detected.)
V+ Language User’s Guide, Rev A
47
Chapter 2
Format of Programs
Program Organization
The first step of every V+ program must be a .PROGRAM instruction. This
instruction names the program, defines any arguments it will receive or return,
and has the format:
.PROGRAM program_name(parameter_list)
;Comment
The program name is required, but the parameter list and comment are optional.
After the .PROGRAM line, there are only two restrictions on the order of other
instructions in a program.
• AUTO, LOCAL, or GLOBAL instructions must precede any executable
program instructions. Only comment lines, blank lines, and other AUTO,
LOCAL, or GLOBAL instructions are permitted between the .PROGRAM step
and an AUTO, LOCAL, or GLOBAL instruction.
• The end of a program is marked by a line beginning with .END. The V+ editors
automatically add (but do not display) this line at the end of a program.1
Program Variables
V+ uses three classes of variables: GLOBAL, LOCAL, and AUTO. These are
described in detail in “Variable Classes” on page 121.
1
48
The .PROGRAM and .END lines are automatically entered by the V+ editors. If you use another
text editor for transfer to a V+ system, you MUST enter these two lines. In general, any editor
that produces unformatted ASCII files can be used for programming. See the FORMAT
command for details on creating floppy disks compatible with other operating systems.
V+ Language User’s Guide, Rev A
Chapter 2
Executing Programs
Executing Programs
When V+ is actively following the instructions in a program, it is said to be
executing that program.
The standard V+ system provides for simultaneous execution of up to seven
different programs—for example, a robot control program and up to six
additional programs. The optional V+ extensions software provides for
simultaneous execution of up to 28 programs. Execution of each program is
administered as a separate program task by the system.
The way program execution is started depends upon the program task to be used
and the type of program to be executed. The following sections describe program
execution in detail.
Selecting a Program Task
Task 0 has the highest priority in the (standard) task configuration. Thus, this task
is normally used for the primary application program. For example, with a robot
system, task #0 is normally used to execute the robot control program.
NOTE: As a convenience, when execution of task #0 begins, the
task always automatically selects robot #1 and attaches the robot.
Execution of task #0 is normally started by using the EXECUTE monitor
command, or by starting the program from the manual control pendant.
While task #0 is executing, the V+ monitor will not display its normal dot prompt.
An asterisk (∗) prompt is used instead to remind the user that task #0 is executing.
The asterisk prompt does not appear automatically, however. The prompt is
displayed whenever there is input to the V+ system monitor from the system
terminal.
NOTE: Even though the system prompt is not displayed while
program task #0 is executing, V+ monitor commands can be entered
at any time that a program is not waiting for input from the
terminal.
The ABORT monitor command or program instruction will stop task #0 after the
current robot motion completes. The CYCLE.END monitor command or program
instruction can be used to stop the program at the end of its current execution
cycle.
V+ Language User’s Guide, Rev A
49
Chapter 2
Executing Programs
If program execution stops because of an error, a PAUSE instruction, an ABORT
command or instruction, or the monitor commands PROCEED or RETRY can be
used to resume execution (see the V+ Operating System Reference Guide for
information on monitor commands). While execution is stopped, the DO monitor
command can be used to execute a single program instruction (entered from the
keyboard) as though it were the next instruction in the program that is stopped.
For debugging purposes, the SSTEP or XSTEP monitor commands can be used to
execute a program one step at a time. Also, the TRACE feature can be used to
follow the flow of program execution. (The program debugger can also be used to
execute a program one instruction at a time. See Chapter 3 for information on the
V+ program debugger.)
Execution of program tasks other than #0 is generally the same as for task #0. The
following points highlight the differences:
• The task number must be explicitly included in all the monitor commands and
program instructions that affect program execution, including EXECUTE,
ABORT, PROCEED, RETRY, SSTEP, and XSTEP. (However, when the V+
program debugger is being used, the task being accessed by the debugger
becomes the default task for all these commands.)
• If the program is going to control the robot, it must explicitly ATTACH the
robot before executing any instructions that control the robot.
• If task 0 is not executing concurrently, the V+ monitor prompt continues to be a
dot (.). Also, the prompt is displayed after the task-initiating EXECUTE
command is processed.
NOTE: If you want program execution to be delayed briefly to
allow time for the dot prompt to be output (for example, to prevent
it from occurring during output from the program), have your
program execute two WAIT instructions with no parameter.
• The TRACE feature does not apply to tasks other than #0.
NOTE: To use TRACE with a program that is intended to execute
in a task other than #0, execute the program as task #0. (This
consideration does not apply when using the V+ program
debugger, which can access any program task.)
See section “Scheduling of Program Execution Tasks” on page 62 for details on
task scheduling.
50
V+ Language User’s Guide, Rev A
Chapter 2
Program Stacks
Program Stacks
When subroutine calls are made, V+ uses an internal storage area called a stack to
save information required by the program that begins executing. This information
includes:
• The name and step number of the calling program.
• Data necessary to access subroutine arguments.
• The values of any automatic variables specified in the called program.
The V+ system allows you to explicitly allocate storage to the stack for each
program task. Thus, the amount of stack space can be tuned for a particular
application to optimize the use of system memory. Stacks can be made arbitrarily
large, limited only by the amount of memory available on your system.
Stack Requirements
When a V+ program is executed in a given task, each program stack is allocated
six kilobytes of memory. This value can be adjusted, once the desired stack
requirements are determined, by using the STACK monitor command (for
example, in a start-up monitor command program). See the V+ Operating System
Reference Guide for information on monitor commands.
One method of determining the stack requirements of a program task is simply to
execute its program. If the program runs out of stack space, it will stop with the
error message
*Too many subroutine calls*
or
*Not enough stack space*
If this happens, use the STACK monitor command to increase the stack size and
then issue the RETRY monitor command to continue program execution. In this
case, you do not need to restart the program from the beginning. (The STATUS
command will tell you how much stack space a failed task requested.)
Alternatively, you can start by setting a large stack size before running your
program. Then execute the program. After the program has been run, and all the
execution paths have been followed, use the STATUS monitor command to look
at the stack statistics for the program task. The stack MAX value shows how
much stack space your program task needs to execute. The stack size can then be
set to the maximum shown, with a little extra for safety.
V+ Language User’s Guide, Rev A
51
Chapter 2
Program Stacks
If it is impossible to invoke all the possible execution paths, the theoretical stack
limits can be calculated using Table 2-1. You can calculate the worst-case stack
size by adding up the overhead for all the program calls that can be active at one
time. Divide the total by 1024 to get the size in kilobytes. Use this number in the
STACK monitor command to set the size.
Table 2-1. Stack Space Required by a Subroutine
Bytes
Required For
Notes
20
The actual subroutine call
32
Each subroutine argument (plus one of the following):
4
Each real subroutine argument or automatic variable
1
8
Each double-precision real subroutine argument or automatic
variable
1
48
Each transformation subroutine argument or automatic variable
1, 2
varies
Each precision-point subroutine argument or automatic variable
1, 2, 3
84
Each belt variable argument or automatic variable
1, 2
132
Each string variable argument or automatic variable
1, 2
Notes: 1. If any subroutine argument or automatic variable is an array, the size shown
must be multiplied by the size of the array. (Remember that array indexes
start at zero.)
2. If a subroutine argument is always called by reference, this value can be
omitted for that argument.
3. Requires four bytes for each joint of the robot (on multiple robot systems, use
the robot with the most joints).
52
V+ Language User’s Guide, Rev A
Chapter 2
Flow of Program Execution
Flow of Program Execution
Program instructions are normally executed sequentially from the beginning of a
program to its end. This sequential flow may be changed when a GOTO or
IF...GOTO instruction, or a control structure, is encountered. The CALL
instruction causes another program to be executed, but it does not change the
sequential flow through the calling program since execution resumes where it left
off when the CALLed program executes a RETURN instruction.
The WAIT instruction suspends execution of the current program until a
condition is satisfied. The WAIT.EVENT instruction suspends execution of the
current program until a specified event occurs or until a specified time elapses.
The PAUSE and HALT instructions both terminate execution of the current
program. After a PAUSE, program execution can be resumed with a PROCEED
monitor command (see the V+ Operating System Reference Guide for information
on monitor commands). Execution cannot be resumed after a HALT.
The STOP instruction may or may not terminate program execution. If there are
more program execution cycles to perform, the STOP instruction causes the main
program to be restarted at its first step (even if the STOP instruction occurs in a
subroutine). If no execution loops remain, STOP terminates the current program.
RUN/HOLD Button
Execution of program task #0 can also be stopped with the RUN/HOLD button
on the manual control pendant (MCP). When a program is executing and the
RUN/HOLD button on the pendant is pressed, program execution is suspended.
If the keyswitch on the CIP or on a remote front panel is set to manual mode,
program execution will resume if the RUN/HOLD button is held down—but
execution will stop again when the button is released. If the keyswitch on the CIP
or on a remote front panel is set to automatic mode, program execution can be
resumed by entering a PROCEED or RETRY monitor command at the system
terminal.
With Category 1 or 3 systems, there are additional restrictions when using the
MCP. See the robot instruction handbook for your Category 1 or 3 system for
details. Also see “Using the STEP Button” on page 294.
Occasionally, you may want to disable the HOLD button on the MCP. For
example, the REACTE instruction will not react when the MCP HOLD button is
pressed unless you disable the HOLD button. You can disable the HOLD button
using the KEYMODE instruction. See the V+ Language Reference Guide for details
on the KEYMODE instruction.
V+ Language User’s Guide, Rev A
53
Chapter 2
Subroutines
Subroutines
There are three methods of exchanging information between programs:
• global variables
• soft-signals
• program argument list
When using global variables, simply use the same variable names in the different
programs. Unless used carefully, this method can make program execution
unpredictable and hard to debug. It also makes it difficult to write generalized
subroutines because the variable names in the main program and subroutine
must always be the same.
Soft-signals are internal program signals. These are digital software switches
whose state can be read and set by all tasks and programs (including across CPUs
in multiple CPU systems). See “Soft Signals” on page 221 for details.
Exchanging information through the program argument list gives you better
control of when variables are changed. It also eliminates the requirement that the
variable names in the calling program be the same as the names in the subroutine.
The following sections describe exchanging data through the program parameter
list.
Argument Passing
There are two important considerations when passing an argument list from a
calling program to a subroutine. The first is making sure the calling program
passes arguments in the way the subroutine expects to receive them (mapping).
The second is determining how you want the subroutine to be able to alter the
variables (passing by value or reference).
Mapping the Argument List
An argument list is a list of variables or values separated by commas. The
argument list passed to a calling program must match the subroutine’s argument
list in number of arguments and data type of each argument (see “Undefined
Arguments” on page 57). The variable names do not have to match.
When a calling program passes an argument list to a subroutine, the subroutine
does not look at the variable names in the list but the position of the arguments in
the list. The argument list in the CALL statement is mapped item for item to the
argument list of the subroutine. It is this mapping feature that allows you to write
generalized subroutines that can be called by any number of different programs,
regardless of the actual values or variable names the calling program uses.
54
V+ Language User’s Guide, Rev A
Chapter 2
Subroutines
Figure 2-2 shows the mapping of an argument list in a CALL statement to the
argument list in a subroutine. The arrows indicate that each item in the list must
match in position and data type but not necessarily in name. (The CALL
statement argument list can include values and expressions as well as variable
names.)
instruction in main program:
CALL a_routine(loc_var_a, real_var_a, 43.654, $string_var_a)
subroutine
program header
.PROGRAM a_routine(any_loc, any_real_x, any_real_y, $any_string)
Figure 2-2. Argument Mapping
In the example in Figure 2-2, when the main program reaches the CALL
instruction shown at the top of the figure, the subroutine a_routine is called and
the argument list is passed as shown.
See the description of the CALL instruction in the V+ Language Reference Guide
for additional details on passing arrays.
V+ Language User’s Guide, Rev A
55
Chapter 2
Subroutines
Argument Passing by Value or Reference
An important principle to grasp in using subroutine calls is the way that the
variables being passed are affected. Variables can be changed by a subroutine, and
the changed value can be passed back to the calling program. If a calling program
passes a variable to a subroutine, and the subroutine can change the variable and
pass back the changed variable to the calling program, the variable is said to be
passed by reference. If a calling program passes a variable to a subroutine but the
subroutine cannot pass back the variable in an altered form, the variable is said to
be passed by value.
Variables you want changed by a subroutine should be passed by reference. All
the variables passed in the CALL statement in Figure 2-2 on page 55 are being
passed by reference. Changes made by the subroutine will be reflected in the state
of the variables in the calling program. Any argument that is to be changed by a
subroutine and passed back to the calling routine must be specified as a variable
(not an expression or value).
In addition to passing variables whose value you want changed, you will also
pass variables that are required for the subroutine to perform its task but whose
value you do not want changed after the subroutine completes execution. Pass
these variables by value. When a variable is passed by value, a copy of the
variable, rather than the actual variable, is passed to the subroutine. The
subroutine can make changes to the variable, but the changes are not returned to
the calling program (the variable in the calling program will have the same value
it had when the subroutine was called).
Figure 2-3 on page 57 shows how to pass the different types of variables by value.
Reals and integers are surrounded by parentheses, :NULL is appended to location
variables, and +"" is appended to string variables (see Chapter 4 for details on the
different variable types).
In Figure 2-3, real_var_b is still being passed by reference, and any changes made
in the subroutine will be reflected in the calling program. The subroutine cannot
change any of the other variables: it can make changes only to the copies of those
variables that have been passed to it. (It is considered poor programming practice
for a subroutine to change any arguments except those that are being passed back
to the calling routine. If an input argument must be changed, Adept suggests you
make an AUTOmatic copy of the argument and work with the copy.)
56
V+ Language User’s Guide, Rev A
Chapter 2
Subroutines
instruction in main program:
CALL a_routine(loc_var_a:NULL, (real_var_a), real_var_b, $string_var_a+"")
subroutine
program header
.PROGRAM a_routine(any_loc, any_real_x, any_real_y, $any_string)
Figure 2-3. Call by Value
Values, as well as variables, can be passed by a CALL statement. The instruction:
CALL a_routine(loc_1, 17.5, 121, "some string")
is an acceptable call to a_routine.
Undefined Arguments
If the calling program omits an argument, either by leaving a blank in the
argument list (e.g., arg_1, , arg_3) or by omitting arguments at the end of a list
(e.g., arg_1, arg_2), the argument will be passed as undefined. The subroutine
receiving the argument list can test for this value using the DEFINED function
and take appropriate action.
V+ Language User’s Guide, Rev A
57
Chapter 2
Subroutines
Program Files
Since linking and compiling are not required by V+, main programs and
subroutines always exist as separate programs. The V+ file structure allows you
to keep a main program and all the subroutines it CALLs or EXECUTEs together
in a single file so that when a main program is loaded, all the subroutines it calls
are also loaded. (If a program calls a subroutine that is not resident in system
memory, the error *Undefined program or variable name* will result.)
See the descriptions of the STORE_ commands and the MODULE command in
the V+ Operating System User’s Guide for details. For an example of creating a
program file, see “Sample Editing Session” on page 92.
Reentrant Programs
The V+ system allows the same program to be executed concurrently by multiple
program tasks. That is, the program can be reentered while it is already executing.
This allows different tasks that are running concurrently to use the same
general-purpose subroutine.
To make a program reentrant, you must observe a few general guidelines when
writing the program:
• Global variables can be read but must not be modified.
• Local variables should not be used.
• Only automatic variables and subroutine arguments can be modified.
In special situations, local variables can be used, and global variables can be
modified, but then the program must explicitly provide program logic to
interlock access to these variables. The TAS real-valued function (defined in
Table 6-4, “System Control Functions,” on page 164) may be helpful in these
situations. (See the V+ Language Reference Guide for details.)
58
V+ Language User’s Guide, Rev A
Chapter 2
Subroutines
Recursive Programs
Recursive programs are subroutines that call themselves, either directly or
indirectly. A direct call occurs when a program actually calls itself, which is useful
for some special programming situations. Indirect calls are more common. They
occur when program A calls program B, which eventually leads to another call to
program A before program B returns. For example, an output routine may detect
an error and call an error-handling routine, which in turn calls the original output
routine to report the error.
If recursive subroutine calls are used, the program must observe the same
guidelines as for reentrant programs (see “Reentrant Programs” on page 58). In
addition, you must guarantee that the recursive calls do not continue indefinitely.
Otherwise, the program task will run out of stack space.
NOTE: Very strange results may occur if a nonreentrant program is
inadvertently called from different tasks (or recursively from a
single task). Therefore, it is good practice to make programs
reentrant if possible.
V+ Language User’s Guide, Rev A
59
Chapter 2
Subroutines
Asynchronous Processing
A particularly powerful feature of V+ is the ability to respond to an event (such as
an external signal or error condition) when it occurs, without the programmer’s
having to include instructions to test repeatedly for the event. If event handling is
properly enabled, V+ will react to an event by invoking a specified program just
as if a CALL instruction had been executed. Such a program is said to be called
asynchronously, since its execution is not synchronized with the normal program
flow.
Asynchronous processing is enabled by the REACT, REACTE, and REACTI
program instructions. Each program task can use these instructions to prepare for
independent processing of events. In addition, the optional V+ Extensions
software uses the WINDOW instruction to enable asynchronous processing of
window violations when the robot is tracking a conveyor belt (see Chapter 12).
Sometimes a reaction must be delayed until a critical program section has
completed. Also, since some events are more important than others, a program
should be able to react to some events but not others. V+ allows the relative
importance of a reaction to be specified by a program priority value from 1 to 127.
The higher the program priority setting, the more important is the reaction.
NOTE: Do not confuse program priority (described here) with task
priority (described in “System Timing and Time Slices” on page
62). Task priority governs the processing of the various system
tasks. Program priority governs the execution of programs within a
program task.
A reaction subroutine is called only if the main program priority is less than that
of the reaction program priority. If the main program priority is greater than or
equal to the reaction program priority, execution of the reaction subroutine is
deferred until the main program priority drops. Since the main program (for
example, the robot control program) normally runs at program priority zero and
the minimum reaction program priority is one, any reaction can normally
interrupt the main program.
The main program priority can be raised or lowered with the LOCK program
instruction, and its current value can be determined with the PRIORITY
real-valued function. When the main program priority is raised to a certain value,
all reactions of equal or lower priority are locked out.
60
V+ Language User’s Guide, Rev A
Chapter 2
Subroutines
When a reaction subroutine is called, the main program priority is automatically
set to the reaction program priority, thus preventing any reactions of equal or
lower program priority from interrupting it. When a RETURN instruction is
executed in the reaction program, the main program priority is automatically
reset to the level it had before the reaction subroutine was called.
For further information on reactions and program priority, see the following
keywords: LOCK, PRIORITY, REACT, and REACTI in the V+ Language Reference
Guide.
Error Trapping
Normally, when an error occurs during execution of a program, the program is
terminated and an error message is displayed on the system terminal. However, if
the REACTE instruction has been used to enable an error-trapping program, the
V+ system will invoke that program as a subroutine instead of terminating the
program that encountered the error. (Each program task can have its own error
trap enabled.)
Before invoking the error-trapping subroutine, V+ locks out all other reactions by
raising the main program priority to 254 (see “Asynchronous Processing” on
page 60). See the description of the REACTE instruction in the V+ Language
Reference Guide for further information on error trapping.
V+ Language User’s Guide, Rev A
61
Chapter 2
Scheduling of Program Execution Tasks
Scheduling of Program Execution Tasks
The V+ system appears to execute all the program tasks at the same time.
However, this is actually achieved by rapidly switching between the tasks many
times each second, with each task receiving a fraction of the total time available.
This is referred to as concurrent execution. The following sections describe how
execution time is divided among the different tasks.
NOTE: The default task configuration will work for most
applications: You will not have to alter task execution priorities. The
default configuration is optimized for Adept’s AIM software.
System Timing and Time Slices
The amount of time a particular program task receives is determined by two
parameters: its assignment to the various time slices and its priority within the
time slice. A brief description of the system timing will help you to understand
what a time slice is and how one can be selected.
NOTE: Do not confuse task priority (described here) with program
priority (described in “Asynchronous Processing” on page 60).
Task priority governs the processing of the various system tasks
within a time slice. Program priority governs the execution of
programs within a task.
Each system cycle is divided into 16 time slices of one millisecond each. The time
slices are numbered 0 through 15. A single occurrence of all 16 time slices is
referred to as a major cycle. For a robot or motion system, each of these cycles
corresponds to one output from the V+ trajectory generator to the digital servos.
Specifying Tasks, Time Slices, and Priorities
Tasks 0 through 6 (0 through 27 with optional V+ Extensions software) can be
used, and their configuration can be tailored to suit the needs of specific
applications.
Each program task configured for use requires dedicated system memory, which
is unavailable to user programs. Therefore, the number of tasks available should
be made no larger than necessary, especially if memory space for user programs is
critical.
62
V+ Language User’s Guide, Rev A
Chapter 2
Scheduling of Program Execution Tasks
When application programs are executed, their program tasks are normally
assigned default time slices and priorities according to the current system
configuration. These defaults can be overridden temporarily for any user
program task. This is done by specifying the desired time-slice and priority
parameters in the EXECUTE, PRIME, or XSTEP command used to initiate
execution. The temporary values remain in effect until the program task is started
again, by a new EXECUTE, PRIME, or XSTEP command. (See the V+ Language
Reference Guide for details on these instructions.)
Task Scheduling
Tasks are scheduled to run with a specified priority in one or more time slices.
Tasks may have priorities from –1 to 64, and the priorities may be different in each
time slice. The priority meanings are:
–1
Do not run in this slice even if no other task is ready to run.
0
Do not run in this slice unless no task from this slice is ready to run.
1 - 64
Run in this slice according to specified priority. Higher priority tasks
may lock out lower ones. Priorities are broken into the following
ranges:
1 - 31
Normal user task priorities.
32 - 62
Used by V+ device drivers and system tasks.
63
Used by the trajectory generator. Do not use 63 or 64 unless you
have very short task execution times. Use of these priorities may
cause jerks in robot trajectories.
Whenever the current task becomes inactive (e.g., due to an I/O operation, a
WAIT instruction, or completion of the task programs), V+ searches for a new
task to run. The search begins with the highest priority task in the current time
slice and proceeds through that slice in order of descending priority. If multiple
programs are waiting to run in the task, they are run according to the relative
program priorities. If a runnable task is not found, the next higher slice is checked.
All time slices are checked, wrapping around from slice 15 to slice 0 until the
original slice is reached. If no runnable tasks are encountered, the V+ null task
executes.
Whenever a 1ms interval expires, V+ performs a similar search of the next time
slice. If the next time slice does not contain a runnable task, the currently
executing task continues.
V+ Language User’s Guide, Rev A
63
Chapter 2
Scheduling of Program Execution Tasks
If more than one task in the same time slice have the same priority, they become
part of a round-robin scheduling group. Whenever a member of a round-robin
group is selected by the normal slice searching, the group is scanned to find the
member of the group that ran most recently. The member that follows the most
recent is run instead of the one that was originally selected. If a task is in more
than one round-robin group in different slices, then all such tasks in both slices
appear to be in one big group. This property can cause a task to be run in a slice
you did not expect. For example:
Slice 1:
Task A priority 10, Task B priority 10
Slice 5:
Task B priority 15, Task C priority 15
All three tasks, A, B, and C, are in the same round-robin group because task B
appears in both. Therefore, task C may run in slice 1 at priority 10, or task A may
run in slice 5 at priority 15, depending on which member of the group ran most
recently.
The RELEASE program instruction may be used to bypass the normal scheduling
process by explicitly passing control to another task. That task then gets to run in
the current time slice until it is rescheduled by the 1ms clock. A task may also
RELEASE to anyone, which means that a normal scan is made of all other tasks to
find one that is ready to run. During this scan, members of the original task’s
round-robin group (if any) are ignored. Therefore, RELEASE to anyone cannot be
used to pass control to a different member of the current group.
AWAIT program instruction with no argument suspends a task until the start of
the next major cycle (slice 0). At that time, the task becomes runnable and will
execute if selected by the normal scheduling process. A WAIT with an expression
performs a release to anyone if the expression is FALSE.
On systems that include the V+ extensions, the V+ task profiler can be used to
determine how the various tasks are interacting. It provides a means of
determining how much time is being used by each task, either on an average basis
or as a snapshot of several consecutive cycles.
64
V+ Language User’s Guide, Rev A
Chapter 2
Scheduling of Program Execution Tasks
Within each time slice, the task with highest priority can be locked out only by a
servo interrupt. Tasks with lower priority can run only if the higher-priority task
is inactive or waiting. A user task waits whenever any of the following occurs:
• The program issues an input or output request that causes a wait.
• The program executes a robot motion instruction while the robot is still moving
in response to a previous motion instruction.
• The program executes a WAIT or WAIT.EVENT program instruction.
If a program is executing continuously without performing any of the above
operations, it will lock out any lower-priority tasks in its time slice. Thus,
programs that execute in a continuous loop should generally execute a WAIT (or
WAIT.EVENT) instruction occasionally (for example, once each time through the
loop). This should not be done, of course, if timing considerations for the
application preclude such execution delays.
If a program potentially has a lot of critical processing to perform, its task should
be in multiple slices, and the task should have the highest priority in these slices.
This will guarantee the task’s getting all the time needed in the multiple slices,
plus (if needed) additional unused time in the major cycle.
Figure 2-4 on page 66 shows the task scheduler algorithm. This flow chart
assumes that the servo task is configured to run every 1ms and no task issues a
RELEASE instruction. (Actually, at the point marked run servos?, any system
level interrupts are processed—in motion systems the servo task is generally the
most likely to interrupt and is the most time-consuming system task.)
V+ Language User’s Guide, Rev A
65
Chapter 2
Scheduling of Program Execution Tasks
run
servos?
slice = 0
yes
yes
run servos
until complete
or slice is up
slice > 15?
no
slice =
slice + 1
no
no
run task until
task completes
or time slice
is up
time
left in
slice?
yes
yes
runnable
task in
slice?
can
current
task
run
no
yes
no
look ahead for
runnable task
in any other
time slice
make highest
priority task
in slice or round
robin group the
current task
yes
run highest
priority program
in task until program
completes, waits,
or time slice is up
yes
time
left in
slice?
no
Figure 2-4. Task Scheduler
66
V+ Language User’s Guide, Rev A
task
found?
no
run null task
until an
"event" occurs
Chapter 2
Scheduling of Program Execution Tasks
Execution Priority Example
The following example shows how the task priority scheme works. The example
makes the following simplifying assumptions:
• Task 0 runs in all time slices at priority 20
• Task 1 runs in all time slices at priority 10
• Task 2 runs in all time slices at priority 20
• All system tasks are ignored (systems tasks are described in the next section)
• All system interrupts are ignored
Figure 2-5 on page 68 shows three tasks executing concurrently. Note that since
no LOCK or REACT_ instructions are issued, the program priority remains 0 for
the entire segment. (See “Program Interrupt Instructions” on page 135 for
descriptions of the REACT routines, the LOCK instruction, and another program
execution example.)
The illustration shows the timelines of executing programs. A solid line indicates
a program is running; a dotted line indicates a program is waiting. The Y axis
shows the program priority. The X axis is divided into 1-millisecond time slices.
The sequence of events for Priority Example 1 is:
➊
prog_a issues a WAIT.EVENT. This suspends prog_a and passes
execution to the next highest task which is task 2 running prog_c.
➋
prog_c runs until it issues a RELEASE instruction. Since the
RELEASE has no arguments, execution is passed to the next highest
task with a program to run. Since task 0 is waiting on a SET.EVENT,
the next task is task 1.
➌
Task 2 issues a SET.EVENT to task 0 and runs until the end of a time
slice at which time task 0 runs. Tasks 0 and 2 have the same priority
so they swap execution. (If two tasks with equal priority are ready
to run, the least recently run task runs.)
➍
prog_c waits for a disk I/O operation to complete. The next highest
priority task is 2 which runs until the I/O operation completes and
task 0 becomes the least recently run task.
➎
prog_a completes, passing control to task 2.
➏
prog_c completes, passing control to task 1.
V+ Language User’s Guide, Rev A
67
Chapter 2
Scheduling of Program Execution Tasks
Program Priority
Notice that unless both task 0 and task 2 are waiting or do not have a program to
run, or task 0 or task 2 RELEASEs to task 1, task 1 is effectively blocked from
execution.
= task waiting
= task running
1 millisecond time slices
task 0 running prog_a, task priority = 20
10
5
0
➍
➊
➎
task 1 running prog_b, task priority = 10
10
5
0
task 2 running prog_c, task priority = 20
10
5
0
➋
➌
➏
O n e
V +
M a j o r
C y c l e
➟
➟
Figure 2-5. Priority Example 1
The numbers in this example are referenced in the text on page 67.
68
V+ Language User’s Guide, Rev A
Chapter 2
Default Task Configuration
Default Task Configuration
System Task Configuration
The Adept V+ system has a number of internal tasks that compete with
application (user) program tasks for time within each time slice:
• On motion systems, the V+ trajectory generator runs (as the highest priority
task) in slice 0 and continues through as many time slices as necessary to
compute the next motion device set point.
• On motion systems, the CPU running servo code will run the servo task (at
interrupt level) every 1 or 2 milliseconds.1
• The V+ system tasks run according to the priorities shown in Table 2-3,
“System Task Priorities,” on page 71.
1
The frequency at which the servo tasks interrupts the major cycle is set with the controller
configuration utility, CONFIG_C.
V+ Language User’s Guide, Rev A
69
Chapter 2
Default Task Configuration
Description of System Tasks
The system tasks and their functions are shown in Table 2-2.
Table 2-2. Description of System Tasks
70
Task
Description
Trajectory Generator
Compute the series of set points that make up a
robot motion
Terminal/Graphics
Refresh the terminal or graphics monitor display
Monitor
Service user requests entered at the monitor
window (monitor commands and responses to
system prompts)
DDCMP
Handle implementation of DDCMP protocols for
serial lines configured as DDCMP lines
Kermit
Handle implementation of Kermit protocols for
serial lines configured as Kermit lines
Pendant
Handle manual control pendant I/O
Disk Driver
Handle requests for I/O to the hard and floppy
disk drives and the Compact Flash
Serial I/O
Service serial I/O ports
Pipes Driver
Allows a V+ task to service I/O requests like a
standard I/O driver
NFS Driver
Allows access of remote files on network file
servers using the Network File Services protocol
TCP Driver
Handles the TCP network communications
protocol on Ethernet
Vision Communications
Communicate between V+ and vision software
Vision Analysis
Evaluate vision commands
Servo Communications
Communicate with the servo interrupt routines or
the motion-control hardware
Cat 3 Timer
Handles timing and sequencing when robot
power is enabled in systems with the Cat 3 option
enabled
V+ Language User’s Guide, Rev A
Chapter 2
Default Task Configuration
System Task
Table 2-3. System Task Priorities
Slice
0
1
2
3
4
5
6
7
8
9
10
11
12
13
14
15
Trajectory
Generator
63
63
63
63
63
63
63
63
63
63
63
63
63
63
63
63
Terminal/
Graphics
0
0
0
0
0
0
0
0
0
0
0
0
0
0
0
58
Monitor
0
0
0
0
0
0
0
0
0
0
0
0
0
0
0
56
DDCMP
0
0
0
0
0
0
0
0
0
0
0
0
0
0
0
42
Kermit
0
0
0
0
0
0
0
0
0
0
0
0
0
0
0
52
Pendant
0
0
0
0
0
0
0
0
0
0
0
0
0
0
50
0
Disk
Driver
0
0
0
0
0
0
0
0
0
0
0
0
0
0
39
48
Serial I/O
0
0
0
0
0
0
0
0
0
0
0
0
0
0
44
44
Pipes
Driver
0
0
0
0
0
0
0
0
0
0
0
0
0
0
43
0
NFS
Driver
0
0
0
0
0
0
0
0
0
0
0
0
0
0
40
40
TCP
Driver
0
0
0
0
0
0
0
0
0
0
0
0
0
0
38
54
Vision
Communications
14
14
14
14
14
14
14
14
14
14
14
14
14
0
0
0
Vision
Analysis
13
13
13
13
13
13
13
13
13
13
13
13
13
0
0
0
V+ Language User’s Guide, Rev A
71
Chapter 2
Default Task Configuration
System Task
Table 2-3. System Task Priorities (Continued)
Slice
0
1
2
3
4
5
6
7
8
9
10
11
12
13
14
15
Servo
Communications
0
0
0
0
0
0
0
0
0
0
0
0
0
0
41
0
Cat 3
Timer
0
45
0
45
0
45
0
45
0
45
0
45
0
45
0
0
User Task Configuration
The remaining time is allocated to the user tasks using the controller
configuration utility. (See the description of CONFIG_C in the Instructions for
Adept Utility Programs for details.) For each time slice, you specify which tasks
may run in the slice and what priority each task has in that slice. The default
priority configuration is shown in Table 2-4.
User Task
Table 2-4. Default Task Priorities
Slice
0
1
2
3
4
5
6
7
8
9
10
11
12
13
14
15
0
20
20
20
20
20
20
20
20
20
10
10
10
10
0
0
0
1
19
19
21
21
19
19
21
21
19
9
11
11
9
0
0
0
2
0
0
0
0
0
0
0
0
0
0
0
0
0
20
0
0
3
0
0
0
0
0
0
0
0
0
0
0
0
0
15
0
0
4
15
15
15
15
15
15
15
15
15
5
5
5
5
0
0
0
5
0
0
0
0
0
0
0
0
0
0
0
0
0
0
20
0
6
0
0
0
0
0
0
0
0
0
0
0
0
0
0
15
0
7 - 27
0
0
0
0
0
0
0
0
0
0
0
0
0
5
0
0
72
V+ Language User’s Guide, Rev A
The SEE Editor and Debugger
3
Basic SEE Editor Operations . . . . . . . . . . . . . . . . . . .
Cursor Movement . . . . . . . . . . . . . . . . . . . . .
Deleting, Copying, and Moving Lines . . . . . . . . . . .
Text Searching and Replacing . . . . . . . . . . . . .
Switching Programs in the Editor . . . . . . . . . . . . . .
The Internal Program List . . . . . . . . . . . . . . . .
Special Editing Situations . . . . . . . . . . . . . . . . .
The SEE Editor in Command Mode . . . . . . . . . . . . .
SEE Editor Extended Commands . . . . . . . . . . . .
Edit Macros . . . . . . . . . . . . . . . . . . . . . .
Sample Editing Session . . . . . . . . . . . . . . . . . . . . . .
The Program Debugger . . . . . . . . . . . . . . . . . . . . .
Entering and Exiting the Debugger . . . . . . . . . . . . .
The DEBUG Monitor Command . . . . . . . . . . . . .
Using the Debug Key or the DEBUG Extended Command
Exiting the Debugger . . . . . . . . . . . . . . . . . .
The Debugger Display . . . . . . . . . . . . . . . . . . .
Debugger Operation Modes . . . . . . . . . . . . . . . .
Debugging Programs . . . . . . . . . . . . . . . . . . .
Positioning the Typing Cursor . . . . . . . . . . . . . .
Debugger Key Commands . . . . . . . . . . . . . . . .
Debug Monitor-Mode Keyboard Commands . . . . . . . .
Using a Pointing Device With the Debugger . . . . . . . .
Control of Program Execution . . . . . . . . . . . . . . .
Single-Step Execution . . . . . . . . . . . . . . . . .
PAUSE Instructions . . . . . . . . . . . . . . . . . . .
Program Breakpoints . . . . . . . . . . . . . . . . . .
Program Watchpoints . . . . . . . . . . . . . . . . . .
V+ Language User’s Guide, Rev A
.
.
.
.
.
.
.
.
.
.
.
.
.
.
.
.
.
.
.
.
.
.
.
.
.
.
.
.
.
.
.
.
.
.
.
.
.
.
.
.
.
.
.
.
.
74
75
77
78
79
81
83
85
89
91
92
95
95
96
97
97
98
100
101
102
103
104
107
107
107
108
108
109
73
Chapter 3
Basic SEE Editor Operations
Basic SEE Editor Operations
The SEE editor was introduced in Chapter 2. It is described in more detail in this
chapter.
The following notation is used in the tables in this section:
•
The control key is indicated by Ctrl+, the alternate key is indicated by Alt+,
and the Shift key is indicated by S+. When using the shift, alternate, and
control keys, they should be pressed at the same time as the following key.
Some terminals on nongraphics-based systems will not have an Alt key, and
the Esc key must be used instead. For example, the equivalent of Alt+A is Esc
and then A (the escape key should be pressed and released before the next
key is pressed).
NOTE: For ASCII terminal and AdeptWindows based systems, use
the shift key to get the secondary function of the cusors and keypad
keys. Use the control key instead of the shift in VGB based systems.
74
•
<n> indicates a number is to be entered as a command prefix (without the
angle brackets). For example, you would enter 10L to move the cursor to line
10.
•
<char> indicates a character is to be entered (without the angle brackets). For
example, you would enter Sa to skip to the next a on the line.
•
Keys used only with graphics-based systems are marked with an {A}. Keys
used only with nongraphics-based systems are marked with an {S}.
V+ Language User’s Guide, Rev A
Chapter 3
Basic SEE Editor Operations
Cursor Movement
Table 3-1, Table 3-2, and Table 3-1 list the keys used for moving around the editor
in all modes. The cursor keys can be either the cursor movement keys above the
trackball or the keys on the numeric keypad when Num lock is not engaged.
Table 3-1. Cursor Movement Keys With a VGB-based Keyboard
Cursor Key
Without Ctrl Key
With Ctrl Key
↑
Up 1 line
Up 1/4 page
↓
Down 1 line
Down 1/4 page
→
Right 1 character
Right 1 item
←
Left 1 character
Left 1 item
Home
Top of program
Page Up
Up 1 screen
Page Down
Down 1 screen
End
End of program
Table 3-2. Cursor Movement Keys With an AdeptWindows-based Keyboard
Cursor Key
Without Ctrl Key
With Ctrl Key
↑
Up 1 line
Up 1/4 page
↓
Down 1 line
Down 1/4 page
→
Right 1 character
Right 1 item
←
Left 1 character
Left 1 item
Home
Top of program
Page Up
Up 1 screen
Page Down
Down 1 screen
End
End of program
V+ Language User’s Guide, Rev A
75
Chapter 3
Basic SEE Editor Operations
The scroll bars will also move through a SEE editor program. (The bottom scroll
bar has an effect only if the editor window has been sized down.) Clicking on the
up/down arrows moves the program up or down a few lines. Clicking the
left/right arrows moves the program left or right. Clicking in a scroll bar displays
the corresponding section of the program (e.g., clicking in the middle of the scroll
bar displays the middle section of the program). Dragging a scroll handle moves
the program up or down, or left or right.
Table 3-3. Cursor Movement Keys With an ASCII Terminal-based Terminal
76
Key
Function Without Shift Key
↑
Up 1 line
↓
Down 1 line
→
Right 1 character
←
Left 1 character
Line Feed
Up 1 screen
Home
Down 1 screen
Start (PF1)
Go to start of line
<-- (PF2)
Move left 1 item
--> (PF3)
Move right 1 item
End (PF4)
Go to end of line
Top (F15)
Go to top of program
Bottom (F16)
Go to end of program
V+ Language User’s Guide, Rev A
Chapter 3
Basic SEE Editor Operations
Deleting, Copying, and Moving Lines
Table 3-4 lists the keys to use for program editing. Unlike many text editors, this
one stores multiple copy operations in a stack. Each copy operation places a
line(s) on top of the stack. Each paste operation removes a line(s) from the top of
the stack and pastes it at the current location. However, once a single line has been
pasted, it is removed from the copy buffer and cannot be pasted again.
Table 3-4. Shortcut Keys for Editing Operations
Key(s)
Action
Copy (F9)
Copy the current line into the editor’s copy buffer (know as
the attach buffer).
Paste (F10)
Paste the most recently copied line above the current line.
You cannot exit SEE with lines in the attach buffer. (Ctrl+K
will remove lines from the copy buffer without pasting them
into a program.)
Lines cannot be pasted in read-only mode.
Paste All (S+F10)
Paste the entire copy buffer above the current line.
Cut (S+F9)
Cut the current line and place it in the copy buffer.
Ctrl+Delete
Delete the current program line and do not place it in the
copy buffer.
(Press Undo (F6) immediately after deleting to restore the
line(s) just deleted.)
V+ Language User’s Guide, Rev A
77
Chapter 3
Basic SEE Editor Operations
Text Searching and Replacing
The SEE editor can search for specific text strings or change a specified string to
another string. The following keys perform string searches and replacements.
To search for a text string:
1.
Press the Find (F7) key (or press F in command mode).
2.
Enter a search string and press ↵.
3.
The text will be searched for from the cursor location to the bottom of the
program (but not from the top of the program to the cursor location).
4.
To repeat the search, press the Repeat (F8) key (or ' in command mode).
To find and replace a line of text:
1.
Press the Change (S+F7) key (or press C in command mode).
2.
Enter a search string and press ↵.
3.
Enter the replace string and press ↵.
4.
The text will be searched for from the cursor location to the bottom of the
program. Only one search and replace operation will take place at a time.
Global search and replaces are not performed.
5.
To repeat the change, press the Repeat (F8) key (or ' in command mode).
6.
To cancel the change, press the Undo (F6) key (before closing the line).
Normally, text searches are not case-sensitive. The EXACT editor command
toggles the case sensitivity of the search operation (see “SEE Editor Extended
Commands” on page 89).
NOTE: Press the space bar to abort a search. The latest search and
replacement strings are retained between edit sessions.
78
V+ Language User’s Guide, Rev A
Chapter 3
Basic SEE Editor Operations
Switching Programs in the Editor
The following function keys switch from editing one program to editing another
program. (The internal program list mentioned below is described in the next
section.)
Table 3-5. The SEE Editor Function Key Description
Key(s)
Action
New (F2)
The editor prompts for the name of the new program to
edit. The new program will be accessed in read-write mode
unless /R is specified after the program name or the
program is currently executing. The home pointer for the
internal program list is set to the old program.
Go To (F3)
If the cursor is on a line containing a CALL instruction, the
program referenced by the CALL is opened in the SEE
editor. If the program is present on the internal program
list, the previous access mode will be used. If the program is
not on the program list, the editor will remain in its current
access mode.
Retrieve (S+F3)
This command causes the editor to cycle through the
internal program list, bringing the next program in the list
into the editor. The access mode for the new program will
be the same as the previous time the program was edited.
V+ Language User’s Guide, Rev A
79
Chapter 3
Basic SEE Editor Operations
Table 3-5. The SEE Editor Function Key Description (Continued)
Key(s)
Action
Prog_Up {S}
Changes to editing a program contained on the task
execution stack being accessed by the editor. When the new
program is opened, its name is added to the internal
program list maintained by the editor.
Ctrl+Home {A}
(Home key on
numeric keypad)
If the execution stack is being accessed for the first time
during the edit session, the editor accesses the stack for the
task that most recently stopped executing (if the program
debugger is not in use), or the stack for the task being
debugged. The last program on the execution stack is
opened for editing.
If the execution stack has already been accessed, the
program opened is the one that called the previous
program accessed from the stack.
Prog_Down {S}
Ctrl+End {A}
Changes to editing a program contained on the task
execution stack being accessed by the editor. When the new
program is opened, its name is added to the internal
program list maintained by the editor.
If the execution stack is being accessed for the first time
during the edit session, this command acts exactly like
Prog_Up {S} or S+Home {A} (see above).
If the execution stack has already been accessed, the
program opened is the one that was called by the previous
program accessed from the stack.
80
V+ Language User’s Guide, Rev A
Chapter 3
Basic SEE Editor Operations
The Internal Program List
To simplify moving from one program to another during an editing session, the
SEE editor maintains an internal list of programs. The program list contains the
following information (for up to 20 programs):
•
Program name
•
Editor access mode last used
•
Number of the step last accessed
•
Memorized cursor position (see the M command)
The program list is accessed with the SEE monitor command and program
instruction and with editor commands described in this chapter.1
The editor maintains two pointers into the program list:
1
1.
The top pointer always refers to the program currently displayed in the edit
window.
2.
The home pointer refers to the program that was edited most recently.
The program list is cleared when the ZERO monitor command is processed.
V+ Language User’s Guide, Rev A
81
Chapter 3
Basic SEE Editor Operations
The following rules govern the program list and its pointers.
•
When a SEE monitor command is entered, one of the following occurs:
•
If a program name is specified, the new program name is added at the
top of the program list.
•
If no program name is specified and no program task has stopped
executing since the last edit session, the program list is not changed and
the program at the top of the list (the last program edited) is opened.
•
If no program name is specified and a program task has stopped
executing since the last edit session, that program is added to the top of
the program list and is displayed for editing.
•
When a SEE program instruction is executed, a temporary program list is
created for that editing session. The list initially includes only the current
program name. The list is deleted at the end of the editing session.
•
Whenever a program not already on the list is edited during an editing
session (for example, pressing the New (F2) or Go To (F3) key), the new name
is added at the top of the program list and the home pointer is moved to the
entry for the previous program edited.
•
Retrieve (S+F3) rotates the program list so the top entry moves to the bottom,
and all the other entries move up one position. Then the top program is
displayed for editing, and the home pointer is positioned at the first entry
below the top of the list.
•
The H command advances the home pointer down the list and displays the
name of the program at the new position.
•
The Alt+H command switches to editing the program marked by the home
pointer, that program is moved to the top of the list, and the home pointer is
moved to the entry for the previous program edited.
If the home pointer has not been explicitly moved, Alt+H opens the
previously edited program.
82
V+ Language User’s Guide, Rev A
Chapter 3
Basic SEE Editor Operations
Special Editing Situations
•
You cannot modify the .PROGRAM argument list or an AUTO instruction
while the program is present on a task execution stack. (A program is on the
execution stack if it has been executed in that task since the last KILL or ZERO
instruction.) The error message *Invalid when program on stack* will be
displayed. To edit the line, exit the editor and remove the program from (all)
the execution stack(s) in which it appears. (See the STATUS monitor
command in the V+ Operating System Reference Guide for information about
how to examine the execution stacks and the KILL monitor command for
information on how to clear a stack.)
•
If you enter a line of code that is longer than 80 characters, the portion of the
line longer than 80 characters will not be displayed until you move the cursor
along the line (or make a change to the line). Then the editor temporarily
wraps the line and overwrites the next line on the screen. The temporarily
overwritten line will be redisplayed as soon as you move off the line that is
wrapping on top of it.
NOTE: You may occasionally encounter lines that are too long for
SEE to process. (Such lines can be created with an editor on another
computer, or they may result from a line becoming further indented
because of new surrounding control structures.)
Any attempt to move the cursor to such a line will result in the
message *Line too long*, and the cursor will automatically move to
the next line. (The { command [and others] can be used to move the
cursor above a long line.)
The best way to use the SEE editor to change such a line is to: (1)
move the cursor to the end of the line just above the long line; (2)
use Insert mode to insert two or more program lines that will have
the same effect as the long line, plus a blank line; (3) with the cursor
at the blank line, issue one command to delete the blank line and
the long line (for example, S+Delete in Command mode).
V+ Language User’s Guide, Rev A
83
Chapter 3
•
Basic SEE Editor Operations
Whenever the cursor is moved off a program line (and when certain
commands are invoked), the editor closes the current line. As part of that
process, the line (and those following it) are displayed in standard V+ format
(for example, abbreviation expansion, letter case, spacing, and line indents).
When a long line is closed, the end of the line is erased from the screen and
the next line is automatically redrawn. Undo (F6) will not undo changes to a
closed line.
Until a line is closed, its effect on the indenting of subsequent lines is not
considered. Thus, for example, Redraw (S+F6) ignores an unclosed line
when redrawing the display.
•
In some cases, closing a line will cause its length to be increased because of
abbreviation expansion and line indents. If the expanded line would be
longer that the maximum line length allowed, an error message will be
displayed and you will be prevented from moving off the long line. You will
then have to shorten the line, break it into two or more pieces, or press Undo
(F6) to restore the previous version of the line.
•
Syntax is also checked when a line is closing. If an error is detected, the editor
normally marks the line as a bad line by placing a ? in column 1. Programs
containing bad lines cannot be executed. Thus, you will have to eliminate all
the bad lines in a program before you will be able to execute it. (You can use
the editor’s string search feature to search through a program for question
marks indicating bad lines.)
NOTE: The editor provides a command (AUTO.BAD, see “SEE
Editor Extended Commands” on page 89 for more information)
that can be used to tell the editor you want to be forced to correct
bad lines as soon as they are detected.
84
V+ Language User’s Guide, Rev A
Chapter 3
Basic SEE Editor Operations
The SEE Editor in Command Mode
In addition to the key lists in Table 3-1 on page 75 through Table 3-1 on page 75,
the key strokes listed in Table 3-6 will move the cursor when the editor is in
command mode.
Table 3-6. Cursor Movement in Command Mode
Key
Action
B
Bump window down a few lines
Esc B
Go to bottom of program
Ctrl+B
T
Bump window up a few lines
Esc T
Go to top of program
Ctrl+T
[
Up a line
]
Down a line
Alt+[ (graphics-based system)
Up a few lines
{
Alt+] (graphics-based system)
Down a few lines
}
(
Up to top of window
)
Down to bottom of window
<n>L
Move to line <n>
Space
Right one character
Esc Space
Right to next item
Tab
Back Space
Left one character
Esc Back Space
Left to previous item
Esc Tab
Return
Go to start of next line
V+ Language User’s Guide, Rev A
85
Chapter 3
Basic SEE Editor Operations
Table 3-6. Cursor Movement in Command Mode (Continued)
Key
Action
Esc Return
Close line and go to column 1
, (comma)
Go to beginning of line
. (period)
Go to end of line
<n>J
Jump to column <n>
S<char>
Skip to character <char>
;
Skip to semicolon
Table 3-7 lists the actions keystrokes will perform when the editor is in Command
mode. The characters in the column labeled Char. Codes are defined as follows:
M
The command changes edit mode from Command mode to either
Insert mode or Replace mode as indicated in the table.
(M)
The command changes the mode as indicated only until the next
character is typed, and then the editor returns to Command mode.
R
The command can be executed when the program is being viewed
in read-only mode.
Table 3-7. SEE Editor Command Mode Operations
Keystroke(s)
Function
Char.
Codes
Editing a Line of Text
D
Delete a character
I
Start character Insert mode
M
Esc I
Break line and enter Insert mode
M
R
Start character Replace mode
M
Esc
Return to Command mode
W
Delete up to the next item
Esc W
Delete item and start Insert mode
K<char>
Delete (kill) up to character <char>
86
V+ Language User’s Guide, Rev A
M
Chapter 3
Basic SEE Editor Operations
Table 3-7. SEE Editor Command Mode Operations (Continued)
Char.
Codes
Keystroke(s)
Function
/
Replace a single character
(M)
\
Insert a single character
(M)
Ctrl+L
Convert to lowercase to end of line
Ctrl+U
Convert to uppercase to end of line
Esc Ctrl+B
Convert tabs to blanks (spaces)
Esc Ctrl+T
Convert spaces to tabs
Deleting/Copying/Moving Lines
Esc D
Delete a line
Ctrl+D
–Esc D
Undelete last line deleted
–Ctrl+D
A
Copy line to attach buffer
–A
Copy line from attach buffer
Esc A
Move line to attach buffer
R
Ctrl+A
–Esc A
Move line from attach buffer
–Ctrl+A
E
Dump attach buffer to program
Esc K
Delete (kill) line in attach buffer
R
Ctrl+K
Text Searching and Replacement
F
Find a string in the program
C
Substitute a string in the program
’
Repeat last Find or Change
R
0’
Display string being searched for
R
V+ Language User’s Guide, Rev A
R
87
Chapter 3
Basic SEE Editor Operations
Table 3-7. SEE Editor Command Mode Operations (Continued)
Keystroke(s)
Function
Char.
Codes
Program Operations
N
Change to editing new program
R
H
Rotate home list and show top name
R
Esc H
Change to top program on home list
R
Ctrl+R
Change to editing program CALLed on the
current line
R
Esc Ctrl+R
Change to next program on home list
R
Esc S
Change to previous program on stack
R
–Esc S
Change to next program on stack
R
Miscellaneous Operations
Esc Ctrl+C
Cancel changes to current line
R
Esc E
Exit the editor (or the debugger)
R
Ctrl+E
Exit the editor (or the debugger)
R
G
Repeat the last S, K, Ctrl+L, or Ctrl+U command
(whichever was last)
R
M
Memorize current line and column
R
–M
Return to memorized position
R
V
Refresh the full display
R
X
Initiate extended command (see below)
R
XDEBUG
Change to debugger monitor mode
R
Command Mode Copy Buffer
88
V+ Language User’s Guide, Rev A
Chapter 3
Basic SEE Editor Operations
In command mode, a special 25-line copy buffer is maintained. This buffer is
completely separate from the copy buffer described in “Deleting, Copying, and
Moving Lines” on page 77 and works only when the editor is in command mode.
S+Delete {A} removes lines from the program and places them in the special
buffer. Preceding S+Delete {A} by a minus sign (–) copies the line most recently
deleted (and removes it from the buffer). S+Delete {A} can be prefaced with a
minus sign and a number to undelete a number of lines.
These keystrokes work as described only in Command mode. The copy buffer is
discarded when you exit the SEE editor (but is maintained as you edit different
programs without leaving the editor).
SEE Editor Extended Commands
Editor extended commands are used for infrequent operations that do not
warrant allocation to a dedicated keyboard key. The extended commands are
invoked with the X command (in Command mode), which prompts for the name
of the actual command to be performed.
The command name can be abbreviated to the shortest length that uniquely
identifies the command. After the command name (or abbreviation) is entered,
press ↵ to indicate the end of the name.
As indicated below, some commands display a message on the editor command
line. Some of the commands prompt for additional input.
All of the following commands can be used when viewing a program in read-only
mode. Most of the commands close the current line.
AUTO.BAD
Toggles between the methods the editor uses to respond to
invalid lines detected while editing.
In the first mode, such lines are flagged as bad lines with a
question mark in column one. Editing of the program can
continue normally, but the program will not be executable
until all the bad lines are either corrected, deleted, or made
into comment lines.
In the second mode, invalid lines must be corrected, deleted,
or commented out before the line can be closed.
V+ Language User’s Guide, Rev A
89
Chapter 3
Basic SEE Editor Operations
DEBUG
Switches from normal program editing to use of the program
debugger in its monitor mode. (The debugger is described in
“The Program Debugger” on page 95.)
DSIZE
Sets the size of the debug window used by the program
debugger (described in “The Debugger Display” on page
98).
EXACT
Toggles the case-sensitivity of text searches.
In the first mode, case is ignored when making text searches.
In the second mode, text searches must match upper- and
lowercase letters exactly for a search to be successful.
READONLY
Changes the access mode for the current program to
read-only mode. (May be abbreviated RO.)
READWRITE
Changes the access mode for the current program to
read-write mode. (May be abbreviated RW).
SEE
Switches from debug editor mode to normal (full-screen)
program editing. (Also see the Edit [F7] key.)
TSIZE
In response to this command, you will be shown the current
size of the display, and asked how many lines high you want
the display to be. You must specify at least seven lines. (Press
↵ to retain the current setting.)
See DSIZE above for an explanation of how the TSIZE setting
affects the size of the edit and debug windows displayed by
the program debugger.
WHERE
Displays the current cursor column number. (The current
cursor line number is always displayed on the information
line at the bottom of the edit window.)
NOTE: The settings controlled by the extended commands are all
retained between editing sessions initiated with the SEE monitor
command.
When the SEE program instruction is used to initiate program
editing, all the settings controlled by the extended commands are
set to the initial settings described below. Settings changed during
the edit session are not retained after the editor is exited.
90
V+ Language User’s Guide, Rev A
Chapter 3
Basic SEE Editor Operations
Edit Macros
Edit macros allow you to perform the same sequence of editor commands or enter
the same sequence of text characters several times during an editing session.
Two edit macros can be defined at the same time. Either macro can be invoked
from any point in the definition of the other macro, except that such linking is not
permitted to be recursive. (That is, a macro cannot call itself, and a called macro
cannot call the other macro.)
Table 3-8 shows the keys used to define and apply the macros. All these
commands can be used when viewing a program in read-only mode but cannot
perform any actions disallowed in read-only mode.
Press the space bar to abort an executing macro.
Table 3-8. Function Keys Associated With Macros
Key(s)
Action
Esc U
Define the U macro. The prompt Macro (Ctrl+Z ends): is displayed on
the editor command line. Press the keys you wish to have recorded in
exactly the sequence they are to be processed to perform the desired
operations. When you have finished entering the macro definition,
enter Ctrl+Z.
NOTE: It may be easier to manually perform the sequence to be
recorded, writing down the keys as you press them. Then you
can read from your notes as you define the equivalent macro.
U
Process the U macro.
0U
Display the current definition of the U macro.
Esc Y
Define the Y macro.
Y
Process the Y macro.
0Y
Display the current definition of the Y macro.
NOTE: Macro definitions are retained between editor sessions
initiated with the SEE monitor command (but not between sessions
initiated with the SEE program instruction).
V+ Language User’s Guide, Rev A
91
Chapter 3
Sample Editing Session
Sample Editing Session
The following steps will create a sample V+ program and subroutine, give an
example of parameter passing, and create a disk file of the sample programs.
1.
With the controller on and running—make sure there are no other programs
in memory by entering the command:1
ZERO
2.
The system will ask for verification that you want to delete all programs from
memory. This will delete the programs and data from system memory but will
not delete the disk files.
3.
Enter the command:
SEE sample
4.
The system will advise you that this program does not exist and ask if you
want to create it. Respond Y ↵.
5.
The SEE editor window should now be displayed. Enter insert mode by
pressing the Insert key (Edit [F11] on a Wyse terminal).
6.
Enter the following lines exactly as shown:
AUTO $ans
TYPE "Welcome."
CALL get_response($ans)
TYPE $ans, " is now at the keyboard."
7.
8.
1
2
92
Create the subroutine get_response:2
a.
Move the cursor to the CALL line and press the Goto (F3) key.
b.
The message line will indicate that get_response does not exist and ask if
you want to create it. Respond Y ↵.
A new program will be opened in the SEE editor window. Enter the parameter
for this subroutine by using the cursor keys to place the typing cursor between
the parentheses on the program line and type $text_param.
Memory does not have to be cleared. However, it will make this example simpler.
There is no difference between a subroutine and a program.
V+ Language User’s Guide, Rev A
Chapter 3
9.
Sample Editing Session
Move the cursor off the program line and enter the lines:
PROMPT "May I have your name please? ", $text_param
RETURN
10. Review your programs. The Retrieve (S+F3) key will toggle you through all
the programs you have edited in the current session.
11. When you are satisfied your programs are correct, exit the SEE editor by
pressing the Exit (F4) key.
12. You will now be at the system prompt. Test your program by entering the
command:
EXECUTE/c sample
13. The program should greet you, ask for your name, and print the response on
the screen. A message will then be displayed indicating the program
completed.
14. If all works correctly, save your programs to a disk file by entering the
commands:
STOREP sampfile.v2
A file will be created (using the default path specification) that will contain
the two programs sample, and get_response.
15. To check that the programs were stored successfully, enter the commands:
ZERO
LOAD sampfile.v2
EXECUTE sample
The program should execute as before. See the V+ Operating System User’s
Guide for details on the default path and options to the STORE commands.
V+ Language User’s Guide, Rev A
93
Chapter 3
Sample Editing Session
When you are creating and modifying programs, keep in mind:
•
If you load a file containing programs with the same names as programs
resident in memory, the resident programs will NOT be replaced. You must
delete (from memory) a program before you can load a program with the
same name.
•
You cannot overwrite existing disk files. A file must be deleted from disk
(with the FDELETE instruction) before a file of the same name can be written
to the same sub-directory. If you are making changes to existing files, we
recommend the following procedure:
1.
Rename the existing file for backup:
FRENAME filename.bak = filename.v2
2.
Store the modified files:
STOREP filename.v2
3.
When you are satisfied with the modified files, delete the backup:
FDELETE filename.bak
•
94
If you have programs from multiple disk files resident in memory, the module
commands will help keep the various files straight. See the descriptions of
MODULE, STOREM, MIDRECTORY, and DELETEM in the V+ Language
Reference Guide.
V+ Language User’s Guide, Rev A
Chapter 3
The Program Debugger
The Program Debugger
V+ systems include a program debugger for interactively executing and
modifying application programs. With the debugger, a program can be executed a
step at a time (or in larger, user-controlled segments) while the program
instructions and the program output are simultaneously displayed in two
separate sections of the monitor window.
NOTE: The program debugger cannot access protected programs.
The debugger has an editor mode that allows editing of programs during the
debugging session. Changes made to the program can be executed immediately
to verify their correctness.
While the program is executing, the values of program variables can easily be
displayed or changed.
The following sections describe the use of the program debugger in detail.
Entering and Exiting the Debugger
The program debugger can be invoked in two ways:
•
From the command line with the DEBUG monitor command (see the V+
Operating System Reference Guide for information on monitor commands).
•
From the SEE editor with the Debug (S+F11) key or the DEBUG extended
command. (The function keys and the SEE editor extended commands are
described in “The SEE Editor in Command Mode” on page 85.)
NOTE: The program debugger cannot be invoked from the SEE
editor when the editor has been initiated with the SEE program
instruction.
When a debugging session is initiated, two aspects of the debugging session need
to be established: the program task that will be accessed for program execution
and the program that will be displayed in the debugger edit window. The
methods for providing this information depend on how you invoke the program
debugger, as described below.
Use the Exit (F4) key (or a keyboard command) to exit the debugger and return to
the V+ system monitor.
V+ Language User’s Guide, Rev A
95
Chapter 3
The Program Debugger
The DEBUG Monitor Command
The following command formats will invoke the debugger from the system
prompt:
DEBUG t prog, step
t
Initiates debugging in task number t. If the task number is not specified, the task number will be determined as follows:
If any execution task has terminated execution since the start of the
last debugging session, that task will be assumed.
If no task has terminated since the previous debugging session, the
previous task is accessed again.
If neither of the above situations apply, the main control task (number 0) is accessed.
(Commands affecting other tasks can still be entered, but their task
number will have to be specified explicitly.)
prog
The named program is displayed in the debugger edit window in
read-only editor access mode.
If the name is omitted, the program primed for the task or the last
program executed by the task will be selected.
An error will result if the named program does not exist, and the
DEBUG request will be aborted.
When the specified program is opened for (read-only) editing, its
name is added at the top of the SEE editor internal program list.
step
96
An optional parameter that allows you to open a program at the
step number specified.
V+ Language User’s Guide, Rev A
Chapter 3
The Program Debugger
DEBUG without any parameters is useful when:
1.
You want to resume the latest debugging session.
In this case, the edit window and the execution pointer (see Figure 3-1 on
page 98) will be restored as they were when the previous debugging session
was ended. That is, debugging can continue as though it had not been
interrupted.
2.
A program has terminated execution with an error, and you want to use the
debugger to investigate the cause.
In this case, the program that failed will be displayed in the edit window,
with the execution pointer positioned at the step after the failed step.
Using the Debug Key or the DEBUG Extended Command
While editing a program with the SEE editor, change to the program debugger by
pressing the Debug (S+F11) key or by entering the DEBUG extended command.
When the debugger is invoked from the SEE editor, you are asked which
execution task you want to use. Then the debugger display replaces the normal
SEE editor display, with the same program visible in the edit window and the
specified task selected.
While using the program debugger you may decide you want to change the
default task number. You can use the following steps to make that change:
1.
If you are in debug monitor mode, press Edit (F11) to select debug editor
mode. (The debug modes are described later in this chapter.)
2.
Enter the SEE editor DEBUG extended command.
3.
In response to the prompt, enter the desired new task number.
Exiting the Debugger
Press Exit (F4) to exit the program debugger and return to the system prompt.
This command is accepted in either debug mode.
In addition, in debug editor mode (in Command mode) you can use Alt+E to exit
to the V+ system prompt (or Esc and E if your keyboard does not have an Alt
key).
V+ Language User’s Guide, Rev A
97
Chapter 3
The Program Debugger
The Debugger Display
Once the program debugger has been invoked, the display will look similar to
that shown in Figure 3-1.
NOTE: The sample shown below represents the display that would
appear on graphics-based monitor. You will see a slightly different
display on a nongraphics-based terminal.
Figure 3-1. Example Program Debugger Display
98
V+ Language User’s Guide, Rev A
Chapter 3
The Program Debugger
The following numbered list refers to the display shown in Figure 3-1.
➊
The execution pointer—indicates the next step in the program that
will be executed.
➋
The editor information line—provides the same information as during a normal editing session (see Figure 2-1 on page 39). Notice that
while the debugger is in monitor mode, the program will be in
read-only mode. The debug window occupies the screen below this
line.
➌
The typing cursor. In monitor mode, the cursor will appear in the
debug window, and debug and monitor commands can be entered.
Responses to program prompts will appear here. Commands will
appear below the debug information line.
➍
Shows which task the debug session is running in.
➎
Shows the debug mode. In monitor mode, debug and other monitor
commands can be entered, and the program can be executed. In editor mode, the typing cursor will appear in the editor window, and
the program can be edited.
➏
Displays entered commands and the results of various debug operations. The > character serves as a prompt for user input when you
are entering commands to the debugger. After processing a command, the debugger displays OK on the command line after the
command. That acknowledges completion of the command, regardless of whether or not the command was successful. For example,
the command line shown in Figure 3-1 indicates that the debugger
has just processed the command XSTEP place.
NOTE: Under some circumstances the display in the edit window
can be overwritten by program or system output. Press Redraw
(S+F6) to restore the entire debugger screen.
Since the edit window can be moved to anywhere in the current
program (or even to another program), this pointer may not be
visible in the edit window. The edit window will move to the
section of program containing this pointer whenever program
execution stops for any reason.
V+ Language User’s Guide, Rev A
99
Chapter 3
The Program Debugger
Debugger Operation Modes
The program debugger has two modes of operation:
•
Monitor mode
In this mode the program in the edit window is accessed in read-only mode,
and all keystrokes are interpreted as system monitor commands. System and
program output is displayed in the debug window.
While in monitor mode, the program displayed in the edit window is
accessed in read-only mode. As described in a later section, most of the
keyboard function keys perform the same functions as with the SEE editor.
This is the initial mode when the debugger is invoked. See the section
“Debug Monitor-Mode Keyboard Commands” on page 104 for a description
of how monitor mode is used.
•
Editor mode
As its name indicates, this mode enables full editing access to the program in
the editor window. All the features of the SEE editor can be used in this mode.
NOTE: Programs that have been loaded from disk files with the
read-only attribute cannot be accessed in editor read-write mode.
Use the Edit (F11) and Debug (S+F11) keys (or Ctrl+E) to change modes.
100
V+ Language User’s Guide, Rev A
Chapter 3
The Program Debugger
Debugging Programs
The basic strategy for debugging a program is:
1.
Invoke the program debugger with the DEBUG monitor command, the
DEBUG editor extended command, or the Debug (S+F12) key.
2.
Initiate execution of the program (usually with the PRIME or XSTEP monitor
commands). (This step can be performed before or after the debugger is
initiated.)
3.
Step through the program (executing individual steps, sections of the
program, or complete subroutines) to trace the flow of program execution. (A
later section of this chapter describes control of program execution while
debugging.)
4.
Use the Display (F5) and Teach (S+F5) keys to display and redefine the values
of variables.
5.
Use edit mode to perform any desired editing operations on the program.
6.
Repeat steps 2 through 5 as required.
7.
Exit from the debugger.
The following sections describe the debugger commands and other features of the
V+ system that aid program debugging.
When using the debugger, keep in mind:
•
Some system monitor commands are not accepted in debug monitor mode.
(For example, the COMMANDS command is not accepted.)
•
In some situations the terminal cursor will be in the edit window when you
want it to be in the debug window. In debug monitor mode, the Redraw
(S+F6) or Undo (F6) keys will force the cursor to the bottom line of the debug
window.
•
Output to the screen from the program will generally be directed to the debug
window. However, if the output includes control strings to position the cursor
(for example, clear the screen), the program output may appear in the edit
window. The Redraw (S+F6) key will restore the normal debugger display
(except in the situation described by the next item).
•
When the program displays a prompt for input in the debug window and
executes a PROMPT instruction, everything you type before pressing ↵ will
be received by the program. Thus, you cannot issue any debugger commands
at such times.
V+ Language User’s Guide, Rev A
101
Chapter 3
The Program Debugger
Positioning the Typing Cursor
The typing cursor is positioned in the debug window when:
•
The program debugger is initiated.
•
Task execution is initiated or terminated (in the latter case, the edit window
will be moved as required to include the execution pointer).
•
The Redraw (S+F6) or Undo (F6) key is pressed in debug monitor mode.
•
The debugger is switched from editor mode to monitor mode.
The typing cursor is positioned in the edit window when:
102
•
Any function key operation—other than Redraw (S+F6) or Undo (F6)—is
performed during debug monitor mode. (Note that this includes all the keys
normally used to move the cursor in the edit window, such as the arrow
keys.)
•
The debugger is switched from monitor mode to edit mode.
•
With graphics-based systems, the typing cursor is positioned in the edit
window if you click the pointer device anywhere in that window.
V+ Language User’s Guide, Rev A
Chapter 3
The Program Debugger
Debugger Key Commands
Table 3-6 on page 85 and Table 3-7 on page 86 list all the keys interpreted as
commands by the V+ SEE editor. Except for the differences described below, all
the keys listed in those tables have exactly the same effect with the debugger (in
either of its modes) as they do when used with the SEE editor (detailed earlier in
this chapter).
NOTE: While using the debugger, the following keys are
particularly useful for moving to different programs on the
execution stack for the task being debugged: Prog Up and Prog
Down {S}, and Ctrl+Home and Ctrl+End {A}.
The following function keys are interpreted differently by the program debugger
and the SEE editor.
Edit (F11)
When the debugger is in monitor mode, this key causes editor mode
to be selected. This key has its normal editor function (selection of
editor Command mode) when in editor mode.
Undo (F6)
When the debugger is in monitor mode, this key simply moves the
typing cursor to the bottom of the debug window.
Teach (S+F5) Initiates changing the value of the variable at the cursor position.
NOTE: This command cannot be used while the editor is in
read-write access mode. You can use the READONLY or RO
extended command to select read-only mode (see “SEE Editor
Extended Commands” on page 89 for details).
As with Display (F5), the typing cursor is used to point to the variable of interest.
Pressing Teach (S+F5) causes the current value of the variable to be displayed in
the debug window and a prompt for a new value to be assigned to the variable.
For real-valued variables, the new value can be input as a constant, a variable
name, or an expression.
For location variables, the new value can be input as a location function (for
example, HERE or TRANS) or a variable name. Also, a compound transformation
can be specified when accessing a transformation variable.
For string variables, the new value can be input as a string constant, variable
name, or expression.
V+ Language User’s Guide, Rev A
103
Chapter 3
The Program Debugger
Debug Monitor-Mode Keyboard Commands
The V+ program debugger allows you to interactively execute and edit the
program being debugged. The commands described in Table 3-10 can be used to
control execution of the program you are debugging (see “Control of Program
Execution” on page 107 for more information).
The terms defined in Table 3-9 are used in Table 3-10 when showing equivalent
monitor commands:
Table 3-9. Definition of Terms
Term Used
Definition
current_program
Refers to the program displayed in the edit window.
current_step
Refers to the program step at which the movable cursor is
positioned. (Note that even when the terminal cursor is
visible in the debug window or on the command line, the
position of the movable cursor is still retained by the
debugger.)
debug_task
Refers to the task number shown on the information line
of the debug window.
NOTE: All the commands described below (except Ctrl+E) require
debug monitor mode for their use.
Be careful not to enter Ctrl+O or Ctrl+S while using the debugger.
These control characters disable output to the terminal until a
second Ctrl+O or a Ctrl+Q is input.
104
V+ Language User’s Guide, Rev A
Chapter 3
The Program Debugger
Table 3-10. Debugger Commands
Key(s)
Action
Ctrl+B
Set a breakpoint at the step indicated by the typing cursor (also see
Ctrl+N below). (The use of breakpoints is described in “Program
Breakpoints” on page 108.)
This command is equivalent to the following system monitor command:
BPT @current_program current_step
Ctrl+E
Alternate between debug modes. This command is equivalent to the Edit
(F12) and Debug (S+F12) function keys, depending on the current
debugger mode. (Use Ctrl+E with terminals that do not have the
equivalent function keys. Use Esc and then E to exit from the editor to the
V+ system prompt.)
Ctrl+G
Perform an XSTEP command for the instruction step indicated by the
typing cursor.
This command is equivalent to the following system monitor command:
XSTEP debug_task,,current_step
Ctrl+N
Cancel the breakpoint at the step indicated by the typing cursor (see
Ctrl+B above).
This command is equivalent to the following system monitor command:
BPT @current_program current_step
Ctrl+P
PROCEED execution of the current task from the current position of the
execution pointer.
This command is equivalent to the following system monitor command:
PROCEED debug_task
V+ Language User’s Guide, Rev A
105
Chapter 3
The Program Debugger
Table 3-10. Debugger Commands (Continued)
Key(s)
Action
Ctrl+X
Perform an XSTEP command for the current task from the current
position of the execution pointer.
This command is equivalent to the following system monitor command:
XSTEP debug_task
Ctrl+Z
Perform an SSTEP command for the current task from the current
position of the execution pointer.
This command is equivalent to the following system monitor command:
SSTEP debug_task
106
V+ Language User’s Guide, Rev A
Chapter 3
The Program Debugger
Using a Pointing Device With the Debugger
On graphics-based systems, double-clicking on a variable or expression will
display the value of the variable or expression. (If program execution has not
progressed to the point where a variable has been assigned a value, double
clicking on the variable may return an undefined value message.)
Control of Program Execution
While debugging programs, you will want to pause execution at various points to
examine the status of the system (e.g., to display the values of program variables).
The following paragraphs describe how to control execution of the program being
debugged.
NOTE: Except for the special debugger commands mentioned
below, all the following techniques can be used even when the
program debugger is not in use.
Single-Step Execution
The debugger Ctrl+X command provides a convenient means for having program
execution stop after each instruction is processed. Each time Ctrl+X is entered, a
V+ XSTEP command is processed for the program being debugged.
The debugger Ctrl+Z command is provided to allow you to step across
subroutine calls. Each time Ctrl+Z is entered, an SSTEP command is processed for
the program being debugged. Thus, when the execution pointer is positioned at a
CALL or CALLS instruction, typing Ctrl+Z will cause the entire subroutine to be
executed, and execution will pause at the step following the subroutine call.
(Ctrl+Z acts exactly like Ctrl+X when the current instruction is not a subroutine
call.)
NOTE: You cannot single-step into a subroutine that was loaded
from a protected disk file. Thus, you must use Ctrl+Z to step across
any CALL of such a routine.
NOTE: The execution pointer (–>) will not be displayed while the
system is executing an instruction. Do not type a Ctrl+X or Ctrl+Z
until the execution pointer reappears.
V+ Language User’s Guide, Rev A
107
Chapter 3
The Program Debugger
PAUSE Instructions
Debug editor mode can be used to insert PAUSE instructions in the program at
strategic points. Then execution will pause when those points are reached. After
the pause has occurred, and you are ready to have execution resume, you can use
the PROCEED command.
The debugger Ctrl+P command provides a convenient means of issuing a
PROCEED command for the program being debugged.
The disadvantage of using PAUSE instructions, however, is that they must be
explicitly edited into the program and removed when debugging is completed.
The following section describes a more convenient way to achieve the same effect
as a PAUSE instruction.
Program Breakpoints
The V+ BPT command can be used to attach a breakpoint to an instruction. The
BPT allows either or both of the following responses to occur when the breakpoint
is encountered during execution:
•
Execution stops at the flagged instruction (before it is executed).
•
Values are displayed on the system terminal, showing the current status of
user-specified expressions.
To set breakpoints at various points in the program, enter the appropriate BPT
commands on the debugger command line to place the breakpoints and to specify
expressions to be evaluated when the breakpoints are encountered.
If you do not need to have an expression evaluated at a breakpoint, you can use
the debugger Ctrl+B command to set a pausing breakpoint—that is, one that will
cause execution to stop. To use the Ctrl+B command you must position the typing
cursor in the edit window so it is on the instruction of interest. Once the cursor is
positioned, you can type Ctrl+B to have a breakpoint placed at that instruction.
NOTE: You can use Go To (F3) (and other editor commands) to
change the program in the edit window. Thus, you can move to any
program you want before typing Ctrl+B to set a breakpoint. (You do
not have to explicitly change back to having the edit window show
the program currently stopped. The debugger will automatically
display the appropriate program the next time execution stops for
any reason.)
108
V+ Language User’s Guide, Rev A
Chapter 3
The Program Debugger
When program execution stops at a breakpoint, you can use the debugger Ctrl+N
command to cancel the breakpoint at the instruction. Or you can leave the
breakpoint set. In either case, you can type Ctrl+P when you are ready to have
program execution resume.
NOTE: A BPT command with no parameters will clear the
breakpoints in all the programs in the system memory (except those
programs that are executing). Entering a BPT command with no
parameters in debug monitor mode will clear breakpoints in the
current program.
Program Watchpoints
The V+ WATCH command attaches a watchpoint to a variable or user-specified
expression. When a watchpoint has been set, the specified variable or expression
is examined before each program instruction is executed by the task associated
with the watchpoint. The value determined is compared with the value recorded
when the watchpoint was originally defined. If the value has changed, the task is
stopped and the old and new values are displayed.
NOTE: Processing watchpoints consumes a lot of execution time
and can significantly slow down program execution. Be sure to
cancel all the watchpoints for an execution task after you are
through using the task for debugging.
There is no shorthand debugger command for setting watchpoints, but WATCH
commands can be entered on the debugger command line.
V+ Language User’s Guide, Rev A
109
4
Data Types and Operators
Introduction . . . . . . . . . . . . . . . . . .
Dynamic Data Typing and Allocation . .
Variable Name Requirements . . . . . .
String Data Type . . . . . . . . . . . . . . . .
ASCII Values . . . . . . . . . . . . . .
Functions That Operate on String Data . .
Real and Integer Data Types . . . . . . . . . .
Numeric Representation . . . . . . . . .
Numeric Expressions . . . . . . . . . . .
Logical Expressions . . . . . . . . . . .
Logical Constants . . . . . . . . . .
Functions That Operate on Numeric Data
Location Data Types . . . . . . . . . . . . . .
Transformations . . . . . . . . . . . . .
Precision Points . . . . . . . . . . . . .
Arrays . . . . . . . . . . . . . . . . . . . . .
Variable Classes . . . . . . . . . . . . . . . .
Global Variables . . . . . . . . . . . .
Local Variables . . . . . . . . . . . . .
Automatic Variables . . . . . . . . . . .
Scope of Variables . . . . . . . . . . .
Variable Initialization . . . . . . . . . .
Operators . . . . . . . . . . . . . . . . . . .
Assignment Operator . . . . . . . . . .
Mathematical Operators . . . . . . . . .
Relational Operators . . . . . . . . . . .
Logical Operators . . . . . . . . . . . .
Bitwise Logical Operators . . . . . . . .
String Operator . . . . . . . . . . . . . . . .
Order of Evaluation . . . . . . . . . . . . . .
.
.
.
.
.
.
.
.
.
.
.
.
.
.
.
.
.
.
.
.
.
.
.
.
.
.
.
.
.
.
.
.
.
.
.
.
.
.
.
.
.
.
.
.
.
.
.
.
.
.
.
.
.
.
.
.
.
.
.
.
.
.
.
.
.
.
.
.
.
.
.
.
.
.
.
.
.
.
.
.
.
.
.
.
.
.
.
.
.
.
V+ Language User’s Guide, Rev A
.
.
.
.
.
.
.
.
.
.
.
.
.
.
.
.
.
.
.
.
.
.
.
.
.
.
.
.
.
.
.
.
.
.
.
.
.
.
.
.
.
.
.
.
.
.
.
.
.
.
.
.
.
.
.
.
.
.
.
.
.
.
.
.
.
.
.
.
.
.
.
.
.
.
.
.
.
.
.
.
.
.
.
.
.
.
.
.
.
.
.
.
.
.
.
.
.
.
.
.
.
.
.
.
.
.
.
.
.
.
.
.
.
.
.
.
.
.
.
.
.
.
.
.
.
.
.
.
.
.
.
.
.
.
.
.
.
.
.
.
.
.
.
.
.
.
.
.
.
.
.
.
.
.
.
.
.
.
.
.
.
.
.
.
.
.
.
.
.
.
.
.
.
.
.
.
.
.
.
.
.
.
.
.
.
.
.
.
.
.
.
.
.
.
.
.
.
.
.
.
.
.
.
.
.
.
.
.
.
.
112
112
112
114
115
115
116
117
117
118
118
118
119
119
119
120
121
121
121
122
123
125
126
126
126
127
128
128
130
130
111
Chapter 4
Introduction
Introduction
This chapter describes the data types used by V+.
Dynamic Data Typing and Allocation
V+ does not require you to declare variables or their data types. The first use of a
variable will determine its data type and allocate space for that variable. You can
create variables and assign them a type as needed. The program instruction:
real_var = 13.65
will create the variable real_var as a real variable and assign it the value 13.65 (if
the real_var had already been created, the instruction will merely change its
value).
Numeric, string, and transformation arrays up to three dimensions can be
declared dynamically.
Variable Name Requirements
The requirements for a valid variable name are:
1.
Keywords reserved by Adept cannot be used. Chapter 1 of the V+ Language
Reference Guide lists the basic keywords reserved by Adept. If you have
AdeptVision VXL, Chapter 1 of the AdeptVision Reference Guide lists the
additional reserved words used by the vision system.
2.
The first character of a variable name must be a letter.
3.
Allowable characters after the first character are letters, numbers, periods, and
the underline character.
4.
Only the first 15 characters in a variable name are significant.
The following are all valid variable names:
x
count
dist.to.part.33
ref_frame
112
V+ Language User’s Guide, Rev A
Chapter 4
Introduction
The following names are invalid for the reasons indicated:
3x (first character not a letter)
one&two (& is an invalid name character)
pi (reserved word)
this_is_a_long_name (too many characters)
All but the last of these invalid names would be rejected by V+ with an error
message. The extra-long name would be truncated (without warning) to
this_is_a_long_.
V+ Language User’s Guide, Rev A
113
Chapter 4
String Data Type
String Data Type
Variable names are preceded with a dollar ($) sign to indicate that they contain
string data.1 The program instruction:
$string_name = "Adept V+"
allocates the string variable string_name (if it had not previously been allocated)
and assigns it the value Adept V+. Numbers can be used as strings with a
program instruction such as:
$numeric_string = "13.5"
where numeric _string is assigned the value 13.5. The program instruction:
$numeric_string = 13.5
will result in an error since you are attempting to assign a real value to a string
variable.
The following restrictions apply to string constants (e.g., "a string"):
•
ASCII values 32 (space) to 126 (~) are acceptable
•
ASCII 34 (") cannot be used in a string
Strings can contain from 0 to 128 characters. String variables can contain values
from 0 to 255 (see Appendix C for the interpretation of the full character set).
The following are all valid names for string variables:
$x $process $prototype.names $part_1
The following names are invalid for strings for the reasons indicated:
$3x (first character not a letter)
$one-two (- is an invalid name character)
factor ($ prefix missing)
$this_is_a_long_name (too many characters)
All but the last of these invalid names would be rejected by V+ with an error
message. The extra long name would be truncated (without warning) to
$this_is_a_long_.
1
114
The dollar sign is not considered in the character count of the variable name.
V+ Language User’s Guide, Rev A
Chapter 4
String Data Type
ASCII Values
An ASCII value is the numeric representation of a single ASCII character. (See
Appendix C for a complete list of the ASCII character set.) An ASCII value is
specified by prefixing a character with an apostrophe ('). Any ASCII character
from the space character (decimal value 32) to the tilde character (~, decimal value
126) can be used as an ASCII constant. Thus, the following are valid ASCII
constants:
'A '1 'v '%
Note that the ASCII value '1 (decimal value 49) is not the same as the integer
value 1 (decimal value 1.0). Also, it is not the same as the string value “1”.
Functions That Operate on String Data
Table 6-1, “String-Related Functions,” on page 159 summarizes the V+ functions
that operate on string data.
V+ Language User’s Guide, Rev A
115
Chapter 4
Real and Integer Data Types
Real and Integer Data Types
Numbers that have a whole number and a fractional part (or mantissa and
exponent if the value is expressed in scientific notation) belong to the data type
real. Numeric values having only a whole number belong to the data type integer.
In general, V+ does not require you to differentiate between these two data types.
If an integer is required and you supply a real, V+ will promote the real to an
integer by rounding (not truncation). Where real values are required, V+
considers an integer a special case of a real that does not have a fractional part.
The default real type is a signed, 32-bit IEEE single-precision number. Real values
can also be stored as 64-bit IEEE double-precision numbers if they are specifically
typed using the DOUBLE instruction (see “Variable Classes” on page 121 for
details).
The range of integer values is:
–16,777,216 to 16,777,215
The range of single-precision real values is:
±3.4*1038
The range of double-precision real values is:
±1.8*10307
116
V+ Language User’s Guide, Rev A
Chapter 4
Real and Integer Data Types
Numeric Representation
Numeric values can be represented in the standard decimal notation or in
scientific notation as illustrated above.
Numeric values can also be represented in octal, binary, and hexadecimal form.
Table 4-1 shows the required form for each integer representation.
Table 4-1. Integer Value Representation
Prefix
Example
Representation
none
–193
decimal
^B
^B1001
binary (maximum of 8
bits)
^
^346
octal
^H
^H23FF
hexadecimal
^D
^D20000000
double-precision
Numeric Expressions
In almost all situations where a numeric value of a variable can be used, a
numeric expression can also be used. The following examples all result in x
having the same value.
x
x
x
x
x
=
=
=
=
=
3
6/2
SQRT(9)
SQR(2) - 1
9 MOD 6
V+ Language User’s Guide, Rev A
117
Chapter 4
Real and Integer Data Types
Logical Expressions
V+ does not have a specific logical (Boolean) data type. Any numeric value,
variable, or expression can be used as a logical data type. V+ considers 0 to be
false and any other value to be true. When a real value is used as a logical data
type, the value is first promoted to an integer.
Logical Constants
There are four logical constants, TRUE and ON that will resolve to –1, and FALSE
and OFF that will resolve to 0. These constants can be used anywhere a boolean
expression is expected.
A logical value, variable, or expression can be used anywhere a decision is
required. In this example, an input signal is tested. If the signal is on (high) the
variable dio.sample is given the value true, and the IF clause executes. Otherwise,
the ELSE clause executes:
dio.sample = SIG(1001)
IF dio.sample THEN
; Steps to take when signal is on (high)
ELSE
; Steps to take when signal is off (low)
END
Since a logical expression can be used in place of a logical variable, the first two
lines of this example could be combined to:
IF SIG(1001) THEN
Functions That Operate on Numeric Data
Table 6-2, “Numeric Value Functions,” on page 162 summarizes the V+
functions that operate on numerical data.
118
V+ Language User’s Guide, Rev A
Chapter 4
Location Data Types
Location Data Types
This section gives a brief explanation of location data. Chapter 8 covers locations
and their use in detail.
Transformations
A data type particular to V+ is the transformation data type. This data type is a
collection of several values that uniquely identify a location in Cartesian space.
The creation and modification of location variables are discussed in Chapter 8.
Precision Points
Precision points are a second data type particular to V+. A precision point is a
collection of joint angles and translational values that uniquely identify the
position and orientation of a robot. The difference between transformation
variables and precision-point variables will become more apparent when robot
motion instructions are discussed in Chapter 8.
V+ Language User’s Guide, Rev A
119
Chapter 4
Arrays
Arrays
V+ supports arrays of up to three dimensions. Any V+ data type can be stored in
an array. Like simple variables, array allocation (and typing) is dynamic. Unless
they are declared to be AUTOmatic, array sizes do not have to be declared.
For example:
array.one[2] = 36
allocates space for a one-dimensional array named array.one and places the value
36 in element two of the array. (The numbers inside the brackets ( [ ]) are referred
to as indices. An array index can also be a variable or an expression.)
$array.two[4,5] = "row 4, col 5"
allocates space for a two-dimensional array named array.two and places row 4,
col 5 in row four, column five of the array.
array.three[2,2,4] = 10.5
allocates space for a three-dimensional array named array.three and places the
value 10.5 in row two, column two, range four.
If any of the above instructions were executed and the array had already been
declared, the instruction would merely place the value in the appropriate
location. If a data type different from the one the array was originally created with
is specified, an error will result.
Arrays are allocated in blocks of 16. Thus, the instruction:
any_array[2] = 50
will result in allocation of array elements 0 - 15. The instructions:
any_array[2] = 50
any_array[20] = 75
will result in the allocation of array elements 0 - 31.
Array allocation is most efficient when the highest range index exceeds the
highest column index, and the highest column index exceeds the highest row
index. (Row is the first element, column is the second element, and range is the
third element.)
120
V+ Language User’s Guide, Rev A
Chapter 4
Variable Classes
Variable Classes
In addition to having a data type, variables belong to one of three classes,
GLOBAL, LOCAL, or AUTOMATIC. These classes determine how a variable can
be altered by different calling instances of a program.
Global Variables
This is the default class. Unless a variable has been specifically declared to be
LOCAL or AUTO, a newly created variable will be considered global. Once a
global variable has been initialized, it is available to any executing program1 until
the variable is deleted or all programs that reference it are removed from system
memory (with a DELETE or ZERO instruction). Global variables can be explicitly
declared with the GLOBAL program instruction.
GLOBAL DOUBLE dbl_real_var
NOTE: For double-precision real variables to be global, they must
be explicitly declared as global in each program they are used in.
Global variables are very powerful and should be used carefully and consciously.
If you cannot think of a good reason to make a variable global, good
programming practice dictates that you declare it to be LOCAL or AUTO.
Local Variables
Local variables are created by a program instruction similar to:
LOCAL the_local_var
where the variable the_local_var is created as a local variable. Local variables can
be changed only by the program they are declared in.
An important difference between local variables in V+ and local variables in most
other high-level languages is that V+ local variables are local to all copies (calling
instances) of a program, not just a particular calling instance of that program. This
distinction is critical if you write recursive programs. In recursive programs you
will generally want to use the next variable class, AUTO.
1
Unless the program has declared a LOCAL or AUTO variable with the same name.
V+ Language User’s Guide, Rev A
121
Chapter 4
Variable Classes
Automatic Variables
Automatic variables are created by a program instruction similar to:
AUTO the_auto_var
where the_auto_var is created as an automatic variable. Automatic variables can
be changed only by a particular calling instance of a program.
AUTO statements cannot be added or deleted when the program is on the stack.
See “Special Editing Situations” on page 83.
NOTE: If LOCAL or AUTO variables are to be double precision, the
DOUBLE keyword must be used.
AUTO DOUBLE dbl_auto_var
Automatic variables are more like the local variables of other high-level
languages. If you are writing programs using a recursive algorithm, you will most
likely want to use variables in the automatic class.
122
V+ Language User’s Guide, Rev A
Chapter 4
Variable Classes
Scope of Variables
The scope of a variable refers to the range of programs that can see that variable.
Figure 4-1 shows the scope of the different variable classes. A variable can be
altered by the program(s) indicated in the shaded area of the box it is in plus any
programs that are in smaller boxes. When a program declares an AUTO or
LOCAL variable, any GLOBAL variables of the same name created in other
programs are not accessible.
Any Program
Global
Variables
Program Declared in
Local
Variables
Copy of Program
Declared in
Automatic
Variables
Figure 4-1. Variable Scoping
Figure 4-2 on page 124 shows an example of using the various variable classes.
Notice that:
•
prog_1 declares a to be GLOBAL. Thus, it is available to all programs not
having an AUTO or LOCAL a.
•
prog_2 creates an undeclared variable b. By default, b is GLOBAL and
available to other programs not having a LOCAL or AUTO b.
•
prog_3 declares an AUTO a and will not be able to use GLOBAL a. After
prog_3 completes, the value of AUTO a is deleted.
V+ Language User’s Guide, Rev A
123
Chapter 4
•
Variable Classes
prog_4 declares a LOCAL a and, therefore, will not be able to use GLOBAL a.
Unlike the AUTO a in prog_3, however, the value of LOCAL a is stored and is
available for any future CALLs to prog_4.
a (GLOBAL to
all programs
not having AUTO
or LOCAL a)
.PROGRAM prog_1()
GLOBAL a
a = 4
CALL prog_2()
.PROGRAM prog_2()
GLOBAL a
a = 7
b = 12
CALL prog_3()
.PROGRAM prog_3()
AUTO a
a = 23
b = 56
CALL prog_4()
b (GLOBAL to
all programs
not having AUTO
or LOCAL b)
a (LOCAL defined
once for all calls
to "prog_4")
a (AUTO defined
for each time
program is called)
.PROGRAM prog_4()
LOCAL a
a = 2
CALL prog_3()
.PROGRAM prog_3()
AUTO a
a (AUTO defined
a = 23
for each time
b = 56
CALL prog_4() program is called)
.PROGRAM prog_4()
LOCAL a
a = 2
CALL prog_3()
Figure 4-2. Variable Scope Example
124
V+ Language User’s Guide, Rev A
Chapter 4
Variable Classes
Variable Initialization
Before a variable can be used it must be initialized. String and numeric variables
can be initialized by placing them on the left side of an assignment statement. The
statements:
var_one = 36
$var_two = "two"
will initialize the variables var_one and $var_two.
var_one = var_two
will initialize var_one if var_two has already been initialized. Otherwise, an
undefined value error will be returned. A variable can never be initialized on the
right side of an assignment statement (var_two could never be initialized by the
above statement).
The statement:
var_one = var_one + 10
would be valid only if var_one had been initialized in a previous statement.
Strings, numeric variables, and location variables can be initialized by being
loaded from a disk file.
Strings and numeric variables can be initialized with the PROMPT instruction.
Transformations and precision points can be initialized with the SET or HERE
program instructions. They can also be initialized with the HERE and POINT
monitor commands or with the TEACH monitor command and the manual
control pendant. See the V+ Operating System Reference Guide for information on
monitor commands.
V+ Language User’s Guide, Rev A
125
Chapter 4
Operators
Operators
The following sections discuss the valid operators.
Assignment Operator
The equal sign (=) is used to assign a value to a numeric or string variable. The
variable being assigned a value must appear by itself on the left side of the equal
sign. The right side of the equal sign can contain any variable or value of the same
data type as the left side, or any expression that resolves to the same data type as
the left side. Any variables used on the right side of an assignment operator must
have been previously initialized.
Location variables require the use of the SET instruction for a valid assignment
statement (see Chapter 8). The instruction:
loc_var1 = loc_var2
is unacceptable for location and precision-point variables.
Mathematical Operators
V+ uses the standard mathematical operators shown in Table 4-2.
Table 4-2. Mathematical Operators
126
Symbol
Function
+
addition
–
subtraction or unary minus
∗
multiplication
/
division
MOD
modular (remainder) division
V+ Language User’s Guide, Rev A
Chapter 4
Operators
Relational Operators
Relational operators are used in expressions that yield a boolean value. The
resolution of an expression containing a relational operator will always be –1
(true) or 0 (false) and will tell you if the specific relation stated in the expression is
true or false. The most common use of relational expressions is with the control
structures discussed in Chapter 5.
V+ uses the standard relational operators shown in Table 4-3.
Table 4-3. Relational Operators
Symbol
Function
==
equal to
<
less than
>
greater than
<= or =<
less than or equal to
>= or =>
greater than or equal to
<>
not equal to
If x has a value of 6 and y has a value of 10, the following boolean expressions
would resolve to –1 (true):
x < y
y >= x
y <> x
and these expressions would resolve to 0 (false):
x > y
x <> 6
x == y
Note the difference between the assignment operator = and the relational
operator ==:
z = x == y
In this example, z will be assigned a value of 0 since the boolean expression x == y
is false and would therefore resolve to 0. A relational operator will never change
the value of the variables on either side of the relational operator.
V+ Language User’s Guide, Rev A
127
Chapter 4
Operators
Logical Operators
Logical operators affect the resolution of a boolean variable or expression, and
combine several boolean expressions so they resolve to a single boolean value.
V+ uses the standard logical operators shown in Table 4-4.
Table 4-4. Logical Operators
Symbol
Effect
NOT
Complement the expression or value;
makes a true expression or value false
and vice versa.
AND
Both expressions must be true before
the entire expression is true.
OR
Either expression must be true before
the entire expression is true.
XOR
One expression must be true and one
must be false before the entire
expression is true.
If x = 6 and y = 10, the following expressions will resolve to –1 (true):
NOT(x == 7)
(x > 2) AND (y =< 10)
And these expressions will resolve to 0 (false):
NOT(x == 6)
(x < 2) OR (y > 10)
Bitwise Logical Operators
Bitwise logical operators operate on pairs of integers. The corresponding bits of
each integer are compared and the result is stored in the same bit position in a
third binary number. Table 4-5 lists the V+ bitwise logical operators.
Table 4-5. Bitwise Logical Operators
128
Operator
Effect
BAND
Each bit is compared using and logic. If both bits are 1, then the
corresponding bit will be set to 1. Otherwise, the bit is set to 0.
V+ Language User’s Guide, Rev A
Chapter 4
Operators
Table 4-5. Bitwise Logical Operators (Continued)
Operator
Effect
BOR
Each bit is compared using or logic. If either bit is 1, then the
corresponding bit will be set to 1. If both bits are 0, the
corresponding bit will be set to 0.
BXOR
Each bit is compared using exclusive or logic. If both bits are 1 or
both bits are 0, the corresponding bit will be set to 0. When one bit
is 1 and the other is 0, the corresponding bit will be set to 1.
COM
This operator works on only one number. Each bit is
complemented: 1s become 0s and 0s become 1s.
Examples:
x = ^B1001001 BAND ^B1110011
results in x having a value of ^B1000001.
x = COM ^B100001
results in x having a value of ^B11110.
V+ Language User’s Guide, Rev A
129
Chapter 4
String Operator
String Operator
Strings can be concatenated (joined) using the plus sign. For example:
$name = "Adept "
$incorp = ", Inc."
$coname = $name + "Technology" + $incorp
results in the variable $coname having the value “Adept Technology, Inc”.
Order of Evaluation
Expressions containing more than one operator are not evaluated in a simple left
to right manner. Table 4-6 lists the order in which operators are evaluated. Within
an expression, functions are evaluated first, with expressions within the function
evaluated according to the table.
The order of evaluation can be changed using parentheses. Operators within each
pair of parentheses, starting with the most deeply nested pair, are completely
evaluated according to the rules in Table 4-6 before any operators outside the
parentheses are evaluated.
Operators on the same level in the table are evaluated strictly left to right.
Table 4-6. Order of Operator Evaluation
Operator
NOT, COM
– (Unary minus)
∗, /, MOD, AND, BAND
+, –, OR, BOR, XOR, BXOR
==, <=, >=, <, >, <>
130
V+ Language User’s Guide, Rev A
5
Program Control
Introduction . . . . . . . . . . . . . . . . .
Unconditional Branch Instructions . . . . . .
GOTO . . . . . . . . . . . . . . . . .
CALL . . . . . . . . . . . . . . . . .
CALLS . . . . . . . . . . . . . . . . .
Program Interrupt Instructions . . . . . . . .
WAIT . . . . . . . . . . . . . . . . .
WAIT.EVENT . . . . . . . . . . . . . .
REACT and REACTI . . . . . . . . . . .
REACTE . . . . . . . . . . . . . . . .
HALT, STOP, and PAUSE . . . . . . . . .
BRAKE, BREAK, and DELAY . . . . . . .
Additional Program Interrupt Instructions
Program Interrupt Example . . . . . .
Logical (Boolean) Expressions . . . . . . . .
Conditional Branching Instructions . . . . . .
IF...GOTO . . . . . . . . . . . . . . .
IF...THEN...ELSE . . . . . . . . . . . . .
CASE value OF . . . . . . . . . . . .
Example . . . . . . . . . . . . . .
Looping Structures . . . . . . . . . . . . . .
FOR . . . . . . . . . . . . . . . . . .
Examples . . . . . . . . . . . . .
DO...UNTIL . . . . . . . . . . . . . . .
WHILE...DO . . . . . . . . . . . . . .
Summary of Program Control Keywords . . .
Controlling Programs in Multiple CPU Systems
.
.
.
.
.
.
.
.
.
.
.
.
.
.
.
.
.
.
.
.
.
.
.
.
.
.
.
.
.
.
.
.
.
.
.
.
.
.
.
.
.
.
.
.
.
.
.
.
.
.
.
.
.
.
.
.
.
.
.
.
.
.
.
.
.
.
.
.
.
.
.
.
.
.
.
.
.
.
.
.
.
.
.
.
.
.
.
.
.
.
.
.
.
.
.
.
.
.
.
.
.
.
.
.
.
.
.
.
V+ Language User’s Guide, Rev A
.
.
.
.
.
.
.
.
.
.
.
.
.
.
.
.
.
.
.
.
.
.
.
.
.
.
.
.
.
.
.
.
.
.
.
.
.
.
.
.
.
.
.
.
.
.
.
.
.
.
.
.
.
.
.
.
.
.
.
.
.
.
.
.
.
.
.
.
.
.
.
.
.
.
.
.
.
.
.
.
.
.
.
.
.
.
.
.
.
.
.
.
.
.
.
.
.
.
.
.
.
.
.
.
.
.
.
.
.
.
.
.
.
.
.
.
.
.
.
.
.
.
.
.
.
.
.
.
.
.
.
.
.
.
.
.
.
.
.
.
.
.
.
.
.
.
.
.
.
.
.
.
.
.
.
.
.
.
.
.
.
.
.
.
.
.
.
.
.
.
.
.
.
.
.
.
.
.
.
.
.
.
.
.
.
.
.
.
.
132
132
132
133
134
135
135
135
136
137
138
138
138
139
142
143
143
143
145
146
147
147
148
148
150
152
155
131
Chapter 5
Introduction
Introduction
This chapter introduces the structures available in V+ to control program
execution. These structures include the looping and branching instructions
common to most high-level languages as well as some instructions specific to V+.
Unconditional Branch Instructions
:
There are three unconditional branching instructions in V+
•
GOTO
•
CALL
•
CALLS
GOTO
The GOTO instruction causes program execution to branch immediately to a
program label instruction somewhere else in the program. The syntax for GOTO
is:
GOTO label
label
is an integer entered at the beginning of a line of program code.
label is not the same as the program step numbers: Step numbers
are assigned by the system; labels are entered by the programmer as
the opening to a line of code. In the next code example, the numbers
in the first column are program step numbers (these numbers are
not displayed in the SEE editor). The numbers in the second column
are program labels.
61
.
62
GOTO 100
63
.
64
.
65 100 TYPE "The instruction GOTO 100 got me here."
66
.
132
V+ Language User’s Guide, Rev A
Chapter 5
Unconditional Branch Instructions
A GOTO instruction can branch to a label before or after the GOTO instruction.
GOTO instructions can make program logic difficult to follow and debug,
especially in a long, complicated program with many subroutine calls. Use GOTO
instructions with care. A common use of GOTO is as an exit routine or exit on
error instruction.
CALL
The CALL and CALLS instructions are used in V+ to implement subroutine calls.
The CALL instruction causes program execution to be suspended and execution
of a new program to begin. When the new program has completed execution,
execution of the original program will resume at the instruction after the CALL
instruction. The details of subroutine creation, execution, and parameter passing
are covered in “Subroutines” on page 54. The simplified syntax for a CALL
instruction is:
CALL program (arg_list)
program
is the name of the program to be called. The program name must be
specified exactly, and the program being CALLed must be resident
in system memory.
arg_list
is the list of arguments being passed to the subroutine. These arguments can be passed either by value or by reference and must agree
with the arguments expected by the program being called. Subroutines and argument lists are described in “Subroutines” on page 54.
The code:
48
49
50
.
CALL check_data(locx, locy, length)
.
will suspend execution of the calling program, pass the arguments locx, locy, and
length to program check_data, execute check_data, and (after check_data has
completed execution) resume execution of the calling program at step 50.
V+ Language User’s Guide, Rev A
133
Chapter 5
Unconditional Branch Instructions
CALLS
The CALLS instruction is identical to the CALL instruction except for the
specification of program. For a CALLS instruction, program is a string value,
variable, or expression. This allows you to call different subroutines under
different conditions using the same line of code. (These different subroutines
must have the same arg_list.)
The code:
47
48
49
50
.
$program_name = $program_list[program_select]
CALLS $program_name(length, width)
.
will suspend execution of the calling program, pass the parameters length and
width to the program specified by array index program_select from the array
$program_list, execute the specified program, and resume execution of the calling
program at step 50.
134
V+ Language User’s Guide, Rev A
Chapter 5
Program Interrupt Instructions
Program Interrupt Instructions
V+ provides several ways of suspending or terminating program execution. A
program can be put on hold until a specific condition becomes TRUE using the
WAIT instruction. A program can be put on hold for a specified time period or
until an event is generated in another task by the WAIT.EVENT instruction. A
program can be interrupted based on a state transition of a digital input signal
with the REACT and REACTI instructions. Program errors can be intercepted
and handled with a REACTE instruction. Program execution can be terminated
with the HALT, STOP, and PAUSE commands. These instructions will interrupt
the program they are contained in. Any programs running as other tasks will not
be affected. Robot motion can be controlled with the BRAKE, BREAK, and
DELAY instructions. (The ABORT and PROCEED monitor commands can also be
used to suspend and proceed programs, see the V+ Operating System Reference
Guide for details.)
WAIT
WAIT suspends program execution until a condition (or conditions) becomes
true.
WAIT SIG(1032, −1028)
will delay execution until digital input signal 1032 is on and 1028 is off.
WAIT TIMER(1) > 10
will suspend execution until timer 1 returns a value greater than 10.
WAIT.EVENT
The instruction:
WAIT.EVENT , 3.7
will suspend execution for 3.7 seconds. This wait is more efficient than waiting for
a timer (as in the previous example) since the task does not have to loop
continually to check the timer value.
The instruction:
WAIT.EVENT
will suspend execution until another task issues a SET.EVENT instruction to the
waiting task. If the SET.EVENT does not occur, the task will wait indefinitely.
V+ Language User’s Guide, Rev A
135
Chapter 5
Program Interrupt Instructions
REACT and REACTI
When a REACT or REACTI instruction is encountered, the program will begin
monitoring a digital input signal specified in the REACT instruction. This signal
is monitored in the background with program execution continuing normally
until the specified signal transitions. When (and if) a transition is detected, the
program will suspend execution at the currently executing step. REACT and
REACTI suspend execution of the current program and call a specified
subroutine. Additionally, REACTI issues a BRAKE instruction to immediately
stop the current robot motion.
Both instructions specify a subroutine to be run when the digital transition is
detected. After the specified subroutine has completed, program execution will
resume at the step executing when the digital transition was detected.
Digital signals 1001 - 1012 and 2001 - 2008 can be used for REACT instructions.
The signal monitoring initiated by REACT/REACTI is in effect until another
REACT/REACTI or IGNORE instruction is encountered. If the specified signal
transition is not detected before an IGNORE or second REACT/REACTI
instruction is encountered, the REACT/REACTI instruction will have no effect on
program execution.
The syntax for a REACT or REACTI instruction is:
REACT signal_number, program, priority
signal_number digital input signal in the range 1001 to 1012 or 2001 to 2008.
program
the subroutine (and its argument list) that is to be executed when a
react is initiated.
priority
number from 1 to 127 that indicates the relative importance of the
reaction.
The following code implements a REACT routine:
35
36
37
38
39
40
41
42
43
44
136
;
;
;
;
Look for a change in signal 1001 from "on" to "off".
Call subroutine "alarm if a change is detected.
Set priority of "alarm" to 10 (default would be 1).
The main program has default priority of 0.
REACT −1001, alarm, 10
; REACT will be in effect for the following code
MOVE a
V+ Language User’s Guide, Rev A
Chapter 5
Program Interrupt Instructions
45
MOVE b
46
LOCK 20;Defer any REACTions to "alarm"
47
MOVE c
48
MOVE d
49
LOCK 0;Allow REACTions
50
MOVE e
51
52
; Disable monitoring of signal 1001
53
54
IGNORE −1001
55 .
If signal 1001 transitions during execution of step 43, step 43 will complete, the
subroutine alarm will be called, and execution will resume at step 44.
If signal 1001 transitions during execution of step 47, steps 47, 48, and 49 will
complete (since the program had been given a higher priority than REACT), the
subroutine alarm will be called, and execution will resume at step 50.1
REACTE
REACTE enables a reaction program that is run whenever a system error that
would cause program execution to terminate is encountered. This includes all
robot errors, hardware errors, and most system errors (it does NOT include I/O
errors).
Unlike REACT and REACTI, REACTE cannot be deferred based on priority
considerations. The instruction:
REACTE trouble
will enable monitoring of system errors and execute the program trouble
whenever a system error is generated.
1
The LOCK instruction can be used to control execution of a program after a REACT or REACTI
subroutine has completed.
V+ Language User’s Guide, Rev A
137
Chapter 5
Program Interrupt Instructions
HALT, STOP, and PAUSE
When a HALT instruction is encountered, program execution is terminated, and
any open serial or disk units are DETACHED and FCLOSEd. PROCEED or
RETRY will not resume execution.
When a STOP instruction is encountered, execution of the current program cycle
is terminated and the next execution cycle resumes at the first step of the
program. If the STOP instruction is encountered on the last execution cycle,
program execution is terminated, and any open serial or disk units are
DETACHED and FCLOSEd. PROCEED or RETRY will not resume execution. (See
EXECUTE for details on execution cycles.) When a PAUSE instruction is
encountered, execution will be suspended. After a PAUSE, the system prompt
will appear and Monitor Commands can be executed. This allows you to check
the values of program variables and set system parameters. This is useful during
program debugging. The monitor command PROCEED will resume execution of
a program interrupted with the PAUSE command.
NOTE: The PANIC monitor command halts program execution
and robot motion immediately but leaves HIGH POWER on.
BRAKE, BREAK, and DELAY
BRAKE aborts the current robot motion. This instruction can be issued from any
task. Program execution is not suspended and the program (executing as task 0)
will continue executing at the next instruction. BREAK suspends program
execution (defeats forward processing) until the current robot motion is
completed. This instruction can be executed only from a robot control program
and is used when completion of the current robot motion must occur before
execution of the next instruction. A DELAY instruction specifies the minimum
delay between robot motions (not program instructions).
Additional Program Interrupt Instructions
You can specify a parameter in the instruction line for the I/O instructions
ATTACH, READ, GETC, and WRITE that causes the program to suspend until the
I/O request has been successfully completed.
Third-party boards may also generate system level interrupts. See the
descriptions of INT.EVENT, CLEAR.EVENT and WAIT.EVENT for details.
138
V+ Language User’s Guide, Rev A
Chapter 5
Program Interrupt Instructions
Program Interrupt Example
Figure 5-1 on page 141 shows how the task and program priority scheme works.
It also shows how the asynchronous and program interrupt instructions work
within the priority scheme. The example makes the following simplifying
assumptions:
•
Task 1 runs in all time slices at priority 30
•
Task 2 runs in all time slices at priority 20
•
All system tasks are ignored
•
All system interrupts are ignored
The illustration shows the time lines of executing programs. A solid line indicates
a program is running, and a dotted line indicates a program is waiting. The Y axis
shows the program priority. The X axis is divided into 16-millisecond major
cycles. The example shows two tasks executing concurrently with REACT
routines enabled for each task. Note how the LOCK instructions and triggering of
the REACT routines change the program priority.
The sequence of events for the example is:
➊
Task 1 is running program prog_a at program priority 0. A reaction
program based on signal 1003 is enabled at priority 5.
➋
Signal 1003 is asserted externally. The signal transition is not
detected until the next major cycle.
➌
The signal 1003 transition is detected. The task 1 reaction program
begins execution, interrupting prog_a.
➍
The task 1 reaction program reenables itself and completes by issuing a RETURN instruction. prog_a resumes execution in task 1.
➎
Task 1 prog_a issues a CLEAR.EVENT instruction followed by a
WAIT.EVENT instruction to wait for its event flag to be set. Task 1 is
suspended, and task 2 resumes execution of prog_b. Task 2 has a
reaction program based on signal 1010 enabled at priority 5.
➏
Task 2 prog_b issues a LOCK 10 instruction to raise its program priority to level 10.
➐
Signal 1010 is asserted externally. The signal transition is not
detected until the next major cycle.
V+ Language User’s Guide, Rev A
139
Chapter 5
Program Interrupt Instructions
➑
The signal 1010 transition is detected, and the task 2 reaction is triggered. However, since the reaction is at level 5 and the current program priority is 10, the reaction execution is deferred.
➒
Task 2 prog_b issues a LOCK 0 instruction to lower its program priority to level 0. Since a level 5 reaction program is pending, it begins
execution immediately and sets the program priority to 5.
➓
Signal 1003 is asserted externally. The signal transition is not
detected until the next major cycle.
11
The signal 1003 transition is detected which triggers the task 1 reaction routine and also sets the task 1 event flag. Since task 1 has a
higher priority (30) than task 2 (20), task 1 begins executing its reaction routine and task 2 is suspended.
12
The task 1 reaction routine completes by issuing a RETURN instruction. Control returns to prog_a in task 1.
13
Task 1 prog_a issues a CLEAR.EVENT instruction followed by a
WAIT.EVENT instruction to wait for its event flag to be set. Task 1 is
suspended and task 2 resumes execution of its reaction routine.
14
The task 2 reaction routine completes by issuing a RETURN instruction. Control returns to prog_b in task 2.
15
Task 2 prog_b issues a SET.EVENT 1 instruction, setting the event
flag for task 1. Task 2 now issues a RELEASE program instruction to
yield control of the CPU.
Since the task 1 event flag is now set, and its priority is higher than
task 2, task 1 resumes execution, and task 2 is suspended.
140
V+ Language User’s Guide, Rev A
Program Interrupt Instructions
Program Priority
Chapter 5
= task waiting
= task running main program
= task running reaction routine
task 1 running prog_a, task priority = 30
10
5
0
➊
➋
➌
➍
➎
12
13
task 2 running prog_b, task priority = 20
10
5
0
➏
16ms
➐
V+
➑➒ ➓
M a j o r
14 15
11
C y c l e s
➟
Figure 5-1. Priority Example 2
V+ Language User’s Guide, Rev A
141
➟
Chapter 5
Logical (Boolean) Expressions
Logical (Boolean) Expressions
The next two sections discuss program control structures whose execution
depends on an expression or variable that will take on a boolean value (a variable
that is either true or false, or an expression that resolves to true or false). An
expression can take into account any number of variables or digital input signals
as long as the final resolution of the expression is a boolean value. In V+, any
number (real or integer) can satisfy this requirement. 0 is considered false; any
nonzero number is considered true. There are four system constants, TRUE and
ON that resolve to –1, and FALSE and FALSE, that resolve to 0.
Examples of valid boolean expressions:
y > 32
NOT(y > 32)
x == 56
x AND y
(x AND y) OR (var1 < var2)
−1
See the section “Relational Operators” on page 127 for details on V+ relational
operators.
142
V+ Language User’s Guide, Rev A
Chapter 5
Conditional Branching Instructions
Conditional Branching Instructions
Conditional branching instructions allow you to execute blocks of code based on
the current values of program variables or expressions. V+ has three conditional
branch instructions:
•
IF...GOTO
•
IF...THEN...ELSE
•
CASE value OF
IF...GOTO
IF...GOTO behaves similarly to GOTO, but a condition can be attached to the
branch. If the instruction:
IF logical_expression GOTO 100
is encountered, the branch to label 100 will occur only if logical_expression
has a value of true.
IF...THEN...ELSE
The basic conditional instruction is the IF...THEN...ELSE clause. This instruction
has two forms:
IF expression THEN
code block (executed when expression is true)
END
IF expression THEN
code block (executed when expression is true)
ELSE
code block (executed when expression is false)
END
expression is any well-formed boolean expression (described above).
V+ Language User’s Guide, Rev A
143
Chapter 5
Conditional Branching Instructions
In the following example, if program execution reaches step 59 and num_parts is
greater than 75, step 60 will be executed. Otherwise, execution will resume at step
62.
56
57
58
59
60
61
62
.
;CALL "check_num" if "num_parts" is greater than 75
IF num_parts > 75 THEN
CALL check_num(num_parts)
END
.
In the following example, if program execution reaches step 37 with input signal
1033 on and need_part true, the program will execute steps 38 to 40 and resume at
step 44. Otherwise, it will execute step 42 and resume at step 44.
32
33
34
35
36
37
38
39
40
41
42
43
44
144
.
; If I/O signal 1033 is on and Boolean "need_part" is
; true, then pick up the part
; else alert the operator.
IF SIG(1033) AND need_part THEN
MOVE loc1
CLOSEI
DEPART 50
ELSE
TYPE "Part not picked up."
END
.
V+ Language User’s Guide, Rev A
Chapter 5
Conditional Branching Instructions
CASE value OF
The IF...THEN...ELSE structure allows a program to take one of two different
actions. The CASE structure will allow a program to take one of many different
actions based on the value of a variable. The variable used must be a real or an
integer. The form of the CASE structure is:
CASE target OF
VALUE list_of_values:
code block (executed when target is in list_of_values)
VALUE list_of_values:
code block (executed when target is in list_of_values)
...
ANY
code block (executed when target not in any
list_of_values)
END
target
real value to match.
list_of_values list (separated by commas) of real values. If one of the values
in the list equals target, the code following that value statement
will be executed.
V+ Language User’s Guide, Rev A
145
Chapter 5
Conditional Branching Instructions
Example
65
; Create a menu structure using a CASE statement
66
67 50 TYPE "1. Execute the program."
68
TYPE "2. Execute the programmer."
69
TYPE "3. Execute the computer."
70
PROMPT "Enter menu selection.", select
71
72
CASE select OF
73
VALUE 1:
74
CALL exec_program()
75
VALUE 2:
76
CALL exec_programmer()
77
VALUE 3:
78
CALL exec_computer()
79
ANY
80
PROMPT "Entry must be from 1 to 3", select
81
GOTO 50
82
END
83
.
If the above code is rewritten without an ANY statement, and a value other than
1, 2, or 3 is entered, the program will continue execution at step 83 without
executing any program.
146
V+ Language User’s Guide, Rev A
Chapter 5
Looping Structures
Looping Structures
In many cases, you will want the program to execute a block of code more than
once. V+ has three looping structures that allow you to execute blocks of code a
variable number of times. The three instructions are:
•
FOR
•
DO...UNTIL
•
WHILE...DO
FOR
A FOR instruction creates an execution loop that will execute a given block of
code a specified number of times. The basic form of a FOR loop is:
FOR index = start_val TO end_val STEP incr
.
code block
.
END
index
is a real variable that will keep track of the number of times the FOR
loop has been executed. This variable is available for use within the
loop.
start_val is a real expression for the starting value of the index.
end_val
is a real expression for the ending value of the index. Execution of
the loop will terminate when index reaches this value.
incr
is a real expression indicating the amount index is to be incremented after each execution of the loop. The default value is 1.
V+ Language User’s Guide, Rev A
147
Chapter 5
Looping Structures
Examples
88
89
90
91
92
93
94
102
103
104
105
106
107
108
109
110
111
112
.
; Output even elements of array "$names" (up to index 32)
FOR i = 2 TO 32 STEP 2
TYPE $names[i]
END
.
.
.
; Output the values of the 2 dimensional array "values" in
; column and row form (10 rows by 10 columns)
.
FOR i = 1 TO 10
FOR j = 1 to 10
TYPE values[i,j], /S
END
TYPE " ", /C1
END
.
A FOR loop can be made to count backward by entering a negative value for the
step increment.
13
14
15
16
17
18
19
.
; Count backward from 10 to 1
FOR i = 10 TO 1 STEP −1
TYPE i
END
.
Changing the value of index inside a FOR loop will cause the loop to behave
improperly. To avoid problems with the index, make the index variable an auto
variable and do not change the index from inside the FOR loop. Changes to the
starting and ending variables will not affect the FOR loop once it is executing.
DO...UNTIL
DO...UNTIL is a looping structure that will execute a given block of code an
indeterminate number of times. Termination of the loop depends on the boolean
expression or variable that controls the loop becoming true. The boolean is tested
after each execution of the code block—if the expression evaluates to true, the
loop is not executed again. Since the expression is not evaluated until after the
code block has been executed, the code block will always execute at least once.
The form for this looping structure is:
148
V+ Language User’s Guide, Rev A
Chapter 5
Looping Structures
DO
.
code block
.
UNTIL expression
expression is any well-formed boolean expression. This
expression must eventually evaluate to true, or the loop
will execute indefinitely (yes, the infamous infinite loop).
20
21
22
23
24
25
26
27
28
.
; Output the numbers 1 to 100 to the screen
x = 1
DO
TYPE x
x = x + 1
UNTIL x > 100
.
Step 26 insures that x will reach a high enough value so that the expression x > 100
will become true.
43
44
45
46
47
48
49
50
51
52
53
.
; Echo up to 15 characters to the screen. Stop when 15
; characters or the character "#" have been entered.
x = 1
DO
PROMPT "Enter a character: ", $ans
TYPE $ans
x = x + 1
UNTIL (x > 15) OR ($ans == "#")
.
In this code, either x reaching 15 or # being entered at the PROMPT instruction
will terminate the loop. As long as the operator enters enough characters, the loop
will terminate.
V+ Language User’s Guide, Rev A
149
Chapter 5
Looping Structures
WHILE...DO
WHILE...DO is a looping structure similar to DO...UNTIL except the boolean
expression is evaluated at the beginning of the loop instead of at the end. This
means that if the condition indicated by the expression is true when the
WHILE...DO instruction is encountered, the code within the loop will not be
executed at all.
WHILE...DO loops are susceptible to infinite looping just as DO...UNTIL loops
are. The expression controlling the loop must eventually evaluate to true for the
loop to terminate. The form of the WHILE...DO looping structure is:
WHILE expression DO
code block
END
expression is any well-formed boolean expression as described at the beginning
of this section.
The following code shows a WHILE...DO loop being used to validate input. Since
the boolean expression is tested before the loop is executed, the code within the
loop will be executed only when the operator inputs an unacceptable value at step
23.
20
21
22
23
24
25
26
27
.
; Loop until operator inputs value in the range 32-64
PROMPT "Enter a number in the range 32 to 64.", ans
WHILE (ans < 32) OR (ans > 64) DO
PROMPT "Number must be in the range 32-64.", ans
END
.
In the above code, an operator could enter a nonnumeric value in which case the
program would crash. A more robust strategy would be to use a string variable in
the PROMPT instruction and then use the $DECODE and VAL functions to
evaluate the input.
In the following code, if digital signal 1033 is on when step 69 is reached, the loop
will not execute, and the program will continue at step 73. If digital signal 1033 is
off, the loop will execute continually until the signal comes on.
65
66
67
68
150
.
; Create a busy loop waiting for signal
; 1033 to turn "on"
WHILE NOT SIG(1033) DO
V+ Language User’s Guide, Rev A
Chapter 5
69
70
71
72
73
Looping Structures
;Wait for signal
END
.
V+ Language User’s Guide, Rev A
151
Chapter 5
Summary of Program Control Keywords
Summary of Program Control Keywords
Table 5-1 summarizes the program control instructions. See the V+ Language
Reference Guide for details on these commands.
Table 5-1. Program Control Operations
Keyword
Type
Function
ABORT
Program
Instruction
Terminate execution of a control program.
CALL
Program
Instruction
Suspend execution of the current program and
continue execution with a new program (that is, a
subroutine).
CALLS
Program
Instruction
Suspend execution of the current program and
continue execution with a new program (that is, a
subroutine) specified with a string value.
CASE
Program
Instruction
Initiate processing of a CASE structure by defining
the value of interest.
CLEAR.EVENT
Program
Instruction
Clear an event associated with the specified task.
CYCLE.END
Program
Instruction
Terminate the specified control program the next
time it executes a STOP program instruction (or its
equivalent). Suspend processing of an application
program or command program until a program
completes execution.
DO
Program
Instruction
Introduce a DO program structure.
EXECUTE
Program
Instruction
Begin execution of a control program.
EXIT
Program
Instruction
Exit a FOR, DO, or WHILE control structure.
FOR
Program
Instruction
Execute a group of program instructions a certain
number of times.
GET.EVENT
Real-Valued
Function
Return events that are set for the specified task.
152
V+ Language User’s Guide, Rev A
Chapter 5
Summary of Program Control Keywords
Table 5-1. Program Control Operations (Continued)
Keyword
Type
Function
GOTO
Program
Instruction
Perform an unconditional branch to the program
step identified by the given label.
HALT
Program
Instruction
Stop program execution and do not allow the
program to be resumed.
IF...GOTO
Program
Instruction
Branch to the specified label if the value of a logical
expression is TRUE (nonzero).
IF...THEN
Program
Instruction
Conditionally execute a group of instructions (or one
of two groups) depending on the result of a logical
expression.
INT.EVENT
Program
Instruction
Send a SET.EVENT instruction to the current task if
an interrupt occurs on a specified VME bus vector.
LOCK
Program
Instruction
Set the program reaction lock-out priority to the
value given.
MCS
Program
Instruction
Invoke a monitor command from a control program.
NEXT
Program
Instruction
Break a FOR, DO, or WHILE structure and start the
next iteration of the control structure.
PAUSE
Program
Instruction
Stop program execution but allow the program to be
resumed.
PRIORITY
Real-Valued
Function
Return the current reaction lock-out priority for the
program.
REACT
Program
Instruction
Initiate continuous monitoring of a specified digital
signal and automatically trigger a subroutine call if
the signal transitions properly.
REACTE
Program
Instruction
Initiate the monitoring of errors that occur during
execution of the current program task.
RELEASE
Program
Instruction
Allow the next available program task to run.
RETURN
Program
Instruction
Terminate execution of the current subroutine and
resume execution of the last-suspended program at
the step following the CALL or CALLS instruction
that caused the subroutine to be invoked.
REACTI
V+ Language User’s Guide, Rev A
153
Chapter 5
Summary of Program Control Keywords
Table 5-1. Program Control Operations (Continued)
Keyword
Type
Function
RETURNE
Program
Instruction
Terminate execution of an error reaction subroutine
and resume execution of the last-suspended
program at the step following the instruction that
caused the subroutine to be invoked.
RUNSIG
Program
Instruction
Turn on (or off) the specified digital signal as long as
execution of the invoking program task continues.
SET.EVENT
Program
Instruction
Set an event associated with the specified task.
STOP
Program
Instruction
Terminate execution of the current program cycle.
WAIT
Program
Instruction
Put the program into a wait loop until the condition
is TRUE.
WAIT.EVENT
Program
Instruction
Suspend program execution until a specified event
has occurred, or until a specified amount of time has
elapsed.
WHILE
Program
Instruction
Initiate processing of a WHILE structure if the
condition is TRUE or skipping of the WHILE
structure if the condition is initially FALSE.
154
V+ Language User’s Guide, Rev A
Chapter 5
Controlling Programs in Multiple CPU Systems
Controlling Programs in Multiple CPU Systems
V+ systems equipped with multiple CPUs and optional V+ Extensions can run
multiple copies of V+ (see Chapter 13 for more information). Keep the following
considerations in mind when running multiple V+ systems:
•
•
A graphics-based system is required.
The second, third, etc., V+ copies will be displayed in separate windows on
•
the monitor. These windows are labeled Monitor_2, Monitor_3, etc. The
system switch MONITORS must be enabled before these windows can be
displayed. The CPU number is determined by the board address switch (see
the Adept MV Controller User’s Guide).
ALL V+ copies share the same digital input, output, and soft signals. Global
variables are not shared.
•
The IOGET_ and IOPUT_ instructions can be used to share data between V+
copies via an 8 KB reserved section of shared memory on each board.
Acceptable address values are 0 to hexadecimal value 1FFF (decimal value 0
to 8191). This memory area is used only for communication between V+
application programs and is not used for any other purpose. (It is not possible
to access the rest of the processor memory map.)
•
The IOTAS() function can be used to interlock access to user data structures.
•
The addresses are based on single-byte (8-bit) values. For example, if you
write a 32-bit value to an address, it will occupy four address spaces (the
address that you specify and the next three addresses).
•
If you read a value from a location using a format different from the format
that was used to write to that location, you will get an invalid value, but you
will not get an error message. (For example, if you write using IOPUTF and
read using IOPUTL, your data will be invalid.)
NOTE: V+ does not enforce any memory protection schemes for
use of the application shared-memory area. It is the user’s
responsibility to keep track of memory usage. If you are using
application or utility programs written by someone else, you should
read the documentation provided with that software to check that it
does not conflict with your usage of the shared area.
•
In general, robot control and system configuration changes must be
performed from CPU #1. CPUs other than #1 always start up with the
stand-alone control module. No belts or kinematic modules are loaded.
V+ Language User’s Guide, Rev A
155
Chapter 5
•
156
Controlling Programs in Multiple CPU Systems
Each multiple CPU can execute its own autostart routine. CPU #1 will load
the normal AUTO file and execute the program auto, CPU #2 will load the
file AUTO02.V2 and execute the program auto02.
V+ Language User’s Guide, Rev A
6
Functions
Using Functions . . . . . . . . . . . . . . . . .
Variable Assignment Using Functions . . . .
Functions Used in Expressions . . . . . . .
Functions as Arguments to a Function . . .
String-Related Functions . . . . . . . . . . . . .
Examples of String Functions . . . . . . . .
Location, Motion, and External Encoder Functions
Examples of Location Functions . . . . . .
Numeric Value Functions . . . . . . . . . . . .
Examples of Arithmetic Functions . . . . .
Logical Functions . . . . . . . . . . . . . . . .
System Control Functions . . . . . . . . . . . .
Example of System Control Functions . . .
.
.
.
.
.
.
.
.
.
.
.
.
.
.
.
.
.
.
.
.
.
.
.
.
.
.
V+ Language User’s Guide, Rev A
.
.
.
.
.
.
.
.
.
.
.
.
.
.
.
.
.
.
.
.
.
.
.
.
.
.
.
.
.
.
.
.
.
.
.
.
.
.
.
.
.
.
.
.
.
.
.
.
.
.
.
.
.
.
.
.
.
.
.
.
.
.
.
.
.
.
.
.
.
.
.
.
.
.
.
.
.
.
.
.
.
.
.
.
.
.
.
.
.
.
.
158
158
158
158
159
160
161
161
162
163
163
164
165
157
Chapter 6
Using Functions
Using Functions
V+ provides you with a wide variety of predefined functions for performing
string, mathematical, and general system parameter manipulation. Functions
generally require you to provide them with data, and they return a value based on
a specific operation on that data. Functions can be used anywhere a value or
expression would be used.
Variable Assignment Using Functions
The instruction:
$curr_time = $TIME()
will put the current system time into the variable $curr_time. This is an example
of a function that does not require any input data. The instruction:
var_root = SQRT(x)
will put the square root of the value x into var_root. x will not be changed by the
function.
Functions Used in Expressions
A function can be used wherever an expression can be used (as long as the data
type returned by the function is the correct type). The instruction:
IF LEN($some_string) > 12 THEN
will result in the boolean expression being true if the string $some_string has
more than 12 characters. The instruction:
array_var = some_array[VAL($x)]
will result in array_var having the same value as the array cell $x. (VAL converts a
string to a real.)
Functions as Arguments to a Function
In most cases, the values passed to a function are not changed. This not only
protects the variables you use as arguments to a function, but also allows you to
use a function as an argument to a function (so long as the data type returned is
the type expected by the function). The following example will result in i having
2
the absolute value of x. (i = D(−2 ) = 2).
i = SQRT(SQR(x))
158
V+ Language User’s Guide, Rev A
Chapter 6
String-Related Functions
String-Related Functions
The value returned from a string function may be another string or a numeric
value.
Table 6-1. String-Related Functions
Keyword
Function
ASC
Return a single character value from within a string.
$CHR
Return a one-character string having a given value.
DBLB
Return the value of eight bytes of a string interpreted as an IEEE
double-precision floating-point number.
$DBLB
Return an 8-byte string containing the binary representation of a real
value in double-precision IEEE floating-point format.
$DECODE
Extract part of a string as delimited by given break characters.
$ENCODE
Return a string created from output specifications. The string produced is
similar to the output of a TYPE instruction.
FLTB
Return the value of four bytes of a string interpreted as an IEEE
single-precision floating-point number.
$FLTB
Return a 4-byte string containing the binary representation of a real value
in single-precision IEEE floating-point format.
$INTB
Return a 2-byte string containing the binary representation of a 16-bit
integer.
LEN
Return the number of characters in the given string.
LNGB
Return the value of four bytes of a string interpreted as a signed 32-bit
binary integer.
$LNGB
Return a 4-byte string containing the binary representation of a 32-bit
integer.
$MID
Return a substring of the specified string.
PACK
Replace a substring within an array of (128-character) string variables or
within a (nonarray) string variable.
POS
Return the starting character position of a substring in a string.
V+ Language User’s Guide, Rev A
159
Chapter 6
String-Related Functions
Table 6-1. String-Related Functions (Continued)
Keyword
Function
$TRANSB
Return a 48-byte string containing the binary representation of a
transformation value.
$TRUNCATE
Return all characters in the input string until an ASCII NUL (or the end of
the string) is encountered.
$UNPACK
Return a substring from an array of 128-character string variables.
VAL
Return the real value represented by the characters in the input string.
Examples of String Functions
The instruction:
TYPE $ERROR(-504)
will output the text *Unexpected end of file* to the screen.
The instructions:
$message = "The length of this line is: "
TYPE $ENCODE($message, /I0, LEN($message)+14), "
characters."
will output the message The length of this line is: 42 characters.
160
V+ Language User’s Guide, Rev A
Chapter 6
Location, Motion, and External Encoder Functions
Location, Motion, and External Encoder Functions
V+ provides numerous functions for manipulating and converting location
variables. See Chapter 8 for details on motion processing and a table that includes
all location-related functions. See Appendix B for details on the external
encoders.
Examples of Location Functions
The instruction:
rotation = RZ(HERE)
will place the value of the current rotation about the Z axis in the variable
rotation.
The instruction:
dist = DISTANCE(HERE, DEST)
will place the distance between the motion device’s current location and its
destination (the value of the next motion instruction) in the variable dist.
The instructions:
IF INRANGE(loc_1) == 0 THEN
IF SPEED(2) > 50 THEN
SPEED 50
END
MOVE(loc_1)
END
will ensure loc_1 is reachable and then move the motion device to that location at
a program speed not exceeding 50.
V+ Language User’s Guide, Rev A
161
Chapter 6
Numeric Value Functions
Numeric Value Functions
The functions listed in Table 6-2 provide trigonometric, statistical, and data-type
conversion operations. See Chapter 4 for additional details on arithmetic
processing.
Table 6-2. Numeric Value Functions
Keyword
Function
ABS
Return absolute value.
ATAN2
Return the size of the angle (in degrees) that has its trigonometric
tangent equal to value_1/value_2.
BCD
Convert a real value to Binary Coded Decimal (BCD) format.
COS
Return the trigonometric cosine of a given angle.
DCB
Convert BCD digits into an equivalent integer value.
FRACT
Return the fractional part of the argument.
INT
Return the integer part of the value.
MAX
Return the maximum value contained in the list of values.
MIN
Return the minimum value contained in the list of values.
OUTSIDE
Test a value to see if it is outside a specified range.
PI
Return the value of the mathematical constant pi (3.141593).
RANDOM
Return a pseudorandom number.
SIGN
Return the value 1 with the sign of the value parameter.
SIN
Return the trigonometric sine of a given angle.
SQR
Return the square of the parameter.
SQRT
Return the square root of the parameter.
162
V+ Language User’s Guide, Rev A
Chapter 6
Logical Functions
Examples of Arithmetic Functions
The instructions:
$a = "16"
x = SQRT(VAL($a))
will result in x having a value of 4.
The instruction:
x = INT(RANDOM*10)
will create a pseudorandom number between 0 and 10.
Logical Functions
The functions listed in Table 6-3 return boolean values. These functions require no
arguments and essentially operate as system constants.
Table 6-3. Logical Functions
Keyword
Function
FALSE
Return the value used by V+ to represent a logical false result.
OFF
Return the value used by V+ to represent a logical false result.
ON
Return the value used by V+ to represent a logical true result.
TRUE
Return the value used by V+ to represent a logical true result.
V+ Language User’s Guide, Rev A
163
Chapter 6
System Control Functions
System Control Functions
The functions listed in Table 6-4 return information about the system and system
parameters.
Table 6-4. System Control Functions
Keyword
Function
DEFINED
Determine whether a variable has been defined.
ERROR
Return the error number of a recent error that caused program
execution to stop or caused a REACTE reaction.
$ERROR
Return the error message associated with the given error code.
FREE
Return the amount of unused free memory storage space.
GET.EVENT
Return events that are set for the specified task.
ID
Return values that identify the configuration of the current system.
$ID
Return the system creation date and edit/revision information.
INTB
Return the value of two bytes of a string interpreted as a signed 16-bit
binary integer.
LAST
Return the highest index used for an array (dimension).
PARAMETER
Return the current setting of the named system parameter.
PRIORITY
Return the current reaction lock-out priority for the program.
SELECT
Return the unit number that is currently selected by the current task
for the device named.
STATUS
Return status information for an application program.
SWITCH
Return an indication of the setting of a system switch.
TAS
Return the current value of a real-valued variable and assign it a new
value. The two actions are done indivisibly so no other program task
can modify the variable at the same time.
TASK
Return information about a program execution task.
TIME
Return an integer value representing either the date or the time
specified in the given string parameter.
164
V+ Language User’s Guide, Rev A
Chapter 6
System Control Functions
Table 6-4. System Control Functions (Continued)
Keyword
Function
$TIME
Return a string value containing either the current system date and
time or the specified date and time.
TIMER
Return the current time value of the specified system timer.
TPS
Return the number of ticks of the system clock that occur per second
(Ticks Per Second).
Example of System Control Functions
The instruction:
IF (TIMER(2) > 100) AND (DEFINED(loc_1)) THEN
MOVE loc_1
END
would execute the MOVE instruction only if timer (2) had a value greater than
100 and the variable loc_1 had been defined.
V+ Language User’s Guide, Rev A
165
7
Switches and Parameters
Introduction . . . . . . . . . . . . . . . . . . . .
Parameters . . . . . . . . . . . . . . . . . . . .
Viewing Parameters . . . . . . . . . . . . .
Setting Parameters . . . . . . . . . . . . .
Summary of Basic System Parameters . . . .
Graphics-Based System Terminal Settings
Switches . . . . . . . . . . . . . . . . . . . . . .
Viewing Switch Settings . . . . . . . . . . .
Setting Switches . . . . . . . . . . . . . . .
Summary of Basic System Switches . . . . .
.
.
.
.
.
.
.
.
.
.
V+ Language User’s Guide, Rev A
.
.
.
.
.
.
.
.
.
.
.
.
.
.
.
.
.
.
.
.
.
.
.
.
.
.
.
.
.
.
.
.
.
.
.
.
.
.
.
.
.
.
.
.
.
.
.
.
.
.
.
.
.
.
.
.
.
.
.
.
.
.
.
.
.
.
.
.
.
.
168
169
169
170
170
172
172
172
173
173
167
Chapter 7
Introduction
Introduction
System parameters determine certain operating characteristics of the V+ system.
These parameters have numeric values that can be changed from the command
line or from within a program to suit particular system configurations and needs.
The various parameters are described in this chapter along with the operations for
displaying and changing their values.
System switches are similar to system parameters in that they control the
operating behavior of the V+ system. Switches differ from parameters, however,
in that they do not have numeric values. Switches can be set to either enabled or
disabled, which can be thought of as on and off, respectively.
All the basic system switches are described in this chapter. The monitor
commands and program instructions that can be used to display and change their
settings are also presented.
168
V+ Language User’s Guide, Rev A
Chapter 7
Parameters
Parameters
See the V+ Language Reference Guide for more detailed descriptions of the
keywords discussed here.
Whenever a system parameter name is used, it can be abbreviated to the
minimum length required to identify the parameter. For example, the
HAND.TIME parameter can be abbreviated to H, since no other parameter name
begins with H.
Viewing Parameters
To see the state of a single parameter, use the PARAMETER monitor command:
PARAMETER parameter_name
If parameter_name is omitted, the value of all parameters is displayed.
To retrieve the value of a parameter from within a program, use the PARAMETER
function. The instruction:
TYPE "HAND.TIME parameter =", PARAMETER(HAND.TIME)
will display the current setting of the hand-delay parameter in the monitor
window.
The PARAMETER function can be used in any expression to include the value of a
parameter. For example, the following program statement will increase the delay
for hand actuation:
PARAMETER HAND.TIME = PARAMETER(HAND.TIME) + 0.15
Note that the left-hand occurrence of PARAMETER is the instruction name and
the right-hand occurrence is the function name.
V+ Language User’s Guide, Rev A
169
Chapter 7
Parameters
Setting Parameters
To set a parameter from the command line, use the PARAMETER monitor
command. The instruction:
PARAMETER SCREEN.TIMEOUT = 10
sets the screen blanking time to 10 seconds.
To set a parameter in a program, use the PARAMETER program instruction. The
instruction:
PARAMETER NOT.CALIBRATED = 1
asserts the not calibrated state for robot 1.
Some parameters are organized as arrays and must be accessed by specifying an
array index.
Summary of Basic System Parameters
System parameters are set to defaults when the V+ system is initialized. The
default values are indicated with each parameter description below. The settings
of the parameter values are not affected by the ZERO command.
If your robot system includes optional enhancements (such as vision), you will
have other system parameters available. Consult the documentation for the
options for details. The basic system parameters are shown in Table 7-1 on page
171.
170
V+ Language User’s Guide, Rev A
Chapter 7
Parameters
Table 7-1. Basic System Parameters
Default
Parameter
Use
BELT.MODE
Controls the operation of the
conveyor tracking feature of the V+
system.
0
0
14
HAND.TIME
Determines the duration of the
motion delay that occurs during
processing of OPENI, CLOSEI, and
RELAXI instructions. The value for
this parameter is interpreted as the
number of seconds to delay. Due to
the way in which V+ generates its
time delays, the HAND.TIME
parameter is internally rounded to
the nearest multiple of 0.016
seconds.
0.05
0
1E18
KERMIT.RETRY
Sets the number of times Kermit will
attempt to transfer a data packet
before quitting with an error.
15
1
1000
KERMIT.TIMEOUT
Time, in seconds, that Kermit will
wait before retrying the transfer of a
data packet.
8
1
95
NOT.CALIBRATED
Represents the calibration status of
the robot(s) controlled by the V+
system.
7
0
7
SCREEN.TIMEOUT
Controls automatic blanking of the
graphics monitor on graphics-based
systems.
0
0
16383
TERMINAL
This parameter determines how the
V+ will interact with an ASCII
system terminal. The acceptable
values are 0 through 4, and they
have the interpretations shown in
the following table.
4a
0
4
a
Min
Max
The default value for TERMINAL is changed with the utility CONFIG_C.V2 on the Adept Utility
Disk. See the Instructions for Adept Utility Programs.
V+ Language User’s Guide, Rev A
171
Chapter 7
Switches
Graphics-Based System Terminal Settings
Parameter
Value
Terminal
Type
Treatment of
DEL & BS
Cursor-up
Command
0
TTY
\<echo>\
None
1
CRT
Erase
<VT>
2
CRT
Erase
<SUB>
3
CRT
Erase
<FF>
4
CRT
Erase
<ESC>M
Switches
System switches govern various features of the V+ system. The switches are
described below. See the V+ Language Reference Guide and the V+ Operating
System Reference Guide for more detailed descriptions of the keywords discussed
here.
As with system parameters, the names of system switches can be abbreviated to
the minimum length required to identify the switch.
Viewing Switch Settings
The SWITCH monitor command displays the setting of one or more system
switches:
SWITCH switch_name, ..., switch_name
If no switches are specified, the settings of all switches are displayed.
Within programs, the SWITCH real-valued function returns the status of a switch.
The instruction:
SWITCH(switch_name)
returns TRUE (–1.0) if the switch is enabled, FALSE (0.0) if the switch is disabled.
Some switches are organized as arrays and may be accessed by specifying the
array index.
172
V+ Language User’s Guide, Rev A
Chapter 7
Switches
Setting Switches
The ENABLE and DISABLE monitor commands/program instructions control
the setting of system switches. The instruction:
ENABLE BELT
will enable the BELT switch. The instruction:
DISABLE BELT, CP
will disable the CP and BELT switches. Multiple switches can be specified for
either instruction.
Switches can also be set with the SWITCH program instruction. Its syntax is:
SWITCH switch_name = value
This instruction differs from the ENABLE and DISABLE instructions in that the
SWITCH instruction enables or disables a switch depending on the value on the
right-hand side of the equal sign. This allows you to set switches based on a
variable or expression. The switch is enabled if the value is TRUE (nonzero) and
disabled if the value is FALSE (zero). The instruction:
SWITCH CP = SIG(1001)
will enable the continuous path (CP) switch if input signal 1001 is on.
Summary of Basic System Switches
The default switch settings at system power-up are given in Table 7-2. (The
switch settings are not affected by the ZERO command.)
Optional enhancements to your V+ system may include additional system
switches. If so, they are described in the documentation for the options.
V+ Language User’s Guide, Rev A
173
Chapter 7
Switches
Table 7-2. Basic System Switches
Switch
Use
AUTO.POWER.
OFF
When this switch is enabled V+ will treat software errors as hard
errors and disable HIGH POWER. Normally these errors stop the
robot and signal the V+ program, but DO NOT cause HIGH
POWER to be turned off. The soft errors are:
(–624) *force protect limit exceeded
(–1003) *Time-out nulling errors* Mtr
(–1006) *Soft envelope error* Mtr
BELT
Used to turn on the conveyor tracking features of V+ (if the option
is installed).
This switch must be enabled before any of the special conveyor
tracking instructions can be executed. When BELT is disabled, the
conveyor tracking software has a minimal impact on the overall
performance of the system.
Default is disabled.
CP
Enable/disable continuous-path motion processing (see
”Continuous-Path Trajectories” on page 197).
Default is enabled.
DECEL.100
When DECEL.100 is enabled for a robot, the maximum
deceleration percentage defined by SPEC is ignored and a
maximum deceleration of 100% is used instead. This maximum
deceleration value is used to limit the value specified by the
ACCEL program instruction. For backwards compatibility, by
default, DECEL.100 is disabled for all robots.
DRY.RUN
Enable/disable sending of motion commands to the robot. Enable
this switch to test programs for proper logical flow and correct
external communication without having to worry about the robot
running into something.
(Also see the TRACE switch, which is useful during program
checkout.) The manual control pendant can still be used to move
the robot when DRY.RUN is enabled.
Default is disabled.
174
V+ Language User’s Guide, Rev A
Chapter 7
Switches
Table 7-2. Basic System Switches (Continued)
Switch
Use
FORCE
Controls whether the (optional) stop-on-force feature of the V+
system is active.
Default is disabled.
INTERACTIVE
Suppresses display of various messages on the system terminal. In
particular, when the INTERACTIVE switch is disabled, V+ does
not ask for confirmation before performing certain operations and
does not output the text of error messages.
This switch is usually disabled when the system is being controlled
by a supervisory computer to relieve the computer from having to
process the text of messages.
Default is enabled.
MCP.MESSAGES
Controls how system error messages are handled when the
controller keyswitch is not in the MANUAL mode position.
Default is disabled.
MCS.MESSAGES
Controls whether monitor commands executed with the MCS
instruction will have their output displayed on the terminal.
Default is disabled.
MESSAGES
Controls whether output from TYPE instructions will be displayed
on the terminal.
Default is enabled.
MONITORS
This switch is used with systems configured for multiple V+ system
processors (requires the optional V+ Extensions software) and
Enable or disable selecting of multiple monitor windows.
POWER
Tracks the status of Robot Power. This switch is automatically
enabled whenever Robot Power is turned on. This switch can be
used to turn Robot Power on or off—enabling the switch turns on
Robot Power and disabling the switch turns off Robot Power.
Default is disabled.
WARNING: ADEPT RECOMMENDS THAT YOU NOT TURN
ON ROBOT POWER FROM WITHIN A PROGRAM since the
robot can be activated without direct operator action. Turning on
Robot Power from the terminal can be hazardous if the operator
does not have a clear view of the robot workspace.
V+ Language User’s Guide, Rev A
175
Chapter 7
Switches
Table 7-2. Basic System Switches (Continued)
Switch
Use
ROBOT
This is an array of switches that control whether or not the system
should access robots normally controlled by the system.
Default is disabled.
SUPERVISOR
Not used in normal operation.
SET.SPEED
Enable/disable the ability to set the monitor speed from the
manual control pendant.
Default is enabled.
TRACE
Enable/disable a special mode of program execution in which each
program step is displayed on the system terminal before it is
executed. This is useful during program development for checking
the logical flow of execution (also see the DRY.RUN switch).
Default is disabled.
UPPER
Determines whether comparisons of string values will consider
lowercase letters the same as uppercase letters. When this switch is
enabled, all lowercase letters are considered as though they are
uppercase.
Default is enabled.
176
V+ Language User’s Guide, Rev A
8
Motion Control Operations
Introduction . . . . . . . . . . . . . . . . . . . . . . .
Location Variables . . . . . . . . . . . . . . . . . . .
Coordinate Systems . . . . . . . . . . . . . . . .
Transformations . . . . . . . . . . . . . . . . . .
Yaw . . . . . . . . . . . . . . . . . . . . . .
Pitch . . . . . . . . . . . . . . . . . . . . . .
Roll . . . . . . . . . . . . . . . . . . . . . . .
Special Situations . . . . . . . . . . . . . . . .
Creating and Altering Location Variables . . . . . . . . .
Creating Location Variables . . . . . . . . . . . .
Transformations vs. Precision Points . . . . . . .
Modifying Location Variables . . . . . . . . . . .
Relative Transformations . . . . . . . . . . . .
Examples of Modifying Location Variables . . .
Defining a Reference Frame . . . . . . . . . . . .
Miscellaneous Location Operations . . . . . . . .
Motion Control Instructions . . . . . . . . . . . . . . . .
Basic Motion Operations . . . . . . . . . . . . . .
Joint-Interpolated Motion vs. Straight-Line Motion
Safe Approaches and Departures . . . . . . .
Moving an Individual Joint . . . . . . . . . . .
End-Effector Operation Instructions . . . . . . . .
Continuous-Path Trajectories . . . . . . . . . . . .
Breaking Continuous-Path Operation . . . . . . .
Procedural Motion . . . . . . . . . . . . . . . . .
Procedural Motion Examples . . . . . . . . . .
Timing Considerations . . . . . . . . . . . . .
Robot Speed . . . . . . . . . . . . . . . . . . .
Motion Modifiers . . . . . . . . . . . . . . . . . .
Customizing the Calibration Routine . . . . . . . .
Tool Transformations . . . . . . . . . . . . . . . . . . .
Defining a Tool Transformation . . . . . . . . . . .
Summary of Motion Keywords . . . . . . . . . . . . . .
V+ Language User’s Guide, Rev A
.
.
.
.
.
.
.
.
.
.
.
.
.
.
.
.
.
.
.
.
.
.
.
.
.
.
.
.
.
.
.
.
.
.
.
.
.
.
.
.
.
.
.
.
.
.
.
.
.
.
.
.
.
.
.
.
.
.
.
.
.
.
.
.
.
.
.
.
.
.
.
.
.
.
.
.
.
.
.
.
.
.
.
.
.
.
.
.
.
.
.
.
.
.
.
.
.
.
.
.
.
.
.
.
.
.
.
.
.
.
.
.
.
.
.
.
.
.
.
.
.
.
.
.
.
.
.
.
.
.
.
.
.
.
.
.
.
.
.
.
.
.
.
.
.
.
.
.
.
.
.
.
.
.
.
.
.
.
.
.
.
.
.
.
.
178
178
179
180
181
183
185
186
187
187
187
187
188
188
191
194
195
195
195
196
196
197
197
198
199
199
200
201
203
203
204
205
207
177
Chapter 8
Introduction
Introduction
A primary focus of the V+ language is to drive motion devices. This chapter
discusses the language elements that generate controller output to move a motion
device from one location to another. Before we introduce the V+ motion
instructions, we should examine the V+ location variables and see how they relate
to the space the motion device operates in.
Location Variables
Locations can be specified in two ways in V+, transformations and precision
points.
A transformation is a set of six components that uniquely identifies a location in
Cartesian space and the orientation of the motion device end-of-arm tooling at
that location. A transformation can also represent the location of an arbitrary local
reference frame.
A precision point includes an element for each joint in the motion device.
Rotational joint values are measured in degrees; translational joint values are
measured in millimeters. These values are absolute with respect to the motion
device’s home sensors and cannot be made relative to other locations or
coordinate frames.
178
V+ Language User’s Guide, Rev A
Chapter 8
Location Variables
Coordinate Systems
Figure 8-1 shows the world coordinate system for an Adept SCARA robot and an
Adept Cartesian robot. Ultimately, all transformations are based on a world
coordinate system. The V+ language contains several instructions for creating
local reference frames, building relative transformations, and changing the origin
of the base (world) coordinate frame. Therefore, an individual transformation
may be relative to another transformation, a local reference frame, or an altered
base reference frame.
Different robots and motion devices will designate different locations as the
origin of the world coordinate system. See the user’s guide for Adept robots or
the device module documentation for AdeptMotion VME systems to determine
the origin and orientation of the world coordinate frame.
+Z
+Z
adept
+Y
+Y
+X
+X
Figure 8-1. Adept Robot Cartesian Space
V+ Language User’s Guide, Rev A
179
Chapter 8
Location Variables
Transformations
The first three components of a transformation variable are the values for the
points on the X, Y, and Z axes. In an Adept SCARA robot, the origin of this
Cartesian space is the base of the robot. The Z axis points straight up through the
middle of the robot column. The X axis points straight out, and the Y axis runs left
to right as you face the robot. The first robot in Figure 8-1 on page 179 shows the
orientation of the Cartesian space for an Adept SCARA robot. The location of the
world coordinate system for other robots and motion devices depends on the
kinematic model of the motion device. For example, the second robot in Figure
8-1 shows the world coordinate frame for a robot built on the Cartesian
coordinate model. See the kinematic device module documents for your
particular motion device.
When a transformation is defined, a local reference frame is created at the X, Y, Z
location with all three local frame axes parallel to the world coordinate frame.
Figure 8-2 on page 181 shows the first part of a transformation. This transformation has the value X = 30, Y = 100, Z = 125, yaw = 0, pitch = 0, and roll = 0.
180
V+ Language User’s Guide, Rev A
Chapter 8
Location Variables
Z
z
x
y
z = 125
X
y=
Y
100
0
x=3
Figure 8-2. XYZ Elements of a Transformation
The second three components of a transformation variable specify the orientation
of the end-of-arm tooling. These three components are yaw, pitch, and roll. These
elements are figured as ZYZ' Euler values. Figures 8-3 through 8-5 demonstrate
how these values are interpreted.
Yaw
Yaw is a rotation about the local reference frame Z axis. This rotation is not about
the primary reference frame Z axis, but is centered at the origin of the local frame
of reference. Figure 8-3 on page 182 shows the yaw axis with a rotation of 30°.
Note that it is parallel to the primary reference frame Z axis but may be centered
at any point in that space. In this example, the yaw value is 30°, resulting in a
transformation with the value (X = 30, Y = 100, Z = 125, yaw = 30, pitch = 0, and
roll = 0).
V+ Language User’s Guide, Rev A
181
Chapter 8
Location Variables
When you are using a robot, the local frame of reference defined by the XYZ
components is located at the end of the robot tool flange. (This local reference
frame is referred to as the tool coordinate system.) In Figure 8-3, the large
Cartesian space represents a world coordinate system. The small Cartesian space
represents a local tool coordinate system (which would be centered at the motion
device tooling flange).
Z
Z
X
Y
X
Y
30°
Figure 8-3. Yaw
182
V+ Language User’s Guide, Rev A
Chapter 8
Location Variables
Pitch
Pitch is defined as a rotation about the local reference frame Y axis, after yaw has
been applied. Figure 8-4 on page 184 shows the local reference frame with a yaw
of 30° and a pitch of 40°.
V+ Language User’s Guide, Rev A
183
Chapter 8
Location Variables
For example, deflection of a wrist joint is reflected in the pitch component. The
movement of a fifth axis on a SCARA robot is reflected in the pitch component. In
this example, the motion device end of arm tooling has a pitch of 40°, resulting in
a transformation with the value (X = 30, Y = 100, Z = 125, yaw = 30, pitch = 40, and
roll = 0). This location can be reached only by a mechanism with a fifth axis. Pitch
is represented as ±180°, not as 360° of rotation. Thus, a positive rotation of 190° is
shown as –170°.
Z
Y-axis of local
reference frame
(after applying yaw)
Z
40°
PITCH
Y
X
X
Y
30°
Figure 8-4. Pitch
184
V+ Language User’s Guide, Rev A
Chapter 8
Location Variables
Roll
Roll is defined as a rotation about the Z axis of the local reference frame after yaw
and pitch have been applied. Figure 8-5 shows a local reference frame in the
primary robot Cartesian space and the direction roll would take within that space.
In this example the transformation has a value of X = 30, Y = 100, Z = 125, yaw =
30, pitch = 40, and roll = 20. This location can be reached only by a mechanism
with fifth and sixth axes.
Z
ROLL
Z-axis of local
reference frame
(after applying
yaw and pitch)
Z
40°
Y
20°
X
X
Y
30°
Figure 8-5. Roll
V+ Language User’s Guide, Rev A
185
Chapter 8
Location Variables
Special Situations
When the Z axes of the local and primary reference frames are parallel, roll and
yaw produce the same motion in the same plane, although the two motions may
be in different directions. This is always the case with a four-axis SCARA robot.
The system automatically reflects rotation of the quill in the roll component of a
transformation variable, and the yaw component is forced to 0°. In a SCARA
robot equipped with a fifth axis, rotation of the quill is reflected in the yaw
component and motion of a rotating end-effector (sixth axis) is reflected in the roll
component.
Notice in Figure 8-2 on page 181 that the local reference frame points straight up.
This corresponds to a situation where the end of arm tooling points straight back
along the third axis. In a mechanism not equipped with a 360° wrist, this is an
impossible position. For a four-axis SCARA, this component must point straight
down (pitch = 180°). For a mechanism with a fifth axis, this component must be
within the range of motion of the fifth axis.
NOTE: When thinking about a transformation, remember that the
rules of ZYZ' Euler angles require that the orientation components
be applied in order after the local reference frame has been defined.
After calculating the Cartesian components and placing a local
reference frame with x, y, and z axes parallel to the primary
reference frame X, Y, and Z axes, the orientation components are
applied in a strict order—yaw is applied first, then pitch, and,
finally, roll.
186
V+ Language User’s Guide, Rev A
Chapter 8
Creating and Altering Location Variables
Creating and Altering Location Variables
Creating Location Variables
The most straightforward method of creating a location variable is to place the
robot or motion device at a location and enter the monitor command:
HERE loc_name
Transformations vs. Precision Points
A location can be specified using either the six components described in the
previous section, or by specifying the state the robot joints would be in when a
location is reached. The former method results in a transformation variable.
Transformations are the most flexible and efficient location variables.
Precision points record the joint values of each joint in the motion device.
Precision points may be more accurate, and they are the only way of extracting
joint information that will allow you to move an individual joint. Precision points
are identified by a leading pound sign (#). The command:
HERE #pick
will create the precision point #pick equal to the current robot joint values.
Modifying Location Variables
The individual components of an existing transformation or precision point can
be edited with the POINT monitor command:
POINT loc_name
will display the transformation components of loc_name and allow you to edit
them. If loc_name is not defined, a null transformation will be displayed for
editing.
V+ Language User’s Guide, Rev A
187
Chapter 8
Creating and Altering Location Variables
A location variable can be duplicated using the POINT monitor command or SET
program instruction. The monitor command:
POINT loc_name = loc_value
and the program instruction:
SET loc_name = loc_value
will both result in the variable loc_name being given the value of loc_value. The
POINT monitor command also allows you to edit loc_name after it has been
assigned the value of loc_value.
The following functions return transformation values:
TRANS
Create a location by specifying individual components of a transformation. A value can be specified for each component.
SHIFT
Alter the Cartesian components of an existing transformation.
The POINT and SET operations can be used in conjunction with the
transformation functions SHIFT and TRANS to create location variables based on
specific modifications of existing variables.
SET loc_name = SHIFT(loc_value BY 5, 5, 5)
will create the location variable loc_name. The location of loc_name will be
shifted 5 mm in the positive X, Y, and Z directions from loc_value.
Relative Transformations
Relative transformations allow you to make one location relative to another and
to build local reference frames that transformations can be relative to. For
example, you may be building an assembly whose location in the workcell
changes periodically. If all the locations on the assembly are taught relative to the
world coordinate frame, each time the assembly is located differently in the
workcell, all the locations must be retaught. If, however, you create a frame based
on identifiable features of the assembly, you will have to reteach only the points
that define the frame.
Examples of Modifying Location Variables
Figure 8-6 on page 190 shows how relative transformations work. The magnitude
and direction elements (x, y, z), but not the orientation elements (y, p, r), of an
Adept transformation can be represented as a 3-D vector, as shown by the dashed
lines and arrows in Figure 8-6. The following code generates the locations shown
in that figure.
188
V+ Language User’s Guide, Rev A
Chapter 8
Creating and Altering Location Variables
; Define a simple transformation
SET loc_a = TRANS(300,50,350,0,180,0)
; Move to the location
MOVE loc_a
BREAK
; Move to a location offset −50mm in X, 20mm in Y,
; and 30mm in Z relative to "loc_a"
MOVE loc_a:TRANS(−50, 20, 30)
BREAK
; Define "loc_b" to be the current location relative
; to "loc_a"
HERE loc_a:loc_b ;loc_b = −50, 20, 30, 0, 0, 0
BREAK
; Define "loc_c" as the vector sum of "loc_a" and "loc_b"
SET loc_c = loc_a:loc_b ;loc_c = 350, 70, 320, 0, 180, 0
Once this code has run, loc_b exists as a transformation that is completely
independent of loc_a. The following instruction will move the robot another
−50mm in the x, 20mm in the y, and 30mm in the z direction (relative to loc_c):
MOVE loc_c:loc_b
Multiple relative transformations can be chained together. If we define loc_d to
have the value 0, 50, 0, 0, 0, 0:
SET loc_d = TRANS(0,50)
and then issue the following MOVE instruction:
MOVE loc_a:loc_b:loc_d
the robot will move to a position x = –50mm, y =70mm, and z = 30mm relative to
loc_a.
In Figure 8-6 on page 190, the transformation loc_b defines the transformation
needed to get from the local reference frame defined by loc_a to the local reference
frame defined by loc_c.
V+ Language User’s Guide, Rev A
189
Chapter 8
Creating and Altering Location Variables
The transformation needed to go in the opposite direction (from loc_c to loc_a)
can be calculated by:
INVERSE(loc_b)
Thus, the instruction:
MOVE loc_c:INVERSE(loc_b)
will effectively move the robot back to loc_a.
Z
loc_a =
300, 50, 350, 0, 180, 0
loc_c = loc_a:loc_b =
350, 70, 320, 0, 180, 0
loc_b =
-50, 20, 30, 0, 0, 0
X
Y
Figure 8-6. Relative Transformation
Figure 8-6 shows the first three locations from the code examples on page 188.
190
V+ Language User’s Guide, Rev A
Chapter 8
Creating and Altering Location Variables
Defining a Reference Frame
In the example shown in Figure 8-7, a pallet is brought into the workcell on a
conveyor. The program that follows will teach three locations that define the
pallet reference frame (pallet.frame) and then remove the parts from the pallet.
The program that follows will run regardless of where the pallet is placed in the
workcell as long as it is within the robot working envelope.
loc.origin
loc.x.axis
loc.pos.y
+X
+Y
e
m
a
.fr
t
lle
pa
+Z
Figure 8-7. Relative Locations
; Get the locations to define the pallet
DETACH ()
;Release robot for use by the MCP
PROMPT "Place robot at pallet origin. ", $ans
HERE loc.origin
;Record the frame origin
PROMPT "Place robot at point on the pallet x-axis. ", $ans
HERE loc.x.axis
;Record point on x-axis
PROMPT "Place robot at point in positive y direction. ", $ans
HERE loc.pos.y
;Record positive y direction
V+ Language User’s Guide, Rev A
191
Chapter 8
Creating and Altering Location Variables
ATTACH ()
;Reattach the robot
; Create the local reference frame "pallet.frame"
SET pallet.frame = FRAME(loc.origin, loc.x.axis,loc.pos.y, loc.origin)
cell.space = 50
;Spacing of cells on pallet
; Remove the palletized items
FOR i = 0 TO 3
FOR J = 0 TO 2
APPRO pallet.frame:TRANS(i*cell.space, j*cell.space), 25
MOVE pallet.frame:TRANS(i*cell.space, j*cell.space)
BREAK
;Settle robot
CLOSEI
;Grab the part
DEPART 25
;MOVE to the drop off location
END
END
In the above example, the code that teaches the pallet frame will need to be run
only when the pallet location changes.
If you are building an assembly that does not have regularly spaced locations like
the above example, the following code will teach individual locations relative to
the frame:
; Get the locations to define the pallet frame
DETACH ();Release robot for use by the MCP
PROMPT "Place robot at assembly origin. ", $ans
HERE loc.origin;Record the frame origin
PROMPT "Place robot at point on the assm. x-axis. ", $ans
HERE loc.x.axis;Record point on x-axis
PROMPT "Place robot at point in positive y direction. ", $ans
HERE loc.pos.y;Record positive y direction
; Create the local reference frame "assm.frame"
SET assm.frame = FRAME(loc.origin, loc.x.axis, loc.pos.y, loc.origin)
; Teach the locations on the assembly
PROMPT "Place the robot in the first location. ", $ans
HERE assm.frame:loc.1;Record the first location
PROMPT "Place the robot in the second location. ", $ans
HERE assm.frame:loc.2;Record the second location
192
V+ Language User’s Guide, Rev A
Chapter 8
Creating and Altering Location Variables
; etc.
; Move to the locations on the assembly
ATTACH ();Reattach the robot
APPRO assm.frame:loc.1, 25
MOVE assm.frame:loc.1
;Activate gripper
DEPART 25
APPRO assm.frame:loc.1, 25
MOVE assm.frame:loc.2
;Activate gripper
DEPART 25
; etc.
In the above example, the frame will need to be taught each time the assembly
moves—the locations on the assembly need to be taught only once.
The instruction HERE assm.frame:loc.1 tells the system to record the location loc.1
relative to assm.frame rather than relative to the world coordinate frame. If a
subassembly is being built relative to loc.1, the instruction:
HERE assm.frame:loc.1:sub.loc.1
will create a compound transformation where sub.loc.1 is relative to the
transformation assm.frame:loc.1.
V+ Language User’s Guide, Rev A
193
Chapter 8
Creating and Altering Location Variables
Miscellaneous Location Operations
The instruction:
DECOMPOSE array_name[] = #loc_name
will place the joint values of #loc_name in the array array_name. DECOMPOSE
works with transformations and precision points.
The command:
WHERE
will display the current robot location.
The BASE operation can be used to realign the world reference frame relative to
the robot.
194
V+ Language User’s Guide, Rev A
Chapter 8
Motion Control Instructions
Motion Control Instructions
V+ processes robot motion instructions differently from the way you might
expect. With V+, a motion instruction such as MOVE part is interpreted to mean
start moving the robot to location ‘part’. As soon as the robot starts moving to the
specified destination, the V+ program continues without waiting for the robot
motion to complete. The instruction sequence:
MOVE part.1
SIGNAL 1
MOVE part.2
SIGNAL 2
will cause external output signal #1 to be turned on immediately after the robot
begins moving to part.1, rather than waiting for it to arrive at the location. When
the second MOVE instruction is encountered, V+ waits until the motion to part.1
is completed. External output signal #2 is turned on just after the motion to part.2
begins. This is known as forward processing. See “Breaking Continuous-Path
Operation” on page 198 for details on how to defeat forward processing.
This parallel operation of program execution and robot motion makes possible
the procedural motions described later in this chapter.
Basic Motion Operations
Joint-Interpolated Motion vs. Straight-Line Motion
The path a motion device takes when moving from one location to another can be
either a joint-interpolated motion or a straight-line motion. Joint-interpolated
motions move each joint at a constant velocity (except during the
acceleration/deceleration phases—see “Robot Speed” on page 201). Typically,
the robot tool tip moves in a series of arcs that represents the least processing—
intensive path the trajectory generator can formulate. Straight-line motions
ensure that the robot tool tip traces a straight line, useful for cutting a straight line
or laying a bead of sealant. The instruction:
MOVE pick
will cause the robot to move to the location pick using joint-interpolated motion.
The instruction:
MOVES pick
will cause the robot to move the pick using a straight-line motion.
V+ Language User’s Guide, Rev A
195
Chapter 8
Motion Control Instructions
Safe Approaches and Departures
In many cases you will want to approach a location from a distance offset along
the tool Z axis or depart from a location along the tool Z axis before moving to the
next location. For example, if you were inserting components into a crowded
circuit board, you would want the robot arm to approach a location from directly
above the board so nearby parts are not disturbed. Assuming you were using a
four-axis Adept robot, the instructions:
APPRO place, 50
MOVE place
DEPART 50
will cause joint-interpolated motion to a point 50 mm above place, movement
down to place, and movement straight up to 50 mm above place.
If the instructions APPROS, DEPARTS, and MOVES had been used, the motions
would have been straight line instead of joint interpolated.
NOTE: Approaches and departs are based on the tool coordinate
system, not the world coordinate system. Thus, if the location
specifies a pitch of 135°, the robot will approach at a 45° angle
relative to the world coordinate system. See “Yaw” on page 181 for a
description of the tool coordinate system.
Moving an Individual Joint
You can move an individual joint of a robot using the instruction DRIVE. The
instructions:
DRIVE 2,50.0, 100
DRIVE 3,25, 100
will move joint 2 through 50° of motion and then move joint 3 a distance of 25 mm
at SPEED 100%.
196
V+ Language User’s Guide, Rev A
Chapter 8
Motion Control Instructions
End-Effector Operation Instructions
The instructions described in this section depend on the use of two digital signals.
They are used to open, close, or relax a gripper. The utility program SPEC
specifies which signals control the end effector. See the Instructions for Adept
Utility Programs.
The instruction OPEN will open the gripper during the ensuing motion
instruction. The instruction OPENI will open the gripper before any additional
motion instructions are executed. CLOSE and CLOSEI are the complementary
instructions.
When an OPEN(I) or CLOSE(I) instruction is issued, one solenoid is activated and
the other is released. To completely relax both solenoids, use the instruction
RELAX or RELAXI.
Use the system parameter HAND.TIME to set the duration of the motion delay
that occurs during an OPENI, CLOSEI, or RELAXI instruction.
Use the function HAND to return the current state of the gripper.
Continuous-Path Trajectories
When a single motion instruction is processed, such as the instruction:
MOVE pick
the robot begins moving toward the location by accelerating smoothly to the
commanded speed. Sometime later, when the robot is close to the destination
location pick, the robot will decelerate smoothly to a stop at location pick. This
motion is referred to as a single motion segment, since it is produced by a single
motion instruction.
When a sequence of motion instructions is executed, such as:
MOVE loc.1
MOVE loc.2
the robot begins moving toward loc.1 by accelerating smoothly to the
commanded speed1 just as before. However, the robot will not decelerate to a stop
when it gets close to loc.1. Instead, it will smoothly change its direction and begin
moving toward loc.2. Finally, when the robot is close to loc.2, it will decelerate
smoothly to a stop at loc.2. This motion consists of two motion segments since it is
generated by two motion instructions.
1
See the SPEED monitor command and SPEED program instructions.
V+ Language User’s Guide, Rev A
197
Chapter 8
Motion Control Instructions
Making smooth transitions between motion segments, without stopping the robot
motion, is called continuous-path operation. That is the normal method V+ uses
to perform robot motions. If desired, continuous-path operation can be disabled
with the CP switch. When the CP switch is disabled, the robot will decelerate and
stop at the end of each motion segment before beginning to move to the next
location.
NOTE: Disabling continuous-path operation does not affect
forward processing (the parallel operation of robot motion and
program execution).
Continuous-path transitions can occur between any combination of straight-line
and joint-interpolated motions. For example, a continuous motion could consist
of a straight-line motion (for example, DEPARTS) followed by a joint-interpolated
motion (for example, APPRO) and a final straight-line motion (for example,
MOVES). Any number of motion segments can be combined this way.
Breaking Continuous-Path Operation
Certain V+ program instructions cause program execution to be suspended until
the current robot motion reaches its destination location and comes to a stop. This
is called breaking continuous path. Such instructions are useful when the robot
must be stopped while some operation is performed (for example, closing the
hand). Consider the instruction sequence:
MOVE loc.1
BREAK
SIGNAL 1
The MOVE instruction starts the robot moving to loc.1. Program execution then
continues and the BREAK instruction is processed. BREAK causes the V+
program to wait until the motion to loc.1 completes. The external signal will not
be turned on until the robot stops. (Recall that without the BREAK instruction the
signal would be turned on immediately after the motion to loc.1 starts.)
The following instructions always cause V+ to suspend program execution until
the robot stops (see the V+ Language Reference Guide for detailed information on
these instructions):
198
BASE
BREAK
CLOSEI
CPOFF
DETACH (0)
HALT
OPENI
PAUSE
RELAXI
TOOL
V+ Language User’s Guide, Rev A
Chapter 8
Motion Control Instructions
Also, the robot decelerates to a stop when the BRAKE (not to be confused with
BREAK) instruction is executed (by any program task), and when the reaction
associated with a REACTI instruction is triggered. These events could happen at
any point within a motion segment. (Note that these events can be initiated from a
different program task.)
The robot also decelerates and comes to a stop if no new motion instruction is
encountered before the current motion completes. This situation can occur for a
variety of reasons:
•
A WAIT or WAIT.EVENT instruction is executed and the wait condition is
not satisfied before the robot motion completes.
•
A PROMPT instruction is executed and no response is entered before the
robot motion completes.
The V+ program instructions between motion instructions take longer to
•
execute than the robot takes to perform its motion.
Procedural Motion
The ability to move in straight lines and joint-interpolated arcs is built into the
basic operation of V+. The robot tool can also move along a path that is
prerecorded, or described by a mathematical formula. Such motions are
performed by programming the robot trajectory as the robot is moving. Such a
program is said to perform a procedural motion.
A procedural motion is a program loop that computes many short motions and
issues the appropriate motion requests. The parallel execution of robot motions
and non-motion instructions allows each successive motion to be defined without
stopping the robot. The continuous-path feature of V+ automatically smooths the
transitions between the computed motion segments.
Procedural Motion Examples
Two simple examples of procedural motions are described below. In the first
example, the robot tool is moved along a trajectory described by locations stored
in the array path. (The LAST function is used to determine the size of the array.)
SPEED 0.75 IPS ALWAYS
FOR index = 0 TO LAST(path[])
MOVES path[index]
END
V+ Language User’s Guide, Rev A
199
Chapter 8
Motion Control Instructions
The robot tool will move at the constant speed of 0.75 inch per second through
each location defined in the array path[]. (One way to create the path array is to
use the V+ TEACH command to move the robot along the desired path and to
press repeatedly the RECORD button on the manual control pendant.)
In the next example, the robot tool is to be moved along a circular arc. However,
the path is not prerecorded—it is described mathematically, based on the radius
and center of the arc to be followed.
The program segment below assumes that a real variable radius has already been
assigned the radius of the desired arc, and x.center and y.center have been
assigned the respective coordinates of the center of curvature. The variables start
and last are assumed to have been defined to describe the portion of the circle to
be traced. Finally, the variable angle.step is assumed to have been defined to
specify the (angular) increment to be traversed in each incremental motion.
(Because the DURATION instruction is used, the program will move the robot
tool angle.step degrees around the arc every 0.5 second.)
When this program segment is executed, the X and Y coordinates of points on the
arc are repeatedly computed. They are then used to create a transformation that
defines the destination for the next robot motion segment.
DURATION 0.5 ALWAYS
FOR angle = start TO last STEP angle.step
x = radius*COS(angle)+x.center
y = radius*SIN(angle)+y.center
MOVE TRANS(x, y, 0, 0, 180, 0)
END
Timing Considerations
Because of the computation time required by V+ to perform the transitions
between motion segments, there is a limit on how closely spaced commanded
locations can be. When locations are too close together, there is not enough time
for V+ to compute and perform the transition from one motion to the next, and
there will be a break in the continuous-path motion. This means that the robot
will stop momentarily at intermediate locations.
The minimum spacing that can be used between locations before this effect occurs
is determined by the time required to complete the motion from one location to
the next. Straight-line motions can be used if the motion segments take more than
about 32 milliseconds each. Joint-interpolated motions can be used with motion
segments as short as about 16 milliseconds each.
200
V+ Language User’s Guide, Rev A
Chapter 8
Motion Control Instructions
NOTE: The standard trajectory generation frequency is 62.5 Hz.
With an optional software license, trajectory frequencies of 125Hz,
250 Hz, and 500 Hz are possible. TE” statement in the .SYSTEM
section of the configuration data and may be changed with the
CONFIG_C system utility.
The minimum motion times for joint and straight-line motions must
be greater than or equal to the configured trajectory cycle time. As a
convenience, if they are set to be less than the configured trajectory
cycle time (for example 0), the trajectory cycle time is used as the
minimum motion time.
Robot Speed
A robot move has three phases: an acceleration phase where the robot accelerates
to the maximum speed specified for the move, a velocity phase where the robot
moves at a rate not exceeding the specified maximum speed, and a deceleration
phase where the robot decelerates to a stop (or transitions to the next motion).
Robot speed can mean two things: how fast the robot moves between the
acceleration and deceleration phases of a motion (referred to in this manual as
robot speed), or how fast the robot gets from one place to another (referred to in
this manual as robot performance).
The robot speed between the acceleration and deceleration phases is specified as
either a percentage of normal speed or an absolute rate of travel of the robot tool
tip. Speed set as a percentage of normal speed is the default. The speed of a robot
move based on normal speed is determined by the following factors:
•
The program speed (set with the SPEED program instruction). This speed is
set to 100 when program execution begins.
•
The monitor speed (set with the SPEED monitor command or a SPEED
program instruction that specifies MONITOR). This speed is normally set to
50 at system startup (start-up SPEED can be set with the CONFIG_C utility).
(The effects of the two SPEED operations are slightly different. See the SPEED
program instruction for further details.)
Robot speed is the product of these two speeds. With monitor speed and program
speed set to 100, the robot will move at its normal speed. With monitor speed set
to 50 and program speed set to 50, the robot will move at 25% of its normal speed.
To move the robot tool tip at an absolute rate of speed, a speed rate in inches per
second or millimeters per second is specified in the SPEED program instruction.
The instruction:
SPEED 25, MMPS ALWAYS
V+ Language User’s Guide, Rev A
201
Chapter 8
Motion Control Instructions
specifies an absolute tool tip speed of 25 millimeters per second for all robot
motions until the next SPEED instruction. In order for the tool tip to actually
move at the specified speed:
•
The monitor speed must be 100.
•
The locations must be far enough apart so that the robot can accelerate to the
desired speed and decelerate to a stop at the end of the motion.
Robot performance is a function of the SPEED settings and the following factors:
•
The robot acceleration profile and ACCEL settings. The default acceleration
profile is based on a normal maximum rate of acceleration and deceleration.
The ACCEL command can scale down these maximum rates so the robot
acceleration and/or deceleration takes more time.
You can also define optional acceleration profiles that alter the maximum rate
of change for acceleration and deceleration (using the SPEC utility).
•
The location tolerance settings (COARSE/FINE, NULL/NONULL) for the
move. The more accurately a robot must get to the actual location, the more
time the move will take. (For AdeptMotion VME devices, the meaning of
COARSE/FINE is set with the SPEC utility.)
•
Any DURATION setting. DURATION forces a robot move to take a minimum
time to complete regardless of the SPEED settings.
•
The maximum allowable velocity. For Adept robots, maximum velocity is
factory set. For AdeptMotion VME devices, this is set with the SPEC utility.
•
The inertial loading of the robot and the tuning of the robot.
•
Straight-line vs. joint-interpolated motions—for complex geometries,
straight-line and joint-interpolated paths produce different dynamic
responses and, therefore, different motion times.
Robot performance for a given application can be greatly enhanced or severely
degraded by these settings. For example:
202
•
A heavily loaded robot may actually show better performance with slower
SPEED and ACCEL settings, which will lessen overshoot at the end of a move
and allow the robot to settle more quickly.
•
Applications such as picking up bags of product with a vacuum gripper do
not require high accuracy and can generally run faster with a COARSE
tolerance.
V+ Language User’s Guide, Rev A
Chapter 8
Motion Control Instructions
Motion Modifiers
The following instructions modify the characteristics of individual motions. These
instructions are summarized in Table 8-1, on page 207.
ACCEL
BRAKE
BREAK
COARSE*
FINE*
DURATION*
SPEED*
ABOVE/BELOW
CPON/CPOFF
FLIP/NOFLIP
LEFTY/RIGHTY/
NULL/NONULL*
SINGLE/MULTIPLE*
The instructions listed above with an asterisk (*) can take ALWAYS as an
argument.
Customizing the Calibration Routine
The following information is required only if you need to customize the
calibration sequence. Most AdeptMotion users do not need to do this.
When a CALIBRATE command or instruction is processed, the V+ system loads
the file CAL_UTIL.V2 (see the dictionary page for the CALIBRATE command for
details) and executes a program contained in that file. The main calibration
program then examines the SPEC data for the robot to determine the name of the
disk file that contains the specific calibration program for the current robot, and
the name of that program.
The standard routine used for AdeptMotion devices is stored on the system disk
in \CALIB\STANDARD.CAL (and the routine is named a.standard.cal). That file
is protected and thus cannot be viewed. However, a read-only copy of the file is
provided, in \CALIB\STANDARD.V2, as a basis for developing a custom
calibration routine that can then be substituted for the standard file. (The name of
the robot-specific calibration file and program can be changed using the SPEC
utility program.)
V+ Language User’s Guide, Rev A
203
Chapter 8
Tool Transformations
Tool Transformations
A tool transformation is a special transformation that is used to account for robot
grippers (or parts held in grippers) that are offset from the center of the robot tool
flange. If a location is taught using a part secured by an offset gripper, the actual
location recorded is not the part location, but the center of the tool flange the
offset gripper is attached to (see Figure 8-8). If the same location is taught with a
tool transformation in place, the location recorded will be the center of the
gripper, not the center of the tool flange. This allows you to change grippers and
still have the robot reach the correct location. Figure 8-8 shows the location of the
robot when a location is taught and the actual location that is recorded when no
tool transformation is in effect. If the proper tool transformation is in effect when
the location is taught, the location recorded will be the part location and not the
center of the tool flange.
Robot tool flange
The location that is recorded
The actual assembly location
Figure 8-8. Recording Locations
204
V+ Language User’s Guide, Rev A
Chapter 8
Tool Transformations
Defining a Tool Transformation
If the dimensions of a robot tool are known, the POINT command can be used to
define a tool transformation to describe the tool. The null tool has its center at the
surface of the tool mounting flange and its coordinate axes parallel to that of the
last joint of the robot. The null tool transformation is equal to [0,0,0,0,0,0].
For example, if your tool has fingers that extend 50 mm below the tool flange and
100 mm in the tool x direction, and you want to change the tool setting to
compensate for the offset, enter the following lines at the system prompt (bold
characters indicate those actually entered):
.POINT hand.tool ↵(create a new transformation)
X Y Z y p r
0.00 0.00 0.00 0.000 0.000 0.000
Change? ,100,—50 ↵ (alter it by the grip offset)
0.00 100.00 -50.00 0.000 0.000 0.000
Change? ↵
.TOOL hand.tool↵
.LISTL hand.tool↵
X.jt1
y/jt2
z/jt3
y/jt4
p/jt5
r/jt6
0.00
100.00 -50.00
0.000
0.000
0.000
Figure 8-9 shows the TOOL that would result from the above operation.
TOOL
Figure 8-9. Tool Transformation
V+ Language User’s Guide, Rev A
205
Chapter 8
Tool Transformations
Tool transformations are most important when:
206
•
Grippers are changed frequently
•
The robot is vision guided
•
Robot locations are loaded directly from CAD data
V+ Language User’s Guide, Rev A
Chapter 8
Summary of Motion Keywords
Summary of Motion Keywords
Table 8-1 summarizes the keywords associated with motion in V+.
These instructions are covered in detail in the V+ Language Reference Guide.
Please see the reference guide for the keyword parameters and their uses.
Table 8-1. Motion Control Operations
Keyword
Type
Function
ABOVE
PI
Request a change in the robot configuration during the
next motion so that the elbow is above the line from the
shoulder to the wrist.
ACCEL
PI
Set acceleration and deceleration for robot motions.
ACCEL
RF
Return the current robot acceleration or deceleration
setting.
ALIGN
PI
Align the robot tool Z axis with the nearest world axis.
ALTER
PI
Specify the magnitude of the real-time path modification
that is to be applied to the robot path during the next
trajectory computation.
ALTOFF
PI
Terminate real-time path-modification mode (alter mode).
ALTON
PI
Enable real-time path-modification mode (alter mode), and
specify the way in which ALTER coordinate information
will be interpreted.
AMOVE
PI
Position an extra robot axis during the next
joint-interpolated or straight-line motion.
APPRO
PI
Start joint-interpolated robot motion toward a location
defined relative to specified location.
APPROS
PI
Start straight-line robot motion toward a location defined
relative to specified location.
BASE
PI
Translate and rotate the world reference frame relative to
the robot.
PI: Program Instruction, RF: Real-Valued Function, TF: Transformation Function, S:
Switch, P: Parameter, PF: Precision-Point Function, CF: Conversion Factor
V+ Language User’s Guide, Rev A
207
Chapter 8
Summary of Motion Keywords
Table 8-1. Motion Control Operations (Continued)
Keyword
Type
Function
BASE
TF
Return the transformation value that represents the
translation and rotation set by the last BASE command or
instruction.
BELOW
PI
Request a change in the robot configuration during the
next motion so that the elbow is below the line from the
shoulder to the wrist.
BRAKE
PI
Abort the current robot motion.
BREAK
PI
Suspend program execution until the current motion
completes.
CALIBRATE
PI
Initialize the robot positioning system.
CLOSE
PI
Close the robot gripper immediately.
CLOSEI
PI
Close the robot gripper.
COARSE
PI
Enable a low-precision feature of the robot hardware servo
(see FINE).
CONFIG
RF
Return a value that provides information about the robot’s
geometric configuration, or the status of the motion
servo-control features.
CP
S
Control the continuous-path feature.
CPOFF
PI
Instruct the V+ system to stop the robot at the completion
of the next motion instruction (for all subsequent motion
instructions) and null position errors.
CPON
PI
Instruct the V+ system to execute the next motion
instruction (or all subsequent motion instructions) as part
of a continuous path.
DECOMPOSE
PI
Extract the (real) values of individual components of a
location value.
DELAY
PI
Cause robot motion to stop for the specified period of time.
DEPART
PI
Start a joint-interpolated robot motion away from the
current location.
PI: Program Instruction, RF: Real-Valued Function, TF: Transformation Function, S:
Switch, P: Parameter, PF: Precision-Point Function, CF: Conversion Factor
208
V+ Language User’s Guide, Rev A
Chapter 8
Summary of Motion Keywords
Table 8-1. Motion Control Operations (Continued)
Keyword
Type
Function
DEPARTS
PI
Start a straight-line robot motion away from the current
location.
DEST
TF
Return a transformation value representing the planned
destination location for the current robot motion.
DISTANCE
RF
Determine the distance between the points defined by two
location values.
DRIVE
PI
Move an individual joint of the robot.
DRY.RUN
S
Control whether or not V+ communicates with the robot.
DURATION
PI
Set the minimum execution time for subsequent robot
motions.
DURATION
RF
Return the current setting of one of the motion
DURATION specifications.
DX
RF
Return the X displacement component of a given
transformation value.
DY
RF
Return the Y displacement component of a given
transformation value.
DZ
RF
Return the Z displacement component of a given
transformation value.
FINE
PI
Enable a high-precision feature of the robot hardware
servo (see COARSE).
FLIP
PI
Request a change in the robot configuration during the
next motion so that the pitch angle of the robot wrist has a
negative value (see NOFLIP).
FORCE
S
Control whether or not the (optional) stop-on-force feature
of the V+ system is active.
FRAME
TF
Return a transformation value defined by four positions.
HAND
RF
Return the current hand opening.
HAND.TIME
P
Establish the duration of the motion delay that occurs
during OPENI, CLOSEI, and RELAXI instructions.
PI: Program Instruction, RF: Real-Valued Function, TF: Transformation Function, S:
Switch, P: Parameter, PF: Precision-Point Function, CF: Conversion Factor
V+ Language User’s Guide, Rev A
209
Chapter 8
Summary of Motion Keywords
Table 8-1. Motion Control Operations (Continued)
Keyword
Type
Function
HERE
PI
Set the value of a transformation or precision-point
variable equal to the current robot location.
HERE
TF
Return a transformation value that represents the current
location of the robot tool point.
HOUR.METER
RF
Return the current value of the robot hour meter.
IDENTICAL
RF
Determine if two location values are exactly the same.
INRANGE
RF
Return a value that indicates if a location can be reached by
the robot, and if not, why not.
INVERSE
TF
Return the transformation value that is the mathematical
inverse of the given transformation value.
IPS
CF
Specify the units for a SPEED instruction as inches per
second.
LATCH
TF
Return a transformation value representing the location of
the robot at the occurrence of the last external trigger.
LATCHED
RF
Return the status of the external trigger and of the
information it causes to be latched.
LEFTY
PI
Request a change in the robot configuration during the
next motion so that the first two links of a SCARA robot
resemble a human’s left arm (see RIGHTY).
MMPS
CF
Specify the units for a SPEED instruction as millimeters per
second.
MOVE
PI
Initiate a joint-interpolated robot motion to the position
and orientation described by the given location.
MOVES
PI
Initiate a straight-line robot motion to the position and
orientation described by the given location.
MOVEF
PI
Initiate a three-segment pick-and-place joint-interpolated
robot motion to the specified destination, moving the robot
at the fastest allowable speed.
PI: Program Instruction, RF: Real-Valued Function, TF: Transformation Function, S:
Switch, P: Parameter, PF: Precision-Point Function, CF: Conversion Factor
210
V+ Language User’s Guide, Rev A
Chapter 8
Summary of Motion Keywords
Table 8-1. Motion Control Operations (Continued)
Keyword
Type
Function
MOVESF
PI
Initiate a three-segment pick-and-place straight-line robot
motion to the specified destination, moving the robot at the
fastest allowable speed.
MOVET
PI
Initiate a joint-interpolated robot motion to the position
and orientation described by the given location and
simultaneously operate the hand.
MOVEST
PI
Initiate a straight-line robot motion to the position and
orientation described by the given location and
simultaneously operate the hand.
MULTIPLE
PI
Allow full rotations of the robot wrist joints (see SINGLE).
NOFLIP
PI
Request a change in the robot configuration during the
next motion so that the pitch angle of the robot wrist has a
positive value (see FLIP).
NONULL
PI
Instruct the V+ system not to wait for position errors to be
nulled at the end of continuous-path motions (see NULL).
NORMAL
TF
Correct a transformation for any mathematical round-off
errors.
NOT.CALIBRAT
ED
P
Indicate (or assert) the calibration status of the robots
connected to the system.
NULL
TF
Return a null transformation value—one with all zero
components.
NULL
PI
Enable nulling of joint position errors.
OPEN
PI
Open the robot gripper.
OPENI
PI
Open the robot gripper immediately.
PAYLOAD
PI
Set an indication of the current robot payload.
#PDEST
PF
Return a precision-point value representing the planned
destination location for the current robot motion.
#PLATCH
PF
Return a precision-point value representing the location of
the robot at the occurrence of the last external trigger.
PI: Program Instruction, RF: Real-Valued Function, TF: Transformation Function, S:
Switch, P: Parameter, PF: Precision-Point Function, CF: Conversion Factor
V+ Language User’s Guide, Rev A
211
Chapter 8
Summary of Motion Keywords
Table 8-1. Motion Control Operations (Continued)
Keyword
Type
Function
POWER
S
Control or monitor the status of Robot Power.
#PPOINT
PF
Return a precision-point value composed from the given
components.
REACTI
PI
Initiate continuous monitoring of a specified digital signal.
Automatically stop the current robot motion if the signal
properly transitions and optionally trigger a subroutine
call.
READY
PI
Move the robot to the READY location above the
workspace, which forces the robot into a standard
configuration.
RELAX
PI
Limp the pneumatic hand.
RELAXI
PI
Limp the pneumatic hand immediately.
RIGHTY
PI
Request a change in the robot configuration during the
next motion so that the first two links of the robot resemble
a human’s right arm (see LEFTY).
ROBOT
S
Enable or disable one robot or all robots.
RX
TF
Return a transformation describing a rotation about the x
axis.
RY
TF
Return a transformation describing a rotation about the y
axis.
RZ
TF
Return a transformation describing a rotation about the z
axis.
SCALE
TF
Return a transformation value equal to the transformation
parameter with the position scaled by the scale factor.
SELECT
PI
Select the unit of the named device for access by the
current task.
SELECT RF
PI
Select the unit (real value function) of the named device for
access by the current task.
PI: Program Instruction, RF: Real-Valued Function, TF: Transformation Function, S:
Switch, P: Parameter, PF: Precision-Point Function, CF: Conversion Factor
212
V+ Language User’s Guide, Rev A
Chapter 8
Summary of Motion Keywords
Table 8-1. Motion Control Operations (Continued)
Keyword
Type
Function
SET
PI
Set the value of the location variable on the left equal to the
location value on the right of the equal sign.
SET.SPEED
S
Control whether or not the monitor speed can be changed
from the manual control pendant. The monitor speed
cannot be changed when the switch is disabled.
SHIFT
TF
Return a transformation value resulting from shifting the
position of the transformation parameter by the given shift
amounts.
SINGLE
PI
Limit rotations of the robot wrist joint to the range –180
degrees to +180 degrees (see MULTIPLE).
SOLVE.ANGLES
PI
Compute the robot joint positions (for the current robot)
that are equivalent to a specified transformation.
SOLVE.FLAGS
RF
Return bit flags representing the robot configuration
specified by an array of joint positions.
SOLVE.TRANS
PI
Compute the transformation equivalent to a given set of
joint positions for the current robot.
SPEED
PI
Set the nominal speed for subsequent robot motions.
SPEED
RF
Return one of the system motion speed factors.
STATE
RF
Return a value that provides information about the robot
system state.
TOOL
PI
Set the internal transformation used to represent the
location and orientation of the tool tip relative to the tool
mounting flange of the robot.
TOOL
TF
Return the value of the transformation specified in the last
TOOL command or instruction.
TRANS
TF
Return a transformation value computed from the given X,
Y, Z position displacements and y, p, r orientation
rotations.
PI: Program Instruction, RF: Real-Valued Function, TF: Transformation Function, S:
Switch, P: Parameter, PF: Precision-Point Function, CF: Conversion Factor
V+ Language User’s Guide, Rev A
213
9
Input/Output Operations
Terminal I/O . . . . . . . . . . . . . . . . . .
Terminal Types . . . . . . . . . . . . . .
Input Processing . . . . . . . . . . . . .
Output Processing . . . . . . . . . . . .
Digital I/O . . . . . . . . . . . . . . . . . . .
High-Speed Interrupts . . . . . . . . . .
Soft Signals . . . . . . . . . . . . . . .
Digital I/O and Third Party Boards . . . .
Digital I/O and DeviceNet . . . . . . . .
Pendant I/O . . . . . . . . . . . . . . . . . .
Analog I/O . . . . . . . . . . . . . . . . . .
Serial and Disk I/O Basics . . . . . . . . . . .
Logical Units . . . . . . . . . . . . . . .
Error Status . . . . . . . . . . . . . . .
Attaching/Detaching Logical Units . . . .
Reading . . . . . . . . . . . . . . . .
Writing . . . . . . . . . . . . . . . . .
Input Wait Modes . . . . . . . . . . . .
Output Wait Modes . . . . . . . . . . .
Disk I/O . . . . . . . . . . . . . . . . . . . .
Attaching Disk Devices . . . . . . . . .
Disk I/O and the Network File System (NFS)
Disk Directories . . . . . . . . . . . . .
Disk File Operations . . . . . . . . . . .
Opening a Disk File . . . . . . . . . .
Writing to a Disk . . . . . . . . . . .
Reading From a Disk . . . . . . . . .
Detaching . . . . . . . . . . . . . .
Disk I/O Example . . . . . . . . . . .
Advanced Disk Operations . . . . . . . . . .
Variable-Length Records . . . . . . . .
Fixed-Length Records . . . . . . . . . .
Sequential-Access Files . . . . . . . . .
Random-Access Files . . . . . . . . . .
.
.
.
.
.
.
.
.
.
.
.
.
.
.
.
.
.
.
.
.
.
.
.
.
.
.
.
.
.
.
.
.
.
.
.
.
.
.
.
.
.
.
.
.
.
.
.
.
.
.
.
.
.
.
.
.
.
.
.
.
.
.
.
.
.
.
.
.
.
.
.
.
.
.
.
.
.
.
.
.
.
.
.
.
.
.
.
.
.
.
.
.
.
.
.
.
.
.
.
.
.
.
V+ Language User’s Guide, Rev A
.
.
.
.
.
.
.
.
.
.
.
.
.
.
.
.
.
.
.
.
.
.
.
.
.
.
.
.
.
.
.
.
.
.
.
.
.
.
.
.
.
.
.
.
.
.
.
.
.
.
.
.
.
.
.
.
.
.
.
.
.
.
.
.
.
.
.
.
.
.
.
.
.
.
.
.
.
.
.
.
.
.
.
.
.
.
.
.
.
.
.
.
.
.
.
.
.
.
.
.
.
.
.
.
.
.
.
.
.
.
.
.
.
.
.
.
.
.
.
.
.
.
.
.
.
.
.
.
.
.
.
.
.
.
.
.
.
.
.
.
.
.
.
.
.
.
.
.
.
.
.
.
.
.
.
.
.
.
.
.
.
.
.
.
.
.
.
.
.
.
.
.
.
.
.
.
.
.
.
.
.
.
.
.
.
.
.
.
.
.
.
.
.
.
.
.
.
.
.
.
.
.
.
.
.
.
.
.
.
.
.
.
.
.
.
.
.
.
.
.
.
.
.
.
.
.
.
.
.
.
.
.
.
.
.
.
.
.
217
218
218
220
220
221
221
222
222
223
223
225
225
225
227
228
229
229
230
231
231
232
232
232
233
234
235
235
236
237
237
238
238
238
215
Chapter 9
Buffering and I/O Overlapping . . .
Disk Commands . . . . . . . . . . .
Accessing the Disk Directories . . . .
AdeptNET . . . . . . . . . . . . . .
Serial Line I/O . . . . . . . . . . . . . . .
I/O Configuration . . . . . . . . . .
Attaching/Detaching Serial I/O Lines .
Input Processing . . . . . . . . . . .
Output Processing . . . . . . . . . .
Serial I/O Examples . . . . . . . .
DDCMP Communication Protocol . . . . .
General Operation . . . . . . . . .
Attaching/Detaching DDCMP Devices
Input Processing . . . . . . . . . . .
Output Processing . . . . . . . . . .
Protocol Parameters . . . . . . . .
Kermit Communication Protocol . . . . . .
Starting a Kermit Session . . . . . . .
File Access Using Kermit . . . . . . .
Binary Files . . . . . . . . . . . .
Kermit Line Errors . . . . . . . . . .
V+ System Parameters for Kermit . . .
DeviceNet . . . . . . . . . . . . . . . . .
Summary of I/O Operations . . . . . . . .
216
.
.
.
.
.
.
.
.
.
.
.
.
.
.
.
.
.
.
.
.
.
.
.
.
.
.
.
.
.
.
.
.
.
.
.
.
.
.
.
.
.
.
.
.
.
.
.
.
V+ Language User’s Guide, Rev A
.
.
.
.
.
.
.
.
.
.
.
.
.
.
.
.
.
.
.
.
.
.
.
.
.
.
.
.
.
.
.
.
.
.
.
.
.
.
.
.
.
.
.
.
.
.
.
.
.
.
.
.
.
.
.
.
.
.
.
.
.
.
.
.
.
.
.
.
.
.
.
.
.
.
.
.
.
.
.
.
.
.
.
.
.
.
.
.
.
.
.
.
.
.
.
.
.
.
.
.
.
.
.
.
.
.
.
.
.
.
.
.
.
.
.
.
.
.
.
.
.
.
.
.
.
.
.
.
.
.
.
.
.
.
.
.
.
.
.
.
.
.
.
.
.
.
.
.
.
.
.
.
.
.
.
.
.
.
.
.
.
.
.
.
.
.
.
.
.
.
.
.
.
.
.
.
.
.
.
.
.
.
.
.
.
.
.
.
.
.
.
.
.
.
.
.
.
.
.
.
.
.
.
.
.
.
.
.
.
.
.
.
.
.
.
.
.
.
.
.
.
.
.
.
.
.
.
.
.
.
.
.
.
.
.
.
.
.
.
.
239
240
241
242
243
243
244
244
245
245
248
248
249
249
250
251
252
253
255
256
257
258
258
259
Chapter 9
Terminal I/O
Terminal I/O
The program instruction used to output text to the monitor screen is TYPE. The
program line:
TYPE "This is a terminal output instruction."
will output the text between the quotation marks to the current cursor location. If
a variable x has a value of 27, the instruction:
TYPE "The value of x is ", x, "."
will output
The value of x is 27.
to the monitor.
The TYPE instruction has qualifiers for entering blank spaces and moving the
cursor. The instruction:
TYPE /C34, /U17, "This is the screen center."
will enter 34 carriage returns (clear the screen), move up 17 lines from the bottom
of the screen, and output the text message. Additional qualifiers are available to
format the output of variables and control terminal behavior.
The program instruction used to retrieve data input from the keyboard is
PROMPT. The program line:
PROMPT "Enter a value for x: ", x
will halt program execution and wait for the operator to enter a value from the
keyboard (in this case a real or integer value). If a value of the proper data type is
entered, the value is assigned to the named variable (if the variable does not exist,
it will be created and assigned the value entered) and program execution will
proceed. If an improper data type is entered, the system will generate an error
message and halt execution. String data is expected if a string variable ($x, for
example) is specified.
All terminal input should be checked for proper data type. The following code
segment will insure that a positive integer is input. (Using the VAL() function also
guarantees that inadvertently entered nonnumeric characters will not cause a
system error.)
V+ Language User’s Guide, Rev A
217
Chapter 9
Terminal I/O
DO
PROMPT "Enter a value greater than 0: ", $x
x = VAL($x)
UNTIL x > 0
Terminal Types
In order for V+ to echo input characters properly and to generate certain displays
on character-based terminals, the type of terminal being used must be specified to
the system. The default terminal type (which is recorded on the V+ system disk) is
assumed each time the V+ system is booted from disk.1 After the system is
booted, the TERMINAL system parameter can be set to specify a different
terminal type.
Input Processing
Terminal input is buffered by the system but is not echoed until it is actually read
by the V+ monitor or by a program. A maximum of 80 characters can be received
before V+ begins to reject input. When input is being rejected, V+ beeps the
terminal for each character rejected.
On input, V+ may intercept special characters Ctrl+O, Ctrl+Q, and Ctrl+S, and
use them to control terminal output.2 They cannot be input even by the GETC
function. Their functions are shown in Table 9-1.
Table 9-1. Special Character Codes
1
2
218
Char.
Decimal
Function
Ctrl+O
15
Suppress or stop suppressing
output
Ctrl+Q
17
Resume output suspended by
Ctrl+S
Ctrl+S
19
Immediately suspend terminal
output
The default terminal type and communication characteristics of the serial line are set with the
configuration program in the file CONFIG_C.V2 on the Adept Utility Disk.
Terminal behavior is configurable using the /FLUSH and /FLOW arguments to the FSET
instruction. See the V+ Language Reference Guide.
V+ Language User’s Guide, Rev A
Chapter 9
Terminal I/O
When Ctrl+O is used to suppress output, all output instructions behave normally,
except that no output is sent to the terminal. Output suppression is canceled by
typing a second Ctrl+O, by V+ writing a system error message, or by a terminal
read request.
Other special characters are recognized by the terminal input handler when
processing a PROMPT or READ instruction, or when reading a monitor
command. However, these characters can be read by the GETC function, in which
case their normal action is suppressed.
Table 9-2. Special Character Codes Read by GETC
Char.
Decimal
Name
Action
Ctrl+C
03
Ctrl+H
08
Backspace
Delete the previous input character
Ctrl+I
09
Tab
Move to the next tab stop
Ctrl+M
13
Return
Complete this input line
Ctrl+R
18
Retype the current input line
Ctrl+U
21
Delete the entire current line
Ctrl+W
23
Start/stop slow output mode
Ctrl+Z
26
Complete this input with an end of file
error
DEL
12
07
Abort the current monitor command
Delete
Delete the previous input character
During a PROMPT or READ instruction, all control characters are ignored except
those listed above. Tab characters are automatically converted to the appropriate
number of space characters when they are received. (Tab stops are assumed to be
set every eight spaces [at columns 9, 17, 25,...] and cannot be changed.)
Unlike PROMPT, both READ and GETC require that the terminal be ATTACHed.
Normally, READ and GETC echo input characters as they are processed. An
optional mode argument for each of these operations allows echo to be
suppressed.
V+ Language User’s Guide, Rev A
219
Chapter 9
Digital I/O
Output Processing
Output to the system terminal can be performed using PROMPT, TYPE, or
WRITE instructions. All eight-bit, binary, byte data is output to the terminal
without any modification.
TYPE and WRITE automatically append a Return character (13 decimal) and Line
Feed character (10 decimal) to each data record, unless the /S format control is
specified. PROMPT does not append any characters.
Unlike all the other I/O devices, the terminal does not have to be attached prior to
output requests. If a different task is attached to the terminal, however, any
output requests are queued until the other task detaches. V+ system error
messages are always displayed immediately, regardless of the status of terminal
attachment.
Digital I/O
Adept controllers can communicate in a digital fashion with external devices
using the Digital I/O capability. Digital input reads the status of a signal
controlled by user-installed equipment. A typical digital input operation would
be to wait for a microswitch on a workcell conveyor to close, indicating that an
assembly is in the proper place. The WAIT instruction and SIG function are used
to halt program execution until a digital input channel signal achieves a specified
state. The program line:
WAIT SIG(1001)
will halt program execution until a switching device attached to digital input
channel 1001 is closed. If signal 1002 is a sensor indicating a part feeder is empty,
the code:
IF SIG(1002) THEN
CALL service.feeder()
END
will check the sensor state and call a routine to service the feeder if the sensor is
on.
The SIGNAL instruction is used for digital output. In the above example, the
conveyor belt may need to be stopped after digital input signal 1001 signals that a
part is in place. The instruction:
SIGNAL(−33)
220
V+ Language User’s Guide, Rev A
Chapter 9
Digital I/O
will turn off digital output signal 33, causing the conveyor belt connected to
signal 33 to stop. When processing on the part is finished and the part needs to be
moved out of the work area, the instruction:
SIGNAL(33)
will turn the conveyor belt back on. The digital I/O channels must be installed
before they can be accessed by the SIG function or SIGNAL instruction. The
SIG.INS function returns an indication of whether a given signal number is
available. The code line:
IF SIG.INS(33) THEN
can be used to insure that a digital signal was available before you attempted to
access it. The monitor command IO will display the status of all digital I/O
channels. See the Adept MV Controller User’s Guide for details on installing
digital I/O hardware.
Digital output channels are numbered from 1 to 512. Input channels are in the
range 1001 to 1512.
High-Speed Interrupts
Normally, the digital I/O system is checked once every V+ major cycle (every
16ms). In some cases, the delay or uncertainty resulting may be unacceptable.
Digital signals 1001 - 1004 can be configured as high-speed interrupts. When a
signal configured as a high-speed interrupt transitions, its state is read at system
interrupt level, resulting in a maximum delay of 1ms. The controller configuration
utility CONFIG_C is used to configure high-speed interrupts. See the INT.EVENT
instruction in the V+ Language Reference Guide for more information
Soft Signals
Soft signals are used primarily as global flags. The soft signals are in the range
2001 - 2512 and can be used with SIG and SIGNAL. A typical use of soft signals is
for intertask communication. See “REACT and REACTI” on page 136 and the
REACT_ instructions in the V+ Language Reference Guide.
Soft signals may be used to communicate between different V+ systems running
on multiple system processors. 1
1
If your system is equipped with multiple system processors and the optional V+ Extensions
software, you can run different copies of V+ on each processor. Use the CONFIG_C utility to set
up multiple V+ systems.
V+ Language User’s Guide, Rev A
221
Chapter 9
Digital I/O
Digital I/O and Third Party Boards
When V+ starts, default blocks of system memory are assigned to the digital I/O
system. V+ expects to find the digital I/O image at these locations. If you are
using a third party digital I/O board, you will need to remap these memory
locations to correspond to the actual memory location of the digital I/O image on
your board. See the description of DEF.DIO in the V+ Language Reference Guide
for details.
Digital I/O and DeviceNet
When V+ starts, default blocks of system memory are assigned to the DeviceNet
system. V+ expects to find the DeviceNet image at these locations. See the
DeviceNet configuration set-up procedures in the Adept MV Controller User’s
Guide for details.
222
V+ Language User’s Guide, Rev A
Chapter 9
Pendant I/O
Pendant I/O
Most of the standard V+ I/O operations can be used to read data from the manual
control pendant keypad and to write data to the pendant display. See Chapter 11
for information on accessing the manual control pendant.
Analog I/O
Up to eight analog I/O modules for a total of 32 output and 256 input channels1
can be installed in an Adept MV controller. Figure 9-1 on page 224 shows the I/O
channel numbers for each installed module. Analog I/O modules can be
configured for different input/output ranges. The actual input and output
voltages are determined by setting on the AIO module. Regardless of the
input/output range selected, the AIO.IN function returns a value in the –1.0 to 1.0
range and the AIO.OUT instruction expects a value in the range –1.0 to 1.0.
Additionally, modules can be configured for differential input (which reduces the
maximum number of input channels to 128). Contact Adept Applications for
details on installing and configuring analog I/O boards.2 See “How Can I Get
Help?” on page 32 for phone numbers.
The instruction:
analog.value = AIO.IN(1004)
will read the current state of analog input channel 4.
The instruction:
AIO.OUT 2 = 0.9
will write the value 0.9 to analog output channel 2.
The instruction:
IF AIO.INS (4) THEN
AIO.OUT 4 = 0.56
END
will write to output channel 4 only if output channel 4 is installed.
1
2
Analog I/O boards can be configured for differential input rather than single-ended input.
Differential input reduces the number of channels on a single board from 32 to 16.
The analog I/O board used by the Adept controller is supplied by Xycom, Inc. The model
number is XVME-540. The phone number for Xycom is (800) 289-9266.
V+ Language User’s Guide, Rev A
223
Chapter 9
Board 1
in 1001-1032
(dif 1001-1016)
out 1-4
Board 5
in 1129-1160
(dif 1129-1144)
out 17-20
Analog I/O
Board 2
in 1033-1064
(dif 1033-1048)
out 5-8
Board 6
in 1161-1192
(dif 1161-1176)
out 21-24
Board 3
in 1065-1096
(dif 1065-1080)
out 9-12
Board 7
in 1193-1224
(dif 1193-1208)
out 25-28
Board 4
in 1097-1128
(dif 1097-1112)
out 13-16
Board 8
in 1225-1256
(dif 1225-1240)
out 29-32
Figure 9-1. Analog I/O Board Channels
224
V+ Language User’s Guide, Rev A
Chapter 9
Serial and Disk I/O Basics
Serial and Disk I/O Basics
The following sections describe the basic procedures that are common to both
serial and disk I/O operations. “Disk I/O” on page 231 covers disk I/O in detail.
“Serial Line I/O” on page 243 covers serial I/O in detail.
Logical Units
All V+ serial and disk I/O operations reference an integer value called a Logical
Unit Number or LUN. The LUN provides a shorthand method of identifying
which device or file is being referenced by an I/O operation. See the ATTACH
command in the V+ Language Reference Guide for the default device LUN
numbers.
Disk devices are different from all the other devices in that they allow files to be
opened. Each program task can have one file open on each disk LUN. That is,
each program task can have multiple files open simultaneously (on the same or
different disk units).
NOTE: No more than 60 disk files can be open by the entire system
at any time. That includes files opened by programs and by the
system monitor (for example, for the FCOPY command). The error
∗Device not ready∗ results if an attempt is made to open a 61st file.
See Chapter 10 for details on accessing the graphics window LUNs.
Error Status
Unlike most other V+ instructions, I/O operations are expected to fail under
certain circumstances. For example, when reading a file, an error status is
returned to the program to indicate when the end of the file is reached. The
program is expected to handle this error and continue execution. Similarly, a
serial line may return an indication of a parity error, which should cause the
program to retry a data transmission sequence.
V+ Language User’s Guide, Rev A
225
Chapter 9
Serial and Disk I/O Basics
For these reasons, V+ I/O instructions normally do not stop program execution
when an error occurs. Instead, the success or failure of the operation is saved
internally for access by the IOSTAT real-valued function. For example, a reference
to IOSTAT(5) will return a value indicating the status of the last I/O operation
performed on LUN 5. The values returned by IOSTAT fall into one of following
three categories:
Table 9-3. IOSTAT Return Values
Value
Explanation
1
The I/O operation completed successfully.
0
The I/O operation has not yet completed. This value appears
only if a pre-read or no-wait I/O is being performed.
<0
The I/O operation completed with an error. The error code
indicates what type of error occurred.
The error message associated with a negative value from IOSTAT can be found in
the V+ Language Reference Guide. The $ERROR string function can be used in a
program (or with the LISTS monitor command) to generate the text associated
with most I/O errors.
It is good practice to use IOSTAT to check each I/O operation performed, even if
you think it cannot fail (hardware problems can cause unexpected errors).
Note that it is not necessary to use IOSTAT after use of a GETC function, since
errors are returned directly by the GETC function.
226
V+ Language User’s Guide, Rev A
Chapter 9
Serial and Disk I/O Basics
Attaching/Detaching Logical Units
In general, an I/O device must be attached using the ATTACH instruction before
it can be accessed by a program. Once a specific device (such as the manual
control pendant) is attached by one program task, it cannot be used by another
program task. Most I/O requests fail if the device associated with the referenced
LUN is not attached.
Each program task has its own sets of disk and graphics logical units. Thus, more
than one program task can attach the same logical unit number in those groups at
the same time without interference.
A physical device type can be specified when the logical unit is attached. If a
device type is specified, it supersedes the default, but only for the logical unit
attached. The specified device type remains selected until the logical unit is
detached.
An attach request can optionally specify immediate mode. Normally, an attach
request is queued, and the calling program is suspended if another control
program task is attached to the device. When the device is detached, the next
attachment in the queue will be processed. In immediate mode, the ATTACH
instruction completes immediately—with an error if the requested device is
already attached by another control program task.
With V+ systems, attach requests can also specify no-wait mode. This mode
allows an attach request to be queued without forcing the program to wait for it to
complete. The IOSTAT function must then be used to determine when the attach
has completed.
If a task is already attached to a logical unit, it will get an error immediately if it
attempts to attach again without detaching, regardless of the type of wait mode
specified.
When a program is finished with a device, it should detach the device with the
DETACH program instruction. This allows other programs to process any
pending I/O operations.
When a control program completes execution normally, all I/O devices attached
by it are automatically detached. If a program stops abnormally, however, most
device attachments are preserved. If the control program task is resumed and
attempts to reattach these logical units, it may fail because of the attachments still
in effect. The KILL monitor command forces a program to detach all the devices it
has attached.
V+ Language User’s Guide, Rev A
227
Chapter 9
Serial and Disk I/O Basics
If attached by a program, the terminal and manual control pendant are detached
whenever the program halts or pauses for any reason, including error conditions
and single-step mode. If the program is resumed, the terminal and the manual
control pendant are automatically reattached if they were attached before the
termination.
NOTE: It is possible that another program task could have attached
the terminal or manual control pendant in the meantime. That
would result in an error message when the stopped task is restarted.
Reading
The READ instruction processes input from all devices. The basic READ
instruction issues a request to the device attached on the indicated LUN and waits
until a complete data record is received before program execution continues. (The
length of the last record read can be obtained with the IOSTAT function with its
second argument set to 2.)
The GETC real-valued function returns the next data byte from an I/O device
without waiting for a complete data record. It is commonly used to read data
from the serial lines or the system terminal. It also can be used to read disk files in
a byte-by-byte manner.
Special mode bits to allow reading with no echo are supported for terminal read
operations. Terminal input also can be performed using the PROMPT instruction.
The GETEVENT instruction can be used to read input from the system terminal.
This may be useful in writing programs that operate on both graphics and
nongraphics-based systems.
To read data from a disk device, a file must be open on the corresponding logical
unit. The FOPEN_ instructions open disk files.
228
V+ Language User’s Guide, Rev A
Chapter 9
Serial and Disk I/O Basics
Writing
The WRITE instruction processes output to serial and disk devices and to the
terminal. The basic WRITE instruction issues a request to the device attached on
the indicated LUN, and waits until the complete data record is output before
program execution continues.
WRITE instructions accept format control specifiers that determine how output
data is formatted, and whether or not an end of record mark should be written at
the end of the record.
Terminal output also can be performed using the PROMPT or TYPE instructions.
A file must be open using the FOPENW or FOPENA instructions before data can
be written to a disk device. FOPENW opens a new file. FOPENA opens an
existing file and appends data to that file.
Input Wait Modes
Normally, V+ waits until the data from an input instruction is available before
continuing with program execution. However, the READ instruction and GETC
function accept an optional argument that specifies no-wait mode. In no-wait
mode, these instructions return immediately with the error status –526 (No data
received) if there is no data available. A program can loop and use these
operations repeatedly until a successful read is completed or until some other
error is received.
The disk devices do not recognize no-wait mode on input and treat such requests
as normal input-with-wait requests.
V+ Language User’s Guide, Rev A
229
Chapter 9
Serial and Disk I/O Basics
Output Wait Modes
Normally, V+ waits for each I/O operation to be complete before continuing to
the next program instruction. For example, the instruction:
TYPE /X50
causes V+ to wait for the entire record of 50 spaces to be transmitted (about 50
milliseconds with the terminal set to 9600 baud) before continuing to the next
program instruction.
Similarly, WRITE instructions to serial lines or disk files will wait for any required
physical output to complete before continuing.
This waiting is not performed if the /N (no wait) format control is specified in an
output instruction. Instead, V+ immediately executes the next instruction. The
IOSTAT function will check whether or not the output has completed. It returns a
value of zero if the previous I/O is not complete.
If a second output instruction for a particular LUN is encountered before the first
no-wait operation has completed, the second instruction will automatically wait
until the first is done. This scheme means the no-wait output is effectively
double-buffered. If an error occurs in the first operation, the second operation is
canceled, and the IOSTAT value is correct for the first operation.
With V+, the IOSTAT function can be used with a second argument of 3 to
explicitly check for the completion of a no-wait write.
230
V+ Language User’s Guide, Rev A
Chapter 9
Disk I/O
Disk I/O
The following sections discuss disk I/O.
Attaching Disk Devices
A disk LUN refers to a local disk device, such as a 3-1/2 inch diskette drive, the
hard disk on a SIO based system, or the Compact Flash in an AWC system. Also, a
remote disk may be accessed via the Kermit protocol or a network.
The type of device to be accessed is determined by the DEFAULT command or the
ATTACH instruction. If the default device type set by the DEFAULT command is
not appropriate at a particular time, the ATTACH instruction can be used to
override the default. The syntax of the ATTACH instruction is:
ATTACH (lun, mode) $device
See the description of ATTACH in the V+ Language Reference Guide for the mode
options and the possible $device names. The instruction:
ATTACH (dlun, 4) "DISK"
will attach to an available disk logical unit and return the number of the logical
unit in the variable dlun, which can then be used in other disk I/O instructions.
If the device name is omitted from the instruction, the default device for the
specified LUN is used. Adept recommends that you always specify a device name
with the ATTACH instruction. (The device SYSTEM refers to the device specified
with the DEFAULT monitor command.)
Once the attachment is made, the device cannot be changed until the logical unit
is detached. However, any of the units available on the device can be specified
when opening a file. For example, the V+ DISK units are A, C and D. After
attaching a DISK device LUN, a program can open and close files on either of
these disk units before detaching the LUN.
V+ Language User’s Guide, Rev A
231
Chapter 9
Disk I/O
Disk I/O and the Network File System (NFS)
In addition to local disk devices, an Adept system equipped with the optional
ethernet hardware and the TCP/IP and NFS licenses can mount remote disk
drives. Once mounted, these remote disk drives can be accessed in the same
fashion as local disks. The following sections describe accessing a disk drive
regardless of whether it is a local drive or a remotely mounted drive. See the
AdeptNet User’s Guide for details on making an NFS mount.
Disk Directories
The FOPEN_ instructions, which open disk files for reading and writing, use
directory paths in the same fashion as the monitor commands LOAD, STORE, etc.
Files on a disk are grouped in directories. If a disk is thought of as a file cabinet,
then a directory can be thought of as a drawer in that cabinet. Directories allow
files (the file folders in our file cabinet analogy) that have some relationship to
each other to be grouped together and separated from other files. See the chapter
Using Files in the V+ Operating System User’s Guide for more details on the
directory structure.
Disk File Operations
All I/O requests to a disk device are made to a file on that device. A disk file is a
logical collection of data records1 on a disk. Each disk file has a name, and all the
names on a disk are stored in a directory on the disk. The FDIRECTORY monitor
command displays the names of the files on a disk.
A disk file can be accessed either sequentially, where data records are accessed
from the beginning of the file to its end, or randomly, where data records are
accessed in any order. Sequential access is simplest and is assumed in this section.
Random access is described later in this chapter.
1
232
A variable-length record is a text string terminated by a CR/LF (ASCII 13/ASCII 10).
V+ Language User’s Guide, Rev A
Chapter 9
Disk I/O
Opening a Disk File
Before a disk file can be opened, the disk the file is on must be ATTACHed.
The FOPEN_ instructions open disk files (and file directories). These instructions
associate a LUN with a disk file. Once a file is open, the READ, GETC, and WRITE
instructions access the file. These instructions use the assigned LUN to access the
file so multiple files may be open on the same disk and the I/O operations for the
different disk files will not affect each other.1
The simplified syntax for FOPEN_ is:
FOPEN_ (lun) file_spec
where:
lun
logical unit number used in the ATTACH instruction
file_spec file specification in the form, unit:path\filename.ext
1
unit
is an optional disk unit name. The standard local disk units are A, C,
and D. If no unit is specified, the colon also must be omitted. Then
the default unit (as determined by the DEFAULT command) is
assumed.
path\
is an optional directory path string. The directory path is defined by
one or more directory names, each followed by a \ character. The
actual directory path is determined by combining any specified path
with the path set by the DEFAULT command. If path is preceded
with a \, the path is absolute. Otherwise, the path is relative and is
added to the current DEFAULT path specification. (If unit is specified and is different from the default unit, the path is always absolute.)
filename
is a name with 1 to 8 characters, which is used as the name of the file
on the disk.
ext
is the filename extension—a string with 0 to 3 characters, which is
used to identify the file type.
When accessing files on a remote system (for example, when using Kermit), the unit can be any
name string, and the file name and extension can be any arbitrary string of characters.
V+ Language User’s Guide, Rev A
233
Chapter 9
Disk I/O
The four open commands are:
1.
Open for read only (FOPENR). If the disk file does not exist, an error is
returned. No write operations are allowed, so data in the file cannot be
modified.
2.
Open for write (FOPENW). If the disk file already exists, an error is returned.
Otherwise, a new file is created. Both read and write operations are allowed.
3.
Open for append (FOPENA). If the disk file does not exist, a new file is created.
Otherwise, an existing file is opened. No error is returned in either case. A
sequential write or a random write with a zero record number appends data
to the end of the file.
4.
Open for directory read (FOPEND). The last directory in the specified
directory path is opened. Only read operations are allowed. Each record read
returns an ASCII string containing directory information. Directories should
be opened using variable-length sequential-access mode.
While a file is open for write or append access, another control program task
cannot access that file. However, multiple control program tasks can access a file
simultaneously in read-only mode.
Writing to a Disk
The instruction:
WRITE (dlun) $in.string
will write the string stored in $in.string to the disk file open on dlun. The
instruction:
error = IOSTAT(dlun)
will return any errors generated during the write operation.
234
V+ Language User’s Guide, Rev A
Chapter 9
Disk I/O
Reading From a Disk
The instruction:
READ (dlun) $in.string
will read (from the open file on dlun) up to the first CR/LF (or end of file if it is
encountered) and store the result in $in.string. When the end of file is reached, V+
error number –504 Unexpected end of file is generated. The IOSTAT() function
must be used to recognize this error and halt reading of the file:
DO
READ (dlun) $in.string
TYPE $in.string
UNTIL IOSTAT(dlun) == —504
The GETC function reads the file byte by byte if you want to examine individual
bytes from the file (or if the file is not delimited by CR/LFs).
Detaching
When a disk logical unit is detached, any disk file that was open on that unit is
automatically closed. However, error conditions detected by the close operation
may not be reported. Therefore, it is good practice to use the FCLOSE instruction
to close files and to check the error status afterwards. FCLOSE ensures that all
buffered data for the file is written to the disk, and updates the disk directory to
reflect any changes made to the file. The DETACH instruction frees up the logical
unit. The following instructions close a file and detach a disk LUN:
FCLOSE (dlun)
IF IOSTAT(dlun) THEN
TYPE $ERROR(IOSTAT(dlun))
END
DETACH (dlun)
When a program completes normally, any open disk files are automatically
closed. If a program stops abnormally and execution will not proceed, the KILL
monitor command will close any files left open by the program.
CAUTION: While a file is open on a floppy disk, do not replace the
floppy disk with another disk: Data may be lost and the new disk
may be corrupted.
V+ Language User’s Guide, Rev A
235
Chapter 9
Disk I/O
Disk I/O Example
The following example creates a disk file, writes to the file, closes the file, reopens
the file, and reads back its contents.
AUTO dlun, i
AUTO $file.name
$file.name = "data.tst"
; Attach to a disk logical unit
ATTACH (dlun, 4) "DISK"
IF IOSTAT(dlun) < 0 GOTO 100
; Open a new file and check status
FOPENW (dlun) $file.name
IF IOSTAT(dlun) < 0 GOTO 100
; Write the text
FOR i = 1 TO 10
WRITE (dlun) "Line "+$ENCODE(i)
IF IOSTAT(dlun) < 0 GOTO 100
END
; Close the file
FCLOSE (dlun)
IF IOSTAT(dlun) < 0 GOTO 100
; Reopen the file and read its contents
FOPENR (dlun) $file.name
IF IOSTAT(dlun) < 0 GOTO 100
READ (dlun) $txt
;Get first line from file
WHILE IOSTAT(dlun) > 0 DO
TYPE $txt
READ (dlun) $txt
END
;End of file or error
IF (IOSTAT(dlun) < 0) AND (IOSTAT(dlun) <> −504) THEN
100 TYPE $ERROR(IOSTAT(dlun)) ;Report any errors
END
FCLOSE (dlun)
;Close the file
IF IOSTAT(dlun) < 0 THEN
TYPE $ERROR(IOSTAT(dlun))
END
DETACH (dlun)
236
;Detach the LUN
V+ Language User’s Guide, Rev A
Chapter 9
Advanced Disk Operations
Advanced Disk Operations
This section introduces additional parameters to the FOPEN_ instructions. See the
descriptions of the FOPEN_ instructions in the V+ Language Reference Guide for
details.
Variable-Length Records
The default disk file access mode is variable-length record mode. In this mode,
records can have any length (up to a maximum of 512 bytes) and can cross the
boundaries of 512-byte sectors. The end of a record is indicated by a Line-Feed
character (ASCII 10). Also, the end of the file is indicated by the presence of a
Ctrl+Z character (26 decimal) in the file. Variable-length records should not
contain any internal Line-Feed or Ctrl+Z characters as data. This format is used
for loading and storing V+ programs, and is compatible with the IBM PC
standard ASCII file format.
Variable-length record mode is selected by setting the record length parameter in
the FOPEN_ instruction to zero, or by omitting the parameter completely. In this
mode, WRITE instructions automatically append Return (ASCII 13) and
Line-Feed characters to the output data—which makes it a complete record. If the
/S format control is specified in an output specification, no Return/Line-Feed is
appended. Then any subsequent WRITE will have its data concatenated to the
current data as part of the same record. If the /Cn format control is specified, n
Return/Line-Feeds are written, creating multiple records with a single WRITE.
When a variable-length record is read using a READ instruction, the
Return/Line-Feed sequence at the end is removed before returning the data to the
V+ program. If the GETC function is used to read from a disk file, all characters
are returned as they appear in the file—including Return, Line-Feed, and Ctrl+Z
characters.
V+ Language User’s Guide, Rev A
237
Chapter 9
Advanced Disk Operations
Fixed-Length Records
In fixed-length record mode, all records in the disk file have the same specific
length. Then there are no special characters embedded in the file to indicate where
records begin or end. Records are contiguous and may freely cross the boundaries
of 512-byte sectors.
Fixed-length record mode is selected by setting the record length parameter in the
FOPEN_ instruction to the size of the record, in bytes. WRITE instructions then
pad data records with zero bytes or truncate records as necessary to make the
record length the size specified. No other data bytes are appended, and the /S
format control has no effect.
In fixed-length mode, READ instructions always return records of the specified
length. If the length of the file is such that it cannot be divided into an even
number of records, a READ of the last record will be padded with zero bytes to
make it the correct length.
Sequential-Access Files
Normally, the records within a disk file are accessed in order from the beginning
to the end without skipping any records. Such files are called sequential files.
Sequential-access files may contain either variable-length or fixed-length records.
Random-Access Files
In some applications, disk files need to be read or written in a nonsequential or
random order. V+ supports random access only for files with fixed-length
records. Records are numbered starting with 1. The position of the first byte in a
random-access record can be computed by:
byte_position = 1 + (record_number −1) * record_length
Random access is selected by setting the random-access bit in the mode parameter
of the FOPEN_ instruction. A nonzero record length must also be specified.
A specific record is accessed by specifying the record number in a READ or
WRITE instruction. If the record number is omitted, or is zero, the record
following the one last accessed is used (see the FOPEN_ description in the V+
Language Reference Guide).
238
V+ Language User’s Guide, Rev A
Chapter 9
Advanced Disk Operations
NOTE: Logically, each disk file appears to be simply a sequence of
bytes. These bytes are interpreted as grouped into records according
to the manner in which the file was opened. Files do not contain
record format information, so any file can be opened in any record
mode. (Thus, it is the programmer’s responsibility to make sure files
are read with the same record format as was used to create the file.)
Buffering and I/O Overlapping
All physical disk I/O occurs as 512-byte sector reads and writes. Records are
unpacked from the sector buffer on input, and additional sectors are read as
needed to complete a record. To speed up read operations, V+ automatically
issues a read request for the next sector while it is processing the current sector.
This request is called a preread. Preread is selected by default for both
sequential-access and random-access modes. It can be disabled by setting a bit in
the mode parameter of the FOPEN_ instruction. If prereads are enabled, opening
a file for read access immediately issues a read for the first sector in the file.
Preread operations may actually degrade system performance if records are
accessed in truly random order, since sectors would be read that would never be
used. In this case, prereads should be disabled and the FSEEK instruction should
be used to initiate a preread of the next record to be used.
The function IOSTAT(lun, 1) returns the completion status for a pending preread
or FSEEK operation.
On output, records are packed into sector buffers and written after the buffers are
filled. If no-wait mode is selected for a write operation by using the /N format
control, the WRITE instruction does not wait for a sector to be written before
allowing program execution to continue.
In random-access mode, a sector buffer is not normally written to disk until a
record not contained in that buffer is accessed. The FEMPTY instruction empties
the current sector buffer by immediately writing it to the disk.
A file may be opened in nonbuffered mode, which is much slower than normal
buffered mode, but it guarantees that information that is written will not be lost
due to a system crash or power failure. This mode was intended primarily for use
with log files that are left opened over an extended period of time and
intermittently updated. For these types of files, the additional (significant)
overhead of this mode is not so important as the benefit.
V+ Language User’s Guide, Rev A
239
Chapter 9
Advanced Disk Operations
When a file is being created, information about the file size is not stored in the
disk directory until the file is closed. Closing a file also forces any partial sector
buffers to be written to the disk. Note that aborting a program does not force files
associated with it to be closed. The files are not closed (and the directory is not
updated) until a KILL command is executed or until the aborted program is
executed again.
CAUTION: To preserve newly written data, do not remove a
floppy disk from the drive until you are sure the file has been
closed.
Disk Commands
There are several disk-oriented monitor commands that do not have a
corresponding program instruction. The FCMND instruction must be used to
perform the following actions from within a program:
•
Rename a file
•
Format a disk
•
Create a subdirectory
•
Delete a subdirectory
The MCS instruction can be used to issue an FCOPY command from within a
program.
FCMND is similar to other disk I/O instructions in that a logical unit must be
attached and the success or failure of the command is returned via the IOSTAT
real-valued function.
The FCMND instruction is described in detail in the V+ Language Reference
Guide. See the Adept MV Controller User’s Guide for the FCMND instruction
updates for DeviceNet.
240
V+ Language User’s Guide, Rev A
Chapter 9
Advanced Disk Operations
Accessing the Disk Directories
The V+ directory structure is identical to that used by the IBM PC DOS operating
system (version 2.0 and later). For each file, the directory structure contains the
file name, attributes, creation time and date, and file size. Directory entries may
be read after successfully executing an FOPEND instruction.
Each directory record returned by a READ instruction contains an ASCII string
with the information shown in Table 9-4.
Table 9-4. Disk Directory Format
Byte
Size
Description
1-8
8
ASCII file name, padded with blanks on right
9
1
ASCII period character (46 decimal)
10-12
3
ASCII file extension, padded with blanks on right
13-20
8
ASCII file size, in sectors, right justified
21
1
ASCII space character (32 decimal)
22-28
7
Attribute codes, padded with blanks on right
29-37
9
File revision date in the format dd-mm-yy
38
1
ASCII space character (32 decimal)
39-46
8
File revision time in the format hh:mm:ss
V+ Language User’s Guide, Rev A
241
Chapter 9
Advanced Disk Operations
The following characters are possible in the file attribute code field of directory
entries:
Table 9-5. File Attribute Codes
Character
Meaning
D
Entry is a subdirectory
L
Entry is the volume label (not supported by
V+)
P
File is protected and cannot be read or
modified
R
File is read-only and cannot be modified
S
File is a system file
The attribute field is blank if no special attributes are indicated.
The file revision date and time fields are blank if the system date and time had not
been set when the file was created or last modified. (The system date and time are
set with the TIME monitor command or program instruction.)
AdeptNET
AdeptNET provides the ability to perform TCP/IP communications with other
equipment, perform NFS mounts on remote disks, and perform FTP transfers of
files between local and remote disks. See the AdeptNet User’s Guide for details.
242
V+ Language User’s Guide, Rev A
Chapter 9
Serial Line I/O
Serial Line I/O
The V+ controller has several serial lines that are available for general use. This
section describes how these lines are used for simple serial communications. To
use a serial line for a special protocol such as DDCMP and Kermit (described later
in this chapter), the line must be configured using the Adept controller
configuration utility program.1
I/O Configuration
In addition to selecting the protocol to be used, the Adept controller configuration
program allows the baud rate and byte format for each serial line to be defined.
Once the serial line configuration is defined on the V+ system boot disk, the serial
lines are set up automatically when the V+ system is loaded and initialized. After
the system is running, the FSET instruction can be used to reconfigure the serial
lines. The following byte formats are available:
•
Byte data length of 7 or 8 bits, not including parity
•
One or two stop bits
•
Parity disabled or enabled
•
Odd or even parity (adds 1 bit to byte length)
The following baud rates are available:
110, 300, 600, 1200, 2400, 4800, 7200, 9600, 19200, 38400
In addition, V+ provides automatic buffering with optional flow control for each
serial line. The I/O configuration program can be used to enable output flow
control with which V+ recognizes Ctrl+S (19 decimal) and Ctrl+Q (17 decimal)
and uses them to suspend and resume, respectively, serial line output. The
configuration program can also enable input flow control, with which V+
generates Ctrl+S and Ctrl+Q to suspend and resume, respectively, input from an
external source. With Ctrl+S and Ctrl+Q flow control disabled, all input and
output is totally transparent, and all 8-bit data bytes can be sent and received.
Serial lines may also be configured to use hardware modem control lines for flow
control. (The RTS/CTS lines must be installed in the modem cable—standard
modem cables often leave these lines out.) See the Adept MV Controller User’s
Guide for pin assignments.
1
The controller configuration utility is on the Adept Utility Disk in the file CONFIG_C.V2.
V+ Language User’s Guide, Rev A
243
Chapter 9
Serial Line I/O
Attaching/Detaching Serial I/O Lines
Serial lines must be attached before any I/O operations can take place. Note that
only one control program task can be attached to a single serial line at any one
time. All other attachment requests will queue or fail, depending on the setting of
the mode parameter in the ATTACH instructions.
Attaching or detaching a serial line automatically stops any output in progress
and clears all input buffers. Serial lines are not automatically detached from a
program unless it completes with success, so it is possible to single-step through a
program or proceed from a PAUSE instruction without loss of data.
Input Processing
Input data is received by V+ according to the byte format specified by the I/O
configuration program. The size of the buffer can be set with the CONFIG_C
utility program. Data errors such as parity or framing errors are also buffered and
are returned in the proper order.
The possible data errors from the serial input lines are:
–522
∗Data
error on device∗
A data byte was received with incorrect parity, or the byte generated
a framing error.
–524
∗Communications overrun∗
Data bytes were received after the input buffer was full, or faster
than V+ could process them.
–526
∗No data
received∗
If data is expected, continue polling the serial line.
–504
∗Unexpected
end of file∗
A BREAK was received from the remote device.
Serial line input data is normally read using the GETC function, since it allows the
most flexible response to communications errors. The READ instruction also can
be used provided that input data is terminated by a Line-Feed character (10
decimal).
V+ does not support input echoing or input line editing for the serial lines.
244
V+ Language User’s Guide, Rev A
Chapter 9
Serial Line I/O
Output Processing
All serial line output is performed using the WRITE instruction. All binary data
(including NULL characters) is output without conversion. If the serial line is
configured to support parity, a parity bit is automatically appended to each data
byte.
By default, the WRITE instruction appends a Return character (13 decimal) and a
Line-Feed character (10 decimal) to each data record unless the /S format control
is specified in the instruction parameter list.
If output flow control is enabled and output has been suspended by a Ctrl+S
character from the remote device, a WRITE request may wait indefinitely before
completing.
Serial I/O Examples
The first example attaches to a serial line and performs simple WRITEs and
READs on the line:
.PROGRAM serial.io()
; ABSTRACT: Example program to write and read lines of
; text to and from serial port 1 on the SIO module.
AUTO slun;Logical unit to communicate to serial port
AUTO $text
; Attach to a logical unit(open communications path
; to serial port)
ATTACH(slun, 4) "SERIAL:1"
IF IOSTAT(slun) < 0 GOTO 100
; Write text out to the serial port
WRITE(slun) "Hello there! "
IF IOSTAT(slun) < 0 GOTO 100
;
;
;
;
Read
line
line
text
a line of text from the serial port. The incoming
of text must be terminated by a carriage return and
feed. The READ instruction will wait until a line of
is received.
READ(slun) $text
IF IOSTAT(slun) < 0 GOTO 100
V+ Language User’s Guide, Rev A
245
Chapter 9
Serial Line I/O
; Display any errors
100
IF(IOSTAT(slun) < 0) THEN
TYPE IOSTAT(slun), " ", $ERROR(IOSTAT(slun))
END
DETACH(slun);Detach from logical unit
.END
The next example reads data from a serial line using the GETC function with
no-wait mode. Records that are received are displayed on the terminal. In this
program, data records on the serial line are assumed to be terminated by an ETX
character, which is not displayed. An empty record terminates the program.
.PROGRAM display()
; ABSTRACT: Monitor a serial line and read data when
; available
AUTO $buffer, char, done, etx, ienod, line
etx = 3
ienod = −526
;ASCII code for ETX character
;Error code for no data
ATTACH (line, 4) "SERIAL:1"
IF IOSTAT(line) < 0 GOTO 90;Check for errors
$buffer = ""
done = FALSE
;Initialize buffer to empty
;Assert not done
DO
CLEAR.EVENT
c = GETC(line, 1)
WHILE c == ienod DO
WAIT.EVENT 1
CLEAR.EVENT
c = GETC(line, 1)
END
IF c < 0 GOTO 90
246
;Read byte from the ser. line
;While there is no data...
;Wait for an event
;Read byte from the ser. line
;Check for errors
V+ Language User’s Guide, Rev A
Chapter 9
Serial Line I/O
IF c == etx THEN
TYPE $buffer, /N
done = (LEN($buffer) == 0)
$buffer = ""
ELSE
$buffer = $buffer+$CHR(c)
;If ETX seen...
;Type buffer
;Done if buffer length is 0
;Set buffer to empty
;Append next byte
;to buffer
END
UNTIL done
;Loop until empty buffer
;seen
GOTO 100
;Exit
90
TYPE "SERIAL LINE I/O ERROR: ", $ERROR(IOSTAT(line))
PAUSE
100
DETACH (line)
RETURN
.END
V+ Language User’s Guide, Rev A
247
Chapter 9
DDCMP Communication Protocol
DDCMP Communication Protocol
DDCMP is a rigorous protocol that automatically handles the detection of errors
and the retransmission of messages when an error occurs. (The name stands for
Digital Data Communications Message Protocol.) It is used in Digital Equipment
Corporation’s computer network DECnet.
DDCMP makes use of one or more of the general-purpose USER serial lines. To be
used for DDCMP, a serial line must be configured using the Adept I/O
configuration program. (The configuration program is on the Adept Utility
Diskette in the file CONFIG_C.V2.)
The Adept implementation of DDCMP does not support maintenance messages
or multidrop lines. In all other respects it is a full implementation of the protocol.
This section is not intended to be a thorough description of DDCMP. Refer to the
DEC DDCMP manual for more details on protocol operation and
implementation.1
General Operation
All messages transmitted by DDCMP are embedded in a packet that includes
sequence information and check codes. Upon receipt, a message packet is checked
to verify that it is received in sequence and without transmission errors.
To initiate communications, a system sends special start-up messages until the
proper acknowledgment is received from the remote system. This handshaking
guarantees that both sides are active and ready to exchange data packets. If a start
request is received after the protocol is active, it means that a system has stopped
and restarted its end of the protocol, and an error is signaled to the local system.
Once the protocol is active, each transmitted message is acknowledged by the
remote system, indicating that it was received correctly or requesting
retransmission. If a message is not acknowledged after a certain time, the remote
system is signaled and a retry sequence is initiated. If a message is not sent
correctly after a number of retries, DDCMP stops the protocol and signals an error
to the local system.
1
248
Reference DECnet Digital Network Architecture, Digital Data Communications Message
Protocol (DDCMP) Specification, Version 4.0, March 1, 1978. Digital Equipment Corporation
order number AA-D599A-TC.
V+ Language User’s Guide, Rev A
Chapter 9
DDCMP Communication Protocol
Table 9-6 shows the standard DDCMP NAK reason codes generated by the Adept
implementation of DDCMP.
Table 9-6. Standard DDCMP NAK Reason Codes
Code
Description
1
Check code error in data header or control message
2
Check code error in data field
3
REP response with NUM in REP <> R
8
Buffer temporarily unavailable for incoming data
9
Bytes lost due to receiver overrun
16
Message too long for buffer
17
Header format error (but check code was okay)
Attaching/Detaching DDCMP Devices
An ATTACH request initiates the DDCMP protocol for the specified logical unit.
The attach will not complete until the remote system also starts up the protocol
and acknowledges the local request. There is no time-out limit for start up, so the
attach request can wait indefinitely. For applications that service multiple lines,
no-wait ATTACH mode can be used, and the logical unit for each line can be
polled with the IOSTAT function to detect when the remote system has started.
A DETACH request stops the protocol, flushes any pending input data, and
deactivates the line. Any data received on the line is ignored.
Input Processing
When the protocol is active, received DDCMP data messages are stored in
internal data buffers and acknowledged immediately. The maximum input
message length is 512 bytes. The total number of data buffers (shared by all the
DDCMP serial lines) is initially 10. The Adept controller configuration program
(CONFIG_C) can be used to change the number of buffers allocated for use by
DDCMP.
Once all the DDCMP buffers are full, additional data messages are rejected with
negative acknowledge (NAK) reason #8 (Buffer temporarily unavailable). It is the
user’s responsibility to limit the input data flow using a higher-level protocol on
the remote system.
V+ Language User’s Guide, Rev A
249
Chapter 9
DDCMP Communication Protocol
Input data is accessed via the V+ READ instruction. Each READ instruction
returns the contents of the next data buffer. If no received data is available, the
read will not complete until a data message is received. No-wait READ mode can
be used for reading; the serial line can be polled using the function IOSTAT(lun, 1)
to detect when the read is completed. Keep in mind that the DDCMP
acknowledge was sent when the data was originally received and buffered, not
when the READ instruction is executed.
Output Processing
Output on a DDCMP line is performed using the V+ WRITE instruction. Each
WRITE instruction sends a single data message with a maximum length of 512
bytes. The write request does not complete until the remote system acknowledges
successful receipt of the message. Retransmission because of errors is handled
automatically without any action required by the V+ program.
If the no-wait format control (/N) is specified in the format list for the WRITE
instruction, V+ processing continues without waiting for the write to complete.
Like other output requests, a second write issued before the first has completed
will force the V+ program to wait for the first write to complete. The
IOSTAT(lun,3) function can be used to determine whether or not a no-wait write
has completed.
NOTE: A WRITE instruction automatically appends a Return
character (13 decimal) and Line-Feed character (10 decimal) to the
data message, unless the /S format control is specified.
250
V+ Language User’s Guide, Rev A
Chapter 9
DDCMP Communication Protocol
Protocol Parameters
Certain parameters can be set to control the operation of DDCMP. These
parameters are set with the V+ FCMND instruction. The following parameters
can be set:
1.
Time before message confirmation or retransmission is attempted. An
acknowledge request must have been received before this period of time, or a
time-out occurs. The default value is 3 seconds. It can be set to any value from
1 to 255 seconds.
2.
Number of successive time-outs before an unrecoverable error is signaled,
halting the protocol and aborting I/O requests. The default value is 8. It can be
set to any value from 1 to 255.
3.
Number of successive negative acknowledge (NAK) packets that can be
received before an unrecoverable error is signaled, halting the protocol and
aborting I/O requests. The default value is 8. It can be set to any value from 1
to 255.
The FCMND instruction to set the parameters is as follows (see V+ Language
Reference Guide for more information on the FCMND instruction):
FCMND(lun, 501)$CHR(time.out)+$CHR(time.retry)+
$CHR(nak.retry)
where
lun
is the logical unit number for the serial line
time.out
is the time-out interval, in seconds
time.retry is the successive time-out maximum
nak.retry is the successive NAK maximum
For example, the instruction
FCMND (lun, 501) $CHR(2)+$CHR(20)+$CHR(8)
specifies a time-out interval of 2 seconds, with a maximum of 20 time-outs and 8
NAK retries.
V+ Language User’s Guide, Rev A
251
Chapter 9
Kermit Communication Protocol
Kermit Communication Protocol
The Kermit protocol is an error-correcting protocol for transferring sequential files
between computers over asynchronous serial communication lines. This protocol
is available as an option to the Adept V+ system.
Kermit is nonproprietary and was originally developed at Columbia University.
Computer users may copy Kermit implementations from one another, or they
may obtain copies from Columbia University for a nominal charge.1
The following information is not intended to be a thorough description of Kermit
and its use. You should refer to the Kermit User Guide and the Reference Kermit
Protocol Manual (both available from Columbia University) for more details on
implementation and operation of the Kermit protocol.
The Adept implementation of Kermit can communicate only with a server (see
the Kermit User Guide for a definition of terms). The following material describes
use of Kermit from the V+ system. In addition to this information, you will need
to know how to perform steps on your computer to initiate the Kermit protocol
and access disk files.
When the V+ implementation of the Kermit protocol is enabled, it makes use of
one of the general-purpose USER serial lines on the Adept system controller. For a
serial line to be used with Kermit, the line must have been configured using the
Adept controller configuration program.2
1
2
252
Kermit documentation and software are available from:
Kermit Distribution
Columbia University Center for Computing Activities
612 West 115th Street
New York, NY 10025 (USA)
Web site <http://www.columbia.edu/kermit/>
Only one line can be configured at any one time for use with Kermit. The controller
configuration program is on the Adept Utility Diskette in the file CONFIG_C.V2.
V+ Language User’s Guide, Rev A
Chapter 9
Kermit Communication Protocol
Starting a Kermit Session
This section will lead you through the steps involved with initiating a Kermit file
transfer session using Kermit with the V+ system. The term remote system is used
in this discussion to refer to the computer system that is to be accessed with
Kermit.
NOTE: The following information should be considered an
example. The specific details may not be correct for the computer
system you are accessing with Kermit.
The first step is to start up a Kermit server on the remote system. One way to do
this is to go into pass-through mode on the V+ system by typing the monitor
command:
PASSTHRU KERMIT
The system terminal is now connected directly to the serial line to the remote
system: Anything you type at the system terminal (except Ctrl+C and Ctrl+P) will
be sent directly to the remote system.
If you cannot get any response from the remote system at this point, there is
probably a problem with the serial line connection. A common problem is a
mismatch of baud rates or other communication characteristics, or a bad serial
line connection. Previous experience is helpful in solving such problems.
Once you are able to communicate with the remote system, you may have to log
onto the remote system. After you have reached the point of being able to enter
commands to the system, the Kermit program may be started simply by typing:
KERMIT
or a similar command appropriate to the operating system of the remote
computer.
The Kermit program should start up in its command mode, with a prompt such
as:
C-Kermit>
V+ Language User’s Guide, Rev A
253
Chapter 9
Kermit Communication Protocol
You may then enter commands directly to the Kermit program. For example, you
might want to enter commands to initialize various parameters in preparation for
communication with the V+ Kermit. For instance, you may type:
SET FILE TYPE TEXT
to initialize the remote file type to ASCII. (The actual syntax needed for these
commands will depend on the remote system. Refer to that system’s user guide.
Most Kermit programs are equipped with help facilities that can be invoked by
typing HELP or a question mark [?].)
After successfully initializing the desired parameters, the Kermit server should be
started by typing:
SERVER
The remote server should start up and type a short message about basic server
usage. This message may not be applicable to use of Kermit communications with
the V+ system. Whenever the instructions for handling and terminating the server
differ from those in this manual, the instructions in this manual should be
followed.
At this point, you should escape back to the (local) V+ system by typing a Ctrl+C
to terminate the PASSTHRU command.
NOTE: A Ctrl+C may be typed at any time while in PASSTHRU
mode to escape back to the local system. This implies that you will
not be able to send a Ctrl+C to the remote system. If the remote
system uses Ctrl+C for special purposes (for example, the DEC
VAX/VMS system uses it to interrupt operations), you will have to
use some other means to achieve those special purposes.
Most Kermit servers cannot be aborted or terminated, except by a special
communication packet. In order to terminate the remote server when
communicating with a V+ system, you must go into PASSTHRU mode as
described earlier. Then, when a Ctrl+P is typed, a special packet of information is
sent to the remote server that causes it to terminate. After this is achieved, the
remote Kermit program should return to command mode and display its
command prompt. You may then exit Kermit and log off the remote system.
254
V+ Language User’s Guide, Rev A
Chapter 9
Kermit Communication Protocol
File Access Using Kermit
After the remote Kermit server has been initiated, you are ready to use the Kermit
line for file access. In general, to access a file via Kermit with the V+ system, all
you have to do is specify the KERMIT> physical device in a normal V+ file-access
command or instruction. For example, the command:
LOAD K>file_spec
will load (from the remote system) the programs or data contained in the
specified file. The file specification may be a simple file name, or it may contain
device and directory information. The actual interpretation of the file specification
depends on the remote Kermit server as well as on the type of remote system
being used.
You may also use the V+ DEFAULT command to define the default disk device to
be the Kermit line. For example, you can enter:
DEFAULT = K>directory/
In this command, K> tells the V+ system it should access the Kermit device (when
the local disk device is not explicitly specified), and directory represents directory
information to be used as the default in subsequent file specifications.
After the above DEFAULT command is entered, the command:
LOAD file_name
would load a program or data file from the Kermit line.
It is also possible for a V+ program to READ and WRITE to remote sequential
files over the Kermit line. To do that, the program has to perform the following
steps:
1.
ATTACH a disk logical unit, specifying the physical device KERMIT
(explicitly or via the current default).
NOTE: Only one logical unit in the entire V+ system can be
attached to the KERMIT physical device at any one time. An
attempt to perform a second attachment will result in the error
*Device not ready*.
2.
FOPEN_ the desired file on that logical unit (if the file is open in
fixed-length-record mode as long as the length is less than about 90).
V+ Language User’s Guide, Rev A
255
Chapter 9
Kermit Communication Protocol
3.
READ or WRITE variable-length records using that logical unit.
The following V+ commands and instructions can be used to access files with
Kermit:
FCOPY
FOPEND
STORE
STORES
FDELETE
FOPENR
STOREL
VLOAD
FLIST
FOPENW
STOREP
VSTORE
FDIRECTORY
LOAD
STORER
VLOAD and VSTORE can be used with Kermit only in binary mode.
The specific commands for the remote system will depend on the system you are
using.
Binary Files
Disk files created by the V+ system are called ASCII files because the files contain
only ASCII characters. V+ application programs (and other computers) can create
nonASCII disk files, which contain information that is not interpreted as ASCII
characters. Such files are often called binary files.
When Kermit is transferring normal text (ASCII) files, the file contents are not
adversely affected if the eighth bit of a byte is corrupted. For example, the serial
line hardware would affect the eighth bit if parity checking is enabled, since that
bit is used for the parity information.
However, when binary files need to be transferred, the eighth bit of each byte
must be preserved. Thus, the serial line parity must be set to no parity (that is, the
serial ports on both the V+ system and the remote system must be set). Also, the
Kermit file mode must be set to binary.
The parity mode for the V+ serial ports is set with the Adept controller
configuration program (CONFIG_C). You may be able to set the modes on the
remote system by performing the following steps:
256
1.
Go into PASSTHRU mode at the V+ system terminal.
2.
Enter a command to the remote system to exit the Kermit program (it may first
be necessary to terminate the server by typing Ctrl+P).
3.
Enter a command to the remote system to set the terminal mode to no parity.
4.
Enter a command to the remote system to restart the Kermit program.
5.
Enter a command to the remote Kermit to set its file mode to binary. For
example
V+ Language User’s Guide, Rev A
Chapter 9
Kermit Communication Protocol
SET FILE TYPE BINARY
6.
7.
Enter a command to Kermit to start the remote server.
Type Ctrl+C to escape back to the (local) V+ system.
When a binary file is accessed over the Kermit line, the file specified to V+ must
have a /B qualifier. For example, the following command will copy the file
REMOTE.DAT from the Kermit line to the local disk drive A:
FCOPY A:local.dat = K>remote.dat/B
NOTE: If the default setting for the remote system’s serial line is
other than no parity, and there is no way you can change that
setting, it will not be possible to successfully transfer binary files
using Kermit. An ASCII file may be accessed as a binary file, but not
vice versa. A file that is transferred back and forth over the Kermit
line must be transferred in the same file mode each time. For
example, if a file is copied in binary mode from the remote system to
the V+ system, then it must be copied back to the remote system in
binary mode in order to preserve the file contents.
Kermit Line Errors
The error *Nonexistent file* is common when using Kermit. This error could
mean any of several things in addition to the inability to find the desired file on
the remote system (the command FDIR K> will verify the contents of a remote
directory). The transactions over the Kermit line are generally considered to be
file transfers. When the V+ system tries to start a file operation, the local Kermit
driver generally tries to open a file on the remote server. If this operation fails, V+
returns the error *Nonexistent file*. Among the things that could possibly cause
this error are: mismatched line settings (like baud rate and parity), unexpected
server state (the server didn’t terminate the previous transaction as expected), the
server was not started correctly, or the file may really not exist.
NOTE: When an error occurs that is associated with the use of
Kermit, it sometimes helps to perform the following steps to make
sure the remote server is in a known state: (1) enter PASSTHRU
mode, (2) stop the remote server by typing Ctrl+P several times, and
(3) restart the remote server. If a Kermit file access is aborted by the
user (for example, Ctrl+C is typed to abort a V+ monitor command),
it may take five seconds for the abort request to be processed.
V+ Language User’s Guide, Rev A
257
Chapter 9
DeviceNet
V+ System Parameters for Kermit
Two V+ system parameters are provided for setting communication parameters
for the Kermit protocol.
The parameter KERMIT.TIMEOUT sets the amount of time that the remote server
is to wait for a response from the V+ system before the remote server declares a
time-out error and retransmits its previous message. This parameter should be set
to a high value (less than or equal to 95 seconds) when V+ READ or WRITE
instructions performed on the Kermit line are far apart, that is, when there are
long pauses between disk requests. (This can occur, for example, when the V+
program is being executed in single-step mode with the program debugger.)
The parameter KERMIT.RETRY is the number of errors and retransmissions that
are allowed by the local V+ Kermit. When this number of errors is exceeded, the
error *Too many network errors* will occur. When this parameter is set to a large
value (less than or equal to 1000), the equivalent parameter for the remote server
must be set to the same value. Otherwise, the settings will not be effective.
DeviceNet
Adept now supports DeviceNet and DeviceNet protocols within the Adept MV
controller. For more information on setup and programming procedures see the
V+ Language Reference Guide and the Instructions for Adept Utility Programs
manuals.
258
V+ Language User’s Guide, Rev A
Chapter 9
Summary of I/O Operations
Summary of I/O Operations
Table 9-7 summarizes the V+ I/O instructions:
Table 9-7. System Input/Output Operations
Keyword
Type
Function
AIO.IN
RF
Read a channel from one of the analog IO boards.
AIO.OUT
PI
Write to a channel on one of the analog IO boards.
AIO.INS
RF
Test whether an analog input or output channel is
installed.
ATTACH
PI
Make a device available for use by the application
program.
BITS
PI
Set or clear a group of digital signals based on a value.
BITS
RF
Read multiple digital signals and return the value
corresponding to the binary bit pattern present on the
signals.
$DEFAULT
SF
Return a string containing the current system default
device, unit, and directory path for disk file access.
DEF.DIO
PI
Assign third-party digital I/O boards to standard V+
signal numbers, for use by standard V+ instructions,
functions, and monitor commands.
This instruction requires the Third-Party Board
Support license.
DETACH
PI
Release a specified device from the control of the
application program.
DEVICE
PI
Send a command or data to an external device and,
optionally, return data back to the program. (The
actual operation performed depends on the device
referenced.)
DEVICE
RF
Return a real value from a specified device. The value
may be data or status information, depending upon
the device and the parameters.
PI: Program Instruction, RF: Real-Valued Function, P: Parameter, SF: String Function
V+ Language User’s Guide, Rev A
259
Chapter 9
Summary of I/O Operations
Table 9-7. System Input/Output Operations (Continued)
Keyword
Type
Function
DEVICES
PI
Send commands or data to an external device and
optionally return data. The actual operation
performed depends on the device referenced.
FCLOSE
PI
Close the disk file, graphics window, or graphics icon
currently open on the specified logical unit.
FCMND
PI
Generate a device-specific command to the
input/output device specified by the logical unit.
FEMPTY
PI
Empty any internal buffers in use for a disk file or a
graphics window by writing the buffers to the file or
window if necessary.
FOPENR
PI
Open a disk file for read-only.
FOPENW
PI
Open a disk file for read-write.
FOPENA
PI
Open a disk file for read-write-append.
FOPEND
PI
Open a disk directory for read.
FSEEK
PI
Position a file open for random access and initiate a
read operation on the specified record.
GETC
RF
Return the next character (byte) from a device or input
record on the specified logical unit.
IOGET_
RF
Return a value from a device on the VME bus.
$IOGETS
SF
Return a string value from a device on the VME bus.
IOPUT_
PI
Write a value to a device on the VME bus.
IOSTAT
RF
Return status information for the last input/output
operation for a device associated with a logical unit.
IOTAS
RF
Control access to shared devices on the VME bus.
KERMIT.RETRY
P
Establish the maximum number of times the (local)
Kermit driver should retry an operation before
reporting an error.
KERMIT.TIMEOUT
P
Establish the delay parameter that the V+ driver for
the Kermit protocol will send to the remote server.
PI: Program Instruction, RF: Real-Valued Function, P: Parameter, SF: String Function
260
V+ Language User’s Guide, Rev A
Chapter 9
Summary of I/O Operations
Table 9-7. System Input/Output Operations (Continued)
Keyword
Type
Function
KEYMODE
PI
Set the behavior of a group of keys on the manual
control pendant.
PENDANT
RF
Return input from the manual control pendant.
PROMPT
PI
Display a string on the system terminal and wait for
operator input.
READ
PI
Read a record from an open file or from an attached
device that is not file oriented.
RESET
PI
Turn off all the external output signals.
SETDEVICE
PI
Initialize a device or set device parameters. (The actual
operation performed depends on the device
referenced.)
SIG
RF
Return the logical AND of the states of the indicated
digital signals.
SIG.INS
RF
Return an indication of whether or not a digital I/O
signal is configured for use by the system, or whether
or not a software signal is available in the system.
SIGNAL
PI
Turn on or off external digital output signals or
internal software signals.
TYPE
PI
Display the information described by the output
specifications on the system terminal. A blank line is
output if no argument is provided.
WRITE
PI
Write a record to an open file or to an attached device
that is not file oriented.
PI: Program Instruction, RF: Real-Valued Function, P: Parameter, SF: String Function
V+ Language User’s Guide, Rev A
261
10
Graphics Programming
Creating Windows . . . . . . . . . . . .
ATTACH Instruction . . . . . . . .
FOPEN Instruction . . . . . . . . .
FCLOSE Instruction . . . . . . . . .
FDELETE Instruction . . . . . . . . .
DETACH Instruction . . . . . . . .
Custom Window Example . . . . .
Monitoring Events . . . . . . . . . . . .
GETEVENT Instruction . . . . . . . .
FSET Instruction . . . . . . . . . .
Building a Menu Structure . . . . . . . .
Menu Example . . . . . . . . . .
Defining Keyboard Shortcuts . . . .
Creating Buttons . . . . . . . . . . . . .
GPANEL Instruction . . . . . . . .
Button Example . . . . . . . . . .
Creating a Slide Bar . . . . . . . . . . .
GSLIDE Example . . . . . . . . . .
Graphics Programming Considerations . .
Using IOSTAT( ) . . . . . . . . . .
Managing Windows . . . . . . . .
Communicating With the System Windows
The Main Window . . . . . . . . .
The Monitor Window . . . . . . . .
The Vision Window . . . . . . . . .
Additional Graphics Instructions . . . . .
.
.
.
.
.
.
.
.
.
.
.
.
.
.
.
.
.
.
.
.
.
.
.
.
.
.
.
.
.
.
.
.
.
.
.
.
.
.
.
.
.
.
.
.
.
.
.
.
.
.
.
.
.
.
.
.
.
.
.
.
.
.
.
.
.
.
.
.
.
.
.
.
.
.
.
.
.
.
.
.
.
.
.
.
.
.
.
.
.
.
.
.
.
.
.
.
.
.
.
.
.
.
.
.
.
.
.
.
.
.
.
.
.
.
.
.
.
.
.
.
.
.
.
.
.
.
.
.
.
.
.
.
.
.
.
.
.
.
.
.
.
.
.
.
.
.
.
.
.
.
.
.
.
.
.
.
V+ Language User’s Guide, Rev A
.
.
.
.
.
.
.
.
.
.
.
.
.
.
.
.
.
.
.
.
.
.
.
.
.
.
.
.
.
.
.
.
.
.
.
.
.
.
.
.
.
.
.
.
.
.
.
.
.
.
.
.
.
.
.
.
.
.
.
.
.
.
.
.
.
.
.
.
.
.
.
.
.
.
.
.
.
.
.
.
.
.
.
.
.
.
.
.
.
.
.
.
.
.
.
.
.
.
.
.
.
.
.
.
.
.
.
.
.
.
.
.
.
.
.
.
.
.
.
.
.
.
.
.
.
.
.
.
.
.
.
.
.
.
.
.
.
.
.
.
.
.
.
.
.
.
.
.
.
.
.
.
.
.
.
.
.
.
.
.
.
.
.
.
.
.
.
.
.
.
.
.
.
.
.
.
.
.
.
.
.
.
264
264
265
265
265
266
266
267
268
269
270
270
272
273
273
273
275
276
278
279
280
281
281
281
282
284
263
Chapter 10
Creating Windows
The instructions in this chapter require a graphics-based system.
NOTE: For clarity in presenting the programming principles,
examples in this chapter leave out the calls to IOSTAT() that are
critical to detecting and responding to I/O errors.
Creating Windows
V+ communicates to windows through logical units, with logical unit numbers
(LUNs) 20 to 23 reserved for window use. (Each task has access to its own set of
four LUNs.) The basic strategy for using a window (or any of the graphics
instructions) is:
1.
ATTACH to a logical unit
2.
FOPEN a window on the logical unit
3.
Perform the window’s tasks (or graphics operations)
4.
FCLOSE the window
5.
FDELETE the window
6.
DETACH from the logical unit
ATTACH Instruction
The ATTACH instruction sets up a communications path so a window can be
written to and read from. The syntax for the ATTACH instruction is:
ATTACH (glun, 4) "GRAPHICS"
glun
264
variable that receives the number of the attached graphics logical
unit. (All menus and graphics commands that take place within a
window will also use glun.)
V+ Language User’s Guide, Rev A
Chapter 10
Creating Windows
FOPEN Instruction
FOPEN creates a new window or reselects an existing window for input and
output. When a window is created, its name is placed in the list of available
windows displayed when the adept logo is clicked on. The simplified syntax for
FOPEN is:
FOPEN (glun) "window_name /MAXSIZE width height"
glun
The logical unit already ATTACHed to.
window_name
The title that will appear at the top of the window. Also used
to close and select the window.
width/height
Specify the largest size the window can be opened to.
This instruction will give you a window with all the default attributes. See the
description of FOPEN and FSET in the V+ Language Reference Guide for details
on how to control the attributes of a window for example, background color,
size, and scrolling.
FCLOSE Instruction
FCLOSE closes a window to input and output (but does not erase it or remove it
from memory). The syntax for FCLOSE is:
FCLOSE (glun)
glun
The logical unit number specified in the FOPEN instruction
that opened the window.
FDELETE Instruction
FDELETE removes a closed, attached window from the screen and from graphics
memory. The syntax for FDELETE is
FDELETE (glun) "window_name"
glun
The same values as specified in the FOPEN instruction that
created the window.
V+ Language User’s Guide, Rev A
265
Chapter 10
Creating Windows
DETACH Instruction
DETACH frees up a LUN for use by a subsequent ATTACH instruction. The
syntax for DETACH is:
DETACH (glun)
glun
The LUN specified in a previous ATTACH instruction.
Custom Window Example
This section of code will create and delete a window:
AUTO glun ;Graphics window LUN
ATTACH (glun, 4) "GRAPHICS"; Attach to a window LUN
; Open the window "Test" with a maximum size of
; 400 x 300 pixels
FOPEN(glun) "Test","/MAXSIZE 400 300"
; Your code for processing within the window
; goes here; e.g:
GTYPE (glun) 10, 10, "Hello!"
; When the window is no longer needed, close and delete the
; window and detach from the logical unit
FCLOSE (glun)
FDELETE (glun) "Test"
DETACH (glun)
266
V+ Language User’s Guide, Rev A
Chapter 10
Monitoring Events
Monitoring Events
The key to pointing-device–driven programming is an event loop. In an event
loop, you wait for an event (from the keyboard or pointer device) and when the
correct event occurs in the proper place, your program initiates some appropriate
action. V+ can monitor many different events including button up, button down,
double click, open window, and menu select. The example code in the following
sections will use event 2, button up, and event 14, menu select. See the description
of GETEVENT in the V+ Language Reference Guide for details on the different
events that can be monitored.
The basic strategy for an event loop is:
1.
Wait for an event to occur.
2.
When an event is detected:
3.
a.
If it is the desired event, go to step 3.
b.
Otherwise, return to step 1.
Check the data from the event array (not necessary for event 14, menu select):
a.
If it is appropriate, go to step 4.
b.
Otherwise, return to step 1.
4.
Initiate appropriate action.
5.
Return to step 1.
V+ Language User’s Guide, Rev A
267
Chapter 10
Monitoring Events
GETEVENT Instruction
The instruction that initiates monitoring of pointer device and keyboard events is
GETEVENT. Its simplified syntax is:
GETEVENT (lun) event[]
lun
Logical unit number of the window to be monitored.
event[]
Array into which the results of the detected event will be stored. The
value stored in event[0] indicates which event was detected.
If event[0] is 2, a button-up event was detected, in which case:
event[1]
indicates the number of the button pressed. (For two-button
devices, 2 = left button, 4 = right button. For three-button devices, 1
= left button, 2 = middle button, 4 = right button.)
event[2]
is the X value of the pointer location of the click.
event[3]
is the Y value of the pointer location of the click.
If event[0] is 14, a click on a menu bar selection was detected, in which case:
If event[1] is 0, a click has been made to the top-level menu bar. In this case, an
FSET instruction must be executed to display the pull-down options
under the menu bar selection and event[2] is the number (from
left to right) of the menu bar option selected.
If event[1] is 1, then a selection from a pull-down menu has been made and
event[2] is the number of the pull-down option selected.
You cannot use the GETEVENT instruction to specify which events to monitor. It
monitors all the events that are enabled for the window. See descriptions of the
FOPEN and FSET instructions in the V+ Language Reference Guide for details on
using the /EVENT argument for enabling and disabling the monitoring of
various events.
268
V+ Language User’s Guide, Rev A
Chapter 10
Monitoring Events
FSET Instruction
FSET is used to alter the characteristics of a window opened with an FOPEN
instruction, and to display pull-down menus. We are going to describe only the
use of FSET to create the top-level menu bar, create the pull-down menu
selections below the top-level menu, and initiate monitoring of events. The
instruction for displaying a top-level menu is:
FSET (glun) " /MENU 'item1' 'item2' ... 'item10' "
glun
is the logical unit of the window the menu will be displayed
in.
item1-item10
are the menu titles for a top-level bar menu. The items appear
from left to right.
The instruction to display a pull-down menu (called when event[0] = 14 and
event[1] = 0) is:
FSET (glun) "/PULLDOWN", top_level#," ' item1' ... ' itemn '"
top_level#
is the number of the top-level selection the pull-down menu
is to appear under.
item1-itemn
are the menu items in the pull-down menu. The items appear
from top to bottom.
The relationship between these two uses of FSET will become clear when we
actually build a menu structure.
The basic FSET instruction for monitoring menu and mouse events is:
FSET (glun) "/EVENT BUTTON MENU"
V+ Language User’s Guide, Rev A
269
Chapter 10
Building a Menu Structure
Building a Menu Structure
The strategy for implementing a menu is:
1.
Declare the top-level bar menu.
2.
Start a loop monitoring event 14 (menu selection).
3.
When event 14 is detected, check to see if the mouse event was on the top-level
bar menu or on a pull-down option.
4.
If the event was a top-level menu selection, then display the proper pull-down
options.
5.
If the event was a pull-down selection, use nested CASE structures to take
appropriate action based on the selections made to the top-level menu and its
corresponding pull-down menu.
Menu Example
This code segment will implement a menu structure for a window open on glun:
; Set the top-level menu bar and enable monitoring of events
FSET (glun) "/menu 'Menu 1' 'Menu 2' 'Menu 3'"
FSET (glun) "/event button menu"
; Define
$menu[1]
$menu[2]
$menu[3]
the strings for the pull-down menus
= "'Item 1-1' 'Item 1-2'"
= "'Item 2-1' 'Item 2-2' 'Item 2-3’"
= "'Quit'"
; Set variable for event to be monitored
wn.e.menu = 14
; Start the processing loop
quit = FALSE
DO
GETEVENT (glun) event[]
IF event[0] == wn.e.menu THEN
;The menu event (14) has two components; a button-down component
;corresponding to a click on a menu bar selection, and a
;button-up component corresponding to the pull-down selection
;made when the button is released.
;After the first component (pointer down on the menu bar),
;event[1] will be 0 and event[2] will have the number of the
;menu bar selection.
; Check to see if event[1] is 0, indicating a top-level menu select
270
V+ Language User’s Guide, Rev A
Chapter 10
Building a Menu Structure
IF event[1] == 0 THEN
; Use the value in event[2] to select a pull-down menu
FSET (lun) "/pulldown", event[2], $menu[event[2]]
; Else, execute the appropriate code for each menu selection
ELSE
; If event[1] is not 0, then the button has been released on a
; pull-down selection and:
; event[1] will have the value of the top-level selection (menu)
; event[2] will have the value of the pull-down selection (item)
menu = event[1]
item = event[2]
; The outer CASE structure checks the top-level menu selection
; The inner CASE structure checks the item selected from the pull-down
CASE menu OF
VALUE 1:
;Menu 1
CASE item OF
VALUE 1:
;code for Item 1-1
VALUE 2:
;code for Item 1-2
END
VALUE 2:
;Menu 2
CASE item OF
VALUE 1:
;code for Item 2-1
VALUE 2:
;code for Item 2-2
VALUE 3:
;code for Item 2-3
END
VALUE 3:
;Menu 3
CASE item OF
VALUE 1:
quit = TRUE;time to quit
END
V+ Language User’s Guide, Rev A
271
Chapter 10
Building a Menu Structure
END ; case menu of
END ; if event[1]
END ; if event[0]
UNTIL quit
Implementing the above code and then clicking on Menu 2 would result in the
window shown in Figure 10-1.
Test
Menu 1
Menu 2
Menu 3
Item 2-1
Item 2-2
Item 2-3
Figure 10-1. Sample Menu
Defining Keyboard Shortcuts
If you are using AdeptWindows, you can create keyboard shortcuts on menu and
pull-down items by placing an ampersand (&) before the desired letter. For
example:
FSET(lun) "/menu '&File' '&Edit'"
In this example, the letters F and E are used as shortcuts when pressed with the
ALT key. Thus, pressing ALT+F displays the File menu and ALT+E displays the
Edit menu. The letters F and E are underlined on the menu or pull-down item to
indicate the keyboard shortcut.
272
V+ Language User’s Guide, Rev A
Chapter 10
Creating Buttons
Creating Buttons
Creating a button in a window is a simple matter of placing a graphic
representing your button on the screen, and then looking to see if a mouse event
occurred within the confines of that graphic.
GPANEL Instruction
The GPANEL instruction is useful for creating standard button graphics. The
syntax for GPANEL is:
GPANEL (glun, mode) x, y, dx, dy
glun
The logical unit of the window the button is in.
mode
Is replaced with:
0
indicating a raised, ungrooved panel
2
indicating a sunken, ungrooved panel
4
indicating a raised, grooved panel
6
indicating a sunken, grooved panel
(Adding 1 to any of the mode values will fill the panel with foreground color.)
x
dx
Coordinates of the upper left corner of the button.
y
dy
Width and height of the button.
Button Example
This code segment would place a button on the screen and then monitor a
button-up event at that button (the logical unit the button is accessing must be
ATTACHed and FOPENed):
; Initialize monitoring of button events for a button
FSET (glun) "/event button"
; Draw a 45x45 pixel panel at window coordinates 100,100
GPANEL (glun, 0) 100, 100, 45, 45
; Put a label in the button
V+ Language User’s Guide, Rev A
273
Chapter 10
Creating Buttons
GTYPE (glun) 102, 122, "Label"
; Declare a variable for pointer event 2 (button up)
btn.up = 2
; Set a variable that will stop the monitoring of button
; events
hit = FALSE
; Start a loop waiting for a button-up event
DO
GETEVENT(glun) event[]
; The status of a button event will be stored in event[0].
; Look to see if that event was a button-up event.
IF event[0] == btn.up THEN
; Check if the button-up event was within the button area
; The x location is in event[1], the y location in event[2]
hit = (event[2] > 99) AND (event[2] < 146)
hit = hit AND (event[3] > 99) AND (event[3] < 146)
END
UNTIL hit
; The code for reacting to a button press is placed here.
This code will work for a single button but will become very unwieldy if several
buttons are used. In the case of several buttons, you should place the button
locations in arrays (or a two-dimensional array) and then pass these locations to a
subroutine that checks whether the mouse event was within the array parameters
passed to it.
274
V+ Language User’s Guide, Rev A
Chapter 10
Creating a Slide Bar
Creating a Slide Bar
V+ allows you to create a feature similar to the window scroll bars called slide
bars. The syntax for a slide bar is:
GSLIDE (glun, mode) slide_id = x, y, len, max_pos,
arrow.inc, handle
glun
The logical unit of the window the slide bar is to be created in.
mode
is replaced with:
0
indicating a horizontal slide bar is to be created or updated.
1
indicating a slide bar is to be deleted.
2
indicating a vertical slide bar is to be created or updated.
slide_id
A number that will identify the slide bar. This number is
returned to the event queue so you can distinguish which slide
was moved.
x
The coordinates of the top left corner of the slide bar.
y
len
The width or height of the bar.
max_pos
Specifies the maximum value the slide bar will return.
arrow_inc
Specifies the increment the slide bar should register when the
arrows are clicked. (The slide bar will be created with a scroll
handle and scroll arrows.)
handle
Specifies position the scroll handle will be in when the slide bar
is created.
V+ Language User’s Guide, Rev A
275
Chapter 10
Creating a Slide Bar
GSLIDE Example
We will be interested in two events when monitoring a slide bar, event 8 (slide bar
pointer move) and event 9 (slide bar button up). Additional event monitoring
must be enabled with the FSET instruction. Object must be specified to monitor
slide bars and move_b2 must be specified to monitor the dragging of the middle
button.
The values returned in the GETEVENT array will be:
•
event[0] the pointer device event code
•
event[1] the ID of the slide bar (as specified by slide_id)
•
event[2] the slide bar value
•
event[3] the maximum slide bar value
The following code will display and monitor a slide bar:
; The slide bar will be in the window open on glun
; The slide bar will use events 8 and 9. A double-click event
; will halt
; monitoring of the slide bar
btn.smov = 8
btn.sup = 9
btn.dclk = 3
; Slide bar position and start-up values
x = 20
y = 60
length = 200
max.pos = 100
arrow_inc = 10
handle_pos = 50
; Enable monitoring of slide bars and pointer drags
FSET(glun) "/event object move_b2"
276
V+ Language User’s Guide, Rev A
Chapter 10
Creating a Slide Bar
; Display the slide bar
GSLIDE (glun, 0) 1 = x, y, length, max_pos, arrow_inc,
handle_pos
;
;
;
;
Begin monitoring events and take action when the slide bar
is moved. Monitor
events until a double click is detected, then delete the
slide bar
DO
GETEVENT(glun) event[]
IF (event[0] == btn.smov) OR (event[0] == btn.sup THEN
; Your code to monitor the slide bar value (event[2]) goes
; here
END
UNTIL event[0] == btn.dclk
; Delete the slide bar
GSLIDE (glun, 1) 1
V+ Language User’s Guide, Rev A
277
Chapter 10
Graphics Programming Considerations
Graphics Programming Considerations
Buttons and menus can be monitored in the same window. However, the code
will get complicated, and you might consider using different windows when the
button and menu structure becomes complex.
Only one pull-down menu can be active at any time.
Design your windows with the following mechanical and aesthetic
considerations:
•
Keep your windows as simple and uncluttered as possible. Use color
carefully and purposefully.
•
If you are using multiple windows, use similar graphic elements so the screen
elements become familiar and intuitive.
•
Let the operator know what is going on. Never leave the operator in the dark
as to the status of a button push or menu selection.
•
Whenever possible, have your windows mimic the real world the operator is
working in.
In the interest of clarity, the examples in this chapter have not been generalized.
When you actually program an application, use generalized subroutine calls for
commonly used code, or your code will quickly become unmanageable.
278
V+ Language User’s Guide, Rev A
Chapter 10
Graphics Programming Considerations
Using IOSTAT( )
The example code in this chapter leaves out critical error detection and recovery
procedures. Effective application code requires these procedures. The IOSTAT
function should be used to build error-handling routines for use with every
ATTACH, FOPEN, FCLOSE, and FSET instruction. The syntax for using IOSTAT
to check the status of I/O requests is:
IOSTAT(lun)
The LUN specified in the previous I/O request.
lun
The IOSTAT function will return the following values:
1
if the last operation was successful
0
if the last operation is not yet complete
<0
if the last operation failed, a negative number corresponding to a
standard Adept error code will be returned.
The following code will check for I/O errors:
; Issue I/O instruction (ATTACH, FOPEN, etc.)
IF IOSTAT(lun) < 0 THEN
;your code to handle the error
END
; The ERROR function can be used to return the text
; of an error number. The code line is:
TYPE $ERROR(IOSTAT(lun))
V+ Language User’s Guide, Rev A
279
Chapter 10
Graphics Programming Considerations
Managing Windows
Windows can be:
•
Hidden (but not deleted)
A hidden window is removed from the screen but not from graphics memory,
and it can be retrieved at any time:
FSET(glun) "/NODISPLAY" ;Hide a window
FSET(glun) "/DISPLAY"
;Redisplay a window
•
Sent behind the parent’s window stack:
FSET(glun) "/STACK −1"
•
Brought to the front of the window stack:
FSET(glun) "STACK 1"
If you will not be reading events from a window, open it in write-only mode to
save memory and processing time.
Only the task that opened a window in read/write mode can read from it
(monitor events).
Multiple tasks can write to an open window. A second task can write to an
already open window by executing its own ATTACH and OPEN for the window.
The logical units’ numbers need not match, but the window name must be the
same. If a task has the window Test open, other tasks can write to the window by:
ATTACH(lun_1, 4) "GRAPHICS"
FOPEN(lun_1) "Test /MAXSIZE 200 200 /WRITEONLY"
280
V+ Language User’s Guide, Rev A
Chapter 10
Communicating With the System Windows
Communicating With the System Windows
The Adept system has three operating system level windows: the main window,
the monitor window, and the vision window (on systems with the AdeptVision
option).
The Main Window
You can place menu options on the top-level menu bar by opening the window
\Screen_1. For example:
ATTACH (glun, 2) "GRAPHICS"
FOPEN (glun) "\Screen_1 /menu 'item1' 'item2' 'item3'"
will open the main window and place three items on the top-level menu bar.
Pull-downs and event monitoring can proceed as described earlier. The
instruction:
FSET (glun) "/menu "
will delete the menu items.
The Monitor Window
The monitor window can be opened in write-only mode to change the
characteristics of the monitor window. For example, the following instruction will
open the monitor window, disable scrolling, and disallow moving of the window:
FOPEN (glun) "Monitor /WRITEONLY /SPECIAL NOPOSITION NOSIZE"
To prevent a user from accessing the monitor window, use the instruction:
FOPEN (glun) "Monitor /WRITEONLY /NOSELECTABLE”
To allow access:
FSET (glun) "/SELECTABLE"
V+ Language User’s Guide, Rev A
281
Chapter 10
Communicating With the System Windows
The Vision Window
For systems equipped with the Adept Vision option, text or graphics can be
output to the vision window, and events can be monitored in the vision window.
To communicate with the vision window, you open it just as you would any other
window. For the window name you must use Vision. For example:
FOPEN (glun) "Vision"
Remember, graphics output to the vision window is displayed only when a
graphics display mode or overlay is selected. When you are done communicating
with the vision window, close and detach from it just as you would any other
window. This will free up the logical unit, but will not delete the vision window.
You can close and detach from the vision window, but you cannot delete it.
To preserve the vision system pull-down menus, open the window in write-only
mode:
FOPEN (glun) "Vision /WRITEONLY"
The following example opens the vision window, writes to the vision window,
and detaches the vision window:
.PROGRAM label.blob()
;
;
;
;
;
ABSTRACT: This program demonstrates how to attach to the
vision window and how to use the millimeter scaling mode of
the GTRANS instruction to label a "blob" in the vision
window.
AUTO vlun
cam = 1
; Attach the vision window and get a logical unit number
ATTACH (vlun, 4) "GRAPHICS"
IF IOSTAT(vlun) < 0 GOTO 100
FOPEN (vlun) "Vision";Open the vision window
IF IOSTAT(vlun) < 0 GOTO 100
; Select display mode and graphics mode
VDISPLAY (cam) 1, 1 ;Display grayscale frame and graphics
; Take a picture and locate an object
VPICTURE(cam);Take a processed picture
VLOCATE(cam, 2) "?" ;Attempt to locate an object
282
V+ Language User’s Guide, Rev A
Chapter 10
Communicating With the System Windows
IF VFEATURE(1) THEN ;If an object was found...
GCOLOR(vlun) 1
;Select the color black
GTRANS (vlun, 2)
;Select millimeter scaling
GTYPE(vlun) DX(vis.loc), DY(vis.loc), "Blob", 3
ELSE
;Else if object was NOT found...
GCOLOR (vlun) 3
;Select the color red
GTRANS(vlun, 0)
;Select pixel scaling
GTYPE (vlun) 100, 100,"No object found!", 3
END
; Detach (frees up the communications path)
DETACH (vlun)
100 IF (IOSTAT(vlun) < 0) THEN; Check for errors
TYPE $ERROR(IOSTAT(vlun))
END
.END
V+ Language User’s Guide, Rev A
283
Chapter 10
Additional Graphics Instructions
Additional Graphics Instructions
Table 10-1 lists the different graphics instructions. See the V+ Language Reference
Guide for complete details on using these instructions.
Table 10-1. List of Graphics Instructions
Command
Action
GARC
Draw an arc or circle in a graphics window.
GCHAIN
Draw a chain of points.
GCLEAR
Clear an entire window to the background color.
GCLIP
Constrain the area of a window within which graphics are
displayed.
GCOLOR
Set the foreground and background colors for subsequent
graphics instructions.
GCOPY
Copy one area of a graphics window to another area in the
window.
GFLOOD
Flood an area with foreground color.
GICON
Allows you to display icons on the screen. You can access the
predefined Adept icons or use your own icons created with the
Icon Editor (see the Instructions for Adept Utility Programs).
GLINE
Draw a line.
GLINES
Draw multiple lines.
GLOGICAL
Set the drawing mode for the next graphics instruction. (Useful
for erasing existing graphics and simulating the dragging of a
graphic across the screen.)
GPOINT
Draw a single point.
GRECTANGLE
Draw a rectangle.
GSCAN
Draw a series of horizontal lines.
GSLIDE
Create a slide bar.
284
V+ Language User’s Guide, Rev A
Chapter 10
Additional Graphics Instructions
Table 10-1. List of Graphics Instructions (Continued)
Command
Action
GTEXTURE
Develop a texture for subsequent graphics. Set subsequent
graphics to transparent or opaque.
GTRANS
Define a transformation to apply to all subsequent G instructions.
GTYPE
Display a text string.
V+ Language User’s Guide, Rev A
285
11
Programming the MCP
Introduction . . . . . . . . . . . . . . . . .
ATTACHing and DETACHing the Pendant
Writing to the Pendant Display . . . . . . . .
The Pendant Display . . . . . . . . . .
Using WRITE With the Pendant . . . .
Detecting User Input . . . . . . . . . . . . .
Using READ With the Pendant . . . . . .
Detecting Pendant Button Presses . . .
Keyboard Mode . . . . . . . . . .
Toggle Mode . . . . . . . . . . . .
Level Mode . . . . . . . . . . . .
Monitoring the MCP Speed Bar . . . . .
Using the STEP Button . . . . . . . . .
Reading the State of the MCP . . . . .
Controlling the Pendant . . . . . . . . . . .
Control Codes for the LCD Panel . . . .
The Pendant LEDs . . . . . . . . . . .
Making Pendant Buttons Repeat Buttons
Auto-Starting Programs With the MCP . . . . .
WAIT.START . . . . . . . . . . . . . .
Programming Example: MCP Menu . . . . .
.
.
.
.
.
.
.
.
.
.
.
.
.
.
.
.
.
.
.
.
.
.
.
.
.
.
.
.
.
.
.
.
.
.
.
.
.
.
.
.
.
.
.
.
.
.
.
.
.
.
.
.
.
.
.
.
.
.
.
.
.
.
.
.
.
.
.
.
.
.
.
.
.
.
.
.
.
.
.
.
.
.
.
.
V+ Language User’s Guide, Rev A
.
.
.
.
.
.
.
.
.
.
.
.
.
.
.
.
.
.
.
.
.
.
.
.
.
.
.
.
.
.
.
.
.
.
.
.
.
.
.
.
.
.
.
.
.
.
.
.
.
.
.
.
.
.
.
.
.
.
.
.
.
.
.
.
.
.
.
.
.
.
.
.
.
.
.
.
.
.
.
.
.
.
.
.
.
.
.
.
.
.
.
.
.
.
.
.
.
.
.
.
.
.
.
.
.
.
.
.
.
.
.
.
.
.
.
.
.
.
.
.
.
.
.
.
.
.
.
.
.
.
.
.
.
.
.
.
.
.
.
.
.
.
.
.
.
.
.
288
288
289
289
289
290
290
290
291
291
292
293
294
295
296
296
297
298
300
301
302
287
Chapter 11
Introduction
Introduction
This chapter provides an overview of strategies for programming the manual
control pendant.
ATTACHing and DETACHing the Pendant
Before an application program can communicate with the MCP, the MCP must
first be ATTACHed using the ATTACH instruction. The logical unit number for
the MCP is 1. The following instruction will ready the MCP for communication:
mcp_lun = 1
ATTACH (mcp_lun)
When the MCP is ATTACHed, the USER LED on the MCP will be lit.
As with all other devices that are ATTACHed by a program, the MCP should be
DETACHed when the program is finished with the MCP. The following
instruction will free up the MCP:
DETACH (mcp_lun)
When the MCP has been ATTACHed by an application program, the user can
interact with the pendant without selecting manual mode.
As with all I/O devices, the IOSTAT function should be used to check for errors
after each I/O operation.
288
V+ Language User’s Guide, Rev A
Chapter 11
Writing to the Pendant Display
Writing to the Pendant Display
The Pendant Display
The MCP display is a 2-line, 80-character LCD display. It is written to using the
WRITE instruction.
Using WRITE With the Pendant
The following instructions will display a welcome message on the two lines of the
pendant display:
AUTO mcp_lun; Pendant LUN
AUTO $intro
$intro = "Welcome to the MCP"
mcp_lun = 1
; Attach the MCP, check for errors and output message
ATTACH (mcp_lun)
IF IOSTAT(mcp_lun) < 1 GOTO 100
WRITE (mcp_lun) $intro
WRITE (mcp_lun) "Instructions to follow...", /S
100 IF IOSTAT(mcp_lun) < 1 THEN;Report errors
TYPE IOSTAT(mcp_lun), " ", $ERROR(IOSTAT(MCP_LUN))
END
DETACH(mcp_lun)
Notice that the second WRITE instruction uses the /S qualifier. This qualifier
suppresses the carriage return-line feed (<CR-LF>) that is normally sent by the
WRITE instruction. If this qualifier was not specified, the first line displayed
would have been scrolled off the top. This section “Controlling the Pendant” on
page 296 discusses the pendant control codes. These codes control the cursor
position, the lights on the MCP, and the interpretation of MCP button presses.
These codes are sent to the pendant using the WRITE instruction. The /S qualifier
must be sent with these instructions to avoid overwriting the pendant display.
V+ Language User’s Guide, Rev A
289
Chapter 11
Detecting User Input
Detecting User Input
Input from the pendant can be received in two ways:
•
A series of button presses from the data entry buttons can be read. The READ
instruction is used for this type of input.
•
A single button press from any of the buttons can be detected. These single
button presses can be monitored in three different modes:
•
The buttons can be monitored like keys on a normal keyboard.
•
The buttons can be monitored in toggle mode (on or off). The state of the
button is changed each time the button is pressed.
•
The keys can be monitored in level mode. The state of the button is
considered “on” only when the button is held down.
The PENDANT( ) function is used to detect button presses in these
modes. The KEYMODE instruction is used to set the button behavior.
Using READ With the Pendant
The READ instruction accepts input from the pendant Data Entry Buttons (1, 2, 3,
4, 5, 6, 7, 8, 9, 0, ., +, –). A READ instruction expects a <CR-LF> to indicate the end
of data entry. On the MCP, this sequence is sent by the REC/DONE button
(similar to the Enter or Return key on a normal keyboard). The DEL button
behaves like the Backspace key on a normal keyboard. All other pendant buttons
are ignored by the READ instruction. Note that the predefined function buttons
are active and may be used while an attached program is waiting for input.
The instruction line:
READ(1) $response
will pause the program and wait for input from the pendant. The user must signal
the end of input by pressing the REC/DONE button. The input will be stored in
the string variable $response. The input can be stored as a real variable, but the +
and – buttons must not be used for input.
Detecting Pendant Button Presses
Individual MCP button presses are detected with the PENDANT( ) function. This
function returns the number of the first acceptable button press. The
interpretation of a button press is determined by the KEYMODE instruction. See
the V+ Language Reference Guide for complete details. The basic use of these two
operations is described below.
290
V+ Language User’s Guide, Rev A
Chapter 11
Detecting User Input
Keyboard Mode
The default mode is keyboard. If a PENDANT( ) instruction requests keyboard
input, the button number of the first keyboard type button pressed will be
returned. See Figure 11-1 on page 294 for the numbers of the buttons on the MCP.
The following code will detect the first soft button pressed:
; Set the soft keys to keyboard mode
KEYMODE 1,5 = 0
; Wait for a button press from buttons 1 - 5
DO
button = PENDANT(0)
UNTIL button < 6
The arguments to the KEYMODE instruction indicate that pendant buttons 1
through 5 are to be configured in keyboard mode. The 0 argument to the
PENDANT( ) function indicates that the button number of the first keyboard
button pressed is to be returned.
Toggle Mode
To detect the state of a button in toggle mode, the PENDANT( ) function must
specify the button to be monitored.
When a button is configured as a toggle button, its state is maintained as on (–1)
or off (0). The state is toggled each time the button is pressed. If an LED is
associated with the button, it is also toggled. The following code sets the
REC/DONE button to toggle mode and waits until REC/DONE is pressed:
; Set the REC/DONE button to toggle
KEYMODE 8 = 1
; Wait until the REC/DONE button is pressed
DO
WAIT
UNTIL PENDANT(8)
The arguments to KEYMODE indicate that MCP button number 8 (the
REC/DONE button) is configured as a toggle button. The argument to
PENDANT() indicates that the state of MCP button 8 is to be read.
V+ Language User’s Guide, Rev A
291
Chapter 11
Detecting User Input
Level Mode
To detect the state of a button in level mode, the PENDANT( ) function must
specify the button to be monitored.
When a button has been configured as a level button, the state of the button is on
as long as the button is pressed. When the button is not pressed, its state is off.
The following code uses the buttons labeled 2, 4, 6, and 8 (button numbers 45, 47,
49, and 57—don’t confuse the button labels with the numbers returned by the
PENDANT function) to move the cursor around the terminal display. The buttons
are configured as level buttons so the cursor moves as long as a button is
depressed.
; Set the REC/DONE button to toggle
KEYMODE 8 = 1
; Set the data entry buttons labeled "2" - "8" to level
KEYMODE 45, 51 = 2
DO
IF PENDANT(49) THEN
TYPE /X1, /S;Cursor right
END
IF PENDANT(47) THEN
TYPE $CHR(8);Cursor left (backspace)
END
IF PENDANT(51) THEN
TYPE /U1, /S;Cursor up
END
IF PENDANT(45) THEN
TYPE $CHR(12) ;Cursor down (line feed)
END
UNTIL PENDANT(8)
292
V+ Language User’s Guide, Rev A
Chapter 11
Detecting User Input
Monitoring the MCP Speed Bar
The speed bar on the MCP returns a value from –128 to 127 depending on where it
is being pressed. An argument of –2 to the PENDANT( ) function will return the
value of the speed bar. The following code displays the state of the speed bar.
; Set the REC/DONE button to toggle
KEYMODE 8 = 1
; Display speed bar value until the REC/DONE is pressed
DO
WRITE(1) PENDANT(−2)
UNTIL PENDANT(8)
The Slow button is intended to alter the value returned by the speed bar. The
following code compresses the range of values returned by 50% whenever the
Slow button is on.
; Set the REC/DONE button to toggle
KEYMODE 8 = 1
; Do until the REC/DONE button is pressed
DO
IF PENDANT(36) THEN
TYPE PENDANT(−2) * 0.5
ELSE
TYPE PENDANT(−2)
END
UNTIL PENDANT(8)
V+ Language User’s Guide, Rev A
293
Chapter 11
Detecting User Input
5
4
3
2
1
19
18
17
16
15
USER
WORLD
TOOL
JOINT
FREE
22
DEV 2
29
30
25
24
23
8
54
53
32
50
51
52
33
9
47
48
49
34
10
44
45
46
37
11
43
55
56
38
36
31
Figure 11-1. MCP Button Map
Using the STEP Button
When manual mode is selected, V+ programs cannot initiate motions unless you
press the STEP button and speed bar on the MCP. To continue the motion once it
has started, you can release the STEP button but must continue to press the speed
bar. Failure to operate the STEP button and the speed bar properly results in the
following error message (with error code –620):
*Speed pot or STEP not pressed*
Once a motion has started in this mode, releasing the speed bar also terminates
any belt tracking or motion defined by an ALTER program instruction.
Motions started in this mode have their maximum speeds limited to those defined
for manual control mode.
294
V+ Language User’s Guide, Rev A
Chapter 11
Detecting User Input
As an additional safeguard, when high power is enabled and manual mode is
selected, the MCP is set to OFF mode, not COMP or MANUAL mode.
Reading the State of the MCP
It is good programming practice to check the state of the MCP before ATTACHing
to it. The instruction:
cur.state = PENDANT(−3)
will return a value to be interpreted as follows:
1.
Indicates that one of the predefined function buttons has been pressed.
2.
Indicates the MCP is in background mode (not ATTACHed to an application
program).
3.
Indicates an error is being displayed.
4.
Indicates that the MCP is in USER mode (ATTACHed to an application
program).
See “Programming Example: MCP Menu” on page 302 for a program example
that checks the MCP state.
V+ Language User’s Guide, Rev A
295
Chapter 11
Controlling the Pendant
Controlling the Pendant
The MCP responds to a number of control codes that affect the LCD panel
(whether or not the buttons are repeat buttons) and the LEDs associated with the
pendant buttons. The control codes are listed in Table 11-1 on page 298. The
control codes are sent as ASCII values using the WRITE instruction. The normal
way to send control codes is to use the $CHR( ) function to convert a control code
to its ASCII value.
Control Codes for the LCD Panel
To clear the display and position the cursor in the middle of the top line, issue the
instruction:
WRITE(mcp_lun) $CHR(12), $CHR(18), $CHR(20), /S
$CHR(12) clears the pendant and places the cursor at position 1 (see Figure 11-2
on page 297). $CHR(18) indicates that the next value received should be
interpreted as a cursor location. $CHR(20) indicates the cursor should be placed at
position 20. /S must be appended to the WRITE instruction or a <CR-LF> will be
sent. Notice that using control code 18 allows you to position the cursor without
disturbing existing text.
The following code will place the text EXIT in the middle of the bottom line and
set the text blinking.
WRITE(mcp_lun) $CHR(18), $CHR(58), "EXIT", /S
WRITE(mcp_lun) $CHR(18), $CHR(58), $CHR(22), $CHR(4), /S
$CHR(22) tells the pendant to start a series of blinking positions starting at the
current cursor location and extending for the number of positions specified by the
next control code ($CHR(4)). This code will cause any text in positions 58 - 62 to
blink until an instruction is sent to cancel the blinking. The following code line
disables the blink positions:
WRITE(mcp_lun) $CHR(18), $CHR(58), $CHR(23), $CHR(4), /S
$CHR(23) tells the pendant to cancel a series of blinking positions starting at the
current cursor location and extending for the number of positions specified by the
next control code ($CHR(4)).
Text can be made to blink as it is written to the display, regardless of the position
the text is in. The following code writes the text EXIT to the middle of the bottom
line, starts the E blinking, and then beeps the MCP:
296
V+ Language User’s Guide, Rev A
Chapter 11
Controlling the Pendant
WRITE(mcp_lun) $CHR(18), $CHR(58), $CHR(2), "E", /S
WRITE(mcp_lun) $CHR(3), "XIT", /S
WRITE(mcp_lun) $CHR(7), /S
$CHR(2) starts blink mode. Any characters sent to the MCP display will blink.
Blink mode is canceled by $CHR(3). $CHR(3) cancels blink mode for subsequent
characters; it does not cancel blinking of previously entered characters. It also
does not cancel blinking of character positions set by control code 22. $CHR(7)
causes the pendant to beep.
1
40
41
80
Figure 11-2. Pendant LCD Display
The Pendant LEDs
The LEDs on the soft buttons, the F buttons, and the REC/DONE button can be lit
(either continuously or intermittently). The following code places the text CLEAR
and EXIT over the first two soft buttons, lights the LED over the first soft button,
and blinks the light over the second soft button:
WRITE(mcp_lun)
WRITE(mcp_lun)
WRITE(mcp_lun)
WRITE(mcp_lun)
$CHR(18), $CHR(41), "CLEAR", /S
$CHR(9), "EXIT", /S
$CHR(31), $CHR(5), /S
$CHR(30), $CHR(4), /S
$CHR(9) tabs the cursor to the next soft button position. $CHR(31) lights an LED.
$CHR(30) starts an LED blinking. The button LED to be lit is specified in the
ensuing control code. In the above example, button 5’s LED is turned on and
button 4’s LED is set blinking. The soft buttons, F buttons, and REC/DONE
button are the only buttons that have programmable LEDs.
V+ Language User’s Guide, Rev A
297
Chapter 11
Controlling the Pendant
Making Pendant Buttons Repeat Buttons
Pendant buttons that are configured as keyboard buttons are normally repeat
buttons: Button presses are recorded as long as the button is held down. The
repeat function can be disabled, requiring users to press the button once for each
button press they want recorded. The following instruction disables the repeat
option for the period (.) button:
WRITE(mcp_lun) $CHR(25), $CHR(55), /S
The repeat option is enabled with the instruction:
WRITE(mcp_lun) $CHR(24), $CHR(55), /S
Table 11-1 lists all the control codes used with the pendant.
Table 11-1. Pendant Control Codes
Single Byte Control Codes
298
Code
Function
1
(Not Used)
2
Enable blink mode for subsequent characters
3
Disable blink mode for subsequent characters (characters will still
blink if they appear in a blinking position set by code 22)
4
Display cursor (make the cursor visible)
5
Hide cursor (make the cursor invisible)
6
(Not Used)
7
Beep
8
Backspace (ignored if cursor is in character position 1)
9
Tab to next soft button
10
Line feed (move down in same position, scroll if on line 2)
11
Vertical tab (move up in same position, do not scroll)
12
Home cursor and clear screen (cancels any blinking positions, but
does not affect blink mode set by code 2)
13
Carriage return (move to column 1 of current line)
14
Home cursor (move to character position 1)
15
Clear from cursor position to end of line
V+ Language User’s Guide, Rev A
Chapter 11
Controlling the Pendant
Table 11-1. Pendant Control Codes (Continued)
Double Byte Control Codes
Code
Function
Second Code
16
(Not Used)
17
(Not Used)
18
Position cursor
19
(Not Used)
20
(Not Used)
21
(Not Used)
22
Enable blinking positions starting Number of blinking positions
at current cursor location
(1-8 0)
23
Disable blinking positions starting Number of blinking positions
at current cursor location
(1-8 0)
24
Enable repeat mode for button
Button number
25
Disable repeat mode for button
Button number
26
(Not Used)
27
(Not Used)
Code
Function
Second Code
28
Turn off pendant button LED
Light number *
29
(Not used)
30
Start pendant button LED
blinking
Light number *
31
Turn on pendant button LED
Light number *
Cursor position (1-80)
*For soft buttons, F buttons, and REC/DONE button only.
V+ Language User’s Guide, Rev A
299
Chapter 11
Auto-Starting Programs With the MCP
Auto-Starting Programs With the MCP
The CMD predefined function button provides three options for loading and
auto-starting a program from the pendant. These three options are AUTO START,
CMD1, and CMD2. The program file requirements for all three options are the
same:
1
300
1.
The file being loaded must be on the default disk. The default disk is specified
with the DEFAULT DISK command. The utility CONFIG_C can be used to
specify a default disk at startup.1 See the Instructions for Adept Utility
Programs for details on running this utility.
2.
The file name must correspond to the MCP selection. If CMD1 is pressed, the
disk file must be named CMD1.V2. If AUTO START is pressed, the user will be
asked to input one or two digits. These digits will be used to complete the file
name AUTOxx.V2. A corresponding file name must exist on the default drive.
3.
A command program with the same name as the file name (minus the
extension) must be one of the programs in the file. If AUTO22.V2 is loaded, the
program auto22 will be COMMANDed. See the V+ Operating System
Reference Guide for details on command programs.
The default disk is not the same as the boot drive. The boot drive is set in hardware and is used
during the boot procedure to specify the drive that contains the operating system. Once the
system is loaded, the default disk is the drive and path specification for loading and storing files.
V+ Language User’s Guide, Rev A
Chapter 11
Auto-Starting Programs With the MCP
WAIT.START
Starting a robot program while the operator is in the workcell can be extremely
dangerous. Therefore, Adept has installed the following safety procedure to
prevent program startup while an operator is in the workcell. Before a program
auto-started from the MCP will begin execution, the operator will have to leave
the workcell, put the controller in automatic mode, and press the Start soft key on
the MCP. The WAIT.START instruction implements this safety feature. This
instruction is automatically included in any programs started with the AUTO
START, CMD, CMD1, CMD2, and CALIBRATE buttons on the MCP. You should
include this safety feature in any pendant routines you write that initiate monitor
command programs that include robot motions. The command WAIT.START in a
monitor command program will pause execution of a monitor command program
until the automatic mode is selected and the START soft key on the MCP is
pressed. See the V+ Language Reference Guide for other uses of WAIT.START.
WARNING: For this safety feature to be effective, the optional front
panel must be installed outside the workcell.
V+ Language User’s Guide, Rev A
301
Chapter 11
Programming Example: MCP Menu
Programming Example: MCP Menu
The following code implements a menu structure on the MCP. (Additionally,
“Teaching Locations With the MCP” on page 347 presents a program example
for using the MCP to teach robot locations.)
.PROGRAM mcp.main( )
; ABSTRACT: This program creates and monitors a menu structure on the MCP.
;
; INPUT PARAMS: None
;
; OUTPUT PARAMS: None
;
; GLOBAL VARS: mcp MCP logical unit
;
mcp.clr.scr_pendant control code, clear display & home cursor
;
mcp.cur.pos_pendant control code, set cursor position
;
mcp.off.led_pendant control code, turn off an LED
;
mcp.blink.char_pendant control code, start blink position
;
mcp.noblink.char_pendant control code, disable blink position
;
mcp.beep_pendant control code, beep the pendant
;
mcp.tab_pendant control code, tab to next soft button
;
mcp.on.led_pendant control code, turn on an LED
AUTO button
AUTO quit
;Number of the soft button pressed
;Boolean indicating menu structure should be exited
mcp = 1
quit = FALSE
mcp.clr.scr = 12
mcp.cur.pos = 18
mcp.off.led = 28
mcp.blink.char = 2
mcp.noblink.char = 3
mcp.beep = 7
mcp.tab = 9
mcp.on.led = 31
; Check to see if the MCP is free
IF PENDANT(−3) <> 2 THEN
GOTO 100
END
; Attach to the MCP
ATTACH (mcp)
; Verify ATTACH was successful
IF IOSTAT(mcp) <> 1 THEN
GOTO 100
302
V+ Language User’s Guide, Rev A
Chapter 11
Programming Example: MCP Menu
END
DO ;Main processing loop
; Display the top-level menu
CALL mcp.disp.main( )
; Get the operator selection (must be between 1 and 5)
DO
button = PENDANT(0)
UNTIL (button < 6)
; Turn on the LED of the selected button
WRITE (mcp) $CHR(mcp.on.led), $CHR(button), /S
; Respond to the menu item selected
CASE button OF
VALUE 1:; Verify program exit
CALL mcp.main.quit(quit)
VALUE 2:
CALL mcp.option.2( )
VALUE 3:
CALL mcp.option.3( )
VALUE 4:
CALL mcp.option.4( )
VALUE 5:
CALL mcp.option.5( )
END ;CASE button of
; Turn off LED
WRITE (mcp) $CHR(mcp.off.led), $CHR(button), /S
UNTIL quit
; Detach from the MCP
DETACH (mcp)
100 IF NOT quit THEN;Exit on MCP busy
TYPE /C34, /U17, "The MCP is busy or not connected."
TYPE "Press the REC/DONE button to clear.", /C5
END
V+ Language User’s Guide, Rev A
303
Chapter 11
Programming Example: MCP Menu
.END
.PROGRAM mcp.disp.main( )
;ABSTRACT: This program is called to display a main menu above the five
;soft keys on the MCP. The program assumes the MCP has been attached.
;
; INPUT PARAMS: None
;
; OUTPUT PARAMS: None
;
; GLOBAL VARS: mcpMCP logical unit
; mcp.clr.scrn_pendant control code, clear display & home cursor
; mcp.cur.pos_pendant control code, set cursor position
; mcp.beep_pendant control code, beep the pendant
; mcp.tab_pendant control code, tab to next soft button
; Clear the display and write the top line
WRITE (mcp) $CHR(mcp.clr.scr), $CHR(mcp.cur.pos), $CHR(16), "MAIN MENU", /S
; Write the menu options
WRITE (mcp) $CHR(mcp.cur.pos), $CHR(41), /S
WRITE (mcp) "Option5", $CHR(mcp.tab), "Option4", $CHR(mcp.tab), /S
WRITE (mcp) "Option3", $CHR(mcp.tab), "Option2", $CHR(mcp.tab), "
; Beep the MCP
WRITE (mcp) $CHR(mcp.beep), /S
.END
.PROGRAM mcp.main.quit(quit)
;
;
;
;
;
;
;
;
;
;
;
;
;
;
;
;
ABSTRACT: This program responds to a "Quit" selection from the MCP
main menu. It verifies the selection and passes the result.
INPUT PARAMS: None
OUTPUT PARAM: quit Boolean indicating whether a "quit"
has been verified
GLOBAL VARS: mcp MCP logical unit
mcp.clr.scr_pendant control code, clear display & home cursor
mcp.off.led_pendant control code, turn off an LED
mcp.blink.char_pendant control code, start blink position
mcp.noblink.char_pendant control code, disable blink position
mcp.tab - pendant control code, tab to next soft button
304
V+ Language User’s Guide, Rev A
QUIT", /S
Chapter 11
Programming Example: MCP Menu
quit = FALSE ;assume quit will not be verified
; Display submenu and start the "NO" option blinking
WRITE (mcp) $CHR(mcp.clr.scr), "Quit. Are you sure?"
WRITE (mcp) $CHR(mcp.tab), $CHR(mcp.tab), $CHR(mcp.tab), "
WRITE (mcp) $CHR(mcp.tab), $CHR(mcp.blink.char), " NO",
$CHR(mcp.noblink.char), /S
button = PENDANT(0)
YES", /S
; Set quit to true if verified, else turn off the "NO" soft button LED
IF button == 2 THEN
quit = TRUE
ELSE
WRITE (mcp) $CHR(mcp.off.led), $CHR(1), /S
END
.END
V+ Language User’s Guide, Rev A
305
Conveyor Tracking
Introduction to Conveyor Tracking . . . . . . . . .
Installation . . . . . . . . . . . . . . . . . . . . .
Calibration . . . . . . . . . . . . . . . . . . . .
Basic Programming Concepts . . . . . . . . . . .
Belt Variables . . . . . . . . . . . . . . . .
Nominal Belt Transformation . . . . . . .
The Belt Encoder . . . . . . . . . . . . .
The Encoder Scaling Factor . . . . . . .
The Encoder Offset . . . . . . . . . . . .
The Belt Window . . . . . . . . . . . . .
Belt-Relative Motion Instructions . . . . . . .
Motion Termination . . . . . . . . . . . . .
Defining Belt-Relative Locations . . . . . . .
Moving-Line Programming . . . . . . . . . . . . .
Instructions and Functions . . . . . . . . . .
Belt Variable Definitions . . . . . . . . . .
Encoder Position and Velocity Information
Window Testing . . . . . . . . . . . . . .
Status Information . . . . . . . . . . . .
System Switch . . . . . . . . . . . . . . . .
System Parameters . . . . . . . . . . . . .
Sample Programs . . . . . . . . . . . . . . . . .
12
.
.
.
.
.
.
.
.
.
.
.
.
.
.
.
.
.
.
.
.
.
.
V+ Language User’s Guide, Rev A
.
.
.
.
.
.
.
.
.
.
.
.
.
.
.
.
.
.
.
.
.
.
.
.
.
.
.
.
.
.
.
.
.
.
.
.
.
.
.
.
.
.
.
.
.
.
.
.
.
.
.
.
.
.
.
.
.
.
.
.
.
.
.
.
.
.
.
.
.
.
.
.
.
.
.
.
.
.
.
.
.
.
.
.
.
.
.
.
.
.
.
.
.
.
.
.
.
.
.
.
.
.
.
.
.
.
.
.
.
.
.
.
.
.
.
.
.
.
.
.
.
.
.
.
.
.
.
.
.
.
.
.
.
.
.
.
.
.
.
.
.
.
.
.
.
.
.
.
.
.
.
.
.
.
308
309
310
311
311
312
314
314
315
316
318
319
319
320
320
320
320
321
321
321
321
322
307
Chapter 12
Introduction to Conveyor Tracking
Introduction to Conveyor Tracking
This chapter describes the Adept Conveyor Tracking (moving-line) feature. The
moving-line feature allows the programs to specify locations that are
automatically modified to compensate for the instantaneous position of a
conveyor belt. Motion locations that are defined relative to a belt can be taught
and played back while the belt is stationary or moving at arbitrarily varying
speeds. Conveyor tracking is available only for systems that have the optional V+
Extensions software.
For V+ to determine the instantaneous position and speed of a belt, the belt must
be equipped with a device to measure its position and speed. As part of the
moving-line hardware option, Adept provides an encoder and an interface for
instrumenting two separate conveyor belts. Robot motions and locations can be
specified relative to either belt.
There are no restrictions concerning the placement or orientation of a conveyor
belt relative to the robot. In fact, belts that move uphill or downhill (or at an angle
to the reference frame of the robot) can be treated as easily as those that move
parallel to an axis of the robot reference frame. The only restriction regarding a
belt is that its motion must follow a straight-line path in the region where the
robot is to work.
The following sections contain installation and application instructions for using
the moving-line feature. Before using this chapter, you should be familiar with V+
and the basic operation of the robot.
308
V+ Language User’s Guide, Rev A
Chapter 12
Installation
Installation
To set up a conveyor belt for use with a robot controlled by the V+ system:
1.
Install all the hardware components and securely fasten them in place. The
conveyor frame and robot base must be mounted rigidly so that no motion
can occur between them.
2.
Install the encoder on the conveyor.
3.
Since any jitter of the encoder will be reflected as jitter in motions of the robot
while tracking the belt, make sure the mechanical connection between the belt
and the encoder operates smoothly. In particular, eliminate any backlash in
gear-driven systems.
4.
Wire the encoder to the robot controller. (See the Adept MV Controller User’s
Guide for location of the encoder ports.)
5.
Start up the robot system controller in the normal manner.
6.
Calibrate the location of the conveyor belt relative to the robot by executing the
Belt Calibration Program. That program is provided in the file BELT_CAL.V2
on the Adept Utility Disk supplied with your robot system.1
When these steps have been completed, the system is ready for use. However,
each time the system is restarted, the belt calibration data must be reloaded (from
the disk file created in the above steps). The next section describes loading belt
calibration.
1
See the Instructions for Adept Utility Programs for details.
V+ Language User’s Guide, Rev A
309
Chapter 12
Calibration
Calibration
The position and orientation of the conveyor belt must be precisely known in
order for the robot to track motion of the belt. The file BELT_CAL.V2 on the
Adept Utility Disk contains a program to calibrate the relationship between the
belt and the robot. The program saves the calibration data in a disk file for later
use by application programs.
The DEFBELT and WINDOW program instructions must be executed before the
associated belt is referenced in a V+ program. See “Belt Variable Definitions” on
page 320 for details. We suggest you include these instructions in an initialization
section of your application program. Although these instructions need be
executed only once, no harm is done if they are executed subsequently.
The file LOADBELT.V2 on the Adept Utility Disk contains a V+ subroutine that
will load the belt calibration data from a disk file and execute the DEFBELT and
WINDOW instructions. (See the next section.)
While the robot is moving relative to a belt (including motions to and from the
belt), all motions must be of the straight-line type. Thus APPROS, DEPARTS,
MOVES, and MOVEST can be used, but APPRO, DEPART, DRIVE, MOVE,
and MOVET cannot. Motion relative to a belt is terminated when the robot moves
to a location that is not defined relative to the belt variable or when a belt-window
violation occurs.
310
V+ Language User’s Guide, Rev A
Chapter 12
Basic Programming Concepts
Basic Programming Concepts
This section describes the basic concepts of the Conveyor Belt Tracking feature.
First, the data used to describe the relationship of the conveyor belt to the robot is
presented. Then a description is given of how belt-relative motion instructions are
specified. Finally, a description is presented of how belt-relative locations are
taught.
The V+ operations associated with belt tracking are disabled when the BELT
system switch is disabled. Thus, application programs that use those operations
must be sure the BELT switch is enabled.
Belt Variables
The primary mechanism for specifying motions relative to a belt is a V+ data type
called a belt variable. By defining a belt variable, the program specifies the
relationship between a specific belt encoder and the location and speed of a
reference frame that maintains a fixed position and orientation relative to the belt.
Alternatively, a belt variable can be thought of as a transformation (with a
time-varying component) that defines the location of a reference frame fixed to a
moving conveyor. As a convenience, more than one belt variable can be
associated with the same physical belt and belt encoder. In this way, several work
stations can be easily referenced on the same belt.
Like other variable names in V+, the names of belt variables are assigned by the
programmer. Each name must start with a letter and can contain only letters,
numbers, periods, and underline characters. (Letters used in variable names can
be entered in either lowercase or uppercase. V+ always displays variable names in
lowercase.)
To differentiate belt variables from other data types, the name of a belt variable
must be preceded by a percent sign (%). As with all other V+ data types, arrays of
belt variables are permitted. Hence the following are all valid belt-variable names:
%pallet.on.belt %base.plate %belt[1]
The DEFBELT instruction must be used to define belt variables (see the
Moving-Line Programming section of this chapter). Thus, the following are not
valid operations:
SET %new_belt = %old_belt or HERE %belt[1]
V+ Language User’s Guide, Rev A
311
Chapter 12
Basic Programming Concepts
Compared to other V+ data types, the belt variable is rather complex in that it
contains several different types of information. Briefly, a belt variable contains the
following information:
1.
The nominal transformation for the belt. This defines the position and
direction of travel of the belt and its approximate center.
2.
The number of the encoder used for reading the instantaneous location of the
belt (from 1 to 6).
3.
The belt encoder scaling factor, which is used for converting encoder counts to
millimeters of belt travel.
4.
An encoder offset, which is used to adjust the origin of the belt frame of
reference.
5.
Window parameters, which define the working range of the robot along the
belt.
These components of belt variables are described in detail in the following
sections.
Unlike other V+ data types, belt variables cannot be stored in a disk file for later
loading. However, the location and real-valued data used to define a belt variable
can be stored and loaded in the normal ways. After the data is loaded from disk,
DEFBELT and WINDOW instructions must be executed to define the belt
variable. See “Belt Variable Definitions” on page 320 for details. (The file
LOADBELT.V2 on the Adept Utility Disk contains a subroutine that will read belt
data from a disk file and execute the appropriate DEFBELT and WINDOW
instructions.)
Nominal Belt Transformation
The position, orientation, and direction of motion of a belt are defined by a
transformation called the nominal belt transformation. This transformation
defines a reference frame aligned with the belt as follows: its X-Y plane coincides
with the plane of the belt, its X axis is parallel to the direction of belt motion, and
its origin is located at a point (fixed in space) chosen by the user.
Since the direction of the X axis of the nominal belt transformation is taken to be
the direction along which the belt moves, this component of the transformation
must be determined with great care. Furthermore, while the point defined by this
transformation (the origin of the frame) can be selected arbitrarily, it normally
should be approximately at the middle of the robot’s working range on the belt.
This transformation will usually be defined using the FRAME location-valued
function with recorded robot locations on the belt. (The easiest way to define
nominal belt transformation is with the conveyor belt calibration program
provided by Adept.)
312
V+ Language User’s Guide, Rev A
Chapter 12
Basic Programming Concepts
The instantaneous location described by the belt variable will almost always be
different from that specified by the nominal transformation. However, since the
belt is constrained to move in a straight line in the working area, the
instantaneous orientation of a belt variable is constant and equal to that defined
by the nominal belt transformation.
To determine the instantaneous location defined by a belt variable, the V+ system
performs a computation that is equivalent to multiplying a unit vector in the X
direction of the nominal transformation by a distance (which is a function of the
belt encoder reading) and adding the result to the position vector of the nominal
belt transformation. Symbolically, this can be represented as
instantaneous_XYZ =
nominal_XYZ + (belt_distance ∗
X_direction_of_nominal_transform)
where
belt_distance =
(encoder_count - encoder_offset) ∗ encoder_scaling_factor
The encoder variables contained in this final equation will be described in later
sections.
V+ Language User’s Guide, Rev A
313
Chapter 12
Basic Programming Concepts
The Belt Encoder
Six belt encoders are supported by the conveyor tracking feature.
Each belt encoder generates pulses that indicate both the distance that the belt has
moved and the direction of travel. The pulses are counted by the belt interface,
and the count is stored as a signed 24-bit number. Therefore, the value of an
encoder counter can range from 223 –1 (8,388,607) to –223 (– 8,388,608). For
example, if a single count of the encoder corresponds to 0.02 millimeters (0.00008
inch) of belt motion, then the full range of the counter would represent motion of
the belt from approximately –167 meters (–550 feet) to +167 meters (+550 feet).
After a counter reaches its maximum positive or negative value, its value will roll
over to the maximum negative or positive value, respectively. This means that if
the encoder value is increasing and a rollover occurs, the sequence of encoder
counter values will be ... ; 8,388,606; 8,388,607; –8,388,608; –8,388,607; ... As long as
the distance between the workspace of the robot and the nominal transformation
of the belt is within the distance that can be represented by the maximum encoder
value, V+ application programs normally do not have to take into account the fact
that the counter will periodically roll over. The belt_distance equation described
above is based upon a relative encoder value:
encoder_count – encoder_offset
and V+ automatically adjusts this calculation for any belt rollover that may occur.
Care must be exercised, however, if an application processes encoder values in
any way. For example, a program may save encoder values associated with
individual parts on the conveyor, and then later use the values to determine
which parts should be processed by the robot. In such situations the application
program may need to consider the possibility of rollover of the encoder value.
NOTE: While the encoder counter value is stored as a 24-bit
number, the rate of change of the belt encoder (the speed of the belt)
is maintained only as a 16-bit number. The belt speed is used
internally by V+ to predict future positions on the belt. Therefore,
the rate of change of the belt encoder should not exceed 32,768
counts per 16 milliseconds. The Adept application program for belt
calibration includes a test for this condition and prints a warning if
this restriction will be violated. This requirement will be a limitation
only for very high-speed conveyors with very high-resolution
encoders.
The Encoder Scaling Factor
For any given conveyor/encoder installation, the encoder scaling factor is a
constant number that represents the amount the encoder counter changes during
a change in belt position. The units of the scaling factor are millimeters/count.
314
V+ Language User’s Guide, Rev A
Chapter 12
Basic Programming Concepts
This factor can be determined either directly from the details of the mechanical
coupling of the encoder to the belt or experimentally by reading the encoder as
the belt is moved. The Adept belt calibration program supports either method of
determining the encoder scaling factor.
If the encoder counter decreases as the belt moves in its normal direction of travel,
the scaling factor will have a negative value.
The Encoder Offset
The last encoder value needed for proper operation of the moving-line system is
the belt encoder offset. The belt encoder offset is used by V+ to establish the
instantaneous location of the belt reference frame relative to its nominal location.
In particular, if the belt offset is set equal to the current belt encoder reading, the
instantaneous belt transformation will be equal to the nominal transformation.
The belt encoder offset can be used, in effect, to zero the encoder reading, or to set
it to a particular value whenever necessary. Unlike the encoder scaling factor,
which is constant for any given conveyor/encoder setup, the value of the belt
encoder offset is variable and will usually be changed often.
Normally, the instantaneous location of the reference frame will be established
using external input from a sensory device such as a photocell or the AdeptVision
system. For example, the VFEATURE function provided by AdeptVision returns
as one of its computed values the belt encoder offset that must be set in order to
grasp an object identified by the vision system. The DEVICE real-valued function
also returns latched or unlatched encoder values for use with SETBELT.
The encoder offset is set with the SETBELT program instruction, described in
“Belt Variable Definitions” on page 320.
V+ Language User’s Guide, Rev A
315
Chapter 12
Basic Programming Concepts
The Belt Window
The belt window controls the region of the belt in which the robot is to work.
Figure 12-1 on page 317 illustrates the terms used here. A window is a segment of
the belt bounded by two planes that are perpendicular to the direction of travel of
the belt. When defining the window, ensure that the robot can reach all conveyor
locations within the belt window. This is especially important for revolute (i.e.,
non-Cartesian) robots.
NOTE: The window has limits only in the direction along the belt.
Within V+, a belt window is defined by two transformations with a WINDOW
program instruction. The window boundaries are computed by V+ as planes that
are perpendicular to the direction of travel of the belt and that pass through the
positions defined by the transformations.
If the robot attempts to move to a belt-relative location that has not yet come
within the window (is upstream of the window), the robot can be instructed
either to pause until it can accomplish the motion or immediately generate a
program error. If a destination moves out of the window (is downstream of the
window), it is flagged as an error condition and the application program can
specify what action is to be taken. (See the description of the BELT.MODE system
parameter in V+ Language Reference Guide.)
If the normal error testing options are selected, whenever the V+ system is
planning a robot motion to a belt-relative location and the destination is outside
the belt window but upstream, the system automatically delays motion planning
until the destination is within the window. However, if an application program
attempts to perform a motion to a belt-relative destination that is out of the
window at planning time (or is predicted to be out by the time the destination
would be reached) and this destination is downstream, a window-violation
condition exists. Also, if during the execution of a belt-relative motion or while
the robot is tracking the belt, the destination moves outside the belt window for
any reason, a window violation occurs. Depending upon the details of the
application program, the program either prints an error message and halts
execution or branches to a specified subroutine when a window violation occurs.
In order to provide flexibility with regard to the operation of the window-testing
mechanism, several modifications to the normal algorithms can be selected by
modifying the value of the BELT.MODE system parameter.
To assist in teaching the belt window, the Adept conveyor belt calibration
program contains routines that lead the operator through definition of the
required bounding transformations.
316
V+ Language User’s Guide, Rev A
Chapter 12
Basic Programming Concepts
+Y
Nominal Transformation
Upstream
Downstream
+X
Lower Limit
Upper LImit
Belt Window
Figure 12-1. Conveyor Terms
V+ Language User’s Guide, Rev A
317
Chapter 12
Basic Programming Concepts
Belt-Relative Motion Instructions
To define a robot motion relative to a conveyor belt, or to define a relative
transformation with respect to the instantaneous location of a moving frame of
reference, a belt variable can be used in place of a regular transformation in a
compound transformation. For example, the instruction
MOVES %belt:loc_1
directs the robot to perform a straight-line motion to location loc_1, which is
specified relative to the location defined by the belt variable %belt. If a belt
variable is specified, it must be the first (that is, leftmost) element in a compound
transformation. Only one belt variable can appear in any compound
transformation.
Motions relative to a belt can be only of the straight-line type. Attempting a
joint-interpolated motion relative to a belt causes an error and halts execution of
the application program. Except for these restrictions, motion statements that are
defined relative to a belt are treated just like any other motion statement. In
particular, continuous-path motions relative to belts are permitted.
Once the robot has been moved to a destination that is defined relative to a belt,
the robot tool will continue to track the belt until it is directed to a location that is
not relative to the belt. For example, the following series of instructions would
move the tool to a location relative to a belt, open the hand, track the belt for two
seconds, close the hand, and finally move off the belt to a fixed location.
MOVES %belt[1]:location3
OPENI
DELAY 2.00
CLOSEI
MOVES fixed.location
If this example did not have the second MOVES statement, the robot would
continue to track the belt until a belt window violation occurred.
As with motions defined relative to a belt, motions that move the tool off a belt
(that is, to a fixed location) must be of the straight-line type.
318
V+ Language User’s Guide, Rev A
Chapter 12
Basic Programming Concepts
Motion Termination
When moving the robot relative to a belt, special attention must be paid to the
conditions used to determine when a motion is completed. At the conclusion of a
continuous-path motion V+ normally waits until all the joints of the manipulator
have achieved their final destinations to within a tight error tolerance before
proceeding to the next instruction. In the case of motions relative to a belt, the
destination is constantly changing and, depending upon the magnitude and
variability of the belt speed, the robot may not always be able to achieve final
positions with the default error tolerance.
Therefore, if a motion does not successfully complete (that is, it is aborted due to a
Time-out nulling error), or if it takes an excessive amount of time to complete, the
error tolerance for the motion should be increased by preceding the motion
instruction with a COARSE instruction. In extreme situations it may even be
necessary to entirely disable checking of the final error tolerance. This can be done
by specifying NONULL before the start of the motion.
Defining Belt-Relative Locations
In order to define locations relative to a belt, belt-relative compound
transformations can be used as parameters to all the standard V+ teaching aids.
For example, all the following commands define a location loc_1 relative to the
current belt location:1
HERE %belt:loc_1
POINT %belt:loc_1
TEACH %belt:loc_1
In each of these cases, the instantaneous location corresponding to %belt would
be determined (based upon the reading of the belt encoder associated with %belt);
loc_1 would be set equal to the difference between the current tool location and
the instantaneous location defined by %belt.
While a belt variable can be used as the first (leftmost) element of a compound
transformation to define a transformation value, a belt variable cannot appear by
itself. For example, LISTL will not display a belt variable directly. To view the
value of a belt variable, enter the command:
LISTL %belt_variable:NULL
1
Before defining a location relative to a belt, you must make sure the belt encoder offset is set
properly. That usually involves issuing a monitor command in the form:
DO SETBELT %belt = BELT(%belt)
V+ Language User’s Guide, Rev A
319
Chapter 12
Moving-Line Programming
Moving-Line Programming
This section describes how to access the moving-line capabilities within V+. A
functional overview is presented that summarizes the extensions to V+ for
Conveyor Tracking. All the V+ moving-line keywords are described in detail in
the V+ Language Reference Guide.
The moving-line extensions to V+ include:
•
Instructions and functions (there are no monitor commands)
•
System switch
•
System parameters
Instructions and Functions
This section summarizes the V+ instructions and functions dedicated to
moving-line processing. The belt-related functions return real values.
Belt Variable Definitions
The following keywords are used to define the parameters of belt variables. Some
parameters are typically set once, based upon information derived from the belt
calibration procedure. Other parameters are changed dynamically as the
application program is executing.
DEFBELT
Program instruction that creates a belt variable and defines its static
characteristics: nominal transformation, encoder number, and
encoder scaling factor.
SETBELT
Program instruction to set the encoder offset of a belt variable. This
defines the instantaneous belt location relative to that of the nominal belt transformation.
WINDOW
Program instruction for establishing the belt window boundaries
and specifying a window-violation error subroutine.
Encoder Position and Velocity Information
The following function is used to read information concerning the encoder
associated with a belt variable.
BELT
320
Real-valued function that returns the instantaneous encoder counter
value or the rate of change of the encoder counter value.
V+ Language User’s Guide, Rev A
Chapter 12
Moving-Line Programming
Window Testing
The following function allows an application program to incorporate its own
specialized working-region strategy, independent of the strategy provided as an
integral part of the V+ conveyor tracking system.
WINDOW
Real-valued function that indicates where a belt-relative location is
(or will be at some future time) relative to a belt window.
Status Information
The following function indicates the current operating status of the moving-line
software.
BSTATUS
Real-valued function that returns bit flags indicating the status of
the moving-line software.
System Switch
The switch BELT enables/disables the operation of the moving-line software. (See
the description of ENABLE, DISABLE, and SWITCH for details on setting and
displaying the value of BELT.)
BELT
This switch must be enabled before any conveyor tracking processing begins.
System Parameters
The following parameter selects alternative modes of operation of the belt
window testing routines. See the description of PARAMETER for details on
setting and displaying the parameter values.
BELT.MODE Bit flags for selecting special belt window testing modes of operation.
V+ Language User’s Guide, Rev A
321
Chapter 12
Sample Programs
Sample Programs
The following program is an example of a robot task working from a conveyor
belt. The task consists of the following steps:
1.
Wait for a signal that a part is present.
2.
Pick up the part.
3.
Place the part at a new location on the belt.
4.
Return to a rest location to wait for the next part.
CAUTION: These programs are meant only to illustrate
programming techniques useful in typical applications. Moving-line
programs are hardware dependent because of the belt parameters,
so care must be exercised if you attempt to use these programs.
; *** PROGRAM TO RELOCATE PART ON CONVEYOR ***
; Set up belt parameters
ENABLE BELT
PARAMETER BELT.MODE = 0
belt.scale = 0.030670
;Encoder scale factor
; Define belt twice, for two stations
DEFBELT %b1 = belt, 1,
WINDOW %b1 = window.1,
DEFBELT %b2 = belt, 2,
WINDOW %b2 = window.1,
32, belt.scale
window.2, window.error
32, belt.scale
window.2, window.error
WHILE TRUE DO ;Loop indefinitely
WAIT part.ready
;Wait for signal that part present
bx = BELT(%b1)
;Read present belt position
SETBELT %b1 = bx
;Set encoder offset for pick-up...
SETBELT %b2 = bx
;... and drop-off stations
APPROS %b1:p1, 50.00 ;Move to the part and pick it up
MOVES %b1:p1
CLOSEI
DEPARTS 50.00
APPROS %b2:p2, 50.00 ;Carry part to drop-off location
MOVES %b2:p2
OPENI DEPARTS 50.00
MOVES wait.location
;Return to rest location
END
;Wait for the next part
322
V+ Language User’s Guide, Rev A
Chapter 12
Sample Programs
; *** End of program ***
The WINDOW instruction in the above program indicates that whenever a
window violation occurs, a subroutine named window.error is to be executed.
The following is an example of what such a routine might contain.
; *** WINDOW VIOLATION ROUTINE ***
TYPE /B, /C1, "** WINDOW ERROR OCCURRED **", /C1
; Find out which end of window was violated
IF DISTANCE(HERE, window.1) < DISTANCE(HERE, window.2) THEN
; Error occurred at window.2
TYPE "Part moved downstream out of reach"
;...(Respond to downstream window error) .
ELSE
; Error occurred at window.1
TYPE "Part moved upstream out of reach"
;...(Respond to upstream window error) .
END
MOVES wait.location ;Move robot to rest location
; Use digital output signals to sound alarm and stop belt
SIGNAL alarm, stop.belt
HALT
;Halt program execution
V+ Language User’s Guide, Rev A
323
MultiProcessor Systems
13
Introduction . . . . . . . . . . . . . . . . . . . . .
Requirements for Motion Systems . . . . . . . . . . .
Allocating Servos with an MI-3 or MI-6 Board
Allocating Servos with a EJI Board . . . . .
Conveyor Belt Encoders . . . . . . . . . . . .
Force Sensors . . . . . . . . . . . . . . . . .
Installing Processor Boards . . . . . . . . . . . . . .
Processor Board Locations . . . . . . . . . . .
Slot Ordering of Processor Boards . . . . . . .
Processor Board Addressing . . . . . . . . . .
Customizing Processor Workloads . . . . . . . . . .
Assigning Workloads With CONFIG_C . . . . .
Using Multiple V+ Systems . . . . . . . . . . . . . .
Requirements for Running Multiple V+ Systems .
Using V+ Commands With Multiple V+ Systems .
Autostart . . . . . . . . . . . . . . . . . .
Accessing the Command Prompt . . . . . .
Intersystem Communications . . . . . . . . .
Shared Data . . . . . . . . . . . . . . . . . .
IOTAS and Data Integrity . . . . . . . . . . . .
Efficiency Considerations . . . . . . . . . . .
Digital I/O . . . . . . . . . . . . . . . . . . .
Restrictions With Multiprocessor Systems . . . . . . .
High-Level Motion Control Tasks . . . . . .
Peripheral Drivers . . . . . . . . . . . . . .
V+ Language User’s Guide, Rev A
.
.
.
.
.
.
.
.
.
.
.
.
.
.
.
.
.
.
.
.
.
.
.
.
.
.
.
.
.
.
.
.
.
.
.
.
.
.
.
.
.
.
.
.
.
.
.
.
.
.
.
.
.
.
.
.
.
.
.
.
.
.
.
.
.
.
.
.
.
.
.
.
.
.
.
.
.
.
.
.
.
.
.
.
.
.
.
.
.
.
.
.
.
.
.
.
.
.
.
.
.
.
.
.
.
.
.
.
.
.
.
.
.
.
.
.
.
.
.
.
.
.
.
.
.
.
.
.
.
.
.
.
.
.
.
.
.
.
.
.
.
.
.
.
.
.
.
.
.
.
.
.
.
.
.
.
.
.
.
.
.
.
.
.
.
.
.
.
.
.
.
.
.
.
.
326
327
327
327
328
328
329
329
329
329
329
330
331
331
331
332
332
333
334
335
336
336
337
338
338
325
Chapter 13
Introduction
Introduction
In most cases, your controller has already been preconfigured at the factory with
sufficient processors for your application. Occasionally, however, your
applications may be more demanding and need multiple processors and possibly
multiple.
You can have an auxiliary processor board installed in an Adept MV controller. To
correctly use multiple (auxiliary) processors with your system, you need to
consider the following:
326
•
Processor and memory requirements
•
Installation of the processor boards
•
Assignment of the processor workloads
V+ Language User’s Guide, Rev A
Chapter 13
Requirements for Motion Systems
Requirements for Motion Systems
This section details the motion boards setup when more than one motion board is
present in the system.
Allocating Servos with an MI-3 or MI-6 Board
When associating servo processes with a motion interface board, all channels of a
motion interface board must be serviced by the same processor. In addition, when
a motion interface board is assigned to a processor board, it allocates all of the
available servo processes per board even if less than the maximum number of
axes are being servioed.
For example, if you are controlling a 4-axis robot with two MI-3 boards, you must
assign all three channels of the first MI-3 board to a single processor as a group.
Likewise, you must assign all three channels of the second MI-6 to a single
processor (although it need not be the same processor as the first three axes). If
you assign the two MI-6s to the same processor, 6 servo processes on that board
are occupied even though only 4 channels are being used. In this situation, the
processor computational load corresponds to that for 4 axes, but no additional
MI-6s can be controlled by this processor.
Allocating Servos with a EJI Board
When associating servo processes with an EJI (Enhanced Joint Interface) board, all
channels of the EJI must be serviced by the same processor board. In addition,
when a EJI is assigned to a processor board, it allocates 8 of the available servo
processes per board even if less than 8 axes are being servioed.
For example, if you are controlling a 4-axis robot with two EJI boards, you must
assign all eight channels of the first EJI board to a single processor as a group.
Likewise, you must assign all eight channels of the second EJI to a single
processor (although it need not be the same processor as the first 8 axes). If you
assign the two EJIs to the same processor, 16 servo processes on that board are
occupied even though only 4 channels are being used. In this situation, the
processor computational load corresponds to that for 4 axes.
V+ Language User’s Guide, Rev A
327
Chapter 13
Requirements for Motion Systems
Conveyor Belt Encoders
With a V+Extensions License, you can install a maximum of one encoder device
module. The Encoder Device module supports up to 6 encoders (the default is 2).
Thus, you can interface a maximum of 6 conveyor belt encoders to a controller.
Each belt encoder requires one servo channel although it adds a negligible
amount of computational load. These encoders are physically connected through
an EJI, MI-6, MI-3.
Force Sensors
The AdeptForce VME option allows up to three force sensors per controller. Each
sensor requires one Force Interface Board (VFI). You can assign one or two VFIs to
each processor board. Each of these force sensors requires one element of the
servo axis allocation.
The force sensor loads the processor computationally only when a force-sensing
operation is taking place, and the load is somewhat less than a single servioed
axis.
328
V+ Language User’s Guide, Rev A
Chapter 13
Installing Processor Boards
Installing Processor Boards
This section gives you an overview of installing auxiliary processor boards,
including:
•
Board locations
•
Slot ordering
•
Board addressing
•
System controller functions
Processor Board Locations
In each controller, the first slot available for processor boards must be occupied by
an AWC processor. This processor must be addressed as board 1 and it must have
the system controller functions enabled This processor is considered the system
processor.
Slot Ordering of Processor Boards
In general, you should configure the fastest processor with the greatest amount of
memory as processor #1.
Processor Board Addressing
The system processor must reside in slot 1 and be addressed as board 1. The
auxiliary processor must be addressed as processor 2. It does not matter which
slot an auxiliary processor is in. For details on setting the board address see the
Adept MV Controller User’s Guide.
Customizing Processor Workloads
Generally, the default assignment of processor workloads is sufficient for most
applications. However, if the default assignments does not suit your application,
you can customize them.
You can assign the following system tasks to the auxiliary processor:
•
Vision processing
V+ Language User’s Guide, Rev A
329
Chapter 13
Customizing Processor Workloads
You can assign each vision system in the controller to a specific processor.
•
Servo processing
You can assign the servo task for each VMI board to a specific processor.
•
A copy of the V+command processor
Each processor can run an individual copy of the V+command processor. See
“Using Multiple V+ Systems” on page 331 for more details on multiple
copies of V+.
Assigning Workloads With CONFIG_C
The assignment of workloads to the different processors is automatic in most
cases. However, you may examine or override the defaults using the CONFIG_C
configuration utility. The default configuration implements the following
processor workload configurations:
330
•
If only one processor is installed, all tasks run on that processor.
•
If a second processor is present, the vision task and servo tasks for the first
two motion boards are automatically assigned to it.
•
If the V+ Extensions license is installed, a copy of the V+ command processor
is also available on each installed processor. In most cases, the copy of V+ on
the auxiliary processor will be idle. That is, it will not be executing any user
tasks. When idle, V+ uses less than one percent of the processor time.
V+ Language User’s Guide, Rev A
Using Multiple V+ Systems
Chapter 13
Using Multiple V+ Systems
For applications demanding extremely intensive V+processing, it is possible to
run a copy of V+ on every processor. This section details the requirements and
considerations needed to run multiple V+ systems.
Requirements for Running Multiple V+ Systems
You must have the following items before you can use multiple processors to run
multiple V+ systems.
•
V+ Extensions license
•
CONFIG_C utility program
•
One processor for every V+ system that you intend to run
•
A graphics-based system
If you are using additional processors for vision or servo processing only, you do
not need a V+ Extensions license. Contact your local Adept sales office for more
information on this license.
Using V+ Commands With Multiple V+ Systems
If more than one processor is running a copy of V+ and the MONITORS system
switch is enabled, multiple monitor windows can be displayed. The first monitor
window is the normal monitor window for the system processor (labeled
Monitor). The monitor windows for the other V+ system is labeled Monitor_2.
The processor can run its own independent V+ system, and can perform all of the
V+ functions with the exceptions described in “Restrictions With Multiprocessor
Systems” on page 337.
V+ Language User’s Guide, Rev A
331
Using Multiple V+ Systems
Chapter 13
Autostart
When the autostart program is used with processor 1, it acts the same as on a
single V+ system and performs the following commands:
LOAD/Q auto
COMM auto
When autostart is used with V+ processor 2, the program performs the following
commands:
LOAD/Q auto02
COMM auto02
where n is V+ system number 2.
You do not have to enable the MONITORS system switch unless you want access
to the V+ command line when using autostart to execute programs on system 2.
The autostart function is enabled for all processors using CONFIG_C utility
‘Controller NVRAM’ menu selection. See the Instructions for Adept Utility
Programs for more details.
Accessing the Command Prompt
If you are not using autostart, you must enable the MONITORS system switch
and use the Adept pull-down menu to select the Monitor window for the system
you want to command. You can then enter V+ commands (such as LOAD and
EXECUTE) at the V+ command prompt (.). See the V+ Language Reference Guide
for a description of the MONITORS system switch.
Each time the controller is turned on, the default is that the auxiliary monitor
window (monitor_2) is hidden and disabled. To enable it, type the command
ENABLE MONITORS.
332
V+ Language User’s Guide, Rev A
Using Multiple V+ Systems
Chapter 13
Intersystem Communications
V+ application programs running on the same processor communicate in the
normal way, using global V+ variables. V+ can execute up to 7 tasks
simultaneously on each processor, or up to 28 tasks if the V+ Extensions software
license is installed.
When multiple V+ systems are running, each operates on its own processor and
functions independently. Programs and global variables for one V+ system are not
accessible to the other V+ systems.
Application programs running on different V+ systems can communicate through
an 8 KB reserved section of shared memory on each board. This memory area is
used only for communication between V+ application programs. It is not used for
any other purpose.
You can access this memory through the following:
•
the six IOPUT_ instructions
•
•
•
•
•
•
•
the five IOGET_ real-valued functions
•
•
•
•
•
•
IOPUTB
IOPUTD
IOPUTF
IOPUTL
IOPUTS
IOPUTW
IOGETB
IOGETD
IOGETF
IOGETL
IOGETW
the string function $IOGETS
Each of the above keywords has a type parameter. Type 0 (zero), the default, is
used to access memory on other Adept V+ processors. See the V+ Language
Reference Guide for more details.
You can use the real-valued function IOTAS to interlock access to this memory.
V+ Language User’s Guide, Rev A
333
Using Multiple V+ Systems
Chapter 13
Shared Data
The IOGET_, $IOGETS, and IOPUT_ keywords allow the following to be written
and read:
•
Single bytes
•
16-bit words
•
32-bit long-words
•
32-bit single-precision floating-point values
•
64-bit double-precision floating-point values
•
Strings up to 128 bytes
An address parameter indicates the position within the application shared area
that is to be written to or from. Acceptable address values are 0 to hexadecimal
1FFF (decimal 8191).
Any Adept system processor can access the shared memory areas of all the Adept
system processors (including its own area). The IOGET_, $IOGETS, IOPUT_ and
IOTAS keywords have an optional parameter to specify the processor number.
The default value for the processor parameter is 0, which is the local processor
(that is, the processor on which the instruction is executing). A nonzero value for
the processor parameter causes that processor to be accessed. (Note that a
processor can access itself as either processor 0 or by its real processor number.)
For example, the instruction:
IOPUTS ^HFF, 0, 2 = "Hello"
will write five ASCII bytes to the shared memory area on processor 2 at the
address ^HFF.
Adept MV controllers support four processors, numbered 1 through 4. The
processor number is established by the board-address switches on the processor
module. The V+ monitor window indicates the number of the processor with
which it is associated: The monitor window for processor 1 is simply entitled
Monitor; the window for processor 2 is entitled Monitor_2.
CAUTION: V+ does not enforce any memory-protection schemes
for use of the application shared memory area. It is your
responsibility to keep track of memory usage. If you are using
application or utility programs (for example, Adept AIM
VisionWare or AIM MotionWare) you should read the
334
V+ Language User’s Guide, Rev A
Using Multiple V+ Systems
Chapter 13
documentation provided with that software to check that there is no
conflict with your usage of the shared area. AIM users should note
that Adept plans to assign application shared memory starting from
the top (address hexadecimal 1FFF) and working down. Therefore,
you should start at the bottom (address 0) and work up.
If you read a value from a location that has not been previously written to, you
will get an invalid value: You will not get an error message. The system will provide
a value based upon the default memory contents and the manner in which the
memory is being read. (Every byte of the application shared area is initialized to
zero when V+ is initialized.)
The memory addresses are based on single-byte (8-bit) memory locations. For
example, if you write a 32-bit (4-byte) value to an address, the value will occupy
four address spaces (the address that you specify and the next three addresses).
If you read a value from a location using a format different from the format that
was used to write to that location, you will also get an invalid value: You will not
get an error message. The system will provide a value based upon the default
memory contents. (For example, if you write using IOPUTF and read using
IOPUTL, the value read will be invalid.)
IOTAS and Data Integrity
Some IOPUT_ and IOGET_ operations involve multiple hardware read or write
cycles. For example, all 64-bit operations will involve at least two 32-bit data
transfers (three transfers if the operation crosses more than one 32-bit boundary).
If a 16-bit or 32-bit operation crosses a 32-bit boundary, it will involve two
transfers.
You can interlock operations that must cross a 32-bit boundary using the IOTAS( )
function. The syntax and an example are given in the V+ Language Reference
Guide.
The IOTAS function performs a hardware-level, read-modify-write (RMW) cycle
on the VMEbus to make a Test And Set operation indivisible in a multiprocessing
environment. If multiple processors all access the same byte by using IOTAS, the
byte can serve as an interlock between the processors.
V+ Language User’s Guide, Rev A
335
Using Multiple V+ Systems
Chapter 13
WARNING: Depending on the application, there is a possibility
that a V+ program running on one processor may update a
shared-memory area while a program on another processor is
reading it. In this case, data that is read across a 32-bit boundary
may be invalid. If the data is being used for safety-critical
operations, including robot motions, be sure to use the IOTAS
function to prevent such conflicts.
Efficiency Considerations
You can put your shared data on any processor. However, it is most efficient to
put the data on the processor that will use it most often, or that is performing the
most time-critical operations. (It takes slightly longer to access data on another
processor than to access data on the local processor.) If you wish, you can put
some of your data on one processor and other data on a different processor. You
must be careful to keep track of which data items are stored in which location.
32-bit and 64-bit operations operate slightly faster if the address is an exact
multiple of four. 16-bit operations operate slightly faster if the address is an exact
multiple of two.
Digital I/O
The digital I/O image— including input (1001-1512), output (1-512), and soft
signals (2000-2512 and 3001-3004)—is managed by processor 1. These signals are
shared by all processors. You can use the soft signals to pass control information
between processors.
336
V+ Language User’s Guide, Rev A
Chapter 13
Restrictions With Multiprocessor Systems
Restrictions With Multiprocessor Systems
You can set up certain tasks to operate on any processor board, including servo
tasks, vision tasks, and in some cases, V+ user tasks. However, there are several
V+ operations that can be performed only from Processor 1:
•
Robot control
•
System configuration changes
•
Certain commands/instructions
•
•
•
•
High-level motion control tasks
•
•
•
•
•
ENABLE/DISABLE of POWER
ENABLE/DISABLE of ROBOT
INSTALL
trajectory generation
kinematic solution program execution
V+ motion instructions such as MOVE instructions
V+ force instructions such as FORCE.READ instructions
DeviceNet
Processors other than processor 1 always start up with the stand-alone control
module, with no belts or kinematic modules loaded. If attempted on another
processor, the V+ operations listed above will return the error:
−666
*Must use Monitor #1*
with the exception of a V+ force instruction, which will return the following error:
−666
*Device Hardware not Present*
V+ Language User’s Guide, Rev A
337
Chapter 13
Restrictions With Multiprocessor Systems
High-Level Motion Control Tasks
As more axes are added to the system, the high-level motion control
computational load on processor 1 increases, even if the servo processing is
moved off to other processors.
For any given application, the processing power required to execute the
high-level motion control is a function of which kinematic modules are used. It
must be evaluated on a case-by-case basis.
Peripheral Drivers
There is an impact on processor 1 whenever an auxiliary processor accesses one of
these devices. However, communications between a processor board and its local
serial lines, digital I/O, and analog I/O operate on the processor on which the V+
instruction is executed.
338
V+ Language User’s Guide, Rev A
A
Example V+ Programs
Introduction . . . . . . . . . . .
Pick and Place . . . . . . . . .
Features Introduced . . . .
Program Listing . . . . . .
Detailed Description . .
Menu Program . . . . . . . . . .
Features Introduced . . . .
Program Listing . . . . . .
Teaching Locations With the MCP
Features Introduced . . . .
Program Listing . . . . . .
Defining a Tool Transformation . .
.
.
.
.
.
.
.
.
.
.
.
.
.
.
.
.
.
.
.
.
.
.
.
.
.
.
.
.
.
.
.
.
.
.
.
.
.
.
.
.
.
.
.
.
.
.
.
.
.
.
.
.
.
.
.
.
.
.
.
.
.
.
.
.
.
.
.
.
.
.
.
.
.
.
.
.
.
.
.
.
.
.
.
.
.
.
.
.
.
.
.
.
.
.
.
.
.
.
.
.
.
.
.
.
.
.
.
.
.
.
.
.
.
.
.
.
.
.
.
.
V+ Language User’s Guide, Rev A
.
.
.
.
.
.
.
.
.
.
.
.
.
.
.
.
.
.
.
.
.
.
.
.
.
.
.
.
.
.
.
.
.
.
.
.
.
.
.
.
.
.
.
.
.
.
.
.
.
.
.
.
.
.
.
.
.
.
.
.
.
.
.
.
.
.
.
.
.
.
.
.
.
.
.
.
.
.
.
.
.
.
.
.
340
341
341
341
342
345
345
346
347
347
347
349
339
Appendix A
Introduction
Introduction
This appendix contains a sampling of V+ programs. The first program is
presented twice: once in its entirety exactly as it would be displayed by V+ and a
second time with a line-by-line explanation.
The program keywords are detailed in the V+ Language Reference Guide.
NOTE: The programs in this manual are not necessarily complete.
In most cases further refinements could be added to improve the
programs. For example, the programs could be made more tolerant
of unusual events such as error conditions.
340
V+ Language User’s Guide, Rev A
Appendix A
Pick and Place
Pick and Place
This program demonstrates a simple pick-and-place application. The robot picks
up parts at one location and places them at another.
Features Introduced
•
Program initialization
•
Variable assignment
•
System parameter modification
•
FOR loop
•
Motion instructions
•
Hand control
•
Terminal output
Program Listing
.PROGRAM move.parts()
; ABSTRACT: Pick up parts at location pick and put them down at place
parts = 100
;Number of parts to be processed
height1 = 25.4
;Approach/depart height at "pick"
height2 = 50.8
;Approach/depart height at "place"
PARAMETER HAND.TIME = 0.16
;Set up for slow hand
OPEN
RIGHTY
MOVE start
;Make sure the hand is open
;Make sure configuration is correct
;Move to safe starting location
FOR i = 1 TO parts
;Process the parts
APPRO pick, height1
MOVES pick
CLOSEI
DEPARTS height1
;Go toward the pick-up
;Move to the part
;Close the hand
;Back away
APPRO place, height2
MOVES place
OPENI
DEPARTS height2
;Go toward the put-down
;Move to the destination
;Release the part
;Back away
V+ Language User’s Guide, Rev A
341
Appendix A
Pick and Place
END
;Loop for next part
TYPE "All done. ", /I0, parts, " parts processed"
RETURN
.END
;End of the program
Detailed Description
This program has five sections: formal introduction, initialization of variables,
initialization of the robot location, performance of the desired motion sequence,
and notice to the operator of completion of the task. Each of these sections is
described in detail below.
The first line of every program must have the form of the line below. It is a good
practice to follow that line with a brief description of the purpose of the program.
If there are any special requirements for use of the program, they should be
included as well.
.PROGRAM move.parts()
This line identifies the program to the V+ system. In this case we see that the
name of the program is move.parts.
; ABSTRACT: Pick up parts at location "pick" and put them down at "place"
This is a very brief description of the operation performed by the program. (Most
programs will require a more extensive summary.)
Use variables to represent constants for two reasons: Using a variable name
throughout a program makes the program easier to understand, and only one
program line needs to be modified if the value of the constant must be changed.
parts = 100
Tell the program how many parts to process during a production run. In this case,
100 parts will be processed.
height1 = 25.4
height1 controls the height of the robot path when approaching and departing
from the location where the parts are to be picked up. Here it is set to 25.4
millimeters (that is, 1 inch).
height2 = 50.8
Similar to height1, height2 sets the height of the robot path when approaching
and departing from the put-down location. It is set to 50.8 millimeters (2 inches).
PARAMETER HAND.TIME 0.16
342
V+ Language User’s Guide, Rev A
Appendix A
Pick and Place
Set the system parameter HAND.TIME so sufficient time will be allowed for
actuation of the robot hand.
This setting will cause OPENI and CLOSEI instructions to delay program
execution for 160 milliseconds while the hand is actuated.
Other important initializing functions are to make sure that the robot has the
desired hand opening, and is at a safe starting location, and that SCARA robots
have the desired configuration.
RIGHTY
Make sure the robot has a right-handed configuration (with the elbow of the robot
to the right side of the workspace). This is important if there are obstructions in
the workspace that must be avoided.
This instruction will cause the robot to assume the requested configuration
during its next motion.
OPEN
Make sure the hand is initially open. This instruction will have its effect during
the next robot motion, rather than delaying program execution as would be done
by the OPENI instruction.
MOVE start
Move to a safe starting location. Due to the preceding two instructions, the robot
will assume a right-handed configuration with the hand open.
The location start must be defined before the program is executed. That can be
done, for example, with the HERE command. The location must be chosen such
that the robot can move from it to the pick-up location for the parts without
hitting anything.
After initialization, the following program section performs the application tasks.
FOR i = 1 TO parts
Start a program loop. The following instructions (down to the END) will be
executed parts times. After the last time the loop is executed, program execution
will continue with the TYPE instruction following the END below.
APPRO pick, height1
Move the robot to a location that is height1 millimeters above the location pick.
V+ Language User’s Guide, Rev A
343
Appendix A
Pick and Place
The APPROS instruction is not used here because its straight-line motion would
be slower than the motion commanded by APPRO.
MOVES pick
Move the robot to the pick-up location pick, which must have been defined
previously.
The straight-line motion commanded by MOVES assures that the hand does not
hit the part during the motion. A MOVE instruction could be used here if there is
sufficient clearance between the hand and the part to allow for a nonstraight-line
path.
CLOSEI
Close the hand. To assure that the part is grasped before the robot moves away,
the I form of the CLOSE instruction is used—program execution will be
suspended while the hand is closing.
DEPARTS height1
Now that the robot is grasping the part, we can back away from the part holder.
This instruction will move the hand back height1 millimeters, following a
straight-line path to make sure the part does not hit its holder.
APPRO place, height2
MOVES place
OPENI
DEPARTS height2
Similar to the above motion sequence, these instructions cause the part to be
moved to the put-down location and released.
END
This marks the end of the FOR loop. When this instruction is executed, control is
transferred back to the FOR instruction for the next cycle through the loop (unless
the loop count specified by parts is exceeded).
344
V+ Language User’s Guide, Rev A
Appendix A
Menu Program
The final section of the program simply displays a message on the system
terminal and terminates execution.
TYPE "All done. ", /I0, parts, " pieces processed."
The above instruction will output the message:
All done. 100 pieces processed.
(The /I0 format specification in the instruction causes the value of parts to be
output as an integer value without a decimal point.)
RETURN
Although not absolutely necessary for proper execution of the program, it is good
programming practice to include a RETURN (or STOP) instruction at the end of
every program.
.END
This line is automatically included by the V+ editor to mark the program’s end.
Menu Program
This program displays a menu of operations from which an operator can choose.
Features Introduced
•
Subroutines
•
Local variables
•
Terminal interaction with operator
•
String variables
•
WHILE and CASE structures
V+ Language User’s Guide, Rev A
345
Appendix A
Menu Program
Program Listing
.PROGRAM sub.menu()
; ABSTRACT: This program provides the operator with a menu of
;
operation selections on the system terminal. After accepting
;
input from the keyboard, the program executes the desired
;
operation. In this case, the menu items include execution of
;
the pick and place program, teaching locations for the pick
;
and place program, and returning to a main menu.
;
; SIDE EFFECTS: The pick and place program may be executed, and
;
locations may be defined.
AUTO choice, quit, $answer
quit = FALSE
DO
TYPE
TYPE
TYPE
TYPE
/C2,
/C1,
/C1,
/C1,
"PICK AND PLACE OPERATIONAL MENU"
" 1 => Initiate pick and place"
" 2 => Teach locations"
" 3 => Return to previous menu", /C1
PROMPT "Enter selection and press RETURN: ", $answer
choice = VAL($answer) ;Convert string to number
CASE choice OF
;Process menu request...
VALUE 1:
;...selection 1
TYPE /C2, "Initiating Operation..."
CALL move.parts()
VALUE 2:
;...selection 2
CALL teach()
VALUE 3:
;...selection 3
quit = TRUE
ANY
;...any other selection
TYPE /B, /C1, "** Invalid input **"
END
;End of CASE structure
UNTIL quit
;End of DO structure
.END
346
V+ Language User’s Guide, Rev A
Appendix A
Teaching Locations With the MCP
Teaching Locations With the MCP
This program demonstrates how an operator can teach locations with the manual
control pendant, thus allowing the controller to operate without a system
terminal. The two-line liquid crystal display (LCD) of the pendant is used to
prompt the operator for the locations to be taught. The operator can then
manually position the robot at a desired location and press a key on the pendant.
The program automatically records the location for later use (in this case, for the
pick-and-place program).
Features Introduced
•
Subroutine parameters
•
Attachments and detachments
•
Manual control pendant interaction
•
WAIT instruction
•
Location definition within a program
Program Listing
.PROGRAM teach(pick, place, start)
; ABSTRACT: This program is used for teaching the locations
;"pick", "place", and "start" for the "move.parts" program.
;
; INPUT PARAM: None
;
; OUTPUT PARAM: pick, place, and start
;
; SIDE EFFECTS: Robot is detached while this routine is active
AUTO $clear.display
$clear.display = $CHR(12)+$CHR(7)
ATTACH (1) ;Connect to the pendant
DETACH (0) ;Release control of the robot
; Output prompt to the display on the manual control pendant
WRITE (1) $clear.display, "Move robot to 'START' & press RECORD"
WRITE (1) /X17, "RECORD", $CHR(5), /S
WRITE (1) $CHR(30), $CHR(3), /S ;Blink LED on control pendant
WAIT PENDANT(3)
;Wait for key to be pressed
V+ Language User’s Guide, Rev A
347
Appendix A
Teaching Locations With the MCP
HERE start
WAIT not pendant(3)
; Prompt for second location
;Record the location "start"
WRITE (1) $clear.display, "Move robot to 'PICK' & press RECORD"
WRITE (1) /X17, "RECORD", $CHR(5), /S
WAIT PENDANT(3)
;Wait for key to be pressed
HERE pick
WAIT not pendant(3)
;Record the location "pick"
; Prompt for third location
WRITE (1) $clear.display, "Move robot to 'PLACE' & press RECORD"
WRITE (1) /X17, "RECORD", $CHR(5), /S
WAIT PENDANT(3)
;Wait for key to be pressed
HERE place
;Record the location "place"
WAIT not pendant(3)
ATTACH (0)
DETACH (1)
RETURN
.END
348
;Reconnect to the robot
;Release the pendant
;Return to calling program
V+ Language User’s Guide, Rev A
Appendix A
Defining a Tool Transformation
Defining a Tool Transformation
The following program establishes a reference point from which tool
transformations can be taught.
.PROGRAM def.tool()
; ABSTRACT: Invoke a new tool transformation based on a predefined reference
; location and, optionally, teach the reference location
AUTO $answer
TYPE /C1, "PROGRAM TO DEFINE TOOL TRANSFORMATION", /C1
ATTACH (1)
;Attach the pendant
PROMPT "Revising a previously defined tool (Y/N)? ", $answer
IF $answer <> "Y" THEN
TYPE /C1, "Move the tool tip to the selected reference ", /S
TYPE "location.", /C1, "Set 'ref.tool' equal to the ", /S
TYPE "transformation for this location.", /C2, "Press ", /S
TYPE "the REC/DONE button on the manual control pendant when ", /S
TYPE "ready to proceed. ", /S
DETACH (0)
;Release the robot to the user
WAIT PENDANT(8)
;Wait for user to press REC/DONE button
ATTACH (0)
;Regain control of the robot
;(automatically wait for COMP mode)
TOOL ref.tool
HERE ref.loc
;Record the reference location
TYPE
END
TYPE /C1, "Install the new tool. Move its tip to the ", /S
TYPE "reference location.", /C2, "Press the REC/DONE button ", /S
TYPE "on the manual control pendant when ready to proceed. ", /S
DETACH (0)
;Release the robot to the user
WAIT PENDANT(8)
;Wait for user to press REC/DONE button
ATTACH (0)
;Regain control of the robot
; Compute the new tool transformation, 'new.tool'
TOOL ref.tool
SET new.tool = ref.tool:INVERSE(HERE):ref.loc
V+ Language User’s Guide, Rev A
349
Appendix A
TOOL new.tool
Defining a Tool Transformation
;Apply the new tool transformation
TYPE /C2, "All done. The tool transformation has been set ", /S
TYPE "equal to 'new.tool' .", /C1
DETACH (1)
RETURN
.END
;Detach the pendant
;Return to calling program (or STOP)
Because of computational errors introduced when compound transformations are
used, the accuracy of the program presented above can be improved by using a
simple tool with no oblique rotations as the reference tool. In fact, you can get the
most accurate results if you can use the mounting flange of the robot without a
tool as the initial pointer. In this case, the reference tool would be the default null
tool. The program above can be simplified by deleting the references to ref.tool in
lines 17, 28, 45, and 46.
The first time the program is executed, respond to the prompt with N. The
reference tool is defined.
After the program executes once, the tool transformation can be updated by
executing the program again. This time, respond to the prompt with Y. The
program directs you to position the new tool at the same reference location as
before. As long as the values of ref.tool and ref.loc have not been altered, a new
tool transformation is automatically computed and asserted. This is a convenient
method for occasionally altering the tool transformation to account for tool wear.
350
V+ Language User’s Guide, Rev A
B
External Encoder Device
Introduction . . . . .
Parameters . . . . .
Device Setup . . . .
Reading Device Data
.
.
.
.
.
.
.
.
.
.
.
.
.
.
.
.
.
.
.
.
.
.
.
.
.
.
.
.
.
.
.
.
.
.
.
.
.
.
.
.
.
.
.
.
.
.
.
.
.
.
.
.
.
.
.
.
.
.
.
.
.
.
.
.
V+ Language User’s Guide, Rev A
.
.
.
.
.
.
.
.
.
.
.
.
.
.
.
.
.
.
.
.
.
.
.
.
.
.
.
.
352
353
354
356
351
Appendix B
Introduction
Introduction
The external-encoder inputs on the system controller are normally used for
conveyor belt tracking with a robot. However, these inputs also can be used for
other sensing applications. In such applications, the DEVICE real-valued
function and SETDEVICE program instruction allow the external encoders to be
accessed in a more flexible manner than the belt-oriented instructions and
functions.
This appendix describes the use of the DEVICE real-valued function and the
SETDEVICE program instruction to access the external encoder device.
In general, SETDEVICE allows a scale factor, offset, and limits to be specified for a
specified external encoder unit. The DEVICE real-valued function returns error
status, position, or velocity information for the specified encoder.
Accessing the external encoders via DEVICE and SETDEVICE is independent of
any belt-tracking commands or instructions. Setting belt parameters with
SETBELT and setting encoder parameters with SETDEVICE have no effect on
each other. The only exceptions are the SETDEVICE initialize command and reset
command, which reset all errors for the specified external encoder—including
any belt-related errors.
NOTE: See the V+ Language Reference Guide for complete
information on the DEVICE real-valued function and the
SETDEVICE program instruction.
352
V+ Language User’s Guide, Rev A
Appendix B
Parameters
Parameters
The external encoder device type is 0. This means that the type parameter in all
DEVICE or SETDEVICE instructions that reference the external encoders must
have a value of 0.
The standard Adept controller allows two external encoder units. These units are
numbered 0 and 1. All DEVICE functions and SETDEVICE instructions that
reference the external encoders must specify one of these unit numbers for the
unit parameter.
V+ Language User’s Guide, Rev A
353
Appendix B
Device Setup
Device Setup
The SETDEVICE program instruction allows the external encoders to be
initialized and various parameters to be set up. The action taken by the
SETDEVICE instruction depends upon the value of the command parameter.
The syntax of the SETDEVICE instruction is
SETDEVICE (0, unit, error, command) p1, p2
Table B-1 describes the valid commands.
Table B-1. Command Parameter Values
Command
Description
0
Initialize Device
This command sets all scale factors, offsets, and limits to their default
values, as follows: offset = 0; scale factor = 1; no limit checking. This
command also resets any errors for the specified device.
This command should be issued before any other commands for a
particular unit and before using the DEVICE real-valued function for
the unit.
1
Reset Device
This command clears any errors associated with this encoder unit. It
does not affect the scale factor, offset, or limits.
8
Set Scale Factor
This command sets the position and velocity scale factor for this
encoder unit to the value of parameter p1. The units are millimeters per
encoder count. The scale factor must be set before setting the offset or
limits. If the scale factor is changed, the offset and limit values will need
to be updated.
354
V+ Language User’s Guide, Rev A
Appendix B
Device Setup
Table B-1. Command Parameter Values (Continued)
Command
Description
9
Set Position Offset
This command sets the position offset for this encoder unit to the value
of parameter p1. The units are millimeters. The scale factor must be set
before setting the offset.
10
Set Position Limits
This command sets the position limits for the encoder unit to the values
of optional parameters p1 and p2, which are the lower and upper limits,
respectively. If a parameter is omitted, no checking is performed for that
limit. The units are millimeters. The scale factor must be set before
setting the limits.
V+ Language User’s Guide, Rev A
355
Appendix B
Reading Device Data
Reading Device Data
The DEVICE real-valued function returns information about the encoder error
status, position, and velocity. The scale factor, offset, and limits defined by the
SETDEVICE instruction affect the velocity and position values returned.
The syntax for this function is
DEVICE(0, unit, error, select)
The value returned depends upon the value of the select parameter, as described
in Table B-2.
Table B-2. Select Parameter Values
select
Description
0
Read Hardware Status
The error status of the encoder unit is returned as a 24-bit value. The
valid error bits for this device are listed below. The corresponding error
listed is the one V+ would report if the error occurred while tracking a
belt encoder.
Bit #
Bit Mask Corresponding Error Message and Code
19
^H040000 *Lost encoder sync*(–1012)
20
^H080000 *Encoder quadrature error*(–1013)
21
^H100000 *No zero index*(–1011)
Only bit #20, for encoder quadrature error, is detected by the error
parameter of the DEVICE function to generate an error.
1
Read Position
The current position of the encoder (in millimeters) is returned, subject
to the scale factor, offset, and limits defined by the SETDEVICE
instruction. The value returned is computed by:
position = scale∗(encoder-offset)
position = MAX(position, lower_limit)
position = MIN(position, upper_limit)
356
V+ Language User’s Guide, Rev A
Appendix B
Reading Device Data
Table B-2. Select Parameter Values (Continued)
select
Description
2
Read Velocity
The current value of the encoder velocity (in millimeters per second) is
returned, subject to the scale factor defined by the SETDEVICE
instruction. The value returned is computed by:
velocity = scale*encoder_velocity
3
Read Predicted Position
The predicted position of the encoder (in millimeters) is returned. The
position is predicted 32 milliseconds in the future, based upon the
current position and velocity. The value is scaled the same as the
current position described above.
4
Read Latched Position
The position or the encoder (in millimeters) when the last external
trigger occurred is returned. The LATCHED real-valued function may
be used to determined when an external trigger has occurred and a
valid position has been recorded.
V+ Language User’s Guide, Rev A
357
Character Sets
C
Table C-1 and Table C-2 list the standard Adept character set. Values 0 to 127
(decimal) are the standard ASCII character set. Characters 1 to 31 are the common
set of special and line-drawing characters. Characters 0 and 127 to 141 are Adept
additions to the standard sets. Characters 32 to 255 (excluding 127 through 141)
are the ISO standard 8859-1 character set. Characters 145 to 159 are overstrike
characters (see the OVERSTRIKE attribute to the /TERMINAL argument for the
FSET instruction in the V+ Language Reference Guide). Values 1 to 31 are also
given special meaning in the extended Adept character set when they are output
to a graphics window with the GTYPE instruction.
NOTE: The full character set is defined for font #1 only. Fonts #2
(medium font), #3 (large font), and #4 (small font) have defined
characters for ASCII values 0 and 32 - 127. Fonts #5 and #6 have
standard English characters for ASCII values 0 and 32 - 135 while
ASCII 136 - 235 are Katakana and Hiragana characters. Font #5 is
standard size and font #6 contains large characters. The last column
in Table C-2 shows the Katakana and Hiragana characters. The
Katakana characters are at ASCII 161 - 223. The Hiragana characters
are at ASCII 136 - 159 and 224 - 255.
The character sets listed in Table C-1 and Table C-2 are for use with
VGB graphics systems only and do not apply to AdeptWindows PC.
Characters with values 0 to 31 and 127 (decimal) have the control meanings listed
in Table C-1 when output to a serial line, an ASCII terminal, or the monitor
window (with TYPE, PROMPT, or WRITE instructions). In files exported to other
text editors or transmitted across serial lines, characters 0 to 31 will generally be
interpreted as having the specified control meaning. The symbols shown for
characters 0 to 31 and 127 in Table C-2 can be displayed only with the GTYPE
instruction.
V+ Language User’s Guide, Rev A
359
Appendix C
Characters in the extended Adept character set can be output using the $CHR
function. For example:
TYPE $CHR(229)
will output the character å to the monitor window. The instruction:
GTYPE (glun) 50, 50, $CHR(229)
will output the same character to the window open on logical unit glun.
Table C-1. ASCII Control Values
Character
Decimal
Value
Hex. Value
Meaning of Control Character
NUL
000
00
Null
SOH
001
01
Start of heading
STX
002
02
Start of text
ETX
003
03
End of text
EOT
004
04
End of transmission
ENQ
005
05
Enquiry
ACK
006
06
Acknowledgment
BEL
007
07
Bell
BS
008
08
Backspace
HT
009
09
Horizontal tab
LF
010
0A
Line feed
VT
011
0B
Vertical tab
FF
012
0C
Form feed
CR
013
0D
Carriage return
SO
014
0E
Shift out
SI
015
0F
Shift in
DLE
016
10
Data link escape
360
V+ Language User’s Guide, Rev A
Appendix C
Table C-1. ASCII Control Values (Continued)
Character
Decimal
Value
Hex. Value
Meaning of Control Character
DC1
017
11
Direct control 1
DC2
018
12
Direct control 2
DC3
019
13
Direct control 3
DC4
020
14
Direct control 4
NAK
021
15
Negative acknowledge
SYN
022
16
Synchronous idle
ETB
023
17
End of transmission block
CAN
024
18
Cancel
EM
025
19
End of medium
SUB
026
1A
Substitute
ESC
027
1B
Escape
FS
028
1C
File separator
GS
029
1D
Group separator
RS
030
1E
Record separator
US
031
1F
Unit separator
DEL
127
7F
Delete
V+ Language User’s Guide, Rev A
361
Appendix C
Table C-2. Adept Character Set
Dec.
Value
Hex.
Value
Description
000
00
cell outline
001
01
diamond
002
02
checkerboard
003
03
HT (Horizontal Tab)
H
004
04
FF (Form Feed)
F
F
005
05
CR (Carriage Return)
C
006
06
LF (Line Feed)
L
007
07
degree symbol
°
008
08
plus/minus
±
009
09
NL (New line)
N
010
0A
VT (Vertical Tab)
V
T
011
0B
lower right corner
012
0C
upper right corner
013
0D
upper left corner
014
0E
lower left corner
015
0F
intersection
016
10
scan line 3
–
017
11
scan line 6
–
018
12
scan line 9
–
019
13
scan line 12
–
020
14
scan line 15
–
021
15
left T-bar
022
16
right T-bar
023
17
bottom T-bar
362
Font 1
u
T
R
F
V+ Language User’s Guide, Rev A
L
Fonts 2, 3, 4, 5, & 6
Appendix C
Table C-2. Adept Character Set (Continued)
Dec.
Value
Hex.
Value
Description
024
18
top T-bar
025
19
vertical bar
|
026
1A
less than or equal to
≤
027
1B
greater than or equal to
≥
028
1C
pi (lowercase)
¼
029
1D
not equal to
¦
030
1E
sterling
£
031
1F
centered dot
⋅
032
20
space
033
21
exclamation
!
!
034
22
double quote
"
"
035
23
pound
#
#
036
24
dollar sign
$
$
037
25
percent
%
%
038
26
ampersand
&
&
039
27
single quote
'
'
040
28
open paren
(
(
041
29
close paren
)
)
042
2A
asterisk
*
*
043
2B
plus
+
+
044
2C
comma
,
,
045
2D
hyphen
-
-
046
2E
period
.
.
047
2F
slash
/
/
Font 1
V+ Language User’s Guide, Rev A
Fonts 2, 3, 4, 5, & 6
363
Appendix C
Table C-2. Adept Character Set (Continued)
Dec.
Value
Hex.
Value
Description
048
30
zero
0
0
049
31
one
1
1
050
32
two
2
2
051
33
three
3
3
052
34
four
4
4
053
35
five
5
5
054
36
six
6
6
055
37
seven
7
7
056
38
eight
8
8
057
39
nine
9
9
058
3A
colon
:
:
059
3B
semicolon
;
;
060
3C
less than
<
<
061
3D
equal to
=
=
062
3E
greater than
>
>
063
3F
question
?
?
064
40
at
@
@
065
41
A
A
A
066
42
B
B
B
067
43
C
C
C
068
44
D
D
D
069
45
E
E
E
070
46
F
F
F
071
47
G
G
G
364
Font 1
V+ Language User’s Guide, Rev A
Fonts 2, 3, 4, 5, & 6
Appendix C
Table C-2. Adept Character Set (Continued)
Dec.
Value
Hex.
Value
Description
072
48
H
H
H
073
49
I
I
I
074
4A
J
J
J
075
4B
K
K
K
076
4C
L
L
L
077
4D
M
M
M
078
4E
N
N
N
079
4F
O
O
O
080
50
P
P
P
081
51
Q
Q
Q
082
52
R
R
R
083
53
S
S
S
084
54
T
T
T
085
55
U
U
U
086
56
V
V
V
087
57
W
W
W
088
58
X
X
X
089
59
Y
Y
Y
090
5A
Z
Z
Z
091
5B
left bracket
[
[
092
5C
back slash
\
\
093
5D
right bracket
]
]
094
5E
circumflex (caret)
^
^
095
5F
underscore
_
_
Font 1
V+ Language User’s Guide, Rev A
Fonts 2, 3, 4, 5, & 6
365
Appendix C
Table C-2. Adept Character Set (Continued)
Dec.
Value
Hex.
Value
Description
Font 1
096
60
grave accent
`
`
097
61
a
a
a
098
62
b
b
b
099
63
c
c
c
100
64
d
d
d
101
65
e
e
e
102
66
f
f
f
103
67
g
g
g
104
68
h
h
h
105
69
i
i
i
106
6A
j
j
j
107
6B
k
k
k
108
6C
l
l
l
109
6D
m
m
m
110
6E
n
n
n
111
6F
o
o
o
112
70
p
p
p
113
71
q
q
q
114
72
r
r
r
115
73
s
s
s
116
74
t
t
t
117
75
u
u
u
118
76
v
v
v
119
77
w
w
w
366
V+ Language User’s Guide, Rev A
Fonts 2, 3, 4, 5, & 6
Appendix C
Dec.
Value
Hex.
Value
Description
120
78
x
x
x
121
79
y
y
y
122
7A
z
z
z
123
7B
right brace
}
{
124
7C
bar
|
|
125
7D
left brace
{
}
126
7E
tilde
~
~
127
7F
solid
128
80
copyright
©
©
129
81
registered trademark
®
®
130
82
trademark
TM
TM
131
83
bullet
•
•
132
84
superscript +
+
+
133
85
double quote (modified)
"
"
134
86
checkmark
✔
✔
135
87
right-pointing triangle
▼
▼
Table C-2. Adept Character Set (Continued)
136
88
approximately equal
symbol
≅
≅
137
89
OE ligature
Œ
a
138
8A
oe ligature
œ
i
139
8B
beta
β
u
140
8C
Sigma
∑
e
141
8D
Omega
Ω
o
142
8E
blank
ya
143
8F
blank
yu
Font 1
V+ Language User’s Guide, Rev A
Fonts 2, 3, 4, 5, & 6
367
Appendix C
Table C-2. Adept Character Set (Continued)
Dec.
Value
Hex.
Value
Description
144
90
dotless i
i
yo
145
91
grave accent
`
Dbl next consonant
146
92
acute accent
´
-
147
93
circumflex
^
A
148
94
tilde
~
I
149
95
macron
¯
U
150
96
breve
•
E
151
97
dot accent
•
O
152
98
dieresis
¨
KA
153
99
blank
154
9A
ring
°
KU
155
9B
cedilla
¸
KE
156
9C
blank
157
9D
hungarumlaut
″
SA
158
9E
ogonek
•
SHI
159
9F
caron
ˆ
SU
160
A0
blank
161
A1
inverted exclamation
point
¡
Closed circle
162
A2
cent
¢
Start quote
163
A3
sterling
£
End quote
164
A4
currency
¤
Comma
165
A5
yen
¥
End sentence
166
A6
broken bar
¦
o
167
A7
section
§
a
368
Font 1
Fonts 2, 3, 4, 5, & 6
KI
KO
Yen symbol
V+ Language User’s Guide, Rev A
Appendix C
Table C-2. Adept Character Set (Continued)
Dec.
Value
Hex.
Value
Description
168
A8
dieresis
¨
i
169
A9
copyright
©
u
170
AA
feminine ordinal
ª
e
171
AB
left guillemot
«
o
172
AC
logical not
¬
ya
173
AD
en dash
–
yu
174
AE
registered
®
yo
175
AF
macron
¯
Dbl next consonant
176
B0
degree
°
-
177
B1
plus/minus
±
A
178
B2
superscript 2
2
I
179
B3
superscript 3
3
U
180
B4
acute accent
´
E
181
B5
mu
µ
O
182
B6
paragraph
¶
KA
183
B7
centered dot
⋅
KI
184
B8
cedilla
¸
KU
185
B9
superscript 1
1
KE
186
BA
masculine ordinal
º
KO
187
BB
right guillemot
»
SA
188
BC
1/4
1/4
SHI
189
BD
1/2
1/2
SU
190
BE
3/4
3/4
SE
191
BF
inverted question mark
¿
SO
Font 1
V+ Language User’s Guide, Rev A
Fonts 2, 3, 4, 5, & 6
369
Appendix C
Table C-2. Adept Character Set (Continued)
Dec.
Value
Hex.
Value
Description
192
C0
A grave
À
TA
193
C1
A acute
Á
CHI
194
C2
A circumflex
Â
TSU
195
C3
A tilde
Ã
TE
196
C4
A dieresis
Ä
TO
197
C5
A ring
Å
NA
198
C6
AE ligature
Æ
NI
199
C7
C cedilla
Ç
NU
200
C8
E grave
È
NE
201
C9
E acute
É
NO
202
CA
E circumflex
Ê
HA
203
CB
E dieresis
Ë
HI
204
CC
I grave
Ì
FU
205
CD
I acute
Í
HE
206
CE
I circumflex
Î
HO
207
CF
I dieresis
Ï
MA
208
D0
Eth
D
MI
209
D1
N tilde
Ñ
MU
210
D2
O grave
Ò
ME
211
D3
O acute
Ó
MO
212
D4
O circumflex
Ô
YA
213
D5
O tilde
Õ
YU
214
D6
O dieresis
Ö
YO
215
D7
multiply
×
RA
370
Font 1
V+ Language User’s Guide, Rev A
Fonts 2, 3, 4, 5, & 6
Appendix C
Table C-2. Adept Character Set (Continued)
Dec.
Value
Hex.
Value
Description
216
D8
O slash
Ø
RI
217
D9
U grave
Ù
RU
218
DA
U acute
Ú
RE
219
DB
U circumflex
Û
RO
220
DC
U dieresis
Ü
WA
221
DD
Y acute
Y
N
222
DE
Thorn
Φ
Voiced consonant
223
DF
German double s
ß
Voiced
consonant-P
224
E0
a grave
à
SE
225
E1
a acute
á
SO
226
E2
a circumflex
â
TA
227
E3
a tilde
ã
CHI
228
E4
a dieresis
ä
TSU
229
E5
a ring
å
TE
230
E6
ae ligature
æ
TO
231
E7
c cedilla
ç
NA
232
E8
e grave
è
NI
233
E9
e acute
é
NU
234
EA
e circumflex
ê
NE
235
EB
e dieresis
ë
NO
236
EC
i grave
ì
HA
237
ED
i acute
í
HI
238
EE
i circumflex
î
FU
239
EF
i dieresis
ï
HE
Font 1
V+ Language User’s Guide, Rev A
Fonts 2, 3, 4, 5, & 6
371
Appendix C
Table C-2. Adept Character Set (Continued)
Dec.
Value
Hex.
Value
Description
240
F0
eth
¹
HO
241
F1
n tilde
ñ
MA
242
F2
o grave
ò
MI
243
F3
o acute
ó
MU
244
F4
o circumflex
ô
ME
245
F5
o tilde
õ
MO
246
F6
o dieresis
ö
YA
247
F7
divide
÷
YU
248
F8
o slash
ø
YO
249
F9
u grave
ù
RA
250
FA
u acute
ú
RI
251
FB
u circumflex
û
RU
252
FC
u dieresis
ü
RE
253
FD
y acute
y
RO
254
FE
thorn
Φ
WA
255
FF
y dieresis
ÿ
N
372
Font 1
V+ Language User’s Guide, Rev A
Fonts 2, 3, 4, 5, & 6
Index
Symbols
# 211, 212
%, to indicate belt variable 311
* (multiplication) 126
∗ system prompt 49
+ (addition) 126
– (subtraction) 126
. system prompt 49
/ (division) 126
; (semicolon) 47
< (less than) 127
<= (less than or equal to) 127
<> (not equal to) 127
= (assignment operator) 126
=< (less than or equal to) 127
== (equal to) 127
=> (greater than or equal to) 127
> (greater than) 127
>= (greater than or equal to) 127
A
abbreviation
parameter name 169
switch name 172
ABORT 152
ABOVE 207
ABS 162
ACCEL 202, 203, 207
accessing memory 333
addition operator 126
Adept MV Controller User's Guide 22
Adept MV controllers
processor support 334
Adept Vision User’s Guide 22
Adept Windows Off-line Editor 41
AdeptForce
restrictions 337
VFI, assigning 328
AdeptMotion
requirements for multiple
systems 327
AdeptMotion VME User’s Guide 22
AdeptNET 242
and disk files 232
AdeptVision Reference Guide 22
AIO.IN 223, 259
AIO.INS 223, 259
AIO.OUT 223, 259
ALIGN 207
Alt key
on non-graphics-based terminals 74
ALTER 207
program instruction 294
ALTOFF 207
ALTON 207
ALWAYS 203
AMOVE 207
analog I/O 223
AND
logical operator 128
angles 29
apostrophe 115
apostrophe character 115
APPRO 207
approaching a location 196
APPROS 196, 207
arguments
numeric 29
passing to a routine 133
program
passing 54
arithmetic functions 162
arrays 120
belt variable 311
efficient allocation 120
multidimensional 120
string 120
ASC 159
ASCII
values 115
ASCII control codes 360
ACK 360
BEL 360
BS 360
CAN 361
CR 360
DC1 361
DC2 361
DC3 361
DC4 361
DEL 361
DLE 360
EM 361
ENQ 360
EOT 360
V+ Language User’s Guide, Rev A
373
Index
ESC 361
ETB 361
ETX 360
FF 360
FS 361
GS 361
HT 360
LF 360
NAK 361
NUL 360
RS 361
SI 360
SO 360
SOH 360
STX 360
SUB 361
SYN 361
US 361
VT 360
assignment operator 126
asterisk prompt 49
asynchronous processing 60
ATAN2 162
ATTACH 259
graphics window 264
with the MCP 288
attach buffer 77
SEE editor 42
attaching
disk devices 231
I/O devices 227
logical units 227
program lines 77
robot 43
with Copy 77
AUTO 122
automatic variables 122
autostart 332
AWOL (Adept Windows Offline
Editor) 41
B
BAND 128
BASE 207, 208
battery backup module 137
BCD 162
BELOW 208
BELT 174, 311, 320
belt
374
calibration 310
encoder 314
tracking 308
variable 311
window 316
belt encoder
offset 315
scaling factor 314
belt instructions
BELT 320
BELT.MODE 321
BSTATUS 321
DEFBELT 320
See also commands, control structures,
debugger commands, functions,
graphics instructions, I/O
operations, motion control
operations, and program
instructions
SETBELT 320
WINDOW 320, 321
belt tracking 308–322
BELT.MODE 171, 316, 321
BELT_CAL.V2 310
binary operators
BAND 128
BOR 128
BXOR 128
COM 128
binary value
representing 117
BITS 259
blank line 47
boolean expressions 142
boolean values 118
BOR 128
BPT
commands 108
BRAKE 138, 203, 208
branch instructions
conditional 143
BREAK 138, 203
breaking continuous path 198
breakpoint 108
BSTATUS 321
buffer
attach 77
copy 77
pasting to 77
V+ Language User’s Guide, Rev A
Index
button modes
MCP 290
buttons 273
BXOR 128
C
CALIBRATE 208
calibration
customizing 203
CALL 133, 152
by reference 56
by value 56
passing variables with 57
CALLS 134, 152
CASE 152
statement 145
case
letter case sensitivity 176
case sensitive text searches 90
character codes 218
read by GETC 219
character set
Adept’s 362
graphics 362
$CHR 159
CLEAR.EVENT 152
CLOSE 197, 208
CLOSEI 197, 208
COARSE 203, 208
tolerance setting 202
codes
ASCII control 360
DDCMP NAK reason 249
file attributes 242
MCP control 298
COM 128
command processor 330
command prompt
accessing with multiple V+
systems 332
commands
BPT 108
DEBUG 96
debugger (see debugger, commands)
restrictions 337
See also belt instructions, control
structures, debugger commands,
functions, graphic operations, I/O
operations, motion control
operations, and program
instructions
SEE editor
extended commands 89
comment
program 47
communications
DDCMP protocol 248
Kermit protocol 252
serial 243
with the MCP 288
concatenation
string 130
conditional branch instructions 143
CONFIG 208
CONFIG_C
assigning workloads 330
configuration
system, restrictions 337
constants
ASCII 115
logical 118
continuous path
breaking 198
trajectories 197–199
control
characters 30
external device 352
robot 43
control structures 132–154
CASE...VALUE OF 145
DO...UNTIL 148
FOR 147
GOTO 132
IF...GOTO 143
IF...THEN...ELSE 143
looping 147
multibranching 145
See also belt instructions, commands,
debugger commands, functions,
graphics instructions, I/O
operations, motion control
operations, and program
instructions
WHILE...DO 150
conventions
used in this manual 27
conveyor
belt
V+ Language User’s Guide, Rev A
375
Index
encoders 328
operations 308
tracking 308–322
coordinate
systems 179
tools 205
copy
buffer 77
pasting from 77
SEE editor 42
program lines 77
to attach buffer 77
copying program lines 77
COS 162
CP 174, 208
CPOFF 208
CPON 208
CR-LF
suppressing to the MCP 289
Ctrl key 27
Ctrl+B 105, 108
Ctrl+E 105
Ctrl+G 105
Ctrl+N 105, 109
Ctrl+O 30
Ctrl+P 105, 108
Ctrl+Q 30
Ctrl+S 30
Ctrl+U 31
Ctrl+W 30
Ctrl+X 106, 107
Ctrl+Z 31, 106, 107
cursor movement keys 75
Customer service assistance
phone numbers 32
CYCLE.END 152
D
data integrity 335
data types 114–119
integer 116
location 178
real 116
string 114
data typing 112
$DBLB 159
DBLB 159
DCB 162
DDCMP 248–251
376
attaching 249
communication protocol 248
detaching 249
input 249
NAK reason codes 249
operation 248
output 250
parameters 251
DEBUG 96
debugger 95–109
breakpoints 108
commands
editor mode 100, 103
execution control 104
function key 103
monitor mode 103, 104
See also belt instructions,
commands, control structures,
functions, graphics instructions,
I/O operations, motion control
operations, and program
instructions
display 98
exiting 97
invoking 95
modes 100
watchpoints 109
window 98
debugging
programs 95, 101
suppressing robot commands 174
$DECODE 159
DECOMPOSE 194, 208
DEFBELT 310, 320
DEFINED 164
defining
belt variable 311
belt-relative locations 319
DELAY 138, 203, 208
deleting program lines 77
DEPART 196
departing a location 196
DEPARTS 209
DEST 209
DETACH 259
graphics window 266
with the MCP 288
detaching
I/O devices 227
V+ Language User’s Guide, Rev A
Index
logical units 227
detecting user input from the MCP 290
DEVICE 259
with external encoder 352
device
control 352
disk 231
DEVICES 260
digital I/O 220, 336
system interrupt 221
digital input 220
digital output 221
directories
disk 232
files, opening 234
root 232
disabling event monitoring 269
disk
devices, attaching 231
directories 232
directory format 241
file name 233
disk driver task 70
disk files
accessing with AdeptNET 232
and NFS 232
opening 234
disk I/O 225–242
DISTANCE 209
distances 29
division operator 126
DO 152
DO...UNTIL 148
dot prompt 49
double precision variables
global 121
DRIVE 196, 209
drivers
peripheral 338
DRY 209
DRY.RUN system switch 174
DURATION 202, 203, 209
DX 209
DY 209
DZ 209
E
editing
closing a line 83
line expansion 84
long line 83
syntax check 84
editor
commands 86
mode, changing 37
using others 48
emergency
backup 137
reaction routines 136
$ENCODE 159
encoder, external 352
end-effector instructions 197
enter key 27
equal operator
equal to 127
greater than or equal to 127
less than or equal to 127
not equal 127
ERROR 164
error
Kermit communication 257
processing 61
reacting to system 137
recovery routines 136
syntax 47
trapping 61
Esc key
using instead of Alt key 74
Ethernet 242
evaluation
order of operator 130
EXECUTE 152
executing programs 49, 107
execution pointer 99
exiting the SEE editor 42
extended commands, SEE editor
external
device control 352
encoder 352
89
F
FALSE 163
FCLOSE 260
graphics window
FCMND 260
FDELETE 265
graphics window
FEMPTY 260
V+ Language User’s Guide, Rev A
265
265
377
Index
files
attribute codes 242
naming 233
opening disk file 234
random access 238
sequential access 238
with fixed length records 238
with variable-length records 237
FINE 202, 203, 209
fixed length records 238
FLIP 209
$FLTB 159
FLTB 159
FOPEN 265
FOPENA 260
FOPEND 234, 260
FOPENR 234, 260
FOPENW 234, 260
FOR 147, 152
FORCE 209
force sensors 328
FORCE system switch 175
format
disk directory 241
of program lines 46
of programs 46, 48
FRACT 162
FRAME 209
FREE 164
FSEEK 260
FSET 269
FTP 242
function keys
debugger commands 103
terminal 27
functions 158–164
as arguments to a function 158
location 161
logical 163
numeric value 162
See also numeric value functions,
real-valued functions, string
functions, and system control
functions
string 159
system control 164
used in expressions 158
378
G
GARC 284
GCHAIN 284
GCLEAR 284
GCLIP 284
GCOLOR 284
GCOPY 284
general-purpose control program 45
GET.EVENT 152, 164
GETC 228, 260
with IOSTAT 226
GETEVENT 268
GFLOOD 284
GICON 284
GLINE 284
GLINES 284
global variables 121
double-precision 121
GLOGICAL 284
GOTO 132, 153
GPANEL 273
GPOINT 284
graphic instructions
GSLIDE 284
graphics
character set 362
instructions 284
graphics instructions
GARC 284
GCHAIN 284
GCLEAR 284
GCLIP 284
GCOLOR 284
GCOPY 284
GFLOOD 284
GICON 284
GLINE 284
GLINES 284
GLOGICAL 284
GPOINT 284
GRECTANGLE 284
GSCAN 284
GTEXTURE 285
GTRANS 285
GTYPE 285
See also belt instructions, commands,
control structures, debugger
commands, functions, I/O
operations, motion control
V+ Language User’s Guide, Rev A
Index
operations, and program
instructions
greater than operator 127
GRECTANGLE 284
gripper instructions 197
GSCAN 284
GSLIDE 275, 284
GTEXTURE 285
GTYPE 285
H
HALT 138, 153
HAND 209
HAND.TIME 171, 209
HERE 187, 210
hexadecimal value
representing 117
HIGH POWER 25
HOUR 210
I
I/O
buffering 239
errors
checking for 279
status 225
opening multiple files 239
overlapping 239
I/O operations 259
$DEFAULT 259
$IOGETS 260
AIO.IN 259
AIO.INS 259
AIO.OUT 259
ATTACH 259
BITS 259
DEF.DIO 259
DETACH 259
DEVICE 259
DEVICES 260
error status 225
FCLOSE 260
FCMND 260
FEMPTY 260
FOPENA 260
FOPEND 260
FOPENR 260
FOPENW 260
FSEEK 260
GETC 260
IOGET_ 260
IOPUT_ 260
IOSTAT 260
IOTAS 260
KERMIT.RETRY 260
KERMIT.TIMEOUT 260
KEYMODE 261
PENDANT 261
PROMPT 261
READ 261
RESET 261
See also belt instructions, commands,
control structures, debugger
commands, functions, graphics
instructions, motion control
operations, and program
instructions
SETDEVICE 261
SIG 261
SIG.INS 261
SIGNAL 261
TYPE 261
WRITE 261
$ID 164
ID 164
IDENTICAL 210
IF 153
IF...GOTO 143
IF...THEN...ELSE 143
IGNORE
with REACT 136
importing program files 48
initialization of variables 125
input
analog 223
digital 220
manual control pendant 223
serial 225
terminal 217
input processing
terminal interrupt characters 218
input signals 336
input wait modes 229
INRANGE 210
insert
SEE editor mode 36
installing
V+ Language User’s Guide, Rev A
379
Index
multiple processor boards 329
instructions
format 46
restrictions 337
INT 162
INT.EVENT 153
$INTB 159
INTB 164
integers
data type 116
range 116
INTERACTIVE system switch 175
internal program list 81
interrupting a program 135
interrupts 221
intersystem communications 333
INVERSE 210
IOGET_ 260, 333
IOPUT_ 260, 333
IOSTAT 260, 279
reporting communication errors 226
return values 226
with GETC 226
IOTAS 260, 333, 334
IPS 210
J
joint
moving an individual 196
number 29
joint-interpolated motion 195
K
keeping track of memory usage 334
KERMIT 260
Kermit 252–258
attaching 255
binary files 256
communication protocol 252
errors 257
file access 255, 256
commands 256
input 256
operation 255, 256
output 256
parameters 258
starting session 253
task 70
380
KERMIT.RETRY parameter 171
KERMIT.TIMEOUT parameter 171, 260
keyboard 27
input 217
mode, MCP 291
KEYMODE 261
keys
control (Ctrl) 27
enter 27
function 27, 103
return 27
shift 27
L
label
program 132
program step 46
LAST 164
LATCH 210
LATCHED 210
LEFTY 203, 210
LEN 159
less than operator 127
$LNGB 159
LNGB 159
LOADBELT.V2 310
LOCAL 121
local variables 121
location
relative to belt 319
location data
transformations 180
type
precision point 119
transformation 119
location functions 161
location values
modifying 188
location variables 179
locations 178–190
LOCK 60
logical constants 118
logical expressions 118, 142
logical functions 163
FALSE 163
OFF 163
ON 163
TRUE 163
logical operators 128
V+ Language User’s Guide, Rev A
Index
AND 128
NOT 128
OR 128
XOR 128
logical units
attaching/detaching 227
number 225
for MCP 288
long line, editing 83
looping structures 147
lowercase letters 28, 47
LUN 225
M
macros
defining 91
editing 91
major cycle 62
MAX 162
MCP
button map 294
button modes
keyboard 291
level 292
toggle 291
control codes 296, 298
for LCDs 296
determining state of 295
LCDs
control codes 296
level mode 292
logical unit number 288
potentiometer
programming 293
slow button
programming 293
MCP.MESSAGES system switch 175
MCS 153
MCS.MESSAGES system switch 175
memory
accessing with multiple V+
systems 333
required by a program 51
shared 334
usage 334
menus
creating 270
messages
control of 175
MESSAGES system switch 175
$MID 159
MIN 162
MMPS 210
MOD 126
modes
program debugger 100
monitor task 70
MONITORS system switch 331
motion
procedural 199
relative to belt 318
motion control
restrictions 337
tasks 338
motion control operations 178–213
#PDEST 211
#PLATCH 211
#PPOINT 212
ABOVE 207
ACCEL 207
ALIGN 207
ALTER 207
ALTOFF 207
ALTON 207
AMOVE 207
APPRO 207
APPROS 207
BASE 207
BELOW 208
BRAKE 208
BREAK 208
CALIBRATE 208
CLOSE 208
CLOSEI 208
COARSE 208
CONFIG 208
CP 208
CPOFF 208
CPON 208
DECOMPOSE 208
DELAY 208
DEPART 208
DEPARTS 209
DEST 209
DISTANCE 209
DRIVE 209
DRY.RUN 209
DURATION 209
V+ Language User’s Guide, Rev A
381
Index
DX 209
DY 209
DZ 209
FINE 209
FLIP 209
FORCE 209
FRAME 209
HAND 209
HAND.TIME 209
HERE 210
HOUR.METER 210
IDENTICAL 210
INRANGE 210
INVERSE 210
IPS 210
LATCH 210
LATCHED 210
LEFTY 210
MMPS 210
MOVE 210
MOVEF 210
MOVES 210
MOVESF 211
MOVEST 211
MOVET 211
MULTIPLE 211
NOFLIP 211
NONULL 211
NORMAL 211
NOT.CALIBRATED 211
NULL 211
OPEN 211
OPENI 211
PAYLOAD 211
POWER 212
REACTI 212
READY 212
RELAX 212
RELAXI 212
RIGHTY 212
ROBOT 212
RX 212
RY 212
RZ 212
SCALE 212
See also belt instructions, commands,
control structures, debugger
commands, functions, graphics
instructions, I/O operations, and
382
program instructions
SELECT 212
SELECT RF 212
SET 213
SET.SPEED 213
SHIFT 213
SINGLE 213
SOLVE.ANGLES 213
SOLVE.FLAGS 213
SOLVE.TRANS 213
SPEED 213
STATE 213
TOOL 213
TRANS 213
motion instructions
description of coordinate space 179
mouse
events, monitoring 267
using in SEE editor 75
MOVE 196, 210
MOVEF 210
MOVES 210
straight line move 195
with conveyor tracking 310
MOVESF 211
MOVEST 211
MOVET 211
moving an individual joint 196
moving-line feature 308
MULITPLE 203
MULTIPLE 211
multiple processors
customizing workloads 329
requirements for AdeptMotion 327
using 326
multiple V+ systems 331
multiplication operator 126
N
names
belt variable 311
disk file 233
parameter 169
program 35
switch 172
variable 112
network File System (NFS) 232
network/DDCMP task 70
NFS 242
V+ Language User’s Guide, Rev A
Index
and disk files 232
NOFLIP 211
NONULL tolerance setting 202, 211
NORMAL 211
normal speed 201
NOT 211
logical operator 128
not equal operator 127
NOT.CALIBRATED 171
notation
used in this manual 27
NULL 211
NULL tolerance setting 202, 203
null tool 350
numeric
argument 29
numeric expressions 117
numeric functions 118
numeric operator 126
numeric representation 117
numeric value functions 162
ABS 162
ATAN2 162
BCD 162
COS 162
DCB 162
FRACT 162
INT 162
INTB 164
MAX 162
MIN 162
OUTSIDE 162
PI 162
RANDOM 162
See also functions, real-valued
functions, string functions, and
system control functions
SIGN 162
SIN 162
SQR 162
SQRT 162
numeric values
representing 117
ON 163
OPEN 197, 211
OPENI 197, 211
operations
system I/O 259
operators 126, 128
- (subtraction) 126
* (multiplication) 126
+ (addition) 126
/ (division) 126
< (less than) 127
<= (less than or equal to) 127
<> (not equal to) 127
== (equal to) 127
> (greater than) 127
>= (greater than or equal to) 127
AND 128
assignment 126
BAND 128
bitwise 128
BOR 129
BXOR 129
COM 129
logical 128
mathematical 126
MOD 126
NOT 128
OR 128
order of evaluation 130
relational 127
XOR 128
OR
logical operator 128
Order of evaluation
operators 130
output
analog 223
digital 220
manual control pendant 223
serial 225
signals 336
terminal 217
wait modes 230
OUTSIDE 162
O
octal value
representing 117
OFF 163
Off-line programming 41
P
π (pi)
162
PACK 159
PARAMETER 164
V+ Language User’s Guide, Rev A
383
Index
parameters 168, 169
BELT.MODE 171, 316, 321
command values 354
HAND.TIME 171
KERMIT.RETRY 171
KERMIT.TIMEOUT 171, 260
NOT.CALIBRATED 171
operations 169
SCREEN.TIMEOUT 171
select values 356
TERMINAL 171
type 333
Paste 77
pasting program lines 77
PAUSE 138, 153
PAYLOAD 211
PENDANT 261
pendant (see MCP)
pendant I/O 223
pendant task 70
PENDANT() 291
used to determine MCP state 295
with MCP speed potentiometer 293
with toggle buttons 291
performance
robot 201
peripheral drivers
restrictions with multiple
processors 338
Pi (mathematical constant) 162
pitch 183
POINT 187
POS 159
POWER 212
power failures
and REACTE 137
POWER system switch 175
precision points 187
location data type 119
PRIORITY 164
priority
program
task 63
task 62
procedural motion 199
PROCEED
with PAUSE 138
processing
asynchronous 60
384
servo 330, 331
processor boards
addressing 329
locations 329
sharing data 336
slot ordering 329
processor number 334
program
blank line 47
comment 47
creating 35
examples 199, 340
executing 49
execution 49
format 46, 48
general purpose 45
interrupts 135
interupt 153
label 46, 132
line format 46
list, internal 81
memory requirements 51
naming requirements 35
pausing 138
priority 63
setting 153
recursive 59
reentrant 58
saving to a disk file 42
spacing 47
stacks 51
requirements 51
size calculation 52
step
format 46
label 46
number 46
tasks 49, 62
scheduling 62
program debugger 95–109
program editor (see SEE editor)
program execution
stopping 138
program files 58
program instructions
ABORT 152
APPROS 196
BRAKE 138
BREAK 138
V+ Language User’s Guide, Rev A
Index
CALL 133, 152
CALLS 134, 152
CASE 152
CASE...VALUE OF 145
CLEAR.EVENT 152
CLOSE 197
CLOSEI 197
CYCLE.END 152
DECOMPOSE 194
DEFBELT 310, 320
DELAY 138
DEPART 196
DO 152
DO...UNTIL 148
DRIVE 196
EXECUTE 152
EXIT 152
FCLOSE 265
FDELETE 265
FOPEN 265
FOR 147, 152
FSET 269
GET.EVENT 152
GETEVENT 268
GOTO 132, 153
HALT 138, 153
HERE 187
IF...GOTO 143, 153
IF...THEN 153
IF...THEN...ELSE 143
INT.EVENT 153
LOCAL 121
LOCK 60, 153
MCS 153
MOVE 196
MOVES 195
NEXT 153
OPEN 197
OPENI 197
PAUSE 138, 153
POINT 187
PRIORITY 153
PROMPT 217
REACT 136, 153
REACTE 153
REACTI 136, 153
RELAX 197
RELAXI 197
RELEASE 153
RETURN 153
RETURNE 154
RUNSIG 154
See also belt instructions, commands,
control structures, debugger
commands, functions, graphics
instructions, I/O operations, and
motion control operations
SET 188
SET.EVENT 154
SIGNAL 221
STOP 138, 154
TYPE 217
WAIT 135, 154, 220
WAIT.EVENT 135, 154
WHERE 194
WHILE 154
WHILE...DO 150
programming, off-line 41
programs
debugging 101
keeping subroutines with 58
robot control 43
PROMPT 217, 261
prompt, system 49
R
RANDOM 162
random access files 238
REACT 136, 153
REACTE 137, 153
REACTI 136, 212
reaction routines 60
READ 228, 261
with the MCP 290
Reading
from input devices 228
READY 212
real data type 116
real-valued functions
BELT 320
BSTATUS 321
GETC 228
IOSTAT 226
IOTAS 333
See also functions, numeric value
functions, string functions, and
system control functions
records
V+ Language User’s Guide, Rev A
385
Index
fixed length 238
variable length 237
recursive programs 59
and variables 122
variable use 121
redraw (S+F6) key 101
reentrant programs 58
relative transformations 188
RELAX 197, 212
RELAXI 197, 212
RELEASE 153
releasing a task 64
remote disk access 232
replace
SEE editor mode 36
replacing text
case sensitive 90
SEE editor 78
RESET 261
restrictions
high-level motion control tasks
multiple processors 337
peripheral drivers 338
RETURN 153
return key 27
RETURNE 154
RIGHTY 203, 212
ROBOT 212
robot
attaching 43
control
restrictions 337
control program 43
motions 195
speed 201
ROBOT system switch 176
roll 185
root directory 232
round-robin group
task scheduling 64
RUN/HOLD button 53
RUNSIG 154
RX 212
RY 212
RZ 212
S
safety
overview 24
386
338
saving programs 42
scalar
variable 29
SCALE 212
scheduling of execution tasks 63
scope of variables 123
SCREEN.TIMEOUT 171
scroll bars and the SEE editor 76
searching
for text in SEE editor 78
text, case sensitive 90
SEE editor 35–42, 74–109
attach buffer 77
command mode 85
commands 86
copy buffer 77
copying lines 77
exiting 42
extended commands 89
macros 91
modes 36
command 36
insert 36
replace 36
moving the cursor 75
pasting from copy buffer 77
scroll bars 76
selecting program 79
switching program 79
using the mouse in 75
SELECT 164, 212
sequential access files 238
serial I/O 225–230, 243–258
task 70
serial line 243
attaching 244, 249
configuration 243
DDCMP (see DDCMP)
detaching 244, 249
input 244, 249
Kermit (see Kermit)
output 245, 250
servo
allocating
MI3 and MI6 boards 327
VJI boards 327
communication task 70
processing 330
vision 331
V+ Language User’s Guide, Rev A
Index
SET 188, 213
SET.EVENT 154
with WAIT.EVENT 135
SET.SPEED system switch 176
SETBELT 320
SETDEVICE 261
with external encoder 352
settings
DURATION 202
shared data 334
shared memory
keeping track of 334
updating 336
sharing data
processor efficiency 336
SHIFT 188, 213
shift key 27
SIG 220, 261
SIG.INS 221, 261
SIGN 162
SIGNAL 221, 261
signal
number 29
SIN 162
SINGLE 213
single-step execution 107
slide bars
creating 275
soft signals 221, 336
SOLVE 213
spacing 47
program line 47
SPEC utility program 202
SPEED 203, 213
absolute speed 201
monitor command 201
normal speed 201
program instruction 201
speed
and the MCP 176
vs. performance 201
SQR 162
SQRT 162
stacks
program 51
task execution 51
STATE 213
state of MCP
determining 295
STATUS 164
step
label 46
number 46
program 46
STOP 138, 154
straight-line motion 195
string
arrays 120
data 114
operators 130
replacement 78
searching 78
string functions 115, 159
ASC 159
$CHR 159
$DBLB 159
DBLB 159
$DECODE 159
$ENCODE 159
$FLTB 159
FLTB 159
$INTB 159
$IOGETS 333
LEN 159
$LNGB 159
LNGB 159
$MID 159
PACK 159
POS 159
See also functions, numeric value
functions, real-valued functions,
and system control functions
$TRANSB 160
$TRUNCATE 160
$UNPACK 160
VAL 160
subdirectories 232
subroutine
argument lists 54
call 133
using a string expression 133
recursive 59
reentrant 58
stack 51
requirements 51
size calculation 52
subtraction operator 126
Support
V+ Language User’s Guide, Rev A
387
Index
phone numbers 32
suppressing CR-LF
to the MCP 289
SWITCH 164
switch 168, 172
switches
BELT 174
CP 174
DRY.RUN 174
FORCE 175
INTERACTIVE 175
MCP.MESSAGES 175
MCS.MESSAGES 175
MESSAGES 175
MONITORS 175
operations 173
POWER 175
ROBOT 176
SET.SPEED 176
TRACE 176
UPPER 176
syntax error 47
system
parameter 168, 169
prompt 49
switch 168, 172
system configuration
restrictions 337
system control functions 164
$ERROR 164
$ID 164
$TIME 165
DEFINED 164
ERROR 164
FREE 164
GET.EVENT 164
ID 164
LAST 164
PARAMETER 164
PRIORITY 164
See also functions, numeric value
functions, real-valued functions,
and string functions
SELECT 164
STATUS 164
SWITCH 164
TAS 164
TASK 164
TIME 164
388
TIMER 165
TPS 165
system interrupt
digital I/O 221
system safeguards
computer-controlled devices 25
system switch
MONITORS 331
system tasks 70
priorities 71
T
TAS 164
TASK 164
task
availability 49
number 49
priority 62, 63
program execution 49, 62
releasing 64
running on multiple V+ systems 333
scheduling 63
stack 51
requirements 51
size calculation 52
system 70, 71
time slices 62
timing 62
waiting 64
task scheduling 62, 63–66
overriding 64
round-robin groups 64
TCP/IP 232, 242
TERMINAL 171
terminal 27
control 30
CRT 172
function keys 27
suppressing message to 175
terminal I/O 217, 220
terminal input 217
terminal/graphics tasks 70
$TIME 165
TIME 164
time slice (cycle) 69
TIMER 165
timing considerations (motions) 200
toggle mode
MCP 291
V+ Language User’s Guide, Rev A
Index
TOOL 213
tool 204
coordinate system 181
coordinates 205
null 350
point 205
transformation 205
transformations 204
TPS 165
TRACE system switch 176
trajectory
continuous path 197
generator task 70
TRANS 188, 213
$TRANSB 160
transformation component
pitch 183
roll 185
yaw 181, 182
transformations 180–190
belt-relative 319
location data type 119
nominal belt 312
relative 188
TRUE 163
$TRUNCATE 160
TYPE 217, 261
type parameter 333
typing cursor
with the debugger 99
U
unconditional branch instructions 132
undo (F6) key 101
unit number, logical 225
$UNPACK 160
UPPER system switch 176
uppercase letters 28, 47
user input
MCP, detecting 290
user task configuration, default 72
V
V+ Extensions license
running tasks 333
+
V keyword arguments 28
V+ Language Reference Guide 22
V+ Operating System Reference
Guide 22
+
V Operating System User’s Guide 22
V+ system tasks 70
VAL 160
value
ASCII 115
variable allocation 112
variable classes 121–125
variable declarations 48
variable-length records 237
variables
and recursive programs 122
automatic 122
belt 311
global 121
global, double-precision 121
initialization 125
local 121
logical 118
naming requirements 112
numeric 116
passing by reference 56
passing by value 56
scalar 29
scoping 123
string 114
VFI board 328
vision
analysis task 70
communication task 70
processing 331
VMEbus 335
W
WAIT 64, 135, 154, 220
wait modes
input 229
output 230
WATCH 109
watchpoint 109
WHERE 194
WHILE 154
WHILE...DO 150
WINDOW 320, 321
windows
and multiple tasks 280
creating 264
V+ Language User’s Guide, Rev A
389
Index
deselecting 280
hiding 280
selecting 280
workload assignment
CONFIG_C 330
world coordinate system 179
WRITE 261
with the MCP 289
writing
to I/O devices 229
X
XOR
128
Y
yaw
390
181
V+ Language User’s Guide, Rev A
Adept User’s Manual
Comment Form
We have provided this form to allow you to make comments about this manual, to point out any mistakes you may find, or to offer suggestions about information you want to see added to the manual. We
review and revise user’s manuals on a regular basis, and any comments or feedback you send us will be
given serious consideration. Thank you for your input.
NAME
DATE_____________________
COMPANY __________________________________________________________________________
ADDRESS ___________________________________________________________________________
PHONE _____________________________________________________________________________
MANUAL TITLE: V+ Language User’s Guide
PART NUMBER: 00963-01300
PUBLICATION DATE: June 1998
COMMENTS ________________________________________________________________________
____________________________________________________________________________________
____________________________________________________________________________________
____________________________________________________________________________________
____________________________________________________________________________________
____________________________________________________________________________________
____________________________________________________________________________________
____________________________________________________________________________________
____________________________________________________________________________________
____________________________________________________________________________________
____________________________________________________________________________________
MAIL TO: Adept Technology, Inc.
Technical Publications Dept.
11133 Kenwood Rd.
Cincinnati, OH 45242
00963-01300, Rev. A