1
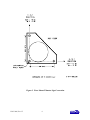
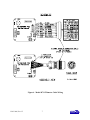
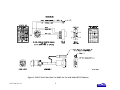
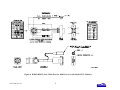
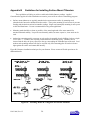
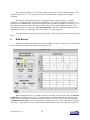
Using HyperTerminal (Windows 95 and later)
1. Apply power and attach the tiltmeter to a PC according to the wire color and pin assignment code
in Appendix A. Or, use the test cable (Figure 5 or 6) and power transformer supplied with your
tiltmeter.
2. Open HyperTerminal, selecting the proper COM port and baud rate (the default baud rate for your
tiltmeter is 9600).
3. Type the command “*9900XYC0” without typing the quotation marks (note that the tiltmeter is
case sensitive).
4. If properly attached, the tiltmeter will now start outputting data through the serial port at a rate of
10 readings per second, and the data will be displayed in HyperTerminal.
5. Tilt the unit in the +X and then the +Y direction (Figure 3). Next tilt it in the –X and –Y
directions. Verify that the tilt values move through the full angular range (Section 3) and that the
sign (polarity) of the output changes on opposite sides of null.
6. Type the command “*9900XYC-OFF” without typing the quotation marks to stop the output.
7. Your Model D711 tiltmeter is now ready for installation.
Using ZAGI Graphical User Interface Software
1. Apply power and attach the tiltmeter to a PC according to the wire color and pin assignments in
Appendix A. Or, use the test cable (Figure 5 or 6) and power transformer supplied with your
tiltmeter.
2. Open ZAGI (see Appendix D for details).
3. Open the “Communications Setup” window, verify the settings, and then close the window.
4. Open the “Data Access” window and wait for the green “Connection Established” light to come on.
5. Click on “Output” in the command line at the top of the screen. Then select “Output Data Rate”
and “10 per sec” in the drop-down menus.
6. Click on the “Start” button. The tiltmeter will now start outputting data through the serial port at a
rate of 10 readings per second. The data will be displayed both graphically and in the text boxes in
the bottom left part of the screen.
7. Tilt the unit in the +X and then the +Y direction (Figure 3). Next tilt it in the –X and –Y
directions. Verify that the tilt values move through the full angular range (Section 3) and that the
sign (polarity) of the output changes on opposite sides of null.
8. Click the “Stop” button, close ZAGI, and disconnect the tiltmeter from the computer and power
supply.
9. Your Model D711 tiltmeter is now ready to install.
B-03-1006, Rev. H
5