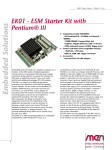
1
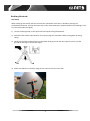
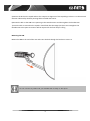
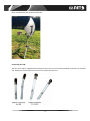
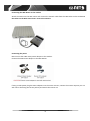
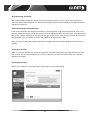
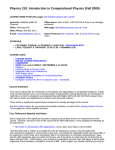
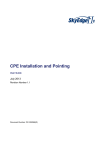
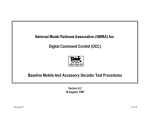
USER MANUAL
For ASTRA 2 at 28.2°E
(GILAT SkyEdge IIc Modem)
About EZ-Net
Congratulations on your new purchase and welcome to the world of EZ-Net
Satellite Internet, EZ-Net is the simplest touring satellite internet system to set up
and operate.
This guide will take you through the simple process required to get you online
as soon as possible.
The EZ-Net Satellite Internet Kit includes everything you need to get high speed broadband
internet on the move. Each kit includes the EZ-Net diamond dish, LNB, sturdy lightweight tripod
with ground fixings, a EZ-Net elevation and alignment kit, all the necessary leads and
connections as well as a satellite modem and WiFi router.
The product can easily be transported and stowed away in the supplied carry bag
and is quite possibly the lightest most portable product currently available on the
market,
Please note that it is important to retain your receipt or proof of purchase so that we are
able to assist and deal with any enquiries you may have.
EZ-Net is a product and brand name of Falcon Technical Ltd using our patented smart
satellite finding technology
For more information on EZ-Net and our products please visit our website:
www.ez-net.co.uk
Get in touch
EZ-Net c/o Falcon Technical Limited
Hill Farm, Northwich Road,
Dutton, Cheshire, WA4 4LE, UK
UK Enquiries: 01928 759 239
International: +44 (0) 1928 759 239
Email: [email protected]
2
Package Contents:
Thanks for purchasing EZ-Net, the easy to use satellite internet system.
With your purchase you will find the following contents:
3
Getting Starte d:
Dish Setup
When setting up the tripod, take into account the orientation of the dish, it should be pointing in a
southeasterly direction and the dish must have a clear view towards the satellite (without any buildings, trees
etc. that may hinder the signal).
1) Loosen the fixing clamp on the tripod stand and push the legs downwards.
2) Extend the feet of the tripod stand as far as they will go for maximum stability and tighten the fixing
clamp.
3) Ideally the tripod should be placed on reasonably level ground so that the tripod is vertical, use the
ground anchor pegs to secure the tripod.
4) Attach the LNB arm to the dish using the two nuts on the rear of the dish.
4
5) Mount the dish on the tripod and use the compass to align one of the tripod legs so that it is in the azimuth
direction indicated by the dish pointing table included with the kit.
6) Rotate the dish so the LNB arm is pointing in the same direction and then tighten the thumbscrew.
7) Once the dish is secured on the tripod it should look like the image (FIG 3) Do not overtighten the
thumbscrew at this point as rotation will be required for the final step in tuning
Mounting the LNB
Mount the LNB on the end of the arm and insert the bolt through the bracket to secure it.
Do not connect any leads until your satellite dish is firmly on the tripod
5
Once assembled the dish should look like this:
Connecting the LNB
The twin coax cable is supplied with waterproof connectors on one end and standard connectors on the other
end. Make sure the waterproof connectors are used at the dish end.
6
Connect the coax cable marked with the TX band to the socket marked TX on the LNB and connect the coax
cable marked with the RX band to the socket marked RX on the LNB.
Connecting the Modem
The modem and WiFi router must be installed inside in a dry location.
At the modem end connect the coax cable marked with the TX band to the socket marked RF OUT on the
modem.
Connect the coax cable marked with the RX band to the socket marked RF IN on the modem.
7
Connecting the WiFi Router to the modem
Attach the antenna to the WiFi router and connect the network cable from the LAN socket on the modem to
the socket on the WiFi router that is next to the antenna:
Connecting the power
Now connect the 240V mains power adapter to the modem.
Connect the 240V mains adapter to the WiFi Router.
If using 12 Volt power plug the mains adapters into the mains inverter, connect the inverter input to your 12
Volt source observing the correct polarity and switch the inverter on.
8
Setting the Elevation
Attach the magnetic base of the elevation meter to the black wedge on
the arm of the dish and switch the meter on.
Use the dish pointing table included with the kit to look up the elevation
angle that applies to your location, or to the city closest to your location.
Pull the dish adjustment handle outwards to allow the elevation of the
dish to be changed, with the dish face starting at vertical slowly tilt the
top of dish back until the correct elevation reads on the elevation meter
as shown on the right. Release the dish adjustment handle so that it locks the dish in position.
Now it is time to move on to the fine positioning of the dish.
Connecting to the modem web interface
To proceed you need to access the web interface of the modem.
To do this you can connect a computer to the spare RJ45 network socket on the router or use WiFi.
Make sure the modem is turned on and properly connected to the WiFi router and that the router and power
lights on both are on.
To use WiFi search for available WiFi networks and look for one named EZ-NET and connect to this network.
There is no password by default.
Once connected to the WiFi start your internet browser (Internet Explorer, Chrome, Mozilla Firefox, Opera,
Safari etc.) on your computer.
Type http://sky.manage into the address bar of the browser and press Enter.
9
If this is the first time setting the system up the installation page automatically opens
If you are setting the dish up again after having moved location click “Reinstall CPE” at the bottom left to
restart the complete installation procedure.
Enter your location code and RF cluster code (these can be found on your invoice) and click Next.
Pointing the dish
Click Start Pointing to start the pointing procedure and proceed to the next section.
10
Return to the dish for azimuth adjustment
Back at the dish the audible tones from the LNB will help you to point the dish correctly. During the pointing
procedure, the LNB will produce various sounds, each having a specific meaning described below.
Possible tones are:
Intermittent short and long tones
The dish is not pointing to a satellite or points to the wrong satellite.
Intermediate musical tone
Stop moving the dish as soon as you hear this tone. The dish is
pointing to the correct satellite and is locking onto the signal. The
tone will now change to one of the tones indicating the reception
level below.
11
Regular short intermittent tone
The dish points to the correct satellite and is locked to the signal but
does not yet receive the strongest signal. You can now proceed to fine
adjustment of the azimuth.
Regular long intermittent tone
The dish is moving away from the correct position. Stop moving it
and go back in the other direction.
Continuous tone
The dish points to the correct satellite and is receiving the strongest
signal: you have the optimal pointing position. Now is the time to
lock the dish in position.
If you move too far and lose the satellite you will hear a siren noise and it will then return to the intermittent
searching tones.
Do not stand in front of the iLNB of the antenna dish during pointing. Keep the space
between the iLNB and the antenna dish clear.
12
Vertical Pointing (elevation)
The correct elevation angle was already set when setting up the dish. You can use the elevation meter to
verify that the elevation angle still corresponds to the value you have found in the dish pointing information
and adjust if necessary.
Horizontal Pointing (rotation/azimuth)
If the correct elevation and rotation have been set, you should hear a high uninterrupted tone, if this is not
the case, adjust the rotation of the dish until you hear the highest possible continuous pitch tone (detection of
the correct satellite). Slowly move the dish left and right across the correct direction and listen for the tone to
change. Make sure you position the dish in the middle of the highest tone range.
Once you have the dish positioned with the high tone tighten up the tripod thumbwheel to lock the dish in
position.
Checking the Pointing
Make sure you can still hear the continuous high pitch tone then briefly place your hand between the iLNB
and the dish. The tone will change but as soon as you remove your hand, you need to hear the continuous
high pitch tone again.
Finishing the Pointing
Back at your computer, in the status page of the modem, click Finish Pointing
13
On the next screen click OK to confirm that you have tightened the dish to lock it in position.
Software Download
The modem continuously checks for software updates. If the software is up to date this step is skipped
automatically, if a newer software version is available, download will start automatically.
Once the download is complete the new software is installed automatically.
The modem reboots automatically. Now you can click Finish to connect to the internet.
You may need to refresh the page of your browser manually after the reboot.
14
Adding security to the WiFi router
By default there is no security on the WiFi router, you can add a password as follows:
1. Make sure you are connected to the EZ-NET WiFi network and type 192.168.2.1 in the address bar of
the browser and press Enter.
2. Log in with the username admin and password admin.
3. On the top menu select Advanced and then Security (under Wireless settings).
4. In the drop down menu for “Security mode” select WPA2-PSK and leave WPA-Algorithm on Auto.
5. Enter the password you want to use in the “Pass Phrase” box and click the blue Apply button. You
don’t need to put anything in the Access Policy section.
The router will restart and you will then have to use the password you set to connect to it.
15
End of Life Disposal
A. Information on Disposal for Users (private households)
1. In the European Union
Attention if you want to dispose of this equipment, please do not use the ordinary dustbin! Used electrical
equipment must be treated separately and in accordance with legislation that requires proper treatment,
recovery and recycling of used electrical and electronic equipment. Following the implementation by
member states, private households within the EU states may return their used electrical and electronic
equipment to designated collection facilities free of charge. In some countries your local retailer may also
take back your old product free of charge if you purchase a similar new one. Please contact your local
authority for further details. If your used electrical or electronic equipment has batteries or accumulators
please dispose of these separately beforehand according to local requirennents_By disposing of this
product correctly you will help ensure that the waste undergoes the necessary treatment ,recovery and
recycling and thus prevent potential negative effects on the environment and human health which could
otherwise arise due to inappropriate waste handling.
2. In other Countries outside the EU
If you wish to discard this product please contact your local authorities and ask for the correct method of
disposal_For Switzerland Used electrical or electronic equipment can be returned free of charge to the Dealer,
even if you don't purchase a new product. Further collection facilities are listed on the homepage of
www.swico.ch
B. Information on Disposal for Business Users
1. In the European Union If the product is for business users and you want to discard it: Please contact your EZNet dealer who will inform you about the take-back of the product_ You might be charged for the costs arising
from take — back and recycling_ Small products (and small amounts) might be taken back by your local
collection facilities.
2. In other Countries outside the EU If you wish to discard this product please contact your local authorities and
ask for the correct method of disposal.
The batteries supplied with this product contains traces of Lead.
For EU: The crossed out wheelie bin implies that used batteries shouldnot be put to the general household
waste!./There is a separate collection system for used batteries to allow proper treatement and recycling in
accordance with legislation. Please contact your local authority for details on the c ollection and recycling
schemes.
For other non —EU countries. Please contact your local authority for correct method of disposal of the used
battery.
W A R R A N T Y
D I S C L A I M E R
E Z-Net i s a trademark of Fal con T echni c al Ltd. Al l technol ogy and techni ques us ed to bui l d and del i ver our produ cts are i ntel l ectual property of the above
named company or its associated partners. It is against copyright laws to attempt to extract, reverse engineer, copy or manip ulate the patent registered
technology included with our products and any party who may breach these conditions set herew ith will he subjected to legal action to the full extent of
the l aw i n his or hers jurisdiction.
All EZ-Net products are covered by a 1 year warranty against any hardware defects (ONLY). Any damages or accidental breakages to have been caused
by us er duri ng i ns tallati on or at any other time will not he covered under the terms of this agreement.
The contents of this publication are believed to be correct at the tim e of going to press however any
information, Detai l s , products or s ervi ces may be s uppl emented, modi fi ed or wi thdrawn wi thout noti ce.
Another innovative product from Falcon Technical Ltd
Hill Farm, Northwich Road, Dutton, Cheshire, WA4 4LE. Tel: 01928 759 239
16