1
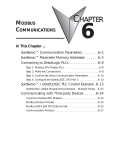
KEYPAD AND
DISPLAY OPERATION
CHAPTER
3
In This Chapter ...
Digital Keypad . . . . . . . . . . . . . . . . . . . . . . . . . . . .3-2
Display Flowchart . . . . . . . . . . . . . . . . . . . . . . . . . .3-3
Display Messages . . . . . . . . . . . . . . . . . . . . . . . . . .3-4
Parameter Setting Value Change Messages . . . . . . . . . . . . . . . . .3-4
Abort Parameter Setting Value Change Message . . . . . . . . . . . . .3-4
Fault Message Display . . . . . . . . . . . . . . . . . . . . . . . . . . . . . . . . .3-4
Polarity Display of Parameter Setting Values . . . . . . . . . . . . . . . .3-5
Monitor Mode Function Display . . . . . . . . . . . . . . . . . . . . . . . . .3-5
Polarity Display of Monitor Values . . . . . . . . . . . . . . . . . . . . . . . .3-6
Servo Drive General Operation . . . . . . . . . . . . . . . .3-7
Display Fault History . . . . . . . . . . . . . . . . . . . . . . . . . . . . . . . . . .3-7
JOG Function . . . . . . . . . . . . . . . . . . . . . . . . . . . . . . . . . . . . . . . .3-7
Teach Position Function . . . . . . . . . . . . . . . . . . . . . . . . . . . . . . . .3-8
DO Force Output Function . . . . . . . . . . . . . . . . . . . . . . . . . . . . .3-9
Display Digital Input Status . . . . . . . . . . . . . . . . . . . . . . . . . . . .3-10
Display Digital Output Status . . . . . . . . . . . . . . . . . . . . . . . . . . .3-10
Chapter 3: Keypad and Display Operation
Digital Keypad
The digital keypad includes the function keys and LED display. The diagram
below shows the features of the digital keypad and an overview of their functions.
LED Display
MODE Key
NEXT Key
MODE
ENTER
NEXT
UP Arrow Key
CHARGE LED
Feature
LED Display
CHARGE LED
ENTER Key
DOWN Arrow Key
Function
The LED Display (5-digit, 7-segment display panel) shows the monitor codes, parameter
settings and operation values of the AC servo drive.
The Charge LED illuminates to indicate that power is applied to the servo drive input power
circuit, and/or that the DC-link capacitor is charged.
MODE Key
The MODE key switches between monitor mode and parameter mode. It also returns to a
parameter (parameter mode) from it’s parameter value (parameter setting mode) without
changing the parameter value.
NEXT Key
The NEXT key scrolls through the parameter groups. After a parameter has been selected
and it’s value displayed (parameter setting mode), users can change the parameter value
individual digits by using the NEXT key to move the cursor to left, and then using the arrow
keys to change the blinking digit. The NEXT key can also be used to scroll left and indicate
negative values for parameter settings.
UP Key
The UP key scrolls through the parameters and parameter groups, and can change the
parameter values.
DOWN Key
The DOWN key scrolls through the parameters and parameter groups, and can change the
parameter values.
ENTER Key
The ENTER key can display and save the parameter value settings. (Parameter value setting
changes are not effective until the ENTER key is pressed.)
For further explanation of keypad operation, refer to the keypad “Display Flowchart” section on the next page.
3–2
SureServo™ AC Servo Systems User Manual
2nd Ed, Rev B
08/2011
Chapter 3: Keypad and Display Operation
Display Flowchart
Parameter Mode
Monitor Mode
MODE
Monitor Status
or
or
to display setting value
or
or
to save setting value
Parameter Setting Mode
(1) When power is applied to the AC servo drive, the LED display will show the
display monitor status code for approximately one second. (This code
indicates which function will be monitored on the display when the drive is
running.) Then the display will enter the monitor mode.
(2) From monitor mode, press the UP or DOWN key to change the monitor status
code. At this time, the monitor code will display for approximately one
second. (Refer to the “Monitor Mode Function Display” section for more
information.)
(3) From monitor mode, press the MODE key to enter the parameter mode, then
press the NEXT key to switch the parameter group, and press the UP or
DOWN key to change the parameter.
(4) From parameter mode, press the ENTER key to enter into the parameter setting
mode, and to display the setting value of the parameter that was previously
shown. Then, use the UP/DOWN keys to change the parameter setting value,
or press the MODE key to exit and return to the parameter mode.
(5) To change parameter setting values, press the UP/DOWN keys while in
parameter setting mode. Alternately, press the NEXT key to move the cursor to
left in order to change individual parameter setting value digits (blinking) with
the UP/DOWN keys. To input negative values, press the NEXT key repeatedly
(past the most significant digit) until the negative value symbol appears.
(6) After the parameter setting value change is completed, press ENTER key to
save the new parameter setting value. (Or press MODE to return to parameter
mode without saving the new parameter setting value.)
(7) When the parameter setting value is saved, the LED display will show the end
code "-END-", and automatically return to monitor mode. (The following
“Display Messages” section lists other messages that may be displayed after a
value is entered.)
2nd Ed, Rev B
08/2011
SureServo™ AC Servo Systems User Manual
3–3
Chapter 3: Keypad and Display Operation
Display Messages
Parameter Setting Value Change Messages
One of the following messages will display for approximately one second after the ENTER key
is pressed to save a new parameter setting value:
Parameter Setting Value Change Messages
Display Message
Description
-End-
The setting value is saved correctly.
Err-r
This parameter is read only, and it’s setting value cannot be changed.
err-P
Invalid password or no password was input.
Err-C
This setting value is invalid.
sruOn
The servo system is running and is unable to accept this setting value change.
Mo-EE
This parameter will not be stored in EEPROM.
Po-On
This setting value change is valid only after restarting the drive.
Abort Parameter Setting Value Change Message
The following message will display for approximately one second after the MODE key is
pressed to avoid saving a new parameter setting value:
Abort Parameter Setting Value Change Message
Display Message
Abort
Description
Return to monitor mode from parameter mode.
Fault Message Display
The following message will display when the AC drive has a fault:
Fault Message Display
Display Message
ALEnn
Description
"ALE" indicates the alarm, and "nn" indicates the drive fault code.
For a listing of drive fault codes, refer to parameter P0-01, or to the “Maintenance and
Troubleshooting” chapter.
For drive firmware v2.10 and higher, active faults can be reset from the keypad.
Press and hold the UP and DOWN Arrow Keys simultaneously for two seconds to clear the fault.
3–4
SureServo™ AC Servo Systems User Manual
2nd Ed, Rev B
08/2011
Chapter 3: Keypad and Display Operation
Polarity Display of Parameter Setting Values
The following symbols indicate positive or negative parameter value polarities:
Polarity Display of Parameter Setting Value
Display Message
Description
12345
Positive value display; no symbols are displayed to indicate sign.
-1234
Negative value display (for parameters with ranges of less than 5 decimal places);
Negative sign is displayed to indicate a negative value.
1.2.3.4.5.
Negative value display (for parameters with ranges of 5 decimal places);
Decimal points following each digit are used to indicate a negative value.
To enter a negative parameter value, push the NEXT key repeatedly until the negative value symbol displays.
Monitor Mode Function Display
When power is applied to the AC servo drive, the LED display will show the monitor function
code for approximately one second, and then the drive will enter into the monitor mode. To
change the monitor function, change parameter P0-02, or press the UP or DOWN keys to
change the function directly. If the monitor function is changed directly by the arrow keys,
the new setting is retained only as long as power remains applied to the drive. If the monitor
function is changed through P0-02, the new setting is retained when power is disconnected
from the drive. Whenever power is applied, the monitor function is determined by the set
value of P0-02. For example, if the value of P0-02 is 6 when power is applied, the monitor
function will be Actual Motor Velocity - rpm.
Monitor Mode Function Display
P0-02
Setting
Display
Message
0
Fb.P
Motor feedback - absolute position
counts
1
Fb.rEu
Motor feedback - absolute position
revs
2
C.P
Position command
counts
3
C.rEu
Position command
revs
4
PErr
Position error (SP - PV pulses)
pulse
5
CP.Fr
Input frequency of pulse command
kHz
6
SPEEd
Actual motor velocity
rpm
7
C.SPd1
Velocity input command
V
8
C.SPd2
Velocity input command
rpm
9
C.t91
Torque input command
V
10
C.t92
Torque input command
%
11
Av6.L
Current load - % of rated torque (average)
%
%
Description
Unit
12
PE.L
Peak load - % of rated torque since power-up
13
Ubus
DC Bus voltage
14
JL
Ratio of load inertia to motor inertia
V
Jl / Jm
15
PLS.
Motor feedback - captured position
counts
16
rEu.
Motor feedback - captured position
revs
2nd Ed, Rev B
08/2011
SureServo™ AC Servo Systems User Manual
3–5
Chapter 3: Keypad and Display Operation
Polarity Display of Monitor Values
The polarity and decimal places of monitored values will be displayed as shown:
Polarity Display of Monitor Value
Display Message
12345
1.2.3.4.5.
3–6
Description
Positive value display; no symbols are displayed to indicate sign.
Negative value display (for parameters with ranges of 5 decimal places);
Decimal points following each digit are used to indicate negative value.
-12.34
Negative value display (for parameters with ranges of less than 5 decimal places);
Negative sign is displayed to indicate negative value.
123.45
Decimal value display;
Multiple digits with only one decimal point indicate an actual decimal value.
SureServo™ AC Servo Systems User Manual
2nd Ed, Rev B
08/2011
Chapter 3: Keypad and Display Operation
Servo Drive General Operation
Display Fault History
Parameters P4-00 to P4-04 contain
the drive fault records. After
entering the parameter mode and
selecting the desired fault record
parameter, press the ENTER key to
display the corresponding fault code
for that parameter. Press the UP key
to scroll through the fault history
and display the other fault codes H1
to H5, or press the MODE key to
return to the parameters.
or
P4-00 and H1 show the most recent fault, P4-01 and H2 show the second most
recent fault, and so on through P4-04 and H5 for the fifth most recent fault. The
fault codes are explained in the “Maintenance and Troubleshooting” chapter.
For drive firmware versions v2.10 and higher, active faults can be reset from the
keypad by pressing and holding the UP and DOWN Arrow Keys simultaneously
for two seconds.
JOG Function
To perform the JOG function, the servo drive must not have any errors present.
“Servo Enable” must be active, and the “Fault Stop” input must not be active.
Use the following steps to JOG the servo motor:
(1) Set the JOG Function parameter (P4-05) to
the desired jog speed. After selecting and
entering the jog speed parameter value,
the servo drive will display “JOG”.
(2) Press the DOWN key to rotate the motor
clockwise (CW), or press UP key to rotate
the motor counterclockwise (CCW). The
motor will rotate (at the jog speed) only as
long as the arrow key is depressed.
(3) Pressing the MODE key will return to
parameter P4-05. From there you can
change the JOG speed again, or return the
servo drive to monitor mode.
or
or
or
CCW
CW
WARNING: Unexpected and potentially dangerous results can occur if the JOG
function is used when the servo drive is configured to run a velocity profile. For
example, if you put the drive in JOG mode when it is configured to run a velocity
profile, the velocity profile setting will take control and run the servo at the profile
setting velocity. Pressing an arrow key will jog the motor at the jog speed while the
key is depressed, but the motor will return to the velocity profile setting as soon as
the arrow key is released.
2nd Ed, Rev B
08/2011
SureServo™ AC Servo Systems User Manual
3–7
Chapter 3: Keypad and Display Operation
Teach Position Function
The Teach Position function allows users to jog the motor to the desired positions
and set those positions as Target Position 1, Target Position 2, etc. In many cases,
this method is easier than entering numeric values directly into P1-15 ~ P1-30.
This function should be used only in Pr mode, and only when the drive is set for
Absolute Positioning. If the drive is in another control mode, or is set for
Incremental Positioning, the operation of the Teach function may not yield the
desired results. The teach function is available through the drive keypad, but is
not accessible via the Digital Inputs.
Use the following steps to perform the Teach Position function:
(1) Home the servo drive and motor.
Teach Position
(2) Set the Auxiliary Function parameter to is valid only
when P2-30 = 4.
Set Teach Position Mode.
(ENTER P2-30 = 4)
(3) Set the JOG Function parameter (P405) to the desired servo motor jog
speed. After selecting and entering the
jog speed parameter value, the servo
drive will display “JOG01”.
(4) Use the DOWN or UP arrow keys to
jog the servo motor clockwise or
counterclockwise to the desired
position.
or
or
(5) Press the ENTER key to store the JOG01 absolute position of the servo motor
into the servo drive memory. The servo drive display will change to show
“JOG02”.
(6) Repeat steps 4 and 5 to store the other teach absolute positions, as needed.
(7) To scroll from one teach position to the next without saving the previous
position in memory, use the NEXT key instead of the ENTER key.
See warning and note on next page regarding the Teach Position Function.
The Teach Positions and associated position parameters are listed below:
Teach Position
3–8
Internally Stored Position Parameters
JOG01
P1-15 (Position 1 Command, revolutions); P1-16 (Position 1 Command, counts)
JOG02
P1-17 (Position 2 Command, revolutions); P1-18 (Position 2 Command, counts)
JOG03
P1-19 (Position 3 Command, revolutions); P1-20 (Position 3 Command, counts)
JOG04
P1-21 (Position 4 Command, revolutions); P1-22 (Position 4 Command, counts)
JOG05
P1-23 (Position 5 Command, revolutions); P1-24 (Position 5 Command, counts)
JOG06
P1-25 (Position 6 Command, revolutions); P1-26 (Position 6 Command, counts)
JOG07
P1-27 (Position 7 Command, revolutions); P1-28 (Position 7 Command, counts)
JOG08
P1-29 (Position 8 Command, revolutions); P1-30 (Position 8 Command, counts)
SureServo™ AC Servo Systems User Manual
2nd Ed, Rev B
08/2011
Chapter 3: Keypad and Display Operation
The servo drive should be homed before performing Teach Functions. Although the
drive will store absolute positions, the drive will reset it’s current position to zero when
power is cycled. Without homing, the preset absolute positions may be meaningless.
WARNING: Unexpected and potentially dangerous results, including personal injury
and damage to equipment, can occur if you set up the JOG function and enable the
drive while it is in velocity mode and a speed signal is present. Pressing the arrow
keys will jog the motor at the jog speed while the key is depressed, but the motor will
return to the speed signal setting as soon as the arrow key is released. The Teach
Position function is useful only in Pr Mode.
DO Force Output Function
For test purposes, the digital outputs
(DO) can be forced to be active or
inactive from the servo drive keypad.
(The active or inactive state
corresponds to ON or OFF, depending
upon the N.O./N.C. setting of P2-18 ~
P2.22.) Use the Force Outputs
Command, parameter P4-06, to force
the outputs. Select P4-06 and press
the ENTER key. The display will then
show “OP xx”, where xx represents the
parameter range from 00 to 1F in hex
numbers. The two hex digits represent
five binary bits which correspond to
the five DO. The least significant bit
represents DO1, and the most
significant bit represents DO5. When
the bit = 1 the corresponding DO is
active, and when the bit = 0 the
corresponding DO is inactive.
Force all DO inactive
Force DO1 active
Force DO2 active
Force DO2, DO1 active
Force DO3 active
Force DO3, DO1 active
or
Force DO4 active
Force DO4, DO1 active
Force DO4, DO2 active
Force DO5 active
Force all DO active
(Hex #s)
WARNING: P4-06 takes effect immediately. The outputs change state immediately as
the value in P4-06 is incremented or decremented.
1) The outputs revert to normal operation when you exit P4-06.
2) The force outputs function is intended for test purposes only. It will not function if
the servo drive is enabled.
2nd Ed, Rev B
08/2011
SureServo™ AC Servo Systems User Manual
3–9
Chapter 3: Keypad and Display Operation
Display Digital Input Status
This function shows the status of the digital
inputs (DI) on the servo drive LED display.
Select parameter P4-07 and press ENTER.
The corresponding LEDs will be on for
each DI that is ON.
N/A DI8 DI6 DI4
DI2
N/A DI7 DI5 DI3
DI1
LEDs:
Off
Off
On
On
On
On
On
Off
On
On
If a DI has been disabled in P2-10 ~ P2-17, it’s status will not show on the LED display.
If a DI is configured as N.C. in P2-10 ~ P2.17, it’s status will show as ON when it has
an open connection.
Display Digital Output Status
This function shows the status of the digital
outputs (DO) on the servo drive LED
display. Select parameter P4-09 and press
ENTER. The corresponding LEDs will be
on for each DO that is active.
N/A N/A N/A DO4 DO2
N/A N/A DO5 DO3 DO1
LEDs:
3–10
SureServo™ AC Servo Systems User Manual
Off
Off
Off
Off
Off
On
On
Off
On
On
2nd Ed, Rev B
08/2011