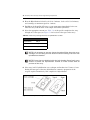
1
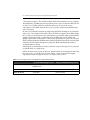
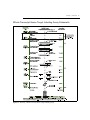
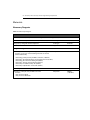
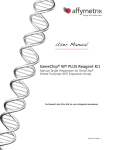
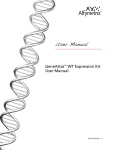
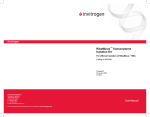
GeneChip® Whole Transcript (WT) Sense Target
Labeling Assay Manual
P/N 701880 Rev. 3
For research use only.
Not for use in diagnostic procedures.
Trademarks
Affymetrix®, GeneChip®,
, HuSNP®, GenFlex®, Flying Objective™, CustomExpress®,
CustomSeq®, NetAffx™, Tools To Take You As Far As Your Vision®, The Way Ahead™, Powered by
Affymetrix™, GeneChip-compatible™, and Command Console™ are trademarks of Affymetrix, Inc.
All other trademarks are the property of their respective owners.
Limited License
Subject to the Affymetrix terms and conditions that govern your use of Affymetrix products, Affymetrix
grants you a non-exclusive, non-transferable, non-sublicensable license to use this Affymetrix product
only in accordance with the manual and written instructions provided by Affymetrix. You understand
and agree that except as expressly set forth in the Affymetrix terms and conditions, that no right or
license to any patent or other intellectual property owned or licensable by Affymetrix is conveyed or
implied by this Affymetrix product. In particular, no right or license is conveyed or implied to use this
Affymetrix product in combination with a product not provided, licensed or specifically recommended
by Affymetrix for such use.
Patents
Arrays: Products may be covered by one or more of the following patents and/or sold under license
from Oxford Gene Technology: U.S. Patent Nos. 5,445,934; 5,700,637; 5,744,305; 5,945,334; 6,054,270;
6,140,044; 6,261,776; 6,291,183; 6,346,413; 6,399,365; 6,420,169; 6,551,817; 6,610,482; 6,733,977; and EP
619 321; 373 203 and other U.S. or foreign patents.
Fluidics Stations: Products may be covered by U.S. Patent Nos. 6,114,122; 6,391,623; 6,422,249; and
other U.S. or foreign patents.
Scanners: Products may be covered by one or more of the following patents: U.S. Patent Nos.
5,578,832; 5,631,734; 5,834,758; 5,936,324; 5,981,956; 6,025,601; 6,141,096; 6,171,793; 6,185,030;
6,201,639; 6,207,960; 6,218,803; 6,225,625; 6,252,236; 6,335,824; 6,403,320; 6,407,858; 6,472,671;
6,490,533; 6,650,411; 6,643,015; 6,813,567; and other U.S. or foreign patents.
Use of the GeneChip® WT cDNA Synthesis and Amplification Kit in accordance with the instructions
provided is accompanied by a limited license to U.S. Patent Nos. 5,716,785; 5,891,636; 6,291,170; and
5,545,522. Users who do not purchase this Kit may be required to obtain a license under these patents
or to purchase another licensed kit.
Copyright
© 2005-2007 Affymetrix Inc. All rights reserved.
Contents
Chapter 1
Overview . . . . . . . . . . . . . . . . . . . . . . . . . . . . . . . . . . . . . . . . . . .1
Introduction . . . . . . . . . . . . . . . . . . . . . . . . . . . . . . . . . . . . . . . . . . . . . . . . 1
Whole Transcript Sense Target Labeling Assay Schematic . . . . . . . . . . . 3
Materials . . . . . . . . . . . . . . . . . . . . . . . . . . . . . . . . . . . . . . . . . . . . . . . . . . 4
Necessary Reagents . . . . . . . . . . . . . . . . . . . . . . . . . . . . . . . . . . . . . . . 4
Miscellaneous Reagents . . . . . . . . . . . . . . . . . . . . . . . . . . . . . . . . . . . . 7
Miscellaneous Supplies . . . . . . . . . . . . . . . . . . . . . . . . . . . . . . . . . . . . . 8
Instruments . . . . . . . . . . . . . . . . . . . . . . . . . . . . . . . . . . . . . . . . . . . . . . 9
Suggested Workflow . . . . . . . . . . . . . . . . . . . . . . . . . . . . . . . . . . . . . . . . 10
Chapter 2
rRNA Reduction and Preparation of Total RNA with
Diluted Poly-A RNA Controls . . . . . . . . . . . . . . . . . . . . . . . . . .11
Procedure A: Preparation of Dilutions of Poly-A RNA Controls . . . . . . . .
Procedure B: Preparation of Hybridization Buffer with Betaine . . . . . . . .
Procedure C: RiboMinus Probe Hybridization . . . . . . . . . . . . . . . . . . . . .
Procedure D: Preparation of Beads . . . . . . . . . . . . . . . . . . . . . . . . . . . . .
Procedure E: rRNA Reduction . . . . . . . . . . . . . . . . . . . . . . . . . . . . . . . . .
Procedure F: Concentration . . . . . . . . . . . . . . . . . . . . . . . . . . . . . . . . . . .
Procedure G: Analysis with Bioanalyzer . . . . . . . . . . . . . . . . . . . . . . . . .
Chapter 3
11
12
13
14
16
17
18
1 µg Total RNA Target Labeling Protocol . . . . . . . . . . . . . . . .19
Procedure A: Preparation of rRNA-Reduced Total RNA/Poly-A
RNA Controls/T7-(N)6 Primers Mix . . . . . . . . . . . . . . . . . . . . . . . . . . . . .
Procedure B: First-Cycle, First-Strand cDNA Synthesis . . . . . . . . . . . . . .
Procedure C: First-Cycle, Second-Strand cDNA Synthesis . . . . . . . . . . .
Procedure D: First-Cycle, cRNA Synthesis and Cleanup . . . . . . . . . . . . .
Procedure E: Second-Cycle, First-Strand cDNA Synthesis . . . . . . . . . . .
Procedure F: Hydrolysis of cRNA and Cleanup of
Single-Stranded DNA . . . . . . . . . . . . . . . . . . . . . . . . . . . . . . . . . . . . . . .
Procedure G: Fragmentation of Single-Stranded DNA . . . . . . . . . . . . . .
Procedure H: Labeling of Fragmented Single-Stranded DNA . . . . . . . . .
19
20
21
22
23
25
26
28
ii
Chapter 4
GeneChip® Whole Transcript Sense Target Labeling Assay Manual
100 ng Total RNA Labeling Protocol . . . . . . . . . . . . . . . . . . . .29
100 ng Total RNA Labeling Protocol . . . . . . . . . . . . . . . . . . . . . . . . . . . .
Procedure A: Preparation of dilutions of Poly-A RNA Controls . . . . . .
Procedure B: Preparation of T7-(N)6 Primers/Poly-A RNA Controls . . .
Procedure C: Preparation of total RNA/T7-(N)6 Primers/Poly-A RNA
Controls . . . . . . . . . . . . . . . . . . . . . . . . . . . . . . . . . . . . . . . . . . . . . . .
Chapter 5
29
29
29
30
Hybridization . . . . . . . . . . . . . . . . . . . . . . . . . . . . . . . . . . . . . . .31
Hybridization . . . . . . . . . . . . . . . . . . . . . . . . . . . . . . . . . . . . . . . . . . . . . . 31
Chapter 6
Array Washing and Staining . . . . . . . . . . . . . . . . . . . . . . . . . .33
Procedure A: Entering Experiment Information . . . . . . . . . . . . . . . . . . .
Procedure B: Preparing the Fluidics Station . . . . . . . . . . . . . . . . . . . . . .
Setting Up the Fluidics Station . . . . . . . . . . . . . . . . . . . . . . . . . . . . . .
Priming the Fluidics Station . . . . . . . . . . . . . . . . . . . . . . . . . . . . . . . . .
Procedure C: Probe Array Washing and Staining . . . . . . . . . . . . . . . . . .
Preparing the Staining Reagents . . . . . . . . . . . . . . . . . . . . . . . . . . . . .
Fluidics Protocols . . . . . . . . . . . . . . . . . . . . . . . . . . . . . . . . . . . . . . . . .
Washing and Staining the Probe Array on Fluidics Station 450 . . . . . .
Shutting Down the Fluidics Station . . . . . . . . . . . . . . . . . . . . . . . . . . .
Chapter 7
33
34
34
34
35
36
37
38
40
Scanning . . . . . . . . . . . . . . . . . . . . . . . . . . . . . . . . . . . . . . . . . .41
Scanning . . . . . . . . . . . . . . . . . . . . . . . . . . . . . . . . . . . . . . . . . . . . . . . . . 41
Handling the Probe Array . . . . . . . . . . . . . . . . . . . . . . . . . . . . . . . . . . . 41
Scanning the Probe Array . . . . . . . . . . . . . . . . . . . . . . . . . . . . . . . . . . 43
Appendix A
FAQ. . . . . . . . . . . . . . . . . . . . . . . . . . . . . . . . . . . . . . . . . . . . . . .45
WT Sense Target Labeling Assay . . . . . . . . . . . . . . . . . . . . . . . . . . . . . . 45
Array Hybridization, Washing, Staining, and Scanning . . . . . . . . . . . . . . 48
Appendix B
Gel-Shift Assay . . . . . . . . . . . . . . . . . . . . . . . . . . . . . . . . . . . . .51
Gel-Shift Assay . . . . . . . . . . . . . . . . . . . . . . . . . . . . . . . . . . . . . . . . . . . . 51
Chapter
1
OVERVIEW
Introduction
The Affymetrix GeneChip® Whole Transcript (WT) Sense Target Labeling Assay is
designed to generate amplified and biotinylated sense-strand DNA targets from the
entire expressed genome without bias. This assay and associated reagents have been
optimized specifically for use with the GeneChip® ST Arrays where “ST” stands for
“Sense Target,” and the probes on the arrays have been selected to be distributed
throughout the entire length of each transcript.
NOTE: The WT Assay is not compatible with GeneChip arrays designed to
focus on the 3’ ends of the transcripts. For the 3’ arrays, continue to follow
the protocols detailed in the GeneChip® Expression Analysis Technical
Manual (P/N 900223).
This manual describes in detail two configurations of the WT Assay with key differences
indicated in Table 1.1. The 1 µg Total RNA Labeling Protocol starts with a ribosomal
RNA (rRNA) reduction procedure where the 28S and 18S rRNA population is
significantly reduced from the total RNA sample minimizing the background and
thereby increasing the array detection sensitivity and specificity. The rRNA reduction
becomes critical when a user is interested in high-sensitivity analysis of expression
levels for both genes and exons using the GeneChip® Exon 1.0 ST Arrays. This is
because exon probe sets contain a smaller number of probes and in some cases, selection
of those probes is constrained by the limited size of the probe selection region. Therefore
it is imperative to use the high-sensitivity assay for optimal performance.
On the other hand, analysis of the gene level benefits from a larger number of highquality probes selected from the entire transcript, thus the advantage of the additional
rRNA reduction step is reduced. Therefore, the 100 ng Total RNA Labeling Protocol is
acceptable for use with the GeneChip® Gene 1.0 ST Arrays. For more information
regarding the performances of the two protocols on Gene 1.0 ST Arrays refer to the
Whole Transcript Sense Target Labeling Assay Performance white paper.
As outlined in Figure 1.1, following the rRNA reduction procedure, the two protocols
merge where double-stranded cDNA is synthesized with random hexamers tagged with
2
GeneChip® Whole Transcript Sense Target Labeling Assay Manual
a T7 promoter sequence. The double-stranded cDNA is subsequently used as a template
and amplified by T7 RNA polymerase producing many copies of antisense cRNA. In the
second cycle of cDNA synthesis, random hexamers are used to prune reverse
transcription of the cRNA from the first cycle to produce single-stranded DNA in the
sense orientation.
In order to reproducibly fragment the single-stranded DNA and improve the robustness
of the assay, a novel approach is utilized where dUTP is incorporated in the DNA during
the second-cycle, first-strand reverse transcription reaction. This single-stranded DNA
sample is then treated with a combination of uracil DNA glycosylase (UDG) and
apurinic/apyrimidinic endonuclease 1 (APE 1) that specifically recognizes the unnatural
dUTP residues and breaks the DNA strand. DNA is labeled by terminal deoxynucleotidyl
transferase (TdT) with the Affymetrix® proprietary DNA Labeling Reagent that is
covalently linked to biotin.
Following the recommended procedures, sufficient target is anticipated to be generated
for hybridization to a single array.
Follow the instructions closely for the most optimal results. As an Affymetrix GeneChip
microarray user, your feedback is welcome. Please contact your technical support
representative with any input on how we can improve this resource.
Table 1.1 Two Configurations of the WT Sense Target Labeling Assay
1 μg Total RNA Labeling Protocol
100 ng Total RNA Labeling Protocol
Procedural Difference
Requires rRNA Reduction with
RiboMinus Kit
Omits rRNA Reduction
Exon ST Arrays
Recommended
Not Optimal
Gene ST Arrays
Acceptable
Recommended
chapter 1 | Overview
Whole Transcript Sense Target Labeling Assay Schematic
Figure 1.1 GeneChip® Whole Transcript Sense Target Labeling Assay
3
4
GeneChip® Whole Transcript Sense Target Labeling Assay Manual
Materials
Necessary Reagents
Table 1.2 Necessary Reagents
Material
Source
P/N
rRNA Reduction (Not required for the 100 ng Total RNA Labeling Protocol)
RiboMinus™ Transcriptome Isolation Kit (Human/Mouse)
Invitrogen
K1550-02 (49 Rxn)
Magna-Sep™ Magnetic Particle Separator
Invitrogen
K1585-01
Betaine, 5M
Sigma-Aldrich
B-0300
Affymetrix
900652 (30 Rxn)
Affymetrix
900433
(~100 Rxn)
Target Labeling
GeneChip® WT Sense Target Labeling and Control Reagents
Contains one of each of the following kits that can also be
ordered individually:
•
•
•
•
•
•
GeneChip® Eukaryotic Poly-A RNA Control Kit (~100 Rxn)
GeneChip® WT cDNA Synthesis and Amplification Kit (30 Rxn)
GeneChip® WT Terminal Labeling Kit (30 Rxn)
GeneChip® Sample Cleanup Module (30 Rxn)
GeneChip® IVT cRNA Cleanup Kit (30 Rxn)
GeneChip® Hybridization Control Kit (30 Rxn)
cDNA Synthesis and Amplification
GeneChip® Eukaryotic Poly-A RNA Control Kit
Contains:
• Poly-A Control Stock
• Poly-A Control Dil Buffer
chapter 1 | Overview
Table 1.2 Necessary Reagents (Continued)
Material
Source
P/N
GeneChip® WT cDNA Synthesis and Amplification Kit
Affymetrix
900673 (30 Rxn) or
900672 (10 Rxn)
Affymetrix
900671 (30 Rxn) or
900670 (10 Rxn)
Affymetrix
900547 (30 Rxn)
Sub-kit 1: GeneChip® WT cDNA Synthesis Kit
Contains:
• T7-(N)6 Primers, 2.5 µg/µL
• 5X 1st Strand Buffer
• DTT, 0.1M
• dNTP, 10 mM
• RNase Inhibitor
• SuperScript II
• MgCl2, 1M
• DNA Polymerase I
• RNase H
• Random Primers, 3 µg/µL
• dNTP+dUTP, 10 mM
• RNase-free Water
Sub-kit 2: GeneChip® WT cDNA Amplification Kit
Contains:
• 10X IVT Buffer
• IVT NTP Mix
• IVT Enzyme Mix
• IVT Control
Fragmentation and Labeling
GeneChip® WT Terminal Labeling Kit
Contains:
• 10X cDNA Fragmentation Buffer
• UDG, 10 U/µL
• APE 1, 1,000 U/µL
• 5X TdT Buffer
• TdT, 30 U/µL
• DNA Labeling Reagent, 5 mM
• RNase-free Water
cDNA, cRNA Cleanup
GeneChip® IVT cRNA Cleanup Kit
Contains:
• IVT cRNA Cleanup Spin Columns
• IVT cRNA Binding Buffer
• IVT cRNA Wash Buffer, 5 mL concentrate
• RNase-free Water
• 1.5 mL Collection Tubes (for elution)
• 2 mL Collection Tubes
5
6
GeneChip® Whole Transcript Sense Target Labeling Assay Manual
Table 1.2 Necessary Reagents (Continued)
Material
Source
P/N
GeneChip® Sample Cleanup Module
Contains:
• cDNA Cleanup Spin Columns
• cDNA Binding Buffer
• cDNA Wash Buffer, 6mL concentrate
• cDNA Elution Buffer
• IVT cRNA Cleanup Spin Columns
• IVT cRNA Binding Buffer
• IVT cRNA Wash Buffer, 5 mL concentrate
• RNase-free Water
• 1.5 mL Collection Tubes (for elution)
• 2 mL Collection Tubes
• 5X Fragmentation Buffer
Affymetrix
900371 (30 Rxn)
GeneChip® Hybridization Control Kit
Contains:
• 20X Hybridization Controls
• 3 nM Control Oligo B2
Affymetrix
900454 (30 Rxn) or
900457 (150 Rxn)
GeneChip® Hybridization, Wash, and Stain Kit (30 reactions)
containing:
Hybridization Module from Box 1
• Pre-Hybridization Mix
• 2X Hybridization Mix
• DMSO
• Nuclease-free water
Stain Module from Box 1
• Stain Cocktail 1
• Stain Cocktail 2
• Array Holding Buffer
Wash Buffers A and B from Box 2
• Wash Buffer A (P/N 900721)
• Wash Buffer B (P/N 900722)
Affymetrix
900720 (30 Rxn)
Hybridization, Stain and Wash
chapter 1 | Overview
Miscellaneous Reagents
Table 1.3 Miscellaneous Reagents
Materials
Source
P/N
Absolute ethanol
Gold Shield
Chemical Co.
N/A
RNA 6000 Nano Kit
Agilent
5067-1511
Novex XCell SureLock Mini-Cell*
Invitrogen
EI0001
TBE Gel, 4-20%,1.0 mm, 12 well*
Invitrogen
EC62252
Novex Hi-Density TBE Sample Buffer (5X)
Invitrogen
LC6678
10X TBE Buffer
Cambrex
50843
SYBR Gold
Invitrogen
S-11494
10 bp DNA ladder and
100 bp DNA ladder
Invitrogen
10821-015
15628-019
ImmunoPure NeutrAvidin
Pierce
31000
PBS, pH 7.2
Invitrogen
20012-027
Miscellaneous Reagents
Gel-Shift Assay (Optional)
* Or
equivalent.
7
8
GeneChip® Whole Transcript Sense Target Labeling Assay Manual
Miscellaneous Supplies
Table 1.4 Miscellaneous Supplies
Materials
Source
P/N
1.5 mL RNase-free Microfuge Tubes*
Ambion
12400
1.5 mL Non-stick RNase-free Microfuge Tubes*
Ambion
12450
0.2 mL MicroAmp reaction tubes (8 tubes/strip)*
Applied Biosystems
N801-0580
MicroAmp caps for 8 strip tubes*
Applied Biosystems
N801-0535
Pipette for 25 mL*
VWR
53283-710
Pipet-aid*
VWR
53498-103
Tough-Spots®
USA Scientific
9185
Miscellaneous Supplies
* Or
equivalent.
chapter 1 | Overview
Instruments
Table 1.5 Instruments
Instruments
Manufacturer
P/N
NanoDrop ND-1000*
NanoDrop Technologies
N/A
GeneChip® Hybridization Oven 640
Affymetrix
800138 (110 v)
800139 (220 v)
Eppendorf Centrifuge*
Eppendorf
5417C
Tube-Strip Picofuge*
Stratagene
400540
PicoFuge*
Stratagene
400550
GeneChip® Fluidics Station 450
Affymetrix
00-0079
GeneChip® Scanner 3000 7G
Affymetrix
00-0212 (North America)
00-0213 (International)
GeneChip® AutoLoader with External
Barcode Reader (Optional)
Affymetrix
00-0090 (GCS 3000 7G S/N 501)
00-0129 (GCS 3000 7G S/N 502)
ABI GeneAmp PCR System 9700*
Applied Biosystems
N8050001
Bioanalyzer 2100
Agilent
G2940CA
Heating blocks*
VWR
13259-030
Pipette for 0.1 to 2 µL*
Rainin
L-2
Pipette for 2 to 20 µL*
Rainin
L-20
Pipette for 20 to 200 µL*
Rainin
L-200
Pipette for 100 to 1000 µL*
Rainin
L-1000
* Or
equivalent.
9
10 GeneChip® Whole Transcript Sense Target Labeling Assay Manual
Suggested Workflow1
Day 1
• Complete Chapter 2: rRNA Reduction - ~1.5 hours (for GeneChip Exon 1.0 ST Arrays
• Complete Chapter 3 or 4, Procedures A – C: First Cycle: Synthesis of cDNA – ~3.5 hours
• Start Chapter 3, Procedure D: First Cycle: Synthesis of cRNA – 16 hours – Start on
Day 1 finish on Day 2
Day 2
• Complete Chapter 3, Procedures D – I: Second Cycle: Synthesis of first-strand DNA,
fragmentation, and labeling – 8 hours
• Start Chapter 5: Hybridization – 17 hours – Start on Day 2, complete on Day 3
Day 3
• Chapter 6: Array Washing, Staining, and Scanning – 2 hours
1
Assumes that only one sample is carried through the assay. The estimated time required may be longer if multiple samples are processed simultaneously.
Chapter
2
rRNA REDUCTION AND PREPARATION OF TOTAL RNA
WITH DILUTED POLY-A RNA CONTROLS
NOTE: This step may be omitted when following the 100 ng Total RNA
Labeling Protocol to prepare targets for GeneChip Gene 1.0 ST Arrays.
Proceed directly to Chapter 4 and follow the 100 ng Total Labeling Protocol.
Procedure A: Preparation of Dilutions of Poly-A RNA Controls
This Procedure requires the use of the GeneChip® Poly-A RNA Control Kit.
The quality of the starting RNA sample is essential to the overall success of the analysis.
Since the most appropriate protocol for the isolation of RNA can be source dependent,
we recommend using a protocol that has been established for the tissues or cells being
used. In the absence of an established protocol, using one of the commercially available
kits designed for RNA isolation is suggested.
IMPORTANT: When using a commercial kit, follow the manufacturer’s
instructions for RNA isolation.
The following protocol requires a minimum of 1 µg of total RNA as starting material,
and the concentration should not fall below 0.31 µg/µL. In other words, the 1 µg of total
RNA should be suspended in a maximum of 3.2 µL of solution in volume.
1. The Poly-A RNA controls are provided as a concentrated stock of 4 different
transcripts at staggered concentrations. Dilution buffer is supplied with the kit to
prepare the appropriate dilutions based on Table 2.1. Use non-stick RNase-free
microfuge tubes for all dilutions.
Table 2.1 Poly-A RNA Control Stock Serial Dilutions
Starting Amount of Total RNA
1 µg
Serial Dilutions
Volume into Sample
First
Second
Third
1:20
1:50
1:50
2 µg
12 GeneChip® Whole Transcript Sense Target Labeling Assay Manual
2. Add 2 µL of Poly-A RNA Control Stock to 38 µL of Poly-A Control Dil Buffer to
make the First Dilution (1:20).
3. Mix and spin to collect the solution at the bottom of the tube.
4. Add 2 µL of the First Dilution to 98 µL of Poly-A Control Dil Buffer to make the
Second Dilution (1:50).
5. Mix and spin to collect the solution at the bottom of the tube.
6. Add 2 µL of the Second Dilution to 98 µL of Poly-A Control Dil Buffer to make the
Third Dilution (1:50).
7. Mix and spin to collect the solution at the bottom of the tube. Add 2 µL of the Third
Dilution to 1 µg of total RNA to make up the Total RNA/Poly-A RNA Controls Mix.
Procedure B: Preparation of Hybridization Buffer with Betaine
This Procedure requires the use of the RiboMinus Human/Mouse Transcriptome
Isolation Kit that needs to be obtained directly from Invitrogen.
IMPORTANT: The protocol for using the RiboMinus Kit for rRNA reduction
for GeneChip® arrays has been modified from the manufacturer’s original
recommendation. Follow only the procedure described in this manual for
optimal transition to the target labeling process immediately following the
rRNA reduction steps. Note that the Concentration Module within the
RiboMinus Kit is not needed for GeneChip target labeling. Instead, the
GeneChip® IVT cRNA Cleanup Kit is used for concentrating the rRNA-reduced
RNA samples
1. Prepare the buffer by mixing these components as listed in Table 2.2.
Table 2.2 Hybridization Buffer with Betaine
Component
Volume for 1 Rxn
Betaine, 5M
54 µL
Invitrogen Hybridization buffer
126 µL
Total Volume
180 µL*
*A
30 µL overfill is included in the Total Volume, sufficient for completing the RiboMinus procedure for a single total RNA sample.
chapter 2 | rRNA Reduction and Preparation of Total RNA with Diluted Poly-A RNA Controls
13
Procedure C: RiboMinus Probe Hybridization
This Procedure requires the use of the RiboMinus Human/Mouse Transcriptome
Isolation Kit that needs to be obtained directly from Invitrogen.
1. In a 0.2 mL strip tube, mix the following components in Table 2.3. If the total RNA
is in 1 µg/µL of concentration, follow the instructions in the second column. If the
total RNA sample is at a lower concentration of between 0.31 µg/µL to 1 µg/µL, then
follow the protocol listed in the third column of Table 2.3.
.
Table 2.3 RiboMinus Probe Hybridization Mix for Samples of 1 µg/µL in Concentration and Samples Between
0.31 µg/µL to 1 µg/µL in Concentration
Component
Volume in 1 Rxn
For Samples of 1 μg/μL
in Concentration
For Samples Between
0.31 μg/μL to 1 μg/μL in
Concentration
Total RNA/Poly-A RNA Controls Mix (from Procedure A)
3.0 µL
Up to 5.2 µL
RiboMinus Probe, 100 pmol/µL
0.8 µL
0.8 µL
Hybridization Buffer with Betaine (from Procedure B)
20 µL
30 µL
23.8 µL
36.0 µL*
Total Volume
* Indicates
Maximum Volume.
2. Flick the tube gently to mix, spin briefly and incubate at 70°C for 5 minutes in a
thermal cycler.
3. Quench the reaction immediately by placing the tube on ice while preparing the
magnetic beads.
14 GeneChip® Whole Transcript Sense Target Labeling Assay Manual
Procedure D: Preparation of Beads
This Procedure requires the use of the RiboMinus Human/Mouse Transcriptome
Isolation Kit that needs to be obtained directly from Invitrogen.
A heating block at 37°C is required.
1. Completely re-suspend the bottle containing magnetic beads by flicking it until no
deposit is observed at the bottom of the bottle.
2. Pipet 50 µL of beads suspension into a 1.5 mL non-stick RNase-free tube.
3. Briefly spin and place the tube with the beads suspension on the magnetic stand for
~1 minute. Gently aspirate and discard the supernatant.
NOTE: Drying of the beads decreases the bead efficiency, therefore ensure
that the beads are hydrated at all times. It is recommended to handle a
limited number of tubes at one time to reduce the risk of drying the beads.
4. 1st Wash: Add 50 µL of RNase-free water to the beads and re-suspend them by
flicking the tube. Place the tube on the magnetic stand for ~1 minute. Gently aspirate
and discard the supernatant.
5. 2nd Wash: Add 50 µL of RNase-free water to the beads and re-suspend them by
flicking the tube. Place the tube on the magnetic stand for ~1 minute. Gently aspirate
and discard the supernatant.
6. 3rd Wash: Add 50 µL of the Hybridization Buffer with Betaine (from Procedure B)
to the beads and re-suspend them by flicking the tube. Place the tube on the magnetic
stand for ~ 1 minute. Gently aspirate and discard the supernatant.
NOTE: When the Hybridization Buffer with Betaine is added in the 3rd Wash,
even after complete settling of the beads on the magnetic stand, a thin film
of beads may coat the entire inside of the tube, so the solution may appear
yellow. Carefully aspirate out the supernatant from the center of the tube,
which should be clear in color.
chapter 2 | rRNA Reduction and Preparation of Total RNA with Diluted Poly-A RNA Controls
15
7. Re-suspend the beads in 30 µL (or 20 µL, if 30 µL of Hybridization Buffer with
Betaine is added in Procedure C, following Table 2.3) of Hybridization Buffer with
Betaine, and keep them at 37°C in a heating block for 1 to 2 minutes.
NOTE: If there is a large number of samples to be processed at the same
time the beads can be prepared in a large batch. This can be done with up to
a total of 10 samples, by increasing the volume of the beads and wash
solutions proportionately, and carrying out the wash steps in a single tube.
Make sure to pipet the beads gently up and down several times for a
thorough mixing after each step. Following the 3rd Wash (Procedure D
Step 6), the resuspended beads can then be aliquoted to individual tubes as
described in Procedure D Step 7 before proceeding to rRNA Reduction for
individual samples.
16 GeneChip® Whole Transcript Sense Target Labeling Assay Manual
Procedure E: rRNA Reduction
This Procedure requires the use of the RiboMinus Human/Mouse Transcriptome
Isolation Kit that needs to be obtained directly from Invitrogen.
Two heating blocks are required: one at 37°C, and the other at 50°C.
1. Transfer the ice-cooled hybridized sample prepared in Procedure C to the beads
prepared in Procedure D (the total volume is ≤ 56 µL), mix well, and briefly spin.
2. Incubate the tube with the mixture at 37°C for 10 minutes in a heating block. After
5 minutes of incubation, gently flick-mix the tube.
3. Briefly spin and place the tube in the magnetic stand for 1 to 2 minutes to obtain the
rRNA-probe pellet.
NOTE: The supernatant contains the rRNA-Reduced Total RNA/Poly-A RNA
Controls Mix.
4. Transfer the supernatant (≤ 56 µL) to a 1.5 mL non-stick RNase-free tube and leave
on ice.
5. Wash the beads by re-suspending them in 50 µL of Hybridization Buffer with
Betaine and incubate at 50ºC for 5 minutes.
6. Place the tube in the magnetic stand for 1 to 2 minutes, transfer the supernatant
directly, and combine with the supernatant in the tube from Procedure E Step 4. The
total volume of the rRNA-reduced sample is approximately 100 µL.
chapter 2 | rRNA Reduction and Preparation of Total RNA with Diluted Poly-A RNA Controls
17
Procedure F: Concentration
This Procedure requires the use of the GeneChip® IVT cRNA Cleanup Kit.
NOTE: This Procedure uses the IVT cRNA Cleanup Spin Columns in place of
the purification columns as part of the RiboMinus Kit. Carefully follow the
protocol described here for best results.
1. Proceed to the cleanup procedure using the IVT cRNA Cleanup Spin Columns from
the IVT cRNA Cleanup Kit following the protocol described below.
2. If not already done, add 20 mL of Ethanol (100%) to the cRNA Wash Buffer supplied
in the IVT cRNA Cleanup Kit.
3. Add 350 µL of cRNA Binding Buffer to each rRNA-reduced sample from
Procedure E and vortex for 3 seconds.
4. Add 250 µL of 100% ethanol to each reaction and flick the tube to mix.
5. Apply the sample to the IVT cRNA Cleanup Spin Column sitting in a 2 mL
Collection Tube.
6. Centrifuge for 15 seconds at ≥ 8,000 x g. Discard the flow-through.
7. Transfer the IVT cRNA Cleanup Spin Column to a new 2 mL Collection Tube and
add 500 µL of cRNA Wash Buffer and centrifuge for 15 seconds at ≥ 8,000 x g.
Discard the flow-through.
8. Wash again with 500 µL of 80% (v/v) ethanol. Centrifuge for 15 seconds at
≥ 8,000 x g and discard the flow-through.
9. Open column cap and spin at ≤ 25,000 x g (maximum speed) for 5 minutes with the
cap left open.
10. Transfer the IVT cRNA Cleanup Spin Column to a new 1.5 mL Collection Tube and
add 11 µL of RNase-free Water directly to the membrane. Spin at ≤ 25,000 x g
(maximum speed) for 1 minute.
11. The eluted rRNA-Reduced Total RNA/Poly-A RNA Controls Mix is ~9.8 µL.
18 GeneChip® Whole Transcript Sense Target Labeling Assay Manual
Procedure G: Analysis with Bioanalyzer
1. Use 1 µL of the concentrated sample to check its quality by running the Eukaryotic
Total RNA Nano Assay in the Bioanalyzer. Please see the Reagent Kit Guide
provided with the RNA 6000 Nano LabChip Kit for instructions. Based on the
Bioanalyzer results, on average, >100 ng of rRNA-reduced sample may be recovered
from 1 µg of total RNA starting material; but the recovery rate may vary depending
on the tissue type. See Figure 2.1 for an example of the results.
NOTE: It is recommended to analyze 100 ng (1 μL) of total RNA sample
without RiboMinus Kit treatment as a control.
Figure 2.1 Bioanalyzer profile of Human Brain total RNA before and after rRNA reduction with RiboMinus Kit
(treated samples are in triplicates)
Chapter
3
1 μg TOTAL RNA TARGET LABELING PROTOCOL
NOTE: The 1 μg Total RNA Labeling Protocol is recommended for use with
GeneChip Exon 1.0 ST Arrays. To prepare targets for GeneChip Gene 1.0 ST
Arrays, follow the 100 ng Total RNA Labeling Protocol in Chapter 4.
Procedure A: Preparation of rRNA-Reduced Total RNA/Poly-A RNA
Controls/T7-(N)6 Primers Mix
This Procedure requires the use of the GeneChip® WT cDNA Synthesis Kit.
1. Dilute the T7-(N)6 Primers, 2.5 µg/µL stock 1:5 with RNase-free water to make up a
500 ng/µL working solution.
2. Mix the diluted T7-(N)6 Primers with the Concentrated rRNA-Reduced Sample from
Chapter 2, Procedure F as listed in Table 3.1.
Table 3.1 First-cycle, Preparation of rRNA-reduced Total RNA/Poly-A RNA Controls/T7-(N)6
Primers
Component
Volume in 1 Rxn
rRNA-Reduced Total RNA/Poly-A RNA Controls Mix
4 µL
Diluted T7-(N)6 Primers, 500 ng/µL
1 µL
Total Volume
5 µL
3. Flick the tube to mix, spin down the tube, and incubate at:
• 70°C for 5 minutes
• 4°C for at least 2 minutes
4. Spin down and place on ice for use in Procedure B.
20 GeneChip® Whole Transcript Sense Target Labeling Assay Manual
Procedure B: First-Cycle, First-Strand cDNA Synthesis
This Procedure requires the use of the GeneChip® WT cDNA Synthesis Kit.
1. Prepare the First-Cycle, First-Strand Master Mix as shown in Table 3.2.
Table 3.2 First-Cycle, First-Strand Master Mix
Component
Volume in 1 Rxn
5X 1st Strand Buffer
2 µL
DTT, 0.1M
1 µL
dNTP Mix, 10 mM
0.5 µL
RNase Inhibitor
0.5 µL
SuperScript II
1 µL
Total Volume
5 µL
2. Add 5 µL of the First-Cycle, First-Strand Master Mix to the tube containing the
Concentrated rRNA-Reduced Total RNA/Poly-A RNA Controls/ T7-(N)6 Primers
Mix from Procedure A, flick-mix, and spin-down. The total reaction volume is
10 µL.
3. Incubate the reaction at:
• 25°C for 10 minutes
• 42°C for 60 minutes
• 70°C for 10 minutes
4. Cool the reaction to 4°C for at least 2 minutes before immediately continuing to the
First-Cycle, Second-Strand cDNA Synthesis.
NOTE: Keeping the reaction at 4°C longer than 10 minutes may result in
reduced cRNA yields.
chapter 3 | 1 µg Total RNA Target Labeling Protocol
21
Procedure C: First-Cycle, Second-Strand cDNA Synthesis
This Procedure requires the use of the GeneChip® WT cDNA Synthesis Kit.
1. Make a fresh dilution of 17.5 mM MgCl2 each time. Mix 2 µL of 1M MgCl2 with
112 µL of RNase-free water.
2. Prepare the First-Cycle, Second-Strand Master Mix as described in Table 3.3.
Table 3.3 First-Cycle, Second-Strand Master Mix
Component
Volume in 1 Rxn
MgCl2, 17.5 mM
4.0 µL
dNTP Mix, 10 mM
0.4 µL
DNA Polymerase I
0.6 µL
RNase H
0.2 µL
RNase-free Water
4.8 µL
Total Volume
10.0 µL
3. Add 10 µL of the First-Cycle, Second-Strand Master Mix to the reaction tube from
the First-Strand cDNA Synthesis Reaction in Procedure B for a total reaction volume
of 20 µL. Flick-mix the solution and spin down.
4. Incubate the reaction in a thermal cycler at:
• 16°C for 120 minutes without heated lid
• 75°C for 10 minutes with heated lid
5. Cool the sample for at least 2 minutes at 4°C before immediately proceeding to the
next Procedure: First-Cycle, cRNA Synthesis and Cleanup.
NOTE: Keeping the reaction at 4°C longer than 10 minutes may result in
reduced cRNA yields.
22 GeneChip® Whole Transcript Sense Target Labeling Assay Manual
Procedure D: First-Cycle, cRNA Synthesis and Cleanup
This Procedure requires the use of the GeneChip® WT cDNA Amplification Kit and
the GeneChip® Sample Cleanup Module.
1. In a separate tube, assemble the IVT Master Mix at room temperature as listed in
Table 3.4.
Table 3.4 First-Cycle, IVT Master Mix
Component
Volume in 1 Rxn
10X IVT Buffer
5.0 µL
IVT NTP Mix
20.0 µL
IVT Enzyme Mix
5.0 µL
Total Volume
30.0 µL
2. Transfer 30 µL of the IVT Master Mix to each First-Cycle cDNA Synthesis Reaction
sample from Procedure C to a final volume of 50 µL. Flick-mix the solution, and
briefly spin in a microfuge.
3. Incubate the reaction for 16 hours at 37°C. Hold at 4°C.
4. Proceed to the cleanup procedure for cRNA using the cRNA Cleanup Spin Columns
from the GeneChip Sample Cleanup Module following the protocol described below.
Store the sample at -80°C if not purifying the cRNA immediately.
5. If not already done, add 20 mL of Ethanol (100%) to the cRNA Wash Buffer supplied
in the GeneChip Sample Cleanup Module.
6. Add 50 µL of RNase-free water to each IVT reaction to a final volume of 100 µL.
7. Add 350 µL of cRNA Binding Buffer to each sample and vortex for 3 seconds.
8. Add 250 µL of 100% ethanol to each reaction and flick-mix.
9. Apply the sample to the IVT cRNA Cleanup Spin Column sitting in a 2 mL
Collection Tube.
10. Centrifuge for 15 seconds at ≥ 8,000 x g. Discard the flow-through.
11. Transfer the IVT cRNA Cleanup Spin Column to a new 2 mL Collection Tube.
Add 500 µL of cRNA Wash Buffer to column and centrifuge for 15 seconds at
≥ 8,000 x g. Discard the flow-through.
12. Wash again with 500 µL of 80% (v/v) Ethanol. Centrifuge for 15 seconds at ≥ 8,000
x g and discard the flow-through.
13. Open the column cap and spin at ≤ 25,000 x g (maximum speed) for 5 minutes with
the caps open.
chapter 3 | 1 µg Total RNA Target Labeling Protocol
23
14. Transfer the IVT cRNA Cleanup Spin Column to a new 1.5 mL Collection Tube and
add 12 µL of RNase-free water directly to the membrane. Spin at ≤ 25,000 x g
(maximum speed) for 1 minute.
15. The eluted cRNA is ~10.5 µL. Determine the cRNA yield by spectrophotometric UV
measurement at 260 nm, 280 nm, and 320 nm:
Concentration of cRNA (µg/µL) = [A260 - A320] x 0.04 x dilution factor
µg of cRNA = eluate in µL x concentration of cRNA in µg/µL
NOTE: The average yield may vary depending on the type of tissue used and
the quality of the RiboMinus rRNA reduction step.
Procedure E: Second-Cycle, First-Strand cDNA Synthesis
This Procedure requires the use of the GeneChip® WT cDNA Synthesis Kit.
1. Mix cRNA sample from Procedure D with the Random Primers in a strip tube, as
listed in Table 3.5 below.
Table 3.5 Second-Cycle, cRNA/Random Primers Mix
Component
Volume in 1 Rxn
cRNA, 10 µg*
variable
Random Primers (3 µg/µL)
RNase-free water
Total Volume
1.5 µL
up to 8 µL
8.0 µL
* For
some samples that generate high yield in the second-cycle cDNA
synthesis reaction, 8 µg may be used to obtain 5 µg of single-stranded
DNA target. The starting amount of cRNA varies depending on the type
of tissue used.
2. Flick-mix and spin down the tubes.
3. Incubate the Second-Cycle, cRNA/Random Primers Mix at:
• 70°C for 5 minutes
• 25°C for 5 minutes
4. Cool the samples at 4°C for at least 2 minutes.
24 GeneChip® Whole Transcript Sense Target Labeling Assay Manual
5. In a separate tube, prepare the Second-Cycle, Reverse Transcription Master Mix as
described in Table 3.6.
Table 3.6 Second-Cycle, First-Strand cDNA Synthesis Master Mix
Component
Volume in 1 Rxn
5X 1st Strand Buffer
4.0 µL
DTT, 0.1M
2.0 µL
dNTP+dUTP, 10 mM
1.25 µL
SuperScript II
4.75 µL
Total Volume
12.0 µL
6. Transfer 12 µL of the Second-Cycle, First-Strand cDNA Synthesis Master Mix to the
Second-Cycle, cRNA/Random Primers Mix from Procedure E Step 4 for a total
reaction volume of 20 µL. Mix thoroughly by gently flicking the tubes a few times
and centrifuge briefly.
7. Incubate the reactions at:
•
•
•
•
25°C for 10 minutes
42°C for 90 minutes
70°C for 10 minutes
4°C for at least 2 minutes
chapter 3 | 1 µg Total RNA Target Labeling Protocol
25
Procedure F: Hydrolysis of cRNA and Cleanup of
Single-Stranded DNA
This Procedure requires the use of the GeneChip® WT cDNA Synthesis Kit and the
GeneChip® Sample Cleanup Module.
1. Add 1 µL of RNase H to each of the samples and incubate at:
• 37°C for 45 minutes
• 95°C for 5 minutes
• 4°C for 2 minutes
2. Proceed to the cleanup step using the cDNA Cleanup Spin Columns from the
GeneChip Sample Cleanup Module following the protocol as described below.
Store the sample at –80°C if not purifying the Single-Stranded DNA immediately.
3. If not already done, add 24 mL of Ethanol (100%) to the cDNA Wash Buffer supplied
in the GeneChip Sample Cleanup Module.
4. Add 80 µL of RNase-free water to each sample, followed by 370 µL of cDNA
Binding Buffer, and vortex for 3 seconds.
5. Apply the entire sample (the total volume is 471 µL) to a cDNA Spin Column sitting
in a 2 mL Collection Tube.
6. Spin at ≥ 8,000 x g for 1 minute. Discard the flow-through.
7. Transfer the cDNA Cleanup Spin Column to a new 2 mL Collection Tube and add
750 µL of cDNA Wash Buffer to the column. Spin at ≥ 8,000 x g for 1 minute and
discard the flow-through.
8. Open the cap of the cDNA Cleanup Spin Column and spin at ≤ 25,000 x g for
5 minutes with the caps open. Discard the flow-through, and place the column in a
1.5 mL collection tube.
9. Pipet 15 µL of the cDNA Elution Buffer directly to the column membrane and
incubate at room temperature for 1 minute. Then, spin at ≤ 25,000 x g for 1 minute.
10. Repeat the elution step by pipetting another 15 µL of the cDNA Elution Buffer
directly to the column membrane and incubate at room temperature for 1 minute.
Then, spin at ≤ 25,000 x g for 1 minute.
11. The total volume of the eluted Single-Stranded DNA is ~28 µL total. Take 2 µL from
each sample to determine the yield by spectrophotometric UV measurement at
260 nm, 280 nm, and 320 nm:
Concentration of Single-Stranded DNA (µg/µL) = [A260 - A320] x 0.033 x dilution
factor
µg of DNA = eluate in µL x concentration of DNA in µg/µL
Each tube should have ≥ 5.5 µg of Single-Stranded DNA.
26 GeneChip® Whole Transcript Sense Target Labeling Assay Manual
Procedure G: Fragmentation of Single-Stranded DNA
This Procedure requires the use of the GeneChip® WT Terminal Labeling Kit.
1. Fragment the samples using Table 3.7.
Table 3.7 Fragmentation Master Mix
Component
Volume/Amount in 1 Rxn
Single-Stranded DNA
5.5 µg
10X cDNA Fragmentation Buffer
4.8 µL
UDG, 10 U/µL
1.0 µL
APE 1, 1,000 U/µL
1.0 µL
RNase-free Water
up to 48 µL
Total Volume
48.0 µL
2. Add 48 µL of the above Fragmentation Master Mix to the samples after cRNA
Hydrolysis and Cleanup from Procedure F, flick-mix, and spin down the tubes.
3. Incubate the reactions at:
• 37°C for 60 minutes
• 93°C for 2 minutes
• 4°C for at least 2 minutes
4. Flick-mix, spin down the tubes, and transfer 45 µL of the sample to a new tube. The
remainder of the sample can be used for size analysis using a Bioanalyzer. Please see
the Reagent Kit Guide that comes with the RNA 6000 Nano LabChip Kit for detailed
instructions. The range in peak size of the fragmented samples should be
approximately 40-70 bp. See Figure 3.1 as an example of typical results on
fragmented samples.
5. If the samples are not labeled immediately, store the fragmented Single-Stranded
DNA at –20°C.
chapter 3 | 1 µg Total RNA Target Labeling Protocol
Figure 3.1 Bioanalyzer profile of Fragmented Single-Stranded DNA from Human Brain
27
28 GeneChip® Whole Transcript Sense Target Labeling Assay Manual
Procedure H: Labeling of Fragmented Single-Stranded DNA
This Procedure requires the use of the GeneChip® WT Terminal Labeling Kit.
1. Prepare the labeling reactions as listed in Table 3.8.
Table 3.8 Labeling Reaction
Component
Volume in 1 Rxn
Fragmented Single-Stranded DNA (from Procedure G)
45 µL
5x TdT Buffer
12 µL
TdT
2 µL
DNA Labeling Reagent, 5 mM
1 µL
Total Volume
60 µL
2. After adding the labeling reagents to the fragmented DNA samples, flick-mix, and
spin them down.
3. Incubate the reactions at:
• 37°C for 60 minutes
• 70°C for 10 minutes
• 4°C for at least 2 minutes
4. Remove 2 µL of each sample for Gel-shift analysis (optional) as described in
Appendix B, to assess the labeling efficiency.
Chapter
4
100 ng TOTAL RNA LABELING PROTOCOL
100 ng Total RNA Labeling Protocol
NOTE: The 100 ng Total RNA Labeling Protocol is recommended to be used
with the GeneChip Gene 1.0 ST Arrays. For optimal sensitivity on the
GeneChip Exon 1.0 ST Arrays, the 1 μg Total RNA Labeling Protocol
(Chapter 2) should be followed.
Procedure A: Preparation of dilutions of Poly-A RNA Controls
Follow the same procedure as described in Chapter 2, Procedure A on page 11.
Procedure B: Preparation of T7-(N)6 Primers/Poly-A RNA Controls
1. Prepare a fresh 250 ng/µL T7-(N)6 Primers dilution (from a 2.5 µg/µL stock) by
adding the concentrated T7-(N)6 Primers to the diluted Poly-A RNA controls using
a non-stick RNase-free microfuge tube as follows:
Table 4.1 First-cycle, Primer/Poly-A RNA Controls
Component
Volume
T7-(N)6 Primers, 2.5 µg/µL
2 µL
Diluted Poly-A RNA Controls (3rd dilution)
2 µL
RNase-free Water
16 µL
Total Volume
20 µL
2. Flick-mix the solution, spin down, and place on ice.
30 GeneChip® Whole Transcript Sense Target Labeling Assay Manual
Procedure C: Preparation of total RNA/T7-(N)6 Primers/Poly-A RNA Controls
1. Mix total RNA and the T7-(N)6 Primers/Poly-A RNA Controls solution as listed in
Table 4.2.
Table 4.2 First-Cycle, Total RNA/Primer/Poly-A RNA Controls
Component
Volume in 1 Rxn
Total RNA, 100 ng
variable
T7-(N)6 Primers/Poly-A RNA Controls Solution
2 µL
RNase-free Water
up to 5 µL
Total Volume
5 µL
2. Flick-mix, spin down the tube, and incubate for 5 minutes at 70°C. Then, cool the
sample for at least 2 minutes at 4°C and spin down.
3. Place on ice for use in the section below.
Follow the same protocol as described in Chapter 3, Procedures B-H (starting on
page 20) for the remainder of the Whole Transcript Sense Target Labeling Assay.
Chapter
5
HYBRIDIZATION
Hybridization
This Procedure requires the use of the GeneChip® Hybridization, Wash and Stain Kit.
Three heating blocks are required: one at 65°C, one at 99°C, and the third one at 45°C.
1. Prepare the Hybridization Cocktail in a 1.5 mL RNase-free microfuge tube as shown
in Table 5.1.
Table 5.1 Hybridization Cocktail
Component
Volume for One
49/64 Format Array
Volume for One
169 Format Array
Final
Concentration
~60.0* µL
27 µL
~25 ng/µL
Control Oligonucleotide B2 (3 nM)
3.7 µL
1.7 µL
50 pM
20X Eukaryotic Hybridization
Controls (bioB, bioC, bioD, cre)
11 µL
5 µL
1.5, 5, 25 and
100 pM,
respectively
2X Hybridization Mix
110 µL
50 µL
1X
DMSO
15.4 µL
7 µL
7%
up to 220.0 µL
up to 100
220.0 µL
100 µL
Fragmented and Labeled DNA
Target (from Chapter 3)
Nuclease-free Water
Total Volume
* This
volume is 58 µL if a portion of the sample was set aside for Gel-shift analysis.
IMPORTANT: It is imperative that frozen stocks of 20X GeneChip®
Eukaryotic Hybridization Controls are heated to 65°C for 5 minutes to
completely resuspend the cRNA before aliquoting.
2. Flick or gently vortex the tubes and spin down.
32 GeneChip® Whole Transcript Sense Target Labeling Assay Manual
3. Heat the Hybridization Cocktail at 99°C for 5 minutes. Cool to 45°C for 5 minutes,
and centrifuge at maximum speed for 1 minute.
4. Equilibrate the GeneChip ST Array to room temperature immediately before use.
Label the array with the name of the sample that will be hybridized.
5. Inject the appropriate amount (see Table 5.2) of the specific sample into the array
through one of the septa (see Figure 5.1 for location of the septa on the array).
Table 5.2 Probe Array Cartridge Volumes for Hybridization Cocktail
Array Format
Volume
49 (Standard)
200 µL
64
200 µL
169
80 µL
NOTE: It is necessary to use two pipette tips when filling the probe array
cartridge: one for filling and the second to allow venting of air from the
hybridization chamber.
NOTE: Ensure that the bubble inside the hyb chamber floats freely upon
rotation to allow the hybridization cocktail to make contact with all
portions of the array.
6. Place array in 45°C hybridization oven, at 60 rpm, and incubate for 17 hours ± 1 hour.
During the latter part of the array hybridization, commence preparation of the
reagents required immediately after completion of hybridization.
Figure 5.1 GeneChip® Probe Array
Chapter
6
ARRAY WASHING AND STAINING
Procedure A: Entering Experiment Information
To wash, stain, and scan a probe array, an experiment must first be registered in
GeneChip® Operating Software (GCOS). Please follow the instructions detailed in the
“Setting Up an Experiment” section of the GCOS User’s Guide.
The fields of information required are:
• Experiment Name
• Probe Array Type
• Sample Name
• Sample Type
• Project
Sample templates, experiment templates, and array barcodes can also be employed in
GCOS to standardize and simplify the registration process. Please see the GCOS User’s
Guide for more information.
The Project, Sample Name, and Experiment Name fields establish a sample hierarchy
that organizes GeneChip data in GCOS. In terms of the organizational structure, the
Project is at the top of the hierarchy, followed by Sample Name and then Experiment
Name.
PROJECT
SAMPLE
EXPERIMENT
34 GeneChip® Whole Transcript Sense Target Labeling Assay Manual
Procedure B: Preparing the Fluidics Station
This Procedure requires the use of the GeneChip® Hybridization, Wash and Stain Kit.
The GeneChip® Fluidics Station 450/250 is used to wash and stain the GeneChip® ST
Arrays. It is operated using GCOS.
Setting Up the Fluidics Station
1. Turn on the Fluidics Station using the toggle switch on the lower left side of the
machine.
2. Select Run → Fluidics from the menu bar.
The Fluidics Station dialog box appears with a drop-down list for selecting the
experiment name for each of the fluidics station modules. A second drop-down list
is accessed for choosing the Protocol for each of the fluidics station modules.
NOTE: Refer to the Fluidics Station User’s Guide for instructions on
connecting and addressing multiple fluidics stations.
Priming the Fluidics Station
Priming ensures that the lines of the fluidics station are filled with the appropriate
buffers and the fluidics station is ready for running fluidics station protocols.
Priming should be done:
•
•
•
•
when the fluidics station is first started.
when wash solutions are changed.
before washing, if a shutdown has been performed.
if the LCD window instructs the user to prime.
1. To prime the fluidics station, select Protocol in the Fluidics Station dialog box.
2. Choose Prime_450 for the respective modules in the Protocol drop-down list.
3. Ensure that the designated Fluidics Station Wash A and Wash B media bottles are
clean. Transfer Wash Buffer A and Wash Buffer B from the kit to the clean, empty
Fluidics Station bottles.
4. Select the All Modules check box, then click Run.
chapter 6 | Array Washing and Staining
35
Procedure C: Probe Array Washing and Staining
This Procedure requires the use of the GeneChip® Hybridization, Wash and Stain Kit.
After 17 hours ± 1 hour of hybridization remove the array from the hybridization oven.
Vent the array by inserting a clean pipette tip into one of the septa, and extract the
hybridization cocktail with a pipettor through the remaining septum. Refill the probe
array completely with the appropriate volume of Wash Buffer A, as given in Table 6.1.
Table 6.1 Probe Array Cartridge Volumes for Wash Buffer A
and Array Holding Buffer
Array
Volume
49 Format
250 µL
64 Format
250 µL
169 Format
100 µL
NOTE: If necessary, at this point, the probe array can be stored at 4°C for up
to 3 hours before proceeding with washing and staining. Equilibrate the
probe array to room temperature before washing and staining.
The wash and stain procedure takes approximately 90 minutes to complete.
36 GeneChip® Whole Transcript Sense Target Labeling Assay Manual
Preparing the Staining Reagents
Prepare the following reagents. Volumes given are sufficient for one probe array.
1. Remove Stain Cocktail 1, Stain Cocktail 2, and Array Holding Buffer from the Stain
Module, Box 1.
2. Gently tap the bottles to mix well.
3. Aliquot the following reagents:
A. 600 µL of Stain Cocktail 1 into a 1.5 mL amber microcentrifuge vial.
B. 600 µL of Stain Cocktail 2 into a 1.5 mL (clear) microcentrifuge vial.
C. 800 µL of Array Holding Buffer into a 1.5 mL (clear) microcentrifuge vial.
4. Spin down all vials to remove the presence of any air bubbles.
NOTE: Stain Cocktail 1 is light-sensitive. Please be sure to use amber
microcentrifuge vials when aliquoting.
chapter 6 | Array Washing and Staining
Fluidics Protocols
Table 6.2 Fluidics Protocols for the GeneChip® ST Arrays
Fluidics Station 450
FS450_0001 and FS450_0007
Post Hyb Wash #1
10 cycles of 2 mixes/cycle with Wash Buffer A at 30°C
Post Hyb Wash #2
6 cycles of 15 mixes/cycle with Wash Buffer B at 50°C
Stain
Stain the probe array for 5 minutes in SAPE solution at 35°C
Post Stain Wash
10 cycles of 4 mixes/cycle with Wash Buffer A at 30°C
2nd Stain
Stain the probe array for 5 minutes in antibody solution at 35°C
3rd Stain
Stain the probe array for 5 minutes in SAPE solution at 35°C
Final Wash
15 cycles of 4 mixes/cycle with Wash Buffer A at 35°C.
Holding Buffer
Fill the probe array with Array Holding Buffer.
• Wash Buffer A = non-stringent wash buffer
• Wash Buffer B = stringent wash buffer
Table 6.3 Fluidics Scripts for GeneChip® ST Array Types
Array Format
Fluidics Script Protocol
49 Format
FS450_0001
64 Format
FS450_0001
169 Format
FS450_0007
37
38 GeneChip® Whole Transcript Sense Target Labeling Assay Manual
Washing and Staining the Probe Array on Fluidics Station 450
1. In the Fluidics Station dialog box on the workstation, select the correct experiment
name from the drop-down Experiment list.
The Probe Array Type appears automatically.
2. In the Protocol drop-down list, select FS450_0001 or FS450_0007 to control the
washing and staining steps. Refer to Table 6.3 for information on determining the
correct Protocol for your array.
3. Choose Run in the Fluidics Station dialog box to begin the washing and staining.
Follow the instructions on the LCD window on the fluidics station.
If you are unfamiliar with inserting and removing probe arrays from the fluidics
station modules, please refer to the appropriate Fluidics Station User’s Guide or
Quick Reference Card (P/N 08-0093 for the FS-450/250 fluidics station).
4. Insert the appropriate probe array into the designated module of the fluidics station
while the cartridge lever is in the down, or EJECT position. When finished, verify
that the cartridge lever is returned to the up, or ENGAGE position.
5. Remove any microcentrifuge vial remaining in the sample holder of the fluidics
station module(s) being used.
6. Follow the instructions on the LCD window on the fluidics station by placing the
three experiment sample vials (the microcentrifuge vials) into the sample holders 1,
2, and 3 on the fluidics station.
A. Place one vial containing 600 µL Stain Cocktail 1 in sample holder 1.
B. Place one vial containing 600 µL Stain Cocktail 2 in sample holder 2.
C. Place one vial containing 800 µL of Array Holding Buffer in sample holder 3.
D. Press down on the needle lever to snap needles into position and to start the run.
The run begins. The Fluidics Station dialog box at the workstation terminal and the
LCD window display the status of the washing and staining as the protocol progresses.
7. When the protocol is complete, the LCD window displays the message EJECT &
INSPECT CARTRIDGE.
8. Remove the probe arrays from the fluidics station modules by first pressing down the
cartridge lever to the eject position.
9. Check the probe array window for large bubbles or air pockets.
• If the probe array has no large bubbles, it is ready to scan on the GeneChip®
Scanner 3000 7G. Pull up on the cartridge lever to engage washblock and proceed
to Scanning on page 41.
• If bubbles are present, do the following:
Return the probe array to the probe array holder. Follow instructions on the LCD
window. Engage the washblock by gently pushing up on the cartridge lever to the
engaged, or closed, position.
chapter 6 | Array Washing and Staining
39
The fluidics station will drain the probe array and then fill it with a fresh volume of
Array Holding Buffer. When it is finished, the LCD window will display EJECT &
INSPECT CARTRIDGE. Again, remove the probe array and inspect it for bubbles.
If no bubbles are present, it is ready to scan. Pull up on the lever to close the
washblock and proceed to Scanning on page 41.
If attempt to fill the probe array without bubbles is unsuccessful, the array should be
filled manually with Array Holding Buffer using a micropipette with volumes listed
in Table 6.1. Excessive washing will result in a loss of signal intensity.
10. If you do not scan the arrays right away, keep the probe arrays at 4°C and in the dark
until ready for scanning.
11. If there are no more arrays to wash, shut down the fluidics station following the
procedure outlined in the section, Shutting Down the Fluidics Station on page 40.
40 GeneChip® Whole Transcript Sense Target Labeling Assay Manual
Shutting Down the Fluidics Station
1. After removing a probe array from the probe array holder, the LCD window displays
the message ENGAGE WASHBLOCK.
2. Gently lift up the cartridge lever to engage, or close, the washblock.
• The fluidics station automatically performs a Cleanout procedure. The LCD
window indicates the progress of the Cleanout procedure.
3. When the fluidics station LCD window indicates REMOVE VIALS, the Cleanout
procedure is complete.
4. Remove the sample microcentrifuge vial(s) from the sample holder(s).
5. If no other arrays are to be processed, place wash lines into a bottle filled with
deionized water.
6. Choose Shutdown_450 for all modules from the drop-down Protocol list in the
Fluidics Station dialog box. Click the Run button for all modules.
The Shutdown protocol is critical to instrument reliability. Refer to the appropriate
Fluidics Station User’s Guide for more information.
7. After Shutdown protocol is complete, flip the ON/OFF switch of the fluidics station
to the OFF position.
IMPORTANT: To maintain the cleanliness of the fluidics station and
obtain the highest quality image and data possible, the bleach protocol
is highly recommended. Please refer to the GeneChip® Fluidics Station
450/250 User’s Guide (P/N 08-0092) available at www.affymetrix.com.
Chapter
7
SCANNING
Scanning
The GeneChip® Scanner 3000 7G is also controlled by GeneChip® Operating Software
(GCOS). The probe array is scanned after the wash protocols are complete. Make sure
the laser is warmed up prior to scanning by turning it on at least 10 minutes prior to use.
If probe array was stored at 4°C, warm to room temperature before scanning. Refer to
the GCOS online help and the appropriate scanner user’s manual for more information
on scanning.
WARNING: The scanner uses a laser and is equipped with a safety interlock
system. Defeating the interlock system may result in exposure to hazardous
laser light.
You must have read, and be familiar with, the operation of the scanner
before attempting to scan a probe array. Please refer to the GeneChip®
Scanner 3000 7G quick reference card or user’s manual.
Handling the Probe Array
Before you scan the probe array, follow the directions in this section on handling the
probe array. If necessary, clean the glass surface of the probe array with a non-abrasive
towel or tissue before scanning. Do not use alcohol to clean glass.
Before scanning the probe array cartridge, apply Tough-Spots to each of the two septa
on the probe array cartridge to prevent the leaking of fluids from the cartridge during
scanning.
IMPORTANT: Apply the spots just before scanning.
1. On the back of the probe array cartridge, clean excess fluid from around septa.
42 GeneChip® Whole Transcript Sense Target Labeling Assay Manual
2. Carefully apply one Tough-Spots to each of the two septa. Press to ensure that the
spots remain flat. If the Tough-Spots do not apply smoothly, that is, if you observe
bumps, bubbles, tears, or curled edges, do not attempt to smooth out the spot.
Remove the spot and apply a new spot. See Figure 7.1.
Figure 7.1 Applying Tough-Spots® to the probe array cartridge
3. Insert the cartridge into the scanner and test the autofocus to ensure that the Tough-
Spots do not interfere with the focus. If you observe a focus error message, remove
the spot and apply a new spot. Ensure that the spots lie flat.
chapter 7 | Scanning
43
Scanning the Probe Array
1. Select Run → Scanner from the menu bar. Alternatively, click the Start Scan icon
in the tool bar.
• The Scanner dialog box appears with a drop-down list of experiments that have not
been run.
2. Select the experiment name that corresponds to the probe array to be scanned.
A previously run experiment can also be selected by using the Include Scanned
Experiments option box. After selecting this option, previously scanned experiments
appear in the drop-down list.
3. Once the experiment has been selected, click the Start button.
• A dialog box prompts you to load an array into the scanner.
4. Open the sample door on the scanner and insert the probe array into the holder. Do
not force the probe array into the holder. Close the sample door of the scanner.
5. Click OK in the Start Scanner dialog box.
• The scanner begins scanning the probe array and acquiring data. When Scan in
Progress is selected from the View menu, the probe array image appears on the
screen as the scan progresses.
44 GeneChip® Whole Transcript Sense Target Labeling Assay Manual
Appendix
A
FAQ
WT Sense Target Labeling Assay
1. What is the basic principle of the ribosomal RNA reduction procedure
using the RiboMinus Human/Mouse Transcriptome Isolation Kit?
Four biotinylated LNA RiboMinus probes are designed to specifically bind to the
abundant 18S and 28S rRNA species (2 probes each for 18S and 28S rRNA). Following
hybridization of the biotinylated probes to the rRNA molecules in the total RNA sample,
the rRNA is efficiently removed from the sample by the addition of the RiboMinus
Magnetic Beads that are coated with streptavidin. The unbound fraction represents the
RNA with rRNA species reduced. The sample is then concentrated before target labeling
using the IVT cRNA Cleanup Kit. Consult the handbook included in the RiboMinus Kit
from Invitrogen for more details.
2. Why is Betaine added to the RiboMinus Hybridization Buffer?
Betaine increases the hybridization stringency. It equalizes the GC Tm and AT Tm, so the
background, non-specific, non-rRNA hybridization to the RiboMinus probes due to high
GC content may be reduced.
3. Why do you choose to use an rRNA-reduction strategy but not a poly-A
mRNA-specific selection protocol?
It has been shown that a portion of the transcripts in total RNA do not necessarily contain
Poly-A tails; therefore, they will be excluded by a poly-A RNA positive selection
technique. The rRNA reduction approach will also make the protocol more robust in
handling smaller amounts of total RNA samples as little as 1 µg.
46 GeneChip® Whole Transcript Sense Target Labeling Assay Manual
4. What is the recommendation on how the total RNA samples should be
prepared for this assay?
A standard preparation method should be used, as recommended for the current
GeneChip® Human Genome U133 Arrays. The quality assessment metrics, including the
Bioanalyzer trace and O.D. ratios, should remain unchanged.
5. Does genomic DNA contamination in the sample interfere with the results,
and how do I monitor the degree of its effect?
By titrating genomic DNA back into the total RNA samples and monitoring the
deterioration of the array data, it was determined during development of the assay that a
moderate amount of genomic DNA contamination will only have minimum effect on the
array results. Therefore, routine RNA isolation techniques coupled with DNase
treatment should yield sufficiently high-quality sample for analysis on the GeneChip ST
arrays.
6. What starting material is needed for the assay?
1 µg of total RNA per sample is the recommended starting quantity if following the
standard protocol with an up-front rRNA removal procedure. Less total RNA (~100 ng)
can be used with an alternative protocol without the rRNA reduction process, however,
it is anticipated that the array detection sensitivity and specificity will be compromised
at the exon level. Follow recommendations on the optimal assay for each array, as
described in Chapter 1.
7. What is the typical cRNA yield after the IVT reaction in the first cycle?
Starting with 1 µg of total RNA, following the standard protocol, ≥ 8 µg of cRNA is
routinely obtained; cRNA yields will depend mainly on the cell line or tissue used.
Starting with 100 ng of total RNA without the RiboMinus rRNA removal step, typically,
20 to 60 µg of cRNA can be generated after cRNA cleanup.
8. What is the basic principle of the single-stranded DNA fragmentation and
labeling procedure?
Using cRNA generated from the IVT reaction at the end of the first cycle of the assay as
a template, single-stranded DNA is synthesized using random primers and the dUTP +
dNTP mix. The resulting single-stranded DNA (ss-DNA) containing the unnatural uracil
base is then treated with Uracil DNA Glycosylase, which specifically removes the uracil
residue from the ss-DNA molecules. In the same reaction, the APE 1 enzyme then
cleaves the phosphodiester backbone where the base is missing, leaving a 3’-hydroxyl
and a 5’-deoxyribose phosphate terminus.
chapter A | FAQ
47
9. What is the basic component in the DNA Labeling Reagent?
The key labeling molecule in the DNA Labeling Reagent is Biotin Allonamide
Triphosphate. See the structure below:
10. What is the expected length of the fragmented DNA target?
On a Bioanalyzer, the fragmented single-stranded DNA target should have a peak
centered around 40 to 70 bases with the majority of the fragments ranging from 20 bases
to 200 bases.
11. Are there any safe stopping points in the assay?
There are a few safe stopping points in the assay, including:
• After IVT reaction and the cRNA cleanup step in the first cycle, before proceeding to
the second cycle of reverse transcription
• After reverse transcription and the single-stranded cDNA cleanup step in the second
cycle, before fragmentation and labeling
• After fragmentation and labeling, before hybridization
12. How much single-stranded DNA target do you need to hybridize to one
array?
It is recommended to hybridize approximately 5 µg or 2 µg of fragmented and labeled
DNA target to each Exon or Gene Arrays respectively.
13. What is the hybridization condition?
As described in the GeneChip® Whole Transcript Sense Target Labeling Assay Manual,
a final concentration of 7% DMSO is included in the hybridization cocktail for
hybridizing the WT sense target to ST arrays.
14. Can I hybridize the DNA target to the HG-U133 arrays?
The WT Sense Target Labeling Assay is optimized to produce targets specifically for
hybridization to ST array type of design. The target is in the sense orientation and the
GeneChip Human Genome U133 Plus 2.0 Array is designed to be compatible with antisense targets. Therefore, it is not recommended to mix and match the assays and the array
types.
48 GeneChip® Whole Transcript Sense Target Labeling Assay Manual
15. Can I use this protocol for prokaryotic arrays?
This has not been tested at the moment; therefore, it is not recommended to use the
protocol for any application other than on ST arrays.
16. How does this protocol perform on partially degraded samples?
Utilizing the WT assay for partially degraded samples may be an attractive strategy for
profiling these samples. However, it has not been tested thus far in development;
therefore, it is recommended that only high-quality total RNA samples should be used.
Array Hybridization, Washing, Staining, and Scanning
17. Why is there no pre-hybridization step for the arrays using the targets
from the WT Assay? The pre-hybridization step was required for the 3’
target in the GeneChip® Expression Analysis Technical Manual.
No pre-hybridization step is necessary for the WT targets. There are many differences
between the WT targets and the 3’ targets in terms of the nature of the molecules (DNA
vs. RNA), as well as labeling molecule and hybridization cocktail makeup. It has been
found that pre-hybridization is not necessary for the WT targets.
18. What Fluidics Protocol do I use for the GeneChip® ST Arrays?
New Fluidics Protocols have been developed for this assay, FS450_0001 for Exon
Arrays and FS450_0007 for Gene Arrays. In addition to tubes containing SAPE and antistreptavidin biotinylated antibody, there is a tube containing 1X Array Holding Buffer,
which is added to the cartridge following the wash/stain procedure. Please refer to the
GeneChip® Whole Transcript Sense Target Labeling Assay Manual, Chapter 5, for more
details.
19. How long does it take to scan an array?
It takes approximately 35 minutes to scan each Exon Array and approximately 10
minutes to scan each Gene Array.
20. What are the internal grid lines on the array image for?
There is a new gridding algorithm in GCOS 1.3, specifically designed for image analysis
of arrays with 5 µm or smaller feature size. This algorithm utilizes 169 subgrids (13x13)
to address probe cells on the array. This method is superior to global gridding for arrays
with feature pitch less than 11 µm.
chapter A | FAQ
49
21. How do I check for the correct gridding of the new array?
If any of the subgrids fail to align, GCOS will fail to generate a .cel file. The failed
subgrids will be visualized with red borders and an “x” in the center, rather than white
borders for successfully aligned subgrids.
50 GeneChip® Whole Transcript Sense Target Labeling Assay Manual
Appendix
B
GEL-SHIFT ASSAY
Gel-Shift Assay
The efficiency of the labeling procedure can be assessed using the following procedure.
This quality control protocol prevents hybridizing poorly labeled target onto the probe
array. The addition of biotin residues is monitored in a gel-shift assay, where the
fragments are incubated with avidin prior to electrophoresis. The nucleic acids are then
detected by staining, as shown in the gel photograph Figure B.1. The procedure takes
approximately 90 minutes to complete.
NOTE: The absence of a shift pattern indicates poor biotin labeling. The
problem should be addressed before proceeding to the hybridization step.
Figure B.1 Gel-Shift
52 GeneChip® Whole Transcript Sense Target Labeling Assay Manual
1. Prepare a NeutrAvidin solution of 2 mg/mL in PBS.
2. Place a 4% to 20% TBE gel into the gel holder and load system with 1X TBE Buffer.
3. For each sample to be tested, remove two 1 µL aliquots of fragmented and
biotinylated sample to fresh tubes. Heat the aliquots of samples at 70°C 2 minutes.
4. Add 5 µL of 2 mg/mL NeutrAvidin to one of the two tubes for each sample tested.
5. Mix and incubate at room temperature for 5 minutes.
6. Add loading dye to all samples to a final concentration of 1X loading dye.
7. Prepare 10 bp and 100 bp DNA ladders
(1 µL ladder + 7 µL water + 2 µL loading dye for each lane).
8. Carefully load samples and two ladders on gel. Each well can hold a maximum of
20 µL.
9. Run the gel at 150 volts until the front dye (red) almost reaches the bottom. The
electrophoresis takes approximately 1 hour.
10. While the gel is running, prepare at least 100 mL of a 1X solution of SYBR Gold for
staining.
NOTE: SYBR Gold is light sensitive. Therefore, use caution and shield the
staining solution from light. Prepare a new batch of stain at least once a
week.
11. After the gel is complete, break open cartridge and stain the gel in 1X SYBR Gold
for 10 minutes.
12. Place the gel on the UV light box and produce an image following standard
procedure. Be sure to use the appropriate filter for SYBR Gold.