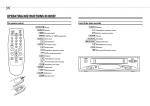
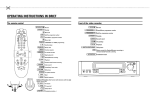
1
Infinity Software
Quick-Start Manual
Copyright © 2009, Berg Company, LLC
Infinity Help
Copyright © 2009, Berg Company, LLC
All rights reserved.
No part of this publication may be reproduced, transmitted, transcribed, stored in a retrieval system,
or translated into any language in any form by any means without the written permission of Berg
Company, LLC, Madison, Wisconsin.
Trademarks
Infinity, All-Bottle, Laser and TAP 1 are registered trademarks of Berg Company, a Wisconsin
Limited Liability Corporation.
Other brand and product names may be trademarks or registered trademarks of their respective
companies.
Berg Part Number: 5202031
Revision 6.00
Printed in U.S.A.
Table of Contents
Infinity Quick-Start
.............................................................................................................................................. 4
Quick-Start Intro
..............................................................................................................................................
5
Quick-Start Task
1: Install Infinity Software
..............................................................................................................................................
6
Quick-Start Task
2: Brand Wizard
..............................................................................................................................................
7
Quick-Start Task
3: New Network Setup
..............................................................................................................................................
8
Quick-Start Task
4: Device Settings
..............................................................................................................................................
9
Quick-Start Task
5: New ECU Setup
11
Quick-Start ..............................................................................................................................................
Task 6: Modify Prices and Portions
12
Quick-Start ..............................................................................................................................................
Task 7: Assign Brands
..............................................................................................................................................
13
Quick-Start Task
8: Cocktail Recipes
..............................................................................................................................................
14
Quick-Start Task
9: Assign Cocktails
..............................................................................................................................................
15
Quick-Start Task
10: Broadcast Pending Changes
..............................................................................................................................................
16
Quick-Start Task
11: Dispenser Calibration
..............................................................................................................................................
17
Quick-Start Task
12: Make Test Pours
18
Quick-Start ..............................................................................................................................................
Task 13: Brand Calibration
19
Quick-Start ..............................................................................................................................................
Task 14: Archive and Clear Sales
20
Quick-Start ..............................................................................................................................................
Task 15: Usage Report
..............................................................................................................................................
21
Quick-Start Task
16: Schedule
Infinity Help
4
Quick-Start Intro
4This manual is a quick guide to installing and configuring Infinity software for a fictitious restaurant, Uptown Grill.
4You'll learn the simplest way to get a new installation of Infinity up and running.
4All tasks are presented sequentially to help guide you from one step to another.
4However, our example covers only the basics and uses several default options. Several references are made to more
detailed topics which can be found in the Infinity User Manual in PDF format or in the online Help.
4You can also click Help from any Infinity screen for more information.
4If you are viewing this document from within the Infinity online Help, you can easily access more information by clicking
the links to other topics.
October 2009
Copyright © 2009, Berg Company, LLC
Infinity Help
5
Quick-Start Task 1: Install Infinity Software
To install Infinity software:
1. Close all other programs running under Windows.
2. Insert the Infinity CD in a CD drive.
3. Click Install Infinity software.
4. Click Yes to accept the License Agreement.
5. Click Yes to confirm the serial number for this installation.
Each serial numb er can only b e installed on one PC. Therefore, you
will b e asked to confirm the serial numb er at the b eginning of
installation. See Ab out Activation & Renewal.
6. Choose Install Software as the Setup Type and click Next.
7. Click Next to accept the default destination directory (C:\Program
Files\Berg\Infinity).
8. Click Next to accept the default folder for Infinity program icons (
Berg Infinity).
9. Click Yes to place the Infinity icons on your computer desktop.
10. Click No to not copy online manuals to your hard disk.
You can copy the manuals to your computer if you wish. The default is
to leave the manuals on the install disk.This saves space on your PC.
You can always access Help from Infinity or view/print the PDF
version of the manuals anytime b y inserting the install CD.
11. Enter the dealer's name and phone number for technical support
and click Next.
12. Click Next to confirm the installation.
13. Wait while the software is installed.
14. Click Finish on the Configuration screen.
Uptown Grill is using default options.
15. Click OK to exit Infinity setup.
You should now see Infinity program icons on your computer's
desktop.
Software Installation
4Be sure to use the Infinity CD
with the serial number for this
specific site.
4The CD starts with a selection
page where you can select and
install programs other than
Infinity that are present on the
disk. After clicking on a link,
you may be asked if you want
to run, open or save. Choose
run or open.
4You can change Configuration
Options when you install Infinity
or at any time.
4Configuration options include
security options, data storage
and display options, country
options (units of measure), and
features.
4During a new install, a Business
Name is given to each
installation. The default name for
the business will be the folder
name, but it is advisable to
change to a name that reflects
the actual business. See
Change Business Name.
16. Click the Berg Infinity Program icon to launch Infinity.
17. Remember to activate your license. See About Activation and
Renewal.
October 2009
Copyright © 2009, Berg Company, LLC
Infinity Help
6
Quick-Start Task 2: Brand Wizard
To use the Brand Wizard:
1. Run Infinity.
Brand Wizard starts automatically the first time you run Infinity.
2. Click Next to continue.
3. Select the product types you need and click Next.
Uptown Grill is using all product types.
4. Select the number of price levels and portion sizes and click Next.
Uptown Grill uses the default numb er of price levels and portions.
5. Type a reasonable portion amount and price for your first price level of
Liquor and click Next. Repeat for each price level.
If you like the defaults shown, just click Next.
6. Repeat steps 4 and 5 for the Cocktail, Wine, Mixer and Other product
types.
You'll see a new screen for each price level. Simply click Next anytime you
don't have a b etter numb er to enter.
Default Prices and Portions
4You can just keep clicking Next
to accept Berg's default prices
and portions.
4However, it saves time later to
enter your default prices and
portions for each product type
here.
4For detailed help on any Brand
Wizard screen, click Help or
see the Brand Wizard section in
the manual.
7. Click Next to load the product types selected.
8. Click Next.
Uptown Grill uses the default container sizes.
9. Click Next to commence loading the brand list.
10. Click Finish to exit the Brand Wizard.
October 2009
Copyright © 2009, Berg Company, LLC
Infinity Help
7
Quick-Start Task 3: New Network Setup
To set up a network:
Port Number
4If you don't know the port
number, the Communication
Wizard in the Communications
menu can help. (This requires a
loopback tester.)
4Security codes are an optional
layer of security, especially in
remote networks,.
1.Pull down the Management menu and point to Setup. Click Network....
2. Click New....
3. Type your network New Name (e.g., "Uptown Grill Infinity") and click
Continue....
4. Select the computer Port number used for communication with the
ECUs.
5. Select the ECU Types.
Uptown Grill is setting up two networks: an Infinity network and a Dispenser
Network. First, we'll select Infinity ECUs (for our Laser and All-Bottle
dispensers) for our Infinity network. Then we'll set up another new network
and select Dispenser Network ECUs (for our Tap 2 dispensers).
6. Select the correct Baud Rate for the computer/network communications.
This numb er is different for Infinity networks and Dispenser networks.
Uptown Grill is using the default b aud rate of 9600 for the Infinity network
and 57600 for the Dispenser network.
7. Click OK.
Repeat steps 2-7 for another network. See Network Setup if you need help
setting up a Remote Network.
8. Click Close to exit the Network Setup screen.
October 2009
Copyright © 2009, Berg Company, LLC
Infinity Help
8
Quick-Start Task 4: Device Settings
To enter your system device settings:
System Device Settings
4This is where you can set up
system-wide dispenser and
pouring options.
4It's a good idea to enter your
system settings before setting
up a new ECU, so the
dispensers will have the system
settings.
4You can always change
settings for a specific device
later. See Device Settings.
1. Pull down the Management menu and point to Setup. Click Device
Settings.
2. Confirm <System Settings> displays as the Device Name.
3. Click or enter the settings you want to use for your system.
You'll see every possib le setting for every possib le device. See Description
of Device Settings for help with each setting. Don't worry ab out settings not
applicab le to your system. Since Uptown Grill does not allow comp pours,
we'll just uncheck Complimentary Enab le and Complimentary Cocktail
Enab le. Now comp pouring is disallowed on all our dispensers.
4. Click OK to save.
5. Select No communication at this time and click Continue....
This lets you send the settings later, when you're ready to send all setup
information to the equipment at the same time.
October 2009
Copyright © 2009, Berg Company, LLC
Infinity Help
9
Quick-Start Task 5: New ECU Setup
To set up an ECU:
1. Pull down the Management menu and point to Setup. Click ECU/
Hardware Station....
2. Click New....
First, we want to set up an Infinity type ECU:
ECU Setup
4It's essential to specify the
correct dispensers in the correct
positions for ECUs to control
pouring at the dispensers.
1. Select the name of the Network you set up for Infinity ECUs (e.g.,
Uptown Grill Infinity).
2. Type the unique ECU number.
Uptown Grill's Infinity ECU is numb ered 1. (The ECU numb er must match
the numb er set in the ECU itself.)
OR
If you don't know the ECU number, click Identify... to communicate with
the network and determine the next available ECU.
The next numb ered ECU that has not b een set up will b e identified.
3. Select the ECU Type.
Uptown Grill is setting up an Infinity ECU with Laser dispensers.
4. Click Continue....
5. Click in the Hardware Station field and type a name for this ECU (e.g.,
Main Bar).
Choose a hardware station name which helps you easily distinguish this
ECU in a selection list when you assign b rands, run reports, or other
operations.
6. Select the correct Device Type for each Dispenser Number.
Uptown Grill has a Laser-16 for Dispenser 1 and a Laser-6 for Dispenser 2.
Depending on the ECU type, you'll see one or more dispenser numb ers.
7. Type a new Device Name for each Dispenser Number.
Use meaningful names (e.g., "Main Laser 16" or "Dining AB 7" to help
distinguish your dispensers easily in a list.
8. Click OK to save the ECU.
9. Wait for all communication with the ECU to finish.
A message confirms saving the new ECU.
Second, we want to set up a Dispenser network ECU:
1. Select the name of the Network you set up for Dispenser network ECUs
(e.g., Uptown Grill Dispenser).
2. Type the unique ECU number.
Uptown Grill's Tap2 ECU will b e numb ered 2.
3. Select Dispenser Network as the ECU Type.
October 2009
Copyright © 2009, Berg Company, LLC
Infinity Help
10
4. Click Set ECU Number... to communicate with the equipment and "set"
this number in the ECU itself.
5. Click OK to confirm the message. Go to the ECU and cycle power (pull
the power out and plug it right back in to the power supply).
Wait for communication to occur which assigns the ECU numb er.
6. Click in the Hardware Station field and type a name for this ECU (e.g.,
Left Tap 2).
Choose a hardware station name which helps you easily distinguish this
ECU in a selection list when you assign b rands, run reports, or other
operations.
7. Select the correct Device Type for each Device Address.
On dispenser networks, a POS b ox is considered a device, as well as Tap 2
taps. (The address of each device will b e communicated to the hardware
when you click OK.)
8. Type a new Device Name for each Device Address.
Use meaningful names (e.g., 'Left POS' or the b rand of a tap--'Left Sam
Adams') to help distinguish your dispensers easily in a list.
9. Click OK to save the ECU.
A message tells you to press the address b utton on the device you've
assigned to address A.
10. Go to the equipment you specified for Device Address A and press the
flashing button.
When finished, the software displays the message for the next device.
11. Repeat step 10 for each device, as prompted.
When all the device addressing is done, communication occurs to send all
the ECU setup details to the ECU.
12. Wait for all communication with the ECU to finish.
A message confirms saving the new ECU. See Modify an ECU for help with
dispenser network addressing features.
October 2009
Copyright © 2009, Berg Company, LLC
Infinity Help
11
Quick-Start Task 6: Modify Prices and Portions
To modify prices and portions:
Default Prices and Portions
4Until you change them, the
prices and portions listed are
the defaults you set up with
Brand Wizard for the product
type.
4The "Standard" category is the
basic set of price levels
assigned to each brand when
it's added to the brand list.
4See Modify Multiple Brands to
modify prices and portions for all
brands of a product type on one
screen.
4If you're using Interface, see
1. Pull down the Pouring menu and click Prices and Portions....
How to enter PLUs.
2. Select a Product Type and select a brand's Prices and Portions and
click Modify....
Uptown Grill is modifying Tequila-Standard.
3. Type the correct Portion and Portion Price for each Size listed on the
Price Level A tab.
Type 6 for 6.00 fl oz, or 2 for $2.00. Repeat for each price level tab you use.
4. Click OK to save your entries on all tabs.
5. Repeat steps 2-4 for any other brands with price and/or portion
modifications.
6. Click Close to exit the Prices and Portions Setup screen.
October 2009
Copyright © 2009, Berg Company, LLC
Infinity Help
12
Quick-Start Task 7: Assign Brands
To assign brands to dispensers:
Assign Brands
4For convenience on this screen,
use the following options:
4Dispenser Captions lets you
1. Pull down the Pouring menu and click Assign Brands....
2. Select the Equipment Name and click OK.
You can select an ECU or a single dispenser. Uptown Grill is assigning
b rands to the Main Bar ECU we set up.
3. If you selected an ECU, click a dispenser tab to begin assigning brands.
Uptown Grill starts with the Main Laser-16 dispenser. The cursor
automatically points to b utton 1.
4. Click a brand in the list.
Uptown Grill is using "Brandy- Standard". To quickly jump to a b rand in the
list, click anywhere in the list and type the first letter of the b rand name.
5. Click <Assign to place "Brandy" in the Button 1 position. (Or drag and
drop "Brandy" to the first line.)
6. Repeat steps 4-5 for the brands you're assigning to the other Laser-16
buttons.
change the labels on the
dispenser tabs. (You can
change them anytime.)
Device Address shows the
dispenser number.
Device Name shows the full
dispenser name (the default
name or one you've set up).
Dispenser Type shows the
type of dispenser in
parentheses after the Device
Address or Device Name.
4Sort Options let you sort the
brand list for your convenience.
Sort by Descriptor sorts the list
by any descriptor(s) you've set
up.
Category lets you select which
categories of price/portions
display in the list.
4Click Modify... to see and
modify the prices and portions
for the highlighted brand.
When assigning to Laser dispensers, b e sure to include all ingredients
needed in cocktails.
7. Click the next dispenser tab (e.g., Main Laser-6).
8. Repeat steps 4-6 to assign brands to this dispenser.
9. Click OK to save the brand assignments for both dispensers.
10. Select No communication at this time and click Continue.
This lets you send the assignments later, when you're ready to send all
setup information to the equipment at the same time.
11. Click OK to the message about saved changes.
12. Click Cancel to exit the Assign Brands screen.
October 2009
Copyright © 2009, Berg Company, LLC
Infinity Help
13
Quick-Start Task 8: Cocktail Recipes
To set up cocktail recipes:
Cocktail Recipes
4You can type an Ingredient
Portion Price for each ingredient
Name or see Calculate Portion
Prices for Cocktail Ingredients.
4If you're using Interface, see
How to enter PLUs.
1. Pull down the Pouring menu and click Prices and Portions....
2. Select Cocktail as the Product Type.
3. Select the cocktail's Prices and Portions you want to change and click
Modify.....
Uptown Grill is modifying Long Island Iced Tea-Standard.
4. Scroll down the list of Ingredients and click "Vodka-Standard".
Click anywhere in the list and type V to jump closer to "Vodka-Standard".
5. Click <Replace to put "Vodka-Standard" in the first line of the cocktail
definition. (Or drag and drop to its position.)
6. Repeat steps 4-5 for "Gin-Standard", "Rum-Standard" "Tequila-Standard"
and "Triple Sec-Standard".
7. Click the Price Level A tab.
The cocktail ingredient prices and portions we set up in Brand Wizard
appear b y default.
8. If necessary, type the correct Portion for each Ingredient Name.
The portion size of each ingredient determines the actual cocktail recipe.
Uptown Grill is using the Berg defaults.
9. Type the Cocktail Price for Price Level A.
10. Click OK to save the cocktail recipe.
11. Repeat steps 3-10 for each cocktail.
October 2009
Copyright © 2009, Berg Company, LLC
Infinity Help
14
Quick-Start Task 9: Assign Cocktails
To assign cocktails to Laser dispensers:
Assign Cocktails
4Be sure any ingredients you
need for a cocktail are assigned
to the gun.
4If you're using the Reconciliation
Report, all ECUs display a tab
for PLU Recipes.
4If you don't need to create any
PLU recipes, ignore this tab.
4For further information, see PLU
Recipes and Reconciliation
Report.
1. Pull down the Pouring menu and click Assign Cocktails....
2. Select the Equipment Name and click OK.
You can select an ECU or a single Laser dispenser. Uptown Grill is
assigning cocktails to the Main Bar ECU we set up.
3. If you selected an ECU, click the tab for the correct Laser dispenser and
the correct Cocktail Bank.
Our Laser-16 dispenser displays on tab A with the Regular Bank selected
and the cursor at Button 1.
4. Click a cocktail in the list to assign to Button 1.
Uptown Grill is using "Long Island Iced Tea-Standard". To quickly jump to a
cocktail in the list, click anywhere in the list and type the first letter of the
cocktail.
5. Click <Assign to put "Long Island Iced Tea-Standard" in the Button 1
position of the regular bank. (Or drag and drop to the first line.)
The cursor automatically advances to the next b utton.
6. Repeat steps 4-5 for the remaining Button numbers of this dispenser.
7. Repeat steps 3-6 for any other Laser dispenser tab.
8. Click OK to save the cocktail assignments for all dispenser tabs.
You won't b e ab le to save a cocktail assignment if the ingredients are not
already assigned to the dispenser.
9. Select No communication at this time and click Continue.
This lets you send the assignments later, when you're ready to send all
setup information to the equipment at the same time.
10. Click OK to the message about saved changes.
11. Click Cancel to exit the Assign Cocktails screen.
October 2009
Copyright © 2009, Berg Company, LLC
Infinity Help
15
Quick-Start Task 10: Broadcast Pending Changes
To broadcast pending changes:
Broadcast Pending
4Send all changes you've made
in the software to the hardware
in one operation.
1. Pull down the Management menu and point to Setup. Click Broadcast
Pending....
A list of all the pending changes displays.
2. Select <Master Group> as the Equipment Name.
3. Click OK to send the changes.
4. Wait for communication with the equipment.
Now all equipment has all the setup information we've entered.
October 2009
Copyright © 2009, Berg Company, LLC
Infinity Help
16
Quick-Start Task 11: Dispenser Calibration
To perform dispenser calibration:
Calibration
4Dispenser calibration copies the
calibration values of one brand
to all brands at the dispenser.
4If you have an All-Bottle 7
dispenser, see Align Activator
Rings and Store Alignment
Values before calibrating.
1. Pull down the Management menu and point to Calibration. Click
Calibrate....
2. Select the Equipment Name.
Uptown Grill is calib rating the Main Laser-16 dispenser we set up.
3. Click OK.
4It's helpful to have a partner or
carry a portable computer from
dispenser to dispenser when
performing the calibration
procedure.
4For further help with calibration,
see: Calibration Overview.
4To calibrate by weight, set your
Calibration Units to grams
before calibrating.
4. Click a brand on the dispenser and click Dispenser Calibration....
If all b rands at the dispenser are of similar viscosity, choose any one of
them. Don't choose an especially "thick" b rand. Uptown Grill is leaving the
cursor at Button 1 "Brandy-Standard".
5. Click Yes.
6. Click OK to confirm.
7. Go to the Laser-16 dispenser and pour a small portion from the Button
you selected into a measuring cup or graduated cylinder. Record the
amount or weight of the pour. Then pour a large portion and record the
amount.
8. At the computer, type the exact amount or weight of the Small Portion
and the Large Portion click OK.
9. If the values are not within the accuracy range, click Yes to re-calibrate.
Repeat steps 6 and 7 as needed. When the values are within the
accuracy range, click OK.
All b rands at the Laser-16 dispenser are now calib rated with the values of
the first b rand. Proceed with making test pours to determine which specific
b rands need further calib ration.
10. Click Close to exit.
11. Repeat steps 2-10 for any other dispensers.
October 2009
Copyright © 2009, Berg Company, LLC
Infinity Help
17
Quick-Start Task 12: Make Test Pours
To make test pours:
1. Go to the dispenser (e.g., Main Laser-16) where you performed
Dispenser Calibration.
2. Using a graduated cylinder or measuring cup, make several test pours of
various brands at the gun (particularly those with a different viscosity).
Test Pours
4
3. Record the exact amount of the pours.
4. Compare the test pour amounts with the expected portion size to see if
the brands are calibrated correctly.
For example, Uptown Grill used Brandy to calib rate the dispenser. Brandy
now pours a correct Small Portion of 1 oz. However, Rum (on Button 2)
pours closer to 1.5 oz for a Small Portion. So we need to perform b rand
calib ration for Button 2.
5. Go to another dispenser and repeat steps 2-4.
6. Perform Brand Calibration for each brand you've determined needs further
calibration.
October 2009
Copyright © 2009, Berg Company, LLC
Infinity Help
18
Quick-Start Task 13: Brand Calibration
To calibrate a specific brand:
Brand Calibration
4Perform brand calibration for any
brand that is still not pouring
correctly after a dispenser
calibration.
4If you have an All-Bottle 7
dispenser, see Align Activator
Rings and Store Alignment
Values before calibrating.
1. Pull down the Management menu and point to Calibration. Click
Calibrate....
2. Select the Equipment Name.
4It's helpful to have a partner or
carry a portable computer from
dispenser to dispenser when
performing the calibration
procedure.
4For further help with calibration,
see: Calibration Overview.
Uptown Grill is calib rating a b rand on the Main Laser-16 dispenser we set
up.
3. Click OK.
4. Click a brand on the dispenser.
Uptown Grill is calib rating "Bailey's- Standard".
5. Click Continue....
6. Click OK to confirm.
7. Go to the Laser-16 dispenser and pour a small portion of Bailey's into a
measuring cup or graduated cylinder. Record the amount of the pour.
Then pour a large portion and record the amount.
8. At the computer, type the exact amount of the Small Portion and the
Large Portion click OK.
9. If the values are not within the accuracy range, click Yes to re-calibrate.
Repeat steps 7 and 8 as needed. When the values are within the
accuracy range, click OK.
Bailey's is now calib rated.
10. Repeat steps 4-9 for any other brands at this dispenser that need
calibration.
11. Click Close to exit.
12. Repeat steps 2-11 for any other dispensers with brands that need
calibration
October 2009
Copyright © 2009, Berg Company, LLC
Infinity Help
19
Quick-Start Task 14: Archive and Clear Sales
To archive and clear sales:
1.Pull down the Reports menu and click Archive and Clear (Z)...
2. Select <Master Group> as the Equipment Name.
Uptown Grill wants to clear sales at all equipment.
3. Click Run.
4. Click OK to confirm.
Wait while the data is retrieved from the ECU(s).
5. View, save or print the report. See View Report.
6. Click Close to exit the View screen.
7. If prompted, click OK to confirm closing the screen without saving or
printing.
Archive & Clear Sales
4When you archive and clear
sales, you reset all totals at the
ECUs to zero and send the data
to archive records at the
computer.
4See Archive and Clear Sales for
more information.
4See Current Sales Totals/Clear
Sales (Z) Report for a
description of the report.
October 2009
Copyright © 2009, Berg Company, LLC
Infinity Help
20
Quick-Start Task 15: Usage Report
To run a Usage report:
1. Pull down the Reports menu. Click Advanced Reports....
2. Select Usage.
You'll see <Master Group> is already selected for the Equipment Name,
which is what we want.
3. Click View.
Usage Report
4See Usage Report for a
description of the report.
Wait while the report is run.
4. View, save or print the report. See View Report.
Since we used the Most Recent Archive data to run the report, the totals are
the same as those in the Archive and Clear Sales report.
5. Click Close to exit the View screen.
6. If prompted, click OK to confirm closing the screen without saving or
printing.
October 2009
Copyright © 2009, Berg Company, LLC
Infinity Help
21
Quick-Start Task 16: Schedule
To set up a schedule:
Schedule
4For further help with schedules,
see:
Schedules
About BERG.SCH
Define Action
Time Schedule Setup
On Demand Schedule Setup
1. Pull down the Scheduling menu and click Schedules....
The file berg.sch displays in the Schedule File field.
2. Click Modify....
A schedule appears with the name b erg.sch. Since Uptown Grill is using the
default schedule options, we won't change anything on the Options tab .
3. Click one of the day tabs.
Uptown Grill starts its schedule on Sunday. On an initial install of Infinity, a
schedule will b e created for you that runs an Archive and Clear every hour.
To remove any Archive and Clear you don't want, select it and click Delete.
4. Click New... to add a schedule Action.
5. Type a Time, select an Action, leave <Master Group> as the
Equipment Name and click OK.
Uptown Grill is scheduling an Archive and Clear Sales report for all
equipment at 2:00 AM--closing time.
6. Repeat steps 4 and 5 for additional actions on the same day.
Uptown Grill is also scheduling a Usage report at closing time, using data
from 0 days ago--today.
7. Click a new day tab when you've completed your first day.
8. Click Yes if you want to copy all the actions to the new day.
9. Repeat steps 7 and 8 for each day with identical actions.
OR
Click Copy... and select <All> to copy the actions to all days of the
week.
Uptown Grill wants these same reports each day at closing, so we use Copy
to quickly populate all days with Sunday's actions.
10. If you need different actions on any day, click a new day tab and
answer No to copying. Then repeat steps 4-6 to define new actions.
11. Click OK to save the schedule.
12. Click Run to start the schedule.
You can still perform other tasks in Infinity. Note Infinity must b e running
when you want the scheduled actions to occur.
13. Click Close to exit the Schedules screen.
October 2009
Copyright © 2009, Berg Company, LLC